eftr user guide - iso new england user guide version 1.3 june 2016 ii trademarks “esca” and...
TRANSCRIPT

eFTR User Guide
Version 1.3 June 2016

ii
Trademarks
“ESCA” and “HABITAT” are registered trademarks of ALSTOM Grid Inc. “e-terra” is a registered trademark and/or service mark of E-Terra, LLC, licensed for use by ALSTOM Grid Inc. in connection with its e-terra family of products and services.
Other product and company names in these materials may be trademarks or registered trademarks of other companies, and are the property of their respective owners. They are used only for explanation and to the respective owners’ benefit, without intent to infringe.

iii
Contents About This Document .................................................................................................... v Who Should Use this Document ................................................................................... v For More Information ..................................................................................................... v Conventions .................................................................................................................. v
Revision Record ............................................................................................................ v
1. Introduction ........................................................................................... 1
1.1 Accessing the eFTR GUI ........................................................................................ 1 1.2 User Roles .............................................................................................................. 1 1.3 Agent Users ............................................................................................................ 2
1.4 Business Rules and Timelines ................................................................................ 2 1.5 Display "Refresh" versus Browser "Refresh" ........................................................... 3 1.6 Browser "Back" Function ......................................................................................... 3
2. Interface Basics .................................................................................... 4
2.1 Common Display Fields and Elements ................................................................... 4 2.2 Navigation ............................................................................................................... 6
2.3 Filters Pane ............................................................................................................. 7 2.4 Messages Pane ...................................................................................................... 8
2.5 Data Displays and Entry ........................................................................................ 10
3. Public Navigation Tab ........................................................................ 14
3.1 Public File Transfer ............................................................................................... 14 3.1.1 Binding Constraints Report .............................................................................. 16
3.1.2 Clearing Prices Report ..................................................................................... 17 3.1.3 FTR Report ...................................................................................................... 17 3.1.4 FTR Auction Results Report ............................................................................ 18
3.2 Clearing Prices by Path Display ............................................................................ 18 3.3 Clearing Prices by Portfolio Display ...................................................................... 19
3.4 FTR Results Display ............................................................................................. 21 3.5 All FTRs Display .................................................................................................... 23 3.6 Constraints Display ............................................................................................... 24
4. Private Navigation Tab ....................................................................... 26
4.1 Managing FTR Bids .............................................................................................. 26 4.2 Private File Transfer Display ................................................................................. 27
4.2.1 Download a CSV File ....................................................................................... 28 4.2.1.1 Auction Bids Report .................................................................................... 29 4.2.1.2 Auction Results Report ............................................................................... 30
4.2.2 Upload a CSV File ........................................................................................... 31 4.2.2.1 CSV File Format ......................................................................................... 34
4.2.3 Delete a CSV File ............................................................................................ 35
4.2.4 Delete all Bids for an Auction ........................................................................... 36
iv
4.3 Bid Summary by Portfolio Display ......................................................................... 37 4.3.1 Create an FTR Bid ........................................................................................... 38 4.3.2 Modify an FTR Bid ........................................................................................... 40
4.3.3 Delete an FTR Bid ........................................................................................... 41 4.4 FTR Results Display ............................................................................................. 43 4.5 Portfolio Manager .................................................................................................. 44
4.5.1 Create a Portfolio ............................................................................................. 46 4.5.2 View a Portfolio ................................................................................................ 47
4.5.3 Modify a Portfolio ............................................................................................. 48 4.5.4 Create a Copy of a Portfolio ............................................................................. 49 4.5.5 Delete a Portfolio ............................................................................................. 49
4.6 Bids by Path Display ............................................................................................. 50
4.6.1 Create an FTR Bid ........................................................................................... 52 4.6.2 Modify an FTR Bid ........................................................................................... 53 4.6.3 Delete an FTR Bid ........................................................................................... 54
Appendix A. File Upload Error Messages ............................................. 55

v
About This Document
This document describes the usage of the eFTR Graphical User Interface (GUI) from the perspective of an end user, such as FTR Auction Participant or Market Participant. This document does not describe the GUI from the perspective of IT administrators at ISO-NE wishing to configure the eFTR application. It does describe each display in the eFTR GUI application along with a set of common tasks users will perform. Some of the tasks change only certain data on a display. Users may certainly change any fields they wish during the steps. The tasks merely provide a quick reference for users who want to do certain things.
Who Should Use this Document
Market Participants wishing to use the eFTR user interface to perform auction operations and users requesting auction information should use this document.
For More Information
Additional information that was used in the creation and development of this document can be found in the following documents.
ISO-NE Manuals > M-06 Financial Transmission Rights
Conventions
The following are conventions used throughout this document:
Bolding is used to highlight important screen items.
Revision Record
Version Date Comments
1.1 09/10/2012 Created
1.1.1 10/09/2012 Modified section 4.2.2.1 CSV File Format
1.2 04/29/2013 Revisions to timing in “1.4 Business Rules and Timing” section.
1.3 06/22/2016 Modified sections 1.1 (browser versions), 3.1.3, 4.2.1.1, 4.2.1.2, 4.2.2.1 (CSV file formats), Appendix A (error messages). Minor editorial changes.

1
1. Introduction
This chapter contains introductory material and concepts relevant to the eFTR Graphical User Interface (GUI). It describes such topics as high level GUI functionality, accessing the GUI, user roles, business rules and timelines.
1.1 Accessing the eFTR GUI
The eFTR Graphical User Interface (GUI) is accessed through Internet facilities with the following web browsers supporting SSL 3.0 secured 128-bit encryption:
Microsoft Internet Explorer 11
Since January 12, 2016, Microsoft no longer provides security updates or technical support for older versions of Internet Explorer. It is therefore highly recommended that users of Internet Explorer upgrade to version 11.
Mozilla Firefox version 46
All users need to register with ISO-NE Customer Support in order to view public information or to submit and view private information in the eFTR application. This is done by the user's company Security Administrator using the ISO New England Customer and Asset Management System (CAMS). The Administrator will create the user accounts and assign each user the various rights to access the eFTR application. A digital certificate will be issued to the user. Refer to the Customer & Asset Management System (CAMS) Frequently Asked Questions page on the ISO New England web site (www.iso-ne.com) for more information.
Once registered, market system users will be provided with the link to access the SMD home page, which will then allow direct access to eFTR application. Access to the SMD Application Sandbox is also restricted to registered market users.
All questions or inquires about eFTR access should be addressed to the ISO New England's Customer Support Department at (413) 540-4220 or via email at [email protected], or to your company's Security Administrator.
1.2 User Roles
Roles define the displays and actions that a user can use to update or view data and are divided into two sub-types; “Read-only” and “Read/Write”. Read-only roles restrict the user to strictly viewing data on a display, while Read/Write roles allow the user to view and submit data using a display. The

2
public displays can be viewed by any user with any role. They are all read-
only displays.
Refer to the Customer Asset Management System Application Group Roles document on the ISO-NE Web site for a complete list and description of the eFTR roles.
1.3 Agent Users
Some eFTR users can represent or act on behalf of more than one Participant. Such users are referred to as agents. Agents need to specify the Participant they are representing when using eFTR. This is done by selecting the Participant in the upper right part of the eFTR header:
Customer Asset Management System (CAMS) application provides capability to define users and agents.
1.4 Business Rules and Timelines
Submission deadlines are market restrictions/validations established by Market Rule defining deadlines by which data must be submitted. If data is submitted after a submission deadline, that data submittal will be rejected. The associated business rules and timelines can be found in the document Market Rule 1 and in the ISO New England Manuals.
Every submittal (display or CSV upload) to the eFTR application has an embedded timestamp that cannot be edited. This timestamp tells eFTR when the data was submitted. Deadline validation is performed for data submittals only; there is no deadline validation performed on data queries, which means that one can view and retrieve data at any time.
The time against which these validations are done will be the time that the eFTR application receives the submission for processing, which is the earliest time that eFTR can recognize the submission.
Consider the following examples (assuming a submission deadline of 11:00):
You send a submittal at 10:59.45 AM. eFTR receives the complete document at 10:59:48 AM. Assume the validation and database processing required to submit this transaction is significant, such that the transaction does not complete until 11:00:12 PM. The transaction succeeds, because eFTR received the complete request at 10:59:48 AM, before the cut-off time.

3
You send a submittal at 11:01.45 PM. eFTR receives the complete document at 11:01:48 PM. eFTR will reject this submission because it was received after the cut-off time.
You send a submittal at 10:59.45 AM. Due to unusual network latency, eFTR receives the complete document at 11:00:13 PM. eFTR will reject this submission because it was received after the cut-off time, even though it was sent before the cut-off time. eFTR has no way of knowing that this document was sent before the cut-off time, and therefore can only rely on the time the document was received.
1.5 Display "Refresh" versus Browser "Refresh"
For cyber security reasons, the eFTR user interface does not use cookies to remember the last eFTR display page that the user accessed.
Consequently, if you perform a browser refresh to reload the web page using:
The F5 function key
The Refresh function in Internet Explorer (toolbar button or Refresh on the View drop-down menu)
The Reload function in Mozilla (toolbar button or Reload on the View drop-down menu)
eFTR will present its initial web page rather than reload the web page with the display you had selected along with your filter selections. To refresh the information shown in an eFTR display page, use the Refresh button provided on the eFTR display.
1.6 Browser "Back" Function
Since the eFTR user interface does not use cookies to remember the last eFTR display page that the user has accessed, using the browser's "Back" function will not show the last page, but instead will return to the eFTR login display. eFTR navigation tabs should be used to return to the desired page.

4
2. Interface Basics This chapter describes the common topics and concepts used in the eFTR GUI. Sub-sections in this chapter describe basic actions such as display navigation, screen layouts, filters, and data entry.
2.1 Common Display Fields and Elements
A typical display in eFTR looks like this:
The basic elements of an eFTR display are:
A. Header Area
1. Auction Status – displays “Open” or “Closed” depending on whether the FTR auction bidding period is open to receive Participant bids.
2. Hyperlinks - provide access to the following information
SMD Home - SMD Applications Home Page
FTR Auction - Auction results
FTR Assumptions - Auction assumptions
Notices - Calendar
User Registration - ISO New England customer registration
3. Current Date and Time – current wall clock date and time in user's location
4. Participant Selector – For most users, it simply shows which Participant they represent with their digital certificate. For agent users, it shows the Participant that the user is currently representing; the drop-down list shows all the Participants that
D
A
E
B
C
F

5
the user can represent and provides the means to select a Participant on the list that they want to represent. For ISO New England's Customer Service personnel, it provides them the list of all Participants; they can select from the list the Participant on whose behalf they can submit bids.
5. Certificate User – name of the currently logged-in user associated with the security certificate.
6. Username – this will normally be the same as the certificate user name and the drop-down list will show only that user's name. This drop-down box is for ISO New England’s Customer Service personnel; it provides them the list of users registered under the selected Participant.
B. Navigation Area
1. Public/Private Navigation Tabs – allow the user to choose which set of displays of eFTR to view.
2. Navigation Sub-Tabs – allow the user to choose specific displays within a set: either private or public displays.
3. Data Window Title – displays the title of the currently selected display from the tabs.
C. Filters Pane – contains the filters for the selected display. See section 2.3 for more details.
D. Display Pane
1. Display Title – reflects the type of information that is presented in the display, for instance FTR Results or Bid Summary.
2. Display Content – presents the data based on selected navigation tabs and filters.
E. Action Buttons – A display can present any or all of the following buttons:
1. New – use this button to add a new row to a grid display and edit the data in the added row. You can use the button several times to add more than one row and then edit the data in the added rows. The data in the new row is shown on a pink background and it is not updated in the database until you select the Update button. The displayed rows of data will be shown with normal background when it is successfully stored in the database.
2. Delete – use this button to delete one or more rows of data in the database. Only the highlighted rows in the display are
6
deleted from the database. You can select more than one row to delete at the same time.
3. Update – use this button after you change the data in the display and you want to submit the data to the database. The updated fields are shown on a pink background and are not updated in the database until you select the Update button. The displayed rows of data will be shown with normal background when they are successfully stored in the database.
4. Refresh – use this button to retrieve the most recent data from the data base, i.e. to refresh the information shown on the display. You can also use this button to discard changes that you have made in the display and have not yet submitted to the database.
F. Messages Pane – shows error and confirmation messages for user actions. It can be collapsed or expanded by clicking the double-arrow icon in the pane header. See section 2.4 for more details.
G. Display Update Progress Bar – A display popup labeled "Please Wait…" will be presented when a display update is initiated. The popup will automatically close when the update completes.
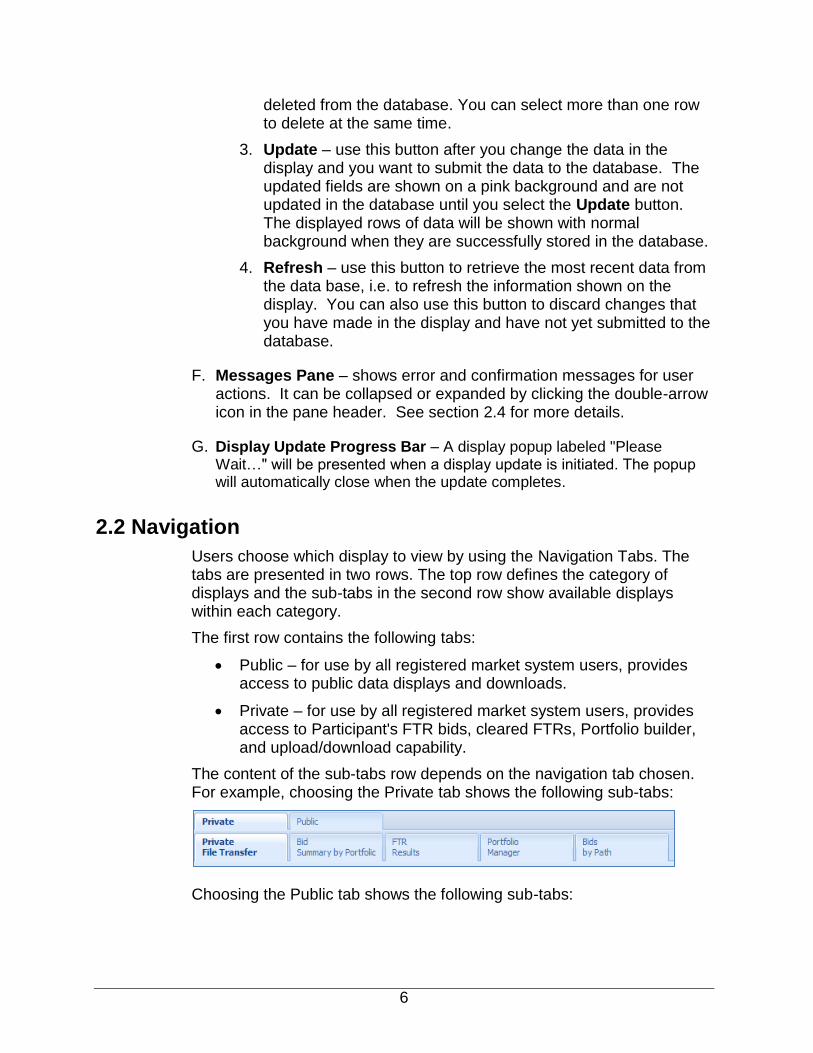
2.2 Navigation
Users choose which display to view by using the Navigation Tabs. The tabs are presented in two rows. The top row defines the category of displays and the sub-tabs in the second row show available displays within each category.
The first row contains the following tabs:
Public – for use by all registered market system users, provides access to public data displays and downloads.
Private – for use by all registered market system users, provides access to Participant's FTR bids, cleared FTRs, Portfolio builder, and upload/download capability.
The content of the sub-tabs row depends on the navigation tab chosen. For example, choosing the Private tab shows the following sub-tabs:
Choosing the Public tab shows the following sub-tabs:

7
Users can always determine which display is being shown by looking at:
A. The highlighted navigation tab
B. The display name shown in the display pane:
2.3 Filters Pane
The Filters Pane provides a set of filters applicable to the currently shown display. It is positioned on the left side of the eFTR application window as shown below:
The filter selections vary based on the display. Some displays require only selection of Year and Source/Sink filters while others may require the Effective Period, Auction and Portfolio filters. When you navigate to a display, the appropriate filter selections are shown in this pane.
A
B

8
The Filters Pane can be collapsed to use the entire screen for the Display Content.
By default, the Filters Pane is expanded as shown above. If you wish to hide the Filters Pane, simply click on the double-arrow button and the pane will collapse into a single bar on the left side:
To restore the Filters Pane, simply click on the double-arrow button.
2.4 Messages Pane
The Messages Pane shows error messages, warnings, and action confirmation messages. It appears at the bottom of the eFTR window. By default only its header bar is shown.

9
To manually expand the Messages Pane at any time, simply click on the double-arrow button on the right side of the Messages Pane header:
Whenever an update to save entered data is unsuccessful, the Messages Pane is automatically expanded (if collapsed) and an error message is shown for each error on the display.
The pane will not automatically expand when a successful update is made and the confirmation message is displayed. To manually expand the Messages Pane at any time, simply click on the double-arrow button on the right side of the Messages Pane header, as shown above.

10
When the Messages Pane is expanded, it can be returned to its hidden position by clicking on the double-arrow button on the right side of the Messages Pane header:
The Messages Pane can be manually expanded or collapsed at any time by clicking the double-arrow button on the right side of the Messages Pane header.
2.5 Data Displays and Entry
The data entry process is similar throughout the eFTR application.
Enterable displays are grouped under the Private tab. Auction bids can be entered, modified, or deleted only when the auction bidding period is open, which is indicated by the Auction Status "OPEN" displayed in eFTR header and the asterisk symbol displayed next to the auction name in the selection frame.
Enterable and non-enterable fields:
Enterable fields are distinguishable by a frame displayed around the value
Non-enterable fields are displayed on plain background

11
To update data, the process is similar throughout the eFTR GUI:
1. Click to place the cursor in the enterable field that you want to update.
2. Change the data to a new value.
When the enter key is hit or when another data entry field is selected, the background color of the field where data was entered is highlighted in pink to indicate that a new value is unsaved.
The application title in the header changes from white to pink as shown below:
3. Click the Update button to save the data in the database.
The “Please Wait…” progress bar is shown in the header.

12
When the update is complete, the “Please Wait…” progress bar is removed, all pink highlights are removed and a new message is added to the Messages Pane indicating the completion status:
The changed value is now stored in the database.
Inevitably, users will make mistakes during data entry. When this happens, eFTR automatically expands the Messages Pane showing an error message and also highlighting the field in error:
Similarly, when some of the entered data is accepted but violates certain cautionary rules, eFTR displays a warning message in the Messages pane.
When an auction bidding period is closed, eFTR does not allow data submittals. To prevent data entry when the bidding window is closed, eFTR shows the following indicators:
The Auction Status field in the eFTR header displays "CLOSED" if none of the Auctions is currently open for bidding
The Auction name displayed in the Selection Pane is shown without asterisk
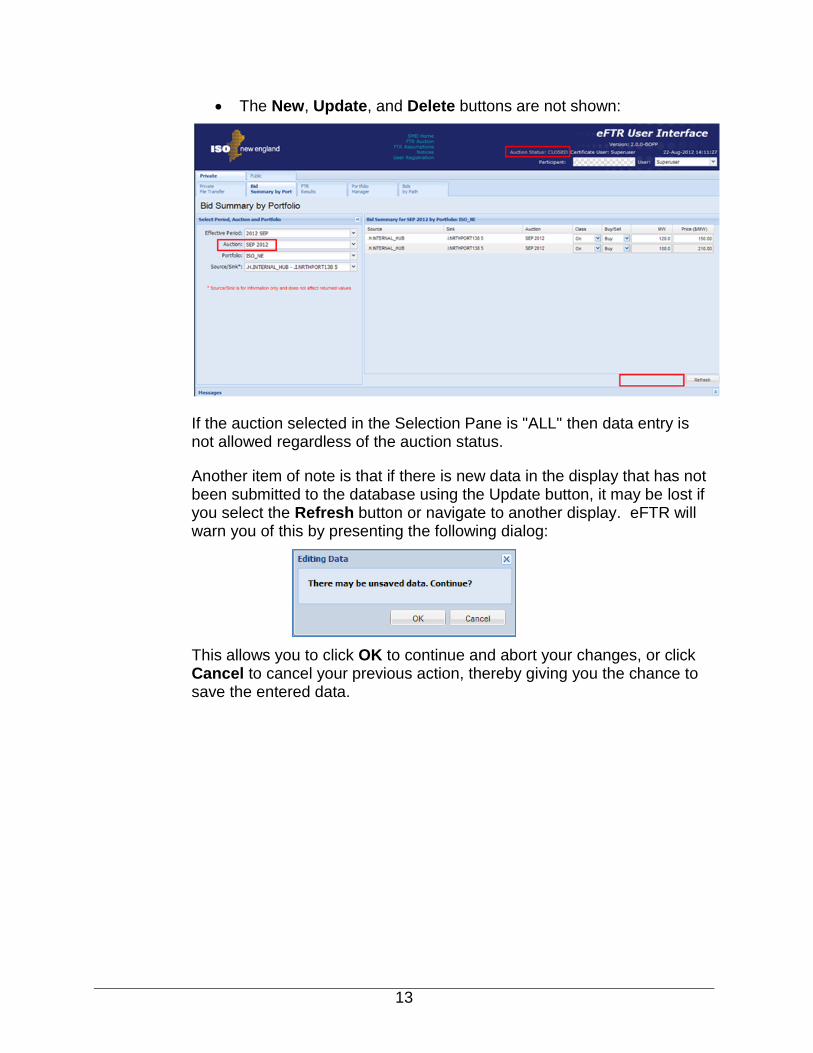
13
The New, Update, and Delete buttons are not shown:
If the auction selected in the Selection Pane is "ALL" then data entry is not allowed regardless of the auction status.
Another item of note is that if there is new data in the display that has not been submitted to the database using the Update button, it may be lost if you select the Refresh button or navigate to another display. eFTR will warn you of this by presenting the following dialog:
This allows you to click OK to continue and abort your changes, or click Cancel to cancel your previous action, thereby giving you the chance to save the entered data.
14
3. Public Navigation Tab
The Public Navigation Tab provides navigation to the displays for viewing public FTR data available for all registered eFTR users. The Public Navigation Tab contains the following sub-tabs:
Each of the public displays is documented in the following sections.
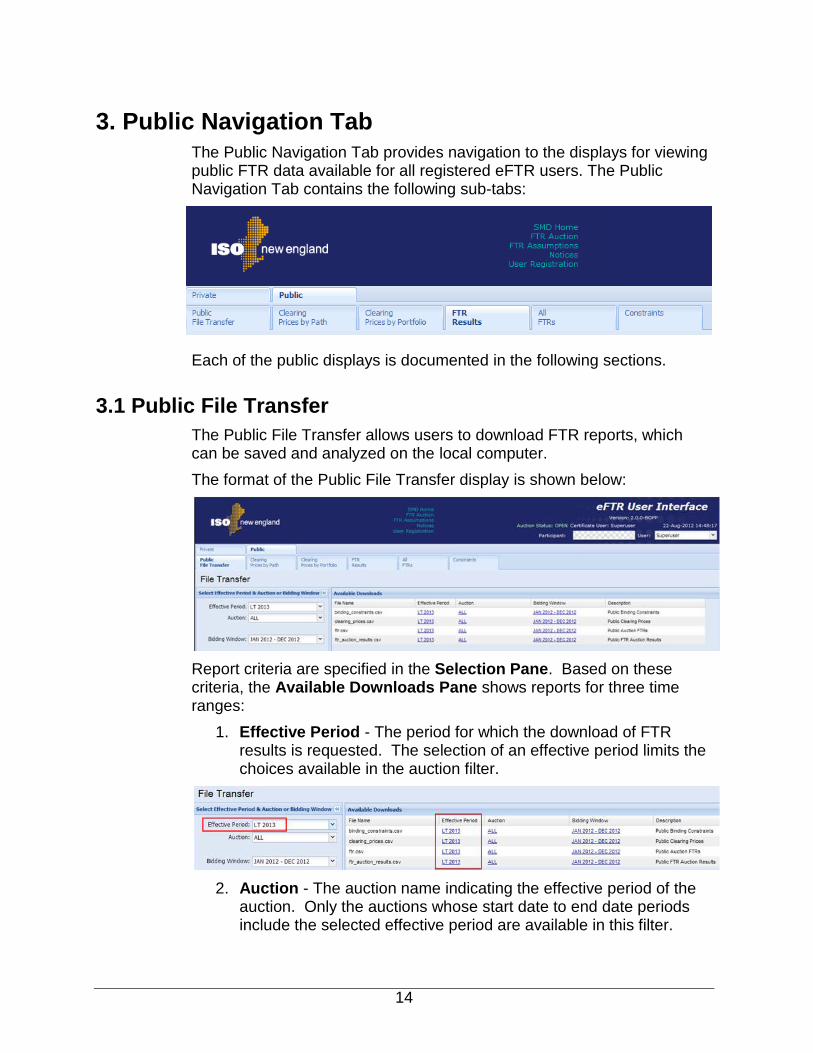
3.1 Public File Transfer
The Public File Transfer allows users to download FTR reports, which can be saved and analyzed on the local computer.
The format of the Public File Transfer display is shown below:
Report criteria are specified in the Selection Pane. Based on these criteria, the Available Downloads Pane shows reports for three time ranges:
1. Effective Period - The period for which the download of FTR results is requested. The selection of an effective period limits the choices available in the auction filter.
2. Auction - The auction name indicating the effective period of the auction. Only the auctions whose start date to end date periods include the selected effective period are available in this filter.

15
If a year is selected in the effective period filter (e.g. LT 2013), the options available in the auction filter include “ALL” and any long term auction for that year. Selection of “ALL” results in data for all auctions included in the auction filter. Selection of a specific auction results in data for only that auction.
If a month is selected in the effective period filter (e.g. 2013 NOV), the options available in the auction filter include “ALL” and any auction whose start date to end date periods include the effective period, including the long term auction(s). Selection of “ALL” results in data for all auctions included in the auction filter. Selection of a specific auction results in data for only that auction.
3. Bidding Window - Contains data for all auctions associated with the selected Bidding Window. This filter is independent of the effective period and auction filters
There are four types of available public reports:
Binding Constraints
Clearing Prices
FTRs
FTR Auction Results
All the reports are presented in CSV (coma-separated values) format. When the download is initiated, you can either open the report or save it in a local directory.
Initiate the download by one of the following actions:
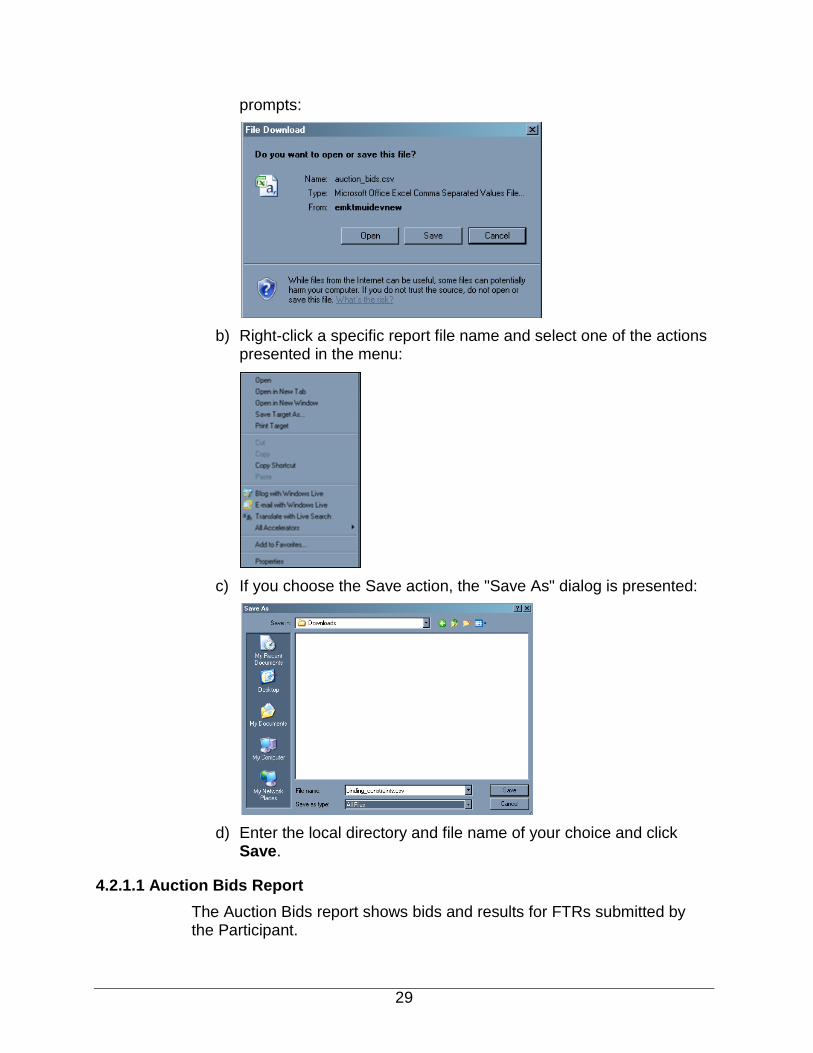
a) Click a link for a specific report file name to be downloaded and follow the prompts.
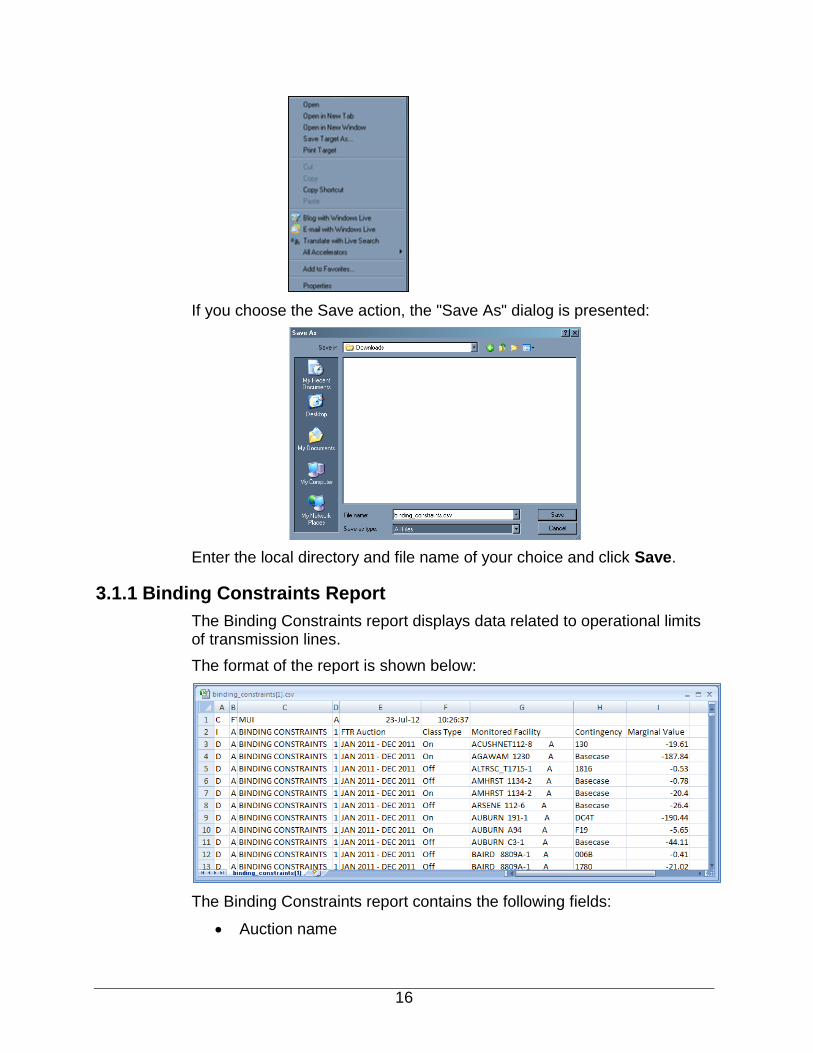
b) Right-click a link for a specific report file name and select one of the actions presented in the menu:
16
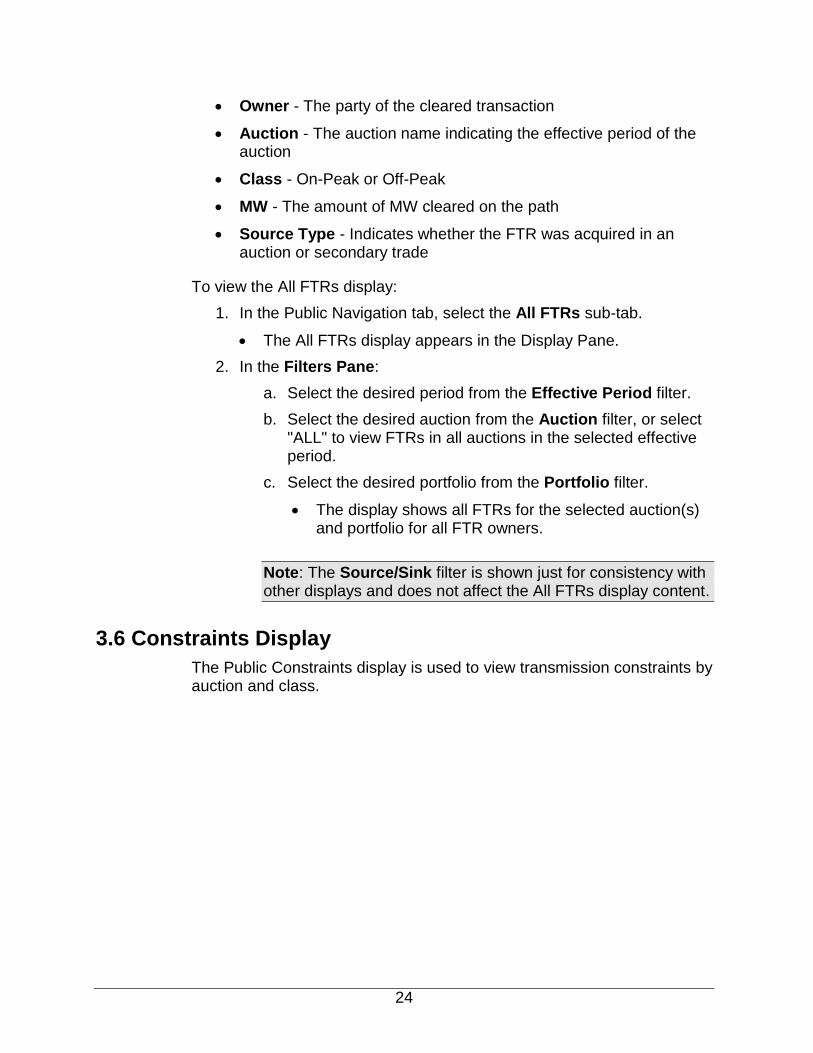
If you choose the Save action, the "Save As" dialog is presented:
Enter the local directory and file name of your choice and click Save.
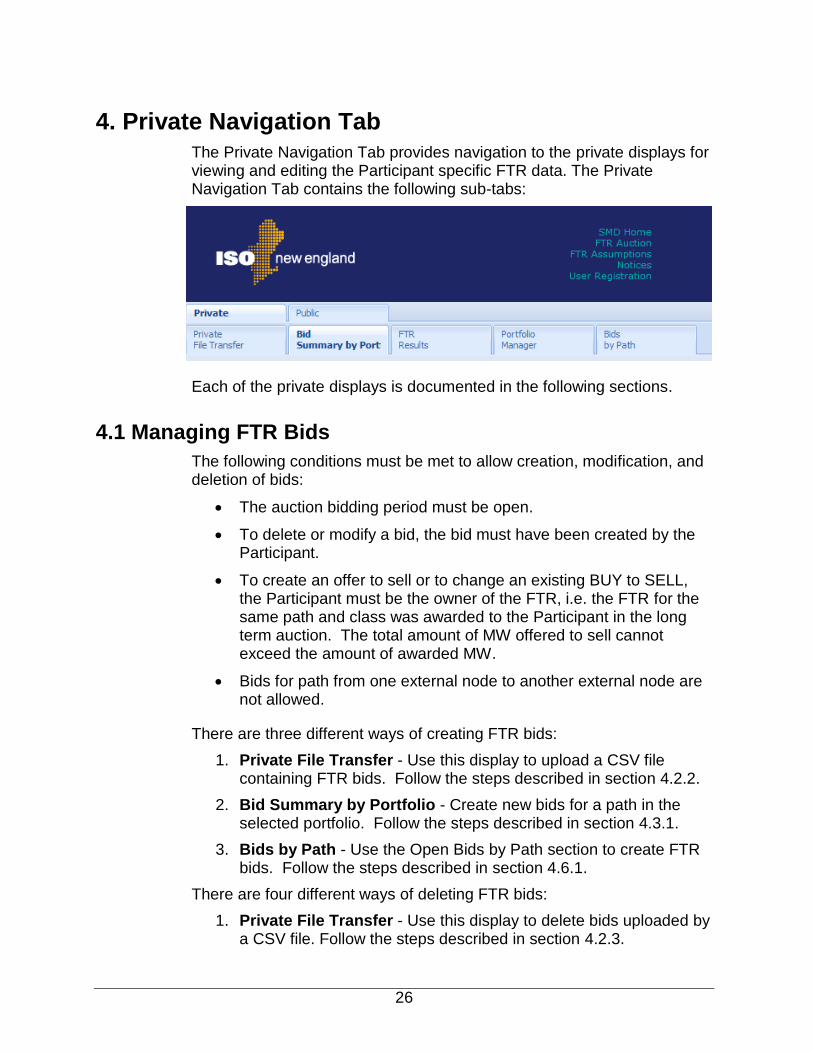
3.1.1 Binding Constraints Report
The Binding Constraints report displays data related to operational limits of transmission lines.
The format of the report is shown below:
The Binding Constraints report contains the following fields:
Auction name

17
Class Type
Monitored Facility
Contingency Name
Marginal Value
3.1.2 Clearing Prices Report
The Clearing Prices report displays the nodal prices for all the nodes in the system.
The format of the report is shown below:
The Clearing Prices report contains the following information:
Auction name
Class Type
Node ID, Name, and Type
Clearing Price
3.1.3 FTR Report
The FTR report shows all the FTRs for the selected period for all the Participants.
The format of the report is shown below:
The FTR report contains the following fields:

18
Auction name
Source Location ID, Name, and Type
Sink Location ID, Name, and Type
Customer ID
Customer Name
Auction Start Date
Auction End Date
Class Type
MW
Source Type
3.1.4 FTR Auction Results Report
The FTR Auction Results report shows the FTR cleared results for all the auctions in the selected period.
The format of the report is shown below:
The FTR Auction Results report contains the following fields:
Auction name
Customer ID
Customer Name
Source Location ID, Name, and Type
Sink Location ID, Name, and Type
Buy/Sell
Class Type
Award FTR MW
Award FTR Price
3.2 Clearing Prices by Path Display
The Public Clearing Prices by Path display is used to view both on-peak and off-peak FTR auction clearing prices for auctions in the selected year and path.

19
The format of the Clearing Prices by Path display is shown below:
The Clearing Prices by Path display contains the following fields:
Auction - The auction name indicating the effective period of the auction
Class - On-Peak or Off-Peak
Price ($/MW) - The FTR clearing price
To view the Clearing Prices by Path:
1. In the Public Navigation tab, select the Clearing Prices by Path sub-tab.
The Clearing Prices by Path display appears in the Display Pane.
2. In the Filters Pane:
a. Select the desired year from the Year filter.
b. Select the desired location of the source node from the Source filter.
c. Select the desired location of the sink node from the Sink filter.
The display shows the auction clearing prices for the auctions included in the selected year and path sorted by auction and class.
3.3 Clearing Prices by Portfolio Display
The Public Clearing Prices by Portfolio display is used to view both on-peak and off-peak FTR auction clearing prices for auctions in the selected year and portfolio. The selection of the portfolio limits the choices available in the source/sink filter. Only the paths included in the user's selected portfolio will appear in the source/sink filter.

20
The format of the Clearing Prices by Path display is shown below:
The Clearing Prices by Path display contains the following fields:
Auction - The auction name indicating the effective period of the auction
Class - On-Peak or Off-Peak
Price ($/MW) - The FTR clearing price
To view the Clearing Prices by Portfolio:
1. In the Public Navigation tab, select the Clearing Prices by Portfolio sub-tab.
The Clearing Prices by Portfolio display appears in the Display Pane.
2. In the Filters Pane:
a. Select the desired year from the Year filter.
b. Select the desired portfolio from the Portfolio filter.
c. Select the desired path from the Source/Sink filter.
The display shows the auction clearing prices for the auctions included in the selected year, portfolio and source/sink, sorted by auction and class.

21
3.4 FTR Results Display
The Public FTR Results display is used to view auction clearing prices and awarded MWs for all cleared bids made by all FTR owners. If an FTR owner made multiple bids for the same path, class, and buy/sell, the amount of awarded MWs is displayed separately for each bid.
The format of the FTR Results display is shown below:
The Filter Pane contains the following filters:
Effective Period - The period for which the display of FTR results is requested. The selection of an effective period limits the choices available in the auction filter.
Auction - The auction name indicating the effective period of the auction. Only the auctions whose start date to end date periods include the selected effective period are available in this filter. If "ALL" is selected then the display contains FTR results for all the auctions within the effective period.
Portfolio - The user's portfolio selection which filters the display by paths included in this portfolio.
Source/Sink - This filter is shown just for consistency with other displays and does not affect the FTR Results content.

22
The Display Pane of the FTR Results display is shown below (expanded):
The Display Pane contains the following fields:
Source - The starting node of the Path
Sink - The ending node of the Path
Owner - The party of the cleared transaction
Auction - The auction name indicating the effective period of the auction
Class - On-Peak or Off-Peak
Buy/Sell - The type of transaction
MW - The amount of MW cleared on the path
Price ($/MW) - The auction clearing price on the path
To view the FTR Results display:
1. In the Public Navigation sub-tabs, select the FTR Results tab.
The FTR Results display appears in the Display Pane.
2. In the Filters Pane:
a. Select the desired period from the Effective Period filter.
b. Select the desired auction from the Auction filter, or select "ALL" to view results of all auctions in the selected effective period.
c. Select a portfolio from the Portfolio filter.
The display shows FTR cleared results for the selected auction and portfolio for all FTR owners.

23
Note: The Source/Sink filter is shown just for consistency with other displays and does not affect the FTR Results display content.
3.5 All FTRs Display
The Public All FTRs display is used to view all FTR cleared results grouped by path, owner, auction, class, and buy/sell. For each group, if a Participant made multiple bids, the amount of awarded MWs is summarized.
The format of the All FTRs display is shown below:
The Filter Pane contains the following filters:
Effective Period - The period for which the display of FTRs is requested. The selection of an effective period limits the choices available in the auction filter.
Auction - The auction name indicating the effective period of the auction. Only the auctions whose start date to end date periods include the selected effective period are available in this filter. If "ALL" is selected, the display contains FTRs for all the auctions within the effective period.
Portfolio - The user's portfolio selection which filters the display by paths included in this portfolio.
Source/Sink - This filter is shown just for consistency with other displays and does not affect the All FTRs display content.
The Display Pane contains the following fields:
Source - The starting node of the Path
Sink - The ending node of the Path
24
Owner - The party of the cleared transaction
Auction - The auction name indicating the effective period of the auction
Class - On-Peak or Off-Peak
MW - The amount of MW cleared on the path
Source Type - Indicates whether the FTR was acquired in an auction or secondary trade
To view the All FTRs display:
1. In the Public Navigation tab, select the All FTRs sub-tab.
The All FTRs display appears in the Display Pane.
2. In the Filters Pane:
a. Select the desired period from the Effective Period filter.
b. Select the desired auction from the Auction filter, or select "ALL" to view FTRs in all auctions in the selected effective period.
c. Select the desired portfolio from the Portfolio filter.
The display shows all FTRs for the selected auction(s) and portfolio for all FTR owners.
Note: The Source/Sink filter is shown just for consistency with other displays and does not affect the All FTRs display content.
3.6 Constraints Display
The Public Constraints display is used to view transmission constraints by auction and class.

25
The format of the Constraints display is shown below:
The Constraints display contains the following fields:
Auction - The auction name indicating the effective period of the auction
Class - On-Peak or Off-Peak
Monitored Facility - The name of the equipment
Contingency Name - Identifier of the contingency
Marginal Value - The marginal value of the constraint expressed in $/MWh
To view the Constraints display:
1. In the Public Navigation tab, select the Constraints sub-tab.
The Constraints display appears in the Display Pane.
2. In the Filters Pane:
a. Select the desired period from the Effective Period filter.
b. Select the desired auction name from the Auction filter, or select "ALL" to view constraints for all auctions in the selected effective period.
The display shows constraints for the selected auction(s).
26
4. Private Navigation Tab
The Private Navigation Tab provides navigation to the private displays for viewing and editing the Participant specific FTR data. The Private Navigation Tab contains the following sub-tabs:
Each of the private displays is documented in the following sections.
4.1 Managing FTR Bids
The following conditions must be met to allow creation, modification, and deletion of bids:
The auction bidding period must be open.
To delete or modify a bid, the bid must have been created by the Participant.
To create an offer to sell or to change an existing BUY to SELL, the Participant must be the owner of the FTR, i.e. the FTR for the same path and class was awarded to the Participant in the long term auction. The total amount of MW offered to sell cannot exceed the amount of awarded MW.
Bids for path from one external node to another external node are not allowed.
There are three different ways of creating FTR bids:
1. Private File Transfer - Use this display to upload a CSV file containing FTR bids. Follow the steps described in section 4.2.2.
2. Bid Summary by Portfolio - Create new bids for a path in the selected portfolio. Follow the steps described in section 4.3.1.
3. Bids by Path - Use the Open Bids by Path section to create FTR bids. Follow the steps described in section 4.6.1.
There are four different ways of deleting FTR bids:
1. Private File Transfer - Use this display to delete bids uploaded by a CSV file. Follow the steps described in section 4.2.3.
27
2. Private File Transfer - Use this display to delete all your bids for a selected auction. Follow the steps described in section 4.2.4.
3. Bid Summary by Portfolio - Delete selected bids. Follow the steps described in section 4.3.3.
4. Bids by Path - Use the Open Bids section to delete selected bids. Follow the steps described in section 4.6.3.
There are two displays which can be used to modify FTR bids:
1. Bid Summary by Portfolio - Follow the steps described in section 4.3.2.
2. Bids by Path - Follow the steps described in section 4.6.2.
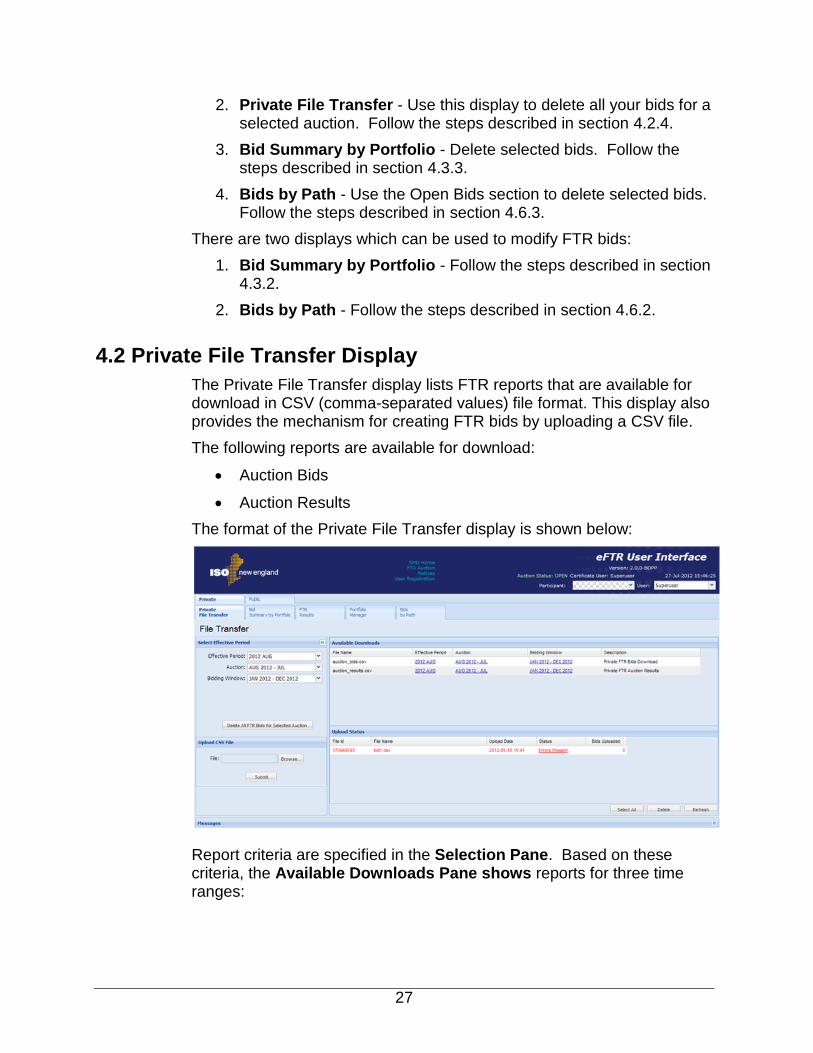
4.2 Private File Transfer Display
The Private File Transfer display lists FTR reports that are available for download in CSV (comma-separated values) file format. This display also provides the mechanism for creating FTR bids by uploading a CSV file.
The following reports are available for download:
Auction Bids
Auction Results
The format of the Private File Transfer display is shown below:
Report criteria are specified in the Selection Pane. Based on these criteria, the Available Downloads Pane shows reports for three time ranges:

28
1. Effective Period - The period for which the download of FTR results is requested. The selection of an effective period limits the choices available in the auction filter.
2. Auction - The auction name indicating the effective period of the auction. Only the auctions whose start date to end date periods include the selected effective period are available in this filter.
If a year is selected in the effective period filter (e.g. LT 2013), the options available in the auction filter include “ALL” and any long term auction for that year. Selection of “ALL” results in data for all auctions included in the auction filter. Selection of a specific auction results in data for only that auction.
If a month is selected in the effective period filter (e.g. 2013 NOV), the options available in the auction filter include “ALL” and any auction whose start date to end date periods include the effective period, including the long term auction(s). Selection of “ALL” results in data for all auctions included in the auction filter. Selection of a specific auction results in data for only that auction
3. Bidding Window - Contains data for all auctions associated with the selected Bidding Window. This filter is independent of the effective period and auction filters.
4.2.1 Download a CSV File
All the eFTR reports are presented in CSV (coma-separated values) format. When the download is initiated, the user can either open the report or save it in a local directory.
Initiate the file download by one of the following actions:
a) Click a specific report file name to be downloaded and follow the
29
prompts:
b) Right-click a specific report file name and select one of the actions presented in the menu:
c) If you choose the Save action, the "Save As" dialog is presented:
d) Enter the local directory and file name of your choice and click Save.
4.2.1.1 Auction Bids Report
The Auction Bids report shows bids and results for FTRs submitted by the Participant.

30
The format of the report is shown below:
The Auction Bids report contains the following fields:
FTR Auction
Source Location ID, Name, and Type
Sink Location ID, Name, and Type
Customer ID
Customer Name
Class Type
Bid MW
Bid Price
Clearing MW
Clearing Price
Buy/Sell
4.2.1.2 Auction Results Report
The Auction Results report shows auction results for FTRs submitted by the Participant.
The format of the report is shown below:
The Auction Results report contains the following fields:
FTR Auction
Source Location ID, Name, and Type
Sink Location ID, Name, and Type
Customer ID

31
Customer Name
Class Type
Buy/Sell
Clearing MW
Clearing Price
4.2.2 Upload a CSV File
To create FTR bids using CSV file upload:
1. In the Private Navigation tab, click the Private File Transfer sub-tab.
The Private File Transfer display appears in the Display Pane.
2. In the Upload CSV File section of the display, click the Browse button.
The Windows Choose File to Upload dialog opens:
3. Select the desired file which you want to upload and click the Open button.
4. Click the Submit button in the Upload CSV File section of the eFTR display.
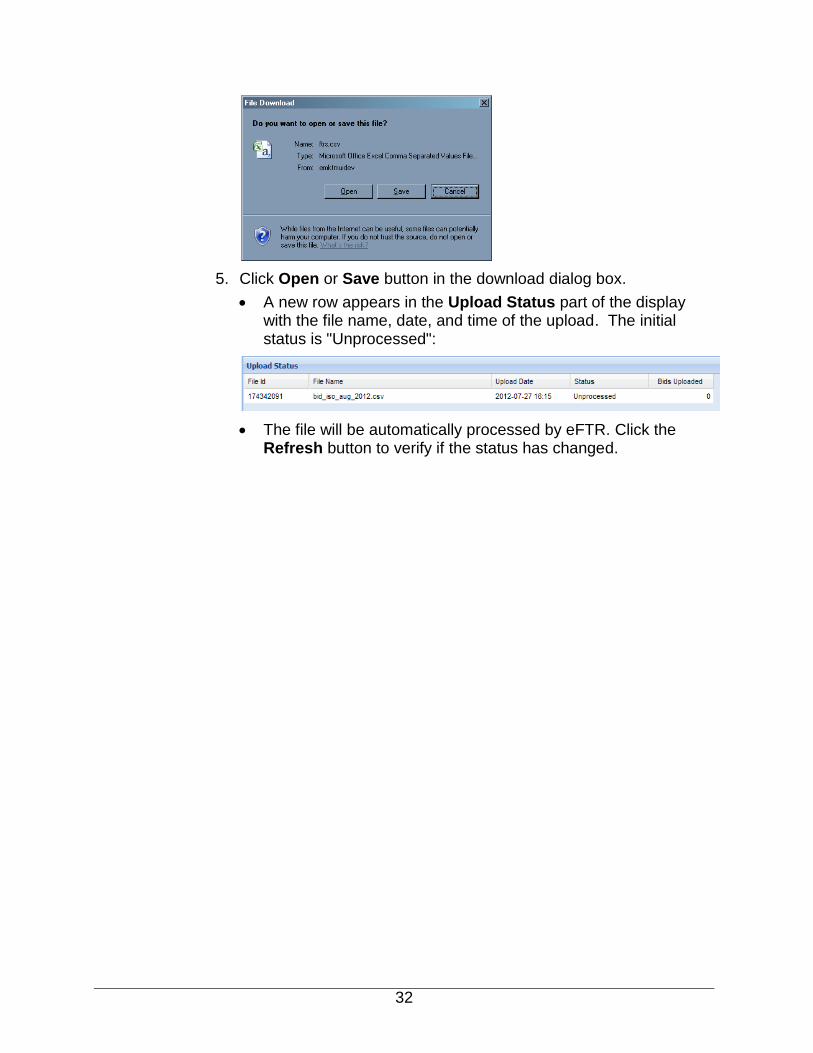
A download dialog box opens:
32
5. Click Open or Save button in the download dialog box.
A new row appears in the Upload Status part of the display with the file name, date, and time of the upload. The initial status is "Unprocessed":
The file will be automatically processed by eFTR. Click the Refresh button to verify if the status has changed.
33
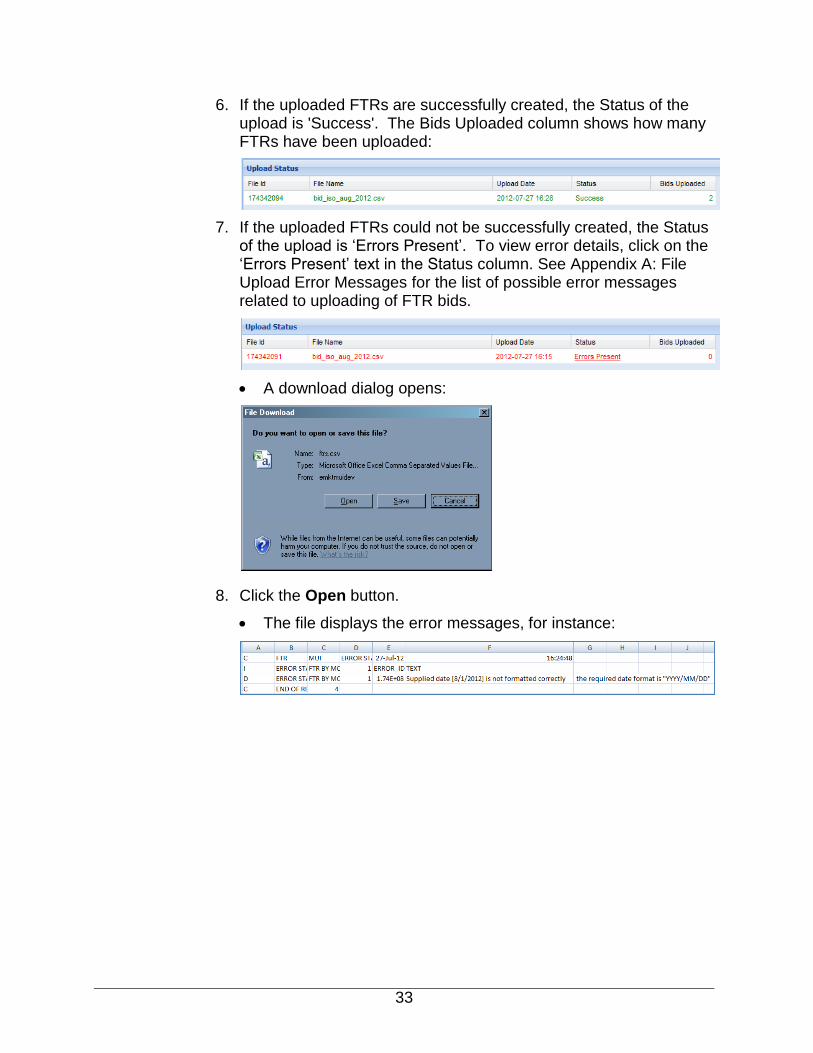
6. If the uploaded FTRs are successfully created, the Status of the upload is 'Success'. The Bids Uploaded column shows how many FTRs have been uploaded:
7. If the uploaded FTRs could not be successfully created, the Status of the upload is ‘Errors Present’. To view error details, click on the ‘Errors Present’ text in the Status column. See Appendix A: File Upload Error Messages for the list of possible error messages related to uploading of FTR bids.
A download dialog opens:
8. Click the Open button.
The file displays the error messages, for instance:

34
Note: The names of successfully uploaded files must be unique. If you attempt to upload a file with the same name as a previously uploaded file that was successfully processed, an error message is displayed: "Duplicate file name". You are allowed to submit a file with the same name if the previous upload of this file resulted in errors; however, the “Duplicate file name” error message will still appear in the Messages pane. To verify that the file was successfully uploaded, the Upload Status section of the display will reflect a status of “Success”, and the uploaded file information will appear in green color.
4.2.2.1 CSV File Format
You can upload Private Auction quote files in comma separated value (CSV) format. The format of the CSV upload file is shown below:
C,FTR,BID,1,Customer ID,A,Begin,End,Class,Buy/Sell,Source location ID,Sink location
ID,MW,Price
I,FTRBID,BID,VERSION,CUSTOMER ID,AUCTION,BEGIN,END,CLASS,BUY SELL,SOURCE LOCATION ID,SINK
LOCATION ID,MW,PRICE
D,FTRBID,BID,1,<Customer ID>,A,<Begin Date>,<End Date>,<Class>,<BUY/SELL>,<Source
locationID>,<Sink location ID>,<MW amount>,<Price per MW>
C, END OF REPORT, <Line Count>
The first field in each line is the line code: C - Comment
I - Information
D - Data
The first two lines (a comment line and an informational line with column headers) are optional. The first line may be used to specify general information about the upload, for instance upload date and time, file location etc.
The last comment line, indicating the end of report and record count, is mandatory and must specify the number of rows in the file.
Example of an upload file:

35
Caution: If you open the CSV file using Microsoft® Excel, the date formats may be changed when modifications are made and saved in Excel. The data format for file upload is YYYY/MM/DD. Excel translates YYYY/MM/DD as a date and defaults in most systems to M/D/YYYY. Attempting to upload the file with the wrong date format will result in errors.
The following table is offered as a reference for formatting the lines of the CSV upload file. If the first column contains the code "C" or "I", all the other values are optional, but the fields must be still separated by a coma. If the first column contains the code "D", the values are required or optional as specified in the table below.
Table 1 - CSV Upload File Format
CSV Line Code
Field
Description
Format or Maximum
Length
Required
D FTRBID Optional field No
D BID Optional field No
D VERSION Optional field No
D CUSTOMER ID Customer’s numeric ID Number Yes
D AUCTION Optional field No
D BEGIN Beginning date of Auction for which the bid is intended. This is the first day of month for monthly auctions, or the first day of year for long term auctions.
YYYY/MM/DD (Be careful of default date formats in your editing program that may alter your entry)
Yes
D END Ending date of Auction for which quote is intended. This is the last day of month for monthly auctions, or the last day of year for long term auctions.
YYYY/MM/DD Yes
D CLASS ONPEAK or OFFPEAK 7 characters, case sensitive
Yes
D BUY SELL BUY or SELL 4 characters Yes
D SOURCE LOCATION ID
The FTR source location ID Number Yes
D SINK LOCATION ID
The FTR sink location ID Number Yes
D MW The MW amount of the bid 8 digits with 1 decimal place
Yes
D PRICE The $/MW amount for the bid 10 digits with 2 decimal places
Yes
4.2.3 Delete a CSV File
You can remove all bids uploaded by a file by deleting the file. The removal of bids is allowed only if the auction bidding period is still open.

36
Note: If you modify uploaded bids using the eFTR interactive displays, they become disassociated from the file, and will not be removed when you remove the file. The association between a bid and a file is maintained for each individual bid, so if only some bids uploaded by a file have been manually updated then the removal of the file will delete all the bids that have not been updated.
To remove all unmodified bids uploaded by a CSV file:
1. In the Private Navigation tab, click the Private File Transfer sub-tab.
The File Transfer display appears in the Display Pane.
2. In the Upload CSV File section of the display select the file name that you wish to delete.
The selected row is highlighted.
3. Click the Delete button
The selected file is removed and all unmodified bids uploaded by this file are also deleted.
4.2.4 Delete all Bids for an Auction
You can remove all your bids for a selected auction. The removal of bids is allowed only if the auction bidding period is still open.
To remove all bids for a selected auction:
1. In the Private Navigation tab, click the Private File Transfer sub-tab.
The File Transfer display appears in the Display Pane.
2. In the Selection Pane select the auction for which you wish to remove all your bids.
37
3. Click the button labeled Delete All FTR Bids for Selected Auction.
All your bids for the selected auction are deleted.
The Delete All FTR Bids for Selected Auction may be used only if the bidding period for the selected auction is open. However, it is possible that the Private File Transfer screen remains displayed while the auction status switches from Open to Close. The button will be still enabled if you do not refresh the display. If you click the button, an error message will inform you that bids cannot be removed for a closed auction.
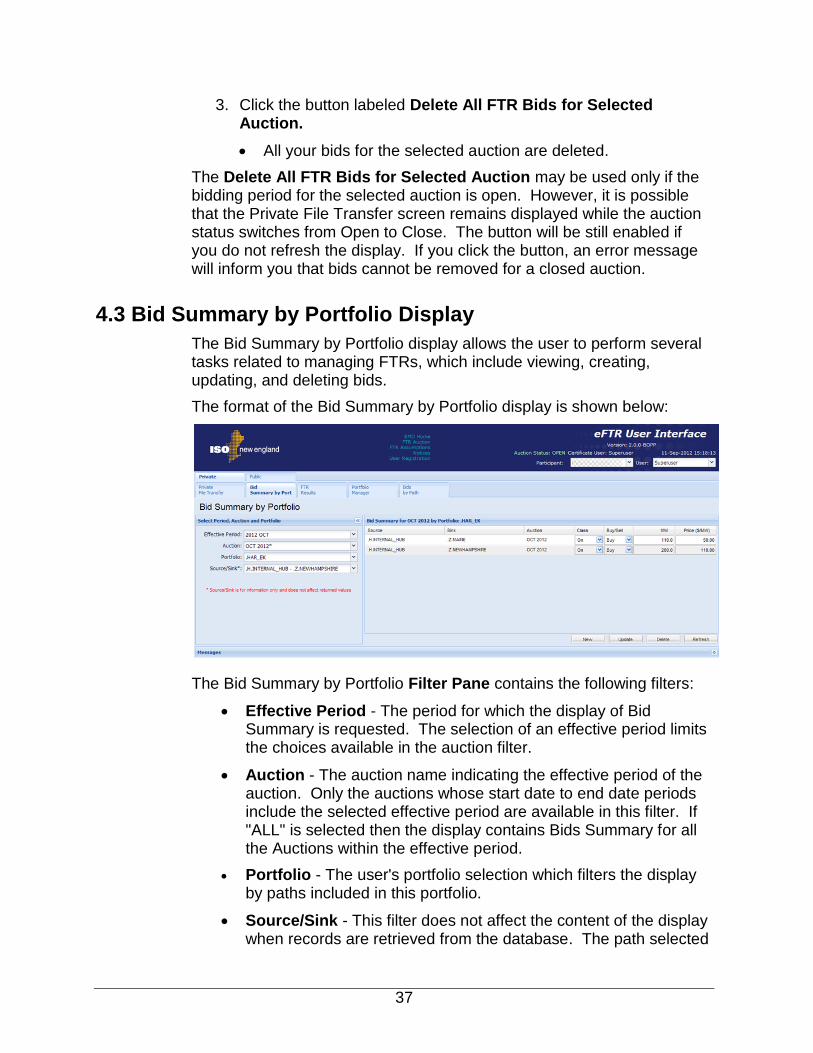
4.3 Bid Summary by Portfolio Display
The Bid Summary by Portfolio display allows the user to perform several tasks related to managing FTRs, which include viewing, creating, updating, and deleting bids.
The format of the Bid Summary by Portfolio display is shown below:
The Bid Summary by Portfolio Filter Pane contains the following filters:
Effective Period - The period for which the display of Bid Summary is requested. The selection of an effective period limits the choices available in the auction filter.
Auction - The auction name indicating the effective period of the auction. Only the auctions whose start date to end date periods include the selected effective period are available in this filter. If "ALL" is selected then the display contains Bids Summary for all the Auctions within the effective period.
Portfolio - The user's portfolio selection which filters the display by paths included in this portfolio.
Source/Sink - This filter does not affect the content of the display when records are retrieved from the database. The path selected

38
in the Source/Sink filter is used to set source and sink when new bids are created.
The Bid Summary by Portfolio Display Pane contains the following fields:
Source - The starting node of the path
Sink - The ending node of the path
Auction - The auction name
Class - On-Peak or Off-Peak
Buy/Sell - The type of transaction
MW- The MW being bought or sold on the path
Price ($/MW) - the price for the bid
The action buttons, New, Update, Delete, appear in the display only for open auctions, i.e. auctions for which the bidding period is open.
To view the Bid Summary by Portfolio display:
1. In the Private Navigation tab, select the Bid Summary by Portfolio sub-tab.
The Bid Summary by Portfolio display appears in the Display Pane.
2. In the Filters Pane:
a. Select the desired period from the Effective Period filter.
b. Select the desired auction name from the Auction filter, or select "ALL" to view bids in all auctions in the selected effective period.
c. Select the desired portfolio from the Portfolio filter.
The display shows the open bids for the selected auction(s) and paths included in the portfolio.
Note: The Source/Sink filter is relevant only when the Bids Summary display is used for creation of new bids.
4.3.1 Create an FTR Bid
1. In the Private Navigation tab, click the Bid Summary by Portfolio sub-tab.
The Bid Summary by Portfolio display appears in the Display Pane.
2. In the Filters Pane:
39
a. Select the desired period from the Effective Period filter.
b. Select the open auction from the Auction filter. An open auction, i.e. an auction for which the bidding period is open,
is indicated by the * symbol displayed next to the auction name.
c. Select the desired portfolio from the Portfolio filter.
d. Select the desired path from the Source/Sink filter.
3. Click the New button.
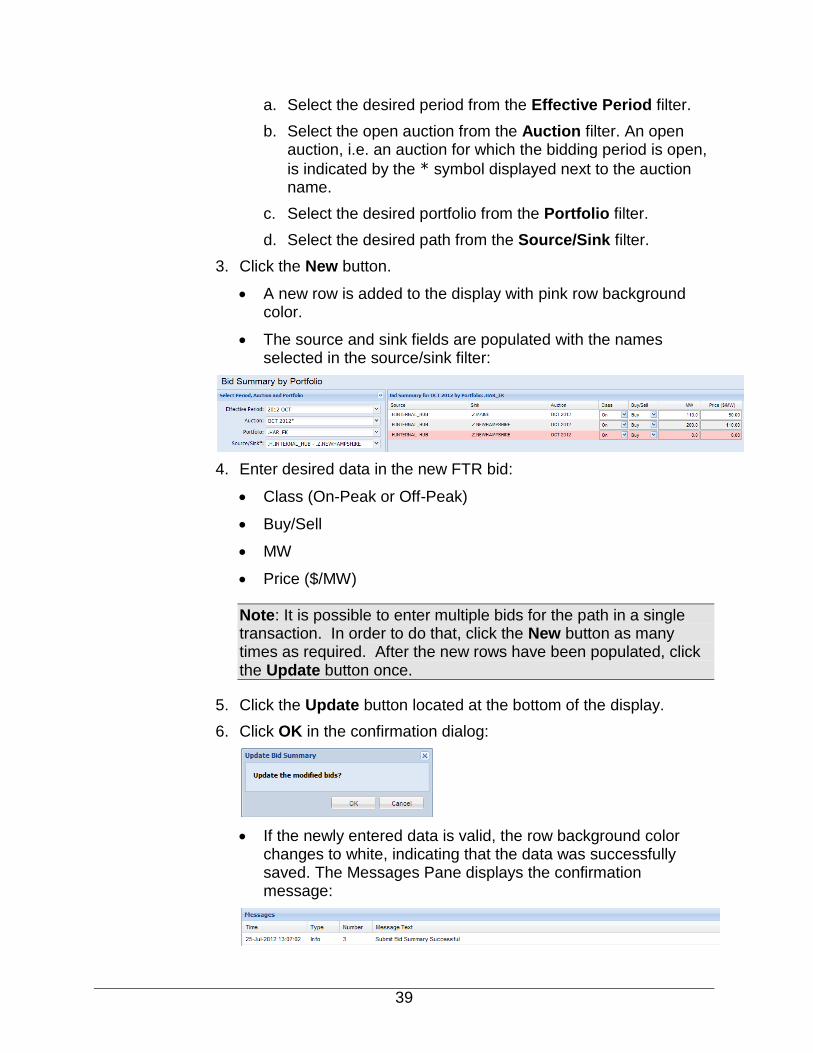
A new row is added to the display with pink row background color.
The source and sink fields are populated with the names selected in the source/sink filter:
4. Enter desired data in the new FTR bid:
Class (On-Peak or Off-Peak)
Buy/Sell
MW
Price ($/MW)
Note: It is possible to enter multiple bids for the path in a single transaction. In order to do that, click the New button as many times as required. After the new rows have been populated, click the Update button once.
5. Click the Update button located at the bottom of the display.
6. Click OK in the confirmation dialog:
If the newly entered data is valid, the row background color changes to white, indicating that the data was successfully saved. The Messages Pane displays the confirmation message:
40
If there is any invalid data, the Messages Pane displays the relevant error message, and data is not saved.
Note: If the Messages Pane was collapsed during the Update, it will expand only if an error occurred.
Note: Another display where FTR bids can be created is Private Bids by Path - Open Bids section. FTR bids can be created also by using Private File Transfer.
4.3.2 Modify an FTR Bid
The following fields of the Bid Summary by Portfolio display are updateable:
Class (On-Peak or Off-Peak)
Buy/Sell
MW
Price ($/MW)
To modify an existing open FTR bid:
1. In the Private Navigation tab, select the Bid Summary by Portfolio sub-tab.
The Bid Summary by Portfolio display appears in the Display Pane.
2. In the Filters Pane:
a. Select the desired period from the Effective Period filter.
b. Select the open auction from the Auction filter. An open auction, i.e. an auction for which the bidding period is open,
is indicated by the * symbol displayed next to the auction name.
c. Select the desired portfolio from the Portfolio filter.
The display contains all the bids for the selected auction and paths contained in the selected portfolio.
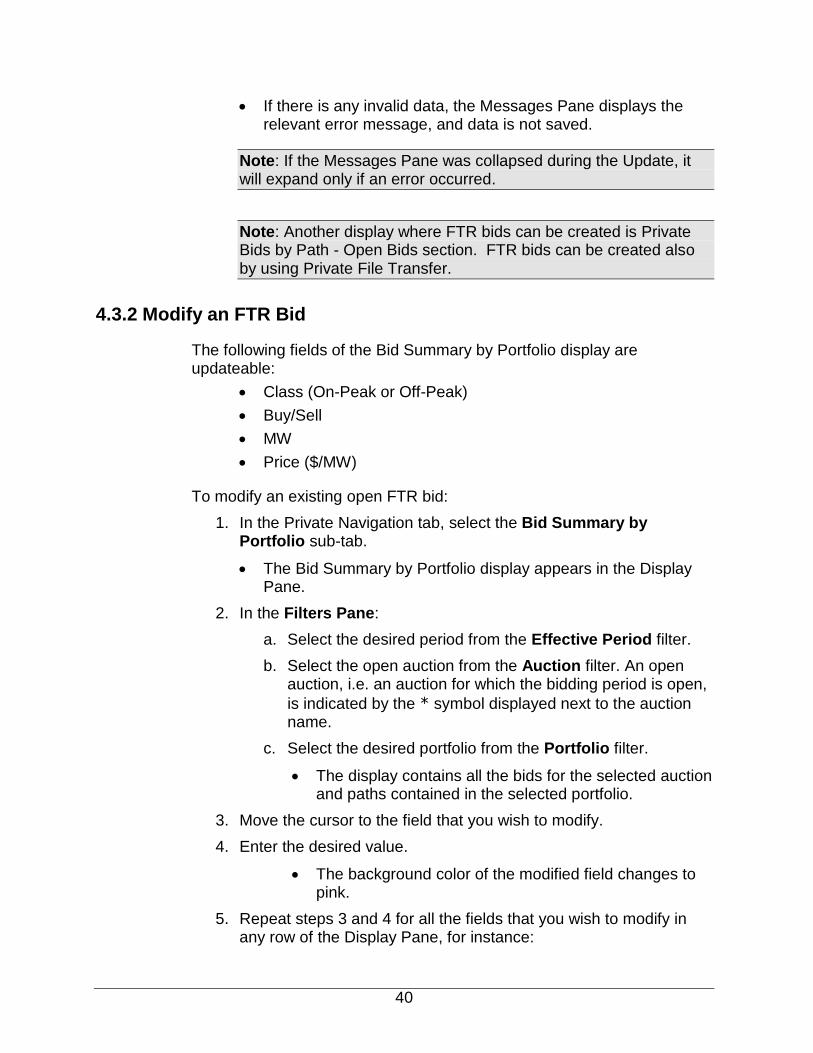
3. Move the cursor to the field that you wish to modify.
4. Enter the desired value.
The background color of the modified field changes to pink.
5. Repeat steps 3 and 4 for all the fields that you wish to modify in any row of the Display Pane, for instance:
41
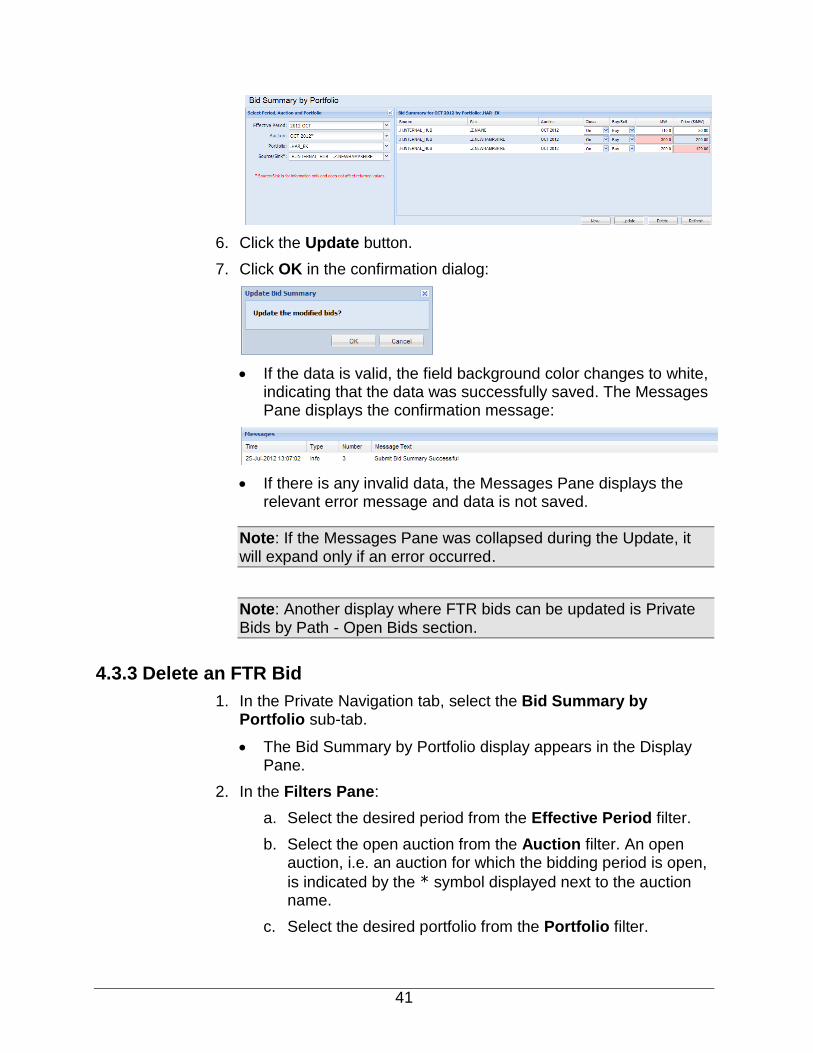
6. Click the Update button.
7. Click OK in the confirmation dialog:
If the data is valid, the field background color changes to white, indicating that the data was successfully saved. The Messages Pane displays the confirmation message:
If there is any invalid data, the Messages Pane displays the relevant error message and data is not saved.
Note: If the Messages Pane was collapsed during the Update, it will expand only if an error occurred.
Note: Another display where FTR bids can be updated is Private Bids by Path - Open Bids section.
4.3.3 Delete an FTR Bid
1. In the Private Navigation tab, select the Bid Summary by Portfolio sub-tab.
The Bid Summary by Portfolio display appears in the Display Pane.
2. In the Filters Pane:
a. Select the desired period from the Effective Period filter.
b. Select the open auction from the Auction filter. An open auction, i.e. an auction for which the bidding period is open,
is indicated by the * symbol displayed next to the auction name.
c. Select the desired portfolio from the Portfolio filter.

42
The display contains all the bids for the selected auction and paths contained in the selected portfolio.
3. Select the bid or multiple bids that you wish to delete.
The row background color changes to blue:
4. Click the Delete button located at the bottom of the display.
5. Click OK in the confirmation dialog:
The Bid Summary by Portfolio display refreshes. Deleted bids do not appear in the Display Pane.
The Messages Pane displays the confirmation message:
Note: If the Messages Pane was collapsed during the deletion, it will expand only if an error occurred.
Note:
1. Another display where FTR bids can be deleted is Private Bids by Path - Open Bids section.
2. Bids that were created using Private File Transfer, and have not been manually updated, can be deleted by deleting the upload file in Private File Transfer while the auction bidding period is open.
3. In Private File Transfer display, there is an action button which allows the Participant to delete all the bids that this Participant has created in the selected auction. Bids can be deleted only while the auction bidding period is open.
43
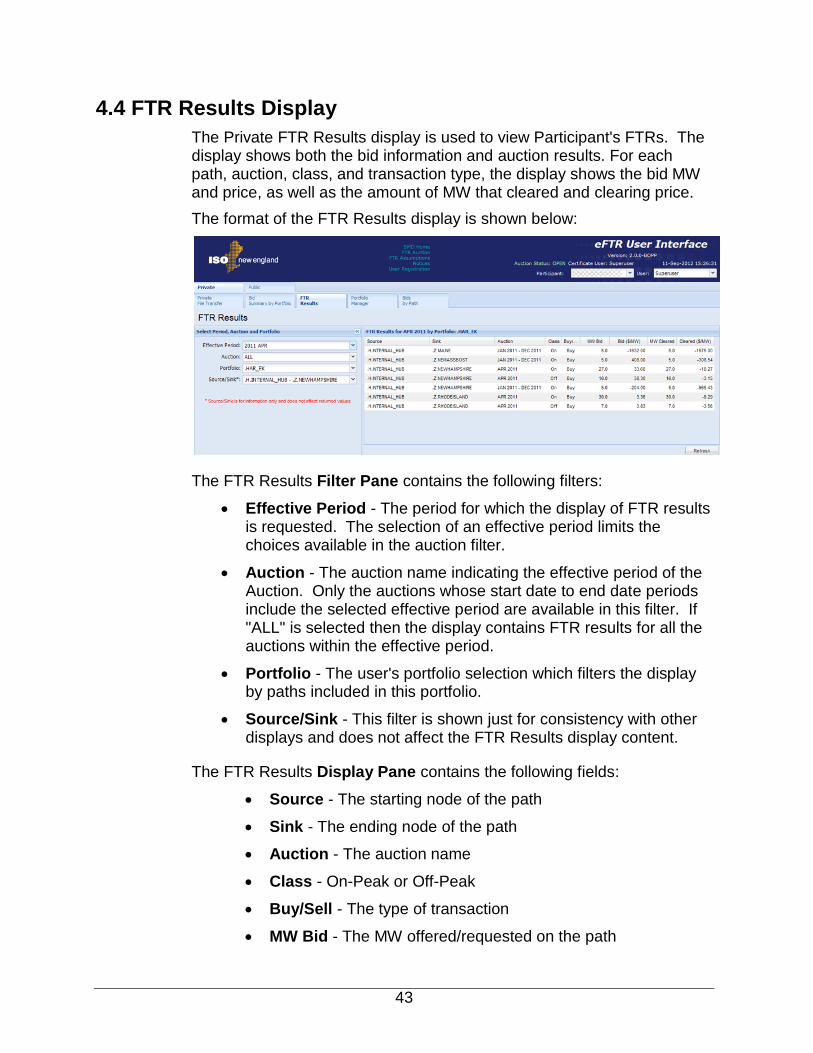
4.4 FTR Results Display
The Private FTR Results display is used to view Participant's FTRs. The display shows both the bid information and auction results. For each path, auction, class, and transaction type, the display shows the bid MW and price, as well as the amount of MW that cleared and clearing price.
The format of the FTR Results display is shown below:
The FTR Results Filter Pane contains the following filters:
Effective Period - The period for which the display of FTR results is requested. The selection of an effective period limits the choices available in the auction filter.
Auction - The auction name indicating the effective period of the Auction. Only the auctions whose start date to end date periods include the selected effective period are available in this filter. If "ALL" is selected then the display contains FTR results for all the auctions within the effective period.
Portfolio - The user's portfolio selection which filters the display by paths included in this portfolio.
Source/Sink - This filter is shown just for consistency with other displays and does not affect the FTR Results display content.
The FTR Results Display Pane contains the following fields:
Source - The starting node of the path
Sink - The ending node of the path
Auction - The auction name
Class - On-Peak or Off-Peak
Buy/Sell - The type of transaction
MW Bid - The MW offered/requested on the path
44
Bid ($/MW) - The price offered on the path
MW Cleared - The MW cleared on the path
Cleared ($/MW) - The price of the MW cleared on the path
To view the FTR Results display:
1. In the Private Navigation tab, click the FTR Results sub-tab.
The FTR Results display appears in the Display Pane.
2. In the Filters Pane:
a. Select the desired period from the Effective Period filter.
b. Select the desired auction from the Auction filter, or select "ALL" to view results of all auctions for the selected effective period.
c. Select a portfolio from the Portfolio filter.
The display shows Participant's FTR results for the selected auction(s) and paths included in the selected portfolio.
Note: The Source/Sink filter is shown just for consistency with other displays and does not affect the FTR Results display content.
4.5 Portfolio Manager
Portfolios provide filtering of data for the eFTR displays. Portfolios are used to group paths together to help view and manage subsets of data in public and private displays.
A portfolio contains one or more paths, and a path can appear in multiple portfolios. You may create any number of portfolios, with each portfolio uniquely named by you to describe its usage. Portfolios that you create belong only to you and are not shared with other users.
The portfolio can be used from the moment the portfolio was created until the portfolio is deleted. There is no effective period for a portfolio to be active.
The Portfolio Manager display is used for creating, modifying and deleting portfolios.

45
The Portfolio Manager format is shown below:
The main elements of the Portfolio Manager display are:
A. Portfolios - This area lists the existing portfolios ordered by name.
B. Portfolio Action Buttons - These buttons are used to manage the portfolios:
New - Opens the dialog to create a new Portfolio.
Copy - Opens the dialog to create a copy of an existing Portfolio with the same content which may be modified later.
Delete - Removes the selected Portfolio.
C. Source/Sink Nodes in Portfolio - This middle section of the display shows the paths that are included in the portfolio currently selected in the Portfolios list.
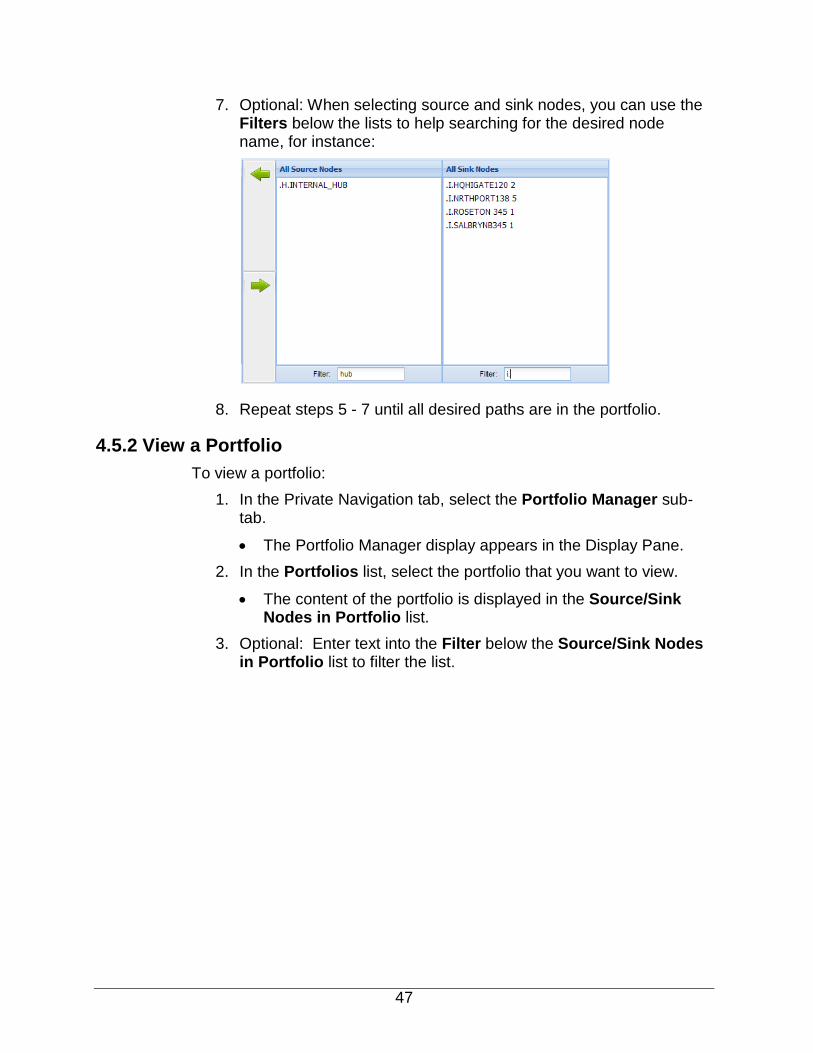
D. Filters - To facilitate search by name, the list of source or sink nodes can be filtered by the string of characters typed in the filter field below the list.
E. Add To Portfolio (left arrow) - Clicking this icon adds the selected nodes in the source and sink lists (G) to the Source/Sink Nodes in Portfolio list (C). A node must be selected in All Source Nodes and All Sink Nodes to form a path. Multiple nodes selection is allowed to create a combination of paths.
F. Remove from Portfolio (right arrow) - Clicking this icon removes the selected paths from the Source/Sink Nodes in Portfolio list (C). If there are no paths left in the portfolio, this portfolio is automatically deleted.
A
B
C
E
F
G
D D
G
46
G. All Source Nodes/All Sink Nodes - These two lists show the nodes that may be added to the currently selected portfolio.
The following sections describe the steps for creating, modifying, and deleting portfolios.
4.5.1 Create a Portfolio
To create a portfolio:
1. In the Private Navigation tab, select the Portfolio Manager sub-tab.
The Portfolio Manager display appears in the Display Pane.
2. Click the New button.
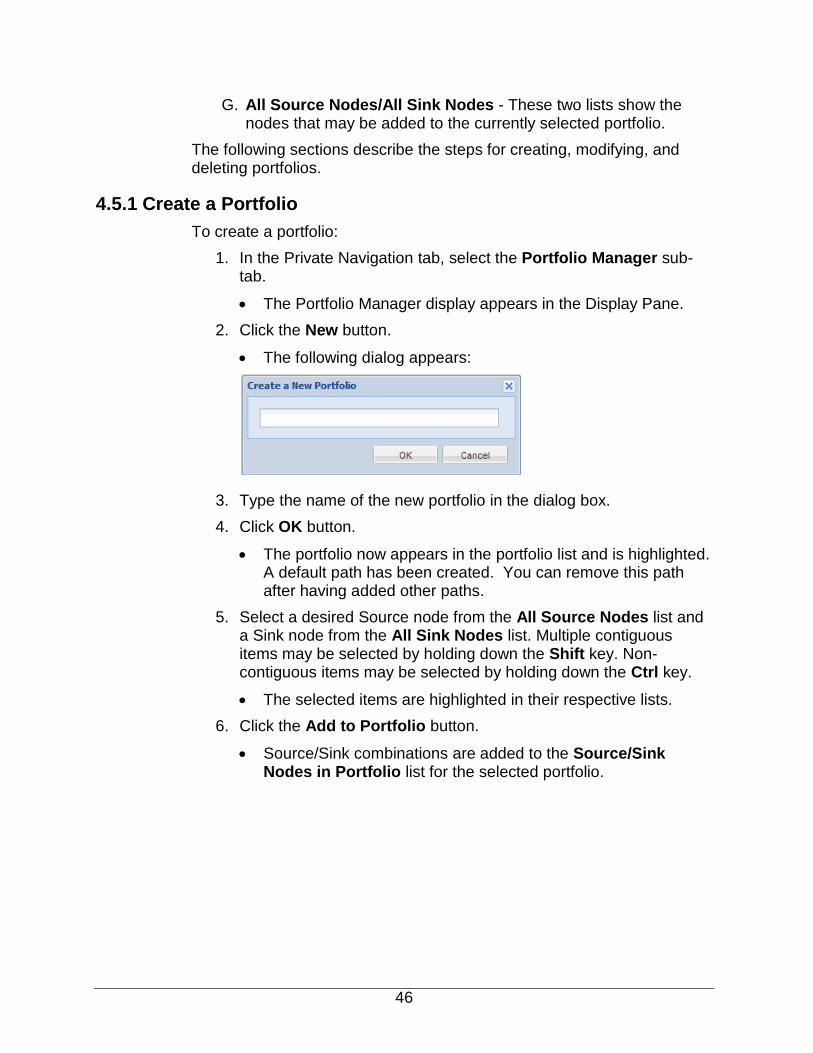
The following dialog appears:
3. Type the name of the new portfolio in the dialog box.
4. Click OK button.
The portfolio now appears in the portfolio list and is highlighted. A default path has been created. You can remove this path after having added other paths.
5. Select a desired Source node from the All Source Nodes list and a Sink node from the All Sink Nodes list. Multiple contiguous items may be selected by holding down the Shift key. Non-contiguous items may be selected by holding down the Ctrl key.
The selected items are highlighted in their respective lists.
6. Click the Add to Portfolio button.
Source/Sink combinations are added to the Source/Sink Nodes in Portfolio list for the selected portfolio.
47
7. Optional: When selecting source and sink nodes, you can use the Filters below the lists to help searching for the desired node name, for instance:
8. Repeat steps 5 - 7 until all desired paths are in the portfolio.
4.5.2 View a Portfolio
To view a portfolio:
1. In the Private Navigation tab, select the Portfolio Manager sub-tab.
The Portfolio Manager display appears in the Display Pane.
2. In the Portfolios list, select the portfolio that you want to view.
The content of the portfolio is displayed in the Source/Sink Nodes in Portfolio list.
3. Optional: Enter text into the Filter below the Source/Sink Nodes in Portfolio list to filter the list.

48
The list shows only those items that match the filter for sink nodes:
4.5.3 Modify a Portfolio
To modify a portfolio:
1. In the Private Navigation tab, select the Portfolio Manager sub-tab.
The Portfolio Manager display appears in the Display Pane.
2. In the Portfolios list, select the portfolio that you want to modify.
The content of the selected portfolio is displayed in the Source/Sink Nodes in Portfolio list.
3. To add items to the Portfolio:
a. Select a desired source node from the All Source Nodes list and a pink node from the All Sink Nodes list. Multiple contiguous items may be selected by holding down the Shift key. Non-contiguous items may be selected by holding down the Ctrl key.
The selected nodes are highlighted in their respective lists.
b. Click the Add to Portfolio icon.
Paths are added to the Source/Sink Nodes in Portfolio list for the selected portfolio.
4. To remove paths from the portfolio:
a. In the Source/Sink Nodes in Portfolio list, select the paths that you want to remove. Multiple contiguous paths may be selected by holding down the Shift key. Non-contiguous paths may be selected by holding down the Ctrl key.
The selected paths are highlighted in the Source/Sink Nodes in Portfolio list.
b. Click the Remove from Portfolio icon.

49
Paths are removed from the Source/Sink Nodes in the Portfolios list.
5. Repeat steps 3 - 4 as desired.
4.5.4 Create a Copy of a Portfolio
To create a copy of a portfolio:
1. In the Private Navigation tab, select the Portfolio Manager sub-tab.
The Portfolio Manager appears in the Display Pane.
2. In the Portfolios list, select the portfolio that you want to copy.
The portfolio name is highlighted.
3. Click the Copy button.
4. The following dialog with the name of the portfolio that you want to copy appears, for instance:
5. Enter the name of the new portfolio in the dialog.
6. Click the OK button.
The new portfolio is added to the Portfolios list. The new portfolio contains the same paths as the original portfolio.
7. Modify the content of the new portfolio as needed.
4.5.5 Delete a Portfolio
To delete a portfolio:
1. In the Private Navigation tab, select the Portfolio Manager sub-tab.
The Portfolio Manager display appears in the Display Pane.
2. In the Portfolios list, select the portfolio that you want to delete.
The portfolio name is highlighted.
3. Click the Delete button.

50
4. The following dialog with the name of the portfolio that you want to delete appears, for instance:
5. Click the OK button.
The portfolio is removed from the Portfolios list.
4.6 Bids by Path Display
The Private Bids by Path display contains two sections: Clearing Prices and Open Bids.
The Clearing Prices section displays the clearing prices for all the auctions within the selected effective period, for paths included in the selected portfolio. The auction filter and source/sink filter are not relevant for this section of the display.
The Open Bids section displays the Participant's bids for the selected auction, or all auctions within the selected effective period, and for the selected path. The display is used to view, create, modify, and delete bids.
The format of the Bids by Path display is shown below:
The Bids by Path Filter Pane contains the following filters:

51
Effective Period - The period for which the display of Clearing Prices and Open Bids is requested. The selection of an effective period limits the choices available in the auction filter
Auction - The auction name indicating the effective period of the auction. Only the auctions whose start date to end date periods include the selected effective period are available in this filter. This filter is relevant only for the Open Bids section. If "ALL" is selected then the Open Bids display shows bids for all the open auctions within the effective period.
Portfolio - The user's portfolio selection which filters both sections of the display by paths included in the selected portfolio.
Source/Sink - This filter is relevant only for the Open Bids section. The source/sink selection determines the path when new bids are created using the Open Bids display.
The Clearing Prices by Path section displays the FTR prices by auction and class for all the auctions within the selected effective period, regardless of the value of the auction filter.
The Clearing Prices by Path Display Pane contains the following fields:
Auction - The auction name
Class - On-Peak or Off-Peak
Price - The $/MW cleared on the path
The Open Bids by Path section displays the Participant's FTRs for the auctions within the selected effective period.
The Open Bids by Path display contains the following fields:
Auction - The auction name
Class - On-Peak or Off-Peak
Buy/Sell - The type of transaction
MW - The MW amount of the bid
Price - The $/MW price of the bid
To view the Open Bids by Path display:
1. In the Private Navigation tab, select the Open Bids by Path sub-tab.
The Open Bids by Path display appears in the Display Pane.
2. In the Filters Pane:
a. Select the desired period from the Effective Period filter.

52
b. Select the desired auction name from the Auction filter, or select "ALL" to view bids in all auctions in the selected effective period.
c. Select the desired portfolio from the Portfolio filter.
The display contains all the open bids for the selected auction and paths contained in the selected portfolio.
4.6.1 Create an FTR Bid
To create an FTR bid:
1. In the Private Navigation tab, select the Bids by Path sub-tab.
The Bids by Path display appears in the Display Pane.
2. In the Filters Pane:
a. Select the desired period from the Effective Period filter.
b. Select the open auction from the Auction filter. An open auction, i.e. an auction for which the bidding period is open,
is indicated by the * symbol displayed next to the auction name.
c. Select the desired portfolio from the Portfolio filter.
The Open Bids section displays all the bids for the selected auction and paths contained in the selected portfolio.
3. Select the New button.
A new row is added to the display with pink row background color:
The source and sink fields displayed in the title of this section are populated with the names selected in the source/sink filter.
The auction field displays the auction name selected in the auction filter.
4. Enter desired values into :
Class (On-Peak or Off-Peak)
Buy/Sell

53
MW
Price ($/MW)
5. Click the Update button located at the bottom of the display.
If the data is valid, the row background color changes to white, indicating that the data was successfully saved.
If there is any invalid data, the Messages Pane displays the relevant error message, and data is not saved.
Note: If the Messages Pane was collapsed during the Update, it will expand only if an error occurred.
4.6.2 Modify an FTR Bid
To modify an FTR bid:
1. In the Private Navigation tab, select the Bids by Path sub-tab.
The Bids by Path display appears in the Display Pane.
2. In the Filters Pane:
a. Select the desired period from the Effective Period filter.
b. Select the open auction from the Auction filter. An open auction, i.e. an auction for which the bidding period is open,
is indicated by the * symbol displayed next to the auction name.
c. Select the desired Portfolio from the Portfolio filter.
The Open Bids section of the display contains all the bids for the selected auction and paths contained in the selected portfolio.
3. Move the cursor to the field you wish to modify.
4. Enter the desired value.
The background color of the modified field changes to pink:
5. Repeat steps 3 and 4 for all the fields that you wish to modify in any row of the Open Bids section.
6. Click the Update button located at the bottom of the section.

54
7. Click OK in the confirmation dialog:
If the data is valid, the row background color changes to white, indicating that the data was successfully saved.
If there is any invalid data, the Messages Pane displays the relevant error message, and data is not saved.
4.6.3 Delete an FTR Bid
To delete an FTR bid:
1. In the Private Navigation tab, select the Bids by Path sub-tab.
The Bids by Path display appears in the Display Pane.
2. In the Filters Pane:
a. Select the desired period from the Effective Period filter.
b. Select the open auction from the Auction filter. An open auction, i.e. an auction for which the bidding period is open,
is indicated by the * symbol displayed next to the auction name.
c. Select the desired portfolio from the Portfolio filter.
The Open Bids by Path section of the display contains all the bids for the selected auction and paths contained in the selected Portfolio.
3. Select one or multiple bids that you wish to delete.
The row background color changes to blue:
4. Click the Delete button located at the bottom of the display.
5. Click OK in the confirmation dialog:
The Open Bids display refreshes. Deleted bids do not appear in the list.

55
Appendix A. File Upload Error Messages Error Message Reason
Error on line #<n>: Could not determine FTR Market for begin date [<start date>] and end date [<end date>]
You have attempted to enter bids for a market that is not open, or you have submitted incorrect start or end market dates.
Cannot delete a file having one or more FTRs assigned to a closed market
You have attempted to delete an uploaded file that contained bids for a closed market.
Error on line #<n>: Invalid data line: D <data line>
Incorrect file content. The number of elements in the data line is lower than expected.
Subscript outside of limit Incorrect file content. The number of elements in the data line is greater than expected.
Error on line #<n>: Invalid participant ID: <participant ID>
You entered an incorrect participant ID or left the participant field empty. The participant ID must match the participant selected in the eFTR header.
Error on line #<n>: Class type must be one of "OFFPEAK" or "ONPEAK" cannot accept [<class type>]
The class type in the upload file is not valid. Class type must be on of "OFFPEAK" or "ONPEAK".
Error on line #<n>: <end date> <participant> does not own this FTR.
You have attempted to sell MW that you do not own. Offer to sell FTRs cannot exceed the amount of MW awarded in the long term auction for the effective period, class, and path.
Error on line #<n>: <end date> Requested sale exceeds owned BY <MW> MW for <participant>
You have attempted to sell more MW than you own. Offer to sell FTRs cannot exceed the amount of MW awarded in the long term auction for the effective period, class, and path. The error message displays the amount of MW by which the submitted MW value exceeds the amount of owned MW.
Error on line #<n>: Trade Type must be one of "BUY" or "SELL"; cannot accept [<data>]
The trade type in the upload file is not valid. Trade type must be one of "BUY" or "SELL".
Error on line #<n>: Invalid source PNode ID <pnode>
The Source pnode ID in the upload file is not valid.
Error on line #<n>: Invalid sink Pnode ID <pnode>
The Sink pnode ID in the upload file is not valid.
Error on line #<n>: Source is not a valid bidding NODE
The Source pnode ID in the upload file is blank.
Error on line #<n>: Sink is not a valid bidding NODE
The Sink pnode ID in the upload file is blank.
PL/SQL: numeric or value error: character to number conversion error
MW and/or Price fields contain non-numeric values.
Error on line #<n>: Bid price cannot be greater than <max value>
Bidding price is greater than the maximum allowed value.
Error on line #<n>: Bid price cannot be less than <min value>
Bidding price is lower than the minimum allowed value.
Error on line #<n>: Bids must be specified to the nearest 0.1 MW and the quantity shall be greater than zero. Error value: <value>
MW value in the upload file is negative or zero.
Duplicate file name You submitted a duplicate file upload with the same name as a file that was already successfully uploaded or is awaiting processing.
PL/SQL: numeric or value error: character string buffer too small
Incorrect file format. The file extension is ".csv" but the file does not have the csv format.
File not uploaded. File must end with extension ".csv"
Incorrect file extension. File extension must be ".csv".

56