eid/eresidence card middleware - identity malta · this quick installation guide aims to help out...
TRANSCRIPT

Version 4.0
EID/ERESIDENCE CARD
MIDDLEWARE Quick Installation Guide
This quick installation guide aims to help out users to set up the eID/eResidence Card Middleware
software and prepare the computer to use and read the Card Digital Certificates. Written in a
concise step-by-step manner, users shall easily understand how to set up and make use of their
eID/eResidence card.

Page 1
Document Control Information
01. Document reference
Middleware Quick Installation Guide.docx
02. Document type
Guide
03. Security Classification
Public
04. Synopsis
This quick installation guide aims to help out users to set up the eID/eResidence Card
Middleware software and prepare the computer to use and read the Card Digital Certificates.
Written in a concise step-by-step manner, users shall easily understand how to set up and
make use of their eID/eResidence card.
05. Document control
Author Change controller Distribution controller
Government of Malta Government of Malta Government of Malta
06. Modification history
Version Date Comments
Version 1.0 05/02/2014 Version 1.0
Version 1.1 27/04/2016 Updated to reflect SSO screen.
Version 2.1 06/02/2017 Added new sections
Version 3.0 06/07/2017 Changed Figure 31: SSO Sign In Dialog to reflect live
environment screen, and removed the Classic client version
wherever mentioned.
Version 4.0 07/07/2017 Included Appendix B – Configuring Firefox
07. References
Classic Client 6.1 User Guide

Page 2
Table of Contents
Document Control Information .............................................................................................................. 1
Table of Contents .................................................................................................................................... 2
Table of Figures ....................................................................................................................................... 3
System Requirements ............................................................................................................................. 5
Assumptions ........................................................................................................................................ 5
Compatibility and Versions ................................................................................................................. 5
Installing the Middleware Software ........................................................................................................ 6
Installing Classic Client ........................................................................................................................ 6
Installing the Gemalto Card Reader Drivers ..................................................................................... 10
Using the Software ................................................................................................................................ 13
Opening the Classic Client Toolbox ................................................................................................... 13
Windows 10 .................................................................................................................................. 13
Windows 8 .................................................................................................................................... 14
Windows 7 .................................................................................................................................... 14
Using The Card ...................................................................................................................................... 15
First time setup ................................................................................................................................. 15
Changing The PIN Numbers .............................................................................................................. 16
Importing Card Certificates in the Certificate Store ............................................................................. 18
Export the Root Certificate ............................................................................................................... 18
Export the Intermediate Certificate .................................................................................................. 20
Export the Authentication Certificate ............................................................................................... 21
Export the Signing Certificate ........................................................................................................... 23
Authentication in myGov with the card ................................................................................................ 25
Appendix A – PIN Letter Sample ........................................................................................................... 28
Appendix B – Configuring Firefox ......................................................................................................... 29
Installing Gemalto Cryptographic Security Modules ............................................................................ 29
Manually install a security module for Firefox ............................................................................. 29

Page 3
Table of Figures
Figure 1: Installation Welcome Screen ................................................................................................... 6
Figure 2: License Agreement................................................................................................................... 7
Figure 3: Destination Folder Screen ........................................................................................................ 7
Figure 4: Installation Progress ................................................................................................................. 8
Figure 5: Installation Completion Screen ................................................................................................ 8
Figure 6: Reboot Computer Dialog ......................................................................................................... 9
Figure 7: Installation Welcome Screen ................................................................................................. 10
Figure 8: License Agreement................................................................................................................. 11
Figure 9: Installation Progress ............................................................................................................... 11
Figure 10: Installation Completion Screen ............................................................................................ 12
Figure 11 - Windows 10 Search Bar ...................................................................................................... 13
Figure 12 - Classic Client Toolbox .......................................................................................................... 13
Figure 13 - Windows 8 Start Menu ....................................................................................................... 14
Figure 14 - Windows 7 Start Menu ....................................................................................................... 14
Figure 15 - Initialise PIN dialog .............................................................................................................. 15
Figure 16 - Changing PIN, screen 1 ....................................................................................................... 16
Figure 17 - Change PIN, screen 2 .......................................................................................................... 17
Figure 18 - Success Message ................................................................................................................. 17
Figure 19: Card Contents – Certificates ................................................................................................ 18
Figure 20: Export to IE Store - Trusted Root ......................................................................................... 19
Figure 21: Successful export of Trusted Root Certificate ..................................................................... 19
Figure 22: Card Contents - Certificates ................................................................................................. 20
Figure 23: Export to IE Store – Intermediate ........................................................................................ 21
Figure 24: Successful Export of Intermediate Certificate ..................................................................... 21
Figure 25: Card Contents – Certificates ................................................................................................ 21
Figure 26: Export to IE store – Personal ................................................................................................ 22

Page 4
Figure 27: Successful Export of Authentication Certificate .................................................................. 22
Figure 28: Card Contents - Certificates ................................................................................................. 23
Figure 29: Export to IE store – Personal ................................................................................................ 23
Figure 30: Successful Export of Signing Certificate ............................................................................... 24
Figure 31: SSO Sign In Dialog ................................................................................................................ 25
Figure 32: Windows Security – Select a Certificate .............................................................................. 25
Figure 33 : Select Certificate ................................................................................................................. 26
Figure 34: Authentication PIN Code ..................................................................................................... 26
Figure 35: Certificate Information ........................................................................................................ 27
Figure 36 - Firefox Certificate Options .................................................................................................. 29
Figure 37 - Device Manager .................................................................................................................. 29
Figure 38 - Load PKCS#11 Device .......................................................................................................... 30
Figure 39 - Cryptographic Modules Available ....................................................................................... 30

Page 5
System Requirements
Assumptions
In order to install successfully the Classic Client, this guide assumes that:
1. For any computer on which Classic Client will be installed, the user installing the software has
administrator privileges on that computer;
2. The workstation meets the normal system requirements to run its version of Microsoft
Windows;
3. The Classic Client Toolbox is best viewed with a screen resolution of 90 dpi. Using a different
resolution does not affect performance, but the appearance of the toolbox may not be
perfect;
4. The computer has either an available USB Port or PCMCIA Port unless the computer has an
embedded smart card reader.
Compatibility and Versions
1. Classic Client comes in two versions, one for 64–bit operating systems and one for 32–bit
operating systems (OS). It is essential that the user installs the correct version;
2. It is highly recommended that your machine has a RAM at least equal to that normally
recommended for the OS;
3. The .NET Framework version 2.0 or later must be already installed on the computer.

Page 6
Installing the Middleware Software
Installing Classic Client
Follow the below steps in order to install the Classic Client:
1. Download the Classic Client from the location indicated by the Identity Management Office.
[Skip this step if you have been provided with a CD ROM];
2. If the Identity Management Office has provided an installation CD-ROM [Skip this step if you
have downloaded the installation file]:
a. Insert the CD-ROM into the CD-ROM reader of your computer;
b. If your computer is configured to auto run a CD, the installation wizard will start
automatically and skip to step 3. If the installation wizard does not start automatically
navigate to the location of the installation file on the CD and double click on the
“Classic_Client_##_User_setup.exe” file (where ## is either 32 or 64 depending on
the version being installed);
3. Note for the subsequent steps: If the computer is running on Microsoft Windows Vista / 7 / 8 /
8.1 / Server 2008 or Server 2008 R2 with User Access Control activated, a warning may show
stating “An unidentified program wants access to your computer”. Choose Allow whenever
you are shown such message;
4. When the Welcome dialog box appears, click “Next” to continue;
Figure 1: Installation Welcome Screen

Page 7
5. Read the Gemalto License Agreement. Accept the terms if you wish to continue by choosing “I
accept the terms in the license agreement...” button and then click “Next”;
Figure 2: License Agreement
6. In destination folder screen either click “Next” to accept the proposed default (recommended)
or use the Change function to choose another location and then click “Next”;
Figure 3: Destination Folder Screen

Page 8
7. On the next screen click “Install” to start the installation. A window displays a progress bar
during the installation;
Figure 4: Installation Progress
8. In the Installation completion screen, click “Finish” to complete the installation;
Figure 5: Installation Completion Screen

Page 9
9. The Classic Client InstallShield Wizard displays the Reboot Dialog. Click “Yes” to restart the
computer immediately or “No” to restart your computer later. After the restart, Classic Client
would be installed on the computer and would be available for use.
Figure 6: Reboot Computer Dialog

Page 10
Installing the Gemalto Card Reader Drivers
Follow the below steps in order to install the Gemalto card reader drivers:
1. Download the card reader driver from the location indicated by the Identity Management
Office. [Skip this step if you have been provided with a CD ROM];
2. If the Identity Management Office has provided an installation CD-ROM [Skip this step if you
have downloaded the installation file]:
a. Insert the CD-ROM into the CD-ROM reader of your computer;
b. If your computer is configured to auto run a CD, the installation wizard will start
automatically and skip to step 3. If the installation wizard does not start automatically
navigate to the location of the installation file on the CD and double click on the
“GemPcCCID_en-us_##” file (where ## is either 32 or 64 depending on the version
being installed);
3. Note for the subsequent steps: If the computer is running on Microsoft Windows Vista / 7 / 8 /
8.1 / 10 / Server 2008 or Server 2008 R2 with User Access Control activated, a warning may
show stating “An unidentified program wants access to your computer”. Choose “Allow”
whenever you are shown such message;
4. When the Welcome dialog box appears, click “Next” to continue;
Figure 7: Installation Welcome Screen

Page 11
5. Read the Gemalto License Agreement. Accept the terms if you wish to continue by choosing “I
accept the terms in the license agreement...” button and then click “Next”;
Figure 8: License Agreement
6. On the next screen click “Install” to start the installation. A window displays a progress bar
during the installation;
Figure 9: Installation Progress

Page 12
7. In the Installation completion screen, click “Finish” to complete the installation.
Figure 10: Installation Completion Screen

Page 13
Using the Software
Opening the Classic Client Toolbox
Windows 10
1. Click the windows start button or press
“ + s” on the keyboard.
2. Type Classic Client Toolbox. The search bar will
open and displays the results.
3. One of the results should be similar to the one
shown in Figure 11. Click on it to launch the classic
client toolbox.
4. The Classic Client Toolbox window will be shown.
Figure 12 - Classic Client Toolbox
Figure 11 - Windows 10 Search Bar

Page 14
Windows 8
1. Click the windows start button or press “ + s”
on the keyboard.
2. Type Classic Client Toolbox. The search bar will open and
displays the results.
3. One of the results should be similar to the one shown in
Figure 13. Click on it to launch the classic client toolbox.
Figure 13 - Windows 8 Start Menu
Windows 7
1. Click on the start button, and type classic client toolbox
2. The programs matching the results will be displayed as
shown in Figure 14.
3. Click on the program named Classic Client Toolbox.
Figure 14 - Windows 7 Start Menu

Page 15
Using the Card
First time setup
The Maltese eID / eRP card contains two certificates; one for authentication and one for digital
signature. Each of these certificates is protected with a PIN number.
For security reasons, upon first use, the PIN numbers must be changed from the initial ones. You
should have received a letter from Identity Management Office with the PIN numbers (see Appendix A
– PIN Letter Sample) when you got your card. If not, please contact the Identity Management Office.
The steps below detail the process on how to change the PIN numbers.
1. Open Classic Client Toolbox
as described in the previous
section “Opening the Classic
Client Toolbox”
2. Insert the Card in the card
reader, and make sure the
chip is facing the correct side
in the reader;
3. Upon inserting the card, a
window similar to Figure 15
will be shown.
4. In the “Current PIN” field, enter the pin number received by post (See Appendix A – PIN Letter
Sample), such that:
a. If the Window is titled “Change User PIN – Authentication slot”, you need to enter
PIN A (Authentication PIN)
b. If the window is titled “Change User PIN – Qualified Signature slot”, you need to enter
PIN B (Signing PIN)
5. In the “New PIN” field, enter you secret PIN. Make sure to follow guidelines on the right of the
screen. For your new PIN to be valid, all the red crosses ( ) must turn into green checkmarks.
( ).
6. In the “Confirm New PIN” field, enter the same PIN number entered in step 5.
7. Click on the “Change User PIN” button.
8. The process above should be repeated for the other certificate.
If this window is NOT shown, please proceed to next Section – Changing the PIN Numbers
Figure 15 - Initialise PIN dialog

Page 16
Changing the PIN Numbers
This section will describe the process on how to change the PIN numbers for the certificates on the
card.
1. Insert the card into the card reader
2. Open the Classic Client Toolbox as described in section Opening the Classic Client Toolbox
3. From the Classic Client Toolbox:
1. Click the Card Administrator menu button
2. Click on the PIN Management icon.
3. Select a slot from the card section. The first slot is the Authentication Slot, while the
second slot is the Qualified Signature Slot. This can be verified by the text next to the
padlock ( ) in box 4 of Figure 16.
4. Select the Change PIN option
5. Click Next
Figure 16 - Changing PIN, screen 1

Page 17
4. The next screen will be shown
Figure 17 - Change PIN, screen 2
1. In the “Current PIN” field, enter your current PIN number. If this is the first time
changing the pin, you need to use PIN A, or PIN B as specified in the letter received by
post (See Appendix A – PIN Letter Sample).
2. In the “New PIN” field, enter your new secret PIN. Make sure to follow guidelines on
the right of the screen. For your new PIN to be valid, all the red crosses ( ) must turn
into green checkmarks. ( ).
3. In the “Confirm New PIN” field, enter the same PIN number entered in step 2.
4. Click on the “Change PIN” button.
5. A message box will indicate if the PIN was changed or not.
Figure 18 - Success Message
6. The process above should be repeated for the other certificate.

Page 18
Importing Card Certificates in the Certificate Store
1. Insert the Card in the card reader;
2. Open the Gemalto Classic Client Toolbox;
Export the Root Certificate
1. Click on “Certificates” within the “Card Contents Section”, then click “ROOT”, and click on the
“Export” button;
Figure 19: Card Contents – Certificates
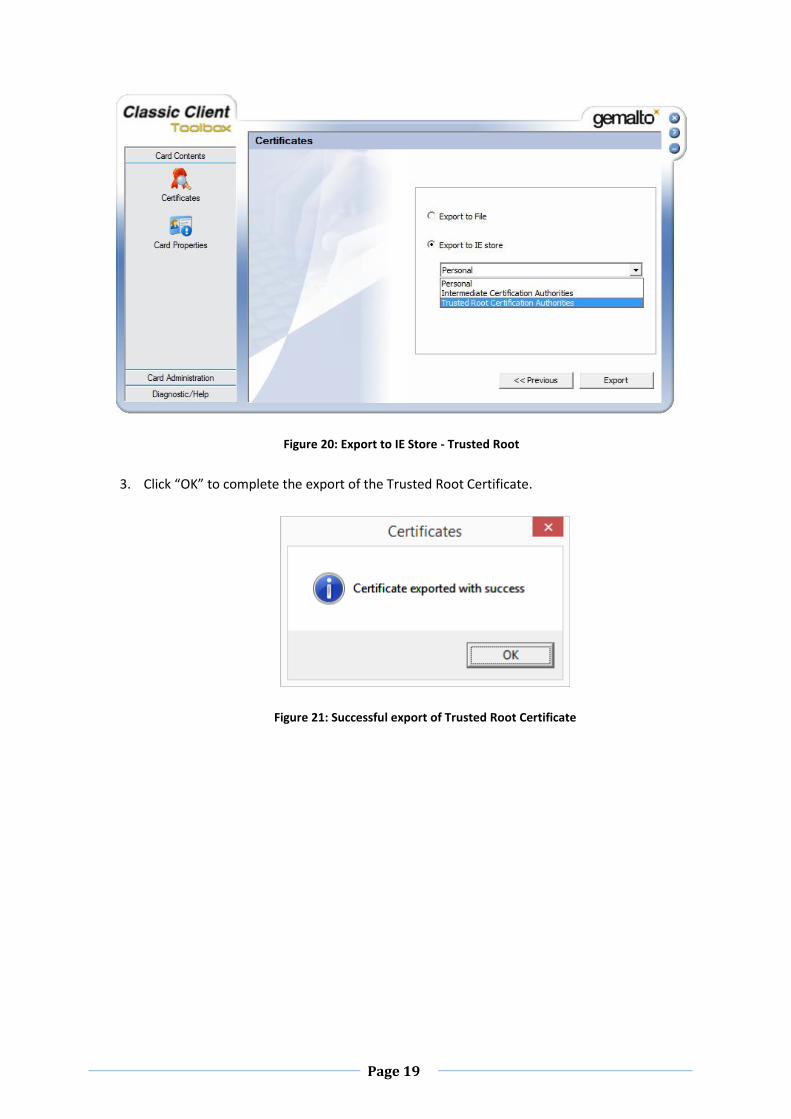
2. Select “Export to IE store”; select “Trusted Root Certification Authorities” within the
dropdown list and click on the “Export” button;
Page 19
Figure 20: Export to IE Store - Trusted Root
3. Click “OK” to complete the export of the Trusted Root Certificate.
Figure 21: Successful export of Trusted Root Certificate

Page 20
Export the Intermediate Certificate
1. Click on “Certificates” within the “Card Contents” Section, then click “LVL1”, and click on the
“Export” button;
Figure 22: Card Contents - Certificates
2. Select “Export to IE store”; select “Intermediate Certification Authorities” within the
dropdown list and click on the “Export” button;

Page 21
Figure 23: Export to IE Store – Intermediate
3. Click “OK” to complete the export of the Intermediate Certificate.
Figure 24: Successful Export of Intermediate Certificate
Export the Authentication Certificate
1. Click on “Certificates” within the “Card Contents” Section, then click “Auth ##”, where ## is
your name and surname; and click on the “Export” button;
Figure 25: Card Contents – Certificates
2. Select “Export to IE store”; select “Personal” within the dropdown list and click on the
“Export” button;

Page 22
Figure 26: Export to IE store – Personal
4. Click “OK” to complete the export of the Authentication Certificate.
Figure 27: Successful Export of Authentication Certificate

Page 23
Export the Signing Certificate
1. Click on “Certificates” within the “Card Contents” section, then click “Sign ##”, where ## is
your name and surname; and click on the “Export” button;
Figure 28: Card Contents - Certificates
2. Select “Export to IE store”; select “Personal” within the dropdown list and click on the
“Export” button;
Figure 29: Export to IE store – Personal

Page 24
5. Click “OK” to complete the export of the Signing Certificate.
Figure 30: Successful Export of Signing Certificate

Page 25
Authentication in myGov with the card
Note: Firefox users should install the Gemalto Cryptographic Security Modules as per Appendix B –
Configuring Firefox
1. Following a complete installation, unless you have
an embedded Smart Card reader, connect the
external Smart Card reader to the computer;
2. Insert the eID Card into the Smart Card Reader;
3. Open your browser and navigate to
https://mygov.mt to open the MyGov Portal;
4. Once the portal is loaded, on the left-hand side
click the “Sign in” button, to be redirected to the
Single Sign-On Screen.
5. On the Single Sign-On screen select the “Select my
e-ID Card Authentication Certificate”
6. A popup, as shown on the below, should appear
to load the Digital Certificates;
Figure 32: Windows Security – Select a Certificate
Figure 31: SSO Sign In Dialog

Page 26
7. Select the Authentication Certificate. Choose the certificate and click “OK”;
Figure 33 : Select Certificate
8. Enter the Authentication PIN Code and click the “OK” button;
Figure 34: Authentication PIN Code

Page 27
9. The certificate information will be loaded underneath the authentication section. Input the “e-
ID Number” and “Password” and click “Sign In” to log into the portal. After logging in the user
shall have a Smart Card icon in the middle of the header indicating that the log through Card
was successful.
Figure 35: Certificate Information

Page 28
Appendix A – PIN Letter Sample

Page 29
Appendix B – Configuring Firefox
Installing Gemalto Cryptographic Security Modules Security Modules are software add-ons that provide a variety of cryptographic services, such as secure
browsing, and support the use of smart cards/tokens.
Classic Client must be declared as a security module, so that applications can communicate with it. For
some applications, such as Firefox for example, the security module cannot be installed automatically
and must be done manually.
Manually install a security module for Firefox
1. Open Firefox and from the Menu ( ) choose Options. The Options tab opens.
2. Click the Advanced menu option, then the Certificates tab to display the settings as shown in
Figure 36 below.
3. Click Security Devices to display the Device Manager window. This displays the modules
currently available as shown in Figure 37 - Device Manager
Figure 37 - Device Manager
Figure 36 - Firefox Certificate Options

Page 30
4. Click the Load button to the right in the
dialog. This displays the Load PKCS#11 Device
window, as shown in Figure 38.
5. Enter a Module Name.
6. In Module filename, use the Browse button
to select the gclib.dll file as follows:
• For 32-bit versions of Windows, this is in \install dir\BIN\, where install dir is the directory
where you installed Classic Client. By default, install dir is c:\Program
Files\Gemalto\Classic Client\
• For 64-bit versions of Windows, the location of the gclib.dll depends on whether you are
using the 32-bit version of Firefox or the 64-bit version.
For a 32-bit version of Firefox, the gclib.dll is in \install dir\BIN\. By default, install dir is
c:\Program Files (X86)\Gemalto\Classic Client\
For a 64-bit version of Firefox, the gclib.dll is in c:\Program Files\Gemalto\Classic
Client\BIN\
7. Click OK.
The Device Manager indicates the presence of the new module as shown in Figure 39:
Figure 39 - Cryptographic Modules Available
Note: The example shown in Figure 39 shows the name of the reader (Gemplus USB Smart Card
Reader 0 – App 1 & Gemplus USB Smart Card Reader 0 – App 2) because no card is inserted in the
reader. If a card is inserted at the time you are loading the module, then the name of the card appears
instead of the reader (Authentication Slot & Qualified Signature Slot).
Figure 38 - Load PKCS#11 Device