eigner plm 5.0 administration manual - oracle...administrating your plm environments 8 • oracle 8i...
TRANSCRIPT
Administration Manual
Eigner PLM 5.0 Administration Manual

2002 Eigner U.S. Headquarters: European Headquarters EIGNER U.S. Inc. EIGNER Germany GmbH 200 Fifth Avenue Ruschgraben 133 Waltham, MA 02451 USA D-76139 Karlsruhe Tel.: 781.472.6300 Tel.: +49 / 721 / 62 91 0 Fax: 781.472.6400 Fax: +49 / 721 / 62 91 88
www.eigner.com
3
Important Notice!
This document contains information protected by copyright.
All rights reserved, including the translation. No part of this documentation may be reproduced in any way (print, photocopy, microfilm or any other form) or processed, duplicated or distributed by use of electronic system without written permission of the company. Changes reserved. The information contained in this manual does not constitute any obligation on the part of the seller. The software described in this manual is delivered under licensing contract and is solely allowed to be used and copied in accordance with the conditions therein.
EIGNER is not liable for errors in this documentation. A liability for direct or consequential damages which happen during delivery or use of this documentation is excluded as far as legally possible.

4
Contents
1 Introduction 5
1.1 About Eigner PLM environments 5
1.2 About the Eigner Web Presentation Services 5
2 Administrating Your PLM Environments 6
2.1 Creating Eigner PLM environments 8
2.1.1 Required environment parameters 9
2.1.2 Examples of database creation settings 11
2.1.3 Optional PLM Business Services attributes 13
2.2 Configuring Eigner PLM environments 15
2.2.1 Viewing and editing an environment definition 16
2.2.2 Changing the default language 17
2.2.3 Configuring PLM Business Services 18
2.3 Deleting Eigner PLM environments 20
2.4 Checking environment configuration files 21
3 Administrating the Web Presentation Services 22
3.1 Creating Web Presentation Services environments 23
3.2 Configuring Web Presentation Services environments 26
3.3 Deleting Web Presentation Services environments 28
Introduction
5
1 Introduction
This manual describes how to create, configure, and manage Eigner PLM environments and Web Presentation Services.
1.1 About Eigner PLM environments
An Eigner PLM environment defines database parameters and connection information that Eigner PLM uses to work with an Oracle DBMS or Microsoft SQL Server.
Environment definitions include information such as database type, database user, and data tablespace name—as well as optional WEB and Workflow services connection information, such as JDBC driver and HMTL JMX port. Each environment is referenced by an application name, which is used for the Eigner PLM login. A single Eigner PLM installation usually includes separate environments for production, testing, education, and development, so it is not necessary to have separate installations for these purposes.
1.2 About the Eigner Web Presentation Services
The Eigner Web Presentation Services is a component of the PLM system. It runs on a PLM server, manages PLM users' web sessions, and creates the DHTML that users interact with in their web browsers.
Both the PLM environment and the Web Presentation Services are administrated through the Eigner PLM Administration Server. The Administration Server can be started through an Internet browser (Eigner recommends Internet Explorer 5.5 or Netscape 6.*) .

Administrating Your PLM Environments
6
2 Administrating Your PLM Environments
You can use the Eigner PLM Administration Server to administrate your Eigner PLM environments.
To start the Administration Server:
Point your web browser to the following URL:
http://localhost:8017
In the URL, localhost is the name of the machine on which the Eigner PLM server was installed.
If an Eigner PLM Home Page similar to the one shown in the following figure does not appear immediately, check the settings of your browser (For example, in Internet Explorer, click Tools >Internet Options > Connections > LAN settings) and make sure that the option "Bypass proxy server for local addresses" is checked.
Click Administrate Eigner PLM .
Administrating Your PLM Environments
7
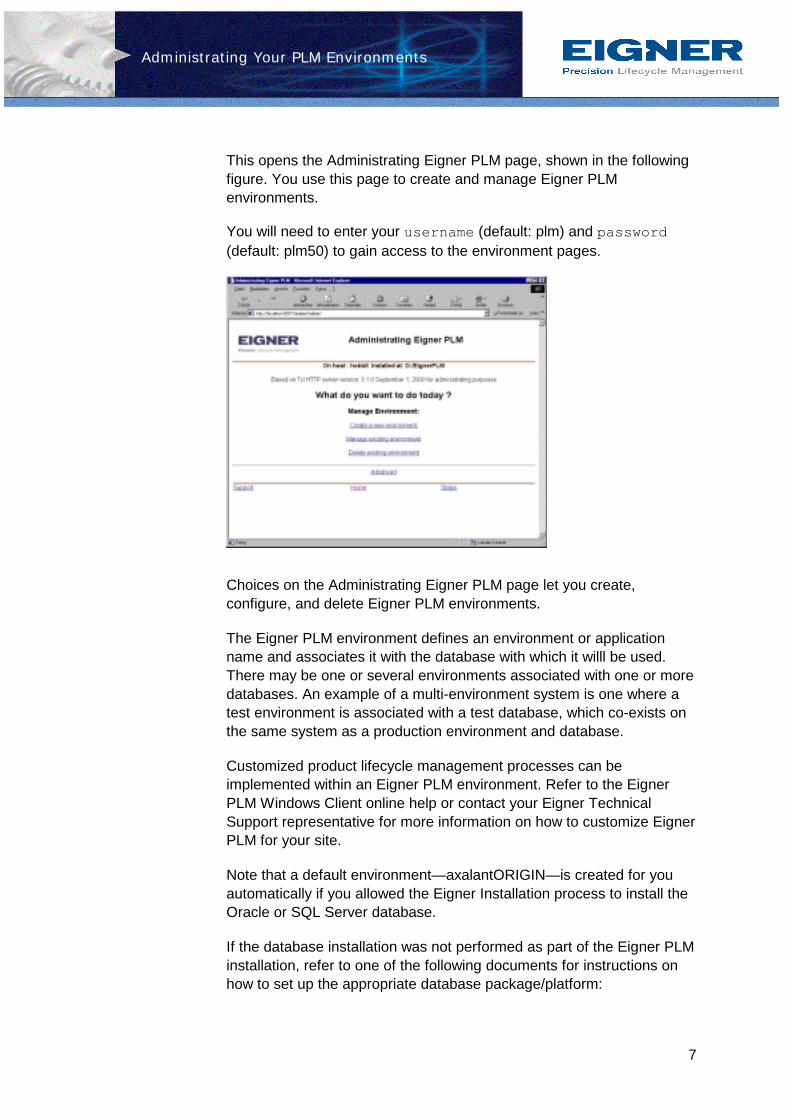
This opens the Administrating Eigner PLM page, shown in the following figure. You use this page to create and manage Eigner PLM environments.
You will need to enter your username (default: plm) and password (default: plm50) to gain access to the environment pages.
Choices on the Administrating Eigner PLM page let you create, configure, and delete Eigner PLM environments.
The Eigner PLM environment defines an environment or application name and associates it with the database with which it willl be used. There may be one or several environments associated with one or more databases. An example of a multi-environment system is one where a test environment is associated with a test database, which co-exists on the same system as a production environment and database.
Customized product lifecycle management processes can be implemented within an Eigner PLM environment. Refer to the Eigner PLM Windows Client online help or contact your Eigner Technical Support representative for more information on how to customize Eigner PLM for your site.
Note that a default environment—axalantORIGIN—is created for you automatically if you allowed the Eigner Installation process to install the Oracle or SQL Server database.
If the database installation was not performed as part of the Eigner PLM installation, refer to one of the following documents for instructions on how to set up the appropriate database package/platform:
Administrating Your PLM Environments
8
• Oracle 8i (8.1.7) for Windows
• Oracle 8i (8.1.7) for UNIX
These documents can be found on the Eigner PLM or EP-Data CD. To obtain EP-Data CD, contact your Eigner Technical Support representative.
After following the instructions for installing the database and importing the PLM database dump, you must either create a new environment or update an existing environment with the database parameters to associate Eigner PLM with the database.
Once an Eigner PLM environment is set up, the environment can be accessed from the Eigner PLM Windows Client and UNIX Client. Refer to the Eigner PLM 5.0 Client Installation Manual for your platform.
2.1 Creating Eigner PLM environments
After opening the Administrating Eigner PLM page in your web browser, do the following to create an environment.
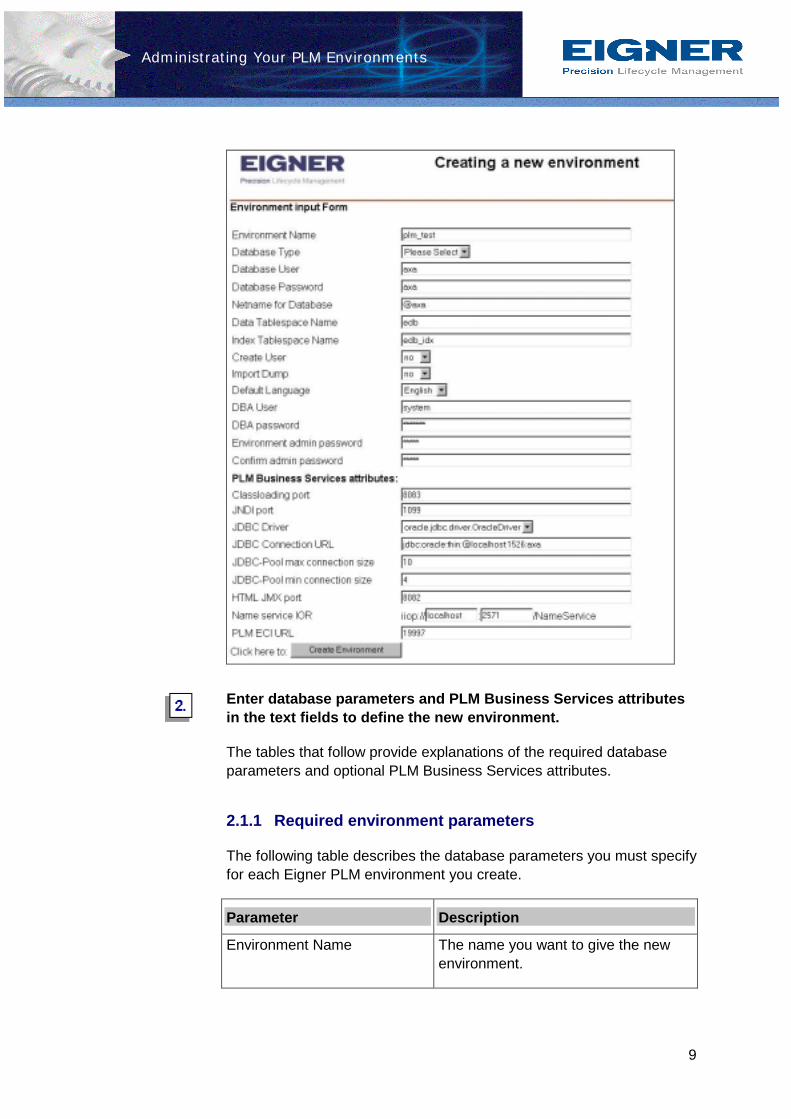
Click the link Create a new environment.
This opens the Creating a new environment page, shown in the following figure. You use this page to create an environment and edit the database parameters so they conform to your system.
Administrating Your PLM Environments
9
Enter database parameters and PLM Business Services attributes in the text fields to define the new environment.
The tables that follow provide explanations of the required database parameters and optional PLM Business Services attributes.
2.1.1 Required environment parameters
The following table describes the database parameters you must specify for each Eigner PLM environment you create.
Parameter Description
Environment Name The name you want to give the new environment.
Administrating Your PLM Environments
10
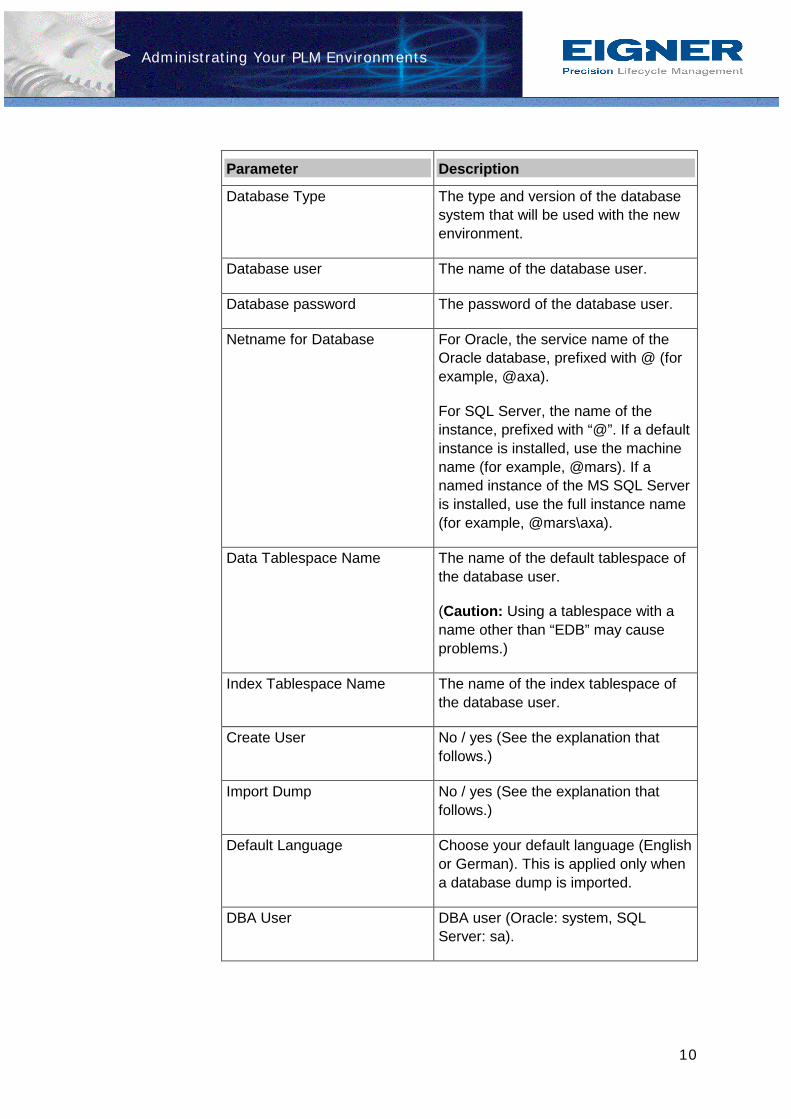
Parameter Description
Database Type The type and version of the database system that will be used with the new environment.
Database user The name of the database user.
Database password The password of the database user.
Netname for Database For Oracle, the service name of the Oracle database, prefixed with @ (for example, @axa).
For SQL Server, the name of the instance, prefixed with “@”. If a default instance is installed, use the machine name (for example, @mars). If a named instance of the MS SQL Server is installed, use the full instance name (for example, @mars\axa).
Data Tablespace Name The name of the default tablespace of the database user.
(Caution: Using a tablespace with a name other than “EDB” may cause problems.)
Index Tablespace Name The name of the index tablespace of the database user.
Create User No / yes (See the explanation that follows.)
Import Dump No / yes (See the explanation that follows.)
Default Language Choose your default language (English or German). This is applied only when a database dump is imported.
DBA User DBA user (Oracle: system, SQL Server: sa).
Administrating Your PLM Environments
11
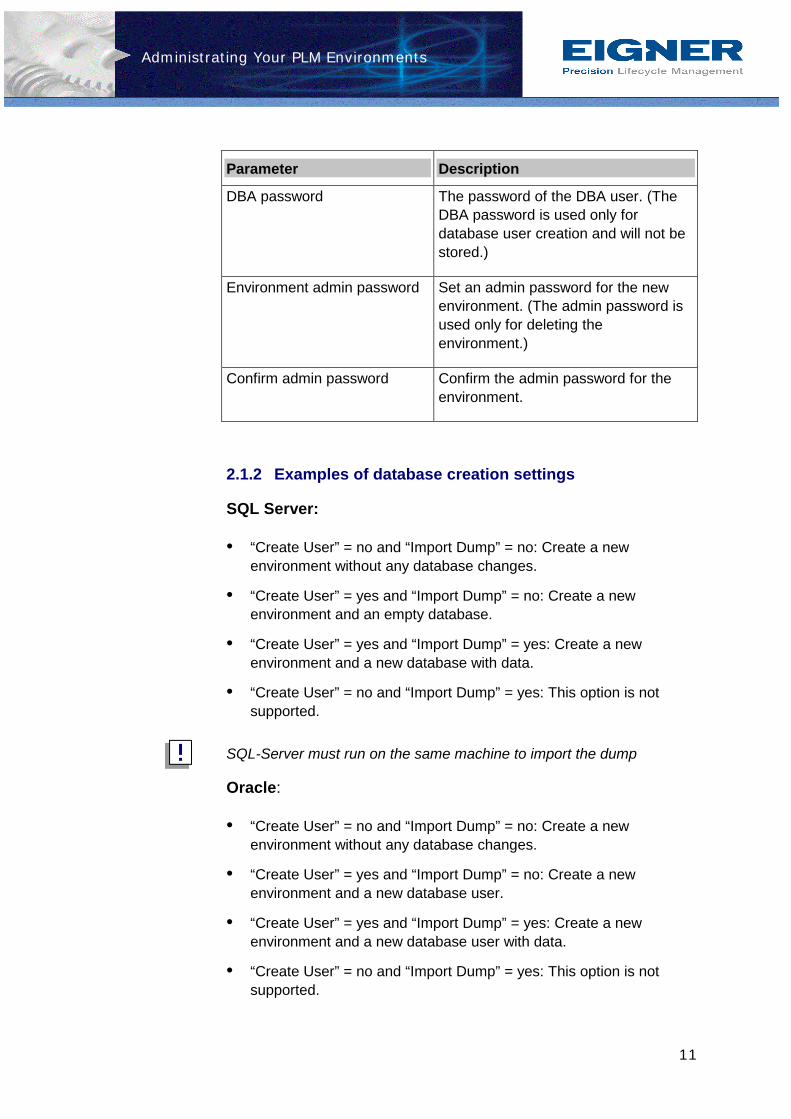
Parameter Description
DBA password The password of the DBA user. (The DBA password is used only for database user creation and will not be stored.)
Environment admin password Set an admin password for the new environment. (The admin password is used only for deleting the environment.)
Confirm admin password Confirm the admin password for the environment.
2.1.2 Examples of database creation settings
SQL Server:
• “Create User” = no and “Import Dump” = no: Create a new environment without any database changes.
• “Create User” = yes and “Import Dump” = no: Create a new environment and an empty database.
• “Create User” = yes and “Import Dump” = yes: Create a new environment and a new database with data.
• “Create User” = no and “Import Dump” = yes: This option is not supported.
SQL-Server must run on the same machine to import the dump
Oracle:
• “Create User” = no and “Import Dump” = no: Create a new environment without any database changes.
• “Create User” = yes and “Import Dump” = no: Create a new environment and a new database user.
• “Create User” = yes and “Import Dump” = yes: Create a new environment and a new database user with data.
• “Create User” = no and “Import Dump” = yes: This option is not supported.
Administrating Your PLM Environments
12
Administrating Your PLM Environments
13
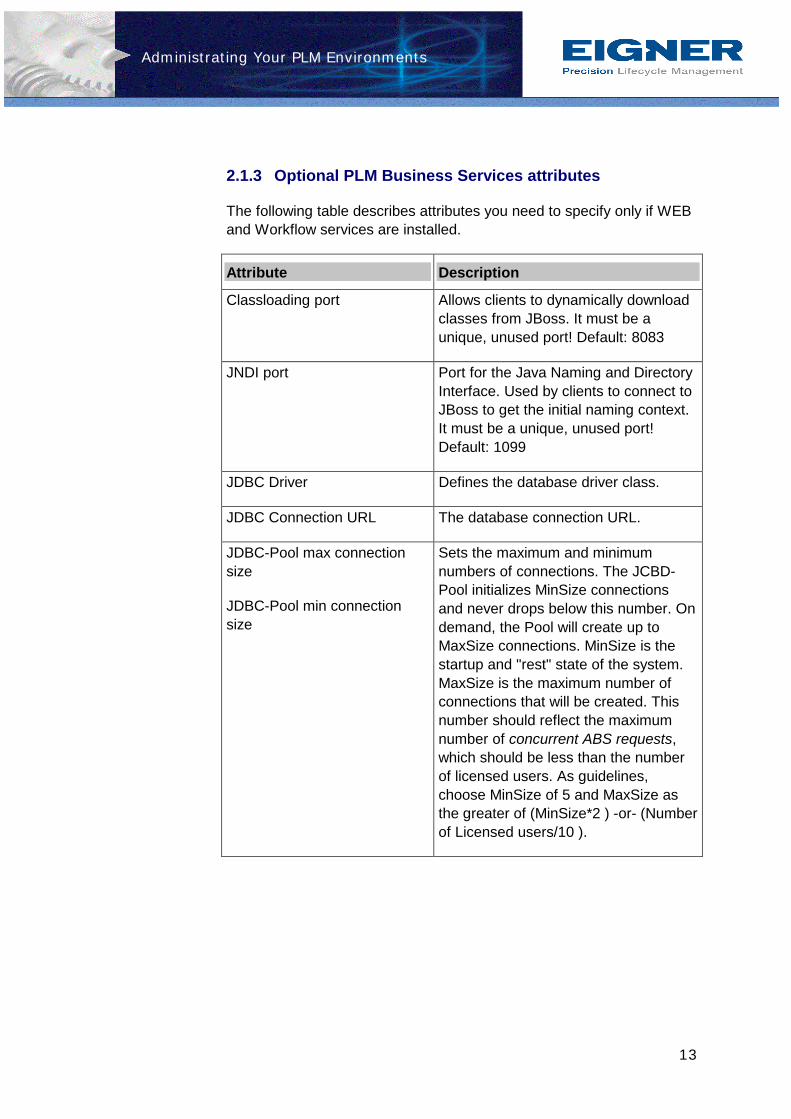
2.1.3 Optional PLM Business Services attributes
The following table describes attributes you need to specify only if WEB and Workflow services are installed.
Attribute Description
Classloading port Allows clients to dynamically download classes from JBoss. It must be a unique, unused port! Default: 8083
JNDI port Port for the Java Naming and Directory Interface. Used by clients to connect to JBoss to get the initial naming context. It must be a unique, unused port! Default: 1099
JDBC Driver Defines the database driver class.
JDBC Connection URL The database connection URL.
JDBC-Pool max connection size
JDBC-Pool min connection size
Sets the maximum and minimum numbers of connections. The JCBD-Pool initializes MinSize connections and never drops below this number. On demand, the Pool will create up to MaxSize connections. MinSize is the startup and "rest" state of the system. MaxSize is the maximum number of connections that will be created. This number should reflect the maximum number of concurrent ABS requests, which should be less than the number of licensed users. As guidelines, choose MinSize of 5 and MaxSize as the greater of (MinSize*2 ) -or- (Number of Licensed users/10 ).
Administrating Your PLM Environments
14
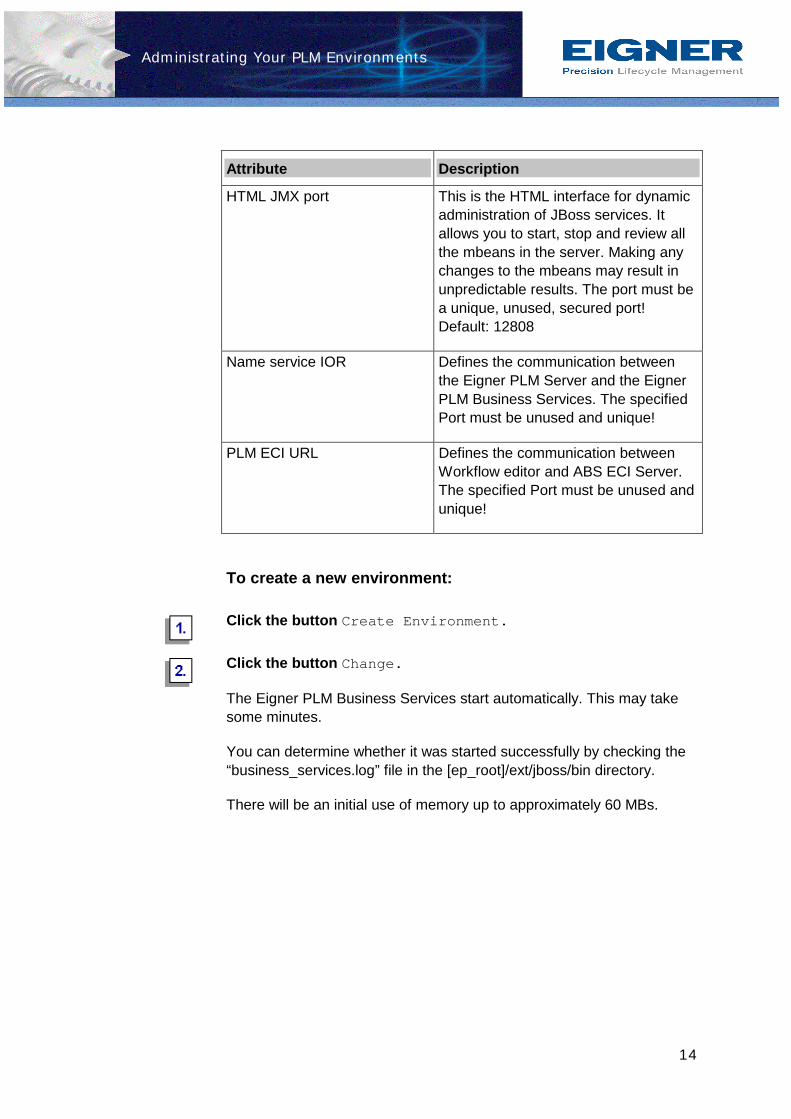
Attribute Description
HTML JMX port This is the HTML interface for dynamic administration of JBoss services. It allows you to start, stop and review all the mbeans in the server. Making any changes to the mbeans may result in unpredictable results. The port must be a unique, unused, secured port! Default: 12808
Name service IOR Defines the communication between the Eigner PLM Server and the Eigner PLM Business Services. The specified Port must be unused and unique!
PLM ECI URL Defines the communication between Workflow editor and ABS ECI Server. The specified Port must be unused and unique!
To create a new environment:
Click the button Create Environment.
Click the button Change.
The Eigner PLM Business Services start automatically. This may take some minutes.
You can determine whether it was started successfully by checking the “business_services.log” file in the [ep_root]/ext/jboss/bin directory.
There will be an initial use of memory up to approximately 60 MBs.
Administrating Your PLM Environments
15
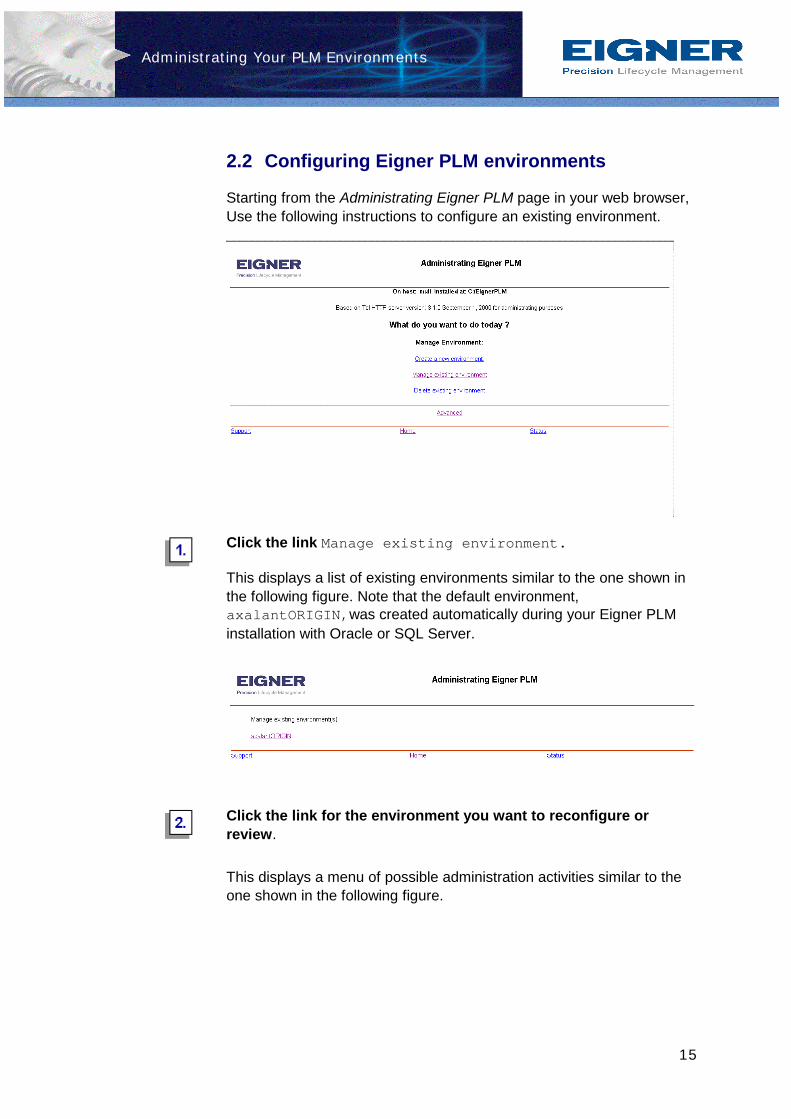
2.2 Configuring Eigner PLM environments
Starting from the Administrating Eigner PLM page in your web browser, Use the following instructions to configure an existing environment.
Click the link Manage existing environment.
This displays a list of existing environments similar to the one shown in the following figure. Note that the default environment, axalantORIGIN,was created automatically during your Eigner PLM installation with Oracle or SQL Server.
Click the link for the environment you want to reconfigure or review.
This displays a menu of possible administration activities similar to the one shown in the following figure.

Administrating Your PLM Environments
16
2.2.1 Viewing and editing an environment definition
Use the following instructions to view and edit the configuration file that defines your environment.
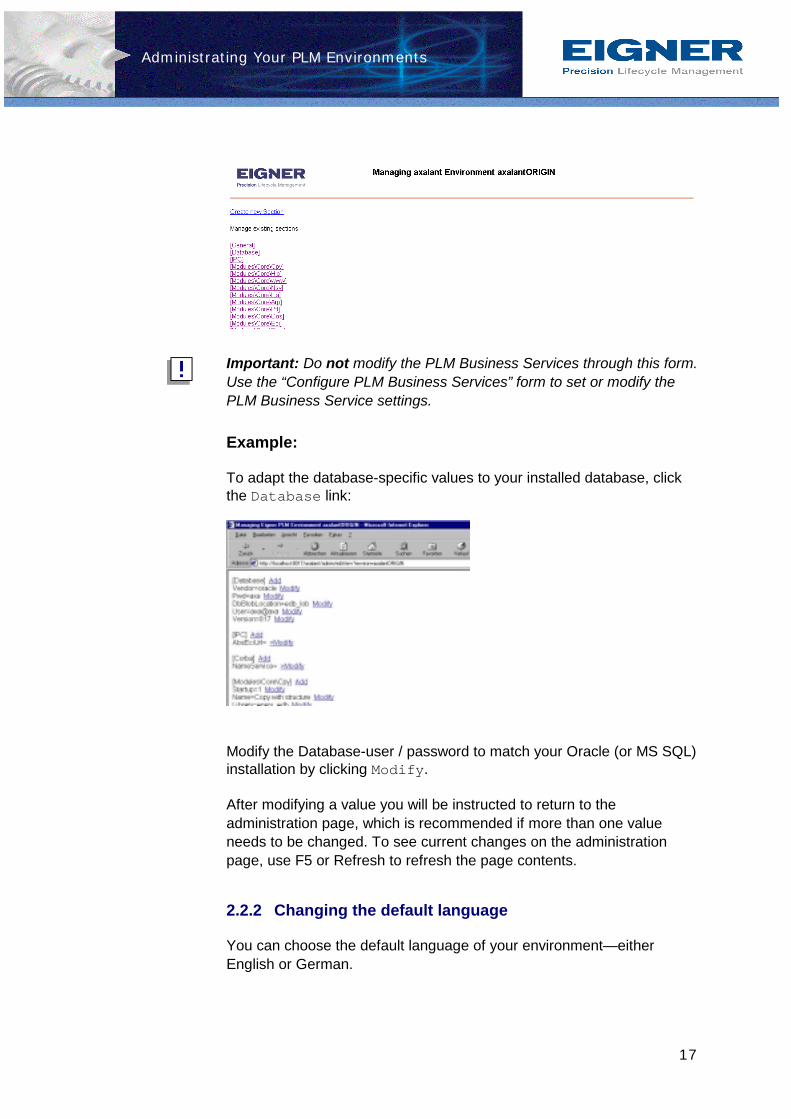
Click the link View environment definition file.
This displays a list of the current attributes from your environment configuration file.
Click the link Edit environment definition file.
This displays a list of all entries (database connection, modules, special variables, and so forth) pertaining to your environment.
Administrating Your PLM Environments
17
Important: Do not modify the PLM Business Services through this form. Use the “Configure PLM Business Services” form to set or modify the PLM Business Service settings.
Example:
To adapt the database-specific values to your installed database, click the Database link:
Modify the Database-user / password to match your Oracle (or MS SQL) installation by clicking Modify.
After modifying a value you will be instructed to return to the administration page, which is recommended if more than one value needs to be changed. To see current changes on the administration page, use F5 or Refresh to refresh the page contents.
2.2.2 Changing the default language
You can choose the default language of your environment—either English or German.
Administrating Your PLM Environments
18
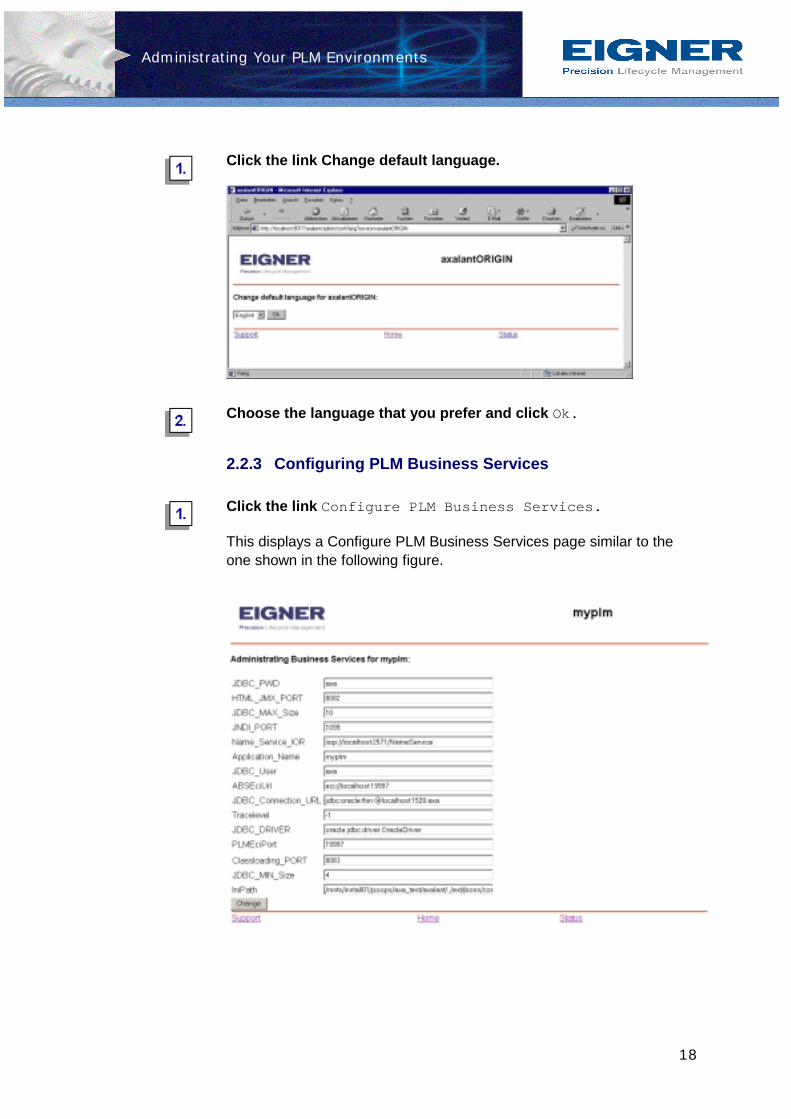
Click the link Change default language.
Choose the language that you prefer and click Ok.
2.2.3 Configuring PLM Business Services
Click the link Configure PLM Business Services.
This displays a Configure PLM Business Services page similar to the one shown in the following figure.
Administrating Your PLM Environments
19
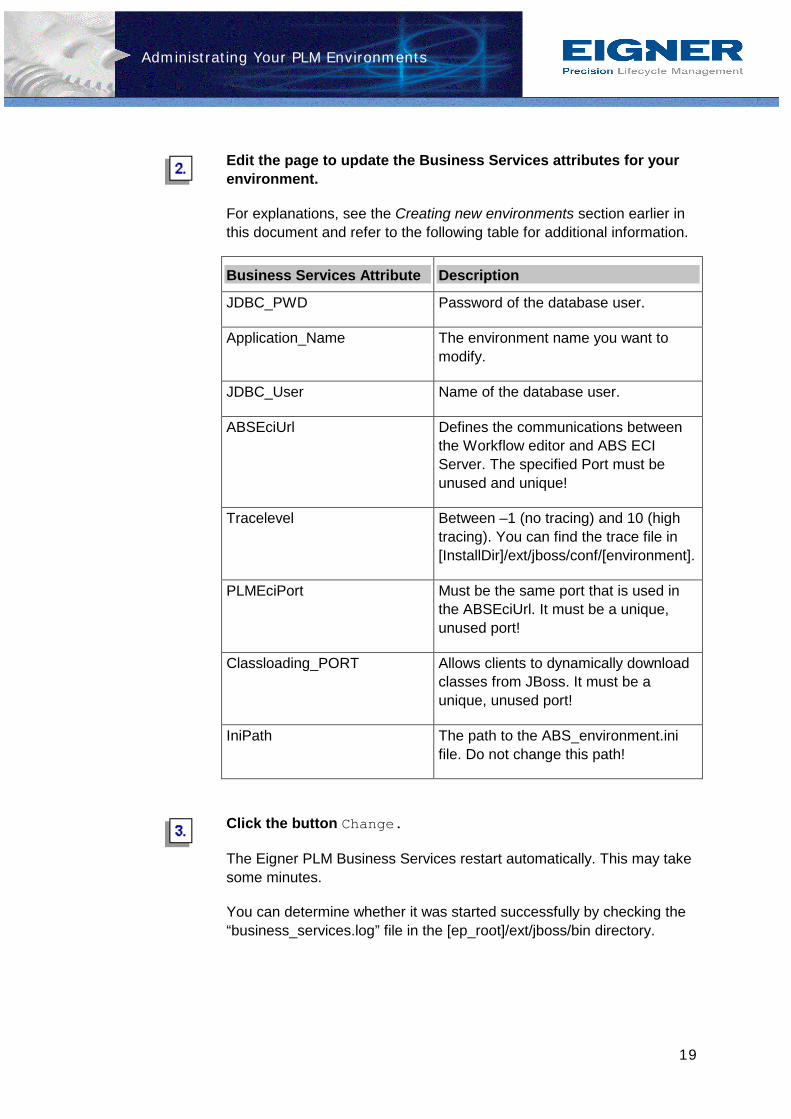
Edit the page to update the Business Services attributes for your environment.
For explanations, see the Creating new environments section earlier in this document and refer to the following table for additional information.
Business Services Attribute Description
JDBC_PWD Password of the database user.
Application_Name The environment name you want to modify.
JDBC_User Name of the database user.
ABSEciUrl Defines the communications between the Workflow editor and ABS ECI Server. The specified Port must be unused and unique!
Tracelevel Between –1 (no tracing) and 10 (high tracing). You can find the trace file in [InstallDir]/ext/jboss/conf/[environment].
PLMEciPort Must be the same port that is used in the ABSEciUrl. It must be a unique, unused port!
Classloading_PORT Allows clients to dynamically download classes from JBoss. It must be a unique, unused port!
IniPath The path to the ABS_environment.ini file. Do not change this path!
Click the button Change.
The Eigner PLM Business Services restart automatically. This may take some minutes.
You can determine whether it was started successfully by checking the “business_services.log” file in the [ep_root]/ext/jboss/bin directory.
Administrating Your PLM Environments
20
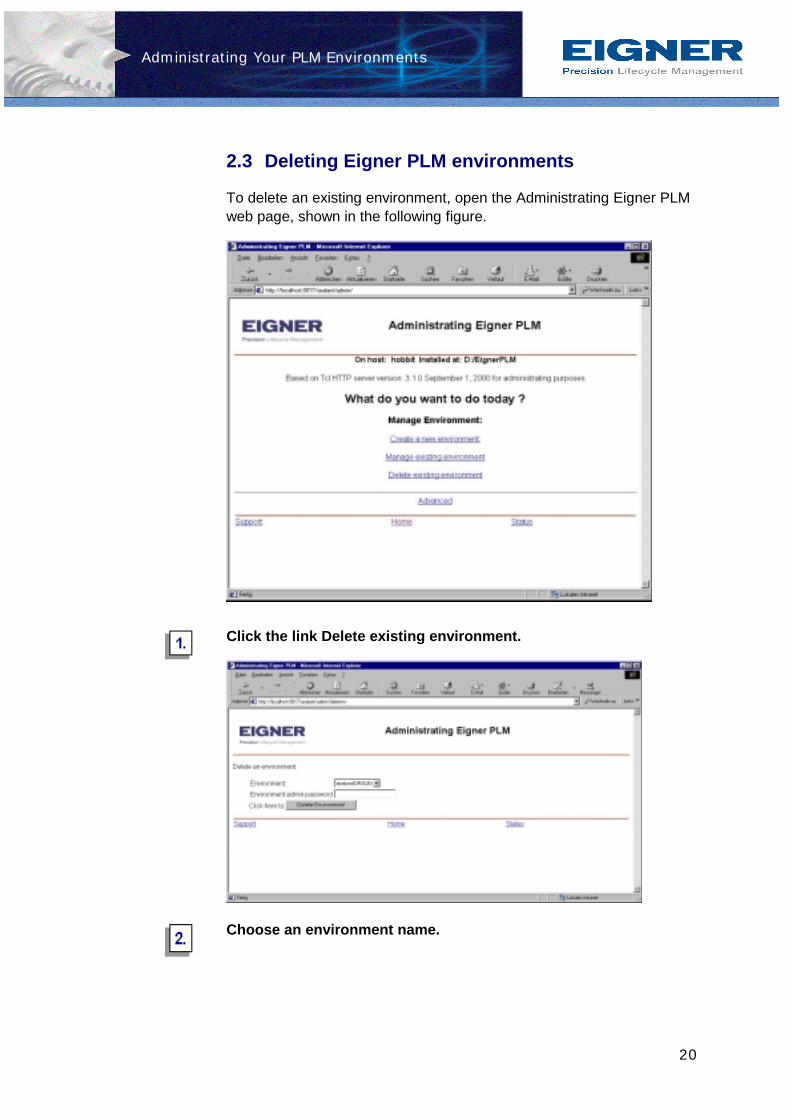
2.3 Deleting Eigner PLM environments
To delete an existing environment, open the Administrating Eigner PLM web page, shown in the following figure.
Click the link Delete existing environment.
Choose an environment name.
Administrating Your PLM Environments
21
Enter the administration password for this environment.
Click the button Delete Environment.
2.4 Checking environment configuration files
All settings / modifications performed by the administration tool are written to the corresponding environment file in<InstallDir>/init/<environment.edb> (for example,EignerPLM5/init/axalantORIGIN.edb)
After a successful installation the setup tool replaces variables such as <InstallDir> with your installation path. In some cases it may happen that variables such as <InstallDir> cannot be replaced successfully.
You’ll need to change these lines manually by using an editor and replacing <InstallDir> with the complete installation path where Eigner PLM was installed (for example, /app/plm50).

Administrating the Web Presentation Services
22
3 Administrating the Web Presentation Services
You can use the Eigner PLM Administration Server to administrate the Eigner PLM Web Presentation Services.
To start the Administration Server:
Point your web browser to the following URL:
http://localhost:8017
In the URL, localhost is the name of the machine on which the Eigner PLM server was installed.
If an Eigner PLM Home Page similar to the one shown in the following figure does not appear immediately, check the settings of your browser (For example, in Internet Explorer, click Tools >Internet Options > Connections > LAN settings) and make sure that the option "Bypass proxy server for local addresses" is checked.
Click the link Administrate Web Presentation Service.
Administrating the Web Presentation Services
23
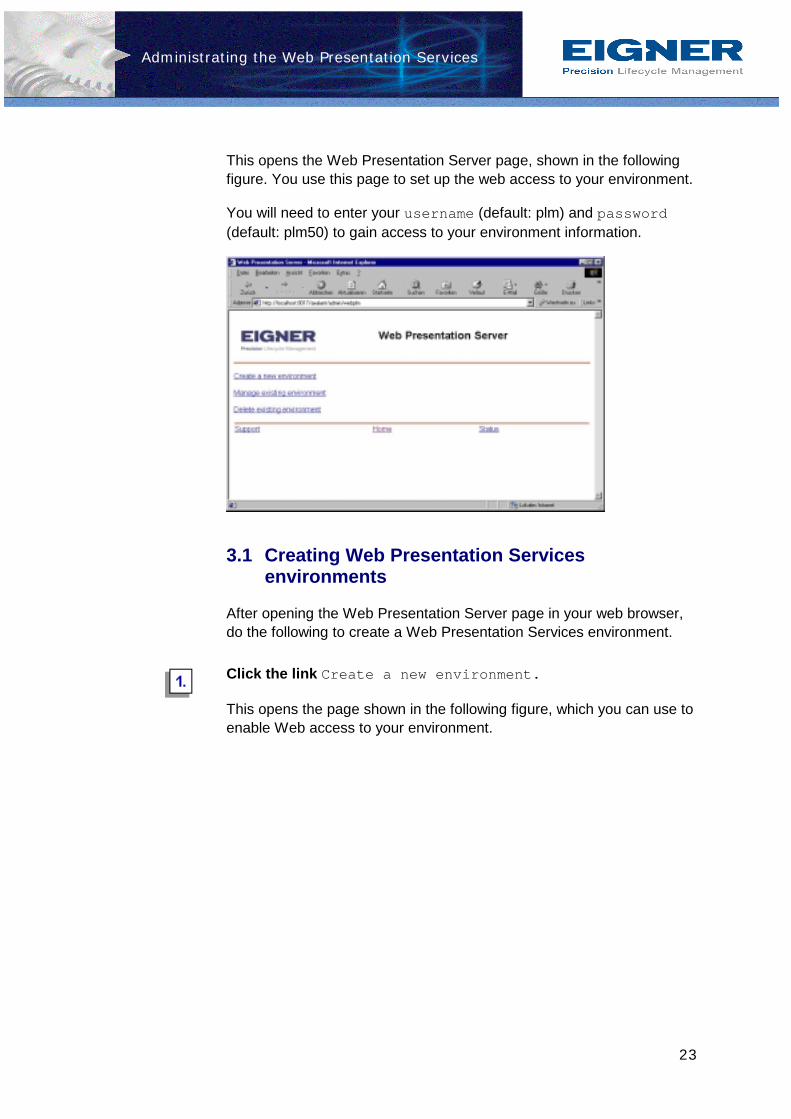
This opens the Web Presentation Server page, shown in the following figure. You use this page to set up the web access to your environment.
You will need to enter your username (default: plm) and password (default: plm50) to gain access to your environment information.
3.1 Creating Web Presentation Services environments
After opening the Web Presentation Server page in your web browser, do the following to create a Web Presentation Services environment.
Click the link Create a new environment.
This opens the page shown in the following figure, which you can use to enable Web access to your environment.
Administrating the Web Presentation Services
24
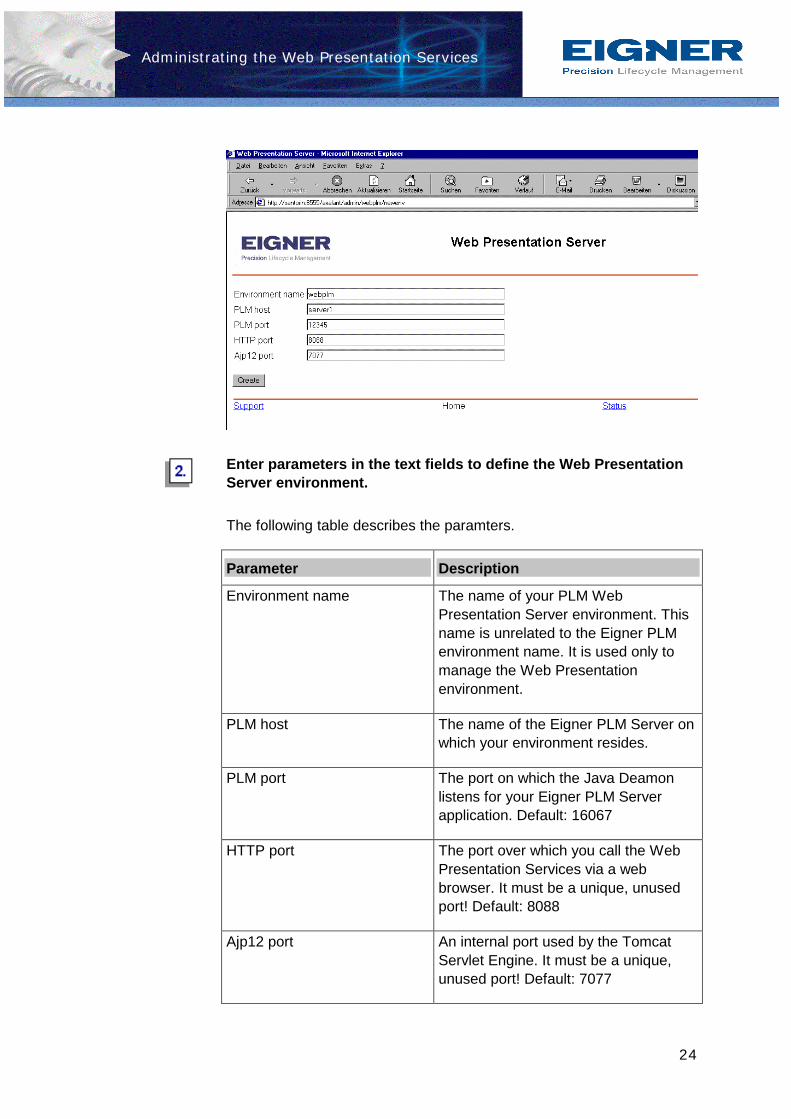
Enter parameters in the text fields to define the Web Presentation Server environment.
The following table describes the paramters.
Parameter Description
Environment name The name of your PLM Web Presentation Server environment. This name is unrelated to the Eigner PLM environment name. It is used only to manage the Web Presentation environment.
PLM host The name of the Eigner PLM Server on which your environment resides.
PLM port The port on which the Java Deamon listens for your Eigner PLM Server application. Default: 16067
HTTP port The port over which you call the Web Presentation Services via a web browser. It must be a unique, unused port! Default: 8088
Ajp12 port An internal port used by the Tomcat Servlet Engine. It must be a unique, unused port! Default: 7077
Administrating the Web Presentation Services
25
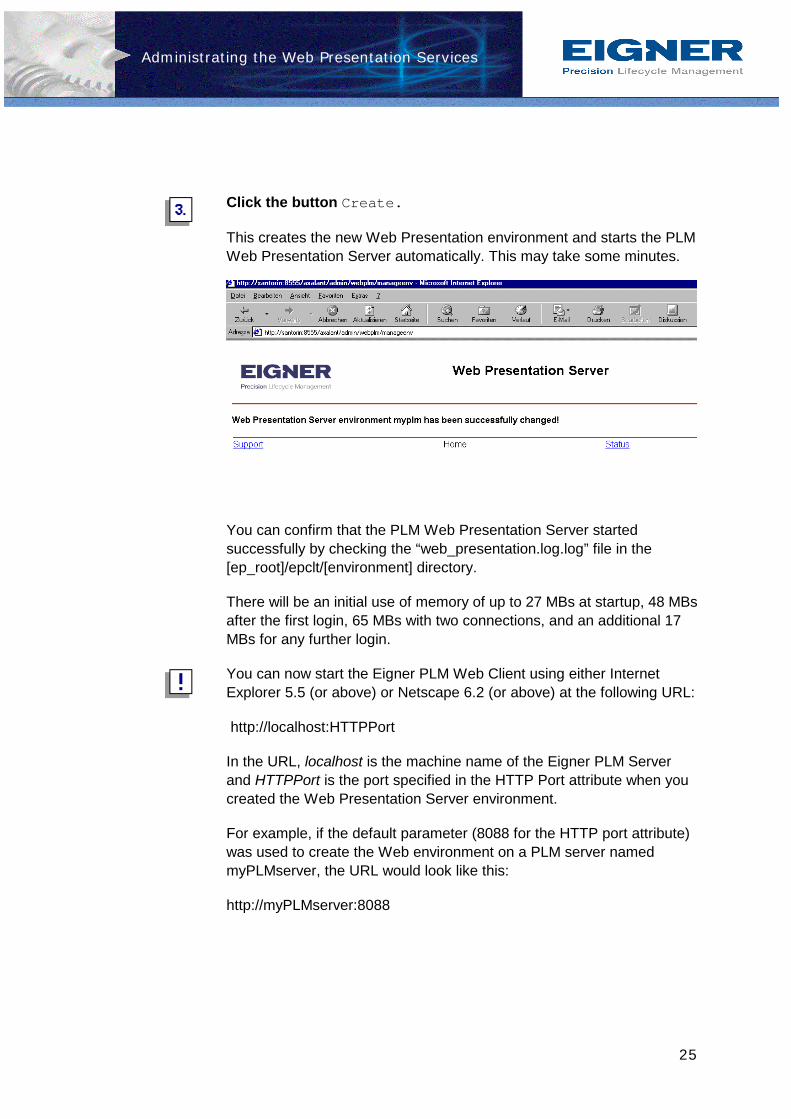
Click the button Create.
This creates the new Web Presentation environment and starts the PLM Web Presentation Server automatically. This may take some minutes.
You can confirm that the PLM Web Presentation Server started successfully by checking the “web_presentation.log.log” file in the [ep_root]/epclt/[environment] directory.
There will be an initial use of memory of up to 27 MBs at startup, 48 MBs after the first login, 65 MBs with two connections, and an additional 17 MBs for any further login.
You can now start the Eigner PLM Web Client using either Internet Explorer 5.5 (or above) or Netscape 6.2 (or above) at the following URL:
http://localhost:HTTPPort
In the URL, localhost is the machine name of the Eigner PLM Server and HTTPPort is the port specified in the HTTP Port attribute when you created the Web Presentation Server environment.
For example, if the default parameter (8088 for the HTTP port attribute) was used to create the Web environment on a PLM server named myPLMserver, the URL would look like this:
http://myPLMserver:8088
Administrating the Web Presentation Services
26
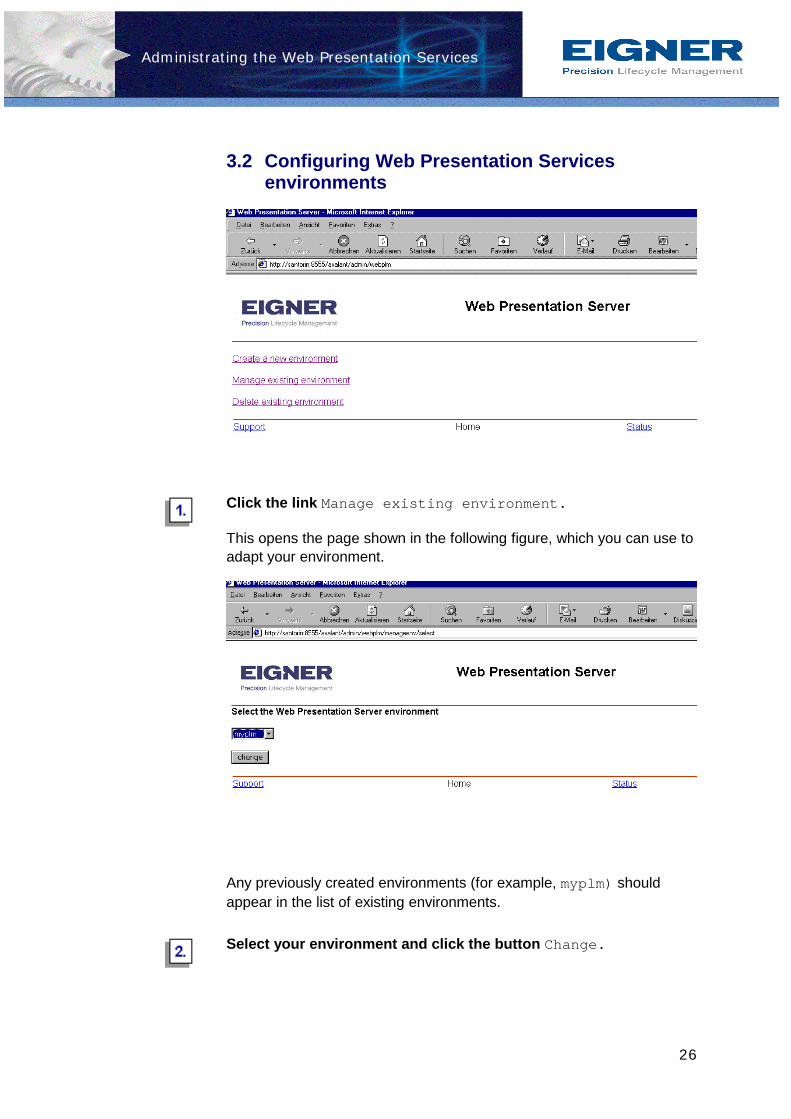
3.2 Configuring Web Presentation Services environments
Click the link Manage existing environment.
This opens the page shown in the following figure, which you can use to adapt your environment.
Any previously created environments (for example, myplm) should appear in the list of existing environments.
Select your environment and click the button Change.
Administrating the Web Presentation Services
27
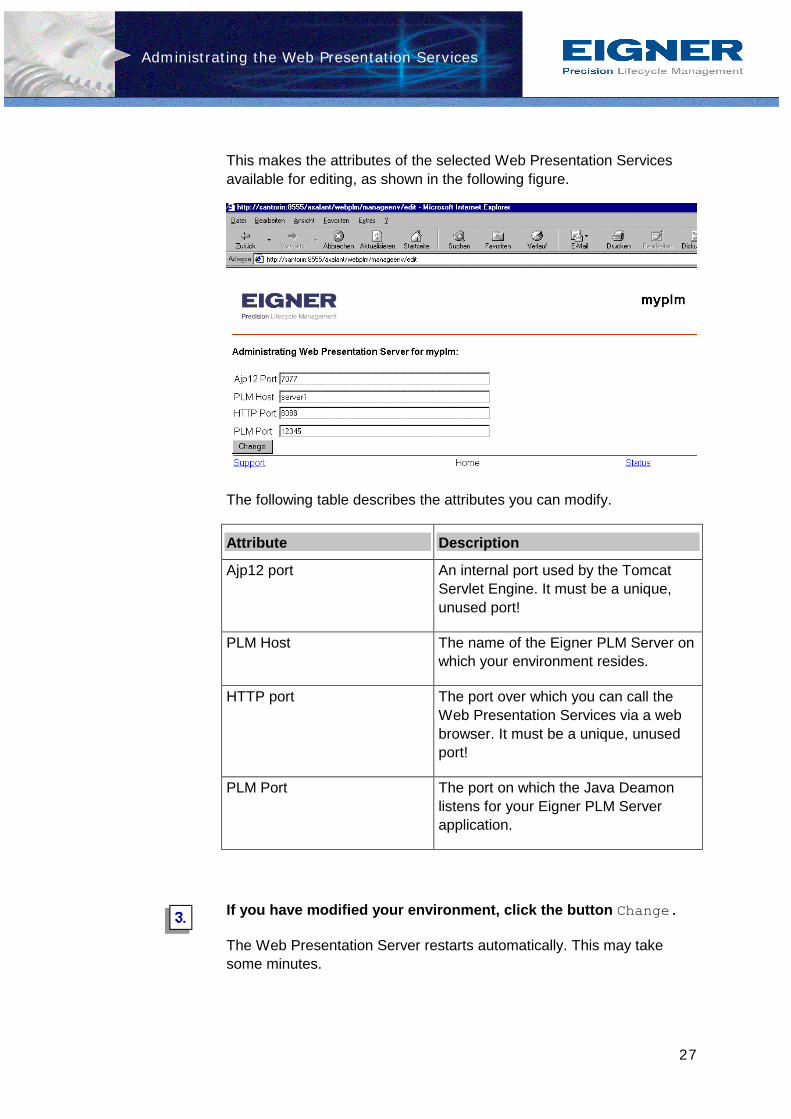
This makes the attributes of the selected Web Presentation Services available for editing, as shown in the following figure.
The following table describes the attributes you can modify.
Attribute Description
Ajp12 port An internal port used by the Tomcat Servlet Engine. It must be a unique, unused port!
PLM Host The name of the Eigner PLM Server on which your environment resides.
HTTP port The port over which you can call the Web Presentation Services via a web browser. It must be a unique, unused port!
PLM Port The port on which the Java Deamon listens for your Eigner PLM Server application.
If you have modified your environment, click the button Change.
The Web Presentation Server restarts automatically. This may take some minutes.
Administrating the Web Presentation Services
28
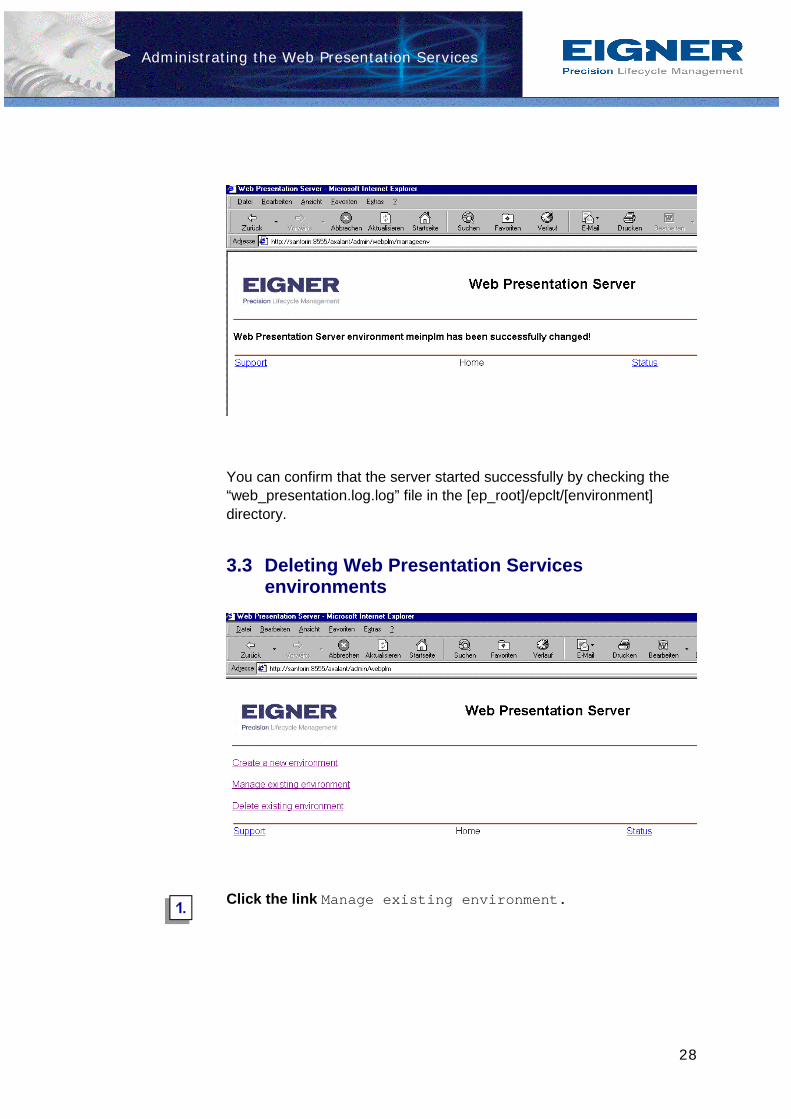
You can confirm that the server started successfully by checking the “web_presentation.log.log” file in the [ep_root]/epclt/[environment] directory.
3.3 Deleting Web Presentation Services environments
Click the link Manage existing environment.
Administrating the Web Presentation Services
29
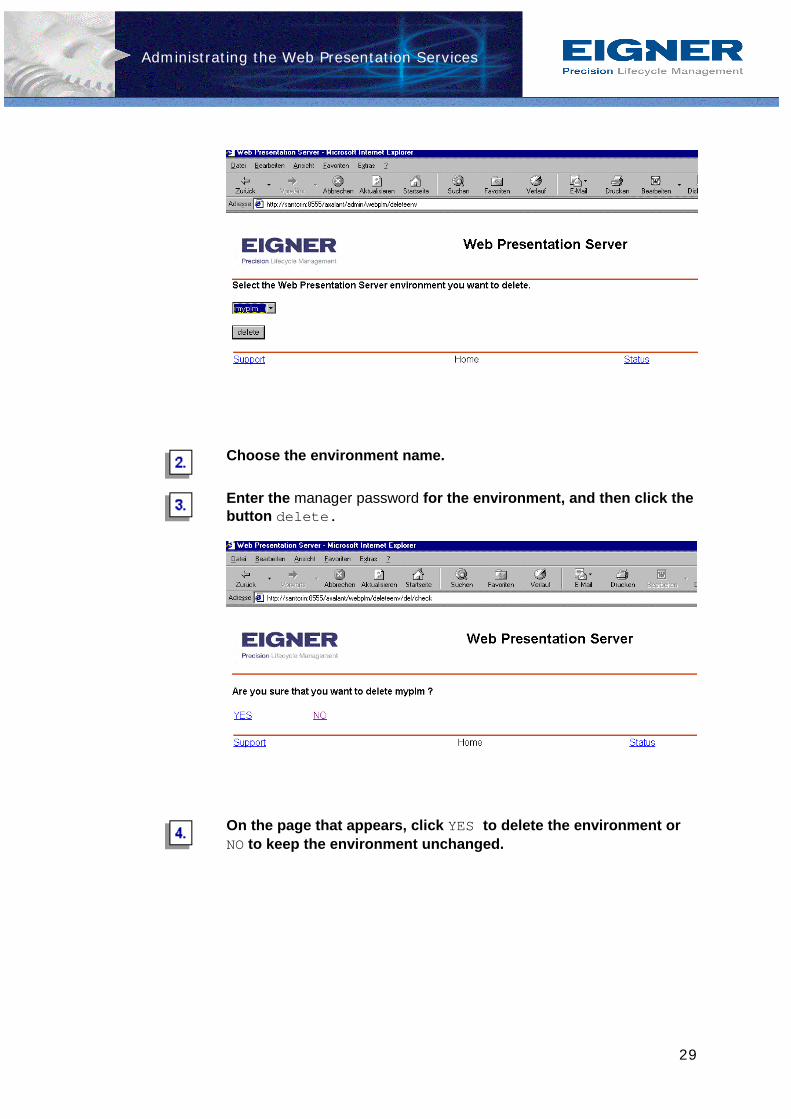
Choose the environment name.
Enter the manager password for the environment, and then click the button delete.
On the page that appears, click YES to delete the environment or NO to keep the environment unchanged.
Setting up the Online help
30
4 Setting up the Online help
For Eigner PLM 5.0 three types of online documentation are available:
• Online manuals in Microsoft Help format
• Context-sensitive help in plain HTML
• Web Client Help
Due to restrictions caused by the Microsoft Help format, the online manuals are only available on Windows PCs using Internet Explorer 4.0 or higher.
For the Unix Client the context-sensitive help is available in plain HTML using any browser available. The context-sensitive help for Unix is installed on the server.
For the Web Client an online manual is available in plain HTML.
4.1 PC Client
The online documentation is installed together with the software on your client. All defaults and parameters are set in the standard.
4.2 Unix Client
For setting up the context-sensitive help available for the UNIX Client, follow the following steps:
Unzip the help file dmo.zip in the directory:
English: axalant/htd/htdocs/axalant/doc_ep/eng/dmo.zip
German: axalant/htd/htdocs/axalant/doc_ep/ger/dmo.zip
The directory "dmo" is created in the directory "doc_ep".
For unzipping the file, you can use the file unzip.exe in the directory ext/bin/<machine>/unzip.exe
If you use the Eigner PLM Admin Service to import your dump, the settings for calling the context-senstive help are set correctly now.
Setting up the Online help
31
If you do not use the Service, carry out the following steps in addition:
Log in as manager user (edbcusto, demoep_m)
Select the function Manager > Configure system > Other Pa-rameters
In the configuration mask search for Rubric “EDB-HLLP” and select folder “Configuration parameter”
Set the parameter for the start page EDB-HLP-INDEX to
dmo/nav_all.htm
Set the documentation root EDB-HLP-ROOT to e.g.
http://<hostname>:<Port>/axalant//htd/htdocs/axalant/doc_ep
If English language is active the URL path of the starting page is
http://mars:8017/axalant/ /doc_ep/eng/ dmo/nav_all.htm
EDB-HLP-ROOT EDB-HLP-INDEX
On Unix Systems Eigner PLM starts Netscape as a default. If the browser is not defined, follow the steps below:
1. Select Manager/System configuration/External
Applications To specify different browsers on different operating systems and client nodes . Here the default browsers for each available Unix System (for MS Windows the default system HTML browser is used) are defined.
Setting up the Online help
32
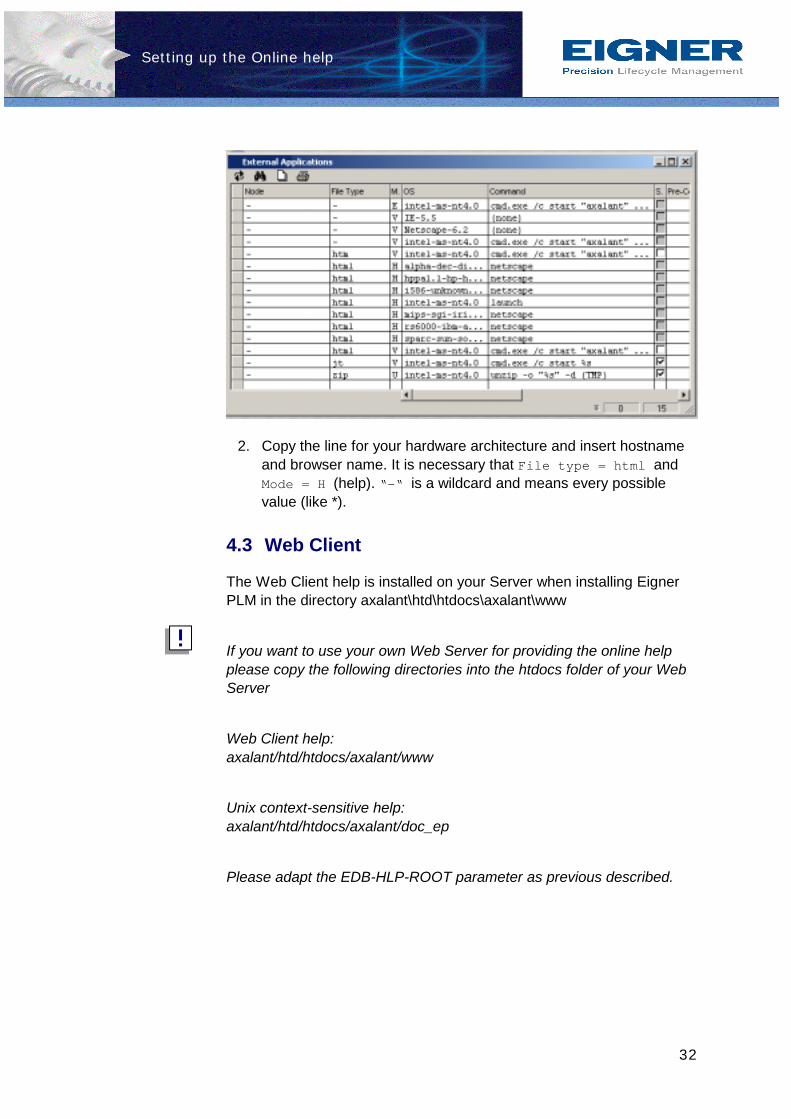
2. Copy the line for your hardware architecture and insert hostname and browser name. It is necessary that File type = html and Mode = H (help). “-“ is a wildcard and means every possible value (like *).
4.3 Web Client
The Web Client help is installed on your Server when installing Eigner PLM in the directory axalant\htd\htdocs\axalant\www
If you want to use your own Web Server for providing the online help please copy the following directories into the htdocs folder of your Web Server
Web Client help: axalant/htd/htdocs/axalant/www
Unix context-sensitive help: axalant/htd/htdocs/axalant/doc_ep
Please adapt the EDB-HLP-ROOT parameter as previous described.