ejbca cloud azure launch guide - download.primekey.com · enter the ejbca superadmin password in...
TRANSCRIPT

PRINT DATE: 2019-05-22
EJBCA Cloud Azure Launch Guide
Copyright ©2019 PrimeKey Solutions
Published by PrimeKey Solutions AB
Solna Access, Sundbybergsvägen 1
SE-171 73 Solna, Sweden
To report errors, please send a note to [email protected].
Notice of Rights
All rights reserved. No part of this guide may be reproduced or transmitted in any form by any means, electronic, mechanical, photocopying, recording, or otherwise, without the prior written permission of the publisher. For more information on getting permission for reprints and excerpts, contact [email protected].
Notice of Liability
The information in this guide is distributed on an “As Is” basis without warranty. While every precaution has been taken in the preparation of the guide, neither the authors nor PrimeKey shall have any liability to any person or entity with respect to any loss or damage caused or alleged to be caused directly or indirectly by the instructions contained in the guide or by computer software and hardware products described in it.
Trademarks
Many of the designations used by manufacturers and sellers to distinguish their products are claimed as trademarks. Where those designations appear in this guide, and PrimeKey was aware of a trademark claim, the designations appear as requested by the owner of the trademark. All other product names and services identified throughout this guide are used in editorial fashion only and for the benefit of such companies with no intention of infringement of the trademark. No such use, or the use of any trade name, is intended to convey endorsement or other affiliation with this guide.

Table of ContentsIntroduction ........................................................................................................ 4
Documentation..................................................................................................................4
Launch EJBCA Enterprise Cloud on Azure ....................................................... 5Locate EJBCA ECE in the Azure Marketplace.................................................................5
Launch the instance..........................................................................................................7
Retrieving SuperAdmin Credentials ................................................................ 14Step 1: Obtain the public IP address of your deployed EJBCA Enterprise Cloud instance in Microsoft Azure .......................................................................................... 14
Step 2: Download p12 file from EJBCA Public Web .................................................... 15
Step 3: Install p12 ......................................................................................................... 15
Step 4: Browse to EJBCA Admin Web ......................................................................... 16
Optional Step 5: Obtain the Management CA Certificate............................................ 16

EJBCA CLOUD AZURE LAUNCH GUIDE
© 2019 PRIMEKEY 4 (16)
IntroductionThis Launch Guide is intended to help customers deploy EJBCA Enterprise Cloud from Microsoft Azure Marketplace and log in to the EJBCA Admin Web for the first time.
DocumentationEJBCA Cloud documentation is available on:https://download.primekey.com/docs/EJBCA-Enterprise-Cloud/latest/
EJBCA Enterprise documentation is available on: https://download.primekey.com/docs/EJBCA-Enterprise/latest/
Additional information on EJBCA Community is available on: www.ejbca.org

EJBCA CLOUD AZURE LAUNCH GUIDE
© 2019 PRIMEKEY 5 (16)
Launch EJBCA Enterprise Cloud on AzureThis section describes how to launch EJBCA Enterprise Cloud from Azure Marketplace.
The Azure Portal is a web interface that allows you to configure the EJBCA Enterprise Cloud instance details from a web browser before you launch it. Follow the instructions below to launch an EJBCA Enterprise Cloud Azure instance.
Locate EJBCA ECE in the Azure MarketplaceBrowse to the Azure Marketplace and search for "primekey" to display the following EJBCA Enterprise Cloud. Review the plans as desired under the plans tab to see the different pricing options. Select the instance type to use and click the GET IT NOW button.
Select the desired support level, 8x5 or 24x7 and fill out the contact information as required my Microsoft.

EJBCA CLOUD AZURE LAUNCH GUIDE
© 2019 PRIMEKEY 6 (16)

EJBCA CLOUD AZURE LAUNCH GUIDE
© 2019 PRIMEKEY 7 (16)
Launch the instance
BasicsThis action will redirect you to the Azure portal. Login to the Azure portal if not already done. Ensure the proper support plan is selected and click "Create".
This will bring you to the EJBCA Enterprise Cloud Launch Wizard for Azure. Select the desired subscription. Click the "Create new" link and enter the name of a Resource Group that will hold all of the EJBCA Enterprise Cloud resources. Click "OK".
Select a location for the virtual machine. Click "OK".

EJBCA CLOUD AZURE LAUNCH GUIDE
© 2019 PRIMEKEY 8 (16)
Network SettingsA Virtual Network is predefined with a 10.2.0.0/16 network. If a different virtual network is desired, enter the desired values. Click "OK"
Select "Subnets". Change the subnet names and prefix if desired or just click "OK".
Select the IP Range that will be allowed to connect to this instance. For a single IP use a /32. For example, 1.2.3.4/32.

EJBCA CLOUD AZURE LAUNCH GUIDE
© 2019 PRIMEKEY 9 (16)
VM SettingsEnter the Admin Username that will be allowed to SSH into the EJBCA Enterprise Cloud Instance.
Select the Authentication Type, either Password or SSH public key. If using password, enter it twice. Password must be at least 12 characters long and have 3 out of the following: one number, one lower case, one upper case, or one special character. If entering an SSH key, copy and paste an RSA public key in the single-line format (starting with "ssh-rsa") or the multi-line PEM format. You can generate SSH keys using ssh-keygen on Linux and OS X, or PuTTYGen on Windows.
The default VM size is a 2 Core 8GB RAM virtual machine. To change the size, click "Change size". Some default recommended sizes are shown. To see more options, click "Clear all filters". The prices Azure charges will be shown as well as the resources available for those virtual machines. These charges are

EJBCA CLOUD AZURE LAUNCH GUIDE
© 2019 PRIMEKEY 10 (16)
separate from the PrimeKey licensing charges associated with the marketplace. Once the desired virtual machine is chosen, click "Select", and then click "OK".
EJBCA CredentialsEnter the EJBCA Superadmin Password in the dialog shown. This password will be used to retrieve the superadmin.p12 file that will be downloaded from the public web. The password must be at least 12 characters long and have 3 out of the following: one number, one lower case, one upper case, or one special character. Once a valid password is entered, click "OK".
The system will run a final validation. This will check your settings as well as the resource allocations you selected.

EJBCA CLOUD AZURE LAUNCH GUIDE
© 2019 PRIMEKEY 11 (16)
Once the Validation passes, click "OK".
Terms of UseAccept the terms of use to proceed and click "Create".
EJBCA CLOUD AZURE LAUNCH GUIDE
© 2019 PRIMEKEY 12 (16)
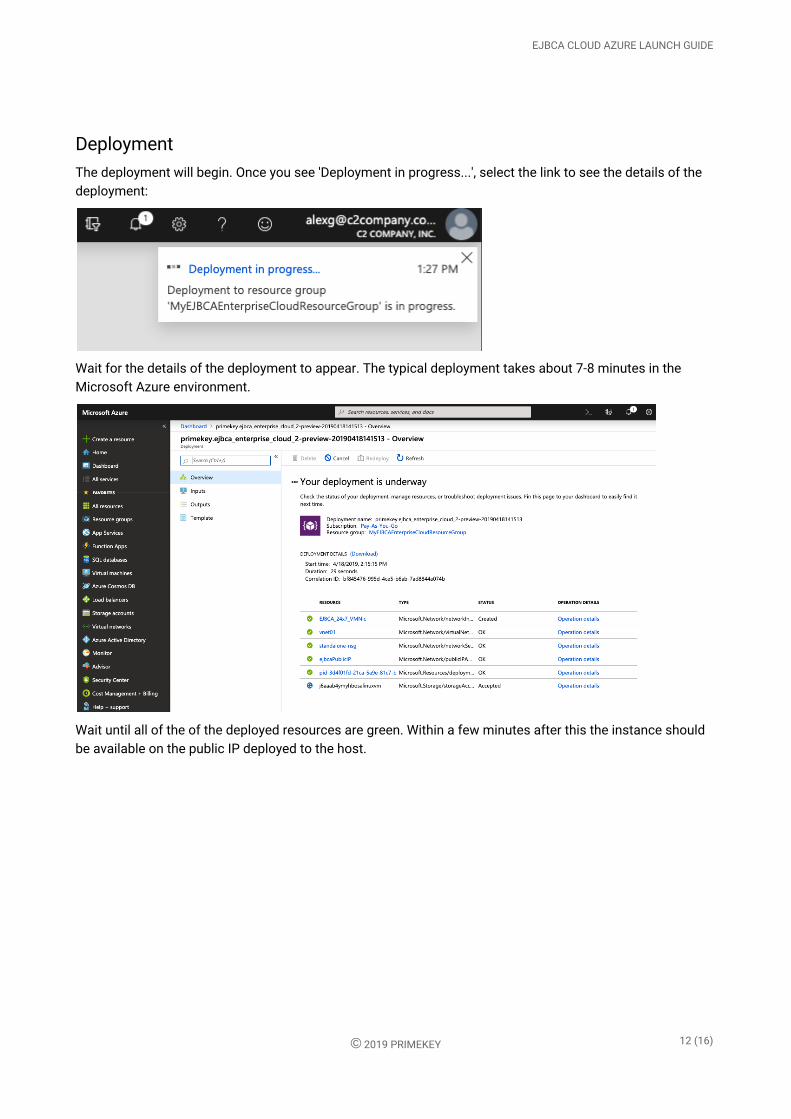
DeploymentThe deployment will begin. Once you see 'Deployment in progress...', select the link to see the details of the deployment:
Wait for the details of the deployment to appear. The typical deployment takes about 7-8 minutes in the Microsoft Azure environment.
Wait until all of the of the deployed resources are green. Within a few minutes after this the instance should be available on the public IP deployed to the host.

EJBCA CLOUD AZURE LAUNCH GUIDE
© 2019 PRIMEKEY 13 (16)

EJBCA CLOUD AZURE LAUNCH GUIDE
© 2019 PRIMEKEY 14 (16)
Retrieving SuperAdmin CredentialsThis section describes how to log in to EJBCA Enterprise Cloud for the first time, following these steps:
• Step 1: Obtain the public IP address of your deployed EJBCA Enterprise Cloud instance in Microsoft Azure
• Step 2: Download p12 file from EJBCA Public Web
• Step 3: Install p12
• Step 4: Browse to EJBCA Admin Web
• Optional Step 5: Obtain the Management CA Certificate
To access the Admin Web of the deployed EJBCA Cloud instance, the superadmin credentials need to be retrieved from the server and installed on a system and/or browser.
PrimeKey recommends using Mozilla Firefox, since it has self-enrollment capabilities and its own keystore separate from the operating system. Note: if you are using Google Chrome, you will need to import the key file to the local machine keystore.
Step 1: Obtain the public IP address of your deployed EJBCA Enterprise Cloud instance in Microsoft Azure
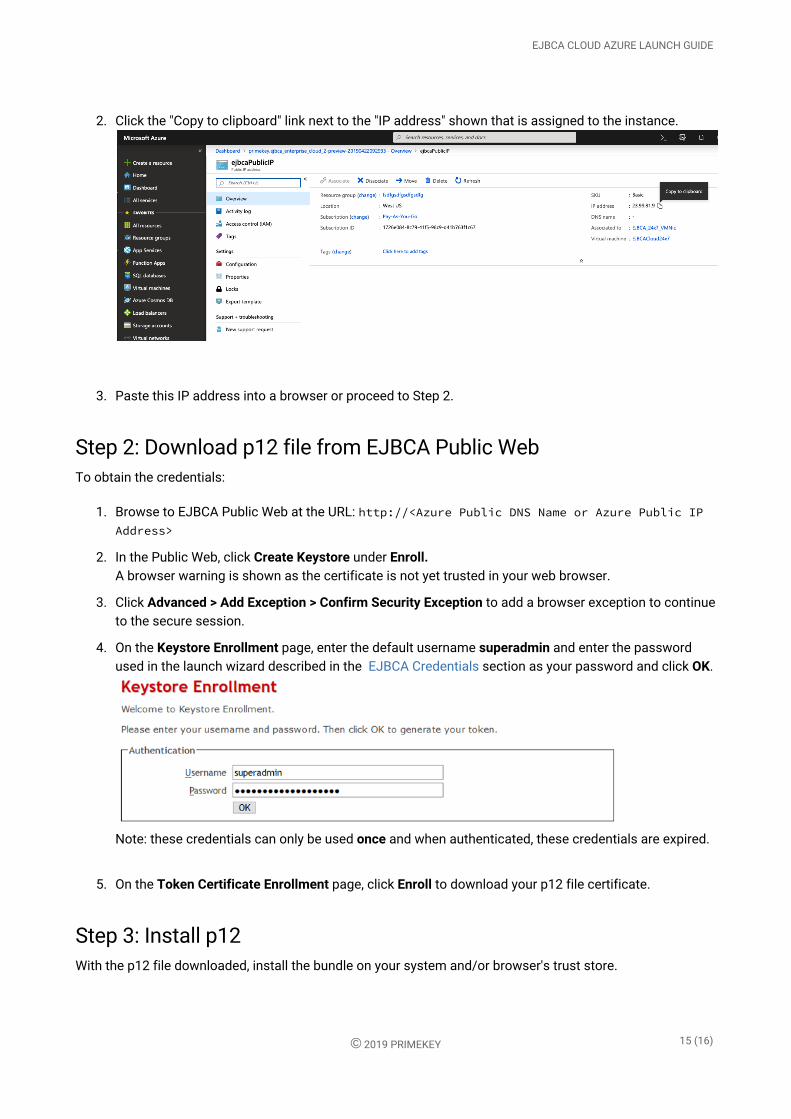
1. Click the "ejbcaPublicIP" resource.
EJBCA CLOUD AZURE LAUNCH GUIDE
© 2019 PRIMEKEY 15 (16)
2. Click the "Copy to clipboard" link next to the "IP address" shown that is assigned to the instance.
3. Paste this IP address into a browser or proceed to Step 2.
Step 2: Download p12 file from EJBCA Public WebTo obtain the credentials:
1. Browse to EJBCA Public Web at the URL: http://<Azure Public DNS Name or Azure Public IP Address>
2. In the Public Web, click Create Keystore under Enroll.A browser warning is shown as the certificate is not yet trusted in your web browser.
3. Click Advanced > Add Exception > Confirm Security Exception to add a browser exception to continue to the secure session.
4. On the Keystore Enrollment page, enter the default username superadmin and enter the password used in the launch wizard described in the EJBCA Credentials section as your password and click OK.
Note: these credentials can only be used once and when authenticated, these credentials are expired.
5. On the Token Certificate Enrollment page, click Enroll to download your p12 file certificate.
Step 3: Install p12 With the p12 file downloaded, install the bundle on your system and/or browser's trust store.

EJBCA CLOUD AZURE LAUNCH GUIDE
© 2019 PRIMEKEY 16 (16)
To import the certificate in Mozilla Firefox:
1. On the Firefox menu, select Preferences.
2. Click Privacy & Security.
3. Scroll down to the Security section and click View Certificates.
4. On the tab Your Certificates, select Import.
5. Browse to the p12 file to import and for the password enter the Instance ID of the instance (copied from the launch wizard described in the EJBCA Credentials section).
Step 4: Browse to EJBCA Admin Web With the credentials installed, click Administration in the Public Web to access the EJBCA Admin Web at the URL:https://<Azure Public DNS Name or Azure Public IP Address>/ejbca/adminweb
Your browser should now recognize your new certificate and open the EJBCA Admin Web displaying the Administration page.
Optional Step 5: Obtain the Management CA CertificateAs an optional step, the Management CA's Certificate created during provisioning can be imported to a machine's Trusted Root Certificate store that will be administering EJBCA. By importing the Management CA certificate to your system/browser, you ensure that administrators are presented with a green lock in their browsers upon accessing the EJBCA Admin Web for the first time, which indicates a trusted website and avoids untrusted website warnings.
To obtain the Management CA Certificate:
1. Browse to EJBCA Public Web at the URL:http://<Azure Public DNS Name or Azure Public IP Address>
2. Select Fetch CA Certificates.
3. Download the CA certificate chain of the format of your choosing and import to your system/browser.