electric actuator / slider type lej seriesproduct name electric actuator / slider type 《 ac servo...
TRANSCRIPT

PRODUCT NAME
Electric Actuator / Slider Type 《 AC Servo Motor 》
MODEL / Series / Product number
LEJ Series Applicable models: LEJS / LEJB
Doc. No. LEJ-OM00204
LECSA ( Pulse input / Positioning )
LECSS ( SSCNET III ) ( SSCNET III / H )
AC Servo Motor Driver LECS Series
LEJS Series (Ball screw type)
LECSB ( Pulse input )
LECSC ( CC-Link )
LEJB Series (Belt type)

- 1 –
Contents
Safety Instructions............................................................................. 2
1. Procedure before operation .......................................................... 4
1.1 Preparation ................................................................................ 4
1.2 Startup ....................................................................................... 6
1.3 Gain tuning................................................................................ 7
2. Slider type / LEJS series.............................................................. 12
2.1 Specification............................................................................ 12
2.2 How to order............................................................................ 13
2.3 Construction ........................................................................... 14
3. Slider type / LEJB series ............................................................. 15
3.1 Specification............................................................................ 15
3.2 How to order............................................................................ 16
3.3 Construction ........................................................................... 17
4. Product Outline ............................................................................ 18
4.1 System construction .............................................................. 18
4.2 Function / Control mode ........................................................ 21
5. Wiring and cables / Common precautions................................. 22
6. Electric actuators / Common precautions ................................. 23
6.1 Design and selection .............................................................. 23
6.2 Mounting.................................................................................. 24
6.3 Handling .................................................................................. 25
6.4 Operating environment .......................................................... 26
6.5 Maintenance ............................................................................ 27
6.6 Precautions for actuator with lock ........................................ 27
7. Electric actuators / Slider type Common precautions .............. 28
7.1 Design...................................................................................... 28
7.2 Selection.................................................................................. 28
7.3 Handling .................................................................................. 28
7.4 Plug and unplug the “Cable” and the “Motor cover” .......... 30
7.5 Precaution on maintenance ................................................... 31
8. Troubleshooting ........................................................................... 34
8.1 Alarms and Warning ............................................................... 34

- 2 -
LEJ Series / Slider type Safety Instructions
These safety instructions are intended to prevent hazardous situations and / or equipment damage. These instructions indicate the level of potential hazard with the labels of “Caution,” “Warning” or “Danger.” They are all important notes for safety and must be followed in addition to International Standards (ISO/IEC), Japan Industrial Standards (JIS)*1) and other safety regulations*2). *1) ISO 4414: Pneumatic fluid power -- General rules relating to systems ISO 4413: Hydraulic fluid power -- General rules relating to systems IEC 60204-1: Safety of machinery -- Electrical equipment of machines (Part 1: General requirements) ISO 10218-1992: Manipulating industrial robots -- Safety JIS B 8370: General rules for pneumatic equipment. JIS B 8361: General rules for hydraulic equipment. JIS B 9960-1: Safety of machinery – Electrical equipment for machines. (Part 1: General requirements) JIS B 8433-1993: Manipulating industrial robots - Safety. etc. *2) Labor Safety and Sanitation Law, etc.
Caution Caution indicates a hazard with a low level of risk which, if not avoided, could result in minor or
moderate injury.
Warning Warning indicates a hazard with a medium level of risk which, if not avoided, could result in
death or serious injury.
Danger Danger indicates a hazard with a high level of risk which, if not avoided, will result in death or
serious injury.
Warning 1. The compatibility of the product is the responsibility of the person who designs the equipment or
decides its specifications. Since the product specified here is used under various operating conditions, its compatibility with specific equipment must be decided by the person who designs the equipment or decides its specifications based on necessary analysis and test results. The expected performance and safety assurance of the equipment will be the responsibility of the person who has determined its compatibility with the product. This person should also continuously review all specifications of the product referring to its latest catalog information, with a view to giving due consideration to any possibility of equipment failure when configuring the equipment.
2. Only personnel with appropriate training should operate machinery and equipment. The product specified here may become unsafe if handled incorrectly. The assembly, operation and maintenance of machines or equipment including our products must be performed by an operator who is appropriately trained and experienced.
3. Do not service or attempt to remove product and machinery / equipment until safety is confirmed.The inspection and maintenance of machinery / equipment should only be performed after measures to prevent falling or runaway of the driven objects have been confirmed. When the product is to be removed, confirm that the safety measures as mentioned above are implemented and the power from any appropriate source is cut, and read and understand the specific product precautions of all relevant products carefully. Before machinery / equipment is restarted, take measures to prevent unexpected operation and malfunction.
4. Contact SMC beforehand and take special consideration of safety measures if the product is to be used in any of the following conditions. 1) Conditions and environments outside of the given specifications, or use outdoors or in a place exposed to direct sunlight. 2) Installation on equipment in conjunction with atomic energy, railways, air navigation, space, shipping, vehicles, military, medical treatment, combustion and recreation, or equipment in contact with food and beverages, emergency stop circuits, clutch and brake circuits in press applications, safety equipment or other applications unsuitable for the standard specifications described in the product catalog. 3) An application which could have negative effects on people, property, or animals requiring special safety analysis. 4) Use in an interlock circuit, which requires the provision of double interlock for possible failure by using a mechanical protective function, and periodical checks to confirm proper operation.

- 3 -
LEJ Series / Slider type Safety Instructions
Caution The product is provided for use in manufacturing industries. The product herein described is basically provided for peaceful use in manufacturing industries. If considering using the product in other industries, consult SMC beforehand and exchange specifications or a contract if necessary. If anything is unclear, contact your nearest sales branch.
Limited warranty and Disclaimer / Compliance Requirements The product used is subject to the following “Limited warranty and Disclaimer” and “Compliance Requirements”. Read and accept them before using the product.
Limited warranty and Disclaimer The warranty period of the product is 1 year in service or 1.5 years after the product is delivered.*3)Also, the product may have specified durability, running distance or replacement parts. Please consult your nearest sales branch. For any failure or damage reported within the warranty period which is clearly our responsibility, a replacement product or necessary parts will be provided. This limited warranty applies only to our product independently, and not to any other damage incurred due to the failure of the product. Prior to using SMC products, please read and understand the warranty terms and disclaimers noted in the specified catalog for the particular products. *3) Vacuum pads are excluded from this 1 year warranty.
A vacuum pad is a consumable part, so it is warranted for a year after it is delivered. Also, even within the warranty period, the wear of a product due to the use of the vacuum pad or failure due to the deterioration of rubber material are not covered by the limited warranty.
Compliance Requirements When the product is exported, strictly follow the laws required by the Ministry of Economy, Trade and Industry (Foreign Exchange and Foreign Trade Control Law).
- 4 -
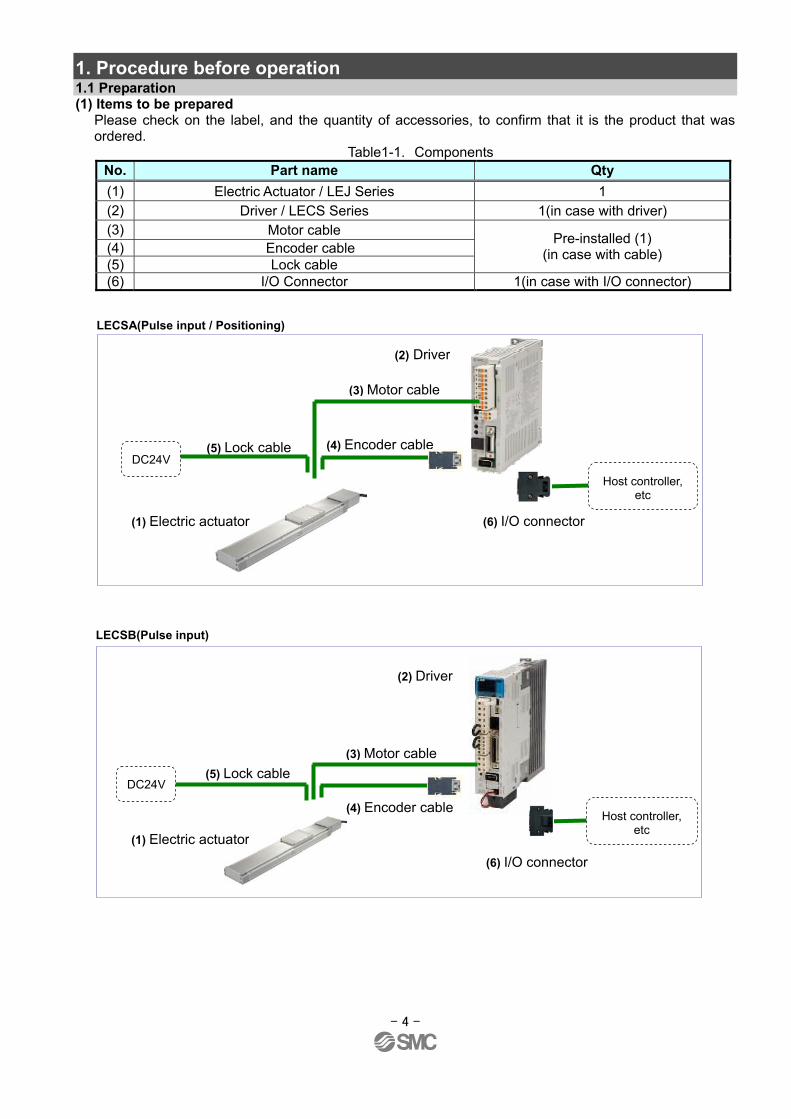
1. Procedure before operation 1.1 Preparation (1) Items to be prepared
Please check on the label, and the quantity of accessories, to confirm that it is the product that was ordered.
Table1-1. Components
No. Part name Qty
(1) Electric Actuator / LEJ Series 1 (2) Driver / LECS Series 1(in case with driver) (3) Motor cable (4) Encoder cable (5) Lock cable
Pre-installed (1) (in case with cable)
(6) I/O Connector 1(in case with I/O connector)
LECSA(Pulse input / Positioning)
(2) Driver
(3) Motor cable
(4) Encoder cable
(1) Electric actuator
DC24V (5) Lock cable
(2) Driver
(3) Motor cable
(4) Encoder cable
(1) Electric actuator
(5) Lock cable
LECSB(Pulse input)
DC24V
Host controller, etc
(6) I/O connector
Host controller, etc
(6) I/O connector

- 5 -
LECSC(CC-Link)
(2) Driver
(3) Motor cable
(4) Encoder cable
(1) Electric actuator
DC24V (5) Lock cable
(2) Driver
(3) Motor cable
(4) Encoder cable
(1) Electric actuator
(5) Lock cable
LECSS ( SSCNET III ) , LECSS-T ( SSCNET III / H )
DC24V
Host controller, etc
(6) I/O connector
Host controller, etc
(6) I/O connector

- 6 -
1.2 Startup When switching the power on for the first time, follow the startup procedure below. Refer to the “Driver operation manual” for wiring method and detailed procedure.
Wiring check
Surrounding environment check
Power-on of the controlled circuit power
I/O signal wiring and cables check
during power-on
Parameter setting
Power-on of the main circuit power supply
Test operation (JOG operation)
Actual operation
Stop
Confirm that the cables to the driver and the actuator are connected correctly.
Check the surrounding environment (cable routing and impurity such as wire off cuts or metallic dust) of the driver and the servo motor.
Follow the procedure shown in the "Controller Operation Manual" to supply power to the product.
Check the wiring of the input and output signals and cables1) according to the procedure shown in the "Driver Operation Manual".
Set the parameters as necessary, such as selecting the control mode and each control value.
Follow the procedure shown in the "Driver Operation Manual" to supply power to the product.
Operation with a vibration might be done according to the condition. In that case, adjust gain. (Refer to section 1.3)
Gain tuning
Check if the cables to the driver and actuator are connected correctly.
Stop command to stop the operation.
- - -
- - -
- - -
- - -
- - -
- - -
- - -
- - -
- - -
- - -
Use the test operation mode (JOG operation) at the slowest speed and check whether the servo motor rotates.2)
1)CC-Link cable (LECSC), SSCNETIII cable (LECSS) 2)When using test operation mode (JOG operation), the LECSC and LECSS need the MR-Configurator, the LECSS-T needs the MR-Configurator2.

- 7 -
1.3 Gain tuning 1.3.1 Procedure Here are the steps for basic gain tuning. Refer to the “Driver operation manual” for details and for tuning methods other than shown below. ●For LECSA (Pulse input / Positioning) A. One-touch tuning During motor driving, push “AUTO” button on the front of the driver for three seconds. When display panel becomes “ ”, push “AUTO” button again. ⇒The gain (including filter, etc) is adjusted automatically. When the error occurs, refer to the “Driver operation manual”.
B. Auto tuning (Mode1) Do this operation, if you are not satisfied with the result of “One-touch tuning”. Set parameter No.PA08 “001”. Afterwards, do 1 and 2 alternately. 1. Reduce value of parameter No.PA09 to be less than present value. 2. Operate and ascertain the situation. ⇒The gain is adjusted automatically. ●For LECSB (Pulse input), LECSC (CC-Link), LECSS(SSCNETIII) A. Adaptive filter II Set parameter No.PB01 “0001” and drive the motor. ⇒The filter is adjusted automatically. B. Auto tuning (Mode1) Do this operation, if you are not satisfied with the result of “Adaptive filter II”. Set parameter No.PA08 “0001”. Afterwards, do 1 and 2 alternately. 1. Reduce value of parameter No.PA09 to be less than present value. 2. Operate and ascertain the situation. ⇒The gain is adjusted automatically. ●For LECSS-T(SSCNET III/H) A. Auto tuning (Mode1) Set parameter No.PA08 “0001”. Afterwards, do 1 and 2 alternately. 1. Reduce value of parameter No.PA09 to be less than present value. 2. Operate and ascertain the situation. ⇒The gain is adjusted automatically.
B. Robust filter Do this operation, if you are not satisfied with the result of “Auto tuning”.
Set parameter No.PE41 “0001” and drive the motor. ⇒The filter is adjusted automatically.
Warning A mechanical resonance may occur depending on the configuration or the mounting orientation of the
transferred object. Please change the appropriate parameter in the initial setting. Refer to "The recommended the parameter for each driver" for the parameter.
1) The auto tuning mode 1 may not be performed properly if the following conditions are not satisfied. ・Time to reach 2,000rpm is the acceleration/deceleration time constant of 5[s] or less. ・Speed is 150rpm or higher. ・Load to motor inertia is 100 times or less. ・The acceleration/deceleration is 10% or more of the rated torque.

- 8 -
1.3.2 The recommended the parameter for each driver The recommended the parameter for each driver. Please change the parameter values by use of the customer. Please refer to the manual of the driver for more details. [LECSA]
LEJS40 LEJS63 LEJB40 LEJB63
Lead symbol H A B H A B T Series
Lead 24 16 8 30 20 10 27 42
Parameter Para. No
Initial value
Recommended value
Number of command input pulses per revolution *3
PA05 100 100
Electronic gear numerator *3
PA06 1 100(Positioning mode: 10)
Electronic gear denominator *3
PA07 1 24 16 8 30 20 10 27 42
Feel length multiplication (STM) (Multiplier)
PE02 0000 0000(Less than stroke 1000)/
0001(Stroke 1000 or more)
Home position return type
PE03 0010 □□□3(Stopper type)
Home position return direction
PE03 0010 □□1□ (Motor side)
Home position return Speed (rpm)
PE04 500 75 113 225 60 90 180 133 86
Home position return/JOG operation acceleration/deceleration time constants (msec)
PE07 100 1200 800 400 1500 1000 500 1350 2100
Home position return position data (μm)
PE08 0 -2000(Less than stroke 1000) / -200(Stroke 1000 or more)
Stopper type home position return stopper time (msec)
PE10 100 200
Stopper type home position return torque limit value (%)
PE11 15 30
Regenerative option PA02 000 000(Non) / 002(LEC-MR-RB-032) / 003(LEC-MR-RB-12)
Rotation direction selection
PA14 0 1
(+:Counter motors side) 0
(+:Counter motors side)
★Adaptive tuning mode
PB01 000 000 002 000
★Load to motor inertia moment ratio
PB06 7 7 50
★Machine resonance suppression filter 1
PB13 4500 4500 400 4500
★Notch shape selection 1
PB14 000 000 030 000
★:Parameter should be changed. *1 Parameter is the recommended value. Please change the parameter to make appropriate value for your operating method. *2 A mechanical resonance may occur depending on the configuration or the mounting orientation of the transferred object. Please change the parameter in the initial setting. *3 When the positioning mode is not set: The travel distance of the actuator per 1 pulse should be 10 [μm/pulse]. When the positioning mode is set: The minimum unit of the travel distance of the actuator should be 1 [μm].

- 9 -
[LECSB] LEJS40 LEJS63 LEJB40 LEJB63
Lead symbol H A B H A B T Series
Lead 24 16 8 30 20 10 27 42
Parameter Para. No.
Initial value
Recommended value
Number of command input pulses per revolution *3
PA05 0 0
Electronic gear numerator *3
PA06 1 32768 65536 32768
Electronic gear denominator *3
PA07 1 300 200 100 375 250 125 675 525
Regenerative option PA02 0000 0000(Non) / 0002(LEC-MR-RB-032) / 0003(LEC-MR-RB-12)
Rotation direction selection PA14 0
1 (+:Counter motors side)
0 (+:Counter motors side)
★Adaptive tuning mode
PB01 0000 0000 0002 0000
★Load to motor inertia moment ratio
PB06 7 7 50
★Machine resonance suppression filter 1
PB13 4500 4500 400 4500
★Notch shape selection 1
PB14 0000 0000 0030 0000
★:Parameter should be changed. *1 Parameter is the recommended value. Please change the parameter to make appropriate value for your operating method. *2 A mechanical resonance may occur depending on the configuration or the mounting orientation of the transferred object. Please change the parameter in the initial setting. *3 The travel distance of the actuator per 1 pulse should be 10 [μm/pulse].

- 10 -
[LECSC] LEJS40 LEJS63 LEJB40 LEJB63
Lead symbol H A B H A B T Series
Lead 24 16 8 30 20 10 27 42
Parameter Para. No.
Initial value
Recommended value
Electronic gear numerator *3
PA06 1 32768
Electronic gear denominator *3
PA07 1 3000 2000 1000 3750 2500 1250 3375 5250
Feel length multiplication (STM) (Multiplier)
PA05 0000 0000(Less than stroke 1000)/
0001(Stroke 1000 or more)
Home position return type
PC02 0000 □□□3(Stopper type)
Home position return direction
PC03 0001 □□1□ (Motor side)
Home position return Speed (rpm)
PC04 500 75 113 225 60 90 180 133 86
Home position return position data (μm)
PC07 0 -2000(Less than stroke 1000) / -200(Stroke 1000 or more)
Stopper type home position return stopper time (msec)
PC09 100 200
Stopper type home position return torque limit value (%)
PC10 15 30
Regenerative option PA02 0000 0000(Non) / 0002(LEC-MR-RB-032) / 0003(LEC-MR-RB-12)
Rotation direction selection PA14 0
1 (+:Counter motors side)
0 (+:Counter motors side)
★Adaptive tuning mode
PB01 0000 0000 0002 0000
★Load to motor inertia moment ratio
PB06 7 7 50
★Machine resonance suppression filter 1
PB13 4500 4500 400 4500
★Notch shape selection 1
PB14 0000 0000 0030 0000
★:Parameter should be changed. *1 Parameter is the recommended value. Please change the parameter to make appropriate value for your operating method. *2 A mechanical resonance may occur depending on the configuration or the mounting orientation of the transferred object. Please change the parameter in the initial setting. *3 The travel distance of the actuator per 1 pulse should be 10 [μm/pulse].

- 11 -
[LECSS] LEJS40 LEJS63 LEJB40 LEJB63
Lead symbol H A B H A B T Series
Lead 24 16 8 30 20 10 27 42
Parameter Para. No.
Initial value
Recommended value
Regenerative option PA02 0000 0000(Non) / 0002(LEC-MR-RB-032) / 0003(LEC-MR-RB-12)
Rotation direction selection PA14 0
1 (+:Counter motors side)
0 (+:Counter motors side)
★Adaptive tuning mode
PB01 0000 0000 0002 0000
★Load to motor inertia moment ratio
PB06 7 7 50
★Machine resonance suppression filter 1
PB13 4500 4500 400 4500
★Notch shape selection 1
PB14 0000 0000 0030 0000
★:Parameter should be changed. *1 Parameter is the recommended value. Please change the parameter to make appropriate value for your operating method. *2 A mechanical resonance may occur depending on the configuration or the mounting orientation of the transferred object. Please change the parameter in the initial setting. * For LECSS, please set the electronic gear with PC, PLC etc. in your application.
[LECSS-T]
LEJS40 LEJS63 LEJB40 LEJB63
Lead symbol H A B H A B T Series
Lead 24 16 8 30 20 10 27 42
Parameter Para. No.
Initial value
Recommended value
Regenerative option PA02 0000 0000 (Non) / 0002 (LEC-MR-RB-032) / 0003 (LEC-MR-RB-12)
Rotation direction selection PA14 0
1 (+:Counter motors side)
0 (+:Counter motors side)
★Load to motor inertia moment ratio
PB06 7 7 50
Function selection E-3 PE41 0000 0000 0001
(Robust filter Enabled)
★:Parameter should be changed. *1 Parameter is the recommended value. Please change the parameter to make appropriate value for your operating method. *2 A mechanical resonance may occur depending on the configuration or the mounting orientation of the transferred object. Please change the parameter in the initial setting. * For LECSS, please set the electronic gear with PC, PLC etc. in your application.

- 12 -
2. Slider type / LEJS series 2.1 Specification LEJS40-63 AC servo motor (100W / 200W)
Model LEJS40 LEJS63
Stroke [mm] Note1) 200,300,400,500,600, 700,800,900,1000,1200
300,400,500,600,700, 800,900,1000,1200,1500
Horizontal 15 30 55 30 45 85 Work load [kg] Note2)
Vertical 3 5 10 6 10 20 Up to 500 1800 1200 600 1800 1200 600 501 to 600 1580 1050 520 1800 1200 600 601 to 700 1170 780 390 1800 1200 600 701 to 800 910 600 300 1390 930 460 801 to 900 720 480 240 1110 740 370
901 to 1000 580 390 190 900 600 300 1001 to 1100 480 320 160 750 500 250 1101 to 1200 410 270 130 630 420 210 1201 to 1300 - - - 540 360 180 1301 to 1400 - - - 470 310 150
Speed [mm/s] Note3)
Stroke range
1401 to 1500 - - - 410 270 130 Maximum acceleration / deceleration [mm/s2] 20000 (Refer catalog about limit according to work load and duty rate.)
Basic type ±0.02 Positioning repeatability [mm] High precision type ±0.01
Basic type 0.1 or less Lost motion [mm] Note4) High precision type 0.05 or less Lead [mm] 24 16 8 30 20 10
Impact / Vibration resistance [m/s2] Note5) 50 / 20
Drive method Ball screw Guide type Liner guide Acceptable external resistance [N] 20
Operating temperature range [℃] 5 to 40
Operating humidity range [%RH] 90 or less (No condensation)
Act
uat
or
spec
ific
atio
n
Regenerative option It may be required by speed and work load. Refer to catalog.
Motor output [W] / size [mm] 100 / □40 200 / □60 Type of Motor AC servo motor (100/200VAC)
Encoder Type of Motor S2,S3:Incremental 17bit encoder (Resolution:131072 p/rev)
Type of Motor S6,S7:Absolute 18bit encoder (Resolution:262144 p/rev) Type of Motor T6,T7:Absolute 22bit encoder (Resolution: 4194304 p/rev)
Horizontal 65 80 Power consumption[W] Note6) Vertical 165 235
Horizontal 2 2 Standby power consumption when operating[W]
Note7) Vertical 10 12
Ele
ctri
c sp
ecif
icat
ion
Max. instantaneous power consumption[W] Note8)
445 725 Type Note9) No excitation operating type Holding force [N] 67 101 203 220 330 660 Power consumption [W] at 20℃Note10) 6.3 7.9 L
ock
sp
ecif
icat
ion
Rated voltage [VDC] 24 0-10% Note1) Strokes other than standard are available as special order, so please contact with our company. Note2) Details are shown in “Speed-Work load graph (indication)” of catalog. Note3) The allowable speed changes by the stroke. Note4) A reference value for correcting an error in reciprocal operation. Note5) Impact resistance: No malfunction occurred when the actuator was tested with a drop tester in both an axial direction and perpendicular
direction to the lead screw. (The test was performed with the actuator in the initial state.) Vibration resistance: No malfunction occurred in a test ranging between 45 to 2000 Hz, when the actuator was tested in both an axial direction and a perpendicular direction to the lead screw. (The test was performed with the actuator in the initial state.)
Note6) The power consumption ( including the driver ) is for when the actuator is operating. Note7) The standby power consumption when operating ( including the driver ) is for when the actuator is stopped in the set position during
the operation. Note8) The maximum instantaneous power consumption ( including the driver ) is for when the actuator is operating. Note9) Only applies to actuators supplied with a lock. Note10) For the actuator with lock, please add the power consumption for the lock. Note11) Sensor magnet position is located in the table center. Note12) Do not allow collisions at either end of the table travelling distance. Additionally, when running the positioning operation, do not set within 2mm of both ends. Note13) Consult with SMC for the manufacture of intermediate strokes. (Manufacturable stroke range: LEJS40/ 200 to 1200mm, LEJS63/ 300 to 1500mm)

- 13 -
Product Weight
Series LEJS40 Stroke [mm] 200 300 400 500 600 700 800 900 1000 1200
Weight (kg) 5.6 6.4 7.1 7.9 8.7 9.4 10.2 11.0 11.7 13.3 Extra weight of lock (kg) 0.2 (Incremental encoder) / 0.3 (Absolute encoder)
Series LEJS63 Stroke [mm] 300 400 500 600 700 800 900 1000 1200 1500
Weight (kg) 11.4 12.7 13.9 15.2 16.4 17.7 18.9 20.1 22.6 26.4 Extra weight of lock (kg) 0.4 (Incremental encoder) / 0.7 (Absolute encoder)
2.2 How to order
- 14 -
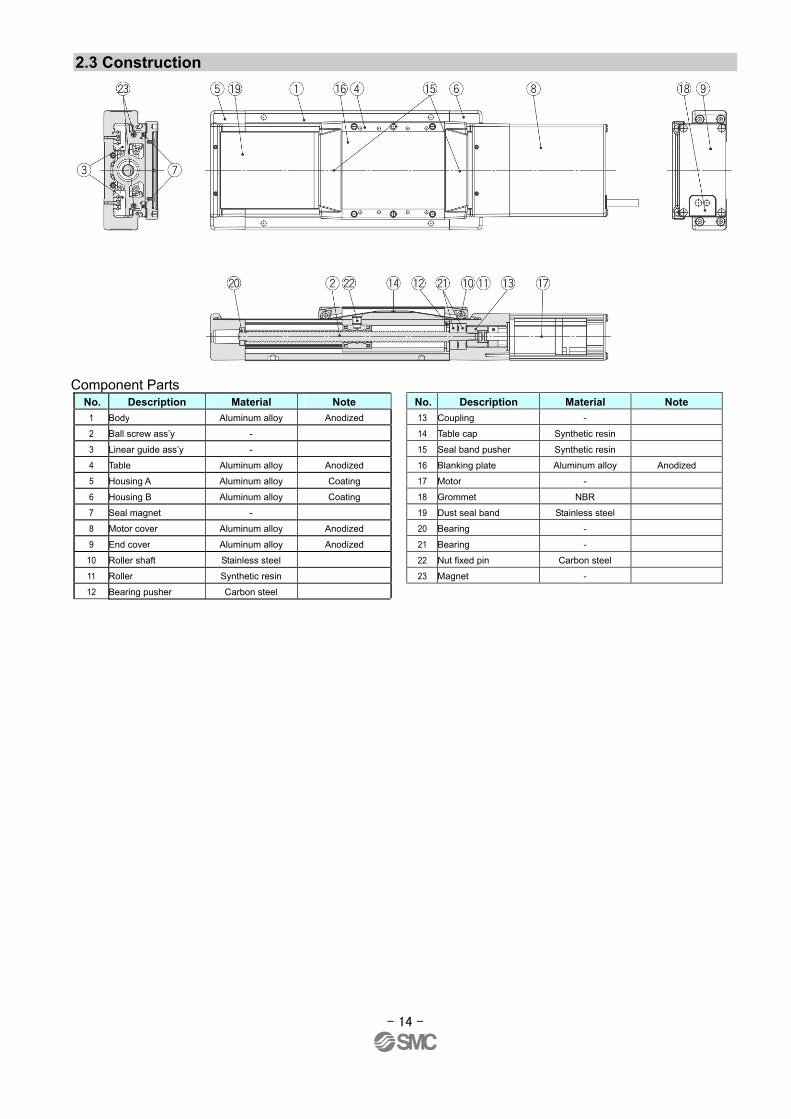
2.3 Construction
Component Parts No. Description Material Note No. Description Material Note
1 Body Aluminum alloy Anodized 13 Coupling -
2 Ball screw ass’y - 14 Table cap Synthetic resin
3 Linear guide ass’y - 15 Seal band pusher Synthetic resin
4 Table Aluminum alloy Anodized 16 Blanking plate Aluminum alloy Anodized
5 Housing A Aluminum alloy Coating 17 Motor -
6 Housing B Aluminum alloy Coating 18 Grommet NBR
7 Seal magnet - 19 Dust seal band Stainless steel
8 Motor cover Aluminum alloy Anodized 20 Bearing -
9 End cover Aluminum alloy Anodized 21 Bearing -
10 Roller shaft Stainless steel 22 Nut fixed pin Carbon steel
11 Roller Synthetic resin 23 Magnet -
12 Bearing pusher Carbon steel

- 15 -
3. Slider type / LEJB series 3.1 Specification LEJB40-63 AC servo motor (100W / 200W)
Model LEJB40 LEJB63
Stroke [mm] Note1) 200,300,400,500,600,700, 800,900,1000,1200,1500,2000
300,400,500,600,700,800, 900,1000,1200,1500,2000,3000
Work load [kg] Horizontal 20(10 The stroke over 1000mm) 30 Speed [mm/s] Note2) 2000 3000 Maximum acceleration / deceleration [mm/s2] 20000 (Refer catalog about limit according to work load and duty rate.) Positioning repeatability [mm] ±0.04 Lost motion [mm] Note3) 0.1 or less Lead [mm] 27 42 Impact / Vibration resistance [m/s2] Note4) 50 / 20 Drive method Belt Guide type Liner guide Acceptable external resistance [N] 20 Operating temperature range [℃] 5 to 40 Operating humidity range [%RH] 90 or less (No condensation)
Act
uat
or
spec
ific
atio
n
Regenerative option It may be required by speed and work load. Refer to catalog. Motor output [W] / size [mm] 100 / □40 200 / □60 Type of Motor AC servo motor (100/200VAC)
Encoder Type of Motor S2,S3:Incremental 17bit encoder (Resolution:131072 p/rev)
Type of Motor S6,S7:Absolute 18bit encoder (Resolution:262144 p/rev) Type of Motor T6,T7:Absolute 22bit encoder (Resolution: 4194304 p/rev)
Horizontal 65 190 Power consumption[W] Note5) Vertical - -
Horizontal 2 2 Standby power consumption when operating[W]
Note6) Vertical - -
Ele
ctri
c sp
ecif
icat
ion
Max. instantaneous power consumption[W] Note7)
445 725 Type Note8) No excitation operating type
Holding force [N] 60 189 Power consumption [W] at 20℃Note9) 6.3 7.9 L
ock
sp
ecif
icat
ion
Rated voltage [VDC] 24 0-10% Note1) Strokes other than standard is available as special order, so please contact with our company Note2) Details are shown in “Speed-Work load graph (indication)” of catalog. Note3) A reference value for correcting an error in reciprocal operation. Note4) Impact resistance: No malfunction occurred when the actuator was tested with a drop tester in both an sending direction and
perpendicular direction to the belt. (The test was performed with the actuator in the initial state.) Vibration resistance: No malfunction occurred in a test ranging between 45 to 2000 Hz, when the actuator was tested in both an sending direction and a perpendicular direction to the belt. (The test was performed with the actuator in the initial state.)
Note5) The power consumption ( including the driver ) is for when the actuator is operating. Note6) The standby power consumption when operating ( including the driver ) is for when the actuator is stopped in the set position during
the operation. Note7) The maximum instantaneous power consumption ( including the driver ) is for when the actuator is operating. Note8) Only applies to actuators supplied with a lock. Note9) For the actuator with lock, please add the power consumption for the lock. Note10) Sensor magnet position is located in the table center. Note11) Do not allow collisions at either end of the table travelling distance. Additionally, when running the positioning operation, do not set within 2mm of both ends. Note12) Consult with SMC for the manufacture of intermediate strokes. (Manufacturable stroke range:LEJB40/ 200 to 2000mm, LEJB63/ 300 to 3000mm)
Product Weight Series LEJB40
Stroke [mm] 200 300 400 500 600 700 800 900 1000 1200 1500 2000Weight (kg) 5.7 6.4 7.1 7.7 8.4 9.1 9.8 10.5 11.2 12.6 14.7 18.1
Extra weight of lock (kg) 0.2 (Incremental encoder) / 0.3 (Absolute encoder)
Series LEJB63 Stroke [mm] 300 400 500 600 700 800 900 1000 1200 1500 2000 3000
Weight (kg) 11.5 12.7 13.8 15.0 16.2 17.4 18.6 19.7 22.1 25.7 31.6 43.4Extra weight of lock (kg) 0.4 (Incremental encoder) / 0.7 (Absolute encoder)

- 16 -
3.2 How to order

- 17 -
3.3 Construction
Component Parts No. Description Material Note No. Description Material Note
1 Body Aluminum alloy Anodized 20 Pulley shaft A Stainless steel
2 Belt - 21 Pulley shaft B Stainless steel
3 Belt holder Carbon steel 22 Table cap Synthetic resin
4 Belt pusher Aluminum alloy 23 Seal band pusher Synthetic resin
5 Linear guide ass’y - 24 Blanking plate Aluminum alloy Anodized
6 Table Aluminum alloy Anodized 25 Motor mount plate Carbon steel
7 Housing A Aluminum alloy Coating 26 Pulley block Aluminum alloy Anodized
8 Housing B Aluminum alloy Coating 27 Pulley cover Aluminum alloy Anodized
9 Seal magnet - 28 Belt stopper Aluminum alloy
10 Motor cover Aluminum alloy Anodized 29 Side plate Aluminum alloy Anodized
11 End cover A Aluminum alloy Anodized 30 Motor plate Carbon steel
12 End cover B Aluminum alloy Anodized 31 Belt -
13 Roller shaft Stainless steel 32 Motor -
14 Roller Synthetic resin 33 Grommet NBR
15 Pulley holder Aluminum alloy 34 Dust seal band Stainless steel
16 Driving pulley Aluminum alloy 35 Bearing -
17 Driven pulley Aluminum alloy 36 Bearing -
18 Motor pulley Aluminum alloy 37 Stopper pin Stainless steel
19 Spacer Aluminum alloy 38 Magnet -
Motor details

- 18 -
4. Product Outline 4.1 System construction
Incremental Encoder (Pulse input / Positioning)
Absolute Encoder (Pulse input)
Prepared by user
Prepared by user
Prepared by user
Prepared by user
Prepared by user
Power supply
Control circuit powersupply
Regenerative option
Setup software
Electric actuator
PLC (Positioning unit)
LEC-MR-SETUP221
USB cable LEC-MR-J3USB
Motor cable
Lock cable
1-phase 100 to 120VAC (50/60Hz) 200 to 230VAC (50/60Hz)
LEC-MR-RB-□
Power supply DC24V
PC
Driver
Standard
Standard Robot
Robot
Encoder cable
Standard Robot
Slider type LEJ series
I/O connector LE-CSNA
Control circuit power connector (accessory)
Main circuit power connector (accessory)
Power supply
Regenerative option
Setup software
Electric actuator
PLC (Positioning unit)
Slider type LEJ series
Power supply DC24V
I/O connector LE-CSNB
LEC-MR-SETUP221
PC
USB cable LEC-MR-J3USB
◎option
◎option
1-phase 100 to 120VAC (50/60Hz) 200 to 230VAC (50/60Hz) 3-phase 200 to 230VAC (50/60Hz)
LEC-MR-RB-□
Motor cable
Lock cable
Encoder cable
Main circuit power connector (accessory)
Driver
Standard
Standard Robot
Robot
Standard Robot
Control circuit power connector (accessory)
Motor connector (accessory)
◎option
◎option
◎option
◎option Analog monitor output
RS-422 interface
Battery (accessory) LE-MR-J3BAT
When using this software, order USB cable separately.
When using this software, order USB cable separately.

- 19 -
Absolute Encoder (SSCNET III)
Absolute Encoder (CC-Link)
Prepared by user
Prepared by user
Prepared by user
Preparedby user
Power supply
Regenerative option
Setup software
Electric actuator
PLC (CC-Link master unit)
Slider type LEJ series
Power supply DC24V
I/O connector LE-CSNA
LEC-MR-SETUP221
PC
USB cable LEC-MR-J3USB
◎option
1-phase 100 to 120VAC (50/60Hz) 200 to 230VAC (50/60Hz) 3-phase 200 to 230VAC (50/60Hz)
LEC-MR-RB-□
Motor cable
Lock cable
Main circuit power connector (accessory)
Driver
Standard
Standard Robot
Robot Control circuit Power connector(accessory)
Motor connector (accessory)
◎option
◎option RS-422 interface
Power supply
Regenerative option
Setup software
Electric actuator
PLC (Positioning unit / motion controller)
Slider type LEJ series
Power supply DC24V
I/O connector LE-CSNS
LEC-MR-SETUP221
PC
USB cable LEC-MR-J3USB
◎option
1-phase 100 to 120VAC (50/60Hz) 200 to 230VAC (50/60Hz) 3-phase 200 to 230VAC (50/60Hz)
LEC-MR-RB-□
Motor cable
Lock cable
Main circuit power connector (accessory)
Driver
Standard
Standard Robot
Robot
Control circuit power connector(accessory)
Motor connector (accessory)
◎option
◎option
Encoder cable
Standard Robot
Encoder cable
Standard Robot
CC-Link connector (accessory)
SSCNET III optical cable LE-CSS-□
◎option
Battery (accessory) LE-MR-J3BAT
Battery (accessory) LE-MR-J3BAT

- 20 -
Absolute Encoder Series LECSS-T
Provided by customer
Provided by customer
Power supply
Regenerative option
Setup software
PLC ( Positioning unit / motion controller ) Slider type LEJ series
Power supply DC24V
I/O connector LE-CSNS
LEC-MRC2
PC
USB cable LEC-MR-J3USB
◎option
1-phase 200 to 240VAC (50/60Hz) 3-phase 200 to 240VAC (50/60Hz)
LEC-MR-RB-□
Motor cable
Lock cable
Main circuit power connector (accessory)
Driver
Standard
Standard Robot
Robot
Control circuit power connector(accessory)
Motor connector (accessory)
◎option
◎option
Encoder cable
Standard Robot
SSCNET III optical cable LE-CSS-□
◎option
Battery (accessory) LE-MR-J3BAT
Electric actuator

- 21 -
4.2 Function / Control mode The following control mode can be selected for applicable drivers. Refer to the “Driver Operation Manual” about wiring and parameter setting.
Table4-1. Applicable control mode Control modeNote1) Positioning
Driver Position control
Encoder Point table method Program methodNote3)
Parameter select
LECSA (Pulse input / positioning)
Pulse train Incremental ON/OFF signal
3 points (max. 7 points)Note2)
ON/OFF signal 4 programs
(max. 8 Programs)Note2) PA01
LECSB (Pulse input)
Pulse train Absolute - - PA01
LECSC (CC-Link)
CC-Link (When 2 stations
are occupied) Absolute
CC-Link 31 points(When 1 station is occupied)
255 points(When 2 stations are occupied)- PC30
LECSS (SSCNET III)
SSCNET III Absolute - - Note4)
LECSS-T (SSCNET III / H)
SSCNET III / H Absolute - - Note4)
Operation method
Positioning operation - Positioning operation by point table No. setting
Positioning operation by program No. setting -
Note1) Only the position control can be used. Note2) To set the maximum value for the each method, it is necessary to change the setting.
Please refer “Driver Operation Manual”. Note3) The MR Configurator is necessary to control by the program method.
Order separately. -MR Configurator (Setup software Japanese version) / LEC-MR-STUP221 -MR Configurator (Setup software English version) / LEC-MR-SETUP221E -USB cable for Setup software (3m) / LEC-MR-J3USB
Note4) The LECSS is set by upper positioning unit or motion controller.

- 22 -
5. Wiring and cables / Common precautions Warning
1. Adjusting, mounting or wiring change should never be done before shutting off the power supply to the product. Electrical shock, malfunction and damaged can result.
2. Never disassemble the cable. Use only specified cables.
3. Never connect or disconnect the cable or connector with power on.
Caution 1. Wire the connector securely.
Do not apply any voltage to the terminals other than those specified in the product manual. 2. Wire the connector securely.
Check for correct connector wiring and polarity. 3. Take appropriate measures against noise.
Noise in a signal line may cause malfunction. As a countermeasure, separate high voltage and low voltage cables, and shorten wiring lengths, etc.
4. Do not route wires and cables together with power or high voltage cables. The product can malfunction due to interference of noise and surge voltage from power and high voltage cables to the signal line. Route the wires of the product separately from power or high voltage cables.
5. Take care that actuator movement does not catch cables. 6. Operate with cables secured.
Avoid bending cables at sharp angles where they enter the product. 7. Avoid twisting, folding, rotating or applying an external force to the cable.
Risk of electric shock, wire break, contact failure and loss of control for the product can happen. 8. Select “Robotic type cables” in case of inflecting cable (encoder / motor / rock) repeatedly.
Refer to the “Driver operation manual” for the bending life of the bending radius of the cable. 9. Confirm proper wiring of the product.
Poor insulation (interference with other circuits, poor insulation between terminals and etc.) can apply excessive voltage or current to the product causing damage.
[Transportation]
Caution 1. Do not carry or swing the product by the motor or cable.

- 23 -
6. Electric actuators / Common precautions 6.1 Design and selection
Warning 1. Be sure to read the Operation Manual (this manual and the one for the driver: LEC series).
Handling or usage/operation other than that specified in the Operation Manual may lead to breakage and operation failure of the product. Any damage attributed to the use beyond the specifications is not guaranteed.
2. There is a possibility of dangerous sudden action by the product if sliding parts of machinery are twisted due to external forces etc. In such cases, human injury may occur, such as by catching hands or feet in the machinery, or damage to the machinery itself may occur. Design the machinery should be designed to avoid such dangers.
3. A protective cover is recommended to minimize the risk of personal injury. If a driven object and moving parts of the product are in close proximity, personal injury may occur. Design the system to avoid contact with the human body.
4. Securely tighten all stationary parts and connected parts so that they will not become loose. When the product operates with high frequency or is installed where there is a lot of vibration, ensure that all parts remain secure.
5. Consider a possible loss of power source. Take measures to prevent injury and equipment damage even in the case of a power source failure.
6. Consider behavior of emergency stop of whole system. Design the system so that human injury and/or damage to machinery and equipment will not be caused, when it is stopped by a safety device for abnormal conditions such as a power outage or a manual emergency stop of whole system.
7. Consider the action when operation is restarted after an emergency stop or abnormal stop of whole system. Design the system so that human injury or equipment damage will not occur upon restart of operation of whole system.
8. Disassembly and modification is prohibited Do not modify or reconstruct (including additional machining) the product. An injury or failure can result.
9. When using it for vertical application, it is necessary to build in a safety device. The rod may fall due to the weight of work. The safety device should not interfere with normal operation of the machine.
Caution 1. Operate within the limits of the maximum usable stoke.
The product will be damaged if it is used with the stroke which is over the maximum stroke. Refer to the specifications of the product.
2. When the product repeatedly cycles with partial strokes, lubrication can run out. Operate it at a full stroke at least once a day or every 1000 strokes.
3. Do not use the product in applications where excessive external force or impact force is applied to it.
The product can be damaged. Each component that includes motor is made with accurate tolerance. So even slightly deformed or miss-alignment of component may lead operation failure of the product.
4. Refer to a common auto switch /matter (Best Pneumatics No 2) when an auto switch is built in
and used.

- 24 -
6.2 Mounting
Warning 1. Install and operate the product only after reading the Operation Manual carefully and under
standing its contents. Keep the manual in a safe place future reference.
2. Observe the tightening torque for screws. Tighten the screws to the recommended torque for mounting the product.
3. Do not make any alterations to this product. Alterations made to this product may lead to a loss of durability and damage to the product, which can lead to human injury and damage to other equipment and machinery.
4. When using external guide, the guide axis should be parallel to the actuator axis. There will be damage/excessive wear on the lead screw if the external guide is not parallel.
5. When an external guide is used, connect the moving parts of the product and the load in such a way that there is no interference at any point within the stroke. Do not scratch or dent the sliding parts of the product tube or piston rod etc., by striking or grasping them with other objects. Components are manufactured to precise tolerances, so that even a slight deformation may cause faulty operation.
6. Prevent the seizure of rotating parts. Prevent the seizure of rotating parts (pins, etc.) by applying grease.
7. Do not use the product until you verify that the equipment can operate properly. After mounting or repair, connect the power supply to the product and perform appropriate functional inspections to check it is mounted properly.
8. Cantilever When the actuator is operated at high speed while it is fixed at one end and free at the other end (flange type, foot type, double clevis type, direct mount type), a bending moment may act on the actuator due to vibration generated at the stroke end, which can damage the actuator. In such a case, install a support bracket to suppress the vibration of the actuator body or reduce the speed so that the actuator does not vibrate. Use a support bracket also when moving the actuator body or when a long stroke actuator is mounted horizontally and fixed at one end.
9. When mounting the actuator or attaching the work piece, do not apply strong impact or large moment. If an external force over the allowable moment is applied, it may cause looseness in the guide unit, an increase in sliding resistance or other problems.
10. Maintenance space Allow sufficient space for maintenance and inspection.

- 25 -
6.3 Handling
Warning 1. If abnormal heating, smoking or fire, etc., occurs in the product, immediately shut off the power
supply. 2. Immediately stop operation if abnormal operation noise or vibration occurs.
If abnormal operation noise or vibration occurs, the product may have been mounted incorrectly. Unless operation of the product is stopped for inspection, the product can be seriously damaged.
3. Never touch the rotating part of the motor or moving part of the actuator while in operation. Alterations made to this product may lead to a loss of durability and damage to the product, which can lead to human injury and damage to other equipment and machinery.
4. When installing, adjusting, inapecting or performing maintenance on the product, driver and related equipment, be sure to shut off the power supply to them. Then, lock it so that no one other than the person working can turn the power on, or implement measures such as a safety plug.
Caution 1. Keep the driver and product combined as delivered for use.
The product is set in parameters for shipment. If it is combined with a different parameter, failure can result.
2. Check the product for the following points before operation. a) Damage to power supply line and signal line. b) Looseness of the connector to each power line and signal line. c) Looseness of the actuator /cylinder and controller /driver mounting. d) Abnormal operation. e) Emergency stop of the total system.
3. When more than one person is performing work, decide on the procedures, signals, measures and resolution for abnormal conditions before beginning the work.
Also, designate a person to supervise work other than those performing work. 4. Actual speed of the product will be changed by the workload.
Before selecting a product, check the catalog for the instructions regarding selection and specifications.
5. Do not apply a load, impact or resistance in addition to a transferred load during return to origin. In the case of the return to origin by pushing force, additional force will cause displacement of the origin position since it is based on detected motor torque.
6. Do not remove the nameplate. 7. Operation test should be done by low speed.
Start operation by predefined speed after confirming there is no trouble.
[Ground] Warning
1. Do the earth construction surely. 2. Refer to the driver manual for the grounding procedure and notes.
[Unpackaging] Caution
1. Check the received product is as ordered If the different product is installed from the one ordered, injury or damage can result.

- 26 -
6.4 Operating environment
Warning 1. Avoid use in the following environments.
a. Locations where a large amount of dusts and cutting chips are airborne. b. Locations where the ambient temperature is outside the range of the temperature specification
(refer to specifications). c. Locations where the ambient humidity is outside the range of the humidity specification (refer to
specifications). d. Locations where corrosive gas, flammable gas, sea water, water and steam are present. e. Locations where strong magnetic or electric fields are generated. f. Locations where direct vibration or impact is applied to the product. g. Areas that are dusty, or are exposed to splashes of water and oil drops. h. Areas exposed to direct sunlight (ultraviolet ray).
2. Do not use in an environment where the product is directly exposed to liquid, such as cutting oils. If cutting oils, coolant or oil mist contaminates the product, failure or increased sliding resistance can result.
3. Install a protective cover when the product is used in an environment directly exposed to foreign matters such as dust, cutting chips and spatter. Play or increased sliding resistance can result.
4. Shade the sunlight in the place where the product is applied with direct sunshine. 5. Shield the product if there is a heat source nearby.
When there is a heat source surrounding the product, the radiated heat from the heat source can increase the temperature of the product beyond the operating temperature range. Protect it with a cover, etc.
6. Grease oil can be decreased due to external environment and operating conditions, and it deteriorates lubrication performance to shorten the life of the product.
[Storage] Warning
1. Do not store the product in a place in direct contact with rain or water drops or is exposed to harmful gas or liquid.
2. Store in an area that is shaded from direct sunlight and has a temperature and humidity within the specified range (-10°C to 60°C and 90%RH or less No condensation or freezing).
3. Do not apply vibration and impact to the product during storage.

- 27 -
6.5 Maintenance Warning
1. Do not disassemble or repair the product. Fire or electric shock can result.
2. Before modifying or checking the wiring, the voltage should be checked with a tester 5 minutes after the power supply is turned off. Electrical shock can result.
Caution 1. Maintenance should be performed according to the procedure indicated in the Operating
Manual. Incorrect handling can cause an injury, damage or malfunction of equipment and machinery.
2. Removal of product. When equipment is serviced, first confirm that measures are in place to prevent dropping of work pieces and run-away of equipment, etc, and then cut the power supply to the system. When machinery is restarted, check that operation is normal with actuators in the proper positions.
[Lubrication] Caution
1. The product has been lubricated for life at manufacturer, and does not require lubrication in service. In case that the product requires lubrication according to condition of use, refer to chapter 7.
6.6 Precautions for actuator with lock
Warning 1. Do not use the lock as a safety lock or a control that requires a locking force.
The lock used for the product with a lock is designed to prevent dropping of work piece. 2. For vertical mounting, use the product with a lock.
If the product is not equipped with a lock, the product will move and drop the work piece when the power is removed.
3. "Measures against drops” means preventing a work piece from dropping due to its weight when the product operation is stopped and the power supply is turned off.
4. Do not apply an impact load or strong vibration while the lock is activated. If an external impact load or strong vibration is applied to the product, the lock will lose it’s holding force and damage to the sliding part of the lock or reduced lifetime can result. The same situations will happen when the lock slips due to a force hight than its holding force, as this will accelerate the wear to the lock.
5. Do not apply liquid or oil and grease to the lock or its surrounding. When liquid or oil and grease is applied to the sliding part of the lock, its holding force will be reduce significantly.
6. Take measures against drops and check that safety is assured before mounting, adjustment and inspection of the product. If the lock is released with the product mounted vertically, a work piece can drop due to its weight.

- 28 -
7. Electric actuators / Slider type Common precautions 7.1 Design
Caution 1. Do not apply a load in excess of the actuator specification.
A product should be selected based on the maximum work load and allowable moment. If the product is used outside of the operating specification, eccentric load applied to the guide will become excessive and have adverse effects such as creating play in the guide, reduced accuracy and reduced product life.
2. Do not use the product in applications where excessive external force or impact force is applied to it.
The product can be damaged. The components including the motor are manufactured to precise tolerances. So that even a slight deformation may cause faulty operation or seizure.
7.2 Selection
Warning 1. Do not exceed the speed limit of the actuator specification.
Select a suitable actuator by the relationship of allowable work load and speed. Noise or reduction of accuracy may occur if the actuator is operated in excess of its specification and could lead to reduced accuracy and reduced product file.
2. When the product repeatedly cycles with partial strokes (100mm), lubrication can run out. Operate it at a full stroke at least once a day or every 1000 strokes.
3. In case that external force is applied, select the actuator at total work load including external force. When a cable duct or flexible moving tube is attached to the actuator, the sliding resistance of the table increases and may lead to operational failure of the product.
7.3 Handling
Caution 1. Do not allow the table to hit the end of stroke.
It can cause damage to the actuator.
2. The actual speed of this actuator is affected by the work load and stroke. Check specifications with reference to the model selection section of the catalog.
3. Do not apply a load, impact or resistance in addition to a transferred load during return to origin. In the case of return to origin by pushing force, additional force will cause displacement of the origin position since it is based on detected motor torque.
4. Do not scratch or gouge the body or the table. The flatness of the mounting surface will be deteriorated and it can cause play in the guide and increased sliding resistance.
5. Do not apply strong impact and too much moment. When external force that exceeds the allowable moment is applied, it can cause play in the guide and increased sliding resistance.
6. Keep the flatness of mounting surface to within 0.1mm or less. Insufficient flatness of the workpiece or the surface onto which the actuator body is to be mounted can cause play in the guide and increased sliding resistance. In the case of overhang mounting (including cantilever), to avoid deflection of the actuator body use a support plate or support guide.

- 29 -
7. When mounting the actuator, use all mounting holes.
If all mounting holes are not used, it influences specifications. e.g. the amount of displacement of the table increases.
8. Do not allow the table to hit the workpiece in the positioning operation and positioning area. 9. Do not apply external force to dust seal band, particularly during the actuators movement. 10. When mounting the actuator, use screws with adequate length and tighten them with adequate
torque. Tightening the screws with a higher torque than the maximum may cause malfunction, whilst tightening with a lower torque can cause the displacement of the mounting position or fall.
Use screws with adequate length, but at least 0.5mm shorter than the maximum thread depth. The use of screws that are too long can touch the body and cause malfunction.
11. Do not operate by fixing the table and moving the actuator body. 12. The belt drive actuator cannot be used for vertically mounted applications. 13. Vibration may occur during operation, this could be caused by the operating conditions.
If it occurs, adjust response value of autotuning of driver to be lower. During the autotuning noise may occur, the noise will stop when the tuning is complete.
14. When mounting the actuator using the body mounting reference plane, use the pin. And set the height of the pin to be 5mm or more because of R chamfering.
(Recommended height:6mm)
Model Bolt sizeMaximum Tightening torque(Nm)
φA(mm) L(mm)
LEJ□40 M5 3.0 5.5 36.5 LEJ□63 M6 5.2 6.8 49.5
Model Bolt size Maximum Tightening torque(Nm)
L(Maximum threaddepth: mm)
LEJ□40 M6 x 1 5.2 10
LEJ□63 M8 x 1.25 12.5 12
Mounting the actuator
Mounting the workpiece
Mounting reference plane

- 30 -
7.4 Plug and unplug the “Cable” and the “Motor cover” Caution
1. Let each cable through the “Motor cover”, and insert connector. For LEJB series, please take care to make the direction of the cutout of the “Motor cover” in figure. When screwing the connector, gradually tighten the screws in a crisscross pattern.
2. Insert each cable into the “Grommet”.
3. Fix the “Motor cover” and the “End cover A”.
4. When unplug the “Cable” and the “Motor cover”, follow the reverse order of 1~3.
Table 7-1. The fixing bolts of the cover
Motor option Bolt type Bolt size Recommended
tightening torque (Nm) Quantity
Without lock M4×110
With lock
Cross recessed pan head screw M4×150
0.9±0.1 4
Motor cover
Fixing bolts of the cover(Refer to Table 7-1)
End cover A
Grommet
Cutout of the “Motor cover”
Cable
Pully cover

- 31 -
7.5 Precaution on maintenance
Warning 1. Turn off the power supply and remove the workpiece before maintenance and replacement of
the product. [Maintenance frequency]
Perform maintenance according to the table below. Contact SMC if any abnormality is found.
Frequency Visual appearance
check Internal check
Belt check
Inspection before daily operation
○
Inspection every six months / 1000km / 5million cycle *
○ ○ ○
*Whichever occurs first. [Items for visual appearance check]
1. Loose screws. Abnormal dirt. 2. Check of flaws/faults and cable connections. 3. Vibration, noise.
[Items for internal check] 1. Lubricant condition and dirt on moving parts.
For lubrication, use lithium grease No. 2. 2. Loose or mechanical play in fixed parts or fixing screws.
[Items for belt check] Stop operation immediately when the belt appears to be like malfunction shown in the pictures below. If it occurs in the first stage of use, confirm it is within the range of the product specification, the system requirements and conditions of use. Return the actuator to SMC for the belt to be replaced. (When replacing the belt, please contact SMC for the instruction manual. Adjustment of the motor origin and adjustment of the belt tension etc. is difficult. Therefore we recommend returning the actuator to SMC for the belt to be replaced.)
a. Wear-out of tooth shape canvas Canvas fiber becomes fuzzy. Rubber is removed and the fiber becomes whitish. Lines of fiber become unclear.
b. Peeling off or wearing of the side of the belt Belt corner becomes round and frayed threads stick out.
c. Belt partially cut
Belt is partially cut. Foreign matter is caught in the teeth other than the cut part causes flaw.
d. Vertical line of belt teeth Flaw, which is made when the belt runs on the flange.
e. The rubber back of the belt is softened and sticky. f. Crack on the back of the belt

- 32 -
2. For internal check, follow the below procedure.
a. Loosen the bolts of the band holder on the end side of the actuator. Please take care to not cut hand on the edges of the “Dust seal band”.
b. Remove the “Seal band pusher” and the “Blanking plate”. Attention: Do not loosen the fixing bolts of the motor side of the stroke.
c. Re-assembly: Follow the reverse order of a-b. At the time, the surface of the “Seal band pusher” must be under the surface of the “Table”.
Table 7-2. The fixing bolts of the “Dust seal band”
Bolt type Bolt size Recommended
tightening torque (Nm) Quantity
Hexagon socket set screw
M4 x 5 0.4±0.1 2
Table 7-3. The fixing bolts of the “Seal band pusher”
Bolt type Bolt size Recommended
tightening torque (Nm) Quantity
± recessed pan head screw M4 x 25 0.9±0.1 2
Fixing bolts of the “Dust seal band“ (Refer to Table 7-2)
Dust seal band
End side
Blanking plate
Fixing bolts of the “Seal band pusher” (Refer to Table 7-3)
Seal band pusher
Table
Fixing bolts of the “Dust seal band”
Motor side
Seal band pusher
Table

- 33 -
3. For belt (for speed reduction) follow the procedure below.
*This is not a procedure for belt change. Refer to [Items for belt check] on P.25. a. Remove the fixing bolts of “End cover B” and “Pulley cover”.
b. Remove “End cover B” and “Pulley cover”.
c. Re-assembly: Follow the reverse order of a-b.
Table 7-4. The fixing bolts of cover
Bolt type Bolt size Recommended
tightening torque (Nm) Quantity
Cross recessed pan head screw
M4 x 35 (LEJ□40)M4 x 40 (LEJ□63)
0.9±0.1 4
Pulley cover
End cover B
Fixing bolts of the cover (Refer to Table 7-4)
Belt (for speed reduction)

- 34 -
8. Troubleshooting 8.1 Alarms and Warning When a fault occurs during the operation, the corresponding alarm or warning is displayed. If any alarm or warning has occurred, refer to 「Driver Operation Manual」and take the appropriate action. After removing the cause of the alarm, the alarm can be deactivated in any of the methods marked ○ in the alarm deactivation column. ・LECSA(Pulse input / Positioning)
Alarm deactivation
Display Name Power OFF→ON
Press "SET" on current alarm
screen.
Alarm reset (RES)
A.10 Undervoltage ○ ○ ○ A.12 Memory error 1 (RAM) ○ - - A.13 Clock error ○ - - A.15 Memory error 2 (EEP-ROM) ○ - - A.16 Encoder initial communication error1 ○ - - A.17 Board error ○ - - A.19 Memory error 3 (Flash-ROM) ○ - - A.1A Motor combination error ○ - - A.1C Software combination error ○ - - A.1E Encoder initial communication error 2 ○ - - A.1F Encoder initial communication error 3 ○ - - A.20 Encoder normal communication error 1 ○ - - A.21 Encoder normal communication error 2 ○ - - A.24 Main circuit error ○ ○ ○ A.30 Regenerative error ○(Note1) ○(Note1) ○(Note1)
A.31 Overspeed ○ ○ ○ A.32 Overcurrent ○ - - A.33 Overvoltage ○ ○ ○ A.35 Command frequency error ○ ○ ○ A.37 Parameter error ○ - - A.39 Program error ○ - - A.45 Main circuit device overheat ○(Note1) ○(Note1) ○(Note1)
A.46 Servo motor overheat ○(Note1) ○(Note1) ○(Note1)
A.50 Overload 1 ○(Note1) ○(Note1) ○(Note1)
A.51 Overload 2 ○(Note1) ○(Note1) ○(Note1)
A.52 Error excessive ○ ○ ○ A.61 Operation alarm ○ ○ ○ A.8E USB communication error ○ ○ ○
Ala
rms
888 Watchdog ○ - -
Display Name A.90 Amplifier overheat warning A.91 Stroke limit warning A.96 Excessive regeneration warning A.97 Overload warning 1 A.98 Servo forced stop warning A.99 Main circuit off warning A.E0 Overload warning 2 A.E1 Output watt excess warning A.E6 Tough drive warning A.E9 Amplifier overheat warning A.EC Stroke limit warning A.ED Excessive regeneration warning
War
ning
A.F0 Overload warning 1
Note1. Deactivate the alarm about 30 minutes of cooling time after removing the cause of occurrence.

- 35 -
・LECSB(Pulse input)
Alarm deactivation
Display Name Power OFF→ON
Press "SET" on current alarm
screen.
Alarm reset (RES)
AL.10 Undervoltage ○ ○ ○ AL.12 Memory error 1 (RAM) ○ - - AL.13 Clock error ○ - - AL.15 Memory error 2 (EEP-ROM) ○ - - AL.16 Encoder error 1(At power on) ○ - - AL.17 Board error ○ - - AL.19 Memory error 3(Flash-ROM) ○ - - AL.1A Motor combination error ○ - - AL.20 Encoder error 2(during runtime) ○ - - AL.21 Encoder error 3(during runtime) ○ - - AL.24 Main circuit error ○ ○ ○ AL.25 Absolute position erase ○ - - AL.30 Regenerative error ○(Note1) ○(Note1) ○(Note1)
AL.31 Overspeed ○ ○ ○ AL.32 Overcurrent ○ - - AL.33 Overvoltage ○ ○ ○ AL.35 Command pulse frequency alarm ○ ○ ○ AL.37 Parameter error ○ - - AL.45 Main circuit device overheat ○(Note1) ○(Note1) ○(Note1)
AL.46 Servo motor overheat ○(Note1) ○(Note1) ○(Note1)
AL.47 Cooling fan alarm ○ - - AL.50 Overload 1 ○(Note1) ○(Note1) ○(Note1) AL.51 Overload 2 ○(Note1) ○(Note1) ○(Note1)
AL.52 Error excessive ○ ○ ○ AL.8A Serial communication time-out error ○ ○ ○ AL.8E Serial communication error ○ ○ ○
Ala
rms
88888 Watchdog ○ - -
Display Name A.92 Battery cable disconnection warning A.96 Home position setting error A.99 Stroke limit warning A.9F Battery warning A.E0 Excessive regeneration warning A.E1 Overload warning 1 A.E3 Absolute position counter warning A.E5 ABS time-out warning A.E6 Servo emergency stop warning A.E8 Cooling fan speed reduction warning A.E9 Main circuit off warning A.EA ABS servo on warning A.EC Overload warning 2
War
ning
A.ED Output watt excess warning
Note1. Deactivate the alarm about 30 minutes of cooling time after removing the cause of occurrence.

- 36 -
・LECSC(CC-Link)
Alarm deactivation
Display Name Power OFF→ON
MR Configuratior parameter unit(Note3)
Alarm reset
(Note2) A10 Undervoltage ○ ○ ○ A12 Memory error 1 (RAM) ○ - - A13 Clock error ○ - - A15 Memory error 2 (EEP-ROM) ○ - - A16 Encoder error 1(At power on) ○ - - A17 Board error ○ - - A19 Memory error 3(Flash-ROM) ○ - - A1A Motor combination error ○ - - A20 Encoder error 2 ○ - - A24 Main circuit error ○ ○ ○ A25 Absolute position erase ○ - - A30 Regenerative error ○(Note1) ○(Note1) ○(Note1)
A31 Overspeed ○ ○ ○ A32 Overcurrent ○ - - A33 Overvoltage ○ ○ ○ A35 Command pulse frequency alarm ○ ○ ○ A37 Parameter error ○ - - A45 Main circuit device overheat ○(Note1) ○(Note1) ○(Note1)
A46 Servo motor overheat ○(Note1) ○(Note1) ○(Note1)
A47 Cooling fan alarm ○ - - A50 Overload 1 ○(Note1) ○(Note1) ○(Note1)
A51 Overload 2 ○(Note1) ○(Note1) ○(Note1)
A52 Error excessive ○ ○ ○ A61 Operation alarm ○ ○ ○ A8A Serial communication time-out ○ ○ ○ A8D CC-Link alarm ○ ○ ○ A8E Serial communication error ○ ○ ○
Ala
rms
888 Watchdog ○ - -
Display Name A90 Home positioning incomplete warning A92 Open battery cable warning A96 Home position setting error A97 Next station warning A99 Stroke limit warning A9D CC-Link warning 1
A9E CC-Link warning 2 A9F Battery warning AE0 Excessive regeneration warning AE1 Overload warning 1 AE3 Absolute position counter warning AE6 Servo emergency stop warning AE8 Cooling fan speed reduction warning AE9 Main circuit off warning AEC Overload warning 2
War
ning
AED Output watt excess warning
Note1. Deactivate the alarm about 30 minutes of cooling time after removing the cause of occurrence.
Note2. Turns on RY(n+1)A or RY(n+3)A.
Note3. Clicking the “Alarm reset” button on the “Alarm display” screen of MR Configurator allows an alarm to be deactivated. Pressing the “STOP RESET” key of the parameter unit allows an alarm to be deactivated.

- 37 -
・LECSS(SSCNET III)
Alarm deactivation
Display Name Power OFF→ON
Error reset CPU reset
10 Undervoltage ○ ○ ○ 12 Memory error 1 (RAM) ○ - - 13 Clock error ○ - - 15 Memory error 2 (EEP-ROM) ○ - - 16 Encoder error 1(At power on) ○ - - 17 Board error ○ - - 19 Memory error 3(Flash-ROM) ○ - - 1A Motor combination error ○ - - 20 Encoder error 2(during runtime) ○ - - 21 Encoder error 3(during runtime) ○ - - 24 Main circuit error ○ ○ ○ 25 Absolute position erase ○ - - 30 Regenerative error ○(Note1) ○(Note1) ○(Note1)
31 Overspeed ○ ○ ○ 32 Overcurrent ○ - - 33 Overvoltage ○ ○ ○ 34 Receive error 1 ○ ○(Note2) ○ 35 Command pulse frequency alarm ○ ○ ○ 36 Receive error 2 ○ ○ ○ 37 Parameter error ○ - -
3D Driver communication parameter setting error ○ - ○
45 Main circuit device overheat ○(Note1) ○(Note 1) ○(Note1)
46 Servo motor overheat ○(Note1) ○(Note 1) ○(Note1) 47 Cooling fan alarm ○ - - 50 Overload 1 ○(Note1) ○(Note1) ○(Note1)
51 Overload 2 ○(Note1) ○(Note1) ○(Note1)
52 Error excessive ○ ○ ○ 82 Master/Slave operation alarm ○ ○(Note2) ○ 8A USB communication time-out error ○ ○ ○ 8E USB communication error ○ ○ ○
Ala
rms
888 Watchdog ○ - -
Display Name 92 Battery cable disconnection warning 96 Home position setting error 9F Battery warning E0 Excessive regeneration warning E1 Overload warning 1 E3 Absolute position counter warning E4 Parameter warning E6 Servo forced stop warning E7 Controller forced stop warning E8 Cooling fan speed reduction warning E9 Main circuit off warning EC Overload warning 2
War
ning
ED Output watt excess warning
Note1. Deactivate the alarm about 30 minutes of cooling time after removing the cause of occurrence.
Note2. In some controller communication status, the alarm factor may not be removed.

- 38 -
・LECSS-T(SSCNET III / H)
Alarm reset
No. Name
Det
ail d
ispl
ay
Detail name
Sto
p m
etho
d (N
ote
3, 4
)
Err
or r
eset
CP
U r
eset
Pow
er
off →
on
10.1 Voltage drop in the control circuit power
EDB 10 Undervoltage
10.2 Voltage drop in the main circuit power
SD
12.1 RAM error 1 DB - - 12.2 RAM error 2 DB - - 12.3 RAM error 3 DB - - 12.4 RAM error 4 DB - -
12 Memory error 1 (RAM)
12.5 RAM error 5 DB - - 13.1 Clock error 1 DB - - 13 Clock error 13.2 Clock error 2 DB - - 14.1 Control process error 1 DB - - 14.2 Control process error 2 DB - - 14.3 Control process error 3 DB - - 14.4 Control process error 4 DB - - 14.5 Control process error 5 DB - - 14.6 Control process error 6 DB - - 14.7 Control process error 7 DB - - 14.8 Control process error 8 DB - - 14.9 Control process error 9 DB - -
14 Control process error
14.A Control process error 10 DB - - 15.1 EEP-ROM error at power on DB - - 15
Memory error 2 (EEP-ROM) 15.2 EEP-ROM error during operation DB - -
16.1 Encoder initial communication - Receive data error 1
DB - -
16.2 Encoder initial communication - Receive data error 2
DB - -
16.3 Encoder initial communication - Receive data error 3
DB - -
16.5 Encoder initial communication - Transmission data error 1
DB - -
16.6 Encoder initial communication - Transmission data error 2
DB - -
16.7 Encoder initial communication - Transmission data error 3
DB - -
16.A Encoder initial communication - Process error 1
DB - -
16.B Encoder initial communication - Process error 2
DB - -
16.C Encoder initial communication - Process error 3
DB - -
16.D Encoder initial communication - Process error 4
DB - -
16.E Encoder initial communication - Process error 5
DB - -
16 Encoder initial communication error 1
16.F Encoder initial communication - Process error 6
DB - -
17.1 Board error 1 DB - - 17.3 Board error 2 DB - - 17.4 Board error 3 DB - - 17.5 Board error 4 DB - - 17.6 Board error 5 DB - -
17 Board error
17.8 Board error 6 (Note 5) EDB - - 19.1 Flash-ROM error 1 DB - - 19
Memory error 3 (FLASH-ROM) 19.2 Flash-ROM error 2 DB - -
1A.1 Servo motor combination error DB - - 1A
Servo motor combination error 1A.2
Servo motor control mode combination error
DB - -
1E.1 Encoder malfunction DB - -
Ala
rm
1E Encoder initial communication error 2 1E.2 Load-side encoder malfunction DB - -

- 39 -
Alarm reset
No. Name
Det
ail d
ispl
ay
Detail name
Sto
p m
etho
d (N
ote
3, 4
)
Err
or r
eset
CP
U r
eset
Pow
er
off →
on
1F.1 Incompatible encoder DB - - 1F Encoder initial communication error 3 1F.2 Incompatible load-side encoder DB - -
20.1 Encoder normal communication - Receive data error 1
EDB - -
20.2 Encoder normal communication - Receive data error 2
EDB - -
20.3 Encoder normal communication - Receive data error 3
EDB - -
20.5 Encoder normal communication - Transmission data error 1
EDB - -
20.6 Encoder normal communication - Transmission data error 2
EDB - -
20.7 Encoder normal communication - Transmission data error 3
EDB - -
20.9 Encoder normal communication - Receive data error 4
EDB - -
20 Encoder normal communication error 1
20.A Encoder normal communication - Receive data error 5
EDB - -
21.1 Encoder data error 1 EDB - - 21.2 Encoder data update error EDB - - 21.3 Encoder data waveform error EDB - - 21.4 Encoder non-signal error EDB - - 21.5 Encoder hardware error 1 EDB - - 21.6 Encoder hardware error 2 EDB - -
21 Encoder normal communication error 2
21.9 Encoder data error 2 EDB - -
24.1 Ground fault detected by hardware detection circuit
DB - - 24 Main circuit error
24.2 Ground fault detected by software detection function
DB
25 Absolute position erased
25.1 Servo motor encoder - Absolute position erased
DB - -
27.1 Magnetic pole detection - Abnormal termination
DB - -
27.2 Magnetic pole detection - Time out error
DB - -
27.3 Magnetic pole detection - Limit switch error
DB - -
27.4 Magnetic pole detection - Estimated error
DB - -
27.5 Magnetic pole detection - Position deviation error
DB - -
27.6 Magnetic pole detection - Speed deviation error
DB - -
27 Initial magnetic pole detection error
27.7 Magnetic pole detection - Current error
DB - -
28 Linear encoder error 2 28.1 Linear encoder - Environment error
EDB - -
2A.1 Linear encoder error 1-1 EDB - - 2A.2 Linear encoder error 1-2 EDB - - 2A.3 Linear encoder error 1-3 EDB - - 2A.4 Linear encoder error 1-4 EDB - - 2A.5 Linear encoder error 1-5 EDB - - 2A.6 Linear encoder error 1-6 EDB - - 2A.7 Linear encoder error 1-7 EDB - -
2A Linear encoder error 1
2A.8 Linear encoder error 1-8 EDB - - 2B.1 Encoder counter error 1 EDB - - 2B Encoder counter error 2B.2 Encoder counter error 2 EDB - -
30.1 Regeneration heat error DB (Note 1)
(Note 1)
(Note 1)
30.2 Regeneration signal error DB (Note 1)
(Note 1)
(Note 1)
Alarm
30 Regenerative error (Note 1)
30.3 Regeneration feedback signal error
DB (Note 1)
(Note 1)
(Note 1)

- 40 -
Alarm reset
No. Name
Det
ail d
ispl
ay
Detail name
Sto
p m
etho
d (N
ote
3, 4
)
Err
or r
eset
CP
U r
eset
Pow
er
off →
on
30.1 Regeneration heat error DB (Note 1)
(Note 1)
(Note 1)
30.2 Regeneration signal error DB (Note 1)
(Note 1)
(Note 1)
30 Regenerative error (Note 1)
30.3 Regeneration feedback signal error
DB (Note 1)
(Note 1)
(Note 1)
31 Overspeed 31.1 Abnormal motor speed SD
32.1 Overcurrent detected at hardware detection circuit (during operation)
DB - -
32.2 Overcurrent detected at software detection function (during operation)
DB
32.3 Overcurrent detected at hardware detection circuit (during a stop)
DB - -
32 Overcurrent
32.4 Overcurrent detected at software detection function (during a stop)
DB
33 Overvoltage 33.1 Main circuit voltage error EDB - -
34.1 SSCNET receive data error SD
(Note 2)
34.2 SSCNET connector connection error
SD
34.3 SSCNET communication data error
SD
34 SSCNET receive error 1
34.4 Hardware error signal detection SD
35 Command frequency error
35.1 Command frequency error SD
36 SSCNET receive error 2
36.1 Continuous communication data error
SD
37.1 Parameter setting range error DB - 37 Parameter error 37.2 Parameter combination error DB -
3A Inrush current suppression circuit error
3A.1 Inrush current suppression circuit error
EDB - -
3E Operation mode error 3E.1 Operation mode error DB - -
42.1 Servo control error by position deviation
EDB (Note 3)
(Note 3)
42.2 Servo control error by speed deviation
EDB (Note 3)
(Note 3)
Servo control error (for linear servo motor and direct drive motor)
42.3 Servo control error by torque/thrust deviation
EDB (Note 3)
(Note 3)
42.8 Fully closed loop control error by position deviation
EDB (Note 3)
(Note 3)
42.9 Fully closed loop control error by speed deviation
EDB (Note 3)
(Note 3)
42
Fully closed loop control error (during fully closed loop control)
42.A Fully closed loop control error by position deviation during command stop
EDB (Note 3)
(Note 3)
45 Main circuit device overheat (Note 1)
45.1 Main circuit device overheat error SD (Note 1)
(Note 1)
(Note 1)
46.1 Abnormal temperature of servo motor 1
SD (Note 1)
(Note 1)
(Note 1)
46.2 Abnormal temperature of servo motor 2
SD (Note 1)
(Note 1)
(Note 1)
46.3 Thermistor disconnected SD (Note 1)
(Note 1)
(Note 1)
46.5 Abnormal temperature of servo motor 3
DB (Note 1)
(Note 1)
(Note 1)
46 Servo motor overheat (Note 1)
46.6 Abnormal temperature of servo motor 4
DB (Note 1)
(Note 1)
(Note 1)
47.1 Cooling fan stop error SD - - 47 Cooling fan error 47.2 Cooling fan speed reduction error SD - -
50.1 Thermal overload error 1 during operation
SD (Note 1)
(Note 1)
(Note 1)
Ala
rm
50 Overload 1 (Note 1) 50.2
Thermal overload error 2 during operation
SD (Note 1)
(Note 1)
(Note 1)

- 41 -
Alarm reset
No. Name
Det
ail d
ispl
ay
Detail name
Sto
p m
etho
d (N
ote
3, 4
)
Err
or r
eset
CP
U r
eset
Pow
er
off →
on
50.3 Thermal overload error 4 during operation
SD (Note 1)
(Note 1)
(Note 1)
50.4 Thermal overload error 1 during a stop
SD (Note 1)
(Note 1)
(Note 1)
50.5 Thermal overload error 2 during a stop
SD (Note 1)
(Note 1)
(Note 1)
50 Overload 1 (Note 1)
50.6 Thermal overload error 4 during a stop
SD (Note 1)
(Note 1)
(Note 1)
51.1 Thermal overload error 3 during operation
DB (Note 1)
(Note 1)
(Note 1)
51 Overload 2 (Note 1) 51.2
Thermal overload error 3 during a stop
DB (Note 1)
(Note 1)
(Note 1)
52.1 Excess droop pulse 1 SD 52.3 Excess droop pulse 2 SD
52.4 Error excessive during 0 torque limit
SD 52 Error excessive
52.5 Excess droop pulse 3 EDB 54 Oscillation detection 54.1 Oscillation detection error EDB
56.2 Over speed during forced stop EDB 56 Forced stop error
56.3 Estimated distance over during forced stop
EDB
63.1 STO1 off DB 63 STO timing error 63.2 STO2 off DB
70.1 Load-side encoder initial communication - Receive data error 1
DB - -
70.2 Load-side encoder initial communication - Receive data error 2
DB - -
70.3 Load-side encoder initial communication - Receive data error 3
DB - -
70 Load-side encoder initial communication error 1
70.5 Load-side encoder initial communication - Transmission data error 1
DB - -
70.6 Load-side encoder initial communication - Transmission data error 2
DB - -
70.7 Load-side encoder initial communication - Transmission data error 3
DB - -
70.A Load-side encoder initial communication - Process error 1
DB - -
70.B Load-side encoder initial communication - Process error 2
DB - -
70.C Load-side encoder initial communication - Process error 3
DB - -
70.D Load-side encoder initial communication - Process error 4
DB - -
70.E Load-side encoder initial communication - Process error 5
DB - -
70 Load-side encoder initial communication error 1
70.F Load-side encoder initial communication - Process error 6
DB - -
71.1 Load-side encoder communication - Receive data error 1
EDB - -
71.2 Load-side encoder communication - Receive data error 2
EDB - -
71.3 Load-side encoder communication - Receive data error 3
EDB - -
71.5 Load-side encoder communication - Transmission data error 1
EDB - -
71.6 Load-side encoder communication - Transmission data error 2
EDB - -
71.7 Load-side encoder communication - Transmission data error 3
EDB - -
71.9 Load-side encoder communication - Transmission data error 4
EDB - -
Ala
rm
71 Load-side encoder normal communication error 1
71.A Load-side encoder communication - Transmission data error 5
EDB - -

- 42 -
Alarm reset
No. Name
Det
ail d
ispl
ay
Detail name
Sto
p m
etho
d (N
ote
3, 4
)
Err
or r
eset
CP
U r
eset
Pow
er
off →
on
72.1 Load-side encoder data error 1 EDB - - 72.2 Load-side encoder data update
error EDB - -
72.3 Load-side encoder data waveform error
EDB - -
72.4 Load-side encoder non-signal error
EDB - -
72.5 Load-side encoder hardware error 1
EDB - -
72.6 Load-side encoder hardware error 2
EDB - -
72 Load-side encoder normal communication error 2
72.9 Load-side encoder data error 2 EDB - -
8A USB communication time-out error
8A.1 USB communication time-out error
SD
8E.1 USB communication receive error
SD
8E.2 USB communication checksum error
SD
8E.3 USB communication character error
SD
8E.4 USB communication command error
SD
8E USB communication error
8E.5 USB communication data number error
SD
Ala
rm
888 Watchdog 88._ Watchdog DB - -
Note 1. Leave for about 30 minutes of cooling time after removing the cause of occurrence.
2. In some controller communication status, the alarm factor may not be removed.
3. Stop method indicates as follows:
DB: Stops with dynamic brake. (Coasts for the driver without dynamic brake.)
EDB: Stops with electronic dynamic brake for 400 W or less drivers
Stops with dynamic brake for 750 W drivers
SD: Forced stop deceleration
4. This is applicable when [Pr. PA04] is set to the initial value. The stop system of SD can be changed to DB using [Pr. PA04].
5. This alarm will occur only in the J3 compatibility mode.
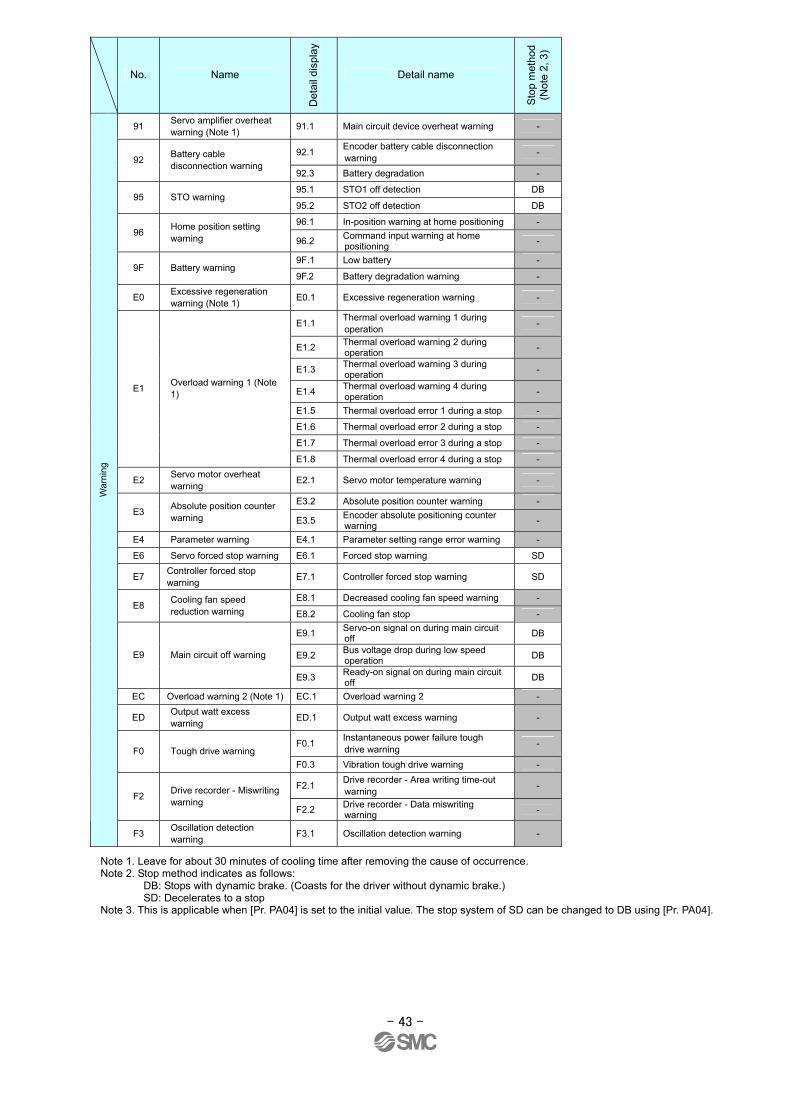
- 43 -
No. Name
Det
ail d
ispl
ay
Detail name
Sto
p m
etho
d (N
ote
2, 3
)
91 Servo amplifier overheat warning (Note 1)
91.1 Main circuit device overheat warning -
92.1 Encoder battery cable disconnection warning
- 92
Battery cable disconnection warning
92.3 Battery degradation -
95.1 STO1 off detection DB 95 STO warning
95.2 STO2 off detection DB
96.1 In-position warning at home positioning - 96
Home position setting warning 96.2
Command input warning at home positioning
-
9F.1 Low battery - 9F Battery warning
9F.2 Battery degradation warning -
E0 Excessive regeneration warning (Note 1)
E0.1 Excessive regeneration warning -
E1.1 Thermal overload warning 1 during operation
-
E1.2 Thermal overload warning 2 during operation
-
E1.3 Thermal overload warning 3 during operation
-
E1.4 Thermal overload warning 4 during operation
-
E1.5 Thermal overload error 1 during a stop -
E1.6 Thermal overload error 2 during a stop -
E1.7 Thermal overload error 3 during a stop -
E1
Overload warning 1 (Note 1)
E1.8 Thermal overload error 4 during a stop -
E2 Servo motor overheat warning
E2.1 Servo motor temperature warning -
E3.2 Absolute position counter warning - E3
Absolute position counter warning E3.5
Encoder absolute positioning counter warning
-
E4 Parameter warning E4.1 Parameter setting range error warning -
E6 Servo forced stop warning E6.1 Forced stop warning SD
E7 Controller forced stop warning
E7.1 Controller forced stop warning SD
E8.1 Decreased cooling fan speed warning - E8
Cooling fan speed reduction warning E8.2 Cooling fan stop -
E9.1 Servo-on signal on during main circuit off
DB
E9.2 Bus voltage drop during low speed operation
DB
E9
Main circuit off warning
E9.3
Ready-on signal on during main circuit off
DB
EC Overload warning 2 (Note 1) EC.1 Overload warning 2 -
ED Output watt excess warning
ED.1 Output watt excess warning -
F0.1 Instantaneous power failure tough drive warning
- F0 Tough drive warning
F0.3 Vibration tough drive warning -
F2.1 Drive recorder - Area writing time-out warning
- F2
Drive recorder - Miswriting warning
F2.2 Drive recorder - Data miswriting warning
-
War
ning
F3 Oscillation detection warning
F3.1 Oscillation detection warning -
Note 1. Leave for about 30 minutes of cooling time after removing the cause of occurrence. Note 2. Stop method indicates as follows:
DB: Stops with dynamic brake. (Coasts for the driver without dynamic brake.) SD: Decelerates to a stop
Note 3. This is applicable when [Pr. PA04] is set to the initial value. The stop system of SD can be changed to DB using [Pr. PA04].

- 44 -
Revision history
No.LEJ-OM00201
May / 2012 1st printing
No.LEJ-OM00202
Mar / 2013 Revision
No.LEJ-OM00203
Nov / 2013 Revision
No.LEJ-OM00204
Jan / 2015 Revision
4-14-1, Sotokanda, Chiyoda-ku, Tokyo 101-0021 JAPAN Tel: + 81 3 5207 8249 Fax: +81 3 5298 5362 URL http: / /www.smcworld.com Note: Specifications are subject to change without prior notice and any obligation on the part of the manufacturer. © 2014 SMC Corporation All Rights Reserved