electric chain saw - desa parts and desa … read and understand this manual before assembling or...
TRANSCRIPT

®
®
IMPORTANT: Read and understand this manual before assembling oroperating this chain saw. Improper use of saw can cause severeinjury. Keep this manual for future reference.
MODELSLNT-2: 076728K, 099178H, 100089-06, 100089-08, & 107709-01EL-7: 075762J, 098031J, 099039J, 100089-04, 100089-05,100089-07, & 107714-02Pole Saw: 104316-04 (8"), 106890-01(10")Pole Saw Assembly: 104317 (8"), 106821 (10")
ELECTRIC CHAIN SAWOWNER’S MANUAL
®

2 107990
ELECTRIC CHAIN SAW
®
For more information, visit www.desatech.com
SAFETYWARNINGS
BEFORE OPERATING SAW1. Read and understand this owner’s
manual before operating chain saw.2. Watch what you are doing. Use com-
mon sense. Do not operate saw whenyou are tired.
3. Use chain saw for cutting wood only.Do not use chain saw for purpose notintended. Do not use for cutting plas-tic, masonry, etc.
4. Only well-instructed adults should op-erate chain saw. Never allow childrento operate chain saw.
5. Use only electrical voltage noted onmodel plate of chain saw.
6. Use only extension cords marked foroutdoor use. See page 8 for extensioncord requirements.
7. Do not operate chain saw• while under the influence of alcohol,
medication, or drugs• in rain or in damp or wet areas• where highly flammable liquids or
gases are present• if saw is damaged, adjusted wrong,
or not fully and securely assembled• if trigger does not turn saw on and off.
Chain must stop moving when yourelease trigger. Have faulty switchreplaced by authorized service center.
• while in a hurry• while in tree or on a ladder unless
trained to do so8. Wear snug-fitting clothes when oper-
ating chain saw. Do not wear looseclothing or jewelry. They can get caughtin moving saw chain.
9. Wear the following safety gear whenoperating chain saw.• heavy-duty gloves (wear rubber
gloves when working outdoors)• steel-toed safety footwear with non-
skid soles
Make certain you read and un-derstand all Safety Warnings onpages 2 and 3. Improper use ofthis chain saw can cause severeinjury or death from fire, electri-cal shock, body contact withmoving chain, or falling wood.
• eye protection such as safety glasses,goggles, or face screen
• safety hard hat• ear mufflers or ear plugs• hair covering to contain long hair• face or dust mask (if working in dusty
areas)10. Before cutting, always provide the fol-
lowing:• clear work area• secure footing• planned retreat path from falling tree
11. Inspect tree before cutting down. Makesure there are no dead limbs or branchesthat may fall on you.
12. To reduce the risk of electric shock, thissaw has a polarized plug (one blade iswider than the other). This plug will fitin a polarized outlet only one way. Ifthe plug does not fit fully in the outletof your extension cord, reverse the plug.If it still does not fit, a polarized exten-sion cord will be necessary. Do notchange the plug in any way.
WHILE OPERATING SAW1. Stay alert. Use common sense while
operating chain saw.2. Keep work area clean. Cluttered areas
invite injuries.3. Be aware of extension cord while op-
erating chain saw. Be careful not to tripover cord. Keep cord away from chainand operator at all times.
4. Keep children, animals, and bystand-ers away from chain saw and extensioncord. Only chain saw user should be inwork area.
5. Do not cut down a tree unless you aretrained or have expert help.
6. If two or more persons perform buck-ing and felling operations at the sametime, provide plenty of distance betweenoperations. Provide distance of at leasttwice the height of tree being felled.
7. Secure wood you are cutting by usingclamps or chocks.
8. Grip chain saw firmly with both hands.Never operate chain saw with one hand.Never use hand guard as handle.
9. Keep finger off trigger until ready tomake cut.
10. Before starting chain saw, make surechain is not touching anything.
11. To guard against electrical shock, avoid
body contact with grounded objectssuch as pipes, fences, and metal posts.
12. Keep all parts of body away from chainwhen saw is running.
13. Do not force chain saw while cutting.Apply light pressure. It will do the jobbetter and safer at the rate for which itwas intended.
14. Cut small brush and saplings with ex-treme care. Slender material may catchin chain and be whipped toward you.This could also pull you off balance.
15. When cutting limb or tree trunk that isunder tension, use extreme caution. Bealert for wood springing back. Whenwood tension is released, limb couldspring back and strike operator caus-ing severe injury or death.
16. Carry chain saw from one place to an-other• with saw stopped and unplugged• by holding front handle (never use
hand guard as handle)• with finger off trigger• with guide bar and chain to rear
WARNING: Some dust createdby power sanding, sawing, grind-ing, drilling, and other construc-tion activities contains chemicalsknown (to the state of California) tocause cancer, birth defects, orother reproductive harm. Someexamples of these chemicals are:• lead from lead-based paints• crystalline silica from bricks
and cement and other masonryproducts
• arsenic and chromium fromchemically-treated lumber
Your risk from these exposuresvaries, depending on how oftenyou do this type of work. To reduceyour exposure to these chemicals:work in a well ventilated area, andwork with approved safety equip-ment, such as those dust masksthat are specially designed to filterout microscopic particles.
WARNING: This product con-tains chemicals known to theState of California to cause can-cer or birth defects, or other re-productive harm.

3107990
OWNER’S MANUAL
For more information, visit www.desatech.com
Kickback Safety Devices OnThis Saw
This saw has a low-kickback chain andreduced kickback guide bar. Both itemsreduce the chance of kickback. Kickbackcan still occur with this saw.
Properly install front hand guard. This itemcan reduce injuries from kickback. Followassembly instructions on page 6. Do notremove front hand guard. Do not replacefront hand guard with substitute.
The following steps will reduce the risk ofkickback.
• Use both hands to grip saw while saw isrunning. Use firm grip. Thumbs andfingers must wrap around saw handles.
• Keep all safety items in place on saw.Make sure they work properly.
• Do not overreach or cut above shoulderheight.
• Keep solid footing and balance at alltimes
• Stand slightly to left side of saw. Thiskeeps your body from being in direct linewith chain.
• Do not let guide bar nose touch anythingwhen chain is moving (see Figure 1).
Direction
90°Quadrant
Figure 1 - Kickback Hazard Example: DoNot Let Nose of Guide Bar Touch ObjectWhile Chain is Moving
Do Not LetGuide BarTouch Here
MAINTENANCE ANDSTORAGE OF CHAIN SAW1. Unplug chain saw from power source
• when not in use• before moving from one place to an-
other• before servicing• before changing accessories or at-
tachments, such as saw chain andguard
2. Inspect chain saw before and after eachuse. Check saw closely if guard or otherpart has been damaged. Check for anydamage that may affect operator safetyor operation of saw. Check for align-ment or binding of moving parts. Checkfor broken or damaged parts. Do notuse chain saw if damage affects safetyor operation. Have damage repaired byauthorized service center.
3. Maintain chain saw with care.• Never expose saw to rain.• Keep chain sharp, clean, and lubri-
cated for better and safer performance.• Follow steps outlined in this manual
to sharpen chain.• Keep handles dry, clean, and free of
oil and grease.• Keep all screws and nuts tight.• Inspect power cord often. If dam-
aged, have repaired by authorizedservice center.
• Never carry chain saw by power cord.• Never yank power cord to unplug it.• Keep power cord from heat, oil, and
sharp edges.• Inspect extension cords often and
replace if damaged.
4. When servicing, use only identical re-placement parts.
5. When not in use, always store chain saw• in a high or locked place, out of
children’s reach• in a dry place• in a carrying case or with scabbard
over guide bar
Keep this manual for reference. It is yourguide to safe and proper operation of thischain saw.
• Never try cutting through two logs atsame time. Only cut one log at a time.
• Do not bury guide bar nose or try plungecut (boring into wood using guide barnose).
• Watch for shifting of wood or otherforces that may pinch chain.
• Use extreme caution when reentering aprevious cut.
• Use low-kickback chain and guide barsupplied with this chain saw. Only re-place these parts with chains and guidebars listed in this manual.
• Never use dull or loose chain. Keep chainsharp with proper tension.
• Do not hand sharpen chain on automaticchain sharpening (Fast Sharp) models.
Saw Maintenance and KickbackSafety
Follow maintenance instructions in thismanual. Proper cleaning of saw and chainand guide bar maintenance can reducechances of kickback. Inspect and maintainsaw after each use. This will increase theservice life of your saw. Note: Even withproper sharpening, risk of kickback canincrease with each sharpening.
WARNING: Kickback may oc-cur when the nose or tip of theguide bar touches an object, orwhen the wood closes in andpinches the saw chain in the cut.Tip contact in some cases maycause a lightning fast reverse re-action, kicking the guide bar upand back towards the operator.Pinching the saw chain along thetop of the guide bar may push theguide bar rapidly back towardsthe operator. Either of these re-actions may cause you to losecontrol of the saw which couldresult in serious injury to user.
KICKBACK
SAFETYWARNINGS

4 107990
ELECTRIC CHAIN SAW
®
For more information, visit www.desatech.com
CHAIN SAW NAMESAND TERMSBucking Process of cutting a felled tree orlog into lengths.
Felling Process of cutting down a tree.
Felling Cut Final cut when felling a tree.Make this cut on opposite side of tree fromnotching cut.
Front Handle Located at front of saw body.
Front Hand Guard Shield between fronthandle and guide bar. Protects left handwhile using saw.
Guide Bar Metal bar that extends from sawbody. The guide bar supports and guides chain.
Guide Bar Nose Tip or end of guide bar.
Kickback Quick backward and upwardmotion of guide bar. Kickback may occurwhen tip of guide bar touches an objectwhile chain is moving. The guide bar willkick up and back towards operator.
Limbing Process of cutting limb(s) from afelled tree.
Low-Kickback Chain Chain that reduceschance of kickback as required by ANSB175.1.
Normal Cutting Position Stance used whilemaking bucking and felling cuts.
Notching Cut Notch cut in tree that directsfall of tree.
Oiler Control System for oiling guide barand chain.
Power Head Chain saw without chain andguide bar. Also known as saw body.
Pushback (Kickback, Pinch) Rapidpushback of chain saw. Pushback may oc-cur if chain along top of guide bar is pinched,caught, or contacts a foreign object.
Rear Handle Handle located at rear of sawbody.
Reduced Kickback Guide Bar Guide barthat reduces chance of kickback.
Replacement Chain Chain that complieswith ANS B175.1 when used with a specificsaw. It may not meet ANS requirementswhen used with other saws.
Saw Chain (Chain) Loop of chain havingcutting teeth for cutting wood. The motordrives chain. The guide bar supports chain.
Spiked Bumper (Spike) Pointed teeth atfront of saw body beside guide bar. Keepspiked bumper in contact with wood whenfelling or bucking. It helps maintain posi-tion of saw while cutting.
Sprocket Toothed wheel that drives chain.
Switch Device that completes or interruptselectrical circuit to motor of saw.
Switch Linkage This device connects switchto trigger. It moves switch when you squeezetrigger.
Switch Lockout Device that reduces acci-dental starting of saw.
Trigger Device that turns saw on and off.Squeezing trigger turns saw on.
Releasing trigger turns saw off.
Trimming (Pruning) Process of cuttinglimb(s) from a living tree.
Undercut An upward cut from underside oflog or limb. This is done while in normalcutting position and cutting with top ofguide bar.

5107990
OWNER’S MANUAL
For more information, visit www.desatech.com
Power Cord
Rear HandGuard
RearHandle
Front HandGuard
Guide Bar
SprocketCover
SawChain
Guide BarNose
Scabbard
Oil Cap WithSqueeze Bulb
TriggerSwitchLockoutMotor
Housing
Figure 2 - Electric Chain Saw
Oil Level Sight Hole(located on saw body,hidden by front handle)
Front Handle
PRODUCTIDENTIFICATION
UNPACKING1. Remove all items from carton.
2. Check all items for any shipping dam-age. If you find any damage or if anyparts are missing, promptly informdealer where you bought chain saw.
Spike

6 107990
ELECTRIC CHAIN SAW
®
For more information, visit www.desatech.com
MountingStand-Outs
Guide BarBolts
Guide BarNuts
AdjustingHole
GuideBar
TappingScrew
SawChain
CuttingEdge
CuttingEdgeTowards
GuideBar Nose
Front HandGuard
DriveSprocket
Figure 3 - Assembling Guide Bar, Chain, and Hand Guard
AdjustingPlate
AdjustingScrew
SprocketSupport
Figure 4 - Part Locations For Assembling Guide Bar
AdjustingBlock
ASSEMBLY
The plastic hardware bag should include:
• two guide bar bolts
• two guide bar nuts
• one Phillips-head tapping screw
• automatic chain sharpener (Fast Sharpmodels only)
1. Lay chain out flat.
2. Install front hand guard onto saw body.Do this by pressing two mounting stand-outs on hand guard into hex-shapedholes in saw body (see Figure 3).
3 Insert tapping screw through handguard and into saw handle. Tightenscrew firmly.
4. Turn adjusting screw counterclockwise(see Figure 4). Continue to turn adjust-ing screw until adjusting block is to rearof adjusting plate.
5. Install guide bar onto saw body. Placerear of guide bar between adjustingplate and sprocket support.
IMPORTANT: Make sure to insert ad-justing block into oval adjusting holeon guide bar.
6. Line up holes on sprocket support withcenter slot on guide bar and holes insaw body.
7. Insert guide bar bolts through fronthand guard, saw body, center slot ofguide bar, and sprocket support. Attachguide bar nuts to guide bar bolts.
IMPORTANT: Tighten guide bar nutsfinger tight only. Make sure adjust-ing block is in oval adjusting hole onguide bar.
8. Place chain around drive sprocket, thenalong top groove of guide bar andaround guide bar nose. Note: Makesure cutting edges of chain are facingthe right direction. Position chain socutting edges on top of guide bar faceguide bar nose (see Figure 3).
Note: Some models are pre assembled. As-sembly is not needed on these models.
See Saw Chain Tension Adjustment, page 7.
WARNING: Cutting edges onchain are sharp. Use protectivegloves when handling chain.
IMPORTANT: Do not clamp chainsaw in vise during assembly.
CAUTION: Do not place chainon saw backwards. If chain isbackwards, saw will vibrate badlyand will not cut.
9. Adjust saw chain tension. Follow stepsunder Saw Chain Tension Adjustment,page 7.

7107990
OWNER’S MANUAL
For more information, visit www.desatech.com
Note: For pre-assembled models, the sawchain tension is properly set at factory. Anew chain will stretch. Check new chainafter first few minutes of operation. Allowchain to cool down. Follow steps below toreadjust saw chain tension.
1. Before adjusting chain, make sureguide bar nuts are only finger tight (seeFigure 3, page 6). Also make sure adjust-ing block is in oval adjusting hole onguide bar (see Figures 3 and 4, page 6).
2. Turn adjusting screw clockwise untilall slack is out of chain (see Figure 5).Note: There should be no gap betweenside links of chain and bottom of guidebar (see Figure 6).
3. Wearing protective gloves, move chainaround guide bar. Chain should movefreely. If chain does not move freely,loosen chain by turning adjusting screwcounterclockwise.
SAW CHAINTENSIONADJUSTMENT
WARNING: Unplug chain sawfrom power source before adjust-ing saw chain tension.
WARNING: Cutting edges onchain are sharp. Use protectivegloves when handling chain.
WARNING: Maintain properchain tension always. A loosechain will increase the risk ofkickback. A loose chain may jumpout of guide bar groove. This mayinjure operator and damagechain. A loose chain will causechain, guide bar, and sprocket towear rapidly.
Figure 5 - Turning Adjusting Screw
Guide Bar
CorrectTension
Guide Bar
Gap
IncorrectTension
Guide Bar Nuts
Figure 6 - Saw Chain Adjustment
1. Remove oil cap.
2. Fill oil tank with SAE #30 motor oil.Note: For temperatures below 30°F, useSAE #10 oil. For temperatures above75°F, use SAE #40 oil.
3. Replace oil cap at once. Tighten oil capfirmly for good seal. This will avoid oilseepage from tank.
4. Wipe off excess oil.
Note: It is normal for oil to seep when sawis not in use. Empty oil tank after each use toprevent seepage.
FILLING OIL TANK4. After chain tension is correct, tightenguide bar nuts firmly. If not, guide barwill move and loosen chain tension.This will increase the risk of kickback.This can also damage saw. Note: A newchain will stretch. Check new chainafter first few minutes of operation.Allow chain to cool down. Readjustchain tension.

8 107990
ELECTRIC CHAIN SAW
®
For more information, visit www.desatech.com
Cord Length AWG Cord Size
25 feet 16 AWG
50 feet 16 AWG
100 feet 16 AWG
150 feet 14 AWG
CUTTING WITH THE CHAINSAW1. Connect saw to extension cord. Con-
nect extension cord to power supply.
2. Make sure section of log to be cut isnot laying on ground. This will keepchain from touching ground as it cutsthrough log. Touching ground withmoving chain will dull chain.
3. Use both hands to grip saw. Always useleft hand to grip front handle and righthand to grip rear handle. Use firm grip.Thumbs and fingers must wrap aroundsaw handles (see Figure 9).
4. Make sure your footing is firm. Keepfeet apart. Divide your weight evenlyon both feet.
5. When ready to make a cut, press inswitch lockout with right thumb andsqueeze trigger (see Figure 9). This willturn saw on. Releasing trigger will turnsaw off. Make sure saw is running atfull speed before starting a cut.
6. When starting a cut, place movingchain against wood. Hold saw firmlyin place to avoid possible bouncing orskating (sideways movement) of saw.
7. Guide saw using light pressure. Do notforce saw. The motor will overload andcan burn out. It will do the job betterand safer at the rate for which it wasintended.
8. Remove saw from a cut with saw run-ning at full speed. Stop saw by releas-ing trigger. Make sure chain hasstopped before setting saw down.
9. Practice until you can maintain a steady,even cutting rate.
SwitchLockout
Trigger
Figure 9 - Switch Lockout and TriggerLocation
OPERATING CHAINSAW
EXTENSION CORDSUse proper extension cords with this saw.Use only extension cords marked for out-door use. The cord must be marked withsuffix W or W-A following the cord typedesignation. Example: SJTW-A or SJTW.
Use proper sized cord with this saw. Cordmust be heavy enough to carry currentneeded. An undersized cord will cause volt-age drop at saw. Saw will lose power andoverheat. Follow cord size requirementslisted below.
ExtensionCord
Chain SawPower Cord
Figure 7 - Tying Extension Cord andPower Cord in Knot
OILING CHAINAlways check oil level before using saw. Tooil chain, press squeeze bulb on oil cap. Donot attempt to operate the oiler while cuttingwith the saw. Oil will feed onto guide barand chain. Press squeeze bulb on oil cap atleast once before each cut. Check oil leveloften by looking at oil sight level hole. Oilsight level hole is on left side of saw, be-tween front handle and front hand guard.
WARNING: Read and under-stand this owner’s manual be-fore operating this saw. Makecertain you read and understandall Safety Warnings, pages 2 and3. Improper use of this chain sawcan cause severe injury or deathfrom fire, electrical shock, or bodycontact with moving chain, orfalling wood.
Figure 8 - Pressing Squeeze Bulb on OilCap to Oil Chain
Keep cord away from cutting area. Makesure cord does not catch on branches or logsduring cutting. Inspect cords often. Replacedamaged cords.
The extension cord may come undone fromthe power cord during use. To avoid this,make a knot with the two cords as shown inFigure 7 below.
Cord Length AWG Cord Size
25 feet 16 AWG
50 feet 16 AWG
100 feet 14 AWG
150 feet 12 AWG
Models LNT-2: 076728K, 099178H,100089-06, & 100089-08; Pole Saw Assy104317 &106821; Pole Saw 104316-04 (8")& 106890 (10")
Models EL-7: 075762J, 098013J, 099039J,100089-04, 100089-05, & 100089-07

9107990
OWNER’S MANUAL
For more information, visit www.desatech.com
Figure 11 - Felling A Tree
Directionof Fall
2"1st Cut -LowerNotch Cut
2nd Cut -UpperNotch Cut
Hinge
2Inches
3rd Cut -Felling Cut
WARNING: Do not cut all theway through tree. Leave abouttwo inches of tree diameter un-cut directly behind felling notch(see Figure 11). This uncut por-tion acts as a hinge. The hingehelps keep tree from twisting andfalling in wrong direction.
WARNING: Be alert for fallingoverhead limbs. Watch your foot-ing while exiting area.
Felling is the process of cutting down a tree.Make sure your footing is firm. Keep feetapart. Divide your weight evenly on bothfeet. Follow directions below to fell a tree.
Before Felling a Tree1. Before felling, inspect tree. Make sure
there are no dead limbs or branches thatmay fall on you. Study natural lean oftree, location of larger branches, andwind direction. This will help you judgewhich way tree will fall.
2. Clear work area around tree.
3. Plan and clear a retreat path before fell-ing. Make retreat path opposite toplanned direction of fall of tree and at45° angle (see Figure 10).
4. Remove dirt, stones, loose bark, nails,staples, and wire from tree where youwill make felling cuts.
5. Stay on uphill side when felling tree.Tree could roll or slide downhill af-ter falling.
WARNING:• Avoid kickback. Kickback can
result in severe injury or death.See Kickback, page 3 to avoidrisk of kickback.
• Do not fell a tree without ampleskill or expert help.
• Keep children, animals, andbystanders away from areawhen felling a tree.
• If two or more persons performbucking and felling operations
WARNING: When felling atree, be aware of your surround-ings. Do not endanger any per-son, strike utility lines, or causeproperty damage. If tree strikesutility lines, contact utility com-pany at once.
Figure 10 - Retreat Path From Tree
Directionof Fall
RetreatPath
RetreatPath
45°
Tree
FELLING A TREE(Cutting Down a Tree)
Felling ProcedureA) Felling Notch
A properly placed felling notch will deter-mine direction tree will fall. Place fellingnotch on side of tree in direction you wanttree to fall (see Figure 11). Follow direc-tions below to create a felling notch.
1. Make lower notch cut as close toground as possible. Hold saw so guidebar is horizontal. Cut 1/3 the diameterof tree trunk (see Figure 11). Note: Al-ways make this horizontal lower notchcut first. If you make this cut second,tree can pinch chain or guide bar.
2. Start upper notch cut the same distanceabove first cut as first cut is deep.
Example: If lower notch cut is eightinches deep, start upper notch cut eightinches above it. Cut downward at 45°angle. The upper notch cut should meetend of lower notch cut (see Figure 11).
3. Remove tree trunk wedge created bynotching cuts.
B) Felling Cut1. Make felling cut two inches higher than
lower notch cut and on opposite sideof tree (see Figure 11). Keep felling cutparallel to lower notch cut.
2. Cut towards notch.
3. As felling cut nears hinge, tree shouldbegin to fall. Note: If needed, drivewedges into felling cut to control direc-tion of fall. If tree settles back and pincheschain, drive wedges into felling cut toremove saw. Only use wedges made ofwood, plastic, or aluminum. Never usewedge made of steel. This could causekickback and damage to chain.
4. When tree begins to fall, quickly• remove saw from felling cut• release trigger to turn saw off• put saw down• exit area using retreat path
Continued
OPERATING CHAINSAWContinued

10 107990
ELECTRIC CHAIN SAW
®
For more information, visit www.desatech.com
BUCKING A LOG
Figure 13 - Bucking Log With EntireLength On Ground
WARNING: Avoid kickback.Kickback can result in severe in-jury or death. See Kickback, page3 to avoid risk of kickback.
WARNING:• If on slope, make sure log will
not roll down hill. Secure logby using wooden stakes. Drivewooden stakes into ground ondownhill side of log. Stand onuphill side of log while cutting.Log may roll after cutting.
• Never try cutting through twologs at same time. This couldincrease the risk of kickback.
• While cutting log, never holdlog with your hand, leg, or foot.
• While cutting log, never allowanother person to hold log.
• Turn off and unplug saw be-fore moving from one place toanother.
Bucking a log is cutting a log into sections.Make sure your footing is firm. Keep feetapart. Divide your weight evenly on both feet.When possible, raise log or section off ground.Do this by using limbs, logs, chocks, etc.
When cutting through log, maintain controlby reducing cutting pressure near end of cut.Do not relax your grip on chain saw handles.Do not let moving chain touch ground.Ground will dull moving chain. After cut-ting through log, release trigger to turn sawoff before moving saw.
Follow directions below to buck a log.
LIMBING A TREE
Figure 12 - Limbing A Tree
WARNING: When cutting limbthat is under tension, use extremecaution. Be alert for wood spring-ing back. When wood tension isreleased, limb could spring backand strike operator causing se-vere injury or death.
WARNING: Avoid kickback.Kickback can result in severe in-jury or death. See Kickback, page3 to avoid risk of kickback.
Limbing is removing branches from a fallentree. Make sure your footing is firm. Keepfeet apart. Divide your weight evenly onboth feet. Do not remove larger limbs undertree that support log off ground. Removeeach limb with one cut (see Figure 12).Clear cut limbs from work area often. Thiswill help maintain a safe work area.
Make sure you start your cut where limbwill not pinch saw during cutting. To avoidpinching, start cut on freely hanging limbsfrom above limb. Start cut on limbs undertension from under limb. If pinch occurs,turn saw off, lift limb, and remove saw.
Entire Length Of Log OnGroundCut log from top (see Figure 13).
Figure 14 - Bucking Log When Log IsSupported On One End
1st Cut
2nd Cut
OPERATING CHAINSAWContinued
Log Supported On One End1. Make first cut on underside of log (see
Figure 14). Use top of guide bar tomake this cut. Cut 1/3 through diam-eter of log. This cut will keep sectionfrom splintering when cut.
2. Make second cut directly above firstcut. Cut down to meet first cut. Thiscut will keep log from pinching guidebar and chain.

11107990
OWNER’S MANUAL
For more information, visit www.desatech.com
1st Cut
Figure 15 - Bucking Log When Log IsSupported On Both Ends
2nd Cut
TRIMMING A TREE (Pruning)
Figure 16 - Cutting A Limb
WARNING: Avoid kickback.Kickback can result in severe in-jury or death. See Kickback, page3 to avoid risk of kickback.
WARNING: Do not operatechain saw while• in a tree• on a ladder or any other un-
stable surface• in any awkward positionYou may lose control of saw caus-ing severe injury.
WARNING: Do not cut limbshigher than your shoulders.
CAUTION: Seek professionalhelp if facing conditions beyondyour ability.
Trimming a tree is the process of cuttinglimbs from a living tree. Make sure yourfooting is firm. Keep feet apart. Divide yourweight evenly on both feet. Follow direc-tions below to trim a tree.
1. Make first cut six inches from tree trunkon underside of limb. Use top of guidebar to make this cut. Cut 1/3 throughdiameter of limb (see Figure 16).
2. Move two to four inches farther out onlimb. Make second cut from above limb.Continue cut until you cut limb off.
3. Make third cut as close to tree trunk aspossible on underside of limb stub. Usetop of guide bar to make this cut. Cut1/3 through diameter of stub.
4. Make fourth cut directly above thirdcut. Cut down to meet third cut. Thiswill remove limb stub.
2" to 4"
6"
1st Cut -Pruning Undercut(to avoid splintering)
3rd Cut - Stub Undercut(to avoid splintering)
2nd Cut -Pruning Cut(to avoid pinching)
4th Cut -Final StubCut
Log Supported On Both Ends1. Make first cut from above log (see Fig-
ure 15). Cut 1/3 through diameter oflog. This cut will keep section fromsplintering when cut.
2. Make second cut on underside of log,directly under first cut. Use top of guidebar to make this cut. Cut up to meetfirst cut. This will keep log from pinch-ing guide bar and chain.
OPERATING CHAINSAWContinued
12 107990
ELECTRIC CHAIN SAW
®
For more information, visit www.desatech.com
CLEANING SAW BODY
CLEANING ANDMAINTENANCE
Guide BarWith Uneven
Wear
Figure 17 - Guide Bar Cross Section Show-ing Uneven Bar Wear
Guide BarGroove
Guide Bar
NOTICE: Below are instructionsfor servicing your chain saw. Anyservicing not mentioned belowshould be done by an authorizedservice center.
WARNING: Unplug chain sawfrom power source before servic-ing. Severe injury or death couldoccur from electrical shock orbody contact with moving chain.
WARNING: Cutting edges onchain are sharp. Use protectivegloves when handling chain.
WARNING: When cleaningsaw body,• do not submerge saw in any
liquids• do not use products that con-
tain ammonia, chlorine, orabrasives
• do not use chlorinated clean-ing solvents, carbon tetrachlo-ride, kerosene, or gasoline
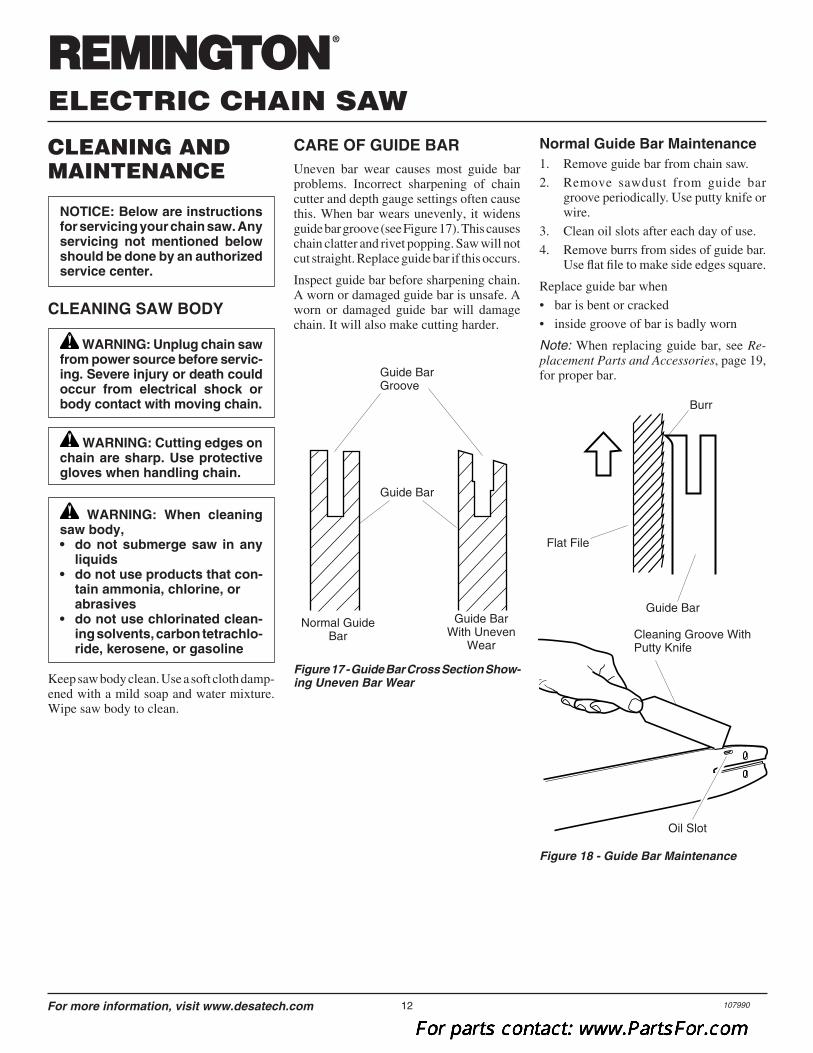
CARE OF GUIDE BARUneven bar wear causes most guide barproblems. Incorrect sharpening of chaincutter and depth gauge settings often causethis. When bar wears unevenly, it widensguide bar groove (see Figure 17). This causeschain clatter and rivet popping. Saw will notcut straight. Replace guide bar if this occurs.
Inspect guide bar before sharpening chain.A worn or damaged guide bar is unsafe. Aworn or damaged guide bar will damagechain. It will also make cutting harder.
Keep saw body clean. Use a soft cloth damp-ened with a mild soap and water mixture.Wipe saw body to clean.
Normal GuideBar
Figure 18 - Guide Bar Maintenance
Flat File
Burr
Oil Slot
Cleaning Groove WithPutty Knife
Guide Bar
Normal Guide Bar Maintenance1. Remove guide bar from chain saw.
2. Remove sawdust from guide bargroove periodically. Use putty knife orwire.
3. Clean oil slots after each day of use.
4. Remove burrs from sides of guide bar.Use flat file to make side edges square.
Replace guide bar when
• bar is bent or cracked
• inside groove of bar is badly worn
Note: When replacing guide bar, see Re-placement Parts and Accessories, page 19,for proper bar.

13107990
OWNER’S MANUAL
For more information, visit www.desatech.com
FILE
HO
LDE
R
WARNING: Unplug chain sawfrom power source before servic-ing. Severe injury or death couldoccur from electrical shock orbody contact with moving chain.
WARNING: Cutting edges onchain are sharp. Use protectivegloves when handling chain.
Figure 19 - File and File Guide Placement On Chain
Note: This illustrationshows file guideplacement and filingdirection for sharpen-ing cutters on left sideof chain.
Figure 20 - Chain Part Locations
Right Side ofChain
Left Side ofChain
Groove
Groove
Depth Gauge(left side of chain) Depth Gauge
(right sideof chain)
Top Plate(left side of chain)
Top Plate(right side of chain)
SHARPENING SAW CHAIN
Keep chain sharp. Your saw will cut fasterand more safely. A dull chain will causeundue sprocket, guide bar, chain, and motorwear. If you must force chain into wood andcutting creates only sawdust with few largechips, chain is dull.
Items Needed to Sharpen Chain
Purchase these items from your local dealer,hardware store, or chain saw supplies outlet.
• 5/32" round file
• Depth gauge tool
• File guide
• Vise
• Medium sized flat file
Continued
30° GuideMark File
Guide
FilingDirection
5/32"Round File
Sharpening Cutters
Use file guide for 30° filing.
1. Adjust chain for proper tension (see SawChain Tension Adjustment, page 7).
2. Clamp guide bar in vise to hold sawsteady. Note: Do not clamp chain.
3. Press 5/32" round file (attached to fileguide) into groove between top plateand depth gauge on chain. File guideshould rest on both top plate and depthgauge (see Figures 19 and 20). Note:File at midpoint of guide bar.
4. Hold file guide level. Make sure 30°mark on file guide is parallel to centerof guide bar (see Figure 19). This willinsure that you file cutters at 30° angle.
5. File from inside towards outside of cut-ter until sharp. Only file in this one direc-tion (see Figure 19). Note: Two or threestrokes with file should sharpen cutter.
6. After each cutter is sharpened, movechain forward to sharpen next cutter.File all cutters on one side of chain.
7. Move to other side of chain and repeatprocess.
CLEANING ANDMAINTENANCEContinued

14 107990
ELECTRIC CHAIN SAW
®
For more information, visit www.desatech.com
Filing Cutter Depth Gauges
The cutter depth gauge clearance is reducedas cutters are sharpened. After every secondor third sharpening, reset cutter depth gauges.1. Place depth gauge tool (.025") firmly
across top of two cutters. Make suredepth gauge enters slot in depth gaugetool (see Figure 21).
2. Use medium flat file. File depth gaugelevel with depth gauge tool.
3. Remove depth gauge tool. With flat file,round o� front corner of cutter depthgauge (see Figure 22).
After several hand filings, have authorizedservice center or sharpening service machinesharpen chain. This will insure even filing.
Figure 21 - Depth Gauge Tool On Chain
Flat File
DepthGaugeSlot
Figure 22 - Round O� Front Corner OfDepth Gauge
DepthGaugeTool
Depth Gauge
Front Corner
.025"CLEANING ANDMAINTENANCEContinued
REPLACING SAW CHAINReplace chain when cutters are too worn tosharpen or when chain breaks. Only usereplacement chain noted in this manual.Always include new drive sprocket whenreplacing chain. This will maintain properdriving of chain. Note: For proper chain anddrive sprocket, see Replacement Parts andAccessories, page 19.
TECHNICALSERVICE
SERVICEPUBLICATIONSYou can receive an illustrated parts list freeof charge. Send a self-addressed stampedenvelope to address on back page of thismanual.
When writing, include model number andserial number of saw. You will find thesenumbers on saw motor housing decal.STORAGE
If storing saw for more than 30 days, followsteps below.1. Drain oil tank.2. Remove and clean guide bar and chain.
Clean guide bar and chain by soakingin petroleum based solvent or mild soapand water mixture.
3. Dry guide bar and chain.4. Place chain in container filled with oil.
This will prevent rust.5. Wipe a thin coating of oil over surface
of guide bar.6. Wipe o� outside of saw body. Do this
with soft cloth dampened with a mildsoap and water mixture.
7. Store chain saw• in a high or locked place, out of
children’s reach• in a dry place• in a carrying case or with scabbard
over guide bar
15107990
OWNER’S MANUAL
For more information, visit www.desatech.com
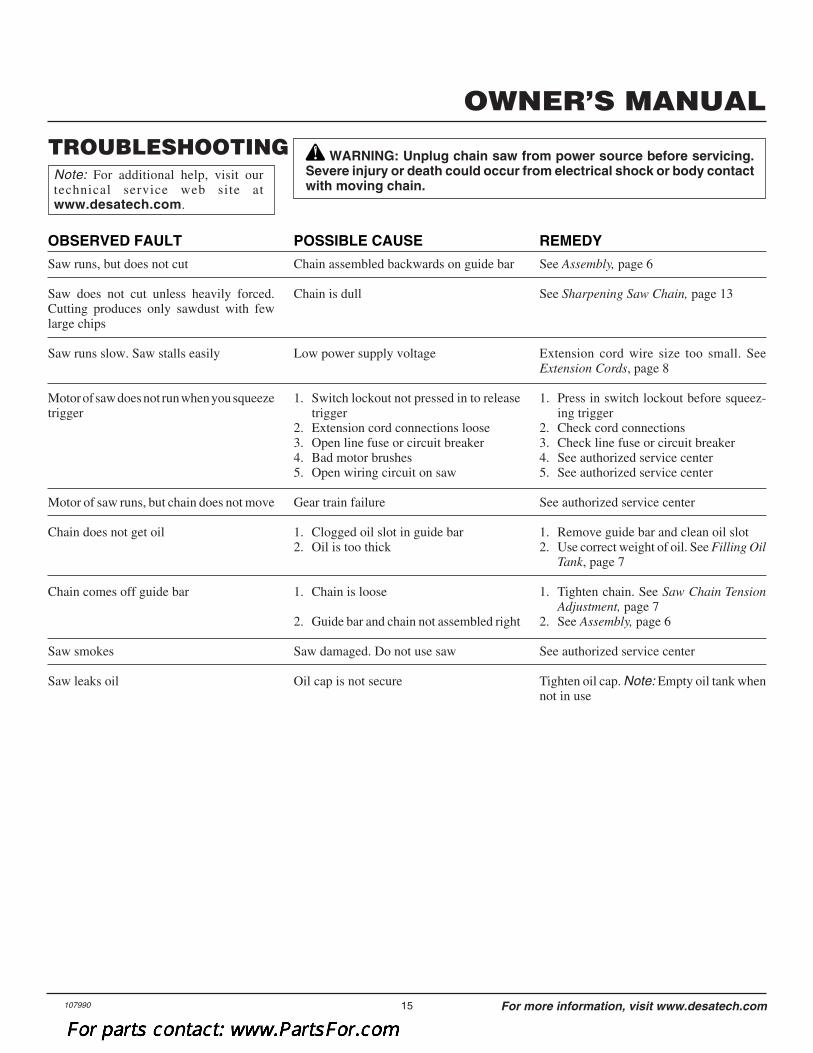
TROUBLESHOOTING WARNING: Unplug chain saw from power source before servicing.Severe injury or death could occur from electrical shock or body contactwith moving chain.
OBSERVED FAULT
Saw runs, but does not cut
Saw does not cut unless heavily forced.Cutting produces only sawdust with fewlarge chips
Saw runs slow. Saw stalls easily
Motor of saw does not run when you squeezetrigger
Motor of saw runs, but chain does not move
Chain does not get oil
Chain comes off guide bar
Saw smokes
Saw leaks oil
POSSIBLE CAUSE
Chain assembled backwards on guide bar
Chain is dull
Low power supply voltage
1. Switch lockout not pressed in to releasetrigger
2. Extension cord connections loose3. Open line fuse or circuit breaker4. Bad motor brushes5. Open wiring circuit on saw
Gear train failure
1. Clogged oil slot in guide bar2. Oil is too thick
1. Chain is loose
2. Guide bar and chain not assembled right
Saw damaged. Do not use saw
Oil cap is not secure
REMEDY
See Assembly, page 6
See Sharpening Saw Chain, page 13
Extension cord wire size too small. SeeExtension Cords, page 8
1. Press in switch lockout before squeez-ing trigger
2. Check cord connections3. Check line fuse or circuit breaker4. See authorized service center5. See authorized service center
See authorized service center
1. Remove guide bar and clean oil slot2. Use correct weight of oil. See Filling Oil
Tank, page 7
1. Tighten chain. See Saw Chain TensionAdjustment, page 7
2. See Assembly, page 6
See authorized service center
Tighten oil cap. Note: Empty oil tank whennot in use
Note: For additional help, visit ourtechnical service web site atwww.desatech.com.

23107990
OWNER’S MANUAL
For more information, visit www.desatech.com
REPLACEMENTPAR TS ANDACCESSORIES
WARNING: Use only replacement parts and accessories described inthis manual. Use of other parts or accessories could damage saw orinjure operator.
Purchase these accessories and parts fromyour nearest dealer or service center. If theycan not supply these accessories or parts,either contact your nearest Parts Dealer orDESA Specialty Products™ for referral infor-mation. Parts dealers are listed in this manual.
# Must order both pieces.
LNT-2Part Number Description104302-01S# Guide bar, 8"104301S# Chain, 8"097567-01S Guide bar, 10"091371S Chain, 10"097568-02S Guide bar, 12"091373-02S Chain, 12"107713-01 Drive sprocket
099178H, 100089-06, 100089-07,100089-08, & EL-1Part Number Description097570-01S Guide bar, 14"091374-02S Chain, 14"107713-01 Drive sprocket
EL-7, 098031J, 099039J, 100089-04,100089-05Part Number Description097572-03S Guide bar, 16"091375-02S Chain, 16"107713-01 Drive sprocket
POLE SAW, 104316-04 (8")POLE SAW ASSEMBLY, 104317Part Number Description104302-01S Guidebar, 8"104301S Chain, 8"107713-01 Drive Sprocket
POLE SAW, 106890-01 (10")POLE SAW ASSEMBLY, 106821Part Number Description097567-01S Guidebar, 10"091371S Chain, 10"107713-01 Drive Sprocket
GeneralPart Number Description079963-02 Plastic scabbard, 8" & 10"079963-04 Plastic scabbard,
12", 14", & 16"106809-01 Hand Guard077155 Adjusting Plate Assy.
You can also visit our technical service website at www.desatech.com .

Click on the picture above for part numbers or to purchase parts
Key # Model Number Description
1 100089-06 Trigger Switch
2 100089-06 Oil Bottle and Cap
3 100089-06 Cap and Bulb
4 100089-06 Screw Tap Flat-HD PR #25
5 100089-06 Chain Adjuster Assy
6 100089-06 Saw Chain
7 100089-06 Guide Bar
8 100089-06 Sprocket Gear Kit
9 100089-06 Drive gear ( ½” H )
10 100089-06 Roller Bearing
11 100089-06 Sprocket ( 3.5” )
12 100089-06 Sprocket Support
13 100089-06 Retainer, E-Ring
14 100089-06 Kit, Sprocket Cover
616-791-0505