electronic claims tracking - ect · electronic claims tracking (ect) allows you to search for the...
TRANSCRIPT

October 2007
Electronic Claims Tracking - ECT

© ENS Inc, an INGENIX company. 2
Introduction
You must have your assigned ENS User ID, Password and Organization IDDelivered to you on your ENS welcome letter via fax 3-4 days after enrolling for service with ENSOr, call Technical Support at 1-866-367-9778
What is Electronic Claims Tracking - ECTElectronic Claims Tracking (ECT) allows you to search for the status of a claim, view information about the claim and submit secondary claims
This lesson will show you how toFind the ENS Home Page and LoginSearch for an electronic claimView Claim Summary and Detail, Claim Adjustments, Line Adjustments and Provider detailsChange secondary IDs and NPI informationSubmit secondary claims
Read the instructions in the gray boxes in this lessonQuestions or problems can be reported to Technical Support at:
Email: [email protected] phone: 1-866-367-9778

© ENS Inc, an INGENIX company. 3
Let’s Get Started
From a web browser,locate the ENS Main Home Page at: http:// www.enshealth.comHelpful hint: once you are at the ENS Home Page, save it as a favorite for future use
Click on “Client
Access”

© ENS Inc, an INGENIX company. 4
Logging In
Enter your User ID, Password and
Organization ID

© ENS Inc, an INGENIX company. 5
Access Electronic Claims Tracking (ECT)
To search for claims status or information, as well as to submit Secondary Claims, click on Electronic Claims Tracking (ECT)

© ENS Inc, an INGENIX company. 6
Search Electronic Claims
Click on the tab Simple Search
1
Enter the ECT number, click on Add
2

© ENS Inc, an INGENIX company. 7
Search Electronic Claims, cont.
Click on Run
3
For claim details or to submit a Secondary claim, click on Details
4
If you simply wish to see the high-level claim details, use the scroll bars on the current screen

© ENS Inc, an INGENIX company. 8
Viewing Results
If you mouse over the ‘+’ symbol in those fields that are applicable, e.g., 17a, 24j, 31b, 32b, or 33b, you will see a list of all the Secondary IDs sent on the original claim. In this example, the claim rejected at ENS and therefore, a secondary claim cannot be submitted. The Create Secondary button will not be visible on a rejected claim.

© ENS Inc, an INGENIX company. 9
Claim Adjustments
For adjustment details, click on the Claim Adjustment tab.
1
2
For adjustment details, click on the Claim Adjustment tab.
2
Claim Adjustment Reason Codes screen

© ENS Inc, an INGENIX company. 10
Line Adjustments & Provider DetailsFor line adjustments, click on the Line Adjustment tab.
For provider details, click on the Provider Details tab.
Provider details screen

© ENS Inc, an INGENIX company. 11
Secondary Claims
To submit a secondary claim, click on the Create Secondary Claim button from the claim details screen.
© ENS Inc, an INGENIX company. 12
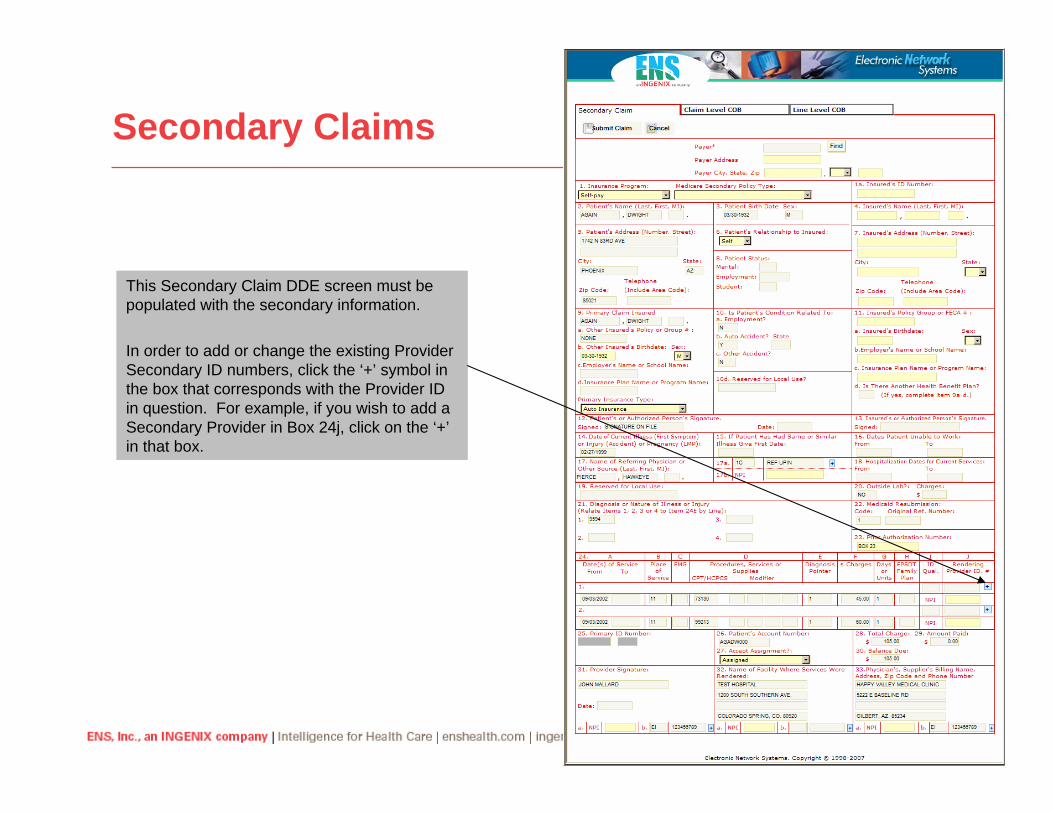
Secondary Claims
This Secondary Claim DDE screen must be populated with the secondary information.
In order to add or change the existing Provider Secondary ID numbers, click the ‘+’ symbol in the box that corresponds with the Provider ID in question. For example, if you wish to add a Secondary Provider in Box 24j, click on the ‘+’ in that box.

© ENS Inc, an INGENIX company. 13
Secondary Claims, cont.
If an NPI number did not come in on the Original Claim, you can enter it in boxes 17, 24, 31,32 and 33. When finished, click OK.
© ENS Inc, an INGENIX company. 14
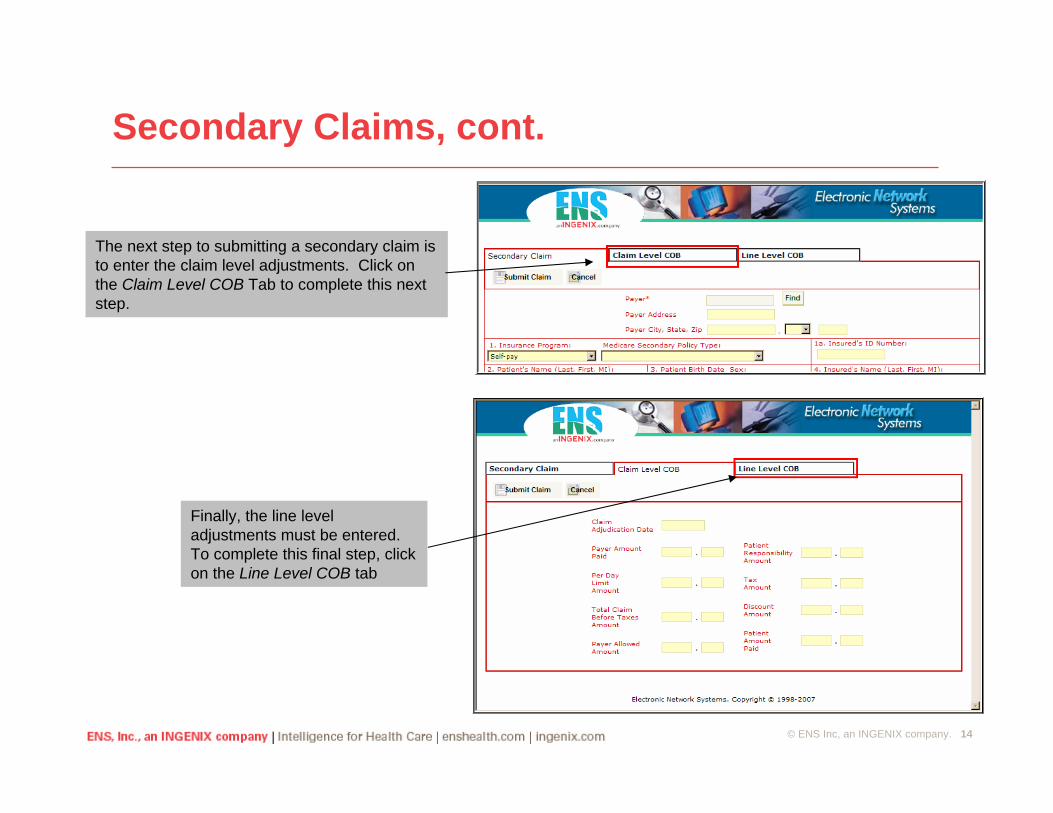
Secondary Claims, cont.
The next step to submitting a secondary claim is to enter the claim level adjustments. Click on the Claim Level COB Tab to complete this next step.
Finally, the line level adjustments must be entered. To complete this final step, click on the Line Level COB tab

© ENS Inc, an INGENIX company. 15
Secondary Claims, cont.
Select the reason for this adjustment, select the reason code from the drop-down list (if you need assistance with reason codes, click on the Reason Codes Description for a complete listing) and then enter in the adjustment Amount. You can also enter a Quantity if needed. Click on the OK button once you have populated the necessary fields.
You will need to have access to the Original EOB that you received back from the Primary Payer. Enter data in the Approved Amount, Service Line Paid Amount, Paid Units of Service and Line Adjudication Date. Once these fields have been populated, click on the Add Adjustment tab

© ENS Inc, an INGENIX company. 16
Secondary Claims, cont.
You will be required to follow the previous steps for each Line Item. Click on the Submit Claim when this step has been completed.
In order for this claim to submit successfully, the following formula must be followed.
At the Claim Level:Payer Amount Paid (Claim Level COB) + All Adjustments (Line Level COB) = Total Claim
At the Line Level:Service Line Paid Amount (Line Level COB) + Line Adjustments = Original Claim Line Charges

© ENS Inc, an INGENIX company. 17
Congratulations!
You have now completed Electronic Claims Tracking (ECT) self-service trainingQuestions or issues can be reported in one of two ways
Email Technical Support at [email protected], call at 1-866-367-9778
We appreciate your business!