electronics merit badge slide teacher notes - … · electronics merit badge november 2013 page 2...
TRANSCRIPT

Electronics Merit Badge November 2013
Page 1
SLIDE TEACHER NOTES
1
This class covers a lot of information,
and it is easy to spend too much time
on it. You will need to pay close
attention to time, and make sure you
get to the activity at the end with
enough time to do it. The activity is
the fun part of the class.
I go rapidly through the first few slides,
spend a little more time on the snake,
and spend more time with the
current/voltage/resistance slides.
2
It is helpful to have examples of these 2
instruments in the class.
3
Computer is heavily used for every day
electronics design. Engineers write
software to support hardware work,
and this is done with computers as
well.
Electronics Merit Badge
Class 1
11/26/2013 1Electronics Merit Badge Class 1
Equipment Used
Volt/Ohm/Amp Meter or MultimeterUsually referred to as meter. With this we can measure current, voltage and resistance.
OscilloscopeUsually referred to as scope.With this we can ‘see’ voltages.This is very useful when voltage is changing, as a meter is no good to us when this is happening.
11/26/2013 2Electronics Merit Badge Class 1
ComputerComputers are used heavily for research, for drawing schematics, for writing programs, for assisting in fixing broken circuits, etc…
Frequency Generator Frequency Counter Circuit Boards
11/26/2013 3Electronics Merit Badge Class 1

Electronics Merit Badge November 2013
Page 2
SLIDE TEACHER NOTES
4
Emphasis is on importance of
education in order to pursue an
engineering degree. Yes, of course it is
difficult, but so what? Challenging
career leads to enriched life.
This is a difficult subject and requires
hard work, but is well worth the effort.
Engineering can provide a lifetime of
continuous discovery and learning.
5
Does this look safe to you? Rightmost
picture looks to be from Korea. What
does that say about electricity safety in
the US and other places?
6
Shock can be avoided by being
educated about potentially dangerous
situations. Stay away from them!!!
Two of the most important kinds of equipment
Your Brain A brain assistant.
11/26/2013 4Electronics Merit Badge Class 1
Safety with Electricity and Electronics
11/26/2013 5Electronics Merit Badge Class 1
Electricity Safety• High Voltage ( 120V AC or greater) – Safety
mainly about not touching the wrong thing.
• Current kills – Only 16 volts can kill when enough electrons flow through the heart or head.
• Ventricular fibrillation – Electrons passing through the heart causes muscles to seize, causing death.
• If the shock doesn’t kill you, you can still be badly burned from touching the wrong thing.
11/26/2013 6Electronics Merit Badge Class 1

Electronics Merit Badge November 2013
Page 3
SLIDE TEACHER NOTES
7
The snake crawled under the fence.
Once through the fence, it felt the
shock from the electric fence, and
turned to bite the fence.
This passed current through either its
brain or heart, and that was it.
Its body made a connection from the
fence to ground, and was being
shocked.
The snake felt the shock and responded
by striking at the source of its pain…
the fence.
My guess is that once it bit the fence, it
provided a better electrical path from
the fence, though its heart, to ground.
8
Emphasis here is that electronics is
inherently safer than electricity,
because the voltages are much smaller.
This does not diminish the necessity for
safety.
9
How to avoid shock.
• Turn power off before working on equipment.• Don’t touch circuits that could have high voltage on them.• Do not allow electrons to flow through the heart. I don’t
think the snake knew about this detail.
11/26/2013 7Electronics Merit Badge Class 1
Electronics Safety
• Electronics generally uses lower voltages (less than 48 volts). You are usually working with DC voltage instead of AC voltage.
• You are usually more concerned with sparks from connecting the wrong wires together, or burning yourself with a soldering iron, or some similar event.
• Even when working with lower voltages, you may still receive an electrical shock from equipment you are using.
11/26/2013 8Electronics Merit Badge Class 1
Personal Safety
• Be aware of what you are doing, and where you are placing equipment and yourself.
• Pay attention to hot soldering irons. Keep a good distance between you those next to you.
• Know when you are working with high current and/or high voltage circuits.
• THINK before you do something.
• Wear safety glasses when soldering.
11/26/2013 9Electronics Merit Badge Class 1

Electronics Merit Badge November 2013
Page 4
SLIDE TEACHER NOTES
10
How to generate static electricity?
Every strand of hair is repelling the
next strand of hair, as they all have the
same electrical charge.
Run comb through hair. The comb will
attract paper.
Walk across a carpet and touch a
doorknob.
Lightning occurs when a large enough
charge accumulates between the
bottom of a cloud and the earth, such
that an ionization path is created
between the two, and electrons flow…
11
AC power is present in the home.
Pay attention to safety around AC
power.
One idea to illustrate AC power is to
get a scout to walk in one direction and
then turn around and walk in the other
direction. Each time he passes the
instructor, he reaches out with his
hand and pushes on the instructors
hand. Though current flows in 2
directions, it is reasonably easy to see
how it can be used to do electrical
work.
12
We are talking batteries. Through a
chemical reaction, batteries provide a
flow of electrons --- current flow.
Types of ElectricityStatic Electricity
Static electricity is usually created when materials are pulled apart or rubbed together, causing positive (+) charges to collect on one material and negative (−) charges on the other surface.. Sparks may result!
Examples of static electricity:
1. Lightning.2. Combing hair.3. Walking across carpet and
getting shocked.4. Pulling out scotch tape.
11/26/2013 10Electronics Merit Badge Class 1
Types of Electricity
Alternating Current (AC)
The common form of electricity from power plant to home/office. Its direction is reversed 60 times per second in the U.S.; 50 times in Europe.
Examples of AC usage:
1. Kitchens: Stoves, ovens, mixer, etc.
2. Computers (the plug)3. Lights in house4. Home air conditioners.
11/26/2013 11Electronics Merit Badge Class 1
Types of Electricity
Direct Current (DC)
Type of electricity used in most electronics we have today. Current only flows in one direction (not both directions, like AC).
Examples of DC usage:
1. MP3 players2. Radios3. Electricity in cars.4. Anywhere you use a battery for
power.
11/26/2013 12Electronics Merit Badge Class 1

Electronics Merit Badge November 2013
Page 5
SLIDE TEACHER NOTES
13
We will use positive flow, not electron
flow when we talk about current.
14
Get 1 scout to walk across the room.
Now, get 2 scouts to walk across the
room.
The scout is an electron, and by
walking, is equal to current flow. Two
scouts walking are two electrons, and
are doubling current flow. I know this
is hokey, but can be used when it
makes sense during the class.
15
Basics of Electronics
• Current: Defined as “flow of electrons”.
• Current: Units of current is AMPS.
• Current: Electrical symbol for current is I (eye).
11/26/2013 13Electronics Merit Badge Class 1
Current Flow – Water Analogy
1. Water flows in the hose, entering at the top and exiting the bottom.
2. The water is the “current” ; the flow of electrons.
3. The more water flowing in the pipe, the more electrons are flowing in the wire.
4. Different pipe diameters illustrates different resistance to water flow, which correlates to different resistor values.
11/26/2013 14Electronics Merit Badge Class 1
Voltage
• Volts is the electrical force that causeselectrons (current) to flow.
• Voltage can also be thought of as the electrical pressure that pushes electrons in a wire.
• Units for voltage is VOLTS.
• The symbol for voltage is E.
• The schematic symbol for voltage is
generally shown as a battery GND
11/26/2013 15Electronics Merit Badge Class 1

Electronics Merit Badge November 2013
Page 6
SLIDE TEACHER NOTES
16
This is a very important concept to get
across. Voltage, current and resistance
are the basis for this class.
17
The larger the resistance, the less
current, given the same voltage in the
circuit.
18
Voltage – Water Analogy
1. Gravity provides the force for water (current) to flow.
2. This illustrates a small voltage, so electron flow is small.
1. Gravity provides the force for water (current) to flow.
2. This illustrates a larger voltage, so electron flow is larger.
Small height = low voltage Big height = high voltage
height
height
11/26/2013 16Electronics Merit Badge Class 1
Resistance
• Resistance is the electrical property of a substance to resist the flow of electrons (current).
• The units for resistance is OHMS (Ω).• The symbol for resistance is R.• The schematic symbol is • The larger the resistance, the more
resistance to current.
11/26/2013 17Electronics Merit Badge Class 1
Resistance – Water Analogy
• Different pipe diameters represents different resistor values.
• The smaller the diameter of the pipe, the larger the resistance.
11/26/2013 18Electronics Merit Badge Class 1

Electronics Merit Badge November 2013
Page 7
SLIDE TEACHER NOTES
19
20
This is really, really important. If you
understand ohms law, you have a
really good understanding of basic
electricity.
Talk about how easy this equation is to
remember and to use.
21
These symbols will be used when
drawing and wiring up the circuit we
are going to do next.
Power – Water Analogy
In electronics, power is equal to
current X voltage.
The units for power is WATTS.
The symbol for power is W.
In our water analogy, power is
equal to water flow X pressure.
You can see from the picture that
more water flow will mean more
force, and more pressure will
mean more force.
Ohms Law
• V = I x R : Volts = Current x Resistance
• Units
– Volts is in volts
– Current is in amps
– Resistance is in ohms
11/26/2013 20Electronics Merit Badge Class 1
Electronic Symbols
Single Pole, Double Throw Switch (SPDT)
Battery
Resistor
Light Emitting Diode (LED)
Buzzer
Fuse
Lamp
or
Capacitor
Ground
WNC
NO
11/26/2013 21Electronics Merit Badge Class 1

Electronics Merit Badge November 2013
Page 8
SLIDE TEACHER NOTES
22
This simple schematic is the circuit of
each flashlight. Place emphasis on
ground, so that it is fully understood
that ground = 0 volts.
23
WHEN INSERTING AND REMOVING
THE WIRES, MAKE SURE THEY
GRAB THE WIRES BY THE PLASTIC
HOUSING, NOT BY THE WIRE
ITSELF.
Some of the connections on this
example are already made, to show
how to use the wiring kit.
Draw the circuit before wiring it up.
Talk about how the circuit works.
SWITCH POSITION DOWN, IS
NORMALLY OPEN.
SWITCH POSITION UP, IS
NORMALLY CLOSED.
24
SWITCH POSITION DOWN, IS
NORMALLY OPEN.
SWITCH POSITION UP, IS
NORMALLY CLOSED.
Draw the circuit before wiring it up.
CIRCUIT DIAGRAM (SCHEMATIC)
+
SWITCH LAMP
GROUNDGROUND
FLASHLIGHT
TWO GROUND SYMBOLS IS THE SAME AS CONNECTING WITH A WIRE
GROUND = 0 VOLTS
11/26/2013 22Electronics Merit Badge Class 1
SPDT FUSE
BATTERY
BUZZERLAMP
+
-
CIRCUIT CONNECTION BOX
Wire circuit to use switch to turn on lamp.
W
NO NC
GND = 0V
11/26/2013 23Electronics Merit Badge Class 1
CIRCUIT CONNECTION BOX
Wire circuit to use switch to turn on lamp AND buzzer.
SPDT FUSE
BATTERY
BUZZERLAMP
+
-
W
NO NC
GND = 0V
11/26/2013 24Electronics Merit Badge Class 1

Electronics Merit Badge November 2013
Page 9
SLIDE TEACHER NOTES
25
The main purpose of this class is to
create an understanding about ohms
law. This means there needs to be a
good understanding of the concepts of
current, voltage and resistance.
The calculations done in this class can
bog down unless you pay close
attention to detail.
26
Units are important in engineering.
These are very common terms that are
used all the time when talking about
these components.
27
It is important that emphasis be placed
on units. Ma = milliamp = .001 amp.
It is necessary to get this correct, as it
will be used when we do the
calculations later.
Electronics Merit BadgeClass 2
11/26/2013 25Electronics Merit Badge Class 2
Resistance
• Resistance is an electrical property of a material that “resists” the flow of electrons.
• The schematic symbol for a resistor is:
• Common units for resistance are:
– Ohms
– Kilohm: 1K= 1000 ohms, 10K = 10,000 ohms
– Megohm: 1M = 1,000,000 ohms
• The units symbol for ohms is: Ω (ohms)
Electronics Merit Badge Class 211/26/2013 26
Current
• Current: Defined as “flow of electrons”.
• Current: Units of current is AMPS.
• Current: Electrical symbol for current is I.
• Common units for current are:– Amps
– Milliamps (ma): 1 ma = .001 amp
– Microamps (ua) : 1 ua = .000001 amp, or .001 ma
– Nanoamps (na) : 1 na = .000000001 amp or .000001 ma, or .001 ua.
Electronics Merit Badge Class 211/26/2013 27

Electronics Merit Badge November 2013
Page 10
SLIDE TEACHER NOTES
28
29
Ohms’s law is the purpose of this class.
Clear understanding of current and
voltage and resistance is key in making
ohm’s law comprehensible.
30
Make sure everyone understands this
page. Make sure they understand that
the units (decimal place) is extremely
important when doing these
calculations.
Getting them to think about the
alternative questions (1V and 1000V) is
good – especially if they can
understand the difference in current
just by looking at the difference in
voltage, (resistor is unchanged).
Perhaps looking at the example, and
asking about what the current would
be if only the resistor was changed
from 1000 ohms to 1 ohm, shows
another way to look at this simple
relationship.
Voltage
• Volts is the electrical force that causeselectrons (current) to flow.
• Units of volts is VOLTS.
• The symbol of volts is E or V. We will use V.
• Common units for voltage are:– Volts
– Millivolt (mv) : .001 volt.
– Microvolt (uv) : .000001 volt, or .001 mv
– Nanovolt (nv) : .000000001 volt, or .000001 mv, or .001 uv.
Electronics Merit Badge Class 211/26/2013 28
Ohms Law
• One of the most important laws in electronics/electricity.
• V = I x R : Voltage = Current x Resistance
• Volts is measure in VOLTS, current is measured in AMPS, and resistance is measured in OHMS.
• 1 AMP, going through 1 OHM of resistance, generates a voltage drop of 1 VOLT.
• 1 V = 1 A x 1 Ω.
Electronics Merit Badge Class 211/26/2013 29
More Ohm’s Law
Volts = 10.Resistance = 1000ΩCompute current.I = V / RI = 10 / 1000 = .01A.01A = 10maQuestion: what would the current be if thevoltage was 1 V? How about 1000 V?
Different forms of Ohm’s Law:V = I x R : Voltage = Current X ResistanceI = V / R : Current = Voltage / Resistance
R = V / I : Resistance = Voltage / Current
10V
1000 Ω
Electronics Merit Badge Class 211/26/2013 30
+

Electronics Merit Badge November 2013
Page 11
SLIDE TEACHER NOTES
31
Since the meter is used for measuring
current and voltage, this would be a
good time to talk about the meter some.
I would show how we need to move the
leads when measuring current, and
then move them back when we are
measuring voltage.
Emphasize that if we measure voltage,
when the meter is dialed to current and
the leads are in the current locations,
we will blow up the meter….
32
33
Ohm’s Law Exercise
• Using a meter, we will measure some resistors.
• Then, using ohm’s law, we will calculate the resistor’s values. To do this, we will use the meter to measure current and voltage in a circuit.
Electronics Merit Badge Class 211/26/2013 31
A
B
Meter
Using the meter,
measure current.
I = _________ amps
000
Ohms Law – Step 1
SET METER TO DCA -20m+ -
Meter
000
Using the meter,
measure voltage.
V = _________ volts
Ohms Law – Step 2
SET METER TO DCV - 20

Electronics Merit Badge November 2013
Page 12
SLIDE TEACHER NOTES
34
35
36
In this class, we talk about binary and
hexadecimal numbers. We have a
teaching aid to assist in understanding
how to count in these number systems.
We show how a flip-flop works, and
how they can be used to form a binary
counter.
We draw the kit schematic, in
preparation for the last class – building
the kit.
Ohms Law – Step 3
Calculate resistance from your 2 measurements.
Ohms Law : V = I x R.
Therefore, R = V / I <- Use this equation.
Note: you will be measuring current on the
20ma range, so a value of 2.5ma needs to be
written as .0025A when using this equation.
Meter
000
Using the meter,
measure Resistance.
R = _________ ohms
Ohms Law – Step 4
How does this compare with your calculated
value?
SET METER TO Ω – 20k
Electronics Merit BadgeClass 3
11/26/2013 Electronics Merit Badge Class 3 36

Electronics Merit Badge November 2013
Page 13
SLIDE TEACHER NOTES
37
Everyone should already know this.
38
This is a little more complicated than
base 10, since they are not used to
thinking this way, but I think it can be
emphasized how easy it is to think in
base 2. If they understand this isn’t
really that complicated, it makes them
more open to understanding base 16.
39
Decimal – Base 10
• In base 10, there are 10 unique digits (0-9).• When writing large numbers (more that 1
digit), each column represents a value 10 times larger than the previous column.
• We say, how many 1’s, how many 10’s and how many 100’s are there?
1231s column10s column100s column
There is 1 ‘100’ and
2 ‘10’s and
3 ‘1’s,
Making this number equal to
one hundred and twenty three.
11/26/2013 Electronics Merit Badge Class 3 37
• In base 2 (binary) there are two numbers, 0 and 1.• When writing large numbers (more that 1 digit),
each column represents a value 2 times larger than
the previous column.
• We say, how many 128s, how many 64s how many
32s, how many 16s, how many 8s, how many 4s,
how many 2s and how many 1s are there?
Binary – Base 2
1011 1s column2s column4s column8s column
There is 1 ‘8’ and
1 ‘2’ and
2 ‘1’,
making this number equal to eleven.
11/26/2013 Electronics Merit Badge Class 3 38
number 16 8 4 2 1 Binary
0 0 0 0 0 0 000001 0 0 0 0 1 000012 0 0 0 1 0 000103 0 0 0 1 1 000114 0 0 1 0 0 001005 0 0 1 0 1 001016 0 0 1 1 0 001107 0 0 1 1 1 001118 0 1 0 0 0 010009 0 1 0 0 1 01001
10 0 1 0 1 0 0101011 0 1 0 1 1 0101112 0 1 1 0 0 0110013 0 1 1 0 1 0110114 0 1 1 1 0 0111015 0 1 1 1 1 0111116 1 0 0 0 0 10000
Counting to 16 in Binary
11/26/2013 Electronics Merit Badge Class 3 39

Electronics Merit Badge November 2013
Page 14
SLIDE TEACHER NOTES
40
It is worth spending a little time
making sure they understand this
concept.
Base 16 is the language used by
engineers and programmers when
talking about binary. And, there are
lots of discussions surrounding binary
values.
41
We’ll use the binary tool kit a little
later to reinforce binary, decimal and
hexadecimal conversions.
I have found that this is where some
find it difficult to follow base 16
counting. I think it valuable to spend a
little extra time on this for those that
need it.
42
Here we start to blur the lines between
voltages and logical values. 5 volts =
logical 1, and 0 volts (ground) is logical
0.
This equating voltage levels with
binary values helps in understanding
how electronic circuits can be made to
do counting and other ‘math’ functions.
The flip-flop is a building block for
many other complicated circuits.
A clock edge is a ‘0 to 1’ transition, and
a ‘1 to 0’ transition.
Hexadecimal
• Hexadecimal represents numbers as base 16.• It is easier to write and read a large number by
describing it in hex rather than in binary.
• Each number column is a power of 16 higher.
• The digits for hexadecimal are 0-9, A,B,C,D,E,F.
1s column16s column256s column
There are 1 ‘256’ and
2 ‘16’s and
3 ‘1’s,
making this number equal to
291.
123
11/26/2013 Electronics Merit Badge Class 3 40
Counting to 16 in Binary AND Hex
Decimal 16 8 4 2 1 Binary Hex0 0 0 0 0 0 00000000 01 0 0 0 0 1 00000001 12 0 0 0 1 0 00000010 23 0 0 0 1 1 00000011 34 0 0 1 0 0 00000100 45 0 0 1 0 1 00000101 56 0 0 1 1 0 00000110 67 0 0 1 1 1 00000111 78 0 1 0 0 0 00001000 89 0 1 0 0 1 00001001 9
10 0 1 0 1 0 00001010 A11 0 1 0 1 1 00001011 B12 0 1 1 0 0 00001100 C13 0 1 1 0 1 00001101 D14 0 1 1 1 0 00001110 E15 0 1 1 1 1 00001111 F16 1 0 0 0 0 00010000 10
11/26/2013 Electronics Merit Badge Class 3 41
FLIP-FLOP
Clock
Q
Flip-Flop
+ 5V
Press the switch, the clock goes to 0 volts (logical 0).
Release the switch, the clock goes to 5 volts (logical 1).
The output (Q) changes state on each 1 to 0 transition of
the clock.
A flip-flop basically divides the clock by 2. It takes 2
clock transitions to make the output change once.
1
0
Clock
Q Output11 00
Press Press Press
0111 000
Press
11/26/2013 Electronics Merit Badge Class 3 42

Electronics Merit Badge November 2013
Page 15
SLIDE TEACHER NOTES
43
I have had success with the following
activity. It also kind of wakes everyone
up.
Get 5 scouts to bring their chairs
and sit up front. Have them face
the room and sit shoulder to
shoulder.
The scout on the far left is the
clock.
The instructions are: every time the
scout on your left sits down, you
change state. If you are sitting, you
will stand. If you are standing you
will sit.
Instruct the clock to stand up and
then sit down. Enforce the rules.
They have become a 4-bit counter…
44
This diagram shows the original (older)
counter circuit. There is a newer
counter designed, and some of the
scouts will have it instead of the old
one.
The 2 circuit boards do equivalent
things.
45
Talk about 7 segment displays.
Each segment is an LED. We only
turn on the segment that we want
to display a particular number.
Even more interesting; we really
only turn on 1 segment at a time,
but do it so quickly that it looks (to
the human eye) that each segment
is always on. This is called
multiplexing.
Every time we press the INCR
button, the electronics increments a
counter, and then the newest count
value is displayed in the 7 segment
displays.
Binary Counter using Flip-Flops
Clk
Q
0 0 0 0 press
0 0 0 1 press 1
0 0 1 0 press 2
0 0 1 1 press 3
0 1 0 0 press 4
0 1 0 1 press 5
0 1 1 0 press 6
4 Bit Binary Counter
5V
1
0
Clk
Q
Clk
Q
Clk
Q
Flip FlopFlip FlopFlip FlopFlip Flop
11/26/2013 Electronics Merit Badge Class 3 43
AUTO
BIN/DEC
INCR
RESET
POWERBinary Counter
Binary Tool Kit
IC 1IC 2
Hex Binary/
Decimal
Selection
Auto Count
Mode Selection
Manual Count
Increments Display
Resets Display
Back to 000
Remote Power
Supply + 5vdc
IC has 2500 transistors
11/26/2013 Electronics Merit Badge Class 3 44
Clock
Input
4 Bit Binary Counter
(Flip Flops)
4 Bit Binary Counter
(Flip Flops)
abcdefgabcdefgBinary to
7 segment
Display
Binary Tool Kit Design
How it works
LEDs
7 Segment
LED Displays
IC1
abcdefg
11/26/2013 Electronics Merit Badge Class 3 45

Electronics Merit Badge November 2013
Page 16
SLIDE TEACHER NOTES
The BIN/DEC (DEC/HEX on newer
kits) switch selects how the
counters are incremented.
The 8 individual LEDs show us the
binary representation of the
current count.
The newer circuit board operates in the
same way, but is controlled by a
microcontroller, and the program
implements the counter and
display functions.
46
Rather than have anyone write the
answers on a piece of paper, it is better
to just have everyone participate by
voicing the answers.
47
The scouts will build this kit (or one
like it), but before they do, they must
understand how it works, and they
must draw the schematic.
AUTO
BIN/DEC
INCR
RESET
POWERBinary Counter
Decimal Count
0000 =0 0
0001 =0 1
0010 =___
0011 =___
0100 =___
0101 =0 5
0110 =0 6
0111 =0 7
1000 =0 8
1001 =___
1010 =___
1011 =___
1100 =___
1101 =1 3
1110 =1 4
1111 =1 5
Binary Tool Kit
Use Tool to find Answers
IC 1IC 2
11/26/2013 Electronics Merit Badge Class 3 46
Microprocessor Controlled Counter
The kit contains a microprocessor that will drive 12 LEDs in a
diminishing pattern. The LEDs can be displayed in many different
modes, though each mode starts as a fast pattern, and eventually
slows to a stop.
11/26/2013 Electronics Merit Badge Class 3 47

Electronics Merit Badge November 2013
Page 17
SLIDE TEACHER NOTES
48
Take a good look at this schematic.
You (the scout) will be required to draw
this schematic once we go to the next
slide.
Spend a little time describing the
elements of the circuit, and why they
are connected as they are. If they can
understand the ‘why’ a little, it will
make drawing the schematic easier.
The battery provides power. The
negative of the battery is GROUND,
indicated by the ground symbol. The
ground symbol means that that
particular place in the schematic is
connected to the negative of the
battery. Notice where all the ground
connections are.
The 2 switches provide the START and
MODE signals to the microcontroller.
SW3 is the ON/OFF switch and when
ON, connects the positive of the battery
to the rest of the circuit.
The capacitor (C1), helps keep the
battery voltage stable, which makes
the circuit work more reliably.
The microcontroller performs the
intended logic, and basically turns on
each LED in the proper sequence,
based on MODE and START.
Note there are 4 resistors connected to
the LEDs. The three individual
resistors are needed when we are
writing the program into the
microcontroller.
When the circuit is operating in a
normal fashion (NOT programming the
microcontroller), the resistors control
how much current flows through the
LEDs, which controls how bright they
get.
Microprocessor Controlled Counter
11/26/2013 Electronics Merit Badge Class 3 48
Electronics Merit Badge November 2013
Page 18
SLIDE TEACHER NOTES
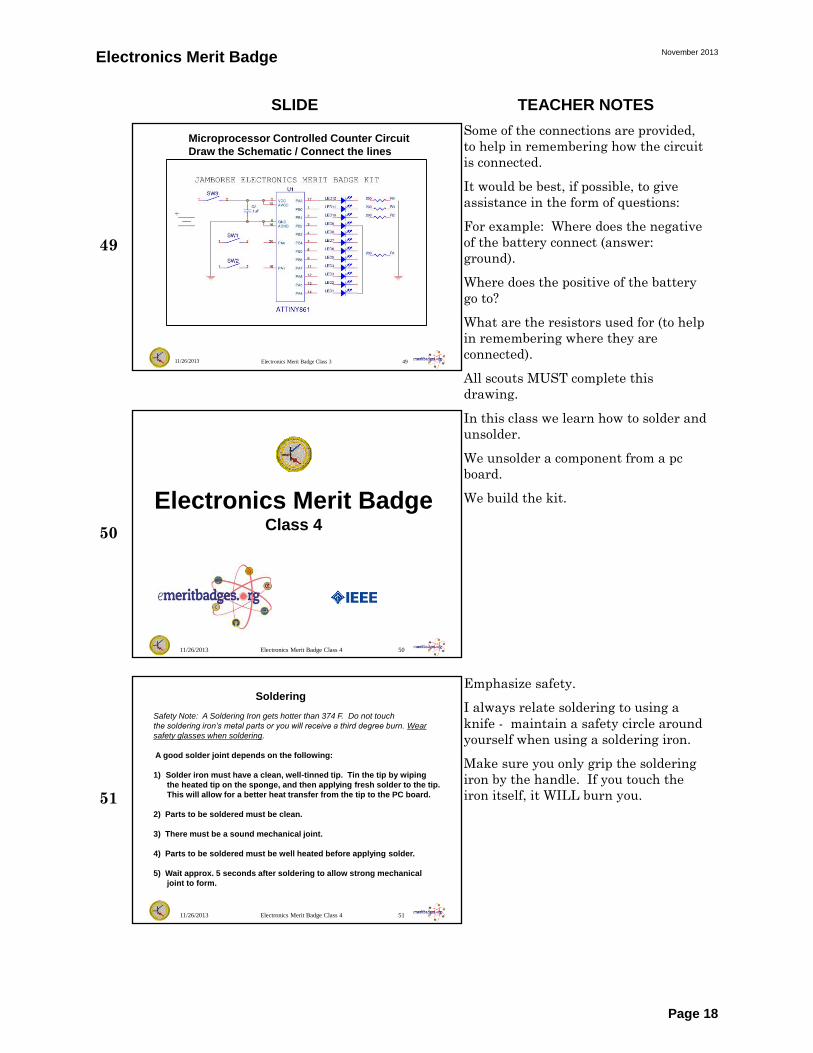
49
Some of the connections are provided,
to help in remembering how the circuit
is connected.
It would be best, if possible, to give
assistance in the form of questions:
For example: Where does the negative
of the battery connect (answer:
ground).
Where does the positive of the battery
go to?
What are the resistors used for (to help
in remembering where they are
connected).
All scouts MUST complete this
drawing.
50
In this class we learn how to solder and
unsolder.
We unsolder a component from a pc
board.
We build the kit.
51
Emphasize safety.
I always relate soldering to using a
knife - maintain a safety circle around
yourself when using a soldering iron.
Make sure you only grip the soldering
iron by the handle. If you touch the
iron itself, it WILL burn you.
11/26/2013 Electronics Merit Badge Class 3 49
Microprocessor Controlled Counter Circuit
Draw the Schematic / Connect the lines
Electronics Merit BadgeClass 4
11/26/2013 Electronics Merit Badge Class 4 50
Soldering
Safety Note: A Soldering Iron gets hotter than 374 F. Do not touch
the soldering iron’s metal parts or you will receive a third degree burn. Wear
safety glasses when soldering.
A good solder joint depends on the following:
1) Solder iron must have a clean, well-tinned tip. Tin the tip by wiping
the heated tip on the sponge, and then applying fresh solder to the tip.
This will allow for a better heat transfer from the tip to the PC board.
2) Parts to be soldered must be clean.
3) There must be a sound mechanical joint.
4) Parts to be soldered must be well heated before applying solder.
5) Wait approx. 5 seconds after soldering to allow strong mechanical
joint to form.
11/26/2013 Electronics Merit Badge Class 4 51

Electronics Merit Badge November 2013
Page 19
SLIDE TEACHER NOTES
52
It is a good idea for the instructor to
show how to do a good solder joint.
Once you give them the kit to start
building, it will be difficult to get their
attention to show how to solder, so it is
best to do it now.
53
54
It is a good idea to show how to
unsolder a component before turning
them loose.
Note that this is where a good number
of instructors/assistants can be very
useful. Good supervision when
learning to solder gives them feedback
when they are most receptive to being
taught. This is a highly teachable
moment.
Solder melts at
374 F. So the wire
and PC board
must be the same
temperature for the
solder to melt on both
items.
Place soldering iron so that
it touches both the PC board
and wire. The heat from the
soldering iron will transfer to the
PC board and wire at the same
time.
Soldering
Iron
Wire
PC Board
Iron
Wire
PC Board
Iron
Wire
PC Board
Wrong
wayRight
way
11/26/2013 Electronics Merit Badge Class 4 52
When the board and wire are hot
enough, the solder will flow
and create a cone shape. If
the board is not hot enough
the solder will be rounded on
the board, creating somewhat
of a ball. The finished solder joint
should also be shiny.
Wire
PC Board
After 3 seconds place
the solder on the tip
of the iron, the wire,
and the PC board all
together.
The solder should
flow to everything
making a good
connection.
WireIron
Solder PC Board
Wire
Iron
Solder PC Board
Right
way
Wrong
way
Soldering
11/26/2013 Electronics Merit Badge Class 4 53
Un-Soldering
1. Use pliers to hold the body of the component to be removed. If
the lead is held with the pliers it will draw heat from the lead,
and you may damage the part and possibly the board.
2. Apply soldering iron tip to printed circuit board and the
component lead. It is common to add a little fresh solder to
the lead and board, to improve heat transfer.
3. Using the pliers, simply pull the component lead from PC
board while holding the soldering iron on the lead.
4. The soldering Iron will damage electronic components if left on
device for greater than 15 seconds, so work quickly.
5. Clean soldering iron tip and keep it shiny.
11/26/2013 Electronics Merit Badge Class 4 54

Electronics Merit Badge November 2013
Page 20
SLIDE TEACHER NOTES
55
56
Orientation of the LED is
EXTREMELY important. Make
sure the shorter LED lead is next to
the flat side of the LED silkscreen.
If this isn’t correct, then you will be
spending time removing the
misoriented LED and resoldering it
back down. This is not particularly
fun.
Also, orientation of the battery
leads is CRITICAL. If these are not
correct, then when you turn on the
kit, the battery will get very hot,
and U1 will be destroyed.
Removing U1 is not particularly
fun either.
Orientation of the resistor or the
capacitor is not important.
57
To make the board look good, I
solder only 1 LED lead initially,
and then while heating that lead
with the soldering iron, push the
LED package flush with the PC
board. THEN, turn the board back
over and solder the second lead.
Also, if there are multiple colors of
LEDs, pay attention to which color
LED gets placed where.
Resistors can be treated in the
same manner, but be a little more
careful, as the resistor body will get
pretty hot when heating up the one
lead.
WireIron
PC Board
Iron
Pliers
With pliers, hold the body of
the part to be unsoldered. As
heat is applied, pull the lead
from the board by pulling on
the body. Repeat for second
lead.
Un-Soldering
PC Board
Unsolder one component
from the board.
11/26/2013 Electronics Merit Badge Class 4 55
PC Board
LED
Note flat edge
Short lead is closest
to flat edge.
+Red
Black
Soldering Kit
1. Place components into PC board in the order recommended on
instruction sheet
2. Bend leads out slightly to keep parts in place.
3. Follow instructions as to proper orientation of components.
Clip wire at boardWrong
Correct
11/26/2013 Electronics Merit Badge Class 4 56
Battery
Assembly Sequence
1. Place U1 on board. Note pin 1 orientation. Solder component into place.
2. Place all LEDs in board, bend leads out and solder, then cut leads.
3. Place resistors in board, bend leads out and solder, then cut leads.
4. Place capacitor in board, bend leads out and solder, then cut leads.
5. Place Switch S1, S2 & S3 in board and solder.
6. Place Red and Black battery wires from the back of the board and solder.
7. Place battery in box and cover with PC board
8. Use two screws to secure the PC board to box.
Microprocessor Controlled Counter
11/26/2013 Electronics Merit Badge Class 4 57

Electronics Merit Badge November 2013
Page 21
SLIDE TEACHER NOTES
The ON/OFF switch can also use a
little extra attention. Solder only
one of the leads, and then , while
reheating that lead from the
bottom, position the switch so that
it is not leaning to one side or the
other. Then, solder the rest of the
leads.
58
59
You can straighten the leads of the
component all at once, by holding
one edge of the component against
the table, and carefully pressing
all the leads into a more vertical
orientation. While you do this, be
careful you are not bending any of
the leads on the side of the
component that is not against the
table.
Orientation of U1 is CRITICAL. If
it is backwards, it will be damaged
when power is first applied. To fix
it, you will have to remove U1 from
the board and solder a new U1 in
its place.
1. PC board
2. 5 resistors R1-R4 =200Ω, R5=56KΩ
3. 1 Microprocessor –Atmel ATTINY861-20PU (U1)
4. 1 Capacitor C1 =.01uf
5. 12 LED’s
6. 1 slide switch S3, 2 push buttons S1 & S2
7. one battery holder and one box – 2 screws
Microprocessor Controlled Counter Kit
11/26/2013 Electronics Merit Badge Class 4 58
Microprocessor Controlled Counter Kit
1) Solder 20-pin DIP (Microprocessor)
in U1 location. Orient U1 so that pin 1
is on the left.
Pin 1 U1Note: You will need to bend all
leads on each side to be more
perpendicular to body of the
component, before inserting the
leads in the board.
Insert U1 into proper position on the
board. Leads should come out the
bottom of the board.
11/26/2013 Electronics Merit Badge Class 4 59

Electronics Merit Badge November 2013
Page 22
SLIDE TEACHER NOTES
60
Orientation is critical.
The construction of the LEDs is such
that there is a diagonal slot inside,
between the 2 metal members of the
LED structure. It is easy to notice if all
the LEDs have been inserted correctly
by making sure this diagonal slot
points in the same direction.
61
It is important to get the 200 ohm
resistors in the R1,R2,R3 and R4
positions. Putting the 56K resistor in
one of these locations will make at least
1, but possibly many more of the LEDs
to not turn on.
For those who are color blind, instruct
them to just find the 4 resistors that
are the same, and those are R1-R4.
The oddball resistor is 56K (R5).
62
Orientation of the capacitor does not
matter.
2) Place LED’s on PC board, flat side of LED’s facing right, bend leads out,
then solder leads. After soldering, cut leads close to board. There are 12
of these. Hint: Solder only 1 lead of each LED. Place solder iron on
soldered lead, melting solder, and then press LED flush to the board.
Then solder the other lead.
LED
Note: Flat Edge
Shorter Lead
Cut when soldered
When soldering LED’s, do not leave
the solder iron on pads for more than
5 seconds, or you will destroy the pad.
LED against
board
Microprocessor Controlled Counter Kit
11/26/2013 Electronics Merit Badge Class 4 60
3) Place Resistors, bend leads out, then solder. Clip leads when done.
Orientation of resistor does not matter.
PC Board
R5 = 56K
PC Board
R1,R2,R3,R4 = 200
Microprocessor Controlled Counter Kit
11/26/2013 Electronics Merit Badge Class 4 61
R1-R4 200Ω, (red, black, brown)
R5 56KΩ, (green, blue, orange)
4) Place capacitor at C1. Bend leads out. Solder leads.
Orientation of capacitor does not matter.
C1 = .01uf
Microprocessor Controlled Counter Kit
11/26/2013 Electronics Merit Badge Class 4 62

Electronics Merit Badge November 2013
Page 23
SLIDE TEACHER NOTES
63
S3 is the ON/OFF switch. Orientation
does not matter, but I would try and
make sure the connector ends up
vertically with respect to the pc board.
This is just for looks.
S1 and S2, once inserted, will not fall
out, so it is easy to install these guys.
They only fit in one way (it’s a
rectangular part), so just insert it and
then solder.
64
Experience has shown that it is best to
have the board inspected before
applying power. I would have either
the instructor or an assistant, both who
should know what to look for, check the
board for obvious problems:
Solder Shorts
Opens connections; no solder.
Cold solder joints.
LEDs in backwards.
IC in backwards.
Resistors in the wrong position.
Battery wires not in the correct
place.
I think scouts really like it when their
kit works the first time they power it
on. That is why inspection is so
important.
65
This talks about foam as a filler, but I
have found that wadded up paper
works just as well.
5) Place Switches S1, S2 and S3 in their appropriate
positions and solder. Make sure S3 (slide switch) is
vertical, before soldering all the leads.
Microprocessor Controlled Counter Kit
11/26/2013 Electronics Merit Badge Class 4 63
7) Inspect board for good solder joints and for no solder shorts.
Connect the battery and turn unit on. If unit does not work, have an
instructor check it for problems.
+Red
Black
6) From the bottom of the board, insert the red battery holder lead into
the + hole. Insert the black lead into the other hole. From the top
of the board, solder both battery leads.
Microprocessor Controlled Counter Kit
11/26/2013 Electronics Merit Badge Class 4 64
Completed Kit
9 v Battery
Box
Filler
8) Place the battery in the box. Place foam/filler on top of the battery.
Place the board onto the top of the box, and using the two screws,
affix the board to the box. Place the screws in opposite corners.
Screws
Screw
Screw
Microprocessor Controlled Counter Kit
11/26/2013 Electronics Merit Badge Class 4 65

Electronics Merit Badge November 2013
Page 24