elementary science grade technology...
TRANSCRIPT

Floating Fun for my Favourite Toy
Strand: Matter and MaterialsTopic: Properties of Solids & Liquids
2GRADE
Context and Purpose
Unit Overview
Making Decisions
Looking at Values
Teaching the Unit
New Vocabulary
Summary of Resources
MOE Expectations
Links to Other Subjects
Blackline Masters
2
3
4
5
6
18
19
20
22
23
Elementary Science andTechnology Partnership

Acknowledgements
Project director and editor Dr. Malcolm Welch, Faculty of Education, Queen’s University, Kingston, Ontario, Canada, K7L 3N6
Project deputy director Dr. Andréa Mueller, Faculty of Education, Queen’s University
Lead teacher author Rosemary Engemann, Algonquin & Lakeshore Catholic District School Board
Teacher and Faculty Partners Algonquin & Lakeshore Catholic District School Board
Christina Ackerman, Faith Bland, Paul Couture, Paul Cox, Pauline Dockrill, Theresa Frendo-
Cumbo, Jamie Gaudet, Lisa McDonald, Gail Ows, Lisa Romano, Walter Sepic, Jamie Tees, Sheena
Whalen
Catholic District School Board of Eastern Ontario
Colleen Bennett, Dawn Fewer, Heather Garleau, Chris Shannon
Faculty of Education, Queen’s University
Dr. Peter Chin, Dr. Cathy Christie, Joan McDuff, Dr. Hugh Munby, Luigia Cimellaro, Jenny Taylor
Consultant Dr. David Barlex, Director, Nuffield Design & Technology Project
Layout Douglas Gifford
Illustrations Michael Shumate and Rob Loree
Project administrator Tricia Walker
The EST project wishes to thank all those teachers, administrators, school board personnel and
students who supported the piloting of the curriculum materials and who provided valuable feedback.
© Algonquin & Lakeshore Catholic District School Board 2002
© Catholic District School Board of Eastern Ontario 2002
© Faculty of Education at Queen’s University 2002
ISBN 1-894855-08-6

2 3
The Context
Most children enjoy playing in water, whether at
the beach, in a pool or in the bathtub. When at the
beach or in a pool they often make use of some
type of float to aid them in swimming and for
fun. These devices may be rings or tubes, rafts or
floating animal shapes.
In this unit students will design and make a float
for a small toy of their choice. To be successful,
the students will need to learn why objects float
or sink and why some materials and shapes float
better than others.
The Purpose
In this unit students will learn:
about the buoyancy of materials;
how the shape of a material affects buoyancy;
to conduct a simple experiment and record
their observations;
to write a design specification;
to mark, cut and shape materials with
increasing accuracy;
to evaluate a product against a design
specification;
to evaluate their designing and making.
Context and Purpose

2 3
Unit Overview
The Support Tasks
1 Exploring floating and sinking
45 minutes
2 Investigating shapes and materials that float
45 minutes
3 Learning to cut and join materials
80 minutes
4 Supporting a mass
45 minutes
5 Writing a design specification
30 minutes
The Big Task: The design and make activity
The Big Task is for students to design and make a
float to support a small toy. The float may be used
in the bath or in a swimming pool. The shape of
the float should reflect the toy it is supporting.
140 minutes
The Evaluation 30 minutes
Unit Review 30 minutes

4 5
Making Decisions
Design Decisions
The students can decide on the following:
which toy is to be supported by the float
the shape of the float
the size of the float
the materials used to make the float buoyant

4 5
Looking at Values
Grades 1 - 3
Making design decisions involves making value
judgements. Making these judgements is an ongoing
process that will permeate this unit. Teachers should
engage students in thoughtful discussion that will
help them make decisions that are important to
themselves and eventually to society.
Values are influenced by personal priorities. This
is particularly relevant in the case of Grade 1 - 3
students. Teachers should explore how students
feel and what they think, knowing their experience
is centred on themselves, their friends and their
family. Discuss how these relationships might
influence them when making decisions.
Teacher input
Explain to students that products and services are
designed and made to meet a need or want. Tell
students that when they decide about the worth
or importance of a product, they are making a
value judgement about its quality. Tell students
that a democratic society requires each student to
become an informed citizen who will use his or her
knowledge and value system when making decisions
about technology in settings outside the school.
Explain to students that as they learn to recognize
and discuss values, they will begin to compare
how their own values are similar to or distinct
from those of friends and others. Ask questions
that will help students conceptualize what values
are and how these values might impact their
life, both now and in the future. Recognize that
students’ answers will reveal value judgements
that become more complex and sophisticated
with practice and experience.
At appropriate times throughout the unit, use the
following questions as starting points to engage
students in thinking about and discussing values.
Aesthetic values
In what ways is the product pleasing to the
senses?
Do I like my product? If so, why? If not, why
not?
Technical values
What materials were used in the production?
What skills were needed to make the product?
Does the product perform its intended
function?
Will the product withstand extended use?
Economic values
Who else would want to own the product?
Why would someone else want to own the
product?
Environmental values
How long will the product last?
What happens to the product when it is no
longer wanted?
Social values
Whose needs or wants were considered
during the designing?
What needs or wants were considered during
the designing?
Moral values
How does the product affect me?

6
Teaching the Unit
7
Teaching the Unit
�����
�����
�����
suggested timing
Support Task 1: Exploring floating and sinking
45 minutes
Student activity
Working in small groups students will conduct
an experiment to determine which objects and
materials float and which sink.
From a central table one student from each group
will choose an item from those available. Before
putting the object into the water they must
record its name on the BLM “Does it float or does
it sink?”, the material from which the object is
made, and predict whether the object will sink or
float. Remind students not to drop the item into
the water, but place it in gently to cut down on
splashing. They should wait a few seconds and
then record whether it floats or sinks.
Students record their observations on
the BLM “Does it float or does it sink?”
Return the objects to the
main table and repeat
until each group has
tested ten items.
Teacher input
Tell the class they are going to design and make
a float to support their toy in a pool or bathtub.
Explain that to be successful they will first need
to learn about why some objects float and others
sink.
Ask the students where some of their
favourite swimming places are (pool at home,
neighbourhood public pool, beach) and about
special toys they like to use when playing in the
water. Make a list on the board to include inner
tubes, flutter boards, rafts, inflatable creatures
and life jackets. Identify with the students that
not only are these devices fun to play with when
swimming, but they also keep us afloat.
Show the students how some objects
float and some sink. Use a variety of
materials and a see-through water
container (aquarium). Include
objects of different sizes, as well
as those of similar size and
different mass. Ask students
the following questions:
What is the name of this
object? What material is it made of? Do you think it will float or sink? Did it float or sink? Why do you think this happened?
Repeat this procedure with two or three items.
Ask students to define the words float and sink.
Record their responses on the chalkboard or on
chart paper.

6
Teaching the Unit
7
Teaching the Unit
Resources requiredStimulus materials: none required
Consumable materials: large see-through container of water (aquarium), variety of objects
that will sink or float (jars with lids, pennies, nails, stones, popsicle sticks,
blocks of wood, milk cartons, Styrofoam blocks, ping pong balls, golf balls,
different fruits and vegetables), tub of water for each group of students,
paper towels, copies of BLM “Does it float or does it sink?”Tools: pencils
Safety checkDiscuss the hazards and risks involved in using water in the classroom and how these risks can be
managed by behaving sensibly and following the correct procedures. Check that students do not
have a latex allergy.
suggested timing
Teacher input
When the experiment is complete ask students
to identify common factors for those objects that
float and those that sink. Ask if there are any
surprises (not all little objects float, not all big
objects sink). Ask students to draw conclusions
from the experiment.
To encourage students to experiment with
different items, keep a “Floating/Sinking”
centre in the classroom until the end of the unit.
Encourage students to add new items to the
collection. They can then add their findings to
the chart made at the end of the student activity.
Students may also bring in some of the pool floats
they use.
Relating this Support Task to the Big Task
At the conclusion of this Support Task have
students tell you what they have learned about
floating and sinking. Next ask students how this
information will help them to design and make a
float to support a small toy.
New vocabulary
sink, float

8
Teaching the Unit
9
Teaching the Unit
�����
�����
�����
suggested timing
Support Task 2: Investigating shapes and materials that float
45 minutes
Student activity
Divide students into small groups and give each
a tub of water, a ball of plasticine, a re-sealable
sandwich bag or balloon, a ball of foil, and paper
towels.
Explain that their task is to change the shape of
each object that sinks so that it floats and remains
above the waterline. Students use the BLM “I
made it float.” Students may use words or pictures
to record how the object looked before and after
changes were made.
Teacher input
Tell the students that today they will investigate
why a huge ocean liner floats but a little penny
will quickly sink.
Place a ball of plasticine into a large, clear
container (aquarium) of water at the front of the
class. Ask students: What is happening? Why do
you think this is happening?
Tell the students that they will be working in
groups to change objects that sink into objects
that float and also objects that float low in the
water into objects that float well above the
waterline. This is important since the floats they
will be designing and making must stay above the
waterline.
8
Teaching the Unit
9
Teaching the Unit
Resources requiredStimulus materials: picture of large ocean liner
Consumable materials: a large, clear tank (aquarium) containing water, several balls of
plasticine and foil, re-sealable sandwich bags or balloons, a tub of water
for each group, paper towels, copies of BLM “I made it float”Tools: pencils
Safety checkDiscuss the hazards and risks involved in using water in the classroom and how these risks can be
managed by behaving sensibly and following the correct procedures. Check that students do not
have a latex allergy before using balloons.
suggested timing
Teacher input
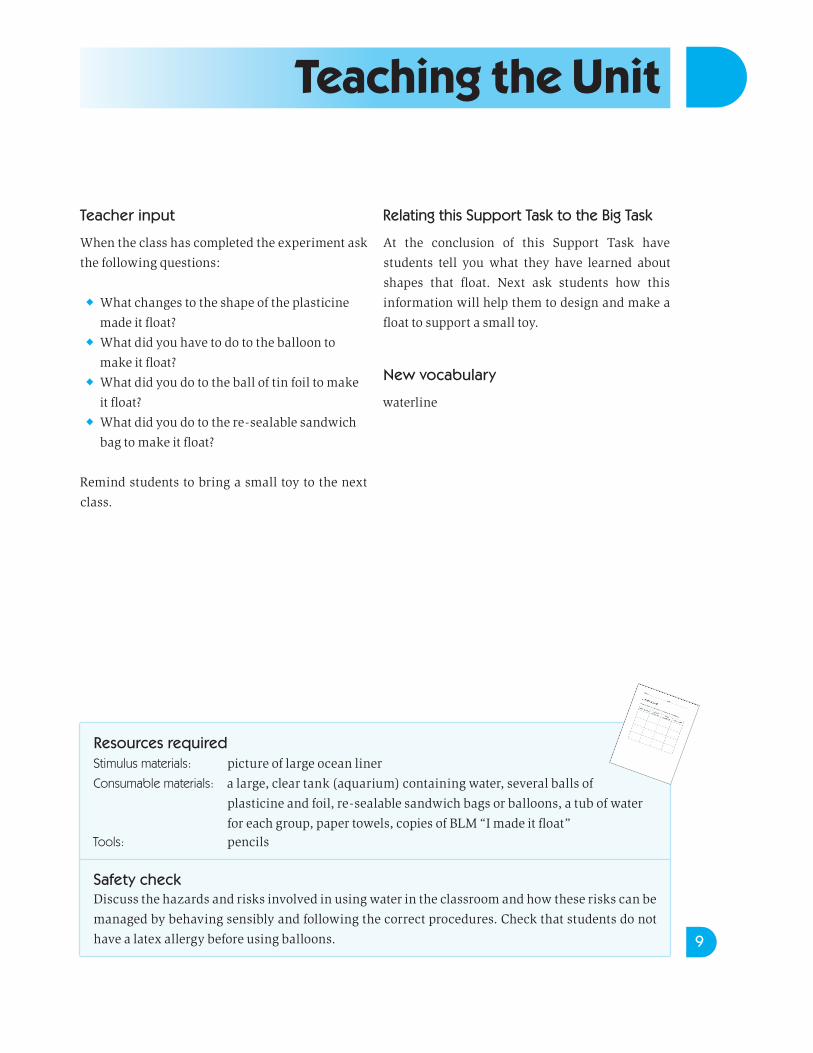
When the class has completed the experiment ask
the following questions:
What changes to the shape of the plasticine
made it float?
What did you have to do to the balloon to
make it float?
What did you do to the ball of tin foil to make
it float?
What did you do to the re-sealable sandwich
bag to make it float?
Remind students to bring a small toy to the next
class.
Relating this Support Task to the Big Task
At the conclusion of this Support Task have
students tell you what they have learned about
shapes that float. Next ask students how this
information will help them to design and make a
float to support a small toy.
New vocabulary
waterline

10
Teaching the Unit
11
Teaching the Unit
�����
�����
�����
suggested timing
Support Task 3: Learning to cut and join materials
80 minutes
Student activity
Divide the class into groups of three or four. These
will act as expert groups. Students will experiment
with different ways to cut and join materials in
order to make an open box. Remind them to work
carefully and to seal all joins so that water cannot
get in. When they have completed their box they
may try it in a tub of water. If it is unsuccessful
they will need to identify the problem and make
corrections. If it floats, ask the students to identify
improvements they can make.
When the students have completed the
activity, gather the class together to
observe and discuss which method,
materials and tools worked best.
Record these on chart paper or on the
chalkboard for students to refer
to when they tackle
the Big Task.
Teacher input
Tell the students that it is important to know how
to cut and join the materials (Styrofoam, tin foil,
plasticine, popsicle sticks, milk cartons) they
might use for designing and making their float. A
way for them to do this is to construct an open box.
This will provide the opportunity to create a simple
structure that floats, experience working with
different materials, and learn about joining seams.
Ask the students what they think is important to
remember when they join the materials (there
should be no spaces where water can get in).
Set up one or two stations
for each of the materials
that will be available to
students. Have available
the tools for cutting and
measuring as well as
materials for joining
(tape, glue, stapler).

10
Teaching the Unit
11
Teaching the Unit
Resources requiredStimulus materials: none required
Consumable materials: tub of water, Styrofoam (meat trays), plasticine, tin foil, popsicle sticks,
milk cartons, masking tape, duct tape, white glueTools: scissors, rulers, staplers
Safety checkDiscuss the hazards and risks involved in using cutting tools and materials in the classroom and
how these risks can be managed by working carefully and following the correct procedures.
suggested timing
Relating this Support Task to the Big Task
At the conclusion of this Support Task have students
tell you what they have learned about materials
and tools, and making boxes that float. Next ask
students how this information will help them to
design and make a float to support a small toy.
New vocabulary
none

12
Teaching the Unit
13
Teaching the Unit
�����
�����
�����
suggested timing
Support Task 4: Supporting a mass
45 minutes
Student activity
Have workstations set up with the required
materials. Divide the class into small
groups. Explain to the class that they will be
experimenting with floats and objects in the
following way:
Place the smallest object on the smallest piece
of Styrofoam and place on top of the water.
Observe what happens. Repeat with the other
two sizes of Styrofoam.
Repeat with the medium size object.
Repeat with the large size object.
When all groups have completed the activity,
gather students as a class to discuss their
findings. Record these on chart paper or on the
chalkboard.
Teacher input
Explain to the students that the float they will
be designing and making has to float and also
support a mass (their toy). Tell them that during
this activity they will be given the opportunity
to test different sizes of floats with objects of
different mass to determine which size float is
most effective.

12
Teaching the Unit
13
Teaching the Unit
Resources requiredStimulus materials: none required
Consumable materials: enough Styrofoam rectangles/squares (which may be cut from meat trays)
so that each workstation has 1 small piece (60 mm x 60 mm), 1 medium
piece (100 mm x 100 mm), and 1 large piece (150 mm x 150 mm), 3 objects
(small, medium, large) for each group (these may be chunks of plasticine),
tub of water (1 per workstation)Tools: none required
Safety checkDiscuss the hazards and risks involved in using water in the classroom and how these risks can be
managed by behaving sensibly and following the correct procedures.
suggested timing
Relating this Support Task to the Big Task
At the conclusion of this Support Task have
students tell you what they have learned about
supporting a mass. Next ask students how this
information will help them to design and make a
float to support a small toy.
New vocabulary
mass

14
Teaching the Unit
15
Teaching the Unit
Resources requiredStimulus materials: none required
Consumable materials: BLM “My fabulous float design specification”
Tools: none required
Safety checkReview with students the hazards and risks they may encounter when making a float for their
favourite toy.
�����
�������
�����
suggested timing
Support Task 5: Writing a design specification
30 minutes
Student activity
Students complete the BLM “My fabulous float
design specification”. Working in small groups
they can discuss their answers with other
students.
Relating this Support Task to the Big Task
At the conclusion of this Support Task have
students tell you what they have learned about
writing a design specification. Next ask students
how this information will help them to design and
make a float to support a small toy.
New vocabulary
none
Teacher input
Explain to the class that each student must
write a design specification that will answer the
following questions:
Who will play with the float?
What toy must the float support?
What size must the float be?
What shape must the float be?
What materials will be used to make the float?
What tools will be needed to make this float?
Tell the class that they can record their answers
to these questions on the BLM “My fabulous float
design specification.” They can also record the
materials they will use and the tools needed to cut
and shape them. This specification will be used
in the sessions when the students design and
make and then evaluate their float.

14
Teaching the Unit
15
Teaching the Unit
Resources requiredStimulus materials: BLM “My fabulous float design specification”, a variety of pool
floats brought in by students, toysConsumable materials: milk cartons, plasticine, foil, popsicle sticks, Styrofoam, cardboard, re-
sealable sandwich bags, balloons, elastic bands, white glue, items for
decorating floats (buttons, sequins, wallpaper sample books), tubs of waterTools: pencils, scissors, crayons, permanent markers (variety of colours)
Safety checkReview the hazards and risks involved when using cutting tools and how working carefully and
using the correct procedures can manage these. Check there are no latex allergies within the
school before using balloons.
�����
�������
suggested timing
The Big Task: Designing and making a float for a favourite toy
140 minutes
Student activity
Students work individually to make their float.
They may choose any materials from the class
supplies or they may have brought in some of their
own. Have tubs of water available for testing their
floats at various stages of making. Encourage the
students to make changes as necessary. Students
should refer to their design specification on BLM
“My fabulous float design specification” before
making begins. They may test their float at any
time to determine if they are being successful.
Teacher input
Tell the class that they are now ready to design
and make their fabulous float for the toy of their
choice. Remind the students they have written a
design specification that they should use as they
are making the float.
Remind the students that they have made design
decisions about:
the toy the float must support;
the size of the float;
the shape of the float;
the materials they will use to make the float.
Students may wish to bring some materials from
home for their project. They should be allowed the
chance to do so. They can use one work period
to design their float and consider necessary
materials, then they can begin making their float
during the next work period.
suggested timing

16
Teaching the Unit
17
Teaching the Unit
Resources requiredStimulus materials: none required
Consumable materials: tubs of water, floats made by students, BLM “My fabulous
float: self evaluation”, BLM “My fabulous float: peer evaluation”Tools: pencils
Safety checkDiscuss the hazards and risks involved in testing floats and how these risks can be managed by
being careful and respecting the property of others.
�����
�����
suggested timing
Evaluating the Final Product
30 minutes
Student activity
Put students into pairs. They should look at and
test the floats to answer the following questions
about their float and their partner’s float:
Did it float?
Did it support the toy?
Was it the shape the designer had planned to
use?
Did the designer choose the materials wisely?
Did the designer need to make changes?
Is it attractively decorated?
There are two evaluation sheets (BLM “My
fabulous float: self evaluation” and BLM “My
fabulous float: peer evaluation”) that the students
can use to record their answers.
Teacher input
Tell the class that now is the time to evaluate the
fabulous floats. Explain that to do this they will
need to check whether the float did what it was
supposed to do. Remind students that they wrote
this down just before they began to make their
special float (BLM “My fabulous float design
specification”) and they should use this sheet as
a reminder.

16
Teaching the Unit
17
Teaching the Unit
Resources requiredStimulus materials: none required
Consumable materials: BLM “Unit Review”
Tools: pencils
Safety checkDiscuss whether students used hazard recognition, risk identification, and risk management
when designing and making a float for their favourite toy.
�����
�����
suggested timing
Unit Review
30 minutes
Student activity
The students can discuss these questions in
small groups or as a whole class. When they have
finished their discussion give each student a copy
of BLM “Unit Review.” Based on their responses
the students should set a goal for improvement for
their next design and make activity.
Teacher input
Explain to the class that it is important to think
about how to become better designers and
makers. They can do this by thinking about and
discussing the following questions:
What did you enjoy the most?
What did you find easy?
What did you find difficult?
What did you get better at?
Did you help each other?
What could have been done better?
How could these things have been done
better?
suggested timing

18
New Vocabulary
19
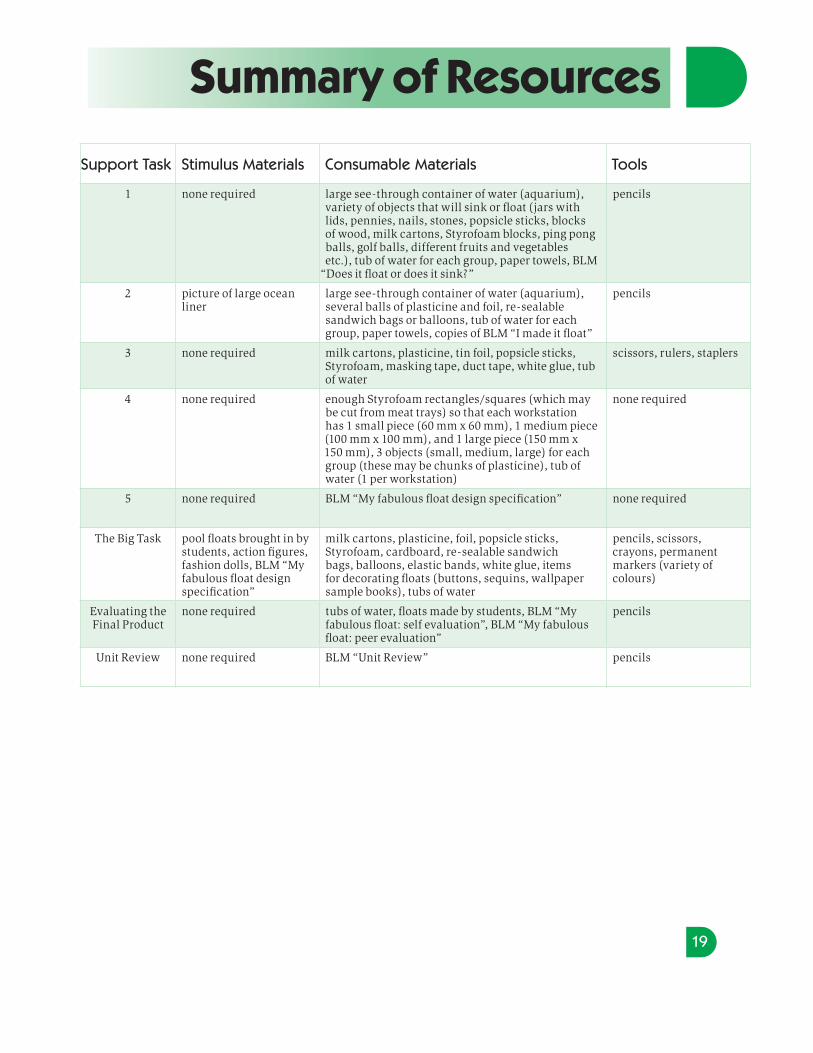
Summary of Resources
Term Definition
float to rest or move on the surface of a liquid without sinking
mass the amount of matter in an object, measured in kilograms
sink to disappear partly or totally below the surface of a liquid
waterline the line along which the surface of the water touches a ship’s side
18
New Vocabulary
19
Summary of Resources
Support Task Stimulus Materials Consumable Materials Tools
1 none required large see-through container of water (aquarium), variety of objects that will sink or float (jars with lids, pennies, nails, stones, popsicle sticks, blocks of wood, milk cartons, Styrofoam blocks, ping pong balls, golf balls, different fruits and vegetables etc.), tub of water for each group, paper towels, BLM
“Does it float or does it sink?”
pencils
2 picture of large ocean liner
large see-through container of water (aquarium), several balls of plasticine and foil, re-sealable sandwich bags or balloons, tub of water for each group, paper towels, copies of BLM “I made it float”
pencils
3 none required milk cartons, plasticine, tin foil, popsicle sticks, Styrofoam, masking tape, duct tape, white glue, tub of water
scissors, rulers, staplers
4 none required enough Styrofoam rectangles/squares (which may be cut from meat trays) so that each workstation has 1 small piece (60 mm x 60 mm), 1 medium piece (100 mm x 100 mm), and 1 large piece (150 mm x 150 mm), 3 objects (small, medium, large) for each group (these may be chunks of plasticine), tub of water (1 per workstation)
none required
5 none required BLM “My fabulous float design specification” none required
The Big Task pool floats brought in by students, action figures, fashion dolls, BLM “My fabulous float design specification”
milk cartons, plasticine, foil, popsicle sticks, Styrofoam, cardboard, re-sealable sandwich bags, balloons, elastic bands, white glue, items for decorating floats (buttons, sequins, wallpaper sample books), tubs of water
pencils, scissors, crayons, permanent markers (variety of colours)
Evaluating the Final Product
none required tubs of water, floats made by students, BLM “My fabulous float: self evaluation”, BLM “My fabulous float: peer evaluation”
pencils
Unit Review none required BLM “Unit Review” pencils

20
MOE Expectations
21
MOE Expectations
MOE ExpectationsLinks to Support Tasksand the Big Task
Overview 1 2 3 4 5 BT when students examine materials in the world around them, they become
aware of a wide variety of similarities and differences in the properties of those materials – for example, the way they look, feel, sound, or change. In Grade 2, students will develop their understanding of properties of materials through investigating liquid and solid materials. They will investigate ways in which solids and liquids interact, and will learn that some materials exist in both solid and liquid states. They will also learn that it is important to take into consideration the various properties of solids and liquids when designing and making or building objects for use
Overall expectations 1 2 3 4 5 BT demonstrate an understanding of the properties of familiar liquids (e.g.,
vinegar, detergent, water, oil) and solids (e.g., sugar, salt, sand), and of interactions between liquids and between liquids and solids
investigate the properties of and interactions between liquids and between liquids and solids, and identify the types of objects or materials that can be used to contain liquids and solids (e.g., a plastic bowl will hold a liquid or a solid but a paper towel will only hold a dry solid)
identify and describe ways in which we use our knowledge of liquids and solids in making useful objects and in living in our environment
Specific expectations: Understanding basic concepts 1 2 3 4 5 BT
describe the properties of liquids and solids, using their observations
distinguish between solids that dissolve in water (e.g., sugar) and solids that do not (e.g., sand)
describe, using their observations, the characteristics of the three states of water, and identify the conditions that cause changes from one state to another (e.g., water turns to ice when placed in a freezer)
recognize that the states of liquids and solids remain constant in some circumstances (e.g., solids remain solid when broken; liquids remain liquid when poured), but may change in other circumstances (e.g., liquids may freeze when the temperature drops; solids may melt when heated)
identify reversible changes in materials (e.g., the changing of ice to water)
identify, through observation, various substances that are buoyant (e.g., wood, oil), that can absorb another substance (e.g., paper towel), and that can dissolve another substance (e.g., water)
evaluate the appropriateness of the materials chosen in the design and used in the construction of a structure that is intended to float (e.g., polystyrene, paper, metal, wood)

20
MOE Expectations
21
MOE Expectations
Specific expectations: Developing skills of inquiry, design, & communication 1 2 3 4 5 BT design and assemble, using given materials, an object that is buoyant and able
to support a given mass, and identify and describe the materials and tools they used
ask questions about and identify needs and problems related to the use of liquids and solids, and explore possible answers and solutions (e.g., devise and explain a plan to build a model raft; predict changes that will occur when ice or water is heated or cooled)
plan investigations to answer some of these questions or solve some of these problems, and describe the steps involved
use appropriate vocabulary in describing their investigations, explorations, and observations (e.g., use such words as clear, runny, and greasy when describing liquids, and granular, hard, and opaque when describing solids)
record relevant observations, findings, and measurements, using written language, drawings, charts, and concrete materials (e.g., record data from experimentation with liquids and solids; on a chart list characteristics of different liquids that they have observed)
communicate the procedures and results of investigations for specific purposes, using demonstrations, drawings, and oral and written descriptions (e.g., write a booklet for the school library describing class experiments in investigating liquids and solids)
Specific expectations: Relating science and technology to the world outside the school 1 2 3 4 5 BT compare the properties of liquids with those of solids to determine which
materials take the shape of their container (e.g., water will fill a margarine container completely but ice cubes will leave spaces)
compare different materials with respect to their capacity to absorb, and identify ways in which this capacity determines how these materials are used (e.g., bond paper, paper towels, cotton, linen, wood, plastic)
describe, using their observations, the behaviour of various liquids (e.g., water, oil) when poured on different surfaces (e.g., rough wood, smooth wood, cloth), when combined with solids (e.g., powdered milk), and when combined with other liquids (e.g., vinegar), and explain how the reactions they observe determine the uses of these liquids and solids
compare the properties of water with the properties of at least one other liquid (e.g., detergent, oil, molasses)
identify liquids used in the home and describe how they are used (e.g., milk for drinking and cooking; detergent for cleaning)
describe, using their observations, some ways in which solids and liquids can be combined to make useful substances (e.g., flour and water make paste)
identify objects in the immediate environment as solids (e.g., sand, ice, rocks) or liquids (e.g., milk, vinegar, water)
recognize international symbols that give us information on the safety of substances (e.g., household cleaners, cleansers, bleaches) and Canadian Safety Association signage when working with liquids and solids

22
Links to Other Subjects
23
Blackline Masters
22
Language
Writing
communicate ideas (thoughts, feelings,
experiences) for specific purposes
organize ideas in a logical sequence
(beginning, middle, end)
use and spell correctly the vocabulary
appropriate for this grade level
use correctly the conventions specified for
this grade level
Reading
read independently, using reading strategies
appropriate for this grade level
understand the vocabulary and language
structures appropriate for this grade level
use some conventions of written materials to
help them understand and use the materials
Oral and Visual Communication
communicate messages (using words and
pictures), and follow instructions and
directions
listen to discussions and ask relevant
questions
apply the rules of participating in a
conversation and working with others
use conventions (sentence structure) of oral
language
use words from their oral vocabulary,
personal word lists and class lists compiled
through brainstorming
use underlining, colour, size of print for
emphasis, print legibly
Mathematics
Measurement
use mathematical language to describe
relative times, sizes, temperatures, amounts
of money, areas, masses and capacities (e.g.,
higher tower, fewer cups)
Geometry
explain how they used different three-
dimensional figures and concrete materials in
building a structure or model
Data management and Probability
sort and classify objects and data using
concrete materials
collect and organize data
create and interpret displays of data, and
present and discuss the information
The Arts
Visual Arts
produce 2D and 3D works of art that
communicate ideas (thoughts, feelings,
experiences) for specific purposes and to
familiar audiences
use the elements of design in ways
appropriate to this grade
use correctly vocabulary and art terminology
associated with the specific expectations for
this grade
identify strengths and areas for improvement
in their own and others’ artwork, and explain
their choice

22
Links to Other Subjects
23
Blackline Masters
Title Used in…
Does it float or does it sink? Support Task 1 on page 6
I made it float Support Task 2 on page 8
My fabulous float design specification Support Task 5 on page 14
My fabulous float: self evaluationEvaluating the Final Producton page 16
My fabulous float: peer evaluationEvaluating the Final Producton page 16
Unit Review Unit Review on page 17

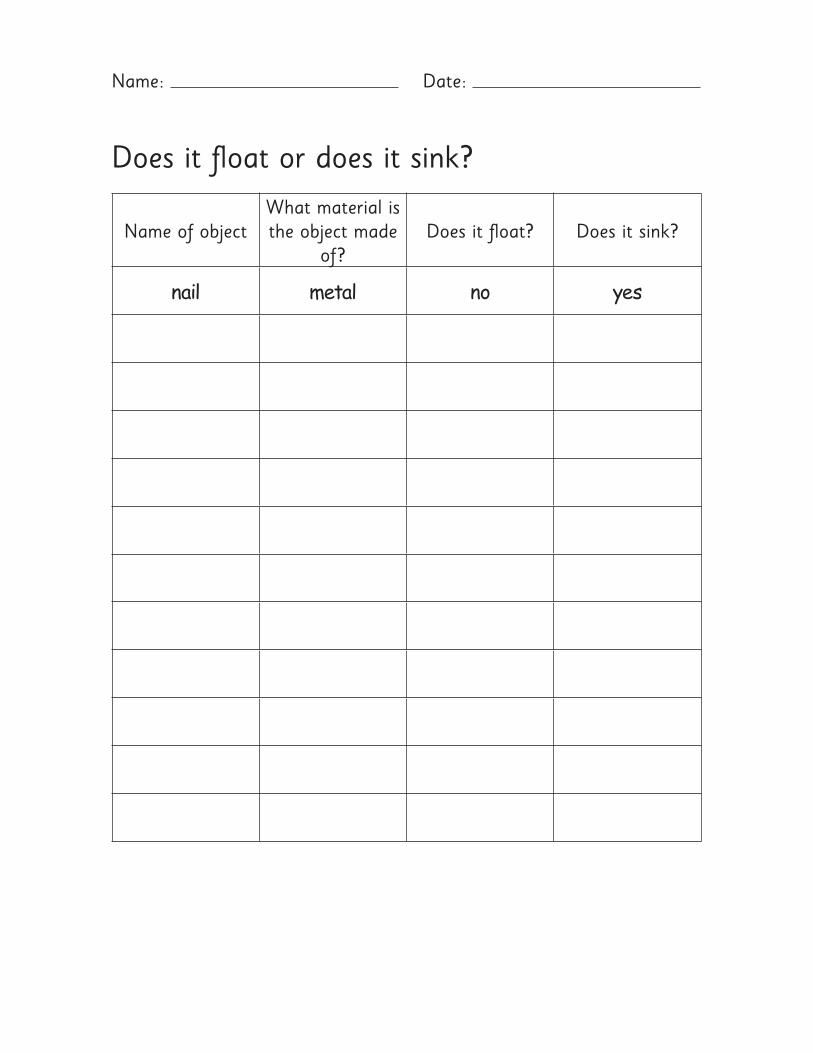
Name: Date:
Does it float or does it sink?
Name of objectWhat material is the object made
of?Does it float? Does it sink?
nail metal no yes

Name: Date: Name: Date:
I made it float
Draw pictures or use words to complete the chart below.
Name of object What it looked like
How I changed it Did it work?
Name: Date: Name: Date:
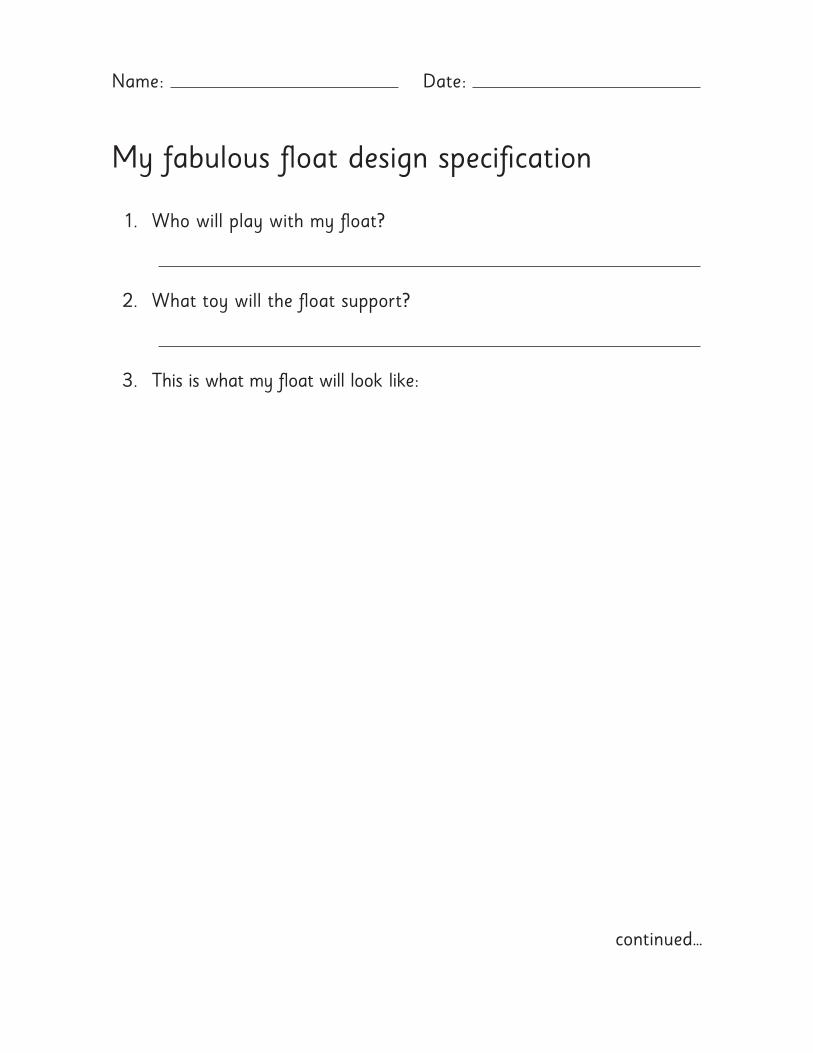
My fabulous float design specification
1. Who will play with my float?
2. What toy will the float support?
3. This is what my float will look like:
continued…

Name: Date:
4. To make my float I will need the following materials:
.
5. To make my float I will need the following tools:
.

Name: Date:
My fabulous float: self evaluation
1. Did the float actually float?
2. Did the float support the toy?
3. This was the shape I planned to use:
4. This was the shape I did use:
continued…

5. Did I choose the correct materials?
6. I know this because
.
7. What changes did I need to make during the designing and making?
.
8. Is the float attractively decorated with appropriate materials?

Float made by: Date:
Float evaluated by:
My fabulous float: peer evaluation
1. Did the float actually float?
2. Did the float support the toy?
3. Did the float use appropriate materials?
4. Is the float attractively decorated with appropriate materials?
5. I think the float could be improved by
.

Name: Date:
Unit review
1. The thing I enjoyed most about this unit was
.
2. It was easy to
.
3. It was not so easy to
.
4. I am pleased with my completed float.
5. I could have made it even better by
.

Name: Date:
6. Three things I learned while doing this unit were:
1.
2.
3.
7. One thing I will do differently next time I design and make a
product is
.
