em - modify - - get a free blog here
TRANSCRIPT

COMPUTER SCIENCE
Untouchability is a sinUntouchability is a crimeUntouchability is inhuman
TAMILNADU
TEXTBOOK CORPORATIONCCollege Road, Chennai - 600 006.
STANDARD VI
Distribution of Free Textbook Programme
A Publication under
Government of Tamilnadu
( NOT FOR SALE )
Government of Tamilnadu
First Edition - 2009
c
Dr. R. Swaminathan,Principal,
Shri Vidhyaa Giri Matriculation School,
Puduvayal,
Sivagangai District.
CHAIRPERSON
This book has been prepared by the Directorate of School
Education on behalf of the Government of Tamilnadu
This book has been printed on 70 G.S.M. Paper
Mr. T. Balasubramanian,Computer Teacher,
G.H.S.School,
Marungulam,
Thanjavur District.
AUTHORSMr. S.Rajakumar,Computer Teacher,
G.G.H.S.School,
Villupuram
Villupuram District.
Dr. R.Ayyappan,Cheif Programme Executive,
Educational Television Studio,
DPI Campus,
Chennai-6.
Mr. V.Rajasekar,Head Master,
Government Higher Secondary School,
Perambakkam,
Thiruvallur District.
REVIEWERS

PREFACE
Technology has grown enormously and has entered every sphere of life. Today
Schools in our country realize the potential of learning through technology tools. In
recent years, there has been a wake of computer literacy in India. This has led to
computers finding its way into schools in our country. The latest trend is learning subjects
through technology tools.
Computer education is beneficial to students in inculcating interest in their subjects
and enhancing retention. With the advent of technology, students are encouraged to
explore various subjects and analyze what they have learnt.
Basic education provides knowledge and makes the students a part of the
knowledge community.
To meet the growing needs in the field of education and to keep pace with the
fast moving world of technology, students should be educated with skills to use
technology in effectively learning and updating their knowledge from sixth standard
onwards.
This book introduces the Computer Concepts, Operating System and
Painting tool.
The Committee wishes to thank our Tamil Nadu Government, Hon’ble Minister
for School Education, Thiru Thangam Thennarasu, Thiru M Kutralingam, I.A.S.,
Principal Secretary, School Education, Dr. P Perumalsamy, Director of School
Education and Tmt V.Rajarajeswari Join Director ( Vocational ) of School
Education for the encouragement and support given during the course of writing the
book.
The authors, reviewers and editors of this volume have taken great care in
ensuring the accuracy of the contents. The presentation is lucid with many illustrations.
It is highly appreciable that senior and experienced teachers in the field have
been selected to provide the required inputs to the book, keeping in the view of changing
needs of the society.
We hope that the book is rich in its content and quality which will enhance the
knowledge of the students.Chair Person
iii

CONTENTS
Chapter 1 INTRODUCTION TO COMPUTER 1
1.1 History of Computer 1
1.2 Generation of Computer 4
1.3 Types of Computer 7
1.4 Parts of Computer 10
1.5 Input Device 11
1.6 Central Processing Unit 13
1.7 Output Devices 14
1.8 Memory 16
1.9 Applications 16
Chapter 2 INTRODUCTION TO WINDOWS XP 19
2.1 Operating System 19
2.2 Windows Operating System 19
2.3 Working with Windows XP 20
2.4 Files and Folders 26
2.5 Recyclebin 35
Chapter 3 MICROSOFT PAINT 36
3.1 Microsoft Paint Overview 36
3.2 Menu bar and tool box 38
3.3 Drawing Shapes 43
3.4 Editing and Moving Objects 52
3.5 Save, Open and Print Picture 53
Exercises 57
Practicals 59
Abbreviations 60
iv

CHAPTER 1
INTRODUCTION TO COMPUTER
In our life we use different kinds of instruments in different ways. Computer has
become the invitable part in humans life. The introduction of computer has made vast
number of changes from industrial fields to entertaintment items. In this fast moving
world computer is practically utilized in an excellent way.
What is Computer? Computer is an electronic device which enhances most of
the calculations. We can save many messages in it which can be utilized in future for
many purposes.
Generally, when a human being is doing some work, it may be delayed due to
carelessness, tiredness or lack of time. But when the same work is done with the help
of Computer, in a few minutes it will finish off all the works quickly and perfectly.
In early times, man used to do the calculations with the help of stones, pebbles,
small sticks, by drawing lines on the walls or by using his fingers. Then he started doing
the calculations using numerals. Next he started doing the work with the help of manual
calculating devices and electrical calculating devices.
All these devices helped the man to do his works. But they did not function like
human beings. Only the computer has the capacity to do all sorts of calculations
instead of man. In due course the quantity and quality of calculations has been
increasing, keeping this situation in mind nowadays new model of computers has been
designed in this field to do the work successfully.
1.1. HISTORY OF COMPUTER
The foremost devices of computer is the ABACUS. This was desigined in the
years of 2500 BC, It is the simplest and effective device which is used by man even
now. In a rectangular frame a metal string would have been fixed horizontally. Each
bead above this metalic string has the value of 5 for each bead. Below the string has
value of 1. The value of the beads are assigned according to the position of the beads
in the columns. This abacus device is designed to do addition and subtraction first,
then multiplication and division processes.
ABACUS
1

2
NAPIER BONES
In 1614 BC, John Napier who lived in Scotland designed a calculating device
called Napier Bones. This device consists of many sticks. These sticks have to be
arranged in such a way to do multiplications quicklly.
SLIDE RULE
This is a calculating device which works on the basis of logarithm. In 1633 A D
William Oughtred designed this device. The slide rule is embodied by the two sets of
scales that are joined together with a marginal space between them. It is able to
perform multiplication and division with help of additon and subtraction.
ABACUS
John Napier Bones

3
PASCAL MACHINE
DIFFERENCE ENGINE
In 1822 AD Charles Babbage invented this machine. As
he had given the basic ideas about computer in his device, he is
known as “The Father of Computers.”
This is a device designed by a French scientist named Balise Pascal in the year
1642 AD. He had applied the gears and levers in his device.
SLIDE RULE
HOLLERITH TABULATING MACHINE
This is a device which is introduced in the year 1890 AD and the calculations
were done with the help of punched Cards.
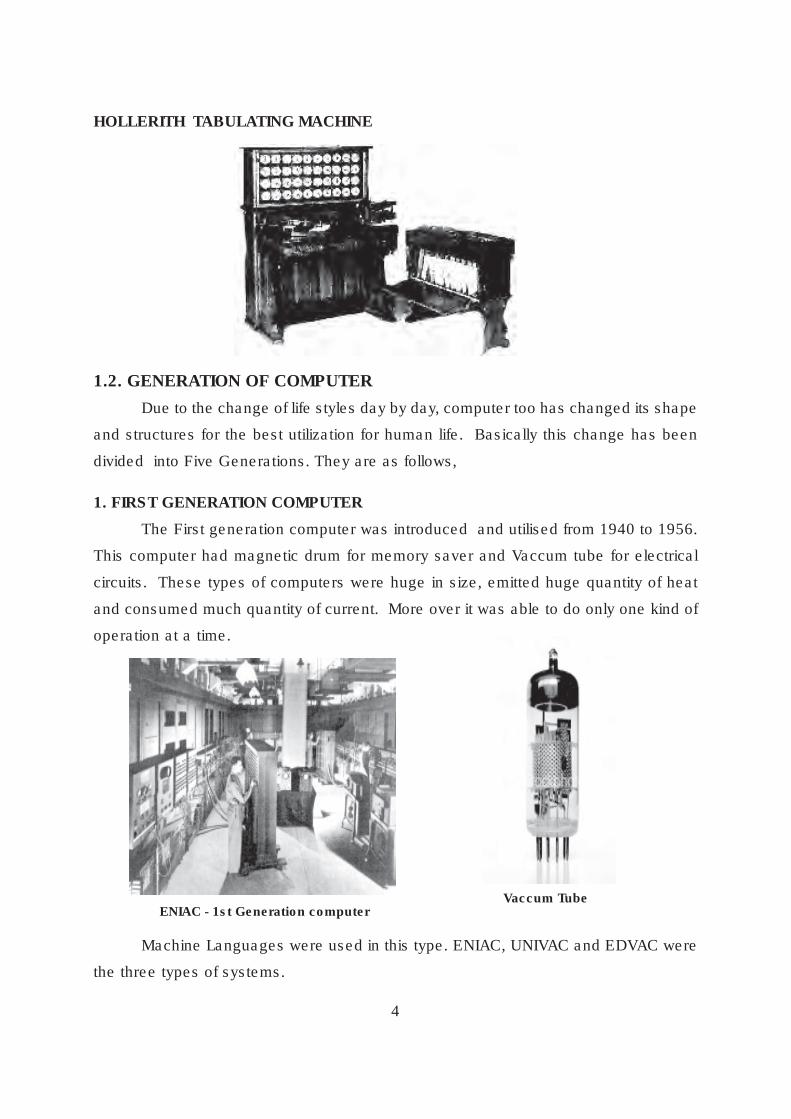
1.2. GENERATION OF COMPUTER
Due to the change of life styles day by day, computer too has changed its shape
and structures for the best utilization for human life. Basically this change has been
divided into Five Generations. They are as follows,
1. FIRST GENERATION COMPUTER
The First generation computer was introduced and utilised from 1940 to 1956.
This computer had magnetic drum for memory saver and Vaccum tube for electrical
circuits. These types of computers were huge in size, emitted huge quantity of heat
and consumed much quantity of current. More over it was able to do only one kind of
operation at a time.
ENIAC - 1st Generation computerVaccum Tube
Machine Languages were used in this type. ENIAC, UNIVAC and EDVAC were
the three types of systems.
4
HOLLERITH TABULATING MACHINE

5
2. SECOND GENERATION COMPUTER
The Second generation computers had been used from 1956 to 1963. In this
the TRANSISTOR had been used instead of vaccum tube. So these types of
computers had reduced in size and shape and there was reduction in the consumption
of current also. These system worked on the basis of Assembly Languages. To make
these computer functions, small words were given as commands. Moreover magnetic
core were used as Memory storage. High level languages like BASIC, FORTRAN and
COBOL were used.
2nd Generation computer Transistor
3. THIRD GENERATION COMPUTER
These Computers were made of Integarated Circuits ( IC’s ) and were in usage
from 1964 to 1971. Many Transistors were united together in a same CHIP, which was
known as Integarated Circuits.
3rd Generation Computer IC’s

These Computers were designed in such a way however they were small in
size, they had done their calculations quickly and perfectly. So that age is known us the
“GOLDEN AGE OF COMPUTERS”. Moreover these computers function with the help of
input device, output device and operating system.
4. FOURTH GENERATION COMPUTER
These Computers were used from 1971 onwards which had many Integrated
Circuits installed in a same chip later it had been converted into MICROPROCESSOR.
They were made to function on the basis of Very Large Scale Integrated
Circuits (VLSI)
4th Generation Computer Microprocessor Chip
5. FIFTH GENERATION COMPUTER
5th Generation AI computer
It had been designed with ARTIFICIAL INTELLIGENCE (AI) to think and work
as human being. Experiments were being carried out to design them as Expert
System.
6

1.3. TYPES OF COMPUTER
Computers are classified as follows on the basis of their functioning, Speed, Time
measurement and Memory Capacity.
1. Principle of Operation
2. Configuration
1.3.1. Principle of Operation.
These are of three kinds. They are,
( i ) ANALOG Computer
( ii ) DIGITAL Computer
( iii ) HYBRID Computer
( i ) Analog Computer
These computers give only approximate results as they function according to
the consumpution of electricity, out coming heat and pressure and change in values.
Analog Computer
These computers give the output as Binary Number System such as either
Yes / No, True / False , Right / Wrong or 0 / 1.
Digital Computer
7
( ii ) Digital Computer

( iii ) Hybrid Computer This is the combination of Analog and Digital characters.
1.3.2. Configuration
These are of Four kinds. These types depend upon the structure, speed,
functioning nature, memory storage and also the price. They are as follows,
1. Super Computer
2. Main frame Computer
3. Mini Computer
4. Micro Computer
1. SUPER COMPUTER
It can do the calculations quickly and perfectly. Within a second it can do crores
and crores of functions. It is very expensive. This type of computer is used for scientific
experiments.
Super Computer
8
Desktop Hybrid Computer

2. MAIN FRAME COMPUTER
It has the capcity to do few crores of functions with in a second. This is
expensive and bigger in size. E-banking, E-ticketing are functioning with the help of this
computers.
Main frame computer
3. MINI COMPUTER
Mini computer
It is very cheap. It is lower than main frame computers in all aspects. The func-
tions are also done very slowly.
4. MICRO COMPUTER
It has a single microchip which contains the CPU within itself. It is very cheap
and all can use this. It is divided into the following types on the basis of its nature.
Ø Work Station
Ø Personal Computers
Ø LapTop
Ø Palm PCs
9

1.4. PARTS OF COMPUTERThe Computer has three main divisions.
Ø INPUT
Ø C P U
Ø OUTPUT
Block diagram of a computer
INPUT UNIT
It is one of the main part of the computer which receives the informations and
programmes from the outside and send it inside the system. The input devices help for
these actions .
OUTPUT UNIT
The Result of the incoming informations are informed to the users only
through this output unit.
CENTRAL PROCESSING UNIT ( CPU ) This functions as the Brain of the computer. It has three important units.
They are,
( i ) Control Unit
( ii ) ALU
( iii ) Memory Unit
( i ) Control Unit : This Controls all the parts of the computer and their functionsand make way to co-ordinate the functions.
( ii ) Arithmetic : The Input functions and calculations also the Logical functions as AND,OR, NOT are working in this part only. This is
defined as the heart of the computer.
10
Logic Unit
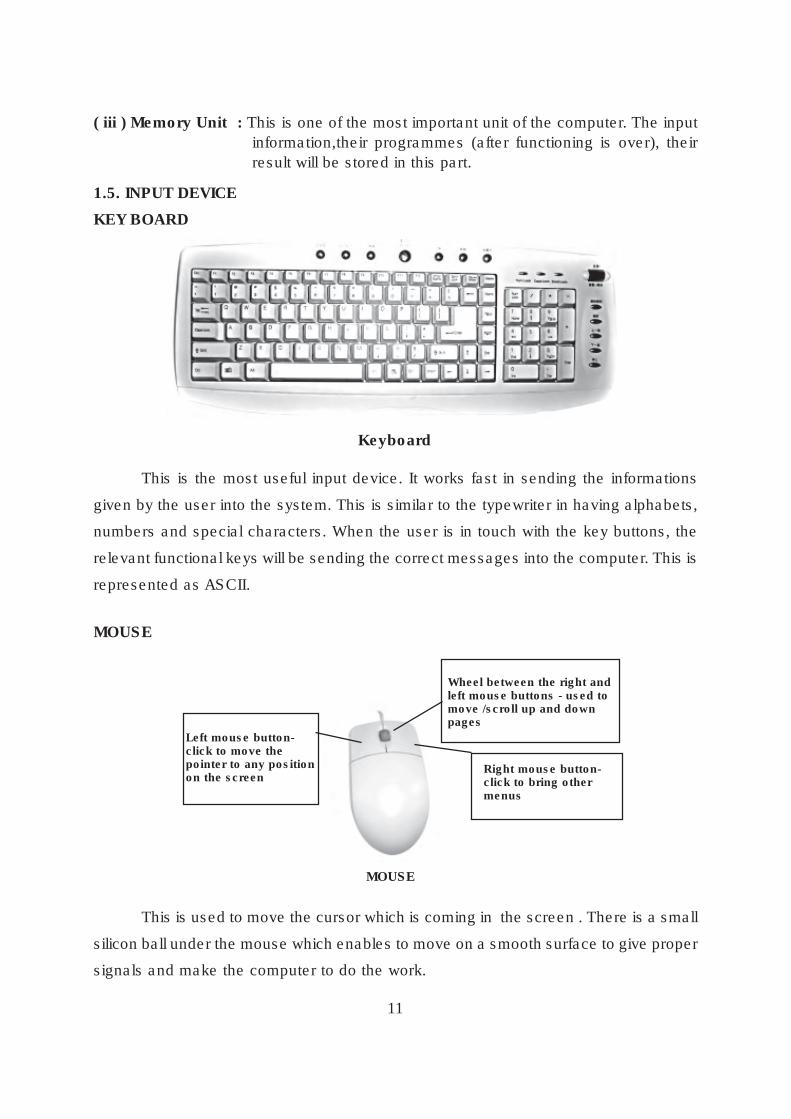
( iii ) Memory Unit : This is one of the most important unit of the computer. The input
information,their programmes (after functioning is over), their
result will be stored in this part.
1.5. INPUT DEVICE
KEY BOARD
This is the most useful input device. It works fast in sending the informations
given by the user into the system. This is similar to the typewriter in having alphabets,
numbers and special characters. When the user is in touch with the key buttons, the
relevant functional keys will be sending the correct messages into the computer. This is
represented as ASCII.
Keyboard
MOUSE
This is used to move the cursor which is coming in the screen . There is a small
silicon ball under the mouse which enables to move on a smooth surface to give proper
signals and make the computer to do the work.
11
MOUSE
Left mouse button-click to move thepointer to any positionon the screen
Right mouse button-click to bring othermenus
Wheel between the right andleft mouse buttons - used tomove /scroll up and downpages

SCANNER
This is a device which can scan any picture or a printed document as it is.
This is similar like a Photocopy Machine (Xerox).
Scanner
BAR CODE READER
Now a days in departmental stores and other shops we can see some thick and
thin lines on the packings to represent the rate of the things, manufacturing dates,
months, expiry dates and other informations are scanned. These lines are called BAR
CODE . If we see the bar code we cannot understand anything by these lines. Only Bar
Code Readers( BCR) will read and feed the rates into the computers.
BCR
MAGNETIC INK CHARACTER RECOGNITION ( MICR )
This is widely used in banks. This system is used to issue cheques. By this method
cheating of cheque leaves can be secured. This is helpful in banks to do the work
punctually and quickly.
12
BAR CODE

MAGNETIC CARD READER
This Reader is used to read the ATM card , Credit card issued by the banks
and Petrocards given by the petrol bunks belong to this kinds.
MICRO PHONE
This is like a Mike. It receives the sound waves and
change into electro magnetic waves and send it into the
computer for processing the informations. It is very useful
for blind people to enter the programmes in the system.
1.6. CENTRAL PROCESSING UNIT ( CPU )
This is the BRAIN of the computer. It will do all sort of calculations and arithmetic
and logical calculations. More over it also controls all parts of the computer and make the
system to work without any hindrances.
Block diagram of a CPU
13
Microphone
ATM cards Magnetic card reader

From one part of the CPU the data move to the other part through a bundle of
wires. This is collectively known as BUS. There are individual BUS’s to carry the data
and to send control signals. CPU has three important parts. They are,
1. Arithmetic Logic Unit
2. Control Unit
3. Memory Unit
1. Arithmetic Logic Unit
All kinds of calculations are done in their region only, other than this logic units
like AND, OR, NOT are being done through this. Generally ALU has the capacity to
solve even complicated calculations so easily and quickly. The result from the ALU is
stored in the stroage memory.
2. Control Unit
This is the Unit which controls all sorts of work in the system. It sends the control
signals for logical commands after analysing the facts and make them to act
accordingly. This processes is repeated again and again till the programme is over.
3. Memory Unit
This is one of the important part of the computer. Memory units are the storage
area of the computer. It stores the input informations and logical commands in their
units. This will be sent to the other parts of the computer whenever necessary.
1.7. OUTPUT DEVICES
After the completion of the functions, this unit brings out the information from
a computer.The Monitors and Printers are mainly used as output devices.
Monitor is the main device of the computer which
resembles a Television screen. Initially only
monochrome monitors were used. But now a days
coloured monitors, LCD monitors and FST monitors
are in use. Monitors display images and texts. The
smallest dot that displayed is called a Picture Elements.
The monitor resolutions are 640 480, 800 600,
1024 768 , 1152 864.
For example, In the value 800 600 , 800 is the number of dots from left to right
( Horizontal ). The value 600 shows the vertical counting. If the number of the dots
increases step by step, sharp image will be seen on the screen.
14
×
××××

PRINTERS
This enables to print out the outcoming results obtained from the computer.
Depending upon the printing capacity, speed and accuracy. The printer is classifed into
two types. They are,
1. IMPACT PRINTERS
2. NON IMPACT PRINTERS
1. IMPACT PRINTERS
Line printers and Dot matrix printers are the two kinds of Impact Printers.
The printout obtained from these printers are of low quality.
Line printer
Dot matrix printer
2. NON IMPACT PRINTERS
Non Impact printers are of three kinds.They are,
Ø Thermal Printers
Ø Laser Printers
Ø Ink jet Printers
These printers produce high quality printouts.Ink jet Printer
Thermal Printer Laser Printer
15

1.8. MEMORY
It is one of the most effective part of the computer. The informations and data
stored in this unit will be sent to the other parts of the system whenever necessary.
These are two types.
1. PRIMARY MEMORY
2. SECONDARY MEMORY
MEMORY CHART
1.9. APPLICATIONS
Now a days we can say that there is no field in this world without the usage of
computer. A situation has been created that nothing can flourish without the help of
the Computer.
EDUCATIONAL APPLICATIONS
Computer plays an important role in the educational field to improve the quality
of education. Under the SSA plan the “edu - sat” function with the help of satellites
16
Hard Disk
Floppy Disk
Compact Disc (CD)
Pen Drive
Memory card
MEMORY
RAM- Random
Access Memory
ROM- Read Only
Memory
PROM - Programable Read Only Memory
EPROM - Erasable Programmable
Read Only Memory
EEPROM- Electrically Erasable
Programmable Read
Only Memory
SRAM
Static Memory
DRAM
Dynamic
Memory

which give educational programmes to rural and urban area schools. It also enriches
the teaching ability of the teachers and learning capacity of the students through “Video
Conference” methods. Now a days the lesson plans are recorded into audio, video
CD’s and make the students to learn by themselves. The result analysis about the
examination results are being done through the computers. Now the Tamilnadu
Government has introduced a web site “www.pallikalvi.in” which gives informations
about the education, to improve the standard of education of the students and
required information for students, teachers and also parents.
USAGE IN MEDICAL FIELD
Computer plays its best role in the medical field. Our entire body can be scanned
through a scanner which is under the control of the computers. The computerized
ECG helps to check our heart functioning.
Now a days many complicated operations are done with the computerized
robots. Through video conference method the doctors in our country can get the
guidance from the efficient doctors and surgeons in the foreign countries to treat their
patients.
APPLICATION IN THE ASTRONOMY
1. Helps to do research about the planets, stars and galaxy.
2. It tries to establish a new galaxy world in the existing space.
The computers enable to send satellites to the sky to watch the nook and corner
of the world, to know about the weather reports and also to give caution to the world
about natural disasters.
USAGE IN THE ENTERTAINMENT FIELD
The technical aids like graphics, animation and 3D effects can be introduced in
the film industries which will attract the viewers. The Digital Track Sound (DTS) in the
audio filed to enjoy the music in the audiable way. For a person who want to learn more
about this field, there is a course named as “Visual Communication” in graduation
and professional levels.
17

APPLICATIONS IN THE SPORTS ACTIVITIES
Computer has the best utility in calculating the physical fitness of the athletes,
to receive the data about the sports events then and there and to study about even the
minute details about sports. The players used to play with computer to enrich their
playing ability. Other than this, students can spend their holidays joyfully by playing
video games, words building, number magic, puzzles, cartoons games, cricket, WWF
etc., with the help of computers. Moreover computer has countless usages to help and
bring up the humanity to higher level. We have to utilise “The Computer Our Friend”
in the correct and proper way to bring happiness to the society.
18
CHAPTER 2
INTRODUCTION TO WINDOWS XP
2.1. OPERATING SYSTEM
Before learning Windows XP you must know what is an operating system? In a
simple language Operating System is a set of computer programs that manage the
hardware and software resources of a computer system.
Operating system act as a bridge between the hardware and the software.
It provide a platform for the programs to run on. Operating system is popularly known
as “ OS ”.
It communicates with computer hardware on the most basic level. Without an
operating system, no software programs can run.
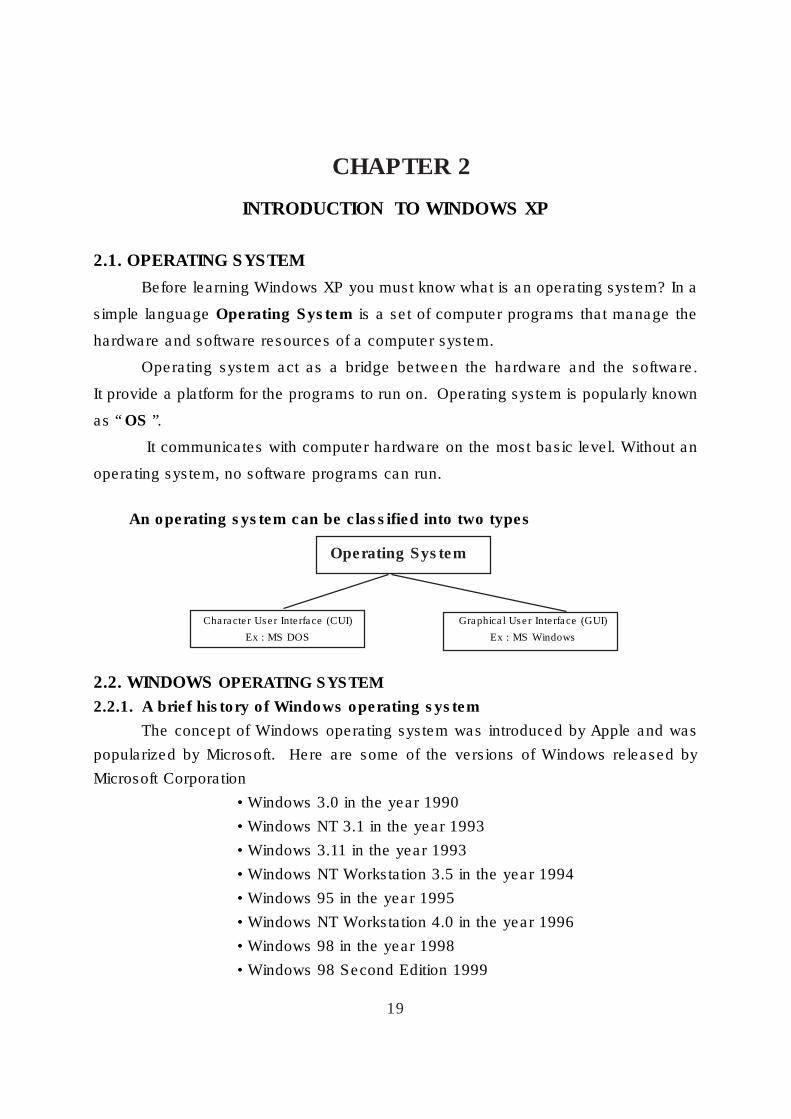
An operating system can be classified into two types
Operating System
Character User Interface (CUI)
Ex : MS DOS
Graphical User Interface (GUI)
Ex : MS Windows
2.2. WINDOWS OPERATING SYSTEM
2.2.1. A brief history of Windows operating system
The concept of Windows operating system was introduced by Apple and was
popularized by Microsoft. Here are some of the versions of Windows released by
Microsoft Corporation
• Windows 3.0 in the year 1990
• Windows NT 3.1 in the year 1993
• Windows 3.11 in the year 1993
• Windows NT Workstation 3.5 in the year 1994
• Windows 95 in the year 1995
• Windows NT Workstation 4.0 in the year 1996
• Windows 98 in the year 1998
• Windows 98 Second Edition 1999
19

• In the year 2000
• Windows Me (Millennium Edition)
• Windows 2000 professional
• In the year 2001
• Windows XP
• Windows XP Professional
• Windows XP Home
2.2.2. What is Windows XP ?
Windows XP is a very popular Graphical User Interface (GUI) and a user
friendly operating system provided by Microsoft. It displays all the information on the
screen and what you have to do is to point and select using the mouse.
Using Windows operating system you can run many applications at the same
time. You can type a letter to a friend, you can paint a picture, and you can listen to
music and so on.
2.3. WORKING WITH WINDOWS XP
2.3.1. Logging In
Login Form
Turn on your computer. It will take few moments to load the Windows XP operating
system into the memory. If you are the only user you will be taken to Desktop, which is
also called the opening screen of Windows XP.
20

When a computer is used by many users, say in an office, each and every user
will be provided with a logon screen in which the user can enter his or her user name
and password to logon. The user will be taken to the Desktop. This helps to maintain
the secrecy.
Logging off means to close the Windows XP desktop and return to the log on
screen. First you must save all your unsaved documents and then log off. If you want
to log off then click on the Start button Log off ( Figure 1 & Figure 2)
→
Figure 1
Figure 2
Shutdown means the process of closing down the computer after you have
finished your work. Be sure that you have saved all your unsaved documents. If you
want to turn off the computer then click on the Start button Turn Off Computer.
Alternately you can try the keyboard shortcuts Alt +F4 and then Alt +U
( Figure 1 and Figure 3 )
→
21
Figure 3
2.3.2. Logging off and Shutdown
The terms Logging off and Shutdown are two different processes.

2.3.3. The Desktop
The opening screen of Windows XP is called the Desktop. In Windows XP the
basic working platform is the Desktop. You can keep the programs that are frequently
required by you on the Desktop as a shortcut, like you keep the frequently needed
books for study on your study table, instead of keeping them on the bookshelf.
You can see the desktop has,
i) Icons
ii) Taskbar at the bottom
Desktop
2.3.4. Icons
Icons are the graphical representation of the applications on the desktop. These
small graphic images are used to represent files and programs as well as to execute
commands.
Some of the common icons found on the Desktop are
♦ My Computer
♦ My Documents
♦ Recyclebin
22

In computer applications, icons are used to quickly execute commands or open
programs and documents. Double click on any of the icon to open that application.
Double clicking on the My Computer icon opens My Computer window which allow you
see the contents of your computer. You can see the different drives like C drive,
D drive, CD drive, Floppy drive etc.,
2.3.5. Taskbar
At the bottom of the desktop you will find the taskbar which is in the form of a
narrow strip. On the extreme left of the taskbar Start button is present and on the
extreme right system tray is present which displays the system time and has some
other useful icons.
2.3.6. Start Menu
Click on the Star Button, you will get the Start Menu. Move the mouse pointer over
All Programs. You will find a right arrow. The presence of right arrow indicates that
there is a submenu present. When you place the mouse pointer on All Programs
another submenu will appear.
Figure showing Start menu and sub menu
23

To select an option from the submenu slide the mouse pointer sideways. One
option on the submenu gets highlighted. Now you can move the mouse pointer over
any submenu and click on the required option when it gets highlighted.
Alternatively you can try keyboard shortcuts by pressing the Ctrl Key + Esc key
together to get the Start Menu or by pressing winkey from your keyboard. Instead of
using mouse you can use the arrow keys to move through the menu.
2.3.7. Starting an application
An application in windows can be started in two ways.
Ø You can use the icons present on the Desktop. As learnt earlier double
click on the icon to open the application.
Ø Use Start Menu to open the application.
2.3.8. Window
When you open an application in Windows XP it occupies a rectangular area on
the desktop. This rectangular area is called window. As told earlier Windows XP allows
you to open several applications at the same time. These windows can be as big as the
desktop or it can be in the form of a button in the taskbar.
When you open several applications at the same time, window for each
application over lapses others i.e., one beside the other.
2.3.9. Parts of a Window
As you are familiar with Window, now let us see the different parts of a window.
To learn more efficiently about the various parts of window we will take the example of
Wordpad application.
Wordpad is a software in which you can type and store text. To start Wordpad
you can use the command Start All Programs Accessories
→
Wordpad. The
Wordpad window appears on the screen. These are the various parts of the Wordpad
window ( Figure 4 and 5 ).
→→
Title Bar
At the top of the window is the Title Bar. Title Bar tells you the name of the
application. There are three sizing buttons present on the right corner of the title bar.
Minimize Button
This button is used to minimize the size of the application to a button on
the taskbar.
24

Maximise Button
This button is used to maximize the application to cover the entire desktop.
Starting wordpad
Wordpad Window ( Figure 5 )
25
( Figure 4 )

Restore Button
This button is used to restore the size of the window to its original form.
Close Button
This button is used to close a window.
Menu Bar
Below the title bar is Menu Bar present which displays different menus. When
you click on any menu available on the menu bar, you will get a dropdown menu i.e., a
menu with various options dropping downwards. For example when you click on File
menu you will find options like New, Open, Save, Save As etc.., You can select any of
the options using your mouse and clicking on it.
Toolbar - Below the menu bar is the toolbar present which has the shortcuts of
the command available in the menu bar in the form of icons. For
example when you click on the new icon (first icon) present in the
toolbar you will get a new document.
Format bar- Below the Toolbar is the Format Bar which has the shortcuts for
formatting a text in the form of icons. For example to make a text
bold, select the text and click on the B icon present on the format
bar.
Rulerline - Ruler line is present just below the format bar.
Workarea - This is the area where we can enter text.
Statusbar - This gives the status about the document i.e. the information like
number of pages in the document, currently we are in which page etc.
2.4. Files and Folders
2.4.1. Files
Whenever you try to store any information in the Windows XP it will be stored as
file. For example typing a letter to your friend, drawing using Ms-Paint will be stored in
the computer as a file.
2.4.2. Folders
Folders are the collection of files. For example the letters
typed by you to your friends will be stored in the computer in a
folder. A folder can contain another folder inside it but a file
cannot contain another file in it. A folder is represented by a
small yellow icon.
Folder
26

2.4.3. Creating Folders
Unlike previous versions of Windows operating system, Windows XP allows you
to create folders easily by different methods.
To create a new folder in C: drive follow the steps given below
♦♦♦♦♦ Double click on the My Computer icon
♦ Select C: drive and double click on it to open
♦ Now from the menu bar click on File New Folder
♦ A folder appears on the right side of the window with the New Folder
→→
27

Alternatively you can also follow the steps
♦ Double click on the My Computer icon.
♦ Select C: drive and double click on it to open.
♦ Right click on the blank area a Pop up menu appears.
♦ In the menu move the mouse pointer over New option and Click on Folder
option from the submenu that appears.
Follow the steps given above try to create folders in other drives of your computer
or inside the other folders.
28
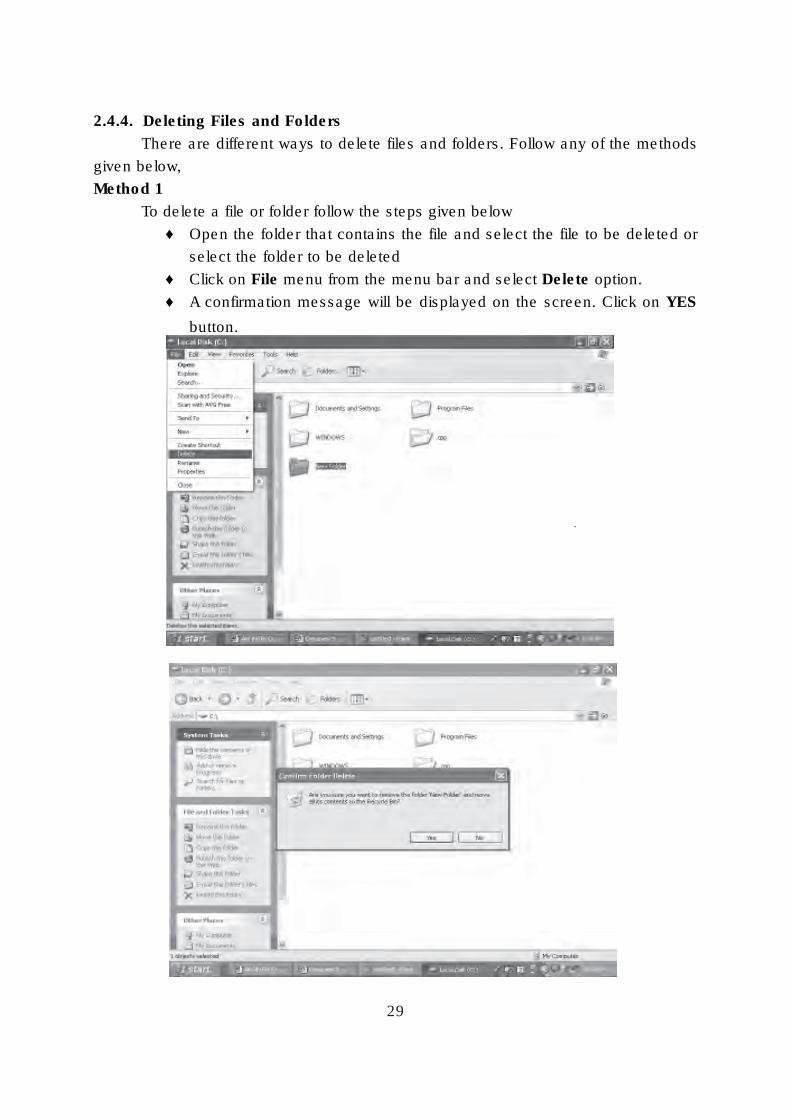
2.4.4. Deleting Files and Folders
There are different ways to delete files and folders. Follow any of the methods
given below,
Method 1
To delete a file or folder follow the steps given below
♦ Open the folder that contains the file and select the file to be deleted or
select the folder to be deleted
♦ Click on File menu from the menu bar and select Delete option.
♦ A confirmation message will be displayed on the screen. Click on YES
button.
29

Method 2
To delete a file or folder follow the steps given below,
♦ Open the folder that contains the file to be deleted or select the folder to
be deleted.
♦ ♦ ♦ ♦ ♦ Right click on the file name or the folder name and select Delete option
from the menu
♦ A confirmation message will be displayed on the screen. Click on YES
button.
30

Method 3
Alternatively you can follow the steps given below,
♦ Select the file or folder to be deleted
♦ Press Delete key from the keyboard.
♦ A confirmation message will be displayed on the screen. Click on YES
button.
2.4.5. Renaming Files and Folders
To Rename Files and Folders you can follow the steps given below,
♦ Select the files or folders to be renamed
♦ Click on File menu from the menu bar and select Rename option
♦ Type the new name for the File or Folder and press enter key.
31
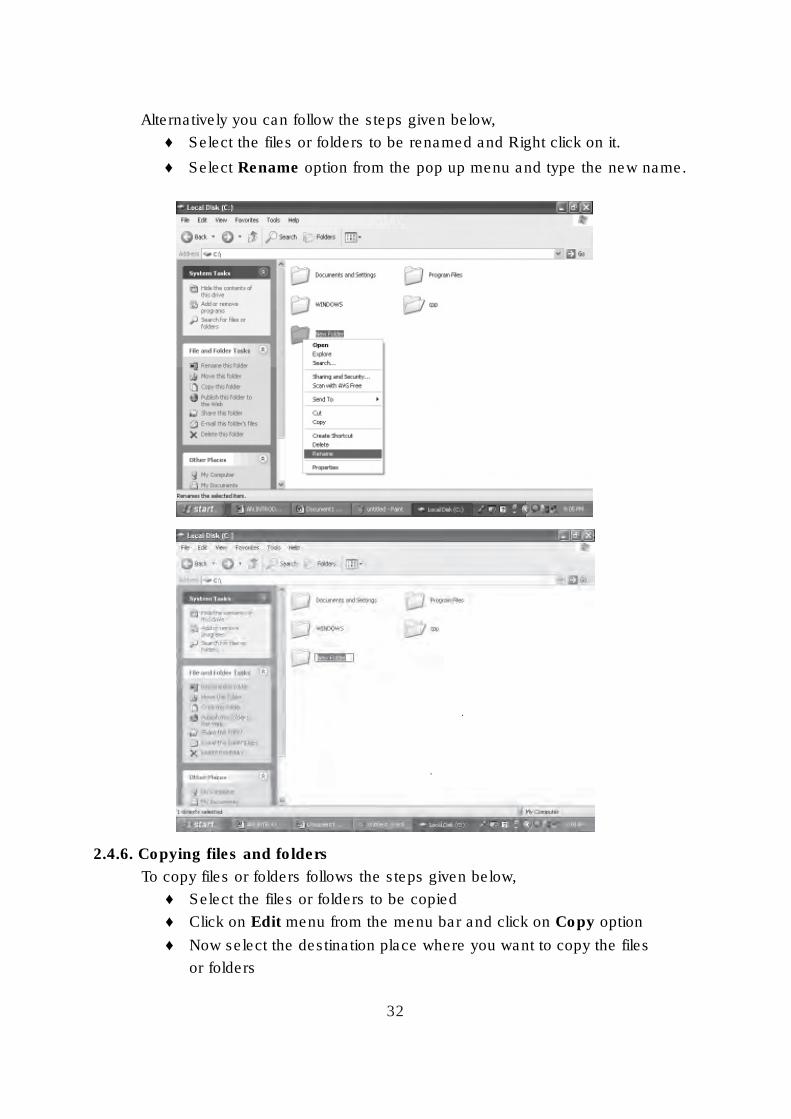
Alternatively you can follow the steps given below,
♦ Select the files or folders to be renamed and Right click on it.
♦ Select Rename option from the pop up menu and type the new name.
2.4.6. Copying files and folders
To copy files or folders follows the steps given below,
♦ Select the files or folders to be copied
♦ Click on Edit menu from the menu bar and click on Copy option
32
♦ Now select the destination place where you want to copy the files
or folders

33
♦ Again click on Edit menu and click on Paste option
Alternatively you can follow the steps given below,
♦ Select the files or folders to be copied
♦ Right click on the file or folder and select Copy option from the pop up
menu
♦ Select the destination place, right click on it and select Paste option from
the pop up menu that appears.

34
2.4.7. Moving files and folders
Moving a file or folder is also referred to as Cut and Paste.
♦ Select the files or folders to be moved.
♦ Select Edit menu from the Menu bar and click on Cut option.
♦ Select the destination place where you want to paste the file or folder.
♦ Select Paste option from the Edit menu.

2.5. Recyclebin
Recyclebin is an icon found on the Windows XP Desktop. Whenever you delete
any unwanted files or folders it will be sent to recycle bin. Just imagine when you
destroy the unwanted what you will do? You will throw it in a dustbin. Same way the
recycle bin on your computer acts like a dustbin which stores the unwanted files and
folders. Files and folders are safe till it remains in the recyclebin. Once you have
changed your mind you can again restore the files to its original location. You cannot
get back the file if you have emptied the recyclebin.
35

CHAPTER 3
MICROSOFT PAINT
3.1. Microsoft Paint overview
Microsoft ( MS ) Paint is one of the applications that comes as part of Windows
operating system. Paint is a drawing tool you can use to create simple or elaborate
drawings. These drawings can be either black and white or color, and can be saved as
bitmap files( .bmp ). You can print your drawing, use it for your desktop background, or
paste it into another document. You can even use Paint to view and edit scanned
photos. You can also use Paint to work with pictures, such as .jpg, .gif files. You can
paste a Paint picture into another document you have created, or use it as your desktop
background.
To start Paint, click on Start All Programs Accessories Paint
( figure 3.1). The above command means first click the Start button, then click All
Programs in the menu, then click Accessories from the ensuing submenu, and
finally click Paint in the last submenu that appears (or) double click in windows desktop
paint icon ( figure 3.2 ).→→→
Figure 3.1
36
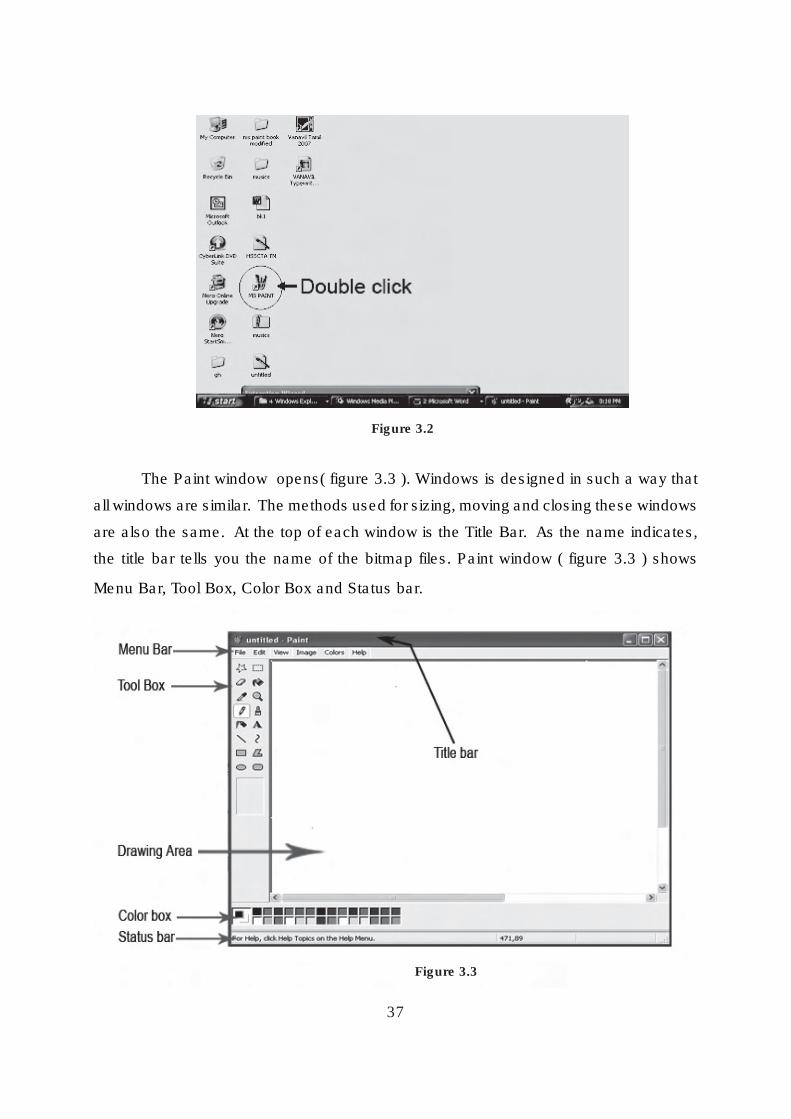
Figure 3.2
The Paint window opens( figure 3.3 ). Windows is designed in such a way that
all windows are similar. The methods used for sizing, moving and closing these windows
are also the same. At the top of each window is the Title Bar. As the name indicates,
the title bar tells you the name of the bitmap files. Paint window ( figure 3.3 ) shows
Menu Bar, Tool Box, Color Box and Status bar.
Figure 3.3
37

3.2. Menu bar and Toolbox
Before introducing the various options that are available in paint it is necessary
to introduce the five areas which help to draw pictures better in Paint.
Menubar : The commands that controls the paint operations and to open new
pictures are present in the menu bar.
Toolbox : The various important tools, which help in the innovative or editing
the drawing, are available in this box.
Drawingarea : To draw a picture or to modify a picture you have to use the drawing
are where the picture can be created or loaded.
Colorbox : The list of colors that can be used for painting the pictures is given
in this box. You can also customize your color.
Statusbar : This contains the pixel positions and displays it on a separate tag
and that it also displays certain important measurements and
values as you paint.
3.2.1. Menu bar
Paint menu bar contains the following list
1. File menu
2. Edit menu
3. View menu
4. Image menu
5. Color menu
6. Help menu
1. File menu
The file menu contains the following inbuilded menu list ( figure 3.4 )
New Ø To create a new window.
Open Ø To open the existing bitmap file
Save Ø To save the bitmap file
Print Ø To get a hard copy of bitmap picture
Exit Ø Exit from paint application.
38

Figure 3.4
2. Edit menu
Edit menu contains the following inbuilded menu list ( figure 3.5 )
Undo Ø You can undo upto 3 changes ( ctrl + Z )
Repeat Ø You can repeat the undo ( ctrl + Y )
Cut Ø To cut the selected area ( ctrl + X )
Copy Ø To copy the selected area ( ctrl + C )
Paste Ø Selected Objects pasted in new location ( ctrl + V )
Figure 3.5
39

3. View menu
The view menu contains the following inbuilded menu list ( figure 3.6 )
Tool box Ø To view / Hide the toolbox
Color Box Ø To view / Hide the color box
Status Bar Ø To view / Hide the States Bar
Zoom Ø To zoom the image into large, normal and custom
4. Image menu
The Image menu contains the following inbuilded menu list ( figure 3.7 )
Flip/Rotate Ø To flip the picture into horizontal (or) vertical shape and
also rotate the picture into various angles (900, 1800, 2700)
Invert color Ø To invert all color in the picture. Each color is replaced by
its color complement.
Clear Image Ø Clear all images in the current working area
Figure 3.6
Figure 3.7
40

5. Color menu
The Color menu contains the following inbuilded menu list ( figure 3.8 )
Edit colors Ø It shows color palate. We choose various colors form the color
palate and also we can make a new color combination.
Figure 3.8
6. Help menu
Ms paint application provides help systems that you can use while to work in
paint. ( figure 3.9 )
Ø Help Topics
Ø About Paint
Figure 3.9
41

A
The following table shows the content and use of Toolbox.
Icon Name Uses
Free form select - To select and irregularly shaped portion of a
picture.To erase a large area.
Select - To select a rectangular portion of a picture.
To erase a large area
Eraser / Color Eraser - To erase a small area. The size of the eraser
can be selected from the shapes given at the
bottom of the toolbox.
Fill with color - Fill an area with color. Change color of an
existing line
Pick color - To copy color from one area or object to
another
Magnifier - To zoom in or zoom out of a picture. The
selected portion can be re-sized to twice, six,
times or eight times the size of the original and
also restored to the original size.
Pencil - To draw a line or any shape
Brush - To draw a line or any shape with varying
thickness or to paint a picture. The thickness of
the brush can be selected from one of the shapes
at the bottom of the toolbox.
Text - To type text and format it
42
3.2.2. Toolbox

Line - To draw a straight line. The width of the line can be selected
from the choices given at the end of the toolbox.
Air brush - To spray color. The size of the spray color can be
choosen from one of the three sizes from the bottom of
the tool box.
Curve - To draw a curved line. The width of the line can be
selected from the choices given at the end of the toolbox.
Rectangle - To draw a square or a rectangle. The first option draws a
transparent rectangle, that is, it does not cover the already
existing picture. The second option results in an opaque
rectangle.
Polygon - To draw a polygon.
Ellipse - To draw a circle or an ellipse
Rounded - To draw a rectangle rounded at the corners
Rectangle
3.3. Drawing shapes
We can create various types of shapes by using
Free from Line ( pencil ),
Straight Line,
Curve,
Ellipse or circle,
Rectangle or square and polygon.
3.3.1. Creating shapes
To draw a freeform line
1. In the toolbox, click pencil . ( figure 3.10 )
2. Drag the pointer to draw the line.
3. When you drag the pointer, the foreground color is used. To use the
background color, pressing the right button of the mouse and drag the
pointer.
43

Figure 3.10
To draw a Straight Line
1. In the toolbox, click Line . ( figure 3.11 )
2. Below the toolbox, click a line width.
3. Drag the pointer to draw the line.
4. When you drag the pointer, the foreground color is used. To use the
background color, pressing the right mouse button and drag the pointer.
Figure 3.11
44

To draw a curved line
1. In the toolbox, click Curve . ( figure 3.12 )
2. Below the toolbox, click a line width.
3. Draw a straight line by dragging the pointer.
4. Click where you want one arc of the curve to be, and then drag the pointer to
adjust the curve. Repeat this step for a second arc. You can only create two
curves for each line.
5. When you drag the pointer, the foreground color is used. To use the background
color, click and press down the left mouse button and drag the pointer.
To draw an ellipse or circle
1. In the toolbox, click Ellipse . ( figure 3.13 )
2. Below the toolbox, click a fill style.
3. Drag the pointer to draw the ellipse or circle.
Figure 3.12
4. When you drag the pointer, the ellipse line color is used to draw the line
surrounding the shape, and the background color is used to fill the shape.
45
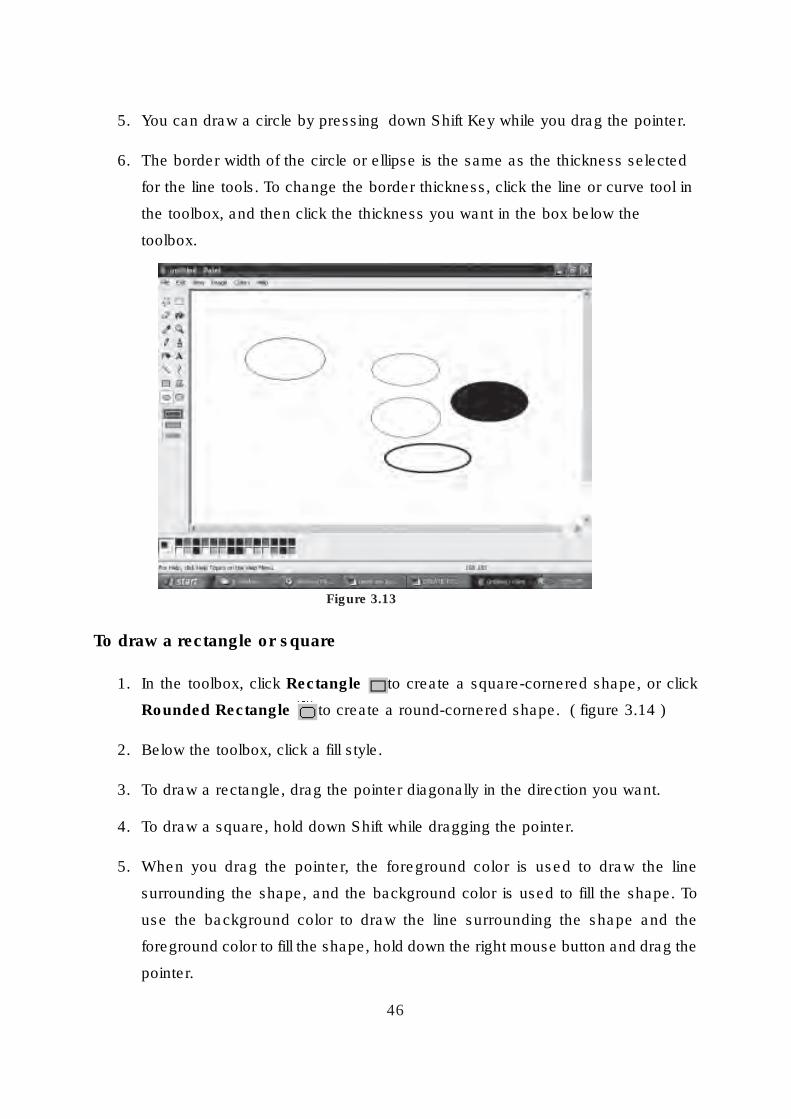
5. You can draw a circle by pressing down Shift Key while you drag the pointer.
6. The border width of the circle or ellipse is the same as the thickness selected
for the line tools. To change the border thickness, click the line or curve tool in
the toolbox, and then click the thickness you want in the box below the
toolbox.
To draw a rectangle or square
1. In the toolbox, click Rectangle to create a square-cornered shape, or click
Rounded Rectangle to create a round-cornered shape. ( figure 3.14 )
2. Below the toolbox, click a fill style.
3. To draw a rectangle, drag the pointer diagonally in the direction you want.
4. To draw a square, hold down Shift while dragging the pointer.
5. When you drag the pointer, the foreground color is used to draw the line
surrounding the shape, and the background color is used to fill the shape. To
use the background color to draw the line surrounding the shape and the
foreground color to fill the shape, hold down the right mouse button and drag the
pointer.
Figure 3.13
46

6. The border width of the box is the same as the thickness selected for the line
tools. To change the border thickness, click the line or curve tool in the toolbox,
and then click the thickness you want in the box below the toolbox.
7. To create a colored fill, click a fill style below the toolbox.
To type and format Text
You can only enter text into an image when you are in normal view. To display the
normal view, on the View menu, point to Zoom, and then click Normal size.
( figure 3.15 )
1. In the toolbox, click Text .
2. To create a text frame, drag the pointer diagonally to the size you want.
3. On the text toolbar, click the font, size, and style you want for the text. If the text
toolbar is not displayed, select the View menu, click Text Toolbar. You can drag
the toolbar to any location in the window.
4. Type your text. You can also paste text into a text box, but not graphics.
Figure 3.14
47

To erase a small area
1. In the toolbox, click Eraser . ( figure 3.16 ) and select the toolbox, an eraser
size in the toolbox.
2. In the toolbox, click Select . ( figure 3.17 ) to select a rectangular area, or click
Free-Form Select to select a freeform area. By the above procedurer you
can erase the selected area.
5. You can enter text in a text box only once.
6. To change the color of the text, click a color in the color box.
7. When you click outside the box, the text is converted to a graphic image and you
cannot make it active again.
8. To undo up to three changes, on the Edit menu, click Undo for each change.
Figure 3.15
48

To erase an entire image
1. If any part of the image is selected, click outside of the selected area.
( figure 3.18 )
2. On the Image menu, click Clear Image.
Figure 3.16
Figure 3.17
49

3. The current image is clear ( figure 3.19 ).
4. Choose a different background color by right clicking a color in the color box.
The background color is used to fill the inside of enclosed shapes and the
background of text frames. It also appears when you use the eraser.
Figure 3.18
Figure 3.19
50

To change the size of picture
1. On the Image menu, click Attributes.( figure 3.20 )
2. Under Units, click the unit of measurement you want to use for the width and
height.
3. Type the measurements in Width and Height.
4. You can also resize your picture by dragging the image resizes handles, located
at the lower right corner and along the bottom and right sides of your picture.
( You might need to maximize the window to see the square resize handles.)
5. We can change the color picture into black and white using color option.
3.3.2. Coloring Shapes
To set the default foreground and background colors
1. To set the foreground color, click a color in the color box.
2. To set the background color, right-click a color in the color box.
Figure 3.20
51

3. The foreground color is used for lines, borders of shapes, and text. The
background color is used to fill the inside of enclosed shapes and the background
of text frames, and when you use the eraser.
4. The default foreground and background colors appear in the left side of the
color box. The top color square represents the foreground color. The bottom
color square represents the background color.
5. In the toolbox, click Fill With Color . Click or right-click a color in the color
box if the color you want is different from either the current foreground color or
background color.
6. And also using Brush, Air brush, pick colours tools in the tool bar to changing the
shapes color.
3.4. Editing and Moving Objects
3.4.1. Editing the Paint Picture
The selected picture can be easily cut and pasted in the required location.
The following steps to be followed
i ) The picture should be selected using select icon or
free from select icon
ii ) Select Edit cut from menu bar or ctrl + x
iii ) Move to a new location
iv ) Select Edit paste from menu bar or ctrl + v
v ) The following figure 3.21. Shows editing the picture
→→
Figure 3.21
52

3.4.2. Moving the Paint Picture
The selected picture can be easily copy and pasted in the required location.
The following steps to be followed
i ) The picture should be selected using select icon or
free from select icon
ii) Select Edit copy from menu bar or ctrl + c
iii) Move to a new location
iv) Select Edit paste from menu bar or ctrl + v
v) The following figure 3.22. shows moving the picture
→→
3.5. Save, Open and Print Picture
3.5.1. Saving a Paint Picture
We can save the picture by the following ways
i ) Select File from the main menu and click Save or Ctrl + S
ii ) Save as dialog box appears on the screen. ( figure 3.23 )
iii ) To select a drive up one level icon is selected then the list of
drives will be displayed, a double click is made on the required derive.
now a list of folders available on that drive is displayed. A double click
is made on the required folder.
Figure 3.22
53

iv ) The file name is given in the file name list box.
v ) Click the Save button in the save as dialog box.
3.5.2. Exit from Paint.
To close the saved paint picture or exit from paint, Select File from menu bar, at the
time a file menu list appears on the screen ( figure 3.24) from that list select Exit (or) from
keyboard press Alt+F4. The paint application closed.
Figure 3.23
Figure 3.24
54
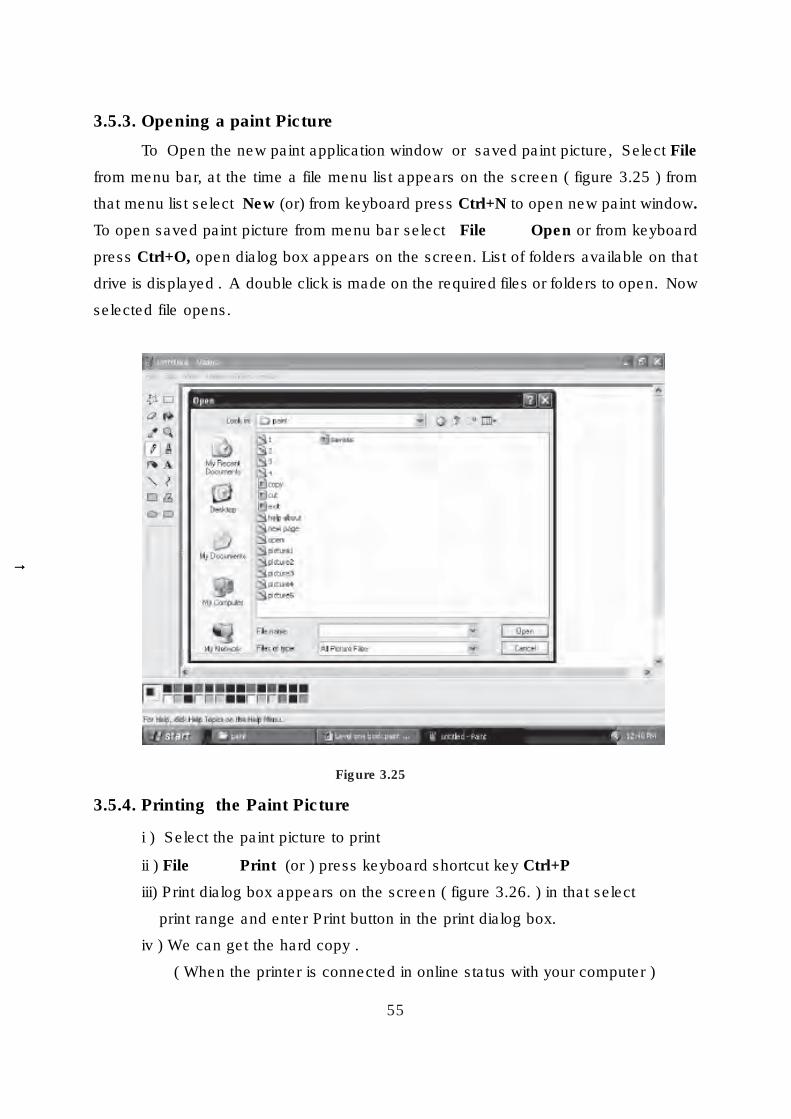
3.5.3. Opening a paint Picture
To Open the new paint application window or saved paint picture, Select File
from menu bar, at the time a file menu list appears on the screen ( figure 3.25 ) from
that menu list select New (or) from keyboard press Ctrl+N to open new paint window.
To open saved paint picture from menu bar select File Open or from keyboard
press Ctrl+O, open dialog box appears on the screen. List of folders available on that
drive is displayed . A double click is made on the required files or folders to open. Now
selected file opens.
→
3.5.4. Printing the Paint Picture
i ) Select the paint picture to print
ii ) File Print (or ) press keyboard shortcut key Ctrl+P
iii) Print dialog box appears on the screen ( figure 3.26. ) in that select
print range and enter Print button in the print dialog box.
iv ) We can get the hard copy .
( When the printer is connected in online status with your computer )
→
Figure 3.25
55

56
Figure 3.26

EXERCISES
1. Computer is a _________ device.
2. _________ is a very old calculating device.
3. ________found the Slide Rule.
4. The gears and levers are applied and designed in _______
5. Computer has been classified into ________ Generations.
6. The First Generation computer has designed with_______
7. _______is used as the memory storage in the second generation
computers.
8. The Third generation computer was designed by__________.
9. The Computer is divided into _______ types.
10. Digital computer work on the basis of ________.
11. CPU means________
12. ALU means_________
13. MICR means________
14. CPU is called the________ of a computer.
15. In Monitor the smallest dot that can be displayed is called_______.
16. Laser printer is ____________ kind of printer.
17. _________ is the example of Impact printers.
18. RAM means________.
19. ROM means_________.
20. __________rays help to erase the data in EPROM.
21. _____ is the user friendly operating systems.
22. _______ corporating introduce windows XP.
23. CUI stands for ___________
24. GUI stands for ___________
25. MS paint picture save with _____ extension.
26. In MS paint draw a lines and shapes __________ tool is used.
57
I. Fill in the Blanks :-

II. Answer the following questions shortly.
1. What is meant by computer ?
2. Write a short notes on 2nd Generation Computers.
3. Write a short notes about the 5th Generation computer.
4. What is digital computer ?
5. List out some name of the Micro computers.
6. What are the parts of the computer ?
7. Name the parts in CPU.
8. What is meant by Mouse ?
9. What is meant by BCR ? Write about its functions.
10. What is meant by output device?
11. Explain files and folders.
12. What is Windows XP?
13. Define : Desktop.
14. What is icon?
15. What is Paint?
16. How to open MS paint application ?
17. Types of Menu bar is MS paint.
III. Answer the following questions in detail.
1. Explain the Generations of Computer.
2. Mention the types of computer. Explain about any one type.
3. Explain the parts of the computer.
4. What is meant by Input devices ? Explain any two.
5. What is meant by Output devices ? Explain any two.
6. Explain the application of the computer.
7. How you create a folder and move folders from are place to another?.
8. Explain in details various tools in MS paint.
58

COMPUTER SCIENCE
LIST OF PROJECT WORKS
1. Entering the MS Paint and Identifying the tools and its functions
2. Drawing the following structures and coloring it.
a. Square
b. Cone
c. Diamond
d. Polygon
e. Rectangle
3. Drawing solar system or any kind of two animals. Save and retrieve the picture
Note : Work done made in any two of the above list (1, 2, 3) is printed and produced
as Project work.
59

ENIAC - Electronic Numerical Integrator and Calculator
UNIVAC - Universal Automatic Computer
EDVAC - Electronic Discrete Variable Automatic Computer
BASIC - Beginners All-purpose Symbolic Instruction Code.
FORTRAN - Formula Transulation
COBOL - Common Business Oriented Language
I C - Integrated Circuit
VLSI - Very Large Scale Integrated Chip
AI - Artificial Intelligence
CPU - Central Processing Unit
CU - Control Unit
ALU - Arithmetic Logic Unit
ASCII - American Standard Code for Information Interchange
BCR - Bar Code Reader
MICR - Magnetic Ink Character Recognition
ATM - Automatic Teller Machine
LCD - Liquid Crystal Display
RAM - Random Access Memory
ROM - Read Only Memory
PROM - Programmable Red Only Memory
EEPROM - Electrically Erasable Programmable Read Only Memory
EPROM - Erasable Programmable Read Only Memory
SRAM - Static Random Access Memory
DRAM - Dynamic Random Access Memory
CD - Compact Disk
DTS - Digital Track Sound
OS - Operating System
GUI - Graphical User Interface
CUI - Character User Interface
ABBREVIATIONS
60