email instructions - all-net municipal solutions · three tabs, “account information, ... all-net...
TRANSCRIPT

Email InstructionsOutlook (Windows)
Mail (Mac)Webmail
Windows Live MailiPhone 4, 4S, 5, 5c, 5s
Samsung Galaxy S4BlackBerry

ii | Table of Contents
Table of Contents
1 Mail Account Settings 1
Account Set Up Instructions - Outlook 2010 . . . . . . . . . . . . . . . . . 2-6
Account Set Up Instructions - Outlook 2007 . . . . . . . . . . . . . . . . . 7-9
Account Set Up Instructions - Mac . . . . . . . . . . . . . . . . . . . . 10-13
Webmail . . . . . . . . . . . . . . . . . . . . . . . . . . . . . . . . . . 14
Windows Live Mail . . . . . . . . . . . . . . . . . . . . . . . . . . . 15-17
2 Smartphone Email Set Up 18
iPhone 4 and 4s . . . . . . . . . . . . . . . . . . . . . . . . . . . . . 18-21
iPhone 5, 5c, 5s . . . . . . . . . . . . . . . . . . . . . . . . . . . . . 22-25
Samsung Galaxy S4 . . . . . . . . . . . . . . . . . . . . . . . . . . . 26-28
BlackBerry . . . . . . . . . . . . . . . . . . . . . . . . . . . . . . . 29-34

2 | Mail Account Settings
Account Set Up Instructions - Outlook 2010
Incoming mail server: mail.all-mail.ca
Outgoing mail server: mail.all-mail.ca
Outgoing server requires authentication
User ID is your email address
Password is the password for the email address
Use port 587 for outgoing and port 110 for incoming (Default settings)
DO NOT use SSL
Outlook 2010
Click on Office button (or File) and click the Account Settings button.

All-neT eMAil inSTruCTionS | 3
From here you will see the Account Settings window with Email tab open, if you have configured multiple accounts then all of them will be listed here. Double click on your email account to bring up your settings.

4 | Mail Account Settings
Enter your account information as provided.
Account Type: POP3
Incoming mail server: mail.all-mail.ca
Outgoing mail server (SMTP): mail.all-mail.ca
Username: (your email address)
Password: (password for your email address)
**Make sure “Require logon using Secure Password Authentication (SPA)” is NOT checked off
Click on more settings > Outgoing Server

All-neT eMAil inSTruCTionS | 5
Check the box to require authentication for your outgoing server
Select “Use same settings for my incoming mail server”

6 | Mail Account Settings
Click the “Advanced” tab and set your outgoing server port to 587.
Leave your incoming server port at 110
Click OK > Next > Finish.
Your account should now be set.
Be sure to click test account setting to ensure your settings are correct. You can do this by click the “test Account Settings” button in the set-up window or by sending yourself a test message.

All-neT eMAil inSTruCTionS | 7
Account Set Up Instructions - Outlook 2007In Outlook click Tools > Account Settings and then select the account you would like to edit.
Under User Information, follow these steps:
1. In the Your Name box, type your full name.
2. In the Email Address box, type your full e-mail address.
3. Under Server Information, click POP3 from the Account Type box.
4. Incoming mail server: mail.all-mail.ca
5. Outgoing mail server (SMTP): mail.all-mail.ca
6. Logon Information: Username: enter your email address Password: enter the password we supplied for your account
Check off Remember Password

8 | Mail Account Settings
Click on more settings > Outgoing Server
Check off “My outgoing server (SMTP) requires authentication.” And make sure you have “Use same settings as my incoming mail server.”

All-neT eMAil inSTruCTionS | 9
Click the “Advanced” tab and set your outgoing server port to 587. Leave your incoming server port at 110.
Click OK > Next > Finish.
Your account should now be set.
Be sure to click test account setting to ensure your settings are correct. You can do this by click the “test Account Settings” button in the set-up window or by sending yourself a test message.

10 | Mail Account Settings
Account Set Up Instructions - Mac
Edit an email accountOpen Mail.
Once you’ve opened Mail, click on the menu labeled “Mail,” and select “Preferences.”

All-neT eMAil inSTruCTionS | 11
Make sure you have the Accounts Icon selected. You’re presented with a window which contains three tabs, “Account Information, “Special Mailboxes,” and “Advanced.” First, let’s look at the “Account Information” tab.

12 | Mail Account Settings
1. The Account type was determined when you set up the account. You cannot change it unless you delete this account and create a new one. The account type is POP.
2. Description can be whatever you like, but it is recommended that you use something descrip-tive Like Reeve Mail.
3. Email Address should be your email address.
4. Full Name can be your name, or whatever text you’d like to be seen as your name when you send email.
5. Incoming Mail Server should be mail.all-mail.ca
6. “User Name” should be your full email address.
7. Password is the password for you email password (case sensitive).
8. Click on “Server Settings”
Outgoing Mail Server

All-neT eMAil inSTruCTionS | 13
You can edit the Outgoing Mail Server by pressing the “Server Settings” button. The Outgoing Mail Server should be mail.all-mail.ca The Server port” should be 587 Set the authentication and enter your full email address for the username and your email password (case sensitive) Click OK

14 | Mail Account Settings
WebmailYou can also access your email via webmail at: http://mail.all-mail.ca:3000/

All-neT eMAil inSTruCTionS | 15
Windows Live MailClick on the “Add an e-mail account button located on the left (refer image above), or go to “Tools” -> “Accounts” and hit the “Add” button. Now choose “E-mail Account”. If you’re using Windows Live 2011 click on the tab Accounts, then add Email icon.
Whichever path you take, you should get the Add an E-mail Account window similar to one below. Enter your email address, your password and display name. Ensure the “Remember password” box is checked unless you are paranoid about security and want to enter the password every time you access your account. Hit the “Next” button to continue.

16 | Mail Account Settings
You now need to select your incoming mail server type and type in the address and port number.
Server Type: POP
Incoming mail server: mail.all-mail.ca
Port Number: 110
SSL NOT checked off
Log on using: Clear text authentication
Login ID: leave as is
Outgoing Server Information:
Outgoing server: mail.all-mail.ca
Port: 587
SSL NOT checked off
“My outgoing server requires authentication” checked off
To continue, click on the “Next” button.
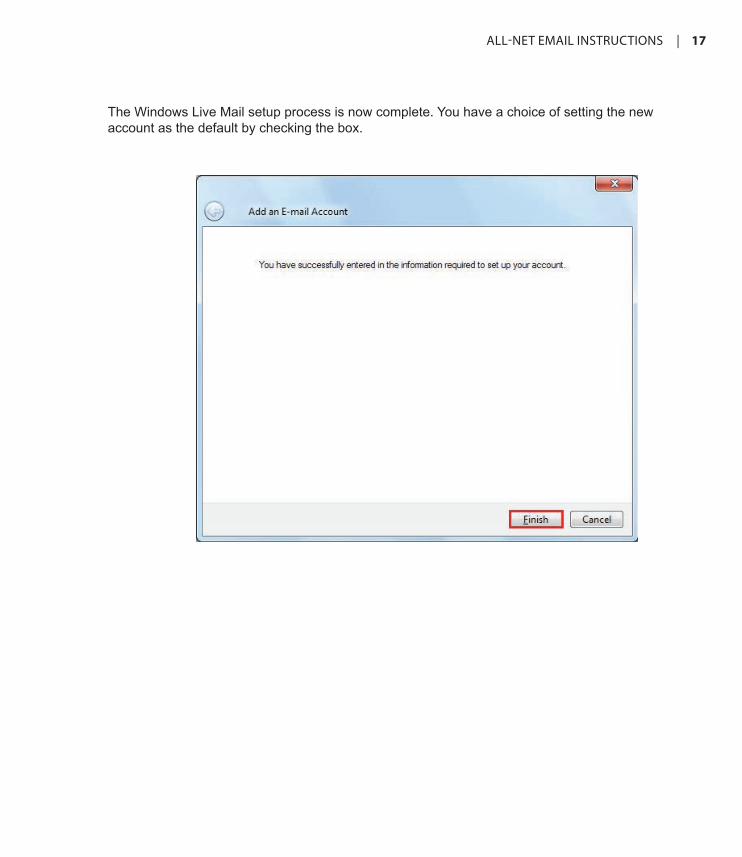
All-neT eMAil inSTruCTionS | 17
The Windows Live Mail setup process is now complete. You have a choice of setting the new account as the default by checking the box.

18 | Smartphone email Set up
1. Press to select “Settings” from your SpringBoard.
2. Press to select “Mail” from the “Settings” menu.
3. Select “Add Account” from the “Mail” menu.
4. Select “Other”
iPhone 4 and 4s2 Smartphone Set Up

All-neT eMAil inSTruCTionS | 19
5. Select "IMAP". Enter your name in the "Name" field, your full email address ([email protected]) in the "Address" field and a description for the account in the "Description" field.
6. Scroll down and input the settings for your Incoming Mail Server. Enter "mail.all-mail.ca" in the "Host Name" field.
Enter your full email address in the "User Name" field and your password in the "Pass-word" field.
NOTE: Passwords are case sensitive
7. Scroll down and input the settings for the Outgoing Mail Server (SMTP).
Enter "mail.all-mail.ca" in the "Host Name" field.
Enter your full email address in the "User Name" field and your password in the "Pass-word" field.
Click "Finish". Press the "Save" button in the top right hand side of the screen. Choose Yes when you get a message saying “Cannot Connect Using SSL. Do you want to try setting up the account without SSL?“ You might see this message appear twice

20 | Smartphone email Set up
8. Mail will then check your mail settings. It will verify your settings and add the email account. Now when you press Mail it will take you to your mail account.
9. Press to select "Settings" from your Spring-Board.
10. Press to select "Mail" from the "Settings" menu.
11. Select the email account that you have just created.

All-neT eMAil inSTruCTionS | 21
12. Scroll down and press "Advanced" 13. Make sure "Use SSL" is turned "OFF" in both "Outgoing Settings" and "Incoming Set-tings".
Change your incoming server port to 143
Change your outgoing server port to 587
Use password authentication
Your set-up is now complete.
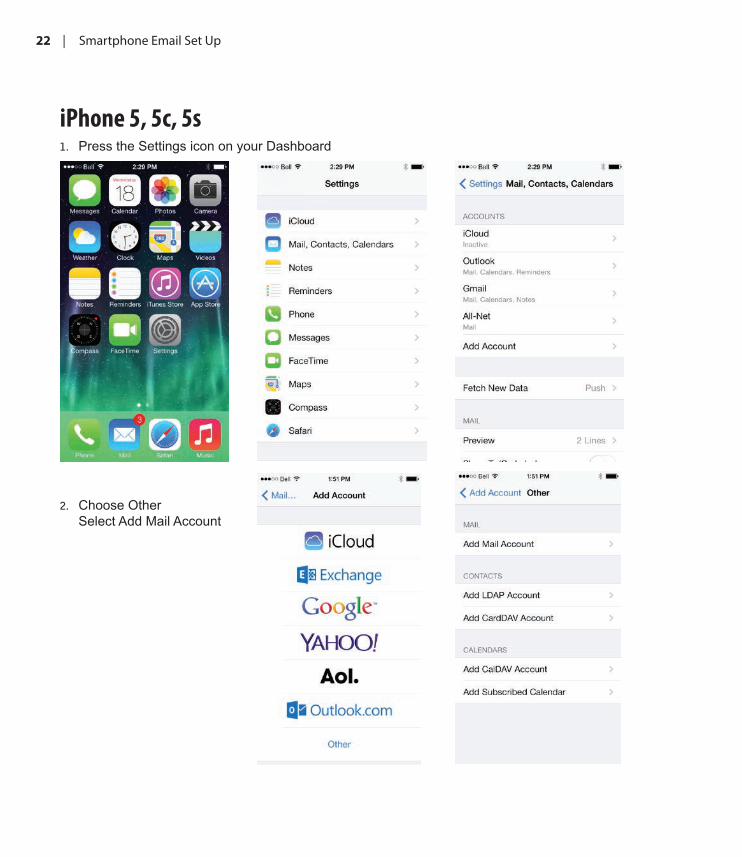
22 | Smartphone email Set up
iPhone 5, 5c, 5s1. Press the Settings icon on your Dashboard
2. Choose Other Select Add Mail Account

All-neT eMAil inSTruCTionS | 23
3. Type in your account information including the password provided by All-Net. **all passwords are case sensitive Click Next
4. Make sure to leave your account highlighted as IMAP
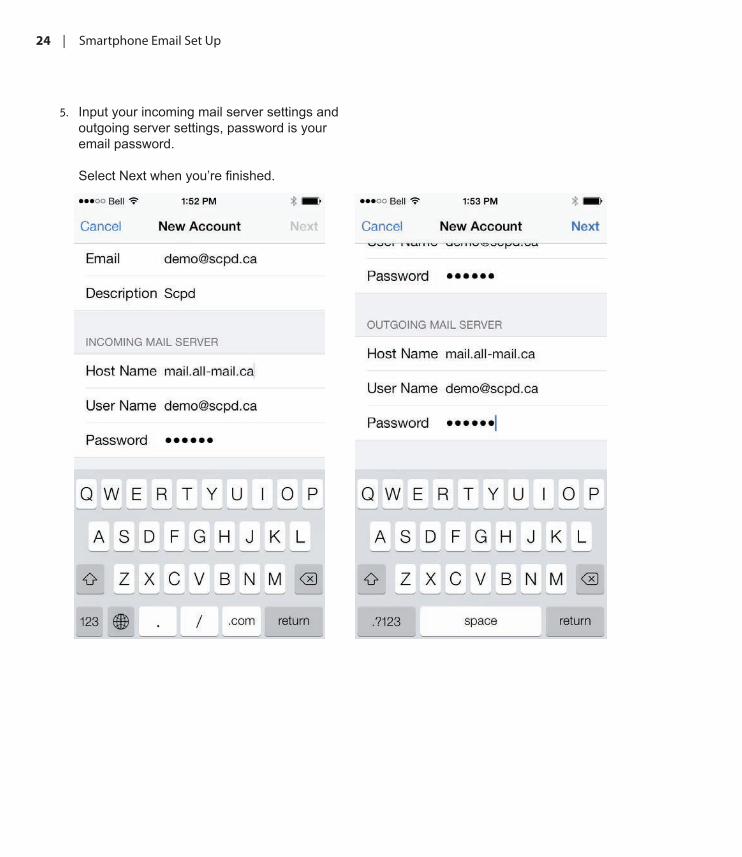
24 | Smartphone email Set up
5. Input your incoming mail server settings and outgoing server settings, password is your email password. Select Next when you’re finished.

All-neT eMAil inSTruCTionS | 25
6. You will see this pop up appear twice, select Yes for both. After your settings have successfully been added you will see a page with Mail and Notes checked off. Leave this as is and select Save.
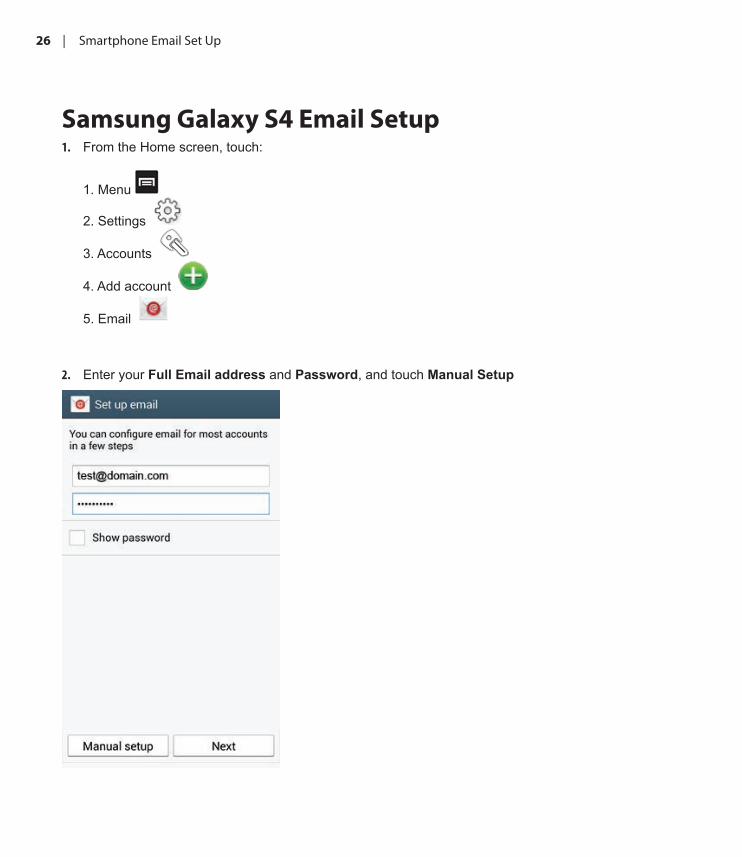
26 | Smartphone email Set up
Samsung Galaxy S4 Email Setup1. From the Home screen, touch:
1. Menu
2. Settings
3. Accounts
4. Add account
5. Email
2. Enter your Full Email address and Password, and touch Manual Setup
All-neT eMAil inSTruCTionS | 27
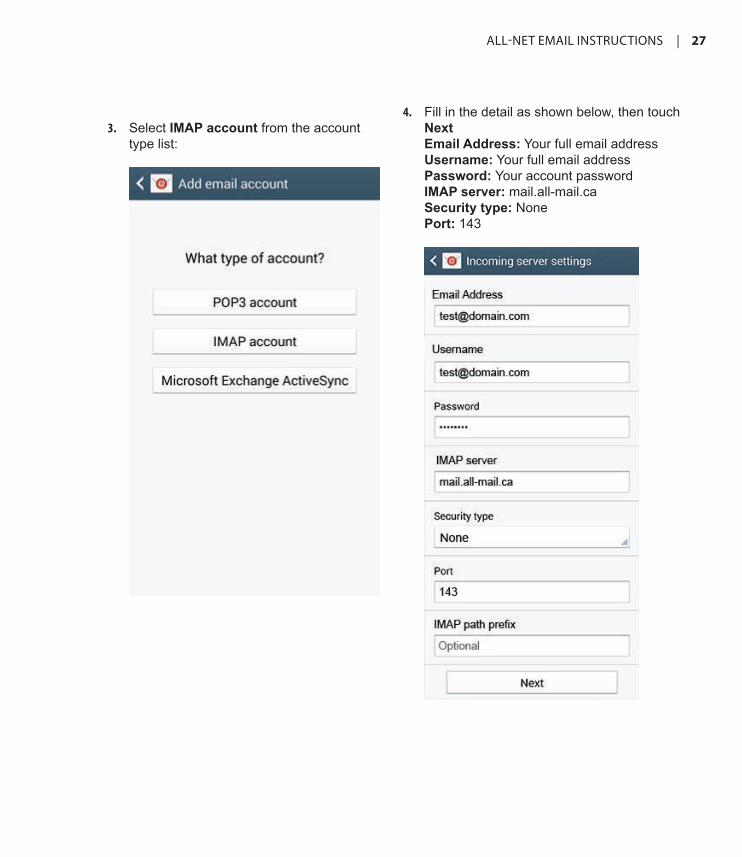
4. Fill in the detail as shown below, then touch Next Email Address: Your full email address Username: Your full email address Password: Your account password IMAP server: mail.all-mail.ca Security type: None Port: 143
3. Select IMAP account from the account type list:
28 | Smartphone email Set up
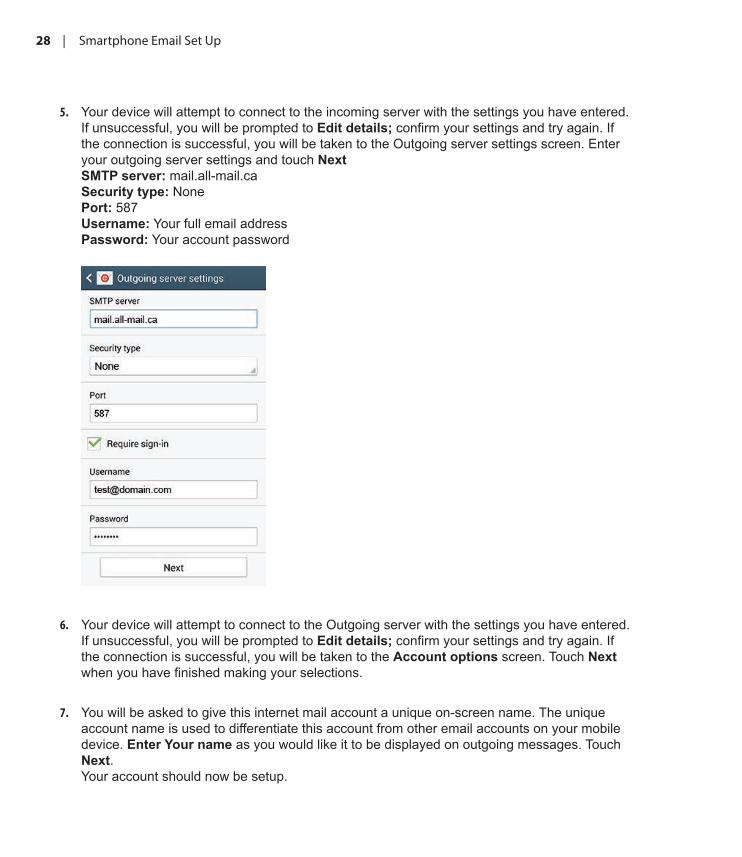
5. Your device will attempt to connect to the incoming server with the settings you have entered. If unsuccessful, you will be prompted to Edit details; confirm your settings and try again. If the connection is successful, you will be taken to the Outgoing server settings screen. Enter your outgoing server settings and touch Next SMTP server: mail.all-mail.ca Security type: None Port: 587 Username: Your full email address Password: Your account password
6. Your device will attempt to connect to the Outgoing server with the settings you have entered. If unsuccessful, you will be prompted to Edit details; confirm your settings and try again. If the connection is successful, you will be taken to the Account options screen. Touch Next when you have finished making your selections.
7. You will be asked to give this internet mail account a unique on-screen name. The unique account name is used to differentiate this account from other email accounts on your mobile device. Enter Your name as you would like it to be displayed on outgoing messages. Touch Next. Your account should now be setup.

All-neT eMAil inSTruCTionS | 29
BlackBerryStep 1
You will first need to go to the MTS BlackBerry website at the following link.
https://mtsm.blackberry.com/
From here you will be asked to enter your username and password and follow the instructions. Once you are in and have entered your email address and password the BlackBerry should connect automatically and synch with the new server.
Step 1:
Enter your BlackBerry username and password

30 | Smartphone email Set up
Step 2:
Click on Set Up Email Account
Enter your email address and password then click next.
All-neT eMAil inSTruCTionS | 31
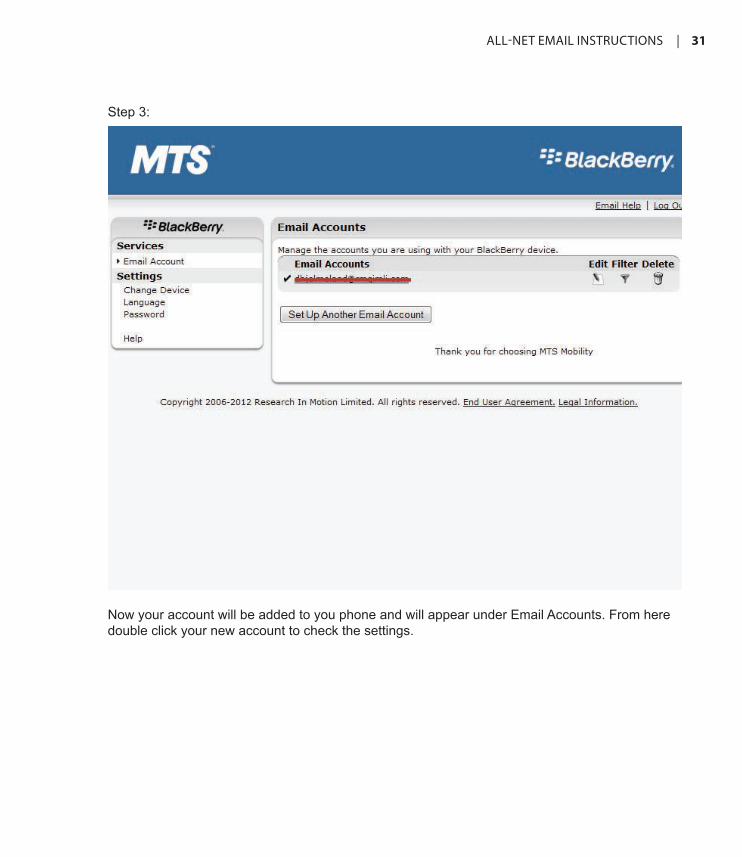
Step 3:
Now your account will be added to you phone and will appear under Email Accounts. From here double click your new account to check the settings.

32 | Smartphone email Set up
Step 4:
Here you will see your information about your account. Click on Advanced Settings
All-neT eMAil inSTruCTionS | 33
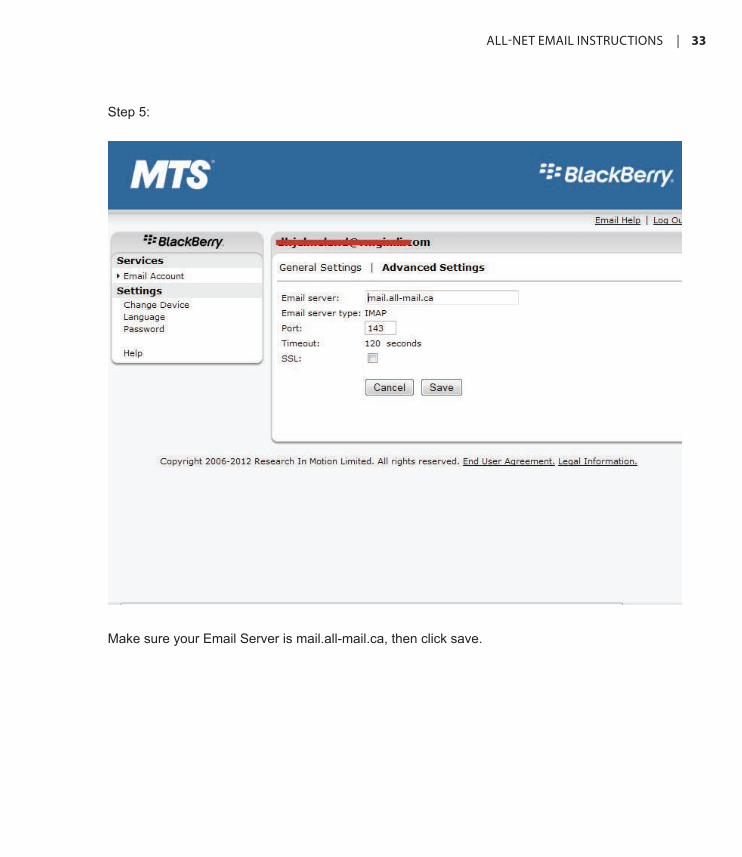
Step 5:
Make sure your Email Server is mail.all-mail.ca, then click save.

34 | Smartphone email Set up
Step 2 (If you do not know your password)
If you do not know your password click on “Forgot Password”
From here you will be asked for your pin. The images below will show you how to find the pin number on your BlackBerry.
Once you enter your pin you will be sent a password on your BlackBerry.
From here you will now be able to login to the MTS BlackBerry website and configure your BlackBerry to the new mail server by following the instructions in step 1.
How to find your BlackBerry PINStep 1:
On your BlackBerry screenfind the
icon labeled “Options” and select it
Step 2:
Once you find Options, scroll down
to “Status” and select it
Now you will be able to see
your Blackberry PIN