embedded data warehouse implementation guide release 11i · oracle e-business intelligence embedded...
TRANSCRIPT

Oracle® E-Business IntelligenceEmbedded Data Warehouse Implementation Guide
Release 11i
Part No. A90298-04
August 2004

Oracle E-Business Intelligence Embedded Data Warehouse Implementation Guide, Release 11i
Part No. A90298-04
Copyright © 2002, 2004, Oracle. All rights reserved.
Primary Authors: Christine Monk
Contributors: Anu Mandalam, Karuna Mukherjea, Ling Wu, Steven Chan, Anurag Garg, Jeffrey Kirk, Anand Thiagarajan, Arun Santhanam, Kiran Prabhakara, Regina Sheynblat, Venu Surendren, Dale Wen, Stephen Oar, Jacques Senchet, Sudha Seshadri, Faustina Setyadi, Elaine Wan, Elisa Chan.
The Programs (which include both the software and documentation) contain proprietary information; they are provided under a license agreement containing restrictions on use and disclosure and are also protected by copyright, patent, and other intellectual and industrial property laws. Reverse engineering, disassembly, or decompilation of the Programs, except to the extent required to obtain interoperability with other independently created software or as specified by law, is prohibited.
The information contained in this document is subject to change without notice. If you find any problems in the documentation, please report them to us in writing. This document is not warranted to be error-free. Except as may be expressly permitted in your license agreement for these Programs, no part of these Programs may be reproduced or transmitted in any form or by any means, electronic or mechanical, for any purpose.
If the Programs are delivered to the United States Government or anyone licensing or using the Programs on behalf of the United States Government, the following notice is applicable:
U.S. GOVERNMENT RIGHTS Programs, software, databases, and related documentation and technical data delivered to U.S. Government customers are "commercial computer software" or "commercial technical data" pursuant to the applicable Federal Acquisition Regulation and agency-specific supplemental regulations. As such, use, duplication, disclosure, modification, and adaptation of the Programs, including documentation and technical data, shall be subject to the licensing restrictions set forth in the applicable Oracle license agreement, and, to the extent applicable, the additional rights set forth in FAR 52.227-19, Commercial Computer Software--Restricted Rights (June 1987). Oracle Corporation, 500 Oracle Parkway, Redwood City, CA 94065.
The Programs are not intended for use in any nuclear, aviation, mass transit, medical, or other inherently dangerous applications. It shall be the licensee's responsibility to take all appropriate fail-safe, backup, redundancy and other measures to ensure the safe use of such applications if the Programs are used for such purposes, and we disclaim liability for any damages caused by such use of the Programs.
The Programs may provide links to Web sites and access to content, products, and services from third parties. Oracle is not responsible for the availability of, or any content provided on, third-party Web sites. You bear all risks associated with the use of such content. If you choose to purchase any products or services from a third party, the relationship is directly between you and the third party. Oracle is not responsible for: (a) the quality of third-party products or services; or (b) fulfilling any of the terms of the agreement with the third party, including delivery of products or services and warranty obligations related to purchased products or services. Oracle is not responsible for any loss or damage of any sort that you may incur from dealing with any third party.
Oracle is a registered trademark of Oracle Corporation and/or its affiliates. Other names may be trademarks of their respective owners.
Contents
Send Us Your Comments ................................................................................................................... ix
Preface............................................................................................................................................................ xi
1 Overview of E-Business Intelligence
Overview of E-Business Intelligence.............................................................................................. 1-2Overview of Embedded Data Warehouse ................................................................................ 1-2
E-Business Intelligence Architecture .............................................................................................. 1-4Embedded Data Warehouse Architecture ................................................................................ 1-4Embedded Data Warehouse Components................................................................................ 1-5
Source System Components ................................................................................................ 1-5Target System Components ................................................................................................. 1-5
2 Implementing EDW
Overview of Implementing EDW.................................................................................................... 2-2Verify Prerequisites ............................................................................................................................ 2-6
Hardware Prerequisites .............................................................................................................. 2-6Source Systems ...................................................................................................................... 2-6Warehouse.............................................................................................................................. 2-6Administrative Client ........................................................................................................... 2-6
Software Prerequisites ................................................................................................................ 2-6Source Systems ...................................................................................................................... 2-7Warehouse.............................................................................................................................. 2-7Administrative Client ........................................................................................................... 2-7
iii

Tablespace Prerequisites.............................................................................................................. 2-8OWB Repository Tablespace................................................................................................ 2-8Rollback Tablespace .............................................................................................................. 2-8
Set Up Warehouse ............................................................................................................................... 2-9Set Up Source Systems on Warehouse .................................................................................... 2-10Set Up Warehouse Parameters ................................................................................................. 2-11Set Up Profile Options ............................................................................................................... 2-15
Generate Business Views ................................................................................................................ 2-19Configure Warehouse Data ............................................................................................................. 2-20
Rules for Mapping Flexfields to User Defined Accounting Dimensions .................... 2-21Rules for Mapping Flexfields to Other User-Defined Dimensions .............................. 2-21Rule for Mapping Flexfields to Attributes in Predefined Dimensions........................ 2-21
Prerequisites ................................................................................................................................ 2-23Launch BIS Configuration Assistant........................................................................................ 2-24Define Sources ............................................................................................................................. 2-27Map Sources to Dimensions...................................................................................................... 2-33
Map Flexfields to User-Defined Accounting Dimensions............................................. 2-34Map Flexfields to Other User-Defined Dimensions ....................................................... 2-41Map Flexfield Segments or Source View Columns to Predefined Dimensions ......... 2-43
Map Sources to Fact Tables ....................................................................................................... 2-45Deploy Configuration ................................................................................................................ 2-50Hide Columns ............................................................................................................................. 2-52
Generate End User Layer ................................................................................................................. 2-55Prerequisite .................................................................................................................................. 2-56Launch the Common Warehouse Metadata Transfer Wizard ............................................. 2-56Transfer Metadata....................................................................................................................... 2-59
Import the End User Layer EEX File.............................................................................................. 2-63Set Up the Item Dimension ............................................................................................................ 2-65
Implementation Considerations for the Item Dimension..................................................... 2-66Control Category Sets at Master or Org Levels............................................................... 2-66Do Not Assign Items to Multiple Categories .................................................................. 2-67Define Default Category Sets for Each Functional Area................................................ 2-68Define a Value Based Hierarchy (VBH) ........................................................................... 2-68Product Category Set .......................................................................................................... 2-68
Create a Value Set and Define a Hierarchy............................................................................. 2-70
iv
Setup Warehouse Parameter..................................................................................................... 2-73Run "Collect" and "Load" Concurrent Programs ................................................................... 2-75Maintaining and Administering the Item Dimension........................................................... 2-75
Set Up GL Value-Based Hierarchy ............................................................................................... 2-77Prerequisites ................................................................................................................................ 2-78Set Up Source Set of Books........................................................................................................ 2-78Set Up Consolidation Set of Books........................................................................................... 2-80Set Up Equivalent Set of Books ................................................................................................ 2-82Set Up Hierarchy Root Nodes .................................................................................................. 2-83Set Up Types................................................................................................................................ 2-86
Set Up Units of Measure ................................................................................................................. 2-87Set Up UOMs............................................................................................................................... 2-90Map Instance UOMs to Warehouse UOMs ............................................................................ 2-92Set Up Base UOM Mapping...................................................................................................... 2-95
Set Up Purchasing Intelligence...................................................................................................... 2-96Set Up Purchasing Intelligence Responsibilities .................................................................... 2-97Set up Custom Measure Survey ............................................................................................... 2-98Set Up Purchasing Intelligence Profile Options................................................................... 2-102
Configure Warehouse Security .................................................................................................... 2-105Setup Security ........................................................................................................................... 2-107
3 Loading Data
Overview of Loading Data ................................................................................................................ 3-2Collecting Data from Sources ..................................................................................................... 3-3Loading Data to Warehouse ....................................................................................................... 3-3
Loader Engine ........................................................................................................................ 3-4Monitoring Collect and Load Processes.................................................................................... 3-4Validate Data................................................................................................................................. 3-5
Dangling Records .................................................................................................................. 3-5Tips for Avoiding Dangling Records ................................................................................. 3-6Duplicate Records ................................................................................................................. 3-6
Checklist for Loading Data ......................................................................................................... 3-7Test Collect and Load Process........................................................................................................... 3-8Collect and Load Data ........................................................................................................................ 3-9
Collect and Load Dimensions..................................................................................................... 3-9
v
Collect and Load Facts ............................................................................................................... 3-12Use the Status Viewer to Monitor Collect and Load Status ................................................. 3-13
Status Viewer Window Reference..................................................................................... 3-14Load Progress Window Reference .................................................................................... 3-15
Use the Interface Table Manager to Monitor and Update Data........................................... 3-16Monitor and Update Dimensions ..................................................................................... 3-16Monitor and Update Facts.................................................................................................. 3-20
Validate Collect and Load Data ...................................................................................................... 3-25Valdiate Collect and Load Data ................................................................................................ 3-25
Checking Dimension Data Validity .................................................................................. 3-26Checking Fact Data Validity .............................................................................................. 3-27
Fix Dangling Records ................................................................................................................. 3-29Fix Duplicate Records ................................................................................................................ 3-30
Purge Interface Tables on Warehouse ........................................................................................... 3-31
4 Tuning EDW
Overview of Tuning............................................................................................................................ 4-2Required Skills Set for Tuning......................................................................................................... 4-3Tuning EDW ......................................................................................................................................... 4-3
A Item Classes, Hidden Columns, and Column Ordering
Item Class ............................................................................................................................................. A-2Implementation Benefits.............................................................................................................. A-2Item Class Conventions by Intelligence Area........................................................................... A-3
Financial Intelligence ............................................................................................................ A-3Manufacturing Business Intelligence.................................................................................. A-3Supply Chain Intelligence .................................................................................................... A-5
Creating Item Classes ................................................................................................................... A-5EDW Hidden Column ........................................................................................................................ A-6
Implementation Benefits.............................................................................................................. A-6Implementation Trade Offs ......................................................................................................... A-7How to Unhide Columns............................................................................................................. A-7Hidden Column Conventions by Intelligence Products ......................................................... A-8
Financials Intelligence........................................................................................................... A-8Supply Chain Intelligence .................................................................................................... A-9
vi
Manufacturing Business Intelligence ................................................................................. A-9Purchasing Intelligence ........................................................................................................ A-9Projects Intelligence............................................................................................................... A-9Marketing Intelligence.......................................................................................................... A-9
Column Ordering.............................................................................................................................. A-10Implementation Benefits............................................................................................................ A-10
Financials Intelligence ........................................................................................................ A-10Supply Chain Intelligence .................................................................................................. A-10Manufacturing Intelligence................................................................................................ A-10Purchasing Intelligence ...................................................................................................... A-11Projects Intelligence............................................................................................................. A-11Marketing Intelligence........................................................................................................ A-11
Changing Column Ordering in OWB...................................................................................... A-12
B Concurrent Programs
Collection Programs ........................................................................................................................... B-2Common Parameters.................................................................................................................... B-2Dimension Collection Programs ................................................................................................ B-2Fact Collection Programs............................................................................................................. B-5
Load Programs ..................................................................................................................................... B-6Dimension Load Programs ......................................................................................................... B-6Fact Load Programs ..................................................................................................................... B-9
Concurrent Programs ....................................................................................................................... B-10
C De-duplication Solution
De-duplication Solution.................................................................................................................... C-1
D Seeded Flexfields
Release 11.0 Flexfields ....................................................................................................................... D-1Key Flexfields - Dimensions........................................................................................................ D-1Descriptive Flexfields - Dimensions .......................................................................................... D-1
Release 11i Flexfields ......................................................................................................................... D-6Key Flexfields - Dimensions........................................................................................................ D-6Descriptive Flexfields - Dimensions ......................................................................................... D-6
vii

Key Flexfields - Facts................................................................................................................. D-13Descriptive Flexfields - Facts.................................................................................................... D-13
E Terminology Mapping
Glossary
Index
viii

Send Us Your Comments
Oracle E-Business Intelligence Embedded Data Warehouse Implementation Guide, Release 11i
Part No. A90298-04
Oracle welcomes your comments and suggestions on the quality and usefulness of this document. Your input is an important part of the information used for revision.
■ Did you find any errors?■ Is the information clearly presented?■ Do you need more information? If so, where?■ Are the examples correct? Do you need more examples?■ What features did you like most?
If you find any errors or have any other suggestions for improvement, please indicate the document title and part number, and the chapter, section, and page number (if available). You can send com-ments to us in the following ways:
■ Electronic mail: [email protected] ■ FAX: (650) 506-7200 Attn: Oracle Applications Documentation Manager■ Postal service:
Oracle Corporation Oracle Applications Documentation Manager500 Oracle ParkwayRedwood Shores, CA 94065USA
If you would like a reply, please give your name, address, telephone number, and (optionally) elec-tronic mail address.
If you have problems with the software, please contact your local Oracle Support Services.
ix

x

Preface
Welcome to the Oracle E-Business Intelligence Embedded Data Warehouse Implementation Guide, Release 11i.
This guide assumes you have a working knowledge of the following:
■ The principles and customary practices of your business area.
■ Oracle E-Business Intelligence.
If you have never used Oracle E-Business Intelligence, Oracle suggests you attend one or more of the Oracle Applications training classes available through Oracle University.
■ The Oracle Applications graphical user interface.
To learn more about the Oracle Applications graphical user interface, read the Oracle Applications User’s Guide.
See Other Information Sources for more information about Oracle Applications product information.
xi

How To Use This GuideThe Oracle E-Business Intelligence Embedded Data Warehouse Implementation Guide contains the information you need to understand and use Oracle E-Business Intelligence. This guide contains the following chapters:
■ Chapter 1 provides an overview of Oracle E-Business Intelligence.
■ Chapter 2 describes how to implement Oracle E-Business Intelligence.
■ Chapter 3 describes how to load data into Oracle E-Business Intelligence Embedded Data Warehouse.
■ Chapter 4 describes how to tune data in Oracle E-Business Intelligence.
■ Appendix A describes the item classes, hidden columns, and column ordering conventions used in Oracle E-Business Intelligence.
■ Appendix B describes the concurrent programs used in Oracle E-Business Intelligence.
■ Appendix C describes the approach for de-duplication of dimensions or facts or that are received from both a legacy and one or more Oracle Applications instances.
■ Appendix D describes the flexfields used in Oracle E-Business Intelligence.
■ Appendix E describes the terminology changes between different releases in Oracle E-Business Intelligence.
■ Glossary contains a consolidated list of terms in Oracle E-Business Intelligence.
xii
Documentation Accessibility Our goal is to make Oracle products, services, and supporting documentation accessible, with good usability, to the disabled community. To that end, our documentation includes features that make information available to users of assistive technology. This documentation is available in HTML format, and contains markup to facilitate access by the disabled community. Standards will continue to evolve over time, and Oracle is actively engaged with other market-leading technology vendors to address technical obstacles so that our documentation can be accessible to all of our customers. For additional information, visit the Oracle Accessibility Program Web site at http://www.oracle.com/accessibility/
Accessibility of Code Examples in DocumentationJAWS, a Windows screen reader, may not always correctly read the code examples in this document. The conventions for writing code require that closing braces should appear on an otherwise empty line; however, JAWS may not always read a line of text that consists solely of a bracket or brace.
Accessibility of Links to External Web Sites in Documentation This documentation may contain links to Web sites of other companies or organizations that Oracle does not own or control. Oracle neither evaluates nor makes any representations regarding the accessibility of these Web sites.
xiii
Other Information SourcesYou can choose from many sources of information, including documentation, training, and support services, to increase your knowledge and understanding of Oracle E-Business Intelligence.
If this guide refers you to other Oracle Applications documentation, use only the Release 11i versions of those guides.
Online DocumentationAll Oracle Applications documentation is available online (HTML or PDF).
■ PDF Documentation- See the Online Documentation CD for current PDF documentation for your product with each release. This Documentation CD is also available on OracleMetaLink and is updated frequently.
■ Online Help - You can refer to Oracle Applications Help for current HTML online help for your product. Oracle provides patchable online help, which you can apply to your system for updated implementation and end user documentation. No system downtime is required to apply online help.
■ Release Content Document - See the Release Content Document for descriptions of new features available by release. The Release Content Document is available on OracleMetaLink.
■ About document - Refer to the About document for information about your release, including feature updates, installation information, and new documentation or documentation patches that you can download. The About document is available on OracleMetaLink.
Related GuidesOracle E-Business Intelligence shares business and setup information with other Oracle Applications products. Therefore, you may want to refer to other guides when you set up and use Oracle E-Business Intelligence.
You can read the guides online by choosing Library from the expandable menu on your HTML help window, by reading from the Oracle Applications Document Library CD included in your media pack, or by using a Web browser with a URL that your system administrator provides.
If you require printed guides, you can purchase them from the Oracle Store at http://oraclestore.oracle.com.
xiv
Guides Related to All Products
Oracle Applications User’s GuideThis guide explains how to enter data, query, run reports, and navigate using the graphical user interface (GUI). This guide also includes information on setting user profiles, as well as running and reviewing reports and concurrent processes.
You can access this user’s guide online by choosing “Getting Started with Oracle Applications” from any Oracle Applications help file.
xv
Installation and System Administration
Oracle Applications ConceptsThis guide provides an introduction to the concepts, features, technology stack, architecture, and terminology for Oracle Applications Release 11i. It provides a useful first book to read before an installation of Oracle Applications. This guide also introduces the concepts behind Applications-wide features such as Business Intelligence (BIS), languages and character sets, and Self-Service Web Applications.
Installing Oracle ApplicationsThis guide provides instructions for managing the installation of Oracle Applications products. In Release 11i, much of the installation process is handled using Oracle Rapid Install, which minimizes the time to install Oracle Applications and the Oracle technology stack by automating many of the required steps. This guide contains instructions for using Oracle Rapid Install and lists the tasks you need to perform to finish your installation. You should use this guide in conjunction with individual product user guides and implementation guides.
Upgrading Oracle ApplicationsRefer to this guide if you are upgrading your Oracle Applications Release 10.7 or Release 11.0 products to Release 11i. This guide describes the upgrade process and lists database and product-specific upgrade tasks. You must be either at Release 10.7 (NCA, SmartClient, or character mode) or Release 11.0, to upgrade to Release 11i. You cannot upgrade to Release 11i directly from releases prior to 10.7.
“About” DocumentFor information about implementation and user documentation, instructions for applying patches, new and changed setup steps, and descriptions of software updates, refer to the ”About” document for your product. ”About” documents are available on OracleMetaLink for most products starting with Release 11.5.8.
Maintaining Oracle ApplicationsUse this guide to help you run the various AD utilities, such as AutoUpgrade, AutoPatch, AD Administration, AD Controller, AD Relink, License Manager, and others. It contains how-to steps, screenshots, and other information that you need to run the AD utilities. This guide also provides information on maintaining the Oracle applications file system and database.
xvi
Oracle Applications System Administrator’s GuideThis guide provides planning and reference information for the Oracle Applications System Administrator. It contains information on how to define security, customize menus and online help, and manage concurrent processing.
Oracle Alert User’s GuideThis guide explains how to define periodic and event alerts to monitor the status of your Oracle Applications data.
Oracle Applications Developer’s GuideThis guide contains the coding standards followed by the Oracle Applications development staff and describes the Oracle Application Object Library components that are needed to implement the Oracle Applications user interface described in the Oracle Applications User Interface Standards for Forms-Based Products. This manual also provides information to help you build your custom Oracle Forms Developer forms so that the forms integrate with Oracle Applications.
Oracle Applications User Interface Standards for Forms-Based ProductsThis guide contains the user interface (UI) standards followed by the Oracle Applications development staff. It describes the UI for the Oracle Applications products and how to apply this UI to the design of an application built by using Oracle Forms.
Other Implementation Documentation
Oracle Applications Product Update NotesUse this guide as a reference for upgrading an installation of Oracle Applications. It provides a history of the changes to individual Oracle Applications products between Release 11.0 and Release 11i. It includes new features, enhancements, and changes made to database objects, profile options, and seed data for this interval.
Oracle Workflow Administrator's GuideThis guide explains how to complete the setup steps necessary for any Oracle Applications product that includes workflow-enabled processes, as well as how to monitor the progress of runtime workflow processes.
xvii

Oracle Workflow Developer's GuideThis guide explains how to define new workflow business processes and customize existing Oracle Applications-embedded workflow processes. It also describes how to define and customize business events and event subscriptions.
Oracle Workflow User's GuideThis guide describes how Oracle Applications users can view and respond to workflow notifications and monitor the progress of their workflow processes.
Oracle Workflow API ReferenceThis guide describes the APIs provided for developers and administrators to access Oracle Workflow.
Oracle Applications Flexfields GuideThis guide provides flexfields planning, setup and reference information for the Oracle E-Business Intelligence implementation team, as well as for users responsible for the ongoing maintenance of Oracle Applications product data. This guide also provides information on creating custom reports on flexfields data.
Oracle eTechnical Reference ManualsEach eTechnical Reference Manual (eTRM) contains database diagrams and a detailed description of database tables, forms, reports, and programs for a specific Oracle Applications product. This information helps you convert data from your existing applications, integrate Oracle Applications data with non-Oracle applications, and write custom reports for Oracle Applications products. Oracle eTRM is available on OracleMetalink
Oracle Applications Message ManualThis manual describes all Oracle Applications messages. This manual is available in HTML format on the documentation CD-ROM for Release 11i.
xviii
Training and Support
TrainingOracle offers a complete set of training courses to help you and your staff master Oracle E-Business Intelligence and reach full productivity quickly. These courses are organized into functional learning paths, so you take only those courses appropriate to your job or area of responsibility.
You have a choice of educational environments. You can attend courses offered by Oracle University at any one of our many education centers, you can arrange for our trainers to teach at your facility, or you can use Oracle Learning Network (OLN), Oracle University's online education utility. In addition, Oracle training professionals can tailor standard courses or develop custom courses to meet your needs. For example, you may want to use your organization structure, terminology, and data as examples in a customized training session delivered at your own facility.
SupportFrom on-site support to central support, our team of experienced professionals provides the help and information you need to keep Oracle E-Business Intelligence working for you. This team includes your technical representative, account manager, and Oracle’s large staff of consultants and support specialists with expertise in your business area, managing an Oracle server, and your hardware and software environment.
xix
Do Not Use Database Tools to Modify Oracle Applications DataOracle STRONGLY RECOMMENDS that you never use SQL*Plus, Oracle Data Browser, database triggers, or any other tool to modify Oracle Applications data unless otherwise instructed.
Oracle provides powerful tools you can use to create, store, change, retrieve, and maintain information in an Oracle database. But if you use Oracle tools such as SQL*Plus to modify Oracle Applications data, you risk destroying the integrity of your data and you lose the ability to audit changes to your data.
Because Oracle Applications tables are interrelated, any change you make using Oracle Applications can update many tables at once. But when you modify Oracle Applications data using anything other than Oracle Applications, you may change a row in one table without making corresponding changes in related tables. If your tables get out of synchronization with each other, you risk retrieving erroneous information and you risk unpredictable results throughout Oracle Applications.
When you use Oracle Applications to modify your data, Oracle Applications automatically checks that your changes are valid. Oracle Applications also keeps track of who changes information. If you enter information into database tables using database tools, you may store invalid information. You also lose the ability to track who has changed your information because SQL*Plus and other database tools do not keep a record of changes.
About OracleOracle develops and markets an integrated line of software products for database management, applications development, decision support, and office automation, as well as Oracle Applications, an integrated suite of more than 160 software modules for financial management, supply chain management, manufacturing, project systems, human resources and customer relationship management.
Oracle products are available for mainframes, minicomputers, personal computers, network computers and personal digital assistants, allowing organizations to integrate different computers, different operating systems, different networks, and even different database management systems, into a single, unified computing and information resource.
Oracle is the world’s leading supplier of software for information management, and the world’s second largest software company. Oracle offers its database, tools, and applications products, along with related consulting, education, and support services, in over 145 countries around the world.
xx
Your FeedbackThank you for using Oracle E-Business Intelligence and this user guide.
Oracle values your comments and feedback. In this guide is a reader’s comment form that you can use to explain what you like or dislike about Oracle E-Business Intelligence or this user guide. Mail your comments to the following address or call us directly at (650) 506-7000.
Oracle Applications Documentation ManagerOracle Corporation500 Oracle ParkwayRedwood Shores, CA 94065U.S.A.
Or, send electronic mail to [email protected].
xxi

xxii

Overview of E-Business Intellig
1
Overview of E-Business IntelligenceThis chapter contains an overview of Oracle E-Business Intelligence and Embedded Data Warehouse. Before you begin your implementation, read the following sections for:
Overview of E-Business Intelligence on page 1-2
■ Overview of Embedded Data Warehouse on page 1-2
E-Business Intelligence Architecture on page 1-4
■ Embedded Data Warehouse Architecture on page 1-4
■ Source System Components on page 1-5
■ Target System Components on page 1-5
■ Performance Management Framework components: The following is a list of the components that comprise the Performance Management Framework. on page 1-7
ence 1-1

Overview of E-Business Intelligence
Overview of E-Business IntelligenceIn becoming e-businesses, organizations have streamlined their internal processes to win new customers and to gain a larger share of their existing customersí business. New, internet-enabled, enterprise application suites and electronic market places are reducing inefficiencies across supply chains while providing new opportunities to improve customer relationships. As organizations adopt these new solutions, the need to make decisions faster has also increased. To remain competitive, every organization must empower more people to make informed decisions, without the need for long approval or review cycles.
To meet this challenge, organizations must provide the relevant business information and analysis tools that every manager or project team needs to quickly understand what is happening, to be able to analyze alternatives, and to take action. Business intelligence applications are available to provide the data and analysis required to make these decisions, but most business intelligence products are not integrated with operational systems. Because the business processes underlying source applications are always changing, traditional business intelligence applications cannot easily gather the necessary data or transform it into useful management information.
The Oracle Embedded Data Warehouse (EDW) provides a simple and powerful framework for delivering information, from internal applications and external sources, to end-users across the enterprise. EDW unlocks the value of information, held in operational systems, by automatically collecting, aggregating and transforming source data, to provide secure access and a unified view of the entire organization. With the Business Intelligence System applications, everyone has immediate access to accurate and timely data to make faster and more informed decisions, which leads to a positive impact on bottom line results.
Overview of Embedded Data WarehouseEDW is a foundation technology for Oracle E-Business Intelligence. This ready-to-run, end-to-end solution provides an open schema and extensible data warehousing architecture, powered by robust data warehousing tools. EDW:
■ Gives users a unified view of the enterprise with its cross-functional analysis capabilities
■ Leverages a common dimension model which enables seamless cross-functional analysis across the entire enterprise
■ Includes fact tables from 7 intelligence areas: Financials, Projects, Purchasing, Manufacturing, Marketing, Human Resources, and Supply Chain
1-2 Oracle E-Business Intelligence Embedded Data Warehouse Implementation Guide
Overview of E-Business Intelligence
■ Includes pre-built collections for Oracle Applications 11i and by using Oracle Warehouse Builder, customers can map non-Oracle sources
■ Provides shorter time-to-benefit with its pre-defined enterprise schemas and hierarchies, and pre-built data collection and integration programs
EDW, the enabling technology of Oracle E-Business Intelligence, unleashes the power of e-business insight, not just information.
Overview of E-Business Intelligence 1-3
E-Business Intelligence Architecture
E-Business Intelligence Architecture E-Business Intelligence is a multi-tiered architecture.
The first tier, the database tier, provides the foundation technology. The database tier can be implemented as a transactional (OLTP) or a warehouse (OLAP) schema. The transactional schema provides users with real-time report data. The warehouse schema provides users with summarized data that supports more complex reporting and decision making. The type of schema you choose determines the type of content that is available to your users.
The second tier, the applications tier, provides the load balancing and business logic. It processes requests from the third tier (client tier) and sends results from the database tier to the client tier.
The third tier, the client tier, supports user activities such as reporting from the web, and administration.
This guide assumes that you are implementing the warehouse schema.
Embedded Data Warehouse ArchitectureEDW divides your data between two types of systems: one or more source systems and one target system.
A source system can be any Oracle Applications system, non-Oracle system running on an Oracle database, or legacy database application that provides data to the warehouse. You can use one or more source systems to provide data to the target system.
The target system is the runtime warehouse. There is only one target system. It integrates data from multiple source systems, transforms the data, and makes it available in a star schema design. The star schema design supports complex user reporting and decision making.
Additional Information: For more information on Oracle Applications and multi-tier architecture, see Oracle Applications Concepts.
1-4 Oracle E-Business Intelligence Embedded Data Warehouse Implementation Guide
E-Business Intelligence Architecture
Embedded Data Warehouse ComponentsThe following section describes the various components that reside on the source systems and the target (warehouse) system.
Source System ComponentsSource systems can be any Oracle Applications Release 10.7, 11, or 11i system; non-Oracle system running on an Oracle database; or legacy database application that provides data to the warehouse. Each source system must contain the following components.
■ Database links: Database links are used to connect the source system to the warehouse and from the warehouse to the source system.
■ Interface tables: For EDW, source system data is put into interface tables before it is pushed to the warehouse.
■ Collect programs: Collect programs determine how to extract and transform source data for the warehouse. Collect programs use the database links to transfer data from the interface tables to the warehouse and from the warehouse to the source system.
■ Concurrent Manager: The concurrent manager coordinates the processes generated by users’ requests to run various data-intensive programs.
■ Web Browser: A web browser is used with Oracle Applications 11i source systems. This is only necessary on an Oracle Applications 11i source system.
These components must be installed and set up on each source system.
Target System ComponentsThe target system is an Oracle Applications Release 11i.3 system (or higher) with an Oracle 8i database. The target system summarizes data from the various source systems into a data warehouse (from this point forward, this document will refer to the target system as the warehouse). The warehouse contains fact tables, dimension tables, APIs, and other supporting utilities and objects. It must also contain the following components:
■ Load programs: Load programs use the EDW metadata to determine how to move data into the warehouse. Load programs transfer data from interface tables to warehouse schema.
■ Database Links: Database links are used to connect the source system to the warehouse and from the warehouse to the source system.
Overview of E-Business Intelligence 1-5

E-Business Intelligence Architecture
■ EDW Metadata: The EDW metadata defines the contents of the runtime warehouse: the facts, dimensions, and other objects. The loader engine uses the metadata define how to move data into the warehouse schema. The reporting and analytical tools also use the metadata.
■ Oracle Discoverer End User Layer: The Oracle Discoverer End User Layer (EUL) is a schema that sits on the warehouse database. This schema is used to access the workbooks. Workbooks and the EUL must reside on the database tier of the warehouse.
■ Oracle Discoverer Workbooks: Workbooks enable users to analyze the summarized data in the warehouse. Workbooks access data through the Oracle Discoverer EUL. Workbooks and the EUL must reside on the database tier of the warehouse.
■ Oracle Warehouse Builder Repository: The Oracle Warehouse Builder (OWB) repository resides on the database tier of the warehouse. This repository stores the EDW metadata.
■ Interface tables: For EDW, source system data is loaded into interface tables before it is transformed into the star schema on the warehouse.
■ Concurrent Manager: The concurrent manager coordinates the processes generated by users’ requests to run various data-intensive programs.
■ Forms Server: The Forms Server is automatically installed as part of the Oracle Applications 11i.3 (or higher) Rapid Install.
■ Oracle Discoverer 4i Web Client: The Oracle Discoverer 4i Web Client is installed as a separate application. The client contains a web browser with the Oracle Discoverer Web Client plug-in that executes the workbooks.
■ Self Service Web Applications: Self Service Web Applications is automatically installed as part of the Oracle Applications 11i.3 (or higher) Rapid Install. .
■ Zip utility: This utility is used to extract compressed files.
■ Oracle Warehouse Builder Client: The OWB client provides front-end access to the OWB repository. The OWB client must be installed on a Windows NT machine. It is the recommended tool for viewing the EDW metadata.
■ Oracle Discoverer Bridge Client: The Oracle Discoverer Bridge client is used to create the EUL from the EDW metadata. The bridge is installed as part of the typical Oracle Warehouse Builder install. The bridge can reside on the same physical machine as the OWB client.
1-6 Oracle E-Business Intelligence Embedded Data Warehouse Implementation Guide

E-Business Intelligence Architecture
■ Oracle Discoverer Administration Client: The Oracle Discoverer Administration client is installed as a separate application. The client is used for administration of the Oracle Discoverer EUL. You use this client to import the EUL and configure security for Oracle Discoverer. The Oracle Discoverer Administration client must be installed on a Windows NT machine.
■ Web Browser: A web browser is used to view warehouse data.
■ Performance Management Framework components: The following is a list of the components that comprise the Performance Management Framework.
■ Presentation components: The Performance Management Graph Portlet allows end users to display graphs from the Performance Management Viewer reports. Through customization of this portlet the end user can choose a report and parameters for display.
The Performance Management List portlet allows end-users to view performance information from the personal homepage. Through customization of this portlet, an end user can choose measures and parameters. The actual values will display, with red color coding if the actual value falls outside of the tolerance range. The values of the measure are calculated through the processing of Alerts.
Through the Performance Management Viewer, end users have access to a set of pre-built reports that are specifically tailored to intelligence users. These reports provide an intuitive user interface and features aimed at the novice end user. Note that previous versions of Oracle E-Business Intelligence used Oracle Reports to define and render reports. In this release, Performance Management Viewer technology is used to define and render reports.
Through Oracle Workflow, users receive notifications. Notifications alert users to out of tolerance situations for measures with targets.
■ Definition components: The AK Repository is a metadata repository used for the definition of application common data. The AK Repository is used to define Performance Management Viewer reports and performance measures. This definition contains layout information for the reports and establishes the source of actual values for both the reports and performance measures.
The Performance Management Framework contains a set of forms to define performance measures and the dimension levels. These forms allow administration users to assign the dimensions, security, corrective actions
Overview of E-Business Intelligence 1-7
E-Business Intelligence Architecture
and automated target retrieval. Note that a measure also needs setup in the AK repository to enable the retrieval of actual values.
■ Responsibilities: The following responsibilities are used for setting up the Performance Management Framework: Performance Management Framework (Full Access), Performance Management Framework (Targets Access), BIS Super User.
The following responsibilities contain Performance Management Viewer Reports: Purchasing Intelligence - Embedded Data Warehouse, Supply Chain Intelligence - Embedded Data Warehouse, Manufacturing Intelligence - Embedded Data Warehouse.
■ Data components: To construct reports and performance measures , intelligence teams have built a set of views on top of the EDW fact tables. These views are optimized for use by the Viewer Reports and Performance Measures.
The Performance Management Framework contains a set of forms for use in entering and maintaining target information on performance measures. This includes target values, tolerance ranges and target owners.
■ Processing components: Through the Performance Management Framework, administration users can schedule alerts and target users can subscribe to the notifications. Schedule Alerts will send notifications to target owners and update data for presentation on the performance measure portlet. Note that previous versions of E-Business Intelligence applications used Oracle Alerts to achieve the alerting functionality. This release uses E-Business Intelligence alerting.
1-8 Oracle E-Business Intelligence Embedded Data Warehouse Implementation Guide
Implementing
2
Implementing EDWThis chapter describes how to implement EDW. It includes the following sections:
■ Overview of Implementing EDW on page 2-2
■ Verify Prerequisites on page 2-6
■ Set Up Warehouse on page 2-9
■ Generate Business Views on page 2-19
■ Configure Warehouse Data on page 2-20
■ Generate End User Layer on page 2-55
■ Import the End User Layer EEX File on page 2-63
■ Set Up the Item Dimension on page 2-65
■ Set Up GL Value-Based Hierarchy on page 2-77
■ Set Up Units of Measure on page 2-87
■ Set Up Purchasing Intelligence on page 2-96
■ Configure Warehouse Security on page 2-105
EDW 2-1
Overview of Implementing EDW
Overview of Implementing EDWThis section contains a checklist of the steps involved in implementing EDW. This checklist lists the implementation steps in a recommended order, not in the actual order that they must be performed. For information on implementing the Performance Measurement Framework or the Performance Management viewer, see the Oracle Performance Management Framework and Performance Management Viewer User Guide.
Before you create your own implementation plan, read this entire chapter. The chapter lists all of the prerequisites and dependencies between the implementation steps. Once you have read this chapter, you will be able to accurately assess your implementation needs and create your own implementation plan.
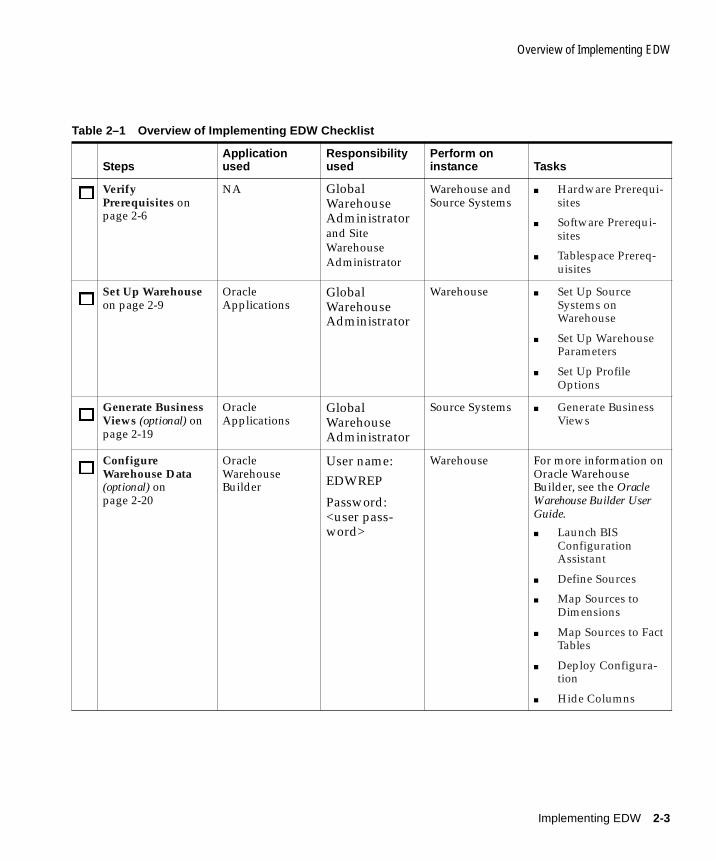
Table 2–1, "Overview of Implementing EDW Checklist", provides the recommended order of steps for implementing EDW.
Attention: The steps in this implementation guide, unless otherwise stated, assumes that you are logged into Oracle Applications on the warehouse instance using the Global Warehouse Administrator responsibility.
2-2 Oracle E-Business Intelligence Embedded Data Warehouse Implementation Guide
Overview of Implementing EDW
Table 2–1 Overview of Implementing EDW Checklist
StepsApplicationused
Responsibilityused
Perform on instance Tasks
� Verify Prerequisites on page 2-6
NA Global Warehouse Administrator and Site Warehouse Administrator
Warehouse and Source Systems
■ Hardware Prerequi-sites
■ Software Prerequi-sites
■ Tablespace Prereq-uisites
�Set Up Warehouse on page 2-9
Oracle Applications
Global Warehouse Administrator
Warehouse ■ Set Up Source Systems on Warehouse
■ Set Up Warehouse Parameters
■ Set Up Profile Options
�Generate Business Views (optional) on page 2-19
Oracle Applications
Global Warehouse Administrator
Source Systems ■ Generate Business Views
�Configure Warehouse Data (optional) on page 2-20
Oracle Warehouse Builder
User name:EDWREP
Password: <user pass-word>
Warehouse For more information on Oracle Warehouse Builder, see the Oracle Warehouse Builder User Guide.
■ Launch BIS Configuration Assistant
■ Define Sources
■ Map Sources to Dimensions
■ Map Sources to Fact Tables
■ Deploy Configura-tion
■ Hide Columns
Implementing EDW 2-3
Overview of Implementing EDW
� Generate End User Layer on page 2-55
Oracle Warehouse Builder
User name:
EDWREPPassword: <user pass-word>
Warehouse For more information on Oracle Warehouse Builder, see the Oracle Warehouse Builder User Guide.
■ Launch the Common Warehouse Metadata Transfer Wizard
■ Transfer Metadata
� Import the End User Layer EEX File on page 2-63
Oracle Discoverer
<EUL owner> Warehouse ■ Import the End User Layer EEX File
� Set Up the Item Dimension (optional) on page 2-65
Oracle Applications
Global Warehouse Administrator
Warehouse ■ Create a Value Set and Define a Hierar-chy
■ Setup Warehouse Parameter
■ Run "Collect" and "Load" Concurrent Programs
� Set Up GL Value-Based Hierarchy (optional) on page 2-77
Oracle Applications
Global Warehouse Administrator
Warehouse ■ Set Up Source Set of Books
■ Set Up Consolidation Set of Books
■ Set Up Equivalent Set of Books
■ Set Up Hierarchy Root Nodes
■ Set Up Types
Table 2–1 Overview of Implementing EDW Checklist
StepsApplicationused
Responsibilityused
Perform on instance Tasks
2-4 Oracle E-Business Intelligence Embedded Data Warehouse Implementation Guide

Overview of Implementing EDW
Once you finish the implementation steps outlined above, you can begin to load data from the source systems into the warehouse. For information on how to load data, see: Overview of Loading Data on page 3-2.
�Set Up Units of Measure on page 2-87
Oracle Applications
Global Warehouse Administrator
Warehouse ■ Set Up UOMs
■ Map Instance UOMs to Warehouse UOMs
■ Set Up Base UOM Mapping
�Set Up Purchasing Intelligence (optional) on page 2-96
Oracle Applications
System administrator
Warehouse and Source Systems
■ Set Up Purchasing Intelligence Responsibilities (optional)
■ Set up Custom Mea-sure Survey
■ Set Up Purchasing Intelligence Profile Options (optional)
�Configure Warehouse Security on page 2-105
Oracle Applications
Global Warehouse Administrator
Warehouse ■ Configure Warehouse Security
Table 2–1 Overview of Implementing EDW Checklist
StepsApplicationused
Responsibilityused
Perform on instance Tasks
Implementing EDW 2-5
Verify Prerequisites
Verify PrerequisitesBefore you begin to install EDW, you must verify that all hardware and software prerequisites have been met.
This section contains the following topics.
■ Hardware Prerequisites
■ Software Prerequisites
■ Tablespace Prerequisites
Hardware PrerequisitesTo successfully complete the installation, you must have the following hardware available.
Source SystemsFor information on hardware requirements for your 11i source systems, see the installation documentation for the respective system.
WarehouseFor the hardware requirements for the database, see Oracle 8i(9i) Installation Guide.
For the hardware requirements and supported platforms for Oracle Discoverer, see Oracle Discoverer 4i Installation Guide.
For the hardware requirements for Oracle Applications 11i see Installing Oracle Applications 11i.
Administrative ClientFor the hardware requirements for Oracle Warehouse Builder Client, see Oracle 9i Warehouse Builder Installation Guide Release 9.0.3. The OWB Client is installed into Oracle 8i home on a Windows NT/2000 machine. The Windows NT/2000 server should have at least 1 GB of RAM and 2 GB of space for installing the OWB Client and converting the OWB metadata repository.
Software PrerequisitesTo successfully complete the install, you must have the following software available on the source system and warehouse servers.
2-6 Oracle E-Business Intelligence Embedded Data Warehouse Implementation Guide

Verify Prerequisites
Source SystemsYou must have one or more of the following standard source systems. For information on the standard install for each source system, see the appropriate installation documentation.
■ Oracle Applications Release 11i with patch set 3 or higher
You must also have the EDW Release 4.1 mini-pack, with the source patchset (11i.EWS.C) installed on each source system. For more information see About Oracle Embedded Data Warehouse for Release 4.1 on MetaLink.
WarehouseYou must have the following standard warehouse system. For information on the install for the warehouse system, see the appropriate installation documentation.
■ Oracle Applications Release 11i with patch set 3 or higher
You must also have the EDW Release 4.1 mini-pack, with the warehouse patchset (11i.EDW.C) installed on the warehouse system. For more information see About Oracle Embedded Data Warehouse for Release 4.1 on MetaLink.
For RDBMS 8i only, update your init.ora parameter file with the following initialization parameters:
star_transformation_enabled = truebitmap_merge_area_size = 1048576create_bitmap_area_size = 8388608
The bitmap_merge_area_size and create_bitmap_area_size parameters should be set to their default values. The ranges of these values are operating system dependent.
Administrative ClientThe following software must be installed on the Administrative Client.
■ Oracle 9i Warehouse Builder Client with Common Warehouse Metadata Transfer Wizard
■ Oracle Discoverer 4i Administration Edition Client (version 4.1.46.14 or higher)
■ Oracle Discoverer 4i User Edition Client (version 4.1.46)
Implementing EDW 2-7
Verify Prerequisites
Tablespace PrerequisitesThe tablespace requirements for EDW databases are listed below. Database tablespaces must be created in the source systems and in the warehouse system. The OWB repository tablespace must be created on the warehouse system only.
OWB Repository TablespaceBefore you install EDW Oracle Warehouse Builder metadata and then generate the EDW EUL, you must create a tablespace for your EDW metadata in the warehouse. This document refers to the USER_DATA tablespace as the default tablespace for the EDW Oracle Warehouse Builder repository schema and EDW End User Layer.
The tablespace size should be at least 300 MB.
Rollback TablespaceBefore you install EDW Oracle Warehouse Builder metadata and then generate the EDW EUL, make sure you allocate enough extents to the rollback segments and you have at least 400Mb of free space in rollback segments tablespace.
Note: It is highly recommended to use separate Windows NT/2000 machines to install Oracle 9i Warehouse Builder Client software and Oracle Discoverer 4i Clients. In all cases Windows NT/2000 boxes with either OWB or Discoverer software installed will be referred as Administrative Client throughout this document.
2-8 Oracle E-Business Intelligence Embedded Data Warehouse Implementation Guide

Set Up Warehouse
Set Up WarehouseThis section describes how to set up source systems and parameters on the warehouse. It also describes how to set up profile options on source systems and the warehouse.
This section contains the following topics:
■ Set Up Source Systems on Warehouse on page 2-10
■ Set Up Warehouse Parameters on page 2-11
■ Set Up Profile Options on page 2-15
Implementing EDW 2-9
Set Up Warehouse
Set Up Source Systems on WarehouseTo implement EDW, you must set up the source systems that you want to use on the warehouse.
To set up source instances for the warehouse:1. Navigate to Setup > Source Instances. The Source Instances Setup window,
appears.
2. In the Instance Code field, enter a unique short name for the source instance. Use the source’s Oracle SID as the instance code (for example, ORCLHQ). Instance codes can be up to 10 alphanumeric characters and must be upper case.
3. In the Name field, enter a unique, descriptive name for the source instance (for example, Oracle Headquarters).
4. In the Description field, enter a description of the source instance (for example, Vision 11i Source System). This field is optional.
5. In the Warehouse to Instance Database Link field, choose a unique database link to link the warehouse to the source system.
Database links are created during the EDW install process. See the Oracle Embedded Data Warehouse Repository and End User Layer Install and Upgrade Guide for more information.
6. Check the Enabled check box if you want to use the database link to populate configuration information from the warehouse to the source instance.
7. Save your work.
Note: Keep the Oracle SID as short as possible. The SID is concatenated to the source instance reference and takes up memory; therefore, the shorter the SID the shorter your source reference and the more efficient your system will be.
2-10 Oracle E-Business Intelligence Embedded Data Warehouse Implementation Guide
Set Up Warehouse
Set Up Warehouse ParametersOnce you set up your source systems, you must set up your warehouse parameters. Warehouse parameters ensure that the data that you collect from your source systems is consistently loaded into the warehouse.
There are three different types of parameters that you can set up on the warehouse:
■ Common parameters (mandatory): Set up common parameters (such as global currency and currency rate types) to ensure that your source data is consistently loaded onto the warehouse.
■ Project parameters (optional): If you are using the project dimension and use project classifications, you can set up project parameters to map pre-defined project classifications to the projects dimension as a hierarchy.
For example, if you have a Industry Sector project classification, you can set up the Industry Sector project classification as a hierarchy on the warehouse. Then, you can create a report or workbook that classifies your data by Industry Sector.
Project classifications are defined in Oracle Projects. For more information on project classifications, see the Oracle Projects User Guide.
■ Item parameters (mandatory): There are 4 category hierarchies in the item dimension. Three of these hiearchies roll up from the item level, and the other hierarchy rolls up from the item/organization level. You can populate each hierarchy with categories of category sets, which are defined in Oracle Applications on the source systems.
Item categories are defined in Oracle Inventory. For more information on item categories, see the Oracle Inventory User Guide.
After you set up your warehouse parameters, you must implement the parameters to your source systems. You can also freeze the parameters to prevent them from being changed.
To set up warehouse parameters:1. Navigate to Setup > Warehouse Parameters. The Warehouse Parameters
window appears.
2. Choose the Common tabbed region and set up your common warehouse parameters by doing the following:
a. In the Master Instance field, choose the source instance that you want to serve as the master instance.
Implementing EDW 2-11
Set Up Warehouse
The master instance is a source instance that you want to use as the source for parameter values such as rate, type, and currency.
b. In the Rate Type field, choose the currency rate type that you want to use to convert your collected data from the transactional currency to the warehouse currency.
If you want to set up new rate types, use Oracle General Ledger on the mas-ter instance. See the Oracle General Ledger User Guide.
c. In the Warehouse Currency field, choose the currency that you want to use as the common currency for the warehouse. When you load data onto the warehouse, the data will be converted into this currency using the rate type you selected.
If you want to set up new currencies, use Oracle General Ledger on the master instance. See the Oracle General Ledger User Guide.
d. In the Enterprise Calendar field, choose the calendar that you want to use as the default calendar for performing cross-functional analysis.
e. In the Period Type field, enter the period type that you want to use.
The combination of calendar and period type, uniquely identify the Enter-prise Calendar for the warehouse.
3. If you are using the project dimension and use project classifications, set up your project parameters by doing the following:
a. In the Project Classification 1 field of the Project Classification tabbed region, choose a project classification that you want to use as a hierarchy.
Project classifications are defined in Oracle Projects. For more information on project classifications, see the Oracle Projects User Guide.
b. Repeat step a for each project classification that you want to map. You can map up to seven project classifications.
2-12 Oracle E-Business Intelligence Embedded Data Warehouse Implementation Guide
Set Up Warehouse
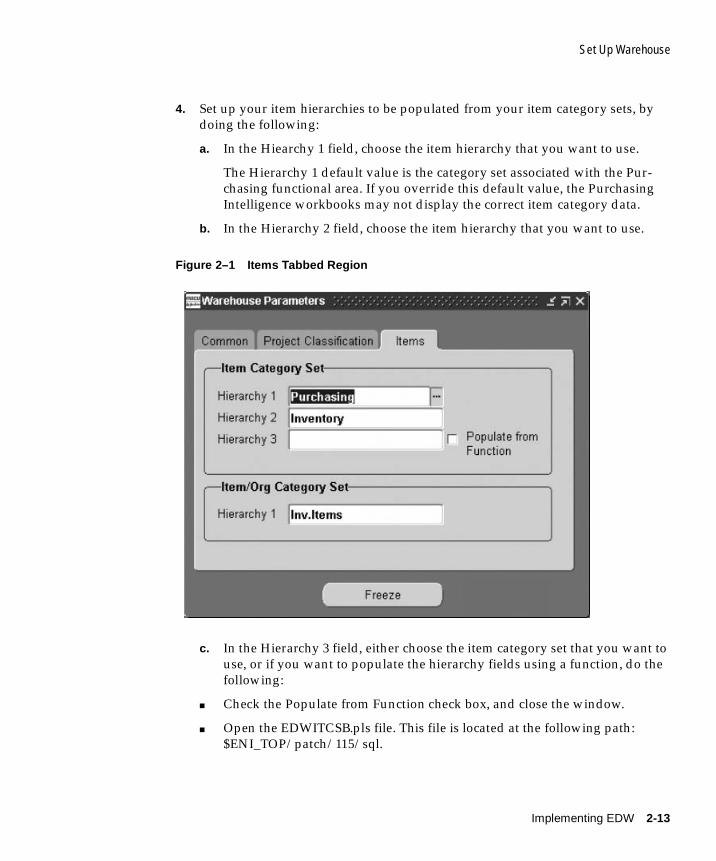
4. Set up your item hierarchies to be populated from your item category sets, by doing the following:
a. In the Hiearchy 1 field, choose the item hierarchy that you want to use.
The Hierarchy 1 default value is the category set associated with the Pur-chasing functional area. If you override this default value, the Purchasing Intelligence workbooks may not display the correct item category data.
b. In the Hierarchy 2 field, choose the item hierarchy that you want to use.
Figure 2–1 Items Tabbed Region
c. In the Hierarchy 3 field, either choose the item category set that you want to use, or if you want to populate the hierarchy fields using a function, do the following:
■ Check the Populate from Function check box, and close the window.
■ Open the EDWITCSB.pls file. This file is located at the following path: $ENI_TOP/patch/115/sql.
Implementing EDW 2-13
Set Up Warehouse
■ Edit the EDW_ITEMCUSTOM_M_C.Get_Product_Category_Set_FK PL/SQL function using a text editor so that it returns the item level foreign key to the parent level in the Product Hierarchy. The default function text is shown below:
EDW_ITEMCUSTOM_M_C.Get_Product_Category_Set_FK (p_inventory_item_id IN Number, p_organization_id IN Number, p_instance_code IN Varchar2)RETURNS VARCHAR2
p_inventory_item_id is the internal item identifier in the source. system
p_organization_id is the internal item's organization identifier.
p_instance_code is the short code for the source instance.
Returns NA_EDW (as a VARCHAR2).
■ Save your changes.
■ Compile the package on the source databases.
d. In the Hierarchy 1 field of the Item/Org Category Set region, choose a hierarchy that you want to associate with the item/organzation category set.
The default value is the category set associated with the Inventory Item functional area. If you override the default value, the Manufacturing Intelli-gence workbooks may not display the correct item category data.
5. Freeze the warehouse parameters by choosing the Freeze button. The Freeze button toggles to Unfreeze and the parameters are frozen. You cannot change parameters once they are frozen, unless you choose the Unfreeze button.
6. Save your work.
Note: You must provide a separate collection program to collect the product hierarchy level records. This collection program must be run after the item dimension collection program to ensure that no records are left dangling when the item dimension is loaded. In the Hierarchy 1 field of the Item/Org Category Set region, choose the item that you want to use.
2-14 Oracle E-Business Intelligence Embedded Data Warehouse Implementation Guide
Set Up Warehouse
Set Up Profile OptionsOnce you set up your warehouse parameters, set up the profile options on the warehouse and on the source systems.
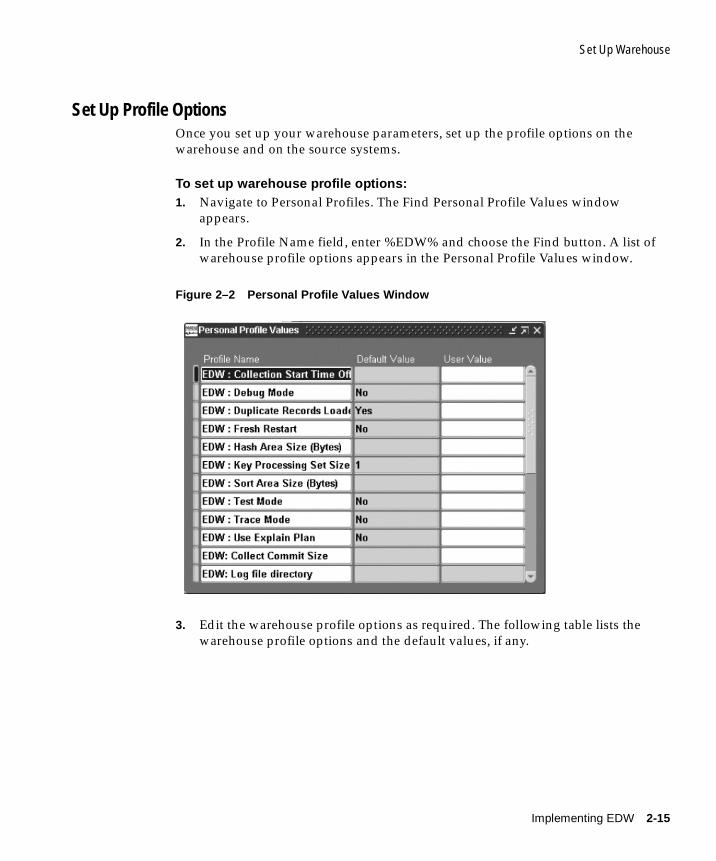
To set up warehouse profile options:1. Navigate to Personal Profiles. The Find Personal Profile Values window
appears.
2. In the Profile Name field, enter %EDW% and choose the Find button. A list of warehouse profile options appears in the Personal Profile Values window.
Figure 2–2 Personal Profile Values Window
3. Edit the warehouse profile options as required. The following table lists the warehouse profile options and the default values, if any.
Implementing EDW 2-15
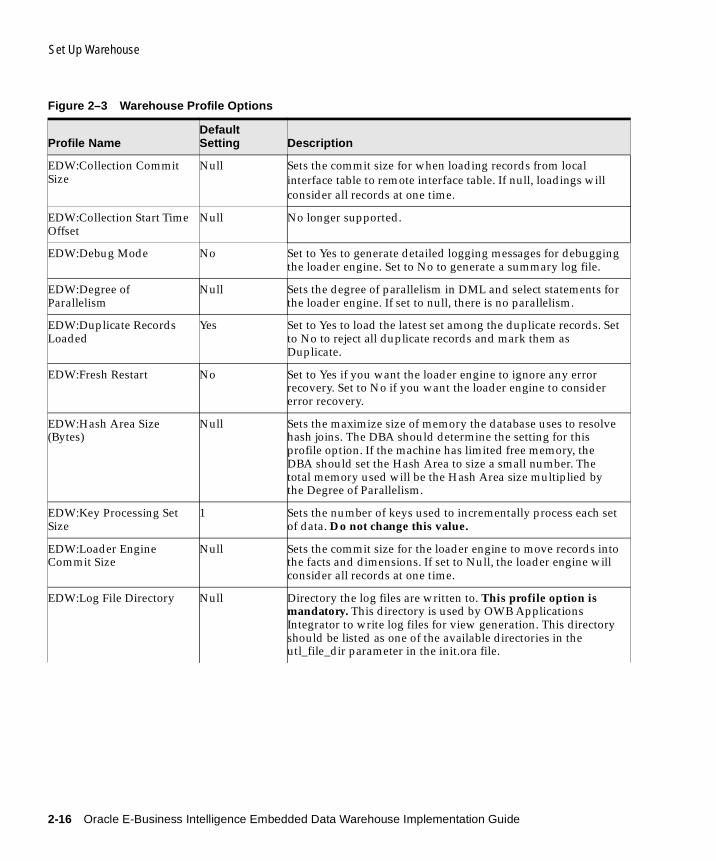
Set Up Warehouse
Figure 2–3 Warehouse Profile Options
Profile NameDefault Setting Description
EDW:Collection Commit Size
Null Sets the commit size for when loading records from local interface table to remote interface table. If null, loadings will consider all records at one time.
EDW:Collection Start Time Offset
Null No longer supported.
EDW:Debug Mode No Set to Yes to generate detailed logging messages for debugging the loader engine. Set to No to generate a summary log file.
EDW:Degree of Parallelism
Null Sets the degree of parallelism in DML and select statements for the loader engine. If set to null, there is no parallelism.
EDW:Duplicate Records Loaded
Yes Set to Yes to load the latest set among the duplicate records. Set to No to reject all duplicate records and mark them as Duplicate.
EDW:Fresh Restart No Set to Yes if you want the loader engine to ignore any error recovery. Set to No if you want the loader engine to consider error recovery.
EDW:Hash Area Size (Bytes)
Null Sets the maximize size of memory the database uses to resolve hash joins. The DBA should determine the setting for this profile option. If the machine has limited free memory, the DBA should set the Hash Area to size a small number. The total memory used will be the Hash Area size multiplied by the Degree of Parallelism.
EDW:Key Processing Set Size
1 Sets the number of keys used to incrementally process each set of data. Do not change this value.
EDW:Loader Engine Commit Size
Null Sets the commit size for the loader engine to move records into the facts and dimensions. If set to Null, the loader engine will consider all records at one time.
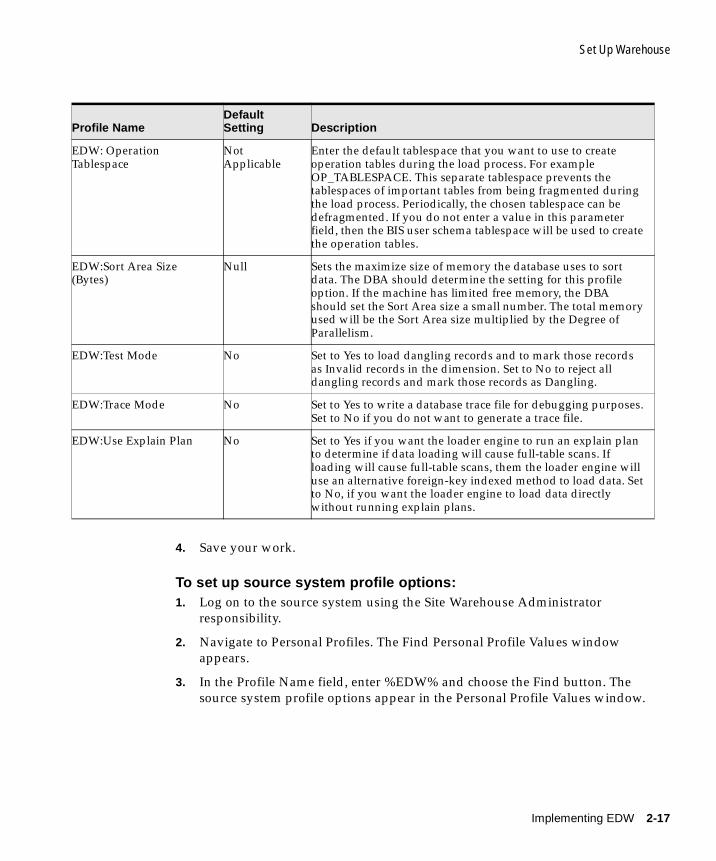
EDW:Log File Directory Null Directory the log files are written to. This profile option is mandatory. This directory is used by OWB Applications Integrator to write log files for view generation. This directory should be listed as one of the available directories in the utl_file_dir parameter in the init.ora file.
2-16 Oracle E-Business Intelligence Embedded Data Warehouse Implementation Guide
Set Up Warehouse
4. Save your work.
To set up source system profile options:1. Log on to the source system using the Site Warehouse Administrator
responsibility.
2. Navigate to Personal Profiles. The Find Personal Profile Values window appears.
3. In the Profile Name field, enter %EDW% and choose the Find button. The source system profile options appear in the Personal Profile Values window.
EDW: Operation Tablespace
Not Applicable
Enter the default tablespace that you want to use to create operation tables during the load process. For example OP_TABLESPACE. This separate tablespace prevents the tablespaces of important tables from being fragmented during the load process. Periodically, the chosen tablespace can be defragmented. If you do not enter a value in this parameter field, then the BIS user schema tablespace will be used to create the operation tables.
EDW:Sort Area Size (Bytes)
Null Sets the maximize size of memory the database uses to sort data. The DBA should determine the setting for this profile option. If the machine has limited free memory, the DBA should set the Sort Area size a small number. The total memory used will be the Sort Area size multiplied by the Degree of Parallelism.
EDW:Test Mode No Set to Yes to load dangling records and to mark those records as Invalid records in the dimension. Set to No to reject all dangling records and mark those records as Dangling.
EDW:Trace Mode No Set to Yes to write a database trace file for debugging purposes. Set to No if you do not want to generate a trace file.
EDW:Use Explain Plan No Set to Yes if you want the loader engine to run an explain plan to determine if data loading will cause full-table scans. If loading will cause full-table scans, them the loader engine will use an alternative foreign-key indexed method to load data. Set to No, if you want the loader engine to load data directly without running explain plans.
Profile NameDefault Setting Description
Implementing EDW 2-17
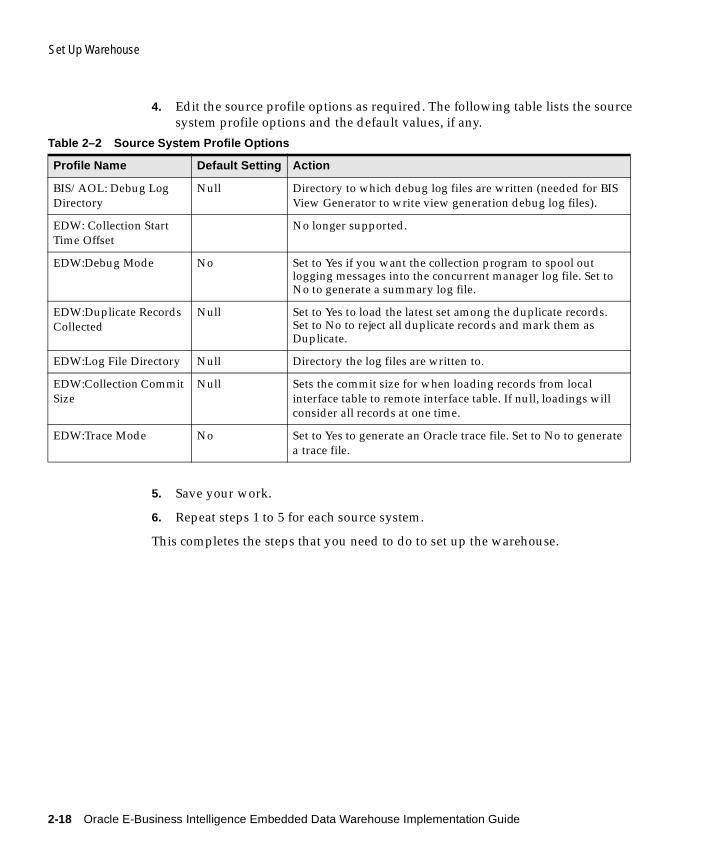
Set Up Warehouse
4. Edit the source profile options as required. The following table lists the source system profile options and the default values, if any.
5. Save your work.
6. Repeat steps 1 to 5 for each source system.
This completes the steps that you need to do to set up the warehouse.
Table 2–2 Source System Profile Options
Profile Name Default Setting Action
BIS/AOL: Debug Log Directory
Null Directory to which debug log files are written (needed for BIS View Generator to write view generation debug log files).
EDW: Collection Start Time Offset
No longer supported.
EDW:Debug Mode No Set to Yes if you want the collection program to spool out logging messages into the concurrent manager log file. Set to No to generate a summary log file.
EDW:Duplicate Records Collected
Null Set to Yes to load the latest set among the duplicate records. Set to No to reject all duplicate records and mark them as Duplicate.
EDW:Log File Directory Null Directory the log files are written to.
EDW:Collection Commit Size
Null Sets the commit size for when loading records from local interface table to remote interface table. If null, loadings will consider all records at one time.
EDW:Trace Mode No Set to Yes to generate an Oracle trace file. Set to No to generate a trace file.
2-18 Oracle E-Business Intelligence Embedded Data Warehouse Implementation Guide
Generate Business Views
Generate Business ViewsThis section describes how to generate business views.
You must run the EDW Generate Business Views concurrent program on each source system.
To run the EDW Generate Business Views concurrent program, do the following:1. Log on to the source system using the Site Warehouse Administrator
responsibility.
2. Navigate to Reports.
3. Run the EDW Generate Business Views concurrent program as a single request. For information on how to run a concurrent program, see the Oracle Applications User Guide.
4. Repeat steps 1 to 3 for each source system that you want to configure using the BIS Configuration Assistant.
Additional Information: You only have to perform this step if you are planning to configure flexfield data using the OWB Applications Integrator BIS Configuration Assistant. For more information, see: Configure Warehouse Data on page 2-20.
Implementing EDW 2-19
Configure Warehouse Data
Configure Warehouse Data This section describes how to configure your warehouse data by mapping the flexfield segments that reside on your source system to the dimensions and fact tables that reside on the warehouse. By mapping these flexfield segments, you can configure the way your business data appears on the warehouse and perform complex data analysis on warehouse fact tables.
You configure your warehouse data using the BIS Configuration Assistant wizard. This wizard that takes you step-by-step through the process of mapping flexfield segments to the warehouse. To run the wizard, you must use Oracle Warehouse Builder (OWB) Applications Integrator. OWB Applications Integrator is a tool that enables you to modify dimensions, measures, attributes, and metadata on the warehouse.
You can use the wizard to map flexfield segments to up to 10 user-defined accounting dimensions and 50 other user-defined dimensions.
■ User-defined accounting dimensions are reserved to map GL Accounting Flexfield segments. User-defined accounting dimensions can have up to 5 hierarchies (4 configurable and 1 type). Each configurable hierarchy can have up to 15 levels associated with it. Each type hiearchy has 3 levels associated with it.
■ Other user-defined dimensions are reserved to map non-Accounting flexfield segments such as non-accounting key flexfields and descriptive flexfields. Each other user-defined dimension can have one hierarchy and two levels.
You can also use the wizard to modify the attributes of predefined dimensions.
■ Predefined dimensions are the dimensions that were provided with EDW. You can use the wizard to map flexfield segments or source view columns to the user-defined attributes of the predefined dimensions.
Map flexfield segments or source view columns to the measures (for fact tables only) and attributes (for both the dimension level tables and fact tables).
Once you map your dimensions to a fact table, you can only add new segements, you cannot remove already mapped segments. To modify already mapped segements, you must un-map the dimension from the fact table, then modify the mapped segements.
2-20 Oracle E-Business Intelligence Embedded Data Warehouse Implementation Guide
Configure Warehouse Data
Rules for Mapping Flexfields to User Defined Accounting DimensionsWhen you are mapping flexfields to user-defined accounting dimensions, there are two rules you must follow. Also, you are responsible for mapping flexfields to dimensions in a meaningful way. EDW does not check for logical errors in flexfield segment mapping.
The rules for mapping flexfields to user-defiend accounting dimensions are as follows.
1. You can map flexfield segments from multiple chart of accounts structures.
2. You can only map one flexfield segment per chart of accounts structure.
Rules for Mapping Flexfields to Other User-Defined DimensionsWhen you are mapping flexfields to other user-defined dimensions, use the following rules:
1. For descriptive flexfields, if you choose a segment from Global Data Elements, you cannot choose segments from other structures. For information on Global Data Elements, see the Oracle Applications Flexfield User Guide.
2. You can only map flexfields with the following value set types: None, Independent, Dependent, Table Validated. For Table Validated value set type, only those single tables without a “where” clause, and without BIND variables, are supported.
3. If you choose a Dependent flexfield segment, the associated Indepedent flexfield segment will be automatically chosen as well.
4. You can only map one segment from each flexfield structure to a dimension. For information on flexfield segments, see the Oracle Applications Flexfield User Guide.
5. In most cases, only the lowest level is populated with data. However, both levels are populated if you choose a Dependant/Independant pair of flexfield segments. In that case, the highest level is the Independant segment values, and the lowest level is populated with the Dependant segment values.
6. You can only map one flexfield segment to a user defined dimension.
Rule for Mapping Flexfields to Attributes in Predefined DimensionsWhen you are mapping flexfields to attributes of predefined dimensions, use the following rule.
■ You can only map one source view column or flexfield segment per attribute.
Implementing EDW 2-21
Configure Warehouse Data
Use these rule to determine how you are going to map your attributes to dimensions.
For a listing of the seeded flexfields, see Appendix D, "Seeded Flexfields".
This section contains the following topics.
■ Prerequisites on page 2-23
■ Launch BIS Configuration Assistant on page 2-24
■ Define Sources on page 2-50
■ Map Sources to Dimensions on page 2-50
■ Map Flexfields to User-Defined Accounting Dimensions on page 2-34
■ Map Flexfields to Other User-Defined Dimensions on page 2-41
■ Map Flexfield Segments or Source View Columns to Predefined Dimensions on page 2-43
■ Map Sources to Fact Tables on page 2-50
■ Deploy Configuration on page 2-50
■ Hide Columns on page 2-52
2-22 Oracle E-Business Intelligence Embedded Data Warehouse Implementation Guide
Configure Warehouse Data
PrerequisitesBefore you launch the BIS Configuration Assistant, ensure that the following prerequisites have been met:
■ Database links from warehouse to source systems are defined. See: Oracle Embedded Data Warehouse Repository and End User Layer Install and Upgrade Guide.
■ OWB client and repository are installed. See: Oracle Embedded Data Warehouse Repository and End User Layer Install and Upgrade Guide.
■ Metadata has been imported into the OWB repository. See: Oracle Embedded Data Warehouse Repository and End User Layer Install and Upgrade Guide.
■ EDW:Log File Directory profile option has been set. See: Set Up Profile Options on page 2-15.
■ Business views have been generated on each source system that you want to configure flexfield data on. See: Generate Business Views on page 2-19.
Implementing EDW 2-23
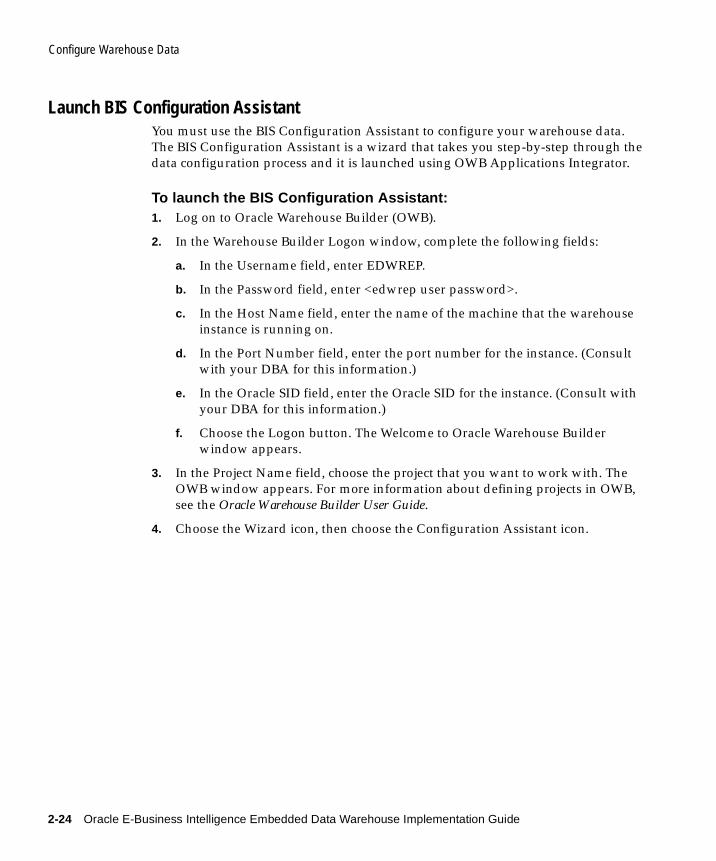
Configure Warehouse Data
Launch BIS Configuration AssistantYou must use the BIS Configuration Assistant to configure your warehouse data. The BIS Configuration Assistant is a wizard that takes you step-by-step through the data configuration process and it is launched using OWB Applications Integrator.
To launch the BIS Configuration Assistant:1. Log on to Oracle Warehouse Builder (OWB).
2. In the Warehouse Builder Logon window, complete the following fields:
a. In the Username field, enter EDWREP.
b. In the Password field, enter <edwrep user password>.
c. In the Host Name field, enter the name of the machine that the warehouse instance is running on.
d. In the Port Number field, enter the port number for the instance. (Consult with your DBA for this information.)
e. In the Oracle SID field, enter the Oracle SID for the instance. (Consult with your DBA for this information.)
f. Choose the Logon button. The Welcome to Oracle Warehouse Builder window appears.
3. In the Project Name field, choose the project that you want to work with. The OWB window appears. For more information about defining projects in OWB, see the Oracle Warehouse Builder User Guide.
4. Choose the Wizard icon, then choose the Configuration Assistant icon.
2-24 Oracle E-Business Intelligence Embedded Data Warehouse Implementation Guide
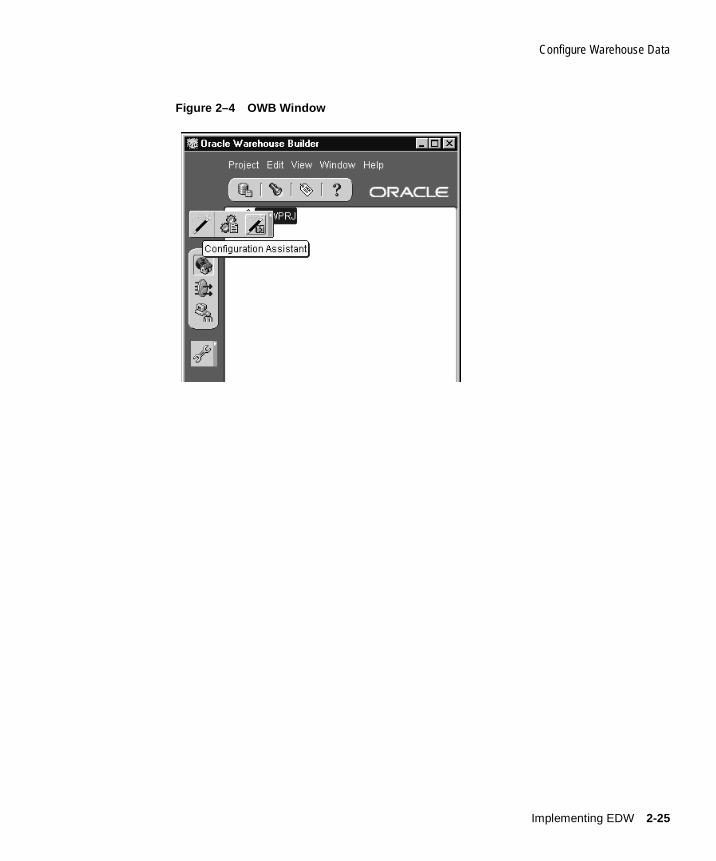
Configure Warehouse Data
Figure 2–4 OWB Window
Implementing EDW 2-25
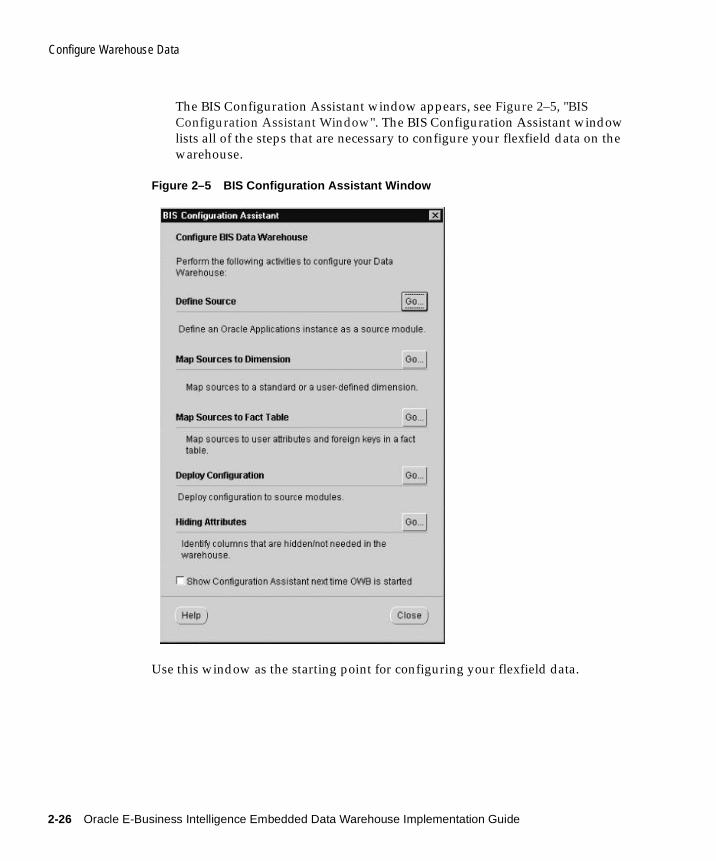
Configure Warehouse Data
The BIS Configuration Assistant window appears, see Figure 2–5, "BIS Configuration Assistant Window". The BIS Configuration Assistant window lists all of the steps that are necessary to configure your flexfield data on the warehouse.
Figure 2–5 BIS Configuration Assistant Window
Use this window as the starting point for configuring your flexfield data.
2-26 Oracle E-Business Intelligence Embedded Data Warehouse Implementation Guide
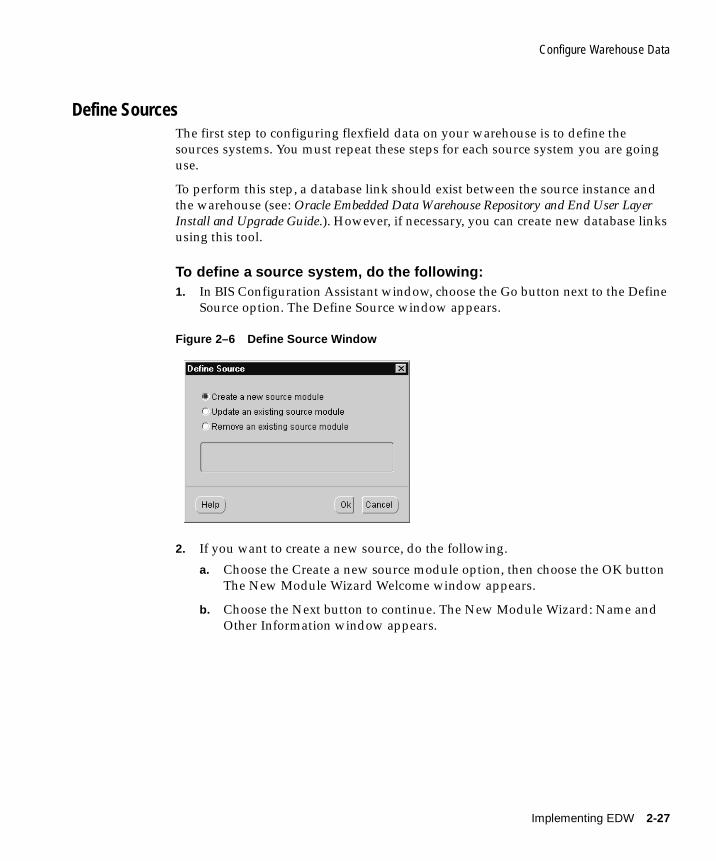
Configure Warehouse Data
Define SourcesThe first step to configuring flexfield data on your warehouse is to define the sources systems. You must repeat these steps for each source system you are going use.
To perform this step, a database link should exist between the source instance and the warehouse (see: Oracle Embedded Data Warehouse Repository and End User Layer Install and Upgrade Guide.). However, if necessary, you can create new database links using this tool.
To define a source system, do the following:1. In BIS Configuration Assistant window, choose the Go button next to the Define
Source option. The Define Source window appears.
Figure 2–6 Define Source Window
2. If you want to create a new source, do the following.
a. Choose the Create a new source module option, then choose the OK button The New Module Wizard Welcome window appears.
b. Choose the Next button to continue. The New Module Wizard: Name and Other Information window appears.
Implementing EDW 2-27
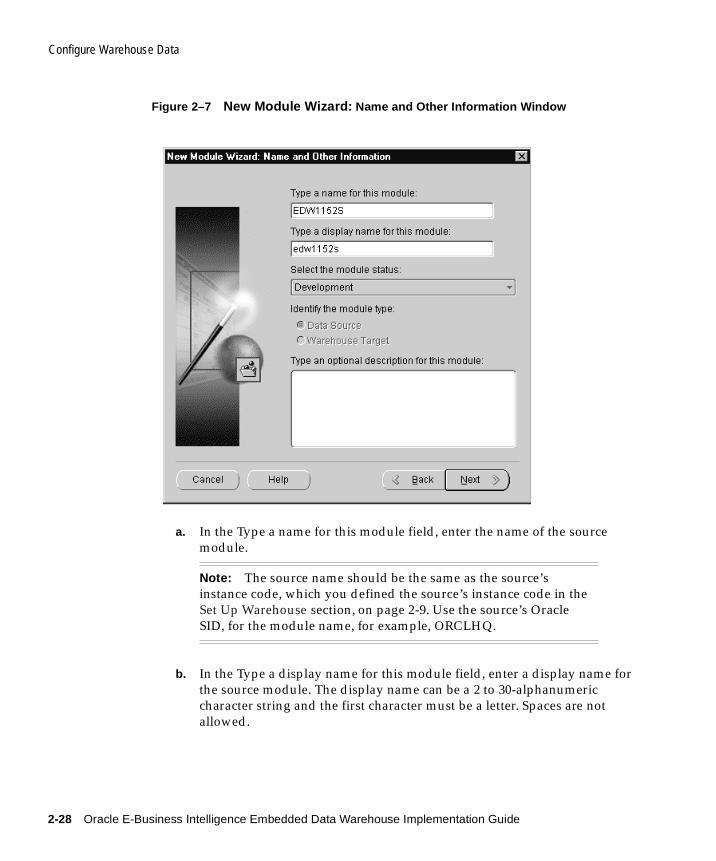
Configure Warehouse Data
Figure 2–7 New Module Wizard: Name and Other Information Window
a. In the Type a name for this module field, enter the name of the source module.
b. In the Type a display name for this module field, enter a display name for the source module. The display name can be a 2 to 30-alphanumeric character string and the first character must be a letter. Spaces are not allowed.
Note: The source name should be the same as the source’s instance code, which you defined the source’s instance code in the Set Up Warehouse section, on page 2-9. Use the source’s Oracle SID, for the module name, for example, ORCLHQ.
2-28 Oracle E-Business Intelligence Embedded Data Warehouse Implementation Guide
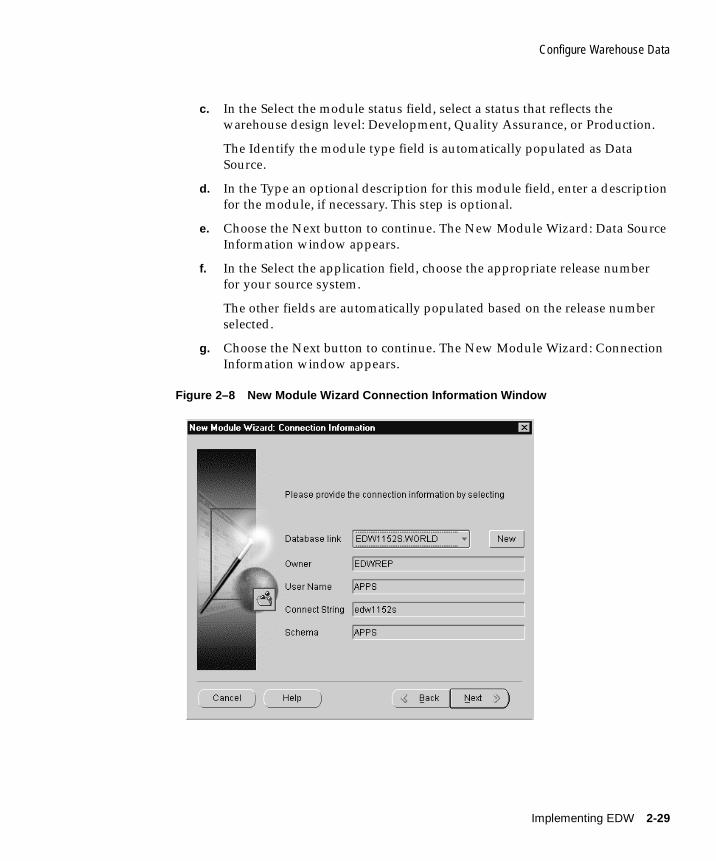
Configure Warehouse Data
c. In the Select the module status field, select a status that reflects the warehouse design level: Development, Quality Assurance, or Production.
The Identify the module type field is automatically populated as Data Source.
d. In the Type an optional description for this module field, enter a description for the module, if necessary. This step is optional.
e. Choose the Next button to continue. The New Module Wizard: Data Source Information window appears.
f. In the Select the application field, choose the appropriate release number for your source system.
The other fields are automatically populated based on the release number selected.
g. Choose the Next button to continue. The New Module Wizard: Connection Information window appears.
Figure 2–8 New Module Wizard Connection Information Window
Implementing EDW 2-29
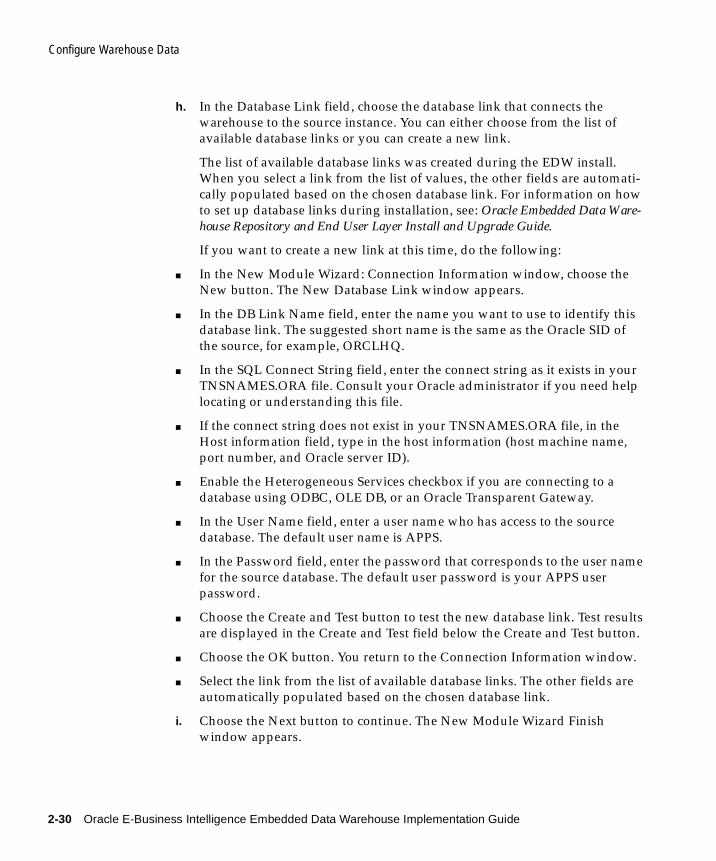
Configure Warehouse Data
h. In the Database Link field, choose the database link that connects the warehouse to the source instance. You can either choose from the list of available database links or you can create a new link.
The list of available database links was created during the EDW install. When you select a link from the list of values, the other fields are automati-cally populated based on the chosen database link. For information on how to set up database links during installation, see: Oracle Embedded Data Ware-house Repository and End User Layer Install and Upgrade Guide.
If you want to create a new link at this time, do the following:
■ In the New Module Wizard: Connection Information window, choose the New button. The New Database Link window appears.
■ In the DB Link Name field, enter the name you want to use to identify this database link. The suggested short name is the same as the Oracle SID of the source, for example, ORCLHQ.
■ In the SQL Connect String field, enter the connect string as it exists in your TNSNAMES.ORA file. Consult your Oracle administrator if you need help locating or understanding this file.
■ If the connect string does not exist in your TNSNAMES.ORA file, in the Host information field, type in the host information (host machine name, port number, and Oracle server ID).
■ Enable the Heterogeneous Services checkbox if you are connecting to a database using ODBC, OLE DB, or an Oracle Transparent Gateway.
■ In the User Name field, enter a user name who has access to the source database. The default user name is APPS.
■ In the Password field, enter the password that corresponds to the user name for the source database. The default user password is your APPS user password.
■ Choose the Create and Test button to test the new database link. Test results are displayed in the Create and Test field below the Create and Test button.
■ Choose the OK button. You return to the Connection Information window.
■ Select the link from the list of available database links. The other fields are automatically populated based on the chosen database link.
i. Choose the Next button to continue. The New Module Wizard Finish window appears.
2-30 Oracle E-Business Intelligence Embedded Data Warehouse Implementation Guide
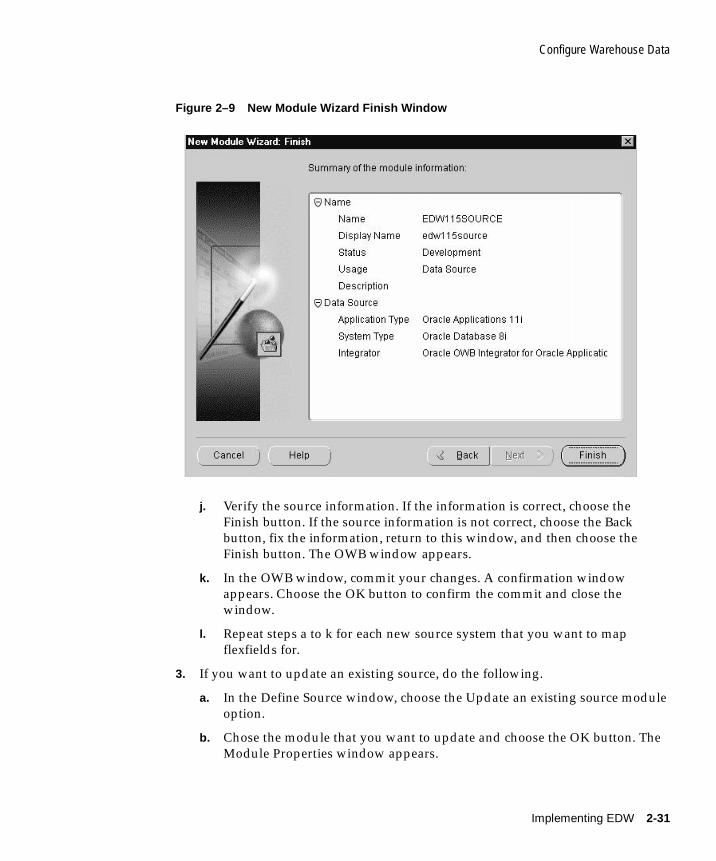
Configure Warehouse Data
Figure 2–9 New Module Wizard Finish Window
j. Verify the source information. If the information is correct, choose the Finish button. If the source information is not correct, choose the Back button, fix the information, return to this window, and then choose the Finish button. The OWB window appears.
k. In the OWB window, commit your changes. A confirmation window appears. Choose the OK button to confirm the commit and close the window.
l. Repeat steps a to k for each new source system that you want to map flexfields for.
3. If you want to update an existing source, do the following.
a. In the Define Source window, choose the Update an existing source module option.
b. Chose the module that you want to update and choose the OK button. The Module Properties window appears.
Implementing EDW 2-31

Configure Warehouse Data
c. In the Name tabbed region, update the following source instance information as required: Name, Display Name, Status.
d. In the Data Source tabbed region, update the Application Type as required.
e. In the Connection tabbed region, update the Database link as required.
f. Choose the OK button to continue.
g. The OWB window appears.
h. In the OWB window, commit your changes. A confirmation window appears. Choose the OK button to confirm the commit and close the window.
i. Repeat steps a to h for each source system that you want to update.
4. If you want to delete an existing source, do the following.
a. In the Define Source window, choose the Remove an existing source module option.
b. Chose the module that you want to remove. A warning message appears if the source has been used to map attributes or dimensions.
c. Choose the OK button to confirm that you want to remove the source. The source is removed.
d. Repeat steps a to c for each source system that you want to delete.
This completes the steps that you need to perform to define your source systems.
2-32 Oracle E-Business Intelligence Embedded Data Warehouse Implementation Guide
Configure Warehouse Data
Map Sources to DimensionsOnce you set up the source systems that you want to map flexfields from, you must map those flexfields to dimensions on the warehouse. You can map flexfields to any of the following dimension types:
■ User-Defined Accounting Dimensions
■ Other User-Defined Dimensions
■ Predefined Dimensions (to the user-defined attributes only)
For a listing of the seeded flexfields that you can map to, see Appendix D, "Seeded Flexfields".
This section contains the following topics:
■ Map Flexfields to User-Defined Accounting Dimensions on page 2-34
■ Map Flexfields to Other User-Defined Dimensions on page 2-41
■ Map Flexfield Segments or Source View Columns to Predefined Dimensions on page 2-43
Implementing EDW 2-33
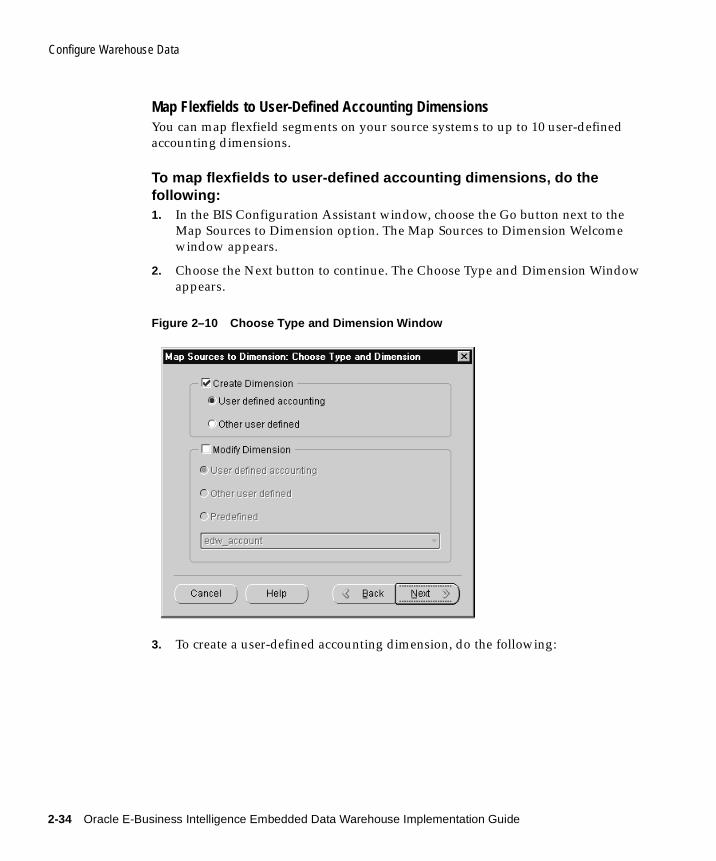
Configure Warehouse Data
Map Flexfields to User-Defined Accounting DimensionsYou can map flexfield segments on your source systems to up to 10 user-defined accounting dimensions.
To map flexfields to user-defined accounting dimensions, do the following:1. In the BIS Configuration Assistant window, choose the Go button next to the
Map Sources to Dimension option. The Map Sources to Dimension Welcome window appears.
2. Choose the Next button to continue. The Choose Type and Dimension Window appears.
Figure 2–10 Choose Type and Dimension Window
3. To create a user-defined accounting dimension, do the following:
2-34 Oracle E-Business Intelligence Embedded Data Warehouse Implementation Guide
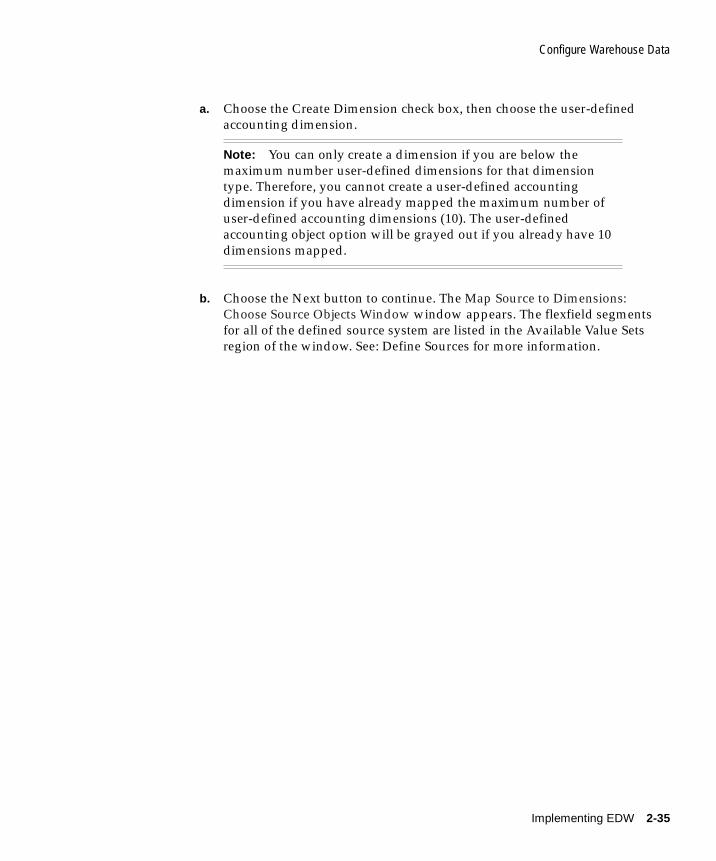
Configure Warehouse Data
a. Choose the Create Dimension check box, then choose the user-defined accounting dimension.
b. Choose the Next button to continue. The Map Source to Dimensions: Choose Source Objects Window window appears. The flexfield segments for all of the defined source system are listed in the Available Value Sets region of the window. See: Define Sources for more information.
Note: You can only create a dimension if you are below the maximum number user-defined dimensions for that dimension type. Therefore, you cannot create a user-defined accounting dimension if you have already mapped the maximum number of user-defined accounting dimensions (10). The user-defined accounting object option will be grayed out if you already have 10 dimensions mapped.
Implementing EDW 2-35
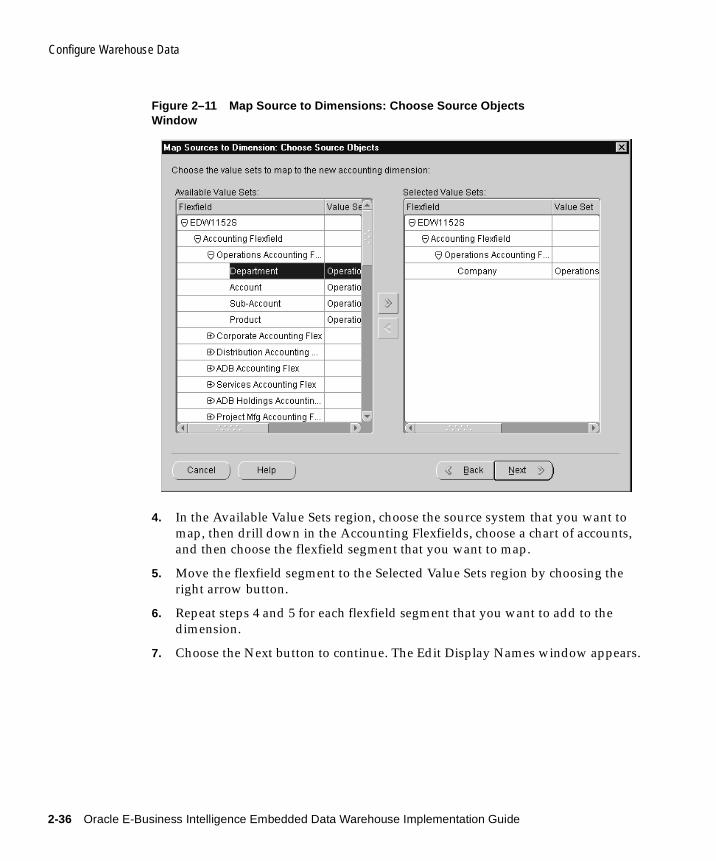
Configure Warehouse Data
Figure 2–11 Map Source to Dimensions: Choose Source Objects Window
4. In the Available Value Sets region, choose the source system that you want to map, then drill down in the Accounting Flexfields, choose a chart of accounts, and then choose the flexfield segment that you want to map.
5. Move the flexfield segment to the Selected Value Sets region by choosing the right arrow button.
6. Repeat steps 4 and 5 for each flexfield segment that you want to add to the dimension.
7. Choose the Next button to continue. The Edit Display Names window appears.
2-36 Oracle E-Business Intelligence Embedded Data Warehouse Implementation Guide
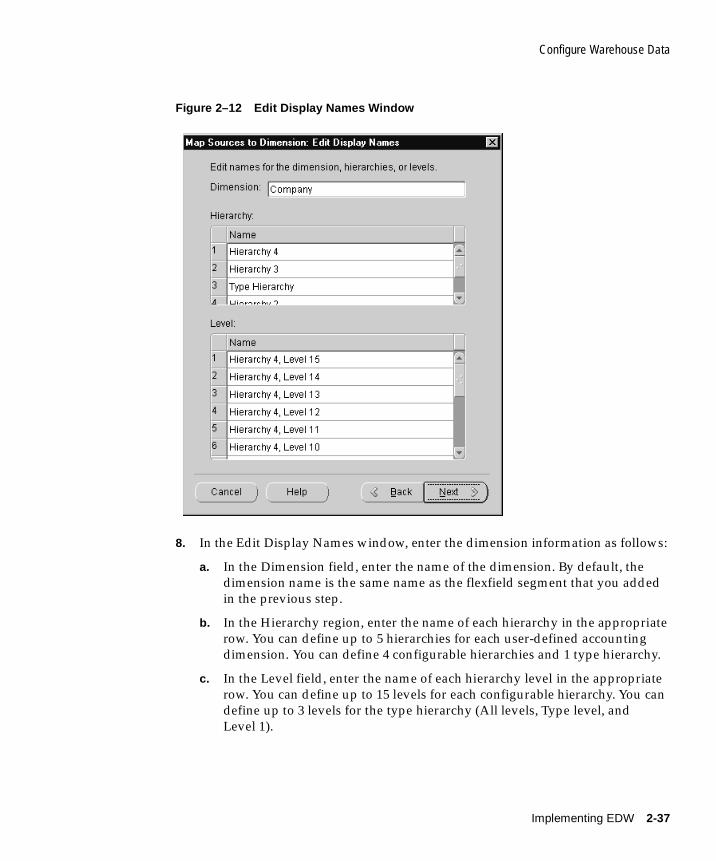
Configure Warehouse Data
Figure 2–12 Edit Display Names Window
8. In the Edit Display Names window, enter the dimension information as follows:
a. In the Dimension field, enter the name of the dimension. By default, the dimension name is the same name as the flexfield segment that you added in the previous step.
b. In the Hierarchy region, enter the name of each hierarchy in the appropriate row. You can define up to 5 hierarchies for each user-defined accounting dimension. You can define 4 configurable hierarchies and 1 type hierarchy.
c. In the Level field, enter the name of each hierarchy level in the appropriate row. You can define up to 15 levels for each configurable hierarchy. You can define up to 3 levels for the type hierarchy (All levels, Type level, and Level 1).
Implementing EDW 2-37
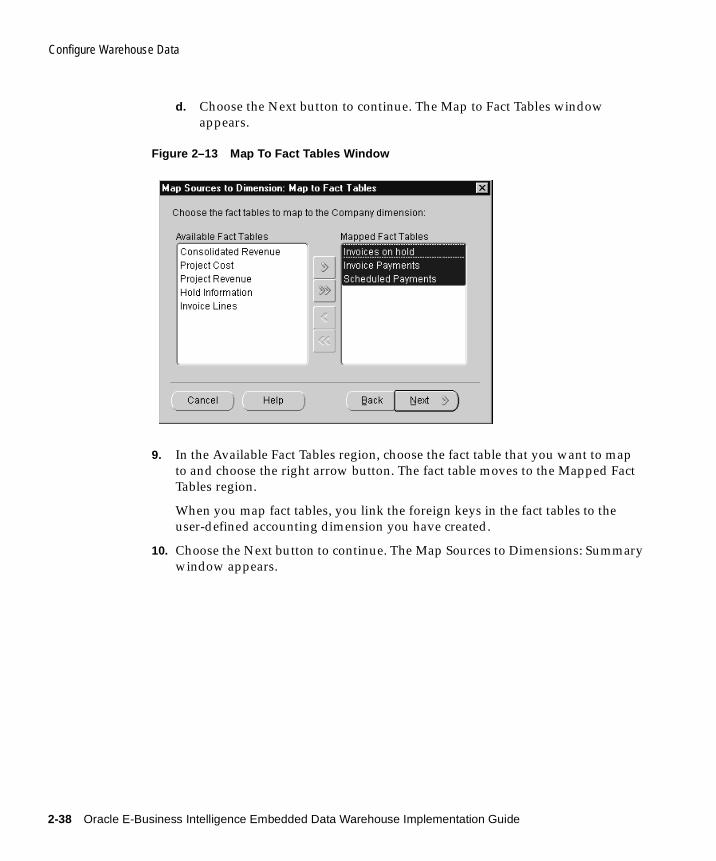
Configure Warehouse Data
d. Choose the Next button to continue. The Map to Fact Tables window appears.
Figure 2–13 Map To Fact Tables Window
9. In the Available Fact Tables region, choose the fact table that you want to map to and choose the right arrow button. The fact table moves to the Mapped Fact Tables region.
When you map fact tables, you link the foreign keys in the fact tables to the user-defined accounting dimension you have created.
10. Choose the Next button to continue. The Map Sources to Dimensions: Summary window appears.
2-38 Oracle E-Business Intelligence Embedded Data Warehouse Implementation Guide
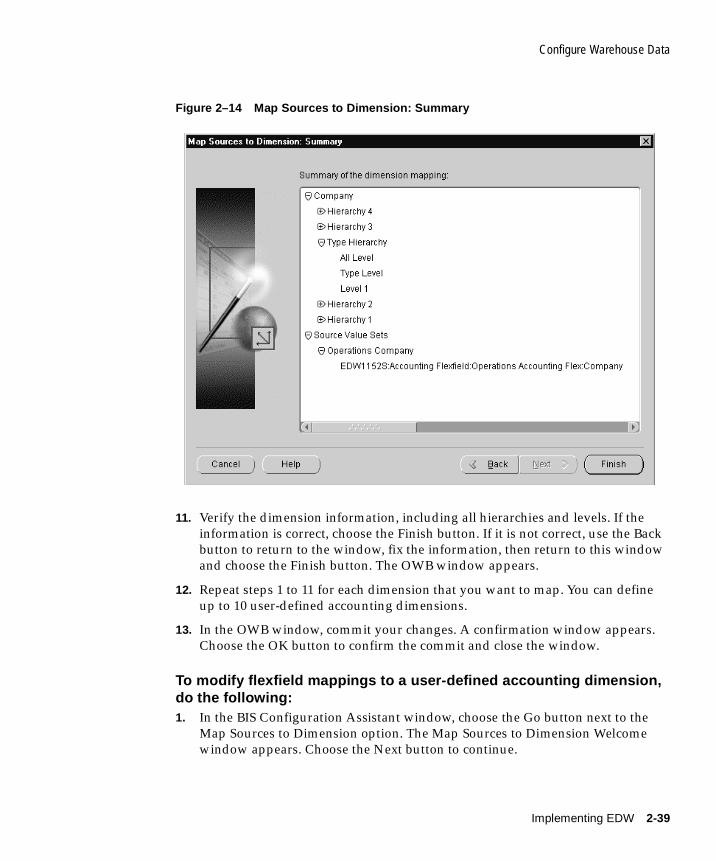
Configure Warehouse Data
Figure 2–14 Map Sources to Dimension: Summary
11. Verify the dimension information, including all hierarchies and levels. If the information is correct, choose the Finish button. If it is not correct, use the Back button to return to the window, fix the information, then return to this window and choose the Finish button. The OWB window appears.
12. Repeat steps 1 to 11 for each dimension that you want to map. You can define up to 10 user-defined accounting dimensions.
13. In the OWB window, commit your changes. A confirmation window appears. Choose the OK button to confirm the commit and close the window.
To modify flexfield mappings to a user-defined accounting dimension, do the following:1. In the BIS Configuration Assistant window, choose the Go button next to the
Map Sources to Dimension option. The Map Sources to Dimension Welcome window appears. Choose the Next button to continue.
Implementing EDW 2-39
Configure Warehouse Data
2. In the Choose Type and Dimension window, choose the Modify Dimension check box, then choose the user-defined accounting option.
3. In the list of values in the Modify Dimension region, choose the user defined accounting option that you want to update and choose the OK button.
4. Edit the flexfield mappings as required.
5. Save your work.
2-40 Oracle E-Business Intelligence Embedded Data Warehouse Implementation Guide
Configure Warehouse Data
Map Flexfields to Other User-Defined DimensionsYou can map flexfield segments to up to 50 other user-defined, non-accounting, dimensions.
To map source flexfields to other user-defined dimensions, do the following:1. In the BIS Configuration Assistant window, choose the Go button next to the
Map Sources to Dimension option. The Map Sources to Dimension Welcome window appears. Choose the Next button to continue.
2. In the Choose Type and Dimension window, do the following:
a. Choose the Create Dimension check box, then choose the other user defined option.
b. Choose the Next button to continue. The Map Sources to Dimension: Summary window appears. The seeded flexfield segments for the specified source system are listed in the Available Value Sets region of the window. For a list of the seeded flexfield segments, see: Appendix D, "Seeded Flexfields".
3. In the Available Objects region, choose the flexfield segment that you want to map, and move it to the Selected Objects region by choosing the right arrow button.
4. Repeat step 3 for each flexfield segment that you want to create a dimension for . When you finish adding flexfield segments, choose the Next button to continue. The Edit Display Names window appears.
5. In the Edit Display Names window, enter the dimension information as follows:
a. In the Dimension field, enter the name of the dimension.
b. In the Hierarchy region, enter the name of the hierarchy in the appropriate row. You can define only one hierarchy for each other user-defined dimension.
Note: You can only create a dimension if you are below the maximum number user-defined dimensions for that dimension type. Therefore, you cannot create an other user-defined dimension (non-accounting dimension) if you have already mapped the maximum number of other user-defined dimensions (50).
Implementing EDW 2-41
Configure Warehouse Data
c. In the Level field, enter the name of the hierarchy level in the appropriate row. You can define only two levels for each other user-defined dimension.
d. Choose the Next button to continue. The Map to Fact Tables window appears.
6. In the Available Fact Tables region, choose the fact table that you want to map to using the right arrow button. The fact table moves to the Mapped Fact Tables region.
When you map fact tables, you link the foreign keys in the fact tables to the other user-defined dimension you created.
7. Choose the Next button to continue. The Map Sources to Dimensions: Summary window appears.
8. Verify the dimension information, including all hierarchies and levels. If the information is correct, choose the Finish button. If it is not correct, use the Back button to return to the previous window, fix the information, then return to this window and choose the Finish button. The OWB window appears.
9. Repeat steps 1 to 8 for each dimension that you want to map.
10. In the OWB window, commit your changes. A confirmation window appears. Choose the OK button to confirm the commit and close the window.
To modify flexfield mappings to other user-defined dimensions, do the following:1. In the BIS Configuration Assistant window, choose the Go button next to the
Map Sources to Dimension option. The Map Sources to Dimension Welcome window appears. Choose the Next button to continue.
2. In the Choose Type and Dimension window, choose the Modify Dimension check box, then choose the other user-defined option.
3. In the list of values in the Modify Dimension region, choose the other user-defined option that you want to update and choose the OK button.
4. Edit the flexfield mappings as required.
5. Save your work.
2-42 Oracle E-Business Intelligence Embedded Data Warehouse Implementation Guide
Configure Warehouse Data
Map Flexfield Segments or Source View Columns to Predefined DimensionsYou can also map flexfields or source view columns to the user-defined attributes of the predefined dimensions that are provided with EDW.
To map flexfield segments or source view columns to predefined dimensions, do the following:1. In the BIS Configuration Assistant window, choose the Go button next to the
Map Sources to Dimension option. The Map Sources to Dimension Welcome window appears. Choose the Next button to continue.
2. In the Choose Type and Dimension window, do the following:
a. Choose the Modify Dimension checkbox, then choose the Predefined option.
b. Choose the predefined dimension that you want to modify from the list of values and choose the Next button to continue. The Map Sources to Dimension: Summary window appears.
3. If you want to add a flexfield or source view column to a predefined dimension, do the following:
a. In the Level field of the Map Sources to Dimension: Choose Source Objects window, choose a dimension level.
b. Choose the Add button. The Map the Attribute window appears.
c. In the Display Name field, enter the display name for the user defined attribute.
The default data type is VARCHAR2. The source view columns and seeded flexfield segments for the chosen predefined dimension, are listed in the Available Objects region.
d. In the Available Objects region, drill down to the source view columns or flexfield segments that you want to map, highlight the object, then choose the right arrow button to move the it into the Selected Objects region.
Only seeded flexfield segments will be listed in the Available Object region. For a complete list of seeded flexfields, see: Appendix D, "Seeded Flexfields".
Implementing EDW 2-43
Configure Warehouse Data
e. Repeat steps a to e for each dimension level that you want to map attributes for.
f. Choose the OK button. You return to the Map Sources to Dimension: Choose Source Objects window.
4. If you want to edit user defined attributes that are already mapped, do the following.
a. In the Level field of the Map Sources to Dimension: Choose Source Objects window, choose a dimension level.
b. Choose the Edit button. The Edit Display Names window appears.
c. Edit the user defined attribute mapping as required.
d. Repeat steps a to c for each dimension level that you want to edit.
e. Choose the OK button. You return to the Map Sources to Dimension: Choose Source Objects window.
5. If you want to remove user defined attributes that are already mapped, do the following.
a. In the Level field of the Map Sources to Dimension: Choose Source Objects window, choose a dimension level.
b. Choose the Remove button.
c. Repeat steps a and b for each dimension level that you want to remove.
6. Choose the Next button to continue. The Map Sources to Dimensions: Summary window appears.
7. Verify the dimension information, including all hierarchies and levels. If the information is correct, choose the Finish button. If it is not correct, use the Back button to return to the previous window, fix the information, then return to this window and choose the Finish button.
8. Repeat steps 1 to 7 for each predefined dimension that you want to map.
9. In the OWB window, commit your changes. A confirmation window appears. Choose the OK button to confirm the commit and close the window.
Note: You can only map one source view columns or flexfield segments per attribute.
2-44 Oracle E-Business Intelligence Embedded Data Warehouse Implementation Guide
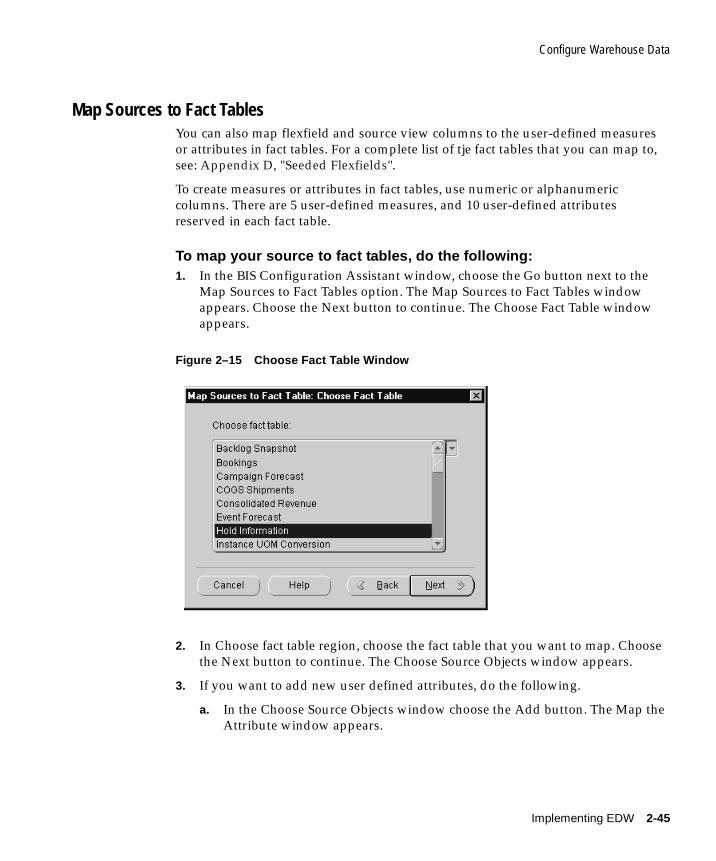
Configure Warehouse Data
Map Sources to Fact TablesYou can also map flexfield and source view columns to the user-defined measures or attributes in fact tables. For a complete list of tje fact tables that you can map to, see: Appendix D, "Seeded Flexfields".
To create measures or attributes in fact tables, use numeric or alphanumeric columns. There are 5 user-defined measures, and 10 user-defined attributes reserved in each fact table.
To map your source to fact tables, do the following:1. In the BIS Configuration Assistant window, choose the Go button next to the
Map Sources to Fact Tables option. The Map Sources to Fact Tables window appears. Choose the Next button to continue. The Choose Fact Table window appears.
Figure 2–15 Choose Fact Table Window
2. In Choose fact table region, choose the fact table that you want to map. Choose the Next button to continue. The Choose Source Objects window appears.
3. If you want to add new user defined attributes, do the following.
a. In the Choose Source Objects window choose the Add button. The Map the Attribute window appears.
Implementing EDW 2-45
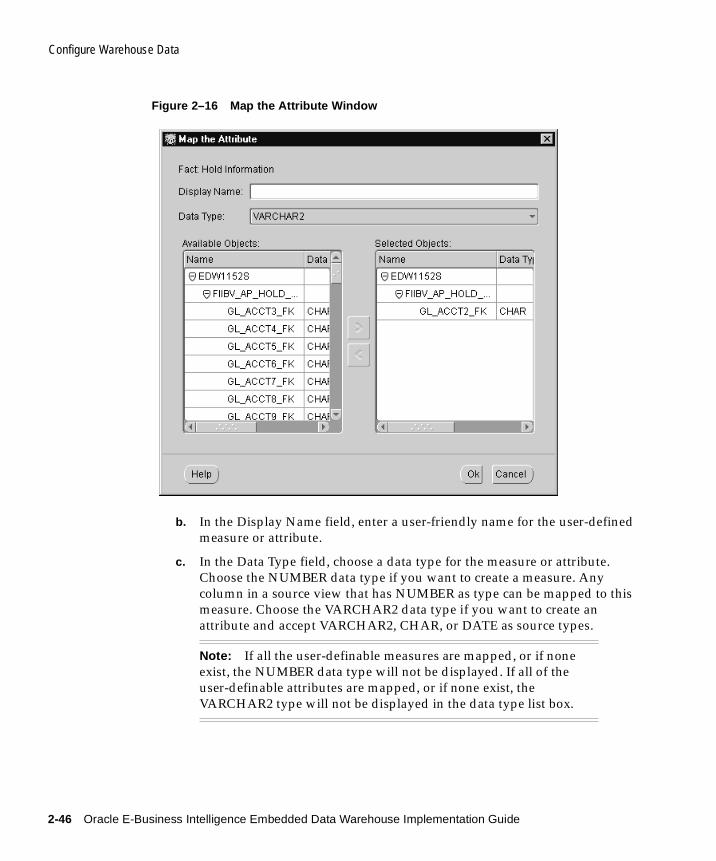
Configure Warehouse Data
Figure 2–16 Map the Attribute Window
b. In the Display Name field, enter a user-friendly name for the user-defined measure or attribute.
c. In the Data Type field, choose a data type for the measure or attribute. Choose the NUMBER data type if you want to create a measure. Any column in a source view that has NUMBER as type can be mapped to this measure. Choose the VARCHAR2 data type if you want to create an attribute and accept VARCHAR2, CHAR, or DATE as source types.
Note: If all the user-definable measures are mapped, or if none exist, the NUMBER data type will not be displayed. If all of the user-definable attributes are mapped, or if none exist, the VARCHAR2 type will not be displayed in the data type list box.
2-46 Oracle E-Business Intelligence Embedded Data Warehouse Implementation Guide
Configure Warehouse Data
The source view and the seeded flexfield structures are listed in the Avail-able Objects region.
d. In the Available Objects region, highlight source view columns or flexfield segments that you want to map, and choose the right arrow button to move to the Selected Objects region.
You can only map one source view column or flexfield segment to the attribute.
If you choose the NUMBER data type, then you can only move any column with a NUMBER data type. If you choose the VARCHAR2 data type, you move any column with a VARCHAR2, CHAR, DATE, but not NUMBER data type.
e. Choose the OK button. The newly created measure or attribute appears in the Choose Source Object window.
4. If you want to edit a mapped user defined measure or attribute, do the following.
a. In the Choose Source Objects window choose the user defined measure or attribute that you want to edit and choose the Edit button. The Map the Attribute window appears.
b. Edit the information as required.
c. Repeat steps a to b for each user defined measure or attribute that you want to edit.
d. Choose the OK button.
5. If you want to remove an existing user defined measure or attribute, do the following.
a. In the Choose Source Objects window, choose the user defined measure or attribute that you want to remove and choose the Remove button. The attribute is removed.
b. Repeat step a for each user defined measure or attribute that you want to remove.
c. Choose the OK button.
6. Choose the Next button to continue. The Map to Dimensions window appears.
Implementing EDW 2-47
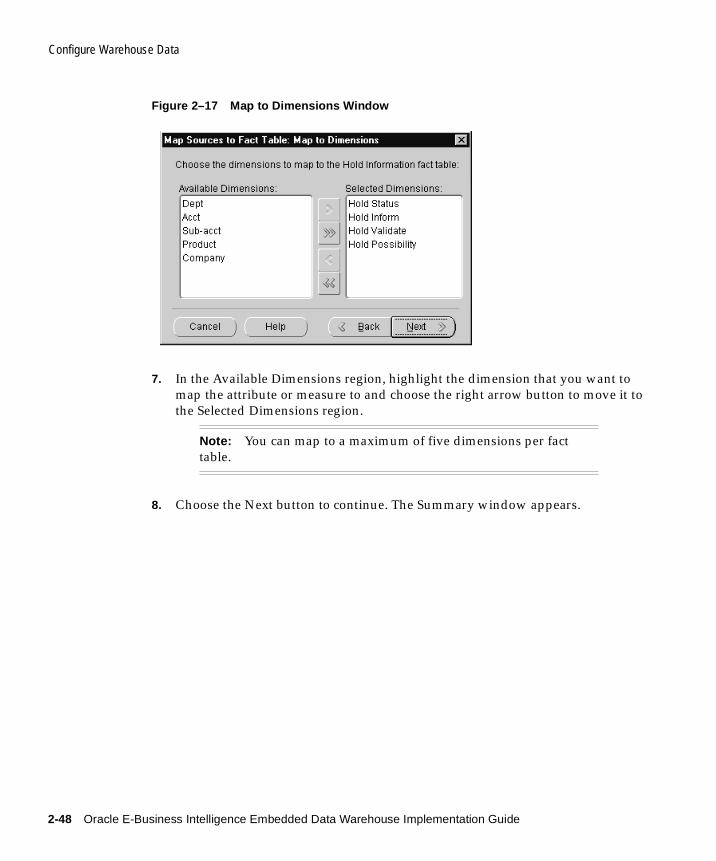
Configure Warehouse Data
Figure 2–17 Map to Dimensions Window
7. In the Available Dimensions region, highlight the dimension that you want to map the attribute or measure to and choose the right arrow button to move it to the Selected Dimensions region.
8. Choose the Next button to continue. The Summary window appears.
Note: You can map to a maximum of five dimensions per fact table.
2-48 Oracle E-Business Intelligence Embedded Data Warehouse Implementation Guide
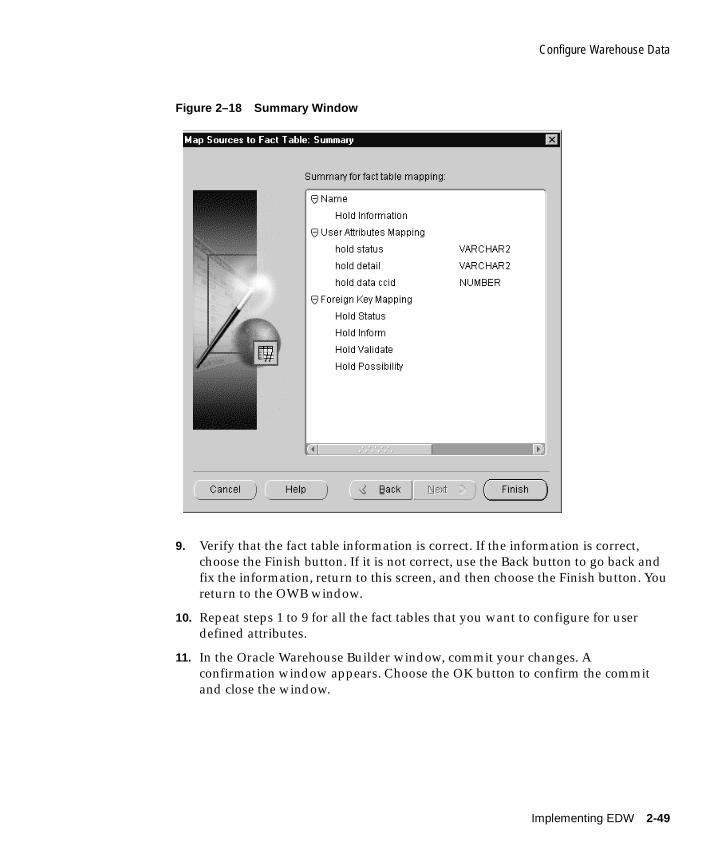
Configure Warehouse Data
Figure 2–18 Summary Window
9. Verify that the fact table information is correct. If the information is correct, choose the Finish button. If it is not correct, use the Back button to go back and fix the information, return to this screen, and then choose the Finish button. You return to the OWB window.
10. Repeat steps 1 to 9 for all the fact tables that you want to configure for user defined attributes.
11. In the Oracle Warehouse Builder window, commit your changes. A confirmation window appears. Choose the OK button to confirm the commit and close the window.
Implementing EDW 2-49
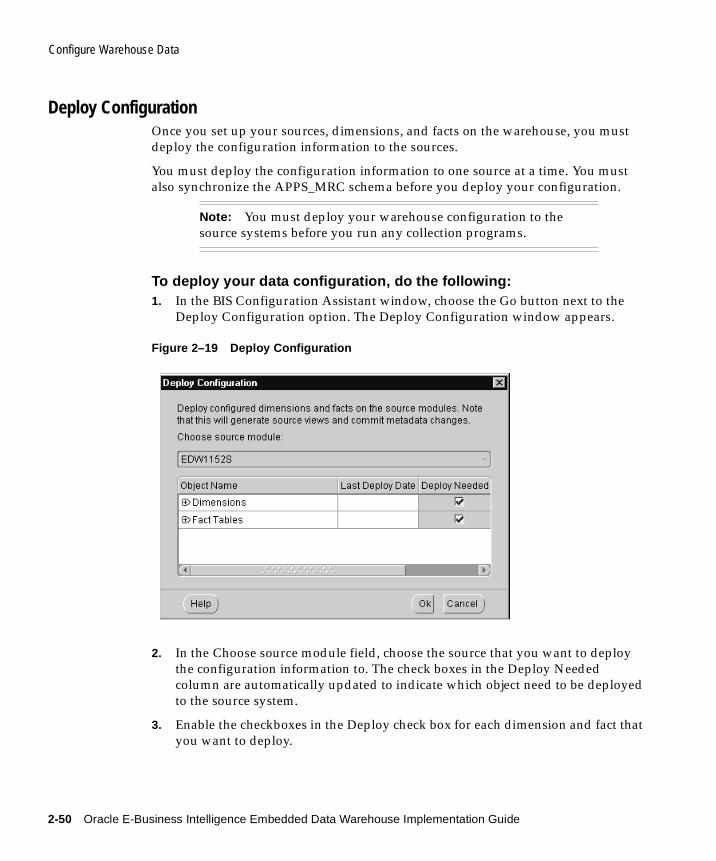
Configure Warehouse Data
Deploy ConfigurationOnce you set up your sources, dimensions, and facts on the warehouse, you must deploy the configuration information to the sources.
You must deploy the configuration information to one source at a time. You must also synchronize the APPS_MRC schema before you deploy your configuration.
To deploy your data configuration, do the following:1. In the BIS Configuration Assistant window, choose the Go button next to the
Deploy Configuration option. The Deploy Configuration window appears.
Figure 2–19 Deploy Configuration
2. In the Choose source module field, choose the source that you want to deploy the configuration information to. The check boxes in the Deploy Needed column are automatically updated to indicate which object need to be deployed to the source system.
3. Enable the checkboxes in the Deploy check box for each dimension and fact that you want to deploy.
Note: You must deploy your warehouse configuration to the source systems before you run any collection programs.
2-50 Oracle E-Business Intelligence Embedded Data Warehouse Implementation Guide

Configure Warehouse Data
4. Choose the OK button to deploy the configuration information to the source.
5. Repeat steps 1 to 4 for each source that you want to deploy the information to.
Implementing EDW 2-51

Configure Warehouse Data
Hide ColumnsYou can also use the BIS Configuration Assistant to select the source view columns that you want to:
■ Not load
■ Hide from view (default)
Choosing to hide or not load columns can improve your EUL usability and performance. For example, users can work more efficiently if they do not have to see or wait to load columns that they do not use in analysis.
Hiding a column does not permanently hide it from users. It is only a default setting. Users can choose to view the column if they want, by unhiding it using Oracle Discoverer Administration edition.
2-52 Oracle E-Business Intelligence Embedded Data Warehouse Implementation Guide
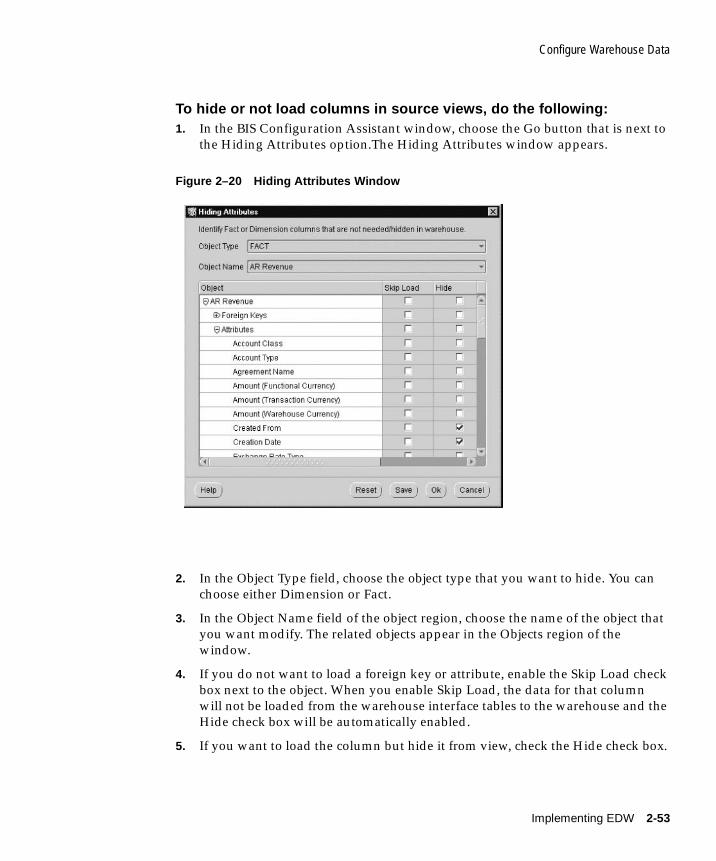
Configure Warehouse Data
To hide or not load columns in source views, do the following:1. In the BIS Configuration Assistant window, choose the Go button that is next to
the Hiding Attributes option.The Hiding Attributes window appears.
Figure 2–20 Hiding Attributes Window
2. In the Object Type field, choose the object type that you want to hide. You can choose either Dimension or Fact.
3. In the Object Name field of the object region, choose the name of the object that you want modify. The related objects appear in the Objects region of the window.
4. If you do not want to load a foreign key or attribute, enable the Skip Load check box next to the object. When you enable Skip Load, the data for that column will not be loaded from the warehouse interface tables to the warehouse and the Hide check box will be automatically enabled.
5. If you want to load the column but hide it from view, check the Hide check box.
Implementing EDW 2-53
Configure Warehouse Data
6. If you want to reset the window and disable all of the Skip Load and Hide check boxes at the same time, choose the Reset button. You can continue to reset the columns as appropriate.
7. Save your work.
8. Choose the OK button to exit the window. The OWB window appears.
9. In the OWB window commit your changes.
10. Save your work. You must save before you can begin to hide another object.
This completes the configuration of your warehouse data using the BIS Configuration Assistant and the OWB Applications Integrator.
2-54 Oracle E-Business Intelligence Embedded Data Warehouse Implementation Guide
Generate End User Layer
Generate End User Layer After you configure your warehouse data using the BIS Configuration Assistant wizard, you must transfer this data to Oracle Discoverer and generate the end user layer (EUL).
The EUL enables users to analyze the data in the warehouse using Oracle Discoverer workbooks.
To perform this transfer and generate the EUL, you need to use the Common Warehouse Metadata Transfer Wizard, which you can launch using OWB Applications Integrator.
The Common Warehouse Metadata Transfer wizard (CWM transfer wizard) generates an ASCII export file (EEX) based on the user-defined flexfields and attributes that you configured using the BIS Configuration Assistant wizard. This ASCII file is then used to generate the EUL.
This chapter includes the following sections:
■ Prerequisite on page 2-56
■ Launch the Common Warehouse Metadata Transfer Wizard on page 2-56
■ Transfer Metadata on page 2-59
Implementing EDW 2-55
Generate End User Layer
PrerequisiteBefore you generate the EUL, ensure that the following prerequisite has been met:
■ All of your data has been configured using the BIS Configuration Assistant. For more information, see: Configure Warehouse Data on page 2-20.
Launch the Common Warehouse Metadata Transfer WizardTo begin the metadata transfer, you must launch the CWM Metadata Transfer wizard.
To launch the CWM Transfer wizard:
1. Log on to Oracle Warehouse Builder by completing the following fields in the Warehouse Builder Logon window:
a. In the Username field, enter EDWREP.
b. In the Password field, enter <edwrep user password>.
c. In the Host Name field, enter the name of the machine that the warehouse instance is running on.
d. In the Port Number field, enter the port number for the instance. (Consult with your DBA for this information.)
e. In the Oracle SID field, enter the Oracle SID for the instance. (Consult with your DBA for this information.)
f. Choose the Logon button. The Welcome to Oracle Warehouse Builder window appears.
2. The Project Name field is automatically populated with ‘EDWPRJ’.
3. Choose the OK button.
4. The BIS Configuration Assistant displays automatically. Choose the Close button to close the BIS Configuration Assistant wizard window. The OWB window appears.
Note: The Windows NT machine that you use to launch the CWM Transfer Wizard must have at least 1GB virtual memory, 500 MB of temporary disk space, and 512 MB of RAM.
2-56 Oracle E-Business Intelligence Embedded Data Warehouse Implementation Guide
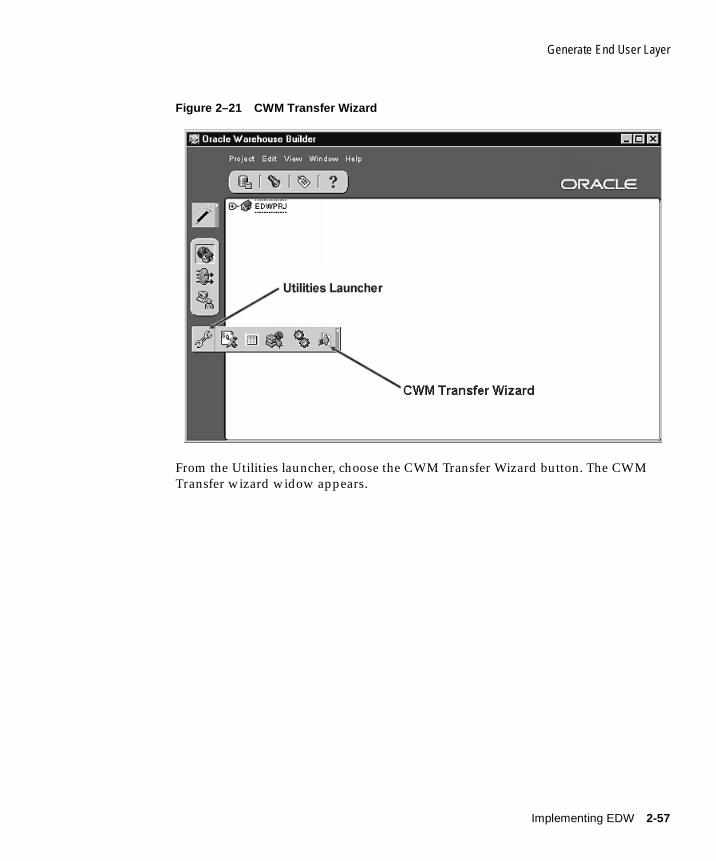
Generate End User Layer
Figure 2–21 CWM Transfer Wizard
From the Utilities launcher, choose the CWM Transfer Wizard button. The CWM Transfer wizard widow appears.
Implementing EDW 2-57
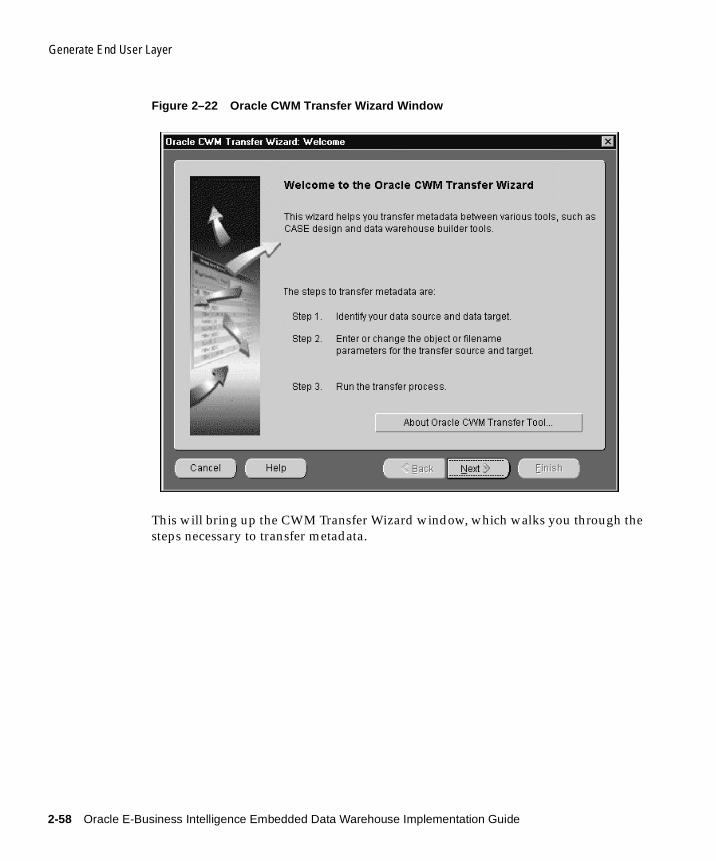
Generate End User Layer
Figure 2–22 Oracle CWM Transfer Wizard Window
This will bring up the CWM Transfer Wizard window, which walks you through the steps necessary to transfer metadata.
2-58 Oracle E-Business Intelligence Embedded Data Warehouse Implementation Guide
Generate End User Layer
Transfer MetadataOnce you launch the CWM Transfer wizard you must transfer the metadata from the OWB Repository to Oracle Discoverer.
To transfer metadata from the OWB Repository to Oracle Discoverer, do the following:1. In the CWM Transfer Wizard: Welcome window, choose the Next button. The
Source and Target Data Locations window appears.
The From field is automatically populated with Oracle Warehouse Builder 9i.
2. In the To field, choose Oracle Discoverer.
3. In the Description field, enter a description of the data transfer. This is an optional step.
4. Choose the Next button to continue. The Data Object/File Names and Detailed Transfer Parameters window appears.
Implementing EDW 2-59

Generate End User Layer
Figure 2–23 Data Object/File names and Detailed Transfer Parameters
5. Complete the transfer parameters, using the values shown in Table 2–3, "CWM Transfer Parameters".
Table 2–3 CWM Transfer Parameters
Transfer Parameter Value
Warehouse Builder User EDWREP
Warehouse Builder Password
<edwrep password>
Warehouse Builder Connect String
<DB hostname>:<TNS listener port>:<Oracle SID>
For example, ap301sun:1521:edw115r
Warehouse Builder Project EDWPRJ
OWB Exported Business Areas
All Business Areas
2-60 Oracle E-Business Intelligence Embedded Data Warehouse Implementation Guide
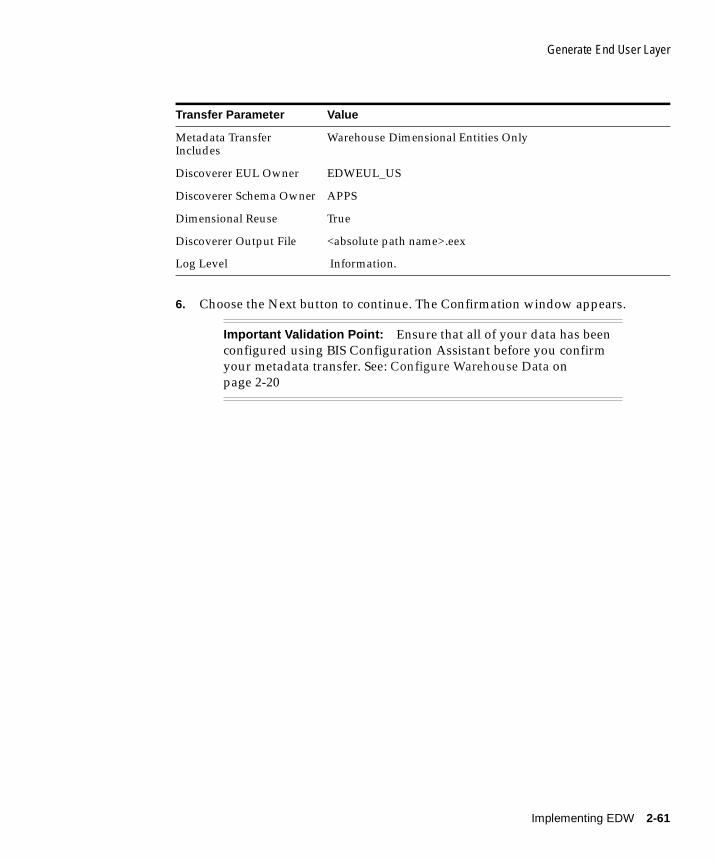
Generate End User Layer
6. Choose the Next button to continue. The Confirmation window appears.
Metadata Transfer Includes
Warehouse Dimensional Entities Only
Discoverer EUL Owner EDWEUL_US
Discoverer Schema Owner APPS
Dimensional Reuse True
Discoverer Output File <absolute path name>.eex
Log Level Information.
Important Validation Point: Ensure that all of your data has been configured using BIS Configuration Assistant before you confirm your metadata transfer. See: Configure Warehouse Data on page 2-20
Transfer Parameter Value
Implementing EDW 2-61
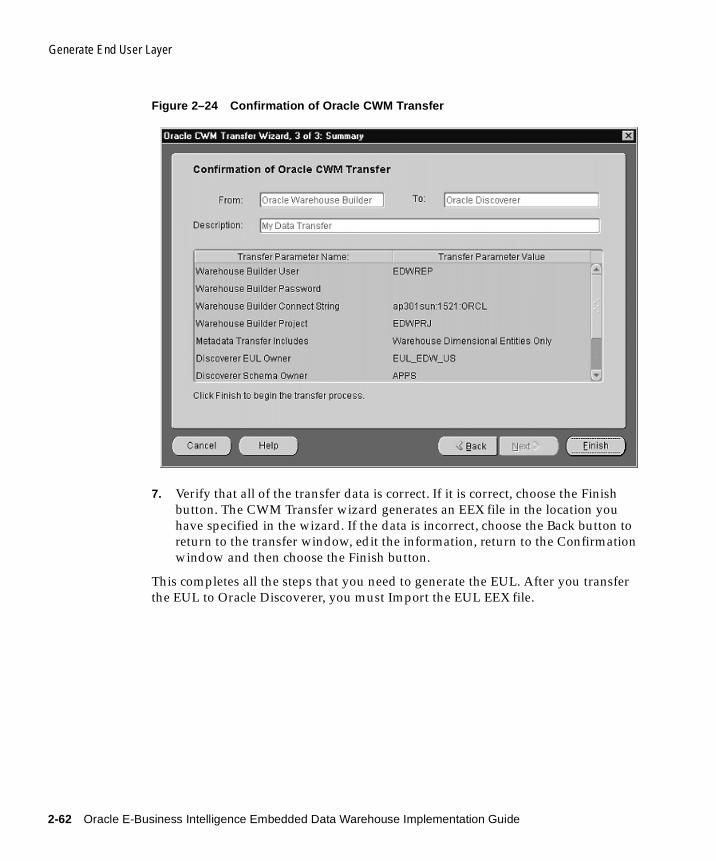
Generate End User Layer
Figure 2–24 Confirmation of Oracle CWM Transfer
7. Verify that all of the transfer data is correct. If it is correct, choose the Finish button. The CWM Transfer wizard generates an EEX file in the location you have specified in the wizard. If the data is incorrect, choose the Back button to return to the transfer window, edit the information, return to the Confirmation window and then choose the Finish button.
This completes all the steps that you need to generate the EUL. After you transfer the EUL to Oracle Discoverer, you must Import the EUL EEX file.
2-62 Oracle E-Business Intelligence Embedded Data Warehouse Implementation Guide
Import the End User Layer EEX File
Import the End User Layer EEX FileAfter you generate the EUL, you must import the EEX file using Oracle Discoverer Administration Edition.
To import the EUL EEX file:
1. Copy the <filename>.eex file from $AU_TOP/discover/US to a temporary directory on the Windows NT machine where you have installed Oracle Discoverer Administration Client.
2. Logon to the Oracle Discoverer Administration Client using the EUL owner responsibility. For example, EDWEUL_US.
The following message appears: “You must upgrade your EUL tables to use this software release. Upgrading the EUL tables requires existing users to install Oracle Discoverer Plus in order to continue running queries and report”.
3. Choose the Upgrade button.
4. Connect to the EUL based on the language of EEX file selected. For example, you can connect to the US version by selecting EDWEUL_US.
5. Choose Import from the File menu.
6. Under Import Options, select Rename Existing Objects.
7. In the Import Business Area window, choose the <filename>.eex file that you want to import.
If you want to enable the Purchasing Intelligence extended business area, choose the following files for import:
■ poaclcsvngrfe.eex*
■ poapospplrprfle.eex*
■ poacntrcttfle.eex*
■ poapospplrscfle.eex*
■ poavlrfe.eex*
■ poapospplrp01fle.eex*
Additional Information: See the Oracle Discoverer Administration Guide for more information on how to import the EEX file.
Implementing EDW 2-63
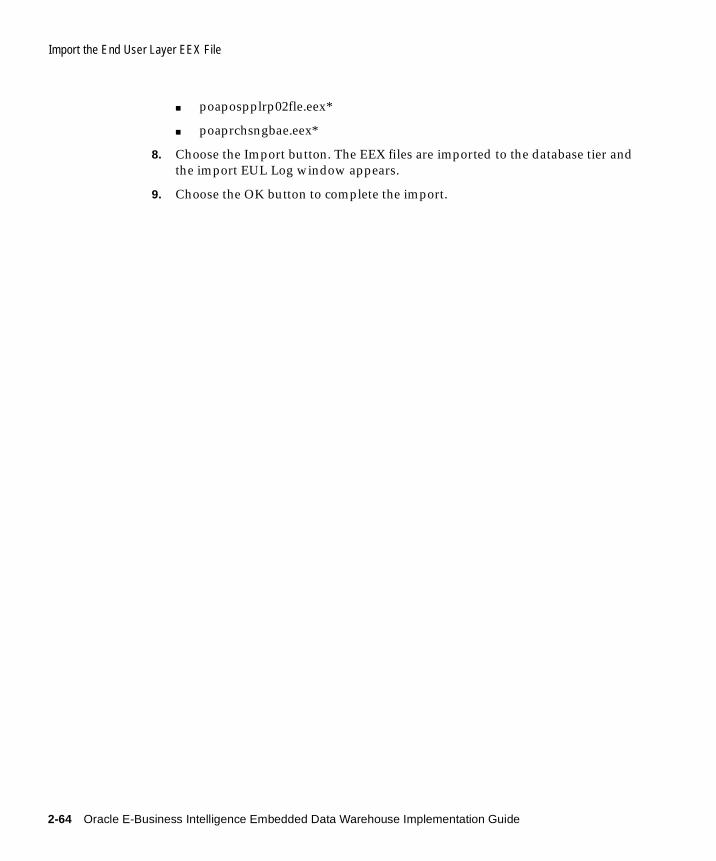
Import the End User Layer EEX File
■ poapospplrp02fle.eex*
■ poaprchsngbae.eex*
8. Choose the Import button. The EEX files are imported to the database tier and the import EUL Log window appears.
9. Choose the OK button to complete the import.
2-64 Oracle E-Business Intelligence Embedded Data Warehouse Implementation Guide
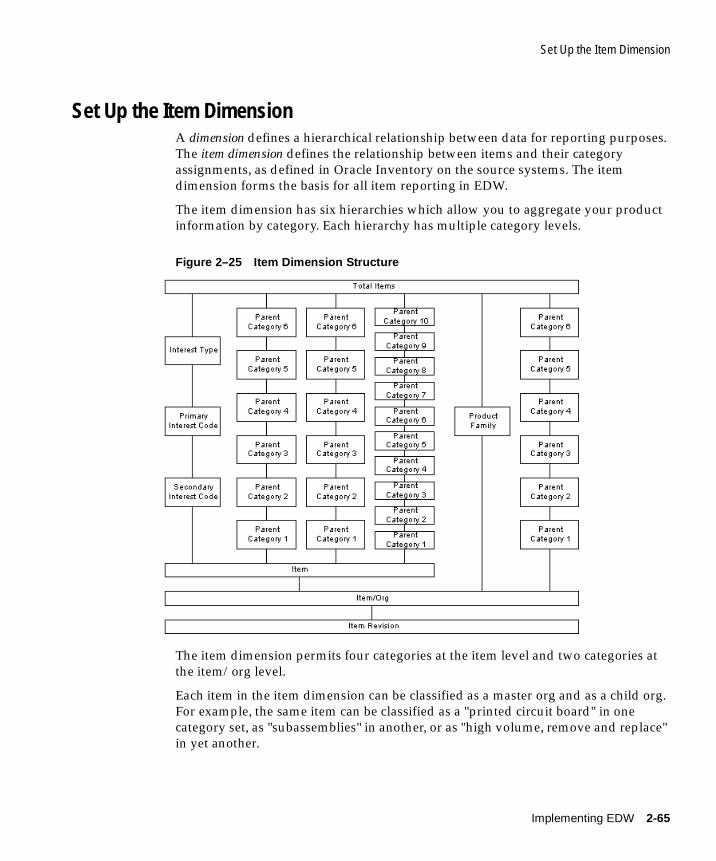
Set Up the Item Dimension
Set Up the Item DimensionA dimension defines a hierarchical relationship between data for reporting purposes. The item dimension defines the relationship between items and their category assignments, as defined in Oracle Inventory on the source systems. The item dimension forms the basis for all item reporting in EDW.
The item dimension has six hierarchies which allow you to aggregate your product information by category. Each hierarchy has multiple category levels.
Figure 2–25 Item Dimension Structure
The item dimension permits four categories at the item level and two categories at the item/org level.
Each item in the item dimension can be classified as a master org and as a child org. For example, the same item can be classified as a "printed circuit board" in one category set, as "subassemblies" in another, or as "high volume, remove and replace" in yet another.
Implementing EDW 2-65
Set Up the Item Dimension
The dimension is populated with the item classification schemes that are defined in Oracle Inventory on each source system. You must ensure that your category sets and product classification schemes are properly defined in Oracle Inventory on your source systems before you begin using the item dimension.
To set up the item dimension, you must do the following:
■ Review the Implementation Considerations for the Item Dimension. See: Implementation Considerations for the Item Dimension on page 2-66.
■ Create a Value Set and Define a Hierarchy on page 2-70
■ Setup Warehouse Parameter on page 2-73
■ Run "Collect" and "Load" Concurrent Programs on page 2-75
Once you set up the item dimension, you can review the maintenance and administration tasks for this feature. See: Maintaining and Administering the Item Dimension on page 2-75.
All of the set up and maintenance and administration tasks for the item dimension are described in detail in the following sections.
Implementation Considerations for the Item DimensionThe following sections describe how you should set up your items and product categories in Oracle Inventory before you begin using the item dimension. For more information, see the Oracle Inventory User Guide.
Control Category Sets at Master or Org LevelsTo use the item dimension, item-level category sets must be controlled at the Master Level and item/org-level category sets must be controlled at the Org Level.
In Oracle Inventory, use the Category Sets window to define the control level for each category set.
2-66 Oracle E-Business Intelligence Embedded Data Warehouse Implementation Guide
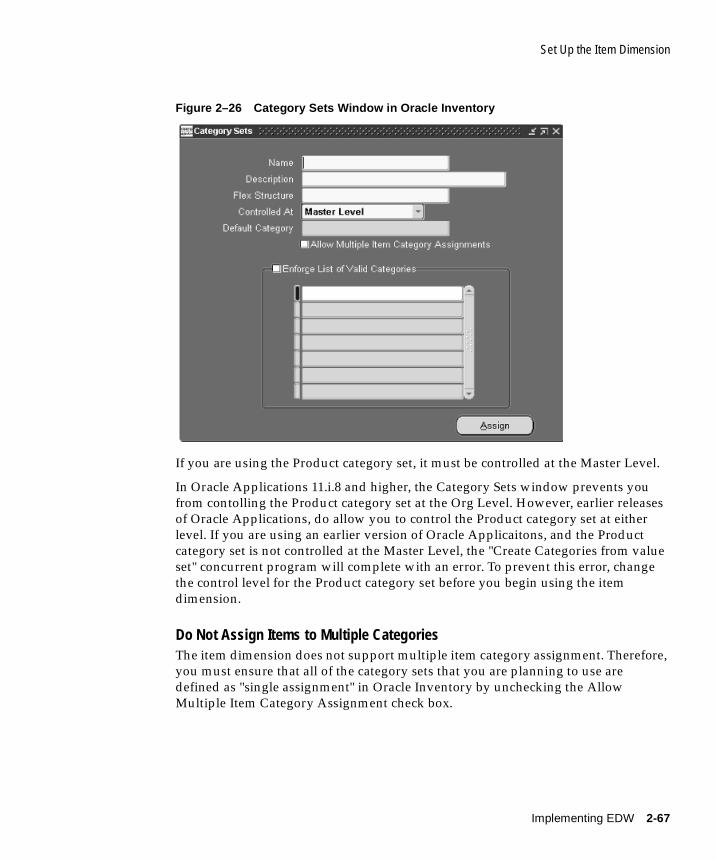
Set Up the Item Dimension
Figure 2–26 Category Sets Window in Oracle Inventory
If you are using the Product category set, it must be controlled at the Master Level.
In Oracle Applications 11.i.8 and higher, the Category Sets window prevents you from contolling the Product category set at the Org Level. However, earlier releases of Oracle Applications, do allow you to control the Product category set at either level. If you are using an earlier version of Oracle Applicaitons, and the Product category set is not controlled at the Master Level, the "Create Categories from value set" concurrent program will complete with an error. To prevent this error, change the control level for the Product category set before you begin using the item dimension.
Do Not Assign Items to Multiple CategoriesThe item dimension does not support multiple item category assignment. Therefore, you must ensure that all of the category sets that you are planning to use are defined as "single assignment" in Oracle Inventory by unchecking the Allow Multiple Item Category Assignment check box.
Implementing EDW 2-67
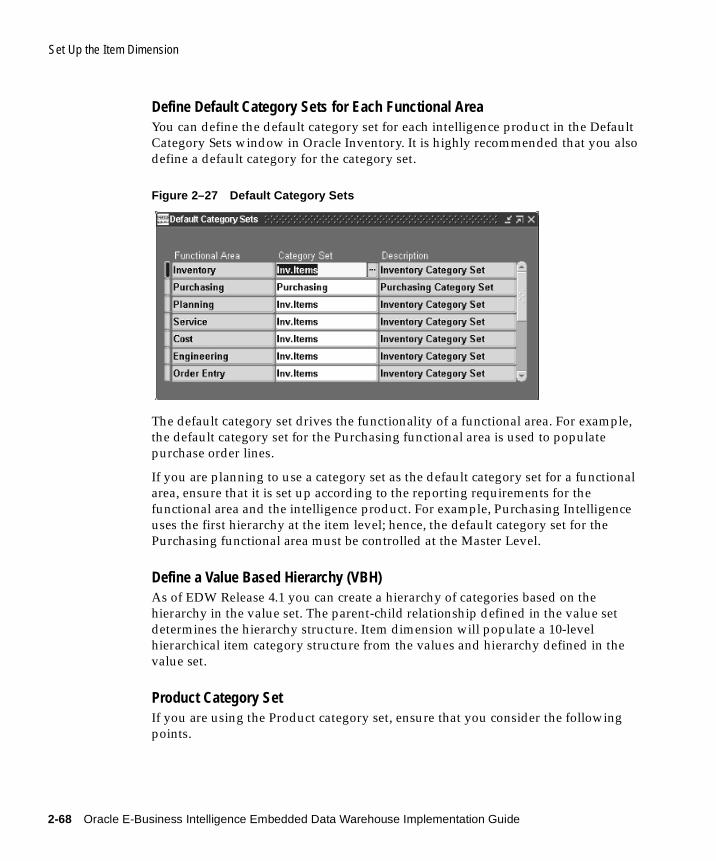
Set Up the Item Dimension
Define Default Category Sets for Each Functional AreaYou can define the default category set for each intelligence product in the Default Category Sets window in Oracle Inventory. It is highly recommended that you also define a default category for the category set.
Figure 2–27 Default Category Sets
The default category set drives the functionality of a functional area. For example, the default category set for the Purchasing functional area is used to populate purchase order lines.
If you are planning to use a category set as the default category set for a functional area, ensure that it is set up according to the reporting requirements for the functional area and the intelligence product. For example, Purchasing Intelligence uses the first hierarchy at the item level; hence, the default category set for the Purchasing functional area must be controlled at the Master Level.
Define a Value Based Hierarchy (VBH)As of EDW Release 4.1 you can create a hierarchy of categories based on the hierarchy in the value set. The parent-child relationship defined in the value set determines the hierarchy structure. Item dimension will populate a 10-level hierarchical item category structure from the values and hierarchy defined in the value set.
Product Category SetIf you are using the Product category set, ensure that you consider the following points.
2-68 Oracle E-Business Intelligence Embedded Data Warehouse Implementation Guide
Set Up the Item Dimension
Value Set
User can define values (nodes) and establish hierarchy (parent and child relationship) in a value set. A value set can be maintained through inventory setup, by navigating to Inventory > Setup > Flexfields > Keys > Values. Once the hierarchy is created, the value set can be assigned to the Product Reporting flex structure.
Once the value set has been created you can run the "Create Categories from Value Set" concurrent program to create the categories. These categories are in the Product category set. Item assignments can be made to these categories.
Item Assignment Restrictions
■ You cannot assign items in the Product category set to multiple categories.
■ Items in the Product category set must be controlled at the Master Level.
■ Items in the Product category set, should only be assigned to LEAF (CHILD) NODES.
Top Node
If you choose the value set option, set up the top node in the warehouse parameter window. Item dimension will populate item assignment information made to categories under the top node structure only.
Handling "Unassigned" in Product category set
Any item that is not assigned to a category under the top node hierarchy in the Product category set will be placed under NA_EDW.
Note: The Product Reporting flex structure is delivered with EDW 4.1. The flex structure must have only one enabled segment and it must be segment 1. See: Oracle Applications Flexfields Guide.
Note: For Oracle Application 11.i.8 and onward, item assignment form will restrict assignments being done only to leaf/child categories in Product category set. In Pre 11.i.8 application, there is no such validation.
Implementing EDW 2-69
Set Up the Item Dimension
Create a Value Set and Define a HierarchyWhen using value set option in the Warehouse Parameter, the item dimension will be populated from values and hierarchy in the value set. This will provide a multiple level hierarchy for reporting.
Create Value Set
You can define categories from values defined in a value set. In the value set form, you can create values and define a hierarchy of values.
To create a new (empty) value set, do the following:
1. Navigate to: Inventory > Setup > Flexfields > Validation > Sets.
2. Enter the Value Set name, description and maximum size allowed and save your work.
To define values and hierarchy for a value set, do the following
1. Navigate to: Inventory > Setup > Flexfields > Key > Values.
2. Select the value set created earlier. Under the Values, Effective tab, define the values as needed for your setup and save your work.
3. Choose the Value, Hierarchy, Qualifiers tab and identify the Parent nodes by checking the corresponding check box.
4. Click on Define Child Ranges for each parent node to define its child range. Child ranges are only immediate children. Specify Parent Value or Child Value for all child node.
5. Save your work. You may use the button "View Hierarchies" to review the defined parent/child relationship.
Note: You only need to complete this step if you are planning to use the Value Based Hierarchy feature (see: Set Up GL Value-Based Hierarchy on page 2-77).
Note: If you are using the Product Category in both your Accounting Flexfield and your Item Category Flexfield, then the maximum character size of the value cannot be greater than 25.
2-70 Oracle E-Business Intelligence Embedded Data Warehouse Implementation Guide
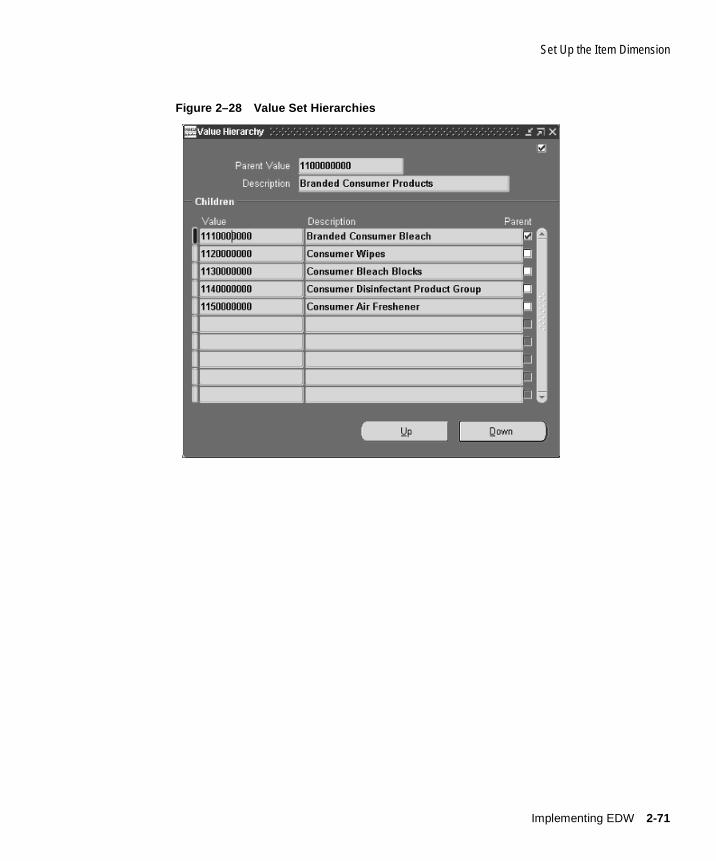
Set Up the Item Dimension
Figure 2–28 Value Set Hierarchies
Implementing EDW 2-71
Set Up the Item Dimension
Assign Value Set to Product Category Structure
Once the hierarchy is defined, the value set can be assigned to the Product Category flex structure.
1. Navigate to: Inventory > Setup > Flexfields > Key > Segments.
2. Select 'Oracle Inventory' as the application, Flexfield title 'Item Categories' and Choose Product Categories from the Structure Codes presented and click on the Segments button.
3. In the Value set field, select the value set to be assigned from the list of values presented.
4. Save your work and Close the "Segments Summary (Item Categories)-Product Categories" form.
5. Check the "Freeze Flexfield Definition" flag.
6. Click on the "Compile" button to re-compile the structure
Create Categories from Value Set
Once the value set has been assigned to the product structure, run "Create Item Categories from Value Set" concurrent program to create corresponding categories for item assignments. The concurrent program can be run under the Site Warehouse Administrator Responsibility. These categories will then be in the Product category set.
Note:
■ The Product Category flex structure must have only one seg-ment enabled and it must be segment. See: Oracle Applications Flexfields Guide for more information on flexfields.
■ Ensure that the Freeze Flexfields box is unchecked, you will not be able to change the value set otherwise.
■ An empty value set "4 Digits" is seeded for this structure, user can change this to any other value set they have created.
2-72 Oracle E-Business Intelligence Embedded Data Warehouse Implementation Guide
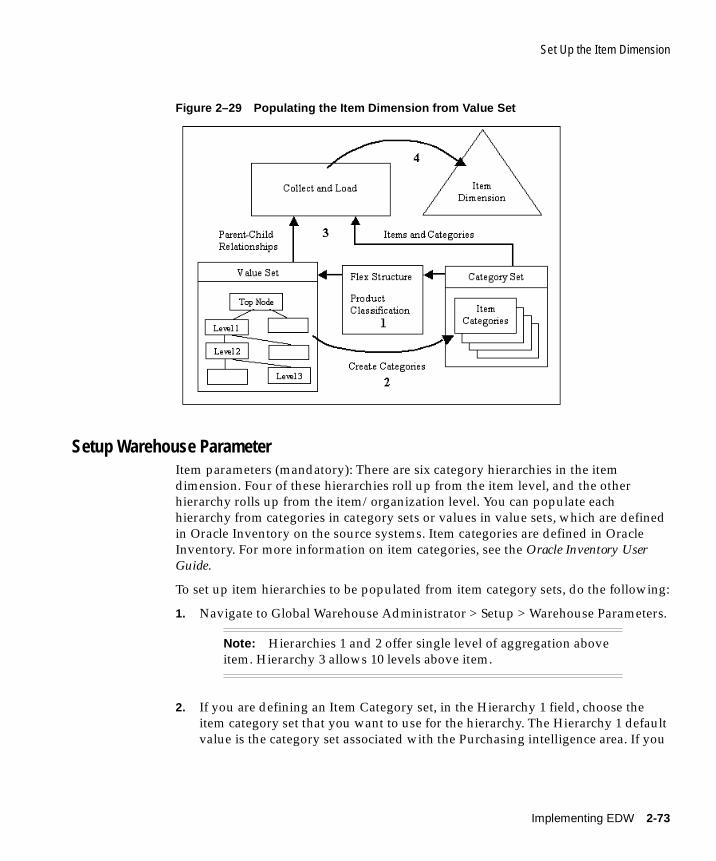
Set Up the Item Dimension
Figure 2–29 Populating the Item Dimension from Value Set
Setup Warehouse ParameterItem parameters (mandatory): There are six category hierarchies in the item dimension. Four of these hierarchies roll up from the item level, and the other hierarchy rolls up from the item/organization level. You can populate each hierarchy from categories in category sets or values in value sets, which are defined in Oracle Inventory on the source systems. Item categories are defined in Oracle Inventory. For more information on item categories, see the Oracle Inventory User Guide.
To set up item hierarchies to be populated from item category sets, do the following:
1. Navigate to Global Warehouse Administrator > Setup > Warehouse Parameters.
2. If you are defining an Item Category set, in the Hierarchy 1 field, choose the item category set that you want to use for the hierarchy. The Hierarchy 1 default value is the category set associated with the Purchasing intelligence area. If you
Note: Hierarchies 1 and 2 offer single level of aggregation above item. Hierarchy 3 allows 10 levels above item.
Implementing EDW 2-73
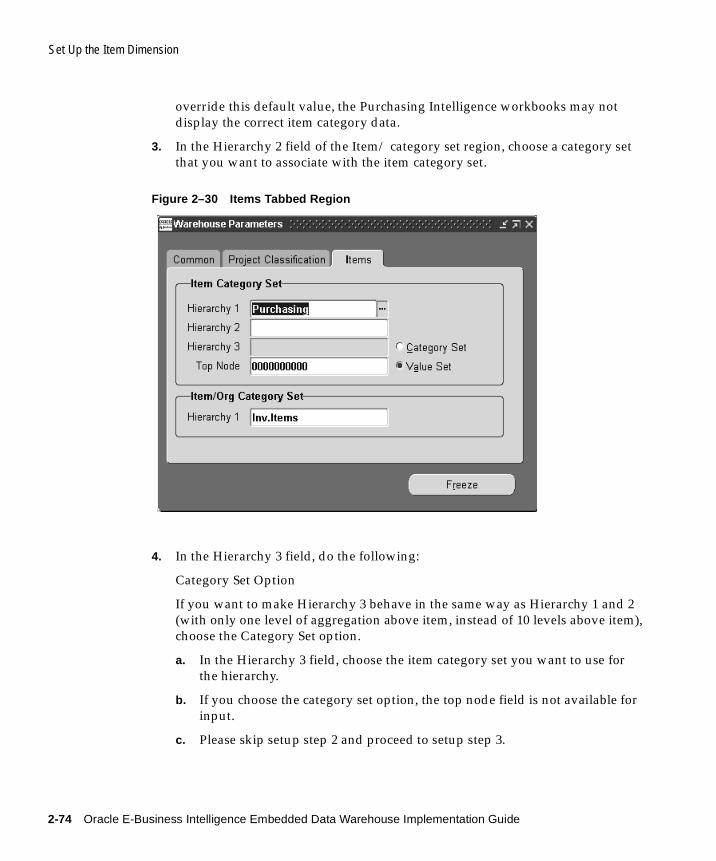
Set Up the Item Dimension
override this default value, the Purchasing Intelligence workbooks may not display the correct item category data.
3. In the Hierarchy 2 field of the Item/ category set region, choose a category set that you want to associate with the item category set.
Figure 2–30 Items Tabbed Region
4. In the Hierarchy 3 field, do the following:
Category Set Option
If you want to make Hierarchy 3 behave in the same way as Hierarchy 1 and 2 (with only one level of aggregation above item, instead of 10 levels above item), choose the Category Set option.
a. In the Hierarchy 3 field, choose the item category set you want to use for the hierarchy.
b. If you choose the category set option, the top node field is not available for input.
c. Please skip setup step 2 and proceed to setup step 3.
2-74 Oracle E-Business Intelligence Embedded Data Warehouse Implementation Guide
Set Up the Item Dimension
Value Set Option
If you want Hierarchy 3 to allow 10 levels of aggregation above item, then choose the Value Set option.
a. If you choose the Value Set option, the category set is automatically defined as the Product category set.
b. The Hierarchy 3 field will be disabled.
c. In the Top Node field, choose the category you want to use as the starting point for your hierarchy. Product hierarchy will be established from the top node downward. This field is mandatory if Value Set option is checked.
5. If you are defining the Item/Org Category Set, In the Hierarchy 1 field of the Item/Org category set region, choose a category set that you want to associate with the item/organization category set. The default value is the category set associated with the Inventory functional area. If you override the default value, the Manufacturing Intelligence workbooks may not display the correct item category data.
6. Freeze the warehouse parameters by choosing the Freeze button. The Freeze button toggles to Unfreeze and the parameters are frozen. You cannot change parameters once they are frozen, unless you choose the Unfreeze button.
7. Save your work.
Run "Collect" and "Load" Concurrent Programs The concurrent program "Collect Item Dimension" will populate the staging tables from transaction tables. The concurrent program "Load Item Dimension" populates EDW star table from staging tables.
With EDW 4.1, the collection program populates the category levels with the concatenated segments of the category flexfield.
Maintaining and Administering the Item DimensionThis section captures special cases and the necessary steps to ensure proper representation in item dimension. There are 3 cases this document considers:
■ Insert New Values in the Value Set
■ Any Change to Value Set or Categories
■ Changing Item Assignments
Implementing EDW 2-75
Set Up the Item Dimension
Insert New Values in the Value Set
Note: Cases 1 is relevant only if value set option is checked in Warehouse Parameter Form.
Before doing any item assignment to this new value, run concurrent program "Create Categories from Value Set" to create a new category. Then run concurrent program "Collect Item Dimension" and "Load Item Dimension" respectively.
Any Change to Value Set or Categories
Run concurrent program "Collect Item Dimension" and "Load Item Dimension" respectively to populate EDW star table with new changes.
Note: In Oracle Applications pre 11.5.8, item assignments can be done to disabled categories, which means either enable flag is unchecked or system date has passed the invalid-on date. From 11.5.8 and onward, item assignment form will not allow item being assigned to disabled categories. Item dimension related collection and load programs does not validate categories in this sense. It loads all the data in transaction tables into EDW star table.
Changing Item Assignments
Run concurrent programs "Collect Item Dimension" and "Load Item Dimension" respectively to populate EDW star table with new changes.
2-76 Oracle E-Business Intelligence Embedded Data Warehouse Implementation Guide
Set Up GL Value-Based Hierarchy
Set Up GL Value-Based Hierarchy This section describes how to set up your GL Value Based Hierarchies. You only need to set up these hierarchies if you are configuring user-defined accounting dimensions using the BIS Configuration Assistant (see: Map Flexfields to User-Defined Accounting Dimensions on page 2-34).
When you define value-based hierarchies, you define which hierarchies you want to associate with which dimensions, and which root nodes you want to associate with each hierarchy.
Value-based hierarchies enable you to summarize your data up to your highest root-level node.
To set up the value-based hierarchy, do the following:
■ Prerequisites on page 2-78
■ Set Up Source Set of Books on page 2-78
■ Set Up Consolidation Set of Books on page 2-80
■ Set Up Equivalent Set of Books on page 2-82
■ Set Up Hierarchy Root Nodes on page 2-83
■ Set Up Types on page 2-86
Attention: You cannot set up a value based hierarchy if your warehouse parameters are frozen. Ensure that you warehouse parameters are unfrozen before you begin. For more information on freezing warehouse parameters, see: Set Up Warehouse Parameters on page 2-11.
Implementing EDW 2-77

Set Up GL Value-Based Hierarchy
PrerequisitesBefore you set up your GL value based hierarchy, ensure that the following prerequisite has been met:
■ Configure all of your user-defined accounting dimensions using the BIS Configuration Assistant. See: Map Flexfields to User-Defined Accounting Dimensions on page 2-34
■ Ensure that your warehouse parameters are not frozen. See: Set Up Warehouse Parameters on page 2-11.
Set Up Source Set of BooksTo set up your value-based hierarchy, you must choose of which set of books you want to load data from.
You cannot set up a source of books at this time if you have not already configured your user-defined accounting dimension using the BIS Configuration Assistant.
To set up the source set of books, do the following:1. Navigate to Setup > Value-Based Hierarchy Setup > Source Set of Books Setup.
The Source Set of Books Setup window appears.
Figure 2–31 Source Set of Books Setup Window
2. In the Source Set of Books Setup window, choose the Populate Table in Warehouse button or query the set of books that you want to use to summarize data. A list of sets of books appears.
2-78 Oracle E-Business Intelligence Embedded Data Warehouse Implementation Guide
Set Up GL Value-Based Hierarchy
If you choose the Populate Table in Warehouse button, all sets of books will appear in the window.
3. Delete any sets of books that you did not map to a user defined accounting dimension using the BIS Configuration Assistant. The records from the deleted sets of books will not be loaded.
4. Save your work.
5. Verify that the data was populated properly in each source system.
Note: For information on which sets of books you mapped to user-defined accounting dimensions, see Map Sources to Dimensions on page 2-33.
Note: You will not be able to save your work if you have frozen your warehouse parameters. If your parameters are frozen, unfreeze your parameters, then save your work. For more information on freezing your parameters, see: Set Up Warehouse Parameters on page 2-11.
Implementing EDW 2-79

Set Up GL Value-Based Hierarchy
Set Up Consolidation Set of BooksOnce you set up your source set of books, you must map the relationship between a parent and child set of books. Any set of books that has a consolidation relationship between segments should be mapped.
To set up the consolidation sets of books, do the following:1. Navigate to Setup > Value-Based Hierarchy Setup > Consolidation Set of Books
Setup. The Consolidation Set of Books Setup Window appears.
Figure 2–32 Consolidation Set of Books Setup Window
2. In the Instance field, choose the instance that contains the parent and child sets of books.
3. In the Child Set of Books field, choose the set of books that is the child set of books. If there is only one parent set of books for the child set of books, the Parent Set of Books field is automatically populated.
4. If there is more than one parent set of books, in the Parent Set of Books field, choose a set of books that you want to use for consolidation. If there is only one
Note: If the relationship between a parent and child set of books has multiple consolidation rules, you can only choose one consolidation rule. For more information on consolidation rules, see the Oracle General Ledger User Guide.
2-80 Oracle E-Business Intelligence Embedded Data Warehouse Implementation Guide

Set Up GL Value-Based Hierarchy
consolidation rule defined between the parent and child set of books, the Consolidation Name field is automatically populated.
5. Save your work.
Note: The window will not prevent you from choosing more than one consolidation rule. If you choose more than one consolidation rule between a parent and child set of books, only the first consolidation rule will apply to the data load.
Implementing EDW 2-81
Set Up GL Value-Based Hierarchy
Set Up Equivalent Set of BooksIf a parent and a child set of books reside in different instances, you must define an equivalent set of books.
To set up an equivalent set of books, do the following:1. Navigate to Setup > Value-Based Hierarchy Setup > Equivalent Set of Books
Setup. The Equivalent Set of Books window appears.
2. In the Parent Instance field, choose the Parent Instance that you want to use. The Parent Set of Books field is automatically populated.
3. In the Equivalent Child Instance field, choose the child instance that you want to define an equivalent set of books for. The Equivalent Child Set of Books field is automatically populated..
4. Repeat steps 2 to 3 for each equivalent set of books relationship that you want to define.
5. Save your work.
2-82 Oracle E-Business Intelligence Embedded Data Warehouse Implementation Guide
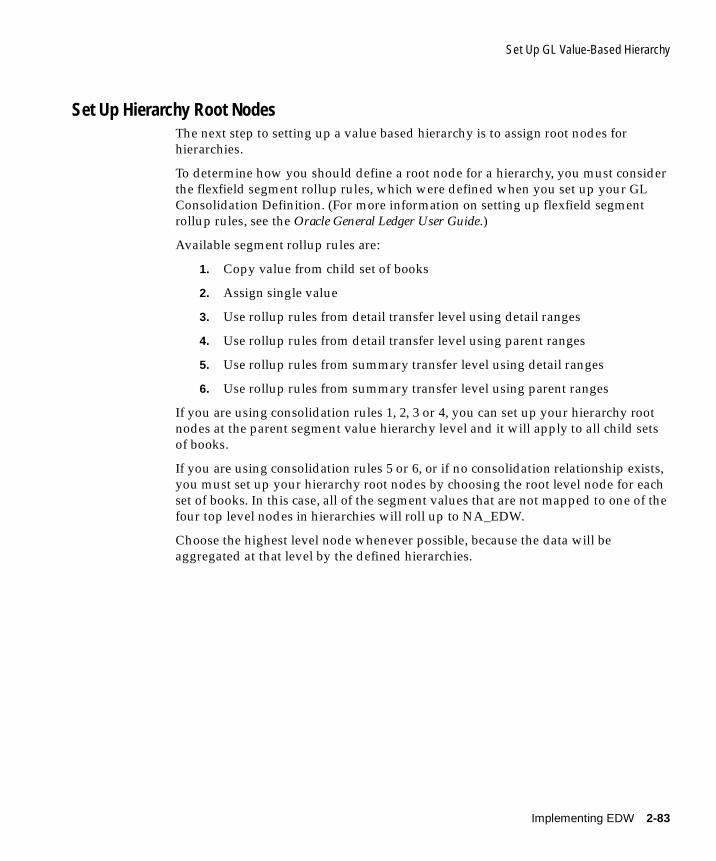
Set Up GL Value-Based Hierarchy
Set Up Hierarchy Root NodesThe next step to setting up a value based hierarchy is to assign root nodes for hierarchies.
To determine how you should define a root node for a hierarchy, you must consider the flexfield segment rollup rules, which were defined when you set up your GL Consolidation Definition. (For more information on setting up flexfield segment rollup rules, see the Oracle General Ledger User Guide.)
Available segment rollup rules are:
1. Copy value from child set of books
2. Assign single value
3. Use rollup rules from detail transfer level using detail ranges
4. Use rollup rules from detail transfer level using parent ranges
5. Use rollup rules from summary transfer level using detail ranges
6. Use rollup rules from summary transfer level using parent ranges
If you are using consolidation rules 1, 2, 3 or 4, you can set up your hierarchy root nodes at the parent segment value hierarchy level and it will apply to all child sets of books.
If you are using consolidation rules 5 or 6, or if no consolidation relationship exists, you must set up your hierarchy root nodes by choosing the root level node for each set of books. In this case, all of the segment values that are not mapped to one of the four top level nodes in hierarchies will roll up to NA_EDW.
Choose the highest level node whenever possible, because the data will be aggregated at that level by the defined hierarchies.
Implementing EDW 2-83
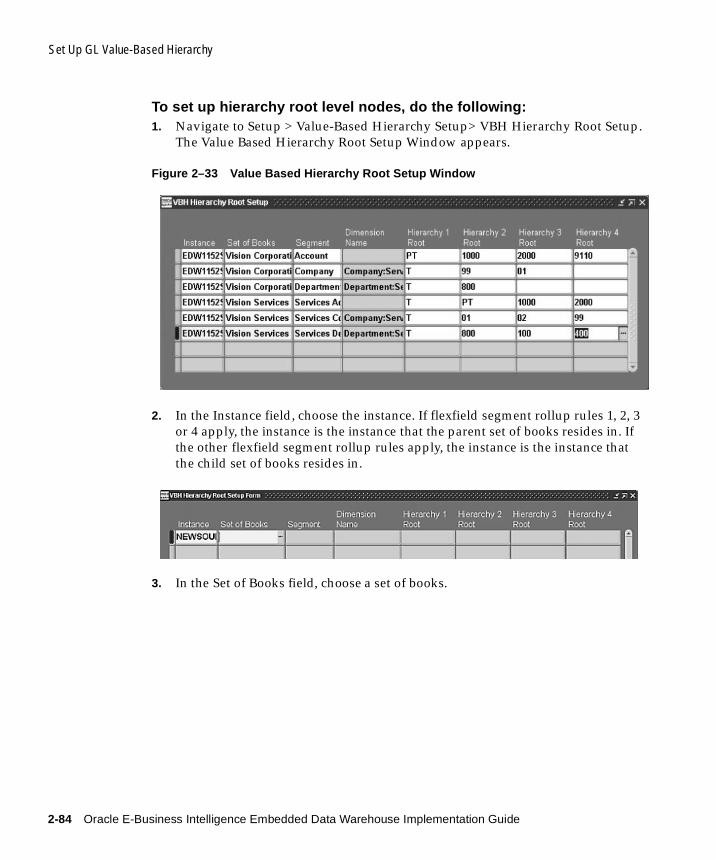
Set Up GL Value-Based Hierarchy
To set up hierarchy root level nodes, do the following:1. Navigate to Setup > Value-Based Hierarchy Setup> VBH Hierarchy Root Setup.
The Value Based Hierarchy Root Setup Window appears.
Figure 2–33 Value Based Hierarchy Root Setup Window
2. In the Instance field, choose the instance. If flexfield segment rollup rules 1, 2, 3 or 4 apply, the instance is the instance that the parent set of books resides in. If the other flexfield segment rollup rules apply, the instance is the instance that the child set of books resides in.
3. In the Set of Books field, choose a set of books.
2-84 Oracle E-Business Intelligence Embedded Data Warehouse Implementation Guide
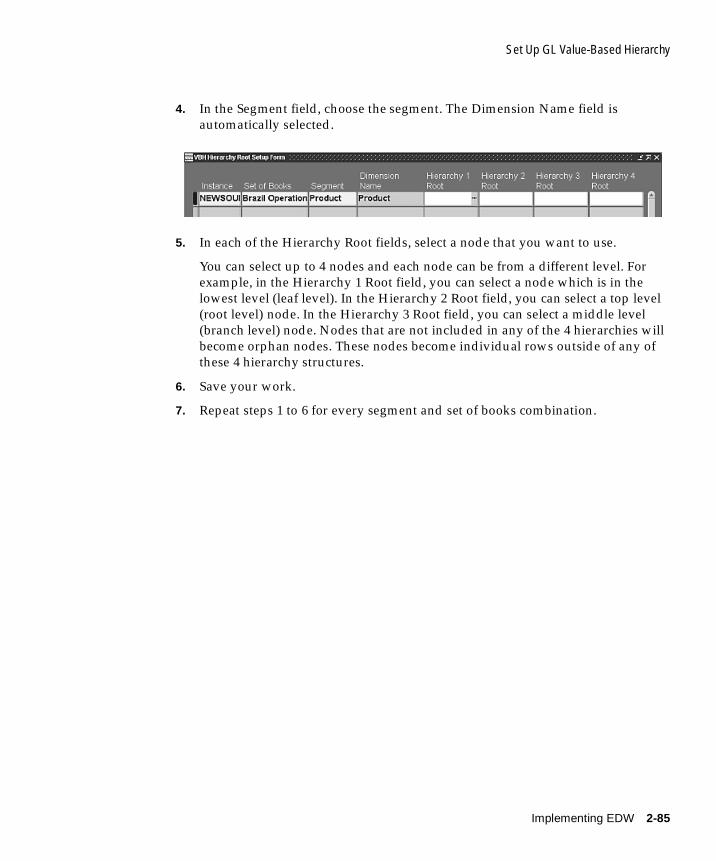
Set Up GL Value-Based Hierarchy
4. In the Segment field, choose the segment. The Dimension Name field is automatically selected.
5. In each of the Hierarchy Root fields, select a node that you want to use.
You can select up to 4 nodes and each node can be from a different level. For example, in the Hierarchy 1 Root field, you can select a node which is in the lowest level (leaf level). In the Hierarchy 2 Root field, you can select a top level (root level) node. In the Hierarchy 3 Root field, you can select a middle level (branch level) node. Nodes that are not included in any of the 4 hierarchies will become orphan nodes. These nodes become individual rows outside of any of these 4 hierarchy structures.
6. Save your work.
7. Repeat steps 1 to 6 for every segment and set of books combination.
Implementing EDW 2-85
Set Up GL Value-Based Hierarchy
Set Up TypesYou can set up types to summarize your data on a more granular level.
To set up types, do the following:1. Navigate to Setup > Value-Based Hierarchy Setup > VBH Type Setup. The VBH
Type Setup window appears.
2. In the Type field, enter the name of the type that you want to define.
3. In the Instance field, choose the instance that you want to define a type for.
4. In the Set of Books field, choose the set of books that you want to define a type for.
5. In the Segment field, choose the flexfield segment that you want to define a type for. The Warehouse Dimension field is automatically populated based on the chosen segment field.
6. In the Value field, assign a value to the type.
For example, if you are defining the Revenue type, the value should be a rollup level account number that represents Revenue type. If there is more than one rollup level account number representing Revenue type, every rollup level account number has to be set up as one row in this window.
7. Repeat steps 1 to 6 for each type you want to set up on each instance and set of books.
8. Save your work.
This completes the steps that you need to do to set up your GL value based hierarchies.
Note: Do not define hierarchical relationships between types.
2-86 Oracle E-Business Intelligence Embedded Data Warehouse Implementation Guide
Set Up Units of Measure
Set Up Units of MeasureThis section describes how to set up units of measure (UOMs) on your source systems and warehouse.
UOMs are used by a variety of applications to express the quantity of items or terms. UOMs are not organization-specific.
Each database instance can have a different set of UOMs. Therefore, when you set up your warehouse, you must define the set of UOMs that you want to use on the warehouse instance. You must also define conversion rates between the warehouse units of measure and the source units of measure (instance UOMs).
When you define your set of warehouse UOMs, you must define:
■ Base UOMs which serve as the base unit of measurement for all related warehouse UOMs. For example a base UOM might be Gallon.
■ Warehouse UOMs which express the quantity of items or terms on the warehouse across all source systems. Each warehouse UOM must be related to a base UOM. The value of a warehouse UOM is calculated using the base UOM and a conversion rate. For example, if you have a base UOM of Gallon, the related warehouse UOMs might be Pint and Quart. Since there are eight Pints and four Quarts in a Gallon, the conversion rates would be 0.125 and 0.25, respectively.
If a UOM is standard across all instances and interpreted uniformly, then you can set Global field to Y and the UOM becomes a global warehouse UOM.
For example, if you set up kilometer as a base UOM, you could set up meter as a related warehouse UOM with a conversion rate of 0.001.
Note: You cannot define warehouse UOMs, unless you have already defined UOMs on every source instance.
Implementing EDW 2-87
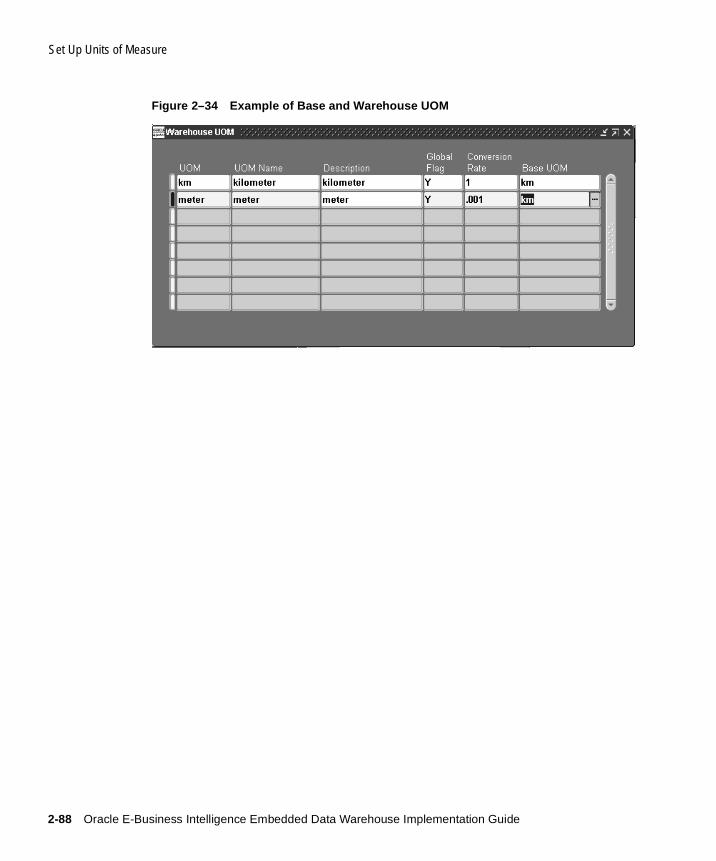
Set Up Units of Measure
Figure 2–34 Example of Base and Warehouse UOM
2-88 Oracle E-Business Intelligence Embedded Data Warehouse Implementation Guide
Set Up Units of Measure
After you define your warehouse UOMs, you must map the UOMs from the source instance (known as Instance UOMs) to the warehouse UOMs. Instance UOMs may or may not differ from your base and warehouse UOMs. For example, you can use inches and feet as UOMs on the source instance, but you may use centimeter and meter as UOMs on the warehouse.
If your instance UOMs are not the same as your warehouse UOMs, then you must map the instance UOMs to the warehouse UOMs and specify a conversion rate.
If the instance UOMs are the same as your warehouse UOMs, and the warehouse UOM is a global warehouse UOM, then you do not have to map the source instance.
In general, when you set up your UOMs you must do so in the following order:
1. Set up base UOMs
2. Set up warehouse UOMs and global warehouse UOMs
3. Map instance UOMs to global warehouse UOMs
To successfully load data from your source instances to the warehouse, you must map the instance UOMs on each source system to your warehouse UOMs and specify a conversion rate.
If the UOM is a global warehouse UOM, you do not have to map instance UOMs to warehouse UOMs. If you have only one source instance, then you can define each of your instance UOMs as global UOMs on the warehouse and skip the instance mapping
This section contains the following topics.
■ Set Up UOMs on page 2-90
■ Map Instance UOMs to Warehouse UOMs on page 2-92
■ Set Up Base UOM Mapping on page 2-95
Implementing EDW 2-89
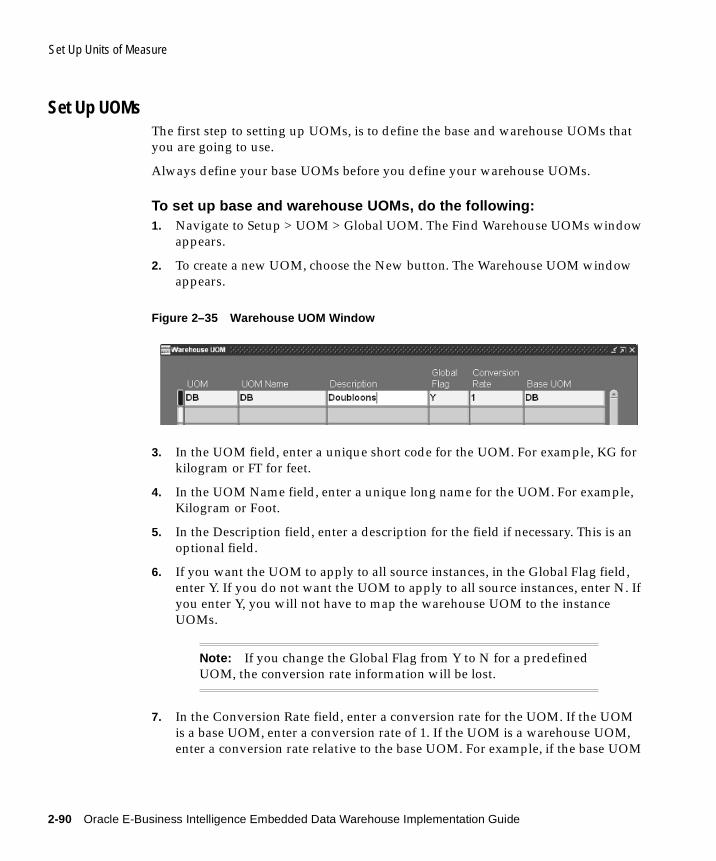
Set Up Units of Measure
Set Up UOMsThe first step to setting up UOMs, is to define the base and warehouse UOMs that you are going to use.
Always define your base UOMs before you define your warehouse UOMs.
To set up base and warehouse UOMs, do the following:1. Navigate to Setup > UOM > Global UOM. The Find Warehouse UOMs window
appears.
2. To create a new UOM, choose the New button. The Warehouse UOM window appears.
Figure 2–35 Warehouse UOM Window
3. In the UOM field, enter a unique short code for the UOM. For example, KG for kilogram or FT for feet.
4. In the UOM Name field, enter a unique long name for the UOM. For example, Kilogram or Foot.
5. In the Description field, enter a description for the field if necessary. This is an optional field.
6. If you want the UOM to apply to all source instances, in the Global Flag field, enter Y. If you do not want the UOM to apply to all source instances, enter N. If you enter Y, you will not have to map the warehouse UOM to the instance UOMs.
7. In the Conversion Rate field, enter a conversion rate for the UOM. If the UOM is a base UOM, enter a conversion rate of 1. If the UOM is a warehouse UOM, enter a conversion rate relative to the base UOM. For example, if the base UOM
Note: If you change the Global Flag from Y to N for a predefined UOM, the conversion rate information will be lost.
2-90 Oracle E-Business Intelligence Embedded Data Warehouse Implementation Guide

Set Up Units of Measure
is kilometer, and you are defining a warehouse UOM of meter, then you would specify a conversion rate of .001.
8. If the UOM is a base UOM, in the Base UOM field enter the short code for the UOM. You defined the short code for the UOM in step 3.
9. Save your work.
10. Run the Load UOM Dimension concurrent program. The UOMs that you defined are loaded to the warehouse. For more information on running concurrent programs, see the Oracle Applications User Guide.
11. Verify that the UOM definitions are correct by doing a find in the Find Warehouse UOMs window.
Note: You must define base UOMs before you can define warehouse UOMs.
Note: You will not be able to see the UOM that you just created in the Warehouse UOM window until you run the Load UOM Dimension concurrent program.
Implementing EDW 2-91
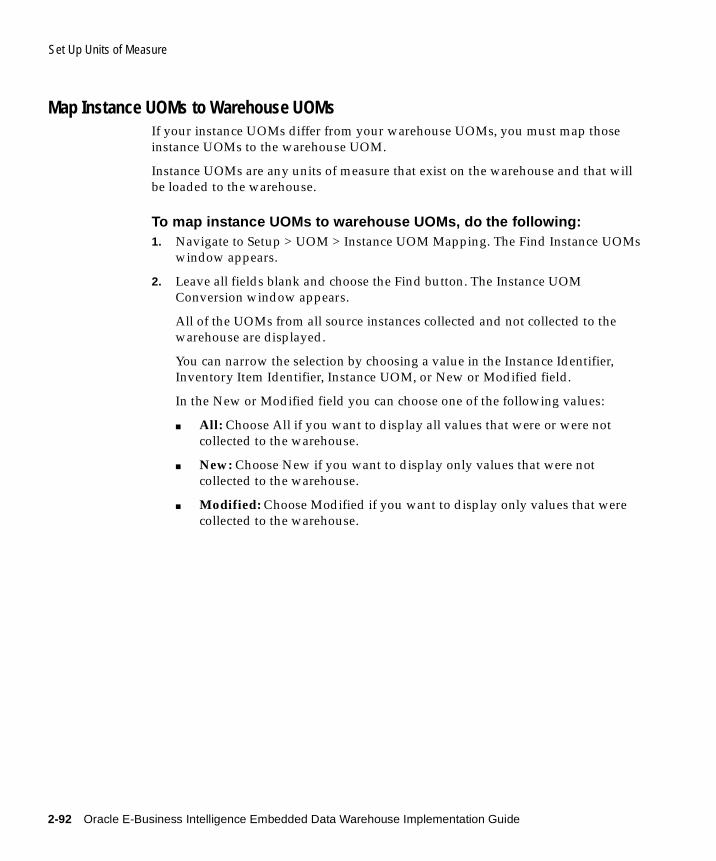
Set Up Units of Measure
Map Instance UOMs to Warehouse UOMsIf your instance UOMs differ from your warehouse UOMs, you must map those instance UOMs to the warehouse UOM.
Instance UOMs are any units of measure that exist on the warehouse and that will be loaded to the warehouse.
To map instance UOMs to warehouse UOMs, do the following:1. Navigate to Setup > UOM > Instance UOM Mapping. The Find Instance UOMs
window appears.
2. Leave all fields blank and choose the Find button. The Instance UOM Conversion window appears.
All of the UOMs from all source instances collected and not collected to the warehouse are displayed.
You can narrow the selection by choosing a value in the Instance Identifier, Inventory Item Identifier, Instance UOM, or New or Modified field.
In the New or Modified field you can choose one of the following values:
■ All: Choose All if you want to display all values that were or were not collected to the warehouse.
■ New: Choose New if you want to display only values that were not collected to the warehouse.
■ Modified: Choose Modified if you want to display only values that were collected to the warehouse.
2-92 Oracle E-Business Intelligence Embedded Data Warehouse Implementation Guide

Set Up Units of Measure
Figure 2–36 Instance UOM Conversion Window Warehouse UOM Tabbed Region
3. Choose the Warehouse UOM tabbed region.
The Instance Identifier, Instance UOM, and Warehouse Base UOM fields are all grayed out.
If an instance UOM matches a warehouse UOM and the Global Flag field for the warehouse instance is set to Y, the row that contains the instance UOM is grayed out and you do not have to map the instance UOM.
However, if an instance UOM does not match a warehouse UOM, or if it matches the warehouse UOM but the Global Flag field is set to N for the warehouse instance, you must map the instance UOM.
4. For each instance UOM that you must map, do the following:
a. In the Warehouse UOM field, select the warehouse UOM that you want to map the instance UOM to.
b. In the Warehouse Conversion Rate field, enter the conversion rate that you want to use to convert the instance UOM to the warehouse’s base UOM.
For example, if PA-Days is an instance UOM, map the instance UOM to the warehouse UOM: Days. Then, because the Days warehouse UOM is based on the HR base UOM, enter a conversion rate of 24.
c. Repeat steps a to b for each instance UOM that needs to be mapped.
Implementing EDW 2-93
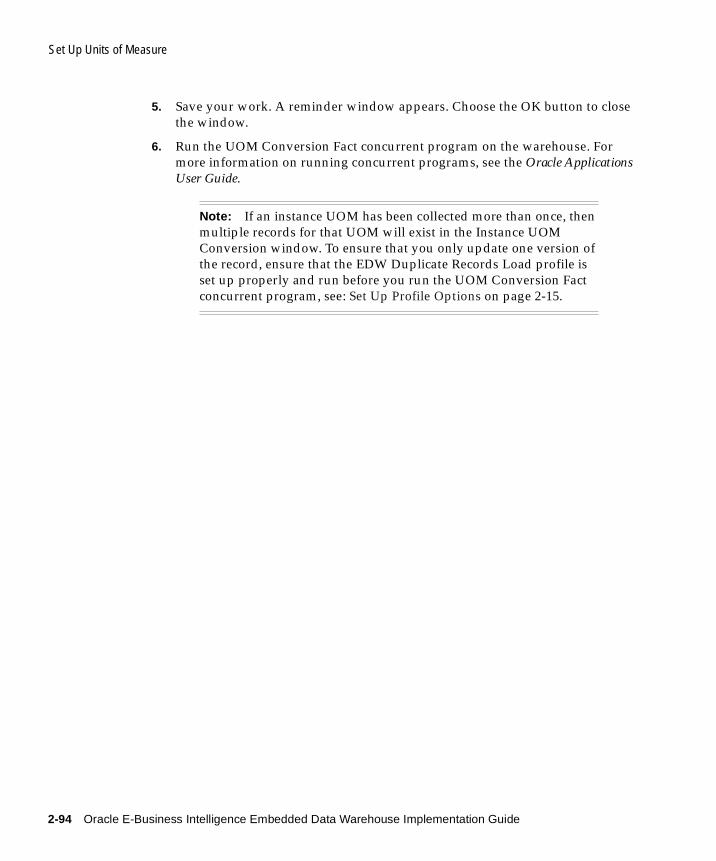
Set Up Units of Measure
5. Save your work. A reminder window appears. Choose the OK button to close the window.
6. Run the UOM Conversion Fact concurrent program on the warehouse. For more information on running concurrent programs, see the Oracle Applications User Guide.
Note: If an instance UOM has been collected more than once, then multiple records for that UOM will exist in the Instance UOM Conversion window. To ensure that you only update one version of the record, ensure that the EDW Duplicate Records Load profile is set up properly and run before you run the UOM Conversion Fact concurrent program, see: Set Up Profile Options on page 2-15.
2-94 Oracle E-Business Intelligence Embedded Data Warehouse Implementation Guide
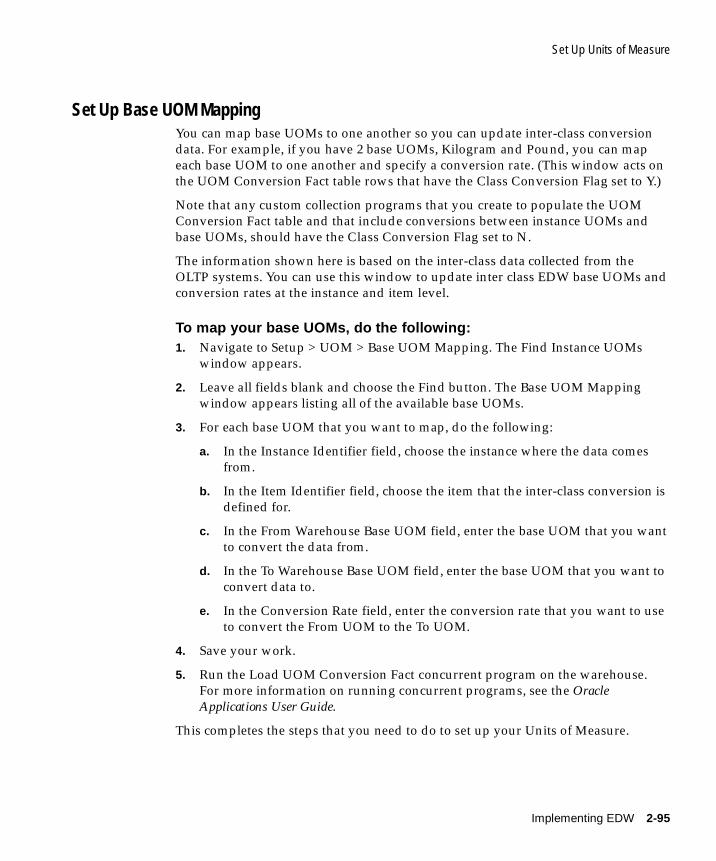
Set Up Units of Measure
Set Up Base UOM MappingYou can map base UOMs to one another so you can update inter-class conversion data. For example, if you have 2 base UOMs, Kilogram and Pound, you can map each base UOM to one another and specify a conversion rate. (This window acts on the UOM Conversion Fact table rows that have the Class Conversion Flag set to Y.)
Note that any custom collection programs that you create to populate the UOM Conversion Fact table and that include conversions between instance UOMs and base UOMs, should have the Class Conversion Flag set to N.
The information shown here is based on the inter-class data collected from the OLTP systems. You can use this window to update inter class EDW base UOMs and conversion rates at the instance and item level.
To map your base UOMs, do the following:1. Navigate to Setup > UOM > Base UOM Mapping. The Find Instance UOMs
window appears.
2. Leave all fields blank and choose the Find button. The Base UOM Mapping window appears listing all of the available base UOMs.
3. For each base UOM that you want to map, do the following:
a. In the Instance Identifier field, choose the instance where the data comes from.
b. In the Item Identifier field, choose the item that the inter-class conversion is defined for.
c. In the From Warehouse Base UOM field, enter the base UOM that you want to convert the data from.
d. In the To Warehouse Base UOM field, enter the base UOM that you want to convert data to.
e. In the Conversion Rate field, enter the conversion rate that you want to use to convert the From UOM to the To UOM.
4. Save your work.
5. Run the Load UOM Conversion Fact concurrent program on the warehouse. For more information on running concurrent programs, see the Oracle Applications User Guide.
This completes the steps that you need to do to set up your Units of Measure.
Implementing EDW 2-95

Set Up Purchasing Intelligence
Set Up Purchasing Intelligence If you are implementing Purchasing Intelligence, you must set up responsibilities, custom measure surveys, and profile options for that intelligence area on the source systems.
This section contains the following topics.
■ Set Up Purchasing Intelligence Responsibilities on page 2-97
■ Set up Custom Measure Survey on page 2-98
■ Set Up Purchasing Intelligence Profile Options on page 2-102
2-96 Oracle E-Business Intelligence Embedded Data Warehouse Implementation Guide
Set Up Purchasing Intelligence
Set Up Purchasing Intelligence ResponsibilitiesBefore you can set up a custom measure survey, or set up the Purchasing Intelligence profile options, you must have a Purchasing Intelligence responsibility on each source system. The available responsibilities are:
■ Purchasing Intelligence – Enterprise Data Warehouse: Provides the user with access to the Purchasing Intelligence workbooks without Dun and Bradstreet data. Add this responsibility to users in the warehouse.
■ Purchasing Intelligence – Enterprise Data Warehouse (D&B Enabled): Provides the user with access to the Purchasing Intelligence workbooks with Dun and Bradstreet data. Add this responsibility to users in the warehouse.
■ Purchasing Intelligence User: Provides the user with access to the Manage Survey window. Users with the responsibility can create custom measure surveys. Add this responsibility to users in the source systems.
■ Purchasing Intelligence Survey: Provides access to users who need to enter custom measure survey data. Add this responsibility to users in the source systems. The responsibility is accessed through Oracle Self Service Applications.
For information on how to set up responsibilities in Oracle Applications, see the Oracle Applications User Guide.
Implementing EDW 2-97
Set Up Purchasing Intelligence
Set up Custom Measure SurveyThe Purchasing Intelligence custom measure survey captures subjective information about supplier performance. Users can create surveys on any Oracle Applications instance. Surveys can only be given from the instance that they were created on.
You can create different types of surveys to meet your organization’s specific needs. Two entities are considered when you define surveys: the operating unit that geneartes the survey response; the commodity purchased from the supplier. The survey levels are as follows:
■ Global: The survey applies to all operating units and all commodities on site.
■ Operating Unit: The survey is applicable to a specific operating unit which originates the survey response, for all commodities purchased by that operating unit.
■ Commodity: The survey is applicable to a specific commodity purchased from the supplier for all operating units that purchase it.
■ Operating Unit and Commodity: The survey is applicable to a specific commodity purchased by the operating unit.
The survey type defines the scope of the survey. This enables you to select what type of survey you want to use for the specific supplier. For example, you can measure a supplier’s custom measure performance for the entire enterprise; or you can measure a supplier’s performance for a commodity ordered from a particular operating unit.
You can specify the operating unit and commodity when you enter a survey response. These parameters define the scope of the survey response; whether itís a general experience with a particular supplier or limited to a specific commodity purchased from the supplier by this operating unit. Based on these parameters, the system determines which survey is applicable.
The survey level order of precedence determines which survey will be used when there is more than one survey that is applicable. There are two possible orders:
■ Commodity, Operating Unit, Global
■ Operating Unit, Commodity, Global
The system first tries to find a survey that is a perfect match for the survey response parameters; if none exists, it matches the survey based on the order the entities appear in the order of precedence.
2-98 Oracle E-Business Intelligence Embedded Data Warehouse Implementation Guide

Set Up Purchasing Intelligence
For example, if you set the precedence to Operating Unit, Commodity, Global and you define the following surveys:
■ Survey 1 for Operating Unit 1 and Commodity 1
■ Survey 2 for only Operating Unit 1
■ Survey 3 for only Commodity 2
■ Survey 4 for Global (no Operating Unit or Commodity specified)
The following table shows which surveys will be used for the Operating Unit and Commodity combinations specified.
To create custom surveys, do the following:1. Log in to Oracle Applications on the source system using the system
administrator responsibility and do the following:
■ Assign the Purchasing Intelligence User responsibility to anyone who needs the ability to create a survey.
■ Assign the Purchasing Intelligence Survey responsibility to anyone who needs the ability to enter survey information.
2. To create the survey questions, log into Oracle Applications on the source system using any responsibility that has access to the Lookup Code window.
3. Navigate to Setup > Purchasing > Lookup Codes. The Lookup Codes window appears.
4. For each survey question that you want to define, enter the following information:
a. In the Type field, enter Customer Satisfaction Evaluation Criteria.
b. Then, in the other fields, enter the name of the question as you would like it to appear on the survey, a description of the question, and the date the question becomes inactive.
Table 2–4 Commodities Example
Operating Unit Commodity 1 Commodity 2 No Commodity
Operating Unit 1 Survey 1 Survey 2 Survey 2
Operating Unit 2 Survey 4 Survey 3 Survey 4
No Operating Unit Survey 4 Survey 3 Survey 4
Implementing EDW 2-99

Set Up Purchasing Intelligence
c. Repeat steps a to b for each question you want to define. You can define questions for multiple surveys at the same time.
5. Log in to the Oracle Applications on the source system where you want to create the survey using the Purchasing Intelligence User responsibility.
6. Navigate to Manage Survey. The Find Survey window appears.
7. In the Find Survey window, enter the operating unit, or commodity, or both that you want to define the survey for and choose the Find button.
If a survey defintion already exists for this level, it will appear in the Define Survey window. If no records appear, a survey does not exist for the level and you can define a new survey.
You can define a survey at the following levels:
■ Global: Do not specify an operating unit or commodity.
■ Operating Unit: Specify the operating unit, do not specify a commodity.
■ Commodity: Specify a commodity, do not specify an operating unit.
■ Operating Unit and Commodity: specify an operating unit and commodity.
8. For each question that you want to include on the survey, do the following:
a. Choose a question from the list of values.
b. Assign the question a minimum and maximum score.
c. Assign the question a weight. Questions should be weighted so that the total weight for all of the questions is equal to 100.
9. Log in to Oracle Applications on the source system using the System Administrator responsibility.
10. Navigate to Profile > System.
11. Set the PO: custome Measure Precedence profile option value to set the order of precedence to determine which survey to use. You can chose one of the following options.
■ Commodity, Operating Unit, Global
■ Operating Unit, Commodity, Global
12. Save your work.
2-100 Oracle E-Business Intelligence Embedded Data Warehouse Implementation Guide

Set Up Purchasing Intelligence
Once you have defined your surveys users can enter the survey responses by logging into Oracle Self Service Applications in the source system using the Purchasing Intelligence Survey responsibility.
Implementing EDW 2-101
Set Up Purchasing Intelligence
Set Up Purchasing Intelligence Profile OptionsIf you are using Purchasing Intelligence, you can set up the following Purchasing Intelligence profile options.
To set up the Purchasing Intelligence profile options, do the following:1. Log into the warehouse or source instance using the system administrator
responsibility.
2. Navigate to Personal Profile Values. A Find window appears.
3. Find the Purchasing Intelligence profile options by entering %POA% in the Find field. Choose the Find button.
2-102 Oracle E-Business Intelligence Embedded Data Warehouse Implementation Guide
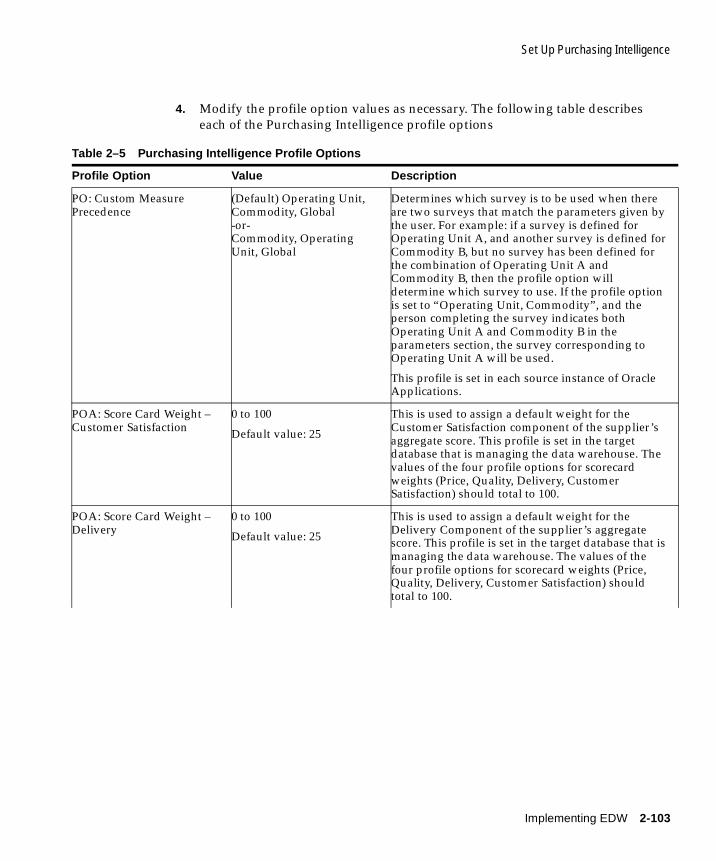
Set Up Purchasing Intelligence
4. Modify the profile option values as necessary. The following table describes each of the Purchasing Intelligence profile options
Table 2–5 Purchasing Intelligence Profile Options
Profile Option Value Description
PO: Custom Measure Precedence
(Default) Operating Unit, Commodity, Global -or- Commodity, Operating Unit, Global
Determines which survey is to be used when there are two surveys that match the parameters given by the user. For example: if a survey is defined for Operating Unit A, and another survey is defined for Commodity B, but no survey has been defined for the combination of Operating Unit A and Commodity B, then the profile option will determine which survey to use. If the profile option is set to “Operating Unit, Commodity”, and the person completing the survey indicates both Operating Unit A and Commodity B in the parameters section, the survey corresponding to Operating Unit A will be used.
This profile is set in each source instance of Oracle Applications.
POA: Score Card Weight – Customer Satisfaction
0 to 100
Default value: 25
This is used to assign a default weight for the Customer Satisfaction component of the supplier’s aggregate score. This profile is set in the target database that is managing the data warehouse. The values of the four profile options for scorecard weights (Price, Quality, Delivery, Customer Satisfaction) should total to 100.
POA: Score Card Weight – Delivery
0 to 100
Default value: 25
This is used to assign a default weight for the Delivery Component of the supplier’s aggregate score. This profile is set in the target database that is managing the data warehouse. The values of the four profile options for scorecard weights (Price, Quality, Delivery, Customer Satisfaction) should total to 100.
Implementing EDW 2-103
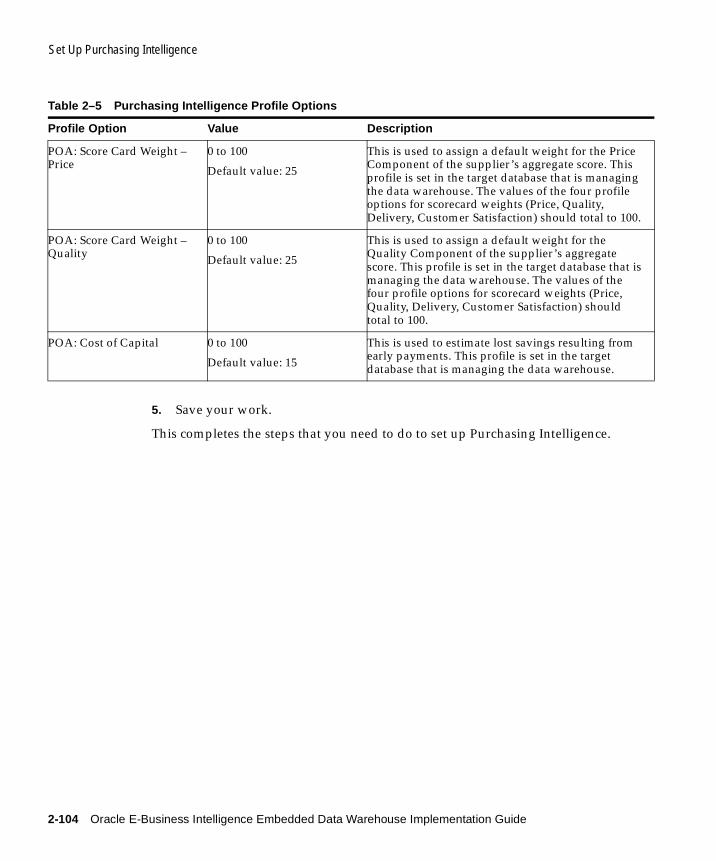
Set Up Purchasing Intelligence
5. Save your work.
This completes the steps that you need to do to set up Purchasing Intelligence.
POA: Score Card Weight – Price
0 to 100
Default value: 25
This is used to assign a default weight for the Price Component of the supplier’s aggregate score. This profile is set in the target database that is managing the data warehouse. The values of the four profile options for scorecard weights (Price, Quality, Delivery, Customer Satisfaction) should total to 100.
POA: Score Card Weight – Quality
0 to 100
Default value: 25
This is used to assign a default weight for the Quality Component of the supplier’s aggregate score. This profile is set in the target database that is managing the data warehouse. The values of the four profile options for scorecard weights (Price, Quality, Delivery, Customer Satisfaction) should total to 100.
POA: Cost of Capital 0 to 100
Default value: 15
This is used to estimate lost savings resulting from early payments. This profile is set in the target database that is managing the data warehouse.
Table 2–5 Purchasing Intelligence Profile Options
Profile Option Value Description
2-104 Oracle E-Business Intelligence Embedded Data Warehouse Implementation Guide
Configure Warehouse Security
Configure Warehouse SecurityYou can set up row-level security in the warehouse. By default, responsibilities can access all rows of a fact table. However, you can define the dimension level values that a responsibility has access to. When the user logs in as this responsibility, and performs a query on a fact table, the query will return only the rows in the fact table that are associated with the dimension level values that the responsibility has access to.
You can set up a responsibility to access multiple values for a given dimension level. For example, the Time dimension has 3 values: Order Date, Ship Date, and Invoice Date. If a responsibility has access to YR2001 data, the responsibility can only access the Order Dates, Ship Dates, or Invoice Dates in the year 2001. If a transaction is ordered and shipped within year 2001, but invoiced in year 2002, this responsibility will not have the access to this transaction.
To define security for a dimension, you must define the level in the dimension that you want to grant access to, and then define the value that you want to grant access to. The responsibility will be able to access all children of the dimension level that you specify.
For example, the GL period hierarchy in the Time dimension has 6 levels. These levels are calendar day, calendar period, calendar quarter, calendar year, calendar name, and all time. If you restrict a responsibility to the calendar year level and the values 1999, 2000, and 2001, the responsibility will be able to access any quarter, period, or day, in 1999, 2000, and 2001.
If multiple dimension level accesses are granted to a responsibility, the higher-level access will supersede the lower-level access. For example, if a responsibility is granted access to 4th quarter for the year 2000, but the user already has access to the calendar year level for 2001, the user will have access to all quarters, all periods, and all days in year 2000. Because the year level privileges are higher than quarter level privileges, the 4th quarter privileges are no longer applicable.
Ensure that your security definitions simple. Depending on which Oracle database version you are using, the database limits the length of the predicate (Where clause) that is used by the security function. The maximum length of the predicate returned by security function is 2000 characters for Oracle v8.1.6x database and 4000 characters for Oracle v8.1.7.x database.
The predicate length is not affected by the number of access values in same level; however, if you define security on large number of dimensions or large number of levels within a dimension, you may exceed the maximum predicate length for your
Implementing EDW 2-105

Configure Warehouse Security
database version. Whenever you exceed the maximum predicate length, you will not be able to query data and you will get the following error in Oracle Discoverer:
"Failed to execute policy function”.
The detailed error message is logged in the EDW_ERROR_LOG table. To view the error message, query the EDW_ERROR_LOG table with condition 'where object_type = 'Security Procedure'. If the predicate has exceeded the maximum length, the following message appears:
“Predicate length exceeds maximum allowable limit”.
Additional Information: You can also use the Oracle Applications security features to set up security for your users and responsibilities. For more information on configuring security for users and responsibilities, see the Oracle Applications User Guide.
2-106 Oracle E-Business Intelligence Embedded Data Warehouse Implementation Guide
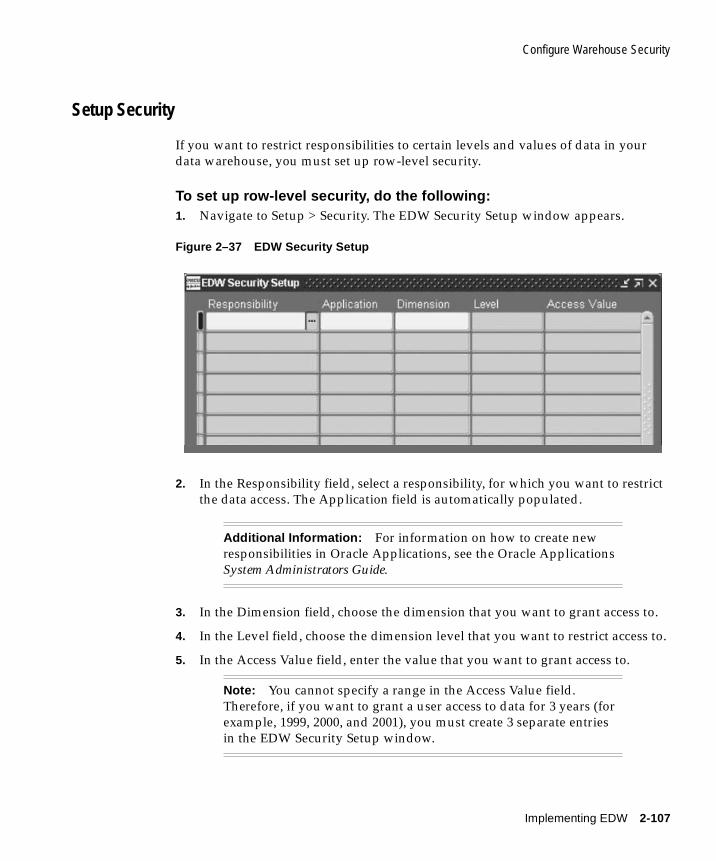
Configure Warehouse Security
Setup Security
If you want to restrict responsibilities to certain levels and values of data in your data warehouse, you must set up row-level security.
To set up row-level security, do the following:1. Navigate to Setup > Security. The EDW Security Setup window appears.
Figure 2–37 EDW Security Setup
2. In the Responsibility field, select a responsibility, for which you want to restrict the data access. The Application field is automatically populated.
3. In the Dimension field, choose the dimension that you want to grant access to.
4. In the Level field, choose the dimension level that you want to restrict access to.
5. In the Access Value field, enter the value that you want to grant access to.
Additional Information: For information on how to create new responsibilities in Oracle Applications, see the Oracle Applications System Administrators Guide.
Note: You cannot specify a range in the Access Value field. Therefore, if you want to grant a user access to data for 3 years (for example, 1999, 2000, and 2001), you must create 3 separate entries in the EDW Security Setup window.
Implementing EDW 2-107
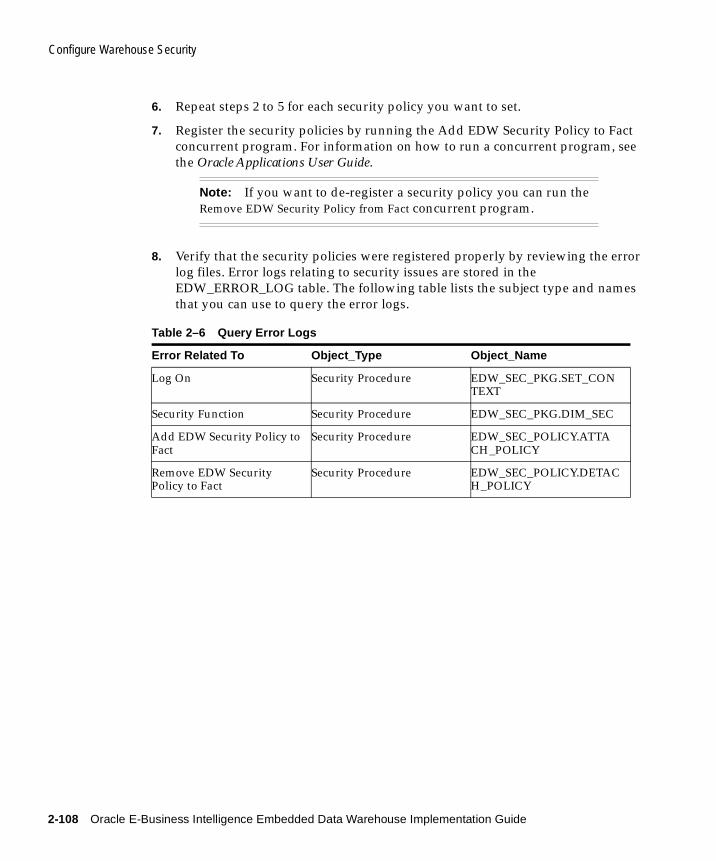
Configure Warehouse Security
6. Repeat steps 2 to 5 for each security policy you want to set.
7. Register the security policies by running the Add EDW Security Policy to Fact concurrent program. For information on how to run a concurrent program, see the Oracle Applications User Guide.
8. Verify that the security policies were registered properly by reviewing the error log files. Error logs relating to security issues are stored in the EDW_ERROR_LOG table. The following table lists the subject type and names that you can use to query the error logs.
Note: If you want to de-register a security policy you can run the Remove EDW Security Policy from Fact concurrent program.
Table 2–6 Query Error Logs
Error Related To Object_Type Object_Name
Log On Security Procedure EDW_SEC_PKG.SET_CONTEXT
Security Function Security Procedure EDW_SEC_PKG.DIM_SEC
Add EDW Security Policy to Fact
Security Procedure EDW_SEC_POLICY.ATTACH_POLICY
Remove EDW Security Policy to Fact
Security Procedure EDW_SEC_POLICY.DETACH_POLICY
2-108 Oracle E-Business Intelligence Embedded Data Warehouse Implementation Guide

Configure Warehouse Security
9. Save your work.
Note: Ensure that your security definitions simple. Depending on which Oracle database version you are using, the database limits the length of the predicate (Where clause) that is used by the security function. The maximum length of the predicate returned by security function is 2000 characters for Oracle v8.1.6x database and 4000 characters for Oracle v8.1.7.x database.
The predicate length is not affected by the number of access values in same level; however, if you define security on large number of dimensions or large number of levels within a dimension, you may exceed the maximum predicate length for your database version. Whenever you exceed the maximum predicate length, you will not be able to query data and you will get the following error in Oracle Discoverer:
"Failed to execute policy function”.
The detailed error message is logged in the EDW_ERROR_LOG table. To view the error message, query the EDW_ERROR_LOG table with condition 'where object_type = 'Security Procedure'. If the predicate has exceeded the maximum length, the following message appears:
“Predicate length exceeds maximum allowable limit”.
Implementing EDW 2-109

Configure Warehouse Security
2-110 Oracle E-Business Intelligence Embedded Data Warehouse Implementation Guide
Loading
3
Loading DataThis chapter describes how to load data into EDW.
This chapter contains the following topics.
■ Overview of Loading Data on page 3-2
■ Collecting Data from Sources on page 3-3
■ Loading Data to Warehouse on page 3-3
■ Monitoring Collect and Load Processes on page 3-4
■ Checklist for Loading Data on page 3-7
■ Test Collect and Load Process on page 3-8
■ Collect and Load Data on page 3-9
■ Collect and Load Dimensions on page 3-9
■ Collect and Load Facts on page 3-12
■ Use the Status Viewer to Monitor Collect and Load Status on page 3-13
■ Use the Interface Table Manager to Monitor and Update Data on page 3-16
■ Validate Collect and Load Data on page 3-25
■ Valdiate Collect and Load Data
■ Fix Dangling Records
■ Purge Interface Tables on Warehouse on page 3-31
Data 3-1
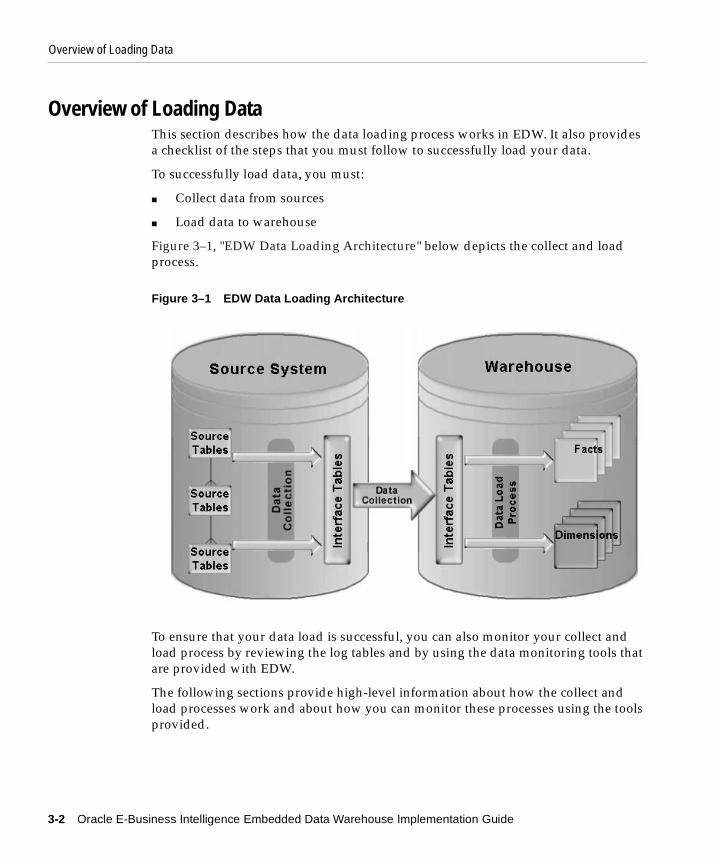
Overview of Loading Data
Overview of Loading DataThis section describes how the data loading process works in EDW. It also provides a checklist of the steps that you must follow to successfully load your data.
To successfully load data, you must:
■ Collect data from sources
■ Load data to warehouse
Figure 3–1, "EDW Data Loading Architecture" below depicts the collect and load process.
Figure 3–1 EDW Data Loading Architecture
To ensure that your data load is successful, you can also monitor your collect and load process by reviewing the log tables and by using the data monitoring tools that are provided with EDW.
The following sections provide high-level information about how the collect and load processes work and about how you can monitor these processes using the tools provided.
3-2 Oracle E-Business Intelligence Embedded Data Warehouse Implementation Guide

Overview of Loading Data
Collecting Data from SourcesTo collect data, you must run the EDW collection programs on each source system that you want to collect data from. These programs extract transactional data from the source system tables using database views. Database views collect fact data from the transactional tables at the correct level of granularity for the warehouse. They also collect dimension-level data from the correct transactional tables.
Because the collection process decouples the source systems from the warehouse, you can:
■ Collect data from multiple source systems at the same time
■ Collect data from different source systems at different times
Loading Data to WarehouseOnce you collect data from the source systems, you must load data to the warehouse by running the EDW loader programs. These programs move the data from the interface tables to the fact, dimension and dimension level tables.
When you load data, keep the following rules in mind.
1. How much historical data do you want to load?
For each time period, how much historical data do you want to load from the source systems into the warehouse. If the volume of data is large, plan on dividing the history load into smaller time periods.
2. How frequently do you want to load data?
For each fact and dimension-level table, determine how often incremental data should be loaded to allow for an effective warehouse. Some facts and dimensions may need to be loaded on a daily or hourly basis, and others may need to be loaded on a weekly or monthly basis.
3. Are there any dependencies between dimensions and facts?
For each fact and dimension-level table, determine if the fact is dependent on any dimensions. If a dependency exists, then if a fact needs to be loaded every day, then all the supporting dimensions need to be loaded every day, before the fact data is loaded.
Loading Data 3-3
Overview of Loading Data
When you load data, you must load it in the following order:
■ Dimensions, including Dun and Bradstreet dimensions
■ Facts
Loading data in this order prevents problems with dangling records.
Loader EngineWhen you run the loader programs, the loader engine processes the records, and checks the data for errors such as dangling foreign keys and other data integrity problems such as duplicate rows. If the data is error-free, data is loaded into the facts, dimensions, and dimension-level tables in the warehouse.
If the loaded data has errors, such as duplicate records, dangling records, or other errors, the loader engine will change the status of the records in the interface tables. You can use the Status Viewer to monitor progress of the load.
Monitoring Collect and Load ProcessesYou can monitor the success of your data collect and data load processes by using the Status Viewer and Interface Table Manager tools, or by reviewing the log tables on the warehouse.
The Status Viewer enables you to view the results of collections and loads from each of the source instances in the interface tables. The status viewer displays the number of records collected and loaded for each fact and dimension from each source instance. You can also use this status viewer to find out how long each collect and load process took.
You can also use the status viewer to monitor the progress of the load. The Load Progress monitor is constantly updated as new activities are started.
The interface table manager enables you to query the interface table entries for the facts and dimensions that were collected.
The log tables store information about the collect and load process, such as the time data was collected and loaded, the number of rows that were collected and loaded, and whether or not the collect and load processes were successful.
It is good practice to periodically verify the validity of the data collected from the source systems and loaded to the warehouse.
3-4 Oracle E-Business Intelligence Embedded Data Warehouse Implementation Guide
Overview of Loading Data
Validate DataOnce you collect and load your data, you must validate the data in the interface tables to ensure that you did not have any errors due to dangling or duplicate records.
Dangling RecordsWhen data is loaded from interface tables to the star tables on the warehouse, the loader engine validate the foreign key reference. If the record’s foreign key has an invalid value, the loader engine will not transfer the record into its related star table. This record will be left in the interface table and the collection_status field will be updated to 'DANGLING'.
There are two types of dangling records that can occur.
■ Dimension level dangling: An invalid foreign key reference exists from child dimension level record to parent dimension level record.
■ Fact to dimension dangling: An invalid foreign key reference exists from the fact record to dimension record.
There are two major causes for the dangling records.
1. Missing date range: For dimension level dangling, if the child level data of a specific dimension is collected into the interface table while its related parent level data which might be created earlier is not included in the collection date range, when the loader engine validate the child record it could not find its parent in the interface table, the record will be marked as dangling.
For example, for Trade Partner dimension, the Trade Partner is the parent level of Trade Partner Location. One Trade Partner value could be created in 1999 while its location value is created in 2000. If for some reason, you only collected the trade partner dimension for the year 2000, all the Location records would be marked as dangling since their foreign key reference to their parent level data Trade Partner are invalid.
2. Transaction data corruption: Sometimes, even your collection date range covered all the possible data, you still find dangling records. That could be caused by the transaction data corruption.
For example, one transaction record was created in 2000, but due to the Y2K problem the last_update_date was updated as 1900. In this case, the user should fix the corrupted transaction data before they proceed recollecting the data.
Loading Data 3-5
Overview of Loading Data
Tips for Avoiding Dangling Records■ To avoid dimension level dangling, always collect/load dimesion data forward
and not backward.
For example, your company started at 1960, you should collect all your dimensions from 1960 to current date.
■ To avoid fact to dimension dangling, always collect and load all dimensions before you collect and load facts.
Duplicate RecordsDuplicate record errors will occur if you set the EDW:Duplicate Records Loaded profile option to No. If you have this profile option set to No, then the loader engine will reject any duplicate records that are loaded to the warehouse. See: Set Up Profile Options on page 2-15.
To fix duplicate record errors, you must either fix the problem on the source systems, or you must modify the data in the interface tables. For more information on how to modify data in the interface tables, see: Use the Interface Table Manager to Monitor and Update Data on page 3-16.
3-6 Oracle E-Business Intelligence Embedded Data Warehouse Implementation Guide
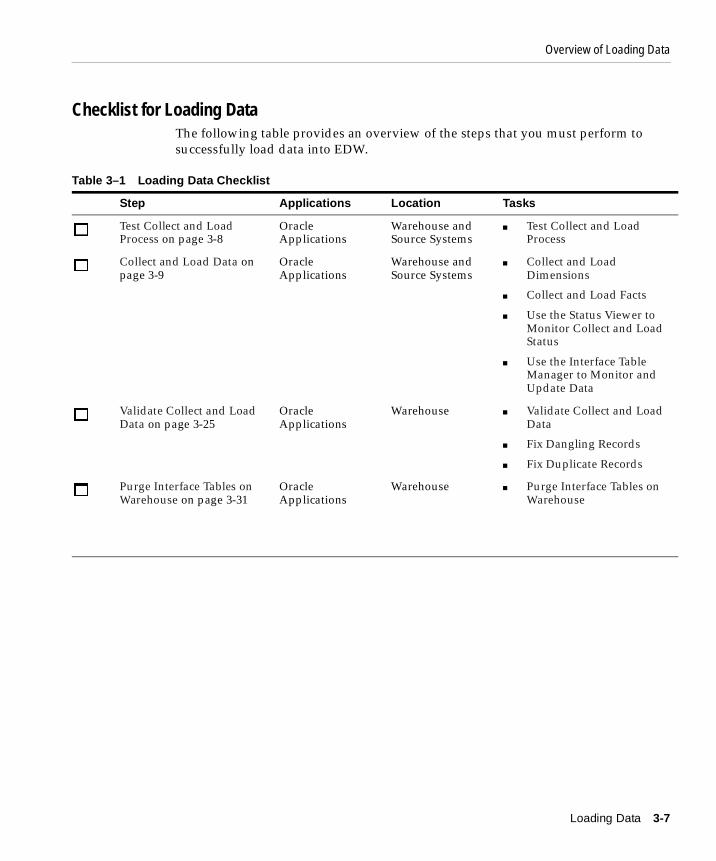
Overview of Loading Data
Checklist for Loading Data The following table provides an overview of the steps that you must perform to successfully load data into EDW.
Table 3–1 Loading Data Checklist
Step Applications Location Tasks
� Test Collect and Load Process on page 3-8
Oracle Applications
Warehouse and Source Systems
■ Test Collect and Load Process
� Collect and Load Data on page 3-9
Oracle Applications
Warehouse and Source Systems
■ Collect and Load Dimensions
■ Collect and Load Facts
■ Use the Status Viewer to Monitor Collect and Load Status
■ Use the Interface Table Manager to Monitor and Update Data
� Validate Collect and Load Data on page 3-25
Oracle Applications
Warehouse ■ Validate Collect and Load Data
■ Fix Dangling Records
■ Fix Duplicate Records
� Purge Interface Tables on Warehouse on page 3-31
Oracle Applications
Warehouse ■ Purge Interface Tables on Warehouse
Loading Data 3-7
Test Collect and Load Process
Test Collect and Load ProcessUse a small set of data to test the collect and load process before you try to collect and load all of your data. This test will ensure that you have set up your source and warehouse information correctly.
To perform the test, follow the instructions in Collect and Load Data on page 3-9, and use a small data set that includes dimensions, Dun and Bradstreet dimensions (if applicable), and facts.
Use the Status Viewer and the Interface Table Manager to monitor the progress of your test collect and load and ensure that the data has loaded correctly.
Attention: Ensure that the instance UOMs and warehouse UOMs are set up before you load your data. See: Set Up Units of Measure on page 2-87.
3-8 Oracle E-Business Intelligence Embedded Data Warehouse Implementation Guide
Collect and Load Data
Collect and Load DataCollect your data first. Then, load your data in the following order:
■ Dimensions, including Dun and Bradstreet Dimensions
■ Facts
Collect and Load Dimensions Dimensions are the first objects that must be collected and loaded to the warehouse.
If you are using the DUNS and UNSPSC dimensions, you must collect and load your Dun and Bradstreet data separately from your other dimensions. Collect and load Dun and Bradstreet data after you collect and load dimensions, but before you collect and load facts to the warehouse.
To collect and load Dun and Bradstreet data, you must export your supplier and item data into text files and send the files to Dun and Bradstreet for processing. Dun and Bradstreet will then return a text file containing information about your suppliers and items. Once you receive the file from Dun and Bradstreet, you can load your data to the warehouse.
To collect and load dimensions, do the following:1. In the source system that you are collecting data from, ensure that the
concurrent manager has write privileges to directory APPLTMP.
2. Run the collection programs. The collection programs collect data from the source system and move it to the interface tables on the warehouse. For a complete list of the collection programs provided with EDW, see: Appendix B, "Concurrent Programs".
3. On the warehouse, use the Status Viewer tools to monitor the progress of the collection. For more information, see: Use the Status Viewer to Monitor Collect and Load Status on page 3-13.
4. Run the load programs to load the data from interface tables into the dimension tables. For a complete list of the load programs provided with EDW, see: Appendix B, "Concurrent Programs".
5. On the warehouse, use the Status Viewer tools to monitor the progress of the load. For more information, see: Use the Status Viewer to Monitor Collect and Load Status on page 3-13.
Loading Data 3-9
Collect and Load Data
6. On the warehouse, use the Interface Table Manager to view and manage the data that was loaded. For more information, see: Use the Interface Table Manager to Monitor and Update Data on page 3-16.
7. Repeat steps 1 to 6 for each source that you want to collect and load dimensions from.
To collect and load Dun and Bradstreet dimensions, do the following:1. In the warehouse, run the following concurrent programs:
■ Generate Item List
■ Generate Trading Partner List
The following files are generated and stored in the directory where your concurrent request output files are stored.
■ <user name>.<concurrent request id for Generate Item List>
■ <user name>.<concurrent request id for Generate Trade Partner List>
2. Rename output files using the following format:
■ EDW_ITEMS_<Dun and Bradstreet account number>.csv
■ EDW_TRPR_<Dun and Bradstreet account number>.csv
3. Send these files to Dun and Bradstreet.
Dun and Bradstreet will add their data to these files and send them back to you.
4. Place the data files that you receive from Dun and Bradstreet into the directory where log files for the target warehouse concurrent processes are stored.
5. Run the following concurrent programs as single requests in the order listed:
Note: The user name is determined by your Oracle Applications login. The concurrent request ID is assigned by the application when the concurrent request is submitted.
Note: You must register the warehouse as a source before you load the Dun and Bradstreet dimensions (see: Set Up Source Systems on Warehouse on page 2-10). Otherwise, the collection programs will fail.
3-10 Oracle E-Business Intelligence Embedded Data Warehouse Implementation Guide
Collect and Load Data
■ Upload DUNS Dimension
■ Upload UNSPSC Dimension
■ Collect DUNS Dimension
■ Collect UNSPSC Dimension
■ Load DUNS Dimension
■ Load UNSPSC Dimension
Existing records in the Purchasing Intelligence fact tables, that have trading partner or item information, are updated when the loader requests are run.
6. On the warehouse, use the Status Viewer tools to monitor the progress of the collect and load process. For more information, see Use the Status Viewer to Monitor Collect and Load Status on page 3-13.
7. On the warehouse, use the Interface Table Manager to view and manage the data that was collected and loaded. For more information, see: Use the Interface Table Manager to Monitor and Update Data on page 3-16.
Loading Data 3-11
Collect and Load Data
Collect and Load Facts After you have loaded your dimensions and your Dun and Bradstreet dimensions, load your facts to the warehouse.
Before you start to load your facts, ensure that:
■ Test load was successful and any problems with profile options, UOMs, or flexfields have been resolved
■ All dimensions were successfully loaded
To load facts, do the following:1. In the source system, run the fact collection programs. The programs collect fact
data from the source system and move it to the interface tables on the warehouse. For a complete list of the collection programs provided with EDW, see: Appendix B, "Concurrent Programs".
2. Use the Status Viewer to ensure that the data was successfully collected. For more information, see: Use the Status Viewer to Monitor Collect and Load Status on page 3-13.
3. On the warehouse, run the load programs to load data from the interface tables to the fact tables. For a complete list of the load programs provided with EDW, see: Appendix B, "Concurrent Programs".
4. Use the Status Viewer to ensure that the data was successfully collected and loaded. For more information, see: Use the Status Viewer to Monitor Collect and Load Status on page 3-13.
5. Use the Interface Table Manager to ensure that all of the data was correctly loaded. For more information, see Use the Interface Table Manager to Monitor and Update Data on page 3-16.
6. Repeat steps 1 to 5 for each source that you want to collect and load dimensions from.
3-12 Oracle E-Business Intelligence Embedded Data Warehouse Implementation Guide
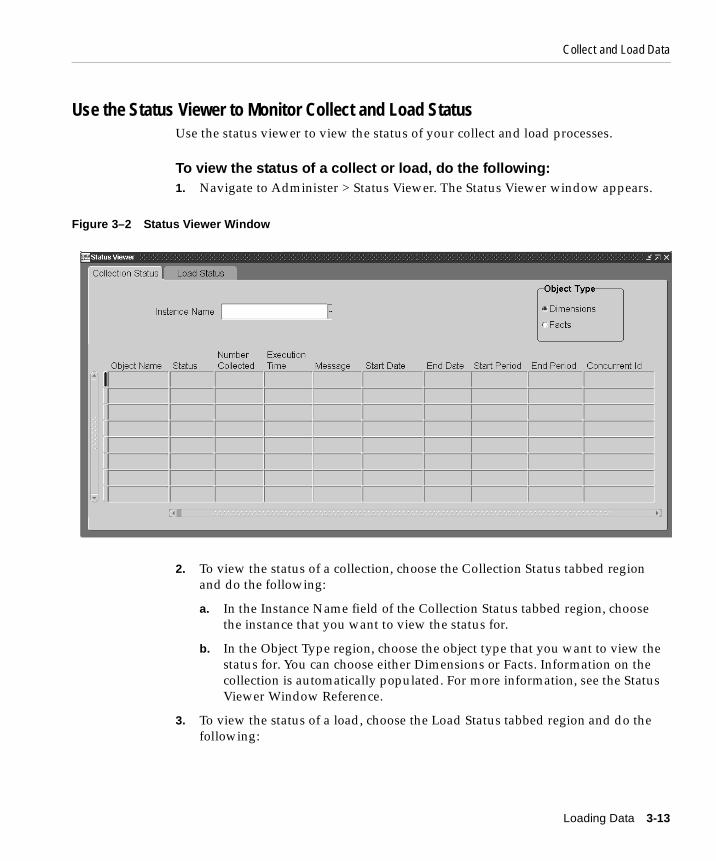
Collect and Load Data
Use the Status Viewer to Monitor Collect and Load StatusUse the status viewer to view the status of your collect and load processes.
To view the status of a collect or load, do the following:1. Navigate to Administer > Status Viewer. The Status Viewer window appears.
Figure 3–2 Status Viewer Window
2. To view the status of a collection, choose the Collection Status tabbed region and do the following:
a. In the Instance Name field of the Collection Status tabbed region, choose the instance that you want to view the status for.
b. In the Object Type region, choose the object type that you want to view the status for. You can choose either Dimensions or Facts. Information on the collection is automatically populated. For more information, see the Status Viewer Window Reference.
3. To view the status of a load, choose the Load Status tabbed region and do the following:
Loading Data 3-13
Collect and Load Data
a. In the Object Type region, chose the object type that you want to view the status for. You can choose either Dimensions or Facts. Information on the load is automatically updated. For more information, see the Status Viewer Window Reference.
b. To view the progress of a specific action in the load, choose the Progress button. The Load Progress window appears. For more information, see the Load Progress window reference.
Status Viewer Window ReferenceThis section describes the regions and fields in the Status Viewer window.
Collection Status Tabbed Region
Instance Name: The instance from which the object was collected.
Object Type Region: The object type for the collection.
Object Name: Name of the object collected.
Collection Status: Status of the object collected. The status can be Error, Success, or Partial.
Number Collected: The total of the number of records collected.
Execution Time: The total time for the collection in HH:MM:SS format.
Message: The message that was generated by the collection. Usually, it is the error message, if any.
Start Date: The date and time the collection started.
End Date: The date and time the collection ended.
Start Period: The start date of the time range for the collection.
End Period: The end date of the time range for the collection.
Concurrent ID: The concurrent request ID for the collection.
Load Status Tabbed Region
Object Type Region: The object type for the load. The object type can be either Dimensions or Facts.
Object Name: The name of the object loaded.
Status: The status of the object load. The status can be Partial, Success, or Error.
3-14 Oracle E-Business Intelligence Embedded Data Warehouse Implementation Guide

Collect and Load Data
Number Processed: Total number of records that were successfully loaded.
Execution Time: The total time for the load in HH:MM:SS format.
Loader Message: This field displays the load status for each of the records. The following is a list of some possible messages:
■ Ready records: the number of records that were collected and ready to be loaded prior to load program execution.
■ Processed records: The number of records that were successfully processed by the load program.
■ Actually Collected: The number of records that were successfully loaded by the load program.
■ Dangling records: The number of records in a fact table that have dangling foreign keys.
■ Duplicated records: The number of records that have duplicated primary keys.
■ Error records: The number of records that could not be loaded due to errors.
Start Date: The start date and time for the load.
End Date: The end date and time for the load.
Concurrent ID: The concurrent request ID for the load.
Progress button: Choose this button to open the Load Progress window. For more information, see the Load Progress Window Reference.
Load Progress Window ReferenceThis section describes the Load Progress window.
Object Name: The name of the object currently selected on the Load Status window.
Load Progress: The action performed by the loader engine.
Start Time: The start date and time of the loader engine action.
End Time: The end date and time of the loader engine action.
Duration: Duration of this action in HH:MM:SS format.
Refresh Data button: Choose this button to refresh the contents of the Load Progress window.
Loading Data 3-15
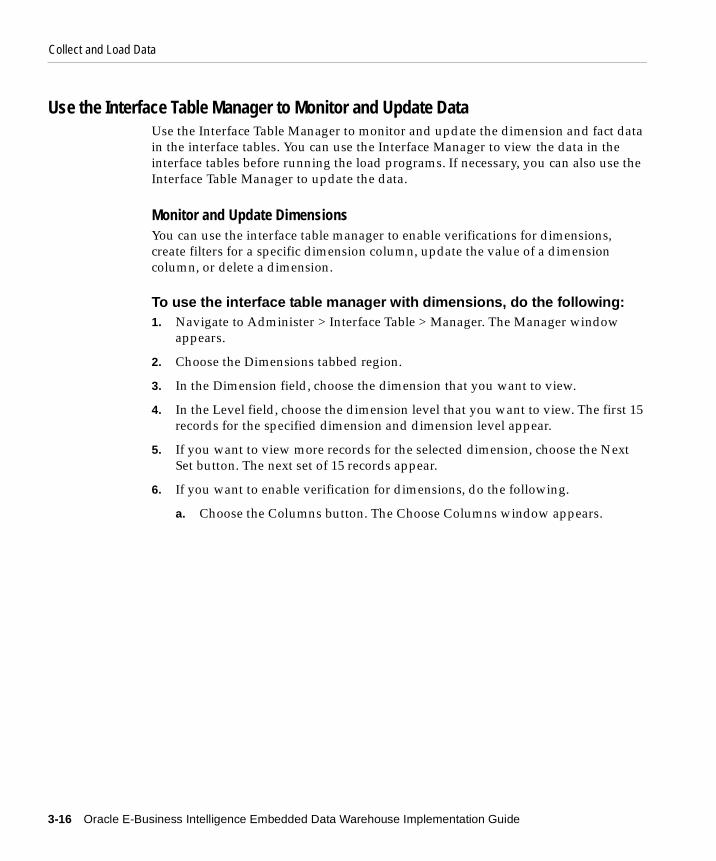
Collect and Load Data
Use the Interface Table Manager to Monitor and Update DataUse the Interface Table Manager to monitor and update the dimension and fact data in the interface tables. You can use the Interface Manager to view the data in the interface tables before running the load programs. If necessary, you can also use the Interface Table Manager to update the data.
Monitor and Update DimensionsYou can use the interface table manager to enable verifications for dimensions, create filters for a specific dimension column, update the value of a dimension column, or delete a dimension.
To use the interface table manager with dimensions, do the following:1. Navigate to Administer > Interface Table > Manager. The Manager window
appears.
2. Choose the Dimensions tabbed region.
3. In the Dimension field, choose the dimension that you want to view.
4. In the Level field, choose the dimension level that you want to view. The first 15 records for the specified dimension and dimension level appear.
5. If you want to view more records for the selected dimension, choose the Next Set button. The next set of 15 records appear.
6. If you want to enable verification for dimensions, do the following.
a. Choose the Columns button. The Choose Columns window appears.
3-16 Oracle E-Business Intelligence Embedded Data Warehouse Implementation Guide
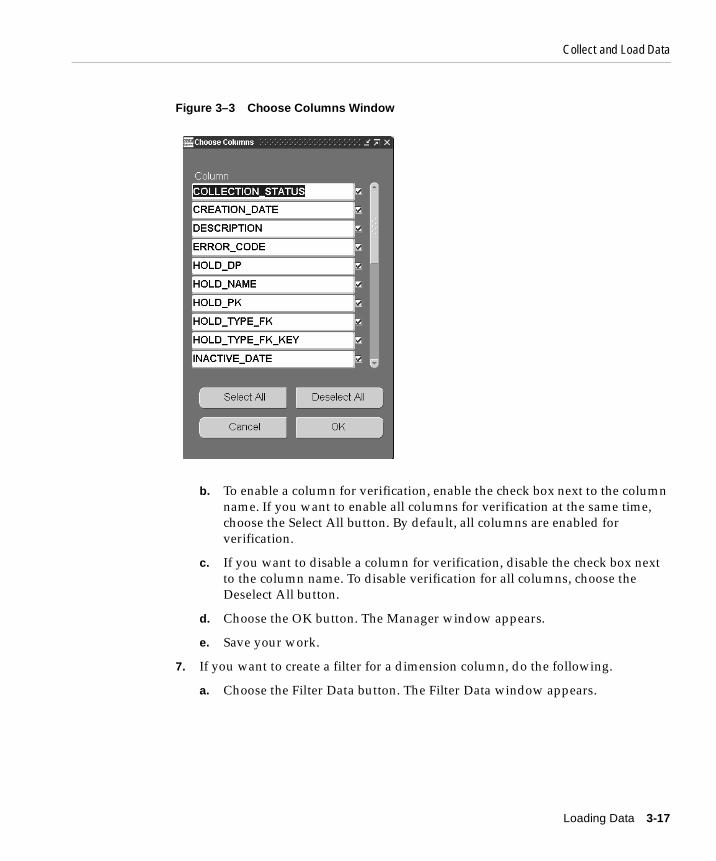
Collect and Load Data
Figure 3–3 Choose Columns Window
b. To enable a column for verification, enable the check box next to the column name. If you want to enable all columns for verification at the same time, choose the Select All button. By default, all columns are enabled for verification.
c. If you want to disable a column for verification, disable the check box next to the column name. To disable verification for all columns, choose the Deselect All button.
d. Choose the OK button. The Manager window appears.
e. Save your work.
7. If you want to create a filter for a dimension column, do the following.
a. Choose the Filter Data button. The Filter Data window appears.
Loading Data 3-17
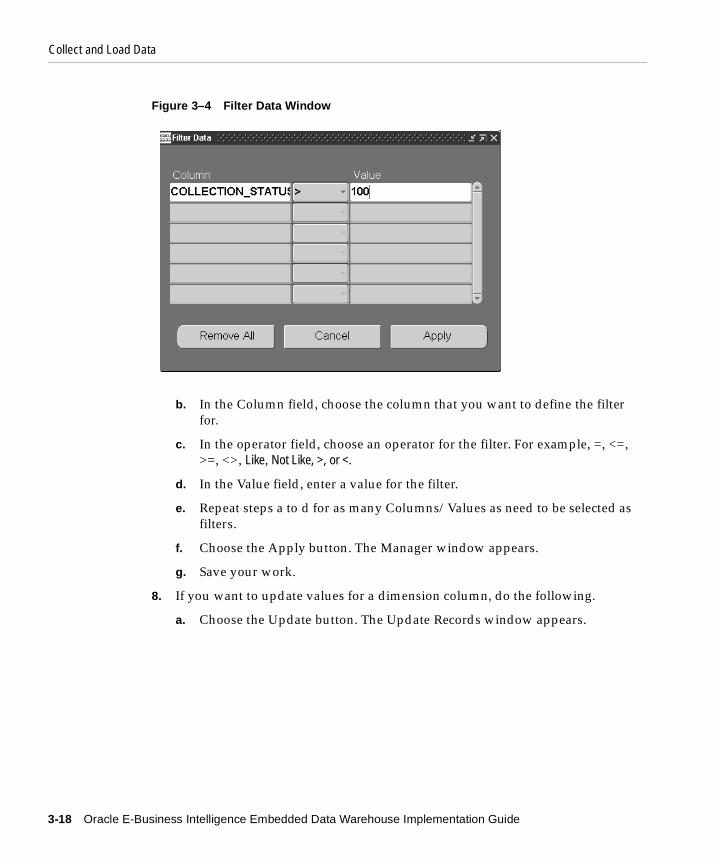
Collect and Load Data
Figure 3–4 Filter Data Window
b. In the Column field, choose the column that you want to define the filter for.
c. In the operator field, choose an operator for the filter. For example, =, <=, >=, <>, Like, Not Like, >, or <.
d. In the Value field, enter a value for the filter.
e. Repeat steps a to d for as many Columns/Values as need to be selected as filters.
f. Choose the Apply button. The Manager window appears.
g. Save your work.
8. If you want to update values for a dimension column, do the following.
a. Choose the Update button. The Update Records window appears.
3-18 Oracle E-Business Intelligence Embedded Data Warehouse Implementation Guide
Collect and Load Data
Figure 3–5 Update Records Window
b. In the Column field, choose the column that you want to update the value for.
c. In the Value field, enter a new value for the column.
d. Choose the Apply button. The Manager window appears.
e. Save your work.
9. If you want to delete a dimension, do the following.
a. Choose the dimension object that you want to delete and choose the Delete button.
If Filter Data has been specified, choosing the Delete button, will delete those records
If Filter Data has not been specified, clicking on the Delete button, will delete all records in the interface table.
A warning window appears.
Loading Data 3-19

Collect and Load Data
b. Choose the Yes button to confirm the delete.
c. Save your work.
Monitor and Update FactsYou can use the interface table manager to enable verifications for facts, create filters for a specific fact column, update the value of a fact column, or delete a fact.
To use the interface table manager with facts, do the following:1. Navigate to Administer > Interface Table > Manager. The Manager window
appears. The Manager window appears.
Figure 3–6 Facts Tabbed Region
2. Choose the Fact tabbed region.
3. In the Fact field, choose the fact that you want to view. The first 20 records appear.
3-20 Oracle E-Business Intelligence Embedded Data Warehouse Implementation Guide
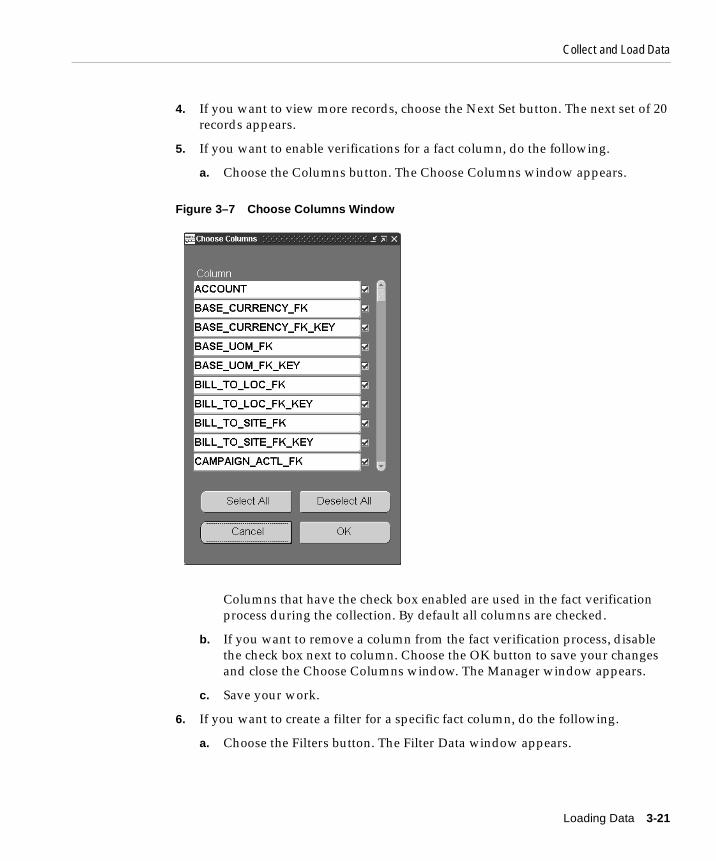
Collect and Load Data
4. If you want to view more records, choose the Next Set button. The next set of 20 records appears.
5. If you want to enable verifications for a fact column, do the following.
a. Choose the Columns button. The Choose Columns window appears.
Figure 3–7 Choose Columns Window
Columns that have the check box enabled are used in the fact verification process during the collection. By default all columns are checked.
b. If you want to remove a column from the fact verification process, disable the check box next to column. Choose the OK button to save your changes and close the Choose Columns window. The Manager window appears.
c. Save your work.
6. If you want to create a filter for a specific fact column, do the following.
a. Choose the Filters button. The Filter Data window appears.
Loading Data 3-21
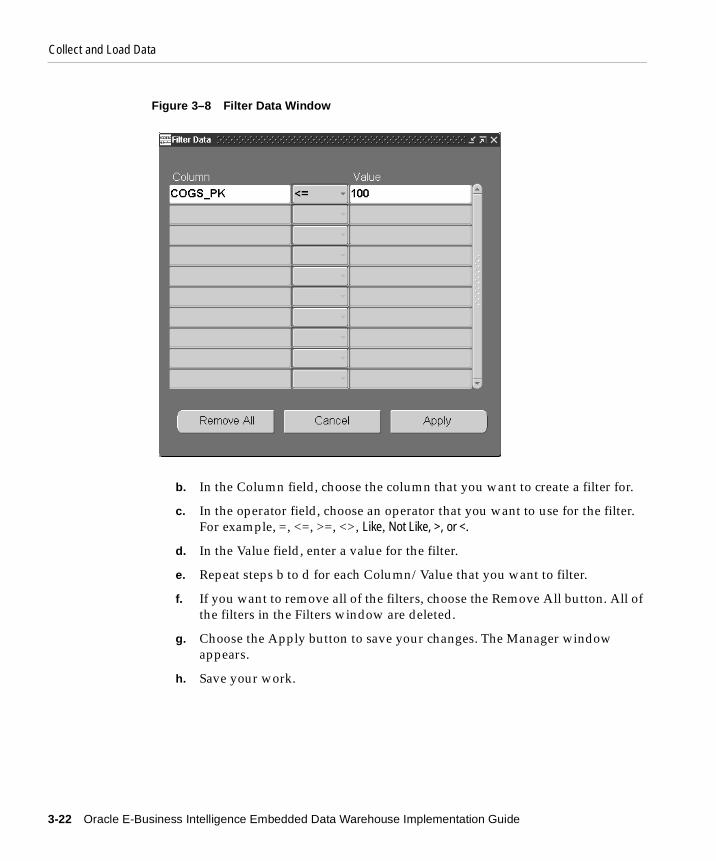
Collect and Load Data
Figure 3–8 Filter Data Window
b. In the Column field, choose the column that you want to create a filter for.
c. In the operator field, choose an operator that you want to use for the filter. For example, =, <=, >=, <>, Like, Not Like, >, or <.
d. In the Value field, enter a value for the filter.
e. Repeat steps b to d for each Column/Value that you want to filter.
f. If you want to remove all of the filters, choose the Remove All button. All of the filters in the Filters window are deleted.
g. Choose the Apply button to save your changes. The Manager window appears.
h. Save your work.
3-22 Oracle E-Business Intelligence Embedded Data Warehouse Implementation Guide
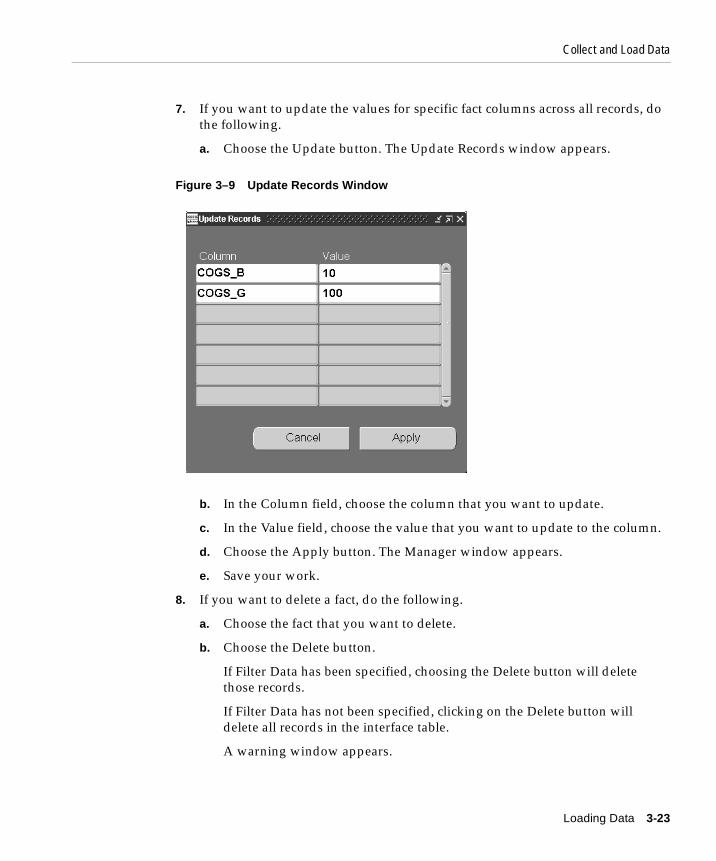
Collect and Load Data
7. If you want to update the values for specific fact columns across all records, do the following.
a. Choose the Update button. The Update Records window appears.
Figure 3–9 Update Records Window
b. In the Column field, choose the column that you want to update.
c. In the Value field, choose the value that you want to update to the column.
d. Choose the Apply button. The Manager window appears.
e. Save your work.
8. If you want to delete a fact, do the following.
a. Choose the fact that you want to delete.
b. Choose the Delete button.
If Filter Data has been specified, choosing the Delete button will delete those records.
If Filter Data has not been specified, clicking on the Delete button will delete all records in the interface table.
A warning window appears.
Loading Data 3-23
Collect and Load Data
c. Choose the Yes button to confirm the delete.
d. Save your work.
3-24 Oracle E-Business Intelligence Embedded Data Warehouse Implementation Guide
Validate Collect and Load Data
Validate Collect and Load DataOnce you collect or load your data, you can validate the data in the interface tables and check your data for dangling and duplicate records.
You must also fix any dangling or duplicate record problems that you may have.
Valdiate Collect and Load DataOnce you collect and load your data, it is good practice to check the validity of the dimension and fact data using the data validity tools provided with EDW.
Note: Only validate base facts. Do not validate derived or summarized facts. The validation concurrent programs check against interface tables and only base facts are collected into interface tables. No interface tables exist for derived/summarized facts since they are populated from base facts.
Loading Data 3-25
Validate Collect and Load Data
Checking Dimension Data Validity1. Navigate to Administer > Interface Table > Data Validity. The Data Validity
window appears.
Figure 3–10 Data Validity Dimensions Tabbed Region
2. Choose the Dimensions tabbed region.
3. If you want to validate the dimension against the parent level tables and it is not the first time you are populating the interface tables, enable the Check Against Level Tables check box in the Options region.
Note: As a rule, do not use the Check Against Level Tables check box the first time you populate the interface tables with data. There will be nothing in the parent level tables to check the dimension against. Use this option only for subsequent data collections.
3-26 Oracle E-Business Intelligence Embedded Data Warehouse Implementation Guide
Validate Collect and Load Data
4. If you want to generate a printed report that lists sample values of dangling and duplicate keys, enabled the Detailed Report check box in the Options region and specify the number of sample values that you want to print in the Sample field below. If you do not check the Detailed Report check box, the report will generate a count of the records with problem keys.
5. To validate a dimension, enable the check box next to the dimension name.
6. Choose the Submit button to start the validation concurrent program. A concurrent request ID (REQID) appears in the upper line of the status bar. A concurrent request is submitted for each chosen dimension.
7. View the results of the validation request. For more information on viewing request results, see the Oracle Applications User Guide.
8. To view more information about the request, you can also view the request log. For information on viewing logs for concurrent requests, see the Oracle Applications User Guide.
Checking Fact Data Validity1. Navigate to Administer > Interface Table > Data Validity. The Data Validity
window appears.
2. Choose the Fact tabbed region. The Data Validity Facts Tabbed Region window appears.
Loading Data 3-27

Validate Collect and Load Data
Figure 3–11 Data Validity Facts Tabbed Region
3. If you want to generate a detailed report listing the sample values of dangling and duplicate keys, enable the Detailed Report check box and enter the number of sample values you want to generate in the Sample field. If you do not check the Detailed Report check box, the report will generate a count of the records with problem keys.
4. To validate a fact, enable the check box next to the fact name.
5. Choose Submit to start the validation process. A concurrent request is submitted for each chosen fact.
6. View the results of the validation request. For more information on viewing request results, see the Oracle Applications User Guide.
7. To view more information about the request, you can also view the request log. For information on viewing logs for concurrent requests, see the Oracle Applications User Guide.
3-28 Oracle E-Business Intelligence Embedded Data Warehouse Implementation Guide
Validate Collect and Load Data
Fix Dangling RecordsAfter you collect and load data, you can check your data validity to find and fix any dangling records that you may have.
To fix dimension level dangling data, do the following:1. Run the validity report for the dimension. For more information on running this
report, see: Checking Dimension Data Validity on page 3-26.
2. Read the validity checking report to find the dangling level.
3. If the dangling record is caused by data corruption, fix the corrupted data.
4. If the dangling record is caused by missing date range, find the missing date date range.
5. Recollect the missed and fixed data for the dimension.
6. Manually update the dangling records from previous load from 'DANGLING' back to 'READY' by updating the <dimesion level interface table name> as shown.
set collection_status = 'READY' where collection_status = 'DANGLING';
7. Recollect and reload the data for the dimension.
8. Repeat step 2 to 8 until all dangling records are fixed.
To fix fact to dimension dangling, do the following:1. Run validity checking for the fact. For more information on running this report,
see: Checking Fact Data Validity on page 3-27.
2. Read the validity checking report to find the dangling foreign key to dimension.
3. If the dangling record is caused by data corruption, fix the corrupted data.
4. If the dangling record is caused by missing date range, find the missing date date range.
5. Recollect the missed and fixed data for the dimension.
6. Manually update the dangling records from previous load from 'DANGLING' back to 'READY' by updating the <fact interface table name> as shown.
set collection_status = 'READY' where collection_status = 'DANGLING';
Loading Data 3-29
Validate Collect and Load Data
7. Reload the data for the fact.
8. Repeat step 2 to 8 until all dangling records are fixed.
Fix Duplicate RecordsDuplicate record errors will occur if you set the EDW:Duplicate Records Loaded profile option to No. If you have this profile option set to No, then the loader engine will reject any duplicate records that are loaded to the warehouse. See: Set Up Profile Options on page 2-15.
To fix duplicate record errors, you must either fix the problem on the source systems, or you must modify the data in the interface tables. For more information on how to modify data in the interface tables, see: Use the Interface Table Manager to Monitor and Update Data on page 3-16.
Congratulations! After you validate your dimension and your fact data and you fix any dangling data problems, you are now ready to run the loading concurrent programs.
3-30 Oracle E-Business Intelligence Embedded Data Warehouse Implementation Guide
Purge Interface Tables on Warehouse
Purge Interface Tables on WarehouseAs a regular maintenance task, you should purge the interface tables on the warehouse after you have completed the data loading process.
To purge interface table information, run the following concurrent programs in the warehouse:
■ Purge Fact Interface Table
■ Purge Dimension Interface Table
These programs delete records in the interface tables that have been successfully loaded into the warehouse. For more information on running concurrent programs, see the Oracle Applications User Guide.
The interface tables that reside on the source systems are automatically purged after the data is collected to the warehouse interface tables.
Loading Data 3-31

Purge Interface Tables on Warehouse
3-32 Oracle E-Business Intelligence Embedded Data Warehouse Implementation Guide

Tuning
4
Tuning EDWThis chapter describes how to tune data for EDW.
This chapter contains the following topics.
■ Overview of Tuning on page 4-2
■ Required Skills Set for Tuning on page 4-3
■ Tuning EDW on page 4-3
EDW 4-1
Overview of Tuning
Overview of TuningTuning is the process of adjusting the configuration and modifying parameter values to optimize the performance of your EDW system. You can start to tune your system once you have completed the installation and implementation steps. However, you should read this section completely before you complete those steps because tuning can impacts the entire EDW system from installation to implementation. This section describes all of the factors that you must consider when you tune EDW and how to tune EDW accordingly.
Performance in an EDW system is affected by many things: the way you plan to install your Operation System (OS) for optimal I/O performance; the way you plan to install your file system for optimal I/O performance; and the way you plan to locate your Oracle database files (database files, redo logs, rollback segment files). For example, you can choose to spread your database files across volumes and minimize your disk I/O contention or you can install a middle tier component. For EDW, it is particularly important to plan the location of your intelligent product data and index tablespaces (for example, FIID and FIIX, or HRD and HRX) and to spread your data files across volumes to minimize disk I/O operation contentions.
When data is collected and loaded into EDW, interface tables are created for each product schema to collect data from the source OLTP system. Therefore, to optimize performance and to avoid disk contention, during the data collection process for a product schema, you should place the data and the index tablespaces (for example, HRD and HRI) on different file system volumes. Also, to minimize contention with the dictionary table space, you should ensure that locally-managed tablespaces have a uniform extent size (PCT_INCREASE = 0). These steps can help to prevent tablespace free space fragmentation.
Suggestion: Create separate tablespaces for large tables (facts, dimensions).
To tune EDW, you must identify all of the factors that affect your performance and modify them. The typical process for tuning EDW is as follows:
■ Identify performance bottlenecks
■ Gather and analyze statistics
■ Set up optimal values for Oracle database init<SID>.ora and EDW-specific parameters
■ Set up optimal parameters for database structures.
The following sections provide tips on how to tune your EDW system.
4-2 Oracle E-Business Intelligence Embedded Data Warehouse Implementation Guide

Tuning EDW
Required Skills Set for TuningThis guide is not intended to replace the Oracle 8i Performance Tuning Guide, however it does contain some helpful compiled information specifically for tuning EDW. This guide assumes that person who is doing the EDW system tuning has the necessary basic DBA skills, and is familiar with the basics of Oracle Database 8i performance tuning. For more information on how to tune systems, see: Oracle 8i Performance Tuning Guide.
Tuning EDWEDW uses a "star" schema and a number of Oracle 8i features to improve performance, including: bitmap indexes, Star Query Transformation, Parallel Query Option, and Partitioning.
The process of tuning EDW consists of two parts:
■ Initial loading
■ Evaluating the performance of executing ad-hoc queries (response time) for Discoverer users.
This guide cannot provide all of the parameter values that you will need to obtain acceptable performance for all-possible cases. It does provide suggestions for how to set your parameter values; however, your performance level will also depend on your existing Oracle Applications installation, the number of concurrent users, the amount of data, and other factors.
The process for tuning EDW is closely related to processes for configuring servers and file systems. EDW uses the parallel query option to configure Oracle 8i. Oracle Sever utilizes massively parallel processing (MPP) to execute SQL in a parallel way and start shadow (slave) processes, which speed up the excecution of SQL queries and reduce the overall elapsed time for requests.
When you install EDW you must plan the installation carefully. You must estimate the size of OLTP database, estimate the daily inserted (updated) data, and plan the file systems configuration. The file systems configuration has a significant impact on disk I/O operations.
The initial load process also has an extremely significant impact on I/O. The intial load extracts data from the source system and inserts it into the LSTG tables to:
■ Clean data
■ Transform data(using LCT tables)
Tuning EDW 4-3
Tuning EDW
■ Create dimension tables
The most resource consuming operations that occur during the intial load are select, insert, and sorting (caused by indexing of table columns). The Oracle parameters that directly affect the select, insert, and sorting operations are:
■ sort_area_size
■ hash_area_size
■ shared_pool
■ db_block_buffers
Two EDW-specific parameters have a significant impact on overall system performance during the initial load:
■ EDW: Degree of Parallelism
■ EDW: Loader Engine Commit Size
Six other Oracle parameters impact the overall performance of the database:
■ db_block_size
■ db_file_multiblock_read_count
■ sort_multiblock_read_count
■ sort_area_size
■ hash_area_size
■ shared_pool
Each of these parameters are discussed in futher detail in this section.
The size of the db_block_size parameter is specified when you create an Oracle database. The typical value for this parameter is 8192 bytes. For EDW systems, you must set this parameter to 16 KB.
If the db_file_multiblock_read_count parameter has a large value it will improve your raw and direct I/O throughput. When you set this parameter, consider the physical layout of the configured file system. If you are using the volume manager to create the striped volume, then the stripe lace size should be ideally:
(Stripe lace size) = (db block size) * (db file multiblock read count)
When you perform the initial load, data is extracted into the LSTG, LCT, <Dimension>_M, <Fact>_F tables using the Oracle Warehouse Builder (OWB)
4-4 Oracle E-Business Intelligence Embedded Data Warehouse Implementation Guide
Tuning EDW
repository. The initial load process causes a large volume of I/O operations along with intensive sorting (for the creation of indexes). To obtain acceptable performance, you must set up correct parameter values for the sort_area_size and the hash_area_size parameters. A small sort_area_size parameter value can cause disk sorting, and result in performance degradation.
If you want to monitor disk sorting, use the following script:
select * from v$sort_usage;select * from v$sort_segment;select * from v$sysstat where the name is like "%sort%"
The EDW loader engine uses dynamic SQL, so you should set up the cursor_sharing parameter value to equal FORCE. This parameter enables a more effective usage of the Library cache.
Note: In this case, any histograms that have been created to improve selectivity for some table columns, will be not used by the Cost Based Optimizer (CBO).
The initial load process is actually a sequence of "select" and "insert" SQL statements. These statements cause a number of redo log writes to occur. To decrease the time impact of these redo log writes on your overall system performance, start the initial load process in the NO ARCHIVE log mode. Then, during the initial load, you can check the switching time of the redo log files.
In the init<SID>.ora file, the following set of parameters affect the database redo log activities:
■ log_buffer_size
■ log_checkpoint_interval
■ log_checkpoint_timeout
During the initial load, it is important to monitor log activity analyzing statistics from sys.v$system_event, sys.v$session_event, sys.v$session_wait, sys.v$waitstat and sys.v$log_history.
The events log file sync, and log file parallel write are inevitable, and are initiated by LGWR I/O operations to provide data consistency. The event log buffer space indicates waiting for free space in the redo log buffer. You can reduce this wait by increasing the value for the log_buffer_size parameter or by optimizing the performance of the log writer. The size of log buffer for OLTP systems is typically about 382 to 1024 KB. For EDW, it can be between 3 to 5 MB.
Tuning EDW 4-5
Tuning EDW
To optimize log writer performance you can increase the size of redo log files (usually up to 100 MB). The log file switch (checkpoint incomplete) event indicates that the next redo log cannot be used because of a checkpoint that commenced when the log that was last switched has not completed. By default, the value of the log_checkpoint_timeout parameter is 1800 (30 min) and the value of the log_checkpoint_interval parameter is the number of redo log blocks flashed into the redo log file after Oracle switches redo log files. (The size of a redo log block is platform specific [for example, for Solaris it is equal to 512 Bytes].)
If you want to monitor redo logs, use the following script:
Select * from v$loghist where first_time >= sysdate order by first_time desc;SELECT SUM (DECODE (name, 'redo blocks written', VALUE, 0)) "Block Writes", SUM (DECODE (name, 'redo entries', VALUE, 0)) "Entries", SUM (DECODE (name, 'redo size', VALUE, 0)) "Size", SUM (DECODE (name, 'redo log space requests', VALUE, 0)) "Space Requests", SUM (DECODE (name, 'redo synch writes', VALUE, 0)) "Synch Writes", SUM (DECODE (name, 'redo writes', VALUE, 0)) "Writes" FROM v$sysstat;
If you want to monitor the time between redo logs switching, use the following script:
SELECT MIN (b.first_time - a.first_time) * 1440 * 60 seconds FROM sys.v_$instance i, sys.v_$log_history a, (SELECT sequence#, first_time FROM sys.v_$log WHERE status = 'CURRENT' UNION ALL SELECT sequence#, first_time FROM sys.v_$log_history) b WHERE i.startup_time < a.first_time AND a.first_time < b.first_time AND a.sequence# + 1 = b.sequence#
If you want to know the session ID for the concurrent request, use the following script:
SELECT session_id FROM apps.fnd_concurrent_processes p WHERE process_status_code = 'A' AND concurrent_process_id =
4-6 Oracle E-Business Intelligence Embedded Data Warehouse Implementation Guide
Tuning EDW
(SELECT controlling_manager FROM apps.fnd_concurrent_requests WHERE request_id = <id>);
There is a lot of information available about the importance of the db_block_buffers parameter for database performance. The typical value for this parameter for EDW is hundreds of MB. The proper size of the db block buffer cache is estimated by the hit ratio, and is calculated from statistics that are reported in V$SYSSTAT. Those statistics are as follows: consistent gets, db block gets, and physical reads. When the hit ratio is ~ 93-99%, it is assumed that the db_block_buffers parameter value has been set correctly. For EDW systems with a significant amount of data, the scan hit ratio is lower. In another word buffer, cache misses are unavoidable. For a large db block buffer a sufficient number of db_lru_latches is required.
To determine the hit ratio for the dictionary cache, use the following script:
SELECT round(sum(gets)/(sum(gets)+ sum(getmisses)) * 100,2) from v$rowcache;
To determine the hit ratio for the library cache, use the following script:
SELECT namespace name, gets, gethits, ROUND (gethitratio * 100, 2) "GetHit Percentage", pins, pinhits, ROUND (pinhitratio * 100, 2) "PinHit Percentage", reloads, invalidations FROM v$librarycache ORDER BY 1
You can also use the Oracle Parallel Query Option (PQO) to significantly speed up the process of data collection. EDW uses the EDW: Degree of Parallelism parameter to specify the degree of parallelism for the data loading operation. The the following set of PQO-related parameters are contained in the init<SID>.ora file:
■ parallel_max_servers
■ parallel_min_servers (depends on the number of CPUs)
■ parallel_execution_message_size
■ large_pool_size
Each of these parameters is described in greater detail below.
The parallel_max_servers parameter value depends primarily on the number of CPUs, and the configuration of the I/O subsystem. Oracle assumes, by default, the
Tuning EDW 4-7
Tuning EDW
number of threads per CPU equals 2, so the appropriate value for the parameter should be 2 x (number of CPUs).
For the parallel_min_servers parameter, set up the value equal to the number of CPUs. The most important value for PQO is not the number of CPUs, but the configuration of file system. Therefore, even if you have a couple of logical volumes and a bunch of CPUs, you can get poorer result for queries using PQO.
The parallel_execution_message_size parameter determines the size of the message for the parallel execution (PX) processes exchange. By default, the value of this parameter is 4192 bytes.
The large_pool_size parameter indicates the size of large pool heap that is used for exchanging messages between the parallel processes. It is a derived parameter that depends on the parallel_max_servers, parallel_min_server, and parallel_execution_message_size parameter values. If you do not have enough space for exchanging messages between the Parallel Query Coordinator (PQC) and the slave process, set up the parallel_automatic_tuning = true value in the init<SID>.ora file, and increase the values for the large_pool_size and parallel_execution_message_size parameters.
To monitor PQO, you can generate statistics for parallel operations downgrades by using the following script:
SELECT n.name, s.class, s.VALUE FROM gv$sysstat s, v$statname n WHERE s.name LIKE 'Parallel operation%' AND s.statistic# = n.statistic#;
SELECT STATISTIC, VALUEFROM v$pq_sysstat;
SELECT * FROM V$PX_PROCESS_SYSSTAT WHERE STATISTIC LIKE 'Buffers%';
The following parameters are important to start the query transformation that is used by EDW to efficiently execute queries against a large amount of data:
■ Bitmap_merge_area_size
■ Create_bitmap_area_size
■ Star_transformation_enabled
Each of these parameters is described in greater detail below.
4-8 Oracle E-Business Intelligence Embedded Data Warehouse Implementation Guide
Tuning EDW
The bitmap_merge_area_size parameter is used to set up the heap size for merging bitmap indexes that have been created for fact tables. The default value for this parameter is 1024 Kbytes.
The create_bitmap_area_size parameter is used to set up the heap size for creating bitmap indexes for fact tables.
The star_transformation_enabled parameter is used to direct Oracle to create/not create temporary tables during the process of merging bitmap indexes. The recommended value for this parameter is star_transformation_enabled=true.
Note that the Loader Engine Commit Size EDW parameter value has an impact on system performance. It indicates the number of rows that have been inserted into the LCT and the dimension/fact tables after commit. A large value for this parameter can cause buffer cache misses and performance degradation.
Tuning EDW 4-9

Tuning EDW
4-10 Oracle E-Business Intelligence Embedded Data Warehouse Implementation Guide
Item Classes, Hidden Columns, and Column Ord
A
Item Classes, Hidden Columns,and Column Ordering
This appendix describes the item classes, hidden columns, and column ordering conventions used in EDW.
This appendix includes the following topics.
■ Item Class
■ Implementation Benefits
■ Item Class Conventions by Intelligence Area
■ Creating Item Classes
■ EDW Hidden Column
■ Implementation Benefits
■ Implementation Trade Offs
■ How to Unhide Columns
■ Hidden Column Conventions by Intelligence Products
■ Column Ordering
■ Implementation Benefits
■ Changing Column Ordering in OWB
ering A-1

Item Class
Item ClassIn Oracle Discoverer, an object within a folder is called an “item”. An item class is a component of the End-User Layer (EUL) that groups together related (by common business purposes), items from different folders. Item classes are used to support features such as List of Values (LOV), Alternate Sorts, and Drill-to-Details. Item classes can be created in the Oracle Discoverer Administration edition, or in the Oracle Warehouse Builder (OWB).
The item class featured in the OWB serves to enable the OWB/Discoverer bridge to automatically generate item groupings each time the EUL is regenerated and/or refreshed. This appendix covers the following Item Class topics:
■ Implementation Benefits
■ Item Class Conventions by Intelligence Area
■ Creating Item Classes
Implementation BenefitsIn general, item classes are designed to provide users with a fast access to the required item(s), and related data. Furthermore, item classes provide users an LOV when creating or applying conditions and/or parameters to Discoverer workbooks. Finally, item classes provide users an easy mechanism to drill down to related items.
For example, from the revenue of the YR2000 worksheet, users can drill down to the expenses of YR2000 worksheet, without having to again regroup all months in YR2000.
A-2 Oracle E-Business Intelligence Embedded Data Warehouse Implementation Guide
Item Class
Item Class Conventions by Intelligence AreaThe following section describes the item class conventions used by each intelligence area in EDW.
Financial IntelligenceFinancial Intelligence utilizes the following item classification naming convention:
■ Time Dimension%Year-Name
■ Time Dimension%Month-Name
■ Set of Books Dimension%General Ledger Book-Name
■ Geography Dimension%COUN_Name
■ Time Dimension%Calendar Year-Name
■ Person Dimension%Person-Business Group Name
Manufacturing Business Intelligence■ Production Line Dimension%PRDL_Name
■ Production Line Dimension%PRDL_Organization Code
■ Production Line Dimension%PRDL_Production Line Name
■ Lot Dimension%LOT_Description
■ Lot Dimension%LOT_Lot
■ Lot Dimension%LOT_Lot Name
■ Lot Dimension%LOT_Name
■ Lot Dimension%LOT_Parent Lot
■ Activity Dimension%ACTV_Activity Code
■ Activity Dimension%ACTV_Activity Name
■ Activity Dimension%ACTV_Name
■ Operation Dimension%OPRC_Description
■ Operation Dimension%OPRC_Name
■ Operation Dimension%OPRN_Department
■ Operation Dimension%OPRN_Description
Item Classes, Hidden Columns, and Column Ordering A-3
Item Class
■ Operation Dimension%OPRN_Name
■ Operation Dimension%OPRN_Operation Name
■ Unit of Measure Dimension%UOM_Name
■ Unit of Measure Dimension%UOM-Unit of Measure Name
■ Inventory Locator Dimension%INVL_Name
■ Inventory Locator Dimension%Locator-Description
■ Inventory Locator Dimension%Locator-Locator
■ Inventory Locator Dimension%OU_Business Group
■ Inventory Locator Dimension%OU_Name
■ Inventory Locator Dimension%OU_Organization
■ Inventory Locator Dimension%OU_Primary Cost Method
■ Inventory Locator Dimension%PCMP_Description
■ Inventory Locator Dimension%PCMP_Name
■ Inventory Locator Dimension%PCMP_Inventory Organi
■ Inventory Locator Dimension%PCMP_Inventory Organi_1
■ Inventory Locator Dimension%PLNT_Name
■ Inventory Locator Dimension%Inventory Organization-Organization Name
■ Inventory Locator Dimension%Inventory Organization-Description
■ Inventory Locator Dimension%Inventory Organization-Organization
■ Inventory Locator Dimension%PORG_Description
■ Inventory Locator Dimension%PORG_Name
■ Inventory Locator Dimension%PORG_Inventory Organi
■ Inventory Locator Dimension%PORG_Inventory Organi_1
■ Inventory Locator Dimension%SUBI_Name
■ Inventory Locator Dimension%Subinventory-Description
■ Inventory Locator Dimension%Subinventory-Subinventory
A-4 Oracle E-Business Intelligence Embedded Data Warehouse Implementation Guide
Item Class
Supply Chain IntelligenceSupply Chain Intelligence has no item class defined.
Creating Item ClassesItem classes can be temporarily created in the Oracle Discoverer Administration Edition, or permanently in OWB.
To create temporary item classes in the Oracle Discoverer Administration Edition:1. Log into the Discoverer Administration Edition.
2. Select the Business Area in which you want to create Item Classes.
3. If hidden, unhide the Administration Tasklist, by navigating to Menu > View > Tasklist.
4. Choose the Create item classes option. The Item Class Wizard appears. The Item Class Wizard will walk you step-by-step through the process of creating an an item class.
To create permanent item classes in OWB:■ Use OWB to add an attribute set called, "DISCOVERER_ITEM_CLASS_ LOV,"
in the Detail Mapping for the star dimension table. An Item class will be generated on whichever item is pulled into the attribute set.
Please refer to the OWB User’s Guide for more information on item classes.
Note: If Item classes are created in OWB, the OWB/Discoverer bridge creates the item classes in the EUL, within Discoverer.
Additional Information: For more information about item classes, see the Oracle Discoverer Administration Guide.
Caution:: When the EUL is refreshed from OWB, the item classes will be deleted. If you want to create permanent item classes you need to log into OWB (see below).
Item Classes, Hidden Columns, and Column Ordering A-5
EDW Hidden Column
EDW Hidden ColumnA “column”, is the fact table or dimension table attribute which appears as an object in an Oracle Discoverer folder.
This section contains the following topics:
■ Implementation Benefits
■ Implementation Trade Offs
■ How to Unhide Columns
■ How to Unhide Columns
■ Hidden Column Conventions by Intelligence Products
Implementation BenefitsHiding columns allows users to view only relevant information. To minimize the number of attributes in a Discoverer folder, objects that are not relevant, such as primary keys and foreign keys, are hidden.
Skip loading data in a column improves the performance of data loads, and the performance of workbook queries, because less data is being handled.
Note: When a column is hidden in the Oracle Warehouse Builder (OWB), it is grayed out in the Oracle Discoverer Administration Edition, and will not be visible in the Oracle Discoverer End User Edition.
When a column is not loaded in the Oracle Warehouse Builder (OWB), the data held in that column will not be loaded to the warehouse. By default, marking a column as skip loaded will also cause it to be marked as hidden.
Note: Please refer to the Oracle Discoverer User Guide for more information on the EUL.
A-6 Oracle E-Business Intelligence Embedded Data Warehouse Implementation Guide
EDW Hidden Column
Implementation Trade OffsIf you wish to view a folder object that is hidden in OWB, you will need to go to the Discoverer Admin edition to unhide the applicable object(s). However, this manual effort of recovering hidden columns will be overwritten each time the EUL is refreshed and/or regenerated by the OWB/Discoverer Bridge.
If you wish to not skip load a column, you will need to go into OWB and uncheck the box for that column. The meta data will need to be regenerated, and the EUL refreshed. This could be a time consuming process.
How to Unhide Columns There are two ways to unhide columns: temporarily, or permanently. To unhide a hidden column temporarily, do so in the Discover Administration Edition. To permanently unhide hidden columns, log into the OWB.
Steps to unhide columns in Oracle Discover Administration Edition:
1. Logon to the Discover Administration Edition.
2. Select the Business Area in which you want to unhide columns.
3. Select the folder for the desired dimension or fact table.
4. Select the gray (hidden) column.
5. Right click with your mouse, choose Options.
6. In the Options window, select the “Visible” option to the “User”, and change the “item” from No to Yes.
7. Refresh the EUL. The unhidden column will now become visible in the Discover End User edition.
Steps to unhide the columns that have been hidden in OWB:
1. Logon to the OWB.
2. Select your Project.
Caution: When the EUL is refreshed from the OWB, the column will become hidden again. If you want to unhide the column permanently, you need to logon to OWB.
Item Classes, Hidden Columns, and Column Ordering A-7
EDW Hidden Column
3. Choose Mappings under your Logical Tree Tab.
4. Select the desired dimension or fact table.
5. Open the Mapping editor by double clicking on the fact table or dimension.
6. Select the Mapping Object.
7. From the Menu Edit > Edit Object. The Detail Mapping Editor opens.
8. Select the fact or dimension table (See the TRM for Physical Names).
Hint: All fact tables are _F, and all dimension tables are _M.
From the Menu View > Display Options > Entity Attribute Sets. The Attribute Editor opens.
Select the desired Attribute Set. At the bottom of the window you will see a list of columns that belong to the selected attribute set. If the column is checked, then it is not visible in the EUL. Select the column you want to unhide, and uncheck the box.
9. Generate the EUL. See: Generate End User Layer on page 2-55
Please refer to the OWB User Guide for more information on hiding columns.
Hidden Column Conventions by Intelligence ProductsIn general, only measures and attributes meaningful to the end user, or those used in provided workbooks are not hidden. For dimensions, only columns such as "Name" or "Description" are kept.
Financials IntelligenceFinancials Intelligence hides all Standard Who, such as Creation Date and system IDs. It also hides unused hierarchy levels. It hides all columns, except the dimension name.
1. “PK” columns (all PK, PK_KEY, FK_KEY)
2. User_attributes
3. User_measures
4. User_FK_KEY
When the dimensions are reloaded, you must run the hide columns program again.
A-8 Oracle E-Business Intelligence Embedded Data Warehouse Implementation Guide

EDW Hidden Column
Supply Chain IntelligenceSupply Chain Intelligence uses the same hidden columns strategy as Financials Intelligence.
Manufacturing Business IntelligenceManufacturing Business Intelligence uses the same hidden columns strategy as Financials Intelligence.
Purchasing IntelligencePurchasing Intelligence uses the same hidden columns strategy as Financials Intelligence.
Projects IntelligenceProjects Intelligence uses the same hidden columns strategy as Financials Intelligence.
Marketing IntelligenceMarketing Intelligence uses the same hidden columns strategy as Financials Intelligence.
Item Classes, Hidden Columns, and Column Ordering A-9
Column Ordering
Column OrderingA column is a fact or dimension table attribute that appears as an item in an Oracle Discoverer folder.
You can use Oracle Discoverer Administrator Edition or OWB, to change the order of columns.
This section contains the following topics:
■ Implementation Benefits
■ Changing Column Ordering in OWB on page A-12
Implementation BenefitsColumn ordering provides quicker access to a specific folder item by designating a logic to the order. Columns can be ordered two ways:
■ Alphabetically: Enables users to see all attributes within a folder in an alphabetical format.
■ Logically: Enables users to see a group of attributes grouped logically, depending on the subject area.
Once the folder contains certain column ordering, the users can easily scroll up and down within the folder. In certain situations, if the ordering logic is not obvious to the user, the column ordering may make it even more difficult for the user to find the item.
The following is the ordering logic that is used by each intelligence area.
Financials IntelligenceFinancials Intelligence uses alphabetical ordering strategy within each folder.
Supply Chain IntelligenceSupply Chain Intelligence orders columns using a logical grouping. Items are ordered alphabetically with those logical groupings. For example, all Quantity measures are grouped and sequenced as they are all named, "Quantity, Quantity Booked, Quantity Cancelled, Quantity Returned, Quantity Shipped".
Manufacturing IntelligenceManufacturing Intelligence orders columns alphabetically within each folder.
A-10 Oracle E-Business Intelligence Embedded Data Warehouse Implementation Guide
Column Ordering
Purchasing IntelligencePurchasing Intelligence orders columns using a logical group ordering. Items are alphabetically listed withing those groupings.
Projects IntelligenceProjects Intelligence orders columns alphabetically and frequency. For example, Project Dimension has the Project level information first, followed by Top Task, and Lowest Task.
Marketing IntelligenceMarketing Intelligence orders columns using a purely logical grouping ordering. Items are not alphabetized within each grouping.
Item Classes, Hidden Columns, and Column Ordering A-11
Column Ordering
Changing Column Ordering in OWBUse OWB to change the order of columns in your workbooks.
For more information on changing column order in OWB, see the Oracle Warehouse Builder User Guide.
Use the following steps to order columns in OWB:1. Log into OWB.
2. Select your project.
3. In the Logical Tree tabbed region, choose Mappings.
4. Choose the dimension or fact table.
5. Double click on the fact table or dimension to open the Mapping editor.
6. Select the Mapping Object.
7. From the Menu Edit > Edit Object. The Detail Mapping Editor opens.
8. Select the fact or dimension table.
9. From the Menu Edit > Edit Object. The Dimension Editor opens.
10. From the Menu Edit > Table Properties. The Table Properties window opens.
11. Choose the Column tabbed region. To order the columns, in the Position field, enter a position number for the column. For example if you want the column to appear first, enter 1; if you want it to appear second, enter 2. Any columns that do not have a numeric order specified will be listed alphabetically, following the numbered columns.
Generate the EUL, see: Generate End User Layer on page 2-55.
Note: All fact tables use the suffix _F, and all dimension tables use the suffix _M.
A-12 Oracle E-Business Intelligence Embedded Data Warehouse Implementation Guide
Concurrent Prog
B
Concurrent ProgramsThis appendix lists all of the concurrent programs provided with EDW.
This appendix contains the following topics.
■ Collection Programs on page B-2
■ Common Parameters on page B-2
■ Dimension Collection Programs on page B-2
■ Fact Collection Programs on page B-5
■ Load Programs on page B-6
■ Dimension Load Programs on page B-6
■ Fact Load Programs on page B-9
■ Concurrent Programs on page B-10
rams B-1
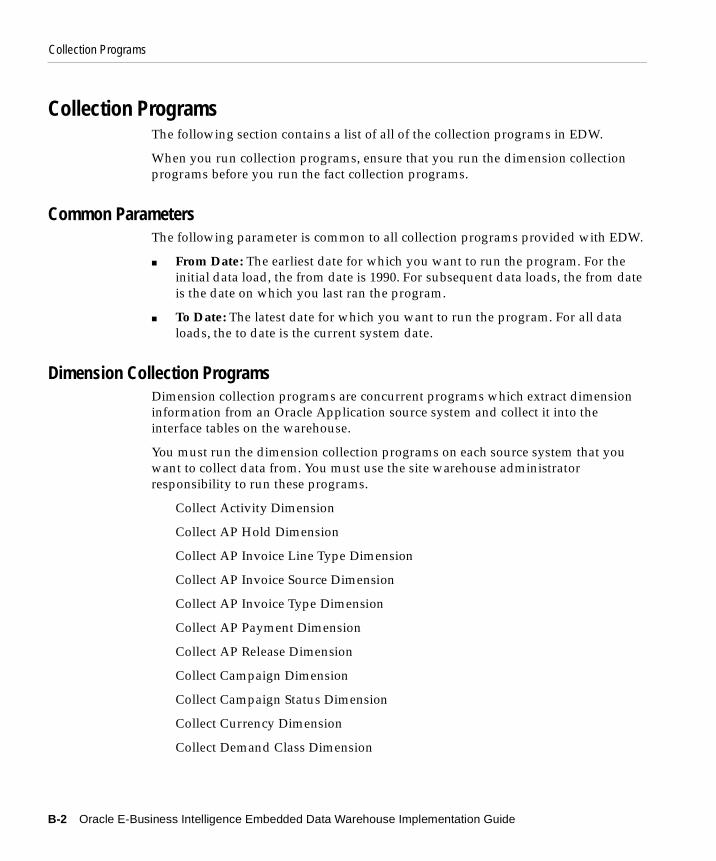
Collection Programs
Collection ProgramsThe following section contains a list of all of the collection programs in EDW.
When you run collection programs, ensure that you run the dimension collection programs before you run the fact collection programs.
Common ParametersThe following parameter is common to all collection programs provided with EDW.
■ From Date: The earliest date for which you want to run the program. For the initial data load, the from date is 1990. For subsequent data loads, the from date is the date on which you last ran the program.
■ To Date: The latest date for which you want to run the program. For all data loads, the to date is the current system date.
Dimension Collection ProgramsDimension collection programs are concurrent programs which extract dimension information from an Oracle Application source system and collect it into the interface tables on the warehouse.
You must run the dimension collection programs on each source system that you want to collect data from. You must use the site warehouse administrator responsibility to run these programs.
Collect Activity Dimension
Collect AP Hold Dimension
Collect AP Invoice Line Type Dimension
Collect AP Invoice Source Dimension
Collect AP Invoice Type Dimension
Collect AP Payment Dimension
Collect AP Release Dimension
Collect Campaign Dimension
Collect Campaign Status Dimension
Collect Currency Dimension
Collect Demand Class Dimension
B-2 Oracle E-Business Intelligence Embedded Data Warehouse Implementation Guide
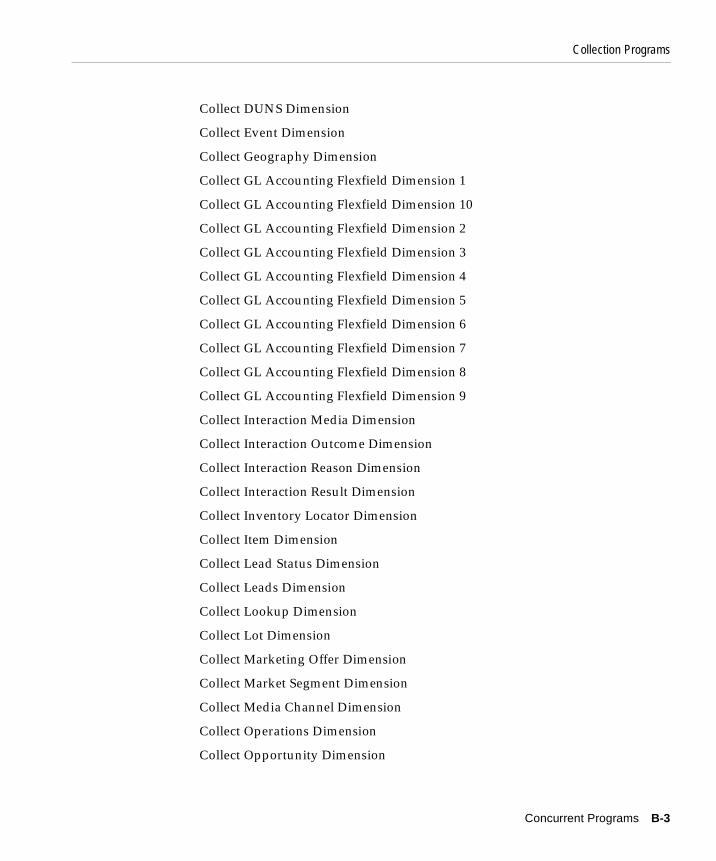
Collection Programs
Collect DUNS Dimension
Collect Event Dimension
Collect Geography Dimension
Collect GL Accounting Flexfield Dimension 1
Collect GL Accounting Flexfield Dimension 10
Collect GL Accounting Flexfield Dimension 2
Collect GL Accounting Flexfield Dimension 3
Collect GL Accounting Flexfield Dimension 4
Collect GL Accounting Flexfield Dimension 5
Collect GL Accounting Flexfield Dimension 6
Collect GL Accounting Flexfield Dimension 7
Collect GL Accounting Flexfield Dimension 8
Collect GL Accounting Flexfield Dimension 9
Collect Interaction Media Dimension
Collect Interaction Outcome Dimension
Collect Interaction Reason Dimension
Collect Interaction Result Dimension
Collect Inventory Locator Dimension
Collect Item Dimension
Collect Lead Status Dimension
Collect Leads Dimension
Collect Lookup Dimension
Collect Lot Dimension
Collect Marketing Offer Dimension
Collect Market Segment Dimension
Collect Media Channel Dimension
Collect Operations Dimension
Collect Opportunity Dimension
Concurrent Programs B-3
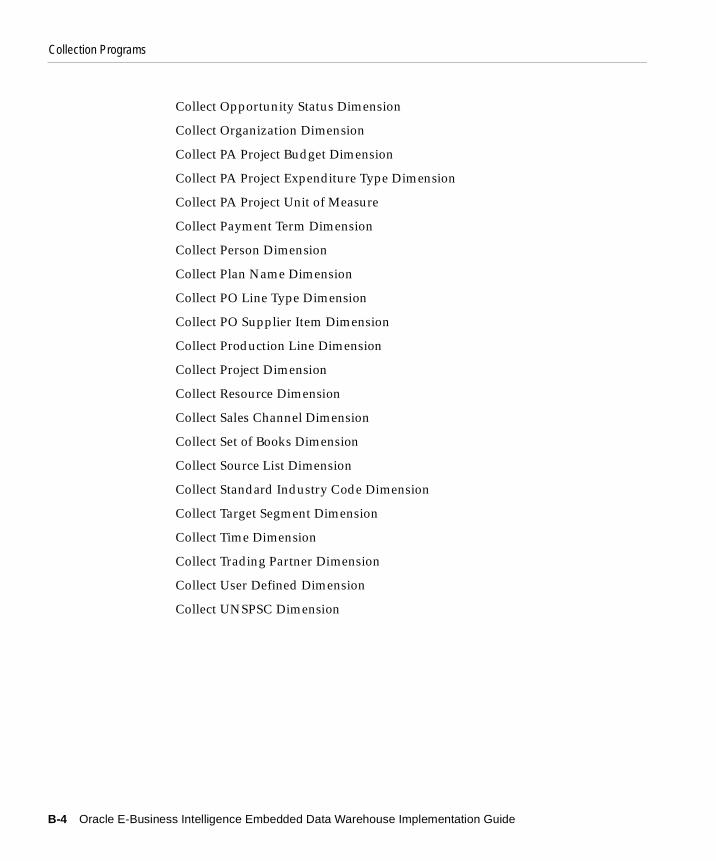
Collection Programs
Collect Opportunity Status Dimension
Collect Organization Dimension
Collect PA Project Budget Dimension
Collect PA Project Expenditure Type Dimension
Collect PA Project Unit of Measure
Collect Payment Term Dimension
Collect Person Dimension
Collect Plan Name Dimension
Collect PO Line Type Dimension
Collect PO Supplier Item Dimension
Collect Production Line Dimension
Collect Project Dimension
Collect Resource Dimension
Collect Sales Channel Dimension
Collect Set of Books Dimension
Collect Source List Dimension
Collect Standard Industry Code Dimension
Collect Target Segment Dimension
Collect Time Dimension
Collect Trading Partner Dimension
Collect User Defined Dimension
Collect UNSPSC Dimension
B-4 Oracle E-Business Intelligence Embedded Data Warehouse Implementation Guide

Collection Programs
Fact Collection ProgramsFact collection programs are concurrent programs which extract fact table information from Oracle Applications source systems and collect it into the interface tables on the warehouse.
You must run these programs on each source system that you want to collect data from. You must use the site warehouse administrator responsibility to run these programs.
Collect AP Hold Information Fact
Collect AP Invoice Line Fact
Collect AP Invoices on Hold Fact
Collect AP Invoice Payment Fact
Collect AP Scheduled Payment Fact
Collect AR Revenue Fact
Collect Backlogs Fact
Collect Bookings Fact
Collect Campaign Forecast Fact
Collect COGS Shipment Fact
Collect Event Forecast Fact
Collect Interaction Fact
Collect Leads Fact
Collect OPI COGS Shipment Fact
Collect OPI Inventory Daily Status Fact
Collect OPI Job Detail Fact
Collect OPI Job Resource Fact
Collect OPI Resource Utilization Fact
Collect OPI UOM Conversion Fact
Collect OPM Batch Status Fact
Collect OPM COGS Shipment Fact
Collect OPM Inventory Daily Base Summary Fact
Concurrent Programs B-5

Load Programs
Collect OPM Inventory Daily Status Fact
Collect OPM Job Detail Fact
Collect OPM Job Resource Fact
Collect OPM Resource Utilization Fact
Collect Opportunity Fact
Collect PA Project Budget Fact
Collect PA Project Cost Fact
Collect PA Project Revenue Fact
Collect PO Contract Fact
Collect UOM Conversion Fact
Collect PO Contract Line Fact
Collect PO Custom Measure Fact
Collect PO Distribution Fact
Collect PO Receiving Fact
Collect PO Supplier Performance Fact
Load ProgramsThis section contains a list of all of the load programs provided with EDW.
When you run the load programs, ensure that you run the dimension load programs before you run the fact load programs. There are no common parameters for the load programs.
Dimension Load ProgramsDimension load programs are concurrent programs that move dimension information from the interface tables to the dimension level tables on the warehouse. You must use the global warehouse administrator responsibility to run the dimension load programs.
Load Campaign Dimension
Load Currency Dimension
Load Demand Class Dimension
B-6 Oracle E-Business Intelligence Embedded Data Warehouse Implementation Guide
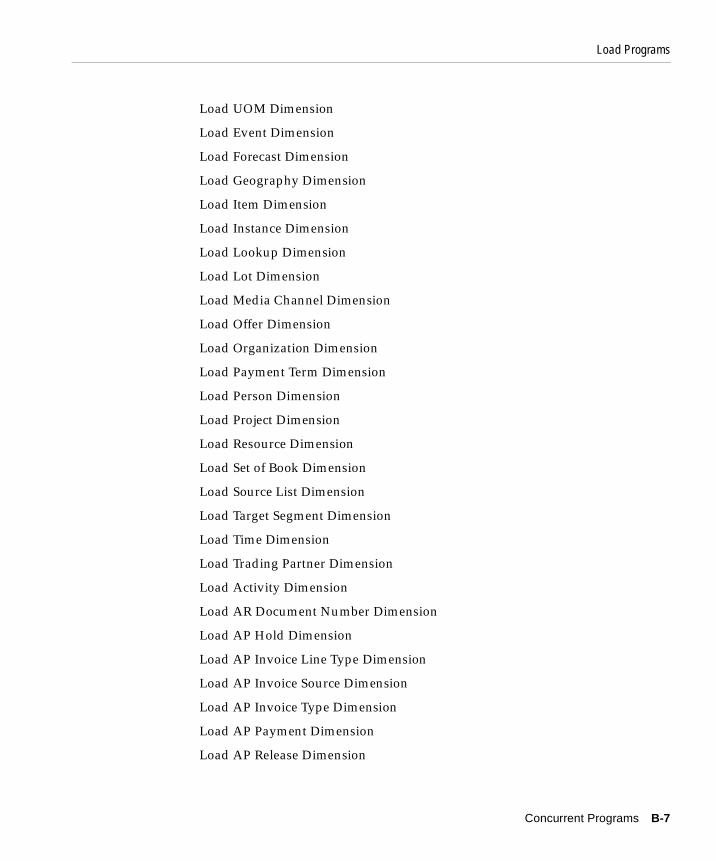
Load Programs
Load UOM Dimension
Load Event Dimension
Load Forecast Dimension
Load Geography Dimension
Load Item Dimension
Load Instance Dimension
Load Lookup Dimension
Load Lot Dimension
Load Media Channel Dimension
Load Offer Dimension
Load Organization Dimension
Load Payment Term Dimension
Load Person Dimension
Load Project Dimension
Load Resource Dimension
Load Set of Book Dimension
Load Source List Dimension
Load Target Segment Dimension
Load Time Dimension
Load Trading Partner Dimension
Load Activity Dimension
Load AR Document Number Dimension
Load AP Hold Dimension
Load AP Invoice Line Type Dimension
Load AP Invoice Source Dimension
Load AP Invoice Type Dimension
Load AP Payment Dimension
Load AP Release Dimension
Concurrent Programs B-7

Load Programs
Load Campaign Status Dimension
Load DUNS Dimension
Load GL Accounting Flexfield Dimension 1
Load GL Accounting Flexfield Dimension 10
Load GL Accounting Flexfield Dimension 2
Load GL Accounting Flexfield Dimension 3
Load GL Accounting Flexfield Dimension 4
Load GL Accounting Flexfield Dimension 5
Load GL Accounting Flexfield Dimension 6
Load GL Accounting Flexfield Dimension 7
Load GL Accounting Flexfield Dimension 8
Load GL Accounting Flexfield Dimension 9
Load Interaction Media Dimension
Load Interaction Outcome Dimension
Load Interaction Reason Dimension
Load Interaction Result Dimension
Load Inventory Locator Dimension
Load Lead Status Dimension
Load Leads Dimension
Load Market Segment Dimension
Load Operations Dimension
Load Opportunity Dimension
Load Opportunity Status Dimension
Load PA Project Budget Dimension
Load PA Project Expenditure Type Dimension
Load Plan Name Dimension
Load PO Line Type Dimension
Load PO Supplier Item Dimension
B-8 Oracle E-Business Intelligence Embedded Data Warehouse Implementation Guide
Load Programs
Load Production Line Dimension
Load Revenue Source Dimension
Load Sales Channel Dimension
Load SIC Dimension
Load UNSPSC Dimension
Load User Defined Dimension
Fact Load ProgramsFact load programs are concurrent programs which move data from the interface tables to the fact tables on the warehouse. You must use the global warehouse administrator responsibility to run the fact load programs.
Load AP Hold Information Fact
Load AP Invoice Line Fact
Load AP Invoice Payment Fact
Load AP Invoices on Hold Fact
Load AP Scheduled Payment Fact
Load AR Revenue Fact
Load Backlogs Fact
Load Bookings Fact
Load Campaign Forecast Fact
Load COGS Shipment Fact
Load EDW UOM Instance Conversion Fact
Load Event Forecast Fact
Load Inventory Daily Status Fact
Load Interaction Fact
Load Job Detail Fact
Load Job Resource Fact
Load Leads Fact
Load Opportunity Fact
Concurrent Programs B-9

Concurrent Programs
Load PA Project Budget Fact
Load PA Project Cost Fact
Load PA Project Revenue Fact
Load PO Contract Fact
Load PO Contract Line Fact
Load PO Custom Measure Fact
Load PO Distributions Fact
Load PO Receiving Fact
Load PO Supplier Performance Fact
Load Product Gross Margin Fact
Load Resource Utilization Fact
Concurrent ProgramsThis section contains a list of the other concurrent programs provided with EDW.
■ Add EDW Security Policy to Fact: This program adds an EDW security policy to a fact table. In the Parameter window, enter the name of the fact cube to which you want to associate the policy using the following format: <fact_table_name> VARCHAR2(50).
■ EDW Generate Business Views: This program runs from an individual source system which has flexfield configuration work that has been done in the Application Integrator.
■ OPM Inventory Daily Base Summary: This program is used to populate initial loading of Oracle Process Manufacturing Inventory Daily Summary Table. There are no default parameters for this report.
■ OPM Inventory Daily Summary: This program summarizes delta changes in OLTP system to be moved to EDW. There are no default parameters for this report.
■ Purge Fact Interface Tables: This program purges all facts in the interface table that have the status Collected.
■ Purge Dimension Interface Tables: This program purges all dimensions in the interface table that have the status Collected.
B-10 Oracle E-Business Intelligence Embedded Data Warehouse Implementation Guide
Concurrent Programs
■ Purge OPM Inventory Daily Summary Table: This program purges data in Oracle Process Manufacturing Inventory Daily Summary Table. You can choose a Purge type for the program: purge the whole table, or up to a given date. There are no default parameters for this report.
■ Remove EDW Security Policy from Fact: This program removes an EDW security policy from a fact table. In the Parameter window, enter the name of the fact cube that you want to remove the policy from using the following format: <fact_table_name> VARCHAR2(50).
■ Import Data Warehouse Dimensions: The Performance Management Framework is seeded with a list of the dimensions and dimension levels that ship with the OWB metadata. If this data is customized in OWB run this program to populate this data into PMF. This concurrent request is available from the BIS Super User responsibility when submitting a new request.
Concurrent Programs B-11

Concurrent Programs
B-12 Oracle E-Business Intelligence Embedded Data Warehouse Implementation Guide
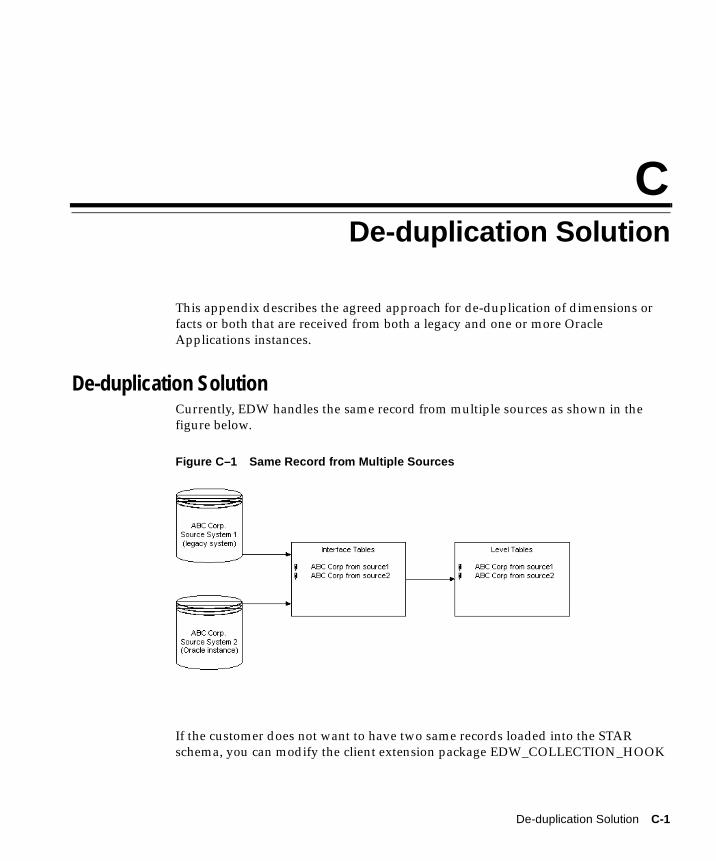
De-duplication So
C
De-duplication SolutionThis appendix describes the agreed approach for de-duplication of dimensions or facts or both that are received from both a legacy and one or more Oracle Applications instances.
De-duplication SolutionCurrently, EDW handles the same record from multiple sources as shown in the figure below.
Figure C–1 Same Record from Multiple Sources
If the customer does not want to have two same records loaded into the STAR schema, you can modify the client extension package EDW_COLLECTION_HOOK
lution C-1
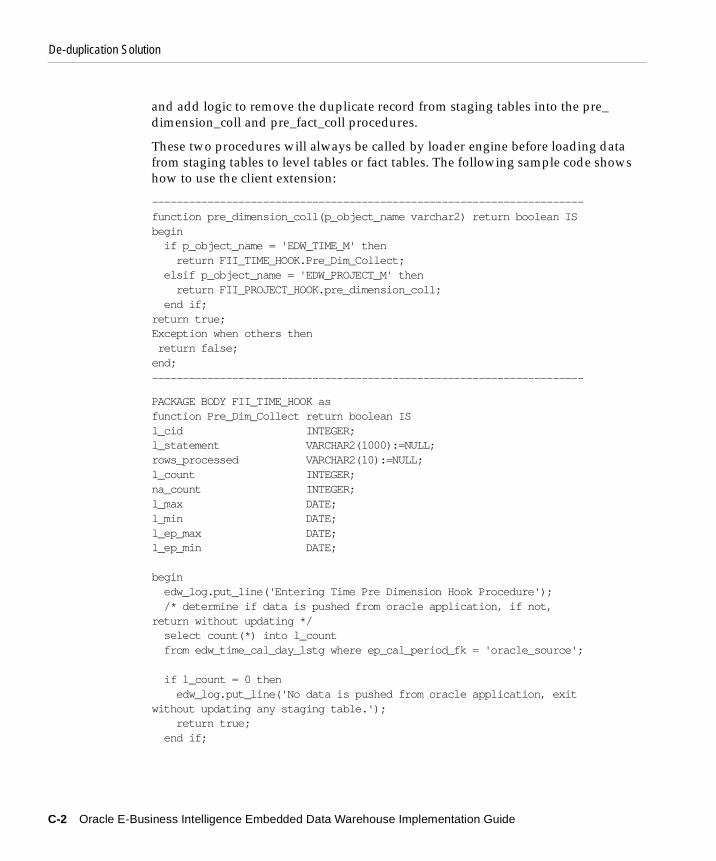
De-duplication Solution
and add logic to remove the duplicate record from staging tables into the pre_dimension_coll and pre_fact_coll procedures.
These two procedures will always be called by loader engine before loading data from staging tables to level tables or fact tables. The following sample code shows how to use the client extension:
----------------------------------------------------------------------function pre_dimension_coll(p_object_name varchar2) return boolean IS begin if p_object_name = 'EDW_TIME_M' then return FII_TIME_HOOK.Pre_Dim_Collect; elsif p_object_name = 'EDW_PROJECT_M' then return FII_PROJECT_HOOK.pre_dimension_coll; end if; return true; Exception when others then return false; end;
----------------------------------------------------------------------
PACKAGE BODY FII_TIME_HOOK as function Pre_Dim_Collect return boolean IS l_cid INTEGER; l_statement VARCHAR2(1000):=NULL; rows_processed VARCHAR2(10):=NULL; l_count INTEGER; na_count INTEGER; l_max DATE; l_min DATE; l_ep_max DATE; l_ep_min DATE;
begin edw_log.put_line('Entering Time Pre Dimension Hook Procedure'); /* determine if data is pushed from oracle application, if not,return without updating */ select count(*) into l_count from edw_time_cal_day_lstg where ep_cal_period_fk = 'oracle_source';
if l_count = 0 then edw_log.put_line('No data is pushed from oracle application, exitwithout updating any staging table.'); return true; end if;
C-2 Oracle E-Business Intelligence Embedded Data Warehouse Implementation Guide
De-duplication Solution
edw_log.put_line('Update Calendar Day level with correct EnterprisePeriod');
/* Populate NA_EDW if period is not defined in gl_periods for thegiven date */ l_statement:='update EDW_TIME_CAL_DAY_LSTG a setep_cal_period_fk=nvl((select ep.cal_period_pk fromedw_time_ep_cal_period_lstg ep where a.calendar_date between ep.start_date andep.end_date),''NA_EDW'') where a.ep_cal_period_fk=''oracle_source'' anda.collection_status=''READY''';
l_cid:=DBMS_SQL.OPEN_CURSOR; DBMS_SQL.PARSE(l_cid, l_statement, dbms_sql.v7); rows_processed:=DBMS_SQL.EXECUTE(l_cid); DBMS_SQL.CLOSE_CURSOR(l_cid);
select count(*), min(calendar_date), max(calendar_date) into na_count, l_min, l_max from edw_time_cal_day_lstg where ep_cal_period_fk = 'NA_EDW' andcollection_status='READY';
select min(start_date), max(end_date) into l_ep_min, l_ep_max from edw_time_ep_cal_period_lstg;
if na_count > 0 then edw_log.put_line('The foreign key up the Enterprise CalendarHierarchy is not updated!'); edw_log.put_line('The records in bottom day level ranges from'||to_char(l_min, 'dd-Mon-yyyy')|| ' to '||to_char(l_max, 'dd-Mon-yyyy')); edw_log.put_line('while the enterprise calendar defined for'||to_char(l_ep_min, 'dd-Mon-yyyy')|| ' to '||to_char(l_ep_max, 'dd-Mon-yyyy')); edw_log.put_line('Please ensure enterprise calendar periods spansthe entire time range'); edw_log.put_line('in the warehouse'); rollback; return false; end if;
commit; edw_log.put_line(rows_processed||' records has been updated!');
De-duplication Solution C-3
De-duplication Solution
return true;
Exception when no_data_found then -- It's okay if there are no records in staging null; return true;
when others then rollback; return false;
end Pre_Dim_Collect;
END FII_TIME_HOOK; ----------------------------------------------------------------------
C-4 Oracle E-Business Intelligence Embedded Data Warehouse Implementation Guide

Seeded Flex
D
Seeded FlexfieldsThis appendix lists the seeded flexfields for Release 11.0 and Release 11i systems.
Release 11.0 FlexfieldsThe following section lists the key and descriptive flexfields seeded by EDW for Release 11.0.
Key Flexfields - DimensionsThere are no key flexfields for dimensions seeded for 11.0.
Descriptive Flexfields - DimensionsList of descriptive flexfields for dimensions seeded for 11.0.
Table D–1 Descriptive Flexfields for 11.0 Dimensions
Name Level Name Flexfield APPLICATION_TABLE_NAME
AP Hold Dimension Hold Type Common Lookups FND_COMMON_LOOKUPS
AP Hold Dimension Hold Common Lookups FND_COMMON_LOOKUPS
AP Invoice Line Type Dimension
Invoice Line Type Common Lookups FND_COMMON_LOOKUPS
AP Invoice Source Dimension
Invoice Source Common Lookups FND_COMMON_LOOKUPS
AP Invoice Source Dimension
Invoice Source OGF Transaction Detail - Invoices
AP_INVOICES_ALL
fields D-1
Release 11.0 Flexfields
AP Invoice Source Dimension
Invoice Source Invoice AP_INVOICES_ALL
AP Invoice Source Dimension
Invoice Source JG_AP_INVOICES AP_INVOICES_ALL
AP Invoice Type Dimension AP Invoice Type Common Lookups FND_COMMON_LOOKUPS
AP Invoice Type Dimension Invoice Invoice AP_INVOICES_ALL
AP Invoice Type Dimension Invoice OGF Transaction Detail - Invoices
AP_INVOICES_ALL
AP Invoice Type Dimension Invoice JG_AP_INVOICES AP_INVOICES_ALL
AP Payment Dimension AP Payment Check Address AP_CHECKS_ALL
AP Payment Dimension AP Payment Method
Check Address AP_CHECKS_ALL
AP Payment Dimension AP Payment Method
Common Lookups FND_COMMON_LOOKUPS
AP Payment Dimension AP Payment Check Check Address AP_CHECKS_ALL
AP Payment Dimension AP Payment Check Payment Information
AP_CHECKS_ALL
AP Payment Dimension AP Payment Method
Payment Information
AP_CHECKS_ALL
AP Payment Dimension AP Payment Payment Information
AP_CHECKS_ALL
AP Payment Dimension AP Payment Check OGF Transaction Detail - Payments
AP_CHECKS_ALL
AP Payment Dimension AP Payment Method
OGF Transaction Detail - Payments
AP_CHECKS_ALL
AP Payment Dimension AP Payment OGF Transaction Detail - Payments
AP_CHECKS_ALL
AP Payment Dimension AP Payment OGF Transaction Detail - Invoices
AP_INVOICES_ALL
AP Payment Dimension AP Payment JG_AP_INVOICE_PAYMENTS
AP_INVOICE_PAYMENTS_ALL
AP Payment Dimension AP Payment JG_AP_INVOICES AP_INVOICES_ALL
Table D–1 Descriptive Flexfields for 11.0 Dimensions
Name Level Name Flexfield APPLICATION_TABLE_NAME
D-2 Oracle E-Business Intelligence Embedded Data Warehouse Implementation Guide

Release 11.0 Flexfields
AP Payment Dimension AP Payment Check JG_AP_CHECKS AP_CHECKS_ALL
AP Payment Dimension AP Payment Method
JG_AP_CHECKS AP_CHECKS_ALL
AP Payment Dimension AP Payment JG_AP_CHECKS AP_CHECKS_ALL
AP Payment Dimension AP Payment Invoice AP_INVOICES_ALL
AP Release Dimension Release Common Lookups FND_COMMON_LOOKUPS
AP Release Dimension Release Type Common Lookups FND_COMMON_LOOKUPS
AR Document Number Dimension
Receivables Document Number
Government Transaction Information
RA_CUSTOMER_TRX_ALL
AR Document Number Dimension
Receivables Document Number
Invoice Transaction Flexfield
RA_CUSTOMER_TRX_ALL
AR Document Number Dimension
Receivables Document Number
Transaction RA_CUSTOMER_TRX_ALL
AR Document Number Dimension
Receivables Document Number
JG_RA_CUSTOMER_TRX
RA_CUSTOMER_TRX_ALL
AR Transaction Type Dimension
Receivables Transaction Code
Common Lookups FND_COMMON_LOOKUPS
AR Transaction Type Dimension
Receivables Transaction Type
Transaction Type Information
RA_CUST_TRX_TYPES_ALL
AR Transaction Type Dimension
Receivables Transaction Type
JG_RA_CUST_TRX_TYPES
RA_CUST_TRX_TYPES_ALL
Currency Dimension Currency Currencies FND_CURRENCIES
Currency Dimension Currency JG_FND_CURRENCIES
FND_CURRENCIES
Internal Organization Dimension
Legal Entity Additional Organization Information
HR_ORGANIZATION_INFORMATION
Internal Organization Dimension
Operating Unit Additional Organization Information
HR_ORGANIZATION_INFORMATION
Table D–1 Descriptive Flexfields for 11.0 Dimensions
Name Level Name Flexfield APPLICATION_TABLE_NAME
Seeded Flexfields D-3
Release 11.0 Flexfields
Internal Organization Dimension
Internal Organization
Additional Organization Information
HR_ORGANIZATION_INFORMATION
Internal Organization Dimension
Business Group Additional Organization Unit Details
HR_ALL_ORGANIZATION_UNITS
Internal Organization Dimension
Legal Entity Additional Organization Unit Details
HR_ALL_ORGANIZATION_UNITS
Internal Organization Dimension
Operating Unit Additional Organization Unit Details
HR_ALL_ORGANIZATION_UNITS
Internal Organization Dimension
Legal Entity Set of Books GL_SETS_OF_BOOKS
Internal Organization Dimension
Internal Organization
Org Developer DF HR_ORGANIZATION_INFORMATION
Internal Organization Dimension
Operating Unit Org Developer DF HR_ORGANIZATION_INFORMATION
Internal Organization Dimension
Legal Entity Org Developer DF HR_ORGANIZATION_INFORMATION
Internal Organization Dimension
Legal Entity JG_GL_SETS_OF_BOOKS
GL_SETS_OF_BOOKS
Internal Organization Dimension
Internal Organization
Additional Organization Unit Details
HR_ALL_ORGANIZATION_UNITS
Project Budget Dimension Project Budget Project Budget Type
PA_BUDGET_TYPES
Project Budget Dimension Project Budget Project PA_PROJECTS_ALL
Project Budget Dimension Project Budget Project Budget Version
PA_BUDGET_VERSIONS
Project Dimension Project Category 7 Project Class Category 7
PA_CLASS_CATEGORIES
Project Dimension Project Category 6 Project Class Category 6
PA_CLASS_CATEGORIES
Table D–1 Descriptive Flexfields for 11.0 Dimensions
Name Level Name Flexfield APPLICATION_TABLE_NAME
D-4 Oracle E-Business Intelligence Embedded Data Warehouse Implementation Guide
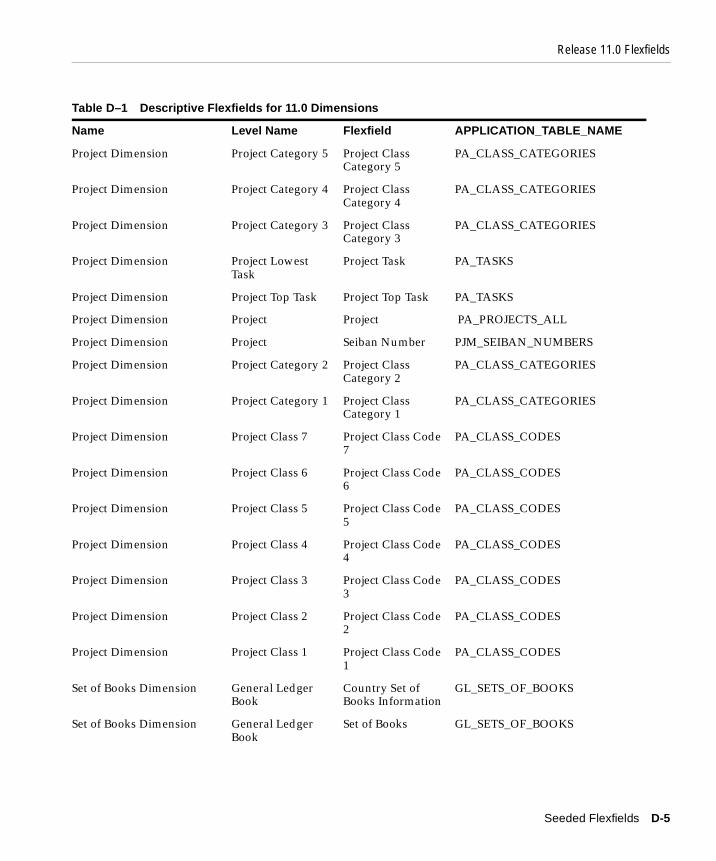
Release 11.0 Flexfields
Project Dimension Project Category 5 Project Class Category 5
PA_CLASS_CATEGORIES
Project Dimension Project Category 4 Project Class Category 4
PA_CLASS_CATEGORIES
Project Dimension Project Category 3 Project Class Category 3
PA_CLASS_CATEGORIES
Project Dimension Project Lowest Task
Project Task PA_TASKS
Project Dimension Project Top Task Project Top Task PA_TASKS
Project Dimension Project Project PA_PROJECTS_ALL
Project Dimension Project Seiban Number PJM_SEIBAN_NUMBERS
Project Dimension Project Category 2 Project Class Category 2
PA_CLASS_CATEGORIES
Project Dimension Project Category 1 Project Class Category 1
PA_CLASS_CATEGORIES
Project Dimension Project Class 7 Project Class Code 7
PA_CLASS_CODES
Project Dimension Project Class 6 Project Class Code 6
PA_CLASS_CODES
Project Dimension Project Class 5 Project Class Code 5
PA_CLASS_CODES
Project Dimension Project Class 4 Project Class Code 4
PA_CLASS_CODES
Project Dimension Project Class 3 Project Class Code 3
PA_CLASS_CODES
Project Dimension Project Class 2 Project Class Code 2
PA_CLASS_CODES
Project Dimension Project Class 1 Project Class Code 1
PA_CLASS_CODES
Set of Books Dimension General Ledger Book
Country Set of Books Information
GL_SETS_OF_BOOKS
Set of Books Dimension General Ledger Book
Set of Books GL_SETS_OF_BOOKS
Table D–1 Descriptive Flexfields for 11.0 Dimensions
Name Level Name Flexfield APPLICATION_TABLE_NAME
Seeded Flexfields D-5

Release 11i Flexfields
Release 11i FlexfieldsThe following section lists the flexfields seeded by EDW for Release 11i.
Key Flexfields - DimensionsThe following table lists the descriptive flexfields for dimensions seeded for 11i
Descriptive Flexfields - DimensionsThe following table lists the descriptive flexfields for dimensions seeded for 11i
Table D–2 Key Flexfields for 11i Dimensions
Name Level Name Flexfield APPLICATION_TABLE_NAME
Assignment Dimension
Assignment Level People Group Flexfield
PAY_PEOPLE_GROUPS
HR Grade Dimension
Grade Level Grade Flexfield PER_GRADE_DEFINITIONS
Item Dimension Organization Item System Items MTL_SYSTEM_ITEMS_B
Item Dimension Item System Items MTL_SYSTEM_ITEMS_B
Job Dimension Job Level Job Flexfield PER_JOB_DEFINITIONS
Position Dimension
Position Level Position Flexfield PER_POSITION_DEFINITIONS
Table D–3 Descriptive Flexfields for 11i Dimensions
Name Lookup Flexfield APPLICATION_TABLE_NAME
AP Hold Dimension
Hold Type Common Lookups FND_LOOKUP_VALUES
AP Hold Dimension
Hold Common Lookups FND_LOOKUP_VALUES
AP Invoice Line Type Dimension
Invoice Line Type Common Lookups FND_LOOKUP_VALUES
AP Invoice Source Dimension
Invoice Source Common Lookups FND_LOOKUP_VALUES
AP Invoice Source Dimension
Invoice Source OGF Transaction Detail - Invoices
AP_INVOICES_ALL
D-6 Oracle E-Business Intelligence Embedded Data Warehouse Implementation Guide
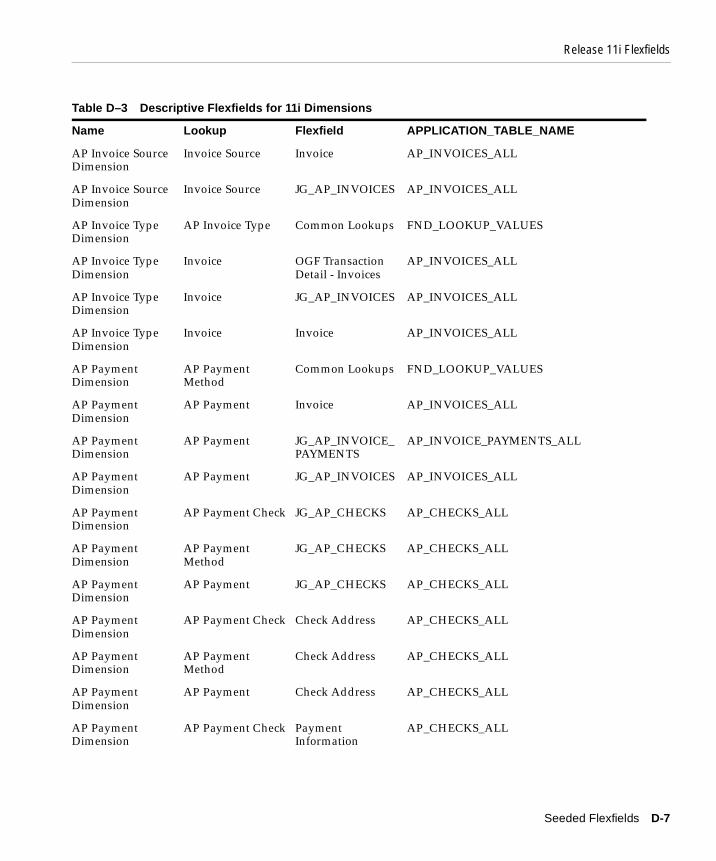
Release 11i Flexfields
AP Invoice Source Dimension
Invoice Source Invoice AP_INVOICES_ALL
AP Invoice Source Dimension
Invoice Source JG_AP_INVOICES AP_INVOICES_ALL
AP Invoice Type Dimension
AP Invoice Type Common Lookups FND_LOOKUP_VALUES
AP Invoice Type Dimension
Invoice OGF Transaction Detail - Invoices
AP_INVOICES_ALL
AP Invoice Type Dimension
Invoice JG_AP_INVOICES AP_INVOICES_ALL
AP Invoice Type Dimension
Invoice Invoice AP_INVOICES_ALL
AP Payment Dimension
AP Payment Method
Common Lookups FND_LOOKUP_VALUES
AP Payment Dimension
AP Payment Invoice AP_INVOICES_ALL
AP Payment Dimension
AP Payment JG_AP_INVOICE_PAYMENTS
AP_INVOICE_PAYMENTS_ALL
AP Payment Dimension
AP Payment JG_AP_INVOICES AP_INVOICES_ALL
AP Payment Dimension
AP Payment Check JG_AP_CHECKS AP_CHECKS_ALL
AP Payment Dimension
AP Payment Method
JG_AP_CHECKS AP_CHECKS_ALL
AP Payment Dimension
AP Payment JG_AP_CHECKS AP_CHECKS_ALL
AP Payment Dimension
AP Payment Check Check Address AP_CHECKS_ALL
AP Payment Dimension
AP Payment Method
Check Address AP_CHECKS_ALL
AP Payment Dimension
AP Payment Check Address AP_CHECKS_ALL
AP Payment Dimension
AP Payment Check Payment Information
AP_CHECKS_ALL
Table D–3 Descriptive Flexfields for 11i Dimensions
Name Lookup Flexfield APPLICATION_TABLE_NAME
Seeded Flexfields D-7

Release 11i Flexfields
AP Payment Dimension
AP Payment Method
OGF Transaction Detail - Payments
AP_CHECKS_ALL
AP Payment Dimension
AP Payment Check OGF Transaction Detail - Payments
AP_CHECKS_ALL
AP Payment Dimension
AP Payment Payment Information
AP_CHECKS_ALL
AP Payment Dimension
AP Payment Method
Payment Information
AP_CHECKS_ALL
AP Payment Dimension
AP Payment OGF Transaction Detail - Invoices
AP_INVOICES_ALL
AP Payment Dimension
AP Payment OGF Transaction Detail - Payments
AP_CHECKS_ALL
AP Release Dimension
Release Common Lookups FND_LOOKUP_VALUES
AP Release Dimension
Release Type Common Lookups FND_LOOKUP_VALUES
AR Document Number Dimension
Receivables Document Number
Transaction RA_CUSTOMER_TRX_ALL
AR Document Number Dimension
Receivables Document Number
JG_RA_CUSTOMER_TRX
RA_CUSTOMER_TRX_ALL
AR Document Number Dimension
Receivables Document Number
Government Transaction Information
RA_CUSTOMER_TRX_ALL
AR Document Number Dimension
Receivables Document Number
Invoice Transaction Flexfield
RA_CUSTOMER_TRX_ALL
AR Transaction Type Dimension
Receivables Transaction Code
Common Lookups FND_LOOKUP_VALUES
AR Transaction Type Dimension
Receivables Transaction Type
JG_RA_CUST_TRX_TYPES
RA_CUST_TRX_TYPES_ALL
AR Transaction Type Dimension
Receivables Transaction Type
Transaction Type Information
RA_CUST_TRX_TYPES_ALL
Table D–3 Descriptive Flexfields for 11i Dimensions
Name Lookup Flexfield APPLICATION_TABLE_NAME
D-8 Oracle E-Business Intelligence Embedded Data Warehouse Implementation Guide
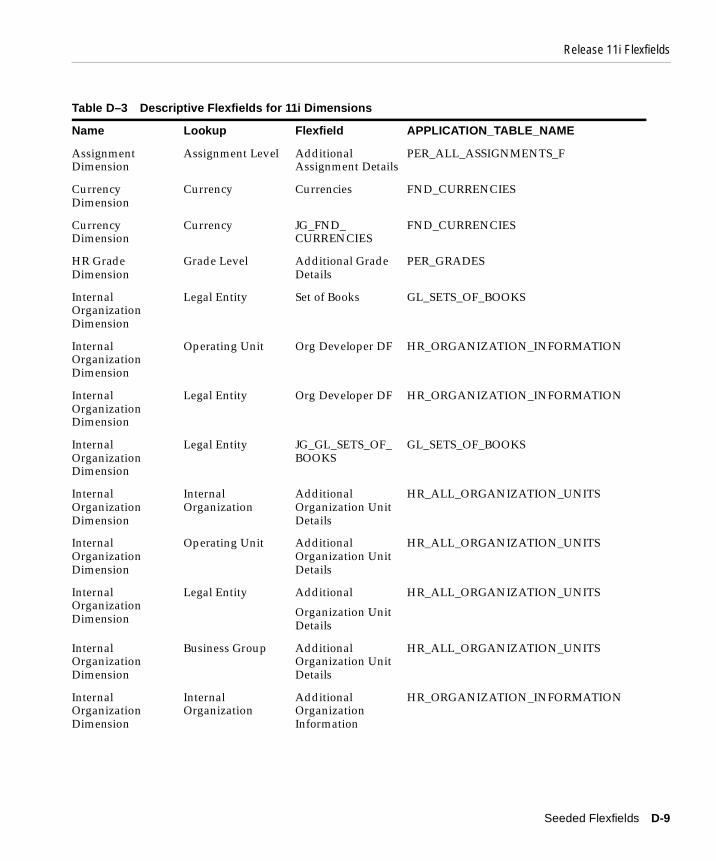
Release 11i Flexfields
Assignment Dimension
Assignment Level Additional Assignment Details
PER_ALL_ASSIGNMENTS_F
Currency Dimension
Currency Currencies FND_CURRENCIES
Currency Dimension
Currency JG_FND_CURRENCIES
FND_CURRENCIES
HR Grade Dimension
Grade Level Additional Grade Details
PER_GRADES
Internal Organization Dimension
Legal Entity Set of Books GL_SETS_OF_BOOKS
Internal Organization Dimension
Operating Unit Org Developer DF HR_ORGANIZATION_INFORMATION
Internal Organization Dimension
Legal Entity Org Developer DF HR_ORGANIZATION_INFORMATION
Internal Organization Dimension
Legal Entity JG_GL_SETS_OF_BOOKS
GL_SETS_OF_BOOKS
Internal Organization Dimension
Internal Organization
Additional Organization Unit Details
HR_ALL_ORGANIZATION_UNITS
Internal Organization Dimension
Operating Unit Additional Organization Unit Details
HR_ALL_ORGANIZATION_UNITS
Internal Organization Dimension
Legal Entity Additional
Organization Unit Details
HR_ALL_ORGANIZATION_UNITS
Internal Organization Dimension
Business Group Additional Organization Unit Details
HR_ALL_ORGANIZATION_UNITS
Internal Organization Dimension
Internal Organization
Additional Organization Information
HR_ORGANIZATION_INFORMATION
Table D–3 Descriptive Flexfields for 11i Dimensions
Name Lookup Flexfield APPLICATION_TABLE_NAME
Seeded Flexfields D-9

Release 11i Flexfields
Internal Organization Dimension
Operating Unit Additional Organization Information
HR_ORGANIZATION_INFORMATION
Internal Organization Dimension
Internal Organization
Org Developer DF HR_ORGANIZATION_INFORMATION
Internal Organization Dimension
Legal Entity Additional Organization Information
HR_ORGANIZATION_INFORMATION
Item Dimension Item Revision Item Revision MTL_ITEM_REVISIONS
Item Dimension Item Inventory Item MTL_SYSTEM_ITEMS_B
Item Dimension Organization Item Inventory Item MTL_SYSTEM_ITEMS_B
Job Dimension Job Level Additional Job Details
PER_JOBS
Job Dimension Job Level Further Job Information
PER_JOBS
Position Dimension
Position Level Additional Position Details
HR_ALL_POSITIONS_F
Project Budget Dimension
Project Budget Project PA_PROJECTS_ALL
Project Budget Dimension
Project Budget Project Budget Type
PA_BUDGET_TYPES
Project Budget Dimension
Project Budget Project Budget Version
PA_BUDGET_VERSIONS
Project Dimension Project Project PA_PROJECTS_ALL
Project Dimension Project Category 7 Project Class Category 7
PA_CLASS_CATEGORIES
Project Dimension Project Lowest Task
Project Task PA_TASKS
Project Dimension Project Top Task Project Top Task PA_TASKS
Project Dimension Project Category 6 Project Class Category 6
PA_CLASS_CATEGORIES
Project Dimension Project Category 4 Project Class Category 4
PA_CLASS_CATEGORIES
Table D–3 Descriptive Flexfields for 11i Dimensions
Name Lookup Flexfield APPLICATION_TABLE_NAME
D-10 Oracle E-Business Intelligence Embedded Data Warehouse Implementation Guide
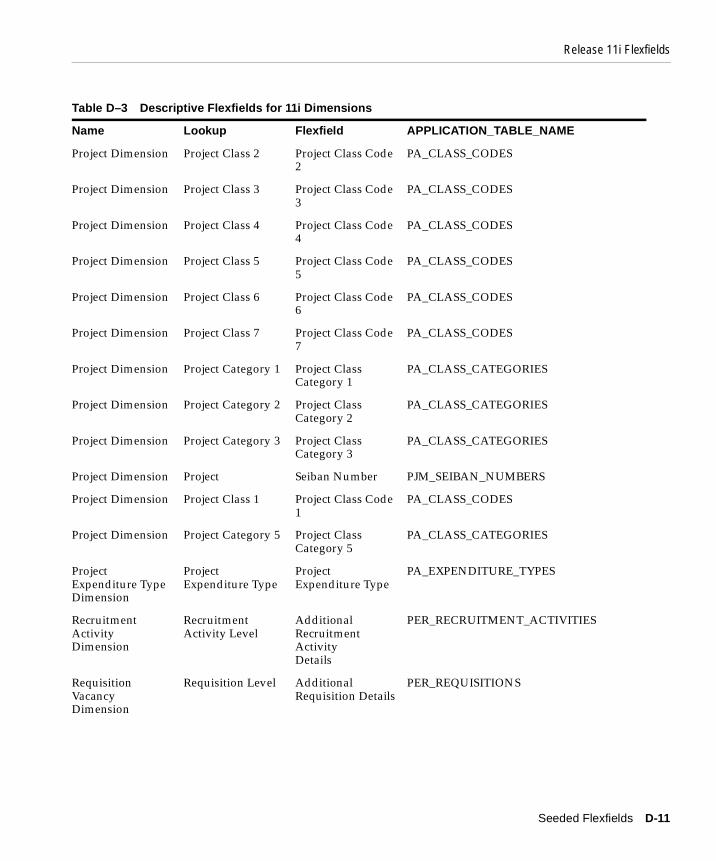
Release 11i Flexfields
Project Dimension Project Class 2 Project Class Code 2
PA_CLASS_CODES
Project Dimension Project Class 3 Project Class Code 3
PA_CLASS_CODES
Project Dimension Project Class 4 Project Class Code 4
PA_CLASS_CODES
Project Dimension Project Class 5 Project Class Code 5
PA_CLASS_CODES
Project Dimension Project Class 6 Project Class Code 6
PA_CLASS_CODES
Project Dimension Project Class 7 Project Class Code 7
PA_CLASS_CODES
Project Dimension Project Category 1 Project Class Category 1
PA_CLASS_CATEGORIES
Project Dimension Project Category 2 Project Class Category 2
PA_CLASS_CATEGORIES
Project Dimension Project Category 3 Project Class Category 3
PA_CLASS_CATEGORIES
Project Dimension Project Seiban Number PJM_SEIBAN_NUMBERS
Project Dimension Project Class 1 Project Class Code 1
PA_CLASS_CODES
Project Dimension Project Category 5 Project Class Category 5
PA_CLASS_CATEGORIES
Project Expenditure Type Dimension
Project Expenditure Type
Project Expenditure Type
PA_EXPENDITURE_TYPES
Recruitment Activity Dimension
Recruitment Activity Level
Additional Recruitment Activity Details
PER_RECRUITMENT_ACTIVITIES
Requisition Vacancy Dimension
Requisition Level Additional Requisition Details
PER_REQUISITIONS
Table D–3 Descriptive Flexfields for 11i Dimensions
Name Lookup Flexfield APPLICATION_TABLE_NAME
Seeded Flexfields D-11
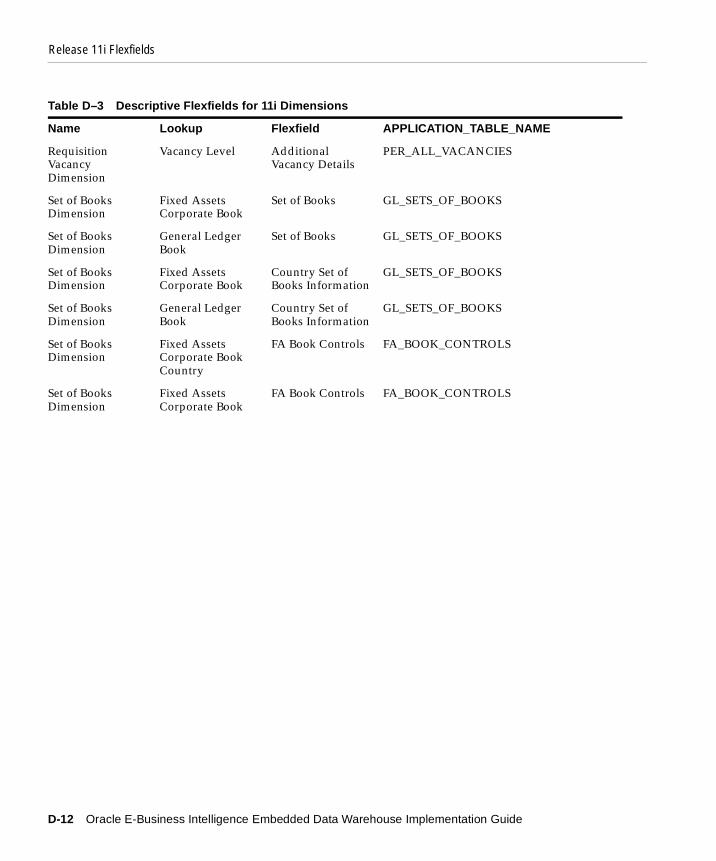
Release 11i Flexfields
Requisition Vacancy Dimension
Vacancy Level Additional Vacancy Details
PER_ALL_VACANCIES
Set of Books Dimension
Fixed Assets Corporate Book
Set of Books GL_SETS_OF_BOOKS
Set of Books Dimension
General Ledger Book
Set of Books GL_SETS_OF_BOOKS
Set of Books Dimension
Fixed Assets Corporate Book
Country Set of Books Information
GL_SETS_OF_BOOKS
Set of Books Dimension
General Ledger Book
Country Set of Books Information
GL_SETS_OF_BOOKS
Set of Books Dimension
Fixed Assets Corporate Book Country
FA Book Controls FA_BOOK_CONTROLS
Set of Books Dimension
Fixed Assets Corporate Book
FA Book Controls FA_BOOK_CONTROLS
Table D–3 Descriptive Flexfields for 11i Dimensions
Name Lookup Flexfield APPLICATION_TABLE_NAME
D-12 Oracle E-Business Intelligence Embedded Data Warehouse Implementation Guide
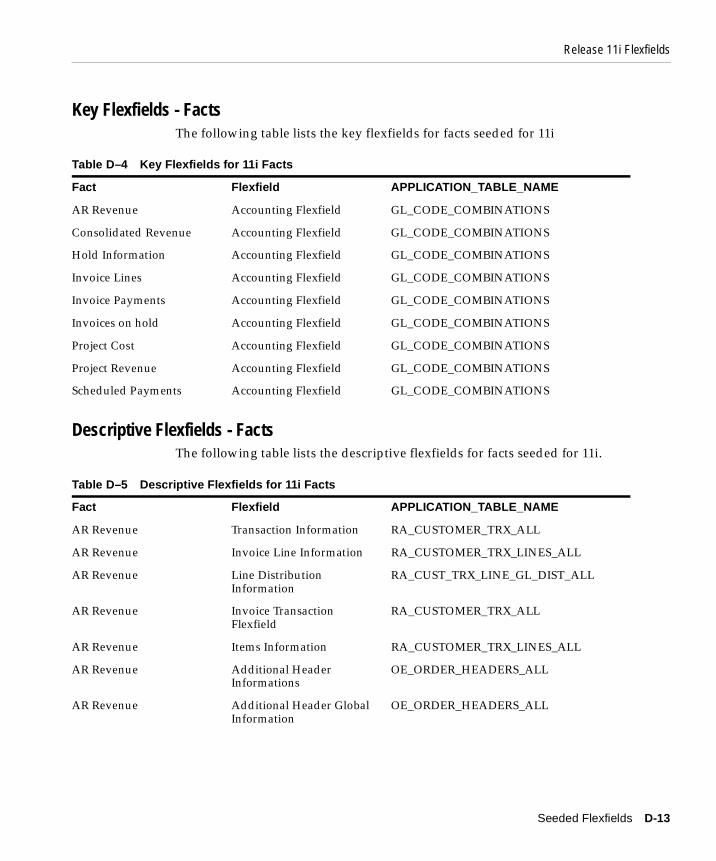
Release 11i Flexfields
Key Flexfields - FactsThe following table lists the key flexfields for facts seeded for 11i.
Descriptive Flexfields - FactsThe following table lists the descriptive flexfields for facts seeded for 11i.
Table D–4 Key Flexfields for 11i Facts
Fact Flexfield APPLICATION_TABLE_NAME
AR Revenue Accounting Flexfield GL_CODE_COMBINATIONS
Consolidated Revenue Accounting Flexfield GL_CODE_COMBINATIONS
Hold Information Accounting Flexfield GL_CODE_COMBINATIONS
Invoice Lines Accounting Flexfield GL_CODE_COMBINATIONS
Invoice Payments Accounting Flexfield GL_CODE_COMBINATIONS
Invoices on hold Accounting Flexfield GL_CODE_COMBINATIONS
Project Cost Accounting Flexfield GL_CODE_COMBINATIONS
Project Revenue Accounting Flexfield GL_CODE_COMBINATIONS
Scheduled Payments Accounting Flexfield GL_CODE_COMBINATIONS
Table D–5 Descriptive Flexfields for 11i Facts
Fact Flexfield APPLICATION_TABLE_NAME
AR Revenue Transaction Information RA_CUSTOMER_TRX_ALL
AR Revenue Invoice Line Information RA_CUSTOMER_TRX_LINES_ALL
AR Revenue Line Distribution Information
RA_CUST_TRX_LINE_GL_DIST_ALL
AR Revenue Invoice Transaction Flexfield
RA_CUSTOMER_TRX_ALL
AR Revenue Items Information RA_CUSTOMER_TRX_LINES_ALL
AR Revenue Additional Header Informations
OE_ORDER_HEADERS_ALL
AR Revenue Additional Header Global Information
OE_ORDER_HEADERS_ALL
Seeded Flexfields D-13
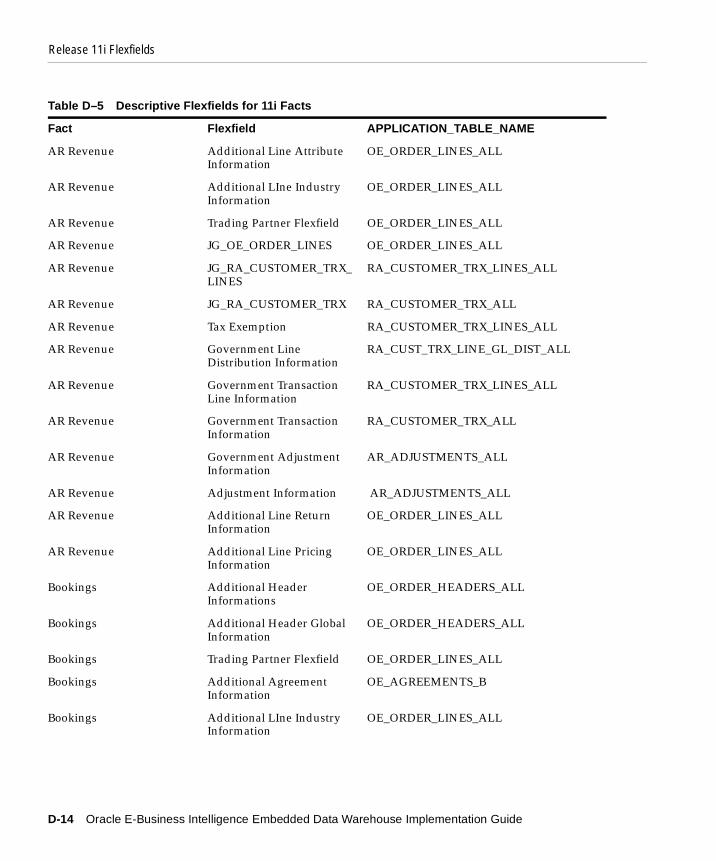
Release 11i Flexfields
AR Revenue Additional Line Attribute Information
OE_ORDER_LINES_ALL
AR Revenue Additional LIne Industry Information
OE_ORDER_LINES_ALL
AR Revenue Trading Partner Flexfield OE_ORDER_LINES_ALL
AR Revenue JG_OE_ORDER_LINES OE_ORDER_LINES_ALL
AR Revenue JG_RA_CUSTOMER_TRX_LINES
RA_CUSTOMER_TRX_LINES_ALL
AR Revenue JG_RA_CUSTOMER_TRX RA_CUSTOMER_TRX_ALL
AR Revenue Tax Exemption RA_CUSTOMER_TRX_LINES_ALL
AR Revenue Government Line Distribution Information
RA_CUST_TRX_LINE_GL_DIST_ALL
AR Revenue Government Transaction Line Information
RA_CUSTOMER_TRX_LINES_ALL
AR Revenue Government Transaction Information
RA_CUSTOMER_TRX_ALL
AR Revenue Government Adjustment Information
AR_ADJUSTMENTS_ALL
AR Revenue Adjustment Information AR_ADJUSTMENTS_ALL
AR Revenue Additional Line Return Information
OE_ORDER_LINES_ALL
AR Revenue Additional Line Pricing Information
OE_ORDER_LINES_ALL
Bookings Additional Header Informations
OE_ORDER_HEADERS_ALL
Bookings Additional Header Global Information
OE_ORDER_HEADERS_ALL
Bookings Trading Partner Flexfield OE_ORDER_LINES_ALL
Bookings Additional Agreement Information
OE_AGREEMENTS_B
Bookings Additional LIne Industry Information
OE_ORDER_LINES_ALL
Table D–5 Descriptive Flexfields for 11i Facts
Fact Flexfield APPLICATION_TABLE_NAME
D-14 Oracle E-Business Intelligence Embedded Data Warehouse Implementation Guide
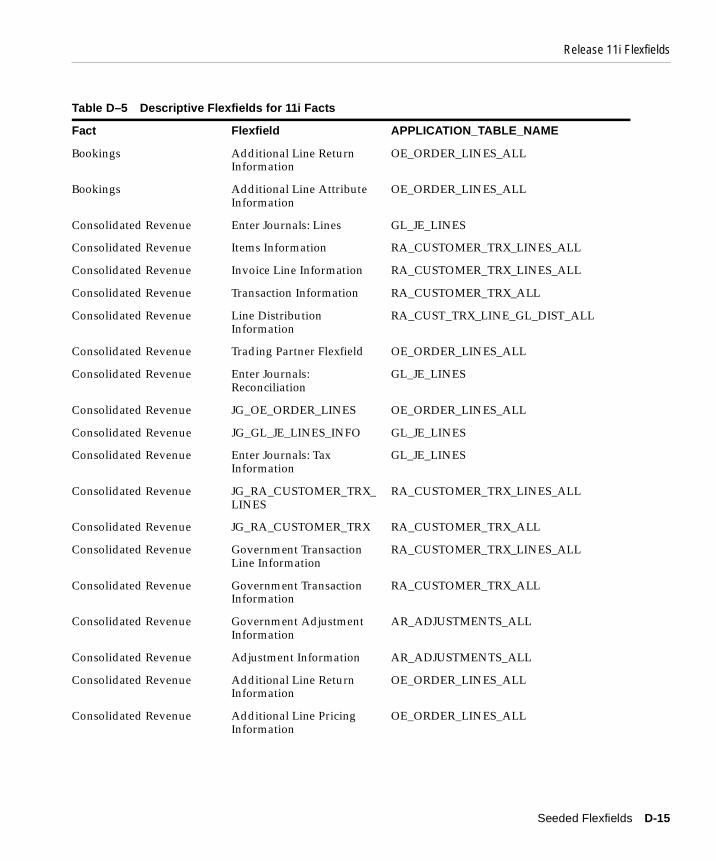
Release 11i Flexfields
Bookings Additional Line Return Information
OE_ORDER_LINES_ALL
Bookings Additional Line Attribute Information
OE_ORDER_LINES_ALL
Consolidated Revenue Enter Journals: Lines GL_JE_LINES
Consolidated Revenue Items Information RA_CUSTOMER_TRX_LINES_ALL
Consolidated Revenue Invoice Line Information RA_CUSTOMER_TRX_LINES_ALL
Consolidated Revenue Transaction Information RA_CUSTOMER_TRX_ALL
Consolidated Revenue Line Distribution Information
RA_CUST_TRX_LINE_GL_DIST_ALL
Consolidated Revenue Trading Partner Flexfield OE_ORDER_LINES_ALL
Consolidated Revenue Enter Journals: Reconciliation
GL_JE_LINES
Consolidated Revenue JG_OE_ORDER_LINES OE_ORDER_LINES_ALL
Consolidated Revenue JG_GL_JE_LINES_INFO GL_JE_LINES
Consolidated Revenue Enter Journals: Tax Information
GL_JE_LINES
Consolidated Revenue JG_RA_CUSTOMER_TRX_LINES
RA_CUSTOMER_TRX_LINES_ALL
Consolidated Revenue JG_RA_CUSTOMER_TRX RA_CUSTOMER_TRX_ALL
Consolidated Revenue Government Transaction Line Information
RA_CUSTOMER_TRX_LINES_ALL
Consolidated Revenue Government Transaction Information
RA_CUSTOMER_TRX_ALL
Consolidated Revenue Government Adjustment Information
AR_ADJUSTMENTS_ALL
Consolidated Revenue Adjustment Information AR_ADJUSTMENTS_ALL
Consolidated Revenue Additional Line Return Information
OE_ORDER_LINES_ALL
Consolidated Revenue Additional Line Pricing Information
OE_ORDER_LINES_ALL
Table D–5 Descriptive Flexfields for 11i Facts
Fact Flexfield APPLICATION_TABLE_NAME
Seeded Flexfields D-15
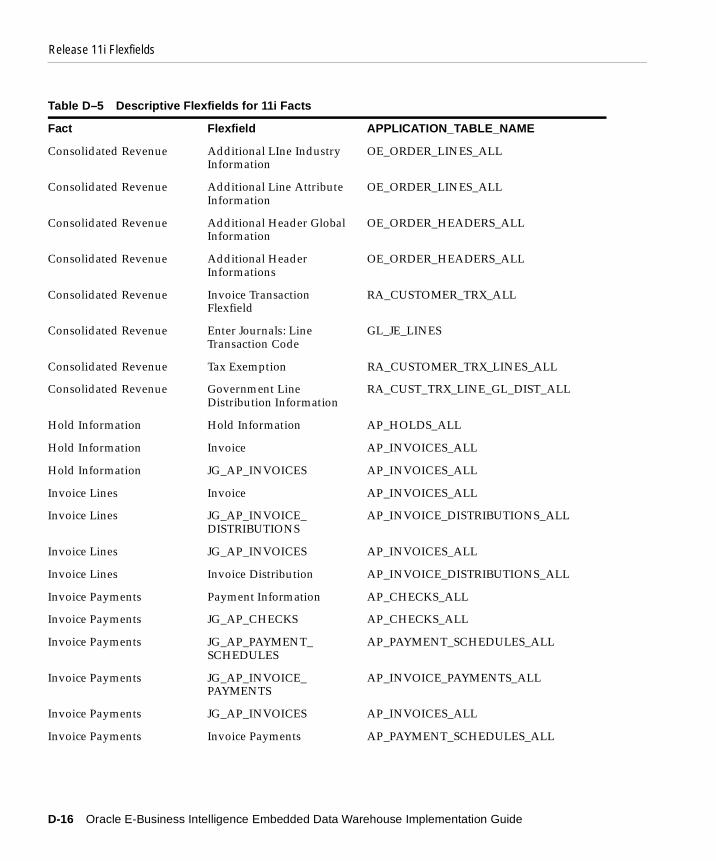
Release 11i Flexfields
Consolidated Revenue Additional LIne Industry Information
OE_ORDER_LINES_ALL
Consolidated Revenue Additional Line Attribute Information
OE_ORDER_LINES_ALL
Consolidated Revenue Additional Header Global Information
OE_ORDER_HEADERS_ALL
Consolidated Revenue Additional Header Informations
OE_ORDER_HEADERS_ALL
Consolidated Revenue Invoice Transaction Flexfield
RA_CUSTOMER_TRX_ALL
Consolidated Revenue Enter Journals: Line Transaction Code
GL_JE_LINES
Consolidated Revenue Tax Exemption RA_CUSTOMER_TRX_LINES_ALL
Consolidated Revenue Government Line Distribution Information
RA_CUST_TRX_LINE_GL_DIST_ALL
Hold Information Hold Information AP_HOLDS_ALL
Hold Information Invoice AP_INVOICES_ALL
Hold Information JG_AP_INVOICES AP_INVOICES_ALL
Invoice Lines Invoice AP_INVOICES_ALL
Invoice Lines JG_AP_INVOICE_DISTRIBUTIONS
AP_INVOICE_DISTRIBUTIONS_ALL
Invoice Lines JG_AP_INVOICES AP_INVOICES_ALL
Invoice Lines Invoice Distribution AP_INVOICE_DISTRIBUTIONS_ALL
Invoice Payments Payment Information AP_CHECKS_ALL
Invoice Payments JG_AP_CHECKS AP_CHECKS_ALL
Invoice Payments JG_AP_PAYMENT_SCHEDULES
AP_PAYMENT_SCHEDULES_ALL
Invoice Payments JG_AP_INVOICE_PAYMENTS
AP_INVOICE_PAYMENTS_ALL
Invoice Payments JG_AP_INVOICES AP_INVOICES_ALL
Invoice Payments Invoice Payments AP_PAYMENT_SCHEDULES_ALL
Table D–5 Descriptive Flexfields for 11i Facts
Fact Flexfield APPLICATION_TABLE_NAME
D-16 Oracle E-Business Intelligence Embedded Data Warehouse Implementation Guide
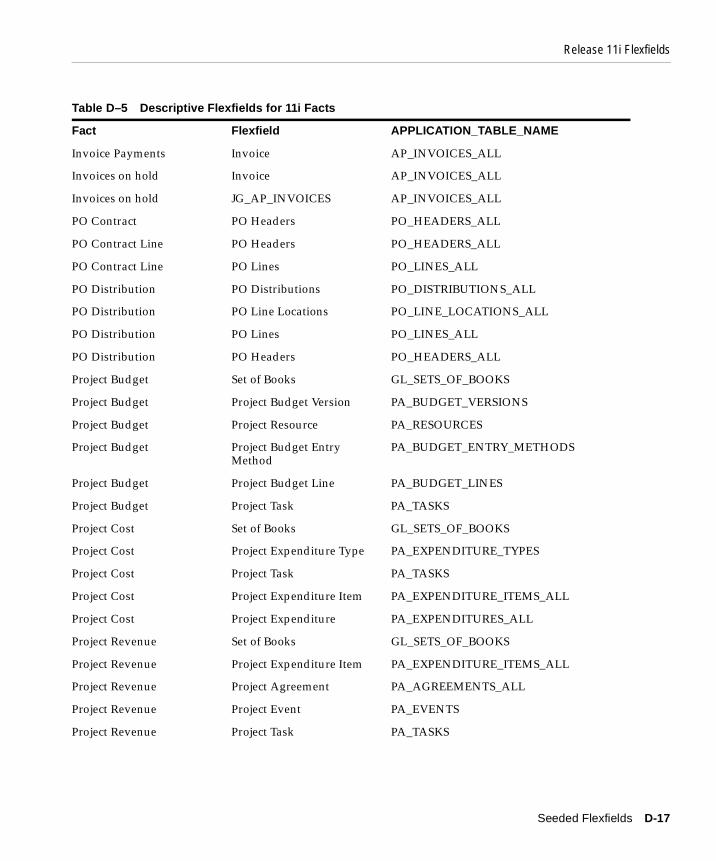
Release 11i Flexfields
Invoice Payments Invoice AP_INVOICES_ALL
Invoices on hold Invoice AP_INVOICES_ALL
Invoices on hold JG_AP_INVOICES AP_INVOICES_ALL
PO Contract PO Headers PO_HEADERS_ALL
PO Contract Line PO Headers PO_HEADERS_ALL
PO Contract Line PO Lines PO_LINES_ALL
PO Distribution PO Distributions PO_DISTRIBUTIONS_ALL
PO Distribution PO Line Locations PO_LINE_LOCATIONS_ALL
PO Distribution PO Lines PO_LINES_ALL
PO Distribution PO Headers PO_HEADERS_ALL
Project Budget Set of Books GL_SETS_OF_BOOKS
Project Budget Project Budget Version PA_BUDGET_VERSIONS
Project Budget Project Resource PA_RESOURCES
Project Budget Project Budget Entry Method
PA_BUDGET_ENTRY_METHODS
Project Budget Project Budget Line PA_BUDGET_LINES
Project Budget Project Task PA_TASKS
Project Cost Set of Books GL_SETS_OF_BOOKS
Project Cost Project Expenditure Type PA_EXPENDITURE_TYPES
Project Cost Project Task PA_TASKS
Project Cost Project Expenditure Item PA_EXPENDITURE_ITEMS_ALL
Project Cost Project Expenditure PA_EXPENDITURES_ALL
Project Revenue Set of Books GL_SETS_OF_BOOKS
Project Revenue Project Expenditure Item PA_EXPENDITURE_ITEMS_ALL
Project Revenue Project Agreement PA_AGREEMENTS_ALL
Project Revenue Project Event PA_EVENTS
Project Revenue Project Task PA_TASKS
Table D–5 Descriptive Flexfields for 11i Facts
Fact Flexfield APPLICATION_TABLE_NAME
Seeded Flexfields D-17

Release 11i Flexfields
Receiving Receiving Transactions RCV_TRANSACTIONS
Receiving PO Lines PO_LINES_ALL
Receiving PO Headers PO_HEADERS_ALL
Scheduled Payments Invoice AP_INVOICES_ALL
Scheduled Payments JG_AP_PAYMENT_SCHEDULES
AP_PAYMENT_SCHEDULES_ALL
Scheduled Payments JG_AP_INVOICE_PAYMENTS
AP_INVOICE_PAYMENTS_ALL
Scheduled Payments Invoice Payments AP_PAYMENT_SCHEDULES_ALL
Scheduled Payments JG_AP_INVOICES AP_INVOICES_ALL
Supplier Performance PO Headers PO_HEADERS_ALL
Supplier Performance PO Lines PO_LINES_ALL
Supplier Performance PO Line Locations PO_LINE_LOCATIONS_ALL
Workforce Separation Fact Additional Period of Service Details
PER_PERIODS_OF_SERVICE
Workforce Separation Fact Additional Periods of Service Information
PER_PERIODS_OF_SERVICE
Table D–5 Descriptive Flexfields for 11i Facts
Fact Flexfield APPLICATION_TABLE_NAME
D-18 Oracle E-Business Intelligence Embedded Data Warehouse Implementation Guide

Terminology Ma
E
Terminology MappingThe following terms changed between Release 3.0.1, and 3.1. Please refer to this matrix to determine how the terms will change from one release to the next.
Table 4–1 Terminology Map from EDW Release 3.0 to 3.0.1
Release 3.0.1 Release 3.1 Definition
push programs collection programs Moves data from source systems into interface tables in preparation for loading to the warehouse.
staging tables interface tables Set of identical tables that reside on the source systems and on the warehouse. On the source systems, the tables are used to collect data for transfer to the warehouse. On the warehouse, thetables are used to collect the data from the source systems for loading into the warehouse.
remote target Objects on the target (warehouse) system.
local source Objects on the source systems.
publish collect Moves data from the source systems into interface tables in preparation for loading to the warehouse.
deploy generate The process of generating the EUL from the metadata.
source views collection views The set of views used to present EDW workbooks and reports.These views include base views, collection views, and generated views.
collection engine
loader engine The mechanism for moving data from the target or run-time warehouse interface tables to the fact and dimension tables.
collection process
loading process The process of moving data from the target or run-time warehouse interface tables to the fact and dimension tables
pping E-1

E-2 Oracle E-Business Intelligence Embedded Data Warehouse Implementation Guide
Glossary
Actual
The calculated value for a performance measure. Alerts will calculate the actual value based on the dimensions specified in the setup of targets in the Performance Management Framework. This actual value will display on the Personal Homepage and on Notification messages.
Alert
A process that runs for a performance measure, delivering notifications for out of tolerance situations to target owners and subscribers. It also updates the data used in the Performance Measure portlet.
Analysis Workbook
A display of enterprise information in a graphical and tabular format. The Analysis Workbook uses Discoverer to allow the user to modify the selection criteria, drill into dimension hierarchies or link to other data elements.
Ask Oracle
A component of E-Business Intelligence that allows users to find reports that answer business questions. Ask Oracle uses a natural language search engine and a repository of questions associated with the E-Business Intelligence reports, to provide the reports that are relevant to a specific question.
Business Plan
A grouping of performance measure targets. Within the Performance Management Framework, the user can create different business plans, each with a set of performance measures and targets. Users of reports can choose the business plan for comparison and alerts can select the business plan for determination of out of
Glossary-1
tolerance situations. For example, a user may want to setup a set of targets based on a favorable economic scenario and a set of targets based on an unfavorable economic scenario.
Business View
Component of the application database that sorts underlying applications data into an understandable and consolidated set of information. By masking the complexity of the databaseís tables, Business Views provide a standard set of interfaces to any tool or application that retrieves and presents data to the user.
Account Type
In the Embedded Data Warehouse, users can assign business meanings to an individual account number (or other segments in an Accounting Flexfield) called an Account Type. It can be assigned to the lowest level account number, or to the parent account number. If it is assigned to a parent account, all children beneath the parent account bear the same business meaning. (See Flexfield Segment.)
Attributes
Attributes are usually text fields, and they usually describe a characteristic of a tangible thing.
Balanced Scorecard
A business practice that uses a set of Key Performance Indicators (KPIs) to create an enterprise scorecard in order to monitor its own corporate performance. This "holistic" methodology stresses that, in addition to financial indicators, the non-financial indicators, such as employee skills, customer satisfaction, or internal business process, need to be tracked, and they ultimately equate to the financial success of a company. A Balanced Scorecard is often implemented during an analysis of the industry situation, and an enterprise's strategic and tactical goals.
Base Unit of Measure (UOM)
The standard Unit of Measure upon which its related unit of measures are based. Each Warehouse unit of measure is tied to a base unit of measure. A conversion rate is required for warehouse-to-base UOM mapping. For example: If a gallon is the base unit of measure, related units of measure could include the quart (1/4 gallon) and the pint (1/8 gallon).
Collection
These are concurrent programs, defined in Oracle Applications, identified as data sources for the Warehouse. A collection extracts data from source tables, based on
Glossary-2

an EDW source view definition, and loads the data into Interface Tables that reside in the warehouse. These concurrent programs are under the Site Warehouse Administrator responsibility in each source application.
Consolidation Set of Books
This is the parent set of books in any consolidation definition in General Ledger. This set of books maps the relationship between a parent and its child Set of Books.
CWM Bridge
One of the utilities provided in the utilities drawer of the Oracle Warehouse Builder. When chosen, it brings up the Oracle Common Warehouse Metadata (CWM) Transfer Wizard window, which walks through the steps necessary to transfer Metadata.
Data Cleansing
The mechanism utilized to improve the quality of data loaded into the Warehouse. The current data cleansing mechanism, provided by EDW, is to remove duplicate records, and to remove records with dangling foreign keys.
Derived Fact Table
The Derived fact table sources data from base tables, instead of source systems. Derived fact tables can be calculated from one or more base fact tables. Or, a Derived fact table can be expressed at a different granularity than the base fact itself.
Dimension
Dimensions are used to calculate and monitor performance measures. Some of the dimensions are organization, geography, time, sales channel, geography and product.
Dimension Hierarchy
The parent/child relationship within dimension levels that facilitates the up and down drilling capability in query tools.
Dimension Hierarchy Level
Individual levels in a dimensional parent/child hierarchical relationship. There is a dimension level table associated with each corresponding hierarchical level.
Glossary-3
Dimension Level
Dimension levels establish granularity for a dimension. For example: in E-Business Intelligence Suite, within the organization dimensions; set of books, legal entity, operating unit, and inventory organization, are the different dimension levels.
Dimension Level Combination
Used with the Performance Management Framework to identify the dimension level associated with a specific target setup. For example: in setting up a target for the Inventory Turns performance measure, the target level might be Organization and Time.
Dimension Table
Each dimension is defined by its primary key, which serves as the basis for referential integrity with any given fact table to which it is joined. Most dimension tables contain many textual attributes (fields) that are the basis for constraining and grouping within data warehouse queries.
Discoverer
An Oracle Tool that allows users to retrieve data from a database. Discoverer provides a user-friendly method for creating database queries and displaying information.
Discoverer Bridge
The Oracle Warehouse Builder has the ability to transfer metadata to other Oracle products using the "Oracle CWM Bridge". The components utilized to transfer metatata between OWB and Discoverer are: the Oracle Warehouse Builder Bridge, the CWM Bridge, and the Oracle Discoverer Bridge. The three components combine, from a user perspective, into simply running a "Transfer Wizard".
Discoverer EUL
A metalayer that contains data about other tables in a database. Conceptually, the End User Layer shields the end user from the complexity of the database. The database tables are modified by the Administration Edition of Discoverer, and the OFS Discoverer/Integrator. Business Areas are defined within the EUL, and then used with the End User Edition of Discoverer. The End User Layer supports Oracle Applications security by recognizing applications user ids, passwords, and responsibilities.
Glossary-4
Discoverer Analysis Workbook
A display of enterprise information in a graphical and tabular format. The Analysis Workbook uses Discoverer to enable the user to modify the selection criteria, drill into dimension hierarchies, or link to other data elements.
Drill Down Report
A report run by drilling down within a report. Generally, this drill down generates a report in greater granularity, at a lower dimension level. For example: in a Resource Utilization report, a drill down allows viewing utilization for a specific department.
EDW
Embedded Data Warehouse.
EDW Warehouse Parameter
A set of parameters that are required to prepare the Warehouse so that it may receive data from heterogeneous sources. Examples are: identify source instances, identify currency type, and global Unit of Measure, along with associated conversion rates, etc.
End User Layer
Component of BIS that translates business view column names into industry standard terminology, and provides links between related data tables. Discoverer accesses information through the End User Layer (EUL). The End User Layer supports Oracle Applications security by recognizing applications userids, passwords, and responsibilities.
Enterprise Calendar
EDW provides various time dimension hierarchies to accommodate different business requirements. For example: EDW provides GL period hierarchy for accounting use. EDW also provides a 4-4-5 week hierarchy for manufacturing oriented use. For a global point of view, in order to enable a consistent reporting mechanism on time, EDW provides an additional hierarchy -- enterprise calendar hierarchy -- to enable data from various sources to be presented in a single time hierarchy.
Equivalent Set of Books
This is a dummy parent set of books mirrored in the child instance, as instructed by the GL Global Consolidation System.
Glossary-5
Fact Table
A set of simultaneous measures at a particular granularity. Most of these measures are numeric, but not necessarily so. Every fact table contains a set of two or more foreign keys that joined to their respective dimension tables.
Favorites
A customizable portlet on the Personal Homepage that allows users to specify their favorite BIS intelligence reports, analysis workbooks, or external web sites.
Flexfield Segment
A flexfield segment is a single sub-field within a flexfield. You define the appearance, and meaning, of individual segments when customizing a flexfield. A segment is represented in your database as a single table column.
Flexfield Value Set
A flexfield value set contains a group of predefined valid values for a specific flexfield segment. System validates data entry for this flexfield segment against the associated value set. Single value sets can be assigned to one, or more than one, segment. A flexfield value set can also be shared among different flexfields.
Global Warehouse Administrator
A responsibility defined in the Warehouse. This responsibility manages the warehouse parameter setup, concurrent program requests, and load process monitoring.
Graph
A portlet on the Personal Homepage that displays graphs relating to the enterprise performance.
Incremental Data Load
This is an extract of the new or modified transactions that occurred since the last extract run. It is detected by reviewing the last update date/time stamp in source systems.
Intelligence Report
A display of enterprise information in a graphical and tabular format, based on a set of parameters, that addresses a business area. BIS reports are viewed on a browser, and accessed through the Personal Homepage. As opposed to transaction level reports that provide detailed information on the business operations, Intelligence Reports focus on a high level view of enterprise performance.
Glossary-6
Interface Table
This serves as a staging area between source systems and the target Warehouse. The Interface Tables in EDW are a set of tables with identical schema, such as target fact tables, or dimension tables. The purpose of an interface table is to reserve a temperate area for data transformation.
Load Program
These are concurrent programs, defined in warehouse, to load data from interface tables into fact tables and dimension level tables. The EDW load program also performs some data cleansing and transformation. These current programs are under the Global Warehouse Administrator responsibility in the warehouse.
Logical Data Model
For BIS, this is a representation of the Business Views in the database and folders in the End User Layer. Available in a readable format, the Logical Data Model gives the relationship between these entities, allowing a Discoverer user to determine the data elements needed for a specific analysis.
Master Instance
A dedicated instance which provides seed date for selections in warehouse parameter forms like rate type, warehouse currency, and enterprise calendar.
Metadata
Data about data. Metadata describes how, and when, and by whom, a particular set of data was collected, and how the data is formatted. Metadata is essential for understanding information stored in data warehouses.
Navigation
A region on the Personal Homepage that displays the menu set for the user, allowing drill down to the intelligence reports.
Notification
A component of Oracle applications that notifies a user of an event. Within BIS, the Performance Management Framework will generate notifications to users on out of tolerance situations. These notifications can appear on the Personal Homepage, and be sent as an E-mail.
Glossary-7
Oracle E-Business Intelligence Suite (E-Business Intelligence Suite)
A Web-enabled Oracle Applications product that allows customers to measure, monitor, and manage enterprise performance in order to make better, more timely decisions across the enterprise. E-Business Intelligence Suite is a user-friendly, intuitive, pre-packaged decision-support system, completely integrated with Oracle Applications.
Other User-Defined Dimension
Based on business requirements for non-Accounting Key Flexfields, and Descriptive Flexfields defined in a user’s Oracle Applications, EDW can accommodate up to fifty dimensions mapped from these Flexfield Segments.
OWB
Oracle Warehouse Builder.
OWB Applications Integrator
The OWB Applications Integrator is a utility provided by OWB to tightly manage EDW Metadata that resides in the OWB repository. It enables users to map GL Accounting Flexfields, other Key Flexfields, and Descriptive Flexfields in Oracle Applications, to dimensions in the Warehouse. It also allows users to configure user-definable measures and attributes in an EDW Schema.
OWB Bridge
The Oracle Warehouse Builder has the ability to transfer metadata to other Oracle products using the "Oracle OWB Bridges". The components utilized to transfer metatata between OWB and Discoverer are: the Oracle Warehouse Builder Bridge, the CWM Bridge, and the Oracle Discoverer Bridge. The three components combine, from a user perspective, into simply running a Transfer Wizard.
OWB Metadata Loader Windows
The OWB Metadata loader windows are used to import or export OWB metadata between OWB repositories. This process requires saving OWB metadata to and from files, which are then imported from or exported to OWB repositories.
OWB Metadata Repository
EDW metadata resides in the OWB metadata repository, which is an object in the warehouse.
Glossary-8
Performance Management Framework
The BIS component that allows implementation of performance measure tracking. The framework is composed of: forms to identify and store the performance measure targets and tolerances, alerts to calculate actual values, and workflows to take action on out-of-tolerance situations.
Performance Measure
A metric used to determine enterprise performance and success. A company will identify relevant performance measures based on the dynamics of the industry, and the company's strategic and tactical goals.
Period Type
Period type is set up in GL, with standard data types of month, quarter and year. A period type is used to define an accounting calendar. An accounting calendar can have multiple period types. In order to uniquely identify an enterprise calendar used in the EDW Warehouse, period type setup is required as one of the parameters.
Personal Homepage
The web-based starting point for BIS access. The Personal Homepage (PHP) includes graphs, key performance indicators, an "Ask Oracle" search engine, workflow notifications, navigation to intelligence reports, a link to analytical workbooks, and links to other web sites.
Portlet
An area on the homepage that holds a specific BIS component. BIS has regions for graphs, performance measures, an "Ask Oracle" search engine, workflow notifications, navigation to BIS reports, a link to analytical workbooks, and a favorites section for links to frequently-used sites.
Predefined Dimension
The Embedded Data Warehouse provides a comprehensive list of predefined dimensions that enable users to perform generic business analyses out-of-box. For example: time dimension, geography dimension, etc.
Project Classification
Project classification is used to group projects according to predefined categories. The definition of these categories is done within Oracle Projects.
Glossary-9
Project in OWB
A Builder Project in OWB is a high-level repository structure that stores and organizes the formal descriptions that define a data warehouse. These definitions include descriptions of data sources, target warehouse objects, mappings of source data to various targets, transformation operations, and configuration parameters. OWB generates and stores numerous scripts in a Project.
Related Report
A report run from a link on another report. Generally, related reports are also menu level reports. This contrasts with a drill-down report and a view-by report. For example: from the Inventory Turns report, Production Efficiency is a related report.
Responsibility
A security feature of Oracle applications that groups forms and procedures under the user application. A responsibility is associated with a window's menu, a data group, and a concurrent request set. Within BIS, the responsibility is used to determine access to menu items, trends, notifications, performance data, report data, and Ask Oracle questions.
Rate Type (Warehouse Parameter)
To identify one conversion rate type to be used in the Warehouse. The conversion rate type is defined in Oracle General Ledger. It is used to automatically assign a rate to convert foreign currency journal amounts to functional currency equivalents.
Schema
A loader of related database objects, usually grouped by a User ID. Schema objects include tables, views, and database links.
Slowly Changing Dimension
A dimension within which certain attributes have tendency to change with time. One example is the martial status of an employee in the employee dimension. The status may change from single, to married, to divorced, to married again. OWB enables users to identify a dimension as slowly changing, and to mark certain attributes in a dimension to be traced over time. In EDW, every change to the dimension attribute creates an additional record in the dimension table, and it also keeps the previous record. Any new transaction related to that dimension will point to the new record in the dimension table, while existing transactions still point to old records.
Glossary-10
Source Instance
These are the database instances in which the source systems that feed data into the EDW Warehouse reside.
Source Set of Books
If a user chooses to create dimensions from GL Accounting Flexfield segments, and complete the mapping process in the OWB Applications Integrator, the selected chart of accounts and its associated set of books will be display in the Value-Based Hierarchy Setup window as a source set of books.
Source System
A database that feeds data required for business analysis into a warehouse. For EDW, the source system can be either Oracle Applications, other ERP systems, or legacy systems.
Summary Fact Table
The Summary fact table sources data from base tables instead of source systems. It expresses the same group of data in a different granularity than the base fact table.
Target
The value specified for a specific performance measure at a certain dimension level, and a specific dimension. For example: the target value of 12 might be set for the performance measure Inventory Turns, for the target level of Organization and Time, and the specific dimensions of U.S. Manufacturing and calendar month.
Target Tolerance
The levels set on a specific performance measurement target, outside of which a workflow will be triggered. BIS allows setup of three pairs of target tolerance levels. For example: with a target of 12, a user might have 11,13 as the first set of tolerances, 10,14 as the second set, and 5,20 as the third set. A different workflow can generate for each out-of-tolerance situation.
Time Stamp
A specially defined date-and-time format field that tracks when a data record has been created, deleted, or changed in any way.
Glossary-11
Type Hierarchy in Value Based Hierarchy
A mechanism to group data, based on account type assigned in EDW. It is used to present all transactions with the same account type from all source set of books together. There are no hierarchical relations between these transactions, even though the terminology is Type Hierarchy.
Unit of Measure
The unit in which the quantity of an item is expressed. For example: resource utilization might have a percentage unit of measure, while revenue has a currency unit of measure.
User-Defined Accounting Dimension
There are ten dimensions, reserved in the EDW Schema, to accommodate GL Accounting Flexfield segments that have been defined in a user’s Oracle Applications. There are five hierarchies, and fifteen levels, for each hierarchy that has been predefined for these dimensions.
User-Defined Attribute
These are user-definable attributes, reserved in EDW fact tables and dimension level tables to enable configuration on the predefined EDW objects. The OWB Applications Integrator is the tool to use for configuration. The Data type for a user-defined attribute is VARCHAR2.
User-Defined Measure
There are user-definable measures reserved in EDW fact tables to enable configuration on the predefined EDW fact tables. The OWB Applications Integrator is the tool to use for configuration. The Data type for a user-defined measure is NUMBER.
Value Based Hierarchy
Within a value set for a GL Accounting Flexfield segment, you can define values which have a parent/child relationship. A parent value is that value which has one or more child values associated with it. This parent/child relationship turns into a dimensional hierarchy -- the Value Based Hierarchy. This is only applicable to GL Accounting Flexfield segments.
Value Based Hierarchy Root
The very top parent node in the parent/child relationship for an individual GL Accounting Flexfield segment.
Glossary-12
View-By
A report run by changing the view-by parameter. The view-by parameter provides the dimension for categorization of the measure, and the corresponding x axis. For example: a Resource Utilization report allows view-by of organization, time, geography. and product. Changing the view-by will keep the set of data, but change in what categories the data will display.
Warehouse
In contrast to source systems, that feed data into warehouse, warehouse is the target system that receives the data load. There are various Schemas in the warehouse, such as fact table, dimension level table, etc. The warehouse metadata repository also resides in the warehouse.
Warehouse Currency
One selected currency that is to be used in the warehouse so that all reports can provide consistent information. This is the mechanism which manages the currency issue that can occur due to heterogeneous data sources.
Warehouse Unit of Measure (UOM)
A set of unit of measures (UOM) defined in the warehouse setup process. This set of unit of measures is used to trace or measure values in a warehouse that have been sourced from various systems in a consistent manner. Quantities from individual source system are converted into warehouse UOMs.
Workbook
Please refer to Analysis Workbook.
Glossary-13

Glossary-14

Index
CChanging Column Ordering in OWB, A-12Check Data Validity, 3-25Purge Interface Table, 3-31Choose Source Objects, 2-45, 2-47Clients
Oracle Discoverer Administration Client, 1-7Oracle Discoverer Bridge Client, 1-6Oracle Warehouse Builder Client, 1-6
Column OrderingChanging Column Ordering in OWB, A-12Implementation Benefits, A-10
Consolidation Set of Books Setup Window, 2-80Creating Item Class, A-5
DData Loading
Initial Load GuidelinesDimensions, 3-9Facts, 3-12
Data Validity Check, 3-25Deploy Configuration, 2-50Dimension Load Programs, B-6Dimension Push Programs, 2-55
EEnterprise Data Warehouse Components
Source System Components, 1-5
FFact Load Programs, B-9Fact Push Programs, B-5Facts, 3-12
GGL Value-Based Hierarchy Setup Forms, 2-77GL Value-Based Hierarchy Setup Windows
Consolidation Set of Books Setup Window, 2-80Global Unit Of Measure Setup
Part One - Warehouse UOMWarehouse UOM Form, 2-90
HHidden Column
Convention by Intelligence Products, A-8How to Unhide Columns, A-7Implementation Benefits, A-6Implementation Trade Offs, A-7
IImplementation Benefits, A-2Initial Load Guidelines
Dimensions, 3-9Facts, 3-12
Install End User Layer and EDW WorkbooksImport the End User Layer EEX File, 2-63
InstallationHardware Prerequisites, 2-6
Interface Table Manager, 3-16
Index-1

Item ClassCreating, A-5Implementation Benefits, A-2
OOracle Applications Integrator
Configure Fact TableChoose Source Objects, 2-45, 2-47
Deploy Configuration, 2-50Oracle CWM Transfer Wizard
Transfer Metadata, 2-59Oracle Discoverer Administration Client, 1-7Oracle Discoverer Bridge Client, 1-6Oracle Warehouse Builder Client, 1-6OWB Applications Integrator Configuration
ProceduresDefine Source
Update an Existing Source Module, 2-31, 2-32
PProfile Options, 2-102Purchasing Custom Measure Survey Setup, 2-98
Profile Options, 2-102Purchasing Intelligence Responsibilities, 2-97
Purchasing Intelligence Responsibilities, 2-97Purge Interface Table, 3-31
RRegistration of Security Policy w/Fact
Tables, 2-108Runtime Warehouse Components
Discoverer End User Layer & Workbooks, 1-6Oracle Warehouse Builder Repository, 1-6
SSet up EDW Warehouse Parameters, 2-11Set up Warehouse Security, 2-105Setup Profile Options, 2-15Setup Source Instances for EDW Runtime
Warehouse, 2-10Setup Warehouse Security
Registration of Security Policy with Fact Tables, 2-108
TTNSNAMES.ORA, 2-30To Add New User Defined Attributes, 2-45Transfer Metadata, 2-59
WWarehouse UOM Form, 2-90
Index-2