embroidery - media. · pdf filemy bernina 1 bernina embroidery orboo 012918 ©2017...
TRANSCRIPT

My BERNINA
1
B E R N I N A E M B R O I D E R Y W O R K B O O K
012918©2017 BERNINA of America. Permission granted to copy and distribute in original form only. Content may not be altered or used in any other form or under any other branding.
For BERNINA 880 PLUS, 790 PLUS, 770 QEE, 700, 590, 570 QEE, 535, and 500 EMBROIDERY MACHINES
BERNINA EMBROIDERY WORKBOOK
EMBROIDERY
M A S T E R Y B O O K
S E R I E S
MYBERNINA
My BERNINA
2
B E R N I N A E M B R O I D E R Y W O R K B O O K
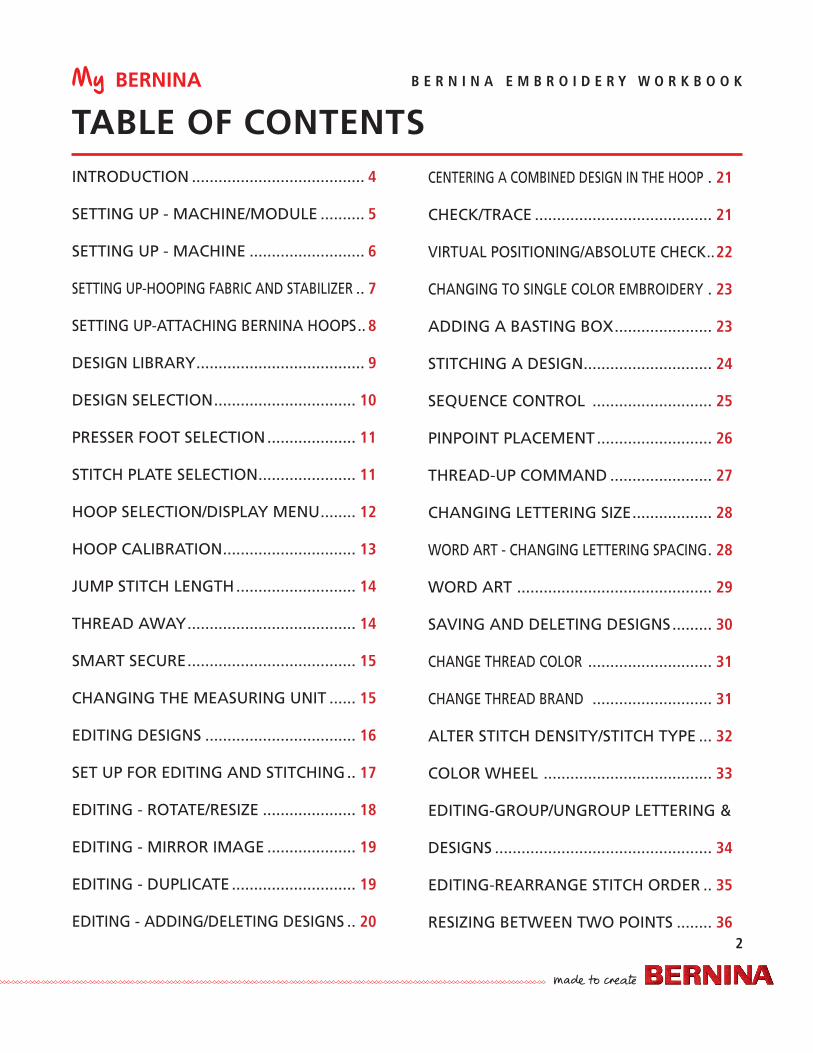
TABLE OF CONTENTSINTRODUCTION ....................................... 4
SETTING UP - MACHINE/MODULE .......... 5
SETTING UP - MACHINE .......................... 6
SETTING UP-HOOPING FABRIC AND STABILIZER .. 7
SETTING UP-ATTACHING BERNINA HOOPS .. 8
DESIGN LIBRARY ...................................... 9
DESIGN SELECTION ................................ 10
PRESSER FOOT SELECTION .................... 11
STITCH PLATE SELECTION ...................... 11
HOOP SELECTION/DISPLAY MENU ........ 12
HOOP CALIBRATION .............................. 13
JUMP STITCH LENGTH ........................... 14
THREAD AWAY ...................................... 14
SMART SECURE ...................................... 15
CHANGING THE MEASURING UNIT ...... 15
EDITING DESIGNS .................................. 16
SET UP FOR EDITING AND STITCHING .. 17
EDITING - ROTATE/RESIZE ..................... 18
EDITING - MIRROR IMAGE .................... 19
EDITING - DUPLICATE ............................ 19
EDITING - ADDING/DELETING DESIGNS .. 20
CENTERING A COMBINED DESIGN IN THE HOOP . 21
CHECK/TRACE ........................................ 21
VIRTUAL POSITIONING/ABSOLUTE CHECK ..22
CHANGING TO SINGLE COLOR EMBROIDERY . 23
ADDING A BASTING BOX ...................... 23
STITCHING A DESIGN ............................. 24
SEQUENCE CONTROL ........................... 25
PINPOINT PLACEMENT .......................... 26
THREAD-UP COMMAND ....................... 27
CHANGING LETTERING SIZE .................. 28
WORD ART - CHANGING LETTERING SPACING . 28
WORD ART ............................................ 29
SAVING AND DELETING DESIGNS ......... 30
CHANGE THREAD COLOR ............................ 31
CHANGE THREAD BRAND ........................... 31
ALTER STITCH DENSITY/STITCH TYPE ... 32
COLOR WHEEL ...................................... 33
EDITING-GROUP/UNGROUP LETTERING &
DESIGNS ................................................. 34
EDITING-REARRANGE STITCH ORDER .. 35
RESIZING BETWEEN TWO POINTS ........ 36
My BERNINA
3
B E R N I N A E M B R O I D E R Y W O R K B O O K
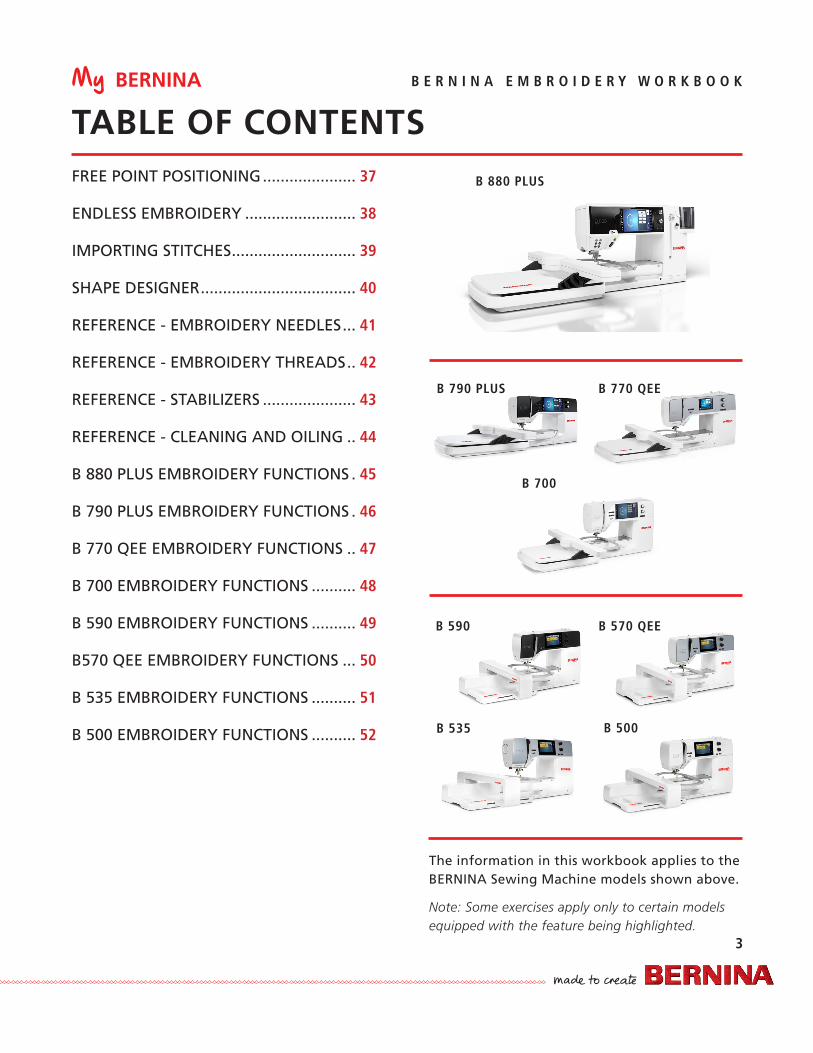
B 570 QEEB 590
TABLE OF CONTENTS
The information in this workbook applies to the BERNINA Sewing Machine models shown above.
Note: Some exercises apply only to certain models equipped with the feature being highlighted.
B 700
B 500B 535
B 880 PLUS
B 790 PLUS B 770 QEE
FREE POINT POSITIONING ..................... 37
ENDLESS EMBROIDERY ......................... 38
IMPORTING STITCHES ............................ 39
SHAPE DESIGNER ................................... 40
REFERENCE - EMBROIDERY NEEDLES ... 41
REFERENCE - EMBROIDERY THREADS .. 42
REFERENCE - STABILIZERS ..................... 43
REFERENCE - CLEANING AND OILING .. 44
B 880 PLUS EMBROIDERY FUNCTIONS . 45
B 790 PLUS EMBROIDERY FUNCTIONS . 46
B 770 QEE EMBROIDERY FUNCTIONS .. 47
B 700 EMBROIDERY FUNCTIONS .......... 48
B 590 EMBROIDERY FUNCTIONS .......... 49
B570 QEE EMBROIDERY FUNCTIONS ... 50
B 535 EMBROIDERY FUNCTIONS .......... 51
B 500 EMBROIDERY FUNCTIONS .......... 52
My BERNINA
4
B E R N I N A E M B R O I D E R Y W O R K B O O K
INTRODUCTION
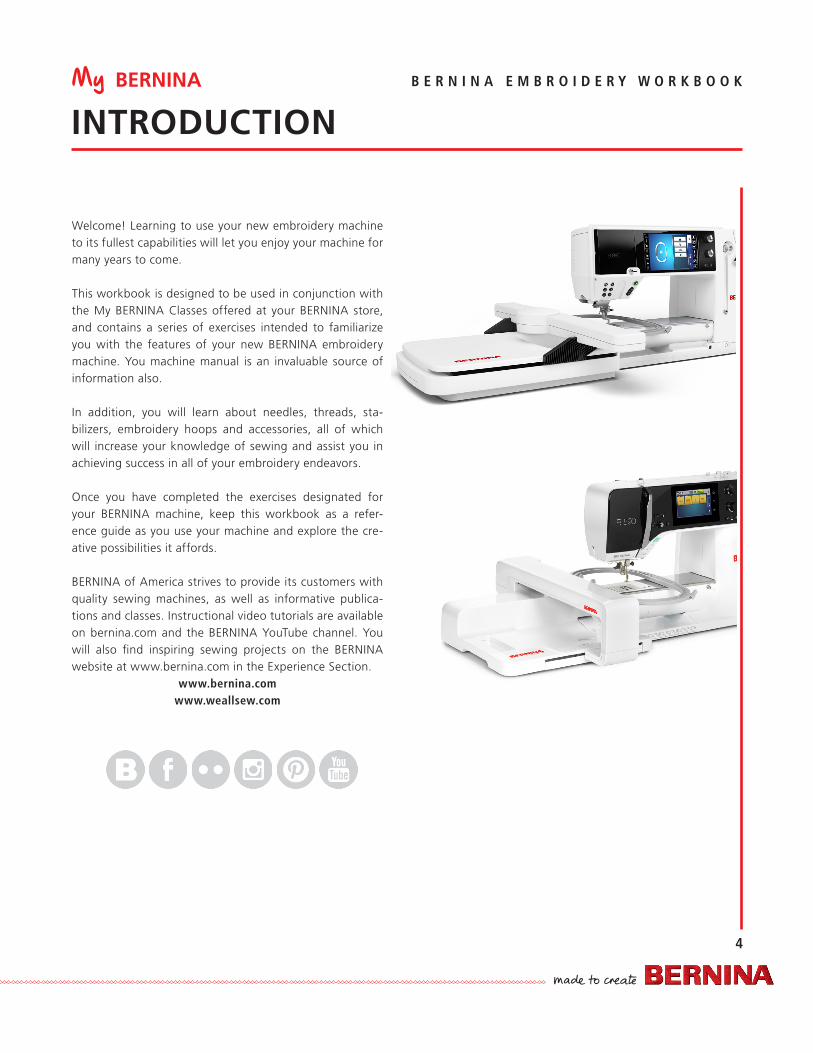
Welcome! Learning to use your new embroidery machine to its fullest capabilities will let you enjoy your machine for many years to come.
This workbook is designed to be used in conjunction with the My BERNINA Classes offered at your BERNINA store, and contains a series of exercises intended to familiarize you with the features of your new BERNINA embroidery machine. You machine manual is an invaluable source of information also.
In addition, you will learn about needles, threads, sta-bilizers, embroidery hoops and accessories, all of which will increase your knowledge of sewing and assist you in achieving success in all of your embroidery endeavors.
Once you have completed the exercises designated for your BERNINA machine, keep this workbook as a refer-ence guide as you use your machine and explore the cre-ative possibilities it affords. BERNINA of America strives to provide its customers with quality sewing machines, as well as informative publica-tions and classes. Instructional video tutorials are available on bernina.com and the BERNINA YouTube channel. You will also find inspiring sewing projects on the BERNINA website at www.bernina.com in the Experience Section.
www.bernina.comwww.weallsew.com
My BERNINA
5
B E R N I N A E M B R O I D E R Y W O R K B O O K
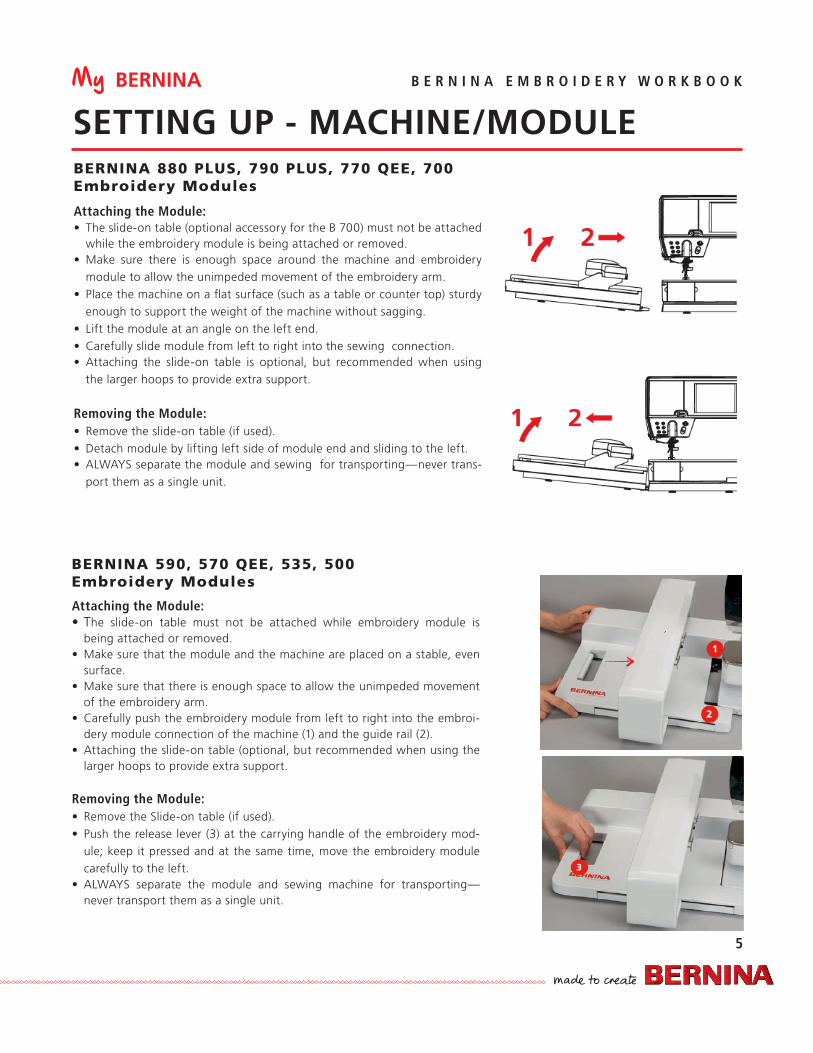
SETTING UP - MACHINE/MODULE
BERNINA 590, 570 QEE, 535, 500 Embroidery Modules
BERNINA 880 PLUS, 790 PLUS, 770 QEE, 700 Embroidery Modules
Attaching the Module:• The slide-on table must not be attached while embroidery module is
being attached or removed.• Make sure that the module and the machine are placed on a stable, even
surface.• Make sure that there is enough space to allow the unimpeded movement
of the embroidery arm.• Carefully push the embroidery module from left to right into the embroi-
dery module connection of the machine (1) and the guide rail (2).• Attaching the slide-on table (optional, but recommended when using the
larger hoops to provide extra support.
Removing the Module:• Remove the Slide-on table (if used).• Push the release lever (3) at the carrying handle of the embroidery mod-
ule; keep it pressed and at the same time, move the embroidery module carefully to the left.
• ALWAYS separate the module and sewing machine for transporting—never transport them as a single unit.
Attaching the Module:• The slide-on table (optional accessory for the B 700) must not be attached
while the embroidery module is being attached or removed.• Make sure there is enough space around the machine and embroidery
module to allow the unimpeded movement of the embroidery arm.• Place the machine on a flat surface (such as a table or counter top) sturdy
enough to support the weight of the machine without sagging.• Lift the module at an angle on the left end.• Carefully slide module from left to right into the sewing connection. • Attaching the slide-on table is optional, but recommended when using
the larger hoops to provide extra support.
Removing the Module:• Remove the slide-on table (if used).• Detach module by lifting left side of module end and sliding to the left.• ALWAYS separate the module and sewing for transporting—never trans-
port them as a single unit.
My BERNINA
6
B E R N I N A E M B R O I D E R Y W O R K B O O K
STITCH PLATE
Attach the appropriate stitch plate to the machine to reduce flagging of fabric, resulting in improved stitching.• Straight Stitch/CutWork Plate: Standard accessory for B 880 PLUS, 790 PLUS, 570 QEE, 590• Embroidery Stitch Plate: Standard accessory for B 700, 500• Straight Stitch Plate: Optional accessory for B 570 QEE, 535
PRESSER FOOT
Attach Teardrop Embroidery Foot #26 to the machine.
MULTIPLE SPOOL HOLDER
Attach the Multiple Spool Holder to the B 700. (Optional accessory for other machines.)
LOWER FEED DOGS
An animation will appear to remind you to do this on all machines with the exception of the B 880. The feed dogs automati-
cally lower when in embroidery for the B 880, but need to be manually lowered on all other machines.
THREAD NEEDLE
1. Use the proper needle for the thread and fabric being used; insert a new needle for each project. The most commonly used thread is a 40 wt. polyester embroidery thread. Refer to Page 41, Reference-Embroidery Needles for additional information on needles, and to Page 42, Reference - Embroidery Threads.
3. Always thread with the presser foot up. This releases tension and seats the thread into the tension disks.
SETTING UP - MACHINE
1 2 3 4
Threading Tips for models with both a horizontal and vertical spool pin:• Use the horizontal spool pin with cross-wound threads; match spool cap size to end of spool• The smallest spool cap fits into the end of large cones/spools such as Isacord embroidery thread• Use the vertical spool pin with stacked threads and for some decorative threads (metallic threads); use the foam disc
under the spool to avoid extra tension on the thread.
THREAD THE BOBBIN FOR EMBROIDERY
1. Wind bobbin with 60 wt. bobbin thread. Refer to Page 42, Reference-Embroidery Threads for additional information on bobbin threads.
2. Insert the bobbin:• 7 and 5 Series: Insert the bobbin into bobbin case and bobbin case into the machine. The bobbin is threaded the same
way for both embroidery and sewing.
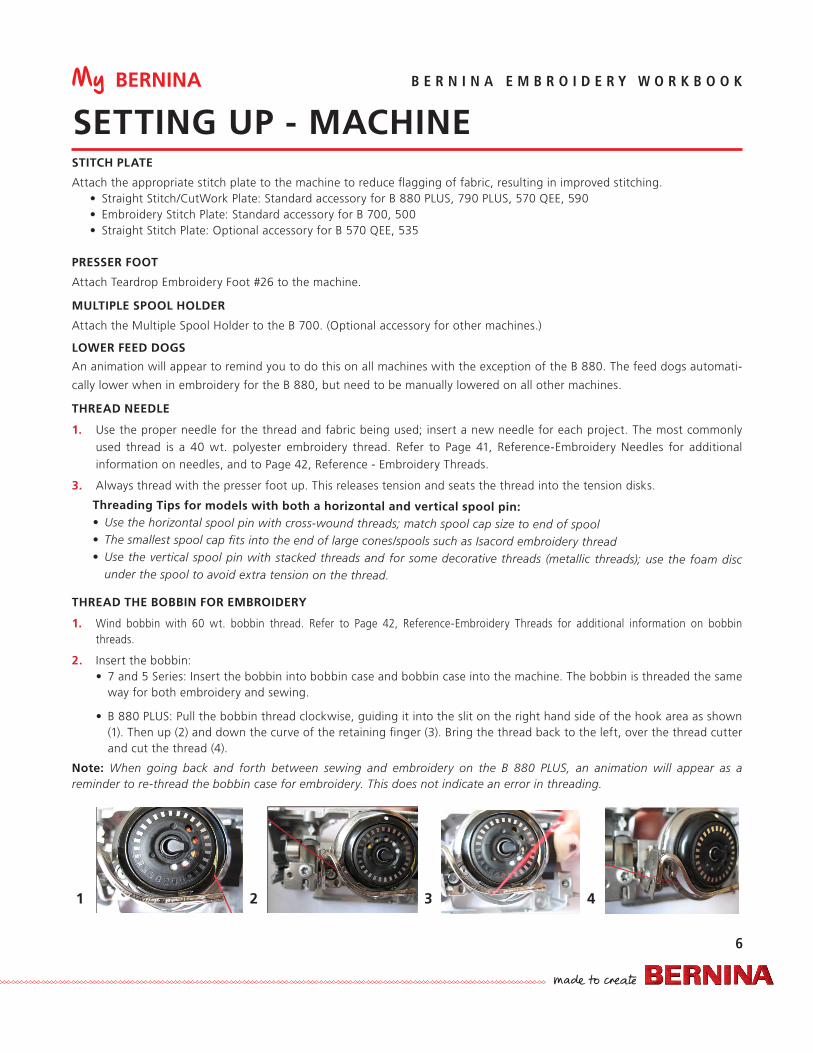
• B 880 PLUS: Pull the bobbin thread clockwise, guiding it into the slit on the right hand side of the hook area as shown (1). Then up (2) and down the curve of the retaining finger (3). Bring the thread back to the left, over the thread cutter and cut the thread (4).
Note: When going back and forth between sewing and embroidery on the B 880 PLUS, an animation will appear as a reminder to re-thread the bobbin case for embroidery. This does not indicate an error in threading.
My BERNINA
7
B E R N I N A E M B R O I D E R Y W O R K B O O K
SETTING UP - HOOPING FABRIC AND STABILIZER
Hooping Tip - Temporary Adhesive Spray: For easier hooping of the layers, adhere the stabilizer to the fabric using a temporary spray adhesive.
• Great for basting or holding layers of fabric and/or batting together. • Can be used as a repositionable spray, allowing items to stay sticky but be repositioned on other surfaces. • Works well for securing “hard-to-hoop” items such as collars and cuffs to hooped stabilizer for embroidering. Note: For best results, spray the stabilizer not the fabric.
HOWDo you know:• How to properly hoop for embroidery?• Why a temporary adhesive spray is
beneficial to the hooping process?
HOOP FABRIC AND STABILIZER
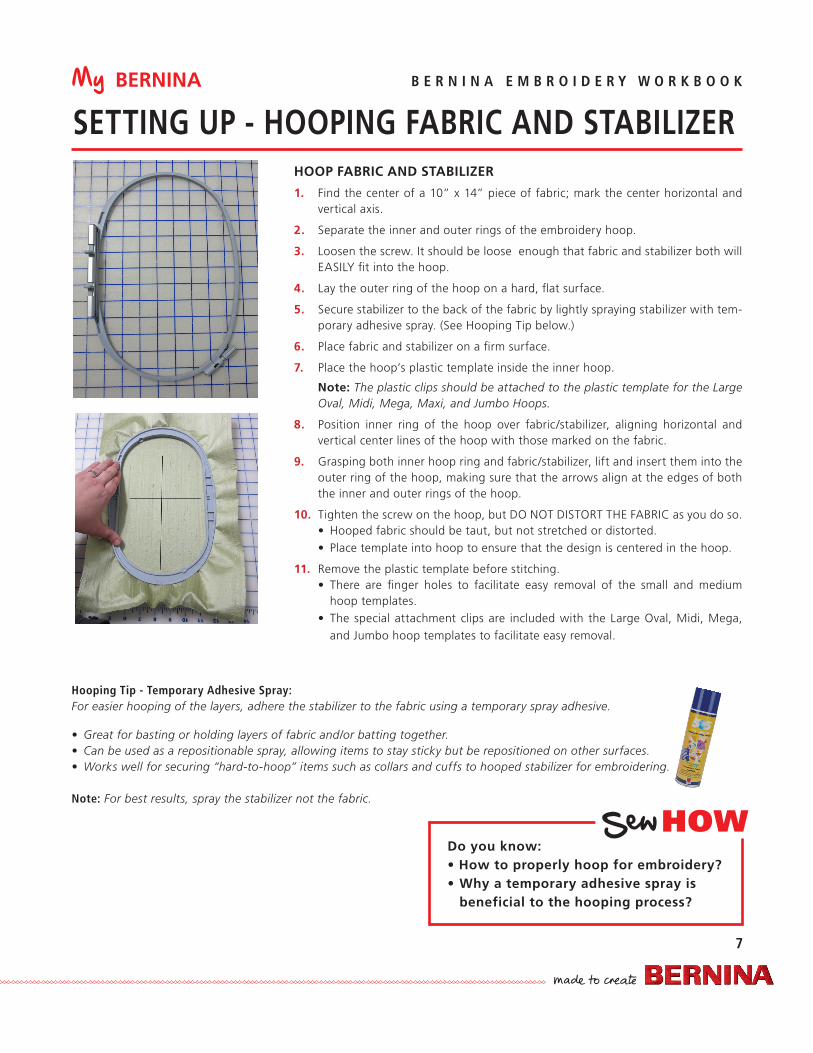
1. Find the center of a 10” x 14” piece of fabric; mark the center horizontal and vertical axis.
2. Separate the inner and outer rings of the embroidery hoop.
3. Loosen the screw. It should be loose enough that fabric and stabilizer both will EASILY fit into the hoop.
4. Lay the outer ring of the hoop on a hard, flat surface.
5. Secure stabilizer to the back of the fabric by lightly spraying stabilizer with tem-porary adhesive spray. (See Hooping Tip below.)
6. Place fabric and stabilizer on a firm surface.
7. Place the hoop’s plastic template inside the inner hoop.
Note: The plastic clips should be attached to the plastic template for the Large Oval, Midi, Mega, Maxi, and Jumbo Hoops.
8. Position inner ring of the hoop over fabric/stabilizer, aligning horizontal and vertical center lines of the hoop with those marked on the fabric.
9. Grasping both inner hoop ring and fabric/stabilizer, lift and insert them into the outer ring of the hoop, making sure that the arrows align at the edges of both the inner and outer rings of the hoop.
10. Tighten the screw on the hoop, but DO NOT DISTORT THE FABRIC as you do so.• Hooped fabric should be taut, but not stretched or distorted.• Place template into hoop to ensure that the design is centered in the hoop.
11. Remove the plastic template before stitching.• There are finger holes to facilitate easy removal of the small and medium
hoop templates.• The special attachment clips are included with the Large Oval, Midi, Mega,
and Jumbo hoop templates to facilitate easy removal.
My BERNINA
8
B E R N I N A E M B R O I D E R Y W O R K B O O K
SETTING UP - ATTACHING BERNINA HOOPS
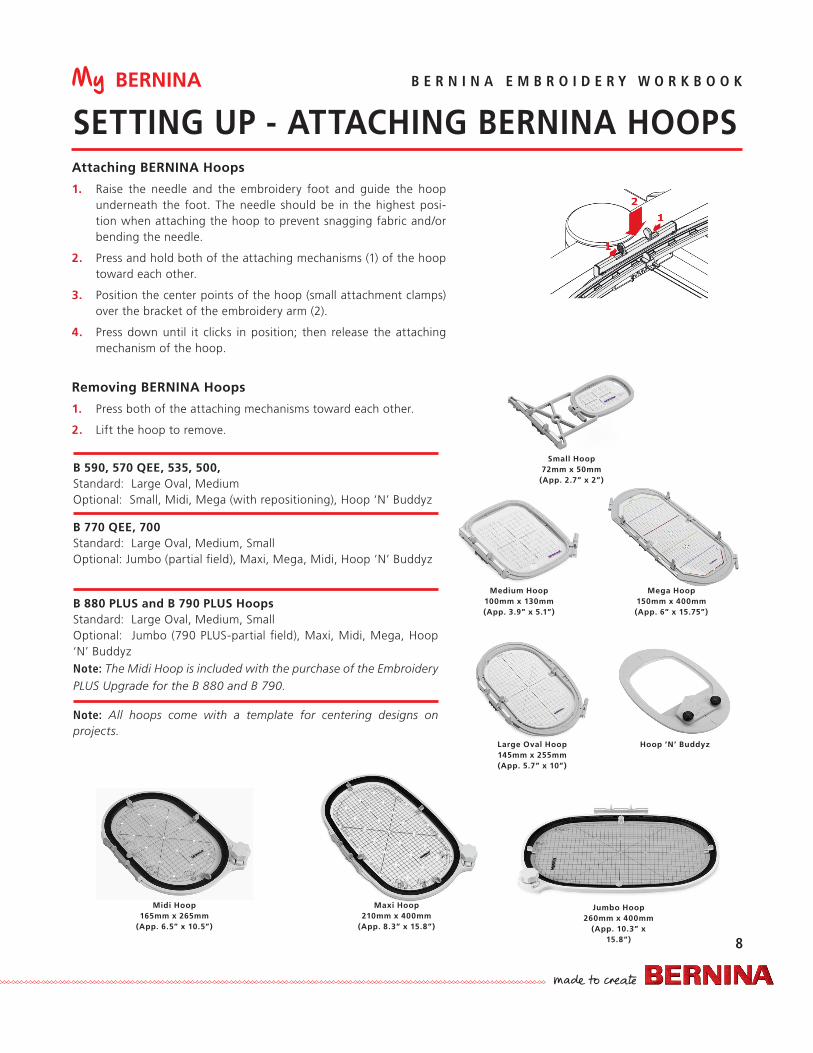
B 590, 570 QEE, 535, 500, Standard: Large Oval, MediumOptional: Small, Midi, Mega (with repositioning), Hoop ‘N’ Buddyz
B 770 QEE, 700Standard: Large Oval, Medium, SmallOptional: Jumbo (partial field), Maxi, Mega, Midi, Hoop ‘N’ Buddyz
B 880 PLUS and B 790 PLUS HoopsStandard: Large Oval, Medium, SmallOptional: Jumbo (790 PLUS-partial field), Maxi, Midi, Mega, Hoop ‘N’ BuddyzNote: The Midi Hoop is included with the purchase of the Embroidery PLUS Upgrade for the B 880 and B 790.
Note: All hoops come with a template for centering designs on projects.
Attaching BERNINA Hoops
1. Raise the needle and the embroidery foot and guide the hoop underneath the foot. The needle should be in the highest posi-tion when attaching the hoop to prevent snagging fabric and/or bending the needle.
2. Press and hold both of the attaching mechanisms (1) of the hoop toward each other.
3. Position the center points of the hoop (small attachment clamps) over the bracket of the embroidery arm (2).
4. Press down until it clicks in position; then release the attaching mechanism of the hoop.
Removing BERNINA Hoops
1. Press both of the attaching mechanisms toward each other.
2. Lift the hoop to remove.
Midi Hoop165mm x 265mm
(App. 6.5” x 10.5”)
Maxi Hoop210mm x 400mm
(App. 8.3” x 15.8”)
Jumbo Hoop260mm x 400mm
(App. 10.3” x 15.8”)
Large Oval Hoop145mm x 255mm (App. 5.7” x 10”)
Hoop ‘N’ Buddyz
Medium Hoop 100mm x 130mm (App. 3.9” x 5.1”)
Small Hoop 72mm x 50mm
(App. 2.7” x 2”)
Mega Hoop150mm x 400mm (App. 6” x 15.75”)
My BERNINA
9
B E R N I N A E M B R O I D E R Y W O R K B O O K
DESIGN LIBRARY
B 880 PLUS, 790 PLUS, 590
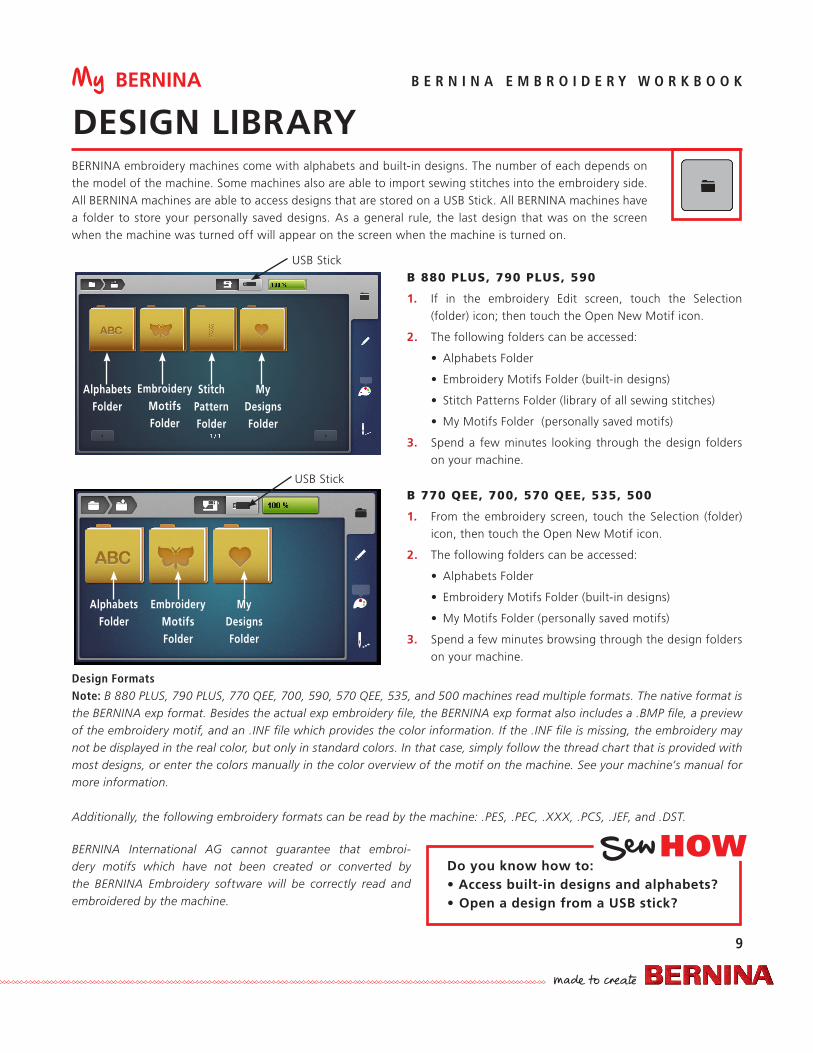
1. If in the embroidery Edit screen, touch the Selection (folder) icon; then touch the Open New Motif icon.
2. The following folders can be accessed:
• Alphabets Folder
• Embroidery Motifs Folder (built-in designs)
• Stitch Patterns Folder (library of all sewing stitches)
• My Motifs Folder (personally saved motifs)
3. Spend a few minutes looking through the design folders on your machine.
B 770 QEE, 700, 570 QEE, 535, 500
1. From the embroidery screen, touch the Selection (folder) icon, then touch the Open New Motif icon.
2. The following folders can be accessed:
• Alphabets Folder
• Embroidery Motifs Folder (built-in designs)
• My Motifs Folder (personally saved motifs)
3. Spend a few minutes browsing through the design folders on your machine.
USB Stick
AlphabetsFolder
EmbroideryMotifsFolder
StitchPatternFolder
My DesignsFolder
Design FormatsNote: B 880 PLUS, 790 PLUS, 770 QEE, 700, 590, 570 QEE, 535, and 500 machines read multiple formats. The native format is the BERNINA exp format. Besides the actual exp embroidery file, the BERNINA exp format also includes a .BMP file, a preview of the embroidery motif, and an .INF file which provides the color information. If the .INF file is missing, the embroidery may not be displayed in the real color, but only in standard colors. In that case, simply follow the thread chart that is provided with most designs, or enter the colors manually in the color overview of the motif on the machine. See your machine’s manual for more information.
Additionally, the following embroidery formats can be read by the machine: .PES, .PEC, .XXX, .PCS, .JEF, and .DST.
BERNINA International AG cannot guarantee that embroi-dery motifs which have not been created or converted by the BERNINA Embroidery software will be correctly read and embroidered by the machine.
USB Stick
BERNINA embroidery machines come with alphabets and built-in designs. The number of each depends on the model of the machine. Some machines also are able to import sewing stitches into the embroidery side. All BERNINA machines are able to access designs that are stored on a USB Stick. All BERNINA machines have a folder to store your personally saved designs. As a general rule, the last design that was on the screen when the machine was turned off will appear on the screen when the machine is turned on.
HOWDo you know how to:• Access built-in designs and alphabets?• Open a design from a USB stick?
AlphabetsFolder
EmbroideryMotifsFolder
My DesignsFolder
My BERNINA
10
B E R N I N A E M B R O I D E R Y W O R K B O O K
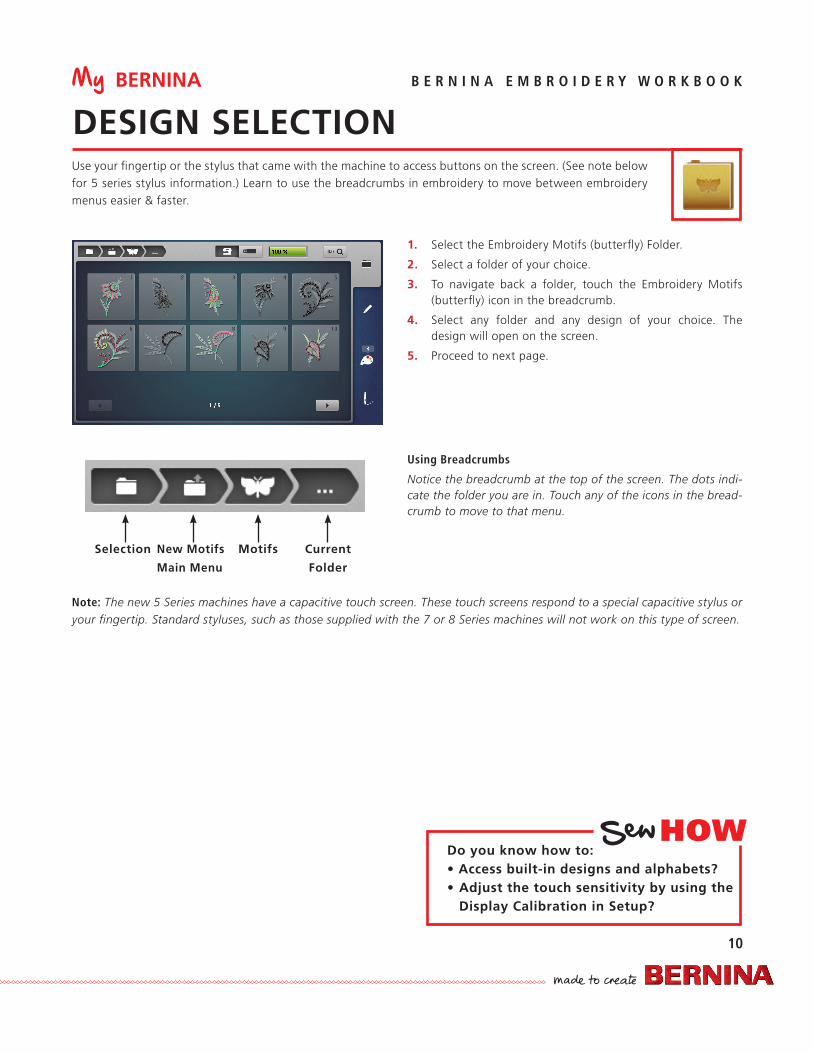
DESIGN SELECTION
1. Select the Embroidery Motifs (butterfly) Folder.
2. Select a folder of your choice.
3. To navigate back a folder, touch the Embroidery Motifs (butterfly) icon in the breadcrumb.
4. Select any folder and any design of your choice. The design will open on the screen.
5. Proceed to next page.
Using Breadcrumbs
Notice the breadcrumb at the top of the screen. The dots indi-cate the folder you are in. Touch any of the icons in the bread-crumb to move to that menu.
Use your fingertip or the stylus that came with the machine to access buttons on the screen. (See note below for 5 series stylus information.) Learn to use the breadcrumbs in embroidery to move between embroidery menus easier & faster.
Note: The new 5 Series machines have a capacitive touch screen. These touch screens respond to a special capacitive stylus or your fingertip. Standard styluses, such as those supplied with the 7 or 8 Series machines will not work on this type of screen.
Selection Current
Folder
New Motifs
Main Menu
Motifs
HOWDo you know how to:• Access built-in designs and alphabets?• Adjust the touch sensitivity by using the
Display Calibration in Setup?

My BERNINA
11
B E R N I N A E M B R O I D E R Y W O R K B O O K
PRESSER FOOT SELECTION
STITCH PLATE SELECTION
1. The machine will show which foot you had last selected as noted by the number above the Presser Foot Selection icon. A warning flag indicates that a wrong foot is selected in the menu.
2. Touch the Presser Foot Selection icon.
3. The suggested foot (#26 in this case) will be displayed with a star.
4. Touch the #26 foot on the screen; the star will be outlined in white and the number 26 will appear in yellow above the Presser Foot Selection icon indicating that the proper foot is attached.
5. Proceed to next section.
Note: If a PaintWork or CutWork design is selected, the Automatic Needle Threader on the B 880 PLUS will be dis-abled to prevent damage to the threader.
1. Select the Stitch Plate Selection icon.
Tip: There is no need to close the Presser Foot Selection screen to access the Stitch Plate Selection icon if you were in the that screen. It will close automatically when you select Stitch Plate Selection.
2. Select the 0 mm/Cut stitch plate (or 0 mm stitch plate depend-ing on your machine). The icon will be outlined in white.
3. Depending on your machine, your will now see 0mm or Cut above the Stitch Plate Selection icon.
4. Proceed to the next page.
In order to embroider a design, Presser Foot Selection and Stitch Plate Selection (0 mm or 0 mm/Cut) must be set. The machine knows what foot to expect by the design selected (or sequence/color number in the design) and the appropriate foot will be suggested.
It is recommended that you always use a Straight Stitch Plate when embroidering. (Refer to Page 6 for infor-mation on the specific plate you would use for your machine.) If changing to this plate, it is imperative that you change this setting in order to prevent needle breakage when returning to the sewing side.
My BERNINA
12
B E R N I N A E M B R O I D E R Y W O R K B O O K
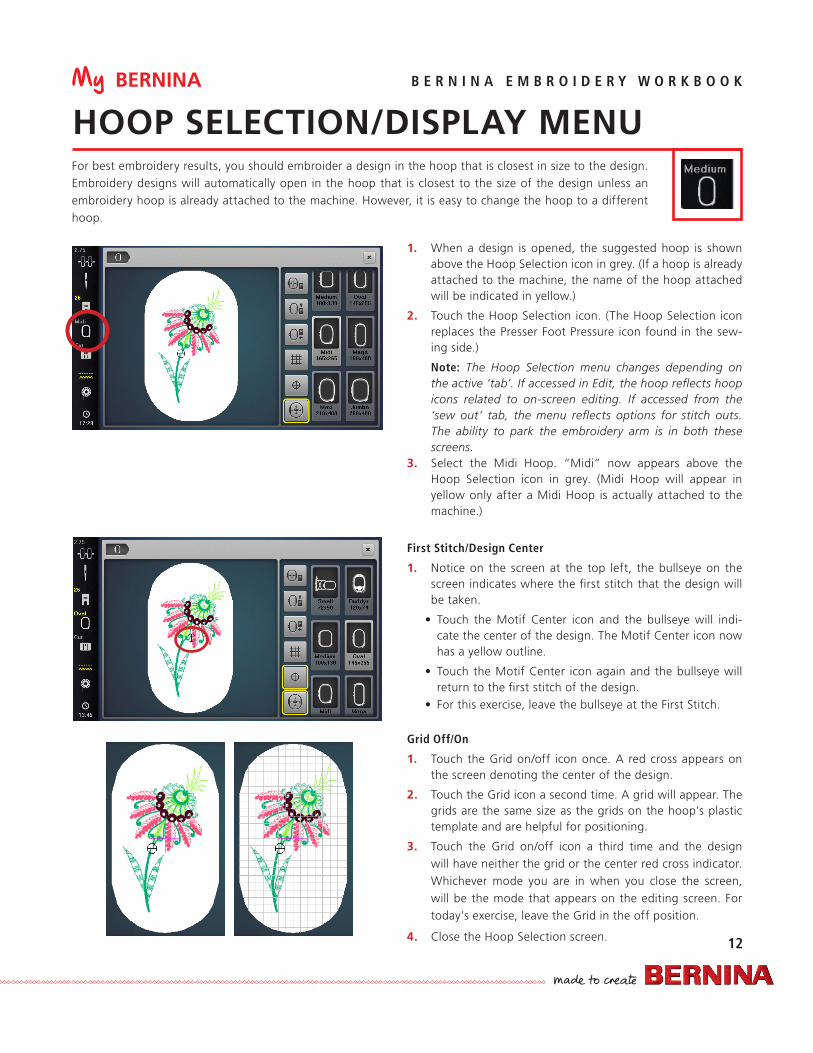
HOOP SELECTION/DISPLAY MENU
1. When a design is opened, the suggested hoop is shown above the Hoop Selection icon in grey. (If a hoop is already attached to the machine, the name of the hoop attached will be indicated in yellow.)
2. Touch the Hoop Selection icon. (The Hoop Selection icon replaces the Presser Foot Pressure icon found in the sew-ing side.)
Note: The Hoop Selection menu changes depending on the active ‘tab’. If accessed in Edit, the hoop reflects hoop icons related to on-screen editing. If accessed from the ‘sew out’ tab, the menu reflects options for stitch outs. The ability to park the embroidery arm is in both these screens.
3. Select the Midi Hoop. “Midi” now appears above the Hoop Selection icon in grey. (Midi Hoop will appear in yellow only after a Midi Hoop is actually attached to the machine.)
First Stitch/Design Center
1. Notice on the screen at the top left, the bullseye on the screen indicates where the first stitch that the design will be taken.
• Touch the Motif Center icon and the bullseye will indi-cate the center of the design. The Motif Center icon now has a yellow outline.
• Touch the Motif Center icon again and the bullseye will return to the first stitch of the design.
• For this exercise, leave the bullseye at the First Stitch.
Grid Off/On
1. Touch the Grid on/off icon once. A red cross appears on the screen denoting the center of the design.
2. Touch the Grid icon a second time. A grid will appear. The grids are the same size as the grids on the hoop’s plastic template and are helpful for positioning.
3. Touch the Grid on/off icon a third time and the design will have neither the grid or the center red cross indicator. Whichever mode you are in when you close the screen, will be the mode that appears on the editing screen. For today’s exercise, leave the Grid in the off position.
4. Close the Hoop Selection screen.
For best embroidery results, you should embroider a design in the hoop that is closest in size to the design. Embroidery designs will automatically open in the hoop that is closest to the size of the design unless an embroidery hoop is already attached to the machine. However, it is easy to change the hoop to a different hoop.
My BERNINA
13
B E R N I N A E M B R O I D E R Y W O R K B O O K
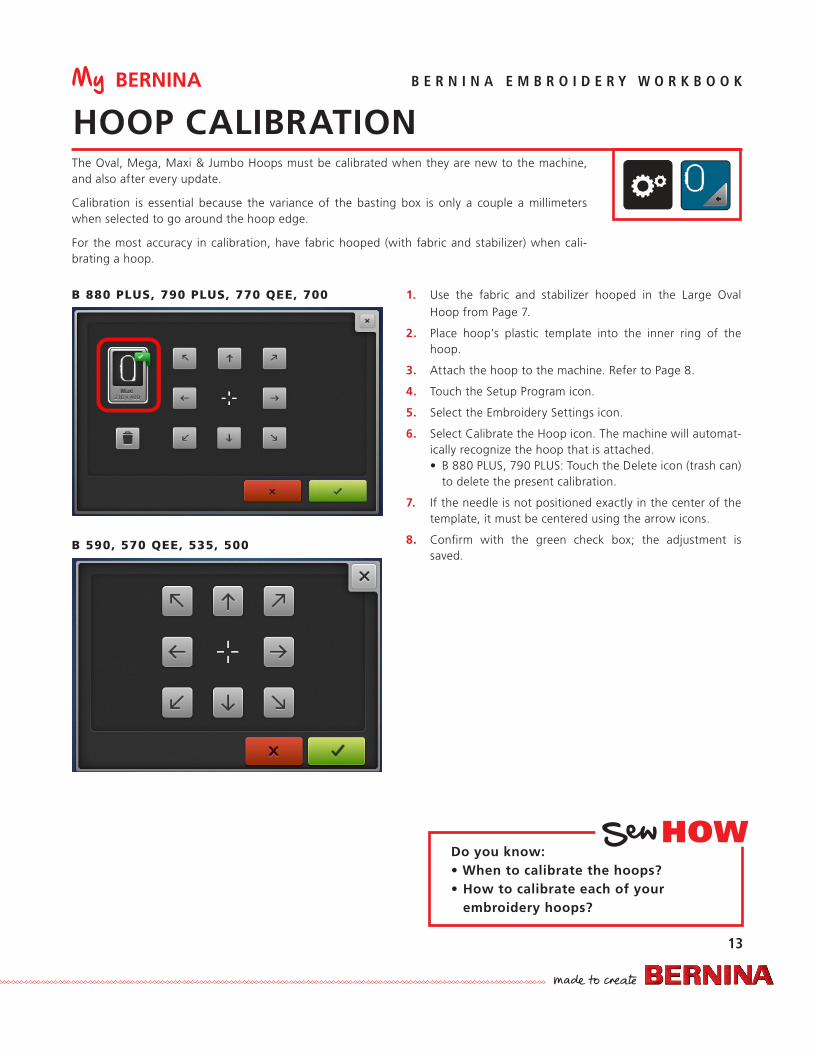
1. Use the fabric and stabilizer hooped in the Large Oval Hoop from Page 7.
2. Place hoop’s plastic template into the inner ring of the hoop.
3. Attach the hoop to the machine. Refer to Page 8.
4. Touch the Setup Program icon.
5. Select the Embroidery Settings icon.
6. Select Calibrate the Hoop icon. The machine will automat-ically recognize the hoop that is attached.• B 880 PLUS, 790 PLUS: Touch the Delete icon (trash can)
to delete the present calibration.
7. If the needle is not positioned exactly in the center of the template, it must be centered using the arrow icons.
8. Confirm with the green check box; the adjustment is saved.
HOOP CALIBRATION
HOWDo you know:• When to calibrate the hoops?• How to calibrate each of your
embroidery hoops?
The Oval, Mega, Maxi & Jumbo Hoops must be calibrated when they are new to the machine, and also after every update.
Calibration is essential because the variance of the basting box is only a couple a millimeters when selected to go around the hoop edge.
For the most accuracy in calibration, have fabric hooped (with fabric and stabilizer) when cali-brating a hoop.
B 880 PLUS, 790 PLUS, 770 QEE, 700
B 590, 570 QEE, 535, 500
My BERNINA
14
B E R N I N A E M B R O I D E R Y W O R K B O O K
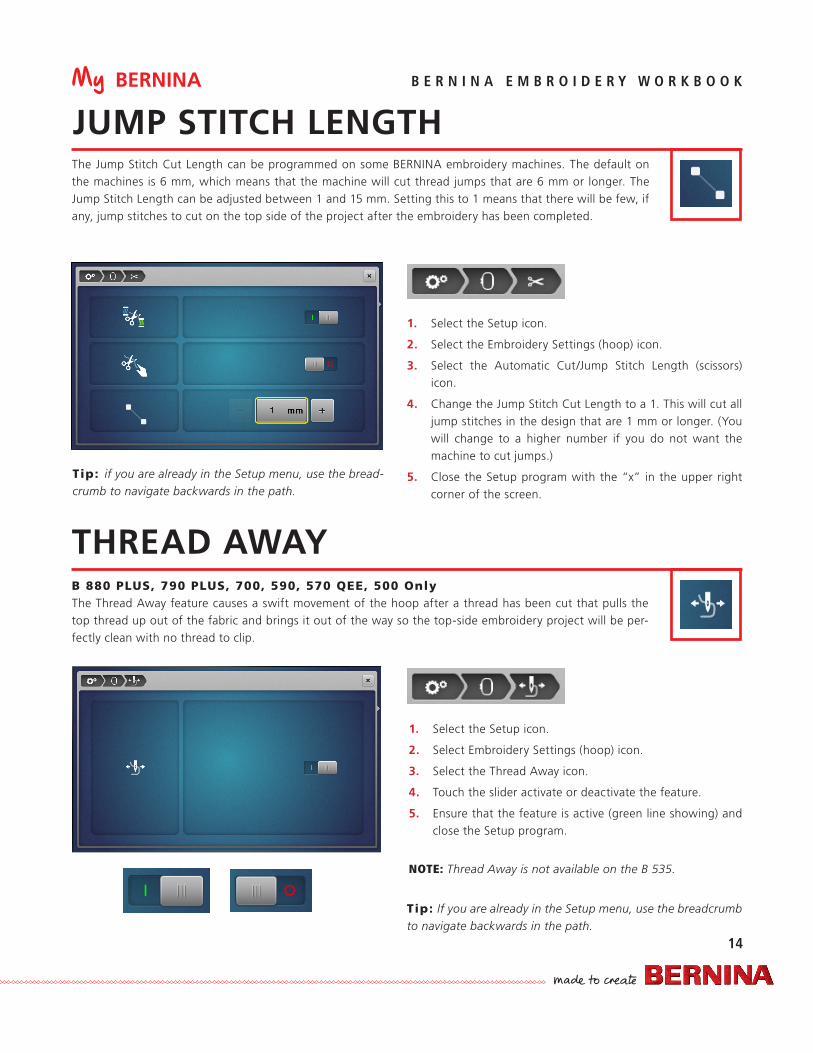
JUMP STITCH LENGTHThe Jump Stitch Cut Length can be programmed on some BERNINA embroidery machines. The default on the machines is 6 mm, which means that the machine will cut thread jumps that are 6 mm or longer. The Jump Stitch Length can be adjusted between 1 and 15 mm. Setting this to 1 means that there will be few, if any, jump stitches to cut on the top side of the project after the embroidery has been completed.
B 880 PLUS, 790 PLUS, 700, 590, 570 QEE, 500 OnlyThe Thread Away feature causes a swift movement of the hoop after a thread has been cut that pulls the top thread up out of the fabric and brings it out of the way so the top-side embroidery project will be per-fectly clean with no thread to clip.
1. Select the Setup icon.
2. Select the Embroidery Settings (hoop) icon.
3. Select the Automatic Cut/Jump Stitch Length (scissors) icon.
4. Change the Jump Stitch Cut Length to a 1. This will cut all jump stitches in the design that are 1 mm or longer. (You will change to a higher number if you do not want the machine to cut jumps.)
5. Close the Setup program with the “x” in the upper right corner of the screen.
1. Select the Setup icon.
2. Select Embroidery Settings (hoop) icon.
3. Select the Thread Away icon.
4. Touch the slider activate or deactivate the feature.
5. Ensure that the feature is active (green line showing) and close the Setup program.
NOTE: Thread Away is not available on the B 535.
THREAD AWAY
Tip: if you are already in the Setup menu, use the bread-crumb to navigate backwards in the path.
Tip: If you are already in the Setup menu, use the breadcrumb to navigate backwards in the path.
My BERNINA
15
B E R N I N A E M B R O I D E R Y W O R K B O O K
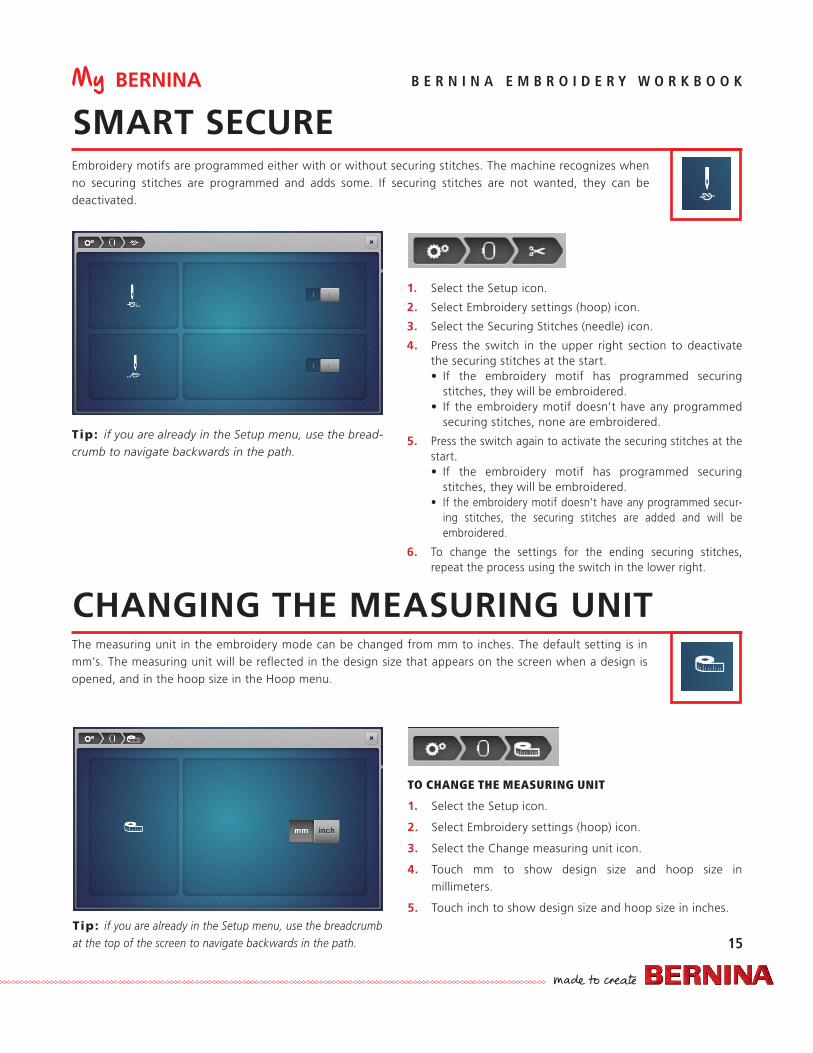
SMART SECURE
CHANGING THE MEASURING UNIT
Embroidery motifs are programmed either with or without securing stitches. The machine recognizes when no securing stitches are programmed and adds some. If securing stitches are not wanted, they can be deactivated.
The measuring unit in the embroidery mode can be changed from mm to inches. The default setting is in mm’s. The measuring unit will be reflected in the design size that appears on the screen when a design is opened, and in the hoop size in the Hoop menu.
Tip: if you are already in the Setup menu, use the bread-crumb to navigate backwards in the path.
TO CHANGE THE MEASURING UNIT
1. Select the Setup icon.
2. Select Embroidery settings (hoop) icon.
3. Select the Change measuring unit icon.
4. Touch mm to show design size and hoop size in millimeters.
5. Touch inch to show design size and hoop size in inches.
1. Select the Setup icon.
2. Select Embroidery settings (hoop) icon.
3. Select the Securing Stitches (needle) icon.
4. Press the switch in the upper right section to deactivate the securing stitches at the start.• If the embroidery motif has programmed securing
stitches, they will be embroidered.• If the embroidery motif doesn’t have any programmed
securing stitches, none are embroidered.
5. Press the switch again to activate the securing stitches at the start.• If the embroidery motif has programmed securing
stitches, they will be embroidered.• If the embroidery motif doesn’t have any programmed secur-
ing stitches, the securing stitches are added and will be embroidered.
6. To change the settings for the ending securing stitches, repeat the process using the switch in the lower right.
Tip: if you are already in the Setup menu, use the breadcrumb at the top of the screen to navigate backwards in the path.
My BERNINA
16
B E R N I N A E M B R O I D E R Y W O R K B O O K
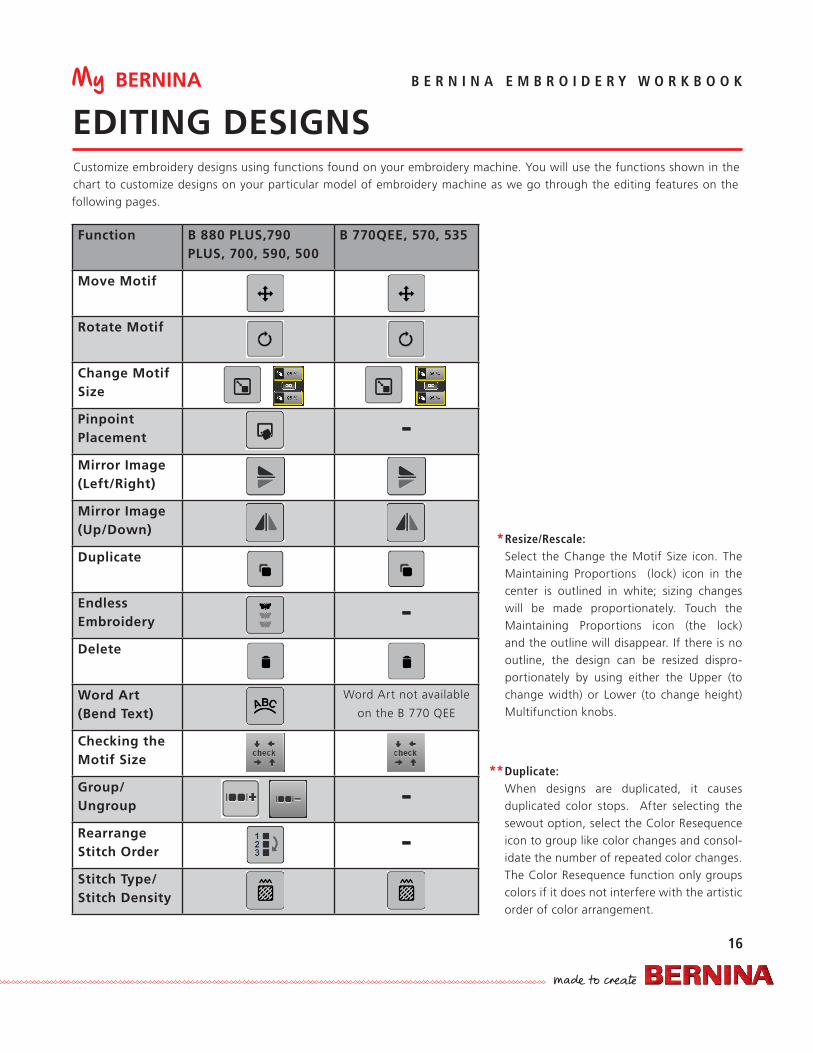
Function B 880 PLUS,790 PLUS, 700, 590, 500
B 770QEE, 570, 535
Move Motif
Rotate Motif
Change Motif Size
Pinpoint Placement -Mirror Image(Left/Right)
Mirror Image (Up/Down)
Duplicate
Endless Embroidery -Delete
Word Art(Bend Text)
Word Art not available
on the B 770 QEE
Checking the Motif Size
Group/Ungroup -Rearrange Stitch Order -Stitch Type/Stitch Density -
EDITING DESIGNSCustomize embroidery designs using functions found on your embroidery machine. You will use the functions shown in the chart to customize designs on your particular model of embroidery machine as we go through the editing features on the following pages.
*Resize/Rescale:Select the Change the Motif Size icon. The Maintaining Proportions (lock) icon in the center is outlined in white; sizing changes will be made proportionately. Touch the Maintaining Proportions icon (the lock) and the outline will disappear. If there is no outline, the design can be resized dispro-portionately by using either the Upper (to change width) or Lower (to change height) Multifunction knobs.
Duplicate: When designs are duplicated, it causes duplicated color stops. After selecting the sewout option, select the Color Resequence icon to group like color changes and consol-idate the number of repeated color changes. The Color Resequence function only groups colors if it does not interfere with the artistic order of color arrangement.
**
My BERNINA
17
B E R N I N A E M B R O I D E R Y W O R K B O O K
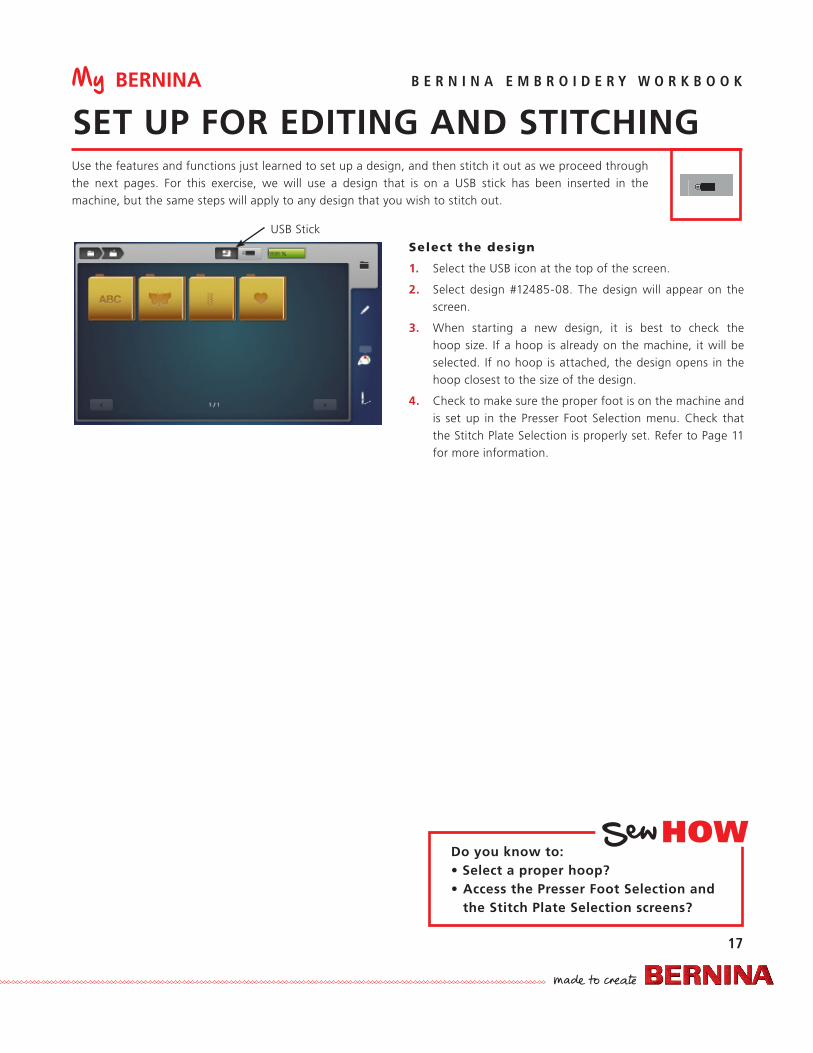
SET UP FOR EDITING AND STITCHING
Select the design
1. Select the USB icon at the top of the screen.
2. Select design #12485-08. The design will appear on the screen.
3. When starting a new design, it is best to check the hoop size. If a hoop is already on the machine, it will be selected. If no hoop is attached, the design opens in the hoop closest to the size of the design.
4. Check to make sure the proper foot is on the machine and is set up in the Presser Foot Selection menu. Check that the Stitch Plate Selection is properly set. Refer to Page 11 for more information.
USB Stick
Use the features and functions just learned to set up a design, and then stitch it out as we proceed through the next pages. For this exercise, we will use a design that is on a USB stick has been inserted in the machine, but the same steps will apply to any design that you wish to stitch out.
HOWDo you know to:• Select a proper hoop?• Access the Presser Foot Selection and
the Stitch Plate Selection screens?
My BERNINA
18
B E R N I N A E M B R O I D E R Y W O R K B O O K
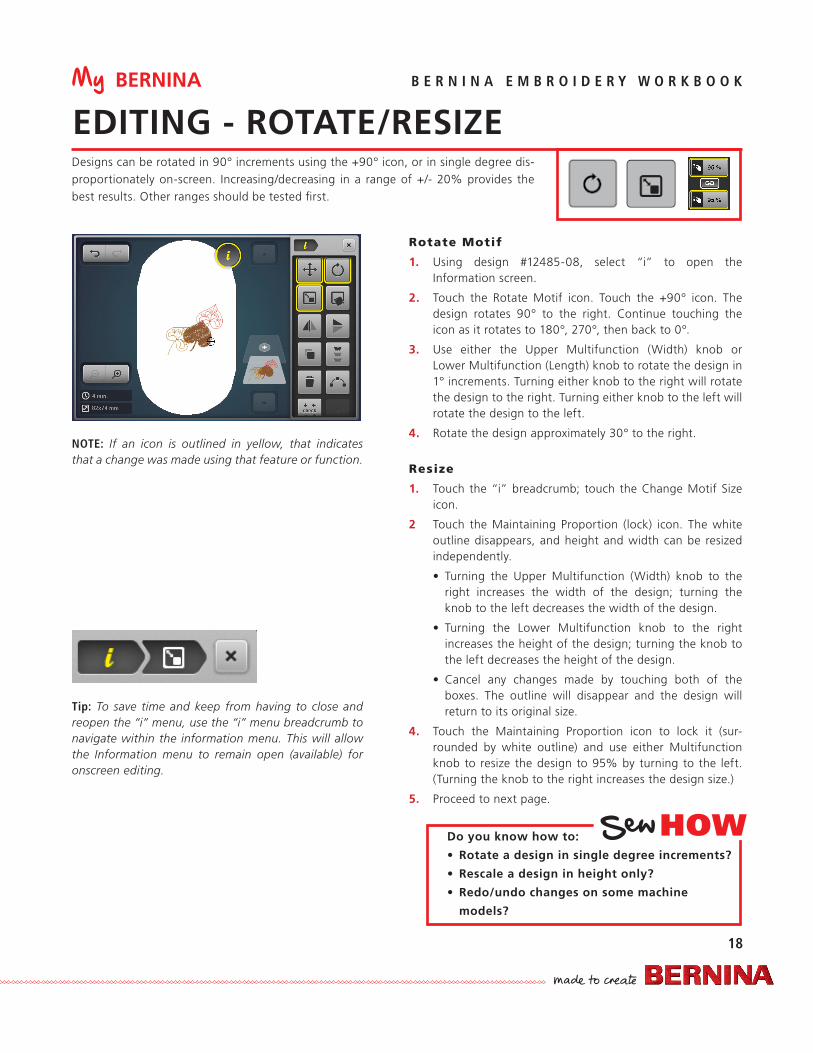
EDITING - ROTATE/RESIZEDesigns can be rotated in 90° increments using the +90° icon, or in single degree dis-proportionately on-screen. Increasing/decreasing in a range of +/- 20% provides the best results. Other ranges should be tested first.
Tip: To save time and keep from having to close and reopen the “i” menu, use the “i” menu breadcrumb to navigate within the information menu. This will allow the Information menu to remain open (available) for onscreen editing.
NOTE: If an icon is outlined in yellow, that indicates that a change was made using that feature or function.
Rotate Motif
1. Using design #12485-08, select “i” to open the Information screen.
2. Touch the Rotate Motif icon. Touch the +90° icon. The design rotates 90° to the right. Continue touching the icon as it rotates to 180°, 270°, then back to 0°.
3. Use either the Upper Multifunction (Width) knob or Lower Multifunction (Length) knob to rotate the design in 1° increments. Turning either knob to the right will rotate the design to the right. Turning either knob to the left will rotate the design to the left.
4. Rotate the design approximately 30° to the right.
Resize
1. Touch the “i” breadcrumb; touch the Change Motif Size icon.
2 Touch the Maintaining Proportion (lock) icon. The white outline disappears, and height and width can be resized independently.
• Turning the Upper Multifunction (Width) knob to the right increases the width of the design; turning the knob to the left decreases the width of the design.
• Turning the Lower Multifunction knob to the right increases the height of the design; turning the knob to the left decreases the height of the design.
• Cancel any changes made by touching both of the boxes. The outline will disappear and the design will return to its original size.
4. Touch the Maintaining Proportion icon to lock it (sur-rounded by white outline) and use either Multifunction knob to resize the design to 95% by turning to the left. (Turning the knob to the right increases the design size.)
5. Proceed to next page.
HOWDo you know how to:
• Rotate a design in single degree increments?
• Rescale a design in height only?
• Redo/undo changes on some machine
models?
My BERNINA
19
B E R N I N A E M B R O I D E R Y W O R K B O O K
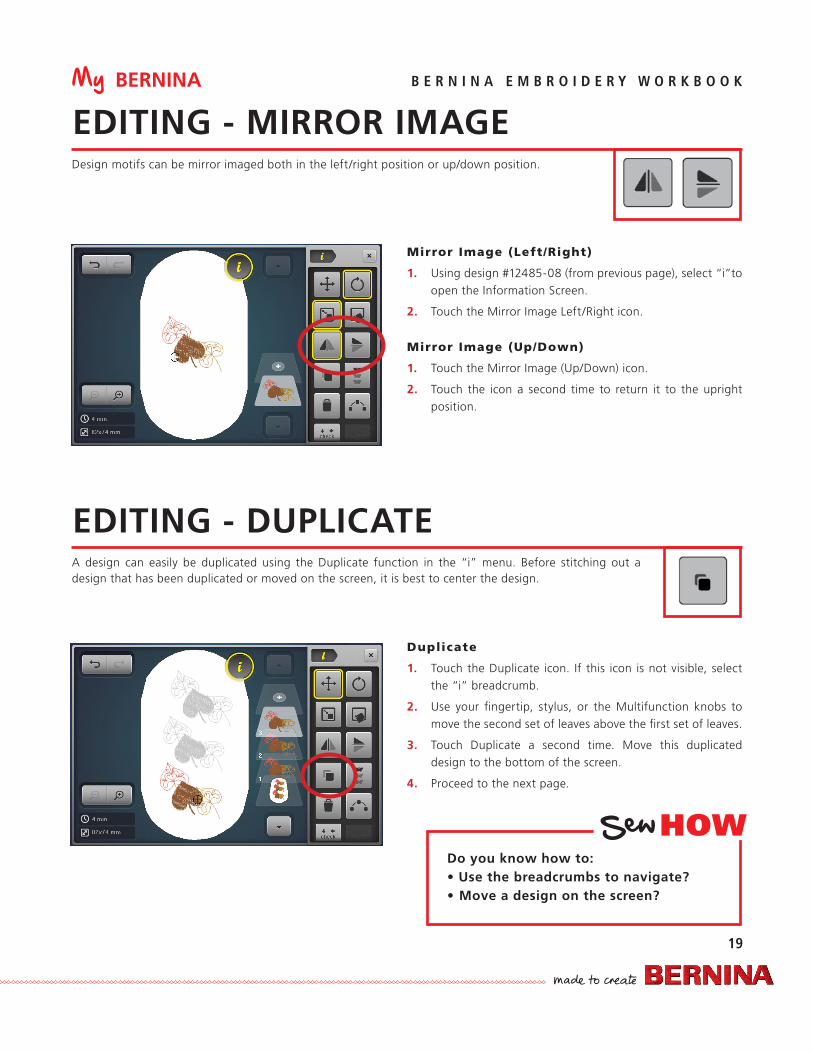
EDITING - MIRROR IMAGE
EDITING - DUPLICATE
Design motifs can be mirror imaged both in the left/right position or up/down position.
A design can easily be duplicated using the Duplicate function in the “i” menu. Before stitching out a design that has been duplicated or moved on the screen, it is best to center the design.
Mirror Image (Left/Right)
1. Using design #12485-08 (from previous page), select “i”to open the Information Screen.
2. Touch the Mirror Image Left/Right icon.
Mirror Image (Up/Down)
1. Touch the Mirror Image (Up/Down) icon.
2. Touch the icon a second time to return it to the upright position.
Duplicate
1. Touch the Duplicate icon. If this icon is not visible, select the “i” breadcrumb.
2. Use your fingertip, stylus, or the Multifunction knobs to move the second set of leaves above the first set of leaves.
3. Touch Duplicate a second time. Move this duplicated design to the bottom of the screen.
4. Proceed to the next page.
HOWDo you know how to:• Use the breadcrumbs to navigate?• Move a design on the screen?
My BERNINA
20
B E R N I N A E M B R O I D E R Y W O R K B O O K
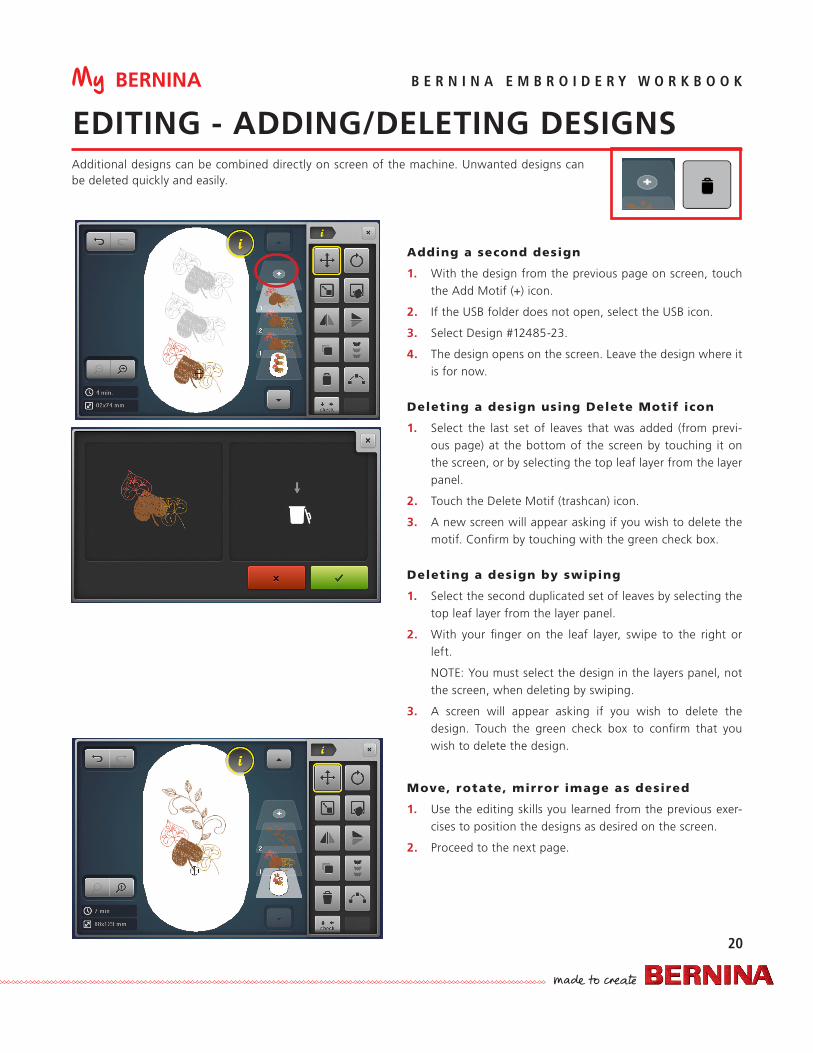
Adding a second design
1. With the design from the previous page on screen, touch the Add Motif (+) icon.
2. If the USB folder does not open, select the USB icon.
3. Select Design #12485-23.
4. The design opens on the screen. Leave the design where it is for now.
Deleting a design using Delete Motif icon
1. Select the last set of leaves that was added (from previ-ous page) at the bottom of the screen by touching it on the screen, or by selecting the top leaf layer from the layer panel.
2. Touch the Delete Motif (trashcan) icon.
3. A new screen will appear asking if you wish to delete the motif. Confirm by touching with the green check box.
Deleting a design by swiping
1. Select the second duplicated set of leaves by selecting the top leaf layer from the layer panel.
2. With your finger on the leaf layer, swipe to the right or left.
NOTE: You must select the design in the layers panel, not the screen, when deleting by swiping.
3. A screen will appear asking if you wish to delete the design. Touch the green check box to confirm that you wish to delete the design.
Move, rotate, mirror image as desired
1. Use the editing skills you learned from the previous exer-cises to position the designs as desired on the screen.
2. Proceed to the next page.
EDITING - ADDING/DELETING DESIGNSAdditional designs can be combined directly on screen of the machine. Unwanted designs can be deleted quickly and easily.
My BERNINA
21
B E R N I N A E M B R O I D E R Y W O R K B O O K
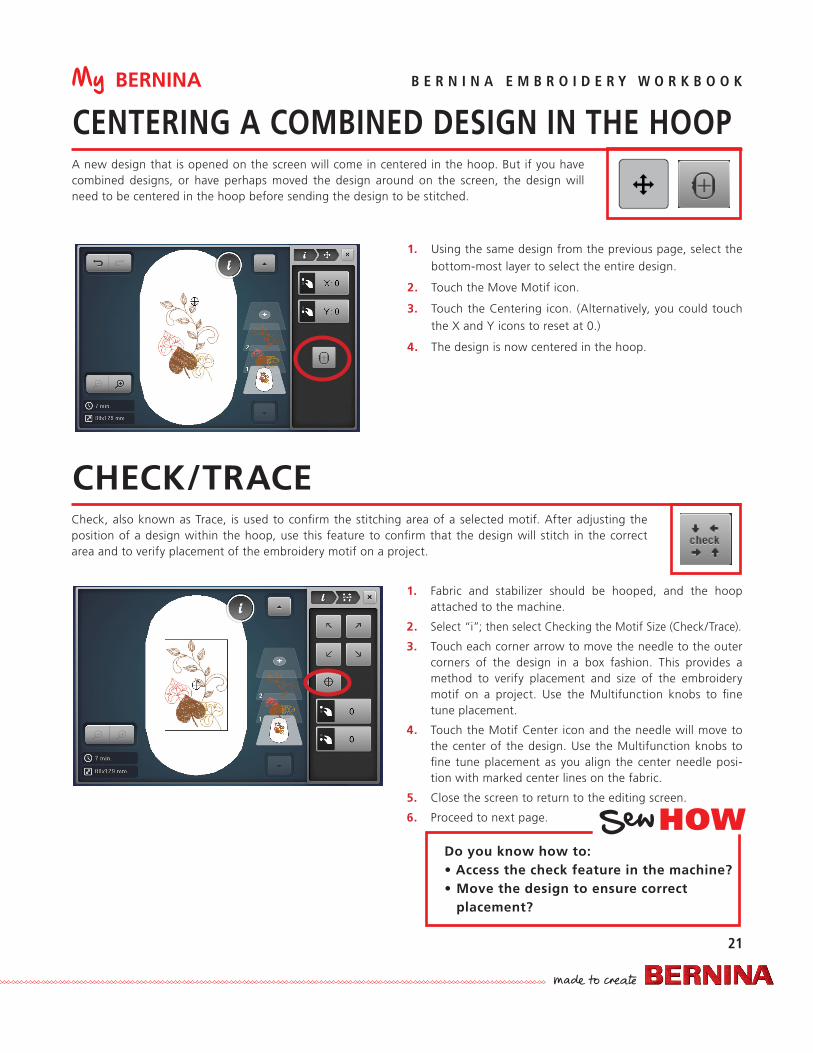
CENTERING A COMBINED DESIGN IN THE HOOP
CHECK/TRACE
A new design that is opened on the screen will come in centered in the hoop. But if you have combined designs, or have perhaps moved the design around on the screen, the design will need to be centered in the hoop before sending the design to be stitched.
Check, also known as Trace, is used to confirm the stitching area of a selected motif. After adjusting the position of a design within the hoop, use this feature to confirm that the design will stitch in the correct area and to verify placement of the embroidery motif on a project.
HOWDo you know how to:• Access the check feature in the machine?• Move the design to ensure correct
placement?
1. Using the same design from the previous page, select the bottom-most layer to select the entire design.
2. Touch the Move Motif icon.
3. Touch the Centering icon. (Alternatively, you could touch the X and Y icons to reset at 0.)
4. The design is now centered in the hoop.
1. Fabric and stabilizer should be hooped, and the hoop attached to the machine.
2. Select “i”; then select Checking the Motif Size (Check/Trace).
3. Touch each corner arrow to move the needle to the outer corners of the design in a box fashion. This provides a method to verify placement and size of the embroidery motif on a project. Use the Multifunction knobs to fine tune placement.
4. Touch the Motif Center icon and the needle will move to the center of the design. Use the Multifunction knobs to fine tune placement as you align the center needle posi-tion with marked center lines on the fabric.
5. Close the screen to return to the editing screen.
6. Proceed to next page.

My BERNINA
22
B E R N I N A E M B R O I D E R Y W O R K B O O K
VIRTUAL POSITIONING/ABSOLUTE CHECKThe goal of Virtual Positioning (sometimes known as Absolute Check) is to check the points and boundar-ies of the design so that they embroider exactly where you want. You can check the location of any single stitch, even the most complex design.
HOWDo you know:• The difference between check and
Absolute Check?
1. Using the design from the previous page, fabric and stabi-lizer should be hooped and attached to the machine.
2. Draw a dot on the hooped stabilizer somewhere in the lower right quadrant of the hoop.
3. By default, the Virtual Positioning setting is active; there-fore, when the motif is on the embroidery edit screen, reference points can be selected and checked for perfect placement.
4. Touch any point of the design on the screen and the nee-dle will move to the location where that stitch would be taken on the hooped fabric. To fine tune placement, use the Move Motif icon.
5. Touch the screen at the bottom of the leaf as denoted by the crosshairs. The needle will move to the corresponding point on the hooped fabric.
Tip: Use the Zoom Tool (up to 5 levels) to zoom in to ensure the greatest accuracy.
6. Select “i”; Move Motif. Use the Multifunction knobs to position the needle over the dot marked in Step 2. (The point that you touch in Step 5 will stitch exactly over the dot marked on the fabric when you stitch the design.)
7. Proceed to the next page.
Note: The Motif Center icon must be deactivated in order to apply Absolute Check. This can be double-checked by touch-ing the Hoop Selection icon. Note that Motif Center is deacti-vated and Virtual Positioning is activated.
My BERNINA
23
B E R N I N A E M B R O I D E R Y W O R K B O O K
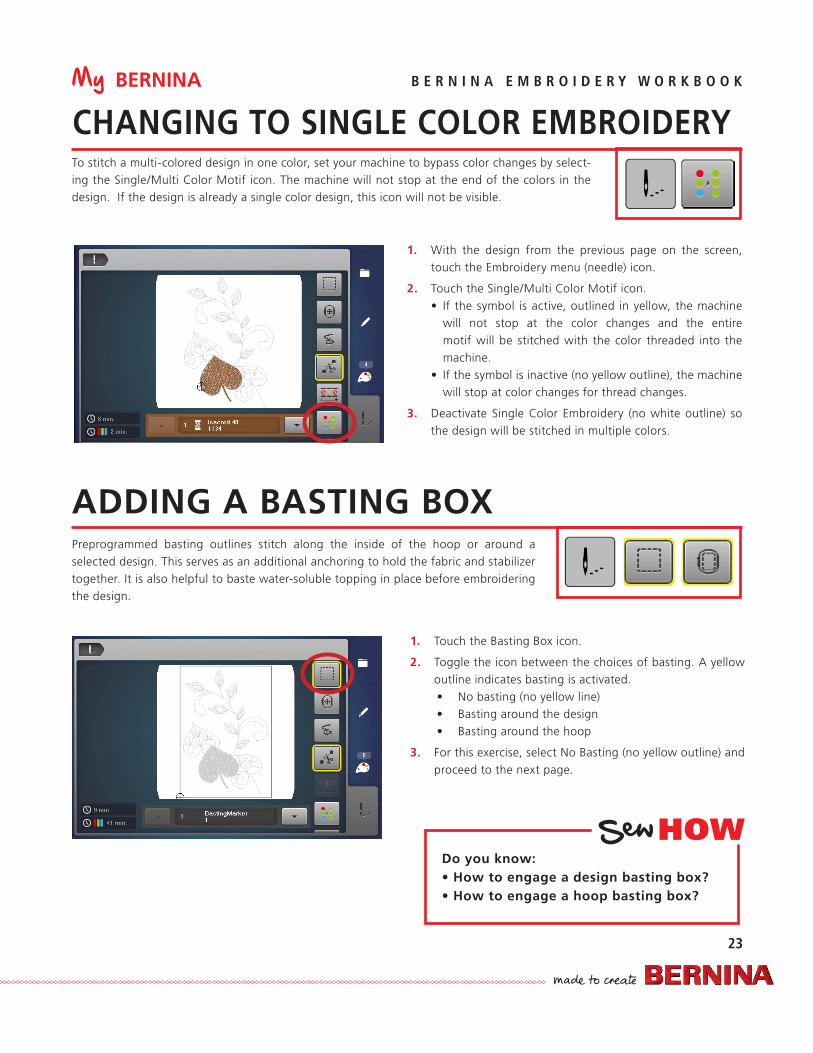
CHANGING TO SINGLE COLOR EMBROIDERY
ADDING A BASTING BOXPreprogrammed basting outlines stitch along the inside of the hoop or around a selected design. This serves as an additional anchoring to hold the fabric and stabilizer together. It is also helpful to baste water-soluble topping in place before embroidering the design.
1. Touch the Basting Box icon.
2. Toggle the icon between the choices of basting. A yellow outline indicates basting is activated.• No basting (no yellow line)• Basting around the design• Basting around the hoop
3. For this exercise, select No Basting (no yellow outline) and proceed to the next page.
1. With the design from the previous page on the screen, touch the Embroidery menu (needle) icon.
2. Touch the Single/Multi Color Motif icon.• If the symbol is active, outlined in yellow, the machine
will not stop at the color changes and the entire motif will be stitched with the color threaded into the machine.
• If the symbol is inactive (no yellow outline), the machine will stop at color changes for thread changes.
3. Deactivate Single Color Embroidery (no white outline) so the design will be stitched in multiple colors.
To stitch a multi-colored design in one color, set your machine to bypass color changes by select-ing the Single/Multi Color Motif icon. The machine will not stop at the end of the colors in the design. If the design is already a single color design, this icon will not be visible.
HOWDo you know:• How to engage a design basting box?• How to engage a hoop basting box?
My BERNINA
24
B E R N I N A E M B R O I D E R Y W O R K B O O K
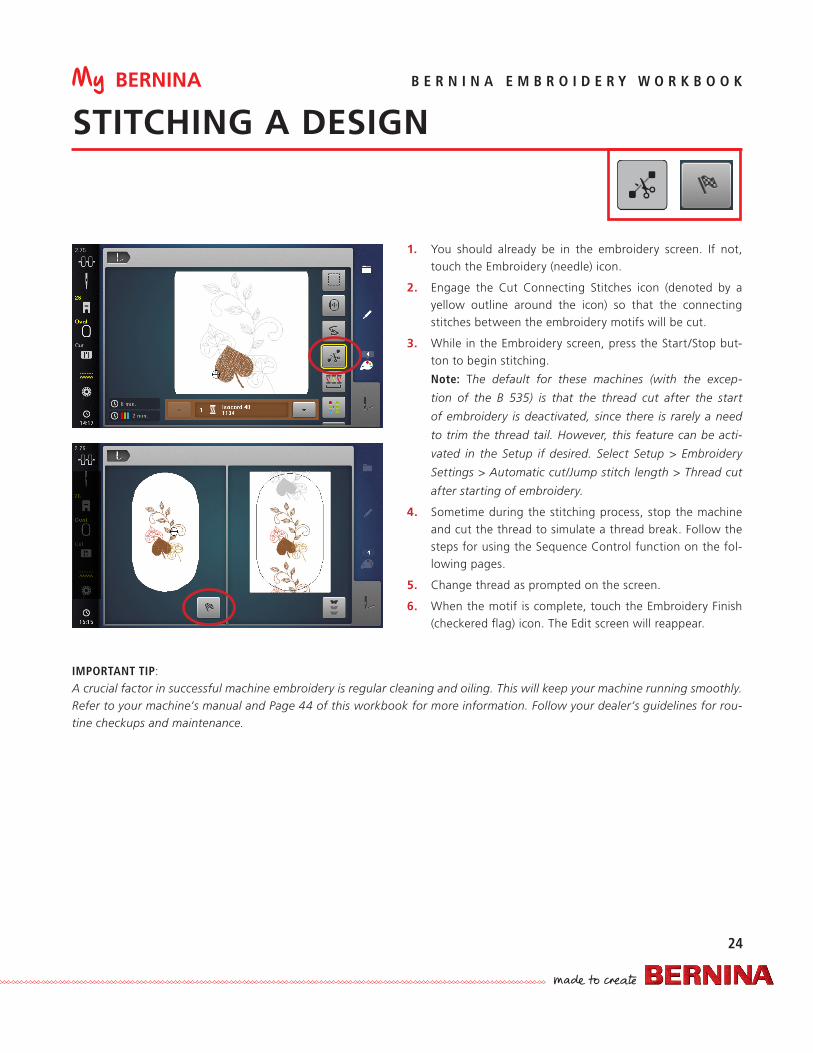
STITCHING A DESIGN
1. You should already be in the embroidery screen. If not, touch the Embroidery (needle) icon.
2. Engage the Cut Connecting Stitches icon (denoted by a yellow outline around the icon) so that the connecting stitches between the embroidery motifs will be cut.
3. While in the Embroidery screen, press the Start/Stop but-ton to begin stitching.
Note: The default for these machines (with the excep-
tion of the B 535) is that the thread cut after the start
of embroidery is deactivated, since there is rarely a need
to trim the thread tail. However, this feature can be acti-
vated in the Setup if desired. Select Setup > Embroidery
Settings > Automatic cut/Jump stitch length > Thread cut
after starting of embroidery.
4. Sometime during the stitching process, stop the machine and cut the thread to simulate a thread break. Follow the steps for using the Sequence Control function on the fol-lowing pages.
5. Change thread as prompted on the screen.
6. When the motif is complete, touch the Embroidery Finish (checkered flag) icon. The Edit screen will reappear.
IMPORTANT TIP:A crucial factor in successful machine embroidery is regular cleaning and oiling. This will keep your machine running smoothly. Refer to your machine’s manual and Page 44 of this workbook for more information. Follow your dealer’s guidelines for rou-tine checkups and maintenance.
My BERNINA
25
B E R N I N A E M B R O I D E R Y W O R K B O O K
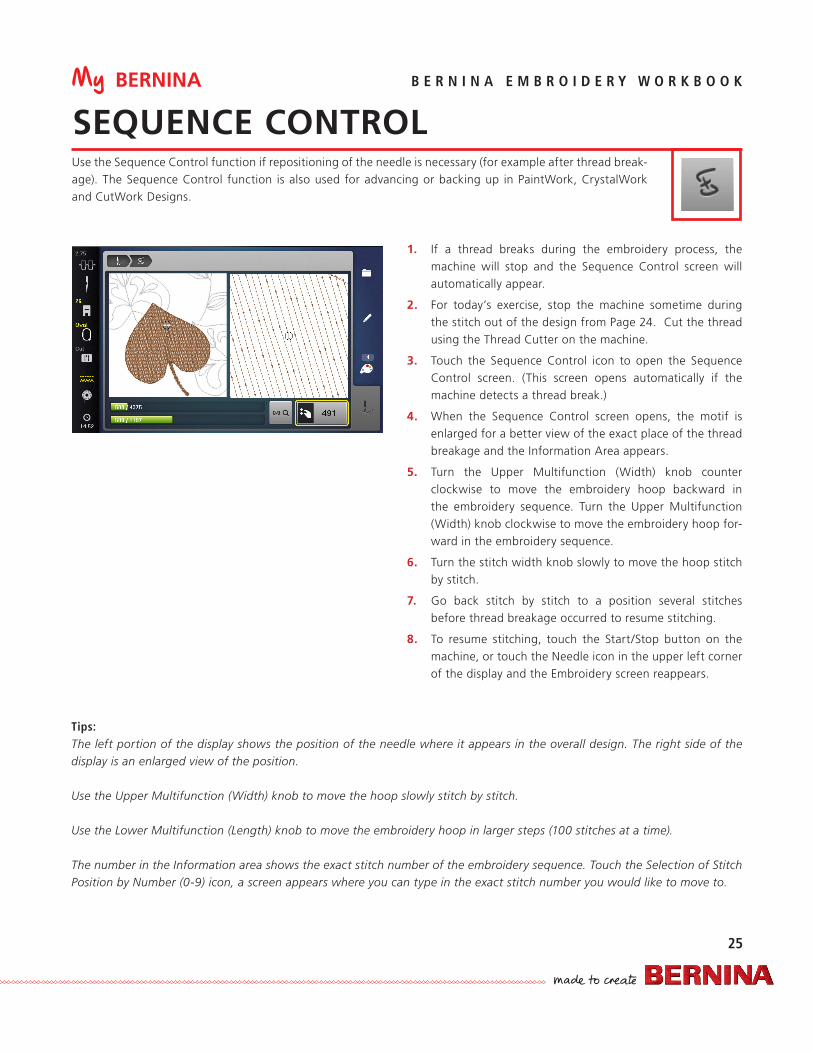
SEQUENCE CONTROL
Tips:The left portion of the display shows the position of the needle where it appears in the overall design. The right side of the display is an enlarged view of the position.
Use the Upper Multifunction (Width) knob to move the hoop slowly stitch by stitch.
Use the Lower Multifunction (Length) knob to move the embroidery hoop in larger steps (100 stitches at a time).
The number in the Information area shows the exact stitch number of the embroidery sequence. Touch the Selection of Stitch Position by Number (0-9) icon, a screen appears where you can type in the exact stitch number you would like to move to.
Use the Sequence Control function if repositioning of the needle is necessary (for example after thread break-age). The Sequence Control function is also used for advancing or backing up in PaintWork, CrystalWork and CutWork Designs.
1. If a thread breaks during the embroidery process, the machine will stop and the Sequence Control screen will automatically appear.
2. For today’s exercise, stop the machine sometime during the stitch out of the design from Page 24. Cut the thread using the Thread Cutter on the machine.
3. Touch the Sequence Control icon to open the Sequence Control screen. (This screen opens automatically if the machine detects a thread break.)
4. When the Sequence Control screen opens, the motif is enlarged for a better view of the exact place of the thread breakage and the Information Area appears.
5. Turn the Upper Multifunction (Width) knob counter clockwise to move the embroidery hoop backward in the embroidery sequence. Turn the Upper Multifunction (Width) knob clockwise to move the embroidery hoop for-ward in the embroidery sequence.
6. Turn the stitch width knob slowly to move the hoop stitch by stitch.
7. Go back stitch by stitch to a position several stitches before thread breakage occurred to resume stitching.
8. To resume stitching, touch the Start/Stop button on the machine, or touch the Needle icon in the upper left corner of the display and the Embroidery screen reappears.
My BERNINA
26
B E R N I N A E M B R O I D E R Y W O R K B O O K
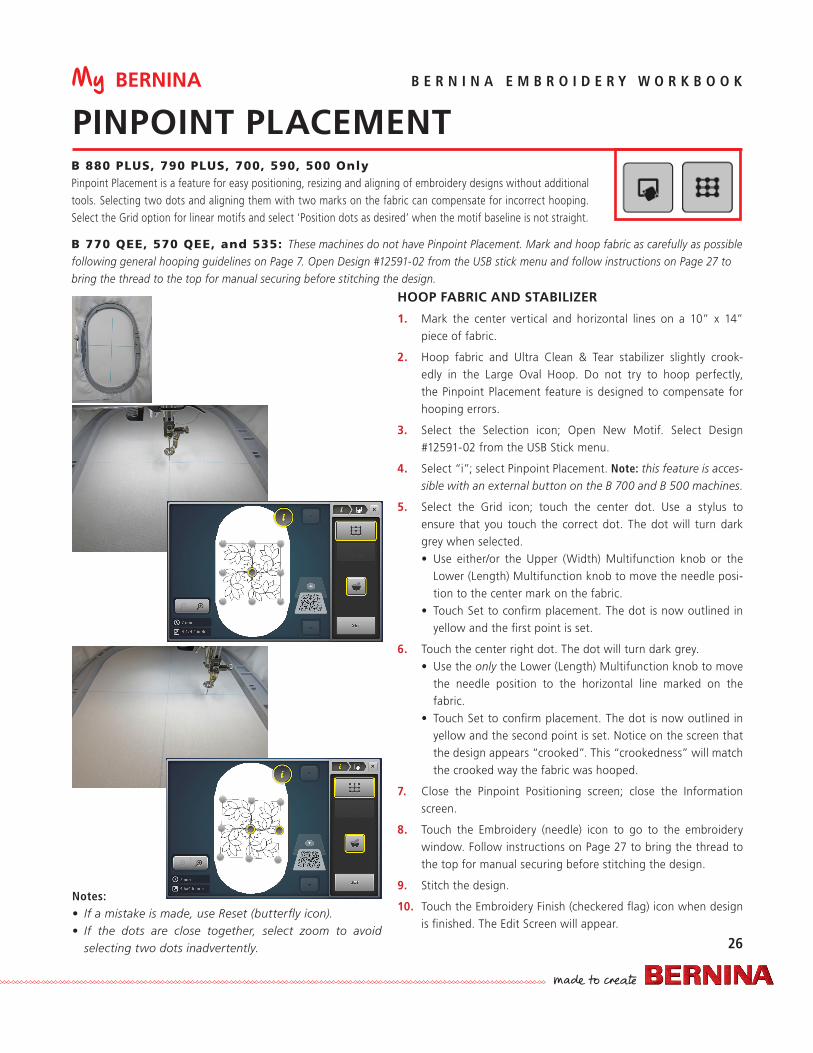
PINPOINT PLACEMENTB 880 PLUS, 790 PLUS, 700, 590, 500 OnlyPinpoint Placement is a feature for easy positioning, resizing and aligning of embroidery designs without additional tools. Selecting two dots and aligning them with two marks on the fabric can compensate for incorrect hooping. Select the Grid option for linear motifs and select ‘Position dots as desired’ when the motif baseline is not straight.
HOOP FABRIC AND STABILIZER
1. Mark the center vertical and horizontal lines on a 10” x 14” piece of fabric.
2. Hoop fabric and Ultra Clean & Tear stabilizer slightly crook-edly in the Large Oval Hoop. Do not try to hoop perfectly, the Pinpoint Placement feature is designed to compensate for hooping errors.
3. Select the Selection icon; Open New Motif. Select Design #12591-02 from the USB Stick menu.
4. Select “i”; select Pinpoint Placement. Note: this feature is acces-sible with an external button on the B 700 and B 500 machines.
5. Select the Grid icon; touch the center dot. Use a stylus to ensure that you touch the correct dot. The dot will turn dark grey when selected.• Use either/or the Upper (Width) Multifunction knob or the
Lower (Length) Multifunction knob to move the needle posi-tion to the center mark on the fabric.
• Touch Set to confirm placement. The dot is now outlined in yellow and the first point is set.
6. Touch the center right dot. The dot will turn dark grey.• Use the only the Lower (Length) Multifunction knob to move
the needle position to the horizontal line marked on the fabric.
• Touch Set to confirm placement. The dot is now outlined in yellow and the second point is set. Notice on the screen that the design appears “crooked”. This “crookedness” will match the crooked way the fabric was hooped.
7. Close the Pinpoint Positioning screen; close the Information screen.
8. Touch the Embroidery (needle) icon to go to the embroidery window. Follow instructions on Page 27 to bring the thread to the top for manual securing before stitching the design.
9. Stitch the design.
10. Touch the Embroidery Finish (checkered flag) icon when design is finished. The Edit Screen will appear.
B 770 QEE, 570 QEE, and 535: These machines do not have Pinpoint Placement. Mark and hoop fabric as carefully as possible following general hooping guidelines on Page 7. Open Design #12591-02 from the USB stick menu and follow instructions on Page 27 to bring the thread to the top for manual securing before stitching the design.
Notes:• If a mistake is made, use Reset (butterfly icon).• If the dots are close together, select zoom to avoid
selecting two dots inadvertently.
My BERNINA
27
B E R N I N A E M B R O I D E R Y W O R K B O O K
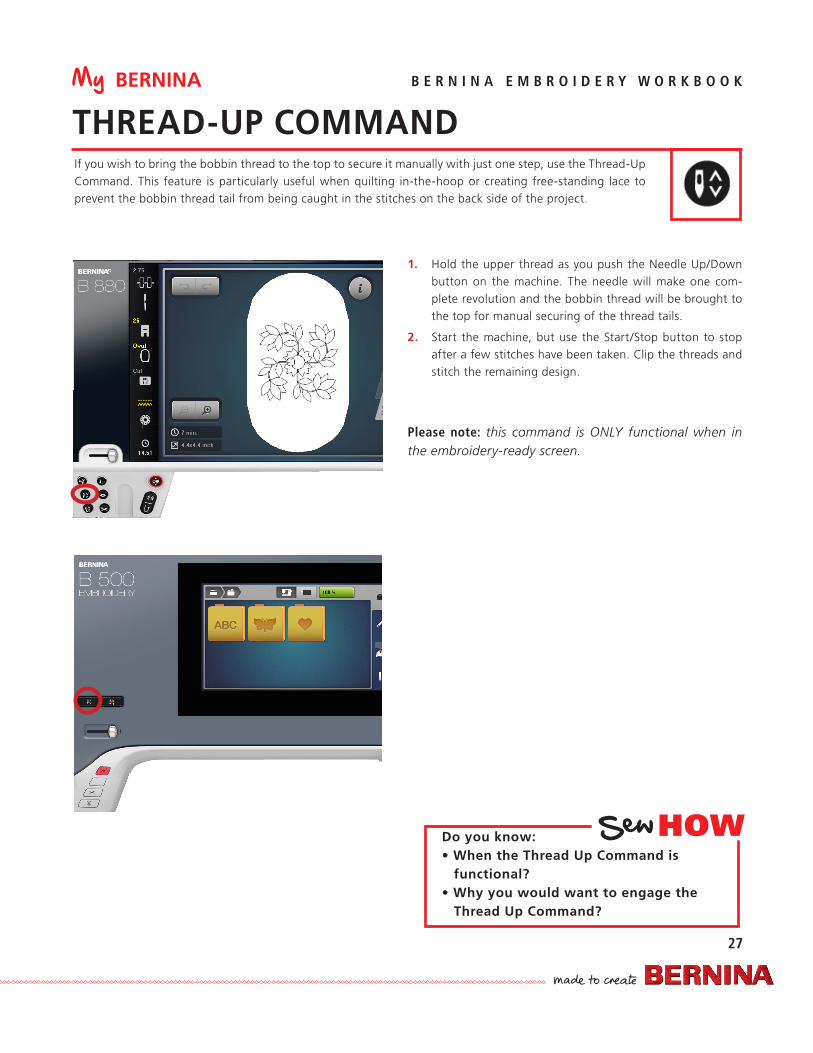
THREAD-UP COMMANDIf you wish to bring the bobbin thread to the top to secure it manually with just one step, use the Thread-Up Command. This feature is particularly useful when quilting in-the-hoop or creating free-standing lace to prevent the bobbin thread tail from being caught in the stitches on the back side of the project.
1. Hold the upper thread as you push the Needle Up/Down button on the machine. The needle will make one com-plete revolution and the bobbin thread will be brought to the top for manual securing of the thread tails.
2. Start the machine, but use the Start/Stop button to stop after a few stitches have been taken. Clip the threads and stitch the remaining design.
Please note: this command is ONLY functional when in the embroidery-ready screen.
HOWDo you know:• When the Thread Up Command is
functional?• Why you would want to engage the
Thread Up Command?
My BERNINA
28
B E R N I N A E M B R O I D E R Y W O R K B O O K
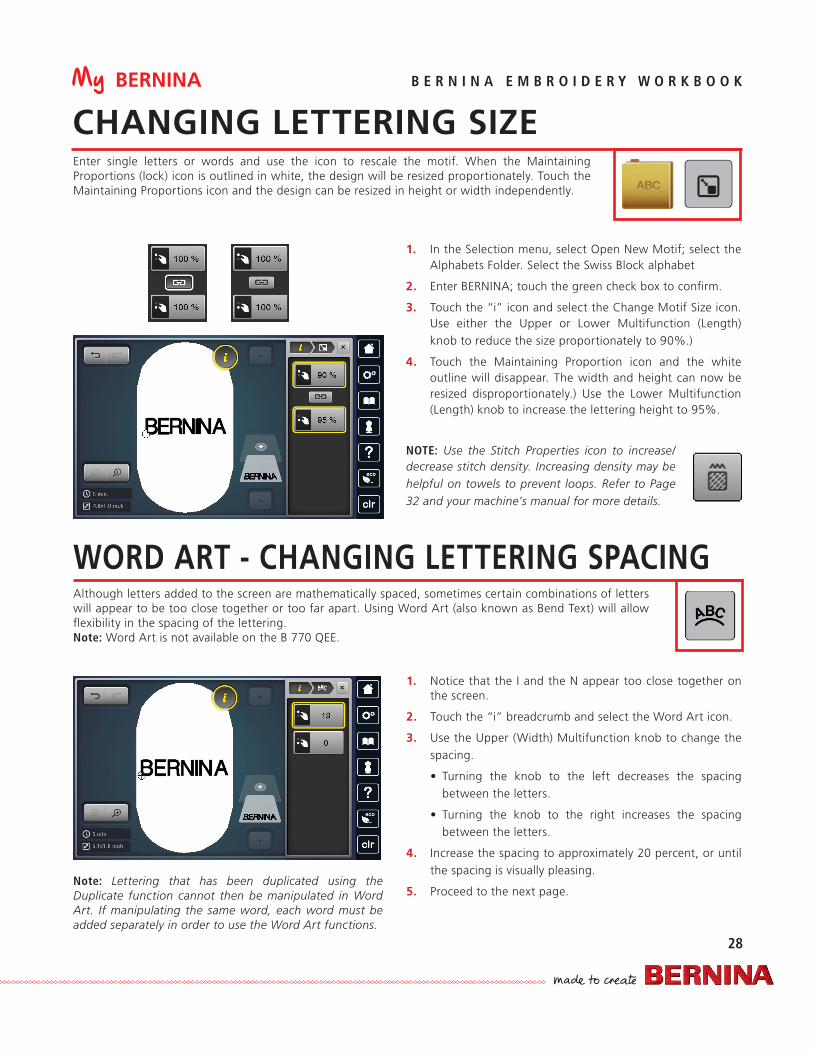
1. In the Selection menu, select Open New Motif; select the Alphabets Folder. Select the Swiss Block alphabet
2. Enter BERNINA; touch the green check box to confirm.
3. Touch the “i” icon and select the Change Motif Size icon. Use either the Upper or Lower Multifunction (Length) knob to reduce the size proportionately to 90%.)
4. Touch the Maintaining Proportion icon and the white outline will disappear. The width and height can now be resized disproportionately.) Use the Lower Multifunction (Length) knob to increase the lettering height to 95%.
NOTE: Use the Stitch Properties icon to increase/decrease stitch density. Increasing density may be helpful on towels to prevent loops. Refer to Page 32 and your machine’s manual for more details.
CHANGING LETTERING SIZEEnter single letters or words and use the icon to rescale the motif. When the Maintaining Proportions (lock) icon is outlined in white, the design will be resized proportionately. Touch the Maintaining Proportions icon and the design can be resized in height or width independently.
Although letters added to the screen are mathematically spaced, sometimes certain combinations of letters will appear to be too close together or too far apart. Using Word Art (also known as Bend Text) will allow flexibility in the spacing of the lettering.Note: Word Art is not available on the B 770 QEE.
Note: Lettering that has been duplicated using the Duplicate function cannot then be manipulated in Word Art. If manipulating the same word, each word must be added separately in order to use the Word Art functions.
1. Notice that the I and the N appear too close together on the screen.
2. Touch the “i” breadcrumb and select the Word Art icon.
3. Use the Upper (Width) Multifunction knob to change the spacing.
• Turning the knob to the left decreases the spacing between the letters.
• Turning the knob to the right increases the spacing between the letters.
4. Increase the spacing to approximately 20 percent, or until the spacing is visually pleasing.
5. Proceed to the next page.
WORD ART - CHANGING LETTERING SPACING
My BERNINA
29
B E R N I N A E M B R O I D E R Y W O R K B O O K
WORD ART
Tip for B 880 PLUS, 790 PLUS, 700, 590, and 500 owners: Remember if you make a change that you do not like, you can use Undo/Redo.
Notes: • If you notice jump stitches between the letters as shown in the picture to the left, decrease
the Jump Stitch Length in the Setup Menu > Embroidery Settings > Automatic cut/Jump stitch length > Reducing the length for thread cut of the connecting stitches. Change the number to 1.
• Lettering that has been duplicated using the Duplicate function cannot then be manipulated in Word Art. If manipulating the same word, each word must be added separately in order to use the Word Art functions.
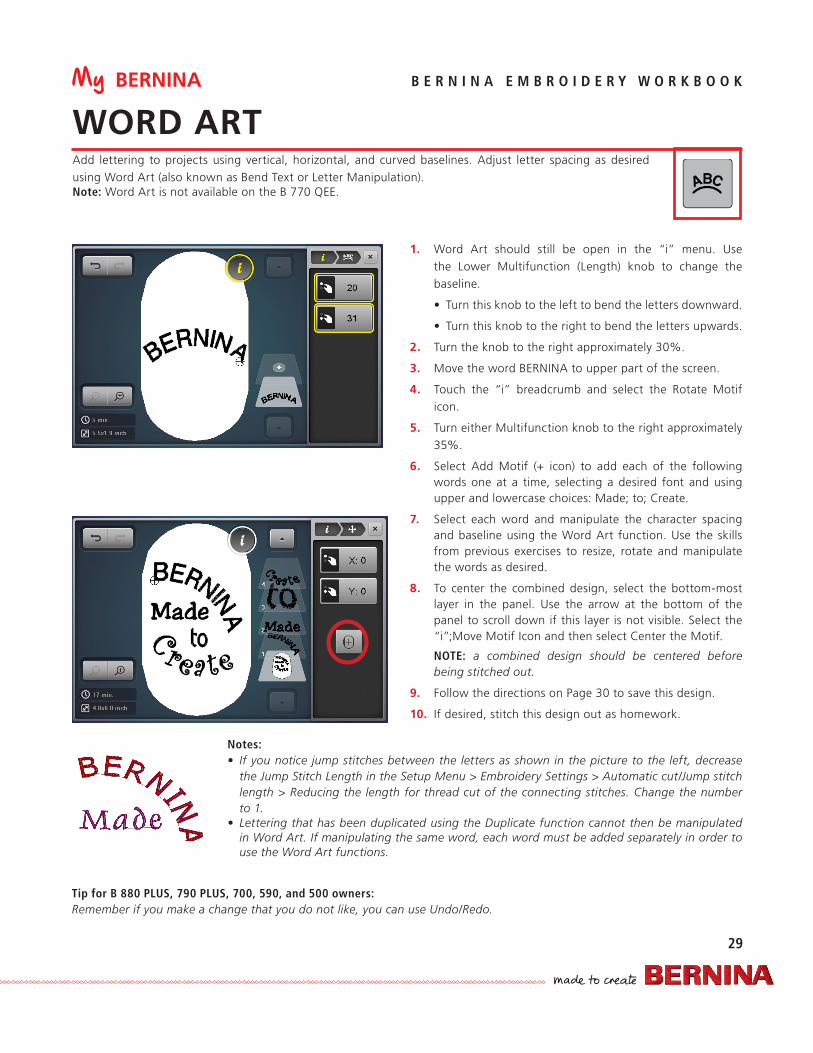
Add lettering to projects using vertical, horizontal, and curved baselines. Adjust letter spacing as desired using Word Art (also known as Bend Text or Letter Manipulation).Note: Word Art is not available on the B 770 QEE.
1. Word Art should still be open in the “i” menu. Use the Lower Multifunction (Length) knob to change the baseline.
• Turn this knob to the left to bend the letters downward.
• Turn this knob to the right to bend the letters upwards.
2. Turn the knob to the right approximately 30%.
3. Move the word BERNINA to upper part of the screen.
4. Touch the “i” breadcrumb and select the Rotate Motif icon.
5. Turn either Multifunction knob to the right approximately 35%.
6. Select Add Motif (+ icon) to add each of the following words one at a time, selecting a desired font and using upper and lowercase choices: Made; to; Create.
7. Select each word and manipulate the character spacing and baseline using the Word Art function. Use the skills from previous exercises to resize, rotate and manipulate the words as desired.
8. To center the combined design, select the bottom-most layer in the panel. Use the arrow at the bottom of the panel to scroll down if this layer is not visible. Select the “i”;Move Motif Icon and then select Center the Motif.
NOTE: a combined design should be centered before being stitched out.
9. Follow the directions on Page 30 to save this design.
10. If desired, stitch this design out as homework.
My BERNINA
30
B E R N I N A E M B R O I D E R Y W O R K B O O K
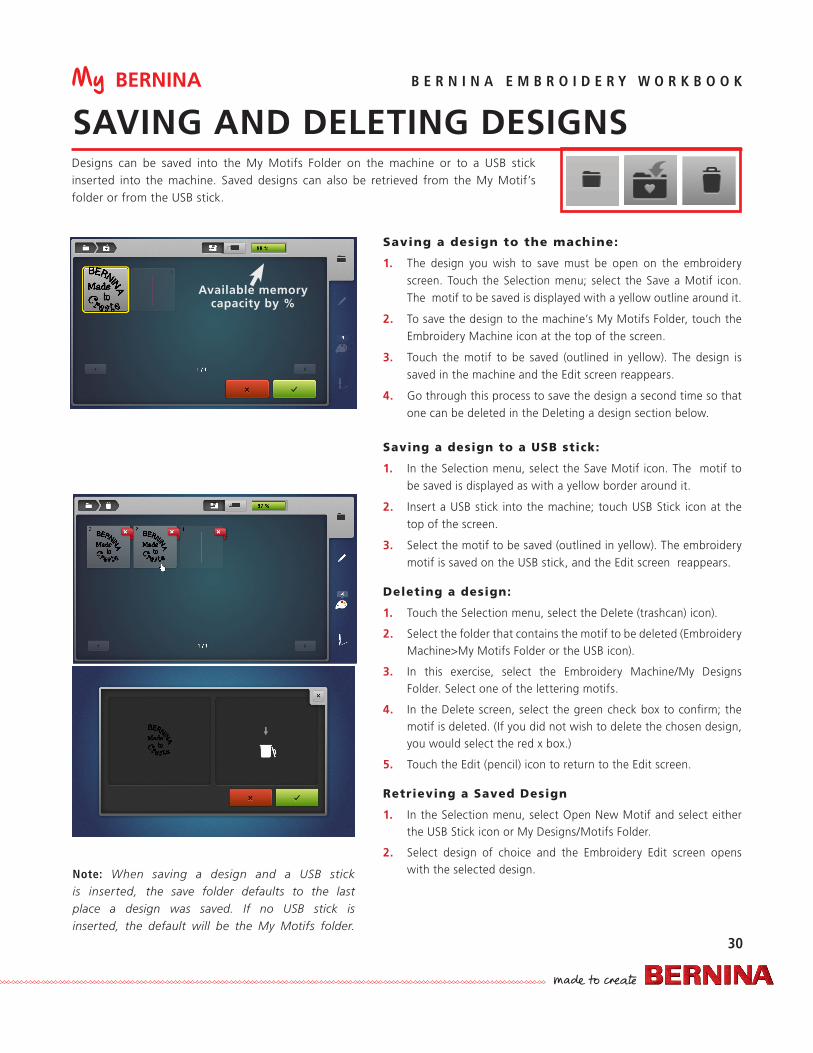
Saving a design to the machine:
1. The design you wish to save must be open on the embroidery screen. Touch the Selection menu; select the Save a Motif icon. The motif to be saved is displayed with a yellow outline around it.
2. To save the design to the machine’s My Motifs Folder, touch the Embroidery Machine icon at the top of the screen.
3. Touch the motif to be saved (outlined in yellow). The design is saved in the machine and the Edit screen reappears.
4. Go through this process to save the design a second time so that one can be deleted in the Deleting a design section below.
Saving a design to a USB stick:
1. In the Selection menu, select the Save Motif icon. The motif to be saved is displayed as with a yellow border around it.
2. Insert a USB stick into the machine; touch USB Stick icon at the top of the screen.
3. Select the motif to be saved (outlined in yellow). The embroidery motif is saved on the USB stick, and the Edit screen reappears.
Deleting a design:
1. Touch the Selection menu, select the Delete (trashcan) icon).
2. Select the folder that contains the motif to be deleted (Embroidery Machine>My Motifs Folder or the USB icon).
3. In this exercise, select the Embroidery Machine/My Designs Folder. Select one of the lettering motifs.
4. In the Delete screen, select the green check box to confirm; the motif is deleted. (If you did not wish to delete the chosen design, you would select the red x box.)
5. Touch the Edit (pencil) icon to return to the Edit screen.
Retrieving a Saved Design
1. In the Selection menu, select Open New Motif and select either the USB Stick icon or My Designs/Motifs Folder.
2. Select design of choice and the Embroidery Edit screen opens with the selected design.
SAVING AND DELETING DESIGNSDesigns can be saved into the My Motifs Folder on the machine or to a USB stick inserted into the machine. Saved designs can also be retrieved from the My Motif’s folder or from the USB stick.
Available memory capacity by %
Note: When saving a design and a USB stick is inserted, the save folder defaults to the last place a design was saved. If no USB stick is inserted, the default will be the My Motifs folder.
My BERNINA
31
B E R N I N A E M B R O I D E R Y W O R K B O O K
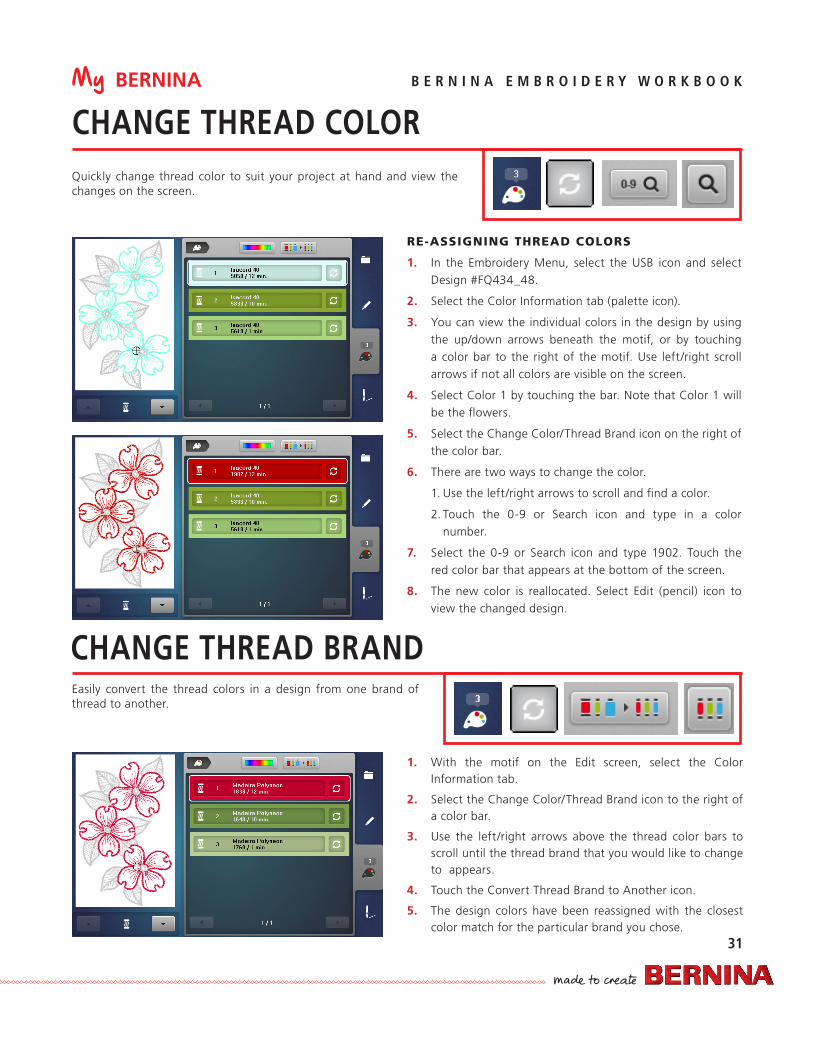
CHANGE THREAD COLOR Quickly change thread color to suit your project at hand and view the changes on the screen.
Easily convert the thread colors in a design from one brand of thread to another.
RE-ASSIGNING THREAD COLORS
1. In the Embroidery Menu, select the USB icon and select Design #FQ434_48.
2. Select the Color Information tab (palette icon).
3. You can view the individual colors in the design by using the up/down arrows beneath the motif, or by touching a color bar to the right of the motif. Use left/right scroll arrows if not all colors are visible on the screen.
4. Select Color 1 by touching the bar. Note that Color 1 will be the flowers.
5. Select the Change Color/Thread Brand icon on the right of the color bar.
6. There are two ways to change the color.
1. Use the left/right arrows to scroll and find a color.
2. Touch the 0-9 or Search icon and type in a color number.
7. Select the 0-9 or Search icon and type 1902. Touch the red color bar that appears at the bottom of the screen.
8. The new color is reallocated. Select Edit (pencil) icon to view the changed design.
1. With the motif on the Edit screen, select the Color Information tab.
2. Select the Change Color/Thread Brand icon to the right of a color bar.
3. Use the left/right arrows above the thread color bars to scroll until the thread brand that you would like to change to appears.
4. Touch the Convert Thread Brand to Another icon.
5. The design colors have been reassigned with the closest color match for the particular brand you chose.
CHANGE THREAD BRAND
My BERNINA
32
B E R N I N A E M B R O I D E R Y W O R K B O O K
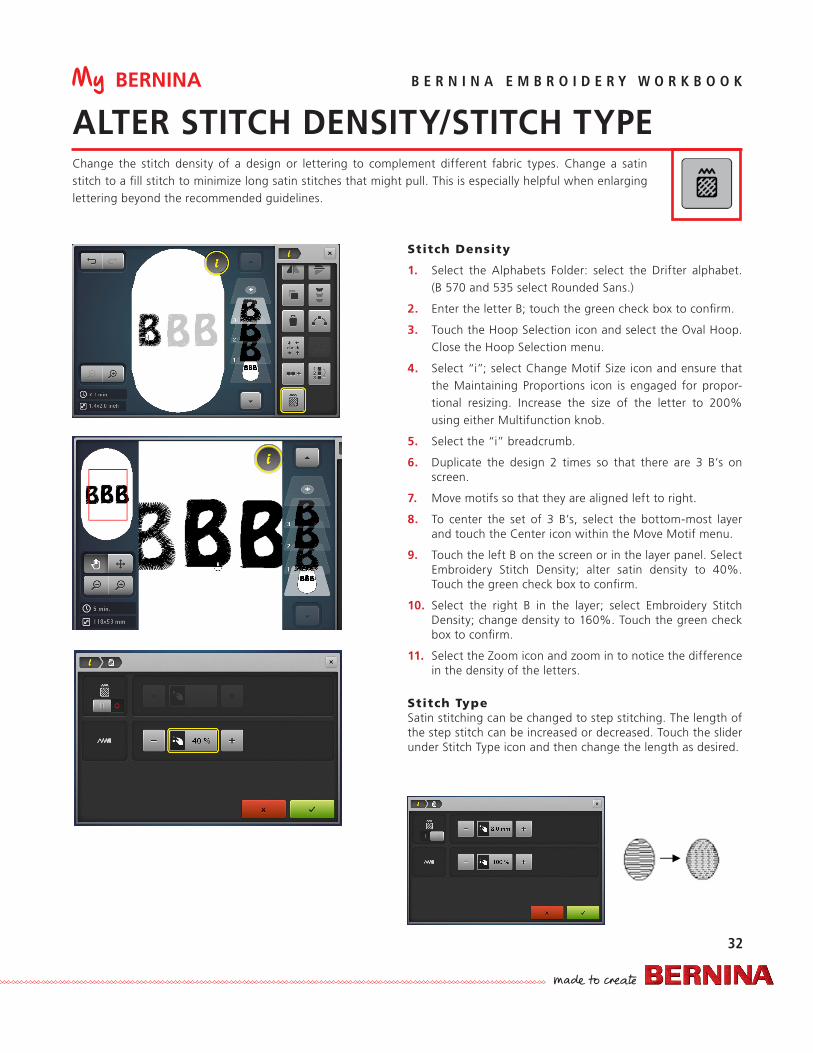
ALTER STITCH DENSITY/STITCH TYPEChange the stitch density of a design or lettering to complement different fabric types. Change a satin stitch to a fill stitch to minimize long satin stitches that might pull. This is especially helpful when enlarging lettering beyond the recommended guidelines.
Stitch Density
1. Select the Alphabets Folder: select the Drifter alphabet. (B 570 and 535 select Rounded Sans.)
2. Enter the letter B; touch the green check box to confirm.
3. Touch the Hoop Selection icon and select the Oval Hoop. Close the Hoop Selection menu.
4. Select “i”; select Change Motif Size icon and ensure that the Maintaining Proportions icon is engaged for propor-tional resizing. Increase the size of the letter to 200% using either Multifunction knob.
5. Select the “i” breadcrumb.
6. Duplicate the design 2 times so that there are 3 B’s on screen.
7. Move motifs so that they are aligned left to right.
8. To center the set of 3 B’s, select the bottom-most layer and touch the Center icon within the Move Motif menu.
9. Touch the left B on the screen or in the layer panel. Select Embroidery Stitch Density; alter satin density to 40%. Touch the green check box to confirm.
10. Select the right B in the layer; select Embroidery Stitch Density; change density to 160%. Touch the green check box to confirm.
11. Select the Zoom icon and zoom in to notice the difference in the density of the letters.
Stitch TypeSatin stitching can be changed to step stitching. The length of the step stitch can be increased or decreased. Touch the slider under Stitch Type icon and then change the length as desired.
My BERNINA
33
B E R N I N A E M B R O I D E R Y W O R K B O O K
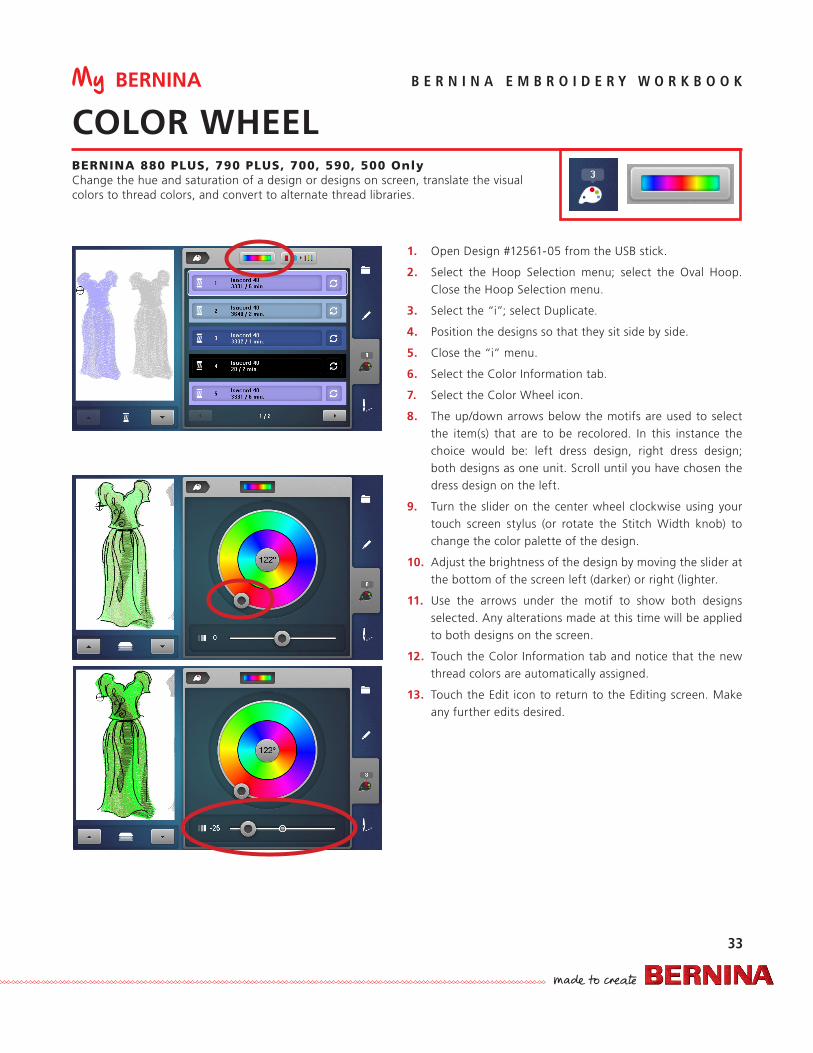
COLOR WHEEL BERNINA 880 PLUS, 790 PLUS, 700, 590, 500 OnlyChange the hue and saturation of a design or designs on screen, translate the visual colors to thread colors, and convert to alternate thread libraries.
1. Open Design #12561-05 from the USB stick.
2. Select the Hoop Selection menu; select the Oval Hoop. Close the Hoop Selection menu.
3. Select the “i”; select Duplicate.
4. Position the designs so that they sit side by side.
5. Close the “i” menu.
6. Select the Color Information tab.
7. Select the Color Wheel icon.
8. The up/down arrows below the motifs are used to select the item(s) that are to be recolored. In this instance the choice would be: left dress design, right dress design; both designs as one unit. Scroll until you have chosen the dress design on the left.
9. Turn the slider on the center wheel clockwise using your touch screen stylus (or rotate the Stitch Width knob) to change the color palette of the design.
10. Adjust the brightness of the design by moving the slider at the bottom of the screen left (darker) or right (lighter.
11. Use the arrows under the motif to show both designs selected. Any alterations made at this time will be applied to both designs on the screen.
12. Touch the Color Information tab and notice that the new thread colors are automatically assigned.
13. Touch the Edit icon to return to the Editing screen. Make any further edits desired.

My BERNINA
34
B E R N I N A E M B R O I D E R Y W O R K B O O K
EDITING - GROUP/UNGROUP LETTERING & DESIGNSB 880 PLUS, 790 PLUS, 700, 590, 500 OnlyUngroup designs to edit individual pieces or parts of a design. Group two or more designs, or design elements and edit them as one unit. (Subject to design properties.)
1. Touch the Selection icon; select Open New Motif. From the Selection menu, select the Alphabet folder; select desired horizontal font.
2. Enter first initial; last initial; middle initial. Touch check in the green check box to confirm.
3. If the design did not open in the Oval Hoop, select the Hoop Selection icon. Select the Oval Hoop. Close the Hoop Selection menu.
4. Select “i”; select Group Embroidery Motifs.
5. Select the Ungroup (- after the two boxes) icon. The 3 initials have now been ungrouped and will appear as 3 separate layers in the layer panel. The Ungroup icon is no longer visible since there is nothing left to ungroup.
6. To make the last name initial larger, select the last name initial in the layer panel or touch the letter on the screen.
7. Select the “i” breadcrumb; select Change Motif Size. With the Maintaining Proportions icon engaged (locked), use either Multifunction knob to resize the initial 120%. Move the last initial to desired position on the screen.
8. Select each individual initial in the layer panel; position as desired.
9. Touch the Add Motif (+) icon and select the USB icon.
10. Select the Blue Flower design. The design opens in the center of the screen. Drag and drop the flower design to the lower part of the screen.
11. With the design flower selected, select the Group icon; then select Ungroup.
12. Select layer 4 (green leaves) in the layer panel. Swipe to the right or left; touch the green check box to confirm deletion.
13. To group the flower parts so that they can be edited as one unit, select the flower fill (Layer 4). Select Group icon, then select Group. The flower with its accent color is now grouped. Select Group again and the flower with its cen-ter is grouped.
14. With the flower selected, touch “i” breadcrumb and select Change Motif Size.
15. With the Maintaining Proportions icon locked, resize the design to 95%.
16. Position design as desired, then proceed to next page.
NOTE: With Alphabets, the Jumpstitch Length must be adjusted to 1 in Setup so that ungrouping will work with all the letters.
My BERNINA
35
B E R N I N A E M B R O I D E R Y W O R K B O O K
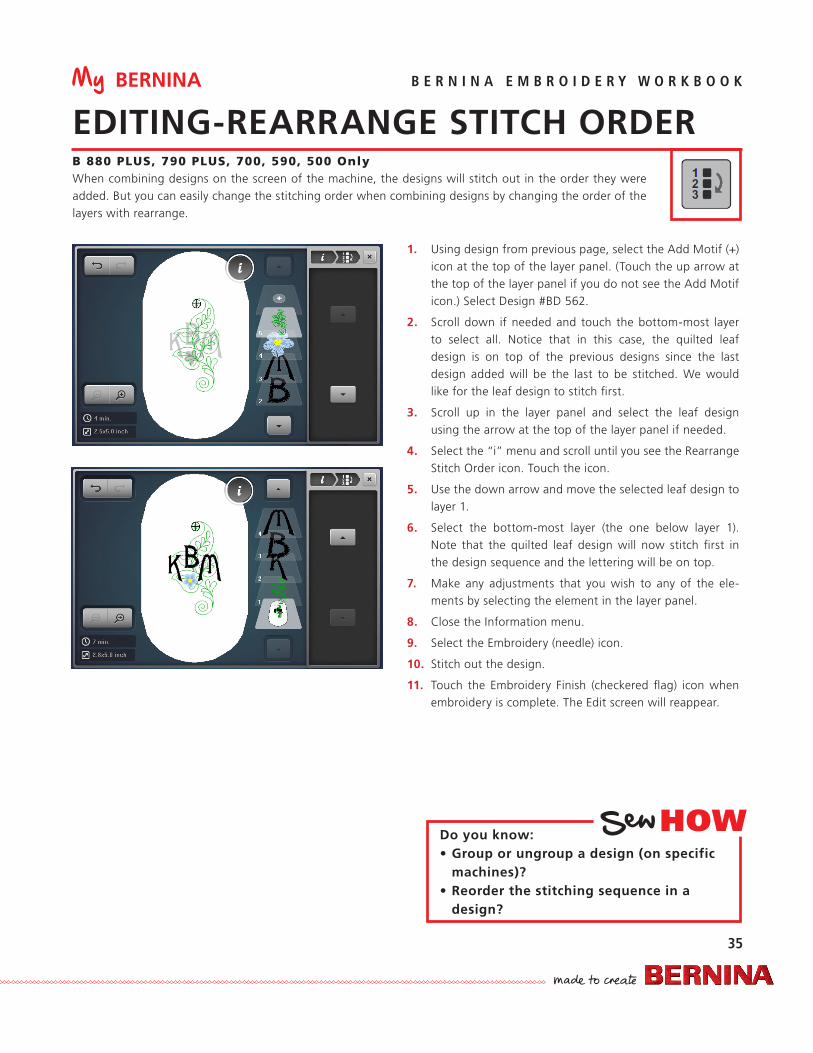
EDITING-REARRANGE STITCH ORDERB 880 PLUS, 790 PLUS, 700, 590, 500 OnlyWhen combining designs on the screen of the machine, the designs will stitch out in the order they were added. But you can easily change the stitching order when combining designs by changing the order of the layers with rearrange.
1. Using design from previous page, select the Add Motif (+) icon at the top of the layer panel. (Touch the up arrow at the top of the layer panel if you do not see the Add Motif icon.) Select Design #BD 562.
2. Scroll down if needed and touch the bottom-most layer to select all. Notice that in this case, the quilted leaf design is on top of the previous designs since the last design added will be the last to be stitched. We would like for the leaf design to stitch first.
3. Scroll up in the layer panel and select the leaf design using the arrow at the top of the layer panel if needed.
4. Select the “i” menu and scroll until you see the Rearrange Stitch Order icon. Touch the icon.
5. Use the down arrow and move the selected leaf design to layer 1.
6. Select the bottom-most layer (the one below layer 1). Note that the quilted leaf design will now stitch first in the design sequence and the lettering will be on top.
7. Make any adjustments that you wish to any of the ele-ments by selecting the element in the layer panel.
8. Close the Information menu.
9. Select the Embroidery (needle) icon.
10. Stitch out the design.
11. Touch the Embroidery Finish (checkered flag) icon when embroidery is complete. The Edit screen will reappear.
HOWDo you know:• Group or ungroup a design (on specific
machines)?• Reorder the stitching sequence in a
design?
My BERNINA
36
B E R N I N A E M B R O I D E R Y W O R K B O O K
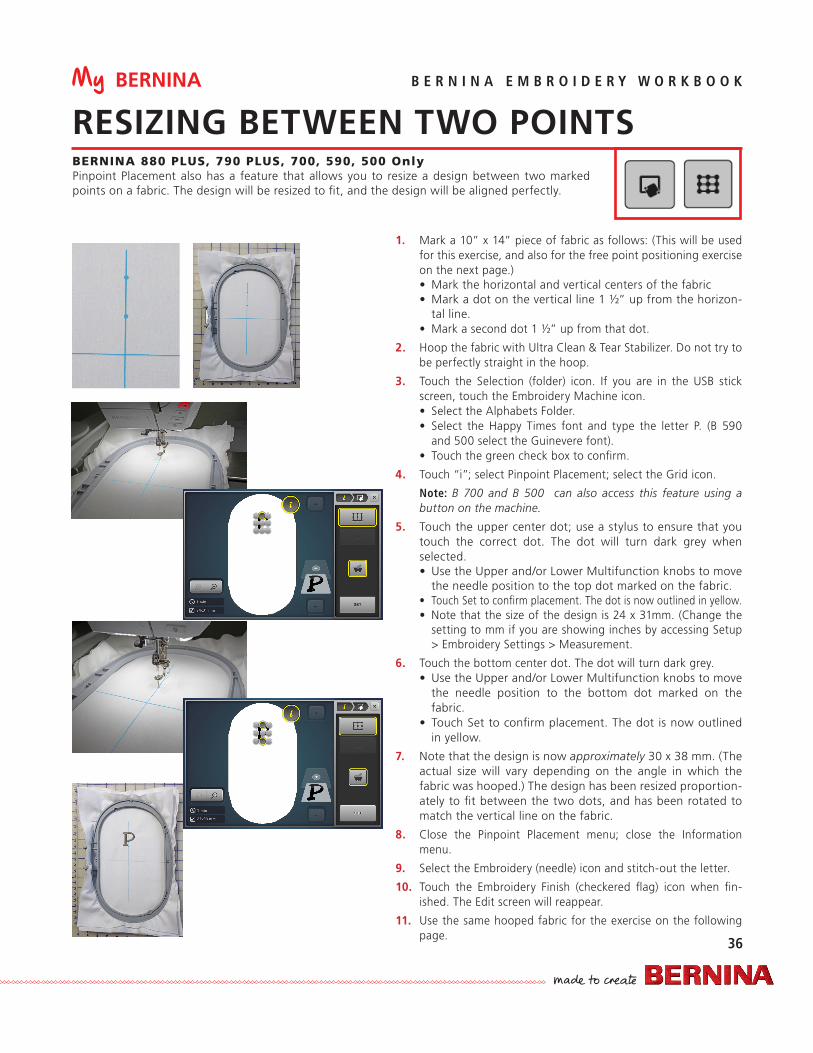
1. Mark a 10” x 14” piece of fabric as follows: (This will be used for this exercise, and also for the free point positioning exercise on the next page.)• Mark the horizontal and vertical centers of the fabric• Mark a dot on the vertical line 1 ½” up from the horizon-
tal line.• Mark a second dot 1 ½” up from that dot.
2. Hoop the fabric with Ultra Clean & Tear Stabilizer. Do not try to be perfectly straight in the hoop.
3. Touch the Selection (folder) icon. If you are in the USB stick screen, touch the Embroidery Machine icon.• Select the Alphabets Folder.• Select the Happy Times font and type the letter P. (B 590
and 500 select the Guinevere font).• Touch the green check box to confirm.
4. Touch “i”; select Pinpoint Placement; select the Grid icon.
Note: B 700 and B 500 can also access this feature using a button on the machine.
5. Touch the upper center dot; use a stylus to ensure that you touch the correct dot. The dot will turn dark grey when selected.• Use the Upper and/or Lower Multifunction knobs to move
the needle position to the top dot marked on the fabric.• Touch Set to confirm placement. The dot is now outlined in yellow. • Note that the size of the design is 24 x 31mm. (Change the
setting to mm if you are showing inches by accessing Setup > Embroidery Settings > Measurement.
6. Touch the bottom center dot. The dot will turn dark grey.• Use the Upper and/or Lower Multifunction knobs to move
the needle position to the bottom dot marked on the fabric.
• Touch Set to confirm placement. The dot is now outlined in yellow.
7. Note that the design is now approximately 30 x 38 mm. (The actual size will vary depending on the angle in which the fabric was hooped.) The design has been resized proportion-ately to fit between the two dots, and has been rotated to match the vertical line on the fabric.
8. Close the Pinpoint Placement menu; close the Information menu.
9. Select the Embroidery (needle) icon and stitch-out the letter.
10. Touch the Embroidery Finish (checkered flag) icon when fin-ished. The Edit screen will reappear.
11. Use the same hooped fabric for the exercise on the following page.
RESIZING BETWEEN TWO POINTSBERNINA 880 PLUS, 790 PLUS, 700, 590, 500 OnlyPinpoint Placement also has a feature that allows you to resize a design between two marked points on a fabric. The design will be resized to fit, and the design will be aligned perfectly.
My BERNINA
37
B E R N I N A E M B R O I D E R Y W O R K B O O K
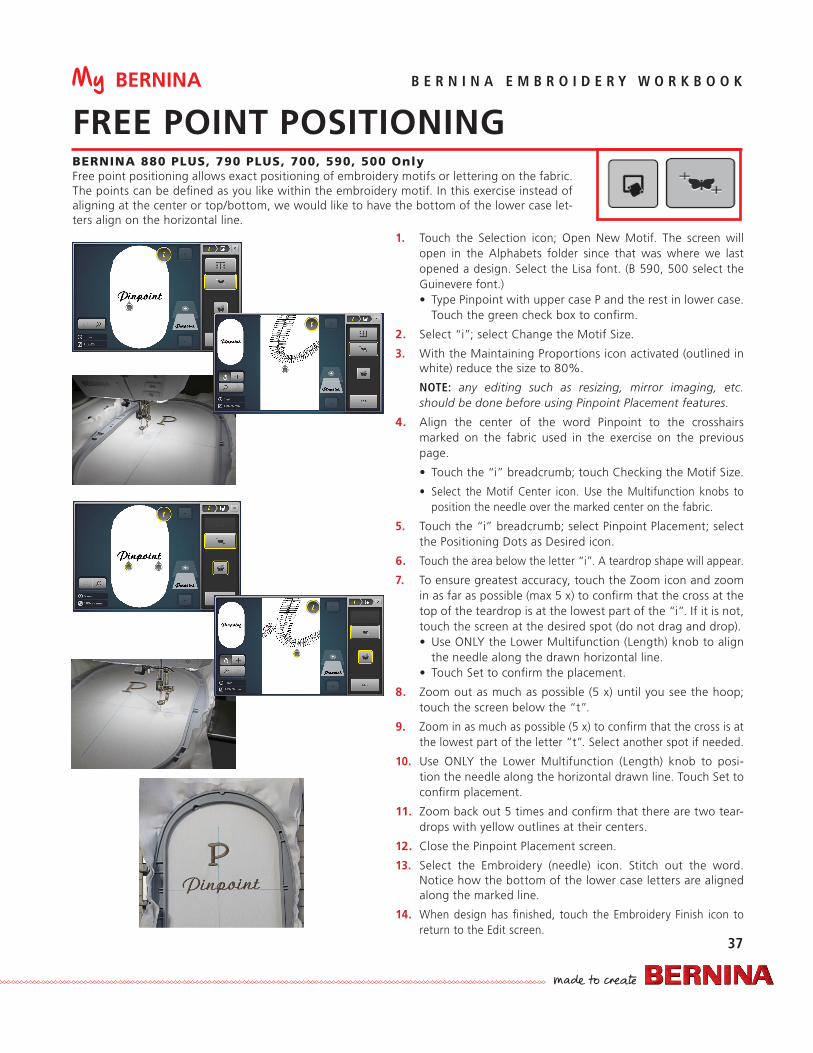
FREE POINT POSITIONINGBERNINA 880 PLUS, 790 PLUS, 700, 590, 500 OnlyFree point positioning allows exact positioning of embroidery motifs or lettering on the fabric. The points can be defined as you like within the embroidery motif. In this exercise instead of aligning at the center or top/bottom, we would like to have the bottom of the lower case let-ters align on the horizontal line.
1. Touch the Selection icon; Open New Motif. The screen will open in the Alphabets folder since that was where we last opened a design. Select the Lisa font. (B 590, 500 select the Guinevere font.)• Type Pinpoint with upper case P and the rest in lower case.
Touch the green check box to confirm.
2. Select “i”; select Change the Motif Size.
3. With the Maintaining Proportions icon activated (outlined in white) reduce the size to 80%.
NOTE: any editing such as resizing, mirror imaging, etc. should be done before using Pinpoint Placement features.
4. Align the center of the word Pinpoint to the crosshairs marked on the fabric used in the exercise on the previous page.
• Touch the “i” breadcrumb; touch Checking the Motif Size.
• Select the Motif Center icon. Use the Multifunction knobs to position the needle over the marked center on the fabric.
5. Touch the “i” breadcrumb; select Pinpoint Placement; select the Positioning Dots as Desired icon.
6. Touch the area below the letter “i”. A teardrop shape will appear.
7. To ensure greatest accuracy, touch the Zoom icon and zoom in as far as possible (max 5 x) to confirm that the cross at the top of the teardrop is at the lowest part of the “i”. If it is not, touch the screen at the desired spot (do not drag and drop).• Use ONLY the Lower Multifunction (Length) knob to align
the needle along the drawn horizontal line.• Touch Set to confirm the placement.
8. Zoom out as much as possible (5 x) until you see the hoop; touch the screen below the “t”.
9. Zoom in as much as possible (5 x) to confirm that the cross is at the lowest part of the letter “t”. Select another spot if needed.
10. Use ONLY the Lower Multifunction (Length) knob to posi-tion the needle along the horizontal drawn line. Touch Set to confirm placement.
11. Zoom back out 5 times and confirm that there are two tear-drops with yellow outlines at their centers.
12. Close the Pinpoint Placement screen.
13. Select the Embroidery (needle) icon. Stitch out the word. Notice how the bottom of the lower case letters are aligned along the marked line.
14. When design has finished, touch the Embroidery Finish icon to return to the Edit screen.
My BERNINA
38
B E R N I N A E M B R O I D E R Y W O R K B O O K
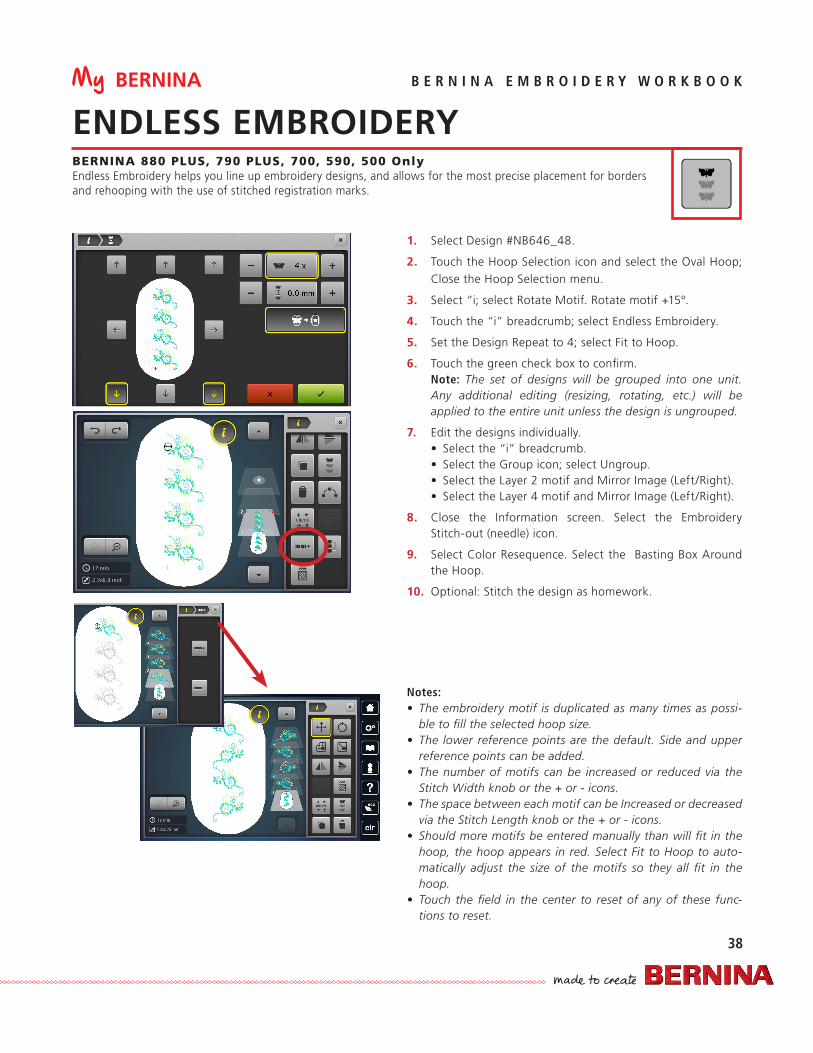
ENDLESS EMBROIDERY
Notes: • The embroidery motif is duplicated as many times as possi-
ble to fill the selected hoop size.• The lower reference points are the default. Side and upper
reference points can be added. • The number of motifs can be increased or reduced via the
Stitch Width knob or the + or - icons. • The space between each motif can be Increased or decreased
via the Stitch Length knob or the + or - icons.• Should more motifs be entered manually than will fit in the
hoop, the hoop appears in red. Select Fit to Hoop to auto-matically adjust the size of the motifs so they all fit in the hoop.
• Touch the field in the center to reset of any of these func-tions to reset.
BERNINA 880 PLUS, 790 PLUS, 700, 590, 500 OnlyEndless Embroidery helps you line up embroidery designs, and allows for the most precise placement for borders and rehooping with the use of stitched registration marks.
1. Select Design #NB646_48.
2. Touch the Hoop Selection icon and select the Oval Hoop; Close the Hoop Selection menu.
3. Select “i; select Rotate Motif. Rotate motif +15°.
4. Touch the “i” breadcrumb; select Endless Embroidery.
5. Set the Design Repeat to 4; select Fit to Hoop.
6. Touch the green check box to confirm.Note: The set of designs will be grouped into one unit. Any additional editing (resizing, rotating, etc.) will be applied to the entire unit unless the design is ungrouped.
7. Edit the designs individually. • Select the “i” breadcrumb.• Select the Group icon; select Ungroup.• Select the Layer 2 motif and Mirror Image (Left/Right).• Select the Layer 4 motif and Mirror Image (Left/Right).
8. Close the Information screen. Select the Embroidery Stitch-out (needle) icon.
9. Select Color Resequence. Select the Basting Box Around the Hoop.
10. Optional: Stitch the design as homework.
My BERNINA
39
B E R N I N A E M B R O I D E R Y W O R K B O O K
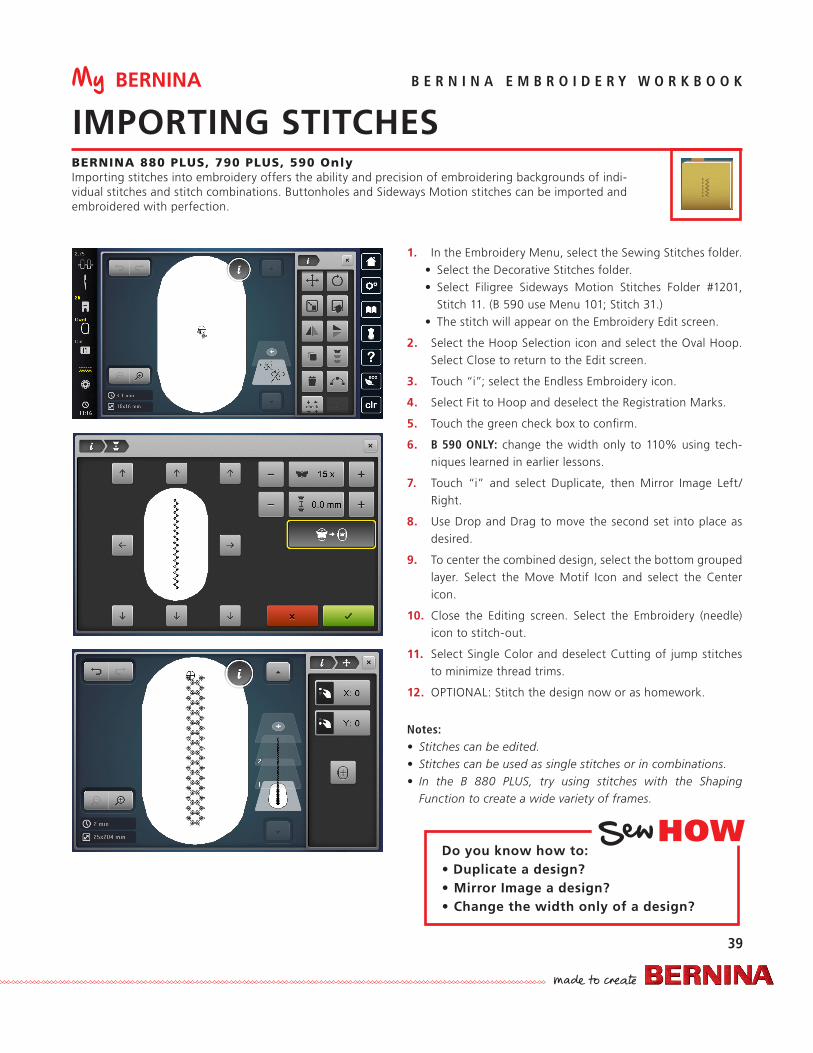
IMPORTING STITCHESBERNINA 880 PLUS, 790 PLUS, 590 OnlyImporting stitches into embroidery offers the ability and precision of embroidering backgrounds of indi-vidual stitches and stitch combinations. Buttonholes and Sideways Motion stitches can be imported and embroidered with perfection.
1. In the Embroidery Menu, select the Sewing Stitches folder.• Select the Decorative Stitches folder.• Select Filigree Sideways Motion Stitches Folder #1201,
Stitch 11. (B 590 use Menu 101; Stitch 31.)• The stitch will appear on the Embroidery Edit screen.
2. Select the Hoop Selection icon and select the Oval Hoop. Select Close to return to the Edit screen.
3. Touch “i”; select the Endless Embroidery icon.
4. Select Fit to Hoop and deselect the Registration Marks.
5. Touch the green check box to confirm.
6. B 590 ONLY: change the width only to 110% using tech-niques learned in earlier lessons.
7. Touch “i” and select Duplicate, then Mirror Image Left/Right.
8. Use Drop and Drag to move the second set into place as desired.
9. To center the combined design, select the bottom grouped layer. Select the Move Motif Icon and select the Center icon.
10. Close the Editing screen. Select the Embroidery (needle) icon to stitch-out.
11. Select Single Color and deselect Cutting of jump stitches to minimize thread trims.
12. OPTIONAL: Stitch the design now or as homework.
Notes: • Stitches can be edited. • Stitches can be used as single stitches or in combinations.• In the B 880 PLUS, try using stitches with the Shaping
Function to create a wide variety of frames.
HOWDo you know how to:• Duplicate a design?• Mirror Image a design?• Change the width only of a design?

My BERNINA
40
B E R N I N A E M B R O I D E R Y W O R K B O O K
SHAPE DESIGNER
1. From the Embroidery Motifs Folder, select Folder 5. This folder contains smaller designs created especially for shaping.
2. Select Design #5.
3. Select the Hoop Selection icon; and select the Oval Hoop and close the hoop menu.
4. Select “i” and the Shaping icon.
5. Select the star shape.
6. Change the star size to 65%. With the lock engaged, the shape size is changed proportionately; unlock to change height and width independently. Changing the size of the shape can provide spacing between motifs.
7. Change number of motifs to 5.
8. Touch +90 one time. Rotate each design 90 degrees; selecting +90 again will provide a different arrangement.
9. Touch the green check box to confirm that you wish to keep the design and return to the Edit screen.
10. Touch the Undo icon to return to the single design.
11. Select “i”; select the Shaping icon.
12. Select the circle; change the size of the circle to 65%.
13. Change the number of motifs to 8.
14. Play with the Rotation and the Mirror Image icons until you have a pleasing arrangement.
15. Select other shapes. Play with the sizes, mirror image and number of designs.
16. Confirm with the green check box if you are pleased with an arrangement. If not, close the screen.
Notes: • The size of shapes depends on the hoop selected.• The Unlock feature can change squares to rectangles, circles
to ovals and other skewed shapes.
BERNINA 880 ONLYArrange stitches, motifs and letters into nine or more shapes to form frames or decorative arrangements.
Touch +90 again.Touch +90 once.
My BERNINA
41
B E R N I N A E M B R O I D E R Y W O R K B O O K
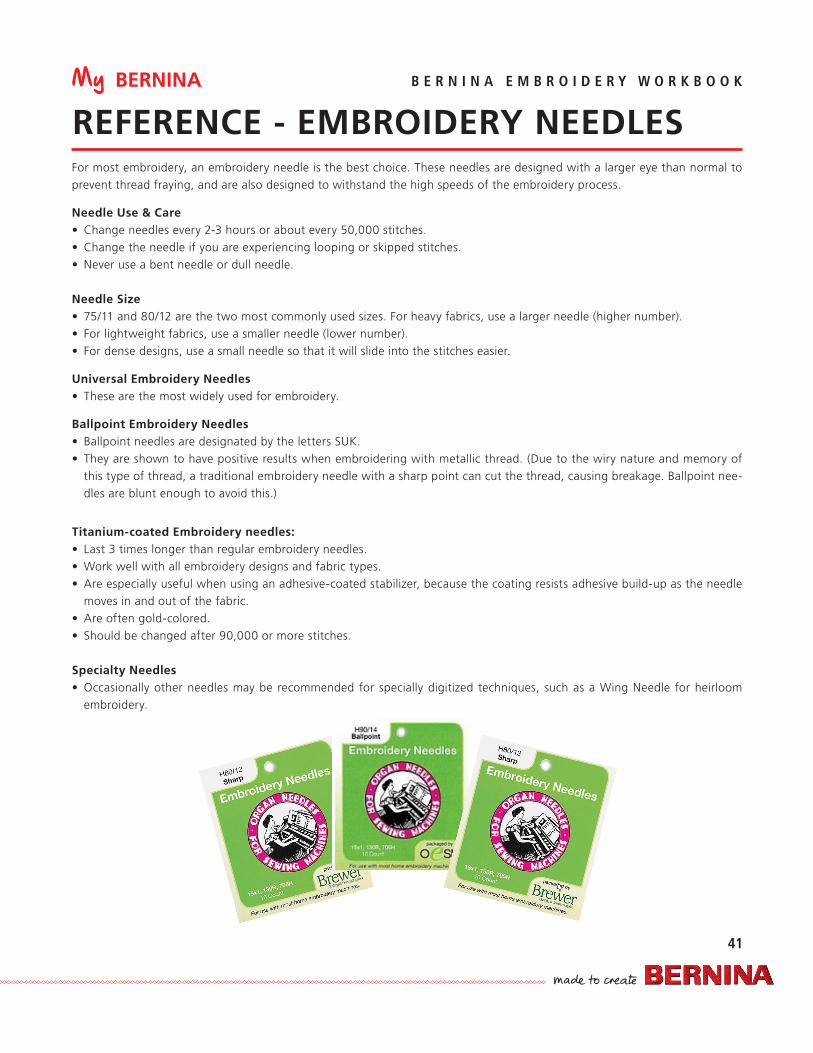
REFERENCE - EMBROIDERY NEEDLESFor most embroidery, an embroidery needle is the best choice. These needles are designed with a larger eye than normal to prevent thread fraying, and are also designed to withstand the high speeds of the embroidery process.
Needle Use & Care• Change needles every 2-3 hours or about every 50,000 stitches.• Change the needle if you are experiencing looping or skipped stitches.• Never use a bent needle or dull needle.
Needle Size• 75/11 and 80/12 are the two most commonly used sizes. For heavy fabrics, use a larger needle (higher number).• For lightweight fabrics, use a smaller needle (lower number).• For dense designs, use a small needle so that it will slide into the stitches easier.
Universal Embroidery Needles• These are the most widely used for embroidery.
Ballpoint Embroidery Needles• Ballpoint needles are designated by the letters SUK.• They are shown to have positive results when embroidering with metallic thread. (Due to the wiry nature and memory of
this type of thread, a traditional embroidery needle with a sharp point can cut the thread, causing breakage. Ballpoint nee-dles are blunt enough to avoid this.)
Titanium-coated Embroidery needles:• Last 3 times longer than regular embroidery needles.• Work well with all embroidery designs and fabric types.• Are especially useful when using an adhesive-coated stabilizer, because the coating resists adhesive build-up as the needle
moves in and out of the fabric.• Are often gold-colored.• Should be changed after 90,000 or more stitches.
Specialty Needles• Occasionally other needles may be recommended for specially digitized techniques, such as a Wing Needle for heirloom
embroidery.
My BERNINA
42
B E R N I N A E M B R O I D E R Y W O R K B O O K
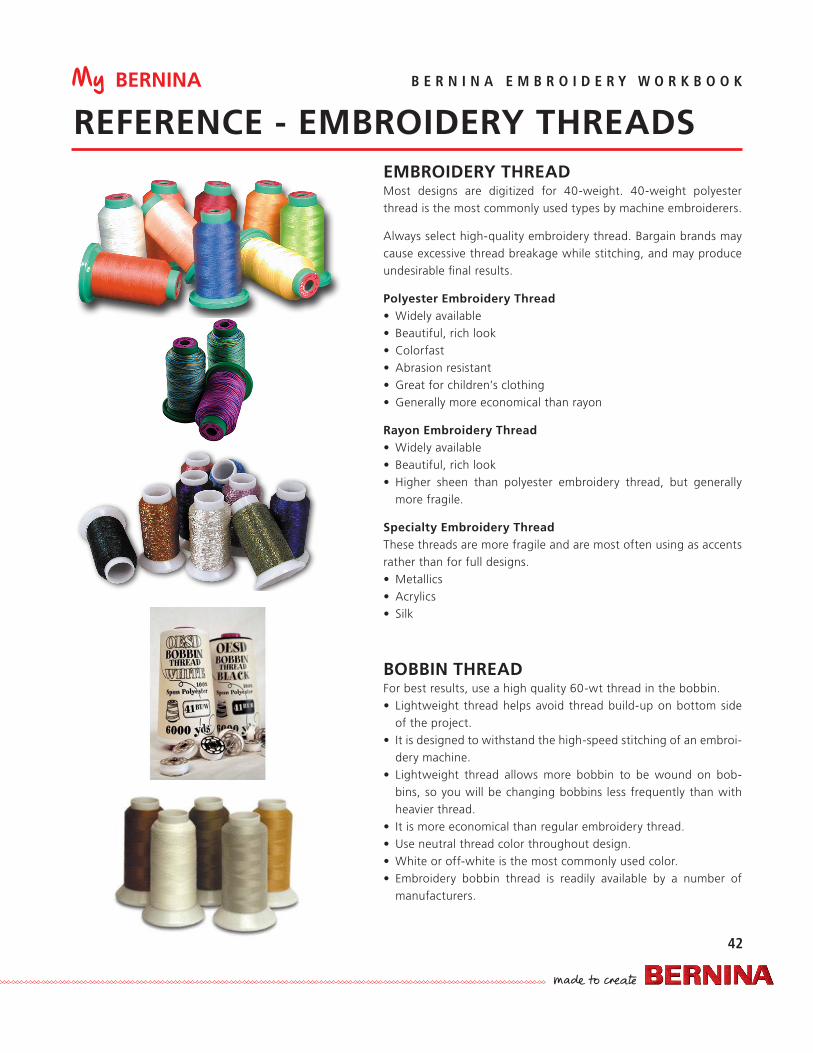
REFERENCE - EMBROIDERY THREADSEMBROIDERY THREADMost designs are digitized for 40-weight. 40-weight polyester thread is the most commonly used types by machine embroiderers.
Always select high-quality embroidery thread. Bargain brands may cause excessive thread breakage while stitching, and may produce undesirable final results.
Polyester Embroidery Thread• Widely available• Beautiful, rich look• Colorfast• Abrasion resistant• Great for children’s clothing• Generally more economical than rayon
Rayon Embroidery Thread• Widely available• Beautiful, rich look• Higher sheen than polyester embroidery thread, but generally
more fragile.
Specialty Embroidery ThreadThese threads are more fragile and are most often using as accents rather than for full designs.• Metallics• Acrylics• Silk
BOBBIN THREADFor best results, use a high quality 60-wt thread in the bobbin. • Lightweight thread helps avoid thread build-up on bottom side
of the project.• It is designed to withstand the high-speed stitching of an embroi-
dery machine.• Lightweight thread allows more bobbin to be wound on bob-
bins, so you will be changing bobbins less frequently than with heavier thread.
• It is more economical than regular embroidery thread.• Use neutral thread color throughout design.• White or off-white is the most commonly used color.• Embroidery bobbin thread is readily available by a number of
manufacturers.
My BERNINA
43
B E R N I N A E M B R O I D E R Y W O R K B O O K
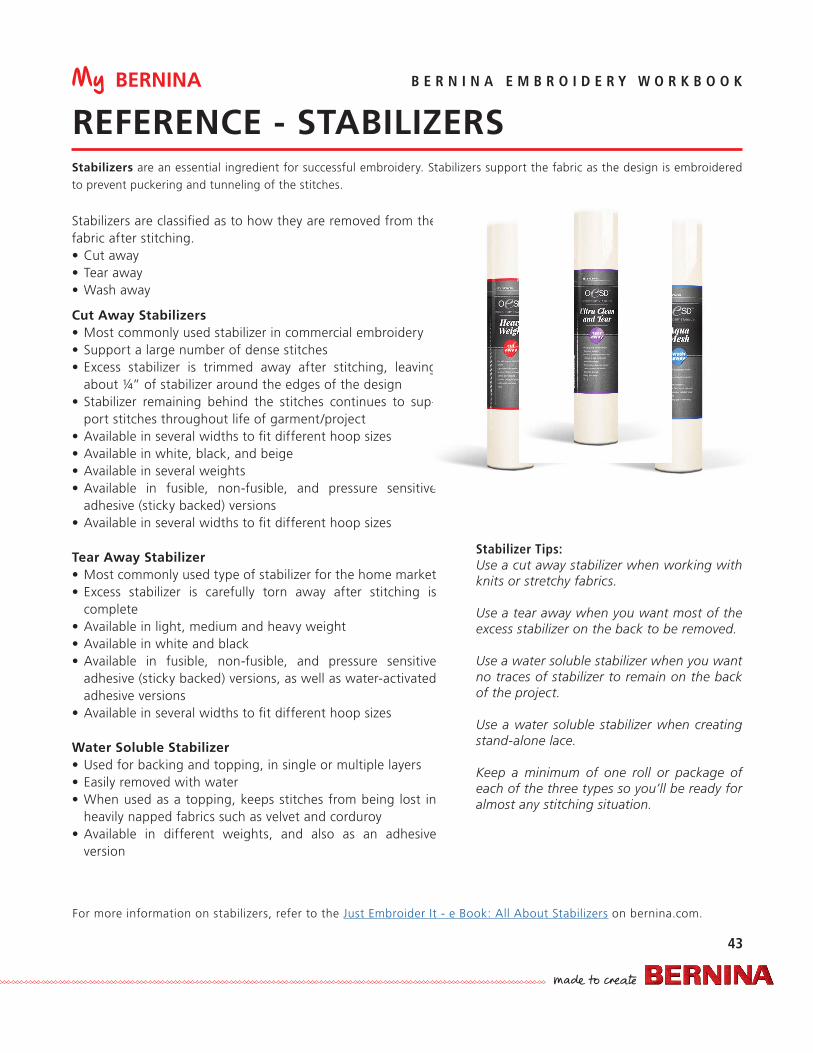
REFERENCE - STABILIZERS
Stabilizers are classified as to how they are removed from the fabric after stitching. • Cut away• Tear away• Wash away
Cut Away Stabilizers • Most commonly used stabilizer in commercial embroidery • Support a large number of dense stitches• Excess stabilizer is trimmed away after stitching, leaving
about ¼” of stabilizer around the edges of the design• Stabilizer remaining behind the stitches continues to sup-
port stitches throughout life of garment/project• Available in several widths to fit different hoop sizes• Available in white, black, and beige• Available in several weights• Available in fusible, non-fusible, and pressure sensitive
adhesive (sticky backed) versions• Available in several widths to fit different hoop sizes
Tear Away Stabilizer • Most commonly used type of stabilizer for the home market• Excess stabilizer is carefully torn away after stitching is
complete• Available in light, medium and heavy weight• Available in white and black• Available in fusible, non-fusible, and pressure sensitive
adhesive (sticky backed) versions, as well as water-activated adhesive versions
• Available in several widths to fit different hoop sizes
Water Soluble Stabilizer • Used for backing and topping, in single or multiple layers• Easily removed with water• When used as a topping, keeps stitches from being lost in
heavily napped fabrics such as velvet and corduroy• Available in different weights, and also as an adhesive
version
Stabilizers are an essential ingredient for successful embroidery. Stabilizers support the fabric as the design is embroidered to prevent puckering and tunneling of the stitches.
Stabilizer Tips: Use a cut away stabilizer when working with knits or stretchy fabrics.
Use a tear away when you want most of the excess stabilizer on the back to be removed.
Use a water soluble stabilizer when you want no traces of stabilizer to remain on the back of the project.
Use a water soluble stabilizer when creating stand-alone lace.
Keep a minimum of one roll or package of each of the three types so you’ll be ready for almost any stitching situation.
For more information on stabilizers, refer to the Just Embroider It - e Book: All About Stabilizers on bernina.com.
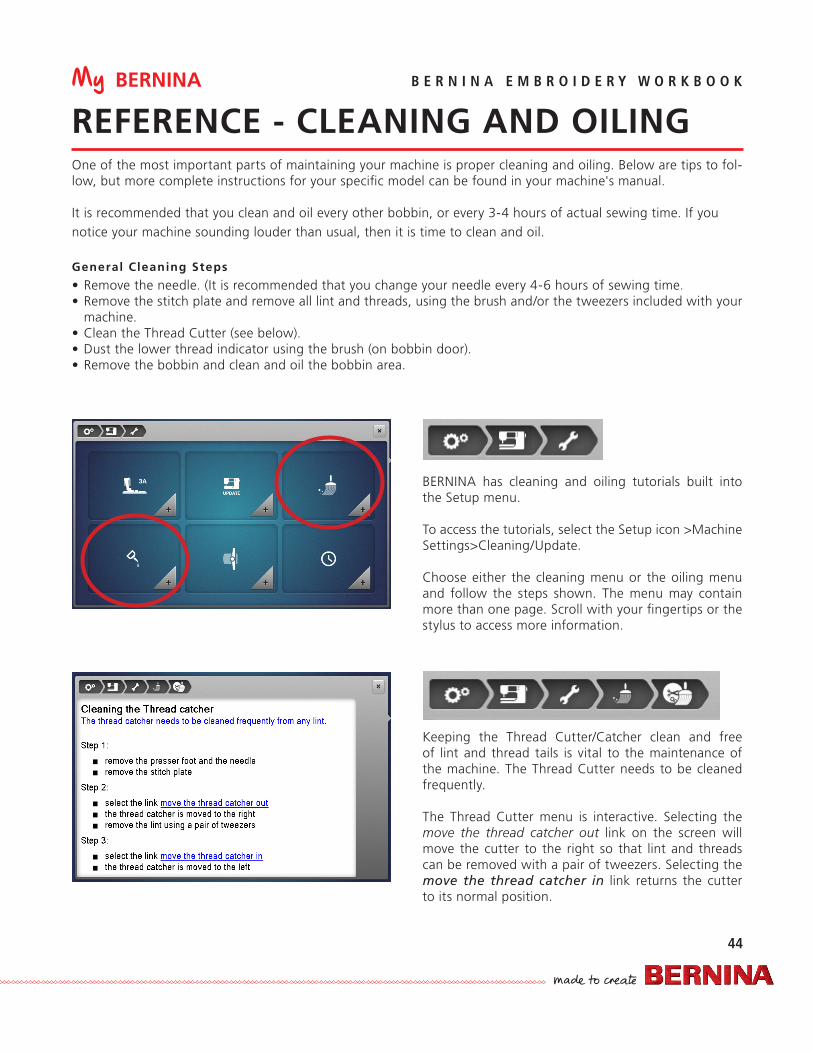
My BERNINA
44
B E R N I N A E M B R O I D E R Y W O R K B O O K
One of the most important parts of maintaining your machine is proper cleaning and oiling. Below are tips to fol-low, but more complete instructions for your specific model can be found in your machine's manual.
It is recommended that you clean and oil every other bobbin, or every 3-4 hours of actual sewing time. If you notice your machine sounding louder than usual, then it is time to clean and oil.
General Cleaning Steps
• Remove the needle. (It is recommended that you change your needle every 4-6 hours of sewing time.• Remove the stitch plate and remove all lint and threads, using the brush and/or the tweezers included with your
machine.• Clean the Thread Cutter (see below).• Dust the lower thread indicator using the brush (on bobbin door).• Remove the bobbin and clean and oil the bobbin area.
BERNINA has cleaning and oiling tutorials built into the Setup menu.
To access the tutorials, select the Setup icon >Machine Settings>Cleaning/Update.
Choose either the cleaning menu or the oiling menu and follow the steps shown. The menu may contain more than one page. Scroll with your fingertips or the stylus to access more information.
Keeping the Thread Cutter/Catcher clean and free of lint and thread tails is vital to the maintenance of the machine. The Thread Cutter needs to be cleaned frequently.
The Thread Cutter menu is interactive. Selecting the move the thread catcher out link on the screen will move the cutter to the right so that lint and threads can be removed with a pair of tweezers. Selecting the move the thread catcher in link returns the cutter to its normal position.
REFERENCE - CLEANING AND OILING
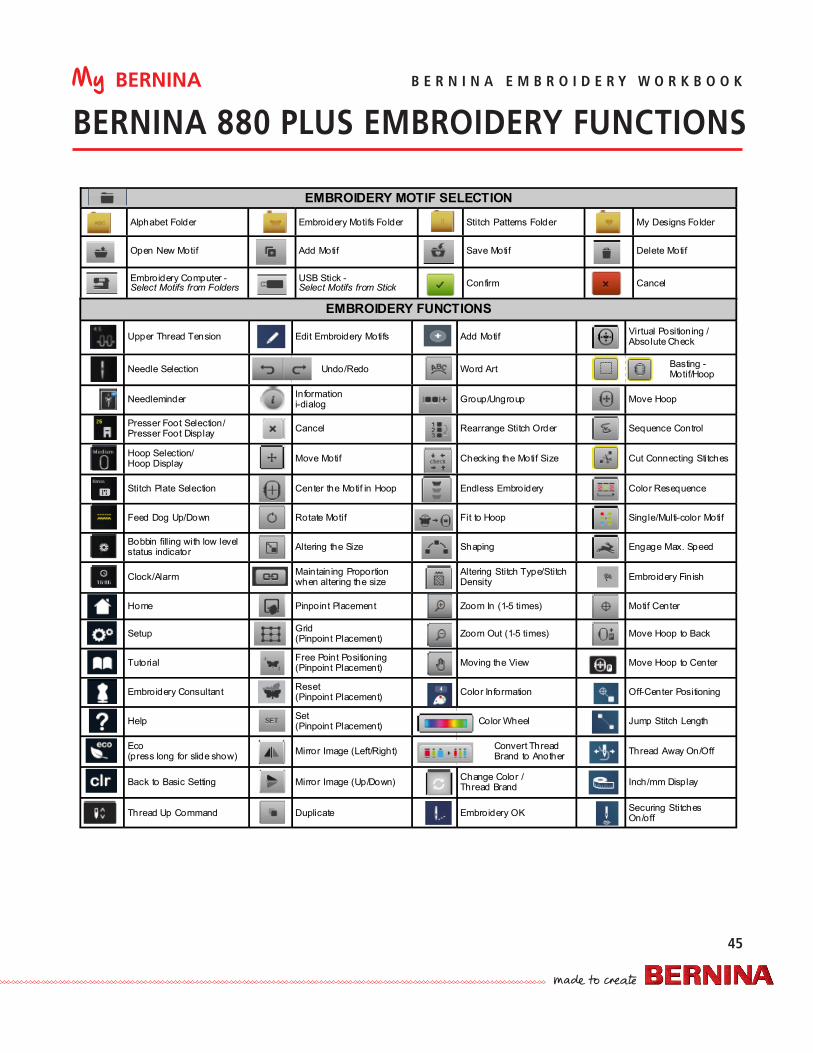
My BERNINA
45
B E R N I N A E M B R O I D E R Y W O R K B O O K
BERNINA 880 PLUS EMBROIDERY FUNCTIONS
EMBROIDERY MOTIF SELECTION
Alphabet Folder Embroidery Motifs Folder Stitch Patterns Folder My Designs Folder
Open New Motif Add Motif Save Motif Delete Motif
Embroidery Computer - Select Motifs from Folders USB Stick -
Select Motifs from Stick Confirm Cancel
EMBROIDERY FUNCTIONS
Upper Thread Tension Edit Embroidery Motifs Add Motif Virtual Positioning / Absolute Check
Needle Selection Undo/Redo Word Art Basting - Motif/Hoop
Needleminder Information i-dialog Group/Ungroup Move Hoop
Presser Foot Selection/ Presser Foot Display Cancel Rearrange Stitch Order Sequence Control
Hoop Selection/ Hoop Display Move Motif Checking the Motif Size Cut Connecting Stitches
Stitch Plate Selection Center the Motif in Hoop Endless Embroidery Color Resequence
Feed Dog Up/Down Rotate Motif Fit to Hoop Single/Multi-color Motif
Bobbin filling with low level status indicator Altering the Size Shaping Engage Max. Speed
Clock/Alarm Maintaining Proportion when altering the size Altering Stitch Type/Stitch
Density Embroidery Finish
Home Pinpoint Placement Zoom In (1-5 times) Motif Center
Setup Grid (Pinpoint Placement) Zoom Out (1-5 times) Move Hoop to Back
Tutorial Free Point Positioning (Pinpoint Placement) Moving the View Move Hoop to Center
Embroidery Consultant Reset (Pinpoint Placement) Color Information Off-Center Positioning
Help Set (Pinpoint Placement) Color Wheel Jump Stitch Length
Eco (press long for slide show) Mirror Image (Left/Right) Convert Thread
Brand to Another Thread Away On/Off
Back to Basic Setting Mirror Image (Up/Down) Change Color / Thread Brand Inch/mm Display
Thread Up Command Duplicate Embroidery OK Securing Stitches On/off
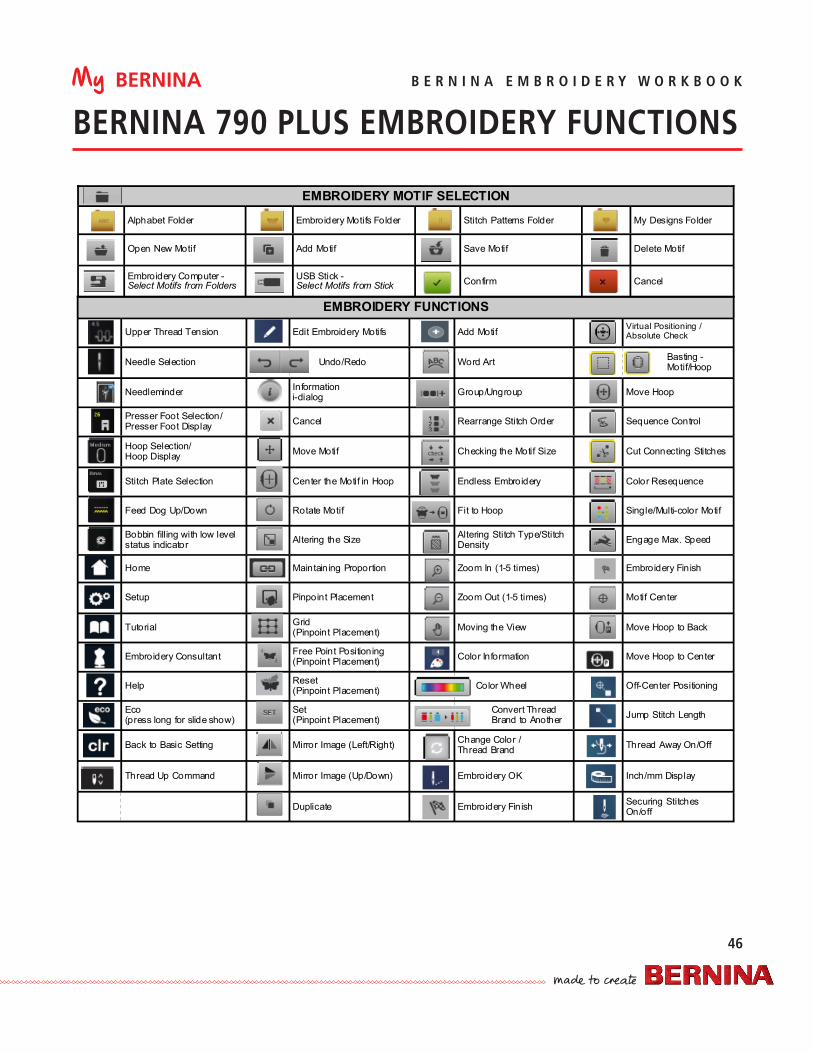
My BERNINA
46
B E R N I N A E M B R O I D E R Y W O R K B O O K
BERNINA 790 PLUS EMBROIDERY FUNCTIONS
EMBROIDERY FUNCTIONS
Upper Thread Tension Edit Embroidery Motifs Add Motif Virtual Positioning / Absolute Check
Needle Selection Undo/Redo Word Art Basting - Motif/Hoop
Needleminder Information i-dialog Group/Ungroup Move Hoop
Presser Foot Selection/ Presser Foot Display Cancel Rearrange Stitch Order Sequence Control
Hoop Selection/ Hoop Display Move Motif Checking the Motif Size Cut Connecting Stitches
Stitch Plate Selection Center the Motif in Hoop Endless Embroidery Color Resequence
Feed Dog Up/Down Rotate Motif Fit to Hoop Single/Multi-color Motif
Bobbin filling with low level status indicator Altering the Size Altering Stitch Type/Stitch
Density Engage Max. Speed
Home Maintaining Proportion Zoom In (1-5 times) Embroidery Finish
Setup Pinpoint Placement Zoom Out (1-5 times) Motif Center
Tutorial Grid (Pinpoint Placement) Moving the View Move Hoop to Back
Embroidery Consultant Free Point Positioning (Pinpoint Placement) Color Information Move Hoop to Center
Help Reset (Pinpoint Placement) Color Wheel Off-Center Positioning
Eco (press long for slide show)
Set (Pinpoint Placement)
Convert Thread Brand to Another Jump Stitch Length
Back to Basic Setting Mirror Image (Left/Right) Change Color / Thread Brand Thread Away On/Off
Thread Up Command Mirror Image (Up/Down) Embroidery OK Inch/mm Display
Duplicate Embroidery Finish Securing Stitches On/off
EMBROIDERY MOTIF SELECTION
Alphabet Folder Embroidery Motifs Folder Stitch Patterns Folder My Designs Folder
Open New Motif Add Motif Save Motif Delete Motif
Embroidery Computer - Select Motifs from Folders USB Stick -
Select Motifs from Stick Confirm Cancel
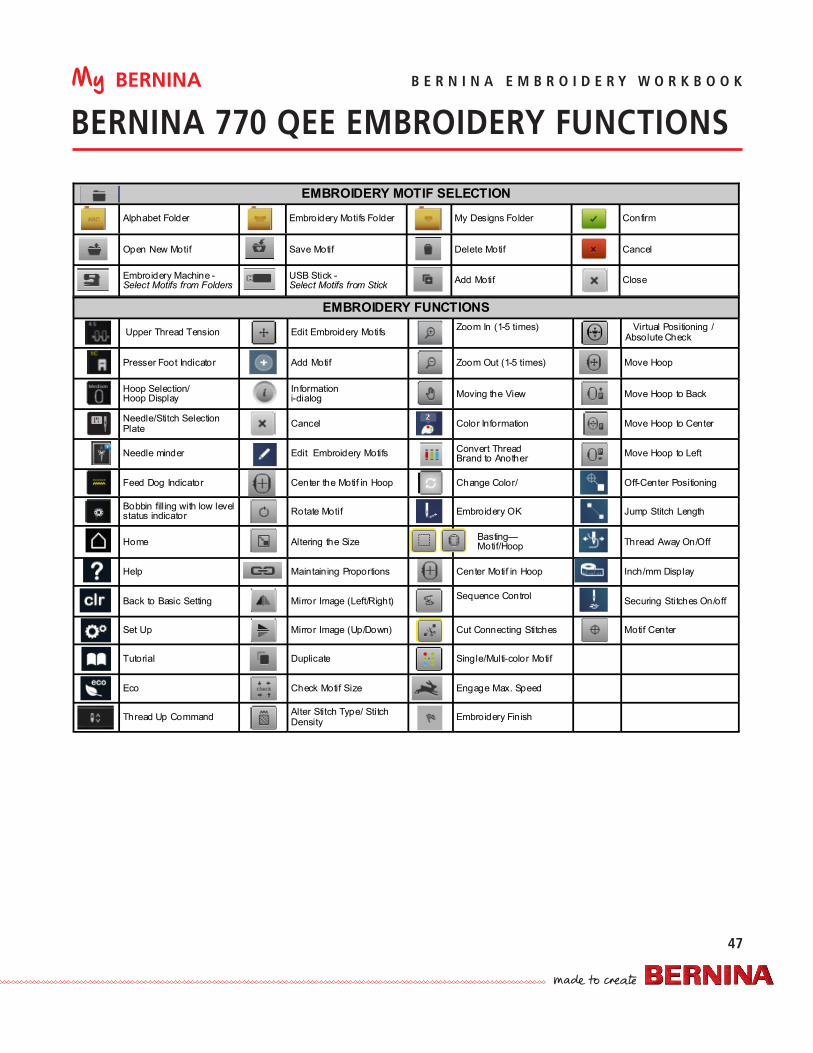
My BERNINA
47
B E R N I N A E M B R O I D E R Y W O R K B O O K
BERNINA 770 QEE EMBROIDERY FUNCTIONS
EMBROIDERY MOTIF SELECTION
Alphabet Folder Embroidery Motifs Folder My Designs Folder Confirm
Open New Motif Save Motif Delete Motif Cancel
Embroidery Machine - Select Motifs from Folders USB Stick -
Select Motifs from Stick Add Motif Close
EMBROIDERY FUNCTIONS
Upper Thread Tension Edit Embroidery Motifs Zoom In (1-5 times)
Virtual Positioning / Absolute Check
Presser Foot Indicator Add Motif Zoom Out (1-5 times) Move Hoop
Hoop Selection/ Hoop Display Information
i-dialog Moving the View Move Hoop to Back
Needle/Stitch Selection Plate Cancel Color Information Move Hoop to Center
Needle minder Edit Embroidery Motifs Convert Thread Brand to Another Move Hoop to Left
Feed Dog Indicator Center the Motif in Hoop Change Color/ Off-Center Positioning
Bobbin filling with low level status indicator Rotate Motif Embroidery OK Jump Stitch Length
Home Altering the Size Basting— Motif/Hoop Thread Away On/Off
Help Maintaining Proportions Center Motif in Hoop Inch/mm Display
Back to Basic Setting Mirror Image (Left/Right) Sequence Control Securing Stitches On/off
Set Up Mirror Image (Up/Down) Cut Connecting Stitches Motif Center
Tutorial Duplicate Single/Multi-color Motif
Eco Check Motif Size Engage Max. Speed
Thread Up Command Alter Stitch Type/ Stitch Density Embroidery Finish
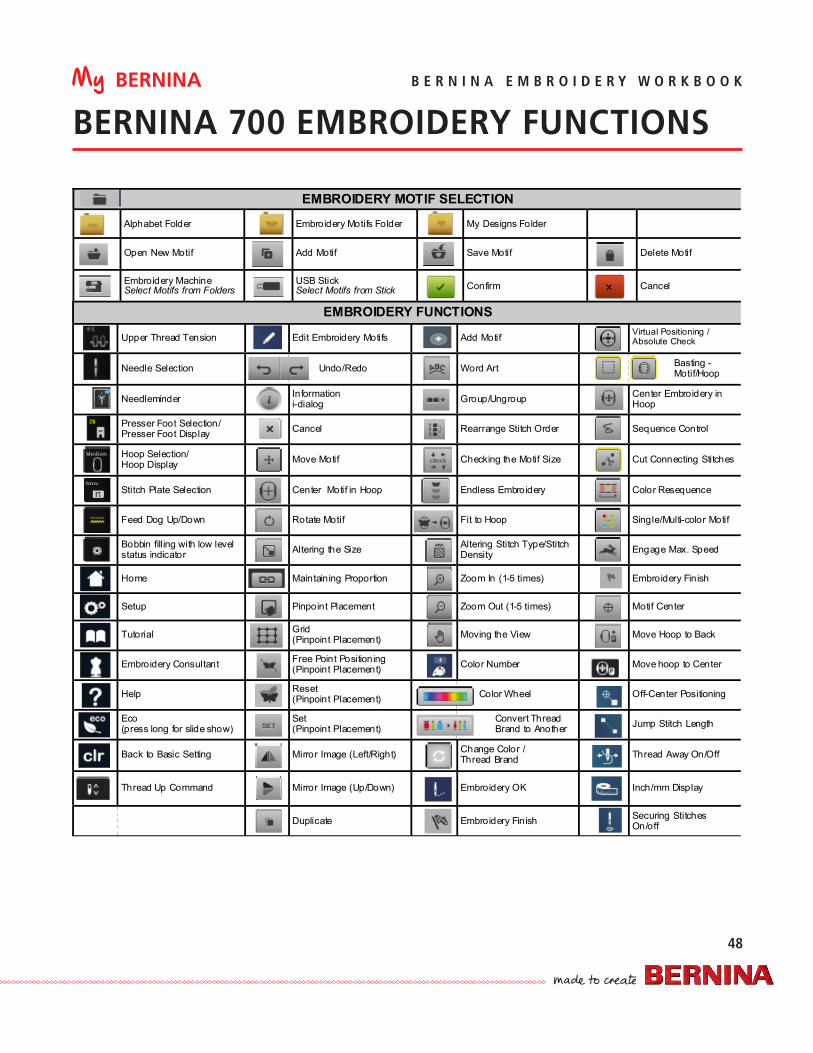
My BERNINA
48
B E R N I N A E M B R O I D E R Y W O R K B O O K
BERNINA 700 EMBROIDERY FUNCTIONS
EMBROIDERY MOTIF SELECTION
Alphabet Folder Embroidery Motifs Folder My Designs Folder
Open New Motif Add Motif Save Motif Delete Motif
Embroidery Machine Select Motifs from Folders USB Stick
Select Motifs from Stick Confirm Cancel
EMBROIDERY FUNCTIONS
Upper Thread Tension Edit Embroidery Motifs Add Motif Virtual Positioning / Absolute Check
Needle Selection Undo/Redo Word Art Basting - Motif/Hoop
Needleminder Information i-dialog Group/Ungroup Center Embroidery in
Hoop
Presser Foot Selection/ Presser Foot Display Cancel Rearrange Stitch Order Sequence Control
Hoop Selection/ Hoop Display Move Motif Checking the Motif Size Cut Connecting Stitches
Stitch Plate Selection Center Motif in Hoop Endless Embroidery Color Resequence
Feed Dog Up/Down Rotate Motif Fit to Hoop Single/Multi-color Motif
Bobbin filling with low level status indicator Altering the Size Altering Stitch Type/Stitch
Density Engage Max. Speed
Home Maintaining Proportion Zoom In (1-5 times) Embroidery Finish
Setup Pinpoint Placement Zoom Out (1-5 times) Motif Center
Tutorial Grid (Pinpoint Placement) Moving the View Move Hoop to Back
Embroidery Consultant Free Point Positioning (Pinpoint Placement) Color Number Move hoop to Center
Help Reset (Pinpoint Placement) Color Wheel Off-Center Positioning
Eco (press long for slide show)
Set (Pinpoint Placement)
Convert Thread Brand to Another Jump Stitch Length
Back to Basic Setting Mirror Image (Left/Right) Change Color / Thread Brand Thread Away On/Off
Thread Up Command Mirror Image (Up/Down) Embroidery OK Inch/mm Display
Duplicate Embroidery Finish Securing Stitches On/off
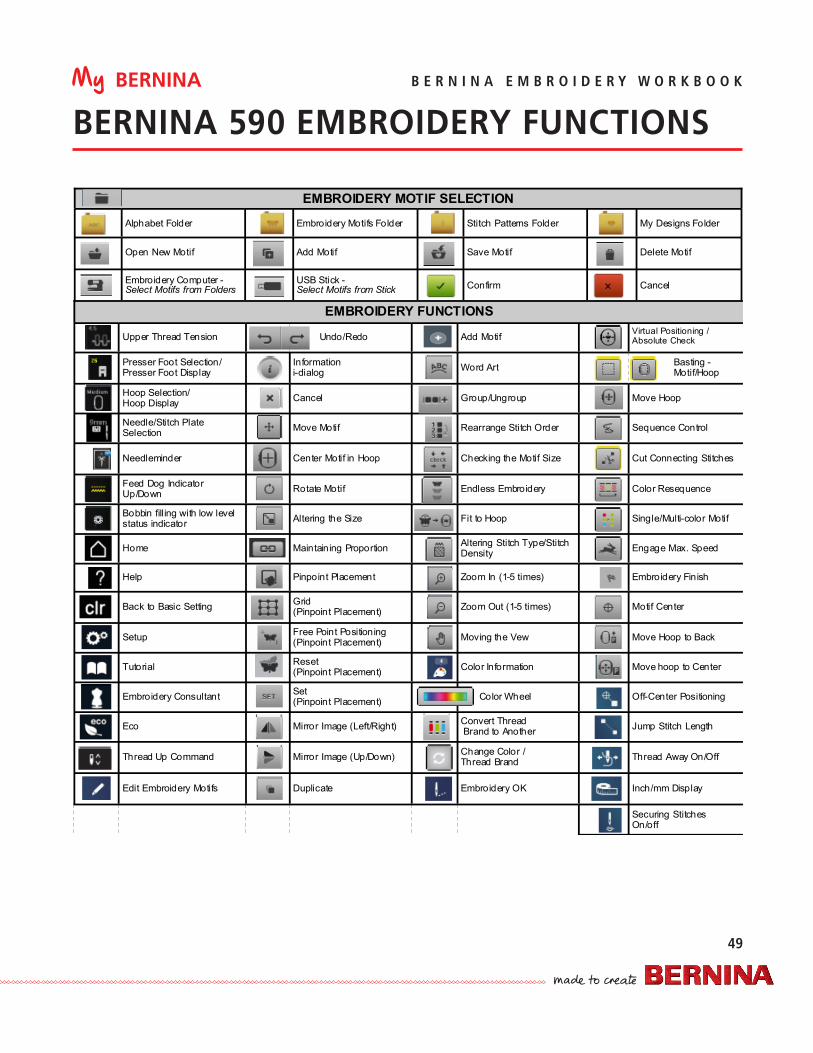
My BERNINA
49
B E R N I N A E M B R O I D E R Y W O R K B O O K
BERNINA 590 EMBROIDERY FUNCTIONS
EMBROIDERY MOTIF SELECTION
Alphabet Folder Embroidery Motifs Folder Stitch Patterns Folder My Designs Folder
Open New Motif Add Motif Save Motif Delete Motif
Embroidery Computer - Select Motifs from Folders USB Stick -
Select Motifs from Stick Confirm Cancel
EMBROIDERY FUNCTIONS
Upper Thread Tension Undo/Redo Add Motif Virtual Positioning / Absolute Check
Presser Foot Selection/ Presser Foot Display Information
i-dialog Word Art Basting - Motif/Hoop
Hoop Selection/ Hoop Display Cancel Group/Ungroup Move Hoop
Needle/Stitch Plate Selection Move Motif Rearrange Stitch Order Sequence Control
Needleminder Center Motif in Hoop Checking the Motif Size Cut Connecting Stitches
Feed Dog Indicator Up/Down Rotate Motif Endless Embroidery Color Resequence
Bobbin filling with low level status indicator Altering the Size Fit to Hoop Single/Multi-color Motif
Home Maintaining Proportion Altering Stitch Type/Stitch Density Engage Max. Speed
Help Pinpoint Placement Zoom In (1-5 times) Embroidery Finish
Back to Basic Setting Grid (Pinpoint Placement) Zoom Out (1-5 times) Motif Center
Setup Free Point Positioning (Pinpoint Placement) Moving the Vew Move Hoop to Back
Tutorial Reset (Pinpoint Placement) Color Information Move hoop to Center
Embroidery Consultant Set (Pinpoint Placement) Color Wheel Off-Center Positioning
Eco Mirror Image (Left/Right) Convert Thread Brand to Another Jump Stitch Length
Thread Up Command Mirror Image (Up/Down) Change Color / Thread Brand Thread Away On/Off
Edit Embroidery Motifs Duplicate Embroidery OK Inch/mm Display
Securing Stitches On/off
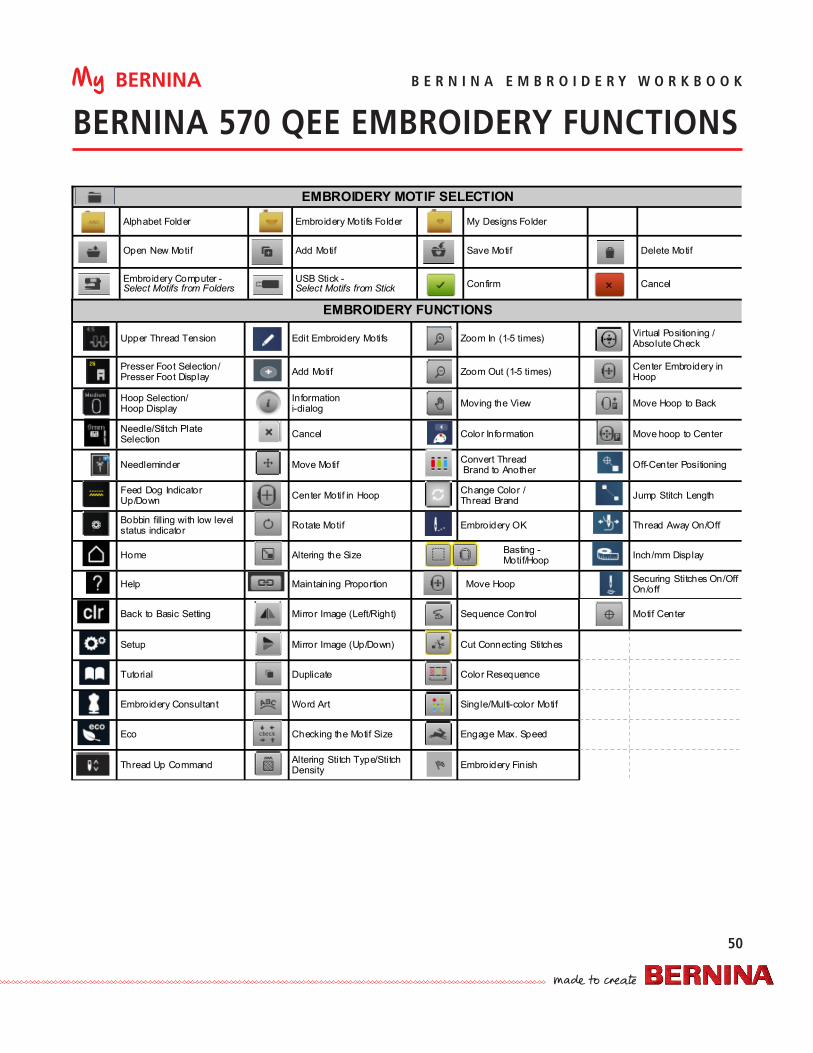
My BERNINA
50
B E R N I N A E M B R O I D E R Y W O R K B O O K
BERNINA 570 QEE EMBROIDERY FUNCTIONS
EMBROIDERY MOTIF SELECTION
Alphabet Folder Embroidery Motifs Folder My Designs Folder
Open New Motif Add Motif Save Motif Delete Motif
Embroidery Computer - Select Motifs from Folders USB Stick -
Select Motifs from Stick Confirm Cancel
EMBROIDERY FUNCTIONS
Upper Thread Tension Edit Embroidery Motifs Zoom In (1-5 times) Virtual Positioning / Absolute Check
Presser Foot Selection/ Presser Foot Display Add Motif Zoom Out (1-5 times) Center Embroidery in
Hoop
Hoop Selection/ Hoop Display Information
i-dialog Moving the View Move Hoop to Back
Needle/Stitch Plate Selection Cancel Color Information Move hoop to Center
Needleminder Move Motif Convert Thread Brand to Another Off-Center Positioning
Feed Dog Indicator Up/Down Center Motif in Hoop Change Color /
Thread Brand Jump Stitch Length
Bobbin filling with low level status indicator Rotate Motif Embroidery OK Thread Away On/Off
Home Altering the Size Basting - Motif/Hoop Inch/mm Display
Help Maintaining Proportion Move Hoop Securing Stitches On/Off On/off
Back to Basic Setting Mirror Image (Left/Right) Sequence Control Motif Center
Setup Mirror Image (Up/Down) Cut Connecting Stitches
Tutorial Duplicate Color Resequence
Embroidery Consultant Word Art Single/Multi-color Motif
Eco Checking the Motif Size Engage Max. Speed
Thread Up Command Altering Stitch Type/Stitch Density Embroidery Finish
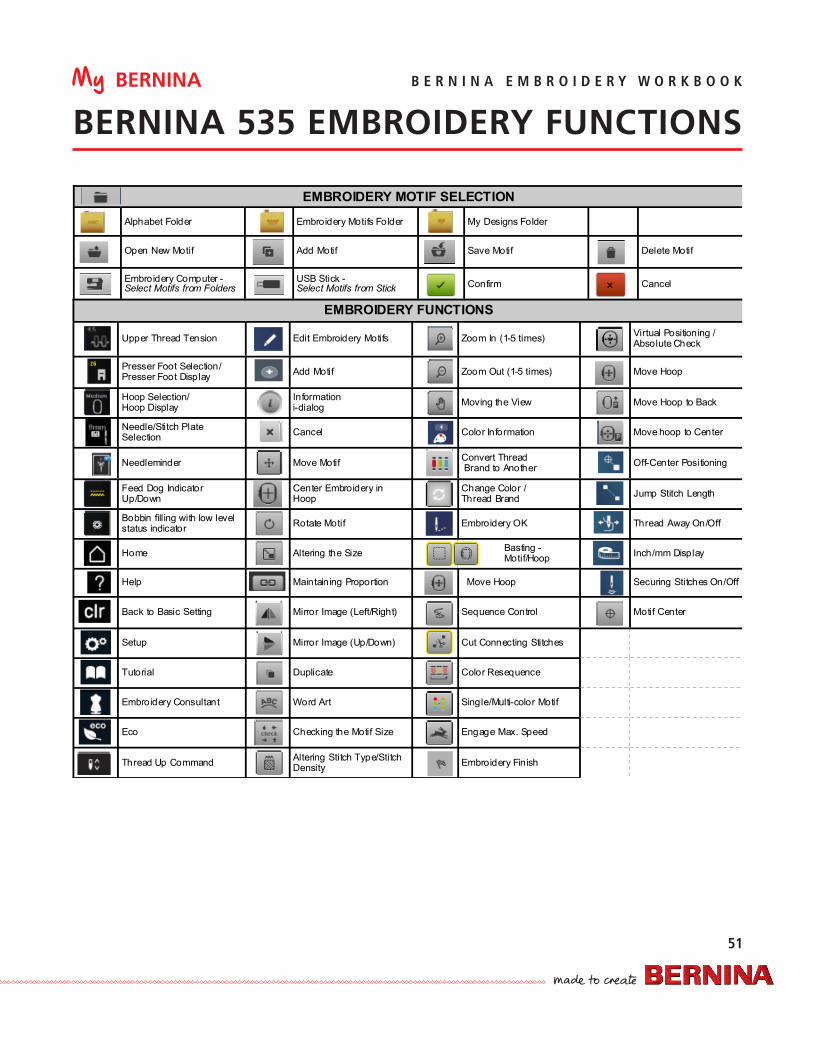
My BERNINA
51
B E R N I N A E M B R O I D E R Y W O R K B O O K
BERNINA 535 EMBROIDERY FUNCTIONS
EMBROIDERY MOTIF SELECTION
Alphabet Folder Embroidery Motifs Folder My Designs Folder
Open New Motif Add Motif Save Motif Delete Motif
Embroidery Computer - Select Motifs from Folders USB Stick -
Select Motifs from Stick Confirm Cancel
EMBROIDERY FUNCTIONS
Upper Thread Tension Edit Embroidery Motifs Zoom In (1-5 times) Virtual Positioning / Absolute Check
Presser Foot Selection/ Presser Foot Display Add Motif Zoom Out (1-5 times) Move Hoop
Hoop Selection/ Hoop Display Information
i-dialog Moving the View Move Hoop to Back
Needle/Stitch Plate Selection Cancel Color Information Move hoop to Center
Needleminder Move Motif Convert Thread Brand to Another Off-Center Positioning
Feed Dog Indicator Up/Down Center Embroidery in
Hoop Change Color / Thread Brand Jump Stitch Length
Bobbin filling with low level status indicator Rotate Motif Embroidery OK Thread Away On/Off
Home Altering the Size Basting - Motif/Hoop Inch/mm Display
Help Maintaining Proportion Move Hoop Securing Stitches On/Off
Back to Basic Setting Mirror Image (Left/Right) Sequence Control Motif Center
Setup Mirror Image (Up/Down) Cut Connecting Stitches
Tutorial Duplicate Color Resequence
Embroidery Consultant Word Art Single/Multi-color Motif
Eco Checking the Motif Size Engage Max. Speed
Thread Up Command Altering Stitch Type/Stitch Density Embroidery Finish
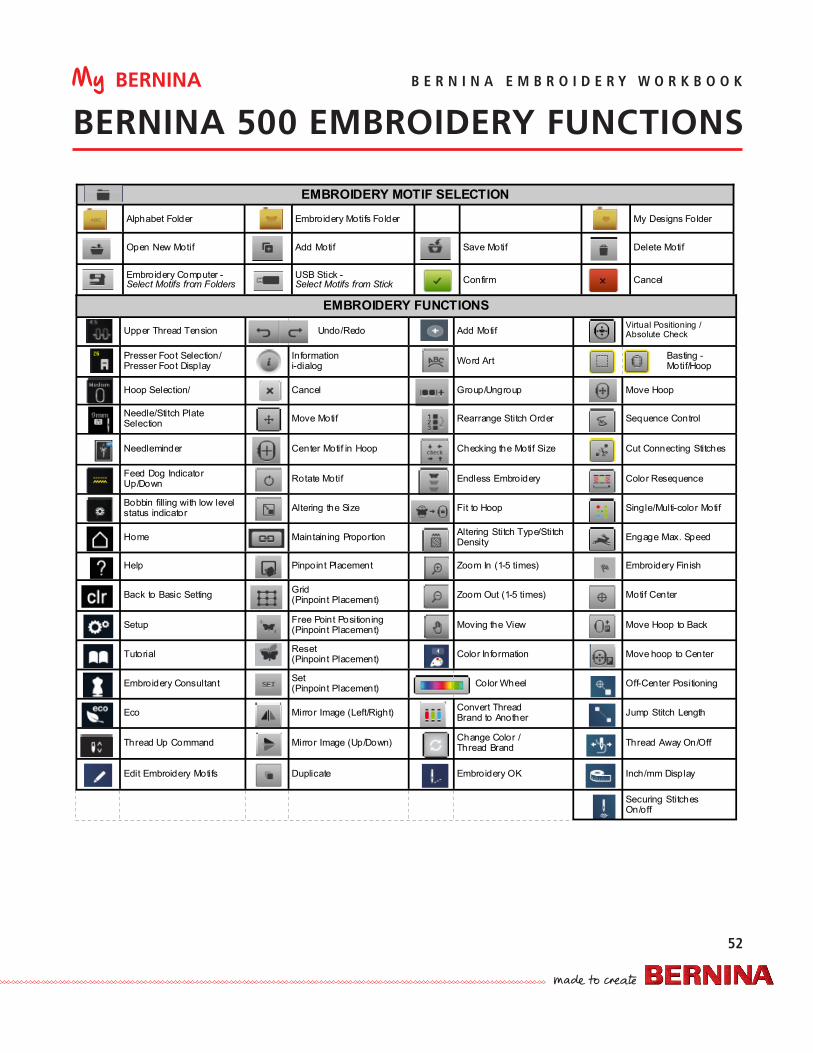
My BERNINA
52
B E R N I N A E M B R O I D E R Y W O R K B O O K
BERNINA 500 EMBROIDERY FUNCTIONS
EMBROIDERY MOTIF SELECTION
Alphabet Folder Embroidery Motifs Folder My Designs Folder
Open New Motif Add Motif Save Motif Delete Motif
Embroidery Computer - Select Motifs from Folders USB Stick -
Select Motifs from Stick Confirm Cancel
EMBROIDERY FUNCTIONS
Upper Thread Tension Undo/Redo Add Motif Virtual Positioning / Absolute Check
Presser Foot Selection/ Presser Foot Display Information
i-dialog Word Art Basting - Motif/Hoop
Hoop Selection/ Cancel Group/Ungroup Move Hoop
Needle/Stitch Plate Selection Move Motif Rearrange Stitch Order Sequence Control
Needleminder Center Motif in Hoop Checking the Motif Size Cut Connecting Stitches
Feed Dog Indicator Up/Down Rotate Motif Endless Embroidery Color Resequence
Bobbin filling with low level status indicator Altering the Size Fit to Hoop Single/Multi-color Motif
Home Maintaining Proportion Altering Stitch Type/Stitch Density Engage Max. Speed
Help Pinpoint Placement Zoom In (1-5 times) Embroidery Finish
Back to Basic Setting Grid (Pinpoint Placement) Zoom Out (1-5 times) Motif Center
Setup Free Point Positioning (Pinpoint Placement) Moving the View Move Hoop to Back
Tutorial Reset (Pinpoint Placement) Color Information Move hoop to Center
Embroidery Consultant Set (Pinpoint Placement) Color Wheel Off-Center Positioning
Eco Mirror Image (Left/Right) Convert Thread Brand to Another Jump Stitch Length
Thread Up Command Mirror Image (Up/Down) Change Color / Thread Brand Thread Away On/Off
Edit Embroidery Motifs Duplicate Embroidery OK Inch/mm Display
Securing Stitches On/off