emc powersnap implementation - dell technologies
TRANSCRIPT

EMC Proven Professional Knowledge Sharing 2010
EMC PowerSnap Implementation –Challenges and Examples
Hrvoje Crvelin
Hrvoje [email protected]

2010 EMC Proven Professional Knowledge Sharing 2
Table of Contents
Introduction ............................................................................................................................................. 3
Components ............................................................................................................................................ 3
Introduction to PowerSnap ..................................................................................................................... 4
Table 1: Terminology guide ................................................................................................................. 5
High Availability Setup or Left and Right ................................................................................................. 7
Table 2: Computer components distribution) ..................................................................................... 7
Table 3: Network allocation ................................................................................................................ 9
Table 4: Where is my data now? ....................................................................................................... 10
Table 5: Drives are…. ......................................................................................................................... 12
How Do I Make File System Backups with PowerSnap? ........................................................................ 12
Table 6: Application information variables ....................................................................................... 26
Oh No! Now I have to do a File System Restore!!! ............................................................................... 35
What about Database Backup? ............................................................................................................. 62
NMSAP configuration file .................................................................................................................. 63
SAP backup profile file ....................................................................................................................... 66
Table 8: initSID.sap options ............................................................................................................... 66
Util file (init<SID>.utl) ........................................................................................................................ 68
Table 11: util file options ................................................................................................................... 68
Opaque file ........................................................................................................................................ 73
Device pool file .................................................................................................................................. 74
Placement and Permissions of backint and BRTools Binaries ........................................................... 74
SAP DB Rollback with PowerSnap ....................................................................................................... 102
Final Words .......................................................................................................................................... 111
Disclaimer: The views, processes or methodologies published in this compilation are those of the authors. They do not necessarily reflect EMC Corporation’s views, processes, or methodologies

2010 EMC Proven Professional Knowledge Sharing 3
Introduction There are multiple approaches to manage modern technologies and datacenters based on
what we have and what may be best to suit our needs for scalability, ease of use and
availability. Nevertheless, we always have mission critical data residing within some
databases. Among those, there is always a single crown jewel that tends to be big and
begging for special attention. Such a database requires protection – backup. We fear the
disaster recovery nightmare scenario the most. This is why we must be ready for such a
scenario no matter how unlikely it may be.
I started my career implementing small systems. Soon they grew to more complex
environments. At the peak of my experience, I have been working at global datacenters
implementing backup solutions based on the EMC Networker family. While there is no single
or unique approach to this subject, from a high level point of view we always have our large
database(s) that require fast backup and no load during this operation. Another requirement
is fast restore; today’s business is based on 24/7 premises and every second matters.
Modern network designs are full of VLANs building isolated islands in a network forest
imposing rather challenging tasks to architects and those in charge of implementation. Is
there a simple approach to this subject? It may depend on your components, but overall the
answer is – yes!
In this article, I will show you how to implement PowerSnap to achieve the above mentioned
goals. Our primary task will is to protect SAP with Oracle database of some 15TB storage
and the surrounding environment. I will show you how to backup and restore both file
systems and the SAP database using different approaches.
Components This article will not go into much detail about the setup used for storage or OS components;
instead it will focus on backup application and modules configuration. To give you an idea of
the environment, here is a list of components:
• 2x HPUX 11.31 in cluster used as backup server (16GB RAM – 4 CPU based VPAR)
• 2xHPUX 11.31 used as storage node (24GB RAM – 11 CPU based VPAR)
• 2xHPUX 11.31 in cluster used as application host (110GB RAM – 20 CPU based
VPAR)
These VPARs are placed within 2 HP RX8660 machines. As you may have guessed, we
have two sites and each site hosts one machine as listed above.

2010 EMC Proven Professional Knowledge Sharing 4
Fibre channel connectivity between sites is done via DWDM link (4GB).
Our storage nodes are designed to accept:
- LAN data from clients - SAN data as proxy for PowerSnap backups
We used Networker™ version 7.4.5.4 in the test. Note that the latest patch level at the moment of writing is 7.4.5.5 that contains a few fixes.
I used PowerSnap version 2.4SP3 in the test. I suggest that you run the NW113195 patch on the application host and build 58 of nsrSnapagent on proxy machine(s).
Version 6.5.3 SYMCLI was used for these setups.
HP native is the multipathing used. I chose it because HP enabled MPIO is by default 1.31 so any other multipathing (e.g. PowerPath™) would only cause problems.
I used a Symmetrix® DMX-4 as the storage subsystem – one per site.
Tape backups will be supported by EDL 4406 – one per site.
Introduction to PowerSnap Theory of Operations PowerSnap is an information protection framework for seamless integration between
applications on one side and Snapshot providers on the other. The PowerSnap or
PowerSnap Module was introduced in Networker 7.1 to support various Snapshot
technologies. PowerSnap offloads the backup tasks of the production or application host.
PowerSnap supports the following features:
• Instant Backup
• Live backups using a proxy client
• Instant Restore and Rollback
• Policy-based Snapshot management
• Application data protection
• Support for both Host and Array based Snapshots

2010 EMC Proven Professional Knowledge Sharing 5
Networker PowerSnap solves the following customer problems:
• Integrates applications and Snapshots
• Minimizes the backup window to near zero using Snapshot technologies
• Removes the impact on the application server during backups
• Provides instant restores from Snapshots without having to go to tape
• Provides the ability to perform many full backups (Instant Backups) in a day
• Enables faster restores using Rollback
• Manages applications and Snapshots on heterogeneous platforms and operating
systems
Networker PowerSnap manages the full lifecycle of Snapshots including creation,
scheduling, backups, and expiration across heterogeneous environments.
I have provided a glossary to help you understand the theory. The following table should
help; it becomes even more important when troubleshooting.
Table 1: Terminology guide What is…? Ah, that’s it!
Snapshot (PiT) A fully usable copy of data, such as consistent file system, database,
or volume, that contains the data as it appeared at a single point in
time. Snapshot copies are also called PiT or Point-In-Time copies.
Instant backup This is the process to create a PiT
Instant restore Restore from our PiT
Rollback Rollback is a complete recovery of a storage subsystem from a PiT
copy to a standard volume without host involvement. This may include
an incremental recovery of changed blocks from a PiT copy to a
standard volume in some Snapshot technologies (such as Symmetrix
TimeFinder®).
Live-Backup This is also called a rollover. It is a backup of a Snapshot to
secondary storage, such as tape, using a proxy client.
Snap save-set Networker save set that represents the result of an instant backup
operation. These Snap-set entries are registered in the media
database and are usually referred as PowerSnap metadata.

2010 EMC Proven Professional Knowledge Sharing 6
What is…? Ah, that’s it!
Rollover save-set Networker save set that represents the result of live-backup of a PiT
copy onto conventional media such as tape or disk. These entries are
also registered in media database.
Cover save-set This acts as a container for PiT copy save sets (Snap save-set) and
related rollover save-sets. It is created at the time of instant backup
along with Snap-set and is updated every time a rollover operation
happens on the PiT copy represented by the Snap-set.
Snap ID This is Networker’s unique 64-bit internal identification number for a
Snap-set.
Snap-Policy A set of rules controlling the lifecycle of Snap-sets. Each Snap-set
uses three policies – backup, retention, and expiration – to manage
the existence of the Snap ID in Networker’s media database.
Snap Backup Policy
The policy determining which Snapshots are to be backed up.
Snap Retention Policy
The policy determining how many PiT copies are retained in the
media database and thus are recoverable.
Snap Expiration Policy
The policy determining how long PiT copies are retained before they
are used to create a different PiT copy.
BCV BCVs are used as target devices for a replica using TimeFinder/
Mirror. Snapshots are stored in these devices by using split-mirror
technology. BCVs should be accessible from the data mover host.
BCVs should be used for long-term storage of production data.
STD STD is a standard volume where the original data of the production
host resides.
Symmetrix® The Symmetrix system is EMC's flagship enterprise storage array.
R1 volume Source device for SRDF – in our case, this is the same as STD
R2 volume Target device for SRDF
Symmetrix disk group
Logical group
SRDF® SRDF (Symmetrix Remote Data Facility) is a family of EMC products
that facilitates data replication from one Symmetrix storage array to
another through a Storage Area Network or IP network.

2010 EMC Proven Professional Knowledge Sharing 7
What is… Ah, that’s it! Networker client Logical name of the client being backed up. The recommended value
is always FQDN of the interface to be used for backup.
Networker pool Media pool used in Networker to group media by certain criteria.
Networker group Group resource used to group clients and trigger their backup.
Storage node Networker’s client resource used to determine which node accepts
data streams sent by the Networker client.
In this article, we will focus on PowerSnap based backups using EMC Symmetrix disk arrays.
All hosts will be HPUX 11.31 using HP Metrocluster (except storage nodes) with SRDF links
between two sites (called Left and Right). The most common Symmetrix configuration used
with Metrocluster with EMC SRDF is a 1 by 1 configuration in which there is a single
Symmetrix frame at each Data Center.
The following section describes the layout of our test environment with a focus on
backup/restore setup.
High Availability Setup or Left and Right As mentioned earlier, our setup includes two sites. For simplicity, we will assume it contains
only the following hosts.
Table 2: Computer components distribution) Role Right Left
Backup server bck-left bck-right
Storage node sn-left sn-right
Application server db-left db-right
Backup server cluster nsr
Application server cluster ble

2010 EMC Proven Professional Knowledge Sharing 8
In reality, both sites will have approximately 500-600 boxes in the enterprise environment.
This setup assumes certain HA setups at the LAN and SAN level which we will not discuss.
As mentioned before, the link between sites is done via DWDM and the approximate site
distance is 10km. This link has allocated bandwidth to address all IP and SAN traffic
between sites.
We will not discuss storage allocation. I will just say we used Symmetrix DMX4, one per site,
to build R1 and R2 and associated BCV devices.
Our database server is a “smallish” cookie monster – Oracle with SAP with 15TB disk space
allocated for the database. In reality, the DB uses 65% of that space. Since with Snaps you
make block level copies of the entire volume, Snap backup takes a copy of the whole 15TB
space. Of course, there is some additional space taken by data used for the file system, but
we will come to that later.
The servers are all based on HPUX 11.31. Each company has its own baseline and specific
tweaking based on the machines’ role. I will not discuss those in this article.
The final ingredient is the network itself. Networks tend to be so diverse when looking from
an implementation point of view. Different vendors, different settings, different everything.
Nevertheless, you can have either a simple or complex network no matter how huge it is. An
example of a simple network:
• Application network – used as application frontend
• Server network – used for maintenance mostly
• Backup network – use for backup only
In the above example, each box would have 3 NICs and the approach is straightforward.
Some architects go much farther, introducing endless VLANs for better security and data
flow control. Again, I won’t discuss details here, but I will reveal that the test I did was done
in a network environment with 100+ VLANs. This, as we will see, is our first problem with our
backup implementation. No, it’s not the firewall if that is what you thought.
The following table will give you an idea of the network setup used for backup servers,
storage nodes (acting as proxy servers for BCV live backups), and application host.
2010 EMC Proven Professional Knowledge Sharing 9
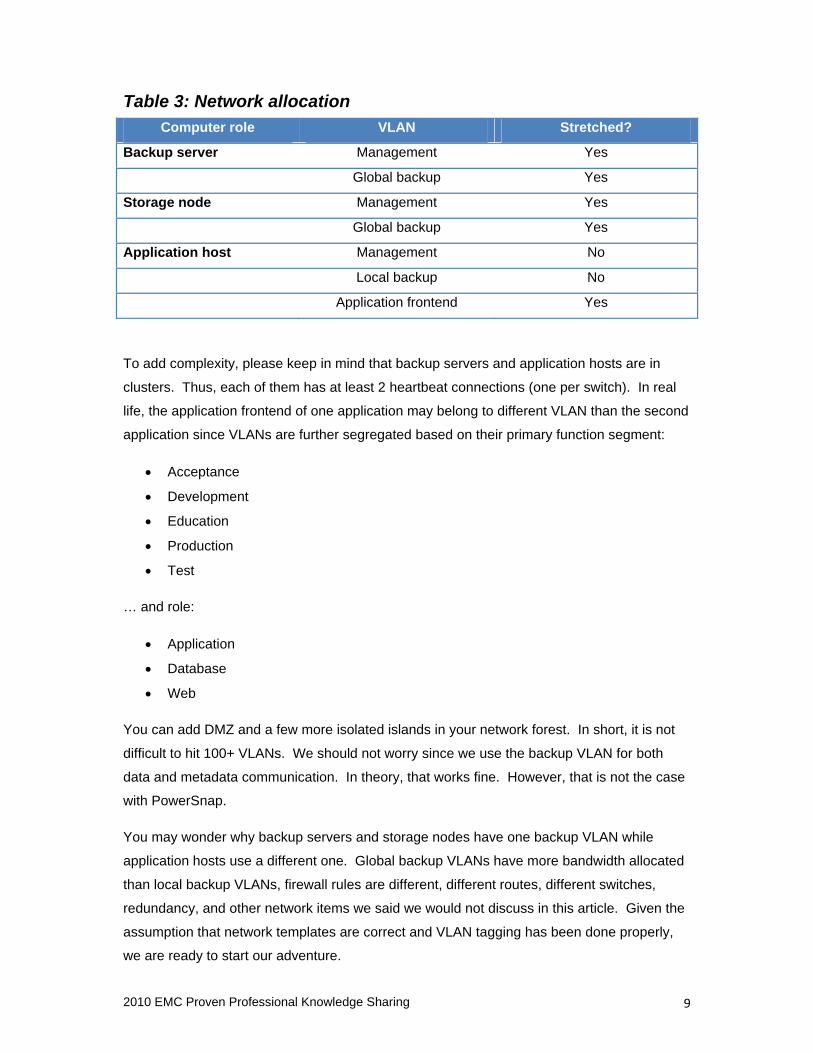
Table 3: Network allocation Computer role VLAN Stretched?
Backup server Management Yes
Global backup Yes
Storage node Management Yes
Global backup Yes
Application host Management No
Local backup No
Application frontend Yes
To add complexity, please keep in mind that backup servers and application hosts are in
clusters. Thus, each of them has at least 2 heartbeat connections (one per switch). In real
life, the application frontend of one application may belong to different VLAN than the second
application since VLANs are further segregated based on their primary function segment:
• Acceptance
• Development
• Education
• Production
• Test
… and role:
• Application
• Database
• Web
You can add DMZ and a few more isolated islands in your network forest. In short, it is not
difficult to hit 100+ VLANs. We should not worry since we use the backup VLAN for both
data and metadata communication. In theory, that works fine. However, that is not the case
with PowerSnap.
You may wonder why backup servers and storage nodes have one backup VLAN while
application hosts use a different one. Global backup VLANs have more bandwidth allocated
than local backup VLANs, firewall rules are different, different routes, different switches,
redundancy, and other network items we said we would not discuss in this article. Given the
assumption that network templates are correct and VLAN tagging has been done properly,
we are ready to start our adventure.

2010 EMC Proven Professional Knowledge Sharing 10
Oh wait, we forgot backup secondary storage tapes. As mentioned earlier, we have EMC
Disk Library 4406 (EDL) on each site. No IP replication there; no offsite policies. We do
have a small Physical Tape Library (PTL) for offsite management, but I don’t use it with EDL.
I recommend using a failover engine with EDL. At this writing, the engine was running on
3.2SP5 with few small patches (3.2SP6 is also available).
With all the redundancy and storage in place, I’ll describe is how EDL has been represented
to our backup environment (backup servers and storage nodes). It is quite simple.
As always, you have a variety of libraries and drives to choose from. In tests, we found
certain issues with LTO4 emulation. But do we really need something as big as LTO4? No!
What you really need are smaller tapes as their rotation based retention policy will be quicker
and you will see more efficient usage. So, size matters and this time smaller is better. Isn’t
that great news?
We must also consider requirements and tape allocation before we create the libraries. We
know that the majority of data coming via PowerSnap will come from the R2 side. This is
because we will use live backup only for the R2 BCVs. We also know the data amount of all
other clients will be somewhat near the data amount generated by PowerSnap backups.
Those clients, instead of SAN based backups, will use the LAN to send their data.
Now, ask yourself how this data is sent and where; where does it end up? If you invested
money in a solution like this, do you want your data to be placed at a remote site for safety
reasons? So we will base our design on following formula.
Table 4: Where is my data now? Site LAN or SAN Backup is at site…?
LEFT LAN RIGHT
LEFT SAN RIGHT
RIGHT LAN LEFT
RIGHT SAN LEFT

2010 EMC Proven Professional Knowledge Sharing 11
OK, this looks simple. There are two ways to achieve this:
• by using cross-site LAN backup (set by storage node)
• by writing to the storage node on the same site with drives presented from remote site
I prefer the second option. But wait! We said earlier we will backup R2 BCVs. So, if my
application server runs at RIGHT (R1), we take the BCV on the R2 side (LEFT), mount on a
local proxy (LEFT), and then write to tape that is coming from the RIGHT. So my remote
BCV ends on the same site as R1. This is not good. Perhaps we could make BCVs to
remote proxy from an R2 to point of view, but that would just increase the number of times
data travels over our SAN. Well, the solution is simple; each site will have 2 libraries. One
will have tape drives presented locally and one will have tape drives presented remotely.
Each EDL 4406 has 2 engines. One library is defined on each engine. I created one STL
L1400M library per engine with 950 virtual tapes and certain number of Quantum SDLT 320
tape drives (SDLT2 media type). Tapes are sized to 163GB. Hardware compression is
enabled so you will see more data landing on those tapes.
Your live backup data is determined by the storage node field of the client and not the proxy.
In the field, having the storage node field used by the proxy client would make your life easier
when doing R2 backups. In our case, we can cope with that due to cluster configuration.
Thus the storage node field for the active node and virtual client will not be the same (but will
introduce some cross site LAN backups to archive log backups which is acceptable).
The number of tape drives you allocate depends entirely on your environment and
requirements. In our case, we sized it to be able to cope with whatever SAN or LAN failure
may happen so that we can always use one of the available libraries or sites to continue our
backup process.
Of course, since a backup server requires local drives, we must map the same devices
presented to one cluster node on the second node. This will introduce the challenge of tape
paths and robotic control during failover of a backup server. This can be addressed in
several ways such as symbolic links or by library creation script. I chose the second option.
I simply modified Networker’s control and monitor cluster script to achieve this solution. This
is a bit out of scope of this document so I will skip the details.

2010 EMC Proven Professional Knowledge Sharing 12
We have following allocation of drives at the end.
Table 5: Drives are…. Site EDL engine Number of devices Devices allocated to…?
LEFT A 14 (2 allocated to server) LEFT (server’s to RIGHT too)
LEFT B 6 RIGHT
RIGHT A 14 (2 allocated to server) RIGHT (server’s to LEFT too)
RIGHT B 6 LEFT
So, our storage nodes will have 18 drives by EDL.
The backup server will see 4 drives – 2 for backup and 2 for cloning. We use tape cloning
only for metadata backup – index database and bootstrap.
If using HPUX 11.31, as we do in this article, pay attention to the agile naming convention
introduced in 11.31. Networker will handle tape drives with agile names without any
problems. However, robotic control will not work. You still need to use legacy names for
robotic control. If backup server is controlling libraries, you may run it with legacy mode
enabled while there is no need for it on storage node(s).
This gives you an idea of the initial setup. Unless you are building a new environment, you
will already have a setup in place and be ready for this article.
How Do I Make File System Backups with PowerSnap? We have to configure a file system backup for a new clustered HPUX client. We follow our
usual procedure:
• install Networker client agent using swinstall
• configure an agent to be cluster aware
• configure a client resource for both physical nodes with save set All on backup server
• configure a client resource for virtual client with save set All on backup server
• test

2010 EMC Proven Professional Knowledge Sharing 13
This will work without any issue, but there is catch. You must configure it using PowerSnap.
We will start from the client.
Our cluster will have two nodes. By design, one will be active. Already, we will have file
systems controlled by the cluster. If this is the case, you will have a Symmetrix disk group
created with all STD devices inside. Your cluster won’t failover without it. You can verify this
with symdg command:
# symdg list
D E V I C E G R O U P S
Number of
Name Type Valid Symmetrix ID Devs GKs BCVs VDEVs TGTs
BLE_r1 RDF1 Yes 000000002074 138 2 0 0 0
We have 138 Symmetrix Meta head devices. Meta devices are Symmetrix logical devices
concatenated to form a larger logical device. The Symmetrix logical devices forming the meta
device are all accessed through the same target/LUN value.
Symmetrix Manager reports the Symmetrix meta device number as the number of the first
logical device in the group, also known as the meta head (so yes, there are more devices
beneath the surface).
Creating BCVs is the next step. Map them and mask them to a proxy host. You can mask
them to both proxy servers in case you want to protect yourself from storage node failure. If
not, masking them to a local site proxy is adequate. SAN administrators or a storage team
usually perform these steps so ask them to provide you with a list of the BCVs.
Alternatively, you can figure these out yourself once they are created by either:
• looking at EMC ControlCenter®
• using symvg and symdev commands to discover the relationship of devices for
volumes you wish to protect with PowerSnap
Many believe that these steps should be performed by storage people and that may be true.

2010 EMC Proven Professional Knowledge Sharing 14
Here is small example based on following file system /usr/sap/BLE.
# bdf /usr/sap/BLE
Filesystem kbytes used avail %used Mounted on
/dev/vgBLEsap/lvBLEusrsap
5242880 506632 4699296 10% /usr/sap/BLE
Now, we have a mounting point and its associated volume group name. The volume group
name we are after is /dev/vgBLEsap.
All we need to do is to feed this data to symvg command. This command displays
information for logical volume groups (vg) that are defined by the platform's logical volume
manager.
We call for the show option along with the vg name to list the meta head device associated
with this file system.
# symvg show /dev/vgBLEsap
Volume Group Name : /dev/vgBLEsap
Volume Group Type : HP-UX LVM
Volume Group State : Enabled
Volume Group Attributes : Multipathed devices
Group's Physical Extent Size : 65536k
Max Number of Devices in Group : 16
Max Number of Volumes in Group : 255
Number of Devices in Group : 1
Number of Volumes in Group : 3
Physical Device Members (1):
{
-------------------------------------------------------
Cap
PdevName Array Dev Att. Sts (MB)
-------------------------------------------------------
/dev/rdsk/c33t0d1 02074 09C7 (M) RW 55455
}
Legend for the Attribute of Devices:

2010 EMC Proven Professional Knowledge Sharing 15
(C): CLARiiON Device.
(S): Symmetrix Device.
(M): Symmetrix Device Meta Head.
(m): Symmetrix Device Meta member.
09C7 is our STD device.
We can query STD device with the symdev command that provides information to identify the
associated BCV (Snap of R1) and BCVR (BCV of R2) devices are.
# symdev show -sid 074 09C7 | grep "BCV Device Symmetrix Name"
BCV Device Symmetrix Name : 25AE
This is your BCV. You will need to discover the R2 device associated with R1 and repeat
the above query against it to learn about BCVR. If possible, your SAN team will probably
keep the same device ids on both sides, but this is not always the case and it requires a
Symmetrix setup on both sides which is not the default in the field. We are lucky to have it
that way:
# symdev show -sid 074 09C7 | grep "Standard (STD) Device Symmetrix Name"
Standard (STD) Device Symmetrix Name : 09C7
# symdev show -sid 217 09C7 | grep "BCV Device Symmetrix Name"
BCV Device Symmetrix Name : 25AE
This can be easily scripted to describe exactly what you have.
Use the symbcv command to add BCV and BCVR devices into an existing Symmetrix disk
group. Here are examples:
• symbcv -g BLE_r1 add dev 25AE to add BCV 25AE into group BLE_r1
• symbcv –g BLE_r1 associateall dev –range <DEVx>:<DEVy> to add BCV range of
devices
Add –rdf at the end of the line to add BCVR devices. There is an easy workaround if your
devices do not follow range; create a file with a list of devices to be added (one per line) and
execute the following command:
for dev in `cat dev.lst`; do symbcv –g BLE_r1 associateall dev –range $dev:$dev;done

2010 EMC Proven Professional Knowledge Sharing 16
We assume the file with the device list is called dev.lst. If you are adding BCVR commands,
don’t forget do add –rdf to the symbcv line at the end.
You will have the following picture of your Symmetrix disk group:
D E V I C E G R O U P S
Number of
Name Type Valid Symmetrix ID Devs GKs BCVs VDEVs TGTs
BLE_r1 RDF1 Yes 000000002074 138 2 276 0 0
Repeat on standby node if your system is clustered. The name of the group will be there
BLE_r2 and you should have the identical thing. You will have to pay attention to the range
you add for devices if the device names are not equal.
If your system is not clustered you will need to:
• create w Symmetrix disk group by running symdg create BLE_r1 -type RDF1
• add STD devices first by running the symld command
From now on, all we have is Networker and PowerSnap configuration.
First, we installed the required software:
• Networker client
• PowerSnap agent
We installed the following packages:
• Networker client
• Networker manual
• PowerSnap Agent for proxy host
• PowerSnap Engine for primary host
• PowerSnap SC for primary and proxy host

2010 EMC Proven Professional Knowledge Sharing 17
Use the swlist command to verify installed packages.
# swlist NetWorker PowerSnap
# Initializing...
# Contacting target "db-left"...
#
# Target: db-left:/
#
# NetWorker 7.4.5 NetWorker
NetWorker.nwr-cbin 7.4.5 NetWorker Client Binaries
NetWorker.nwr-man 7.4.5 NetWorker Man Pages
# PowerSnap 2.4.3 NetWorker PowerSnap
PowerSnap.lgto-psag 2.4.3 EMC PowerSnap Agent for proxy host
PowerSnap.lgto-pseg 2.4.3 EMC PowerSnap Engine for primary host
PowerSnap.lgto-pssc 2.4.3 EMC PowerSnap SC for primary and proxy host
Apply any required patches after installation.
You will also have to install PowerSnap on your proxy storage node. Do not install the lgto-
pseg package as that is designed to run only on primary (application) hosts.
Additionally, you must alter /nsr/res/servers file to include the name of your application host
on the storage node. You are not required to do this step if you do not use servers file.
PowerSnap backups require you to create a Snap pool file. This file consists of a list of STD
devices and associated BCV or BCVR devices. You should have one file per relationship. In
the case of cluster, that would be 4:
# ls -ltra BLE*
-rwx------ 1 root sys 5105 Nov 25 17:57 BLE_R1_active.pool
-rwx------ 1 root sys 5105 Nov 25 17:57 BLE_R1_standby.pool
-rwx------ 1 root sys 5104 Nov 25 17:57 BLE_R2_active.pool
-rwx------ 1 root sys 5105 Nov 25 17:57 BLE_R2_standby.pool

2010 EMC Proven Professional Knowledge Sharing 18
I used the following format in the file:
# grep 09C7 BLE_R1_active.pool
000000002074:09C7 000000002074:25AE
# grep 09C7 BLE_R2_active.pool
000000002074:09C7 000000002217:25AE
# grep 09C7 BLE_R1_standby.pool
000000002217:09C7 000000002217:25AE
# grep 09C7 BLE_R1_active.pool
000000002217:09C7 000000002074:25AE
Remember, place all devices that PowerSnap will use in that file. Place all devices as listed
in the Symmetrix disk group. You will get a list of all devices and with a little bit of scripting
you will get the above file populated of you execute symdg –v list.
Now, before we kick our backup, let’s see what we need to backup. bdf will give us an idea:
# bdf | grep vg00 | awk '{print $6}'
/
/stand
/var
/var/adm
/var/adm/sw
/var/adm/crash
/usr
/tmp
/opt
/opt/networker
/opt/emcsw
/opt/dctk
/opt/OV
/nsr
/home

2010 EMC Proven Professional Knowledge Sharing 19
All devices with vg00 are local devices; those will be handled by the local file system. All
other file systems will be backed up via PowerSnap (except those handled by module
backup).
/oracle
/oracle/BLE
/oracle/BLE/102_64
/oracle/BLE/mirrlogA
/oracle/BLE/mirrlogB
/oracle/BLE/mirrlogC
/oracle/BLE/mirrlogD
/oracle/BLE/mirrlogE
/oracle/BLE/mirrlogF
/oracle/BLE/mirrlogG
/oracle/BLE/mirrlogH
/oracle/BLE/oraarch
/oracle/BLE/origlogA
/oracle/BLE/origlogB
/oracle/BLE/origlogC
/oracle/BLE/origlogD
/oracle/BLE/origlogE
/oracle/BLE/origlogF
/oracle/BLE/origlogG
/oracle/BLE/origlogH
/oracle/BLE/saparch
/oracle/BLE/sapdata1
/oracle/BLE/sapdata2
/oracle/BLE/sapdata3
/oracle/BLE/sapdata4
/oracle/BLE/sapdata5
/oracle/BLE/sapdata6
/oracle/BLE/sapdata7
/oracle/BLE/sapdata8
/oracle/BLE/sapreorg
/oracle/client
/oracle/stage
/sapmnt/BLE
/usr/interface/BLE
/usr/sap
/usr/sap/BLE
/usr/sap/tmp
/H
We need to make the application aware of the cluster setup in order for Networker to be
aware it. We do this by:
• creating empty file NetWorker.clucheck in /etc/cmcluster with touch command
• listing all cluster controlled file systems in /etc/cmcluster/.nsr_cluster
Our cluster contains two stretched IP addresses which are following it:
• application front-end VLAN IP
• local backup VLAN IP

2010 EMC Proven Professional Knowledge Sharing 20
We should use local backup VLAN IP in the .nsr_cluster file. The format of the file is:
<PACKAGE NAME>:<IP>:<DIR1>:<DIR2>:etc
Directory names are mounting points for file systems that used to be controlled by the
cluster. Our file looks like this:
# cat .nsr_cluster
BLE:172.11.12.13:/usr/sap:/usr/sap/tmp:/usr/sap/BLE:/usr/interface/BLE:/sapmnt/BLE:/sapcd:/oracle:/oracle/stage:/oracle/client:/oracle/BLE:/oracle/BLE/sapreorg:/oracle/BLE/sapdata8:/oracle/BLE/sapdata7:/oracle/BLE/sapdata6:/oracle/BLE/sapdata5:/oracle/BLE/sapdata4:/oracle/BLE/sapdata3:/oracle/BLE/sapdata2:/oracle/BLE/sapdata1:/oracle/BLE/saparch:/oracle/BLE/origlogH:/oracle/BLE/origlogG:/oracle/BLE/origlogF:/oracle/BLE/origlogE:/oracle/BLE/origlogD:/oracle/BLE/origlogC:/oracle/BLE/origlogB:/oracle/BLE/origlogA:/oracle/BLE/oraarch:/oracle/BLE/mirrlogH:/oracle/BLE/mirrlogG:/oracle/BLE/mirrlogF:/oracle/BLE/mirrlogE:/oracle/BLE/mirrlogD:/oracle/BLE/mirrlogC:/oracle/BLE/mirrlogB:/oracle/BLE/mirrlogA:/oracle/BLE/102_64
Pay attention to nsrauth or GSS. This adds additional security to communication, and it is
enabled by default. Disabling it at the storage node(s) and backup server should work. With
PowerSnap, you will have to do it on the application host as well.
Here is the example:
# nsradmin -p 390113
NetWorker administration program.
Use the "help" command for help, "visual" for full-screen mode.
nsradmin> show auth methods
nsradmin> print type: NSRLA
auth methods: "0.0.0.0/0,nsrauth/oldauth";
nsradmin> update auth methods: "0.0.0.0/0,oldauth"
auth methods: "0.0.0.0/0,oldauth";
Update? Yes
updated resource id 3.0.127.74.0.0.0.0.171.168.149.74.0.0.0.0.10.244.68.19(11)
nsradmin> q
We are now done with client side configuration. Now, we switch to our backup server.

2010 EMC Proven Professional Knowledge Sharing 21
First we create Snapshot policies:
Daily and Serverless Backup are Networker’s predefined policies. We create R1 and R2
policies with the above properties.
We will now explain Snapshot policy attributes. The Snapshot policy attributes determine
how many Snapshots are created and retained, when the Snapshots expire, and which
Snapshots are backed up to a traditional storage medium.
• Name - Logical name used to uniquely identify a Snapshot policy.
• Comment - Explanatory information for the Snapshot policy. This attribute is optional.
• Number of Snapshots - Determines the number of Snapshots to be created in a 24-
hour period. The default value is 8. When specifying a value, keep the interval
attribute of the group resource in mind. The number of Snapshots must be equal to or
less than the result of 24 hours minus the start time divided by the interval. For
example: Number of Snapshots <= (24:00 - Start Time) / Interval
• Retain Snapshots - Determines the number of Snapshots that must be retained for a
specified period of time before being recycled. The default is 8. This attribute is
overridden by the expiration policy of other Snapshots.
• Snapshot expiration policy - Select a preconfigured expiration policy to determine how
long point-in-time copies are retained. Valid values are Minute, Hour, Day, Decade,
Month, Quarter, Week and Year. The default is Day.
• Backup Snapshots - Specifies the point-in-time copies that will be backed up to
traditional storage mediums. Valid values are All, None, First, Last, Every n and n.
The default is First. If user does not want the point-in-time copy to be backed up
immediately after creation, set this value to none. The data from the copy can be
backed up later using the nwSnapmgr through GUI or nsrSnapadmin through CLI
utility (provided the Snapshot has not expired).

2010 EMC Proven Professional Knowledge Sharing 22
Right click on “Snapshot policies” and select New.
The new window will appear:

2010 EMC Proven Professional Knowledge Sharing 23
Enter the name of the policy in the name field. For this test, we will use R1 and R2 names.
Write whatever you link in the comment field. For test purposes, we set both “Number Of
Snapshots” and “Retain Snapshots” to 1. The Snapshot Expiration Policy is set to 23h,
while Backup Snapshots are set to None for R1 and All for R2.
If you remember, we have a library with locally and remotely attached devices. We also
created media pools. We created a pool called fsL in the library with locally attached devices.
In the library with remotely attached devices we created a pool called fsR for file system
backups. We also created a psmeta media pool for Snap save sets (metadata). If you are
using PTL , have a disk device save that data as they are very small save sets and are
handled more efficiently by a disk device or EDL. Media pools fsL and fsR should have
group name as the selection criteria while psmeta should have a client name.
Next, we create the backup groups that we will use to trigger our backup. We call them:
• BLE_FS_PRD_RIGHT_local_R1
• BLE_FS_PRD_RIGHT_local_R2
The name of the group tells us the following:
• This is a file system backup of BLE system
• This is a production system
• Site to which tape backup goes is RIGHT
• Backup goes to locally attached tape drives (fsL pool)
• This is an R1 or R2 backup (depending on group name)

2010 EMC Proven Professional Knowledge Sharing 24
We position ourselves on group resource and select “New” to create the group.
We can configure the group resource for a PowerSnap backup in the same way as a
standard NetWorker backup, except for three additional PowerSnap attributes:
• Snapshot: Determines whether or not a PowerSnap operation is performed. The
default is False. To perform a traditional NetWorker backup without using the
PowerSnap module features, set this attribute to false. If this attribute is set to true.
and the save set attribute of a member client is set to ALL, all drives on the member
client must be Snapshot-capable. Any drive that is not Snapshot capable will
generate an error and will not be backed up.
• Snapshot Pool: You must configure a separate pool specifically for PowerSnap
operations. If a preconfigured pool is not selected, the pool must be configured before
it can be selected in the group resource.
• Snapshot Policy: Determines how many Snapshots are taken in a given period and
how long they are retained.
We see that Snapshot box has been checked in the right lower corner.
We use the R1 policy created earlier for the Snapshot policy.
We use psmeta media pool for the Snapshot pool.
Creating the client resource is our last step. The client resource for a PowerSnap backup is
configured in the same way as a standard NetWorker backup. The client resource attributes
are Save Set, Browse Policy, Retention Policy, Application Information (used with
PowerSnap file system backups),and Backup Command (used with PowerSnap database
backups).
Before configuring the client, check that the NetWorker client is running on the machine and
what IP interfaces are present. We do that by connecting to the RPC port of nsrexecd (client
daemon) on the target machine using the nsradmin command.

2010 EMC Proven Professional Knowledge Sharing 25
The command in our case would look like following:
• echo p | nsradmin –p 390113 -i - -s ble.lbck.dc.root.local for virtual cluster IP
• echo p | nsradmin –p 390113 -i - -s db-left.lbck.dc.root.local for physical node IP
• echo p | nsradmin –p 390113 -i - -s db-right.lbck.dc.root.local for physical node IP
Physical clients should have all belonging IPs in the alias list (with their respective DNS
names).
The creation of a client resource for physical clients is no different than for any other client
resource so we will focus on virtual clients only.
The first difference is the save set list. Unlike the normal cluster client, we can’t use save set
All here. Rather, we must manually define each save-set.
Do not list file systems that would be protected with module backups later in the save set list.
We enter the following in the Apps & Modules tab:
• Application information – this contains the number of variables to be passed to the
remote agent running on the client and is used to guide the Snap process. There are
a number of possible variables to set – please refer to official EMC documentation for
a full list.
o NSR_DATA_MOVER=sn-right.gbck.dc.root.local
o NSR_SERVER=nsr.gbck.dc.root.local
o SYMM_SNAP_POOL=/nsr/res/BLE_R1_active.pool
o SYMM_SNAP_REMOTE=FALSE
o SYMM_SNAP_TECH=BCV
o SYMM_ON_DELETE=RELEASE_RESOURCE
o NSR_MCSG_DISABLE_MNTPT_CHECK=YES
o NSR_PS_SAVE_PARALLELISM=1
o NSR_SNAP_TYPE=symm-dmx
o NSR_CLIENT=ble.lbck.dc.root.local

2010 EMC Proven Professional Knowledge Sharing 26
The above values apply for R1 backup. The following changes are required for R2:
o NSR_DATA_MOVER=sn-left.gbck.dc.root.local
o SYMM_SNAP_POOL=/nsr/res/BLE_R2_active.pool
o SYMM_SNAP_REMOTE=TRUE
If you use clones instead of BCVs, you cannot do it with 2.4.x PowerSnap. Well, you can
use it, but only for clones of R1 (it won’t work with R2). EMC addressed this in release 2.5
which is now available. If you wish to run clones on R1, you need to use different settings
and at least one undocumented setting to make it work properly.
I recommend following settings with clones:
o NSR_PS_SNAPSHOT_TIMEOUT=28800
o SYMM_CLONE_FULL_COPY=TRUE
o SYMM_SNAP_TECH=CLONE
All other client properties can be used as with normal client backup.
Here is a brief description of those variables (full descriptions in module documentation).
Table 6: Application information variables What is…? Ah, that’s it!
NSR_DATA_MOVER Hostname of the proxy client. Use FQDN of the backup
NIC.
NSR_SERVER Hostname of the Networker server. Use FQDN of the
backup NIC.
SYMM_SNAP_POOL This variable shows the location of the Snap pool file.
SYMM_SNAP_REMOTE Indicates whether we use BCV or BCVR devices.
SYMM_SNAP_TECH Specifies type of target device and operation to be
executed.
SYMM_ON_DELETE Controls behavior with BCV after PiT has expired
NSR_MCSG_DISABLE_MNTPT_CHECK
Check if given mounting point is valid one.
NSR_PS_SAVE_PARALLELISM Controls parallelism with PS operations.
NSR_SNAP_TYPE Specifies the Snapshot provider.
NSR_CLIENT Hostname of application host. Use FQDN of the backup
NIC.

2010 EMC Proven Professional Knowledge Sharing 27
What is…? Ah, that’s it!
NSR_PS_SNAPSHOT_TIMEOUT Overrides default timeout of 10 minutes for CLONE
operation.
SYMM_CLONE_FULL_COPY Whether full copy of STD should be done within
operation.
We are now ready for backup. I will show an example where we backup only the /H partition.
We will use clones instead of BCVs for this exercise.
The following metas are used for address backup of that file system:
000000002074:28B 000000002074:295
000000002074:28C 000000002074:296
000000002074:28D 000000002074:297
000000002074:28E 000000002074:298
000000002074:28F 000000002074:299
000000002074:290 000000002074:29A
000000002074:291 000000002074:29B
000000002074:292 000000002074:29C
000000002074:293 000000002074:29D
000000002074:294 000000002074:29E
Here we see STD and R1 clone devices defined. With this, we can start the group.
Well, almost ready. If we start the group now, it will fail. Our network setup is the reason.
Since our server is an SAP database server, its resolving mechanism for hostname is set to
resolve to the SAP frontend. That VLAN is not allowed to communicate with VLAN when our
backup infrastructure is on. Ouch!
I placed the RFE with EMC so that communication between proxy and application server is
determined by the NSR_CLIENT variable when the application host establishes a session
with proxy, but I needed a solution fast. I found one.

2010 EMC Proven Professional Knowledge Sharing 28
The solution is contained within the resolv.conf manual pages where it states you can set a
resolving mechanism per process using the LOCALDOMAIN variable. Indeed, all that is
required to address this problem is to place PowerSnap in the startup script:
LOCALDOMAIN=lbck.dc.root.local
export LOCALDOMAIN
On the application server, we always get BRC logs; on the proxy server we will find logs by
nsrSnapagent (used for import, mount, unmount and deport of volumes) and nsrbragent
(which can be seen as save for traditional backups). I also increased the debug logging to 3
to get more verbose logging (set by NSR_PS_DEBUG_LEVEL=3 variable in application
information of the client).
When we initiate backup we see something like this:
20.2.2010 11:10:11 db-left nsrpsd EMC NetWorker PowerSnap v2.4.3 # Copyright (c) 2010, EMC Corporation. #All rights reserved.
20.2.2010 11:10:11 db-left nsrpsd PowerSnap logging initialized with a debug level 3
20.2.2010 11:10:11 db-left nsrpsd Start to record message
20.2.2010 11:10:11 db-left nsrpsd message ID 1246439411
20.2.2010 11:10:11 db-left nsrpsd USING vendor = symm-dmx
20.2.2010 11:10:12 db-left nsrpsd brc_session created
20.2.2010 11:10:12 db-left nsrpsd pb_inquiry
20.2.2010 11:10:12 db-left nsrpsd Stack FILE /H: file type = 3
20.2.2010 11:10:12 db-left nsrpsd Stack FS /H , NasMntPt undef , fs type = vxfs
20.2.2010 11:10:12 db-left nsrpsd Stack VOLUME /dev/vgH/lvH: alternate name :/dev/vgH/rlvH ncontrol type :2
20.2.2010 11:10:12 db-left nsrpsd Stack VOLUME GROUP vgH: Volume Manager :LVM
20.2.2010 11:10:12 db-left nsrpsd Stack PARTITION /dev/rdisk/disk21:
20.2.2010 11:10:12 db-left nsrpsd Stack PARTITION /dev/rdisk/disk20:
20.2.2010 11:10:12 db-left nsrpsd Stack PARTITION /dev/rdisk/disk19:
20.2.2010 11:10:12 db-left nsrpsd Stack PARTITION /dev/rdisk/disk18:
20.2.2010 11:10:12 db-left nsrpsd Stack PARTITION /dev/rdisk/disk17:
20.2.2010 11:10:12 db-left nsrpsd Stack PARTITION /dev/rdisk/disk16:
20.2.2010 11:10:12 db-left nsrpsd Stack PARTITION /dev/rdisk/disk15:
20.2.2010 11:10:12 db-left nsrpsd Stack PARTITION /dev/rdisk/disk14:
2010 EMC Proven Professional Knowledge Sharing 29
20.2.2010 11:10:12 db-left nsrpsd Stack PARTITION /dev/rdisk/disk13:
20.2.2010 11:10:12 db-left nsrpsd Stack PARTITION /dev/rdisk/disk12:
20.2.2010 11:10:12 db-left nsrpsd Stack LUN /dev/rdisk/disk21:
20.2.2010 11:10:12 db-left nsrpsd Stack LUN /dev/rdisk/disk20:
20.2.2010 11:10:12 db-left nsrpsd Stack LUN /dev/rdisk/disk19:
20.2.2010 11:10:12 db-left nsrpsd Stack LUN /dev/rdisk/disk18:
20.2.2010 11:10:12 db-left nsrpsd Stack LUN /dev/rdisk/disk17:
20.2.2010 11:10:12 db-left nsrpsd Stack LUN /dev/rdisk/disk16:
20.2.2010 11:10:12 db-left nsrpsd Stack LUN /dev/rdisk/disk15:
20.2.2010 11:10:12 db-left nsrpsd Stack LUN /dev/rdisk/disk14:
20.2.2010 11:10:12 db-left nsrpsd Stack LUN /dev/rdisk/disk13:
20.2.2010 11:10:12 db-left nsrpsd Stack LUN /dev/rdisk/disk12:
20.2.2010 11:10:29 db-left nsrpsd pb_open
20.2.2010 11:11:07 db-left nsrpsd Successfully acquired license.
20.2.2010 11:11:07 db-left nsrpsd pb_prepare
SELECTING the list of Source devices in the group:
Device: 0294 [SELECTED]
Device: 0293 [SELECTED]
Device: 0292 [SELECTED]
Device: 0291 [SELECTED]
Device: 0290 [SELECTED]
Device: 028F [SELECTED]
Device: 028E [SELECTED]
Device: 028D [SELECTED]
Device: 028C [SELECTED]
Device: 028B [SELECTED]
SELECTING Target devices in the group:
Device: 029E [SELECTED]
Device: 029D [SELECTED]
Device: 029C [SELECTED]
Device: 029B [SELECTED]
Device: 029A [SELECTED]
Device: 0299 [SELECTED]

2010 EMC Proven Professional Knowledge Sharing 30
Device: 0298 [SELECTED]
Device: 0297 [SELECTED]
Device: 0296 [SELECTED]
Device: 0295 [SELECTED]
PAIRING of Source and Target devices:
Devices: 0294(S) - 029E(T) [PAIRED]
Devices: 0293(S) - 029D(T) [PAIRED]
Devices: 0292(S) - 029C(T) [PAIRED]
Devices: 0291(S) - 029B(T) [PAIRED]
Devices: 0290(S) - 029A(T) [PAIRED]
Devices: 028F(S) - 0299(T) [PAIRED]
Devices: 028E(S) - 0298(T) [PAIRED]
Devices: 028D(S) - 0297(T) [PAIRED]
Devices: 028C(S) - 0296(T) [PAIRED]
Devices: 028B(S) - 0295(T) [PAIRED]
STARTING a Clone 'RECREATE' operation.
The Clone 'RECREATE' operation SUCCEEDED.
With Enginuity Version 5671 and later, once a clone device is fully copied, you can use the
symclone recreate command to incrementally copy all subsequent changes made to the
source device (made after the point-in-time copy initiated) to the target device.
To use this feature, the copy session must have been created with either the -copy or -
precopy option, and the -differential option. In addition, you must have activated the session
to establish the new point-in-time copy.
While in the Recreated state, the target device will remain Not Ready to the host.
As we can see above, PowerSnap is under the configuration parameters passed via
Application information using the symclone recreate operation.

2010 EMC Proven Professional Knowledge Sharing 31
20.2.2010 11:11:47 db-left nsrpsd pb_Snapshot
20.2.2010 11:11:47 db-left nsrpsd File system /H frozen
20.2.2010 11:11:47 db-left nsrpsd File system /H thawed
20.2.2010 11:11:47 db-left nsrpsd File system /H frozen
SELECTING the list of Source devices in the group:
Device: 0294 [SELECTED]
Device: 0293 [SELECTED]
Device: 0292 [SELECTED]
Device: 0291 [SELECTED]
Device: 0290 [SELECTED]
Device: 028F [SELECTED]
Device: 028E [SELECTED]
Device: 028D [SELECTED]
Device: 028C [SELECTED]
Device: 028B [SELECTED]
SELECTING Target devices in the group:
Device: 029E [SELECTED]
Device: 029D [SELECTED]
Device: 029C [SELECTED]
Device: 029B [SELECTED]
Device: 029A [SELECTED]
Device: 0299 [SELECTED]
Device: 0298 [SELECTED]
Device: 0297 [SELECTED]
Device: 0296 [SELECTED]
Device: 0295 [SELECTED]

2010 EMC Proven Professional Knowledge Sharing 32
PAIRING of Source and Target devices:
Devices: 0294(S) - 029E(T) [PAIRED]
Devices: 0293(S) - 029D(T) [PAIRED]
Devices: 0292(S) - 029C(T) [PAIRED]
Devices: 0291(S) - 029B(T) [PAIRED]
Devices: 0290(S) - 029A(T) [PAIRED]
Devices: 028F(S) - 0299(T) [PAIRED]
Devices: 028E(S) - 0298(T) [PAIRED]
Devices: 028D(S) - 0297(T) [PAIRED]
Devices: 028C(S) - 0296(T) [PAIRED]
Devices: 028B(S) - 0295(T) [PAIRED]
STARTING a Clone 'ACTIVATE' operation.
The Clone 'ACTIVATE' operation SUCCEEDED.
20.2.2010 11:11:55 db-left nsrpsd File system /H thawed
20.2.2010 11:11:55 db-left nsrpsd Snapshot completed for [chptntp1.mgt.dc.root.local]:[/H]
20.2.2010 11:12:01 db-left nsrpsd pb_save
20.2.2010 11:14:34 db-left nsrpsd pb_inquiry
20.2.2010 11:14:34 db-left nsrpsd pb_postpare
20.2.2010 11:14:57 db-left nsrpsd pb_close
20.2.2010 11:15:00 db-left nsrpsd pb_end
Snapshot is completed.
We can query to verify the status of the symdg. During the creation state, we see data being
copied. When done, all SRC and TGT relations should be 100% copied. On the next page
we have an example of this after Snapshots have been completed.

2010 EMC Proven Professional Knowledge Sharing 33
# symclone -g BLE_r1 query
Device Group (DG) Name: BLE_r1
DG's Type : RDF1
DG's Symmetrix ID : 000000002074
Source Device Target Device State Copy
--------------------------------- ---------------------------- ------------ ----
Protected Modified Modified
Logical Sym Tracks Tracks Logical Sym Tracks CGDP SRC <=> TGT (%)
--------------------------------- ---------------------------- ------------ ----
DEV001 028B 0 0 TGT001 0295 0 XXX. Copied 100
DEV002 028C 0 0 TGT002 0296 0 XXX. Copied 100
DEV003 028D 0 0 TGT003 0297 0 XXX. Copied 100
DEV004 028E 0 0 TGT004 0298 0 XXX. Copied 100
DEV005 028F 0 0 TGT005 0299 0 XXX. Copied 100
DEV006 0290 0 0 TGT006 029A 0 XXX. Copied 100
DEV007 0291 0 0 TGT007 029B 0 XXX. Copied 100
DEV008 0292 0 0 TGT008 029C 0 XXX. Copied 100
DEV009 0293 0 0 TGT009 029D 0 XXX. Copied 100
DEV010 0294 0 0 TGT010 029E 0 XXX. Copied 100
Total -------- -------- --------
Track(s) 0 0 0
MB(s) 0.0 0.0 0.0
If we activated an option where we would write R1 backup to tape, we would see the live
backup operation on the proxy side start.
20.2.2010 11:08:49 chpp1011 nsrSnapagent PowerSnap logging initialized with a debug level 3
20.2.2010 11:10:25 chpp1011 nsrSnapagent USING vendor = symm-dmx
20.2.2010 11:12:44 chpp1011 nsrSnapagent vgH : Volume Group imported successfully
20.2.2010 11:12:56 chpp1011 nsrSnapagent /nsr/tmp/8390-1246439564-0 : File system unmounted successfully
20.2.2010 11:13:16 chpp1011 nsrSnapagent vgH : Volume Group deported successfully

2010 EMC Proven Professional Knowledge Sharing 34
During this operation Snap is mounted on proxy under /nsr/tmp.
On the server side, in the main log, this is shown as:
20.2.2010 11:07:52 nsrd savegroup info: starting Snapshot group BLE_FS_PRD_local_R1 (with 1 client(s))
20.2.2010 11:08:15 nsrd powerSnap notice: Debug ID for this session : 1246439411
20.2.2010 11:08:48 nsrd powerSnap notice: Snapshot requested for [ble.lbck.dc.root.local]:[/H]
20.2.2010 11:08:48 nsrd powerSnap notice: Snapshot requested for [ble.lbck.dc.root.local]:[/H]
20.2.2010 11:08:48 nsrd powerSnap notice: Snapshot requested for [ble.lbck.dc.root.local]:[/H]
20.2.2010 11:08:48 nsrd powerSnap notice: Snapshot requested for [ble.lbck.dc.root.local]:[/H]
20.2.2010 11:08:48 nsrd powerSnap notice: Snapshot requested for [ble.lbck.dc.root.local]:[/H]
20.2.2010 11:08:48 nsrd powerSnap notice: Snapshot requested for [ble.lbck.dc.root.local]:[/H]
20.2.2010 11:08:48 nsrd powerSnap notice: Snapshot requested for [ble.lbck.dc.root.local]:[/H]
20.2.2010 11:08:48 nsrd powerSnap notice: Snapshot requested for [ble.lbck.dc.root.local]:[/H]
20.2.2010 11:08:48 nsrd powerSnap notice: Snapshot requested for [ble.lbck.dc.root.local]:[/H]
20.2.2010 11:08:48 nsrd powerSnap notice: Snapshot requested for [ble.lbck.dc.root.local]:[/H]
20.2.2010 11:09:36 nsrd powerSnap notice: Snapshot completed for [ble.lbck.dc.root.local]:[/H]
20.2.2010 11:12:06 nsrd Operation 413 started : Load volume `LEFT0031', volume id `3292961874'.
20.2.2010 11:12:06 nsrd media waiting event: Waiting for 1 writable volumes to backup pool 'psmeta' tape(s) on sn-right.gbck.dc.root.local
20.2.2010 11:12:08 nsrmmgd Loading volume `LEFT0031' from slot `31' into device `rd=sn-right.gbck.dc.root.local:/dev/rtape/tape148_BESTnb'.
20.2.2010 11:12:09 nsrd rd=sn-right.gbck.dc.root.local:/dev/rtape/tape148_BESTnb Verify label operation in progress
20.2.2010 11:12:12 nsrd rd=sn-right.gbck.dc.root.local:/dev/rtape/tape148_BESTnb Mount operation in progress
20.2.2010 11:12:12 nsrd media event cleared: Waiting for 1 writable volumes to backup pool 'psmeta' tape(s) on sn-right.gbck.dc.root.local
20.2.2010 11:12:12 nsrd ble.lbck.dc.root.local:/H saving to pool 'psmeta' (LEFT0031)
20.2.2010 11:12:13 nsrd ble.lbck.dc.root.local:/H done saving to pool 'psmeta' (LEFT0031)
20.2.2010 11:12:13 nsrd ble.lbck.dc.root.local:/H saving to pool 'psmeta' (LEFT0031)
20.2.2010 11:12:13 nsrd ble.lbck.dc.root.local:/H done saving to pool 'psmeta' (LEFT0031) 1 KB
20.2.2010 11:12:16 nsrd [Jukebox `EQ1', operation # 413]. Finished with status: succeeded

2010 EMC Proven Professional Knowledge Sharing 35
20.2.2010 11:12:48 nsrd write completion notice: Writing to volume LEFT0031 complete
20.2.2010 11:13:48 nsrd savegroup info: Added 'nsr.gbck.dc.root.local' to the group 'BLE_FS_PRD_local_R1' for bootstrap backup.
20.2.2010 11:13:48 nsrd Operation 414 started : Load volume `LEFT0950', volume id `2001118749'.
20.2.2010 11:13:48 nsrd media waiting event: Waiting for 1 writable volumes to backup pool 'fsL' tape(s) on nsr.gbck.dc.root.local
20.2.2010 11:13:50 (pid11598) Start nsrmmd #43, with PID 11598, at HOST bck-left.gbck.dc.root.local
20.2.2010 11:13:52 nsrmmgd Loading volume `LEFT0950' from slot `950' into device `/dev/rtape/tape23_BESTnb'.
20.2.2010 11:13:53 nsrd /dev/rtape/tape23_BESTnb Verify label operation in progress
20.2.2010 11:13:55 nsrd /dev/rtape/tape23_BESTnb Mount operation in progress
20.2.2010 11:13:55 nsrd media event cleared: Waiting for 1 writable volumes to backup pool 'fsL' tape(s) on nsr.gbck.dc.root.local
20.2.2010 11:13:55 nsrd nsr.gbck.dc.root.local:bootstrap saving to pool 'fsL' (LEFT0950)
20.2.2010 11:13:56 nsrmmdbd media db is saving its data. This may take a while.
20.2.2010 11:13:56 nsrmmdbd media db is open for business.
20.2.2010 11:13:56 nsrd nsr.gbck.dc.root.local:bootstrap done saving to pool 'fsL' (LEFT0950) 1731 KB
20.2.2010 11:13:56 nsrd savegroup notice: BLE_FS_PRD_local_R1 completed, Total 2 client(s), 2 Succeeded. Please see group completion details for more information.
As we can see, file system backup is straightforward. It does not matter whether BCV or CLONE , the approach is the same.
Restore is more interesting as we can do restore as we would do normally, but we may also restore from PiT (default) and rollback. This is an interesting option during disaster recoveries and is probably the fastest way to restore your data.
Oh No! Now I have to do a File System Restore!!!
You have backup so there is no need to worry. Usually, you will just have to restore a single
file so restoring from tape when using EDL is my primary source. This is different from what
PowerSnap does by default which is called instant restore. Instant restore will mount BCV or
CLONE on the proxy node and read data back over the LAN to the client (so in reality you
are reading data from mounted disk instead of tape). This mechanism is controlled with the
variable RESTORE_TYPE_ORDER that by default reads pit:conventional. I usually prefer
the other way around, but there are cases where you really wish to offload calls towards your
busy tape library so it all depends on your environment.

2010 EMC Proven Professional Knowledge Sharing 36
Let’s first check what we have backed up:
# cd /H
root@db-left:/H
# ll
total 1138674
-rwxr-xr-x 1 root users 2586 May 28 06:03 LGTO_METAFILE.hpux11ia64
-rw-r--r-- 1 root users 291440640 May 28 08:40 NetWorker.pkg
drwx------ 5 root sys 96 Jun 30 22:37 ble
drwx------ 7 root sys 1024 Jun 28 01:26 installation
drwx------ 7 root sys 1024 Jun 28 02:24 installation10
drwx------ 7 root sys 1024 Jul 1 10:35 installation11
drwx------ 7 root sys 1024 Jun 28 01:31 installation2
drwx------ 7 root sys 1024 Jun 28 01:35 installation3
drwx------ 7 root sys 1024 Jun 28 01:38 installation4
drwx------ 7 root sys 1024 Jun 28 02:23 installation5
drwx------ 7 root sys 1024 Jun 28 02:23 installation6
drwx------ 7 root sys 1024 Jun 28 02:24 installation7
drwx------ 7 root sys 1024 Jun 28 02:24 installation8
drwx------ 7 root sys 1024 Jun 28 02:24 installation9
drwxr-xr-x 2 root root 96 Jun 26 17:52 lost+found
Imagine we have gremlins who did the following:
# rm LGTO_METAFILE.hpux11ia64 NetWorker.pkg nw74sp4_hpux11_ia64.tar sd_products.res
# ll
total 22
drwx------ 5 root sys 96 Jun 30 22:37 ble
drwx------ 7 root sys 1024 Jun 28 01:26 installation
drwx------ 7 root sys 1024 Jun 28 02:24 installation10
drwx------ 7 root sys 1024 Jul 1 10:35 installation11
drwx------ 7 root sys 1024 Jun 28 01:31 installation2
drwx------ 7 root sys 1024 Jun 28 01:35 installation3
drwx------ 7 root sys 1024 Jun 28 01:38 installation4
drwx------ 7 root sys 1024 Jun 28 02:23 installation5
drwx------ 7 root sys 1024 Jun 28 02:23 installation6
drwx------ 7 root sys 1024 Jun 28 02:24 installation7
2010 EMC Proven Professional Knowledge Sharing 37
drwx------ 7 root sys 1024 Jun 28 02:24 installation8
drwx------ 7 root sys 1024 Jun 28 02:24 installation9
drwxr-xr-x 2 root root 96 Jun 26 17:52 lost+found
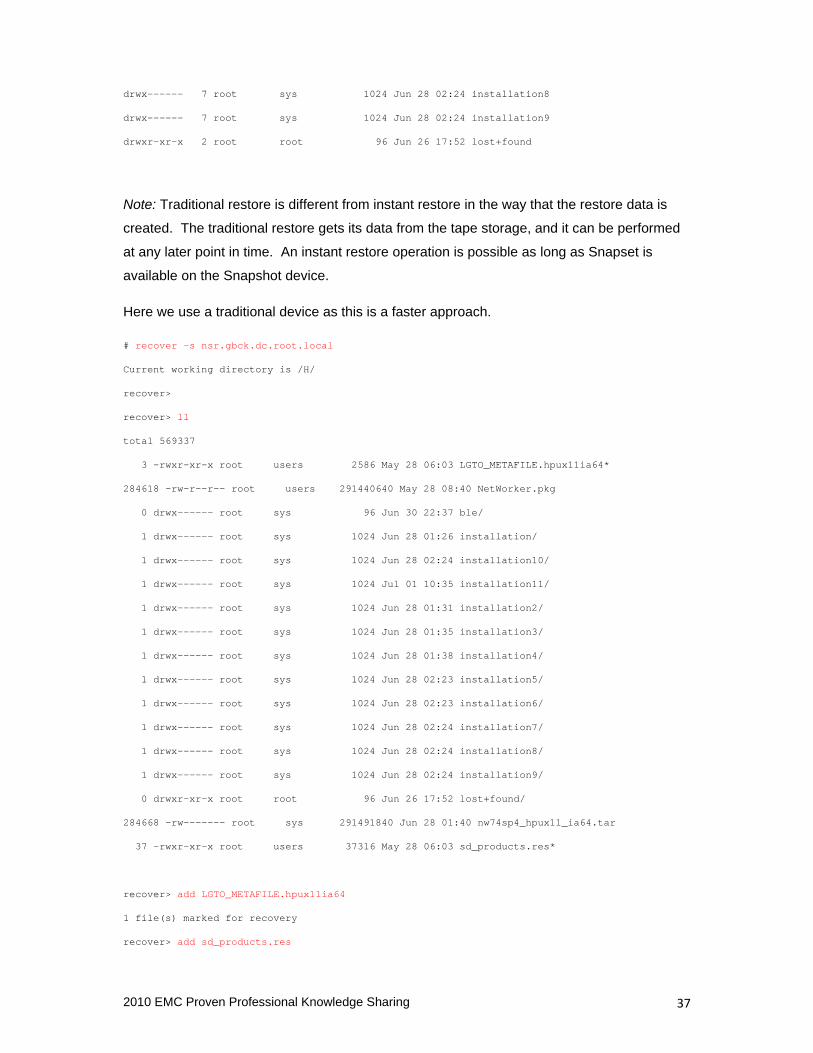
Note: Traditional restore is different from instant restore in the way that the restore data is
created. The traditional restore gets its data from the tape storage, and it can be performed
at any later point in time. An instant restore operation is possible as long as Snapset is
available on the Snapshot device.
Here we use a traditional device as this is a faster approach.
# recover -s nsr.gbck.dc.root.local
Current working directory is /H/
recover>
recover> ll
total 569337
3 -rwxr-xr-x root users 2586 May 28 06:03 LGTO_METAFILE.hpux11ia64*
284618 -rw-r--r-- root users 291440640 May 28 08:40 NetWorker.pkg
0 drwx------ root sys 96 Jun 30 22:37 ble/
1 drwx------ root sys 1024 Jun 28 01:26 installation/
1 drwx------ root sys 1024 Jun 28 02:24 installation10/
1 drwx------ root sys 1024 Jul 01 10:35 installation11/
1 drwx------ root sys 1024 Jun 28 01:31 installation2/
1 drwx------ root sys 1024 Jun 28 01:35 installation3/
1 drwx------ root sys 1024 Jun 28 01:38 installation4/
1 drwx------ root sys 1024 Jun 28 02:23 installation5/
1 drwx------ root sys 1024 Jun 28 02:23 installation6/
1 drwx------ root sys 1024 Jun 28 02:24 installation7/
1 drwx------ root sys 1024 Jun 28 02:24 installation8/
1 drwx------ root sys 1024 Jun 28 02:24 installation9/
0 drwxr-xr-x root root 96 Jun 26 17:52 lost+found/
284668 -rw------- root sys 291491840 Jun 28 01:40 nw74sp4_hpux11_ia64.tar
37 -rwxr-xr-x root users 37316 May 28 06:03 sd_products.res*
recover> add LGTO_METAFILE.hpux11ia64
1 file(s) marked for recovery
recover> add sd_products.res

2010 EMC Proven Professional Knowledge Sharing 38
2 file(s) marked for recovery
recover> add NetWorker.pkg
3 file(s) marked for recovery
recover> add nw74sp4_hpux11_ia64.tar
4 file(s) marked for recovery
recover> volumes
Volumes needed (all near-line):
LEFT0950 at EQ1
recover> recover
Recovering 4 files into their original locations
Volumes needed (all near-line):
LEFT0950 at EQ1
Total estimated disk space needed for recover is 569 MB.
Requesting 4 file(s), this may take a while...
./LGTO_METAFILE.hpux11ia64
./nw74sp4_hpux11_ia64.tar
./NetWorker.pkg
./sd_products.res
Received 4 file(s) from NSR server `nsr.gbck.dc.root.local'
Recover completion time: Sat Feb 20 13:28:34 2010
recover> q
# ll
total 1138674
-rwxr-xr-x 1 root users 2586 May 28 06:03 LGTO_METAFILE.hpux11ia64
-rw-r--r-- 1 root users 291440640 May 28 08:40 NetWorker.pkg
drwx------ 5 root sys 96 Jun 30 22:37 ble
drwx------ 7 root sys 1024 Jun 28 01:26 installation
drwx------ 7 root sys 1024 Jun 28 02:24 installation10
drwx------ 7 root sys 1024 Jul 1 10:35 installation11
drwx------ 7 root sys 1024 Jun 28 01:31 installation2
drwx------ 7 root sys 1024 Jun 28 01:35 installation3
drwx------ 7 root sys 1024 Jun 28 01:38 installation4
drwx------ 7 root sys 1024 Jun 28 02:23 installation5
drwx------ 7 root sys 1024 Jun 28 02:23 installation6
drwx------ 7 root sys 1024 Jun 28 02:24 installation7
drwx------ 7 root sys 1024 Jun 28 02:24 installation8

2010 EMC Proven Professional Knowledge Sharing 39
drwx------ 7 root sys 1024 Jun 28 02:24 installation9
drwxr-xr-x 2 root root 96 Jun 26 17:52 lost+found
-rw------- 1 root sys 291491840 Jun 28 01:40 nw74sp4_hpux11_ia64.tar
-rwxr-xr-x 1 root users 37316 May 28 06:03 sd_products.res
As we can see, our data is back. It looks like the following on the server side:
20.2.2010 13:23:10 nsrd db-left.lbck.dc.root.local:root browsing
20.2.2010 13:25:55 nsrd db-left.lbck.dc.root.local:root done browsing
20.2.2010 13:25:56 nsrd db-left.lbck.dc.root.local:root browsing
20.2.2010 13:25:56 nsrd Operation 487 started : Load volume `LEFT0950', volume id `2001118749'.
20.2.2010 13:25:56 nsrd media waiting event: waiting for sdlt320 tape LEFT0950 on sn-right.gbck.dc.root.local
20.2.2010 13:25:59 nsrmmgd Loading volume `LEFT0950' from slot `950' into device `rd=sn-right.gbck.dc.root.local:/dev/rtape/tape156_BESTnb'.
20.2.2010 13:26:00 nsrd rd=sn-right.gbck.dc.root.local:/dev/rtape/tape156_BESTnb Verify label operation in progress
20.2.2010 13:26:02 nsrd rd=sn-right.gbck.dc.root.local:/dev/rtape/tape156_BESTnb Mount operation in progress
20.2.2010 13:26:02 nsrd media event cleared: confirmed mount of LEFT0950 on rd=sn-right.gbck.dc.root.local:/dev/rtape/tape156_BESTnb
20.2.2010 13:26:02 nsrd db-left:/H (7/01/09) starting read from LEFT0950 of 569 MB
20.2.2010 13:26:07 nsrd [Jukebox `EQ1', operation # 487]. Finished with status: succeeded
20.2.2010 13:26:15 nsrd db-left:/H (7/01/09) done reading 569 MB
20.2.2010 13:27:16 nsrd db-left.lbck.dc.root.local:root done browsing
20.2.2010 13:27:43 nsrd Operation 489 started : Unload jukebox device `rd=sn-right.gbck.dc.root.local:/dev/rtape/tape156_BESTnb'.
20.2.2010 13:27:45 nsrd rd=sn-right.gbck.dc.root.local:/dev/rtape/tape156_BESTnb Eject operation in progress
20.2.2010 13:27:46 nsrmmgd Unloading volume `LEFT0950' from device `rd=sn-right.gbck.dc.root.local:/dev/rtape/tape156_BESTnb' to slot 950.
20.2.2010 13:27:51 nsrd [Jukebox `EQ1', operation # 489]. Finished with status: succeeded

2010 EMC Proven Professional Knowledge Sharing 40
Since we do Snapshot backups, let’s focus on Snapshot based restores now:
• Instant restore (file based restore)
• Rollback
Instant restore or Snapset restore is the process by which you can recover data directly from
the Snapshot device (BCVs). This allows fast recovery as data is read directly from the disk.
This is an interesting approach in cases where you wish to restore data that is on both tape
and Snapshot. By using Snapshot, you avoid the situation where restore does not run as the
tape is locked by another backup or restore process. You do not lock the tape drive while
doing it this way.
Rumour has it that the gremlin has struck again. Let's see what he’s done this time:
# rm -r ble installation10 installation4
# touch Evil_was_here
# ll
total 1138670
-rw------- 1 root sys 0 Jul 1 13:33 Evil_was_here
-rwxr-xr-x 1 root users 2586 May 28 06:03 LGTO_METAFILE.hpux11ia64
-rw-r--r-- 1 root users 291440640 May 28 08:40 NetWorker.pkg
drwx------ 7 root sys 1024 Jun 28 01:26 installation
drwx------ 7 root sys 1024 Jul 1 10:35 installation11
drwx------ 7 root sys 1024 Jun 28 01:31 installation2
drwx------ 7 root sys 1024 Jun 28 01:35 installation3
drwx------ 7 root sys 1024 Jun 28 02:23 installation5
drwx------ 7 root sys 1024 Jun 28 02:23 installation6
drwx------ 7 root sys 1024 Jun 28 02:24 installation7
drwx------ 7 root sys 1024 Jun 28 02:24 installation8
drwx------ 7 root sys 1024 Jun 28 02:24 installation9
drwxr-xr-x 2 root root 96 Jun 26 17:52 lost+found
-rw------- 1 root sys 291491840 Jun 28 01:40 nw74sp4_hpux11_ia64.tar
-rwxr-xr-x 1 root users 37316 May 28 06:03 sd_products.res
2010 EMC Proven Professional Knowledge Sharing 41
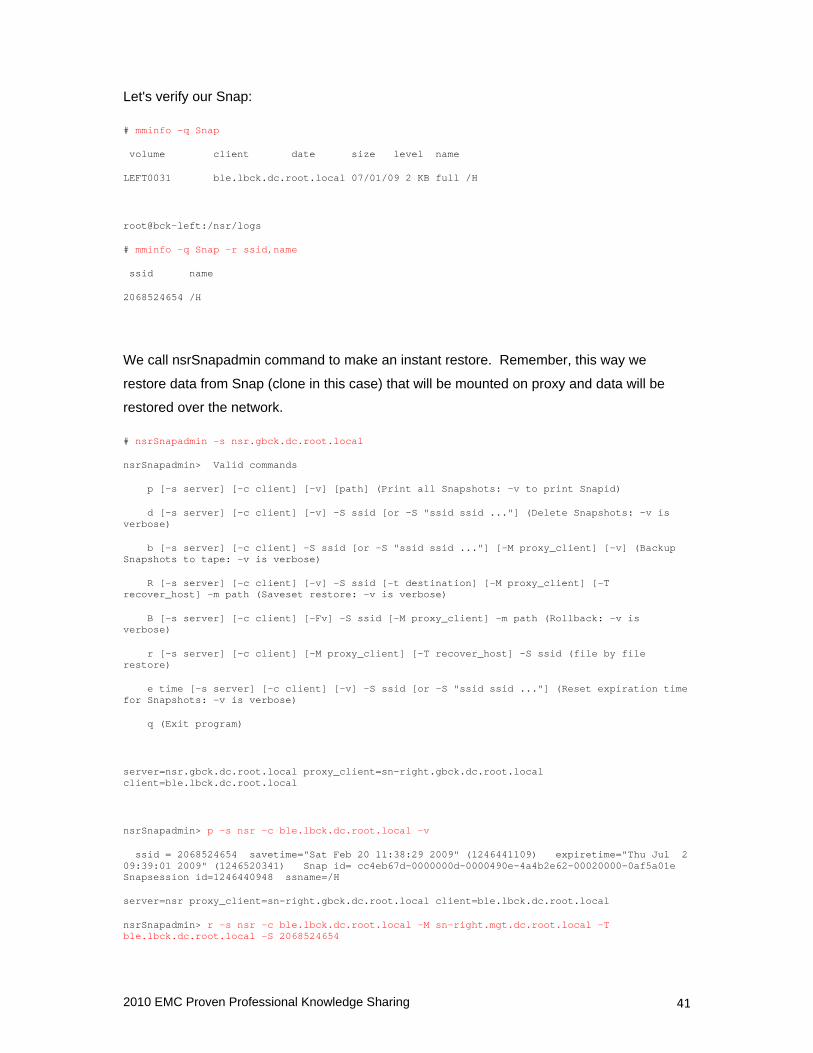
Let's verify our Snap:
# mminfo -q Snap
volume client date size level name
LEFT0031 ble.lbck.dc.root.local 07/01/09 2 KB full /H
root@bck-left:/nsr/logs
# mminfo -q Snap -r ssid,name
ssid name
2068524654 /H
We call nsrSnapadmin command to make an instant restore. Remember, this way we
restore data from Snap (clone in this case) that will be mounted on proxy and data will be
restored over the network.
# nsrSnapadmin -s nsr.gbck.dc.root.local
nsrSnapadmin> Valid commands
p [-s server] [-c client] [-v] [path] (Print all Snapshots: -v to print Snapid)
d [-s server] [-c client] [-v] -S ssid [or -S "ssid ssid ..."] (Delete Snapshots: -v is verbose)
b [-s server] [-c client] -S ssid [or -S "ssid ssid ..."] [-M proxy_client] [-v] (Backup Snapshots to tape: -v is verbose)
R [-s server] [-c client] [-v] -S ssid [-t destination] [-M proxy_client] [-T recover_host] -m path (Saveset restore: -v is verbose)
B [-s server] [-c client] [-Fv] -S ssid [-M proxy_client] -m path (Rollback: -v is verbose)
r [-s server] [-c client] [-M proxy_client] [-T recover_host] -S ssid (file by file restore)
e time [-s server] [-c client] [-v] -S ssid [or -S "ssid ssid ..."] (Reset expiration time for Snapshots: -v is verbose)
q (Exit program)
server=nsr.gbck.dc.root.local proxy_client=sn-right.gbck.dc.root.local client=ble.lbck.dc.root.local
nsrSnapadmin> p -s nsr -c ble.lbck.dc.root.local -v
ssid = 2068524654 savetime="Sat Feb 20 11:38:29 2009" (1246441109) expiretime="Thu Jul 2 09:39:01 2009" (1246520341) Snap id= cc4eb67d-0000000d-0000490e-4a4b2e62-00020000-0af5a01e Snapsession id=1246440948 ssname=/H
server=nsr proxy_client=sn-right.gbck.dc.root.local client=ble.lbck.dc.root.local
nsrSnapadmin> r -s nsr -c ble.lbck.dc.root.local -M sn-right.mgt.dc.root.local -T ble.lbck.dc.root.local -S 2068524654
2010 EMC Proven Professional Knowledge Sharing 42
Current working directory is /H/
Snaprecover> Snaprecover> ll
total 569337
3 -rwxr-xr-x root root 2586 May 28 06:03 LGTO_METAFILE.hpux11ia64*
284618 -rw-r--r-- root root 291440640 May 28 08:40 NetWorker.pkg
0 drwx------ root root 96 Jun 30 22:37 ble/
1 drwx------ root root 1024 Jun 28 01:26 installation/
1 drwx------ root root 1024 Jun 28 02:24 installation10/
1 drwx------ root root 1024 Jul 01 10:35 installation11/
1 drwx------ root root 1024 Jun 28 01:31 installation2/
1 drwx------ root root 1024 Jun 28 01:35 installation3/
1 drwx------ root root 1024 Jun 28 01:38 installation4/
1 drwx------ root root 1024 Jun 28 02:23 installation5/
1 drwx------ root root 1024 Jun 28 02:23 installation6/
1 drwx------ root root 1024 Jun 28 02:24 installation7/
1 drwx------ root root 1024 Jun 28 02:24 installation8/
1 drwx------ root root 1024 Jun 28 02:24 installation9/
0 drwxr-xr-x root root 96 Jun 26 17:52 lost+found/
284668 -rw------- root root 291491840 Jun 28 01:40 nw74sp4_hpux11_ia64.tar
37 -rwxr-xr-x root root 37316 May 28 06:03 sd_products.res*
Snaprecover>
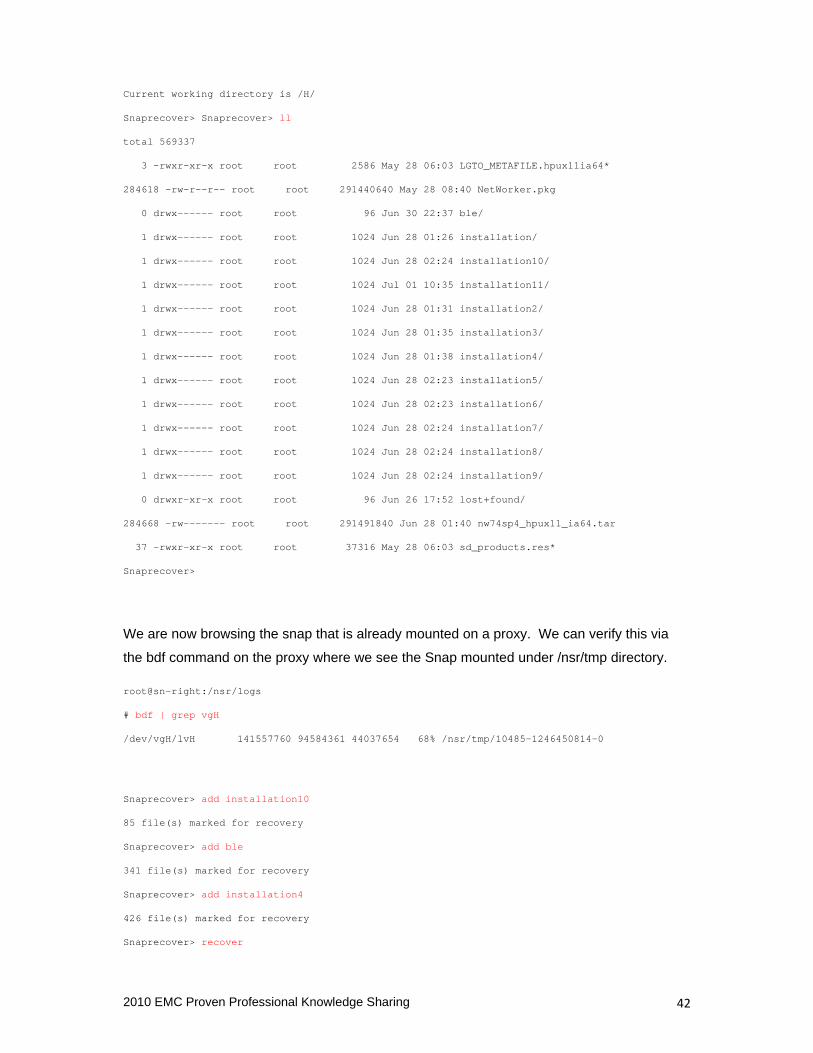
We are now browsing the snap that is already mounted on a proxy. We can verify this via
the bdf command on the proxy where we see the Snap mounted under /nsr/tmp directory.
root@sn-right:/nsr/logs
# bdf | grep vgH
/dev/vgH/lvH 141557760 94584361 44037654 68% /nsr/tmp/10485-1246450814-0
Snaprecover> add installation10
85 file(s) marked for recovery
Snaprecover> add ble
341 file(s) marked for recovery
Snaprecover> add installation4
426 file(s) marked for recovery
Snaprecover> recover

2010 EMC Proven Professional Knowledge Sharing 43
BR_RUN_UPDATEUNIT: Yes;
force_mcp: /H;
NSR_CLIENT: ble.lbck.dc.root.local;
NSR_DATA_MOVER: sn-right.mgt.dc.root.local;
NSR_DIRECTED_RECOVER_HOST: ble.lbck.dc.root.local;
NSR_RVS_CUT_OFF_SIZE: 512;
NSR_SERVER: nsr;
REC_IRMCP_SPLIT: Yes;
REC_RESTDEST_OPTIMA: Yes;
REC_SS_OPTIMA: Yes;
REC_VOL_OPTIMA: Yes;
As soon as the recover process is done, we are back into the Snaprecover prompt. When we
exit back to the parent prompt, the nsrSnapadmin clone copy on proxy will be unmounted.
Snaprecover> q
nsrSnapadmin: 65080:nsrSnapadmin:
Shutting down the browsing session. Please wait ...
server=nsr proxy_client=sn-right.mgt.dc.root.local client=ble.lbck.dc.root.local
Now we can also close nsrSnapadmin session.
nsrSnapadmin> q
We can verify what we did on our database system:
root@db-left:/H
# ll
total 1138674
-rw------- 1 root sys 0 Jul 1 13:33 Evil_was_here
-rwxr-xr-x 1 root users 2586 May 28 06:03 LGTO_METAFILE.hpux11ia64
-rw-r--r-- 1 root users 291440640 May 28 08:40 NetWorker.pkg
drwx------ 5 root sys 96 Jun 30 22:37 ble
drwx------ 7 root sys 1024 Jun 28 01:26 installation
drwx------ 7 root sys 1024 Jun 28 02:24 installation10
drwx------ 7 root sys 1024 Jul 1 10:35 installation11
drwx------ 7 root sys 1024 Jun 28 01:31 installation2

2010 EMC Proven Professional Knowledge Sharing 44
drwx------ 7 root sys 1024 Jun 28 01:35 installation3
drwx------ 7 root sys 1024 Jun 28 01:38 installation4
drwx------ 7 root sys 1024 Jun 28 02:23 installation5
drwx------ 7 root sys 1024 Jun 28 02:23 installation6
drwx------ 7 root sys 1024 Jun 28 02:24 installation7
drwx------ 7 root sys 1024 Jun 28 02:24 installation8
drwx------ 7 root sys 1024 Jun 28 02:24 installation9
drwxr-xr-x 2 root root 96 Jun 26 17:52 lost+found
-rw------- 1 root sys 291491840 Jun 28 01:40 nw74sp4_hpux11_ia64.tar
-rwxr-xr-x 1 root users 37316 May 28 06:03 sd_products.res
Our data is back!
We won't show PowerSnap logs here as in workflow and output they would be the same as
before. The same applies to NetWorker logs. What we see here is file by file restore as an
extension of the Pit-restore process; it provides the user with an interactive medium to
restore individual files or directories within a Snapset. The user can browse the Snapset
directory entries and choose the individual files/directories for recover.
What about rollback? This is a process that the user can perform to restore operations at the
disk level. In simple terms, it is the disk level copy of data from a Snapshot device like
BCV/Clone to an application device (STD). As it is destructive in nature, there is a safety
check. PowerSnap checks for availability of volume/partition other than the target saveset
volume on the application device. This type of file system restore is executed thorough the
nsrSnapadmin interface.
Our evil gremlin is erasing the whole volume.
# cd /H
# ll
total 1138674
-rw------- 1 root sys 0 Jul 1 13:33 Evil_was_here
-rwxr-xr-x 1 root users 2586 May 28 06:03 LGTO_METAFILE.hpux11ia64
-rw-r--r-- 1 root users 291440640 May 28 08:40 NetWorker.pkg
drwx------ 5 root sys 96 Jun 30 22:37 ble
drwx------ 7 root sys 1024 Jun 28 01:26 installation
drwx------ 7 root sys 1024 Jun 28 02:24 installation10
drwx------ 7 root sys 1024 Jul 1 10:35 installation11

2010 EMC Proven Professional Knowledge Sharing 45
drwx------ 7 root sys 1024 Jun 28 01:31 installation2
drwx------ 7 root sys 1024 Jun 28 01:35 installation3
drwx------ 7 root sys 1024 Jun 28 01:38 installation4
drwx------ 7 root sys 1024 Jun 28 02:23 installation5
drwx------ 7 root sys 1024 Jun 28 02:23 installation6
drwx------ 7 root sys 1024 Jun 28 02:24 installation7
drwx------ 7 root sys 1024 Jun 28 02:24 installation8
drwx------ 7 root sys 1024 Jun 28 02:24 installation9
drwxr-xr-x 2 root root 96 Jun 26 17:52 lost+found
-rw------- 1 root sys 291491840 Jun 28 01:40 nw74sp4_hpux11_ia64.tar
-rwxr-xr-x 1 root users 37316 May 28 06:03 sd_products.res
# rm -r installation*
# rm -r ble
# rm *
rm: lost+found directory
# ll
total 0
drwxr-xr-x 2 root root 96 Jun 26 17:52 lost+found
The whole volume has been wiped out. We use rollback to restore the whole volume (94GB)
It sounds ideal for this purpose. As before, we call for the nsrSnapadmin CLI command.
To use rollback we use the B option, but it is always good practice to check what Snaps we
have available with the p option.
Note: after a successful rollback, the BCV/clone is removed.
# nsrSnapadmin -s nsr
nsrSnapadmin> Valid commands
p [-s server] [-c client] [-v] [path] (Print all Snapshots: -v to print Snapid)
d [-s server] [-c client] [-v] -S ssid [or -S "ssid ssid ..."] (Delete Snapshots: -v is verbose)
b [-s server] [-c client] -S ssid [or -S "ssid ssid ..."] [-M proxy_client] [-v] (Backup Snapshots to tape: -v is verbose)
R [-s server] [-c client] [-v] -S ssid [-t destination] [-M proxy_client] [-T recover_host] -m path (Saveset restore: -v is verbose)

2010 EMC Proven Professional Knowledge Sharing 46
B [-s server] [-c client] [-Fv] -S ssid [-M proxy_client] -m path (Rollback: -v is verbose)
r [-s server] [-c client] [-M proxy_client] [-T recover_host] -S ssid (file by file restore)
e time [-s server] [-c client] [-v] -S ssid [or -S "ssid ssid ..."] (Reset expiration time for Snapshots: -v is verbose)
q (Exit program)
server=nsr proxy_client=db-left client=db-left
nsrSnapadmin> p -s nsr -c db-left.lbck.dc.root.local
ssid = 2068524654 savetime="Sat Feb 20 11:38:29 2009" (1246441109) expiretime="Thu Jul 2 09:39:01 2009" (1246520341) ssname=/H
server=nsr proxy_client=db-left client=db-left.lbck.dc.root.local
Let’s check what symcloe says.
# symclone -g BLE_r1 query
Device Group (DG) Name: BLE_r1
DG's Type : RDF1
DG's Symmetrix ID : 000000002074
Source Device Target Device State Copy
--------------------------------- ---------------------------- ------------ ----
Protected Modified Modified
Logical Sym Tracks Tracks Logical Sym Tracks CGDP SRC <=> TGT (%)
--------------------------------- ---------------------------- ------------ ----
DEV001 028B 0 0 TGT001 0295 0 XXX. Copied 100
DEV002 028C 0 0 TGT002 0296 0 XXX. Copied 100
DEV003 028D 0 0 TGT003 0297 0 XXX. Copied 100
DEV004 028E 0 0 TGT004 0298 0 XXX. Copied 100
DEV005 028F 0 0 TGT005 0299 0 XXX. Copied 100
DEV006 0290 0 0 TGT006 029A 0 XXX. Copied 100
DEV007 0291 0 0 TGT007 029B 0 XXX. Copied 100
DEV008 0292 0 0 TGT008 029C 0 XXX. Copied 100
DEV009 0293 0 0 TGT009 029D 0 XXX. Copied 100
DEV010 0294 0 0 TGT010 029E 0 XXX. Copied 100

2010 EMC Proven Professional Knowledge Sharing 47
Total -------- -------- --------
Track(s) 0 0 0
MB(s) 0.0 0.0 0.0
nsrSnapadmin> B -s nsr -c db-left.lbck.dc.root.local -Fv -S 2068524654 -M sn-left.gbck.dc.root.local -m /H
Performing rollback for ssid: 2068524654
nsrSnap_recover: Starting recovery of client [db-left.lbck.dc.root.local] from NetWorker server [nsr] via proxy host [sn-left.gbck.dc.root.local]
nsrSnap_recover: Preparing /H
nsrSnap_recover: Restoring /H
25051:nsrSnap_recover:nsrSnap_recover: /H: Error while restoring.
61540:nsrpsd:/H :Filesystem unmount failed : Reason : Busy
25047:nsrSnap_recover:Restore failed. Reason 3.
25032:nsrSnap_recover:nsrSnap_recover: Restore Failed.
20099:nsrSnap_recover:Recover operation failed.
nsrSnap_recover -s nsr -c db-left.lbck.dc.root.local -M sn-left.gbck.dc.root.local -S 2068524654 -A RESTORE_TYPE_ORDER=force_rollback /H nsrSnapadmin: Process [20348] exited with return code [255].
61610:nsrSnapadmin:Rollback for Snapshot [2068524654] failed.
server=nsr proxy_client=sn-left.gbck.dc.root.local client=db-left.lbck.dc.root.local
Alert, alert! It FAILED! Usually, you expect documentation to contain successful examples.
The error message suggests that something is locking our /H volume and we can't unmount
it. Obviously we can't have open processes on the volume. We can use the fuser command
to see what is locking it.
# fuser /H
/H: 19697c
# ps -ef | grep 19697 | grep –v grep
root 19697 19694 0 14:32:25 pts/1 0:00 -sh
# ps -ef | grep 19694 | grep –v grep
root 19694 1668 0 14:32:23 ? 0:00 sshd: root@pts/1
root 19697 19694 0 14:32:25 pts/1 0:00 –sh
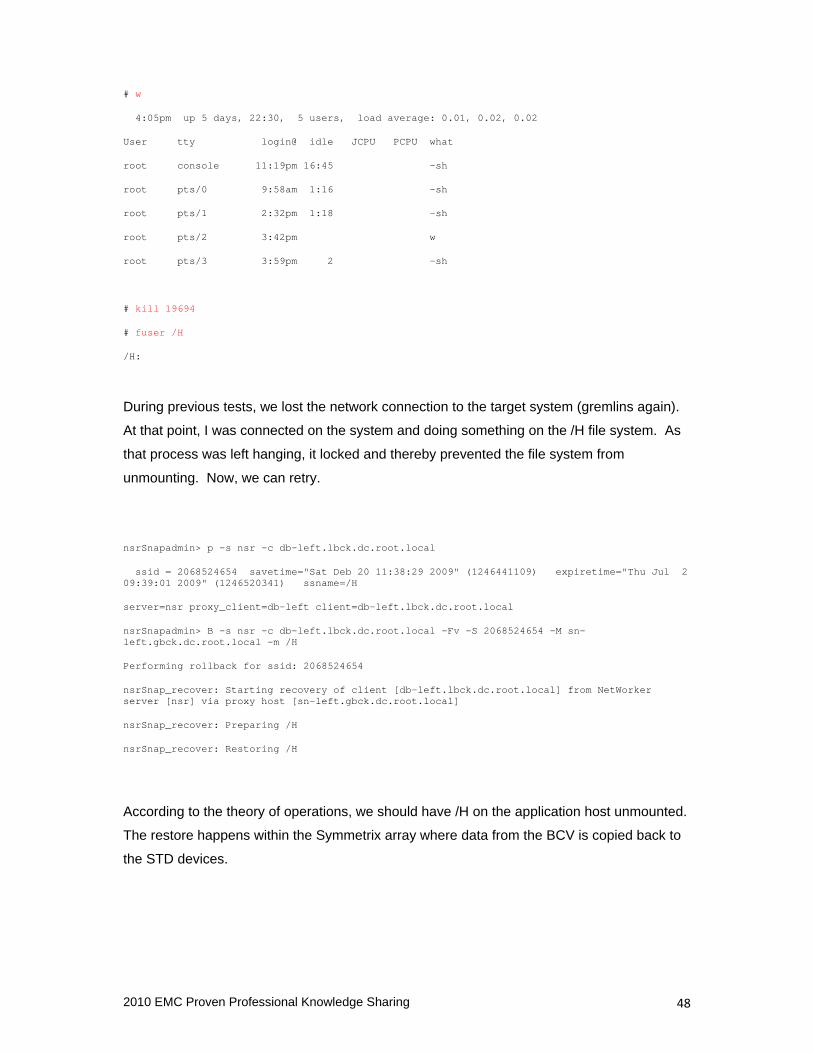
2010 EMC Proven Professional Knowledge Sharing 48
# w
4:05pm up 5 days, 22:30, 5 users, load average: 0.01, 0.02, 0.02
User tty login@ idle JCPU PCPU what
root console 11:19pm 16:45 -sh
root pts/0 9:58am 1:16 -sh
root pts/1 2:32pm 1:18 -sh
root pts/2 3:42pm w
root pts/3 3:59pm 2 -sh
# kill 19694
# fuser /H
/H:
During previous tests, we lost the network connection to the target system (gremlins again).
At that point, I was connected on the system and doing something on the /H file system. As
that process was left hanging, it locked and thereby prevented the file system from
unmounting. Now, we can retry.
nsrSnapadmin> p -s nsr -c db-left.lbck.dc.root.local
ssid = 2068524654 savetime="Sat Deb 20 11:38:29 2009" (1246441109) expiretime="Thu Jul 2 09:39:01 2009" (1246520341) ssname=/H
server=nsr proxy_client=db-left client=db-left.lbck.dc.root.local
nsrSnapadmin> B -s nsr -c db-left.lbck.dc.root.local -Fv -S 2068524654 -M sn-left.gbck.dc.root.local -m /H
Performing rollback for ssid: 2068524654
nsrSnap_recover: Starting recovery of client [db-left.lbck.dc.root.local] from NetWorker server [nsr] via proxy host [sn-left.gbck.dc.root.local]
nsrSnap_recover: Preparing /H
nsrSnap_recover: Restoring /H
According to the theory of operations, we should have /H on the application host unmounted.
The restore happens within the Symmetrix array where data from the BCV is copied back to
the STD devices.

2010 EMC Proven Professional Knowledge Sharing 49
nsrSnap_recover: Completed the restore of /H
Rollback for Snapshot [2068524654] completed successfully.
server=nsr proxy_client=sn-left.gbck.dc.root.local client=db-left.lbck.dc.root.local
nsrSnapadmin> q
/H is mounted back when done.
# ll /H
total 1138674
-rwxr-xr-x 1 root users 2586 May 28 06:03 LGTO_METAFILE.hpux11ia64
-rw-r--r-- 1 root users 291440640 May 28 08:40 NetWorker.pkg
drwx------ 5 root sys 96 Jun 30 22:37 ble
drwx------ 7 root sys 1024 Jun 28 01:26 installation
drwx------ 7 root sys 1024 Jun 28 02:24 installation10
drwx------ 7 root sys 1024 Jul 1 10:35 installation11
drwx------ 7 root sys 1024 Jun 28 01:31 installation2
drwx------ 7 root sys 1024 Jun 28 01:35 installation3
drwx------ 7 root sys 1024 Jun 28 01:38 installation4
drwx------ 7 root sys 1024 Jun 28 02:23 installation5
drwx------ 7 root sys 1024 Jun 28 02:23 installation6
drwx------ 7 root sys 1024 Jun 28 02:24 installation7
drwx------ 7 root sys 1024 Jun 28 02:24 installation8
drwx------ 7 root sys 1024 Jun 28 02:24 installation9
drwxr-xr-x 2 root root 96 Jun 26 17:52 lost+found
-rw------- 1 root sys 291491840 Jun 28 01:40 nw74sp4_hpux11_ia64.tar
-rwxr-xr-x 1 root users 37316 May 28 06:03 sd_products.res
# symclone -g pSnap_local query
Device Group (DG) Name: pSnap_local
DG's Type : RDF1
DG's Symmetrix ID : 000000002074

2010 EMC Proven Professional Knowledge Sharing 50
Source Device Target Device State Copy
--------------------------------- ---------------------------- ------------ ----
Protected Modified Modified
Logical Sym Tracks Tracks Logical Sym Tracks CGDP SRC <=> TGT (%)
--------------------------------- ---------------------------- ------------ ----
DEV001 028B 0 0 TGT001 0295 0 XXX. Split 100
DEV002 028C 0 0 TGT002 0296 0 XXX. Split 100
DEV003 028D 0 0 TGT003 0297 0 XXX. Split 100
DEV004 028E 0 0 TGT004 0298 0 XXX. Split 100
DEV005 028F 0 0 TGT005 0299 0 XXX. Split 100
DEV006 0290 0 0 TGT006 029A 0 XXX. Split 100
DEV007 0291 0 0 TGT007 029B 0 XXX. Split 100
DEV008 0292 0 0 TGT008 029C 0 XXX. Split 100
DEV009 0293 0 0 TGT009 029D 0 XXX. Split 100
DEV010 0294 0 0 TGT010 029E 0 XXX. Split 100
Total -------- -------- --------
Track(s) 0 0 0
MB(s) 0.0 0.0 0.0
We can see that SRC and TGT remain split after restore.
Let's take a closer look at the application log.
20.2.2010 16:08:50 db-left nsrpsd brc_session created
20.2.2010 16:08:50 db-left nsrpsd pb_open
20.2.2010 16:10:16 db-left nsrpsd Fsname is /H
20.2.2010 16:10:16 db-left nsrpsd FSType is vxfs
20.2.2010 16:10:16 db-left nsrpsd No other files on filesystem /H - Rollback is safe
20.2.2010 16:10:16 db-left nsrpsd No other files on Disk or Volume Group - Rollback is safe
20.2.2010 16:10:16 db-left nsrpsd pb_prepare
20.2.2010 16:10:18 db-left nsrpsd pb_restore
20.2.2010 16:10:18 db-left nsrpsd /H : File system unmounted successfully
20.2.2010 16:10:38 db-left nsrpsd vgH : Volume Group deported successfully
SELECTING the list of Source devices in the group:

2010 EMC Proven Professional Knowledge Sharing 51
Device: 0294 [SELECTED]
Device: 0293 [SELECTED]
Device: 0292 [SELECTED]
Device: 0291 [SELECTED]
Device: 0290 [SELECTED]
Device: 028F [SELECTED]
Device: 028E [SELECTED]
Device: 028D [SELECTED]
Device: 028C [SELECTED]
Device: 028B [SELECTED]
SELECTING Target devices in the group:
Device: 029E [SELECTED]
Device: 029D [SELECTED]
Device: 029C [SELECTED]
Device: 029B [SELECTED]
Device: 029A [SELECTED]
Device: 0299 [SELECTED]
Device: 0298 [SELECTED]
Device: 0297 [SELECTED]
Device: 0296 [SELECTED]
Device: 0295 [SELECTED]
PAIRING of Source and Target devices:
Devices: 0294(S) - 029E(T) [PAIRED]
Devices: 0293(S) - 029D(T) [PAIRED]
Devices: 0292(S) - 029C(T) [PAIRED]
Devices: 0291(S) - 029B(T) [PAIRED]
Devices: 0290(S) - 029A(T) [PAIRED]
Devices: 028F(S) - 0299(T) [PAIRED]
Devices: 028E(S) - 0298(T) [PAIRED]
Devices: 028D(S) - 0297(T) [PAIRED]
Devices: 028C(S) - 0296(T) [PAIRED]

2010 EMC Proven Professional Knowledge Sharing 52
Devices: 028B(S) - 0295(T) [PAIRED]
STARTING a Clone 'INCREMENTAL_RESTORE' operation.
The Clone 'INCREMENTAL_RESTORE' operation SUCCEEDED.
SELECTING the list of Source devices in the group:
Device: 0294 [SELECTED]
Device: 0293 [SELECTED]
Device: 0292 [SELECTED]
Device: 0291 [SELECTED]
Device: 0290 [SELECTED]
Device: 028F [SELECTED]
Device: 028E [SELECTED]
Device: 028D [SELECTED]
Device: 028C [SELECTED]
Device: 028B [SELECTED]
SELECTING Target devices in the group:
Device: 029E [SELECTED]
Device: 029D [SELECTED]
Device: 029C [SELECTED]
Device: 029B [SELECTED]
Device: 029A [SELECTED]
Device: 0299 [SELECTED]
Device: 0298 [SELECTED]
Device: 0297 [SELECTED]
Device: 0296 [SELECTED]
Device: 0295 [SELECTED]
PAIRING of Source and Target devices:
Devices: 0294(S) - 029E(T) [PAIRED]

2010 EMC Proven Professional Knowledge Sharing 53
Devices: 0293(S) - 029D(T) [PAIRED]
Devices: 0292(S) - 029C(T) [PAIRED]
Devices: 0291(S) - 029B(T) [PAIRED]
Devices: 0290(S) - 029A(T) [PAIRED]
Devices: 028F(S) - 0299(T) [PAIRED]
Devices: 028E(S) - 0298(T) [PAIRED]
Devices: 028D(S) - 0297(T) [PAIRED]
Devices: 028C(S) - 0296(T) [PAIRED]
Devices: 028B(S) - 0295(T) [PAIRED]
STARTING a Clone 'SPLIT' operation.
The Clone 'SPLIT' operation SUCCEEDED.
20.2.2010 16:20:30 db-left nsrpsd NSR saveset id: 2068524654;
20.2.2010 16:20:30 db-left nsrpsd NSR_CLIENT_OS_NAME: hpux;
20.2.2010 16:20:30 db-left nsrpsd NSR_DATA_MOVER: sn-left.gbck.dc.root.local;
20.2.2010 16:20:30 db-left nsrpsd NSR_PARENT_JOBID: 1056565;
20.2.2010 16:20:30 db-left nsrpsd NSR_PS_DEBUG_DUPTO_LOG: 1;
20.2.2010 16:20:30 db-left nsrpsd NSR_PS_DEBUG_ID: 1246457330;
20.2.2010 16:20:30 db-left nsrpsd NSR_SERVER: nsr;
20.2.2010 16:20:30 db-left nsrpsd RESTORE_TYPE_ORDER: force_rollback;
20.2.2010 16:21:58 db-left nsrpsd vgH : Volume Group imported successfully
20.2.2010 16:21:58 db-left nsrpsd Given mount point is not used:/H
20.2.2010 16:21:59 db-left nsrpsd pb_postpare
20.2.2010 16:22:00 db-left nsrpsd pb_close
20.2.2010 16:22:00 db-left nsrpsd pb_end
NSRSNAPCK::success.
nsrSnapck completed successfully.
The last message, indicating nsrSnapck successful run, indicates that the Snap used for
rollback has been removed from NetWorker. Rollback of a managed or non-managed
volume releases the BCV lock. This prevents the Snapshot from being maintained and
causes the Snap set to become invalid. Perform a tape backup of the Snapshot before
performing a rollback operation.

2010 EMC Proven Professional Knowledge Sharing 54
If you would do the same thing with the R2 BCV there would be no change. We will
conclude the story with PowerSnap usage with file system backup, showing how this works
with restores from BCVRs.
If you remember, we can’t use clones with BCVRs; I had to add BCVs first. We will skip the
details as you should be familiar with those.
Here is the status/relationship of our new devices:
Symmetrix ID: 000000002217
Standard Device BCV Device State
-------------------- ----------------------- --------------
Invalid Invalid GBE
Sym Tracks Sym Tracks STD <=> BCV
-------------------- ----------------------- --------------
028B 0 029E 0 ..X Split
028C 0 0298 0 ..X Split
028D 0 029D 0 ..X Split
028E 0 0299 0 ..X Split
028F 0 0296 0 ..X Split
0290 0 029A 0 ..X Split
0291 0 029B 0 ..X Split
0292 0 0295 0 ..X Split
0293 0 029C 0 ..X Split
0294 0 0297 0 ..X Split
X above means that the BCV is in emulation mode which is exactly what we want (beneath
the surface it is still a clone, but I will say a few words on that at the end). From a backup
application point of view, we just have to make sure that we:
• Set appropriate application information suggesting we are now using the R2 copy
• Set the Snap pool file correctly with the exact relationship
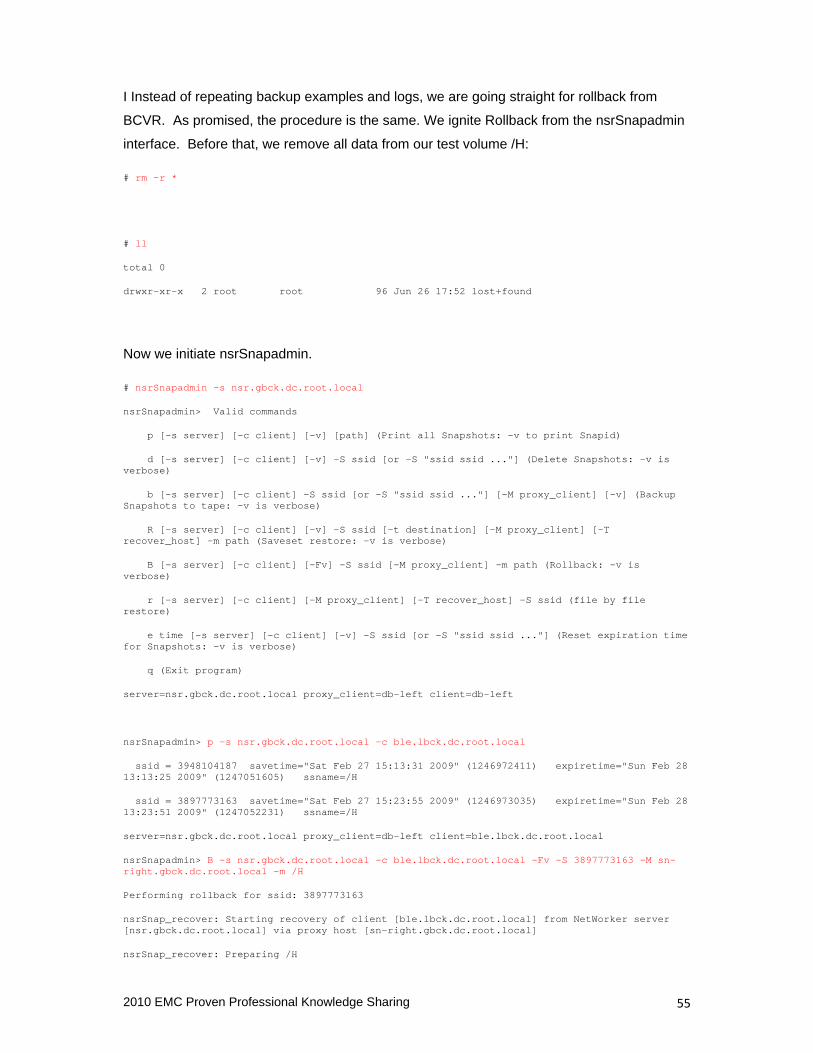
2010 EMC Proven Professional Knowledge Sharing 55
I Instead of repeating backup examples and logs, we are going straight for rollback from
BCVR. As promised, the procedure is the same. We ignite Rollback from the nsrSnapadmin
interface. Before that, we remove all data from our test volume /H:
# rm -r *
# ll
total 0
drwxr-xr-x 2 root root 96 Jun 26 17:52 lost+found
Now we initiate nsrSnapadmin.
# nsrSnapadmin -s nsr.gbck.dc.root.local
nsrSnapadmin> Valid commands
p [-s server] [-c client] [-v] [path] (Print all Snapshots: -v to print Snapid)
d [-s server] [-c client] [-v] -S ssid [or -S "ssid ssid ..."] (Delete Snapshots: -v is verbose)
b [-s server] [-c client] -S ssid [or -S "ssid ssid ..."] [-M proxy_client] [-v] (Backup Snapshots to tape: -v is verbose)
R [-s server] [-c client] [-v] -S ssid [-t destination] [-M proxy_client] [-T recover_host] -m path (Saveset restore: -v is verbose)
B [-s server] [-c client] [-Fv] -S ssid [-M proxy_client] -m path (Rollback: -v is verbose)
r [-s server] [-c client] [-M proxy_client] [-T recover_host] -S ssid (file by file restore)
e time [-s server] [-c client] [-v] -S ssid [or -S "ssid ssid ..."] (Reset expiration time for Snapshots: -v is verbose)
q (Exit program)
server=nsr.gbck.dc.root.local proxy_client=db-left client=db-left
nsrSnapadmin> p -s nsr.gbck.dc.root.local -c ble.lbck.dc.root.local
ssid = 3948104187 savetime="Sat Feb 27 15:13:31 2009" (1246972411) expiretime="Sun Feb 28 13:13:25 2009" (1247051605) ssname=/H
ssid = 3897773163 savetime="Sat Feb 27 15:23:55 2009" (1246973035) expiretime="Sun Feb 28 13:23:51 2009" (1247052231) ssname=/H
server=nsr.gbck.dc.root.local proxy_client=db-left client=ble.lbck.dc.root.local
nsrSnapadmin> B -s nsr.gbck.dc.root.local -c ble.lbck.dc.root.local -Fv -S 3897773163 -M sn-right.gbck.dc.root.local -m /H
Performing rollback for ssid: 3897773163
nsrSnap_recover: Starting recovery of client [ble.lbck.dc.root.local] from NetWorker server [nsr.gbck.dc.root.local] via proxy host [sn-right.gbck.dc.root.local]
nsrSnap_recover: Preparing /H

2010 EMC Proven Professional Knowledge Sharing 56
nsrSnap_recover: Restoring /H
At this point our restore has started. This means that the volume mounted on the production system is
unmounted and that the Symmetrix level restore from BCV towards STD devices has started.
nsrSnap_recover: Completed the restore of /H
Rollback for Snapshot [3897773163] completed successfully.
server=nsr.gbck.dc.root.local proxy_client=sn-right.gbck.dc.root.local client=ble.lbck.dc.root.local
nsrSnapadmin> nsrSnapadmin> q
We see that the restore has completed without any errors. Upon completing this operation,
the original volume is mounted back along with all data restored from Snapshot. Our H
volume is again populated with data.
# ll /H
total 1138674
-rwxr-xr-x 1 root users 2586 May 28 06:03 LGTO_METAFILE.hpux11ia64
-rw-r--r-- 1 root users 291440640 May 28 08:40 NetWorker.pkg
drwx------ 5 root sys 96 Jun 30 22:37 ble
drwx------ 7 root sys 1024 Jun 28 01:26 installation
drwx------ 7 root sys 1024 Jun 28 02:24 installation10
drwx------ 7 root sys 1024 Jul 1 10:35 installation11
drwx------ 7 root sys 1024 Jun 28 01:31 installation2
drwx------ 7 root sys 1024 Jun 28 01:35 installation3
drwx------ 7 root sys 1024 Jun 28 01:38 installation4
drwx------ 7 root sys 1024 Jun 28 02:23 installation5
drwx------ 7 root sys 1024 Jun 28 02:23 installation6
drwx------ 7 root sys 1024 Jun 28 02:24 installation7
drwx------ 7 root sys 1024 Jun 28 02:24 installation8
drwx------ 7 root sys 1024 Jun 28 02:24 installation9
drwxr-xr-x 2 root root 96 Jun 26 17:52 lost+found
-rw------- 1 root sys 291491840 Jun 28 01:40 nw74sp4_hpux11_ia64.tar
-rwxr-xr-x 1 root users 37316 May 28 06:03 sd_products.res

2010 EMC Proven Professional Knowledge Sharing 57
On the application host, the PowerSnap logs show the following:
27.2.2010 22:37:25 db-left nsrpsd *appid: 1;
27.2.2010 22:37:25 db-left nsrpsd *coverid: 3914550379;
27.2.2010 22:37:25 db-left nsrpsd *crname: /H;
27.2.2010 22:37:25 db-left nsrpsd *NSR_SNAPBUFFER: \"SYMMv1|PROVIDER_DATA:-NULL-NULL-|0|10|-|/dev/rdisk/disk12|28B|000290104163|2\9E|000290104422|4|251761182|1246972960|4|1|1|1|0|1|-|/dev/rdisk/disk13|28C|00\0290104163|298|000290104422|4|251761182|1246972959|4|1|1|1|0|1|-|/dev/rdisk/d\isk14|28D|000290104163|29D|000290104422|4|251761182|1246972959|4|1|1|1|0|1|-|\/dev/rdisk/disk15|28E|000290104163|299|000290104422|4|251761182|1246972959|4|\1|1|1|0|1|-|/dev/rdisk/disk16|28F|000290104163|296|000290104422|4|251761182|1\24697
27.2.2010 22:37:25 db-left nsrpsd *SNAP_GROUPING_LEVEL: 3;
27.2.2010 22:37:25 db-left nsrpsd *Snap_sessionid: 1246972792;
27.2.2010 22:37:25 db-left nsrpsd *Snapid: \95558174-0000000d-000038dd-4a534c2f-00020000-0af5a01e;
27.2.2010 22:37:25 db-left nsrpsd *Snapset: Yes;
27.2.2010 22:37:25 db-left nsrpsd *SnapVendor: symm-dmx;
27.2.2010 22:37:25 db-left nsrpsd *ss clone retention: \" 1246973035: 1246973035: 79196";
27.2.2010 22:37:25 db-left nsrpsd *stack_fs: LINKMAP|, /H|vxfs|0|0|undef;
27.2.2010 22:37:25 db-left nsrpsd *stack_lun: \LINKMAP|0-0|1-1|2-2|3-3|4-4|5-5|6-6|7-7|8-8|9-9|, /dev/rdisk/disk12|0|0, /dev/rdisk/disk13|0|0, /dev/rdisk/disk14|0|0, /dev/rdisk/disk15|0|0, /dev/rdisk/disk16|0|0, /dev/rdisk/disk17|0|0, /dev/rdisk/disk18|0|0, /dev/rdisk/disk19|0|0, /dev/rdisk/disk20|0|0, /dev/rdisk/disk21|0|0;
27.2.2010 22:37:25 db-left nsrpsd *stack_partition: \LINKMAP|0-0|1-0|2-0|3-0|4-0|5-0|6-0|7-0|8-0|9-0|, /dev/rdisk/disk12|1|0|0, /dev/rdisk/disk13|1|0|0, /dev/rdisk/disk14|1|0|0, /dev/rdisk/disk15|1|0|0, /dev/rdisk/disk16|1|0|0, /dev/rdisk/disk17|1|0|0, /dev/rdisk/disk18|1|0|0, /dev/r
27.2.2010 22:37:25 db-left nsrpsd *stack_vg: LINKMAP|0-0|, "vgH|1 lvH|LVM|3|11|0|0|0|/dev/rdisk/disk12 /dev/rdisk/disk13 /dev/rdisk/disk14 /dev/rdisk/disk15 /dev/rdisk/disk16 /dev/rdisk/disk17 /dev/rdisk/disk18 /dev/rdisk/disk19 /dev/rdisk/disk20 /dev/rdisk/disk21 ";
27.2.2010 22:37:25 db-left nsrpsd *stack_vol: LINKMAP|0-0|, /dev/vgH/lvH|/dev/vgH/rlvH|2|0|0|0|;
27.2.2010 22:37:25 db-left nsrpsd group: BLE_FS_PRD_RIGHT_local_R2;
27.2.2010 22:36:37 db-left nsrpsd EMC NetWorker PowerSnap v2.4.3 # Copyright (c) 2010, EMC Corporation. #All rights reserved.
27.2.2010 22:36:37 db-left nsrpsd PowerSnap logging initialized with a debug level 0
27.2.2010 22:36:37 db-left nsrpsd Start to record message
27.2.2010 22:36:37 db-left nsrpsd message ID 1246998997
27.2.2010 22:36:37 db-left nsrpsd USING vendor = symm-dmx
27.2.2010 22:36:37 db-left nsrpsd USING vendor = nas

2010 EMC Proven Professional Knowledge Sharing 58
27.2.2010 22:36:37 db-left nsrpsd brc_session created
27.2.2010 22:36:37 db-left nsrpsd pb_open
27.2.2010 22:38:07 db-left nsrpsd Fsname is /H
27.2.2010 22:38:07 db-left nsrpsd FSType is vxfs
27.2.2010 22:38:07 db-left nsrpsd No other files on filesystem /H - Rollback is safe
27.2.2010 22:38:07 db-left nsrpsd No other files on Disk or Volume Group - Rollback is safe
27.2.2010 22:38:07 db-left nsrpsd pb_prepare
27.2.2010 22:38:08 db-left nsrpsd pb_restore
27.2.2010 22:38:08 db-left nsrpsd /H : File system unmounted successfully
27.2.2010 22:38:29 db-left nsrpsd vgH : Volume Group deported successfully
27.2.2010 22:38:29 db-left nsrpsd Performing rollback operation.....
At this point, we see the volume has been unmounted and the volume group deported.
SELECTING the list of Standard devices in the group:
Device: 028B [SELECTED]
Device: 028C [SELECTED]
Device: 028D [SELECTED]
Device: 028E [SELECTED]
Device: 028F [SELECTED]
Device: 0290 [SELECTED]
Device: 0291 [SELECTED]
Device: 0292 [SELECTED]
Device: 0293 [SELECTED]
Device: 0294 [SELECTED]
SELECTING BCV devices associated with the group:
Device: 029E [SELECTED]
Device: 0298 [SELECTED]
Device: 029D [SELECTED]
Device: 0299 [SELECTED]
Device: 0296 [SELECTED]
Device: 029A [SELECTED]
Device: 029B [SELECTED]
Device: 0295 [SELECTED]

2010 EMC Proven Professional Knowledge Sharing 59
Device: 029C [SELECTED]
Device: 0297 [SELECTED]
PAIRING of Standard and BCV devices:
Devices: 028B(S) - 029E(B) [PAIRED]
Devices: 028C(S) - 0298(B) [PAIRED]
Devices: 028D(S) - 029D(B) [PAIRED]
Devices: 028E(S) - 0299(B) [PAIRED]
Devices: 028F(S) - 0296(B) [PAIRED]
Devices: 0290(S) - 029A(B) [PAIRED]
Devices: 0291(S) - 029B(B) [PAIRED]
Devices: 0292(S) - 0295(B) [PAIRED]
Devices: 0293(S) - 029C(B) [PAIRED]
Devices: 0294(S) - 0297(B) [PAIRED]
STARTING a BCV 'INCREMENTAL_RESTORE' operation.
The BCV 'INCREMENTAL_RESTORE' operation SUCCEEDED.
SELECTING the list of Standard devices in the group:
Device: 028B [SELECTED]
Device: 028C [SELECTED]
Device: 028D [SELECTED]
Device: 028E [SELECTED]
Device: 028F [SELECTED]
Device: 0290 [SELECTED]
Device: 0291 [SELECTED]
Device: 0292 [SELECTED]
Device: 0293 [SELECTED]
Device: 0294 [SELECTED]

2010 EMC Proven Professional Knowledge Sharing 60
SELECTING BCV devices associated with the group:
Device: 029E [SELECTED]
Device: 0298 [SELECTED]
Device: 029D [SELECTED]
Device: 0299 [SELECTED]
Device: 0296 [SELECTED]
Device: 029A [SELECTED]
Device: 029B [SELECTED]
Device: 0295 [SELECTED]
Device: 029C [SELECTED]
Device: 0297 [SELECTED]
PAIRING of Standard and BCV devices:
Devices: 028B(S) - 029E(B) [PAIRED]
Devices: 028C(S) - 0298(B) [PAIRED]
Devices: 028D(S) - 029D(B) [PAIRED]
Devices: 028E(S) - 0299(B) [PAIRED]
Devices: 028F(S) - 0296(B) [PAIRED]
Devices: 0290(S) - 029A(B) [PAIRED]
Devices: 0291(S) - 029B(B) [PAIRED]
Devices: 0292(S) - 0295(B) [PAIRED]
Devices: 0293(S) - 029C(B) [PAIRED]
Devices: 0294(S) - 0297(B) [PAIRED]
STARTING a BCV 'SPLIT' operation.
The BCV 'SPLIT' operation SUCCEEDED.

2010 EMC Proven Professional Knowledge Sharing 61
An incremental restore has been done between devices; data is now restored. PowerSnap
will mount back our volume.
27.2.2010 22:47:20 db-left nsrpsd NSR saveset id: 3897773163;
27.2.2010 22:47:20 db-left nsrpsd NSR_CLIENT_OS_NAME: hpux;
27.2.2010 22:47:20 db-left nsrpsd NSR_DATA_MOVER: sn-right.gbck.dc.root.local;
27.2.2010 22:47:20 db-left nsrpsd NSR_PARENT_JOBID: 1088821;
27.2.2010 22:47:20 db-left nsrpsd NSR_PS_DEBUG_DUPTO_LOG: 1;
27.2.2010 22:47:20 db-left nsrpsd NSR_PS_DEBUG_ID: 1246998997;
27.2.2010 22:47:20 db-left nsrpsd NSR_SERVER: nsr.gbck.dc.root.local;
27.2.2010 22:47:20 db-left nsrpsd RESTORE_TYPE_ORDER: force_rollback;
27.2.2010 22:48:47 db-left nsrpsd vgH : Volume Group imported successfully
27.2.2010 22:48:47 db-left nsrpsd Given mount point is not used:/H
27.2.2010 22:48:47 db-left nsrpsd pb_postpare
27.2.2010 22:48:48 db-left nsrpsd pb_close
27.2.2010 22:48:48 db-left nsrpsd pb_end
nsrSnapck completed successfully.
We do not see much action in the proxy logs at the Symmetrix level. This action is not
registered on the backup server.
This concludes backup and restore using PowerSnap. The real benefit is realized when you
must restore huge amounts of data. That is when the real power of rollback shines. Now,
large amounts of data are reserved for NAS filers and databases. This means that the real
thing is about to come.
At the end of this section, you may wonder if there is a GUI that would allow you to do this.
The answer is - no. It used to be called nwSnapmgr. Well, at least it used to be in 2.3.x
version and earlier. In 2.4.x and 2.5x I could not locate it nor could I find any reference in
documentation. This is not big issue as on UNIX you don't use GUI much anyway.

2010 EMC Proven Professional Knowledge Sharing 62
What about Database Backup? Let's say big SAP database... can you make my day? We will now focus on R1 backup (Snapshot only), R2 backup (Snapshot and live backup),
and rollback from BCVR. Here is why I do not cover instant restore or tape restore:
• I keep Snapshots for 23 hours – in 99% of cases restores within that period can be
covered with archive logs unless rollback is required
• I don't wish to end up with mammoth amounts of documentation
First, install the Networker module for SAP. In this example, we use module version 3.5
build 306 (note that this is not the GA version available on EMC Powerlink). Installation is
simple using swinstall and we can verify installed package with swlist once installed.
# swlist NMSAP
# Initializing...
# Contacting target "db-left"...
#
# Target: db-left:/
#
# NMSAP 3.5 EMC NetWorker Module for SAP with Oracle
NMSAP.lgto-nmsap 3.5 EMC NetWorker Module for SAP on Oracle
PowerSnap, when used with file system backups, uses an Application Information field within
the client resource. This is not possible with database modules and each module calls for
this file from its configuration files (in this case util file).
Here are important items for our configuration of SAP over SAN backups:
• NMSAP configuration file (nsrsapsv_BLE_[arch|data]_[R1|R2]_[active|standby].cfg)
• Sap backup profile file (init BLE_[arch|data]_[R1|R2]_[active|standby|offline].sap)
• Util file (initBLE_[arch|data]_[R1|R2]_[active|standby|offline].utl)
• Opaque file (nsrps_BLE_[R1|R2]_[active|standby].cfg)
• Device pool file (BLE_ [R1|R2]_[active|standby].pool)
• Placement and permissions of backint binaries
• BRTools and permissions of those binaries
• NMSAP configuration file, device pool file and opaque file will be placed in /nsr/res. • Util and sap backup profile file are placed in $ORACLE_HOME/dbs directory.

2010 EMC Proven Professional Knowledge Sharing 63
NMSAP configuration file This file contains settings for the NetWorker Module for SAP with Oracle (a.k.a. NMSAP)
used during scheduled backups. The following NMSAP configuration file items can be
configured.
Table 7: nsrsapsv.cfg options
Name Description
BR_EXEC BR_EXEC specifies the command that nsrsapsv will
execute. The BR_EXEC parameter can be any valid
brbackup or brarchive command, including any
command line options. If a username and password are
required to execute the command, they should be
encrypted into this file using the nsrsapsv -c command,
rather than the -u option in this parameter.
ORACLE_HOME ORACLE_HOME is a required environment variable.
This should be set to the value of ORACLE_HOME for
the Oracle instance that will be backed up. This is a
required parameter!
NLS_LANG NLS_LANG is a required environment variable. The
format should be
LANGUAGE_TERRITORY.CHARACTERSET
Refer to your Oracle documentation for more
information of this variable.
SAP_BIN SAP_BIN specifies the path to where the BrTools
executables are installed. This should also be where the
backint binary resides. This path will be added to the
PATH environment variable so that the BrTools and
backint executables can be found. This is a required
parameter!

2010 EMC Proven Professional Knowledge Sharing 64
Name Description
SAPBACKUP SAPBACKUP specifies the temporary directory for the
backup logs. BrTools and backint both use this
directory to store their temporary log files. On UNIX
systems, the default for this is
$ORACLE_HOME/sapbackup.
On Windows, this is a required parameter. On UNIX,
this parameter is only required if the default is not
$ORACLE_HOME/sapbackup.
ORACLE_SID ORACLE_SID specifies the SID of the Oracle
instances to be backed up. If this parameter is
specified, backint will use the value of this parameter
for the Oracle SID.
If this parameter is not specified, the Oracle SID will
be obtained from the save set name you entered
when this client was configured in the NetWorker
software.
For example, if you entered
backint:SAP:online_backup for the save set name
during client configuration, and you do not specify a
value for ORACLE_SID in this file, then SAP will be
used for the Oracle SID. This parameter is only
required if you want to override the one specified by
the save set name.
NSR_SAP_USING_RMAN_OPTION If RMAN is used for backing up database files, set
NSR_SAP_USING_RMAN_OPTION to 'yes'.
ORACLE_BIN ORACLE_BIN specifies where the Oracle binaries are
located. This path will be appended to the PATH
environment variable so that all Oracle binaries can
be found if needed. The default for this will be
$ORACLE_HOME/bin. This parameter is only
required if the Oracle binaries are not located in
$ORACLE_HOME/bin.
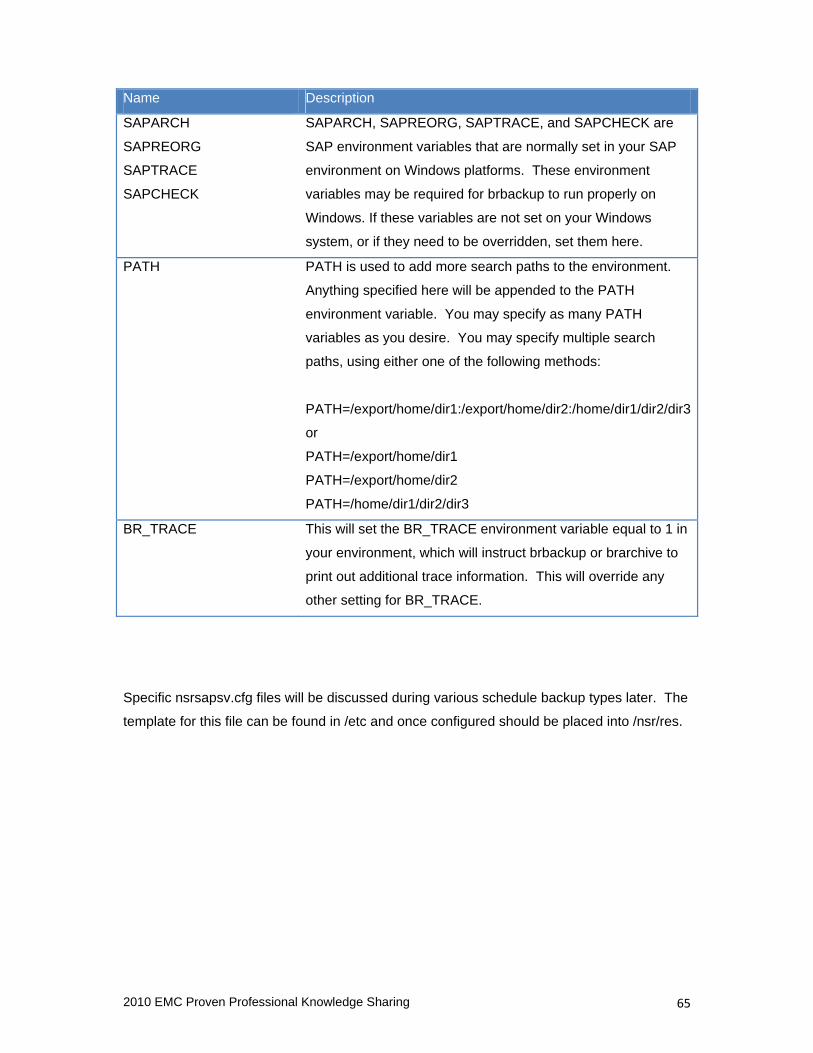
2010 EMC Proven Professional Knowledge Sharing 65
Name Description
SAPARCH
SAPREORG SAPTRACE SAPCHECK
SAPARCH, SAPREORG, SAPTRACE, and SAPCHECK are
SAP environment variables that are normally set in your SAP
environment on Windows platforms. These environment
variables may be required for brbackup to run properly on
Windows. If these variables are not set on your Windows
system, or if they need to be overridden, set them here.
PATH PATH is used to add more search paths to the environment.
Anything specified here will be appended to the PATH
environment variable. You may specify as many PATH
variables as you desire. You may specify multiple search
paths, using either one of the following methods:
PATH=/export/home/dir1:/export/home/dir2:/home/dir1/dir2/dir3
or
PATH=/export/home/dir1
PATH=/export/home/dir2
PATH=/home/dir1/dir2/dir3
BR_TRACE This will set the BR_TRACE environment variable equal to 1 in
your environment, which will instruct brbackup or brarchive to
print out additional trace information. This will override any
other setting for BR_TRACE.
Specific nsrsapsv.cfg files will be discussed during various schedule backup types later. The
template for this file can be found in /etc and once configured should be placed into /nsr/res.

2010 EMC Proven Professional Knowledge Sharing 66
SAP backup profile file The SAP backup profile file comes with SAP installation. The template for this file can be
found in $ORACLE_HOME/dbs. Once configured, it should be placed in
$ORACLE_HOME/dbs. We can use multiple SAP backup profile files and call them
individually from brbackup/brarchive commands. When using scheduled backups, we can
call different SAP backup profile files from BR_EXEC line.
There are 4 important settings in SAP backup profile file:
• backup_type
• backup_dev_type
• archive_function
• util_par_file
While there are other parameters within this configuration file, we will just explain previously
outlined parameters as backup operations are directly affected by their settings.
Table 8: initSID.sap options Name Description
backup_type Identifies the default type of the database backup. This parameter is
only used by BRBACKUP (default is offline).
backup_dev_type Determines the backup medium that will be used (default is tape). In
order to use the backint interface, this parameter must be set either to
'util_file' or 'util_file_online' (see table below). For RMAN, this
parameter is set to 'rman_util'
archive_function Determines in what way the archive logs are being handled during
backup.
Util_par_file This parameter specifies where the parameter file, required for a
backup with an external backup program, is located.

2010 EMC Proven Professional Knowledge Sharing 67
backup_dev_type can be explained through following table.
Table 9: backup device type options
Operation backup_dev_type backup_type
Offline backup util_file offline
Online backup util_file online
Online backup with individual tablespace
locking util_file_online online
Online backup via RMAN rman_util online
archive_dev_type can be explained through following table.
Table 10: archive device type options
archive_dev_type Description
save Archives the offline redo log files that have not yet been backed up
(default).
second_copy Creates a second copy of the offline redo log files.
delete_saved Deletes offline redo log files that have been archived once.
delete_copied Deletes offline redo log files that have been copied twice.
save_delete Archives the offline redo log files and then deletes these files.
second_copy_dele
te Creates a second copy of offline redo log files and then deletes
those files from the archiving directory.
double_save Archives the offline redo log files that have not yet been saved, to
two tape devices in parallel.
double_save_del Archives the offline redo logs that have not yet been backed up, to
two tape devices in parallel, and then deletes the files from the
archiving directory.
copy_save Creates a second copy of offline redo log files that have already
been archived, and then archives the offline redo log files that have
been created in the meantime.
copy_delete_save Creates a second copy of offline redo log files that have already
been archived, and then deletes them and archives the offline redo
log files that have been created in the meantime.

2010 EMC Proven Professional Knowledge Sharing 68
We use individual SAP backup profile files called from the BR_EXEC line from the NMSAP
configuration file.
Util file (init<SID>.utl) During backup, restore, or inquire sessions, the NMSAP program uses the default or user-
specified parameter settings in the init<ORACLE_SID>.utl parameter file. These settings
provide client, server, pool, group, expiration, and other values to the backint program.
For scheduled backups, you do not need to specify the server and group names in the
parameter file. However, if they are specified, they must match the corresponding attributes
on the NetWorker server or an error occurs. Any other parameters specified in this file, such
as pool name, take precedence over the corresponding setting on the NetWorker server. To
set a parameter in the init<ORACLE_SID>.utl file, use the following format: parameter=value.
There is huge list of options here so please check documentation. I will list only those used
in the example.
Table 11: util file options Name Description
savesets Default Value: 20
Valid Values: > 0 integer
Number of savesets to use for backups.
This parameter will be ignored if 'ss_group_by_fs' is set to 'yes'.
parallelism Default Value: 8
Valid Values: > 0 integer
Number of simultaneous savesets/savestreams to send to server.
Be sure your server and devices are configured to support at least as
many streams.
pool Default Value: <none>
Valid Values: any pool defined in your NetWorker server
Set the media pool to use for saves. If not specified for a manual backup,
a pool selected by NetWorker server is used. For scheduled backups, a
pool associated with the group is used.

2010 EMC Proven Professional Knowledge Sharing 69
Name Description
expiration Default Value: <none>
Valid Values: any string in getdate(man nsr_getdate) format.
Set the explicit expiration date for this save set.
The setting here will supersede the browse and retention policy settings
in the client resource. Must be in getdate (man nsr_getdate) format, e.g. 3
Months. Do not use quotes.
server Default Value: local host
Valid Values: your NetWorker server hostname
Set the NetWorker server hostname to use for backups and restores.
client Default Value: local host
Valid Values: your NetWorker client hostname
Use the client name under which the current backup should be
catalogued.
Setting the client name will append the "-c <hostname>" to the save
command that is built by backint. This should always be set if the client is
a virtual cluster client.
verbose Default Value: no
Valid Values: no/yes
Dump more information from NetWorker functions into log file.
For other diagnostic procedures, please contact Technical Support.
query_index Default Value: no
Valid Values: no/yes
Unices only (query_index is always forced to 'yes' for Windows).
This variable controls querying of the NetWorker server indexes (indices)
before backint starts a recover. If the value is 'no', the query will not take
place. If the value is 'yes', the server will be queried for validation of the
requested files & backup id's before recover starts.

2010 EMC Proven Professional Knowledge Sharing 70
Name Description
ssNameFor
mat
Default Value : old
Valid Values : old/new
This variable controls the saveset naming convention. If the value is "old"
the saveset name for ALL backups is "backint:<ORACLE_SID>". If the
value is "new" the saveset name for each session will differ according to
the files being backed up. The saveset name will be
"backint:<ORACLE_SID>:<absolute path of the first filename in the
saveset>".
Please be aware that setting ssNameFormat=new will eliminate the
possibility of recovering the database with NetWorker recover -S and
brrestore will be the only alternative to recover the savesets.
sem_timeout Default Value : 30.
Valid Values : > 0 integer.
This variable controls the amount of time (in minutes) that backint will wait
for brbackup/brconnect to remove the semaphore file.
At the end of this timeout period, if the semaphore file was not deleted,
backint will exit with an error.
level_full Default Value: yes
Valid Values: yes/no, setting to 'no' is at your sole discretion.
This variable controls the "-l Full" invocation of save. If set to 'yes' the file
will be saved with the "-l Full" parameter set.
max_logs Default Value: 0
Valid Values: > 0 integer
This variable sets the maximum number backint session logs to be saved
in the log file. If the value of this parameter is 0, ALL backup logs will be
saved in the log file. Please refer to backint_log parameter.

2010 EMC Proven Professional Knowledge Sharing 71
Name Description
ps_backup_mode
ps_archive_mode ps_restore_mode ps_inquire_mode
Default Value: no
Valid Values: no/yes
This variable controls whether to enable the new PS (aka
Snapshot) feature's mode. An accompanying PS module must be
installed and licensed.
Note that PS savesets will be named "backint:<SID|UID>:PS:". You
should set all ps_xxx_mode variables to yes (or all to no or
commented out). Setting ps_backup_mode to yes (and
ps_archive_mode to yes or no) generally requires ps_restore_mode
and ps_inquire_mode both set to yes; doing otherwise is intended
only for diagnostic/exploratory purposes and is to be used at your
sole discretion.
ps_opaque_pfilena
me Default Value: <none>
Valid Values: any string, but should be a valid absolute path name
of a PS file that has parameters that will be blindly passed by
backint to the PS module. Refer to the documentation of the
relevant PS module for details.
This variable indirectly controls the behaviour of the PS module. It is
mandatory once the ps_xxx_mode variables are set to yes.
ps_ps_before_non
ps Default Value: yes
Valid Values: no/yes
This variable says whether to do all PS file processing before any
traditional, non-Snapshot, nonPS file processing. This can help
prevent potential resource conflicts. This can be set to no to allow
concurrent processing of PS and nonPS files during backup/
archive and restore modes, when there is no possibility of resource
usage conflicts

2010 EMC Proven Professional Knowledge Sharing 72
Name Description
ps_exclude_backup_bi_run_nums ps_exclude_archive_bi_run_nums
Default Value: <none>
Valid Values: any string of numbers, but should be
one or more valid backint run numbers, e.g. "2" ---
minus the quotes in actuality. Run#2 is usually the
second backint run invocation by brtools that only
backs up the parameter files, the SAP backup
catalogue files, etc. The first backint run will usually
be for the main database data files; these files are
usually very large and are the only ones that will
really benefit from undergoing PS Snapshot
processing.
This variable says whether to force all "PS" files in a
backint session to follow the traditional non-Snapshot
processing, i.e., whether to exclude them from any
PS Snapshot processing, thereby saving valuable
Snapshot disk hardware resources for the large files.
ps_exclude_backup_paths ps_exclude_archive_paths
Default Value: <none>
Valid Values: any fullpath string, including standard
UNIX wild-card characters. The values should be
based on actual brtools input file names passed to
backint.
This variable controls whether to force "PS" files to
follow the traditional non-Snapshot processing, i.e.
whether to exclude them from any PS processing. A
"PS" file is one that is on a NetWorker-aware
Snapshot-capable file system.
Preference should be given to setting
ps_exclude_xxx_bi_run_nums before using this
parameter.

2010 EMC Proven Professional Knowledge Sharing 73
Name Description
ps_group_objs Default Value: yes
Valid Values: no/yes
This variable says whether to group all session files
(aka objects) in each PS operation (prepare/sync,
Snapshot/split, save/restore, postpare). Certain DB
disk/filesystem configurations and brbackup usage can
show better NMSAP performance if ps_group_objs is
set to yes, e.g. large number of files being processed by
current BRTools & PS engines, with util_file_online.
However, grouping objects also reduces the potential
parallelism during certain backup and restore sub-
operations; consider setting to no in these cases.
Specific init<SID>.utl files will be discussed during various schedule backup types later. You
can find the template for this file in /etc and once configured you should place it into
$ORACLE_HOME/dbs.
I use individual NMSAP util files that we call from BR_EXEC line from the NMSAP
configuration file.
Opaque file The opaque file, location specified in util file by ps_opaque_pfilename parameter, contains
information about data mover, client, type of Snap, etc. This information is identical to what
we used under Application Information when describing PowerSnap backups of file systems.

2010 EMC Proven Professional Knowledge Sharing 74
Device pool file Device pool file is used to identify source (STD/R1) devices and target devices (either clone
within same Symmetrix or BCV within remote Symmetrix). The format is:
# source #target
<Symmetrix ID>:<device id> <Symmetrix ID>:<device id>
Placement and Permissions of backint and BRTools Binaries When NMSAP is installed, backint binary is installed in /opt/networker/bin. The installation
guide states this should be copied over to the location where BRTools are installed. This is
incorrect - you should move it.
You may face backup or restore failure if, for some reason, several backint binaries are
found in the path.
When moving backint into /usr/sap/<SID>/SYS/exe/run, make sure that backint owner is the
<SID>adm user, and group ownership is assigned to same group as used by BRTools.
Make sure all BRTools have owner set to ora<SID>.
-r-xr-xr-x 1 bleadm sapsys 6521032 Nov 12 2008 backint
-rwsrwxr-x 1 orable sapsys 12626248 Feb 26 11:06 brarchive
-rwsrwxr-x 1 orable sapsys 13054056 Feb 26 11:06 brbackup
-rwsrwxr-x 1 orable sapsys 16086512 Feb 26 11:06 brconnect
-rwxr-xr-x 1 bleadm sapsys 13436888 Feb 26 11:06 brrecover
-rwxr-xr-x 1 bleadm sapsys 3739432 Feb 26 11:06 brrestore
-rwxr-xr-x 1 bleadm sapsys 16541512 Feb 26 11:06 brspace
-rwsrwxr-x 1 orable sapsys 5602136 Feb 26 11:06 brtools

2010 EMC Proven Professional Knowledge Sharing 75
Now let's check quickly our configuration files. We will start with /nsr/res. There we have:
# ls -o
total 72
-rwx------ 1 root 5105 Nov 25 17:57 BLE_R1_active.pool
-rwx------ 1 root 5105 Nov 25 17:57 BLE_R1_standby.pool
-rwx------ 1 root 5104 Nov 25 17:57 BLE_R2_active.pool
-rwx------ 1 root 5105 Nov 25 17:57 BLE_R2_standby.pool
drwx------ 12 root 1024 Feb 28 18:37 nsrladb
-rwxr-xr-x 1 root 392 Nov 25 17:57 nsrps_BLE_R1_active.cfg
-rwxr-xr-x 1 root 393 Jan 25 00:46 nsrps_BLE_R1_standby.cfg
-rwxr-xr-x 1 root 453 Nov 25 17:57 nsrps_BLE_R2_active.cfg
-rwxr-xr-x 1 root 392 Jan 20 17:01 nsrps_BLE_R2_standby.cfg
-rwxr-xr-x 1 root 482 Nov 25 17:57 nsrsapsv_BLE_arch.cfg
-rwxr-xr-x 1 root 481 Nov 25 17:57 nsrsapsv_BLE_data.cfg
-rwxr-xr-x 1 root 634 Nov 25 17:57 nsrsapsv_BLE_data_R1_active.cfg
-rwxr-xr-x 1 root 636 Nov 25 17:57 nsrsapsv_BLE_data_R1_standby.cfg
-rwxr-xr-x 1 root 634 Nov 25 17:57 nsrsapsv_BLE_data_R2_active.cfg
-rwxr-xr-x 1 root 636 Nov 25 17:57 nsrsapsv_BLE_data_R2_standby.cfg
-rwxr-xr-x 1 root 497 Nov 25 17:57 nsrsapsv_BLE_data_offline.cfg
-rw-r--r-- 1 root 697 Oct 7 18:13 nsrwizclnt.res
-rw-r--r-- 1 root 613 Jan 16 2009 powerSnap.res
-rw-r--r-- 1 root 11 Oct 7 18:17 psrollback.res
-rw------- 1 root 81 Jan 24 02:19 servers
*.pool files contain the relationship between are STD and BCV and BCVR devices as
explained earlier.
I will now show R1 active files (R1 backup configuration when cluster is running on a primary
node) and differences between standby and R2 configuration for each group of files we use
for these backups.

2010 EMC Proven Professional Knowledge Sharing 76
We start with opaque file (equivalent to what we had under application information when
doing file system backups):
# cat nsrps_BLE_R1_active.cfg
NSR_DATA_MOVER=sn-left.gbck.dc.root.local
NSR_SERVER=nsr.gbck.dc.root.local
NSR_CLIENT=ble.lbck.dc.root.local
NSR_IMAGE_SAVE=NO
SYMM_SNAP_POOL=/nsr/res/BLE_R1_active.pool
SYMM_SNAP_REMOTE=FALSE
SYMM_SNAP_TECH=BCV
SYMM_ON_DELETE=RELEASE_RESOURCE
NSR_MCSG_DISABLE_MNTPT_CHECK=YES
NSR_PS_SAVE_PARALLELISM=8
NSR_SNAP_TYPE=symm-dmx
NSR_VERBOSE=TRUE
NSR_RPC_TIMEOUT=240
#NSR_PS_DEBUG_LEVEL=1
Let's check the difference between active and standby configurations:
# diff nsrps_BLE_R1_active.cfg nsrps_BLE_R1_standby.cfg
1c1
< NSR_DATA_MOVER=sn-left.gbck.dc.root.local
---
> NSR_DATA_MOVER=sn-right.gbck.dc.root.local
5c5
< SYMM_SNAP_POOL=/nsr/res/BLE_R1_active.pool
---
> SYMM_SNAP_POOL=/nsr/res/BLE_R1_standby.pool

2010 EMC Proven Professional Knowledge Sharing 77
Let's see the difference between active R1 and R2 opaque files:
# diff nsrps_BLE_R1_active.cfg nsrps_BLE_R2_active.cfg
1c1
< NSR_DATA_MOVER=sn-left.gbck.dc.root.local
---
> NSR_DATA_MOVER=sn-right.gbck.dc.root.local
5,6c5,6
< SYMM_SNAP_POOL=/nsr/res/BLE_R1_active.pool
< SYMM_SNAP_REMOTE=FALSE
---
> SYMM_SNAP_POOL=/nsr/res/BLE_R2_active.pool
> SYMM_SNAP_REMOTE=TRUE
And finally, the difference between R2 active and standby configuration:
# diff nsrps_BLE_R2_active.cfg nsrps_BLE_R2_standby.cfg
1c1
< NSR_DATA_MOVER=sn-right.sts.dc.root.local
---
> NSR_DATA_MOVER=sn-left.sts.dc.root.local
5c5
< SYMM_SNAP_POOL=/nsr/res/BLE_R2_active.pool
---
> SYMM_SNAP_POOL=/nsr/res/BLE_R2_standby.pool
The next group of files are SAP module configuration files. In theory, these are only used
when doing server initiated backups. With PowerSnap, this is important as client initiated
backups are not supported.
nsrsapsv_PU1_arch.cfg (used for archive logs), nsrsapsv_PU1_data.cfg (DB LAN backup)
and nsrsapsv_PU1_data_offline.cfg (DB offline backup) are not covered in this document.

2010 EMC Proven Professional Knowledge Sharing 78
# cat nsrsapsv_BLE_data_R1_active.cfg
BR_EXEC=brbackup -r initBLE_data_R1_active.utl -p initBLE_data_R1_active.sap
ORACLE_HOME=/oracle/BLE/102_64
SAPDATA_HOME=/oracle/BLE
NLS_LANG = AMERICAN_AMERICA.UTF8
SAP_BIN=/usr/sap/BLE/SYS/exe/run
SAPBACKUP=/oracle/BLE/sapbackup
ORACLE_SID=BLE
SAPARCH=/oracle/BLE/saparch
SAPREORG=/oracle/BLE/sapreorg
SAPTRACE=/oracle/BLE/saptrace
SAPCHECK=/oracle/BLE/sapcheck
SAPDATA_HOME=/oracle/BLE
SAPMNT=/sapmnt/BLE
PATH=$PATH:/opt/networker/bin
LD_LIBRARY_PATH=/usr/sap/BLE/SYS/exe/run:/oracle/BLE/102_64/lib
SHLIB_PATH=/usr/sap/BLE/SYS/exe/run:/oracle/BLE/102_64/lib
DIR_LIBRARY=/usr/sap/BLE/SYS/exe/run
#BR_TRACE=1
OS_USR_PASSWD=xt6gcd-
The last line is necessary if you want to make SAP backup with bleadm user (instead of
Oracle). Simply run the following to configure that:
# nsrsapadm -c nsrsapsv_BLE_data_R1_active.cfg
Enter Operating System username: bleadm
Enter password: <ENTER> 34076:(pid 18805):ASCII string input is required. Please try again.
Enter password: <ENTER> 34076:(pid 18805):ASCII string input is required. Please try again.
Enter password: <ENTER> 34076:(pid 18805):ASCII string input is required. Please try again.
Is Oracle Database Authentication used? <Y/N>: N
52860:(pid 18805):Please comment or delete any ORACLE_USR_PASSWD line in nsrsapsv_BLE_data_R1_active.cfg to disable Oracle Database Authentication check

2010 EMC Proven Professional Knowledge Sharing 79
Let's explore the differences between various files in this group now.
# diff nsrsapsv_BLE_data_R1_active.cfg nsrsapsv_BLE_data_R1_standby.cfg
1c1
< BR_EXEC=brbackup -r initBLE_data_R1_active.utl -p initBLE_data_R1_active.sap
---
> BR_EXEC=brbackup -r initBLE_data_R1_standby.utl -p initBLE_data_R1_standby.sap
# diff nsrsapsv_BLE_data_R1_active.cfg nsrsapsv_BLE_data_R1_standby.cfg
1c1
< BR_EXEC=brbackup -r initBLE_data_R1_active.utl -p initBLE_data_R1_active.sap
---
> BR_EXEC=brbackup -r initBLE_data_R1_standby.utl -p initBLE_data_R1_standby.sap
# diff nsrsapsv_BLE_data_R1_active.cfg nsrsapsv_BLE_data_R2_active.cfg
1c1
< BR_EXEC=brbackup -r initBLE_data_R1_active.utl -p initBLE_data_R1_active.sap
---
> BR_EXEC=brbackup -r initBLE_data_R2_active.utl -p initBLE_data_R2_active.sap
# diff nsrsapsv_PU1_data_R2_active.cfg nsrsapsv_PU1_data_R2_standby.cfg
1c1
< BR_EXEC=brbackup -r initPU1_data_R2_active.utl -p initPU1_data_R2_active.sap
---
> BR_EXEC=brbackup -r initPU1_data_R2_standby.utl -p initPU1_data_R2_standby.sap
Now we can move on to a second set of configuration files; util and SAP backup profile files
located in $ORACLE_HOME/dbs on the application host.

2010 EMC Proven Professional Knowledge Sharing 80
# ls -o initBLE_*
-rwxr-xr-x 1 orable 1400 Dec 10 15:01 initBLE_arch.sap
-rwxr-xr-x 1 orable 187 Jan 14 10:38 initBLE_arch.utl
-rwxr-xr-x 1 orable 1383 Sep 25 22:26 initBLE_data.sap
-rwxr-xr-x 1 orable 277 Nov 17 13:26 initBLE_data.utl
-rwxr-xr-x 1 orable 1426 Sep 25 22:26 initBLE_data_R1_active.sap
-rwxr-xr-x 1 orable 620 Nov 25 16:00 initBLE_data_R1_active.utl
-rwxr-xr-x 1 orable 1427 Sep 25 22:26 initBLE_data_R1_standby.sap
-rwxr-xr-x 1 orable 621 Nov 17 13:26 initBLE_data_R1_standby.utl
-rwxr-xr-x 1 orable 1426 Sep 25 22:26 initBLE_data_R2_active.sap
-rwxr-xr-x 1 orable 620 Nov 17 13:27 initBLE_data_R2_active.utl
-rwxr-xr-x 1 orable 1427 Sep 25 22:26 initBLE_data_R2_standby.sap
-rwxr-xr-x 1 orable 621 Nov 17 13:27 initBLE_data_R2_standby.utl
-rwxr-xr-x 1 orable 1391 Sep 29 11:07 initBLE_data_offline.sap
-rwxr-xr-x 1 orable 300 Oct 7 17:20 initBLE_data_offline.utl
As before, we won’t comment on files created for archive log backup, database online, and
offline backups over LAN.
# cat initBLE_data_R1_active.sap
backup_mode = all
restore_mode = all
backup_type = online
backup_dev_type = util_file_online
backup_root_dir = /oracle/BLE/sapbackup
stage_root_dir = /oracle/BLE/sapbackup
compress = hardware
compress_cmd = "compress -c $ > $"
uncompress_cmd = "uncompress -c $ > $"
compress_dir = /oracle/BLE/sapreorg
archive_function = save_delete
archive_copy_dir = /oracle/BLE/sapbackup
archive_stage_dir = /oracle/BLE/sapbackup

2010 EMC Proven Professional Knowledge Sharing 81
tape_copy_cmd = cpio
disk_copy_cmd = copy
stage_copy_cmd = rcp
cpio_flags = -ovB
cpio_in_flags = -iuvB
cpio_disk_flags = -pdcu
dd_flags = "obs=64k bs=64k"
dd_in_flags = "ibs=64k bs=64k"
saveset_members = 1
copy_out_cmd = "dd ibs=8k obs=64k of=$"
copy_in_cmd = "dd ibs=64k obs=8k if=$"
rewind = "mt -t $ rew"
rewind_offline = "mt -t $ offl"
tape_pos_cmd = "mt -t $ fsf $"
tape_size = 10000M
exec_parallel = 0
tape_address = /dev/rmt/0mn
tape_address_rew = /dev/rmt/0m
volume_archive = (BLEA01, BLEA02, BLEA03, BLEA04, BLEA05,
BLEA06, BLEA07, BLEA08, BLEA09, BLEA10,
BLEA11, BLEA12, BLEA13, BLEA14, BLEA15,
BLEA16, BLEA17, BLEA18, BLEA19, BLEA20,
BLEA21, BLEA22, BLEA23, BLEA24, BLEA25,
BLEA26, BLEA27, BLEA28, BLEA29, BLEA30)
volume_backup = (BLEB01, BLEB02, BLEB03, BLEB04, BLEB05)
expir_period = 5
tape_use_count = 100
util_par_file = /oracle/BLE/102_64/dbs/initBLE_data_R1_active.utl
stats_parallel_degree = 15
2010 EMC Proven Professional Knowledge Sharing 82
Now check the differences between other SAP profile files.
# diff initBLE_data_R1_active.sap initBLE_data_R1_standby.sap
47c47
< util_par_file = /oracle/BLE/102_64/dbs/initBLE_data_R1_active.utl
---
> util_par_file = /oracle/BLE/102_64/dbs/initBLE_data_R1_standby.utl
# diff initBLE_data_R1_active.sap initBLE_data_R2_active.sap
47c47
< util_par_file = /oracle/BLE/102_64/dbs/initBLE_data_R1_active.utl
---
> util_par_file = /oracle/BLE/102_64/dbs/initBLE_data_R2_active.utl
# diff initBLE_data_R2_active.sap initBLE_data_R2_standby.sap
47c47
< util_par_file = /oracle/BLE/102_64/dbs/initBLE_data_R2_active.utl
---
> util_par_file = /oracle/BLE/102_64/dbs/initBLE_data_R2_standby.utl
From the above, we can see that the only difference between files is which util file we call.
As mentioned earlier, the following settings are important for our backup:
• backup_type
• backup_dev_type
• util_par_file
Other settings are not used by our backup, but we can keep them.
On the next page, we focus on the util file which is a backup application specific file from
which we point toward the opaque file where the PowerSnap settings are.

2010 EMC Proven Professional Knowledge Sharing 83
# cat initBLE_data_R1_active.utl
savesets = 700
parallelism = 8
group = BLE_SAP_DB_PRD_LEFT_local_R1
pool = BLEDATA
expiration = 9 Days
server = nsr.gbck.dc.root.local
client = ble.lbck.dc.root.local
verbose = yes
query_index = no
ssNameFormat = old
sem_timeout = 40
level_full = yes
max_logs = 0
ps_backup_mode = yes
ps_archive_mode = no
ps_restore_mode = yes
ps_inquire_mode = yes
ps_opaque_pfilename = /nsr/res/nsrps_BLE_R1_active.cfg
ps_exclude_backup_paths = /oracle/BLE/sapbackup/*
ps_exclude_backup_bi_run_nums = 2
ps_exclude_archive_bi_run_nums = 1;2
ps_ps_before_nonps = yes
ps_group_objs = yes
#debug_level = 9
#nsr_debug_msg = yes
I must outline one out of ordinary settings before we move on to differences.

2010 EMC Proven Professional Knowledge Sharing 84
Normally, brbackup creates a Snapshot of the control file that is saved within the
/oracle/SID/sapbackup folder. This folder happens to be the home directory of the oraSID
user too. You may face problems if you start rollback where the control file is restored. To
address this, and because it is a small file, we excluded its backup from PowerSnap backup.
This is done over the LAN.
And now the difference:
# diff initBLE_data_R1_active.utl initBLE_data_R1_standby.utl
20c20
< ps_opaque_pfilename = /nsr/res/nsrps_BLE_R1_active.cfg
---
> ps_opaque_pfilename = /nsr/res/nsrps_BLE_R1_standby.cfg
# diff initBLE_data_R1_active.utl initBLE_data_R2_active.utl
3c3
< group = BLE_SAP_DB_PRD_LEFT_local_R1
---
> group = BLE_SAP_DB_PRD_LEFT_local_R2
20c20
< ps_opaque_pfilename = /nsr/res/nsrps_BLE_R1_active.cfg
---
> ps_opaque_pfilename = /nsr/res/nsrps_BLE_R2_active.cfg
# diff initBLE_data_R2_active.utl initBLE_data_R2_standby.utl
20c20
< ps_opaque_pfilename = /nsr/res/nsrps_BLE_R2_active.cfg
---
> ps_opaque_pfilename = /nsr/res/nsrps_BLE_R2_standby.cfg

2010 EMC Proven Professional Knowledge Sharing 85
We set the number of save sets to a value of 700 since our database has 600+ data files to
backup. We created each file as a single save set in case SAP is not able to restore it. We
can then do it ourselves via save set recover. Of course, this will work only if ssNameFormat
is set to old. This approach saved the day twice due to various SAP issues.
With this in place, we create two Snapshot groups for the file system, which we will call:
• BLE_SAP_DB_PRD_LEFT_local_R1
• BLE_SAP_DB_PRD_LEFT_local_R2
In the example of a file system backup, we had fsR and fsL pool where PowerSnap used fsL
pool. Similarly, we use dbL pool for all databases protected with PowerSnap. However, if
you check the util file you will see that we have a special pool for this database called
BLEDATA. This is because:
• We wish to ensure data for this database is divided from other database
• While other databases are allowed to multiplex data we do not wish this to be the
case here
The second requirement is easily addressed with a maximum parallelism pool setting:
We assign both groups to this pool. Then we can create the client resource. The saveset
field is the first difference when compared to file system backup. It is SAP module specific:
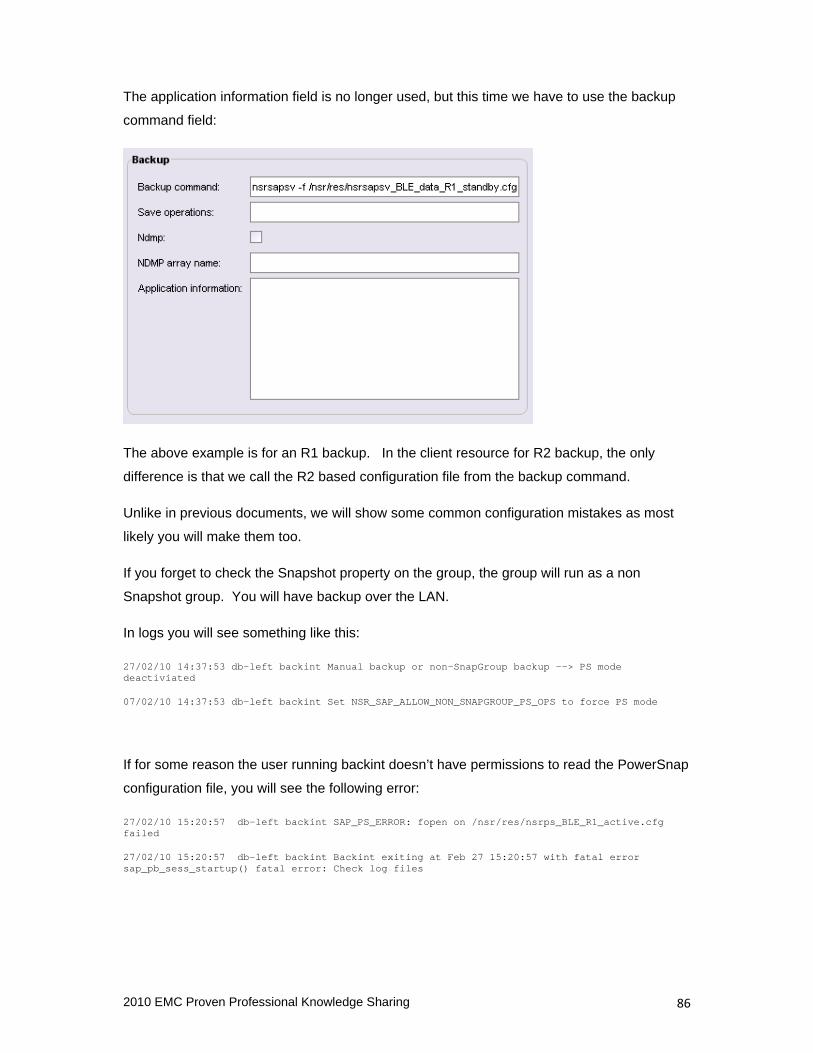
2010 EMC Proven Professional Knowledge Sharing 86
The application information field is no longer used, but this time we have to use the backup
command field:
The above example is for an R1 backup. In the client resource for R2 backup, the only
difference is that we call the R2 based configuration file from the backup command.
Unlike in previous documents, we will show some common configuration mistakes as most
likely you will make them too.
If you forget to check the Snapshot property on the group, the group will run as a non
Snapshot group. You will have backup over the LAN.
In logs you will see something like this:
27/02/10 14:37:53 db-left backint Manual backup or non-SnapGroup backup --> PS mode deactiviated
07/02/10 14:37:53 db-left backint Set NSR_SAP_ALLOW_NON_SNAPGROUP_PS_OPS to force PS mode
If for some reason the user running backint doesn’t have permissions to read the PowerSnap
configuration file, you will see the following error:
27/02/10 15:20:57 db-left backint SAP_PS_ERROR: fopen on /nsr/res/nsrps_BLE_R1_active.cfg failed
27/02/10 15:20:57 db-left backint Backint exiting at Feb 27 15:20:57 with fatal error sap_pb_sess_startup() fatal error: Check log files

2010 EMC Proven Professional Knowledge Sharing 87
In the above case we had to add read and execute permission to /nsr/res to address the
error (unlike file system your SAP backup runs either with Oracle or SAP user).
If /etc/resolv.conf is using a search value pointing to a VLAN not accessible from proxy, or if
you didn’t set the LOCALDOMAIN variable as instructed earlier, this will cause a timeout and
backup failure. In our case, we have search trying to resolve the hostname in the database
production VLAN. Since we use VLAN for local backup we are not able to communicate with
that VLAN (as traffic among VLANs is isolated). We get the following error:
[BrcConnFactory.cpp 435] Starting remote exec for host sn-right.gbck.dc.root.local, port 514, command nsrSnapagent -H db-left.db.prod.dc.root.local -p 8857 -D 1 -I 1247233295
LOG [BrcConnFactory.cpp 487] The binary: [nsrSnapagent -H db-left.data.prd.dc.root.local -p 8857 -D 1 -I 1247233295] on the host: [sn-right.gbck.dc.root.local] failed to connect. It may be because it does not exist or it failed before connecting.
Error [SnapCommInterface.cpp 1626] There was an error in the communication object.: Unable to create connection to remote host.
Error [SnapCommInterface.cpp 325] Failed to start the remote agent
LOG [SnapCopyService.cpp 2495] There was an error in the communication object.: Unable to create connection to remote host.
[BrcOperation.cpp 185] Internal Error There was an error in the communication object.: Unable to create connection to remote host.
Error [BrcBackupOp.cpp 141] Failed to initialize the operation. The information passed to PowerSnap module is not sufficient or incorrect.
LOG [BrcApi.cpp 1219] pb_error
LOG [BrcApi.cpp 415] pb_end
[BrcSession.cpp 329]
With PowerSnap, we backup just database files (usually only inside sapdata[n]), but
brbackup also creates a Snapshot copy of the control file in sapbackup directory. This
means that the volume group containing this backup must also be part of the device list
above.
This is not our case. Anyway, let’s explore what happens if we do so and we didn’t prepare
BCVs for this operation.
[SnapCopySet.cpp 266] initSession: setId : vgBLEora
[SCEmcSymm.cpp 856] Error allocating Resource : No available devices found.
LOG [SnapCopySet.cpp 272] No available devices found.
LOG [SnapCopyService.cpp 1900] No available devices found.
Error [BrcBackupOp.cpp 691] No available devices found.
Error [BrcBackupOp.cpp 695] Failed to prepare the Snapshot of /oracle/BLE/sapbackup/cntrlBLE.dbf.
2010 EMC Proven Professional Knowledge Sharing 88
LOG [BrcApi.cpp 1219] pb_error
LOG [BrcApi.cpp 415] pb_end
[BrcSession.cpp 329]
At this point you must contact your SAN administrator, bring him or her a cup of coffee, and
request more storage allocation for your vgBLEora protection. Once that has been done, we
can add those devices to the already existing Symmetrix disk group and Snap pool file.
Due to the large number of files and size of database, we will cover R1 and R2 backups
without PowerSnap backups for three simple reasons:
• I do not wish to the paste log here which will generate extra 100 pages
• Nsrbragent log is created for each file saved to tape which is 600+ log files of few KB
• PowerSnap operation during SAP and file system does the same thing – freeze,
incremental establish, split, and thaw. No need to repeat that.
Instead, we will show the SAP brbackup log and backup server log for both R1 and R2
Snapshot and live backup.
At this point, you can start the group you created. Since we have two groups, each creating
a Snapshot on one site, schedule them 12 hours apart. Usually this is done after you run a
successful test backup so let’s see how it works here.
Let’s do an R1 backup. We see the following in the SAP brbackup log (placed in
/oracle/BLE/sapbackup):
BR0280I BRBACKUP time stamp: 2010-02-26 11.18.41
BR0057I Backup of database: BLE
BR0058I BRBACKUP action ID: becqzdxg
BR0059I BRBACKUP function ID: anf
BR0110I Backup mode: ALL
BR0077I Database file for backup: /oracle/BLE/sapbackup/cntrlBLE.dbf
BR0061I 604 files found for backup, total size 9632920.633 MB
BR0143I Backup type: online
BR0130I Backup device type: util_file_online
BR0109I Files will be saved by backup utility
BR0142I Files will be switched to backup status during the backup
BR0134I Unattended mode with 'force' active - no operator confirmation allowed
BR0280I BRBACKUP time stamp: 2010-02-26 11.18.41
2010 EMC Proven Professional Knowledge Sharing 89
BR0229I Calling backup utility with function 'backup'...
BR0278I Command output of '/usr/sap/BLE/SYS/exe/run/backint -u BLE -f backup -i /oracle/BLE/sapbackup/.becqzdxg.lst -t file_online -p /oracle/BLE/102_64/dbs/initBLE_data_R1_active.utl -c':
BR0280I BRCONNECT time stamp: 2010-02-26 12.20.30
#BEGIN /oracle/BLE/sapdata1/erp01_1/erp01.data1
[etc]
BR0280I BRCONNECT time stamp: 2010-02-26 12.31.56
#END /oracle/BLE/sapdata1/erp01_1/erp01.data1
#END /oracle/BLE/sapdata1/erp01_17/erp01.data17
[etc]
BR0280I BRBACKUP time stamp: 2010-02-26 13.11.26
#FILE..... /oracle/BLE/sapdata1/system_1/system.data1
#SAVED.... 1267186282
BR0280I BRCONNECT time stamp: 2010-02-26 13.11.35
#BEGIN /oracle/BLE/sapbackup/cntrlBLE.dbf
BR0280I BRCONNECT time stamp: 2010-02-26 13.11.35
BR0280I BRCONNECT time stamp: 2010-02-26 13.11.45
#END /oracle/BLE/sapbackup/cntrlBLE.dbf
BR0280I BRCONNECT time stamp: 2010-02-26 13.11.45
BR0280I BRBACKUP time stamp: 2010-02-26 13.11.46
#FILE..... /oracle/BLE/sapbackup/cntrlBLE.dbf
#SAVED.... 1267186295
BR0280I BRBACKUP time stamp: 2010-02-26 13.11.46
BR0232I 604 of 604 files saved by backup utility
BR0230I Backup utility called successfully
BR0280I BRBACKUP time stamp: 2010-02-26 13.11.48
BR0340I Switching to next online redo log file for database instance BLE ...
BR0321I Switch to next online redo log file for database instance BLE successful

2010 EMC Proven Professional Knowledge Sharing 90
BR0117I ARCHIVE LOG LIST after backup for database instance BLE
Parameter Value
Database log mode Archive Mode
Automatic archival Enabled
Archive destination LOCATION=/oracle/BLE/oraarch/BLEarch
Archive format %t_%s_%r.dbf
Oldest online log sequence 6001
Next log sequence to archive 6008
Current log sequence 6008 SCN: 6131087131766
Database block size 8192 Thread: 1
Current system change number 6131087131804 ResetId: 704836739
BR0280I BRBACKUP time stamp: 2010-02-26 13.11.48
BR0229I Calling backup utility with function 'backup'...
BR0278I Command output of '/usr/sap/BLE/SYS/exe/run/backint -u BLE -f backup -i /oracle/BLE/sapbackup/.becqzdxg.lst -t file -p /oracle/BLE/102_64/dbs/initBLE_data_R1_active.utl -c':
BR0280I BRBACKUP time stamp: 2010-02-26 13.11.56
#PFLOG.... /oracle/BLE/sapbackup/becqzdxg.anf
#SAVED.... 1267186310
BR0280I BRBACKUP time stamp: 2010-02-26 13.11.57
#PFLOG.... /oracle/BLE/102_64/dbs/spfileBLE.ora
#SAVED.... 1267186311
BR0280I BRBACKUP time stamp: 2010-02-26 13.11.58
#PFLOG.... /oracle/BLE/102_64/dbs/initBLE.ora
#SAVED.... 1267186313
BR0280I BRBACKUP time stamp: 2010-02-26 13.11.59
#PFLOG.... /oracle/BLE/102_64/dbs/initBLE_data_R1_active.sap
#SAVED.... 1267186312
BR0280I BRBACKUP time stamp: 2010-02-26 13.11.59
#PFLOG.... /oracle/BLE/sapreorg/strucBLE.log
#SAVED.... 1267186314

2010 EMC Proven Professional Knowledge Sharing 91
BR0280I BRBACKUP time stamp: 2010-02-26 13.11.59
#PFLOG.... /oracle/BLE/102_64/dbs/initBLE_data_R1_active.utl
#SAVED.... 1267186316
BR0280I BRBACKUP time stamp: 2010-02-26 13.11.59
#PFLOG.... /oracle/BLE/sapbackup/backBLE.log
#SAVED.... 1267186315
BR0280I BRBACKUP time stamp: 2010-02-26 13.12.00
#PFLOG.... /oracle/BLE/sapreorg/spaceBLE.log
#SAVED.... 1267186317
BR0280I BRBACKUP time stamp: 2010-02-26 13.12.00
BR0232I 8 of 8 files saved by backup utility
BR0230I Backup utility called successfully
BR0056I End of database backup: becqzdxg.anf 2010-02-26 13.12.00
BR0280I BRBACKUP time stamp: 2010-02-26 13.12.01
BR0052I BRBACKUP completed successfully
The whole brbackup log is 7000 lines so no need to include it here. Instead, it is attached to
this document.
becqzdxg.anf
Let’s check how this words on the server side (GUI is not in scope in this article). Here is the
short version with explanations.
42506 02/26/10 11:00:00 nsrd savegroup info: starting Snapshot group BLE_SAP_DB_PRD_RIGHT_local_R1 (with 1 client(s))
42506 02/26/10 11:00:05 nsrd powerSnap notice: Applying retention for BLE_SAP_DB_PRD_RIGHT_local_R1:ble.lbck.dc.root.local based on SnapPolicy (R1)
/* This time is used to expire previous Snapshots – once expire we request Snapshots */
42506 02/26/10 11:25:29 nsrd powerSnap notice: Operation Requested for : backint:BLE_26631:PS:
42506 02/26/10 11:25:29 nsrd powerSnap notice: Debug ID for this session : 1267179522

2010 EMC Proven Professional Knowledge Sharing 92
42506 02/26/10 11:38:02 nsrd powerSnap notice: Snapshot requested for [ble.lbck.dc.root.local]:[/oracle/PU1/sapdata1]
42506 02/26/10 11:38:02 nsrd powerSnap notice: Snapshot requested for [ble.lbck.dc.root.local]:[/oracle/PU1/sapdata1]
42506 02/26/10 11:38:02 nsrd powerSnap notice: Snapshot requested for [ble.lbck.dc.root.local]:[/oracle/PU1/sapdata1]
42506 02/26/10 11:38:02 nsrd powerSnap notice: Snapshot requested for [ble.lbck.dc.root.local]:[/oracle/PU1/sapdata1]
42506 02/26/10 11:38:02 nsrd powerSnap notice: Snapshot requested for [ble.lbck.dc.root.local]:[/oracle/PU1/sapdata1]
42506 02/26/10 11:38:02 nsrd powerSnap notice: Snapshot requested for [ble.lbck.dc.root.local]:[/oracle/PU1/sapdata1]
42506 02/26/10 11:38:02 nsrd powerSnap notice: Snapshot requested for [ble.lbck.dc.root.local]:[/oracle/PU1/sapdata1]
42506 02/26/10 11:38:02 nsrd powerSnap notice: Snapshot requested for [ble.lbck.dc.root.local]:[/oracle/PU1/sapdata1]
42506 02/26/10 11:38:02 nsrd powerSnap notice: Snapshot requested for [ble.lbck.dc.root.local]:[/oracle/PU1/sapdata1]
42506 02/26/10 11:38:02 nsrd powerSnap notice: Snapshot requested for [ble.lbck.dc.root.local]:[/oracle/PU1/sapdata1]
42506 02/26/10 11:38:02 nsrd powerSnap notice: Snapshot requested for [ble.lbck.dc.root.local]:[/oracle/PU1/sapdata1]
42506 02/26/10 11:38:02 nsrd powerSnap notice: Snapshot requested for [ble.lbck.dc.root.local]:[/oracle/PU1/sapdata1]
42506 02/26/10 11:38:02 nsrd powerSnap notice: Snapshot requested for [ble.lbck.dc.root.local]:[/oracle/PU1/sapdata1]
42506 02/26/10 11:38:02 nsrd powerSnap notice: Snapshot requested for [ble.lbck.dc.root.local]:[/oracle/PU1/sapdata1]
42506 02/26/10 11:38:02 nsrd powerSnap notice: Snapshot requested for [ble.lbck.dc.root.local]:[/oracle/PU1/sapdata1]
42506 02/26/10 11:38:02 nsrd powerSnap notice: Snapshot requested for [ble.lbck.dc.root.local]:[/oracle/PU1/sapdata1]
/* This may look as bug, but we see 16 requests for same sapdata volume because volumes contains 16 metas */
42506 02/26/10 11:40:10 nsrd powerSnap notice: Snapshot requested for [ble.lbck.dc.root.local]:[/oracle/PU1/sapdata2]
[etc]
42506 02/26/10 11:42:24 nsrd powerSnap notice: Snapshot requested for [ble.lbck.dc.root.local]:[/oracle/PU1/sapdata3]
[etc]
42506 02/26/10 11:44:31 nsrd powerSnap notice: Snapshot requested for [ble.lbck.dc.root.local]:[/oracle/PU1/sapdata4]
[etc]
42506 02/26/10 11:46:45 nsrd powerSnap notice: Snapshot requested for [ble.lbck.dc.root.local]:[/oracle/PU1/sapdata5]
[etc]

2010 EMC Proven Professional Knowledge Sharing 93
42506 02/26/10 11:48:59 nsrd powerSnap notice: Snapshot requested for [ble.lbck.dc.root.local]:[/oracle/PU1/sapdata6]
[etc]
42506 02/26/10 11:51:13 nsrd powerSnap notice: Snapshot requested for [ble.lbck.dc.root.local]:[/oracle/PU1/sapdata7]
[etc]
42506 02/26/10 11:53:24 nsrd powerSnap notice: Snapshot requested for [ble.lbck.dc.root.local]:[/oracle/PU1/sapdata8]
[etc]
42506 02/26/10 12:26:51 nsrd powerSnap notice: Snapshot completed for [ble.lbck.dc.root.local]:[/oracle/PU1/sapdata2]
42506 02/26/10 12:27:31 nsrd powerSnap notice: Snapshot completed for [ble.lbck.dc.root.local]:[/oracle/PU1/sapdata3]
42506 02/26/10 12:28:11 nsrd powerSnap notice: Snapshot completed for [ble.lbck.dc.root.local]:[/oracle/PU1/sapdata4]
42506 02/26/10 12:28:52 nsrd powerSnap notice: Snapshot completed for [ble.lbck.dc.root.local]:[/oracle/PU1/sapdata5]
42506 02/26/10 12:29:32 nsrd powerSnap notice: Snapshot completed for [ble.lbck.dc.root.local]:[/oracle/PU1/sapdata6]
42506 02/26/10 12:30:12 nsrd powerSnap notice: Snapshot completed for [ble.lbck.dc.root.local]:[/oracle/PU1/sapdata7]
42506 02/26/10 12:30:52 nsrd powerSnap notice: Snapshot completed for [ble.lbck.dc.root.local]:[/oracle/PU1/sapdata8]
42506 02/26/10 12:31:33 nsrd powerSnap notice: Snapshot completed for [ble.lbck.dc.root.local]:[/oracle/PU1/sapdata1]
/* At this point Snapshots have completed and database is placed out of backup mode. PowerSnap will start saving metadata */
38718 02/26/10 12:32:29 nsrd ble.lbck.dc.root.local:backint:BLE_26631:PS: saving to pool 'psmeta' (RIGHT073)
38714 02/26/10 12:32:29 nsrd ble.lbck.dc.root.local:backint:BLE_26631:PS: done saving to pool 'psmeta' (RIGHT073)
38718 02/26/10 12:32:29 nsrd ble.lbck.dc.root.local:backint:BLE_26631:PS: saving to pool 'psmeta' (RIGHT073)
38714 02/26/10 12:32:29 nsrd ble.lbck.dc.root.local:backint:BLE_26631:PS: done saving to pool 'psmeta' (RIGHT073) 2 KB
38718 02/26/10 12:32:32 nsrd ble.lbck.dc.root.local:backint:BLE_26631:PS: saving to pool 'psmeta' (RIGHT073)
[etc]
38714 02/26/10 13:11:23 nsrd ble.lbck.dc.root.local:backint:BLE_26631:PS: done saving to pool 'psmeta' (RIGHT073) 2 KB
/* metadata saving is done here – now module will save all data that is saved via LAN */
38718 02/26/10 13:11:41 nsrd ble.lbck.dc.root.local:backint:BLE_18598 saving to pool 'BLEDATA' (RIGHT211)

2010 EMC Proven Professional Knowledge Sharing 94
38714 02/26/10 13:11:43 nsrd ble.lbck.dc.root.local:backint:BLE_18598 done saving to pool 'BLEDATA' (RIGHT211) 24 MB
38718 02/26/10 13:11:50 nsrd ble.lbck.dc.root.local:backint:BLE_18648 saving to pool 'BLEDATA' (RIGHT211)
38714 02/26/10 13:11:51 nsrd ble.lbck.dc.root.local:backint:BLE_18648 done saving to pool 'BLEDATA' (RIGHT211) 248 KB
38718 02/26/10 13:11:56 nsrd ble.lbck.dc.root.local:backint:BLE_18651 saving to pool 'BLEDATA' (RIGHT215)
38714 02/26/10 13:11:57 nsrd ble.lbck.dc.root.local:backint:BLE_18651 done saving to pool 'BLEDATA' (RIGHT215) 12 KB
38718 02/26/10 13:11:57 nsrd ble.lbck.dc.root.local:backint:BLE_18653 saving to pool 'BLEDATA' (RIGHT209)
38718 02/26/10 13:11:57 nsrd ble.lbck.dc.root.local:backint:BLE_18654 saving to pool 'BLEDATA' (RIGHT212)
38718 02/26/10 13:11:57 nsrd ble.lbck.dc.root.local:backint:BLE_18650 saving to pool 'BLEDATA' (RIGHT218)
38718 02/26/10 13:11:57 nsrd ble.lbck.dc.root.local:backint:BLE_18649 saving to pool 'BLEDATA' (RIGHT213)
38718 02/26/10 13:11:57 nsrd ble.lbck.dc.root.local:backint:BLE_18655 saving to pool 'BLEDATA' (RIGHT214)
38714 02/26/10 13:11:57 nsrd ble.lbck.dc.root.local:backint:BLE_18653 done saving to pool 'BLEDATA' (RIGHT209) 8 KB
38714 02/26/10 13:11:57 nsrd ble.lbck.dc.root.local:backint:BLE_18654 done saving to pool 'BLEDATA' (RIGHT212) 7 KB
38714 02/26/10 13:11:57 nsrd ble.lbck.dc.root.local:backint:BLE_18649 done saving to pool 'BLEDATA' (RIGHT213) 43 KB
38714 02/26/10 13:11:57 nsrd ble.lbck.dc.root.local:backint:BLE_18655 done saving to pool 'BLEDATA' (RIGHT214) 6 KB
38714 02/26/10 13:11:57 nsrd ble.lbck.dc.root.local:backint:BLE_18650 done saving to pool 'BLEDATA' (RIGHT218) 12 KB
38718 02/26/10 13:11:59 nsrd ble.lbck.dc.root.local:backint:BLE_18652 saving to pool 'BLEDATA' (RIGHT217)
38714 02/26/10 13:11:59 nsrd ble.lbck.dc.root.local:backint:BLE_18652 done saving to pool 'BLEDATA' (RIGHT217) 8 KB
38758 02/26/10 13:13:02 nsrd savegroup notice: BLE_SAP_DB_PRD_RIGHT_local_R1 completed, Total 1 client(s), 1 Succeeded. Please see group completion details for more information.
And our R1 BCV is successfully done. The full Networker log is attached below.
R1.lst
The R2 BCV has exactly the same workflow with the exception that we call for live backup
after PowerSnap metadata has been saved. We will see this in the next example.

2010 EMC Proven Professional Knowledge Sharing 95
As before, here is short summary from the brbackup log.
BR0051I BRBACKUP 7.00 (43)
BR0055I Start of database backup: becqwsjs.anf 2010-02-25 23.22.44
BR0484I BRBACKUP log file: /oracle/BLE/sapbackup/becqwsjs.anf
BR0477I Oracle pfile /oracle/BLE/102_64/dbs/initBLE.ora created from spfile /oracle/BLE/102_64/dbs/spfileBLE.ora
BR0280I BRBACKUP time stamp: 2010-02-25 23.22.53
BR0319I Control file copy created: /oracle/BLE/sapbackup/cntrlBLE.dbf 25083904
[skip]
BR0280I BRBACKUP time stamp: 2010-02-25 23.23.00
BR0057I Backup of database: BLE
BR0058I BRBACKUP action ID: becqwsjs
BR0059I BRBACKUP function ID: anf
BR0110I Backup mode: ALL
BR0077I Database file for backup: /oracle/BLE/sapbackup/cntrlBLE.dbf
BR0061I 604 files found for backup, total size 9631896.633 MB
BR0143I Backup type: online
BR0130I Backup device type: util_file_online
BR0109I Files will be saved by backup utility
BR0142I Files will be switched to backup status during the backup
BR0134I Unattended mode with 'force' active - no operator confirmation allowed
BR0280I BRBACKUP time stamp: 2010-02-25 23.23.00
BR0229I Calling backup utility with function 'backup'...
BR0278I Command output of '/usr/sap/BLE/SYS/exe/run/backint -u BLE -f backup -i /oracle/BLE/sapbackup/.becqwsjs.lst -t file_online -p /oracle/BLE/102_64/dbs/initBLE_data_R2_active.utl -c':
BR0280I BRCONNECT time stamp: 2010-02-26 00.28.49
[skip]
BR0280I BRCONNECT time stamp: 2010-02-26 00.44.17
#END /oracle/BLE/sapdata1/erp01_1/erp01.data1
BR0280I BRBACKUP time stamp: 2010-02-26 00.44.58
#FILE..... /oracle/BLE/sapdata1/erp01_1/erp01.data1
#SAVED.... 1267141490

2010 EMC Proven Professional Knowledge Sharing 96
[skip]
BR0280I BRBACKUP time stamp: 2010-02-26 01.24.49
#FILE..... /oracle/BLE/sapdata1/system_1/system.data1
#SAVED.... 1267143885
BR0280I BRCONNECT time stamp: 2010-02-26 01.24.58
#BEGIN /oracle/BLE/sapbackup/cntrlBLE.dbf
BR0280I BRCONNECT time stamp: 2010-02-26 01.24.59
BR0280I BRCONNECT time stamp: 2010-02-26 01.25.09
#END /oracle/BLE/sapbackup/cntrlBLE.dbf
BR0280I BRCONNECT time stamp: 2010-02-26 01.25.09
BR0280I BRBACKUP time stamp: 2010-02-26 01.25.09
#FILE..... /oracle/BLE/sapbackup/cntrlBLE.dbf
#SAVED.... 1267143900
BR0280I BRBACKUP time stamp: 2010-02-26 01.25.09
BR0232I 604 of 604 files saved by backup utility
BR0230I Backup utility called successfully
BR0280I BRBACKUP time stamp: 2010-02-26 01.25.11
BR0340I Switching to next online redo log file for database instance BLE ...
BR0321I Switch to next online redo log file for database instance BLE successful
BR0117I ARCHIVE LOG LIST after backup for database instance BLE
Parameter Value
Database log mode Archive Mode
Automatic archival Enabled
Archive destination LOCATION=/oracle/BLE/oraarch/BLEarch
Archive format %t_%s_%r.dbf
Oldest online log sequence 5964
Next log sequence to archive 5971

2010 EMC Proven Professional Knowledge Sharing 97
Current log sequence 5971 SCN: 6131064711386
Database block size 8192 Thread: 1
Current system change number 6131064711419 ResetId: 704836739
BR0280I BRBACKUP time stamp: 2010-02-26 01.25.11
BR0229I Calling backup utility with function 'backup'...
BR0278I Command output of '/usr/sap/BLE/SYS/exe/run/backint -u BLE -f backup -i /oracle/BLE/sapbackup/.becqwsjs.lst -t file -p /oracle/BLE/102_64/dbs/initBLE_data_R2_active.utl -c':
BR0280I BRBACKUP time stamp: 2010-02-26 01.25.13
#PFLOG.... /oracle/BLE/sapbackup/becqwsjs.anf
#SAVED.... 1267143912
BR0280I BRBACKUP time stamp: 2010-02-26 01.25.18
#PFLOG.... /oracle/BLE/102_64/dbs/initBLE.ora
#SAVED.... 1267143913
BR0280I BRBACKUP time stamp: 2010-02-26 01.25.20
#PFLOG.... /oracle/BLE/102_64/dbs/spfileBLE.ora
#SAVED.... 1267143914
BR0280I BRBACKUP time stamp: 2010-02-26 01.25.22
#PFLOG.... /oracle/BLE/sapreorg/spaceBLE.log
#SAVED.... 1267143918
BR0280I BRBACKUP time stamp: 2010-02-26 01.25.22
#PFLOG.... /oracle/BLE/sapbackup/backBLE.log
#SAVED.... 1267143917
BR0280I BRBACKUP time stamp: 2010-02-26 01.25.22
#PFLOG.... /oracle/BLE/sapreorg/strucBLE.log
#SAVED.... 1267143916
BR0280I BRBACKUP time stamp: 2010-02-26 01.25.22
#PFLOG.... /oracle/BLE/102_64/dbs/initBLE_data_R2_active.utl

2010 EMC Proven Professional Knowledge Sharing 98
#SAVED.... 1267143915
BR0280I BRBACKUP time stamp: 2010-02-26 01.25.23
#PFLOG.... /oracle/BLE/102_64/dbs/initBLE_data_R2_active.sap
#SAVED.... 1267143919
BR0280I BRBACKUP time stamp: 2010-02-26 01.25.23
BR0232I 8 of 8 files saved by backup utility
BR0230I Backup utility called successfully
BR0056I End of database backup: becqwsjs.anf 2010-02-26 01.25.23
BR0280I BRBACKUP time stamp: 2010-02-26 01.25.24
BR0052I BRBACKUP completed successfully
This is pretty much same as with R1. Since backup runs 12 hours apart, all timestamps
follow this shift. The full brbackup log is attached.
becqwsjs.anf
For brbackup, the backup is done once BCV metadata is saved by Networker and it is not
aware of a live backup which will follow.
Here is the short version of backup server log.
42506 02/25/10 23:00:00 nsrd savegroup info: starting Snapshot group BLE_SAP_DB_PRD_RIGHT_local_R2 (with 1 client(s))
42506 02/25/10 23:00:05 nsrd powerSnap notice: Applying retention for BLE_SAP_DB_PRD_RIGHT_local_R2:ble.lbck.dc.root.local based on SnapPolicy (R2)
42506 02/25/10 23:22:43 nsrd powerSnap notice: Retention applied for BLE_SAP_DB_PRD_RIGHT_local_R2:ble.lbck.dc.root.local based on SnapPolicy (R2)
42506 02/25/10 23:29:31 nsrd powerSnap notice: Operation Requested for : backint:BLE_23552:PS:
42506 02/25/10 23:29:31 nsrd powerSnap notice: Debug ID for this session : 1267136581
[skip]
42506 02/25/10 23:41:48 nsrd powerSnap notice: Snapshot requested for [ble.lbck.dc.root.local]:[/oracle/BLE/sapdata1]
[skip]
42506 02/25/10 23:46:02 nsrd powerSnap notice: Snapshot requested for [ble.lbck.dc.root.local]:[/oracle/BLE/sapdata2]
[skip]

2010 EMC Proven Professional Knowledge Sharing 99
42506 02/25/10 23:50:37 nsrd powerSnap notice: Snapshot requested for [ble.lbck.dc.root.local]:[/oracle/BLE/sapdata3]
[skip]
42506 02/25/10 23:55:09 nsrd powerSnap notice: Snapshot requested for [ble.lbck.dc.root.local]:[/oracle/BLE/sapdata4]
[skip]
42506 02/25/10 23:55:09 nsrd powerSnap notice: Snapshot requested for [ble.lbck.dc.root.local]:[/oracle/BLE/sapdata4]
[skip]
42506 02/25/10 23:59:40 nsrd powerSnap notice: Snapshot requested for [ble.lbck.dc.root.local]:[/oracle/BLE/sapdata5]
[skip]
42506 02/26/10 00:04:10 nsrd powerSnap notice: Snapshot requested for [ble.lbck.dc.root.local]:[/oracle/BLE/sapdata6]
[skip]
42506 02/26/10 00:08:39 nsrd powerSnap notice: Snapshot requested for [ble.lbck.dc.root.local]:[/oracle/BLE/sapdata7]
[skip]
42506 02/26/10 00:13:16 nsrd powerSnap notice: Snapshot requested for [ble.lbck.dc.root.local]:[/oracle/BLE/sapdata8]
[skip]
42506 02/26/10 00:39:25 nsrd powerSnap notice: Snapshot completed for [ble.lbck.dc.root.local]:[/oracle/BLE/sapdata2]
42506 02/26/10 00:40:04 nsrd powerSnap notice: Snapshot completed for [ble.lbck.dc.root.local]:[/oracle/BLE/sapdata3]
42506 02/26/10 00:40:43 nsrd powerSnap notice: Snapshot completed for [ble.lbck.dc.root.local]:[/oracle/BLE/sapdata4]
42506 02/26/10 00:41:22 nsrd powerSnap notice: Snapshot completed for [ble.lbck.dc.root.local]:[/oracle/BLE/sapdata5]
42506 02/26/10 00:42:01 nsrd powerSnap notice: Snapshot completed for [ble.lbck.dc.root.local]:[/oracle/BLE/sapdata6]
42506 02/26/10 00:42:40 nsrd powerSnap notice: Snapshot completed for [ble.lbck.dc.root.local]:[/oracle/BLE/sapdata7]
42506 02/26/10 00:43:18 nsrd powerSnap notice: Snapshot completed for [ble.lbck.dc.root.local]:[/oracle/BLE/sapdata8]
42506 02/26/10 00:43:57 nsrd powerSnap notice: Snapshot completed for [ble.lbck.dc.root.local]:[/oracle/BLE/sapdata1]
38718 02/26/10 00:44:55 nsrd ble.lbck.dc.root.local:backint:BLE_23552:PS: saving to pool 'psmeta' (RIGHT073)
38714 02/26/10 00:44:55 nsrd ble.lbck.dc.root.local:backint:BLE_23552:PS: done saving to pool 'psmeta' (RIGHT073)
[skip]
38718 02/26/10 01:24:46 nsrd ble.lbck.dc.root.local:backint:BLE_23552:PS: saving to pool 'psmeta' (RIGHT072)

2010 EMC Proven Professional Knowledge Sharing 100
38714 02/26/10 01:24:47 nsrd ble.lbck.dc.root.local:backint:BLE_23552:PS: done saving to pool 'psmeta' (RIGHT072) 2 KB
38718 02/26/10 01:25:06 nsrd blensr.stn.dc.root.local:backint:BLE_19152 saving to pool 'BLEDATA' (RIGHT194)
38714 02/26/10 01:25:07 nsrd blensr.stn.dc.root.local:backint:BLE_19152 done saving to pool 'BLEDATA' (RIGHT194) 24 MB
38718 02/26/10 01:25:13 nsrd blensr.stn.dc.root.local:backint:BLE_19234 saving to pool 'BLEDATA' (RIGHT194)
38714 02/26/10 01:25:13 nsrd blensr.stn.dc.root.local:backint:BLE_19234 done saving to pool 'BLEDATA' (RIGHT194) 248 KB
38718 02/26/10 01:25:17 nsrd blensr.stn.dc.root.local:backint:BLE_19239 saving to pool 'BLEDATA' (RIGHT195)
38714 02/26/10 01:25:17 nsrd blensr.stn.dc.root.local:backint:BLE_19239 done saving to pool 'BLEDATA' (RIGHT195) 8 KB
38718 02/26/10 01:25:19 nsrd blensr.stn.dc.root.local:backint:BLE_19237 saving to pool 'BLEDATA' (RIGHT196)
38718 02/26/10 01:25:19 nsrd blensr.stn.dc.root.local:backint:BLE_19241 saving to pool 'BLEDATA' (RIGHT193)
38718 02/26/10 01:25:19 nsrd blensr.stn.dc.root.local:backint:BLE_19236 saving to pool 'BLEDATA' (RIGHT198)
38718 02/26/10 01:25:19 nsrd blensr.stn.dc.root.local:backint:BLE_19235 saving to pool 'BLEDATA' (RIGHT197)
38718 02/26/10 01:25:19 nsrd blensr.stn.dc.root.local:backint:BLE_19238 saving to pool 'BLEDATA' (RIGHT199)
38714 02/26/10 01:25:19 nsrd blensr.stn.dc.root.local:backint:BLE_19237 done saving to pool 'BLEDATA' (RIGHT196) 12 KB
38714 02/26/10 01:25:19 nsrd blensr.stn.dc.root.local:backint:BLE_19241 done saving to pool 'BLEDATA' (RIGHT193) 6 KB
38714 02/26/10 01:25:19 nsrd blensr.stn.dc.root.local:backint:BLE_19236 done saving to pool 'BLEDATA' (RIGHT198) 12 KB
38714 02/26/10 01:25:19 nsrd blensr.stn.dc.root.local:backint:BLE_19235 done saving to pool 'BLEDATA' (RIGHT197) 43 KB
38714 02/26/10 01:25:19 nsrd blensr.stn.dc.root.local:backint:BLE_19238 done saving to pool 'BLEDATA' (RIGHT199) 8 KB
38718 02/26/10 01:25:20 nsrd blensr.stn.dc.root.local:backint:BLE_19240 saving to pool 'BLEDATA' (RIGHT200)
38714 02/26/10 01:25:20 nsrd blensr.stn.dc.root.local:backint:BLE_19240 done saving to pool 'BLEDATA' (RIGHT200) 7 KB
42506 02/26/10 01:25:28 nsrd powerSnap notice: Starting live-backup for BLE_SAP_DB_PRD_RIGHT_local_R2:ble.lbck.dc.root.local:backint:BLE
42506 02/26/10 01:27:47 nsrd powerSnap notice: Operation Requested for : backint:BLE_23552:PS:
38718 02/26/10 01:31:09 nsrd ble.lbck.dc.root.local:backint:BLE_23552:PS: saving to pool 'BLEDATA' (RIGHT194)
38718 02/26/10 01:31:15 nsrd ble.lbck.dc.root.local:backint:BLE_23552:PS: saving to pool 'BLEDATA' (RIGHT193)

2010 EMC Proven Professional Knowledge Sharing 101
38718 02/26/10 01:31:24 nsrd ble.lbck.dc.root.local:backint:BLE_23552:PS: saving to pool 'BLEDATA' (RIGHT196)
38718 02/26/10 01:31:30 nsrd ble.lbck.dc.root.local:backint:BLE_23552:PS: saving to pool 'BLEDATA' (RIGHT197)
38718 02/26/10 01:31:34 nsrd ble.lbck.dc.root.local:backint:BLE_23552:PS: saving to pool 'BLEDATA' (RIGHT198)
38718 02/26/10 01:31:39 nsrd ble.lbck.dc.root.local:backint:BLE_23552:PS: saving to pool 'BLEDATA' (RIGHT199)
38714 02/26/10 01:37:56 nsrd ble.lbck.dc.root.local:backint:BLE_23552:PS: done saving to pool 'BLEDATA' (RIGHT194) 16 GB
38718 02/26/10 01:38:04 nsrd ble.lbck.dc.root.local:backint:BLE_23552:PS: saving to pool 'BLEDATA' (RIGHT194)
[skip]
38714 02/26/10 12:29:05 nsrd ble.lbck.dc.root.local:backint:BLE_23552:PS: done saving to pool 'BLEDATA' (RIGHT213) 16 GB
38714 02/26/10 12:30:10 nsrd ble.lbck.dc.root.local:backint:BLE_23552:PS: done saving to pool 'BLEDATA' (RIGHT209) 16 GB
38714 02/26/10 12:31:23 nsrd ble.lbck.dc.root.local:backint:BLE_23552:PS: done saving to pool 'BLEDATA' (RIGHT211) 13 GB
38714 02/26/10 12:31:29 nsrd ble.lbck.dc.root.local:backint:BLE_23552:PS: done saving to pool 'BLEDATA' (RIGHT212) 16 GB
38714 02/26/10 12:32:34 nsrd ble.lbck.dc.root.local:backint:BLE_23552:PS: done saving to pool 'BLEDATA' (RIGHT218) 16 GB
38714 02/26/10 12:33:37 nsrd ble.lbck.dc.root.local:backint:BLE_23552:PS: done saving to pool 'BLEDATA' (RIGHT214) 16 GB
38714 02/26/10 12:33:38 nsrd ble.lbck.dc.root.local:backint:BLE_23552:PS: done saving to pool 'BLEDATA' (RIGHT215) 16 GB
38714 02/26/10 12:34:13 nsrd ble.lbck.dc.root.local:backint:BLE_23552:PS: done saving to pool 'BLEDATA' (RIGHT217) 16 GB
38758 02/26/10 12:36:04 nsrd savegroup notice: BLE_SAP_DB_PRD_RIGHT_local_R2 completed, Total 1 client(s), 1 Succeeded. Please see group completion details for more information.
Both the R2 BCV Snapshot and live backup (which is nothing more than rollover of the
Snapshot) completed successfully. The full networker server log is attached.
R2.lst
While this may look fast, in reality it is slow. We have backup to tape which lasted 11 hours
for 10TB of data. With 8 streams and 8 sapdata volumes we would expect better results.
Indeed, at the time when this data was recorded, I was aware of certain issues with speed
due to missing paths on proxy servers (only 4 instead of 6) and some HBA or port issue that
2010 EMC Proven Professional Knowledge Sharing 102
was blocking overall bandwidth towards EDL to much lower values than expected. Ideally, I
would expect this to run in approximately 6 hours.
At the end of the day, we have the following options to restore from:
• BCV (R1) taken at 11am
• BCVR (R2) taken at 11pm
• Archive logs taken every hour
At any time SAP team can, using BRTools, run restore of their database in case something is
wrong. Most of the time archive logs will be all right. The alternatives are to restore over LAN
to something smaller either from tape or Snap if it is still available (instant restore option).
What happens if you need to restore the whole thing? LAN might not be an option in that
case (unless your LAN speeds match those by SAN) so we call rollback.
SAP DB Rollback with PowerSnap You just have to love it While this example will use the same database, I will use data from a previously attempted
rollback during acceptance testing. Usually, you do not get a daily opportunity to test rollback
of large scale databases. It is probably very difficult to explain how important such a
database might be and what the loss of such data might mean. I’m quite sure everyone in
the IT industry has heard or witnessed at least one of the horror stories which resulted in a
huge business loss. All computer environments are part of an online generation where no
downtime is desired. Let’s be realistic – you simply can’t avoid it. And for those really bad
situations, you need to have a quick solution where you will be back on track in the shortest
possible time.
So, let’s see how rollback works. Rollbacks and rollforwards are destructive, which means
the entire contents of the file system are overwritten. Rollback or rollforward can only be
performed when there is no other data set on the disks associated with the PIT copy, other
than what is registered with the Snap set.
Also, with PowerSnap for Symmetrix, a PowerSnap-based rollback of a managed or
nonmanaged volume releases the BCV lock. This not only prevents the Snapshot from being
maintained, but also causes the Snap set to become invalid (this will be changed in
PowerSnap 2.5SP1).

2010 EMC Proven Professional Knowledge Sharing 103
Since a PowerSnap Module-based rollback is destructive and operates on a complete
volume group, only backed up file systems are guaranteed to be recovered after a rollback.
If there are some other file systems in the volume group before the rollback, but they were
not backed up using PowerSnap, they are not guaranteed to be available after the recovery.
If a device has more than one partition and a rollback is attempted, the safety check fails
unless the force option is used or all other partitions are listed in the psrollback.res file.
Exercise caution when any such file system is being entered in /nsr/res/psrollback.res file for
exclusion from the rollback safety check. If a rollback fails, the file system is left unmounted.
After a failed rollback, you must mount the file systems manually.
Rollbacks use the permanent Snapshot created by an instant backup or as part of a deferred
live backup. For a rollback, the entire Snapshot is moved to the source destination by using
the appropriate commands for the specific platform.

2010 EMC Proven Professional Knowledge Sharing 104
A restore of a PowerSnap backup from secondary storage uses the following process:
1. The NMSAP backint program verifies the versions of the requested files through
the nsrindexd service.
2. The backint program contacts the PowerSnap master program, nsrpsd, on the
Oracle Server host.
3. The nsrpsd program works with other PowerSnap and NetWorker programs to
retrieve the data from secondary storage, and performs the restore operation.
PowerSnap processes restore the files (save sets) into a destination requested by
the NMSAP program. The processes use the nsrmmd and nsrmmdbd programs
to do the following:
• Determine which media contain the requested save sets.
• Read the backup volumes.
4. Once the required SAP with Oracle files are restored from the backup volumes, a
database administrator can complete the standard SAP with Oracle database
recovery using brrecover command.
So much about theory; let’s get down to business. For the sake of example, we are going to
reproduce all the steps done here and see the eventual problems you might encounter the
first time.
Note: in this example we used policy which does backup of control file Snapshot placed in
/oracle/BLE/sapbackup via LAN instead of SAN. This is because user used for restore (in
case we use –m full option with brrestore) is Oracle user which has home directory set in
same location which would cause failure during restore. To avoid this, we use the LAN
method to restore the control file. SAP user is another way to do it.
Before we proceed, we must instruct PowerSnap that the restore type will be rollback instead
of the default. This is done by editing opaque file and adding RESTORE_TYPE_ORDER to
point toward rollback:
NSR_DATA_MOVER=sn-right.gbck.dc.root.local
NSR_SERVER=nsr.gbck.dc.root.local
NSR_CLIENT=ble.lbck.dc.root.local
NSR_IMAGE_SAVE=NO
SYMM_SNAP_POOL=/nsr/res/BLE_R2_active.pool
SYMM_SNAP_REMOTE=TRUE
SYMM_SNAP_TECH=BCV

2010 EMC Proven Professional Knowledge Sharing 105
SYMM_ON_DELETE=RELEASE_RESOURCE
NSR_MCSG_DISABLE_MNTPT_CHECK=YES
NSR_PS_SAVE_PARALLELISM=8
NSR_SNAP_TYPE=symm-dmx
NSR_VERBOSE=TRUE
NSR_RPC_TIMEOUT=240
RESTORE_TYPE_ORDER=rollback
The SAP operator runs the command:
brrestore -m full -b bebqlcxh.anf -r initPU1_data_R2_active.utl -p initPU1_data_R2_active.sap
In this command we specify:
• that we wish to restore datafiles and control file (-m full),
• what is the backup log file we wish to restore from (-b bebqlcxh.anf), and
• what util and profile file should be used.
Once the command is executed, brtools will generate list of files to be restored and delete
them if they exist on the system. This is tricky and caught me by surprise since if something
goes wrong with restore your data is gone. Anyway, the list is passed to backint and then to
the PowerSnap module that checks if there is anything on existing file systems that might be
overwritten by rollback. If it finds it, rollback will fail. And all data listed for brrestore to be
restored is deleted so you have a problem.
Here is the example:
File or directory '/oracle/BLE/sapdata5/erpslo_13' is present on the file system but not in the list of files to restore. This file/directory would be overwritten by a rollback
Other files are present on file system /oracle/BLE/sapdata5 - Rollback is not safe
Because of above, the rollback will fail. At this point we can place the directory into
/nsr/res/psrollback.res and restart the job.
Run the following command to quickly determine which files or directories have been
identified on the system and are not part of the backup:
grep "is present" brc.<time_stamp>.debug.raw | cut -d\' -f2
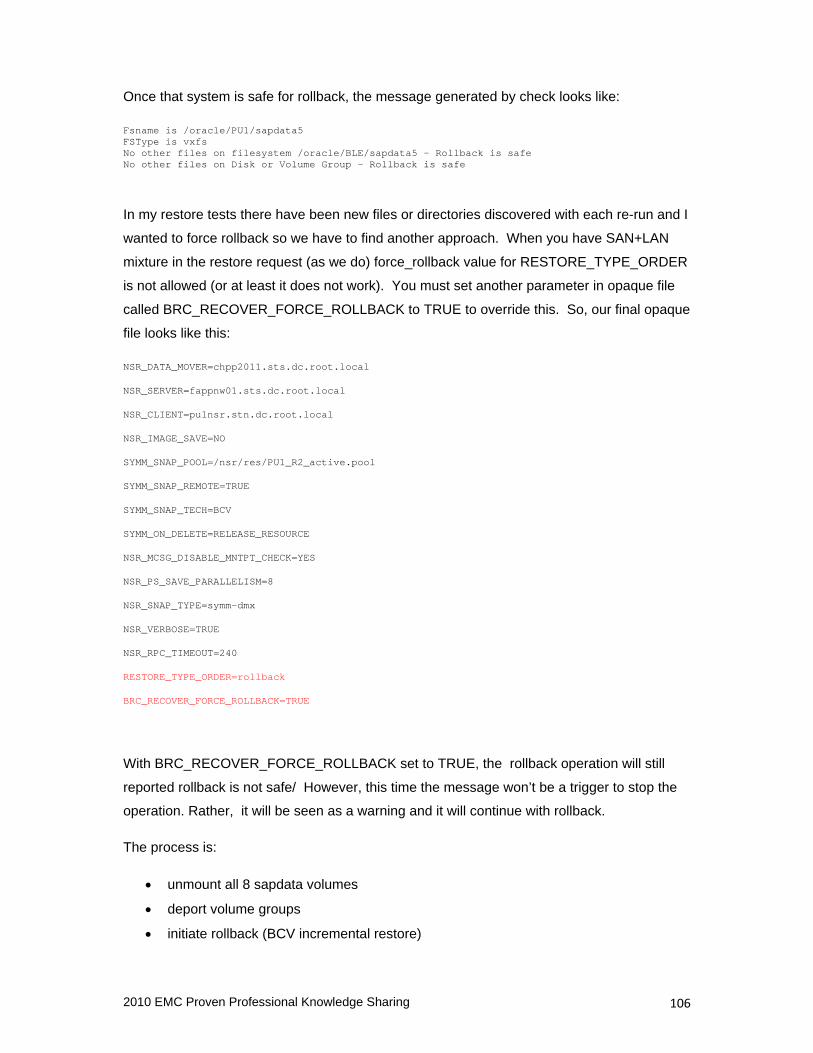
2010 EMC Proven Professional Knowledge Sharing 106
Once that system is safe for rollback, the message generated by check looks like:
Fsname is /oracle/PU1/sapdata5 FSType is vxfs No other files on filesystem /oracle/BLE/sapdata5 - Rollback is safe No other files on Disk or Volume Group - Rollback is safe
In my restore tests there have been new files or directories discovered with each re-run and I
wanted to force rollback so we have to find another approach. When you have SAN+LAN
mixture in the restore request (as we do) force_rollback value for RESTORE_TYPE_ORDER
is not allowed (or at least it does not work). You must set another parameter in opaque file
called BRC_RECOVER_FORCE_ROLLBACK to TRUE to override this. So, our final opaque
file looks like this:
NSR_DATA_MOVER=chpp2011.sts.dc.root.local
NSR_SERVER=fappnw01.sts.dc.root.local
NSR_CLIENT=pu1nsr.stn.dc.root.local
NSR_IMAGE_SAVE=NO
SYMM_SNAP_POOL=/nsr/res/PU1_R2_active.pool
SYMM_SNAP_REMOTE=TRUE
SYMM_SNAP_TECH=BCV
SYMM_ON_DELETE=RELEASE_RESOURCE
NSR_MCSG_DISABLE_MNTPT_CHECK=YES
NSR_PS_SAVE_PARALLELISM=8
NSR_SNAP_TYPE=symm-dmx
NSR_VERBOSE=TRUE
NSR_RPC_TIMEOUT=240
RESTORE_TYPE_ORDER=rollback
BRC_RECOVER_FORCE_ROLLBACK=TRUE
With BRC_RECOVER_FORCE_ROLLBACK set to TRUE, the rollback operation will still
reported rollback is not safe/ However, this time the message won’t be a trigger to stop the
operation. Rather, it will be seen as a warning and it will continue with rollback.
The process is:
• unmount all 8 sapdata volumes
• deport volume groups
• initiate rollback (BCV incremental restore)

2010 EMC Proven Professional Knowledge Sharing 107
• once done BCV split is performed
• volume group is imported successfully
• mount all 8 sapdata volumes
• restore control file
From a brrestore log perspective, this whole step looks like the following (short version):
BR0401I BRRESTORE 7.00 (43)
BR0169I Value 'util_file_online' of parameter/option 'backup_dev_type/-d' ignored for 'brrestore' - 'util_file' assumed
BR0405I Start of file restore: rebqpeqk.rsb 2009-10-09 23.14.26
BR0484I BRRESTORE log file: /oracle/BLE/sapbackup/rebqpeqk.rsb
BR0101I Parameters
Name Value
oracle_sid BLE
oracle_home /oracle/BLE/102_64
oracle_profile /oracle/BLE/102_64/dbs/initBLE.ora
sapdata_home /oracle/BLE
sap_profile /oracle/BLE/102_64/dbs/initBLE_data_R2_active.sap
recov_interval 30
restore_mode FULL
backup_dev_type util_file
util_par_file /oracle/BLE/102_64/dbs/initBLE_data_R2_active.utl
system_info orable/orable db-left HP-UX B.11.31 U ia64
oracle_info BLE 10.2.0.4.0
make_info hpia64 OCI_102 Aug 15 2009
command_line brrestore -c force -m full -b bebqlcxh.anf -r initBLE_data_R2_active.utl -p initBLE_data_R2_active.sap
BR0428W File /oracle/BLE/origlogA/cntrl/cntrlBLE.dbf will be overwritten
BR0428W File /oracle/BLE/origlogB/cntrl/cntrlBLE.dbf will be overwritten
BR0428W File /oracle/BLE/sapdata1/cntrl/cntrlBLE.dbf will be overwritten
BR0456I Probably the database must be recovered due to restore from online backup

2010 EMC Proven Professional Knowledge Sharing 108
BR0280I BRRESTORE time stamp: 2009-10-09 23.14.26
BR0407I Restore of database: BLE
BR0408I BRRESTORE action ID: rebqpeqk
BR0409I BRRESTORE function ID: rsb
BR0449I Restore mode: FULL
BR0411I Database files for restore:
/oracle/BLE/origlogA/cntrl/cntrlBLE.dbf
/oracle/BLE/origlogB/cntrl/cntrlBLE.dbf
/oracle/BLE/sapdata1/cntrl/cntrlBLE.dbf
BR0419I Files will be restored from backup: bebqlcxh.anf 2009-10-09 03.23.09
BR0416I 582 files found to restore, total size 9314986.461 MB
BR0421I Restore device type: util_file
BR0134I Unattended mode with 'force' active - no operator confirmation allowed
BR0280I BRRESTORE time stamp: 2009-10-09 23.14.26
BR0229I Calling backup utility with function 'restore'...
BR0278I Command output of '/usr/sap/BLE/SYS/exe/run/backint -u BLE -f restore -i /oracle/BLE/sapbackup/.rebqpeqk.lst -t file -p /oracle/BLE/102_64/dbs/initBLE_data_R2_active.utl -c':
BR0280I BRRESTORE time stamp: 2009-10-10 01.12.47
#FILE..... /oracle/BLE/sapdata1/erp02_1/erp02.data1
#RESTORED. 1255054997
BR0280I BRRESTORE time stamp: 2009-10-10 01.12.47
#FILE..... /oracle/BLE/sapdata1/erp02_9/erp02.data9
#RESTORED. 1255055001
BR0280I BRRESTORE time stamp: 2009-10-10 01.15.10
#FILE..... /oracle/BLE/sapdata2/erp02_10/erp02.data10
#RESTORED. 1255055005
[skip]
BR0280I BRRESTORE time stamp: 2009-10-10 01.29.38
#FILE..... /oracle/BLE/sapdata8/erp01_8/erp01.data8

2010 EMC Proven Professional Knowledge Sharing 109
#RESTORED. 1255054993
BR0280I BRRESTORE time stamp: 2009-10-10 01.29.50
#FILE..... /oracle/BLE/sapbackup/cntrlBLE.dbf
#RESTORED. 1255056900
BR0280I BRRESTORE time stamp: 2009-10-10 01.29.50
BR0374I 582 of 582 files restored by backup utility
BR0230I Backup utility called successfully
BR0351I Restoring /oracle/BLE/origlogA/cntrl/cntrlBLE.dbf
BR0355I from /oracle/BLE/sapbackup/cntrlBLE.dbf ...
BR0351I Restoring /oracle/BLE/origlogB/cntrl/cntrlBLE.dbf
BR0355I from /oracle/BLE/sapbackup/cntrlBLE.dbf ...
BR0351I Restoring /oracle/BLE/sapdata1/cntrl/cntrlBLE.dbf
BR0355I from /oracle/BLE/sapbackup/cntrlBLE.dbf ...
BR0406I End of file restore: rebqpeqk.rsb 2009-10-10 01.29.53
BR0280I BRRESTORE time stamp: 2009-10-10 01.29.53
BR0403I BRRESTORE completed successfully with warnings
For a full listing of brrestore log, click on attached file.
brrol.lst

2010 EMC Proven Professional Knowledge Sharing 110
We see start and end timestamp if we check the restore log for brrestore:
The brbrestore operation has been initiated at 23:14:26 and everything was restored back at
01:29:53. In our case, it took 2 hours and 15 minutes to unmount, deport group, rollback,
import it back, mount volumes, and restore over the LAN control file. So far, this is rather
impressive as data has been deleted by the first brrestore process at 19:26:40 and the
volume required for restore is 15TB of data. Nevertheless, I suspect data was still on the
disk even though it was not visible from the OS. That would explain the superfast rollback.
Even so, the data is back and consistent.
Since the PowerSnap rollback operation does not involve much backup server since all
operations are done at Symmetrix level (rollback), we won’t find much data in s backup
server log. Instead, we can focus on the PowerSnap log on the application host and
SYMAPI log (/var/symapi/log).
The log is so large that I have attached it:
symapi.lst
In the symapi log we see that the whole rollback that included an RDF split, a BCV
incremental restore, and an RDF incremental restore lasted from 23:50:06 until 1:10:15
which is one hour and twenty minutes.
Lastly, we should check how this looks when we check the PowerSnap logs. Again they are
attached. Inside I removed a list of device names and the only additional information is
about deporting and importing back volumes.

2010 EMC Proven Professional Knowledge Sharing 111
The Log can be found below.
psrol.lst
This concludes our rollback operation.
Ideally, you should not check logs unless something goes wrong. Information contained
within this work gives you a more detailed idea of what is going on and perhaps can be used
as w cross reference between your setup and the one I used.
Final Words Is PowerSnap right for you? If you are running EMC’s flagship storage and have large
volumes of data I believe this product is worth every cent.
If you don’t have EMC storage then it is a bit of problem. But even then, other storage arrays
offer ways to take Snapshots. Just create an intelligent script to handle the overall process.
The good news is that EMC has a plan to integrate PowerSnap with NetWorker in future
releases. This might push integration of PowerSnap with other storage vendors’ API as well.
Are there any problems with PowerSnap? I have had dozens of cases with EMC support –
some resulted in patches and some resulted in requests for enhancements. I feel confident
and secure that I can restore a customers’ data in a worse case scenario after months of
testing and having dozen of databases running setup as explained in this document.
PowerSnap also gives the applications team free hands to manage their restores. In the
past, without PowerSnap, the database team would provide script to place the database in
backup mode which one would call and then execute another script to create Snapshot. At
the end, you had to call for backup to backup your Snapshot once you or script would mount
a volume. If you had to do s restore, it would be reverse, but you would need to have all
people involved in this process on standby. With PowerSnap, the integration with the backup
product is such that the DBA just calls for restore and data keeps coming quickly.
I might use outdated versions of software, but they are stable, patched and tweaked to serve
my needs. If you go for version and patches mentioned in this work you won’t go wrong.

2010 EMC Proven Professional Knowledge Sharing 112
There is plenty yet to be said on the subject of PowerSnap. The possibilities and wide
spectrum of settings make this tool a real hidden diamond in the EMC portfolio. I could write
down a book of 1000 pages to cover the different setups that are possible with PowerSnap.
I’m quite sure you will to a larger industry audience – just like this one.