emergency action plan - volleyball bc | play, coach, … bc emergency plan 090411.pdf · team bc...
TRANSCRIPT
EMERGENCY ACTION PLAN
PREPARED BY:
CAROLINE FAURE, ATC & BRENT FAURE, ATC HIGHLAND HIGH SCHOOL
ADAPTED BY: Chris Berglund, BHK, CSCS Volleyball BC, Technical Director / High Performance Director
Updated April 11, 2009
Team:
Coaching Staff:

2

3
TEAM BC VOLLEYBALL EMERGENCY ACTION PLAN
Table of Contents
OVERVIEW OF THE EMERGENCY ACTION PLAN 5
POLICIES AND PROCEDURES 9
Over the Counter Medications 10
Physician Referrals 10
Getting Hurt on the Field 10
Other Injury Management 10
Sports Medicine Forms 10
Coaching First Aid and CPR Training 10
Travel Bags for Coaches 10
BASIC INJURY MANAGEMENT FOR SPORT COACHES 11
Sprains & Strains 12
Bone Injuries 13
Concussions 14
Environmental Concerns 15
Hydrating Athletes 16
Skin Disorders 17
Special Concerns 18
Supplements 19
Wound Care 20
BASIC TAPING TECHNIQUES FOR SPORT COACHES 21
Ankles 22
Elbow 23
Foot Arch 24
Groin 25
Heel 26
Thumb 27
Wrist 28
APPENDIX A: Concussion Management Return to Play Guidelines 29
APPENDIX B: Volleyball Canada Anti‐Doping Policy 31
APPENDIX C: Emergency Action Plans / Contacts 33
APPENDIX D: Area Map 34

4

5
TEAM BC VOLLEYBALL EMERGENCY ACTION PLAN OVERVIEW
Introduction Emergency situations may arise at anytime during athletic events. Expedient action must be taken in order to provide the best possible care to the sport participant of emergency and/or life threatening conditions. The development and implementation of an emergency plan will help ensure that the best care will be provided. As emergencies may occur at anytime and during any activity, all staff must be prepared. Athletic organizations have a duty to develop an emergency plan that may be implemented immediately when necessary and to provide appropriate standards of emergency care to all sports participants. As athletic injuries may occur at any time and during any activity, the sports medicine team must be prepared. This preparation involves formulation of an emergency plan, proper coverage of events, maintenance of appropriate emergency equipment and supplies, utilization of appropriate emergency medical personnel, and continuing education in the area of emergency medicine and planning. Hopefully, through careful pre‐participation physical screenings, adequate medical coverage, safe practice and training techniques and other safety avenues, some potential emergencies may be averted. However, accidents and injuries are inherent with sports participation, and proper preparation on the part of the sports medicine team should enable each emergency situation to be managed appropriately. Components of the Emergency Plan These are the basic components of every emergency action plan for athletics:
1. Emergency Personnel 2. Emergency Communication 3. Emergency Equipment 4. Roles Of Certified Athletic Trainers, Student Trainers, Coaches, And Administrators 5. Venue Directions With map
The Team BC Emergency Action Plan also includes the following:
Basic Injury Management for Coaches
Basic Taping Techniques for Coaches Emergency Plan Personnel With athletic practice and competition, the first responder to an emergency situation is typically a member of the coaching staff, most commonly the head coach. A team physician may not always be present at every organized practice or competition. The type and degree of sports medicine coverage for an athletic event may vary widely, based on such factors as the sport or activity, the setting, and the type of training or competition. The first responder in some instances may be a coach or other institutional personnel. Certification in cardiopulmonary resuscitation (CPR), first aid, prevention of disease transmission, and emergency plan review is strongly recommended for all athletics personnel associated with practices, competitions, skills instruction, and strength and conditioning. The development of an emergency plan cannot be complete without the formation of an emergency team. The emergency team may consist of a number of healthcare providers including physicians, emergency medical technicians, certified athletic trainers; student athletic trainers; coaches; parents; and, possibly, other bystanders. Roles of these individuals within the emergency team may vary

6
depending on various factors such as the number of members of the team, or the athletic venue itself. There are four basic roles within the emergency team:
1. The first and most important role is establishing safety of the scene and immediate care of the athlete. Acute care in an emergency situation should be provided by the most qualified individual on the scene. In most instances, this role will be assumed by the Head Coach, although if the team trainer/physician is present, he/she may be called in.
2. The second role, Emergency Medical Services (EMS) activation, may be necessary in situations where emergency transportation is not already present at the sporting event. This should be done as soon as the situation is deemed an emergency or a life‐threatening event. The person chosen for this duty should be someone who is calm under pressure and who communicates well over the telephone. This person should also be familiar with the location and address of the sporting event. Typically, the site coordinator is the best choice to fulfill this role.
3. The third role, equipment retrieval may be done by anyone on the emergency team who is familiar with the types and location of the specific equipment needed. Student athletic trainers and coaches are good choices for this role.
4. The fourth role of the emergency team is that of directing EMS to the scene. One member of the team should be responsible for meeting emergency medical personnel as they arrive at the site of the emergency. A student athletic trainer, administrator, or coach may be appropriate for this role.
Roles within the Emergency Team 1. Establish scene safety and immediate care of the athlete 2. Activation of the Emergency Medical System 3. Emergency equipment retrieval 4. Direction of EMS to scene
Activating the EMS System Making the Call:
911 Providing Information:
name, address, telephone number of caller
nature of emergency, whether medical or non‐medical *
number of athletes
condition of athlete(s)
first aid treatment initiated by ATC/Physician
specific directions as needed to locate the emergency scene
When forming the emergency team, it is important to adapt the team to each situation or sport. It may also be advantageous to have more than one individual assigned to each role. This allows the emergency team to function even though certain members may not always be present. Emergency Communication Communication is the key to quick emergency response. Athletic trainers and emergency medical personnel must work together to provide the best emergency response capability and should have contact information such as telephone tree established as a part of pre‐planning for emergency situations. Communication prior to the event is a good way to establish boundaries and to build rapport between both groups of professionals. If emergency medical transportation is not available on site

7
during a particular sporting event then direct communication with the emergency medical system at the time of injury or illness is necessary. Access to a working telephone or other telecommunications device, whether fixed or mobile, should be assured. The communications system should be checked prior to each practice or competition to ensure proper working order. A back‐up communication plan should be in effect should there be failure of the primary communication system. The most common method of communication is a public telephone. However, a cellular phone is preferred if available. At any athletic venue, whether home or away, it is important to know the location of a workable telephone. Pre‐arranged access to the phone should be established if it is not easily accessible. Emergency Equipment All necessary emergency equipment should be at the site and quickly accessible. Personnel should be familiar with the function and operation of each type of emergency equipment. Equipment should be in good operating condition, and personnel must be trained in advance to use it properly. Emergency equipment should be checked on a regular basis and use rehearsed by emergency personnel. The emergency equipment available should be appropriate for the level of training for the emergency medical providers. It is important to know the proper way to care for and store the equipment as well. Equipment should be stored in a clean and environmentally controlled area. It should be readily available when emergency situations arise Medical Emergency Transportation In the event that an ambulance is on site, there should be a designated location with rapid access to the site and a cleared route for entering/exiting the venue. If an ambulance is not present at an event, entrance to the facility should be clearly marked and accessible. In the event of an emergency, the 911 system will still be utilized for activating emergency transport. In the medical emergency evaluation, the primary survey assists the emergency care provider in identifying emergencies requiring critical intervention and in determining transport decisions. In an emergency situation, the athlete should be transported by ambulance, where the necessary staff and equipment is available to deliver appropriate care. Emergency care providers should refrain from transporting unstable athletes in inappropriate vehicles. Care must be taken to ensure that the activity areas are supervised should the emergency care provider leave the site in transporting the athlete. Any emergency situations where there is impairment in level of consciousness (LOC), airway, breathing, or circulation (ABC) or there is neurovascular compromise should be considered a “load and go” situation and emphasis placed on rapid evaluation, treatment and transportation. In order to provide the best possible care for Team BC athletes, all emergency trauma transports are to be sent to nearest emergency medical center. Conclusion The importance of being properly prepared when athletic emergencies arise cannot be stressed enough. An athlete’s survival may hinge on how well trained and prepared athletic healthcare providers are. It is prudent to invest athletic department “ownership" in the emergency plan by involving the athletic administration and sport coaches as well as sports medicine personnel. Through development and implementation of the emergency plan, Volleyball BC helps ensure that the athlete will have the best care provided when an emergency situation does arise.
8
Approval and Acceptance of the Team BC Emergency Plan Approved by ________________________________________________ ____________________
Volleyball BC Executive Director Date
Approved by ________________________________________________ ____________________
Volleyball BC High Performance Director Date
Approved by ________________________________________________ ____________________
Volleyball BC Technical Coordinator ‐ Indoor Date Approved by ________________________________________________ ____________________
Volleyball BC Technical Coordinator ‐ Beach Date
9
Part II: POLICIES AND PROCEDURES

10
Over the Counter Medications Coaches are not allowed to dispense any type of medication. Physician Referrals Should an injury or illness warrant additional treatment and care, the Head Coach for the program will assist in the referral process. Physician referrals will only be done to the athlete's orthopaedic physician of preference, as noted on the sports medicine form signed by the athlete's parent or guardian. In the case were the athlete has travelled and is too far from the noted physician, the athlete will be referred to the physician outlined in the …………. Any athlete who sees a physician for an injury sustained while participating in a sport or activity within the Team BC program must present a signed physician release form to the athletic trainer. Any athlete who does not present a physician release to the athletic trainer should not be allowed to resume practice or participate in games. Getting Hurt on the Field If an athlete is injured on the field, no matter what type, he/she should never be moved if a head or neck injury is suspected. If the injured athlete has a head or spinal injury and is moved, the vertebrae can shift and severe the spinal cord. A severed spinal cord can mean permanent paralysis for that athlete. Thus, you should never move an injured athlete! It will be necessary for the coach to evaluate the injury and use a "common sense" approach to whether or not it will be necessary to call for an ambulance. When in doubt, dial 9‐1‐1. Other Injury Management In the event that an athlete sustains an injury, it is his/her responsibility to contact their Head Coach immediately after that injury is sustained. The head coach will determine the appropriate course of action for that athlete. In the event that a Physician referral is necessary, the Head Coach will refer the athlete to the preferred physician of the athlete's parents, as noted on the Sports Medicine form completed by parents at the beginning of the season. If a physician referral is necessary, the coaching staff will then follow that physician's instructions for treatment and rehabilitation. In most cases, please note that the coaches still want the injured athletes to attend practice as an observer. 237‐1300 (Highland's main number). Sports Medicine Forms Before any treatment can be provided, the athlete must have his/her parent sign and return the Sports Medicine Form which authorizes the coaching staff to direct the athlete to appropriate care. These forms are given to each athlete after team selection and must be returned at the start of the training season. The form also authorizes emergency consent to treat in the event a parent or guardian cannot be reached. Coaching First Aid & CPR Training Volleyball BC will provide a CPR and First Aid course to all coaches at the beginning of the Team BC season. All attendees will certify in CPR and AED and Fitness First Aid. Travel Bags for Coaches Volleyball BC will supply a first aid kit/bag to all sport teams. Coaches should bring in their own bag. Supplies are limited. Coaches should not tape athletes who aren’t getting taped daily. You are always welcome to buy your own tape.

11
Part III: BASIC INJURY MANAGEMENT FOR SPORT COACHES
12
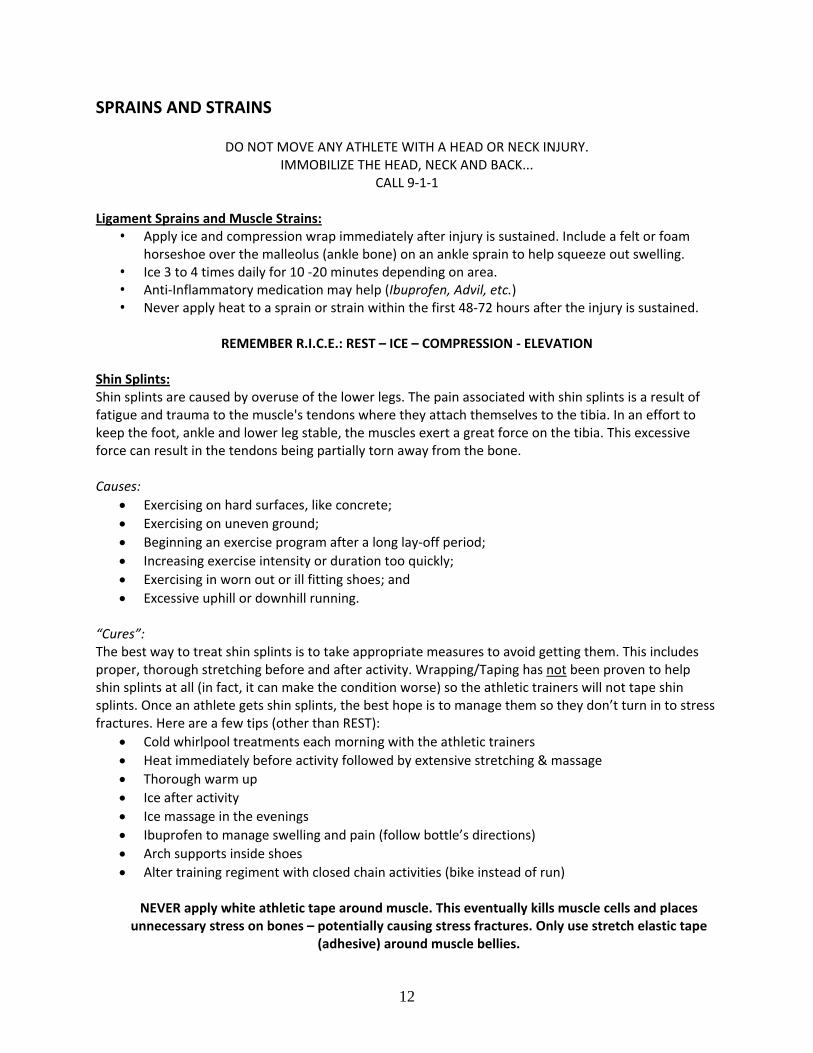
SPRAINS AND STRAINS
DO NOT MOVE ANY ATHLETE WITH A HEAD OR NECK INJURY. IMMOBILIZE THE HEAD, NECK AND BACK...
CALL 9‐1‐1 Ligament Sprains and Muscle Strains:
• Apply ice and compression wrap immediately after injury is sustained. Include a felt or foam horseshoe over the malleolus (ankle bone) on an ankle sprain to help squeeze out swelling.
• Ice 3 to 4 times daily for 10 ‐20 minutes depending on area. • Anti‐Inflammatory medication may help (Ibuprofen, Advil, etc.) • Never apply heat to a sprain or strain within the first 48‐72 hours after the injury is sustained.
REMEMBER R.I.C.E.: REST – ICE – COMPRESSION ‐ ELEVATION
Shin Splints: Shin splints are caused by overuse of the lower legs. The pain associated with shin splints is a result of fatigue and trauma to the muscle's tendons where they attach themselves to the tibia. In an effort to keep the foot, ankle and lower leg stable, the muscles exert a great force on the tibia. This excessive force can result in the tendons being partially torn away from the bone. Causes:
Exercising on hard surfaces, like concrete;
Exercising on uneven ground;
Beginning an exercise program after a long lay‐off period;
Increasing exercise intensity or duration too quickly;
Exercising in worn out or ill fitting shoes; and
Excessive uphill or downhill running. “Cures”: The best way to treat shin splints is to take appropriate measures to avoid getting them. This includes proper, thorough stretching before and after activity. Wrapping/Taping has not been proven to help shin splints at all (in fact, it can make the condition worse) so the athletic trainers will not tape shin splints. Once an athlete gets shin splints, the best hope is to manage them so they don’t turn in to stress fractures. Here are a few tips (other than REST):
Cold whirlpool treatments each morning with the athletic trainers
Heat immediately before activity followed by extensive stretching & massage
Thorough warm up
Ice after activity
Ice massage in the evenings
Ibuprofen to manage swelling and pain (follow bottle’s directions)
Arch supports inside shoes
Alter training regiment with closed chain activities (bike instead of run)
NEVER apply white athletic tape around muscle. This eventually kills muscle cells and places unnecessary stress on bones – potentially causing stress fractures. Only use stretch elastic tape
(adhesive) around muscle bellies.

13
BONE INJURIES Recognizing Fractures: An open fracture will typically be self evident due to the exposed bone. The following clues suggest you are dealing with a probable closed fracture:
• The athlete felt a bone break or heard a "snap"; • The athlete feels a grating sensation when he/she moves a limb; • One limb appears to be a different length, shape or size than the other, or is improperly
angulated; • Reddening of the skin around a fracture may appear shortly after the injury is sustained; • The athlete may not be able to move a limb or part of a limb (e.g., the arm, but not the fingers),
or to do so produces intense pain; • Loss of a pulse at the end of the extremity; • Loss of sensation at the end of the extremity; • Numbness or tingling sensations; • Involuntary muscle spasms; • Other unusual pain, such as intense pain in the rib cage when a patient takes a deep breath or
coughs.
Ice On A Fracture Usually Makes It Throb Worse… Splinting Any suspected fracture should always be splinted before the athlete is allowed to move. Splint the joint above and below the affected area. How to Splint: 1. Check pulse. Then remove clothing from the injured part. Don't force a limb out of the clothing, though. You may need to cut clothing off with scissors to prevent causing the athlete any additional pain. 2. Apply a cold compress or an ice pack wrapped in cloth. 3. Place a splint (or boards) on the injured part by keeping the injured limb in the position you find it. Add soft padding around the injured part placing something firm (like a board or rolled‐up newspapers) next to the injured part, making sure it's long enough to go past the joints above and below the injury keeping the splint in place with first‐aid tape. Re‐check pulse. 4. Seek medical care, and don't allow the athlete to eat or drink anything, in case medication or surgery is needed.
Wrist, Arm & Shoulder Sling and Swath
Ankle and Lower Leg

14
CONCUSSIONS
“Any transient neurological dysfunction resulting from a biomechanical force that may or may not result in a loss of consciousness”
(Giza & Hovda, 2001, p. 228) Recognizing Concussion Concussions do not always involve a loss of consciousness. ANY traumatic blow to the head or to another part of the body (which causes a whiplash effect to the head) should be considered as a mechanism of concussion injury. While headache is the most common symptom of concussion, all people will experience concussion differently. Therefore, all of the potential signs and symptoms of concussion should be considered. A symptom checklist can assist the evaluator in making a more objective return to play decision. If a player sustains any signs or symptoms of concussion, he/she must be pulled from play. Only an
athletic trainer or a physician may clear the athlete to return to play. Concussion Signs and Symptoms
Amnesia Loss of orientation Balance problems Memory problems “Bell rung” Nausea Dazed or Confused Nervousness Depression Numbness or tingling Double vision Drowsiness
Poor concentration Easily distracted Personality changes “Glassy Eyed” Excessive sleep Ringing in the ears Fatigue Sadness Feeling “in a fog” Seeing “stars” Feeling “slowed down”
Sensitivity to light Headache Sluggishness Inappropriate emotions change in personality Sensitivity to noise Irritability sleep disturbance Loss of consciousness Vacant stare Vomiting
ALL ATHLETES WHO GET “ROCKED” AND EXHIBIT ANY OF THESE SIGNS OR SYMPTOMS SHOULD BE
REFERRED IMMEDIATELY TO AN ATHLETIC TRAINER AND/OR A PHYSICIAN!!! Baseline Cognitive Testing In the event a concussion is sustained, all athletes will repeat the testing and the scores will be compared to those of the baseline test. This provides for more objective return to play decision‐making. Coaches need to know that research indicates high school aged athletes take from 7‐15 days to fully recover from a Grade 1, or mild, concussion (a “bell ringer”). Returning the athlete to play too soon following even a mild concussion can lead to death.

15
ENVIRONMENTAL Avoiding Heat Related Illnesses People suffer heat‐related illness when the body's temperature control system is overloaded. The body normally cools itself by sweating. But under some conditions, sweating just isn't enough. In such cases, a person's body temperature rises rapidly. Very high body temperatures may damage the brain or other vital organs. Factors that contribute to heat‐related illness include high humidity, obesity, fever, dehydration, poor circulation, sunburn, and drug and alcohol use. To try to prevent heat related illnesses
• Drink plenty of fluids before, during and after exertion; • Include electrolytes in the fluids (salt, sodium, potassium); • Wear light clothing on hot days; • Wear sunscreen; • Schedule practices during cool periods (avoid 10am to 2pm) and acclimate athletes to heat
gradually. Heat Related Injuries cramping, exhaustion, rapid and shallow breathing, weak pulse, moist pale skin, sweating
Remove athlete from the hot environment. Place in a cool environment (air conditioned);
Loosen athlete’s clothing and fan. Watch for shivering;
Have athlete lay down with legs elevated;
Give athlete water (if not nauseated);
If athlete is having muscle cramps, apply moist towels over cramping areas. Cold Related Injuries
• Get the athlete out of the cold environment; • Warm the affected area (gradually); • If the injury is to an extremity, check pulses, splint, and recheck pulses; • Do not rub or massage the area, and do not re‐expose it to cold.
If the area is white and waxy, grayish colored, or blotched, suspect frostbite and send to hospital. Bee Stings (noticeable bite/sting, blotchy skin, pain or itching, burning, weakness, chills, fever, nausea, etc) The two greatest risks from most insect stings are allergic reaction (which occasionally, in some individuals could be fatal) and infection (more common and less serious). If an athlete is stung by a bee, wasp, hornet, or yellow jacket, follow these instructions closely:
• Check to see if the stinger is injected. Do not try to pull it out as this may release more venom; instead gently scrape it out with a blunt‐edged object, such as a credit card or a dull blade;
• Wash the area carefully with soap and water. This should be continued several times a day until the skin is healed;
• Apply a cold or ice pack, wrapped in cloth for a few minutes; • Apply a paste of baking soda and water and leave it on for 15 to 20 minutes; • Instruct athlete to take acetaminophen (Tylenol) for pain.
If the athlete acknowledges an allergy to stings or has trouble breathing, call 9‐1‐1
16
HYDRATION
Fluid Replacement Athletes should be especially cautious to stay well‐hydrated. While water is essential, it is also imperative to replace lost electrolytes. Consuming sports drinks such as Powerade and Gatorade is one way of doing this. High energy drinks such as Red Bull and Rockstar, however, are not recommended as a safe way to replenish electrolytes and hydrate the body. Generally speaking, the most important thing is that the athlete stays well‐hydrated while not getting too much sugar intake. Here are some general guidelines to follow:
• The athlete should drink plenty of water before athletic participation. Experts recommend 17‐20 fl oz of water or a sports drink be consumed 2 to 3 hours before activity.
• Experts recommend 7‐10 fl oz every ten to twenty minutes during activity. Those who sweat more should consume more;
• Cool beverages are best (50‐59 degrees F). • Sports drinks containing high amounts of carbohydrate are most beneficial for an athlete if
consumed 2‐3 hours prior to activity; • Sports drinks containing fructose should be avoided entirely. Fructose can lead to gastric
distress. • Sports drinks, fruit juices, carbohydrate gels, sodas and other beverages containing more than
8% carbohydrate concentration are not recommended as the sole source of fluid during exercise.
• Recognize signs of dehydration: thirst, irritability, general discomfort, followed by headache, weakness, dizziness, cramps, chills, vomiting, nausea, heat sensations, and decreased performance.
• A moderate amount of sodium chloride in fluid‐replacement beverages can be beneficial in offsetting electrolyte imbalances that result from loss of sweat.
Encourage athletes to drink 16‐32 ounces of fluid for every pound lost during activity.
17
SKIN DISORDERS Impetigo & Staff Infection
If undetected, the Methicillin‐resistant Staphylococcus aureus (MRSA) virus can be fatal. It is absolutely imperative that all rashes and red areas be reported to an athletic trainer and evaluated by a physician. To prevent MRSA, athletes should practice good hygiene. Practice and game clothes should be washed daily. Lockers should be cleaned and aired out nightly. Athletes should shower with soap after engaging
in any physical activity. Towels and water bottles should never be shared. Signs of MRSA
• skin boils or blemishes • redness (first appears like a spider bite in most cases) • sometimes accompanied by fever and chills
Preventing MRSA and other skin disorders
• Avoid contact with infected individuals • Cover all wounds • Practice good hygiene: SHOWER with SOAP immediately after EVERY practice/game and do not
re‐wear sweaty clothing • Wash practice clothing DAILY • Do not share clothing • Clean all equipment ‐ helmets, shoulder pads, wrestling mats, weight equipment, etc. after each
use • Report all skin blemishes/changes to athletic trainer for evaluation • Prevent getting turf burns • Wash hands REGULARLY
Treating MRSA
• Requires physician evaluation and prescription for specific type of oral antibiotics and topical cleanser
IT SHOULD BE STRESSED THAT ATHLETES WASH ALL PRACTICE CLOTHING AFTER EACH USE
ATHLETES SHOULD SHOWER WITH SOAP IMMEDIATELY AFTER PRACTICES AND GAMES

18
SPECIAL CONSIDERATIONS Allergic Reactions
If an athlete has an allergic reaction, it is important that he/she gets medical treatment
If the athlete experiences breathing difficulty and and/or if he/she has an Epi‐Pen, get it for them and have him/her give themselves an injection. Do not do it for them. If they cannot do it themselves, call 9‐1‐1.
If the athlete’s reaction is minor (hives, itching, irritation, etc.), contact parent. In most cases, a Benadryl will fix the problem but as a coach, you cannot give that medicine to the athlete.
Asthma
• Only athletes who have been diagnosed with asthma should use inhalers; • Athletes with asthma should only be allowed to use their own inhaler; • Have the athlete sit in a recovery position. Place a cold, wet towel on the back of their neck.
Assist with their breathing by counting “2 in, 2 out. 2 in, 2 out.” • If trouble persists, call 9‐1‐1.
Dental ‐ Broken Tooth If an athlete gets a tooth knocked out (or broken off)
Keep the tooth;
Put the tooth in a cup of milk (only enough to cover tooth). If milk is unavailable, get the athlete to submerse the tooth in their own siliva
Have athlete chew gum and put over the exposed tooth in mouth (to prevent nerve irritation);
Send to dentist – don’t forget to send the tooth. Diabetics Symptoms: rapid onset of altered mental status, intoxicated appearance, elevated heart rate, cold and clammy skin, hunger, seizures, anxiousness What to Do: Ask the athlete. The athlete will direct you (is he/she hypoglycemic or hyperglycemic?). Does he/she want juice? Sugar? Get him/her what they need. Muscle Cramping
• Poor hydration and low electrolyte count is the cause; • Administer Gatorade or other sports drink; • Have the athlete chug some mustard (seriously!) and “chase” it with lots of water or Gatorade.
Seizures
• Have athlete lie down. Remove any objects in hand or nearby; • Loosen restrictive clothing; • Allow the seizure to finish; • After the convulsions have ended, protect the airway. If athlete is blue, lift chin and tilt head
back. Make sure people are not standing to close as the athlete will be confused when they recover from the seizure. Place a blanket over them and let them rest. They will feel extremely tired.
Call 9‐1‐1

19
SUPPLEMENTS The Basics On Nutritional Supplements Americans spent an estimated $1.4 billion on sports supplements in 1999, hoping that the pills, drinks, and powders would help them bulk up, slim down, or compete more effectively. But people who take these products are actually conducting what amounts to a vast, uncontrolled clinical experiment on themselves with untested, largely unregulated medications. The few good scientific studies available on these "dietary" supplements suggest that they either are ineffective or, at best, produce only slight changes in performance. More disturbing, they can contain powerful and potentially harmful substances, such as:
Androstenedione, which can upset the body's hormonal balance when it metabolizes into testosterone and estrogen, and may cause premature puberty and stunted growth in adolescents.
Creatine, a substance produced by the body that can help generate brief surges of muscle energy during certain types of athletic performance. It may also cause kidney problems in susceptible individuals.
Ephedra, an herbal stimulant that acts like an amphetamine ("speed") and that some investigators hold responsible for dozens of deaths and permanent injuries.
Young athletes and other people who want to lose weight or gain energy should not take sports supplements. Evidence for the products' effectiveness is sketchy at best, and concerns about their safety are too numerous. Adults and youngsters alike should focus instead on the basics of fitness and nutrition. Parents who are concerned that their children may be taking any of these supplements should familiarize themselves with some of the most common brand names and ingredients
For more information, please contact the source of this information: http://www.consumerreports.org/main/detail.jsp?CONTENT%3C%3Ecnt_id=59279&FOLDER%3C%3Efolder_id=18151
Creatine‐based Supplements Creatine is a popular nutritional supplement used by athletes to increase muscle mass and strength. The results of continued use of Creatine are similar to those produced by anabolic steroids, however because the supplement is relatively new, research is inconclusive about potential long‐term medical side effects. It is known that renal failure, weight gain, and increased potential for muscle strains are potential short‐term side effects. Therefore, it is recommended that, if taken, Creatine be used in low to moderate amounts and should not be used as an alternative for a good exercise regimen. Anti‐Doping Policy Volleyball BC follows the Anti‐Doping Policy set forth by Volleyball Canada (see Appendix B).

20
WOUND CARE Abrasions & Turf Burns
• Clean affected area thoroughly. • Clean/Scrub with a 4 in 1 saline solution to make sure any dirt/grass is removed; If using
peroxide, dilute to 50% peroxide / 50% saline solution. • Apply antibiotic ointment (Polysporin / Neosporin); • Cover with gauze bandage, pre‐wrap and soft tape; • After 2 days, uncover and air dry. The open air will help the wound to scab over; • Wrap with pre‐wrap and soft tape for all participation.
Covering the wound is not enough. It is imperative that the wound is first cleaned thoroughly in order
to prevent potentially harmful bacteria Lacerations
• Apply direct pressure with gauze to stop bleeding; • Clean the wound thoroughly and irrigate with saline and Betadine; • Steri‐strip, if the bleeding stops; • If bleeding does not stop and wound is deep (greater than 1/8” deep, cover with pressure
bandage and send to physician for evaluation/stitches; • If wound is caused by object, refer for tetanus.
Blisters
• Clean thoroughly. Irrigate with saline and Betadine; • Place petroleum jelly pad over blister to avoid continuous rubbing; • Wrap with pre‐wrap and soft tape; • Watch for inflammation (redness) and warmth, and possibly streaking (long term). These are
signs of infection; • If infection develops, refer to physician immediately for antibiotics. Never cut away the top skin off a blister if it’s soft. The skin helps to provide a protective barrier.
Watch for Shock • Excessive bleeding can lead to shock. Don’t waste time trying to find a dressing; • Use gloved hand and apply direct pressure over the wound; • Elevate the extremity; • Keep applying steady, firm pressure until the bleeding is controlled; • Once bleeding is controlled, apply a dressing firmly in place (pressure bandage); • Refer to Emergency Room for further treatment.
NEVER apply white athletic tape around muscle. This eventually kills muscle cells and places unnecessary stress on bones – potentially causing stress fractures. Only use stretch
elastic tape (adhesive) around muscle bellies.

21
Part IV: BASIC TAPING TECHNIQUES

22
TAPING ANKLES
Step 1 Place athlete on table. Spray ankle area with adhesive spray. Have athlete pull toe back so foot is at a 90 degree angle and
point toes slightly outward.
Step 2Pre‐wrap ankle from mid‐calf to just past
the mid‐foot.
Step 3Using 2” athletic tape, place anchor strip at the base of the gastrocnemius (calf). Be sure to angle slightly upward (10:00 and 2:00 positions). Place another anchor strip around medial arch on foot – loosely.
Step 4
Place 3‐5 stirrups longitudinally around ankle joint. Start on inside of foot, pull snug on outside as you fasten at the top.
Step 5Place 1‐3 strips at base of lower leg
around ankle joint – just above the heel.
Step 6Cover stirrups with more strips around lower leg. Be sure to maintain upward angle. Be sure to tear tape after each rotation to avoid circulation problems.
Step 7
Apply heel locks. Start tape at 1 (top of ankle), around to 2 (base of heel bone) and around to 3 (back of heel/Achilles’ tendon). Then continue to 1– 2– 3 again. Do this 2‐4 more times, tearing tape each time. Be careful not to go too low on the foot or too
high on the ankle.
Step 8 Place more strips around to secure heel locks. Check for gaps
and cover them with strips. Be sure there are no significant folds in tape to avoid blistering or cuts.

23
TAPING ELBOWS
Step 1 Spray elbow area with adhesive spray. Have
athlete flex elbow to 90 degrees, flex bicep and flex wrist. Have the athlete make a tight fist so that
forearm muscles are fully flexed.
Step 2 Spray elbow area generously with adhesive spray. Pre‐wrap from just above the belly of the bicep to just above the wrist.
Step 3 Using 3” elastic tape, place anchor strips around the entire bicep muscle (you may want to anchor to the skin to ensure the tape job doesn’t slide
down) to the mid‐forearm.
Step 4 Using 2” white athletic tape, place 3 stirrups perpendicular to elbow crease from the top anchor strip to the bottom anchor strip. Then,
place 3‐5 X strips: inside bicep to outside forearm; outside bicep to inside forearm.
Step 5 Using 3” elastic tape, cover entire area. Be sure not to make the tape too tight. Be sure athlete
continues to have bicep, wrist and fist fully flexed to avoid circulation issues.
NEVER USE STANDARD WHITE ATHLETIC TAPE TO GO AROUND MUSCLE.
Without the elasticity, muscle cell dies and strength is significantly reduced.
24
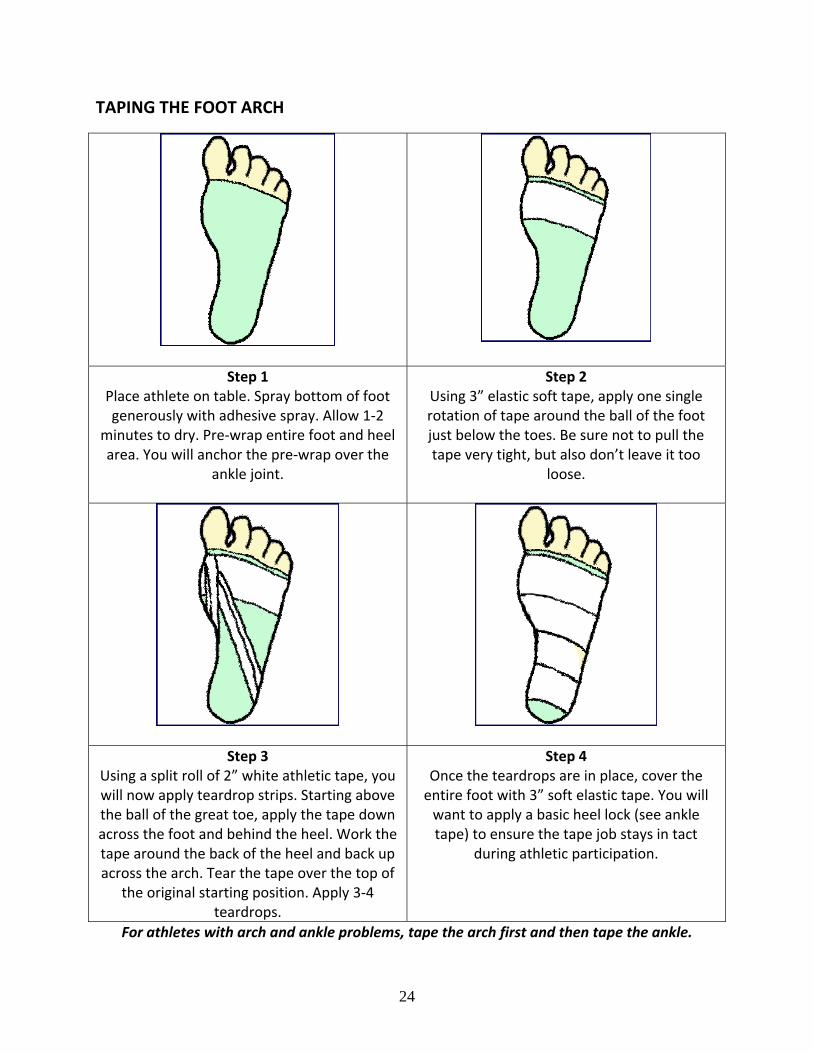
TAPING THE FOOT ARCH
Step 1 Place athlete on table. Spray bottom of foot generously with adhesive spray. Allow 1‐2
minutes to dry. Pre‐wrap entire foot and heel area. You will anchor the pre‐wrap over the
ankle joint.
Step 2 Using 3” elastic soft tape, apply one single rotation of tape around the ball of the foot just below the toes. Be sure not to pull the tape very tight, but also don’t leave it too
loose.
Step 3 Using a split roll of 2” white athletic tape, you will now apply teardrop strips. Starting above the ball of the great toe, apply the tape down across the foot and behind the heel. Work the tape around the back of the heel and back up across the arch. Tear the tape over the top of
the original starting position. Apply 3‐4 teardrops.
Step 4 Once the teardrops are in place, cover the entire foot with 3” soft elastic tape. You will want to apply a basic heel lock (see ankle tape) to ensure the tape job stays in tact
during athletic participation.
For athletes with arch and ankle problems, tape the arch first and then tape the ankle.

25
TAPING THE GROIN
Step 1 Have the athlete strip down to compression shorts or underwear. Then, ask the athlete to put majority of his or her weight on the affected leg with the knee bent to 35‐50
degrees.
Step 2 Using a double‐length, elastic bandage (ACE wrap or 3” soft elastic tape), begin the wrap just above the knee and work upwards and diagonally up the thigh. Pull tension on the inside of the leg (“pull and then wrap”).
Overlap half of the width of the elastic wrap. Once you cover the groin area, angle the wrap above the opposite hip bone and
behind and around the waist….
Step 3 Once you come around the waist, cover the hip bone of the affected leg and reverse the direction of the elastic wrap back down the thigh. Secure the wrap once you get back down to the knee. Be certain there are no
visible gaps and that the wrap does not have any weak areas.
If using an ACE wrap, you will want to
secure the end points with 3” elastic tape.
26
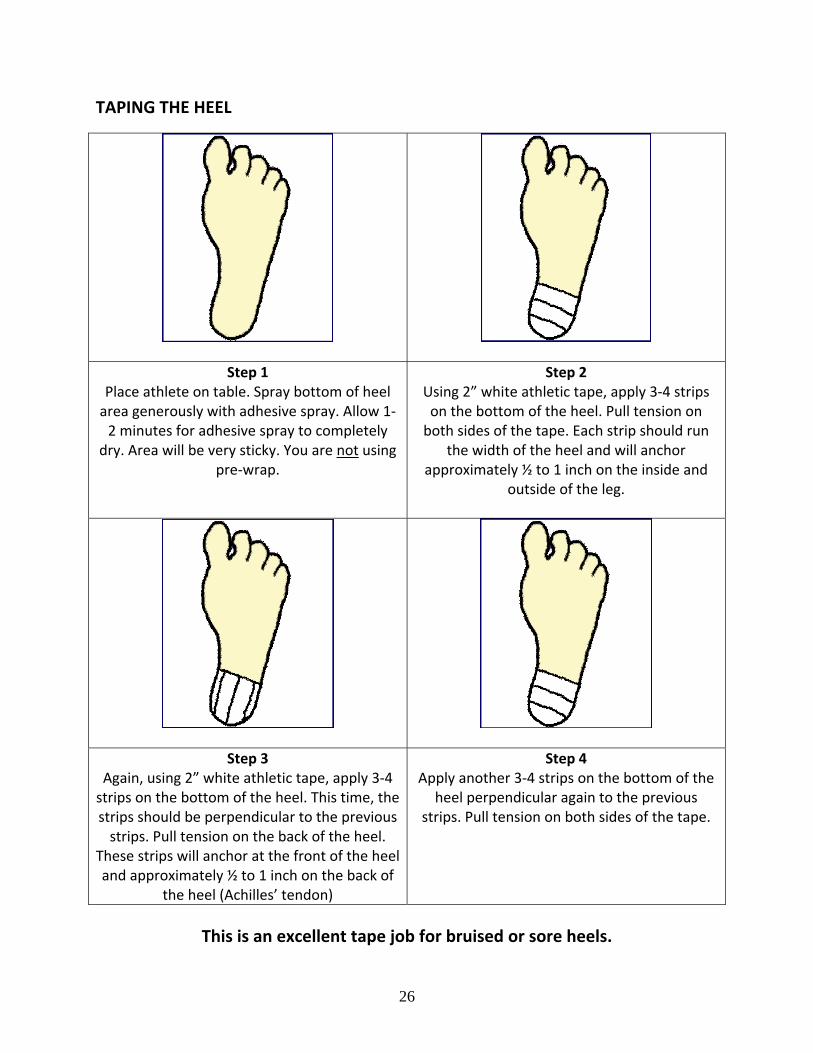
TAPING THE HEEL
Step 1 Place athlete on table. Spray bottom of heel area generously with adhesive spray. Allow 1‐2 minutes for adhesive spray to completely
dry. Area will be very sticky. You are not using pre‐wrap.
Step 2 Using 2” white athletic tape, apply 3‐4 strips on the bottom of the heel. Pull tension on both sides of the tape. Each strip should run
the width of the heel and will anchor approximately ½ to 1 inch on the inside and
outside of the leg.
Step 3 Again, using 2” white athletic tape, apply 3‐4 strips on the bottom of the heel. This time, the strips should be perpendicular to the previous strips. Pull tension on the back of the heel.
These strips will anchor at the front of the heel and approximately ½ to 1 inch on the back of
the heel (Achilles’ tendon)
Step 4 Apply another 3‐4 strips on the bottom of the
heel perpendicular again to the previous strips. Pull tension on both sides of the tape.
This is an excellent tape job for bruised or sore heels.

27
TAPING THE THUMB
Step 1 Have the athlete put the hand forward – as if to shake your hand. The athlete should have his/her thumb in a neutral position. Apply
adhesive spray generously to thumb and wrist areas. Pre‐wrap thumb, hand and wrist.
Step 2 Using 2” white athletic tape, apply anchor strip to wrist. Be sure you are laying the tape evenly over the wrist to avoid circulation issues later on. Split the 2” roll of tape and apply 1” wide anchor strip around thumb just below the
middle knuckle.
Step 3 Continuing to use the split roll of white athletic
tape, you will now form the thumb spica. Anchor the end of the strip on the back of the wrist and angle the strip around the palm, to the inside of the thumb and that back to the
inside of the wrist. Tear the tape. Repeat these spica strips until you cover the entire base of the thumb (where the thumb meets the wrist). For additional support (but less mobility), go higher on the thumb. Be sure to overlap the
tap by half of its width.
Step 4 Using 2” white athletic tape, apply anchor strip to wrist. Be sure you are laying the tape evenly over the wrist to avoid circulation issues later on. Split the 2” roll of tape and apply 1” wide anchor strip around thumb just below the
middle knuckle.
For even more support (including additional wrist support), you can run a strip through the
hand.
28
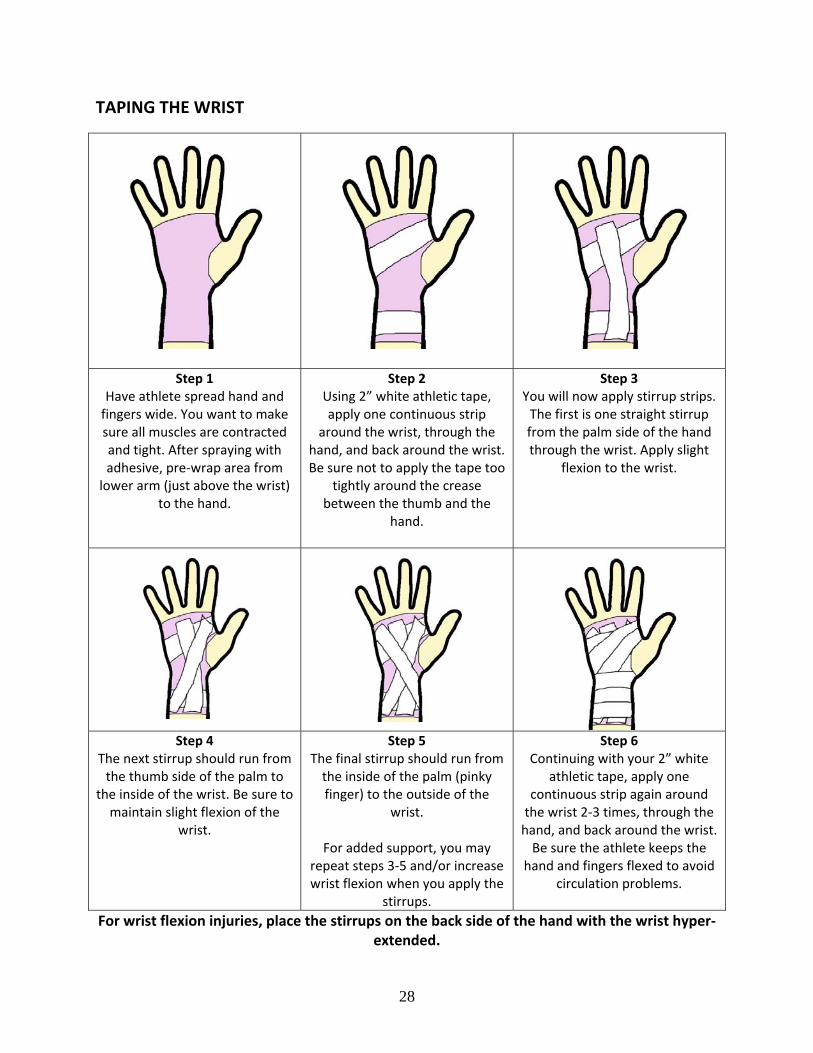
TAPING THE WRIST
Step 1 Have athlete spread hand and fingers wide. You want to make sure all muscles are contracted and tight. After spraying with adhesive, pre‐wrap area from lower arm (just above the wrist)
to the hand.
Step 2 Using 2” white athletic tape, apply one continuous strip
around the wrist, through the hand, and back around the wrist. Be sure not to apply the tape too
tightly around the crease between the thumb and the
hand.
Step 3 You will now apply stirrup strips. The first is one straight stirrup from the palm side of the hand through the wrist. Apply slight
flexion to the wrist.
Step 4 The next stirrup should run from the thumb side of the palm to
the inside of the wrist. Be sure to maintain slight flexion of the
wrist.
Step 5 The final stirrup should run from the inside of the palm (pinky finger) to the outside of the
wrist.
For added support, you may repeat steps 3‐5 and/or increase wrist flexion when you apply the
stirrups.
Step 6 Continuing with your 2” white
athletic tape, apply one continuous strip again around the wrist 2‐3 times, through the hand, and back around the wrist. Be sure the athlete keeps the
hand and fingers flexed to avoid circulation problems.
For wrist flexion injuries, place the stirrups on the back side of the hand with the wrist hyper‐extended.
29
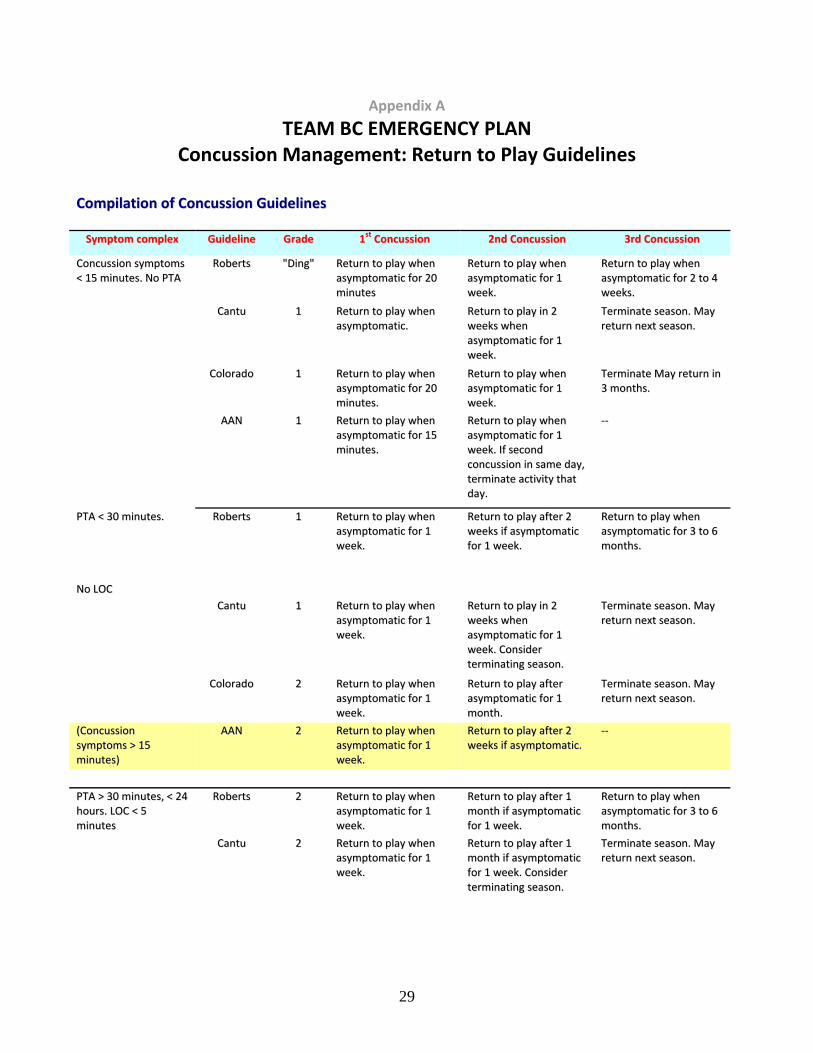
Appendix A
TEAM BC EMERGENCY PLAN Concussion Management: Return to Play Guidelines
CCoommppiillaattiioonn ooff CCoonnccuussssiioonn GGuuiiddeelliinneess
SSyymmppttoomm ccoommpplleexx GGuuiiddeelliinnee GGrraaddee 11sstt CCoonnccuussssiioonn 22nndd CCoonnccuussssiioonn 33rrdd CCoonnccuussssiioonn
CCoonnccuussssiioonn ssyymmppttoommss
<< 1155 mmiinnuutteess.. NNoo PPTTAA RRoobbeerrttss ""DDiinngg"" RReettuurrnn ttoo ppllaayy wwhheenn
aassyymmppttoommaattiicc ffoorr 2200
mmiinnuutteess
RReettuurrnn ttoo ppllaayy wwhheenn
aassyymmppttoommaattiicc ffoorr 11
wweeeekk..
RReettuurrnn ttoo ppllaayy wwhheenn
aassyymmppttoommaattiicc ffoorr 22 ttoo 44
wweeeekkss..
CCaannttuu 11 RReettuurrnn ttoo ppllaayy wwhheenn
aassyymmppttoommaattiicc.. RReettuurrnn ttoo ppllaayy iinn 22
wweeeekkss wwhheenn
aassyymmppttoommaattiicc ffoorr 11
wweeeekk..
TTeerrmmiinnaattee sseeaassoonn.. MMaayy
rreettuurrnn nneexxtt sseeaassoonn..
CCoolloorraaddoo 11 RReettuurrnn ttoo ppllaayy wwhheenn
aassyymmppttoommaattiicc ffoorr 2200
mmiinnuutteess..
RReettuurrnn ttoo ppllaayy wwhheenn
aassyymmppttoommaattiicc ffoorr 11
wweeeekk..
TTeerrmmiinnaattee MMaayy rreettuurrnn iinn
33 mmoonntthhss..
AAAANN 11 RReettuurrnn ttoo ppllaayy wwhheenn
aassyymmppttoommaattiicc ffoorr 1155
mmiinnuutteess..
RReettuurrnn ttoo ppllaayy wwhheenn
aassyymmppttoommaattiicc ffoorr 11
wweeeekk.. IIff sseeccoonndd
ccoonnccuussssiioonn iinn ssaammee ddaayy,,
tteerrmmiinnaattee aaccttiivviittyy tthhaatt
ddaayy..
‐‐‐‐
PPTTAA << 3300 mmiinnuutteess.. RRoobbeerrttss 11 RReettuurrnn ttoo ppllaayy wwhheenn
aassyymmppttoommaattiicc ffoorr 11
wweeeekk..
RReettuurrnn ttoo ppllaayy aafftteerr 22
wweeeekkss iiff aassyymmppttoommaattiicc
ffoorr 11 wweeeekk..
RReettuurrnn ttoo ppllaayy wwhheenn
aassyymmppttoommaattiicc ffoorr 33 ttoo 66
mmoonntthhss..
NNoo LLOOCC
CCaannttuu 11 RReettuurrnn ttoo ppllaayy wwhheenn
aassyymmppttoommaattiicc ffoorr 11
wweeeekk..
RReettuurrnn ttoo ppllaayy iinn 22
wweeeekkss wwhheenn
aassyymmppttoommaattiicc ffoorr 11
wweeeekk.. CCoonnssiiddeerr
tteerrmmiinnaattiinngg sseeaassoonn..
TTeerrmmiinnaattee sseeaassoonn.. MMaayy
rreettuurrnn nneexxtt sseeaassoonn..
CCoolloorraaddoo 22 RReettuurrnn ttoo ppllaayy wwhheenn
aassyymmppttoommaattiicc ffoorr 11
wweeeekk..
RReettuurrnn ttoo ppllaayy aafftteerr
aassyymmppttoommaattiicc ffoorr 11
mmoonntthh..
TTeerrmmiinnaattee sseeaassoonn.. MMaayy
rreettuurrnn nneexxtt sseeaassoonn..
((CCoonnccuussssiioonn
ssyymmppttoommss >> 1155
mmiinnuutteess))
AAAANN 22 RReettuurrnn ttoo ppllaayy wwhheenn
aassyymmppttoommaattiicc ffoorr 11
wweeeekk..
RReettuurrnn ttoo ppllaayy aafftteerr 22
wweeeekkss iiff aassyymmppttoommaattiicc.. ‐‐‐‐
PPTTAA >> 3300 mmiinnuutteess,, << 2244
hhoouurrss.. LLOOCC << 55
mmiinnuutteess
RRoobbeerrttss 22 RReettuurrnn ttoo ppllaayy wwhheenn
aassyymmppttoommaattiicc ffoorr 11
wweeeekk..
RReettuurrnn ttoo ppllaayy aafftteerr 11
mmoonntthh iiff aassyymmppttoommaattiicc
ffoorr 11 wweeeekk..
RReettuurrnn ttoo ppllaayy wwhheenn
aassyymmppttoommaattiicc ffoorr 33 ttoo 66
mmoonntthhss..
CCaannttuu 22 RReettuurrnn ttoo ppllaayy wwhheenn
aassyymmppttoommaattiicc ffoorr 11
wweeeekk..
RReettuurrnn ttoo ppllaayy aafftteerr 11
mmoonntthh iiff aassyymmppttoommaattiicc
ffoorr 11 wweeeekk.. CCoonnssiiddeerr
tteerrmmiinnaattiinngg sseeaassoonn..
TTeerrmmiinnaattee sseeaassoonn.. MMaayy
rreettuurrnn nneexxtt sseeaassoonn..

30
((AAnnyy LLOOCC)) CCoolloorraaddoo 33 TTrraannssppoorrtt ttoo hhoossppiittaall..
RReettuurrnn ttoo ppllaayy 11 mmoonntthh
aafftteerr iinnjjuurryy iiff
aassyymmppttoommaattiicc ffoorr 22
wweeeekkss..
TTeerrmmiinnaattee sseeaassoonn..
DDiissccoouurraaggee rreettuurrnn.. ‐‐‐‐
((LLOOCC ffoorr sseeccoonnddss)) AAAANN 33 TTrraannssppoorrtt ttoo hhoossppiittaall..
RReettuurrnn ttoo ppllaayy wwhheenn
aassyymmppttoommaattiicc ffoorr 11
wweeeekk..
RReettuurrnn ttoo ppllaayy aafftteerr 11
mmoonntthh.. ‐‐‐‐
PPTTAA >> 2244 hhoouurrss.. RRoobbeerrttss 33 RReettuurrnn ttoo ppllaayy 11 mmoonntthh
aafftteerr iinnjjuurryy iiff
aassyymmppttoommaattiicc ffoorr 22
wweeeekkss..
RReettuurrnn ttoo ppllaayy aafftteerr 33 ttoo
66 mmoonntthhss.. NNoo rreettuurrnn
LLOOCC >> 55 mmiinnuutteess
CCaannttuu 33 RReettuurrnn ttoo ppllaayy 11 mmoonntthh
aafftteerr iinnjjuurryy iiff
aassyymmppttoommaattiicc ffoorr 11
wweeeekk..
TTeerrmmiinnaattee sseeaassoonn.. ‐‐‐‐
((AAnnyy LLOOCC)) CCoolloorraaddoo 33 TTrraannssppoorrtt ttoo hhoossppiittaall..
RReettuurrnn ttoo ppllaayy 11 mmoonntthh
aafftteerr iinnjjuurryy iiff
aassyymmppttoommaattiicc ffoorr 22
wweeeekkss..
TTeerrmmiinnaattee sseeaassoonn..
DDiissccoouurraaggee rreettuurrnn.. ‐‐‐‐
((LLOOCC llaassttiinngg mmoorree tthhaann
aa ffeeww sseeccoonnddss)) AAAANN 33 RReettuurrnn ttoo ppllaayy aafftteerr
aassyymmppttoommaattiicc ffoorr 22
wweeeekkss..
RReettuurrnn ttoo ppllaayy wwhheenn
aassyymmppttoommaattiicc ffoorr 11
mmoonntthh..
‐‐‐‐
AAAANN==AAmmeerriiccaann AAccaaddeemmyy ooff NNeeuurroollooggyy;; PPTTAA==ppoosstt‐‐ttrraauummaattiicc aammnneessiiaa;; LLOOCC==lloossss ooff ccoonnsscciioouussnneessss..

31
Appendix B
VOLLEYBALL CANADA: ANTI-DOPING POLICY In accordance with the Canadian Policy on Penalties for Doping in Sport (CPPDS), the following banned and restricted substances and methods exist:
i. BANNED SUBSTANCES: Stimulants, Narcotic Analgesics, Anabolic Agents, Diuretics, Peptide Hormones, Analogues and substances that alter the integrity of the urine samples.
ii. BANNED DOPING METHODS: Blood doping and pharmocological, chemical and physical manipulation of urine.
iii. RESTRICTED DRUGS: Injectable Local Anesthetics, Asthma and Respiratory Ailment Drugs, Corticosteroids, Caffeine, Beta Blockers, Alcohol and Marijuana.
These substances, together with examples of permitted substances are contained in the Canadian Centre for Ethics in Sport's Drug Classification booklet. In accordance with the CPPDS, the following penalties shall apply for those persons committing doping or doping related infractions:
i. Doping infractions: Sport Eligibility for athletes
1st infraction: 4 years ineligibility from all VC activities 2nd infraction: life ineligibility from all VC activities
Sport Eligibility for non-athletes
1st infraction: life ineligibility from all VC activities
ii. Doping related infractions: Sport Eligibility for athletes
i. 1st infraction: a minimum of 4 years ineligibility from all VC activities ii. 2nd infraction: life ineligibility from all VC activities
Sport Eligibility for non-athletes
i. 1st infraction: life ineligibility from all VC activities
http://volleyball.ca/index.asp?page=20

32
33
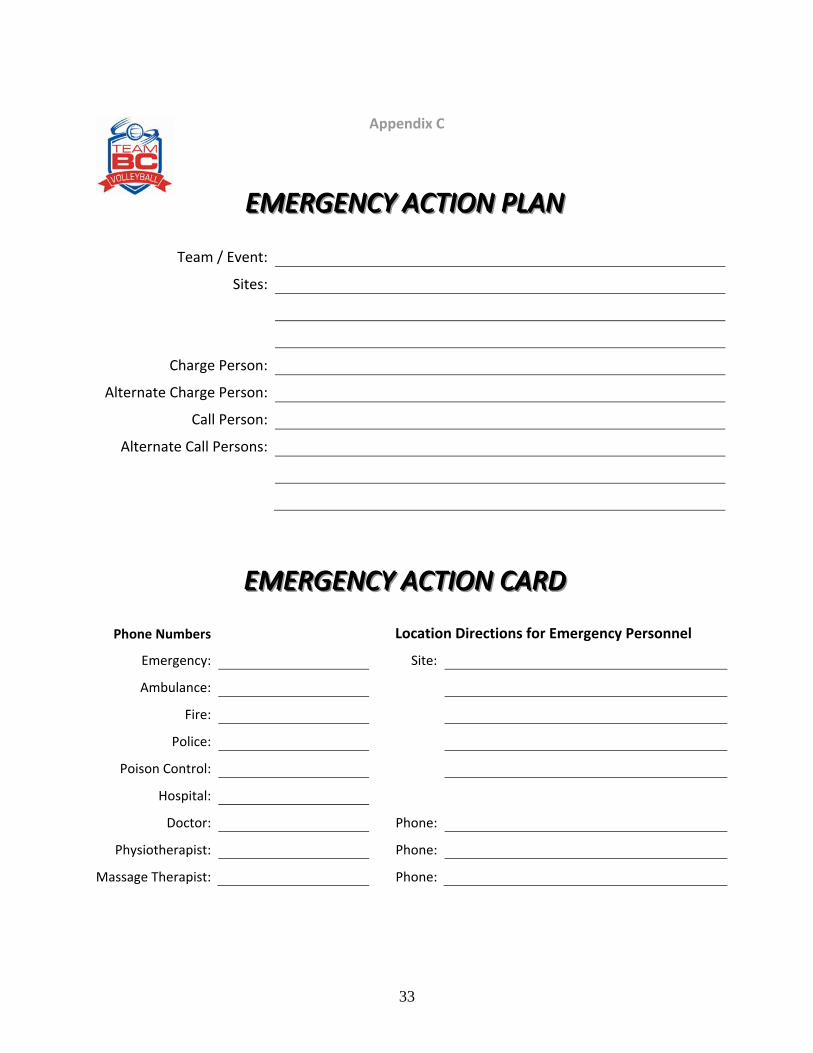
Appendix C
EEEMMMEEERRRGGGEEENNNCCCYYY AAACCCTTTIIIOOONNN PPPLLLAAANNN
Team / Event:
Sites:
Charge Person:
Alternate Charge Person:
Call Person:
Alternate Call Persons:
EEEMMMEEERRRGGGEEENNNCCCYYY AAACCCTTTIIIOOONNN CCCAAARRRDDD
Phone Numbers Location Directions for Emergency Personnel
Emergency: Site:
Ambulance:
Fire:
Police:
Poison Control:
Hospital:
Doctor: Phone:
Physiotherapist: Phone:
Massage Therapist: Phone:

34
Appendix D
AAARRREEEAAA MMMAAAPPP
INCLUDE: training facility, location and direction to nearest hospital, street names