emergency wound management
TRANSCRIPT

8/9/2019 Emergency Wound Management
http://slidepdf.com/reader/full/emergency-wound-management 1/42
Source : Emergency Medicine, a comprehensive study guide, by Judith E Tintinaly
8/9/2019 Emergency Wound Management
http://slidepdf.com/reader/full/emergency-wound-management 2/42
8/9/2019 Emergency Wound Management
http://slidepdf.com/reader/full/emergency-wound-management 3/42
8/9/2019 Emergency Wound Management
http://slidepdf.com/reader/full/emergency-wound-management 4/42

8/9/2019 Emergency Wound Management
http://slidepdf.com/reader/full/emergency-wound-management 5/42
FIG. 42-1. Handling of the skin withskin hook (left) and open limb of fine f orceps (right).
[Reproduced with permissionf rom Singer AJ, HollanderJE(eds): Lacerations and Acute Wounds.An Evidence-Based Guide. Philadelphia,PA: FA Davis, 2003, p. 109.]

8/9/2019 Emergency Wound Management
http://slidepdf.com/reader/full/emergency-wound-management 6/42

8/9/2019 Emergency Wound Management
http://slidepdf.com/reader/full/emergency-wound-management 7/42
I More tissue \in
depth than \at
surface
Needle rolled in arc
Needle holder rolledSkin edge retracted
FIG. 42-2. Placement of simple interrupted percutaneous sutures. The
distance of the suture f rom the wound edge is greater at the depth of the wound than at the surf ace,
promoting wound edge eversion when tightened. [Reproduced with permission f rom Singer AJ, Hollander JE
(eds): Lacerations and Acute Wounds. An Evidence-Based Guide.
Philadelphia, PA: FA Davis, 2003, p. 115.]

8/9/2019 Emergency Wound Management
http://slidepdf.com/reader/full/emergency-wound-management 8/42
FIG. 42-3. Placement of continuous percutaneous
sutures. The suture crosses the wound superf icially at
a 65° angle and traverses the depth of the wound at a
90° angle, perpendicular to the wound.
FIG. 42-5. Placement of continuous subcuticular sutures.
Small horizontal bites are taken beneath the dermal-epidermal junction. Slight backtracking of the needle path
should be perf ormed to ensure wound coaptation.
[Reproduced with permission f rom Singer AJ, Hollander
JE (eds): Lacerations and Acute Wounds. An Evidence-Based
Guide. Philadelphia, PA: FA Davis, 2003, p. 125.]
8/9/2019 Emergency Wound Management
http://slidepdf.com/reader/full/emergency-wound-management 9/42
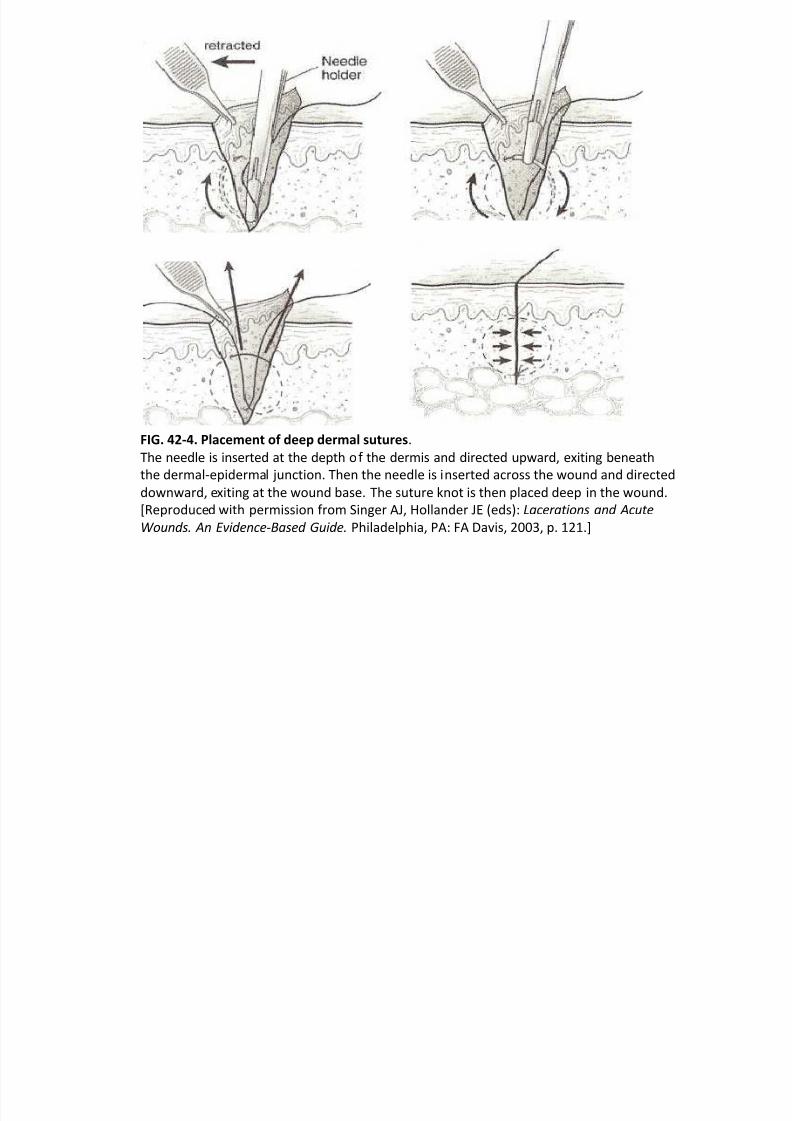
FIG. 42-4. Placement of deep dermal sutures.
The needle is inserted at the depth of the dermis and directed upward, exiting beneath
the dermal-epidermal junction. Then the needle is inserted across the wound and directed
downward, exiting at the wound base. The suture knot is then placed deep in the wound.
[Reproduced with permission f rom Singer AJ, Hollander JE (eds): Lacerations and Acute
Wounds. An Evidence-Based Guide. Philadelphia, PA: FA Davis, 2003, p. 121.]
8/9/2019 Emergency Wound Management
http://slidepdf.com/reader/full/emergency-wound-management 10/42
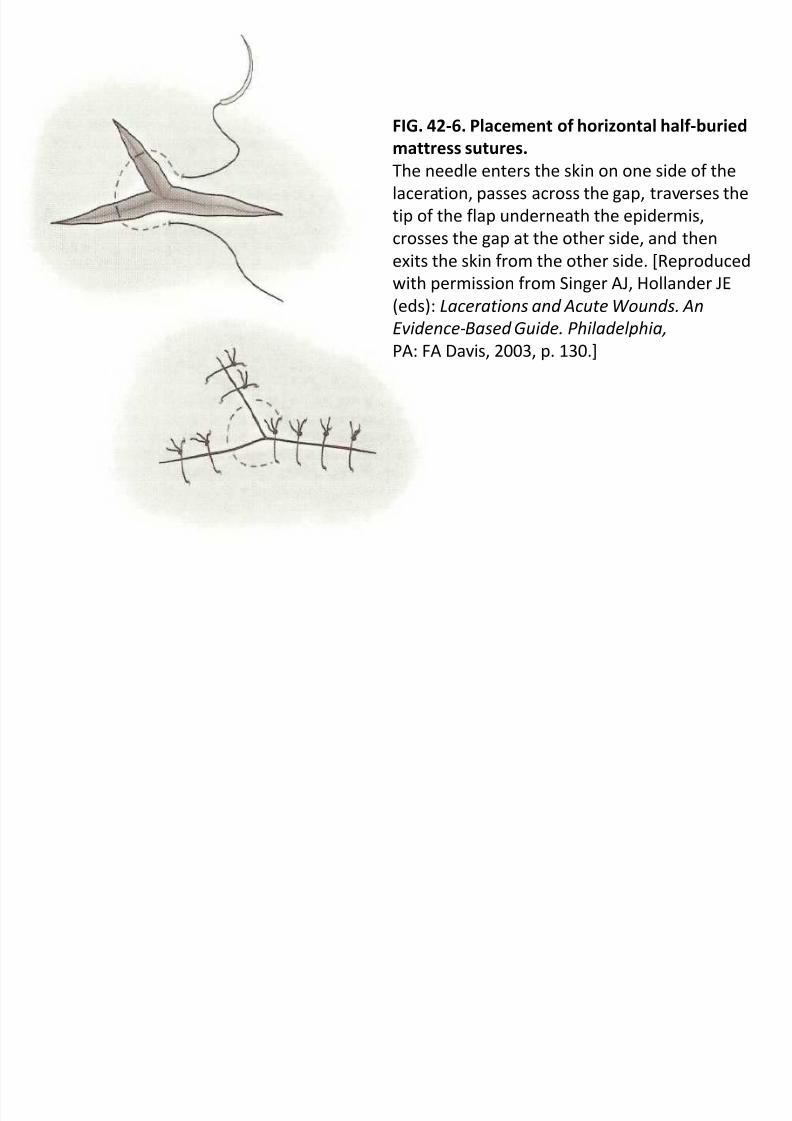
FIG. 42-6. Placement of horizontal half-buried
mattress sutures.
The needle enters the skin on one side of the
laceration, passes across the gap, traverses the
tip of the f lap underneath the epidermis,
crosses the gap at the other side, and then
exits the skin f rom the other side. [Reproduced
with permission f rom Singer AJ, Hollander JE(eds): Lacerations and Acute Wounds. An
Evidence-Based Guide. Philadelphia,
PA: FA Davis, 2003, p. 130.]

8/9/2019 Emergency Wound Management
http://slidepdf.com/reader/full/emergency-wound-management 11/42
FIG. 42-7. Placement of vertical mattress sutures.
The f irst bite is taken f ar f rom the wound, the needle is
reversed, and the second bite is taken close to the wound
edge. The wound edges evert as the knot is tied.[Reproduced with permission f rom Singer AJ, Hollander JE
(eds): Lacerations and Acute Wounds. An Evidence-Based
Guide. Philadelphia, PA: FA Davis, 2003, p. 127.]
FIG. 42-8. Application of tissue adhesive.
The wound edges are held in apposition with the f ingers of
the nondominant hand as the tissue adhesive is applied.
[Reproduced with permission f rom Singer AJ, Hollander JE(eds): Lacerations and Acute Wounds. An Evidence-
Based Guide. Philadelphia, PA: FA Davis, 2003, p. 90.]

8/9/2019 Emergency Wound Management
http://slidepdf.com/reader/full/emergency-wound-management 12/42
FIG. 43-2. Skin tension lines are perpendicular to
underlying muscles
8/9/2019 Emergency Wound Management
http://slidepdf.com/reader/full/emergency-wound-management 13/42
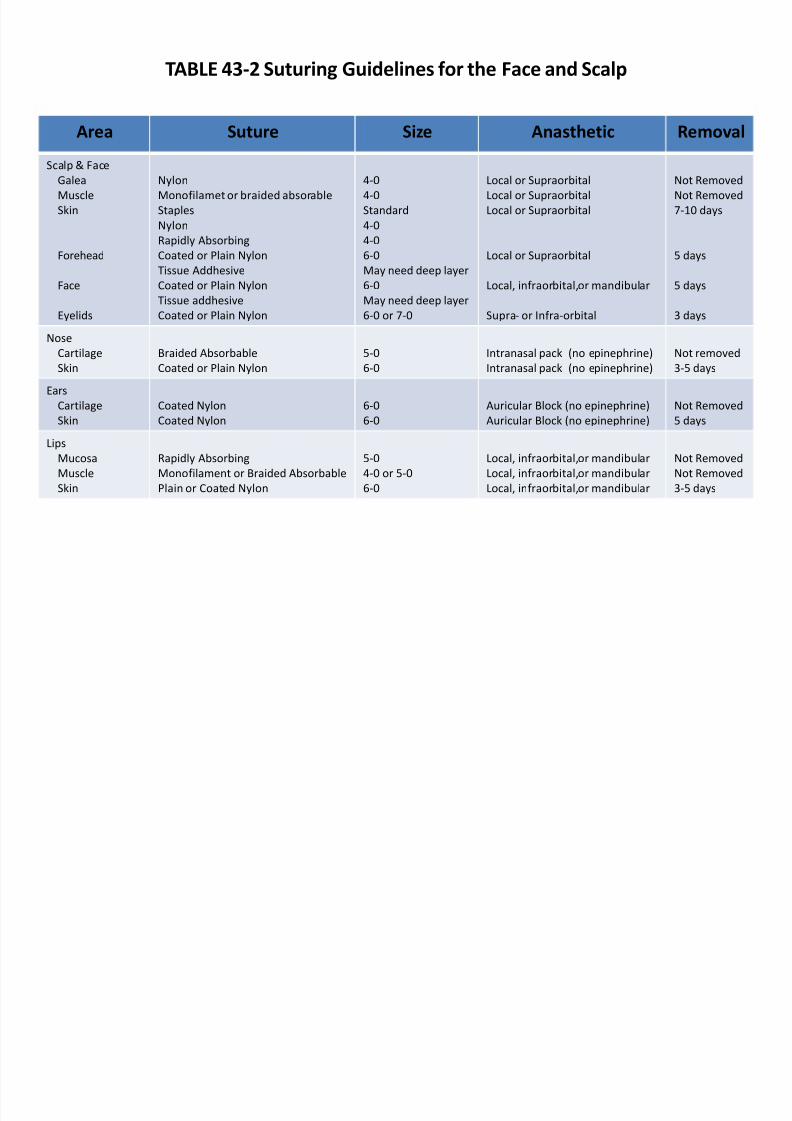
TABLE 43-2 Suturing Guidelines for the Face and Scalp
Area Suture Size Anasthetic RemovalScalp & Face
Galea
Muscle
Skin
Forehead
Face
Eyelids
Nylon
Monof ilamet or braided absorable
Staples
Nylon
Rapidly Absorbing
Coated or Plain Nylon
Tissue Addhesive
Coated or Plain Nylon
Tissue addhesive
Coated or Plain Nylon
4-0
4-0
Standard
4-0
4-0
6-0
May need deep layer
6-0
May need deep layer
6-0 or 7-0
Local or Supraorbital
Local or Supraorbital
Local or Supraorbital
Local or Supraorbital
Local, inf raorbital,or mandibular
Supra- or Inf ra-orbital
Not Removed
Not Removed
7-10 days
5 days
5 days
3 days
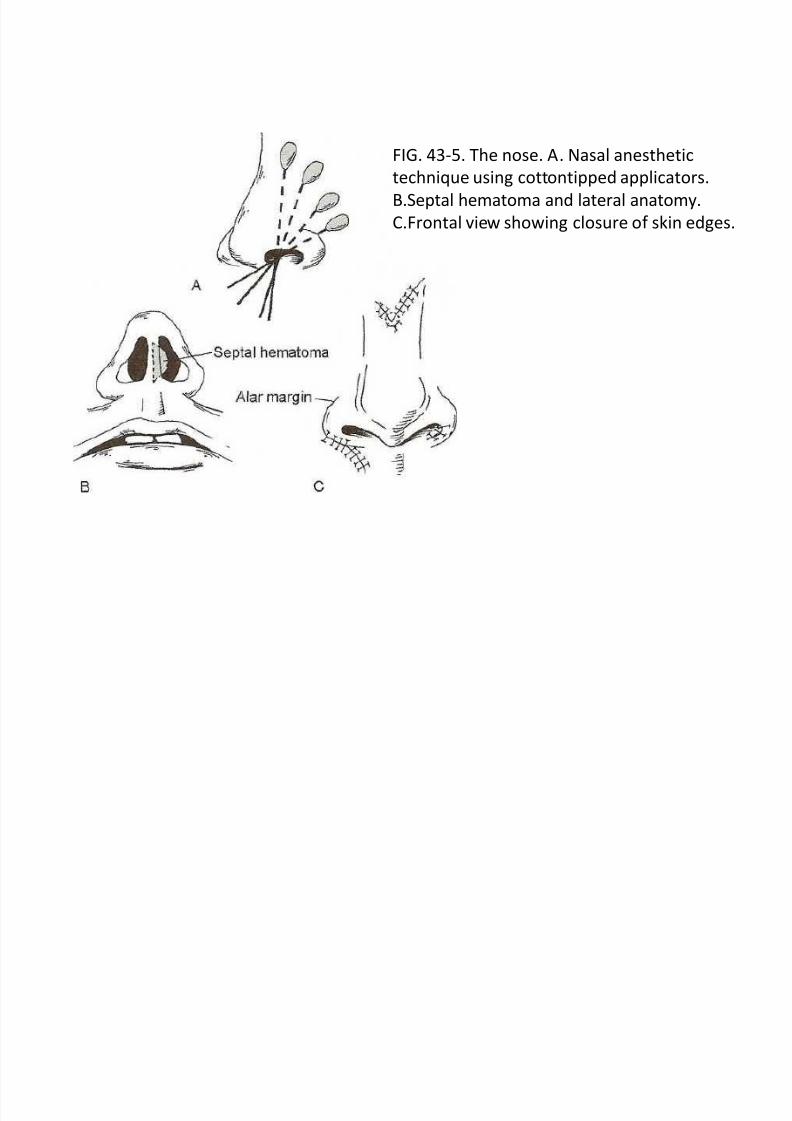
Nose
Cartilage
Skin
Braided Absorbable
Coated or Plain Nylon
5-0
6-0
Intranasal pack (no epinephrine)
Intranasal pack (no epinephrine)
Not removed
3-5 days
Ears
Cartilage
Skin
Coated Nylon
Coated Nylon
6-0
6-0
Auricular Block (no epinephrine)
Auricular Block (no epinephrine)
Not Removed
5 days
Lips
Mucosa
Muscle
Skin
Rapidly Absorbing
Monof ilament or Braided Absorbable
Plain or Coated Nylon
5-0
4-0 or 5-0
6-0
Local, inf raorbital,or mandibular
Local, inf raorbital,or mandibular
Local, inf raorbital,or mandibular
Not Removed
Not Removed
3-5 days

8/9/2019 Emergency Wound Management
http://slidepdf.com/reader/full/emergency-wound-management 14/42
FIG. 43-3. Key stitches in the forehead.
FIG. 43-4. Eyelid anatomy. A. External landmarks. B. Simple
closure of a superf icial laceration of the upper lid
8/9/2019 Emergency Wound Management
http://slidepdf.com/reader/full/emergency-wound-management 15/42

8/9/2019 Emergency Wound Management
http://slidepdf.com/reader/full/emergency-wound-management 16/42
Orbicularis Oris Muscle
FIG. 43-6. Irregular-edged vertical laceration of the upper lip.
A. Traction is applied to the lips and closure of the wound is begun f irstat the vermilion-skin junction.
B. The orbicularis oris muscle is then repaired with interrupted,
absorbable 4-0 synthetic sutures.
C. The irregular edges of the skin are then approximated.
8/9/2019 Emergency Wound Management
http://slidepdf.com/reader/full/emergency-wound-management 17/42
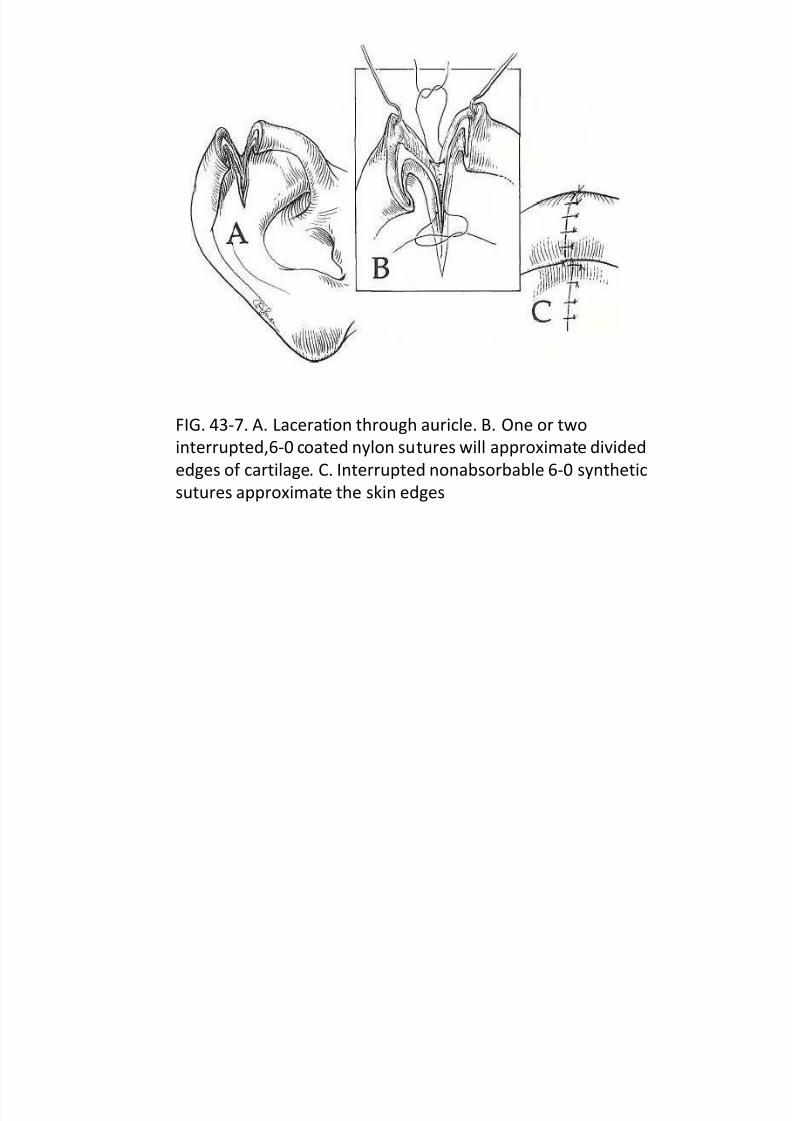
FIG. 43-7. A. Laceration through auricle. B. One or two
interrupted,6-0 coated nylon sutures will approximate divided
edges of cartilage. C. Interrupted nonabsorbable 6-0 synthetic
sutures approximate the skin edges

8/9/2019 Emergency Wound Management
http://slidepdf.com/reader/full/emergency-wound-management 18/42
FIG. 43-8. Pressure dressing for ear
lacerations.
A. Gauze placed behind auricle.
B. Bandage wrapped around head with two
ends cut f or tying.
C. Ends tied.

8/9/2019 Emergency Wound Management
http://slidepdf.com/reader/full/emergency-wound-management 19/42
FIG. 43-9. Anatomic structures of the cheek.
(1): The course of the parotid duct is deep to aline drawn f rom the tragus of the ear to the
midportion of the upper lip. Branches of the
f acial nerve: temporal (T), zygomatic (Z), buccal
(B), mental (M), and cervical (C).
8/9/2019 Emergency Wound Management
http://slidepdf.com/reader/full/emergency-wound-management 20/42
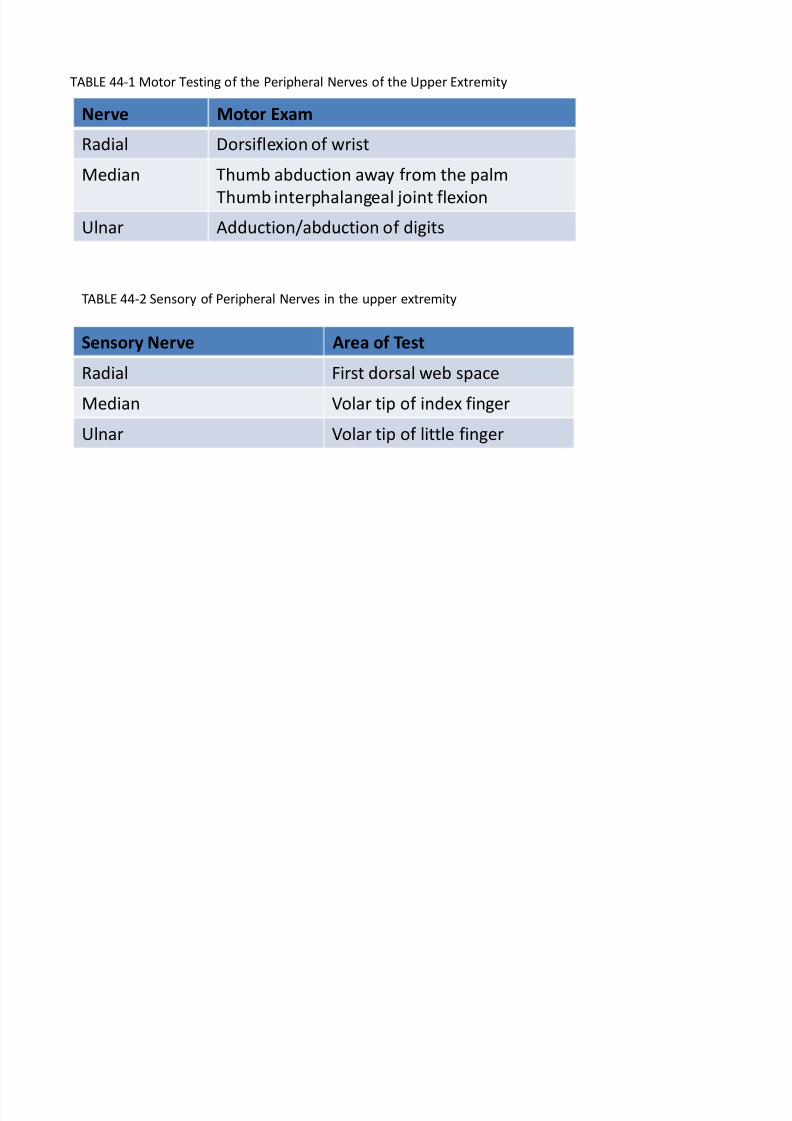
TABLE 44-1 Motor Testing of the Peripheral Nerves of the Upper Extremity
Nerve Motor Exam
Radial Dorsif lexion of wrist
Median Thumb abduction away f rom the palm
Thumb interphalangeal joint f lexion
Ulnar Adduction/abduction of digits
TABLE 44-2 Sensory of Peripheral Nerves in the upper extremity
Sensory Nerve Area of Test
Radial First dorsal web space
Median Volar tip of index f inger
Ulnar Volar tip of little f inger
8/9/2019 Emergency Wound Management
http://slidepdf.com/reader/full/emergency-wound-management 21/42
8/9/2019 Emergency Wound Management
http://slidepdf.com/reader/full/emergency-wound-management 22/42
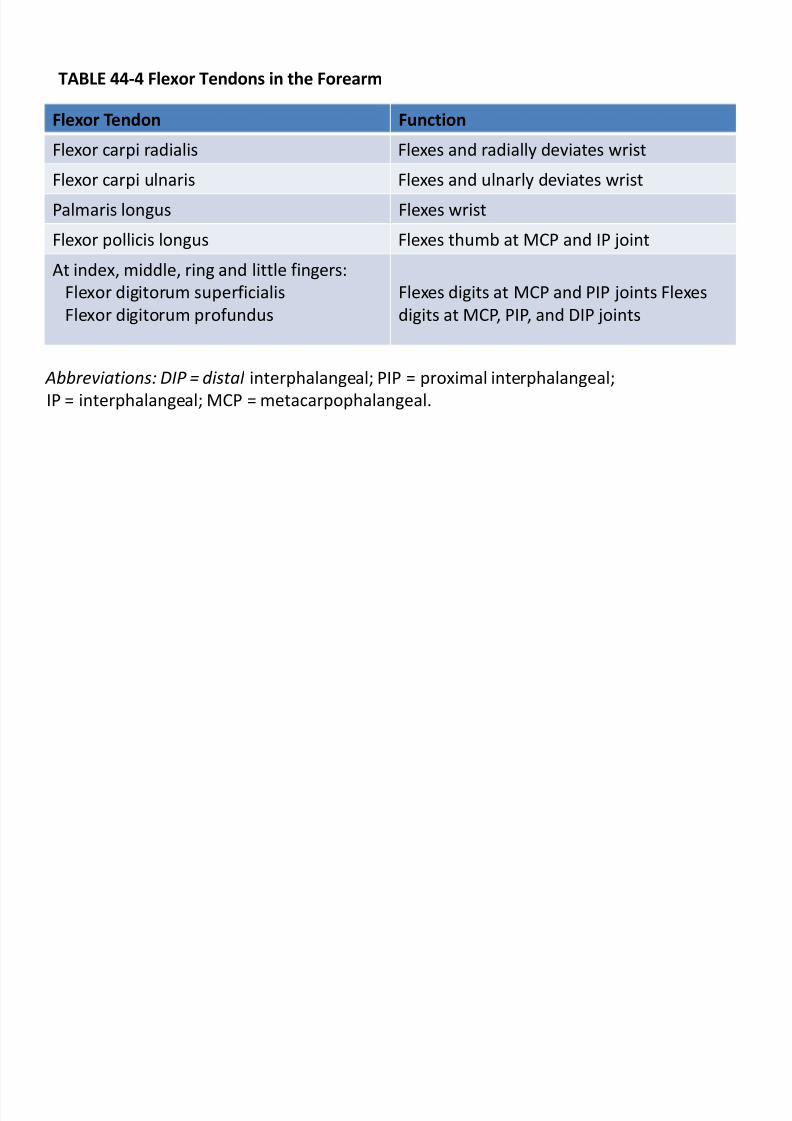
TABLE 44-4 Flexor Tendons in the Forearm
Flexor Tendon Function
Flexor carpi radialis Flexes and radially deviates wrist
Flexor carpi ulnaris Flexes and ulnarly deviates wrist
Palmaris longus Flexes wrist
Flexor pollicis longus Flexes thumb at MCP and IP joint
At index, middle, ring and little f ingers:
Flexor digitorum superf icialis
Flexor digitorum prof undus
Flexes digits at MCP and PIP joints Flexes
digits at MCP, PIP, and DIP joints
Abbreviations: DIP = distal interphalangeal; PIP = proximal interphalangeal;
IP = interphalangeal; MCP = metacarpophalangeal.
8/9/2019 Emergency Wound Management
http://slidepdf.com/reader/full/emergency-wound-management 23/42
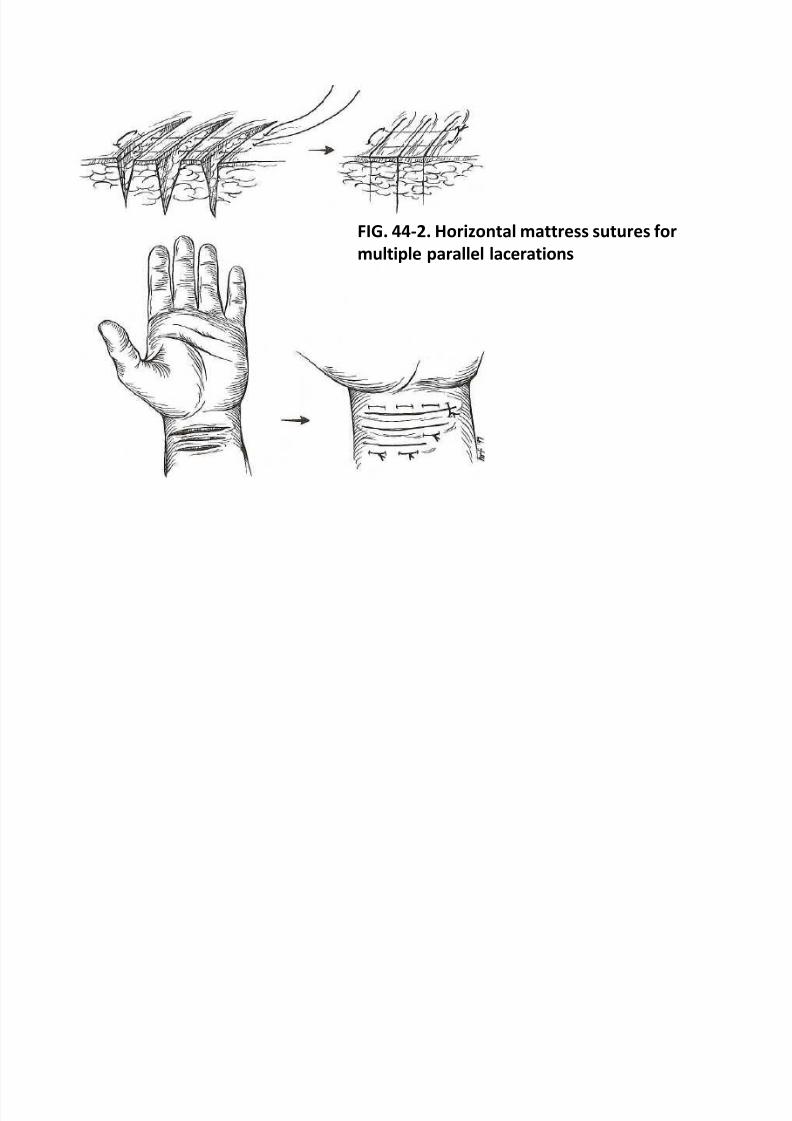
FIG. 44-2. Horizontal mattress sutures for
multiple parallel lacerations
8/9/2019 Emergency Wound Management
http://slidepdf.com/reader/full/emergency-wound-management 24/42
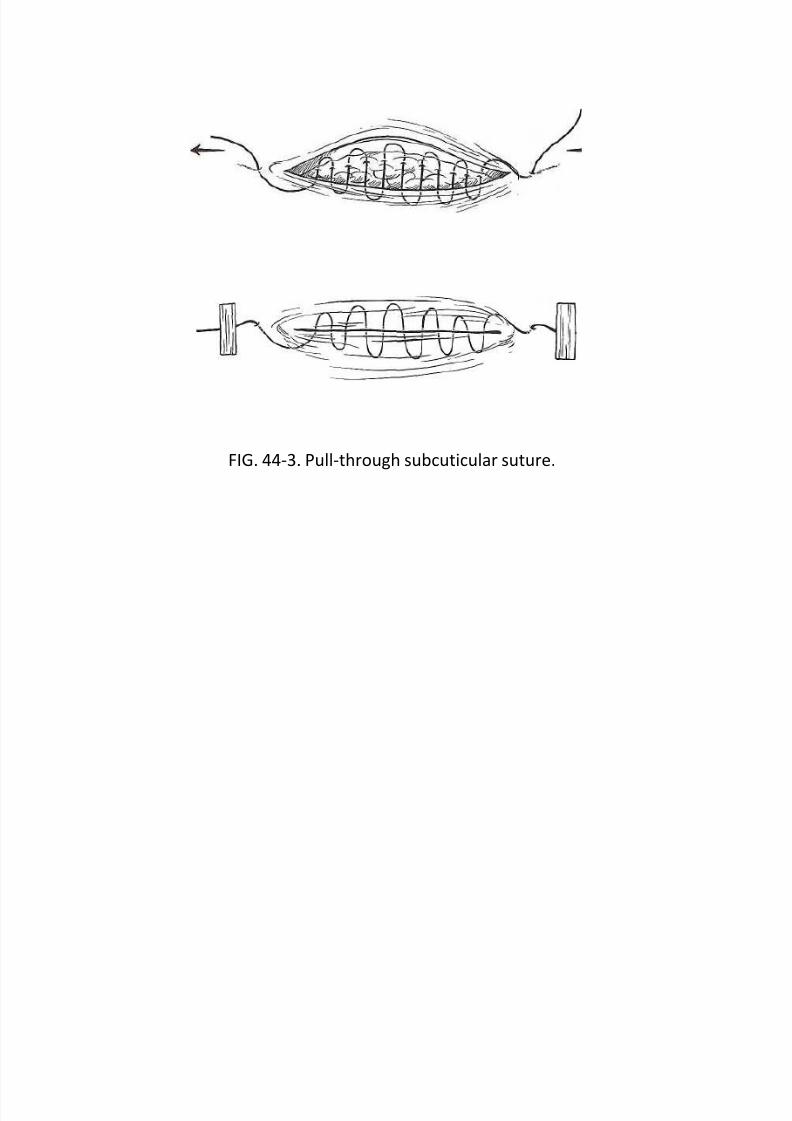
FIG. 44-3. Pull-through subcuticular suture.
8/9/2019 Emergency Wound Management
http://slidepdf.com/reader/full/emergency-wound-management 25/42
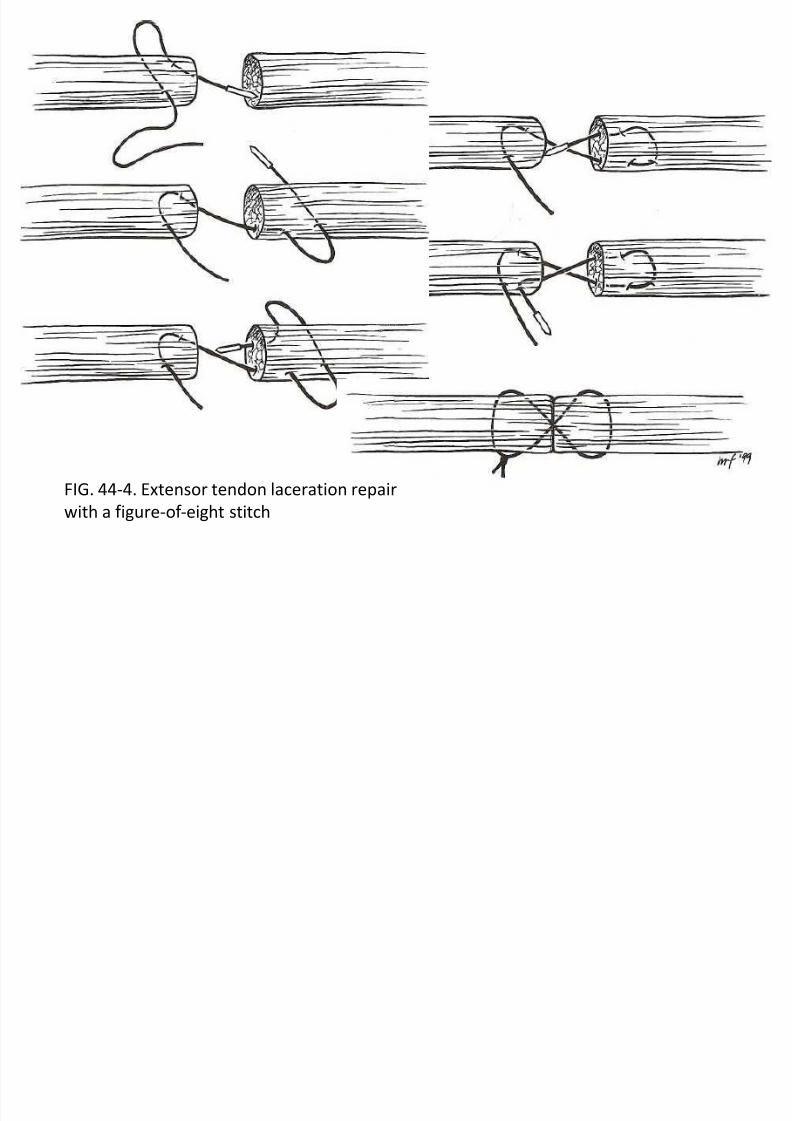
FIG. 44-4. Extensor tendon laceration repair
with a f igure-of -eight stitch
8/9/2019 Emergency Wound Management
http://slidepdf.com/reader/full/emergency-wound-management 26/42
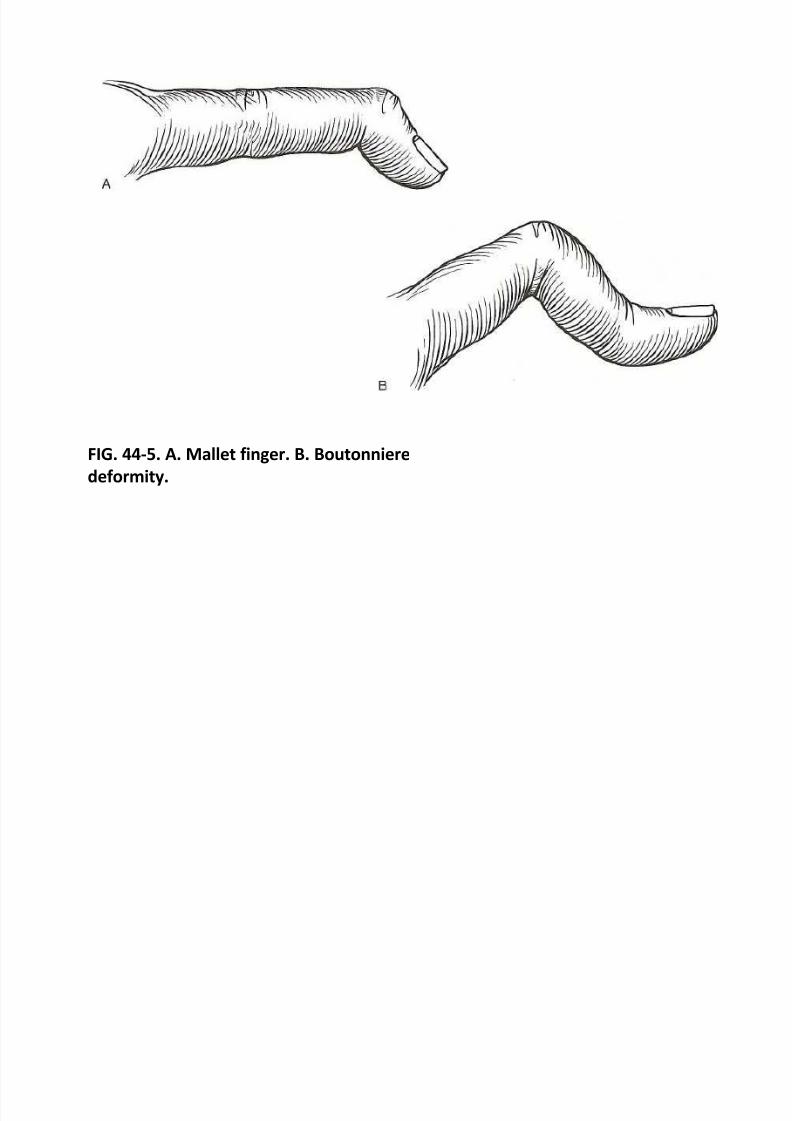
FIG. 44-5. A. Mallet finger. B. Boutonniere
deformity.
8/9/2019 Emergency Wound Management
http://slidepdf.com/reader/full/emergency-wound-management 27/42
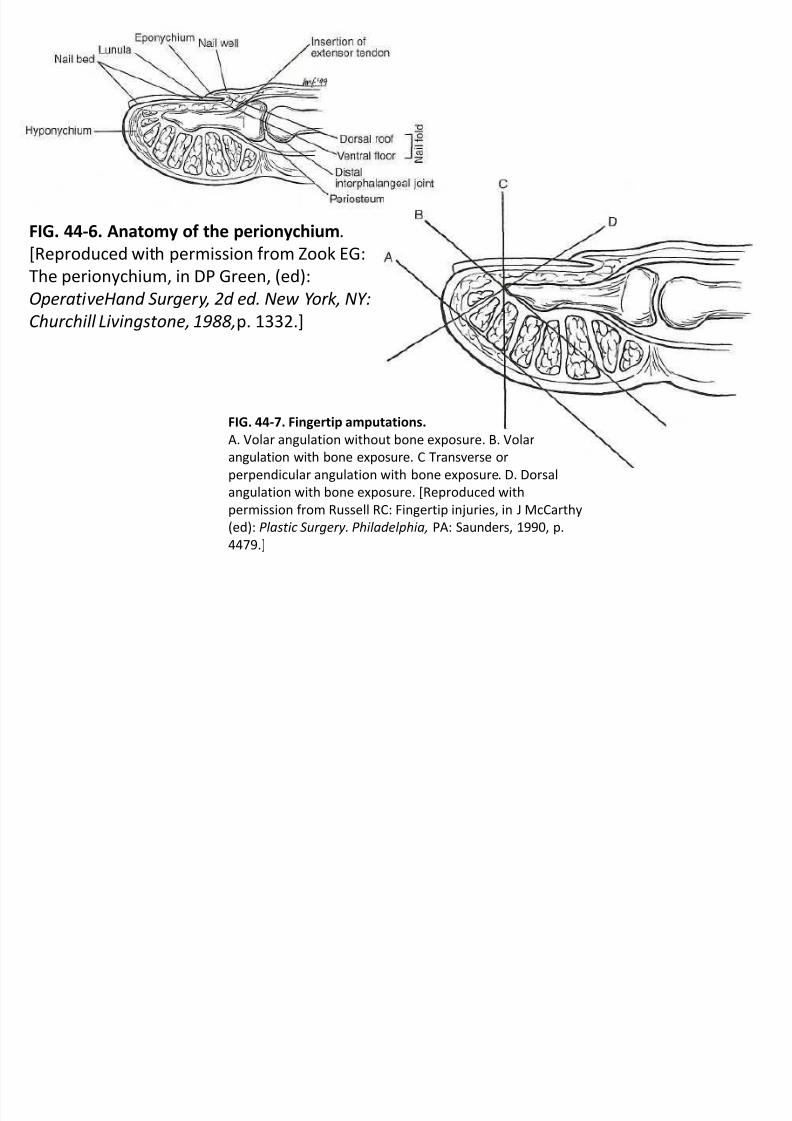
FIG. 44-6. Anatomy of the perionychium.
[Reproduced with permission f rom Zook EG:
The perionychium, in DP Green, (ed):O perativeHand Surgery, 2d ed. New York, NY:
Churchill Livingstone, 1988,p. 1332.]
FIG. 44-7. Fingertip amputations.A. Volar angulation without bone exposure. B. Volar
angulation with bone exposure. C Transverse or
perpendicular angulation with bone exposure. D. Dorsal
angulation with bone exposure. [Reproduced with
permission f rom Russell RC: Fingertip injuries, in J McCarthy
(ed): Plastic Surgery. Philadelphia, PA: Saunders, 1990, p.
4479.]
8/9/2019 Emergency Wound Management
http://slidepdf.com/reader/full/emergency-wound-management 28/42
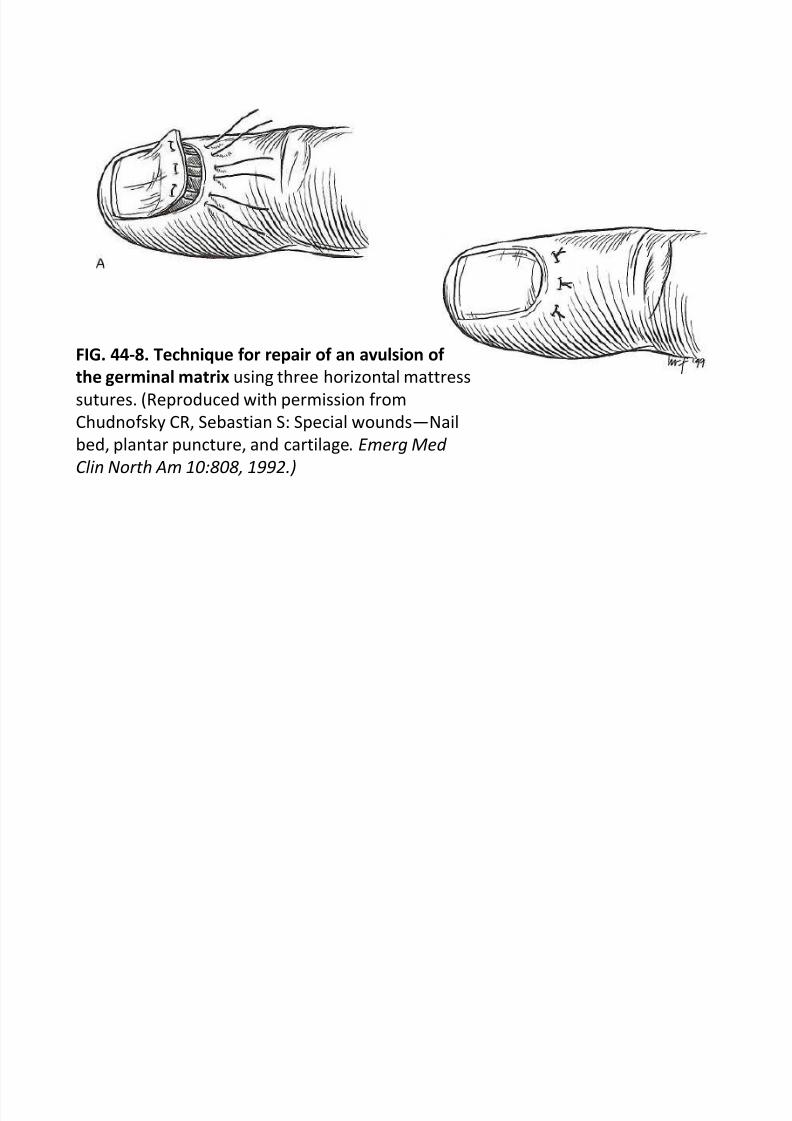
FIG. 44-8. Technique for repair of an avulsion of
the germinal matrix using three horizontal mattress
sutures. (Reproduced with permission f rom
Chudnof sky CR, Sebastian S: Special woundsNailbed, plantar puncture, and cartilage. Emerg Med
Clin North Am 10:808, 1992.)
8/9/2019 Emergency Wound Management
http://slidepdf.com/reader/full/emergency-wound-management 29/42
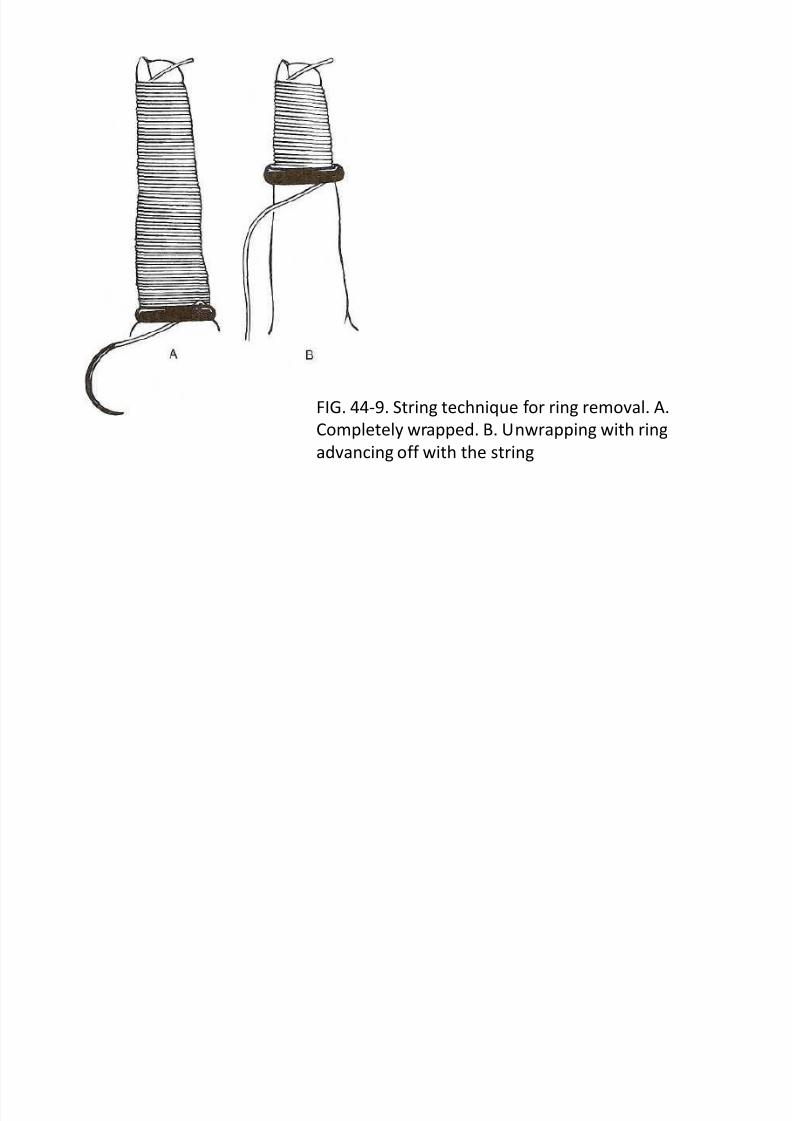
FIG. 44-9. String technique f or ring removal. A.
Completely wrapped. B. Unwrapping with ring
advancing off with the string
8/9/2019 Emergency Wound Management
http://slidepdf.com/reader/full/emergency-wound-management 30/42
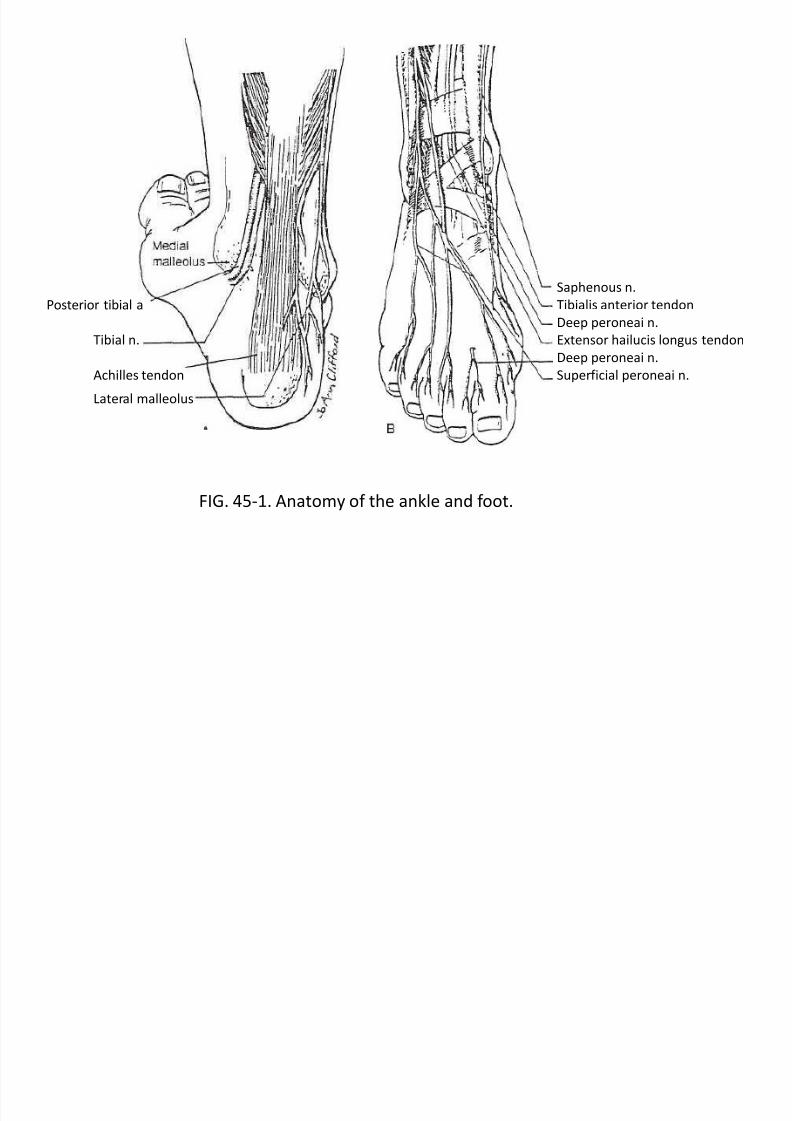
Posterior tibial a
Tibial n.
Achilles tendon
Lateral malleolus
Saphenous n.
Tibialis anterior tendon
Deep peroneai n.
Extensor hailucis longus tendon
Deep peroneai n.
Superf icial peroneai n.
FIG. 45-1. Anatomy of the ankle and f oot.
8/9/2019 Emergency Wound Management
http://slidepdf.com/reader/full/emergency-wound-management 31/42
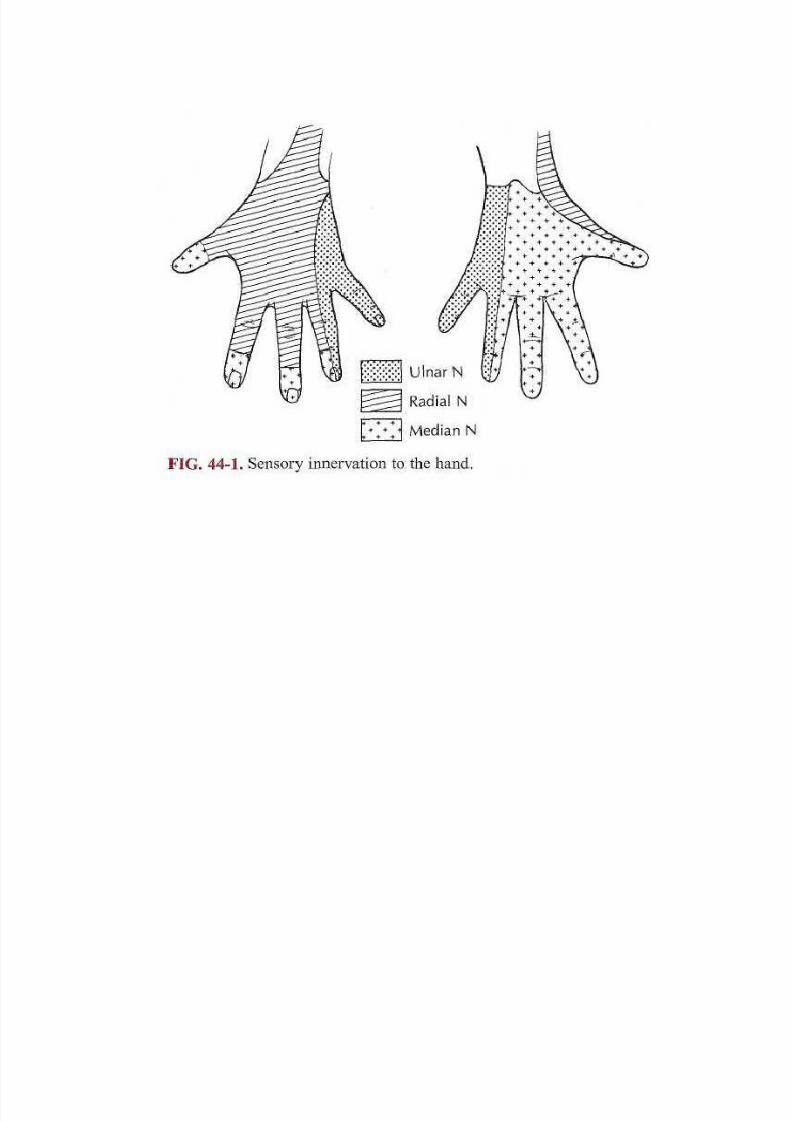
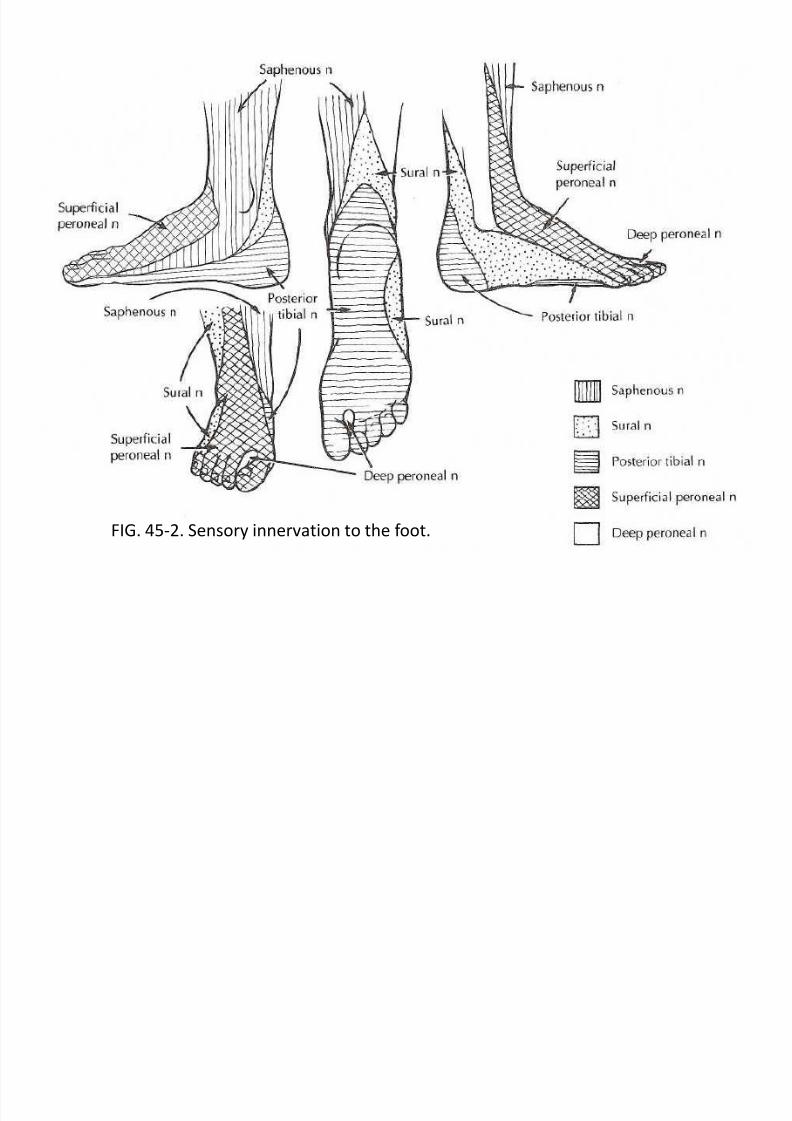
FIG. 45-2. Sensory innervation to the f oot.

8/9/2019 Emergency Wound Management
http://slidepdf.com/reader/full/emergency-wound-management 32/42
FIG. 46-1. A. This patient's leg was punctured by a wooden stake 2 days prior to
presentation. Surrounding cellulitis and point tenderness lateral to the wound indicated theprobability of a retained f oreign body. B. The entrance to the wound was extended. C. A 1.5-
cm piece of woodwas removed f rom a 3.5-cm-deep wound.
8/9/2019 Emergency Wound Management
http://slidepdf.com/reader/full/emergency-wound-management 33/42
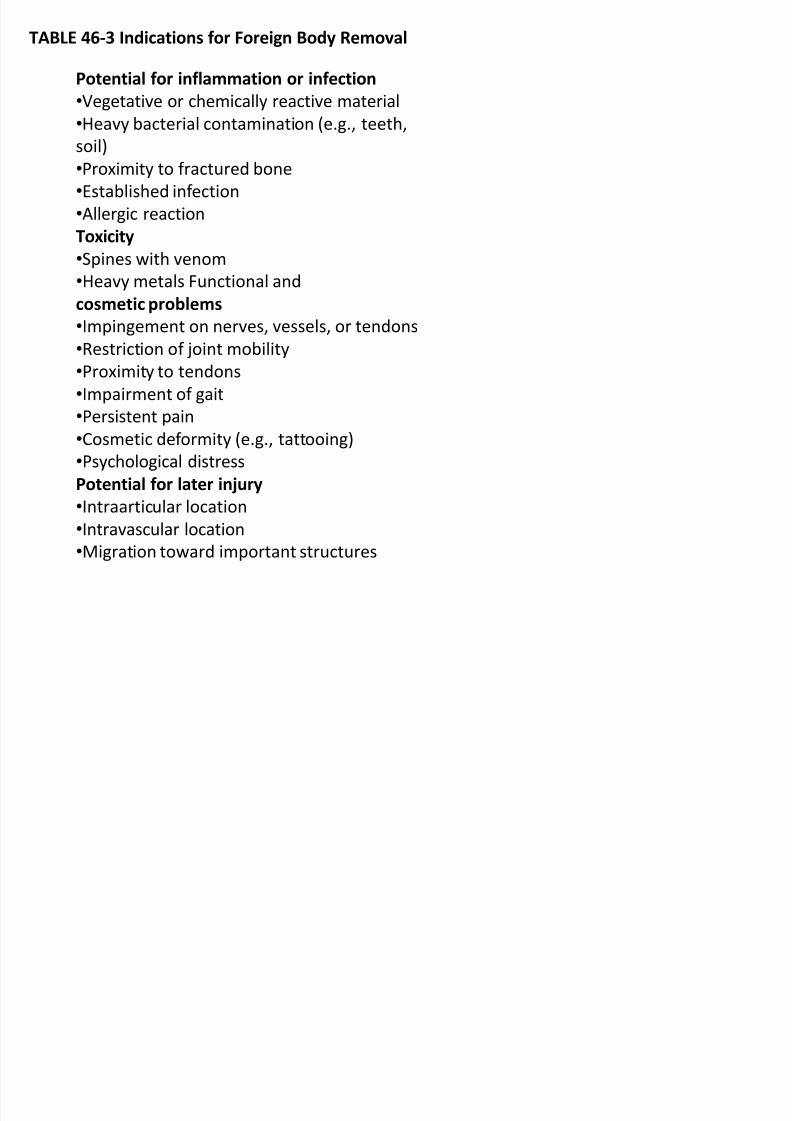
TABLE 46-3 Indications for Foreign Body Removal
Potential for inflammation or infection
Vegetative or chemically reactive material
Heavy bacterial contamination (e.g., teeth,
soil)Proximity to f ractured bone
Established inf ection
Allergic reaction
Toxicity
Spines with venom
Heavy metals Functional andcosmetic problems
Impingement on nerves, vessels, or tendons
Restriction of joint mobility
Proximity to tendons
Impairment of gait
Persistent painCosmetic def ormity (e.g., tattooing)
Psychological distress
Potential for later injury
Intraarticular location
Intravascular location
Migration toward important structures

8/9/2019 Emergency Wound Management
http://slidepdf.com/reader/full/emergency-wound-management 34/42
FIG. 46-2. A. An incision is made
perpendicular to the needle at its midpoint.
B. The needle is grasped through the
incision with a hemostat and backed out of
the puncture woundFIG. 46-4. To remove a friable foreign body
such as a wood splinter that is parallel to the
skin surf ace, an incision is made along its long
axis. The object can be lif ted out and the entire
length of the wound inspected f or remnants.

8/9/2019 Emergency Wound Management
http://slidepdf.com/reader/full/emergency-wound-management 35/42
FIG. 46-3. A. The entrance site is enlarged with a skin incision. B. If the
incision passes to the side of
the object, the skin is undermined. C. Pressureon the skin edges displaces the f oreign body into the center of the wound.
8/9/2019 Emergency Wound Management
http://slidepdf.com/reader/full/emergency-wound-management 36/42
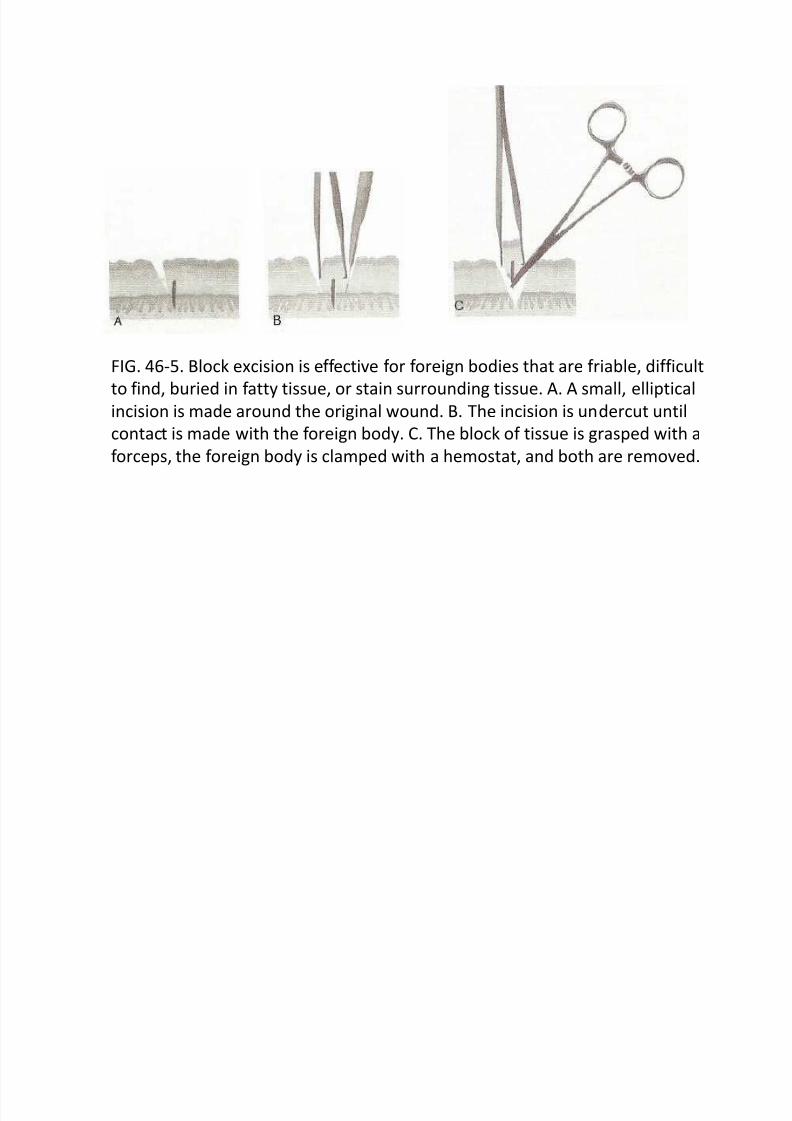
FIG. 46-5. Block excision is eff ective f or f oreign bodies that are f riable, diff icult
to f ind, buried in f atty tissue, or stain surrounding tissue. A. A small, elliptical
incision is made around the original wound. B. The incision is undercut untilcontact is made with the f oreign body. C. The block of tissue is grasped with a
f orceps, the f oreign body is clamped with a hemostat, and both are removed.
8/9/2019 Emergency Wound Management
http://slidepdf.com/reader/full/emergency-wound-management 37/42
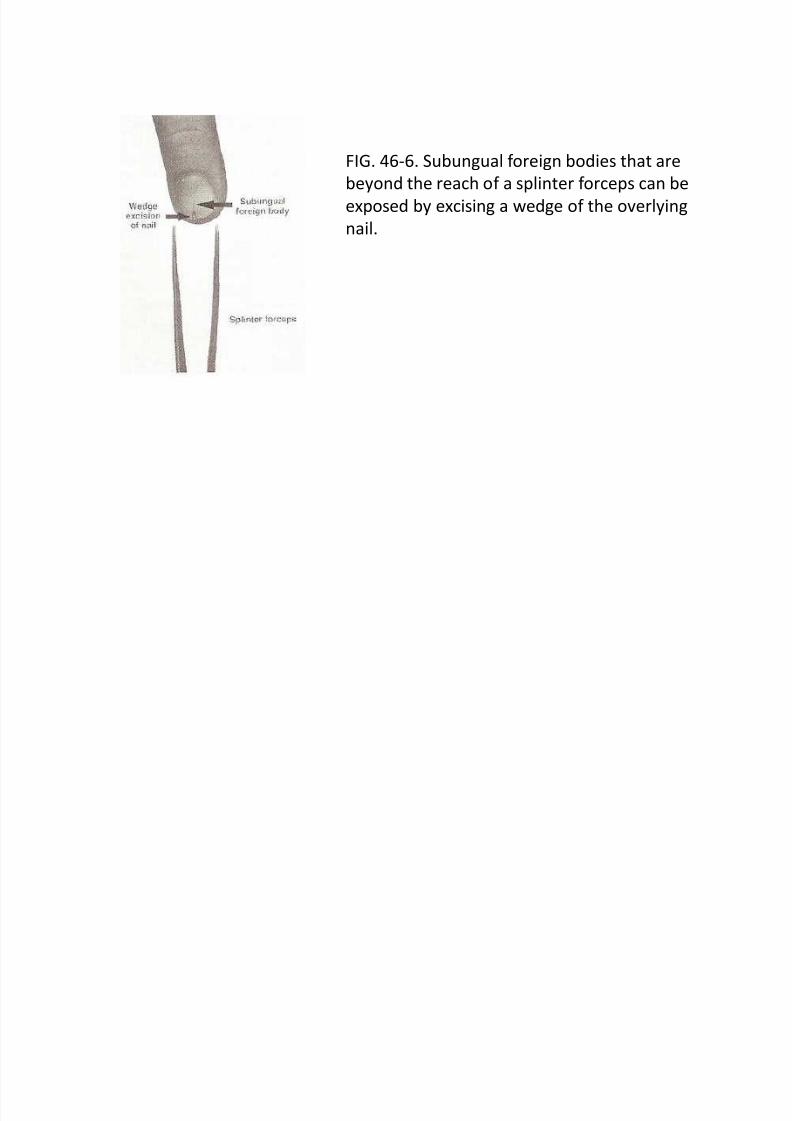
FIG. 46-6. Subungual f oreign bodies that are
beyond the reach of a splinter f orceps can be
exposed by excising a wedge of the overlying
nail.
8/9/2019 Emergency Wound Management
http://slidepdf.com/reader/full/emergency-wound-management 38/42
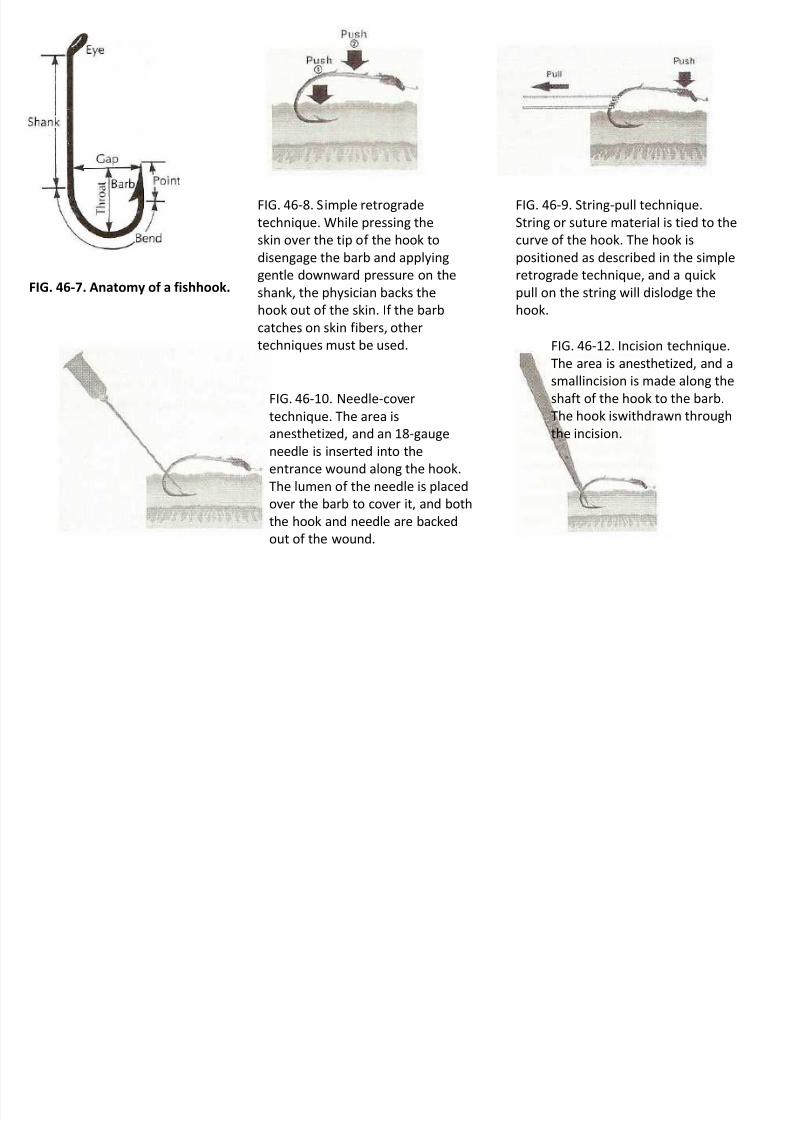
FIG. 46-7. Anatomy of a fishhook.
FIG. 46-8. Simple retrograde
technique. While pressing the
skin over the tip of the hook to
disengage the barb and applying
gentle downward pressure on the
shank, the physician backs the
hook out of the skin. If the barb
catches on skin f ibers, other
techniques must be used.
FIG. 46-9. String-pull technique.
String or suture material is tied to the
curve of the hook. The hook is
positioned as described in the simple
retrograde technique, and a quick
pull on the string will dislodge the
hook.
FIG. 46-10. Needle-cover
technique. The area isanesthetized, and an 18-gauge
needle is inserted into the
entrance wound along the hook.
The lumen of the needle is placed
over the barb to cover it, and both
the hook and needle are backed
out of the wound.
FIG. 46-12. Incision technique.
The area is anesthetized, and a
smallincision is made along the
shaf t of the hook to the barb.
The hook iswithdrawn throughthe incision.
8/9/2019 Emergency Wound Management
http://slidepdf.com/reader/full/emergency-wound-management 39/42
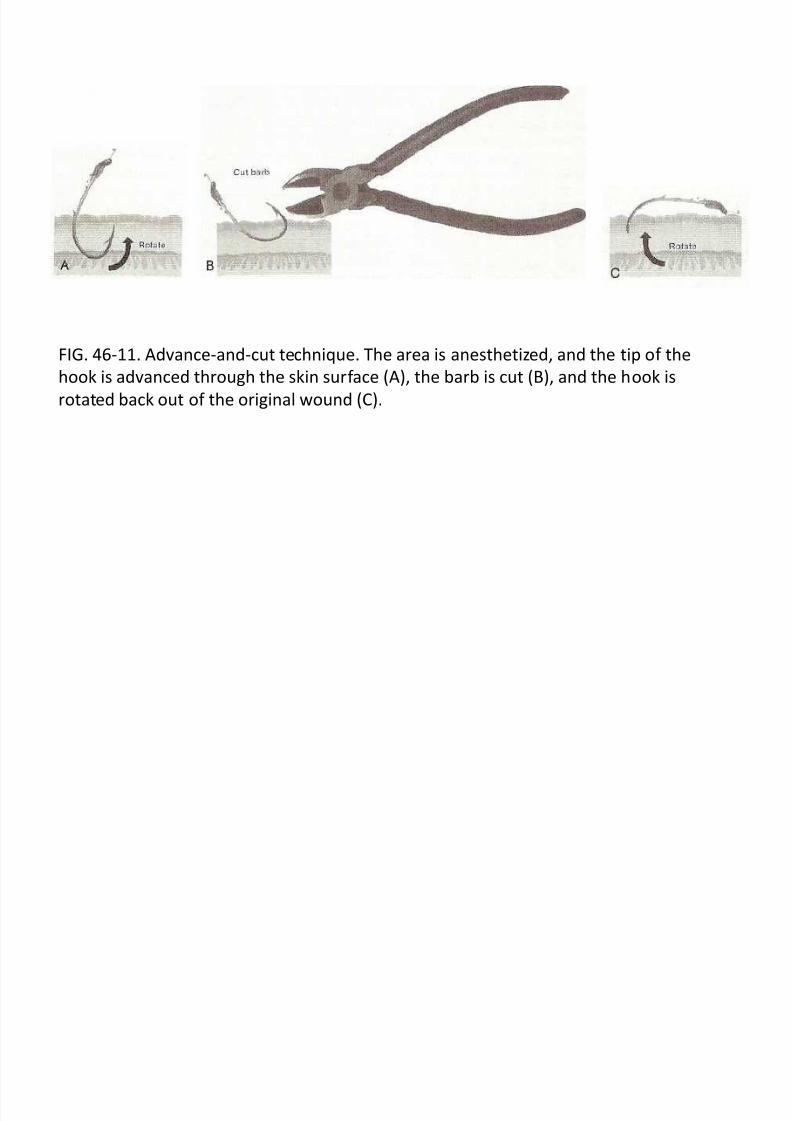
FIG. 46-11. Advance-and-cut technique. The area is anesthetized, and the tip of the
hook is advanced through the skin surf ace (A), the barb is cut (B), and the hook is
rotated back out of the original wound (C).

8/9/2019 Emergency Wound Management
http://slidepdf.com/reader/full/emergency-wound-management 40/42
TABLE 48-1 Empiric Antibiotics for Wound Infections
Clinical Situation First-Line Agent Alternative Therapy Comment
Uncomplicated cellulitis First-generation cephalosporin or
antistaphylococcal penicillin
Macrolide
Patient with underlying
immunodef iciency
Amoxicillin-clavulanate or
secondgenerationcephalosporin
Clindamycin plus a f luoroquinolone
Patient with prosthetic heart valve
or orthopedic implant
Consider adding vancomycin
or orthopedic implant to standard
regimen
Give prophylaxis bef ore
manipulating abscesses
Barnyard injuries, f ecal
contamination
Amoxicillin-clavulanate or
secondgeneration
cephalosporin
Fluoroquinolone plus either
clindamycin or metronidazole
Saltwater exposure Third-generation cephalosporin ±doxycycline
Fluoroquinolone V ibrio may cause hemorrhagic,bullous lesions
Freshwater exposure Antipseudomonal aminoglycoside
or
antipseudomonal penicillin
Fluoroquinolone Aeromonas or Pseudomonas may
be
involved
Abscesses, inf ections due to
intravenous drug use
Amoxicillin-clavulanate or
secondgeneration
cephalosporin
Clindamycin Antibiotics usually not necessary,
incision and drainage essential
Necrotizing f asciitis Imipenem or meropenem Oxacillin plus gentamicin
plus clindamycin
Bite wounds Amoxicillin-clavulanate or
cef oxitin/cef otetan
Clindamycin plus either a
f luoroquinolone or
trimethoprimsulf amethoxazole
Open f racture First-generation cephalosporin or
antistaphylococcal penicillin
Vancomycin
Plantar puncture wound
osteomyelitis
Cef tazidime Ciprof loxacin

8/9/2019 Emergency Wound Management
http://slidepdf.com/reader/full/emergency-wound-management 41/42
TABLE 48-2 Recommendations for Tetanus Prophylaxis

8/9/2019 Emergency Wound Management
http://slidepdf.com/reader/full/emergency-wound-management 42/42
TABLE 48-3 Time from Wound Closure Until Removal of Sutures or Staples
Location Number of Days
Face 3-5
Scalp 7
Chest 8-10
Back 10-14Forearm 10-14
Fingers 8-10
Hand 8-10
Lower extremity 8-12
Foot 10-12