empi tec torch tec torch tm storage, and operation of the tec torchtm and its accessories. 1.2....
TRANSCRIPT

EMPI TEC Torch
Copyright© 2015
Thermal Erosion Cutting
Torch for Tactical and
Rescue Operations
Operating Instruction
Manual
Part Models: C111 | C211
H200 | H300
CC-3 | XT6 | PIG4x2
Energetic Materials & Products, Inc
1413 Brandi Ln
Round Rock, TX 78681
512-380-1992
www.empi-inc.com
v9 February 2016
TEC Torch TM

EMPI TEC Torch
Copyright© 2015

EMPI TEC Torch
Page 1 Copyright© 2015
Table of Contents
Section 1. General Information and Safety Precautions ........................ 2
1.1. Thermal Breaching ..................................................................... 2 1.2. WARNINGS .............................................................................. 2 1.3. SAFETY PRECAUTIONS ........................................................ 4 1.4. Equipment .................................................................................. 5 1.5. Preparing the Work Area ........................................................... 9 1.6. Pre-use Inspection ...................................................................... 9
Section 2. Handheld Operation ............................................................ 11 2.1. Cartridge Insertion ................................................................... 11 2.2. C111 Rod Target Alignment .................................................... 15 2.3. C211 Plate Target Alignment .................................................. 18 2.4. Ignition & Cutting .................................................................... 19 2.5. Cartridge Removal ................................................................... 19
Section 3. Remote Operation ............................................................... 20 3.1. Remote Clip Assembly ............................................................ 21 3.2. Target Attachment ................................................................... 24 3.3. Wiring ...................................................................................... 26 3.4. Ignition & Cutting .................................................................... 28 3.5. Cartridge Removal ................................................................... 28
Section 4. Maintenance, Storage & Disposal ....................................... 29 4.1. Handle Battery Installation / Replacement .............................. 29 4.2. Storage and Transport .............................................................. 30 4.3. Disposal ................................................................................... 32 4.4. Troubleshooting ....................................................................... 32
4.4.1. Cartridges will not Fire in handheld operation ................. 32 4.4.2. Cartridges will not Fire in command line operation ......... 33 4.4.3. Cartridge will not seat into handle receptacle. ................. 34
4.5. WARRANTY INFORMATION .............................................. 35

EMPI TEC Torch
Page 2 Copyright© 2015
Section 1. General Information and Safety Precautions
1.1. Thermal Breaching
Thermal breaching is a technique that utilizes high
temperature devices to melt, cut, or burn away mechanisms
or obstacles to gain access to a secure area. The TEC
TorchTM is one of the first technologies to harness this
energy safely in a compact handheld device. This tool uses
thermites which are solid fuel and oxidizer mixtures
generating reaction temperatures exceeding 5000°F. This
manual will describe the safety precautions, operating
procedures, and recommendations for successful
application of the TEC TorchTM system.
Prior to use, ALL personnel should be trained in proper
handling, storage, and operation of the TEC TorchTM and
its accessories.
1.2. WARNINGS
To avoid serious injury or death, all personnel shall heed
these warnings.
1. Never point the torch at one’s self, another living
being, or at highly flammable objects.
2. Never modify the equipment in any manner or
use it in any way not specified in this manual.

EMPI TEC Torch
Page 3 Copyright© 2015
3. Never operate equipment that is damaged or
deformed. Consult OEM prior to using equipment
past the expiration date.
4. Never remove, hide, or alter the warning labels
attached to this equipment.
5. All users and supervisory personnel must read
and be thoroughly familiar with this manual prior
to using the equipment.
6. Always apply and adhere to ANSI/ASC Z49.1-88
Safety in Welding and Cutting Standards
7. Never operate the torch when under the influence
of drugs (prescription or recreational) and/or
alcohol.

EMPI TEC Torch
Page 4 Copyright© 2015
1.3. SAFETY PRECAUTIONS
Use or misuse of this equipment may result in
death, severe bodily injury, or severe property
damage. Always protect yourself and others
when using this equipment. Fumes and gases
developed from the use of this equipment may
be dangerous to your health. Light emission
and splatter can injure eyes and exposed skin.
1. Always clear the work area of bystanders.
2. Always clear the work area of flammable
materials.
3. All personnel in close proximity must wear
adequate protective clothing, hats, footwear,
eyewear, and gloves when using this system.
4. Never operate this equipment without proper face
and eye protection.
5. Always extend the torch as far as possible from
the operator, prior to ignition.
6. Always keep the torch (lit or unlit) pointed away
your body.
7. Always keep the torch (lit or unlit) pointed away
from unburned cartridges to prevent sympathetic
ignition.

EMPI TEC Torch
Page 5 Copyright© 2015
8. Always keep the cartridge or extension cable
disconnected from the handle until the moment
before immediate use.
9. Always keep the handle Arming Switch in the
OFF/SAFE position prior to inserting any
cartridge or extension cable.
10. Always use extreme caution when operating the
torch in adverse environmental conditions (high
wind, etc).
11. Always know composition of the target material.
12. Always know what is behind and around the
target material.
13. Always keep your head away from the fume
plume.
14. Always use in well-ventilated area to keep fumes
and gases away from your breathing zone.
15. Always allow cartridge burn to fully cease prior
to disengaging from the handle.
16. Beware of extremely hot temperatures of the
cartridge after the burn has completed.
After use, cartridges may be disposed of as standard non-
hazardous waste. Allow cartridges to complete cool prior
to disposal.
1.4. Equipment
The TEC TorchTM is a fast and portable cutting tool
designed for military, law enforcement and first responder
users. The TEC TorchTM consists of two main components: the electric handle and a reactive cartridge. Additional

EMPI TEC Torch
Page 6 Copyright© 2015
accessories are available such as remote-mounting Claw
Clips, extension cables, Splitter cables, and storage boxes.
The C111 cartridges are designed for optimum cutting of
rods, bars, wire rope, and tubing up to 3/4” diameter or
depth. The torch has been proven affective against
numerous steel alloys (such as plain carbon, stainless,
hardened, coated, and painted), aluminum alloys, brass, and
will likely work against most metallic targets.
(Front)
Nozzle End
v-groove notches
(Rear)
Electrical Jack
EMPI TEC Torch
Page 7 Copyright© 2015
The C211 cartridges are designed for optimum cutting of
plates up to ½” thickness. This cartridge provides an
angled head to align the cartridge for the most efficient
cutting performance.
C111 and C211 cartridges burn for approximately 2.0
seconds and cannot be stopped once activated. Cartridges
can only be used once and are disposable. Cartridges are
rugged and will function underwater.
The H200 and H300 handles are fabricated from durable
and heat-resistant plastics. Both handles are water resistant
The H200 is operated via pushbutton Arming Switch and
pushbutton momentary Firing Switch and are powered by a
single 9V battery. The H300 handle is operated via a
rotating Arming Switch and a sliding Firing Switch
protected by a sliding cover and is powered by two (2)
CR123A batteries. The batteries can fire 100’s of
cartridges but are also replaceable when needed.
All cartridges and accessories are designed to be
universally operated with any handle.

EMPI TEC Torch
Page 8 Copyright© 2015
(Front)
Cartridge
Receptacle
Electrical connector (Rear)
ARMING Switch with
LED
(Top)
FIRING Switch
H200
H300
ARMING Switch
Rotary SAFE/ARM
Top FIRING Switch
(cover open)
Sliding cover - CLOSED

EMPI TEC Torch
Page 9 Copyright© 2015
1.5. Preparing the Work Area
Never operate torch near explosives, hydrocarbon fuels,
or similar. Use extreme caution when operating the
torch combustible materials such as textiles, leaves, etc.
Never cut into unknown material. Exotic metals may
ignite. Glass and thin porcelain may shatter. Rock,
minerals, and concrete may spall.
Never operate the torch with personnel or bystanders in
front of the torch or in the immediate work area.
Verify area is well ventilated. Some plastics, paints, and
plated parts give off toxic fumes.
When a target is surrounded by or near wooden
structures, minor fire or smoldering may occur.
1.6. Pre-use Inspection
Never use any equipment which is unsafe or appears to
be unsafe. Properly dispose of damaged or worn
components to reduce the risk of injury.
Never use a torch cartridge with punctures, dents, or
discoloration of the exterior shell.

EMPI TEC Torch
Page 10 Copyright© 2015
For safe operation, verify that the aluminum front seal is
not damaged and/or the nozzle is not exposed. For reliable
operation, verify that the cartridge rear jack is clear of
debris and not corroded, damaged, or deformed.
Verify that the cartridge rear cylinder that inserts into the
handle is round, smooth, untarnished, free of burrs and that
the o-ring is installed and not cracked or broken.
For reliable operation, verify that the handle plug is clear
of debris and not corroded, damaged, or deformed. Verify
that the receptacle body is round, free of debris and burrs
and is not cracked or damaged. It is recommended that the
battery be removed during storage to prevent corrosion and
aging inside the handle. When possible, install a new
battery immediately before field use.

EMPI TEC Torch
Page 11 Copyright© 2015
Section 2. Handheld Operation
Never point the cartridge nozzle towards anybody, even
when disengaged from the handle.
Always ensure that the handle Arming Switch is in the
OFF/SAFE position when installing the cartridge.
Always wear protective flame resistant clothing (gloves,
long sleeve shirt, pants, closed toe shoes, and hats) when
handling or operating the torch components.
Always wear safety glasses when handling or operating
torch components.
Never fire a cartridge without adequate restraint on the
cartridge and handle. The escaping torch flame will
create a reaction force with possible loss of control
resulting in severe injury or death.
2.1. Cartridge Insertion
Remove the shipping caps from the front and rear of the
cartridge and dispose of properly or return to manufacturer.
With the Arming Switch in the OFF/SAFE position, hold
the cartridge in one hand and the handle in the other.
Insure the sliding cover is in the CLOSED position over the
Firing Switch (H300 only).

EMPI TEC Torch
Page 12 Copyright© 2015
OFF
ON
H200

EMPI TEC Torch
Page 13 Copyright© 2015
Ensure that the nozzle is pointed away from yourself and
others. Ensure that hands and fingers are not activating the
Arming Switch or the Firing Switch on the handle.
Firmly press the cartridge rear into the receptacle of the
handle until overlapping the o-ring and fully seated. In
some instance a slight rotation during pressing will aide in
proper seating of the cartridge.
H300
ARM
SAFE

EMPI TEC Torch
Page 14 Copyright© 2015
Proper seat
position

EMPI TEC Torch
Page 15 Copyright© 2015
Rotate the cartridge relative to the handle Firing Switch
for convenient and safe orientation to the target.
Practicing these motions in advance with an INERT
cartridge will improve speed and concise movements.
Predicting the ergonomics of the handle position relative to
the target will allow the user to direct the torch jet in the
safest directions.
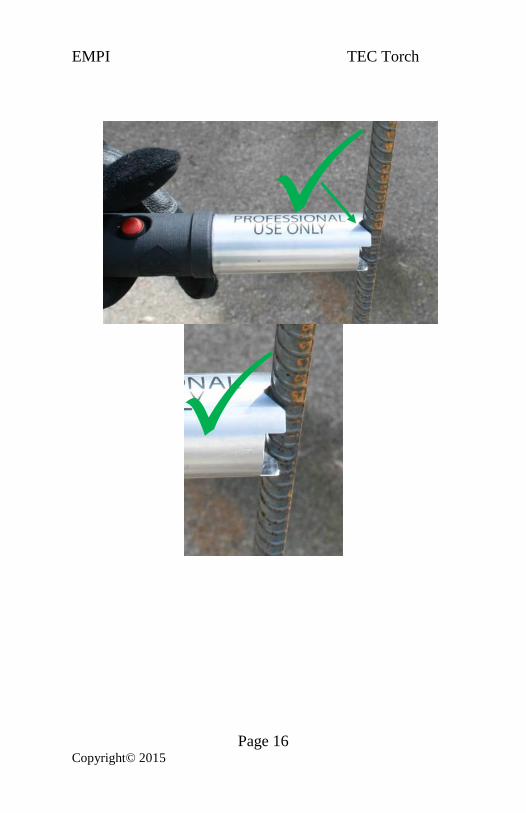
2.2. C111 Rod Target Alignment
The C111 is manufactured with a unique nozzle and two
v-shaped alignment tabs on the front of the cartridge.
These features provide optimized cutting for metal targets
up to 3/4 inch in cross-section.
Bring the cartridge to the target bar, with the bar
spanning the gap between the two v-notches. Ideally, the
cartridge will be perpendicular to the target bar when both
v-notches are seated and making contact.
EMPI TEC Torch
Page 16 Copyright© 2015

EMPI TEC Torch
Page 17 Copyright© 2015
For curved bars (like the shackle on a padlock) try to
orient the torch perpendicular to the point of contact.
In some cases it is recommended to aim the torch in a
downward direction if proper alignment is achievable. If
the target mechanism is on a door face or in a door frame
this technique will reduce reflection and splash-back to the

EMPI TEC Torch
Page 18 Copyright© 2015
user and nearby personnel as either surface may reflect
flame, sparks, and hazardous fumes.
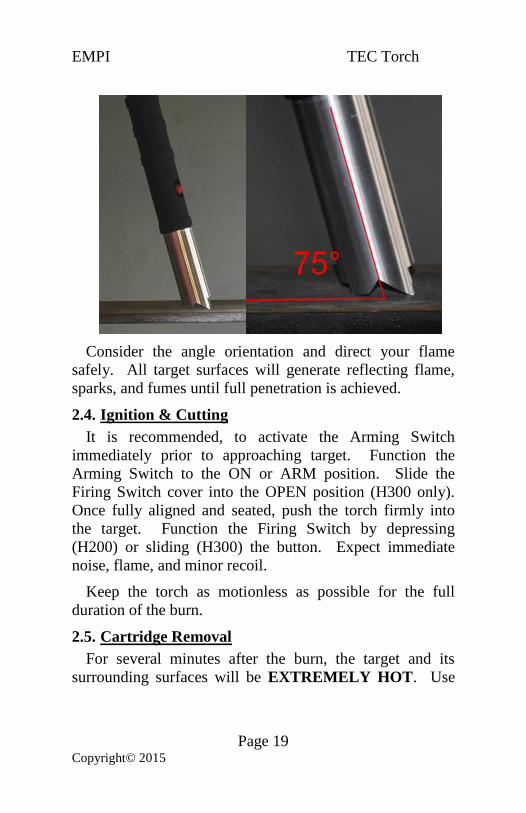
2.3. C211 Plate Target Alignment
The C211 is manufactured with a unique nozzle and four
pillars or tabs on the front of the cartridge. These features
are designed for optimal penetration of a ½” thick metal
plate. These features will help the user maintain an
optimized angle of 75° from the plate.
Bring the cartridge to the target plate, with all 4 pillars
contacting the plate. When positioned correctly, the
cartridge and handle should be 15° from perpendicular to
the plate.
EMPI TEC Torch
Page 19 Copyright© 2015
Consider the angle orientation and direct your flame
safely. All target surfaces will generate reflecting flame,
sparks, and fumes until full penetration is achieved.
2.4. Ignition & Cutting
It is recommended, to activate the Arming Switch
immediately prior to approaching target. Function the
Arming Switch to the ON or ARM position. Slide the
Firing Switch cover into the OPEN position (H300 only).
Once fully aligned and seated, push the torch firmly into
the target. Function the Firing Switch by depressing
(H200) or sliding (H300) the button. Expect immediate
noise, flame, and minor recoil.
Keep the torch as motionless as possible for the full
duration of the burn.
2.5. Cartridge Removal
For several minutes after the burn, the target and its
surrounding surfaces will be EXTREMELY HOT. Use
EMPI TEC Torch
Page 20 Copyright© 2015
appropriate tools (pliers, pry bars, etc) or adequate layered
heat resistant gloves to handle the target.
For several minutes after the burn, the cartridge shell will
be HOT. To remove the cartridge, pull the cartridge free
from the handle in reverse direction of the insertion. In
some instances, a slight rotation will aid in reducing the
pull force. It is recommended to grasp the cartridge near
the rear (closest to the handle) as this section will be cooler
temperature than the nozzle end.
*Separating the cartridge and the handle quickly after the
burn has extinguished will help prevent thermal damage to
the handle.
Section 3. Remote Operation
Never point the cartridge at anybody. Ensure that the
Claw mounted cartridges have not slid, rotated, or
detached prior to ignition.
Always ensure that the handle Arming Switch is in the
OFF/SAFE position when handling cartridges and
connecting command wires.
Always wear protective flame resistant clothing (gloves,
long sleeve shirt, pants, closed toe shoes, and hats) when
handling or operating the torch components.
Always wear safety glasses when handling or operating
torch components.
Never fire a cartridge without adequate restraint on the
cartridge and handle. The escaping torch flame will
EMPI TEC Torch
Page 21 Copyright© 2015
create a reaction force that may cause loss of control
resulting in severe injury or death.
Remote operation is possible for all cartridges. The Claw
Clip (Model CC-3) discussed below is designed ONLY for
attaching the C110 and C111 cartridges to rod and bar
targets. No products are currently available for mounting
plate penetrating cartridges.
3.1. Remote Clip Assembly
The Claw Clip consists of two parts:
1. Base: The Base (Red) is a plastic shell which is
secured to and around the outside of the cartridge.
The Base may come assembled or in two halves
that must be snapped together around the
cartridge before use. The Base assembly is
designed with external teeth to engage and lock
position with the Hook assembly.
2. Hook: The Hook (Gray) allows target rods and
bars to be captured pressed against the nozzle end
of the cartridge. The Hook will arrive fully
assembled.
To assemble a cartridge and Claw Clip assembly, remove
the front and rear shipping caps from the cartridge. If the
Base arrives assembled, pull the halves apart, make sure
not to break the snaps or latches. Place the cartridge into
one of the halves, making sure to align the v-shaped
alignment feature of the cartridge front with the clocking
feature of the Base.

EMPI TEC Torch
Page 22 Copyright© 2015
Install the second half of the Base and snap the two
halves together. There are three snaps along each side,
Clocking
feature Cartridge correctly
oriented in base.
V-shaped
alignment
feature

EMPI TEC Torch
Page 23 Copyright© 2015
work along each side to make sure each snap is fully
engaged. You will feel and/or hear the latch engage.
The assembled Claw Clip and cartridge are shown below.
By design, the Base can only move one direction in the
Hook. To function correctly, the nozzle end of the
Syringe
Tabs

EMPI TEC Torch
Page 24 Copyright© 2015
Base/cartridge assembly should be inserted into syringe tab
end of the Hook. The Base/cartridge can be pre-assembled
by sliding the Base into the Hook until several teeth are
engaged. This will lock the Base into the Hook and allow
for single handed operation.
NOTE: Once the cartridge has been installed in the
Base, it can no longer be used directly with the handle. The
Base will not allow the cartridge to fully seat in the handle
and electrical connection will not be made.
3.2. Target Attachment
To attach the Claw Clip, hold the assembly with the
electrical connector either in the palm of your hand or
against your thumb and extend your fingers over the
syringe features of the Hook. By holding the assembly in

EMPI TEC Torch
Page 25 Copyright© 2015
this manner, the claw clip can be functioned with a single
hand.
Approach the target rod and capture the target in the
Hook. The Claw Clip is not designed to be removed, so
before installing, the target and installation location should
be confirmed.
Secure the claw clip to the target rod by applying
pressure to the electrical connection with your palm/thumb
and using the syringe feature to maintain the target rod
capture in the Hook. Continue applying pressure until the
target is firmly clamped between the Hook and the
cartridge. If installed correctly the assembly should not
move up or down or rotate freely on the target. If there is
still movement between the assembly and target rod,
additional pressure should be applied.

EMPI TEC Torch
Page 26 Copyright© 2015
At this point, the cartridge should be adjusted and aimed
appropriately to minimize injury and property damage.
Once installed on a target, the Claw Clip cannot be
removed.
3.3. Wiring
Insert the plug end of the extension cable into the rear
end jack of the cartridge. Stretch the cable to a safe
distance. Keeping your thumb clear of the firing button,
plug the jack end of the cable into the handle and press
until fully seated.
When connecting multiple remote fire cartridges, you
must use a Splitter Pigtail cable. Current handle designs
will reliably operate up to four (4) cartridges
simultaneously. After mounting 2-4 cartridges using the
Claw Clip, install the plug ends of the Splitter into rear of
each. Then connect the single extension cable to the jack
end of the Splitter and step back to a safe distance.

EMPI TEC Torch
Page 27 Copyright© 2015
EMPI TEC Torch
Page 28 Copyright© 2015
3.4. Ignition & Cutting
Function the Arming Switch to the ON/ARM position.
Visually verify that all cartridges are intentionally aimed
and wiring is connected. Function the Firing Switch and
expect an immediate flame. In some instances, a 1 second
delay may occur when initiating multiple cartridges with
the splitter. To ensure proper ignition, continue to depress
the firing button until all cartridges have fired.
WARNING – During the burn, the cartridge may
release from the target as the target is damaged or cut.
This cartridge can emit hot flames and sparks in an
erratic motion causing injury, death or property
damage.
3.5. Cartridge Removal
After the burn is completed, approach the cartridges
cautiously. For several minutes after the burn, the target
and its surrounding surfaces will be EXTREMELY HOT.
Use appropriate tools (pliers, pry bars, etc) or adequate
layered heat resistant gloves to handle the target. For
several minutes after the burn, the cartridge shell and Claw
Clip will be HOT.
In some instances, the Claw Clip will be destroyed and
the cartridge may have fallen away from the target. In
some instances, the target will be cut but the two separate
pieces will be held in position by the Claw Clip. The Claw
Clip can be removed by simply extending the spring
mechanism freeing the target rod from the clamp notch.

EMPI TEC Torch
Page 29 Copyright© 2015
Section 4. Maintenance, Storage & Disposal
4.1. Handle Battery Installation / Replacement
Either battery configuration allows for the firing of at
least 100 cartridges. If the battery is damaged, corroded,
expired, or anticipated near the end of life, it should be
replaced.
For the H200:
Unscrew the rear of the handle until the cup section is
clear. Remove an existing battery by pushing from the
back side through the small opening. Insert a new battery
by first seating the non-terminal corner in the pocket near
the Firing Switch end. Then rock the terminal end into the
pocket until fully seated. The battery terminals should
make a good connection with the spring terminals of the
handle.
Note the polarity indicated on the handle. The Arming
Switch LED requires a certain specific polarity to function.
If the LED does not function, reverse the battery terminals.
For the H300:

EMPI TEC Torch
Page 30 Copyright© 2015
Unscrew the rear nut and pull the rear of the handle until
it releases from the main body. Remove the two CR123A
batteries; they should fall out freely once the rear has been
removed. Insert two new batteries into the main body
cavity. Note the polarity indicated on the handle; the
negative terminal must be downward in the cavity for
proper firing circuit function.
Reinstall the rear (the rear can only be installed in a
single orientation) to the main body and tighten the rear nut
to hand tight.
4.2. Storage and Transport
The C111 and C211 TEC torch cartridges are currently
classified by a Department of Transportation (DOT)
Interim Hazard Class (IHC) as 1.4G, UN0431, Articles
Pyrotechnic.
Cartridges must be stored and secured as regulated by
your local, state, federal, or prevailing authority. TEC
Torch devices should not be handled, possessed, or
operated by untrained personnel.

EMPI TEC Torch
Page 31 Copyright© 2015
Cartridges should only be transported and shipped in
accordance with 49CFR.
It is recommended that cartridges be stored in a rigid
sealed canister as offered by the manufacturer. The ideal
packaging will offer protection from exposure and
moisture. Packaging should also provide vibration
cushioning via individual foam, paper, or similar wrapping.
Cartridges should never be stored in metal containers.
Cartridges should never be stored near heat sources such
as large batteries, engines, etc.

EMPI TEC Torch
Page 32 Copyright© 2015
Cartridges should never be stored near flammable items
such as gasoline, propane, etc.
4.3. Disposal
When fully burned, cartridges are considered inert and no
longer a hazardous material. These can be disposed of in
accordance with local, state, and federal regulations.
Contact the OEM for options of returning fired cartridges
for recycling.
Unburned, damaged, or defective cartridges should be
destroyed prior to disposal. NO attempt should be made to
dissect or dismantle unburned cartridges due to the risk of
unintentional ignition causing injury or death. Destruction
of unburnt cartridges can be carried out by trained EOD
operatives following procedures of explosive residue
disposal. If EOD operatives are unavailable please consult
with the manufacturer or distributor before proceeding.
4.4. Troubleshooting
4.4.1. Cartridges will not Fire in handheld operation
• Verify that a good battery is installed in the Handle.
• Verify polarity of battery is correct.
• Verify that the handle plug is clear of debris and in
good condition.
• Verify that the cartridge rear jack is clear of debris
and in good condition.
• Ensure that the cartridge is fully seating into the
handle receptacle.

EMPI TEC Torch
Page 33 Copyright© 2015
If all of the above items are checked and unit won’t fire,
then try a different cartridge following the guidelines in
Section 2.
If the handle and cartridge still do not function, contact
the manufacturer.
4.4.2. Cartridges will not Fire in command line
operation
• Verify that a good battery is installed in the Handle.
• Verify polarity of battery is correct.
• Verify that the handle plug is clear of debris and in
good condition.
• Verify that each cartridge rear jack is clear of debris
and in good condition.
• Verify that all plug and jack linkages are clear of
debris and in good condition.
• Verify that all wiring is not cut, worn nor loose
from the plugs and jacks and those items are in
good condition.
• Ensure that all plug and jack connections are fully
seating.
• No more than four (4) cartridges can be fired by a
single handle. Currently, the Splitter Pigtail
configures cartridges in a parallel electrical circuit
such that one unit can function independently of
all others. For example, one may fire even if a
connection malfunction occurs in an adjacent
unit.

EMPI TEC Torch
Page 34 Copyright© 2015
• No more than 30ft of extension cable is being used.
If all of the above items are checked, and the system
still does not function, contact the manufacturer.
4.4.3. Cartridge will not seat into handle receptacle.
• Attempt to seat a different cartridge.
• If neither cartridge seats, then the Handle receptacle
or plug may be damaged or deformed. Contact
the manufacturer.
• If the second cartridge seats correctly, then the first
cartridge rear extension or rear jack may be
damaged or deformed. If only the rear extension
is damaged or burred, the unit can still be used
with a Claw Clip for remote usage according to
Section 3.
• If the cartridge is deemed unfit, contact the
manufacturer for return or disposal instructions.

EMPI TEC Torch
Page 35 Copyright© 2015
4.5. WARRANTY INFORMATION
EXPRESS LIMITED WARRANTY
Energetic Devices, LLC (the “manufacturer”) warrants
that the TEC Torch™ product (the “Product”) will be free
from significant defects in materials and workmanship
under normal use and service for a period of one year from
the date of purchase (the “Warranty Period”). This limited
warranty is non-transferrable and applies only to the
original purchaser of the Product. This limited warranty
also applies only when the Product is used in accordance
with this manual.
This limited warranty covers all defects encountered in
normal use and service but does not apply if: (1) the
Product is modified or tampered with or disassembled, (2)
the Product is damaged by an Act of God, misuse, abuse,
neglect, accident or mishandling, (3) the Product is not
stored, used or maintained in accordance with the
accompanying user documents, or (4) the serial number on
the Product is defaced, altered or removed.
Your exclusive remedy for breach of this limited
warranty during the Warranty Period shall be, at the option
of the manufacturer, the repair or replacement of the
Product. Warranty repair or replacement shall not exceed
the original Warranty Period.
All returns for warranty service will require an RMA
(Return Merchandise Authorization). To receive an RMA
for obtaining warranty services, you must call
512-380-1992.

EMPI TEC Torch
Page 36 Copyright© 2015
In addition, if the Product has not been registered, you
must submit proof of the date of original purchase such as a
copy of your dated invoice and must insure, pack and ship
the Product to an authorized service center in accordance
with manufacturer’s instructions within 7 days after your
receipt of an RMA. The packing must include your RMA.
RMA’s will not be extended or reissued.
WARRANTY LIMITATIONS AND RESTRICTIONS;
LIMITATIONS ON DAMAGES
• TO THE EXTENT PERMITTED BY APPLICABLE LAW, THE
EXPRESS LIMITED WARRANTY PROVIDED ABOVE AND
THE REMEDIES SET FORTH HEREIN ARE EXCLUSIVE AND
IN LIEU OF ALL OTHER WARRANTIES AND REMEDIES,
WHETHER ORAL OR WRITTEN, STATUTORY, EXPRESS OR
IMPLIED. NO ORAL OR WRITTEN REPRESENTATION
MADE BY EMPI OR ANY SELLER, RESELLER OR
DISTRIBUTOR OF THE PRODUCT, INCLUDING
EMPLOYEES AND AGENTS THEREOF, SHALL CREATE ANY
ADDITIONAL WARRANTY OBLIGATIONS, INCREASE THE
SCOPE, OR OTHERWISE MODIFY IN ANY MANNER THE
TERMS OF THIS LIMITED WARRANTY.
• TO THE EXTENT PERMITTED BY APPLICABLE LAW, EMPI
SPECIFICALLY DISCLAIMS ANY AND ALL STATUTORY OR
IMPLIED WARRANTIES, INCLUDING, WITHOUT
LIMITATION, WARRANTIES OF MERCHANTABILITY,
FITNESS FOR A PARTICULAR PURPOSE,
NONINFRINGEMENT AND ALL WARRANTIES AGAINST
HIDDEN OR LATENT DEFECTS. WHERE SUCH
STATUTORY OR IMPLIED WARRANTIES CANNOT
LAWFULLY BE DISCLAIMED, THEN TO THE EXTENT

EMPI TEC Torch
Page 37 Copyright© 2015
PERMITTED BY LAW, ALL SUCH WARRANTIES SHALL BE
LIMITED IN DURATION TO THE DURATION OF THE
EXPRESS LIMITED WARRANTY CONTAINED HEREIN, AND
THE REMEDIES OF REPAIR OR REPLACEMENT, AS
DETERMINED BY EMPI IN ITS SOLE DISCRETION, SHALL
BE THE EXCLUSIVE REMEDY OF THE PURCHASER OF THE
PRODUCT.
• TO THE EXTENT PERMITTED BY APPLICABLE LAW, IN NO
EVENT SHALL EMPI BE LIABLE, WHETHER IN CONTRACT,
TORT OR UNDER OTHER LEGAL THEORY (INCLUDING
NEGLIGENCE), FOR DAMAGES IN EXCESS OF THE
PURCHASE PRICE OF THE PRODUCT, OR FOR ANY
INDIRECT, INCIDENTAL, SPECIAL OR CONSEQUENTIAL
DAMAGES OF ANY KIND, OR LOSS OF REVENUE OR
PROFITS; LOSS OF BUSINESS; BUSINESS INTERRUPTION;
OR LOSS OF OPPORTUNITY.
• SOME STATUES OR JURISDICTIONS DO NOT ALLOW THE
LIMITATION OR EXCLUSION OF INCIDENTAL OR
CONSEQUENTIAL DAMAGES, OR THE EXCLUSION OR
LIMITATION ON THE LENGTH OF AN IMPLIED
WARRANTY, OR THE LIMITATION OR EXCLUSION OF
DAMAGES FOR PERSONAL INJURIES CAUSED BY
NEGLIGENCE, SO THE ABOVE LIMITATIONS OR
EXCLUSIONS MAY NOT APPLY TO YOU. THIS WARRANTY
GIVES YOU SPECIFIC LEGAL RIGHTS, AND YOU MAY
ALSO HAVE OTHER RIGHTS THAT VARY FROM STATE TO
STATE OR JURISDICTION TO JURISDICTION.