employee access - home / homepage screen. you may need to “jump to other systems” and select...
TRANSCRIPT

Employee Access Instruction Manual Page 1 of 35 July 2017
Employee Access Instruction Manual
Table of Contents
LOGIN .......................................................................................................... 2
CHANGE YOUR PASSWORD .................................................................... 6
PERSONAL INFORMATION – REQUEST ADDRESS & PHONE NUMBER
CHANGES ................................................................................................... 7
LONG DISTANCE CODE ............................................................................ 9
WEB POST DOCUMENTS .......................................................................... 9
PAYROLL .................................................................................................. 11
DIRECT DEPOSIT ..................................................................................... 13
W-2 FORMS (1095 Forms – similar process) ............................................ 13
ELECTRONIC W-2 OPTION (Option also available for 1095 Form) ......... 14
W-4 INFORMATION .................................................................................. 15
TRAVEL REIMBURSEMENTS .................................................................. 15
CALENDAR ............................................................................................... 16
TIME OFF .................................................................................................. 18
TIME OFF – LEAVE REQUEST ENTRY ................................................... 19
TIME OFF – LEAVE REQUEST – OUT OF LEAVE – DOCK PAY ............ 23
TIME OFF – LEAVE REQUEST ENTRY – COMP TIME ........................... 24
TIME OFF – LEAVE REQUEST ENTRY – DUAL POSITION ................... 27
TIME OFF – DONATED DAYS .................................................................. 28
TIME OFF – APPROVAL (Principals/Directors or Designees) .................. 29
TIME OFF – REVIEWER REPORTS (Principals/Directors or Designees) 30
E-MAIL NOTIFICATIONS – OUTLOOK FOLDER ..................................... 33
PRINTING .................................................................................................. 35
Employee Access Instruction Manual Page 2 of 35 July 2017
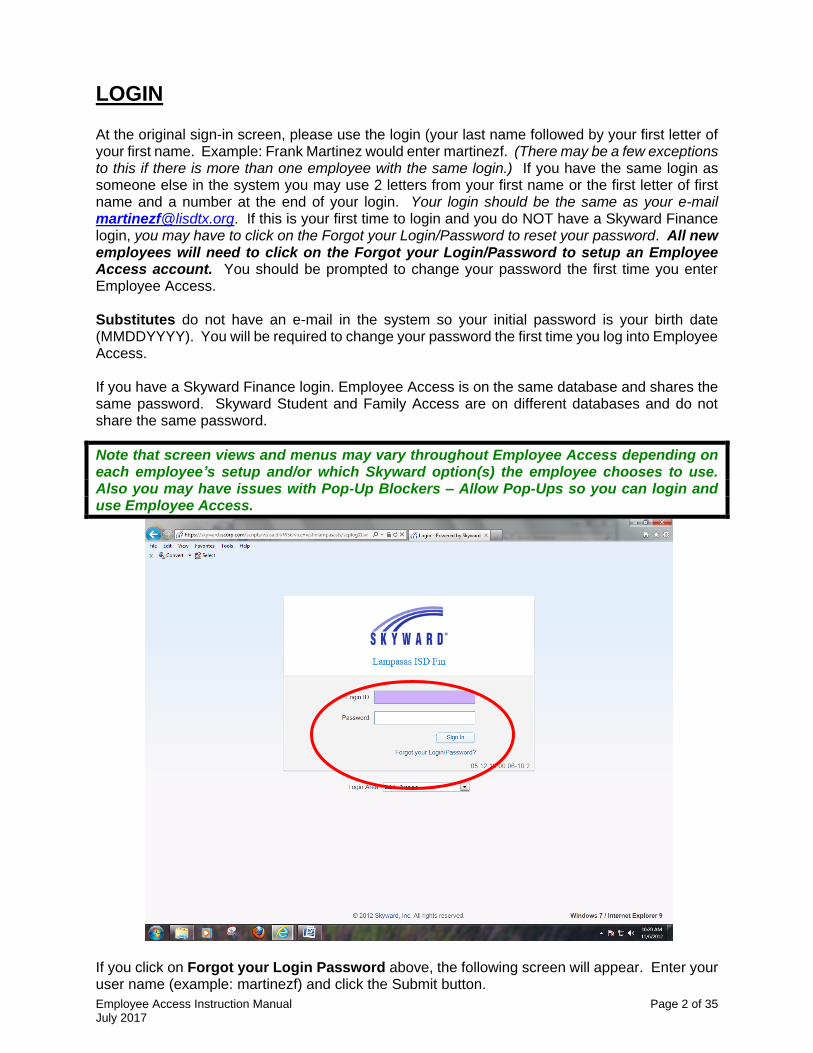
LOGIN At the original sign-in screen, please use the login (your last name followed by your first letter of your first name. Example: Frank Martinez would enter martinezf. (There may be a few exceptions to this if there is more than one employee with the same login.) If you have the same login as someone else in the system you may use 2 letters from your first name or the first letter of first name and a number at the end of your login. Your login should be the same as your e-mail [email protected]. If this is your first time to login and you do NOT have a Skyward Finance login, you may have to click on the Forgot your Login/Password to reset your password. All new employees will need to click on the Forgot your Login/Password to setup an Employee Access account. You should be prompted to change your password the first time you enter Employee Access. Substitutes do not have an e-mail in the system so your initial password is your birth date (MMDDYYYY). You will be required to change your password the first time you log into Employee Access. If you have a Skyward Finance login. Employee Access is on the same database and shares the same password. Skyward Student and Family Access are on different databases and do not share the same password.
Note that screen views and menus may vary throughout Employee Access depending on each employee’s setup and/or which Skyward option(s) the employee chooses to use. Also you may have issues with Pop-Up Blockers – Allow Pop-Ups so you can login and use Employee Access.
If you click on Forgot your Login Password above, the following screen will appear. Enter your user name (example: martinezf) and click the Submit button.
Employee Access Instruction Manual Page 3 of 35 July 2017
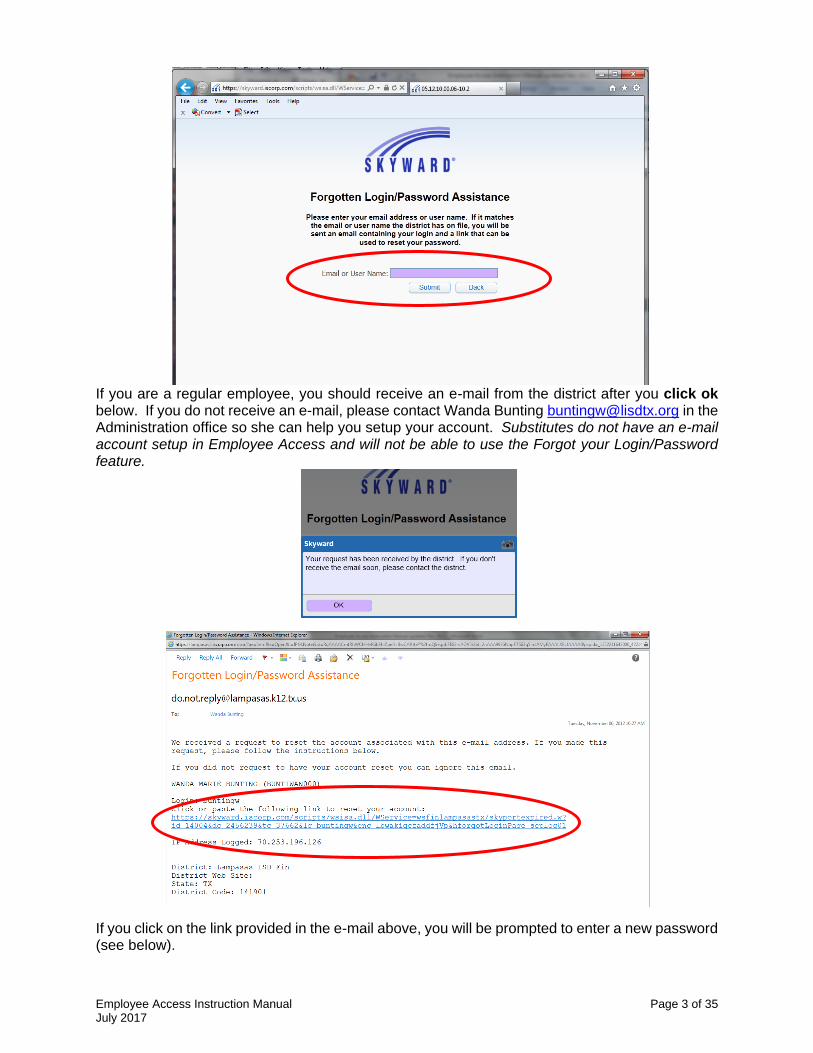
If you are a regular employee, you should receive an e-mail from the district after you click ok below. If you do not receive an e-mail, please contact Wanda Bunting [email protected] in the Administration office so she can help you setup your account. Substitutes do not have an e-mail account setup in Employee Access and will not be able to use the Forgot your Login/Password feature.
If you click on the link provided in the e-mail above, you will be prompted to enter a new password (see below).

Employee Access Instruction Manual Page 4 of 35 July 2017
Once you enter your new password and confirm your new password, click submit. Then click ok on the pop up window. You will have reset your password and will be directed back to the login screen.
Enter your Login ID (example: martinezf) and Password and click Sign In to enter Employee Access.
Be sure you are in Employee Access if you have more than one option at the top right side of your screen. You may need to “Jump to Other Systems” and select Employee Access.
XXXXXXXXX
XXXXX

Employee Access Instruction Manual Page 5 of 35 July 2017
Once in Employee Access, click on Employee Information to see additional menu options. The top row is your first menu. You can always click on Home to go back to the Home screen or you can click on Employee Information or Time Off.
XXXXXXXXX
XXXXX
XXXXXXXXX
XXXXX
Employee Access Instruction Manual Page 6 of 35 July 2017
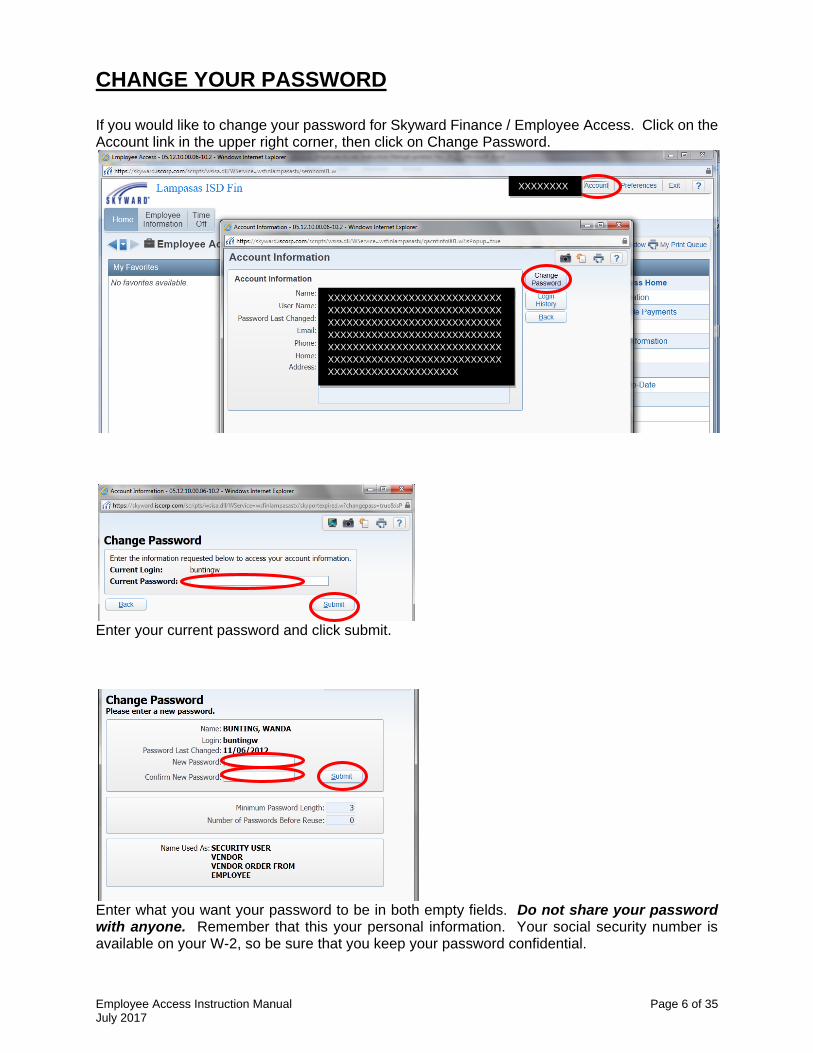
CHANGE YOUR PASSWORD
If you would like to change your password for Skyward Finance / Employee Access. Click on the Account link in the upper right corner, then click on Change Password.
Enter your current password and click submit.
Enter what you want your password to be in both empty fields. Do not share your password with anyone. Remember that this your personal information. Your social security number is available on your W-2, so be sure that you keep your password confidential.
XXXXXXXX
XXXXXX
XXXXXXXXXXXXXXXXXXXXXXXXXXXX
XXXXXXXXXXXXXXXXXXXXXXXXXXXX
XXXXXXXXXXXXXXXXXXXXXXXXXXXX
XXXXXXXXXXXXXXXXXXXXXXXXXXXX
XXXXXXXXXXXXXXXXXXXXXXXXXXXX
XXXXXXXXXXXXXXXXXXXXXXXXXXXX
XXXXXXXXXXXXXXXXXXXXX

Employee Access Instruction Manual Page 7 of 35 July 2017
PERSONAL INFORMATION – REQUEST ADDRESS & PHONE
NUMBER CHANGES
If you select Personal Information you will see information currently on file for you.
You will see your phone numbers on file, your address information. Just select what you would like to view. If you need to update your name, phone number, address you can click on Request Changes.
XXXXXXXXXXXX
XX
XXXXXX
XXXXXX
XXXXXXXX
XXXXXX
XXXXXXXX
XXXXXX
XXXXXXXXXXXX
XX

Employee Access Instruction Manual Page 8 of 35 July 2017
You may make changes to your Former Name, Spouse Name, Phone Numbers and Address. Once you make the changes, click Save. Your request will be sent to Human Resources automatically and will be reviewed and approved within a week of submission. You may also make changes to the Confidential flag (Yes or No). Just be aware Human Resources is testing this functionality. We are not sure what the confidentiality flag does when it comes to reports and inquiry functions.
Your change requests will be highlighted in red and once approved the red box will be removed.
XXXXXXXXXXXX
XX
XXXXXXXXXXXX
XX
XXXXXX
XXXXXX

Employee Access Instruction Manual Page 9 of 35 July 2017
LONG DISTANCE CODE
A four digit long distance code will be required for all long distance phone calls and fax transmittals. Please do NOT share your 4 digit code with anyone. Every employee will have a long distance code for work related use only. The employee handbook states that: School
telephones and fax machines are to be used for school business only. Personal long distance charges to the school are not allowed. If an employee makes a personal call or fax charged to the school, the employee will pay a $5.00 service fee plus the charge for each personal call or fax.
WEB POST DOCUMENTS
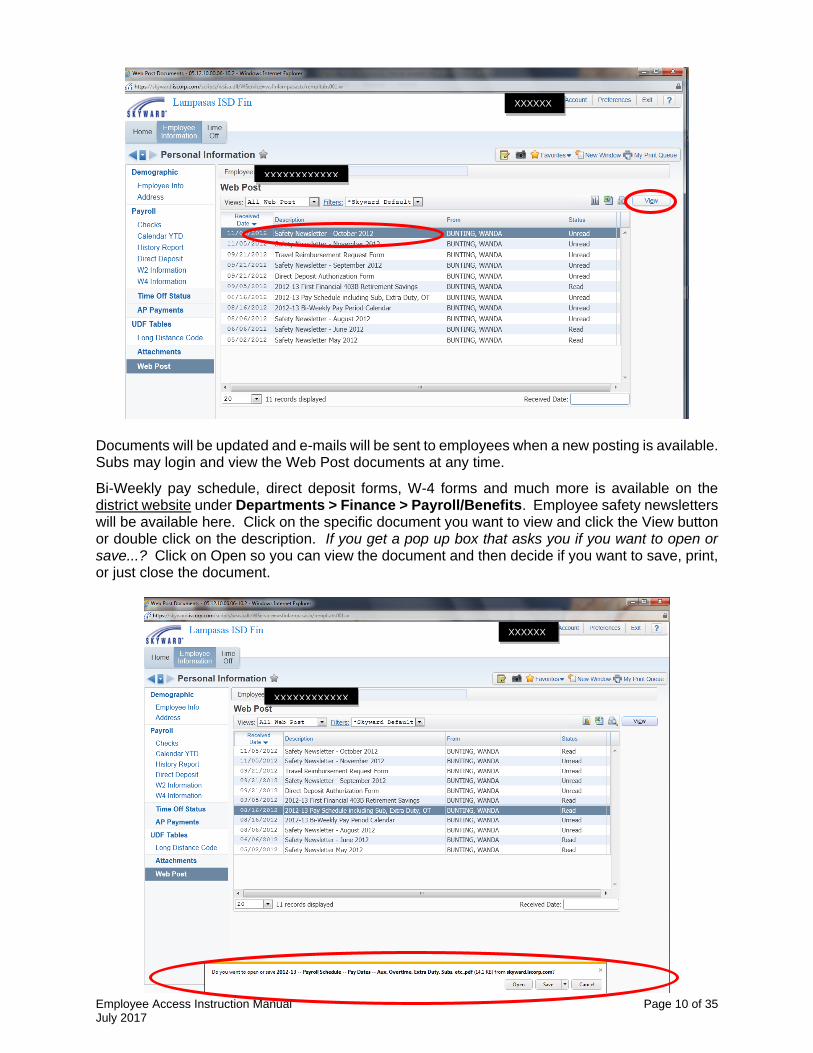
Documents available for you to view and/or print. Under Employee Information > Personal Information, click on Web Post.
XXXXXX
XXXXXX
XXXX
XXXXXX
XXXXXX
XXXXXXX
XXXXXXX
XXXXXXXXXXXXX
X
XXXXXX
XXXXXX
XXXXXXXXXX
XXXX
Employee Access Instruction Manual Page 10 of 35 July 2017
Documents will be updated and e-mails will be sent to employees when a new posting is available. Subs may login and view the Web Post documents at any time.
Bi-Weekly pay schedule, direct deposit forms, W-4 forms and much more is available on the district website under Departments > Finance > Payroll/Benefits. Employee safety newsletters will be available here. Click on the specific document you want to view and click the View button or double click on the description. If you get a pop up box that asks you if you want to open or save...? Click on Open so you can view the document and then decide if you want to save, print, or just close the document.
XXXXXXXXXXXX
XXXXXXXXXXXX
XXXXXX
XXXXXX
XXXXXX
XXXXXX

Employee Access Instruction Manual Page 11 of 35 July 2017
PAYROLL
Under Employee Information and Payroll you can view more detail payroll information. Check History, Calendar Year-to-Date information, Direct Deposit information, W-2 for prior years, 1095 forms, and your current W-4 information. If you click on Check History above, you will see your processed payroll checks.
You can drill down further into any check by clicking on the ‘>’ sign next to the date. You can also select ‘Show Check with YTD Amts’ to view a summary of your pay, deductions, and benefits. (This would be like a check stub for any particular payroll.) At any screen use the back button to go back to the previous screen or click on the Home button to get back to the main menu. If you want to look at a check stub from a payroll date in August 2010, you can click on the number of records displayed in the bottom left corner and increase the amount to see additional history.
XXXXXXX
XXXXXXX
XXXXXXX
XXXXXXX

Employee Access Instruction Manual Page 12 of 35 July 2017
Above is a check stub that you can print. This will have your current check information and your year-to-date information. If you click the Print button in the top right corner, you will run an actual report, if you need something official with social security number, the report may be your best bet (see below for options), otherwise you can just right click with your mouse and select print to print the current page.
XXXXXXXXX
XXXXX
XXXXXXXX
XXXXXX
XXXXXXXXX
XXXXX
XXXXXXXX
XXXXXX

Employee Access Instruction Manual Page 13 of 35 July 2017
DIRECT DEPOSIT
Direct deposit information will show what account(s) you currently have setup. The example above shows a deduction to a savings account and the net amount going to a checking account. You may choose to have your payroll check deposited into one account or multiple accounts. If you choose multiple accounts, you must set a flat amount (example: $100 to savings) to be setup as a deduction with any remaining amount being deposited into your account that is setup as the net account (example: checking). If you have any questions on your direct deposit or if you want to update your direct deposit information, please contact Payroll.
IMPORTANT NOTICE: If you change your direct deposit account number on file with the payroll office, you will receive one paper check in the transition period while the new bank account is sent a pre-note file to verify that the correct account and routing number of the bank process correctly. It could take up to two months (for monthly employees) to complete this process, so please verify with your bank that your initial deposit is received on pay day.
W-2 FORMS (1095 Forms – similar process)
W-2 information is under “How is my W-2 calculated”. If you select View W2 Form, your W-2 will display as shown below and you can print your W-2 and use it for tax purposes.
XXXXXXXX
XXXXXX
XXXXXXXXXXXXXX
XXXXXXXX
XXXXXX
XXXXXXXXXXXXXX
XXX
XXX
XXX
XXX
XXX
XXX

Employee Access Instruction Manual Page 14 of 35 July 2017
ELECTRONIC W-2 OPTION (Option also available for 1095
Form)
Each year, you will have the option to receive your W-2 electronically. When you log into Employee Access, the window will appear for you to choose if you would like to receive an electronic W-2. (This option will be available from mid October through December each year.) You may choose to receive an electronic W-2 as shown below or you may choose to receive a paper copy, or you may request the system to ask you again later. If you select ‘ask me again later’, the option will be available each time you log into Employee Access through December 31st. If you do not make a choice by December 31st, you will automatically receive a printed W-2 from the Payroll office on or before January 31st. Be sure to save your selection.
If you change your mind after you made your selection above there is a way to change your
decision by going to Employee Information > W2 Information.
Select the Options for Receiving My 20XX W2 Electronically.
XXXXXXXX
XXXXXX
XXXXXXXX
XXXXXX
Employee Access Instruction Manual Page 15 of 35 July 2017
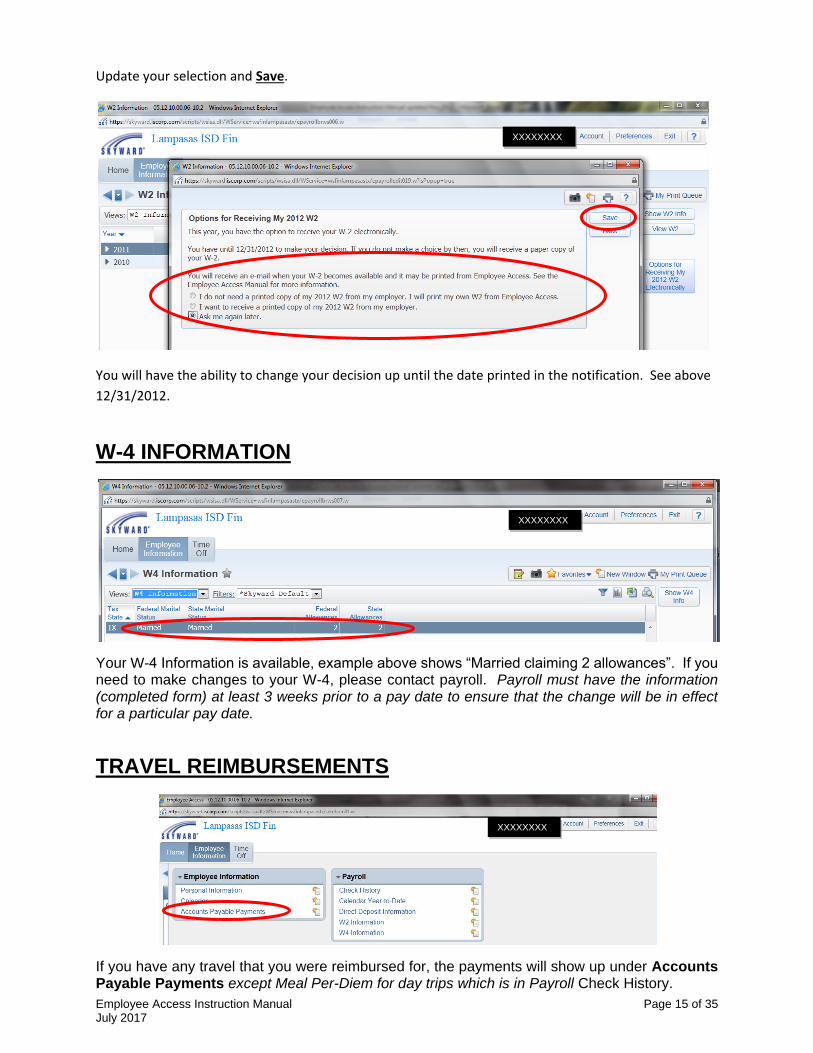
Update your selection and Save.
You will have the ability to change your decision up until the date printed in the notification. See above
12/31/2012.
W-4 INFORMATION
Your W-4 Information is available, example above shows “Married claiming 2 allowances”. If you need to make changes to your W-4, please contact payroll. Payroll must have the information (completed form) at least 3 weeks prior to a pay date to ensure that the change will be in effect for a particular pay date.
TRAVEL REIMBURSEMENTS
If you have any travel that you were reimbursed for, the payments will show up under Accounts Payable Payments except Meal Per-Diem for day trips which is in Payroll Check History.
XXXXXXXX
XXXXXX
XXXXXXXX
XXXXXX
XXXXXXXX
XXXXXX
Employee Access Instruction Manual Page 16 of 35 July 2017
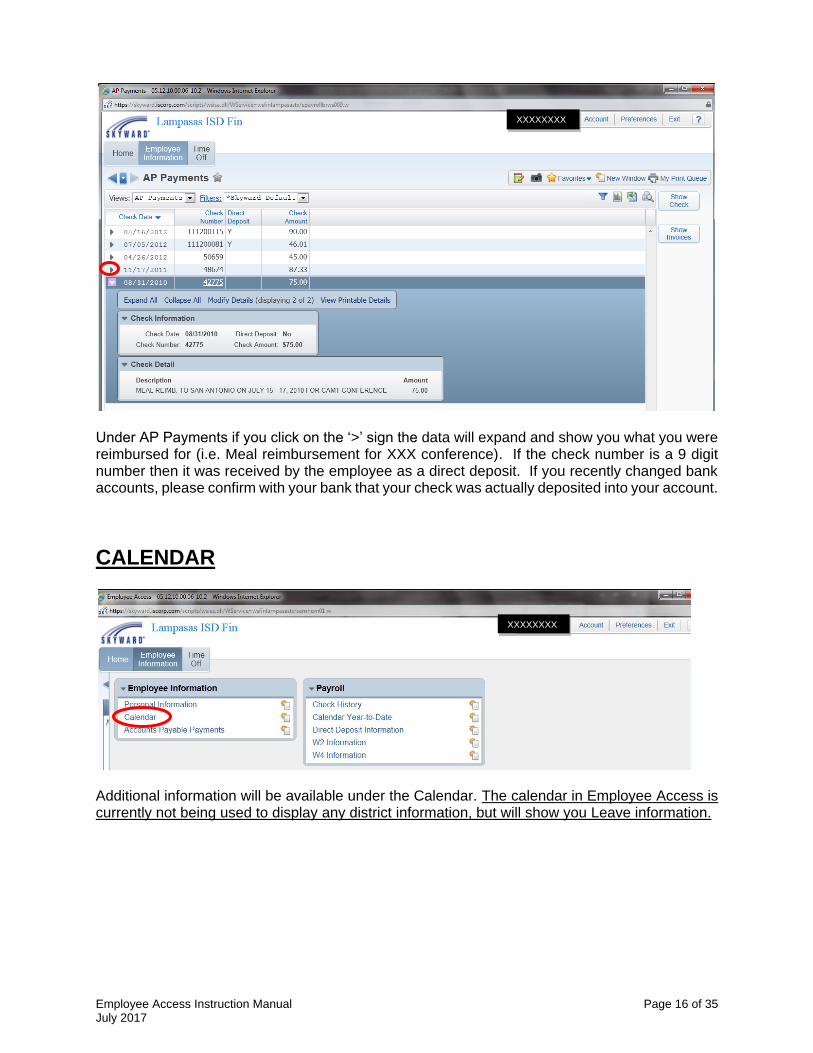
Under AP Payments if you click on the ‘>’ sign the data will expand and show you what you were reimbursed for (i.e. Meal reimbursement for XXX conference). If the check number is a 9 digit number then it was received by the employee as a direct deposit. If you recently changed bank accounts, please confirm with your bank that your check was actually deposited into your account.
CALENDAR
Additional information will be available under the Calendar. The calendar in Employee Access is currently not being used to display any district information, but will show you Leave information.
XXXXXXXX
XXXXXX
XXXXXXXX
Employee Access Instruction Manual Page 17 of 35 July 2017
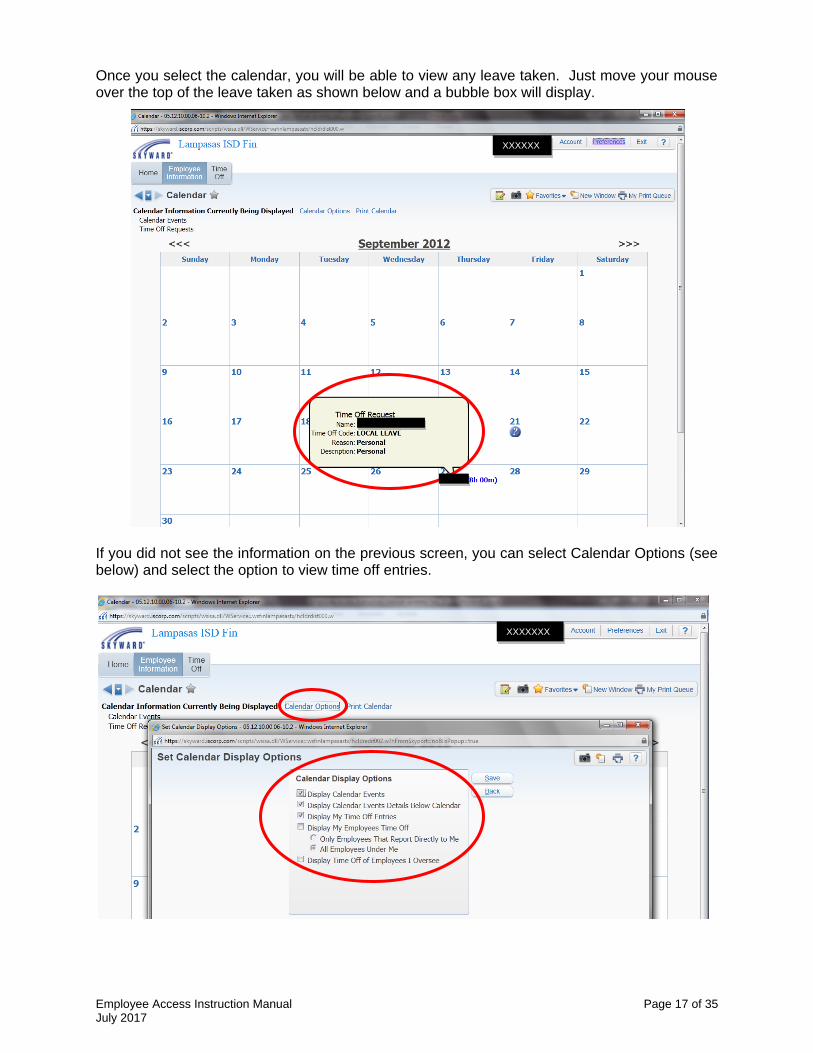
Once you select the calendar, you will be able to view any leave taken. Just move your mouse over the top of the leave taken as shown below and a bubble box will display.
If you did not see the information on the previous screen, you can select Calendar Options (see below) and select the option to view time off entries.
XXXXXX
XXXXXX
XXXXXXXXXX
XXXXXXX
XXXXXXX
XX

Employee Access Instruction Manual Page 18 of 35 July 2017
TIME OFF
Select Time Off and then My Status to see your various time off categories like State Leave; Local Leave; Vacation (if you are a 260 day contract employee); Non-Duty Leave (if you are a 222, 227 or 230 day contract employee), etc.
The summary will show how many days you have remaining/available to be used. You can accumulate up to 30 Local Days before you will have to use them or be paid for them at the daily rate established by the School Board. State Leave does not expire and does not have a maximum number of days that may be carried forward from one year to the next. If you have State Sick Leave Day(s) earned before 1995-96 school year, you will need to use those for sick leave only. Keep in mind that if you have Vacation Days and/or Non Duty Days that they expire annually.
Vacation Days expire on July 31st of each year.
Non Duty Days expire on December 31st of each year. Excused Leave is like a planning/workshop/training day/event with students. These days are in Employee Access for information/reporting purposes only and will carry negative balances. Please see the Employee Handbook for more information.
XXXXXXXX
XXXXXX
XXXXXXXX
XXXXXX
Employee Access Instruction Manual Page 19 of 35 July 2017
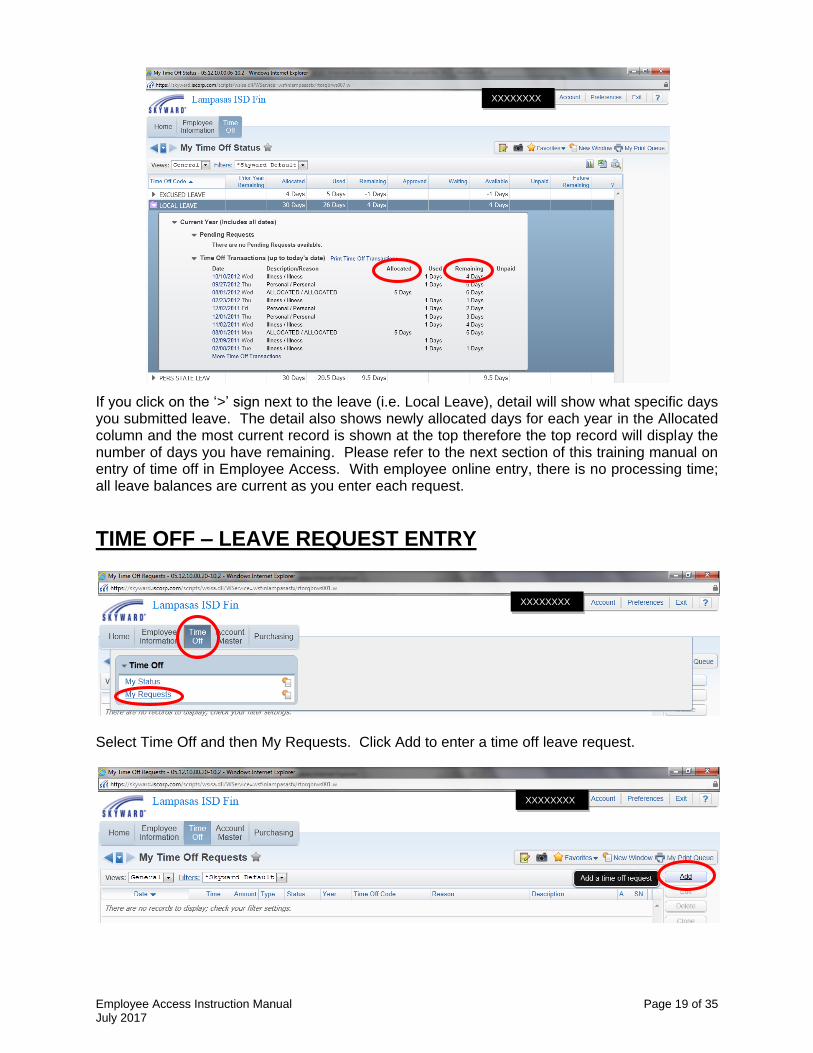
If you click on the ‘>’ sign next to the leave (i.e. Local Leave), detail will show what specific days you submitted leave. The detail also shows newly allocated days for each year in the Allocated column and the most current record is shown at the top therefore the top record will display the number of days you have remaining. Please refer to the next section of this training manual on entry of time off in Employee Access. With employee online entry, there is no processing time; all leave balances are current as you enter each request.
TIME OFF – LEAVE REQUEST ENTRY
Select Time Off and then My Requests. Click Add to enter a time off leave request.
XXXXXXXX
XXXXXX
XXXXXXXX
XXXXXX
XXXXXXXX
XXXXXX

Employee Access Instruction Manual Page 20 of 35 July 2017
When submitting your time off request, you will see your available balances in the ‘Available’
column at the top of the screen. If you have any pending requests that have not been approved,
you will see those in the ‘Waiting’ column. If the request is for a future date, see future columns.
When entering your time off request, be sure to complete all required fields. Select 1) time off
code 2) reason code 3) update description as necessary. If off one day or ½ day leave 4) ‘single
day’ must be marked. 5) Enter 1.0 for a full day or 0.50 for a half day in the Days field. If a full
day, there is no need to update the start time. If only using a ½ day (0.50), then update the 6)
‘start time.’ If you are taking off the afternoon and your afternoon starts at 11:30am, please
change the time to 11:30am to identify that you will be off for the afternoon. Be sure to 7) check
the box next to ‘Sub Needed’ if your position requires a sub in your absence. If you need to notify
someone that you will be out of the office, add their name in the 8) Select Additional Employees
box. Your campus/department will automatically be notified of your submission. Example: An
LVN at a campus may use this feature so that an e-mail will be sent to the campus
principal/designee in addition to the automatic email that will be sent to the district nurse. 9) Be
sure to click the Save button when entry is complete. An e-mail will automatically generate for
the campus principal / department director or their designee.
Employee Access Instruction Manual Page 21 of 35 July 2017
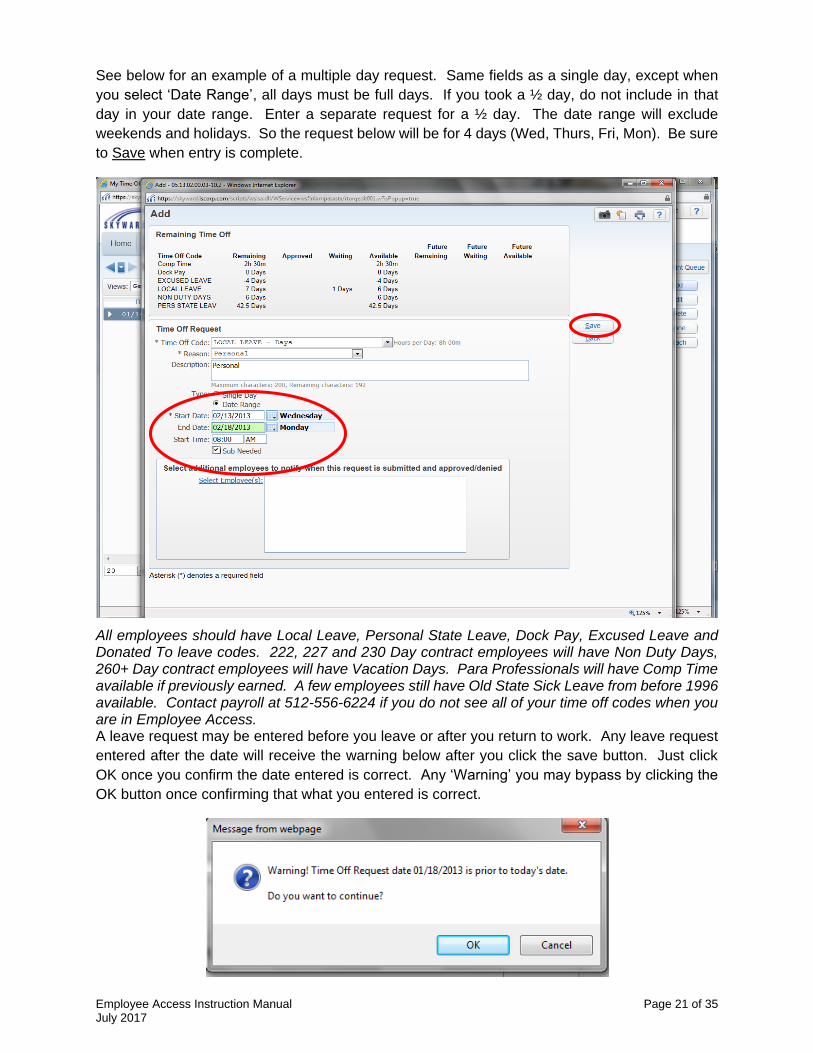
See below for an example of a multiple day request. Same fields as a single day, except when
you select ‘Date Range’, all days must be full days. If you took a ½ day, do not include in that
day in your date range. Enter a separate request for a ½ day. The date range will exclude
weekends and holidays. So the request below will be for 4 days (Wed, Thurs, Fri, Mon). Be sure
to Save when entry is complete.
All employees should have Local Leave, Personal State Leave, Dock Pay, Excused Leave and Donated To leave codes. 222, 227 and 230 Day contract employees will have Non Duty Days, 260+ Day contract employees will have Vacation Days. Para Professionals will have Comp Time available if previously earned. A few employees still have Old State Sick Leave from before 1996 available. Contact payroll at 512-556-6224 if you do not see all of your time off codes when you are in Employee Access. A leave request may be entered before you leave or after you return to work. Any leave request
entered after the date will receive the warning below after you click the save button. Just click
OK once you confirm the date entered is correct. Any ‘Warning’ you may bypass by clicking the
OK button once confirming that what you entered is correct.

Employee Access Instruction Manual Page 22 of 35 July 2017
Beware of an error message, like one below that states you do not have enough leave available.
This request cannot be submitted. You will need to update your request to use a different time
off code. If necessary, enter two time off requests to use different time off codes. If you are out
of leave, you will have to use the Dock time off code.
At any time after entering your time off request, you can go to ‘My Status’ and you will see that
your request is waiting for approval.
Even though your request is waiting for approval, it does remove the requested day from the
available column so your available balance displayed is assuming that your request is approved.
If it is denied, the available balance will be increased back as though you did not request the
leave.
XXXXXXXX
XXXXXX
XXXXXXXX
XXXXXX
Employee Access Instruction Manual Page 23 of 35 July 2017
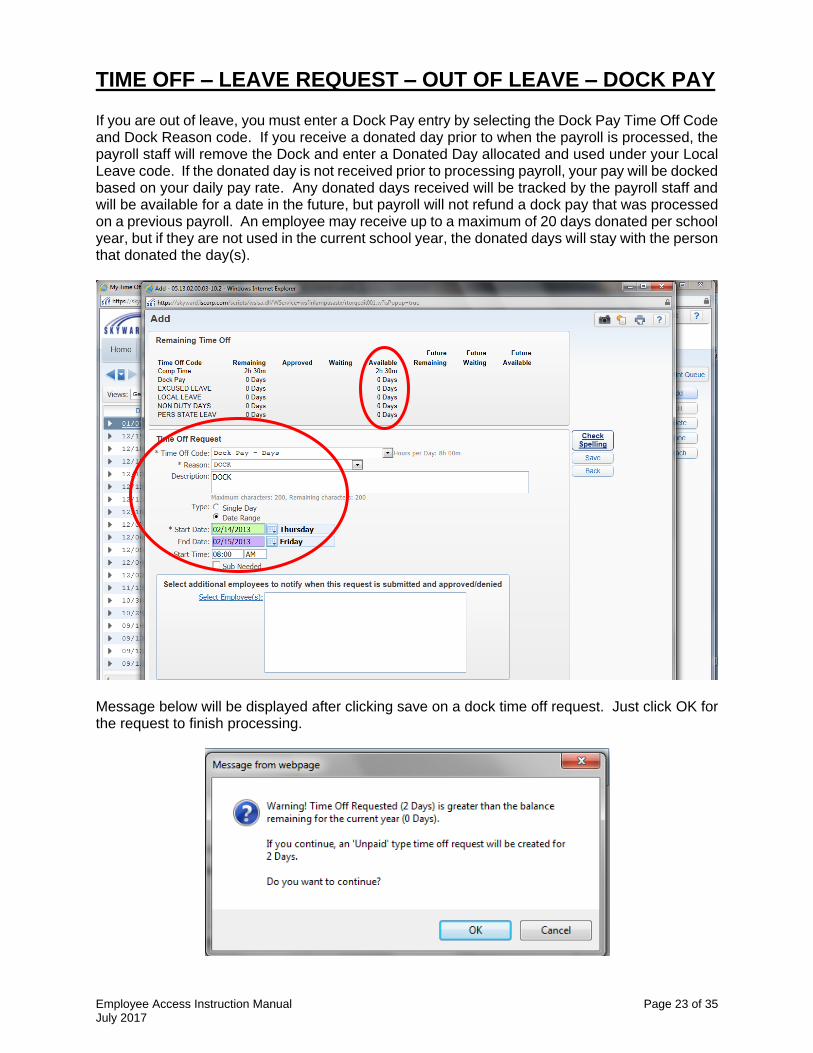
TIME OFF – LEAVE REQUEST – OUT OF LEAVE – DOCK PAY If you are out of leave, you must enter a Dock Pay entry by selecting the Dock Pay Time Off Code and Dock Reason code. If you receive a donated day prior to when the payroll is processed, the payroll staff will remove the Dock and enter a Donated Day allocated and used under your Local Leave code. If the donated day is not received prior to processing payroll, your pay will be docked based on your daily pay rate. Any donated days received will be tracked by the payroll staff and will be available for a date in the future, but payroll will not refund a dock pay that was processed on a previous payroll. An employee may receive up to a maximum of 20 days donated per school year, but if they are not used in the current school year, the donated days will stay with the person that donated the day(s).
Message below will be displayed after clicking save on a dock time off request. Just click OK for the request to finish processing.
Employee Access Instruction Manual Page 24 of 35 July 2017
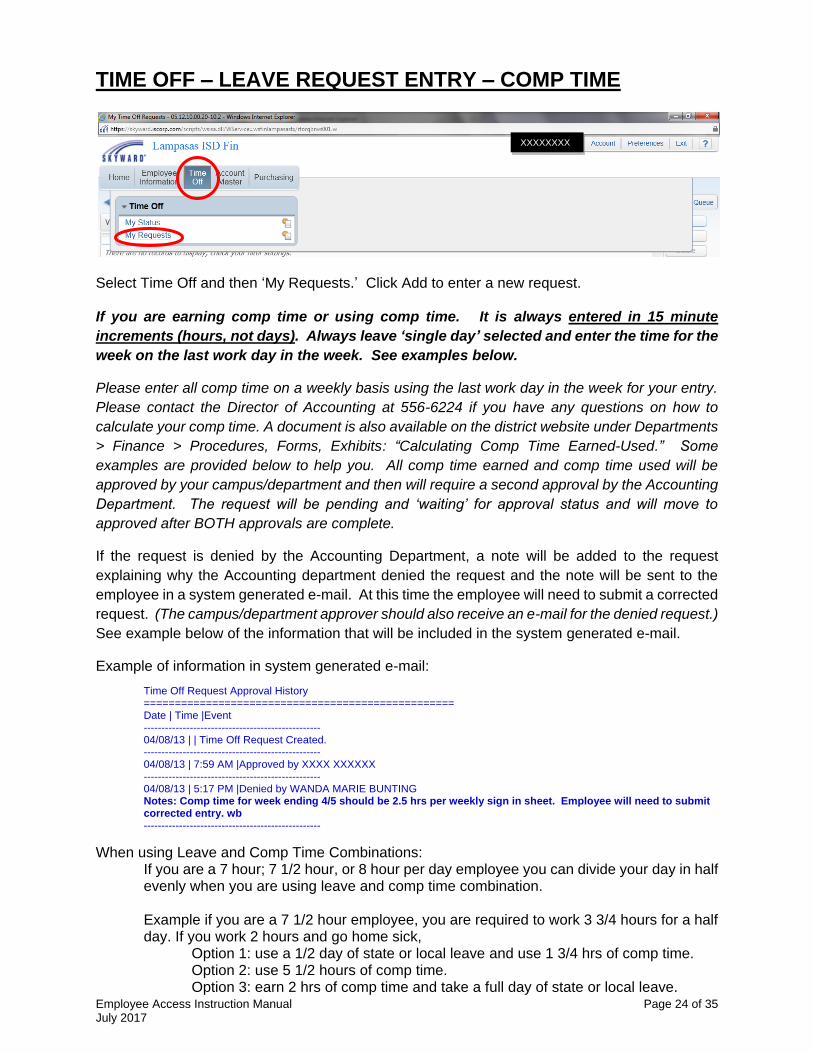
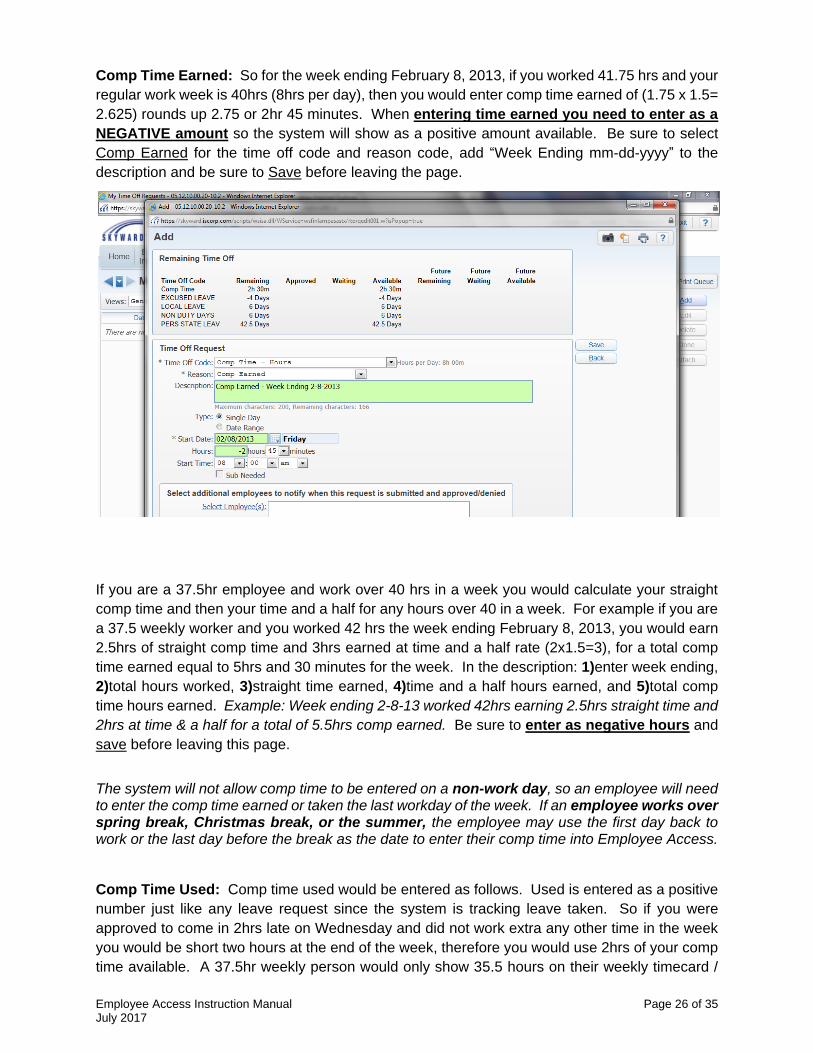
TIME OFF – LEAVE REQUEST ENTRY – COMP TIME
Select Time Off and then ‘My Requests.’ Click Add to enter a new request. If you are earning comp time or using comp time. It is always entered in 15 minute
increments (hours, not days). Always leave ‘single day’ selected and enter the time for the
week on the last work day in the week. See examples below.
Please enter all comp time on a weekly basis using the last work day in the week for your entry.
Please contact the Director of Accounting at 556-6224 if you have any questions on how to
calculate your comp time. A document is also available on the district website under Departments
> Finance > Procedures, Forms, Exhibits: “Calculating Comp Time Earned-Used.” Some
examples are provided below to help you. All comp time earned and comp time used will be
approved by your campus/department and then will require a second approval by the Accounting
Department. The request will be pending and ‘waiting’ for approval status and will move to
approved after BOTH approvals are complete.
If the request is denied by the Accounting Department, a note will be added to the request
explaining why the Accounting department denied the request and the note will be sent to the
employee in a system generated e-mail. At this time the employee will need to submit a corrected
request. (The campus/department approver should also receive an e-mail for the denied request.)
See example below of the information that will be included in the system generated e-mail.
Example of information in system generated e-mail:
Time Off Request Approval History ================================================== Date | Time |Event -------------------------------------------------- 04/08/13 | | Time Off Request Created. -------------------------------------------------- 04/08/13 | 7:59 AM |Approved by XXXX XXXXXX -------------------------------------------------- 04/08/13 | 5:17 PM |Denied by WANDA MARIE BUNTING Notes: Comp time for week ending 4/5 should be 2.5 hrs per weekly sign in sheet. Employee will need to submit corrected entry. wb --------------------------------------------------
When using Leave and Comp Time Combinations: If you are a 7 hour; 7 1/2 hour, or 8 hour per day employee you can divide your day in half evenly when you are using leave and comp time combination. Example if you are a 7 1/2 hour employee, you are required to work 3 3/4 hours for a half day. If you work 2 hours and go home sick,
Option 1: use a 1/2 day of state or local leave and use 1 3/4 hrs of comp time. Option 2: use 5 1/2 hours of comp time. Option 3: earn 2 hrs of comp time and take a full day of state or local leave.
XXXXXXXX
XXXXXX
Employee Access Instruction Manual Page 25 of 35 July 2017
Below are additional examples of calculating comp time earned:
1) A 37.5 hour a week employee worked 10.25 hours on Monday to prepare for a district wide training and worked 7.5 hours for the remaining of the work week. This resulted in a 40.25 hour work week with 2.5 hour of straight comp time earned and .25 hour earned at time and a half (.25x1.5=.375 which rounds up to .5 or 30min) for a total of 3hrs comp earned. You must round up when calculating the time and a half on your total weekly hours. Please keep all comp time in quarter hour increments. (15 min, 30min, 45 min)
2) A 37.5 hour a week employee works 7.5 hours every day through Thursday and on Friday, the employee works 10 hours. The total hours worked is 40. The employee would earn 2.5 hours of straight comp time for the extra time worked up to 40 hours.
Reminders
All Non-Exempt Employees* MUST report all time worked on their weekly sign in
sheets / timecards which are signed by the employee.
Time worked includes all before and after school meetings, parent nights, etc. A non-exempt employee of the district can not volunteer to help with a parent night, work through lunch, take work home, etc. During lunch time, the employee must be completely relieved from their duty for at least 30 minutes or they must be compensated for the time. If an employee meets at 6:30am to leave for a conference, their travel time should be documented on their weekly sign in sheet / timecard. The employee must be compensated for all time worked including travel time to and from a work event.
All Non-Exempt Employees MUST receive approval from their Campus Principal /
Department Director before working any extra time.
*Non-Exempt Employees include all employees that are required to sign-in and sign-out on a timecard or weekly sign-in sheet. All extra time worked by Non-Exempt Employees, must be reported as Comp Time Earned. Auxiliary staff earn overtime for any extra hours worked, therefore they do not earn any Comp Time.
Employee Access Instruction Manual Page 26 of 35 July 2017
Comp Time Earned: So for the week ending February 8, 2013, if you worked 41.75 hrs and your
regular work week is 40hrs (8hrs per day), then you would enter comp time earned of (1.75 x 1.5=
2.625) rounds up 2.75 or 2hr 45 minutes. When entering time earned you need to enter as a
NEGATIVE amount so the system will show as a positive amount available. Be sure to select
Comp Earned for the time off code and reason code, add “Week Ending mm-dd-yyyy” to the
description and be sure to Save before leaving the page.
If you are a 37.5hr employee and work over 40 hrs in a week you would calculate your straight
comp time and then your time and a half for any hours over 40 in a week. For example if you are
a 37.5 weekly worker and you worked 42 hrs the week ending February 8, 2013, you would earn
2.5hrs of straight comp time and 3hrs earned at time and a half rate (2x1.5=3), for a total comp
time earned equal to 5hrs and 30 minutes for the week. In the description: 1)enter week ending,
2)total hours worked, 3)straight time earned, 4)time and a half hours earned, and 5)total comp
time hours earned. Example: Week ending 2-8-13 worked 42hrs earning 2.5hrs straight time and
2hrs at time & a half for a total of 5.5hrs comp earned. Be sure to enter as negative hours and
save before leaving this page.
The system will not allow comp time to be entered on a non-work day, so an employee will need to enter the comp time earned or taken the last workday of the week. If an employee works over spring break, Christmas break, or the summer, the employee may use the first day back to work or the last day before the break as the date to enter their comp time into Employee Access. Comp Time Used: Comp time used would be entered as follows. Used is entered as a positive
number just like any leave request since the system is tracking leave taken. So if you were
approved to come in 2hrs late on Wednesday and did not work extra any other time in the week
you would be short two hours at the end of the week, therefore you would use 2hrs of your comp
time available. A 37.5hr weekly person would only show 35.5 hours on their weekly timecard /
Employee Access Instruction Manual Page 27 of 35 July 2017
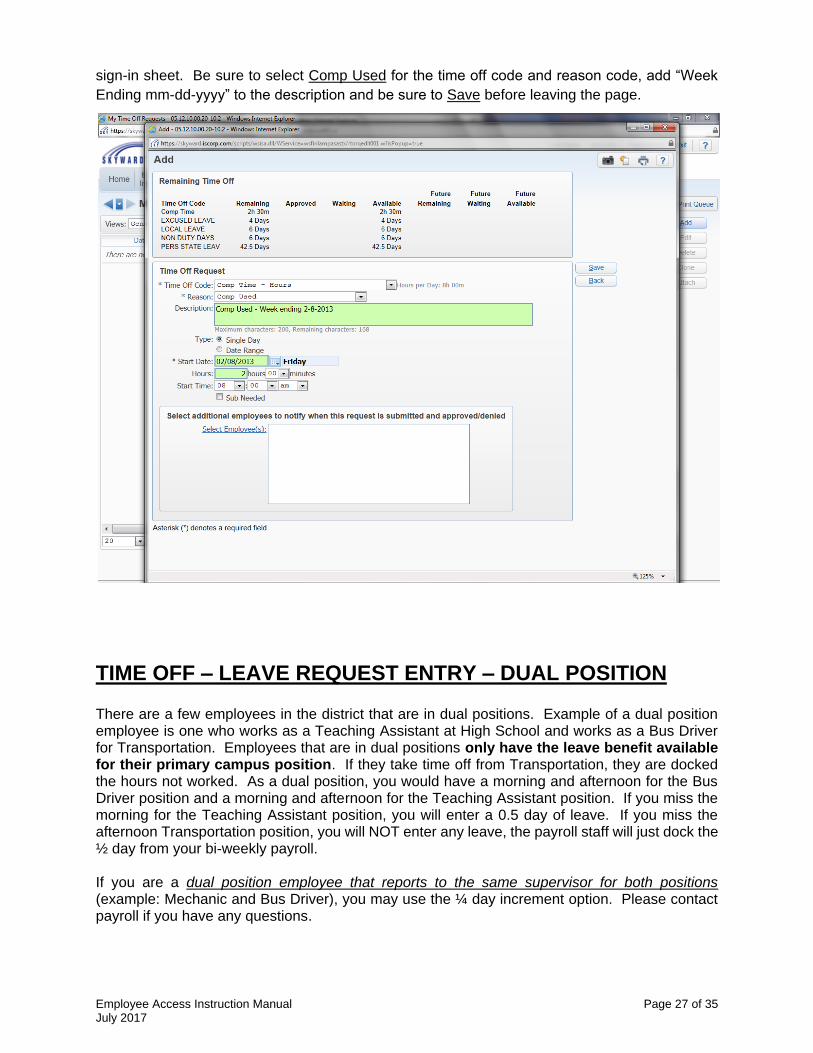
sign-in sheet. Be sure to select Comp Used for the time off code and reason code, add “Week
Ending mm-dd-yyyy” to the description and be sure to Save before leaving the page.
TIME OFF – LEAVE REQUEST ENTRY – DUAL POSITION There are a few employees in the district that are in dual positions. Example of a dual position employee is one who works as a Teaching Assistant at High School and works as a Bus Driver for Transportation. Employees that are in dual positions only have the leave benefit available for their primary campus position. If they take time off from Transportation, they are docked the hours not worked. As a dual position, you would have a morning and afternoon for the Bus Driver position and a morning and afternoon for the Teaching Assistant position. If you miss the morning for the Teaching Assistant position, you will enter a 0.5 day of leave. If you miss the afternoon Transportation position, you will NOT enter any leave, the payroll staff will just dock the ½ day from your bi-weekly payroll. If you are a dual position employee that reports to the same supervisor for both positions (example: Mechanic and Bus Driver), you may use the ¼ day increment option. Please contact payroll if you have any questions.

Employee Access Instruction Manual Page 28 of 35 July 2017
TIME OFF – DONATED DAYS If you would like to donate a day to another employee, you must enter a Donated To entry by
selecting the Donated To Time Off Code and Donated To Reason code. Please use the Current
Date “Today”. Add the employee name that you are donating to in the description. If a name
is not included in the description field and/or you do not have the Local Days available, the leave
request will be declined. Payroll staff will approve or decline your request and make adjustments
to your Local Leave when the Donated day is used. Donated Days will not be deducted from your
Local Days until the employee that you are “donating to” needs to use the donated day.
You can only donate 5 local leave days per school year (August through July). You can accumulate up to 30 Local Days before you will have to use them or be paid for them at the daily rate established by the School Board. If you use your Local Leave before the employee needs to use the Donated day, your “donated to” request will be deleted. Essentially whoever needs the Local Leave day first will be able to use the day. An employee must have used all their leave before they can receive any Donated days. An employee that receives Donated days, will be required to enter a Dock Leave. See Dock Pay on previous pages.
You must include the
employee’s name here.
Employee Access Instruction Manual Page 29 of 35 July 2017
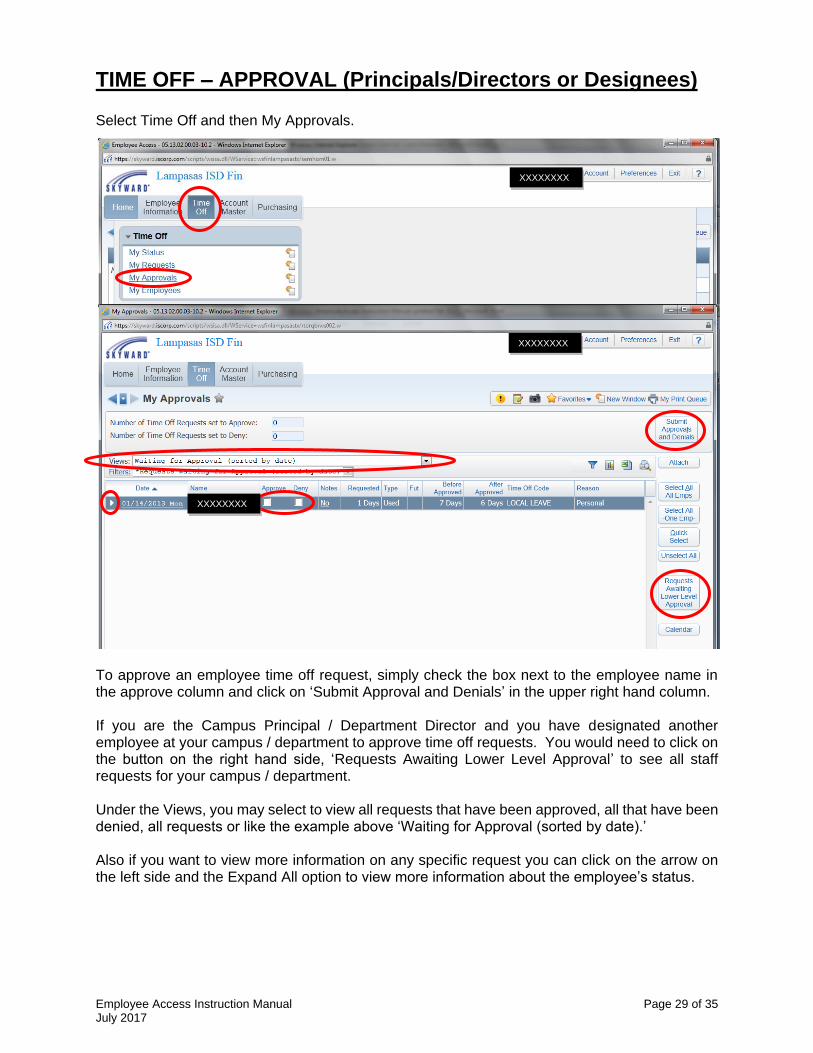
TIME OFF – APPROVAL (Principals/Directors or Designees) Select Time Off and then My Approvals.
To approve an employee time off request, simply check the box next to the employee name in the approve column and click on ‘Submit Approval and Denials’ in the upper right hand column. If you are the Campus Principal / Department Director and you have designated another employee at your campus / department to approve time off requests. You would need to click on the button on the right hand side, ‘Requests Awaiting Lower Level Approval’ to see all staff requests for your campus / department. Under the Views, you may select to view all requests that have been approved, all that have been denied, all requests or like the example above ‘Waiting for Approval (sorted by date).’ Also if you want to view more information on any specific request you can click on the arrow on the left side and the Expand All option to view more information about the employee’s status.
XXXXXXXX
XXXXXX
XXXXXXXX
XXXXXX
XXXXXXXX
XXXXXX
Employee Access Instruction Manual Page 30 of 35 July 2017
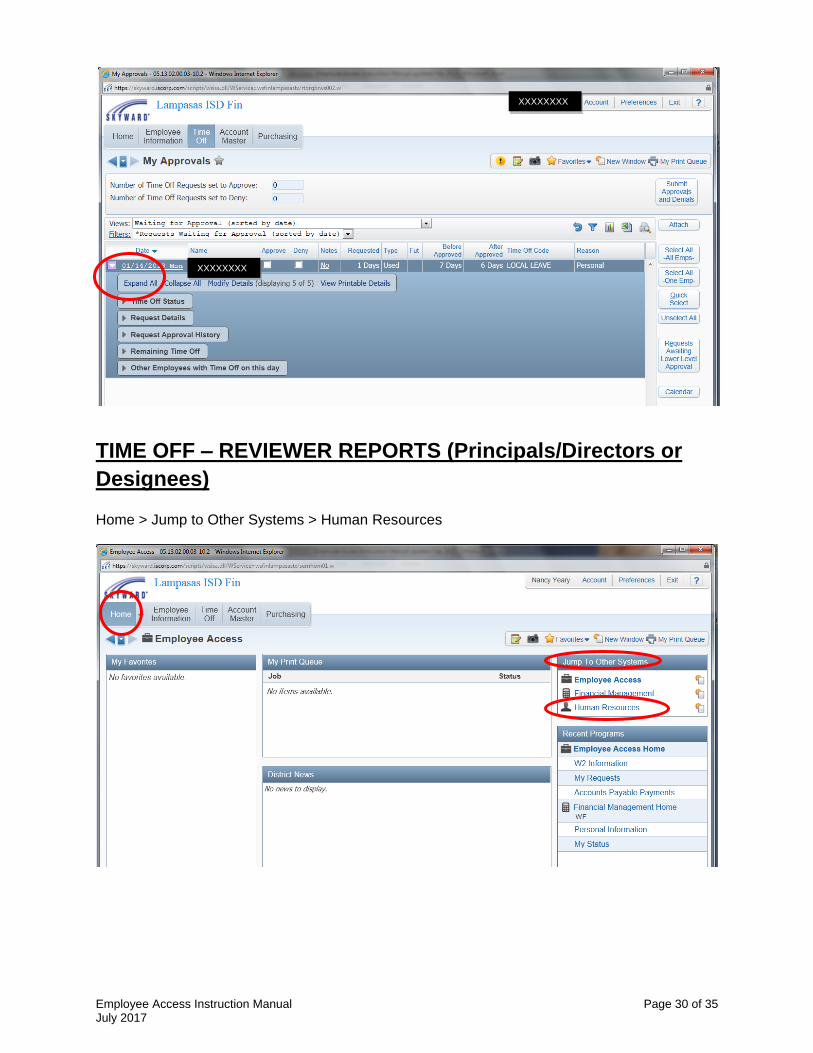
TIME OFF – REVIEWER REPORTS (Principals/Directors or
Designees) Home > Jump to Other Systems > Human Resources
XXXXXXXX
XXXXXX
XXXXXXXX
XXXXXX
Employee Access Instruction Manual Page 31 of 35 July 2017
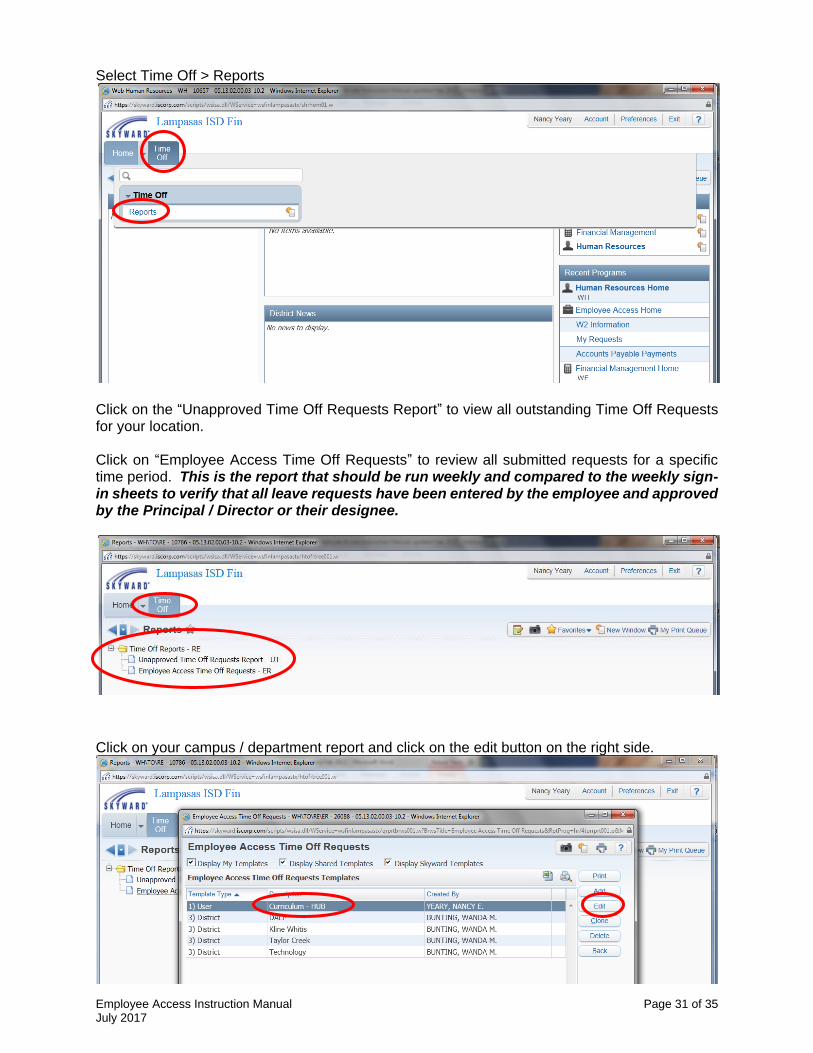
Select Time Off > Reports
Click on the “Unapproved Time Off Requests Report” to view all outstanding Time Off Requests for your location. Click on “Employee Access Time Off Requests” to review all submitted requests for a specific time period. This is the report that should be run weekly and compared to the weekly sign-in sheets to verify that all leave requests have been entered by the employee and approved by the Principal / Director or their designee.
Click on your campus / department report and click on the edit button on the right side.
Employee Access Instruction Manual Page 32 of 35 July 2017
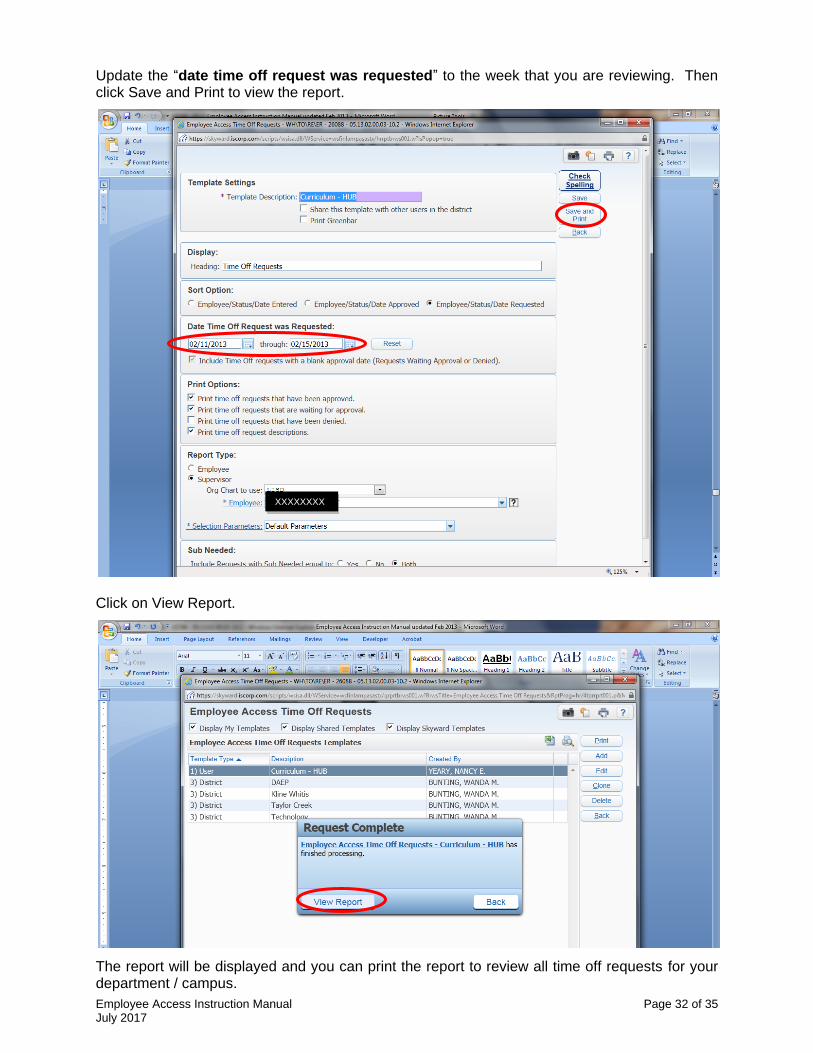
Update the “date time off request was requested” to the week that you are reviewing. Then click Save and Print to view the report.
Click on View Report.
The report will be displayed and you can print the report to review all time off requests for your department / campus.
XXXXXXXX
XXXXXX
Employee Access Instruction Manual Page 33 of 35 July 2017
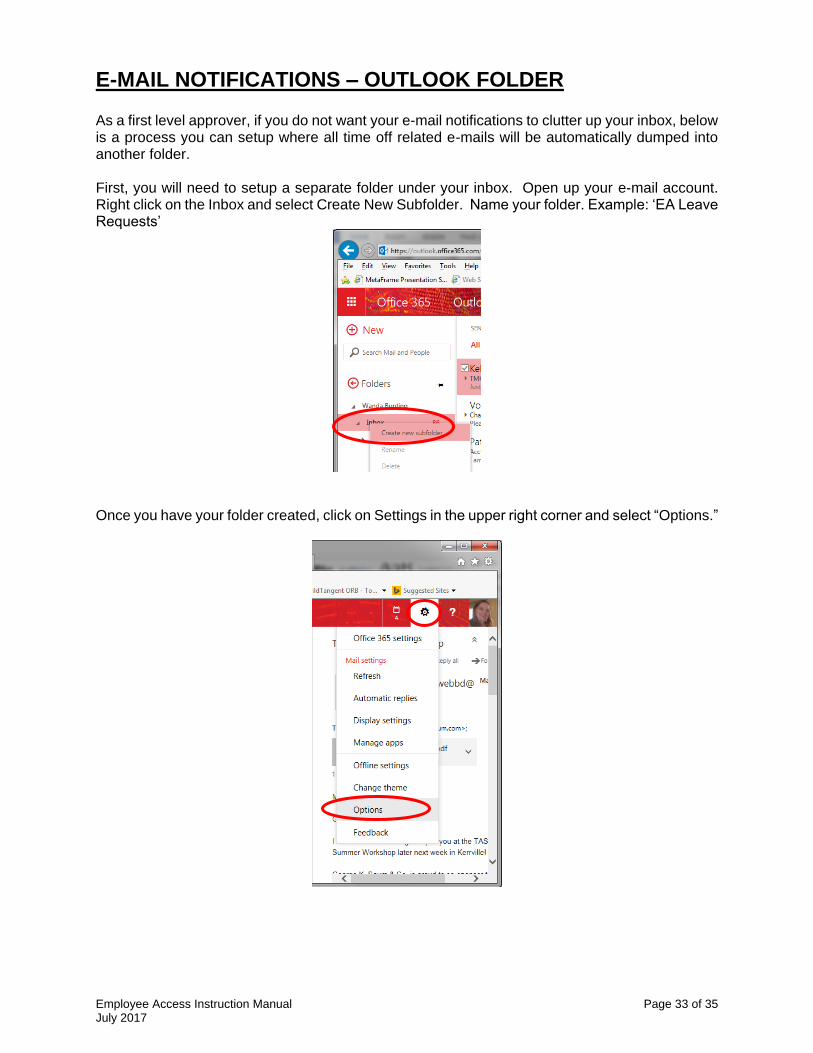
E-MAIL NOTIFICATIONS – OUTLOOK FOLDER As a first level approver, if you do not want your e-mail notifications to clutter up your inbox, below is a process you can setup where all time off related e-mails will be automatically dumped into another folder. First, you will need to setup a separate folder under your inbox. Open up your e-mail account. Right click on the Inbox and select Create New Subfolder. Name your folder. Example: ‘EA Leave Requests’
Once you have your folder created, click on Settings in the upper right corner and select “Options.”
Employee Access Instruction Manual Page 34 of 35 July 2017
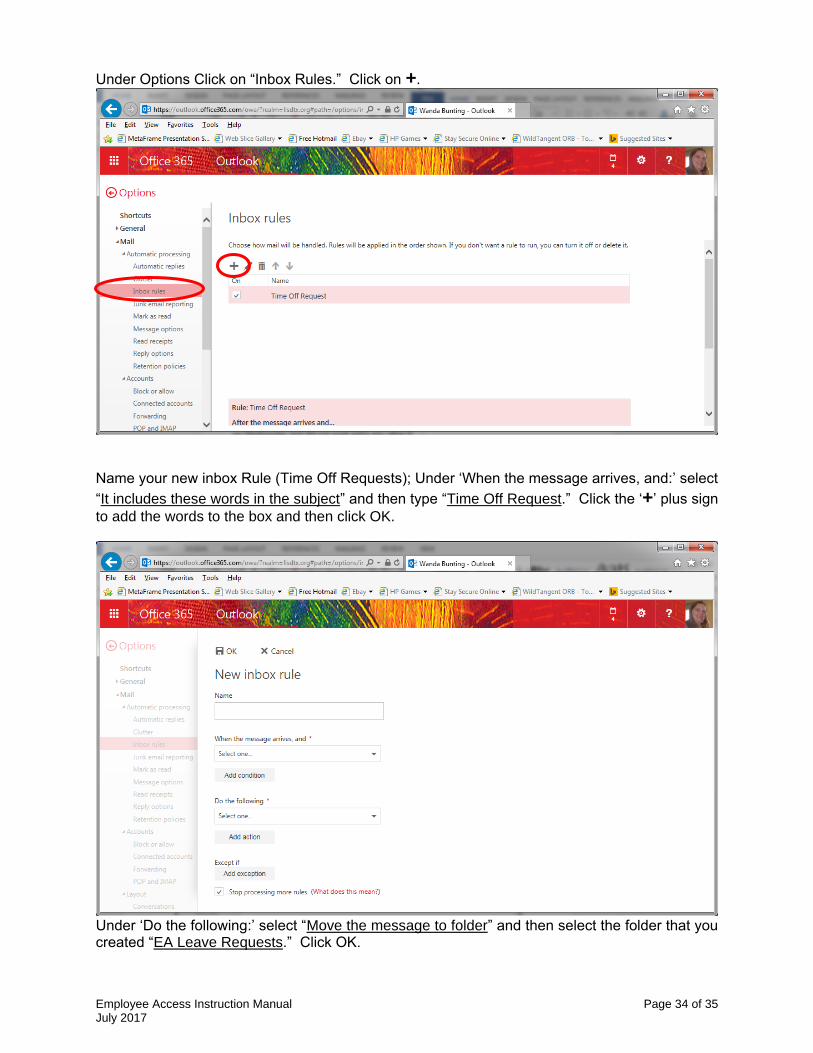
Under Options Click on “Inbox Rules.” Click on +.
Name your new inbox Rule (Time Off Requests); Under ‘When the message arrives, and:’ select
“It includes these words in the subject” and then type “Time Off Request.” Click the ‘+’ plus sign
to add the words to the box and then click OK.
Under ‘Do the following:’ select “Move the message to folder” and then select the folder that you created “EA Leave Requests.” Click OK.
Employee Access Instruction Manual Page 35 of 35 July 2017
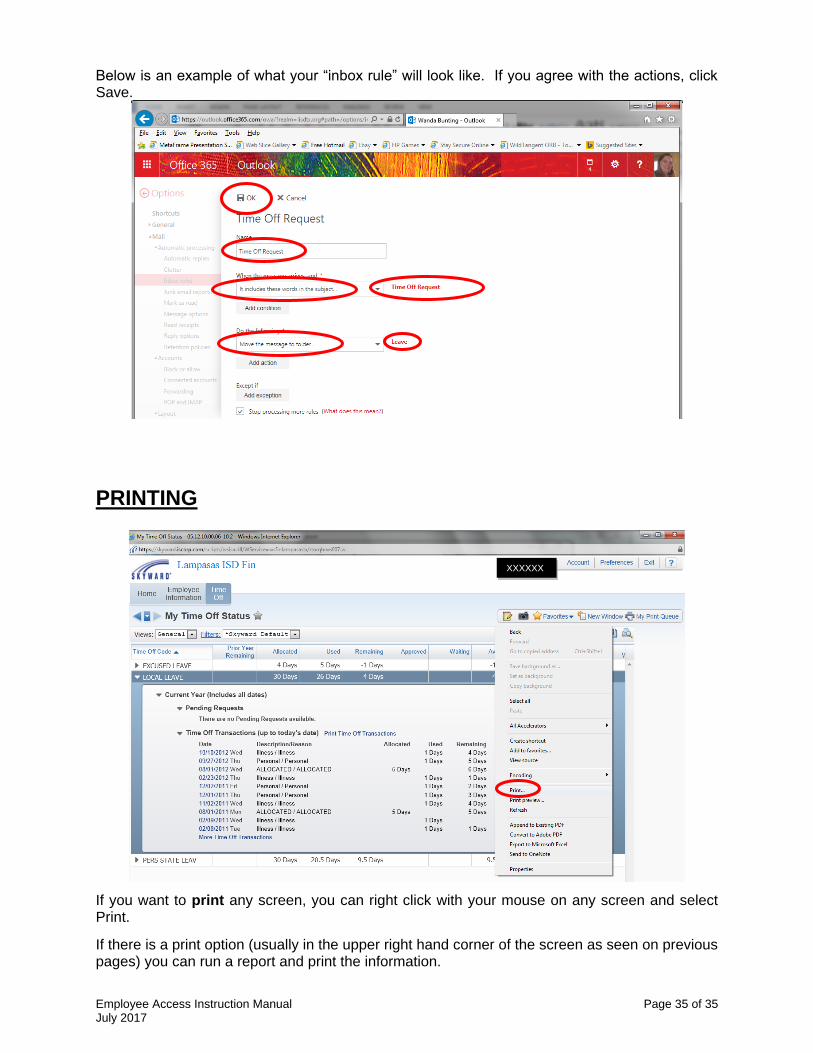
Below is an example of what your “inbox rule” will look like. If you agree with the actions, click Save.
PRINTING
If you want to print any screen, you can right click with your mouse on any screen and select Print.
If there is a print option (usually in the upper right hand corner of the screen as seen on previous pages) you can run a report and print the information.
XXXXXX
XXXXXX