en.540.635 software carpentry lecture 8 git, version
TRANSCRIPT

EN.540.635Software Carpentry
Lecture 8Git, Version Control, and Python Modules

Have you ever…
• Overwritten a file by accident?
• Deleted a file by accident?
• Worked on a project with others, but had issues whenever you had
to merge your work?
• Made a lot of edits to something until you thought:
“Huh… what I had in that first version was much better than what I have
now…”?
2

What is Version Control?
• It stores changes to your work over time, so that you may always retrieve what you had lost.
• It allows you to make edits without breaking everything.
• It allows several people to work together without annoying one another.
• The most popular platforms for version control are:
3
Git SVN

• Git was originally created by Linus Torvalds in 2005, originally for use in the Linux kernel. It is free, open-source, and available for all common operating systems (Windows, macOS, Linux).
• Github is a website that has Git functionalities and other features useful for hosting source code.
• In concept, any project you are working on that involves files (source code, Word documents, PowerPoint slides, etc.) can be managed with Git and Github.
• Git Website: https://git-scm.com/• Github Website: https://github.com/
4
Git and Github

• In practice, pretty much any large software project that requires collaboration between team members needs to use version control.
• For this class, Git and Github will be our way to learn about it and incorporate version control into your work.
• It is important to note that you do not NEED Github in order to use Git - everything can technically be done from the command line.
5
Git and Github

• If we can do everything we need to do with a GUI (which Githubdoes provide), why should we learn how to do things from the command line?
• Using the command line can be faster than using a GUI at the expense of being a bit more complicated to learn and use.
• If you work in tech or software development, there may be many times where you will have to use the command line because a GUI is not available.
6
Command Line Interface (CLI) vs. Graphical User Interface (GUI)

7
Your Profile on Github

8
Sidebar

9
Your Repositories

10
Creating a New Repository

11
Creating a New Repository

12
Cloning from Github

• README.md is a markdown file that should contain text that acts as a ”user manual”. It should cover some/all of the following things:oConfiguration/installation instructions
oOperating instructions
oFile manifest
oTroubleshooting (known errors and bugs)
oCredits and acknowledgments
• .gitignore is a special file that you can use to specify files that git should ignore. Any files that appear in your repo that you don’t need (or are too large), you should list them in this file.
13
README and .gitignore

• To check if you have Git installed on your computer, you will see a display like this if you type git into your command line.
• This menu has all the common commands listed (and they are grouped based on their function).
• There are also tutorials and help functions built in.
14
Git Command Summary

• The single most important thing to remember is that if you ever have any questions about a certain Git command, you can always use the help flag.
• For example:
• This will take you to a screen that displays the documentation for the command you are using. To exit this screen, press the q key.
15
The Help Function

• A repository, or repo for short, is a data structure that stores all the metadata for a set of files in a directory.
• To simplify, you can think of it as a place where we store all our files and keep track of the history of the files themselves.
• To create a new repo locally, you would make a new directory, change to it, and use the command:
16
Repositories

• If we have an existing repo, we can easily create a copy of it using git clone.
• Cloning works both locally and remotely.
• Local:
• Remote:
• Most of the time, we start a remote repo (on Github) and then clone a local version to our computer.
17
Cloning
This can also be replaced with an HTTPS or SSH URL

In the local repo on your computer, there is a certain workflow as to how you make changes and “save” them:
1. Working Directory – this is where the actual files are located.
2. Index – this is basically a staging area where you add all the changes you’ve made.
3. Head – this points to the last commit that was made. Once you’ve staged all the changes you want to make, you commit them and update the head.
18
Workflow

• Git stores the content of your files in objects (here, they are called “blobs”).
• Your folders turn into objects called “trees” that contain other trees and blobs.
• A commit is a type of object that contains a tree. Once created, objects cannot change.
19
How Exactly Does Git Work?
From David Gohberg’s “The Biggest Misconception About Git”

• First, you will add files to your local repo and make edits to them.
• Once you’ve made all the changes you want to make and you want to update your repo, you must add those changes to the index.
oTo add a specific file, use the command:
o If you changed multiple files and you want to add all of them, use the command:
• Even if you have files from a previous commit, you must add them again if you’ve made any edits to them.
20
Adding Files to the Index

• If you have previously added a file, but now you want to remove it from your working directory and index, you can use the command:
• To remove a file just from the index, but keep it in your working directory, you can use the rm command with an appropriate flag:
21
Removing Files

• So now, we have staged all the changes we want to make. The next step is to commit all those changes with the following command:
• For every commit you make, you need to include a message that quickly describes all the changes you made. If you ever want to go back to a previous version of your code, you can find a version of your project you want based on the commit message you used.
• At this point, we have basically “saved” our changes in our local repo on our computer.
22
Committing

• Normally, we have a remote repo that we keep separate from our local repo (especially when we are collaborating on a project with other people).
• To properly update the remote repo, we need to push our local changes to it with the following command:
• For this to work, we need to have cloned our repo from an existing remote repo.
23
Pushing to a Remote Repository

• Branches are used for working on different files/parts of code that are isolated from each other.
• The default branch is called the master branch. Every repo will start with a master branch when initialized.
• If you are collaborating with other people, you will probably be working on different parts of the code and you may want to have different branches for each part.
• Once you have finished work on a certain branch, you can merge it back into the master branch.
24
Branching

25
Branching

• To create a new branch:
• To switch to an existing branch:
• To delete a branch:
• A branch is not available to collaborators unless you first push it to the remote repo.
26
Branching

• If there have been changes made to the remote repo (by other people) and we want to update our local repo with those changes:
• Once we have finished working on a different branch and we want to update our master branch, we merge those changes:
27
Updating and Merging

• Git will try to automatically reconcile the changes when you merge branches.
• If there are any conflicts (ex. if you and another person both edited the same lines of code in the same file, but in different branches), you will have to manually edit the files to resolve conflicts.
• Once you’ve made the appropriate changes, you’ll have to add/commit them again.
• Before merging, you can preview those changes with the following command:
28
Merging

• It is common for software releases to have numerical identifiers to distinguish between different versions.
• The most common format for this numbering is called semantic versioning:
• In Git, you can label software releases with tags:
29
Software Versions and Tagging
This string should be the first 10 characters of the commit tag you are referring to

• To look back at the history of a repo, we can use Git’s logcommand:
• This will display the history of commits and who made them.
• There are many different parameters for displaying the history in different ways:o See all commits from a certain author.
oModify the display (lists, ASCII trees).
o See changed files.
• To see all the different parameters available, use:
30
Repository History

• There many be times where you accidentally mess up your local repo (accidentally delete a file, made a small change somewhere and now your code doesn’t work at all, etc.).
• To replace a file with the version from your previous commit:
• If you want to drop all the changes you’ve made since a previous commit, you can use the following commands:
31
Replacing Local Changes

32
Overall Workflow
Command WorkflowExample of Project
History Tree

• We’ve seen several different Python libraries that have useful functions:o random
omath
oPIL
oMatplotlib
• The ability to import existing functions and classes from other Python scripts is very important for complex programs that require many lines of code.
33
Python Modules

There are 3 different ways to import modules:
There are also shortcuts for importing modules but be sure to use them appropriately!
34
Import Statements
1) 2) 3)

• argparse – library for command line arguments and argument parsing.
• copy, shutil – useful for creating copies of objects.
• os – useful for interfacing with your operating system.
• pickle – convert objects to smaller data types (object compression).
• sys – library for accessing specific system parameters and functions.
• time – useful for functions related to time (benchmarking).
• tkinter – useful for making programs with GUIs.
• itertools – useful functions and data types for efficient looping.
All of them can be found here: https://docs.python.org/3/py-modindex.html
35
Other Useful Modules in Python’s Default Libraries

• Useful for data science and scientific computing (written in C, so it works fast) – these are basically a better version of the default math module.
• NumPy:o Access to array objects (a good alternative to lists).o Has many useful functions related to linear algebra, random numbers, and
vector/matrix operations.
• SciPy:o Has many useful functions related to numerical methods and analysis
(integration, optimization, interpolation, statistics, signal processing).o Has a lot of overlap with NumPy.
• Documentation for both packages can be found here: https://docs.scipy.org/doc/
36
NumPy and SciPy
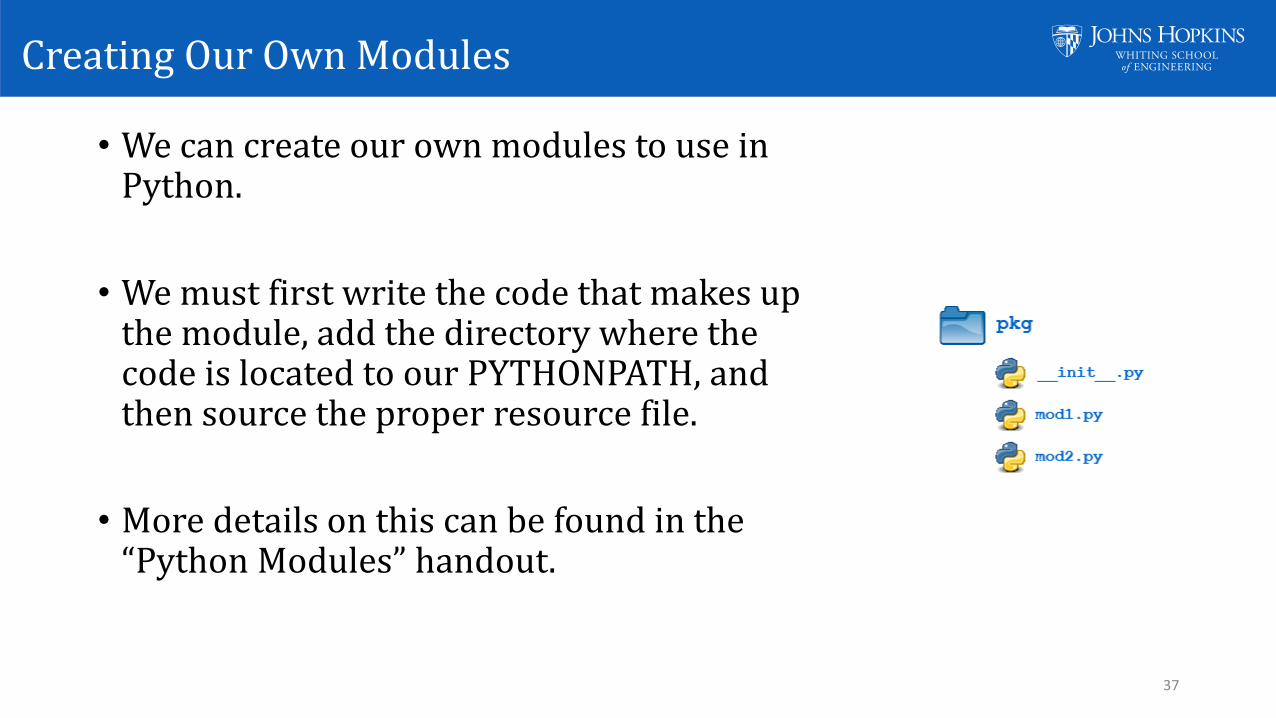
• We can create our own modules to use in Python.
• We must first write the code that makes up the module, add the directory where the code is located to our PYTHONPATH, and then source the proper resource file.
• More details on this can be found in the “Python Modules” handout.
37
Creating Our Own Modules