end user manual 2018 - ncpublicschools.org · public consulting group, inc. - ecats end user manual...
TRANSCRIPT

ECATS End User Manual
2018

TABLE OF CONTENTS WHO IS PUBLIC CONSULTING GROUP (PCG)? .................................................................................. 3 PCG’S EDUCATION SERVICES PRACTICE AREA (ESPA) ...................................................................... 3 ECATS SYSTEM OVERVIEW ............................................................................................................... 4 ECATS GENERAL INFORMATION ....................................................................................................... 6 MAIN MENU TAB .............................................................................................................................. 8 STUDENTS TAB.............................................................................................................................. 111 STUDENT INFORMATION ................................................................................................................ 16 INVITATION DOCUMENTS TAB ....................................................................................................... 30 REFERRAL PROCESS TAB ................................................................................................................. 38 CONSENT TAB ................................................................................................................................. 47 ELIGIBILITY PROCESS TAB ............................................................................................................... 52 IEP PROCESS TAB ............................................................................................................................ 61 PRIOR WRITTEN NOTICE TAB ......................................................................................................... 83 PSSP PROCESS TAB ......................................................................................................................... 87 REEVALUATION PROCESS TAB .................................................................................................... 1075 MANIFESTATION DETERMINATION TAB .................................................................................... 1142 DISCIPLINARY CHANGE IN PLACEMENT TAB ................................................................................ 116 DOCUMENTS TAB ......................................................................................................................... 118 MANAGING YOUR CASELOAD ...................................................................................................... 120

Public Consulting Group, Inc. - ECATS End User Manual Page 3
WHO IS PUBLIC CONSULTING GROUP (PCG)?
Public Consulting Group, Inc. (PCG) is a management consulting firm that primarily serves public sector education, health, human services, and other state, county, and municipal government clients. Established in 1986 with headquarters in Boston, Massachusetts, PCG operates from 46 offices across the U.S. and in Montreal, Canada, London, United Kingdom, and Lodz, Poland. The firm has extensive experience in all 50 states, clients in six Canadian provinces, and a growing practice in the European Union.
PCG’S EDUCATION SERVICES PRACTICE AREA (ESPA) PCG Education offers consulting solutions that help schools, school districts, and state education agencies/ministries of education to promote student success, improve programs and processes, and optimize financial resources. Together with its state-of-the-art technology, PCG Education’s consulting approach helps educators to make effective decisions by transforming data into meaningful results. Below we highlight several of our ESPA services. Our service and product offerings include: ▪ Special Education Consulting Services: PCG offers comprehensive services and customized
technology solutions to special education departments. Related applications and services such as EasyFax™, PaperClip™, Advanced Reporting™, state vertical reporting, Pearson partner, PowerSchool data integration, and School Interoperability Framework (SIF) certification make PCG Education an undisputed market leader.
o ECATS is an internet-based solution for the development of Individualized Education Program (IEPs) and for the management of special education reporting in North Carolina. ECATS provides administrators with a powerful organizational tool, extensive reporting capabilities and instant access to student information securely via the internet.
o The Service documentation module is a component of ECATS. Having a single universal system for both IEP and service documentation purposes minimizes the burden on providers by allowing for a highly streamlined process for IEP development and subsequent service documentation. This consolidation allows for additional monitoring of service documentation, ensuring that students are receiving the proper level of services, as well as maximizing Medicaid reimbursement for the school district.
o The MTSS module is a third component of ECATS. ECATS MTSS complements the multi-tiered framework which promotes school improvement through engaging, research-based academic and behavioral practices. ECATS MTSS uses an early warning system to assist educators in their data-based problem solving for decision making. The intervention planning page is designed to efficiently document interventions at both the supplemental and intensive levels. ECATS MTSS allows for progress monitoring and intervention effectiveness. Reports and summary dashboards also provide aggregate information for LEA, School and student level problem-solving.
ECATS SYSTEM OVERVIEW

Public Consulting Group, Inc. - ECATS End User Manual Page 4
ECATS will enable you to have comprehensive electronic student files, giving you valuable information in a matter of a few clicks of the mouse. Using a database for completing student IEPs may be new to users, but we feel that the ECATS process is similar to using a digital camera. In ECATS, data is entered into the system through a process flow that relates to the respective IEP sections. Once the data has been entered, ECATS takes a ‘snapshot’ of the data and creates a viewable .pdf IEP document that consolidates this information into the student’s electronic file. As in a digital camera, you are able to view a ‘snapshot’ of the picture you took. If you want to change the picture, you are able to snap another picture until you have the ‘snapshot’ that you are looking for. Draft documents are stored for 30 days (please note that some districts have chosen to use a different timeline), while Final documents are stored permanently.

Public Consulting Group, Inc. - ECATS End User Manual Page 5
Creating an IEP in Subsequent Years
The following diagram illustrates the steps of ECATS and the benefit of the system in subsequent years. Once an IEP is created, the data is stored in the record. After the child’s first IEP is created, creating an IEP in subsequent years (year 2, year 3, etc.) is as simple as making updates/changes to the data and creating a new document ‘snapshot’.

Public Consulting Group, Inc. - ECATS End User Manual Page 6
ECATS GENERAL INFORMATION
Security
All ECATS information is confidential. The server uses Secure Socket Layer (SSL) technology to encrypt all information as it flows across the Internet. This is the same technology that online merchants and banks use to protect your credit card number and other sensitive information. Please adhere to the following procedures to ensure security:
▪ Do not give your account name or password to anyone. ▪ Do not write your password down where it can be seen by others. ▪ Do not save documents or reports to an unsecured computer. ▪ Always log off of ECATS and close your browser when you are finished.
Note: ECATS will automatically log you out of the system after 120 minutes of inactivity.
Navigation
ECATS is menu bar driven with tabs along the top on the screen that are used to navigate through the system. Clicking different tabs takes the user to different parts of the database. End users will primarily use the Students tab to complete work.
Saving Changes
After a change is made it is very important to click the ‘Update the Database’ button at the bottom of each screen to save the changes. ‘Update the Database’ is equivalent to Save. Any information entered will be lost if users forget to click ‘Update the Database’.

Public Consulting Group, Inc. - ECATS End User Manual Page 7
Important Symbols in ECATS
Below is a list of icons, and a description of their functionality, that appear on many system pages:
Help - This link shows general help information.
Drop-down menu - Only one selection can be made. Click once on the box and select an option.
Check box - More than one selection can be made. To add or remove a check, click once on the box.
Spell Check icon – Click on the icon to launch the spell check function for a specific text box.
Calendar icon – To add a date, click on the calendar and scroll through the screens to find the appropriate date.
Logging into the System
To login to ECATS, go to the EdCloud/IAM portal and select the icon for ECATS. If you do not have a login to EdCLoud/IAM, you need to claim your account. Contact your local data or technical manager to do so.

Public Consulting Group, Inc. - ECATS End User Manual Page 8
MAIN MENU TAB
Questions/Issues/Suggestions To inform the Helpdesk of any issue, you can ‘Send Us a Message’ via the link on the ECATS Main Menu page. This will prompt a web form to open that you may use to submit a ticket.
You will be prompted to enter the following ticket fields:
• Your name – This will auto populate with your name
• Email address – This will auto populate with the email set on your ECATS profile – IMPORTANT: this should NOT be changed when submitting a ticket.
• Subject - Enter a subject line (*required)
• Description – Describe your question/issue (*required)
• Module – Select the module that relates to your ticket – Special Education, Service Documentation, MTSS, etc. (*required)
• Student – Enter in a student name, student ID etc., if applicable
• Page Title – Indicate the page related to your question/issue
• Attachment – Upload attachments to help explain your issue/question Once the Helpdesk responds to your message, you will receive an e-mail (to the address listed within your ECATS profile) informing you that you have a new message. All messages and responses are sent internally within the system.
Reviewing previously submitted tickets You can access previously submitted tickets by logging into ECATS and selecting the “Message Board” link in the top header and then selecting the “Login to Zendesk” button.

Public Consulting Group, Inc. - ECATS End User Manual Page 9
This will bring you to the Help Center. You can then select under your name > My Activities. This will bring up all the tickets you have submitted. From this view under “My requests”, you can review ticket status (open, pending or solved), see comments/questions from ECATS Agents, and respond when appropriate.
Accessing Messages Related to Alerts
To access a new message related to an Alert, click on ‘My Messages’. This will direct you to the following screen, which displays New Messages, as well as stores your Previous Messages.

Public Consulting Group, Inc. - ECATS End User Manual Page 10
Once you have read all new messages, you will no longer see the ‘New Mail’ icon on your Main Menu screen.
Announcements On the Main Menu page, you will find Announcements. This message is edited by your district’s administrators and will alert you of any important information. Please check this message each time you log in to stay informed with district wide changes or updates.
Document Library At the bottom of the Main Menu page you will see any files that have been made available to you for viewing or downloading. To view a file, click on the name of the file (denoted by a blue hyperlink). The file will open and you will have the option of saving it to your computer. When you are finished viewing the file, click on the “Main Menu” tab at the top of your screen. Do not close your browser, as you are still logged in to ECATS.

Public Consulting Group, Inc. - ECATS End User Manual Page 11
STUDENTS TAB
Student Overview When searching for students, please remember that your district is using a separate Student Information System (PowerSchool) that provides information to ECATS. If you do not see the student you are looking for, please contact your district administrator. The system will only allow a certain number of students to appear on the search results screen at once. You can narrow your search by entering the student’s ID, school, or choosing either General Ed, Initial Eligibility or Current Reeval, IEP, Child Study, Special Ed, or Referral and the beginning letters of the child’s last name. Some users might not be able to search for students and may only be able to view their individual caseload.
1) From the Main Menu, click the “Students” tab. 2) Enter the criteria you wish to search by, such as Student Last Name or Student ID.
3) The student’s record will appear if that student fits the entered criteria or
a list of students
with the same last name exists in the database. 4) To select a specific student record, click on the name of the student.
Public Consulting Group, Inc. - ECATS End User Manual Page 12
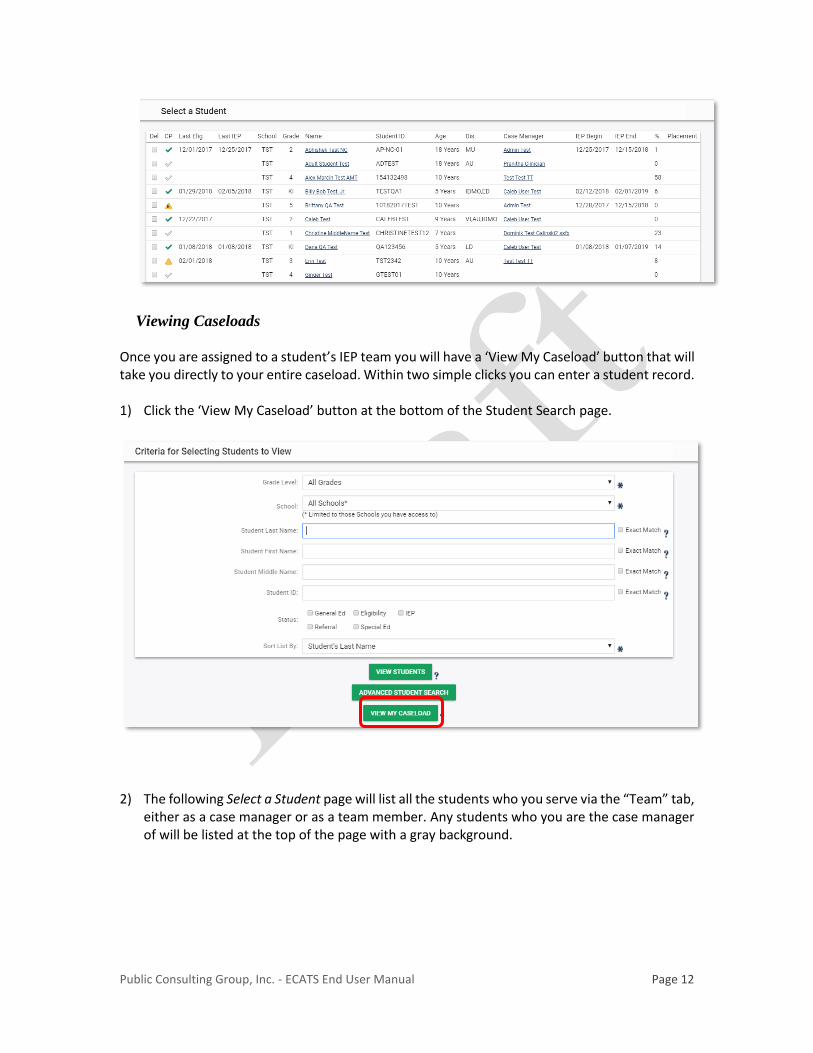
Viewing Caseloads Once you are assigned to a student’s IEP team you will have a ‘View My Caseload’ button that will take you directly to your entire caseload. Within two simple clicks you can enter a student record. 1) Click the ‘View My Caseload’ button at the bottom of the Student Search page.
2) The following Select a Student page will list all the students who you serve via the “Team” tab,
either as a case manager or as a team member. Any students who you are the case manager of will be listed at the top of the page with a gray background.
Public Consulting Group, Inc. - ECATS End User Manual Page 13
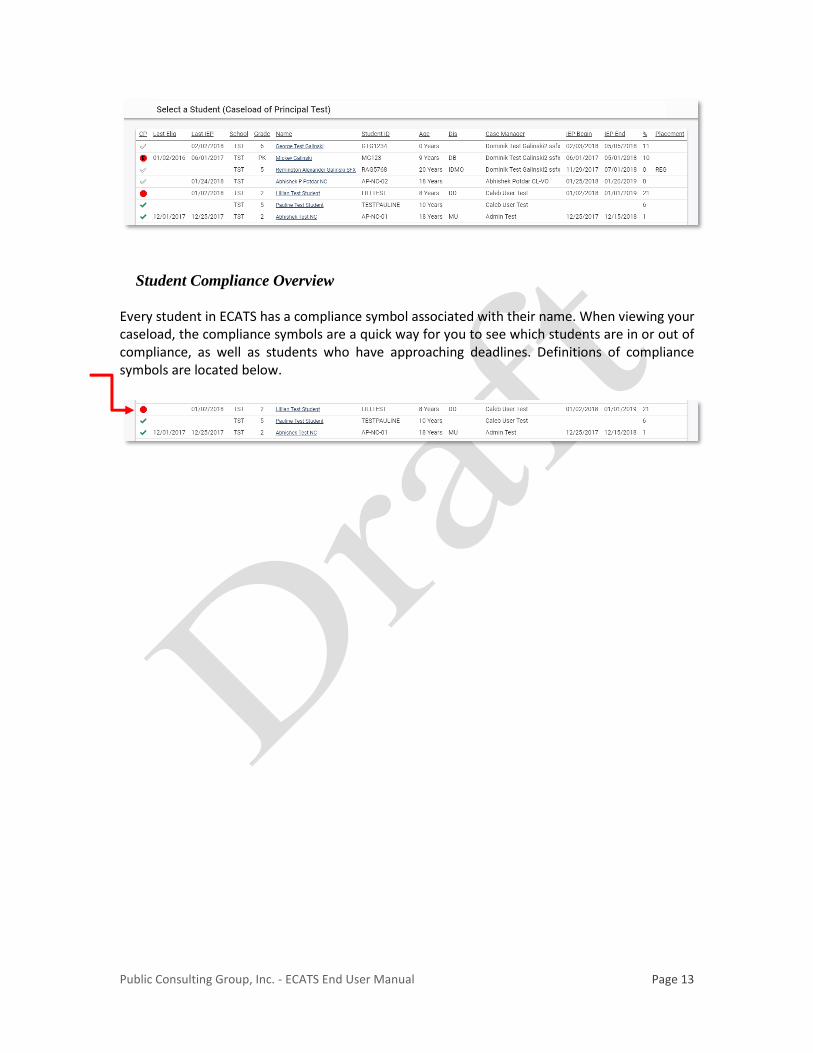
Student Compliance Overview Every student in ECATS has a compliance symbol associated with their name. When viewing your caseload, the compliance symbols are a quick way for you to see which students are in or out of compliance, as well as students who have approaching deadlines. Definitions of compliance symbols are located below.

Public Consulting Group, Inc. - ECATS End User Manual Page 14
Compliance Symbol Definitions
Symbol Meaning What to do
It has been > 1095 days (3 years) since this student's Eligibility Date. A triennial re-evaluation is due.
When a re-evaluation is performed, you should update the student Eligibility Date. You can do that on the student's Eligibility page. Once the document in finalized, the symbol will update to a green check.
It has been > 1035 days since this student's Eligibility Date. A triennial re-evaluation is due within 2 months.
Same as above.
Either 1) it has been > 365 days since this student's Last IEP Date, or 2) it has been > 30 days since this student's Eligibility Date and no IEP has been recorded (i.e. the student's Last IEP Date field is empty).
When you generate an IEP for this student using ECATS, the Last IEP Date will automatically be updated. However, if you do a hand-written IEP, you will need to manually update this student's Last IEP Date. You can do that on the student's Eligibility page.
Either 1) it has been > 335 days since this student's Last IEP Date, or 2) it has been > 23 days since this student's Eligibility Date and no IEP has been recorded (i.e. the student's Last IEP Date field is empty).
Same as above.
It has been > 97 days since this student's Referral Date and Eligibility has not yet been determined.
When a student's Eligibility status is determined, that, along with the date of the Eligibility determination, should be entered on the student's Eligibility page. Once the document is finalized, the symbol will update to a green check.
It has been > 77 days since this student's Referral Date and Eligibility has not yet been determined.
Same as above.
All appropriate Eligibility and IEP information has been entered for this student.
No Eligibility or IEP information has been entered for this student; this usually denotes a regular education student.
To enter the student into special education, fill in the Eligibility page.

Public Consulting Group, Inc.- ECATS End User Manual Page 15
REPORTING TAB
The “Reporting” tab on the Main Menu allows you to run reports, view your reports and create new reports. To Run a Standard Report:
1) From the Main Menu – Click on the “Reporting” tab. 2) Select “Standard Reports” from the drop-down menu. 3) You will see a section for Drill-Down Reports under the “Standard Reports” header. These
reports will allow you to “drill down” into data by narrowing your search criteria. Hovering over the report name will give you a short description of the report and the data it will pull.
4) You will see a section for Scheduled Reports at the bottom of the page. Choose the
appropriate tab and click on the hyperlink for the desired report to run it.
a. Hovering over the report name will give you a short description of the report
and the data it will pull.
b. When the report is complete you will receive an email notification.
c. The time required to generate a report is reflective of the amount of data
returned and how many other reports are already scheduled to run. Reports
with very large amounts of data will run at midnight.

Public Consulting Group, Inc.- ECATS End User Manual Page 16
d. After a report has been run you can find the results by navigating to the “My Reports”
link under the “Reporting” tab. Click on the hyperlink to view the report.
STUDENT INFORMATION
Profile Tab After you have selected a student, the Personal Information containing basic demographic data for that student will appear. This information is imported from your student information system (PowerSchool/Home Base). The “Personal Information” tab in ECATS is accessible as view only. To maintain data integrity, users are not permitted to edit information on this page. Access Student Profile
1) Hover over the “Student Information” dropdown click on the “Profile” tab.
Public Consulting Group, Inc.- ECATS End User Manual Page 17
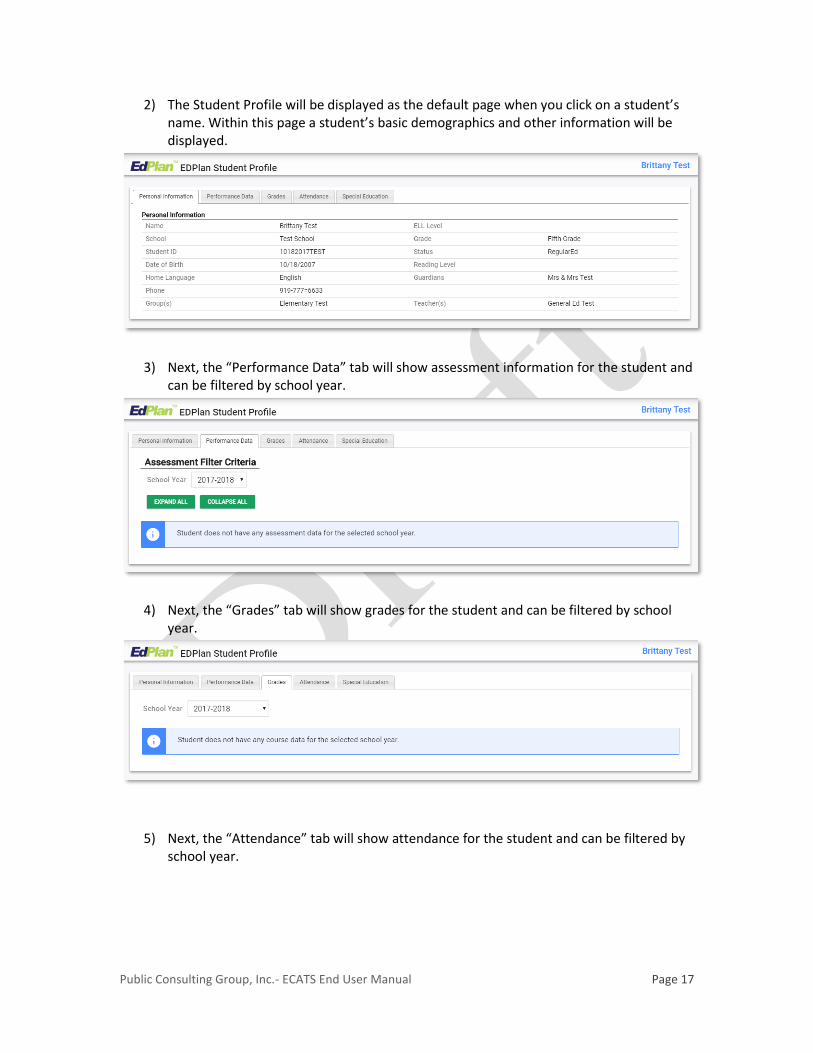
2) The Student Profile will be displayed as the default page when you click on a student’s name. Within this page a student’s basic demographics and other information will be displayed.
3) Next, the “Performance Data” tab will show assessment information for the student and can be filtered by school year.
4) Next, the “Grades” tab will show grades for the student and can be filtered by school year.
5) Next, the “Attendance” tab will show attendance for the student and can be filtered by school year.
Public Consulting Group, Inc.- ECATS End User Manual Page 18
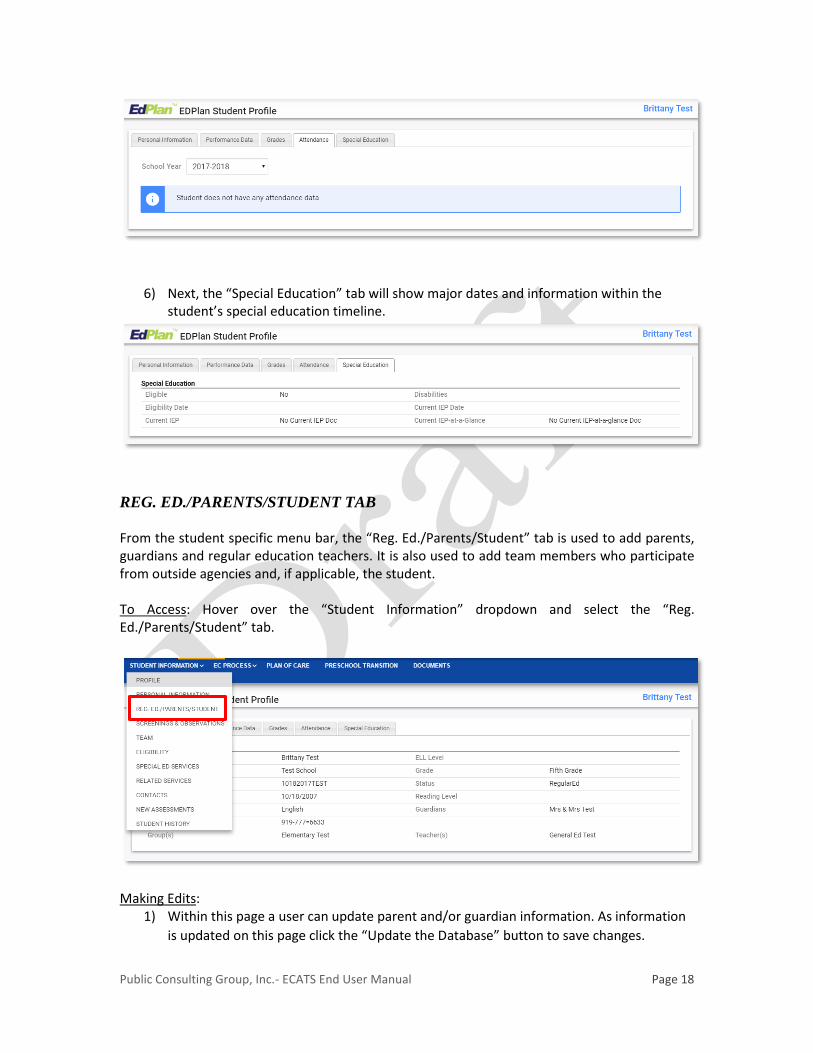
6) Next, the “Special Education” tab will show major dates and information within the student’s special education timeline.
REG. ED./PARENTS/STUDENT TAB From the student specific menu bar, the “Reg. Ed./Parents/Student” tab is used to add parents, guardians and regular education teachers. It is also used to add team members who participate from outside agencies and, if applicable, the student. To Access: Hover over the “Student Information” dropdown and select the “Reg. Ed./Parents/Student” tab.
Making Edits:
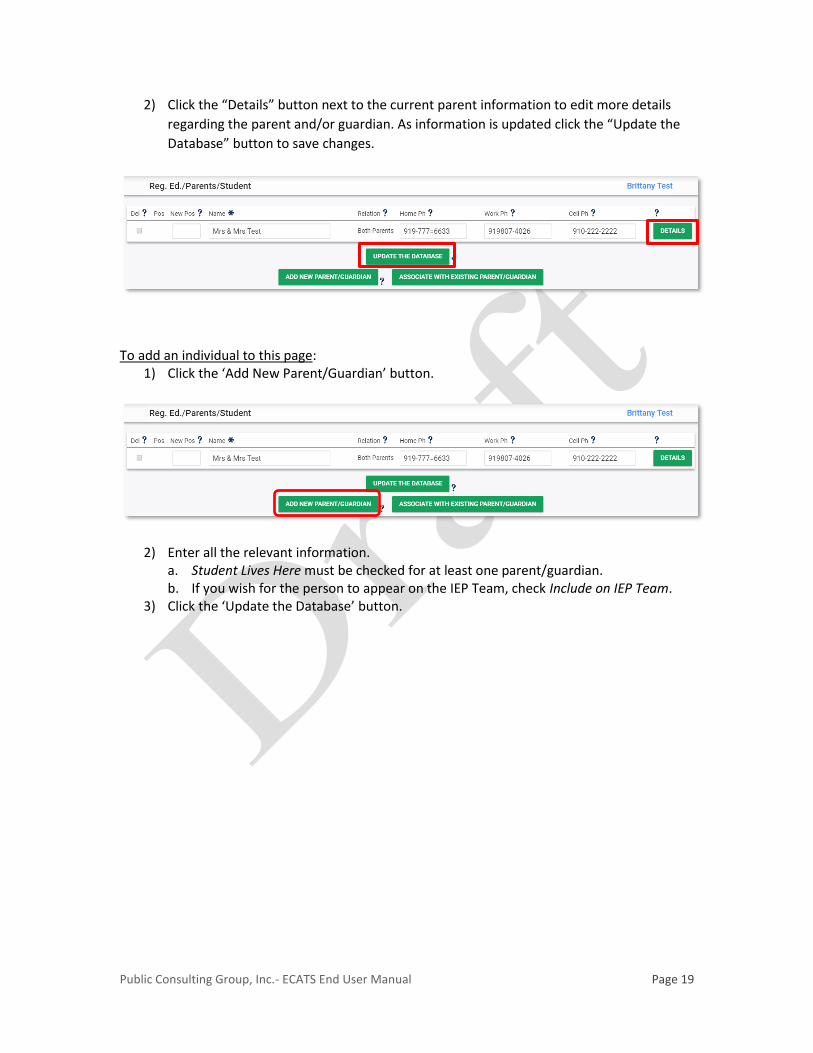
1) Within this page a user can update parent and/or guardian information. As information
is updated on this page click the “Update the Database” button to save changes.
Public Consulting Group, Inc.- ECATS End User Manual Page 19
2) Click the “Details” button next to the current parent information to edit more details
regarding the parent and/or guardian. As information is updated click the “Update the
Database” button to save changes.
To add an individual to this page:
1) Click the ‘Add New Parent/Guardian’ button.
2) Enter all the relevant information. a. Student Lives Here must be checked for at least one parent/guardian. b. If you wish for the person to appear on the IEP Team, check Include on IEP Team.
3) Click the ‘Update the Database’ button.

Public Consulting Group, Inc.- ECATS End User Manual Page 20
Associating Parents:
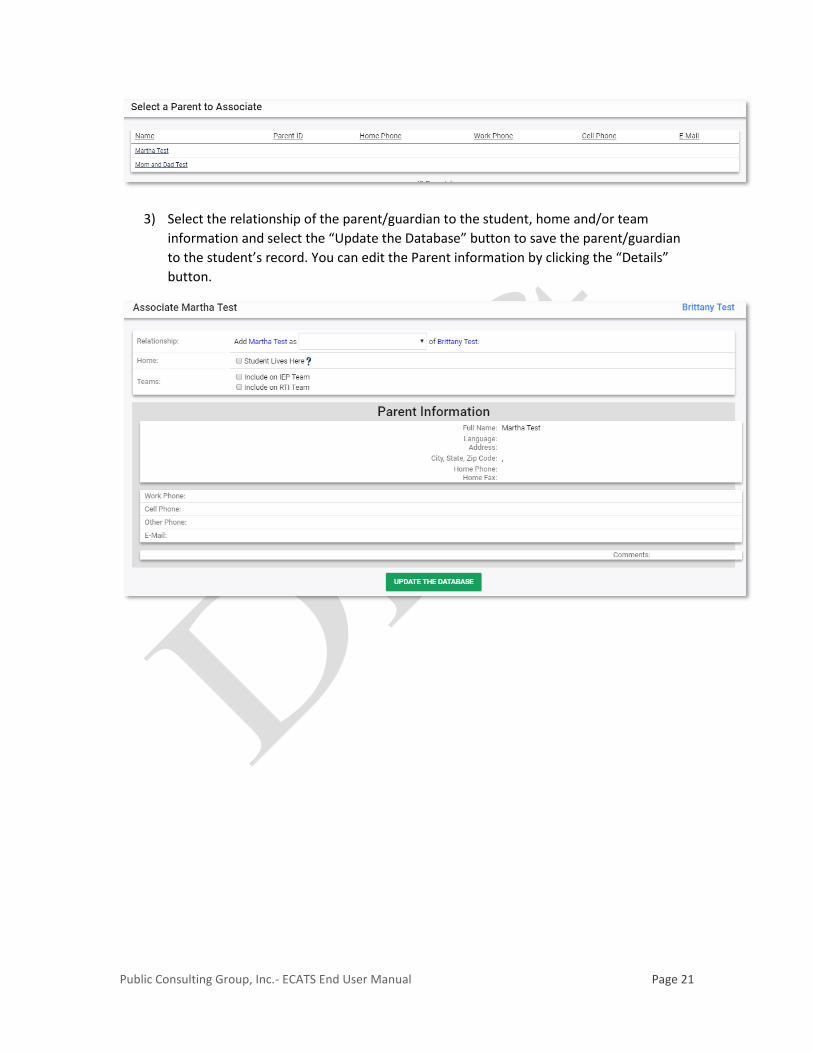
1) Click “Associate with Existing Parent/Guardian” button to associate another student’s parent/guardian with the current student. Search for the parent/guardian by the filters/options on the page and click “View Parent(s).”
2) Click on the parent/guardian that should be associated with the student’s record.
Public Consulting Group, Inc.- ECATS End User Manual Page 21
3) Select the relationship of the parent/guardian to the student, home and/or team
information and select the “Update the Database” button to save the parent/guardian
to the student’s record. You can edit the Parent information by clicking the “Details”
button.

Public Consulting Group, Inc.- ECATS End User Manual Page 22
SCREENINGS & OBSERVATIONS TAB
1) Hover over the “Student Information” dropdown and click on “Screenings &
Observations” from the tree menu.
2) Within this page you can add hearing, vision, and speech/language screening
information. As well as Illness/Hospitalization information and observations. You can do
this by simply clicking the + button to expand the sections, and then click the add
screening button.

Public Consulting Group, Inc.- ECATS End User Manual Page 23

Public Consulting Group, Inc.- ECATS End User Manual Page 24
3) Click the “Save” button to save information added on the page.
a. Click the “Display Section Errors” to show any errors that need to be corrected in
red at the top of this page.
b. Please note, to delete screenings/observations select the “Delete Screening” Yes
checkbox and click the “Delete Screenings” button at the bottom of the screen. The
“Delete Screenings” button will prompt the user to make sure the selected
screenings/observations should be deleted.
TEAM TAB – IEP TEAM AND CASE MANAGER
1) Hover over the “Student Information” tab in the menu bar and click on “Team” from the
tree menu.
2) Within this page you can assign the case manager to the student as well as select the IEP
team members. Select a case manager from the dropdown and click “Update the
Database” to assign the case manager to the student.

Public Consulting Group, Inc.- ECATS End User Manual Page 25
3) Click the “Select IEP Team” button to assign other IEP team members to the student’s
team. Once necessary members are selected click “Update the Database” to ensure
team members have been saved to the student’s record. Check the checkbox in the
“View Only” column for those team members who will need access to view the student
record but should not be able to edit any of the data within it.

Public Consulting Group, Inc.- ECATS End User Manual Page 26
CONTACTS TAB
1) Hover over the “Student Information” tab in the menu bar and click on “Contacts” from
the tree menu.

Public Consulting Group, Inc.- ECATS End User Manual Page 27
2) Within this page you can add a contact attempt that was made by clicking the “Add a
Contact” or “Add a Non Parent Contact” button. Click the “Details” button to edit a
contact log that has already been saved.

Public Consulting Group, Inc.- ECATS End User Manual Page 28
STUDENT HISTORY TAB
1) Hover over the “Student Information” tab in the menu bar and click on “Student
History” from the tree menu.
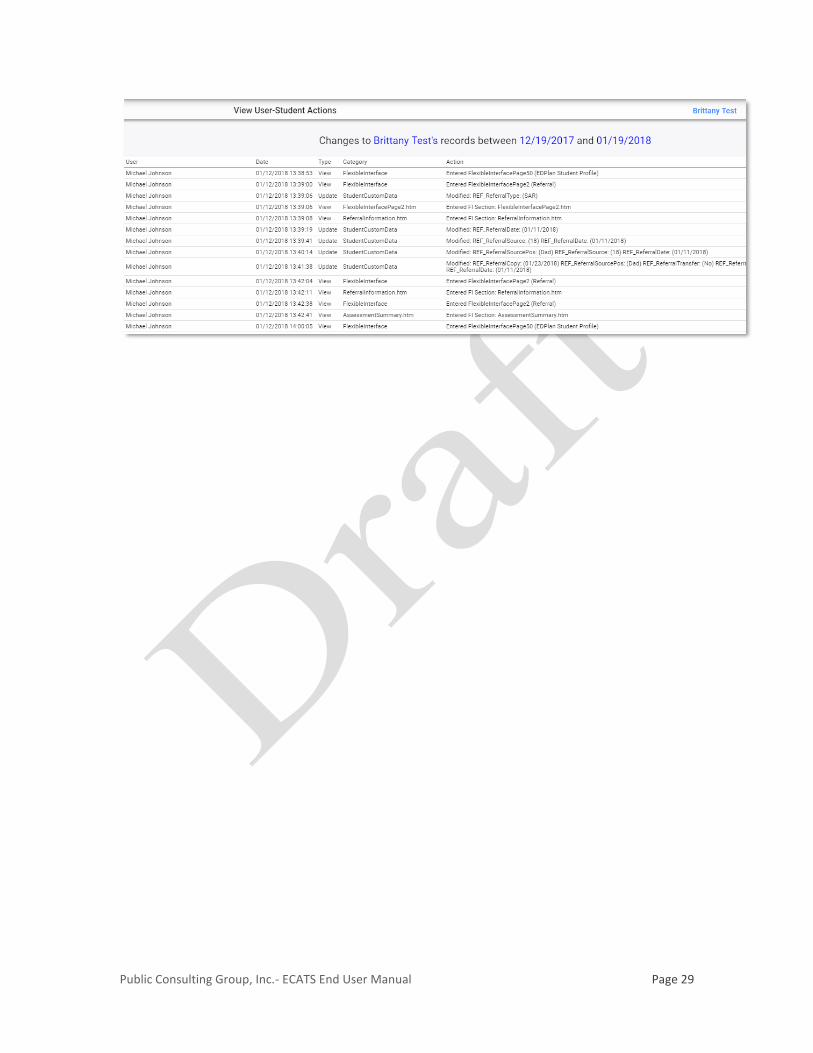
2) Within this page the student’s history of events will display. You can also choose to
view any user actions made to the student’s record.
3) Click “View User Actions” to see the actions taken by users within the student’s record. Fill out the search criteria and select the “Show User Actions” button.
Public Consulting Group, Inc.- ECATS End User Manual Page 29

Public Consulting Group, Inc.- ECATS End User Manual Page 30
INVITATION DOCUMENTS TAB
INVITATION TO IEP TEAM MEETING
1) Hover over the EC Process tab in the menu bar and click on “Invitation Documents” from
the tree menu. On the Invitation Documents page, click on the link for “Invitation to IEP
Team Meeting.”
2) Fill in the fields on the document creation page including the applicable dates, the
meeting participants, and other information. Note that if outside agencies are
attending, additional fields will display and dates consent to participate was
provided by the parent are required.

Public Consulting Group, Inc.- ECATS End User Manual Page 31
3) At the bottom of the page, click the “Create Draft Invitation to IEP Team Meeting
Document” button.
4) Any errors found on the document creation page will display in a red box at the top of
the Download Invitation to IEP Team Meeting page. (You may still view the draft
document without correcting these errors, but you will not be able to finalize the
document.)
a. Click on the “Back” button to navigate back to the document creation page to make
changes.
b. Click on the “Continue” button to navigate back to the main Invitation Documents
page.
c. Click on the “view” hyperlink at the bottom to view the draft PDF document in a
new browser tab.

Public Consulting Group, Inc.- ECATS End User Manual Page 32
d. Once all errors are corrected and you are ready to finalize the document, click on the
“Create Final Invitation to IEP Team Meeting Document” button at the bottom of the
document creation page.
e. The link to the created document can be accessed from the bottom of the Invitation to
Team Meeting document creation page or from the Documents tab.

Public Consulting Group, Inc.- ECATS End User Manual Page 33
INVITATION OF OUTSIDE AGENCIES FOR TRANSITION SERVICES
1) Hover over the EC Process tab in the menu bar and click on “Invitation Documents” from
the tree menu. On the Invitation Documents page, click on the link for “Invitation of
Outside Agencies for Transition Services.”
2) Fill in the fields on the document creation page. If you select that the rights have
transferred to the student, the document will be addressed to him/her. If not, you will
select the addressee from the dropdown that will appear.
3) At the bottom of the page, click the “Create Draft Invitation of Outside Agencies
Document” button.

Public Consulting Group, Inc.- ECATS End User Manual Page 34
4) Any errors found on the document creation page will display in a red box at the top of
the Download Invitation of Outside Agencies page. (You may still view the draft
document without correcting these errors, but you will not be able to finalize the
document.)
a. Click on the “Back” button to navigate back to the document creation page to make
changes.
b. Click on the “Continue” button to navigate back to the main Invitation Document
page.
c. Click on the “view” hyperlink at the bottom to view the draft PDF document in a
new browser tab.
d. Once all errors are corrected and you are ready to finalize the document, click on
the “Create Final Invitation of Outside Agencies Document” button at the bottom of
the document creation page.
e. The link to the created document can be accessed from the bottom of the Invitation
of Outside Agencies document creation page or from the Documents tab.

Public Consulting Group, Inc.- ECATS End User Manual Page 35

Public Consulting Group, Inc.- ECATS End User Manual Page 36
REQUEST TO EXCUSE AN IEP TEAM MEMBER
1) Hover over the EC Process tab in the menu bar and click on “Invitation Documents” from
the tree menu. On the Invitation Documents page, click on the link for “Request to
Excuse an IEP Team Member.”
2) Fill in the fields on the document creation page.
3) At the bottom of the page, click the “Create Draft Request to Excuse an IEP Team
Member Document” button.
4) Any errors found on the document creation page will display in a red box at the top of
the Download Request to Excuse an IEP Team Member page. (You may still view the

Public Consulting Group, Inc.- ECATS End User Manual Page 37
draft document without correcting these errors, but you will not be able to finalize the
document.)
a. Click on the “Back” button to navigate back to the document creation page to make
changes.
b. Click on the “Continue” button to navigate back to the main Invitation Document
page.
c. Click on the “view” hyperlink at the bottom to view the draft PDF document in a
new browser tab.
d. Once all errors are corrected and you are ready to finalize the document, click on the
“Create Final Request to Excuse an IEP Team Member” button at the bottom of the
document creation page.
e. The link to the created document can be accessed from the bottom of the Request to
Excuse an IEP Team Member document creation page or from the Documents tab.

Public Consulting Group, Inc.- ECATS End User Manual Page 38
REFERRAL PROCESS TAB
1) Hover over the EC Process tab in the menu bar and click on “Referral” from the tree
menu. On the Referral Process page, you will see the links for each section in the
process. Select the type of referral being completed for the student from the dropdown
at the top (either School Age Referral or Pre-K Referral.) This will determine which links
appear below. If there is no data entered in any of the sections, the compliance check
marks will appear clear. As data is entered and saved in each section, the check marks
will change to green check marks (all error checks are met) or red X signs (there are
errors within that section that need to be addressed before a final document can be
created.)
2) Click on the first link in the process, “Referral Information.” Fill in the referral date, the
referral source, the title/position of the referral source and the other applicable
information.

Public Consulting Group, Inc.- ECATS End User Manual Page 39
3) At the bottom of the page, click the “Save and Continue” button. Any errors found in
this section will display in a red box at the top of the page.
4) If there are no errors on the page, you will be brought to the “Assessment Summary”
link. Click on the “Add Assessment(s)” button to add assessments to the table. Note that
existing data is entered here as well as data gathered after the evaluation plan is
completed.
Public Consulting Group, Inc.- ECATS End User Manual Page 40
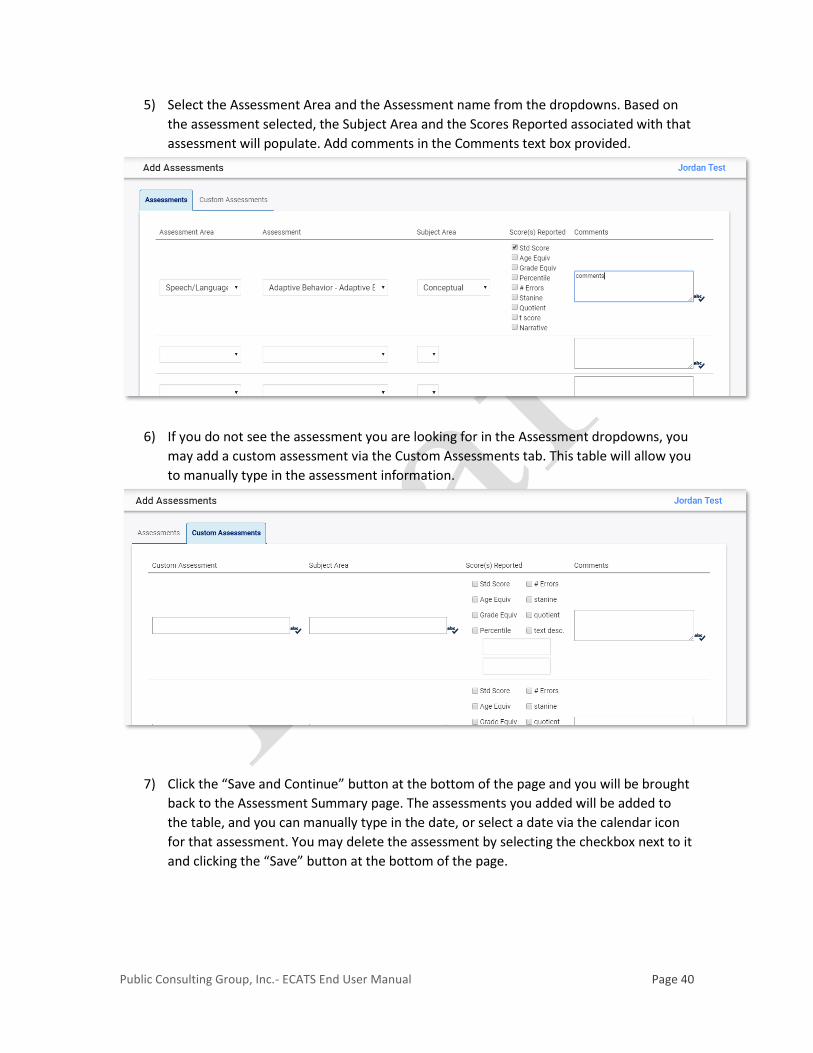
5) Select the Assessment Area and the Assessment name from the dropdowns. Based on
the assessment selected, the Subject Area and the Scores Reported associated with that
assessment will populate. Add comments in the Comments text box provided.
6) If you do not see the assessment you are looking for in the Assessment dropdowns, you
may add a custom assessment via the Custom Assessments tab. This table will allow you
to manually type in the assessment information.
7) Click the “Save and Continue” button at the bottom of the page and you will be brought
back to the Assessment Summary page. The assessments you added will be added to
the table, and you can manually type in the date, or select a date via the calendar icon
for that assessment. You may delete the assessment by selecting the checkbox next to it
and clicking the “Save” button at the bottom of the page.

Public Consulting Group, Inc.- ECATS End User Manual Page 41
8) Add multiple assessments by selecting the “Add Multiple Assessments” button. Select a
category from the Assessment Category dropdown and you will see the assessments
associated with that category populate below. Select one or multiple and click the “Add
Area(s) and Score(s)” button.
9) You can fill in the information associated with the assessments selected on that page.
Use the + button to add information about subsequent assessments.
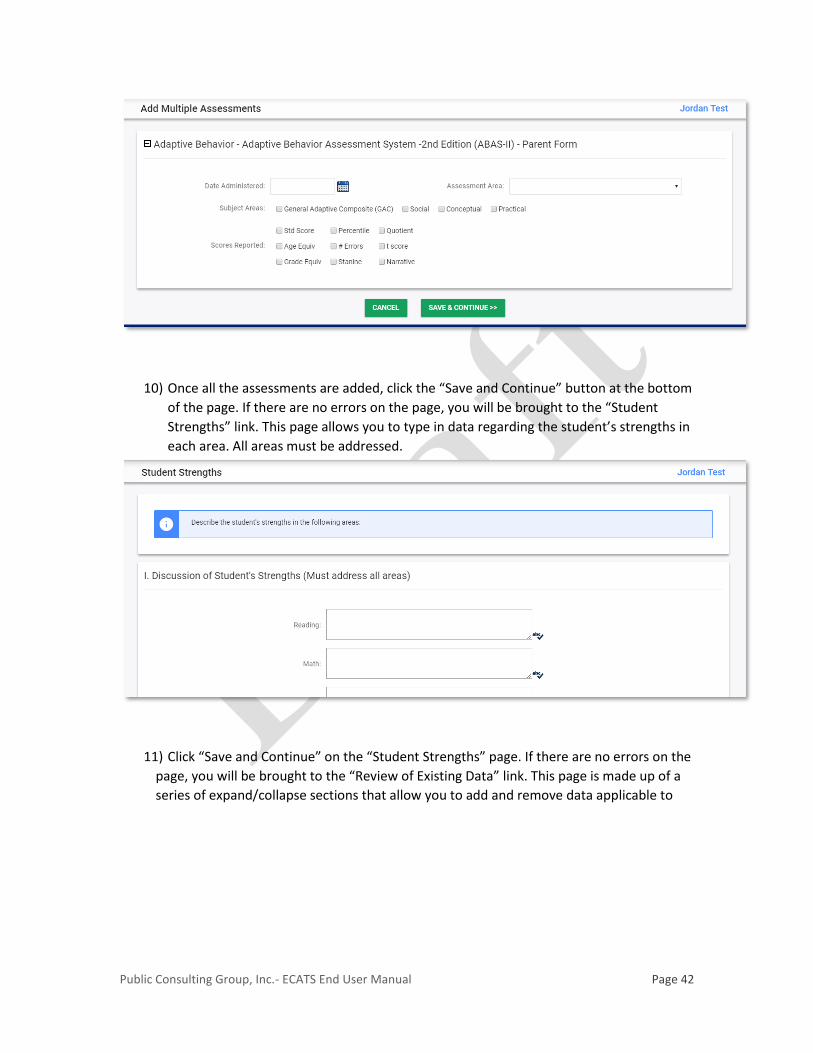
Public Consulting Group, Inc.- ECATS End User Manual Page 42
10) Once all the assessments are added, click the “Save and Continue” button at the bottom
of the page. If there are no errors on the page, you will be brought to the “Student
Strengths” link. This page allows you to type in data regarding the student’s strengths in
each area. All areas must be addressed.
11) Click “Save and Continue” on the “Student Strengths” page. If there are no errors on the
page, you will be brought to the “Review of Existing Data” link. This page is made up of a
series of expand/collapse sections that allow you to add and remove data applicable to

Public Consulting Group, Inc.- ECATS End User Manual Page 43
the referral process for the student.
12) To expand a section, click on the plus sign. You will see fields where data applicable to
that area can be added. If no data is available for that particular area, you can check the
“No data is available for this area” checkbox. Click on the “Add/Remove Existing Data”
button to add data from other sources.
13) After clicking on the “Add/Remove Existing Data” button for a particular section, you
will be brought to another page with expand/collapse sections where you can add
Assessments, Attendance, Grades, and Progress Track data, if available. Click on the
plus/minus signs to expand and collapse each section. Click the “Save and Continue”
button to be brought back to the “Review of Existing Data” page. Note that to stay in
compliance, observations cannot be done without informed consent.

Public Consulting Group, Inc.- ECATS End User Manual Page 44
14) Click the “Save and Continue” button and if there are no errors on the page, you will be
brought to you will be brought to the “Assessment Review” link. You will see all of the
assessment areas, and you will be able to select assessments for each of the areas
determined on the “Assessment Summary” link in the process.
15) Click the “Select Assessments” button for the areas you want to add assessments to.
The available assessments (added from the “Assessment Summary” page) will display as
checkboxes. If no assessments were added to a specific assessment area on the
“Assessment Summary” page, no assessments will display. Click the checkbox to select
the assessment, and click the “Save and Continue” button. The assessment(s) selected
will then be added to the table on the “Assessment Review” page.

Public Consulting Group, Inc.- ECATS End User Manual Page 45
16) Repeat these steps for each applicable Assessment Area. Click “Save and Continue” on
the “Assessment Review” page once you are finished with the applicable areas. If there
are no errors on the page, you will be brought to the “Reason for Referral” link. On this
page, you can enter data into the textbox for the targeted area(s) of need.
17) Click “Save and Continue” on the “Reason for Referral” page. If there are no errors on
the page, you will be brought to the “IEP Team Determination” link. On this page, you
can select the Areas of Suspected Disability by selecting from the dropdowns. Three
dropdowns display; if the student has more than three areas of suspected disability, you
can click the “Add” button to add additional dropdowns. You can also indicate the IEP
Team determination on this page.

Public Consulting Group, Inc.- ECATS End User Manual Page 46
18) Clicking the “Are All Areas Met for Eligibility Determination” button will provide a
message that indicates whether or not all areas have been met for eligibility
determination for the specific disability(ies) selected. Based on the IEP Team
Determination, if an evaluation is not needed, an explanation in the text box below that
option will be a required field.
19) Once you have completed the data fields on the “IEP Team Determination” page, click
the “Save and Continue” button. If there are no errors on the page, you will be brought
to either the Evaluation Plan page or “Create Draft/Create Final” link.

Public Consulting Group, Inc.- ECATS End User Manual Page 47
20) If applicable, the Evaluation Plan page allows you to select evaluations that are needed
based upon the student’s suspected area of disability and the IEP Team determination.
Check the appropriate boxes and then click “Save and Continue”.
21) On this page, you can select the meeting dates and the meeting participants. Click the
“Excused” check box next to the participant’s name to indicate that they are excused
from the meeting.
22) At the bottom of the page is a button to create a draft document. Drafts can be created
while there are still errors within the process; final documents cannot be created until
all errors are corrected. Once the process is free of errors, the “Create Final” button will
display, allowing the user to create a final document and the associated referral event.
This starts the 90 day timeline.
23) Created documents can be viewed by clicking on the hyperlink for the document at the
bottom of the Create Draft/Final page and on the Documents tab.

Public Consulting Group, Inc.- ECATS End User Manual Page 48
CONSENT TAB
1) Hover over the EC Process tab in the menu bar and click on “Consent” from the tree
menu. On the Consent page, click on the link for “Create Consent to Evaluate.”
2) Fill in the fields on the document creation page.
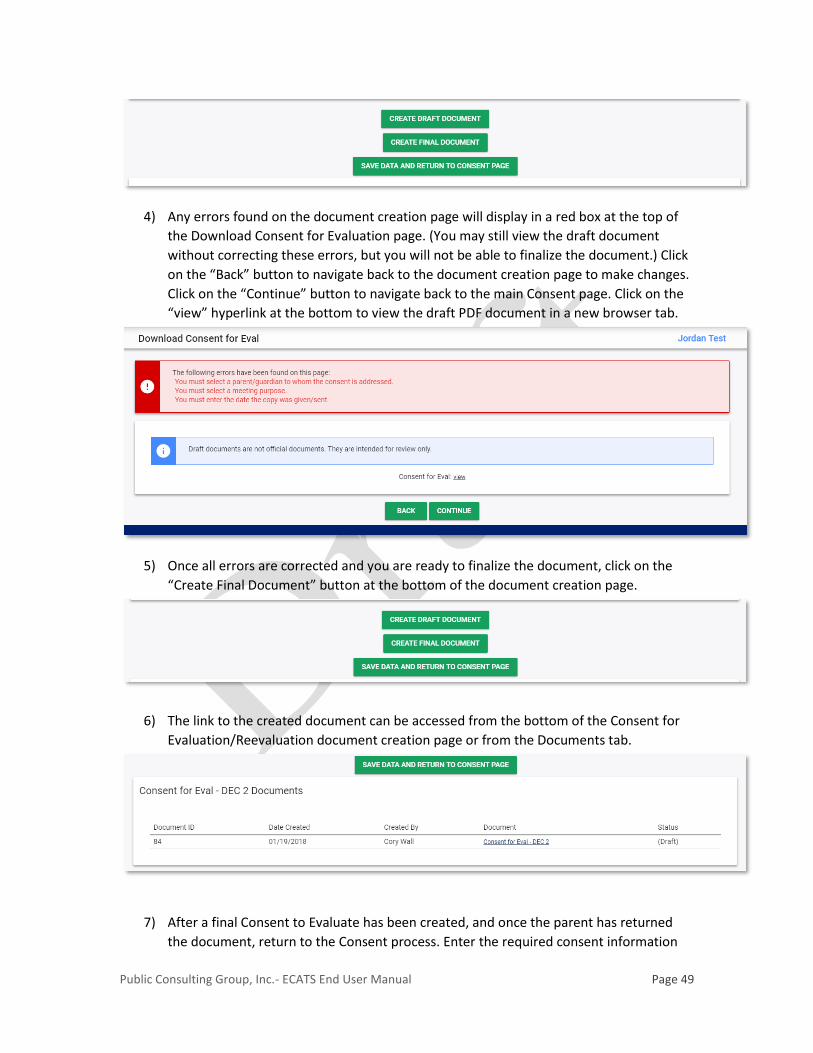
3) At the bottom of the page, click the “Create Draft Document” button.
Public Consulting Group, Inc.- ECATS End User Manual Page 49
4) Any errors found on the document creation page will display in a red box at the top of
the Download Consent for Evaluation page. (You may still view the draft document
without correcting these errors, but you will not be able to finalize the document.) Click
on the “Back” button to navigate back to the document creation page to make changes.
Click on the “Continue” button to navigate back to the main Consent page. Click on the
“view” hyperlink at the bottom to view the draft PDF document in a new browser tab.
5) Once all errors are corrected and you are ready to finalize the document, click on the
“Create Final Document” button at the bottom of the document creation page.
6) The link to the created document can be accessed from the bottom of the Consent for
Evaluation/Reevaluation document creation page or from the Documents tab.
7) After a final Consent to Evaluate has been created, and once the parent has returned
the document, return to the Consent process. Enter the required consent information

Public Consulting Group, Inc.- ECATS End User Manual Page 50
and click “Submit Consent to Evaluate Response”. The event data can be found on the
Student History page.
8) Next, on the Consent page click on the link for “Create Consent for Services.”
9) Fill in the fields on the document creation page.
10) At the bottom of the page, click the “Create Draft Document” button.

Public Consulting Group, Inc.- ECATS End User Manual Page 51
11) Any errors found on the document creation page will display in a red box at the top of
the Download Consent for Services page. (You may still view the draft document
without correcting these errors, but you will not be able to finalize the document.) Click
on the “Back” button to navigate back to the document creation page to make changes.
Click on the “Continue” button to navigate back to the main Consent page. Click on the
“view” hyperlink at the bottom to view the draft PDF document in a new browser tab.
12) Once all errors are corrected and you are ready to finalize the document, click on the
“Create Final Document” button at the bottom of the document creation page.
13) After a final Consent to Evaluate has been created, Eligibility has been determined and
once the parent has returned the document, return to the Consent process. Enter the
required consent information and click “Submit Consent for Services Response”.
14) The link to the created document can be accessed from the bottom of the Consent
for Services document creation page or from the Documents tab. The event data
can be found on the Student History page.
Public Consulting Group, Inc.- ECATS End User Manual Page 52
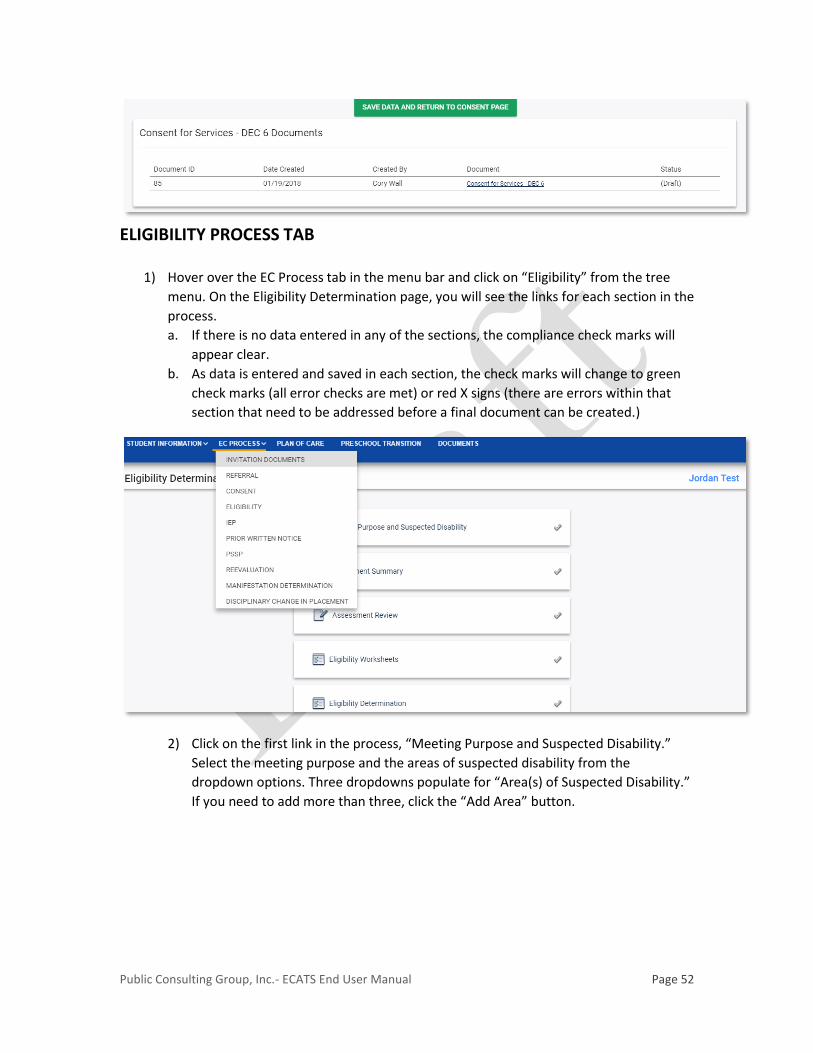
ELIGIBILITY PROCESS TAB
1) Hover over the EC Process tab in the menu bar and click on “Eligibility” from the tree
menu. On the Eligibility Determination page, you will see the links for each section in the
process.
a. If there is no data entered in any of the sections, the compliance check marks will
appear clear.
b. As data is entered and saved in each section, the check marks will change to green
check marks (all error checks are met) or red X signs (there are errors within that
section that need to be addressed before a final document can be created.)
2) Click on the first link in the process, “Meeting Purpose and Suspected Disability.”
Select the meeting purpose and the areas of suspected disability from the
dropdown options. Three dropdowns populate for “Area(s) of Suspected Disability.”
If you need to add more than three, click the “Add Area” button.

Public Consulting Group, Inc.- ECATS End User Manual Page 53
3) At the bottom of the page, click the “Save and Continue” button. Any errors found in
this section will display in a red box at the top of the page.
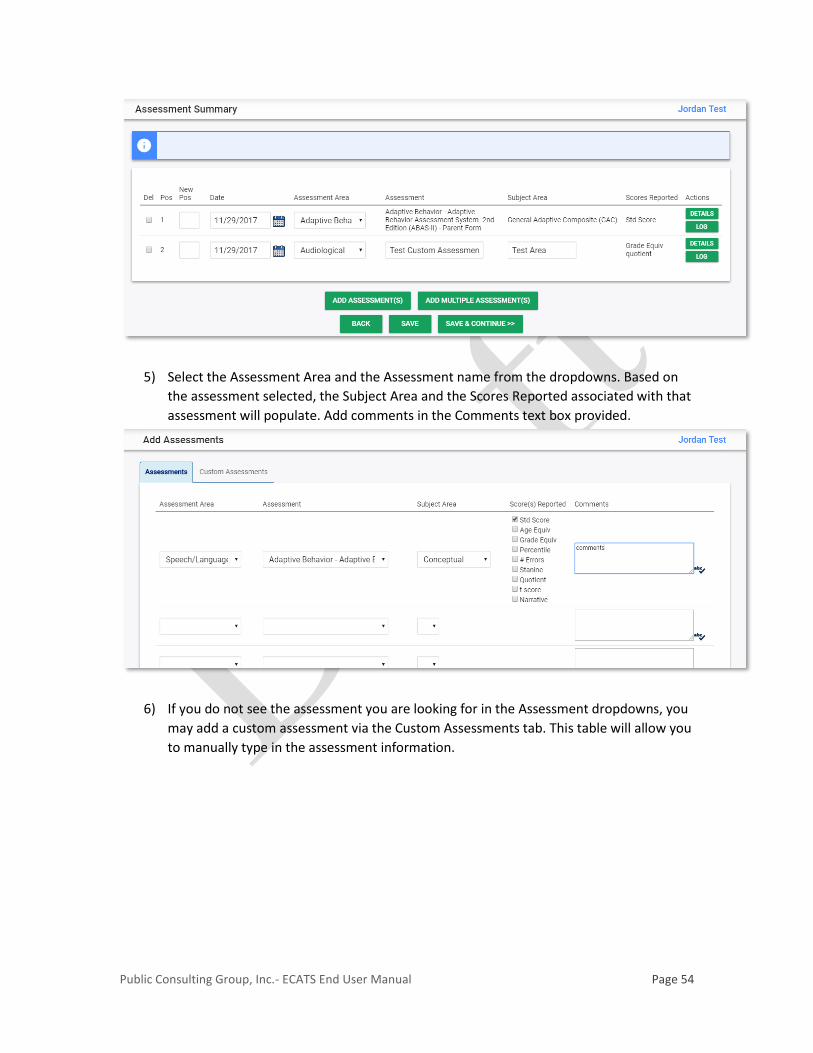
4) If there are no errors on the page, you will be brought to the “Assessment Summary”
link. Click on the “Add Assessment(s)” button to add assessments to the table.
Public Consulting Group, Inc.- ECATS End User Manual Page 54
5) Select the Assessment Area and the Assessment name from the dropdowns. Based on
the assessment selected, the Subject Area and the Scores Reported associated with that
assessment will populate. Add comments in the Comments text box provided.
6) If you do not see the assessment you are looking for in the Assessment dropdowns, you
may add a custom assessment via the Custom Assessments tab. This table will allow you
to manually type in the assessment information.

Public Consulting Group, Inc.- ECATS End User Manual Page 55
7) Click the “Save and Continue” button at the bottom of the page and you will be brought
back to the Assessment Summary page.
a. The assessments you added will be added to the table, and you can manually type
in the date, or select a date via the calendar icon for that assessment.
b. You may delete the assessment by selecting the checkbox next to it and clicking
the “Save” button at the bottom of the page.
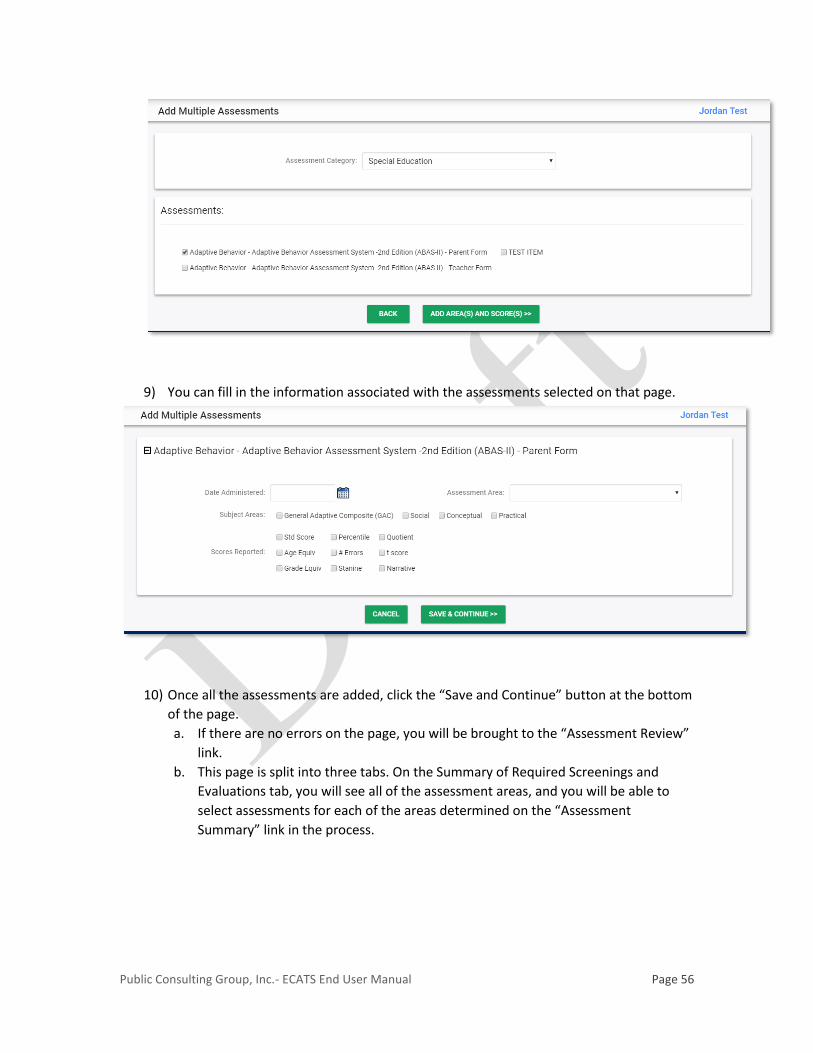
8) Add multiple assessments by selecting the “Add Multiple Assessments” button.
a. Select a category from the Assessment Category dropdown and you will see the
assessments associated with that category populate below.
b. Select one or multiple and click the “Add Area(s) and Score(s)” button.
Public Consulting Group, Inc.- ECATS End User Manual Page 56
9) You can fill in the information associated with the assessments selected on that page.
10) Once all the assessments are added, click the “Save and Continue” button at the bottom
of the page.
a. If there are no errors on the page, you will be brought to the “Assessment Review”
link.
b. This page is split into three tabs. On the Summary of Required Screenings and
Evaluations tab, you will see all of the assessment areas, and you will be able to
select assessments for each of the areas determined on the “Assessment
Summary” link in the process.

Public Consulting Group, Inc.- ECATS End User Manual Page 57
11) Click the “Select Assessments” button for the areas you want to add assessments to.
The available assessments (added from the “Assessment Summary” page) will display as
checkboxes.
a. If no assessments were added to a specific assessment area on the “Assessment
Summary” page, no assessments will display.
b. Otherwise, click the checkbox to select the assessment, and click the “Save and
Continue” button.
12) The assessment(s) selected will then be added to the table on the “Assessment Review”
page. Repeat these steps for each applicable Assessment Area.

Public Consulting Group, Inc.- ECATS End User Manual Page 58
13) Click on the Vision Screening tab. Select whether or not Vision Screening data is
available. If “No” is selected, you can move to the Hearing Screening tab. If “Yes” is
selected, you can fill in the necessary data from the Vision Screening.
14) Once the Vision Screening data is entered, click “Save and Continue.” Then click on the
Hearing Screening tab. Select whether or not Hearing Screening data is available. If “No”
is selected, you can move to the next page. If “Yes” is selected, you can fill in the
necessary data from the Hearing Screening.
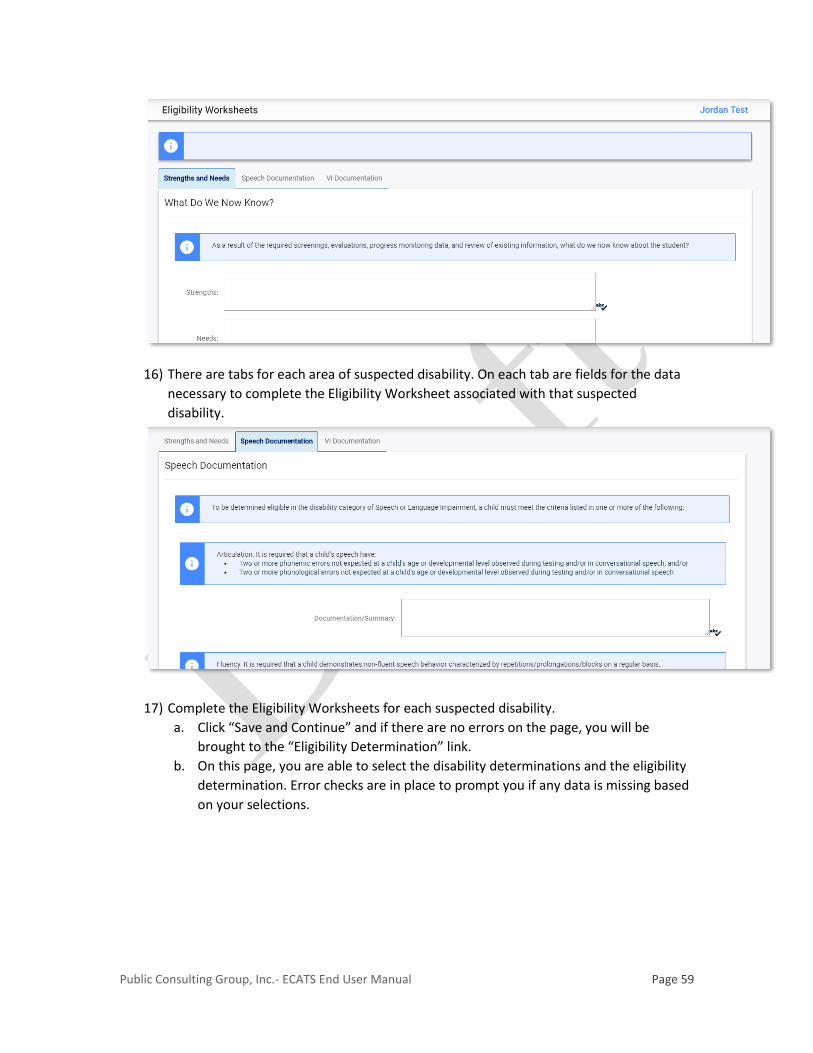
15) Click “Save and Continue” on the “Assessment Review” page. If there are no errors on
the page, you will be brought to the “Eligibility Worksheets” link. On this page, you can
enter strengths and needs data.
Public Consulting Group, Inc.- ECATS End User Manual Page 59
16) There are tabs for each area of suspected disability. On each tab are fields for the data
necessary to complete the Eligibility Worksheet associated with that suspected
disability.
17) Complete the Eligibility Worksheets for each suspected disability.
a. Click “Save and Continue” and if there are no errors on the page, you will be
brought to the “Eligibility Determination” link.
b. On this page, you are able to select the disability determinations and the eligibility
determination. Error checks are in place to prompt you if any data is missing based
on your selections.

Public Consulting Group, Inc.- ECATS End User Manual Page 60
18) Click the “Save and Continue” button and if there are no errors on the page, you will be
brought to the “Create Draft/Final Eligibility Determination and Worksheets” link.
a. On this page, you can select the meeting dates, the meeting participants, and the
information regarding procedural safeguards.
b. Click the “Excused” check box next to the participant’s name to indicate that they
are excused from the meeting.
19) At the bottom of the page is a button to create a draft document. Drafts can be created
while there are still errors within the process; final documents cannot be created until
all errors are corrected. Once the process is free of errors, the “Create Final” button will
display, allowing the user to create a final document and recording the eligibility event
associated with it.

Public Consulting Group, Inc.- ECATS End User Manual Page 61
20) Created documents can be viewed by clicking on the hyperlink for the document at the
bottom of the Create Draft/Final page.
IEP PROCESS TAB 1) Hover over the EC Process tab in the menu bar and click on “IEP” from the tree menu.
a. As you complete each link, the check next to each section will turn green if
completed correctly. You will receive a red ‘X’ if information is missing or
conflicting data has been entered.
b. If you click on “Show Section”, a PDF will appear that shows the section of the IEP that you just completed.
c. “Just Update” will save the information entered and keep you on the page.

Public Consulting Group, Inc.- ECATS End User Manual Page 62
d. “Save & Continue” will save the information you entered on the page and continue to the next step (link).
IEP Process
Meeting Purpose Link In this section you select the meeting purpose and add the IEP dates. To begin the process, click
on the “Meeting Purpose” link.
1) Fill in the fields on the page and click the “Save & Continue” button. The Case
Manager can be added or changed within the Team tab on the Student Information
menu.
IEP Process
Student Profile Link In this section, add information regarding the student and parents.

Public Consulting Group, Inc.- ECATS End User Manual Page 63
1) The student’s area(s) of eligibility will appear at the top of the page. This is set after the
finalization of an Eligibility Determination.
2) Complete the narratives regarding student strengths and parent desires. This
information is mandatory, so you will receive an error message if no data is entered on
the page.
3) If the information has been entered, click “Save and Continue” to move to the next
section. As with all sections, if you cannot complete the entire section, simply navigate
back to the IEP process tab and click on the next link in the process. You can return to
pages and later add in the remaining information.
IEP Process
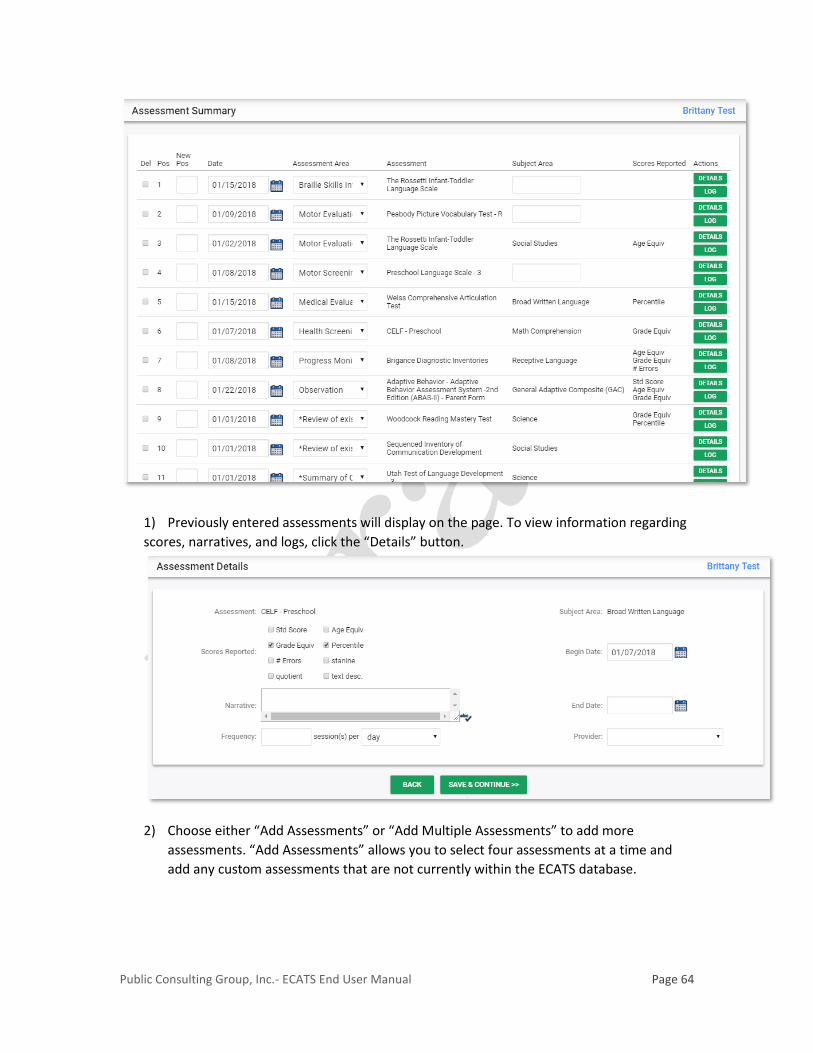
Assessment Summary Link In this section, you can add assessments or view the assessments previously entered for the
student within the Referral and/or Eligibility processes.
Public Consulting Group, Inc.- ECATS End User Manual Page 64
1) Previously entered assessments will display on the page. To view information regarding
scores, narratives, and logs, click the “Details” button.
2) Choose either “Add Assessments” or “Add Multiple Assessments” to add more
assessments. “Add Assessments” allows you to select four assessments at a time and
add any custom assessments that are not currently within the ECATS database.

Public Consulting Group, Inc.- ECATS End User Manual Page 65
3) Select the Assessment Area and Assessment from the dropdown list. The Subject Area
and Scores Reported will populate after you have selected the Assessment.
4) If the assessment you are looking for is not listed, use the “Custom Assessments” tab.

Public Consulting Group, Inc.- ECATS End User Manual Page 66
5) After adding your Assessment information, click “Save and Continue”. This will take you
to the Assessment Summary page where you can add the date, details, and log scores.
6) For custom assessments, you will then need to add the Assessment Area from the
dropdown list.
7) Alternately, you can click “Add Multiple Assessments”, which will bring up the full
alphabetized list of all the assessments within ECATS.
8) Select the Assessment Category of Special Education and then check all assessments you
want to add.

Public Consulting Group, Inc.- ECATS End User Manual Page 67
9) Click “Add Areas and Scores” to continue.
10) Fill in the relevant information, using the expand/collapse buttons to navigate down the
page. When you are finished, click “Save and Continue”.
IEP Process
Public Consulting Group, Inc.- ECATS End User Manual Page 68
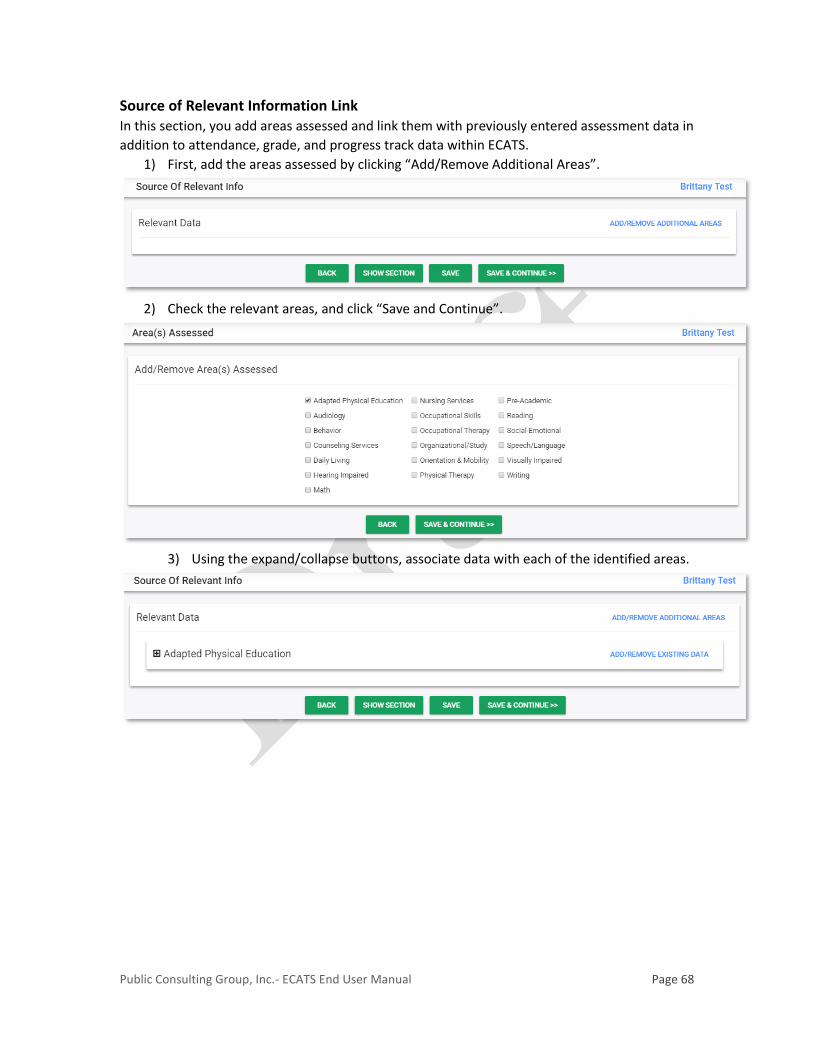
Source of Relevant Information Link In this section, you add areas assessed and link them with previously entered assessment data in
addition to attendance, grade, and progress track data within ECATS.
1) First, add the areas assessed by clicking “Add/Remove Additional Areas”.
2) Check the relevant areas, and click “Save and Continue”.
3) Using the expand/collapse buttons, associate data with each of the identified areas.

Public Consulting Group, Inc.- ECATS End User Manual Page 69
IEP Process
Present Levels Link Within this section, you specify the present levels of performance for each of the previously
identified areas assessed.
1) Enter information regarding the present levels for each area, then complete the
Additional Information section.
2) Once complete click the “Save & Continue” button to continue to the next page in the
IEP process.
IEP Process
Special Factors Link

Public Consulting Group, Inc.- ECATS End User Manual Page 70
On this page, decide whether any special factors should be considered in the development of
the IEP.
1) Answer the questions and add additional information if necessary.
2) If the student has documented hearing loss, a Communication Plan Worksheet must be
created. Click on “Communication Plan Worksheet” to create the document.
3) At the bottom of the page, specify if the areas assessed are in need of specially
designed instruction.

Public Consulting Group, Inc.- ECATS End User Manual Page 71
IEP Process
Secondary Transition Link On this page, add transition information for students age 16 and older during the life of the IEP.
If the student will not be 16 or older during the life of the IEP, click on the link and scroll down
the page to the “Save & Continue” button.
1) A warning box at the top of the page will remind you of the student age, so you can
determine whether or not a transition plan is necessary.

Public Consulting Group, Inc.- ECATS End User Manual Page 72
2) If the student is in need of a transition plan, complete the necessary information
and continue to the bottom of the page.
3) Within each Transition Area, add transition services.

Public Consulting Group, Inc.- ECATS End User Manual Page 73
4) Click “Save and Continue” to save your data and move back to the Transition Areas.
Complete each tab as necessary before clicking “Save and Continue” at the bottom
of the page.
IEP Process
Annual Goals Link Within this link, you build upon previously entered areas of need and present level information.
1) Click on “Add/Delete Goals” to add the details and objectives (if applicable) for each goal.
2) Click “Add Goals” to add and edit annual goals (criteria of mastery will be added later.)

Public Consulting Group, Inc.- ECATS End User Manual Page 74
3) Then click “Goal Details/Objectives”.
4) Select the goal details and add objectives, if desired.
a. If you add objectives, two must be added per goal. If the student is receiving
instruction using the Extended Content Standards, two objectives must be
entered for each goal.
b. If the student will require the goal for ESY, check the box so that it will be
included within the ESY Services Goal Integration section later in the
process.
c. Add mastery criteria, indicate whether assistive technology is needed, and
indicate whether this goal is related to transition goals, in this section as
well.

Public Consulting Group, Inc.- ECATS End User Manual Page 75
5) There is a text box at the bottom of the page for an explanation regarding
alternate assessments. If this is not applicable for the student, check the “Not
applicable at this time” check box and it will disable the text box.
IEP Process
Services Link In this section, add special education and related service information.
1) Click “Add Special Ed Services”.

Public Consulting Group, Inc.- ECATS End User Manual Page 76
2) Choose the Special Ed service(s) from the dropdowns. To add more than four services,
click “Save and Continue” and then click “Add Special Ed Services” again to return to the
page.
3) Complete the information regarding the service timing and duration.
Public Consulting Group, Inc.- ECATS End User Manual Page 77
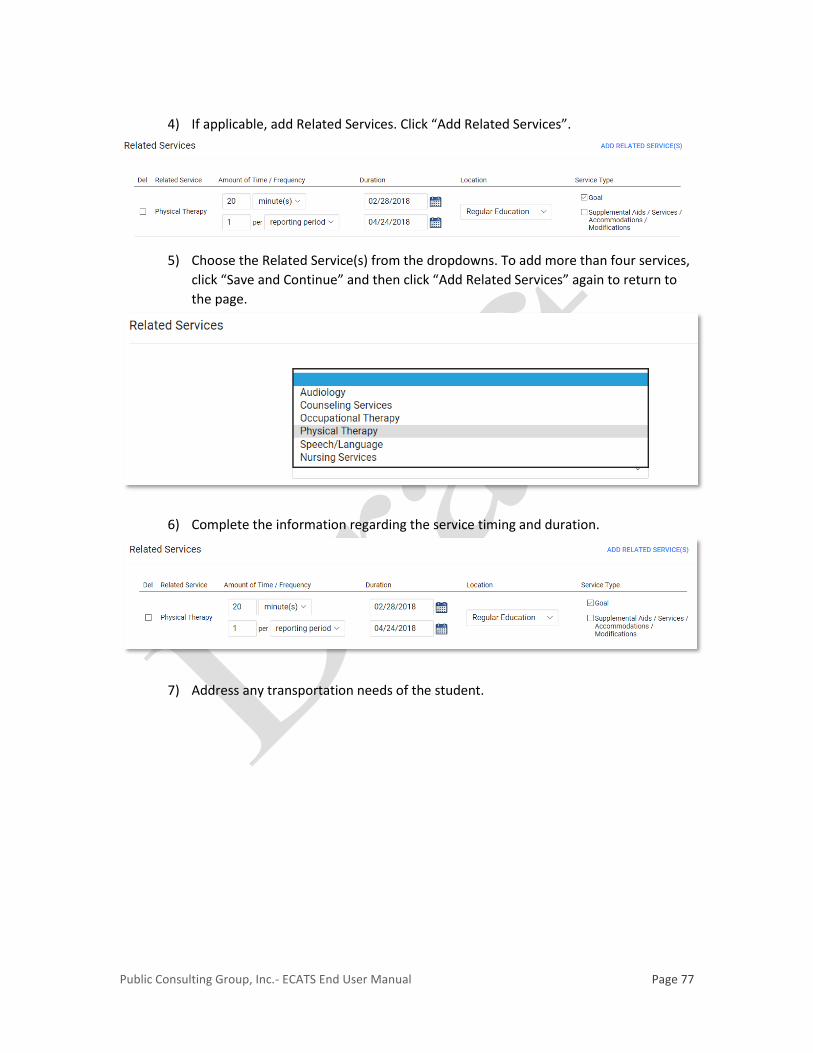
4) If applicable, add Related Services. Click “Add Related Services”.
5) Choose the Related Service(s) from the dropdowns. To add more than four services,
click “Save and Continue” and then click “Add Related Services” again to return to
the page.
6) Complete the information regarding the service timing and duration.
7) Address any transportation needs of the student.

Public Consulting Group, Inc.- ECATS End User Manual Page 78
IEP Process
Services Goal Integration Link In this section, you can edit goal integration with services and add supplemental aids.
1) All of the present level, goal, and services information previously entered in the process
is available on this page.
2) Click “Edit Goal integration” to add services supporting the goal.

Public Consulting Group, Inc.- ECATS End User Manual Page 79
3) Check the corresponding service and then click “Save and Continue” to return to the
Service Goal Integration page.
4) Click “Add Supplemental Aids”, and add information.
IEP Process
Accommodations Link In this section, add classes, district assessments and state tests in which the student is
participating. If the student requires any accommodations, you can add them here as well.
a. The system requires that any accommodations provides for assessments or tests
also be provided within the classroom.
b. The process of adding classes, district assessments, and state tests is the same.
The following is an example of class accommodations.
1) Click “Add Class Activities” to be taken to a list of classes.

Public Consulting Group, Inc.- ECATS End User Manual Page 80
2) Check the box next to the desired classes/activities, and then select the participation
level at the bottom of the page. Click “Save and Continue” to progress to the
accommodations page.
3) On the Accommodation page, select from the list of allowable accommodations for each
class/activity. If you have selected multiple classes, the accommodations added to one
class will automatically select for all classes.
c. In the example below, Multiple Testing Sessions was selected for Health.
d. Multiple Testing Sessions was automatically checked for Music.

Public Consulting Group, Inc.- ECATS End User Manual Page 81
4) Once the classes/tests and accommodations have been added, update the location dropdown. If you want to add or remove any accommodations for an individual class/test, click the “Edit” button.
5) At the bottom of the page, click “Add Implementation Specifics” to add a narrative
for all accommodations across classes and tests.

Public Consulting Group, Inc.- ECATS End User Manual Page 82
IEP Process
ESY Services Link In this section, you will address ESY eligibility and services.
1) Determine if the student requires ESY.
2) If yes, complete the ESY Eligibility and Services sections. If no, click “Save and Continue”.

Public Consulting Group, Inc.- ECATS End User Manual Page 83
IEP Process
ESY Services Goal Integration Link If the student is eligible for ESY and requires services to support an annual goal, you can add it
here. If not, click “Save and Continue” to move to the next step of the process.
1) Any goals previously flagged as ESY within the “Annual Goals” link will appear here.
2) In the same way as the Service Goal Integration link, you can add ESY goal integration
and supplemental aids.
IEP Process
Create Draft/Final IEP Document Link
Public Consulting Group, Inc.- ECATS End User Manual Page 84
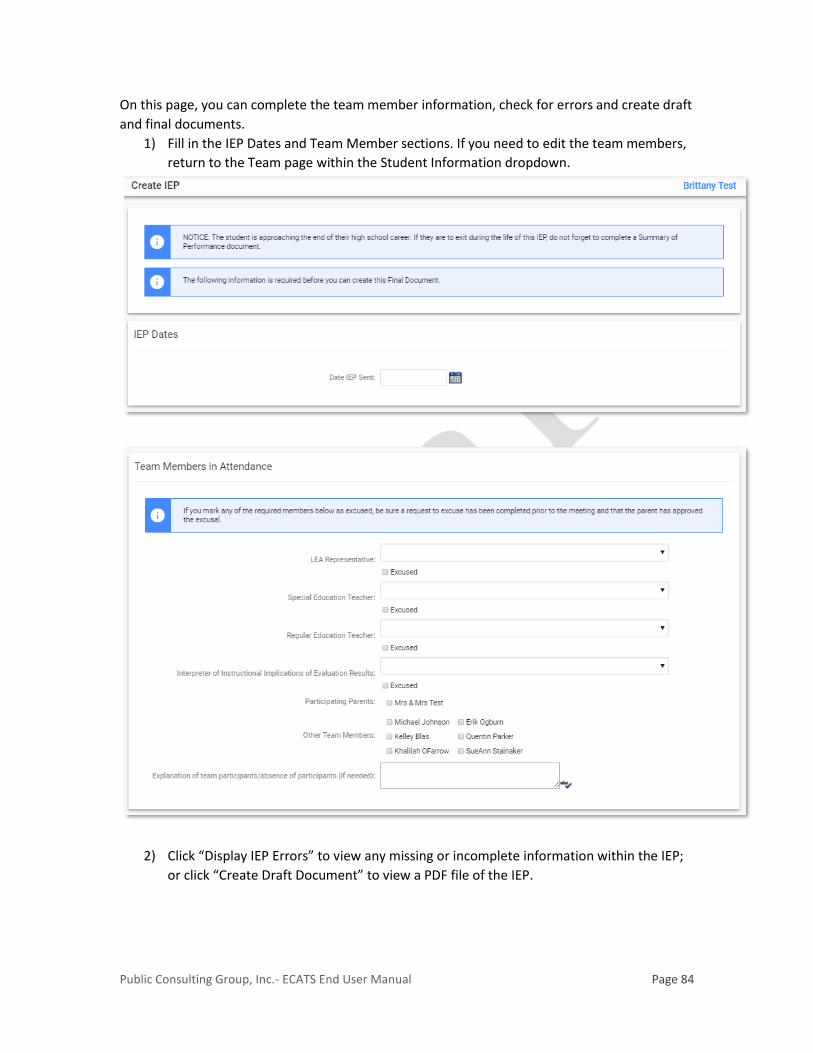
On this page, you can complete the team member information, check for errors and create draft
and final documents.
1) Fill in the IEP Dates and Team Member sections. If you need to edit the team members,
return to the Team page within the Student Information dropdown.
2) Click “Display IEP Errors” to view any missing or incomplete information within the IEP;
or click “Create Draft Document” to view a PDF file of the IEP.

Public Consulting Group, Inc.- ECATS End User Manual Page 85
3) Once an error free draft document has been created, you will be able to create a final
IEP.
PRIOR WRITTEN NOTICE TAB
1) Hover over the EC Process tab in the menu bar and click on “Prior Written Notice” from
the tree menu. This will take you to the document creation page for the Prior Written
Notice.
2) Fill in the necessary data regarding the meeting details, the meeting purpose, and the
explanations of actions proposed/refused.

Public Consulting Group, Inc.- ECATS End User Manual Page 86
3) When you reach the “Source of Relevant Information” section, click the “Add Remove
Existing Data” button.

Public Consulting Group, Inc.- ECATS End User Manual Page 87
4) This page is made up of a series of expand/collapse sections that allow you to add and
remove data applicable to the Prior Written Notice. To expand a section, click on the
plus sign. Click the checkbox for any item you wish to add. Once you are finished with
adding data to each section, click the “Save and Continue” button to navigate back to
the Prior Written Notice creation page.
5) The data added will populate in the “Source of Relevant Information” section. To delete
any data, click the “Add/Remove Existing Data” button again, uncheck the boxes, and
click “Save and Continue” and the data will be removed from the “Source of Relevant
Information” section.
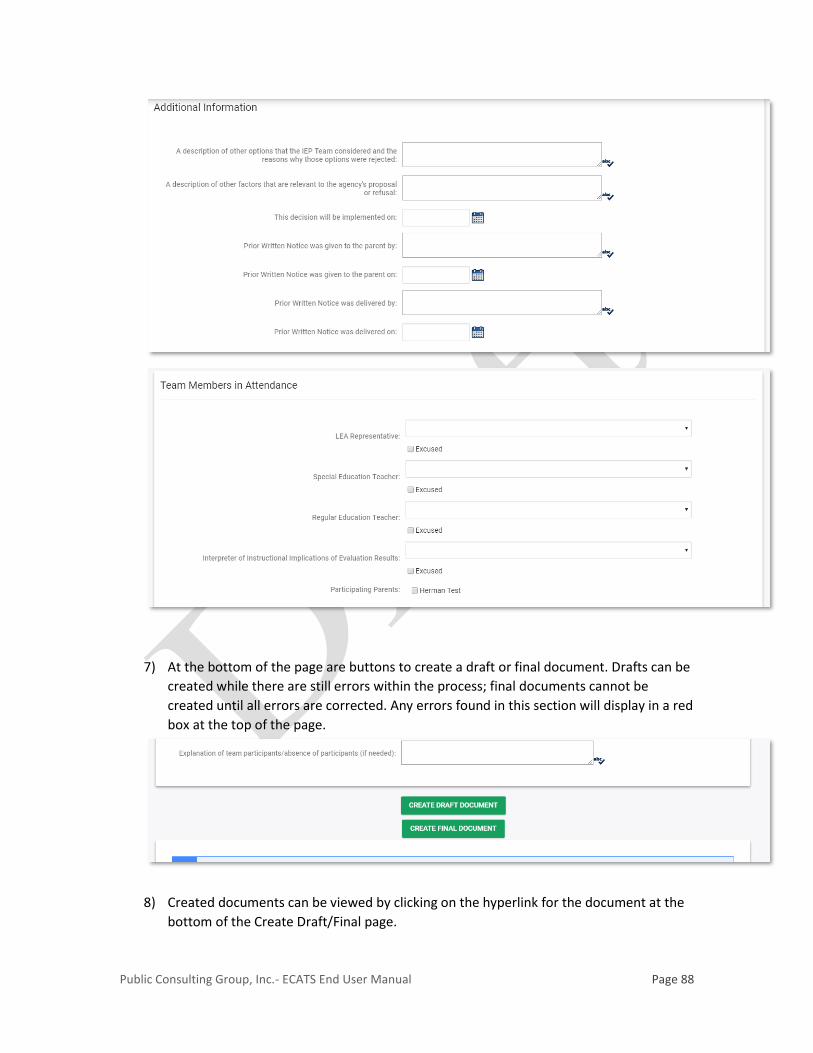
6) Complete the “Additional Information” and “Team Members in Attendance” sections.
Public Consulting Group, Inc.- ECATS End User Manual Page 88
7) At the bottom of the page are buttons to create a draft or final document. Drafts can be
created while there are still errors within the process; final documents cannot be
created until all errors are corrected. Any errors found in this section will display in a red
box at the top of the page.
8) Created documents can be viewed by clicking on the hyperlink for the document at the
bottom of the Create Draft/Final page.

Public Consulting Group, Inc.- ECATS End User Manual Page 89
PSSP PROCESS TAB
1) Click on the Students tab in the blue menu bar to search for the student via the search
criteria or by clicking the “View My Caseload” button at the bottom of the page.
2) Click on the student’s name.

Public Consulting Group, Inc.- ECATS End User Manual Page 90
3) Hover over the EC Process tab in the menu bar and click on “PSSP” from the tree menu.
a. As you complete each link, the check next to each section will turn green if
completed correctly. You will receive a red ‘X’ if information is missing or
conflicting data has been entered.
b. If you click on “Show Section”, a PDF will appear that shows the section of the PSSP you just completed.
c. “Just Update” will save the information entered and keep you on the page. d. “Save & Continue” will save the information you entered on the page and
continue to the next step (link). 2) If you would like to copy data from the IEP process into the PSSP process click the
button “copy from IEP”

Public Consulting Group, Inc.- ECATS End User Manual Page 91
PSSP Process
Meeting Purpose Link In this section you select the meeting purpose and add the PSSP dates. To begin the process,
click on the “Meeting Purpose” link.
1) Fill in the fields on the page and click the “Save & Continue” button. The Case Manager
can be added or changed within the Team tab on the Student Information menu.
PSSP Process
Student Profile Link In this section, add information regarding the student and parents.

Public Consulting Group, Inc.- ECATS End User Manual Page 92
1) The student’s area(s) of eligibility will appear at the top of the page. This is set after the
finalization of an Eligibility Determination.
2) Complete the narratives regarding student strengths and parent desires.
3) If the information has been entered, click “Save and Continue” to move to the next
section. As with all sections, if you cannot complete the entire section, simply navigate
back to the PSSP process tab and click on the next link in the process. You can return to
pages and later add in the remaining information.
PSSP Process
Assessment Summary Link In this section, you can add assessments or view the assessments previously entered for the
student within the Referral and/or Eligibility processes.
Public Consulting Group, Inc.- ECATS End User Manual Page 93
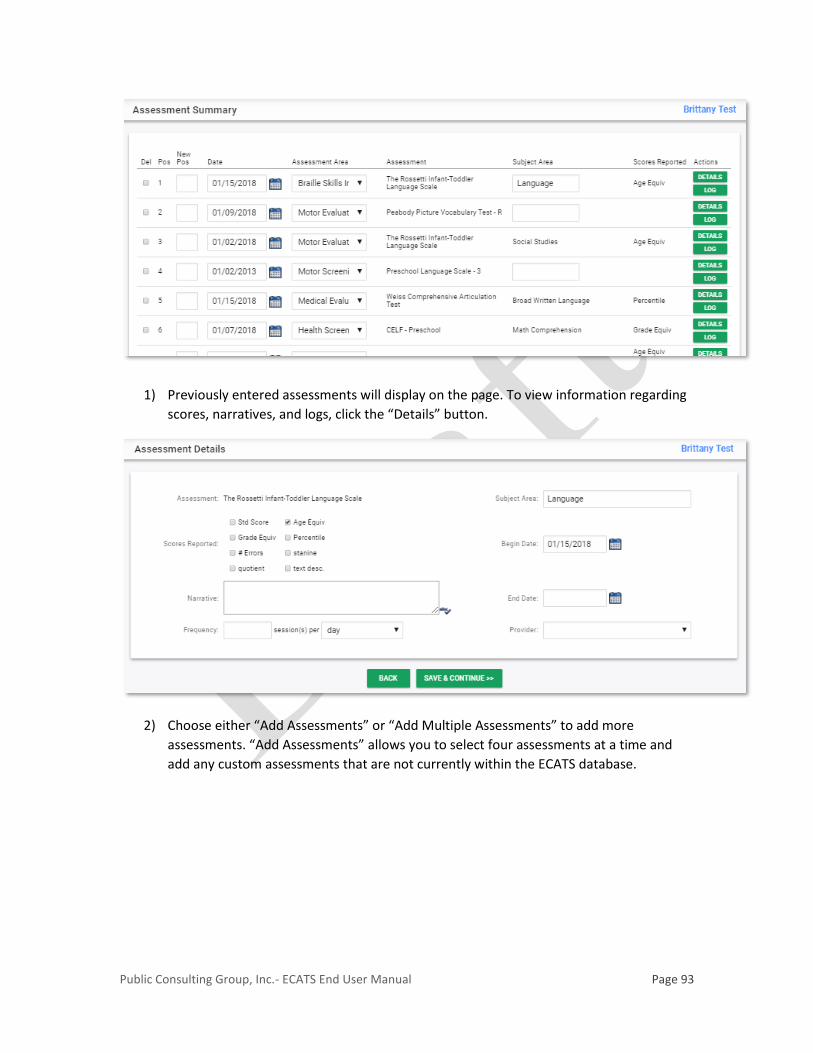
1) Previously entered assessments will display on the page. To view information regarding
scores, narratives, and logs, click the “Details” button.
2) Choose either “Add Assessments” or “Add Multiple Assessments” to add more
assessments. “Add Assessments” allows you to select four assessments at a time and
add any custom assessments that are not currently within the ECATS database.

Public Consulting Group, Inc.- ECATS End User Manual Page 94
3) Select the Assessment Area and Assessment from the dropdown list. The Subject Area
and Scores Reported will populate after you have selected the Assessment.
4) If the assessment you are looking for is not listed, use the “Custom Assessments” tab.

Public Consulting Group, Inc.- ECATS End User Manual Page 95
5) After adding your Assessment information, click “Save and Continue”. This will take you
to the Assessment Summary page where you can add the date, details, and log scores.
6) For custom assessments, you will then need to add the Assessment Area from the
dropdown list.
7) Alternately, you can click “Add Multiple Assessments”, which will bring up the full
alphabetized list of all the assessments within ECATS.
8) Select the Assessment Category of Special Education and then check all assessments you
want to add.

Public Consulting Group, Inc.- ECATS End User Manual Page 96
9) Click “Add Areas and Scores” to continue.
10) Fill in the relevant information, using the expand/collapse buttons to navigate down the
page. When you are finished, click “Save and Continue”.
PSSP Process

Public Consulting Group, Inc.- ECATS End User Manual Page 97
Source of Relevant Information Link In this section, you add areas assessed and link them with previously entered assessment data in
addition to attendance, grade, and progress track data within ECATS.
1) First, add the areas assessed by clicking “Add/Remove Additional Areas”.
2) Check the relevant areas, and click “Save and Continue”.
3) Using the expand/collapse buttons, associate data with each of the identified areas.

Public Consulting Group, Inc.- ECATS End User Manual Page 98
PSSP Process
Present Levels Link Within this section, you specify the present levels of performance for each of the previously
identified areas assessed.
1) Enter information regarding the present levels for each area, then complete the
Additional Information section.
2) Once complete click the “Save & Continue” button to continue to the next page in
the PSSP process.
PSSP Process
Special Factors Link

Public Consulting Group, Inc.- ECATS End User Manual Page 99
On this page, decide whether any special factors should be considered in the development of
the PSSP.
1) Answer the questions and add additional information if necessary.
2) If the student has documented hearing loss, a Communication Plan Worksheet must be
created. Click on “Communication Plan Worksheet” to create the document.
3) At the bottom of the page, specify if the areas assessed are in need of specially designed
instruction.

Public Consulting Group, Inc.- ECATS End User Manual Page 100
PSSP Process
Annual Goals Link Within this link, you build upon previously entered areas of need and present level information.
1) Click on “Add/Delete Goals” to add the details and objectives (if applicable) for each goal.
2) Add annual goals.

Public Consulting Group, Inc.- ECATS End User Manual Page 101
3) Then click “Goal Details/Objectives”.
4) Select the goal details and add objectives, if desired. If you add objectives, two must be
added per goal. If the student is receiving instruction using the Extended Content
Standards, two objectives must be entered for each goal.

Public Consulting Group, Inc.- ECATS End User Manual Page 102
PSSP Process
Services Link In this section, add special education and related service information.
1) Click “Add Special Ed Services”.
2) Choose the Special Ed service(s) from the dropdowns. To add more than four services,
click “Save and Continue” and then click “Add Special Ed Services” again to return to the
page.

Public Consulting Group, Inc.- ECATS End User Manual Page 103
3) Complete the information regarding the service timing and duration.
4) Address any transportation needs of the student.

Public Consulting Group, Inc.- ECATS End User Manual Page 104
PSSP Process
Services Goal Integration Link In this section, you can edit goal integration with services and add supplemental aids.
1) All of the present level, goal, and services information previously entered in the process
is available on this page.
2) Click “Edit Goal integration” to add services supporting the goal.

Public Consulting Group, Inc.- ECATS End User Manual Page 105
3) Check the corresponding service and then click “Save and Continue” to return to the
Service Goal Integration page.
4) Click “Add Supplemental Aids”, and add information.
PSSP Process
Create PSSP Link On this page, you can complete the team member information, check for errors and create draft
and final documents.
1) Fill in the PSSP Team Member sections. If you need to edit the team members, return to
the Team page within the Student Information dropdown.
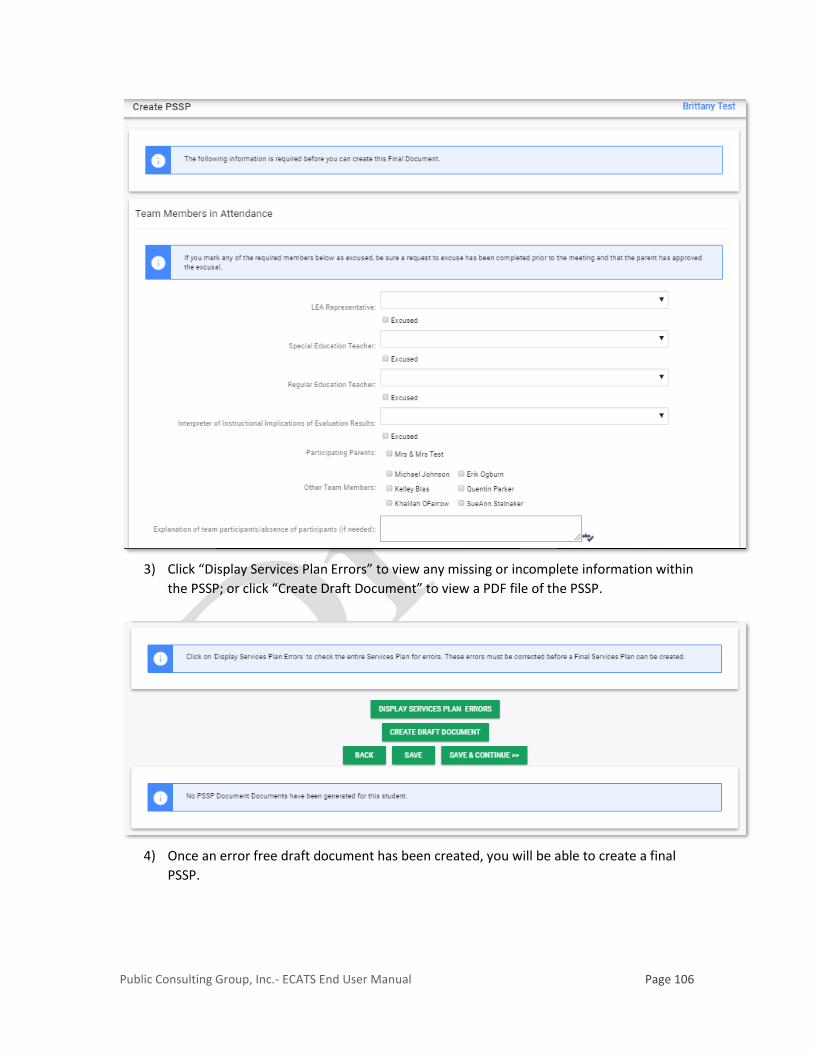
Public Consulting Group, Inc.- ECATS End User Manual Page 106
3) Click “Display Services Plan Errors” to view any missing or incomplete information within
the PSSP; or click “Create Draft Document” to view a PDF file of the PSSP.
4) Once an error free draft document has been created, you will be able to create a final
PSSP.

Public Consulting Group, Inc.- ECATS End User Manual Page 107
REEVALUATION PROCESS TAB 1) Hover over the EC Process tab in the menu bar and click on “Reevaluation” from the
tree menu. On the Reevaluation Report Process page, you will see the links for each
section in the process.
a. If there is no data entered in any of the sections, the compliance check
marks will appear clear.
b. As data is entered and saved in each section, the check marks will change to
green check marks (all error checks are met) or red X signs (there are errors
within that section that need to be addressed before a final document can
be created.)
2) Click on the first link in the process, “Assessment Summary.” Any assessments and
evaluations entered for the student thus far will appear here. Click on the “Add
Assessment(s)” button to add assessments to the table.

Public Consulting Group, Inc.- ECATS End User Manual Page 108
3) Select the Assessment Area and the Assessment name from the dropdowns. Based on
the assessment selected, the Subject Area and the Scores Reported associated with that
assessment will populate. Add comments in the Comments text box provided.
4) If you do not see the assessment you are looking for in the Assessment dropdowns, you
may add a custom assessment via the Custom Assessments tab. This table will allow you
to manually type in the assessment information.
5) Click the “Save and Continue” button at the bottom of the page and you will be brought
back to the “Assessment Summary” page.
a. The assessments you added will be added to the table, and you can type in
the date, or select a date via the calendar icon for that assessment.
b. You may delete the assessment by selecting the checkbox next to it and
clicking the “Save” button at the bottom of the page.

Public Consulting Group, Inc.- ECATS End User Manual Page 109
6) Add multiple assessments by selecting the “Add Multiple Assessments” button.
a. Select a category from the Assessment Category dropdown and you will see
the assessments associated with that category populate below.
b. Select one or multiple and click the “Add Area(s) and Score(s)” button.
7) You can fill in the information associated with the assessments selected on that page.

Public Consulting Group, Inc.- ECATS End User Manual Page 110
8) Once all the assessments are added, click the “Save and Continue” button at the bottom
of the page.
a. If there are no errors on the page, you will be brought to the “Review of
Existing Data” link.
b. This page is made up of a series of expand/collapse sections that allow you
to add and remove data applicable to the reevaluation process for the
student.
c. Each tab on the table has expand/collapse sections pertaining to each type
of data.
9) To expand a section, click on the plus sign. You will see fields where data applicable to
that area can be added.
a. If no data is available for an area, you can check the “No data is available for
this area” checkbox.
b. Click on the “Add/Remove Existing Data” button to add data from other
sources.

Public Consulting Group, Inc.- ECATS End User Manual Page 111
10) After clicking on the “Add/Remove Existing Data” button for a particular section, you
will be brought to another page with expand/collapse sections where you can add
Assessments, Attendance, Grades, and Progress Track data, if available.
a. Click on the plus/minus signs to expand and collapse each section.
b. Click the “Save and Continue” button to be brought back to the “Review of
Existing Data” page.
11) Once you have completed the sections on each of the tabs, click the “Save and
Continue” button and if there are no errors on the page, you will be brought to the
“Reevaluation Decision” link. On this page, you will be able to indicate the IEP team’s
determination.

Public Consulting Group, Inc.- ECATS End User Manual Page 112
12) If you select that the IEP team has determined that no additional formal evaluations are
needed, a textbox will display for further explanation.
13) If you select that the IEP team has decided that formal evaluations are needed, two
additional sections will display with Yes/No questions that must be answered regarding
Eligibility and Programming: Development of the IEP.
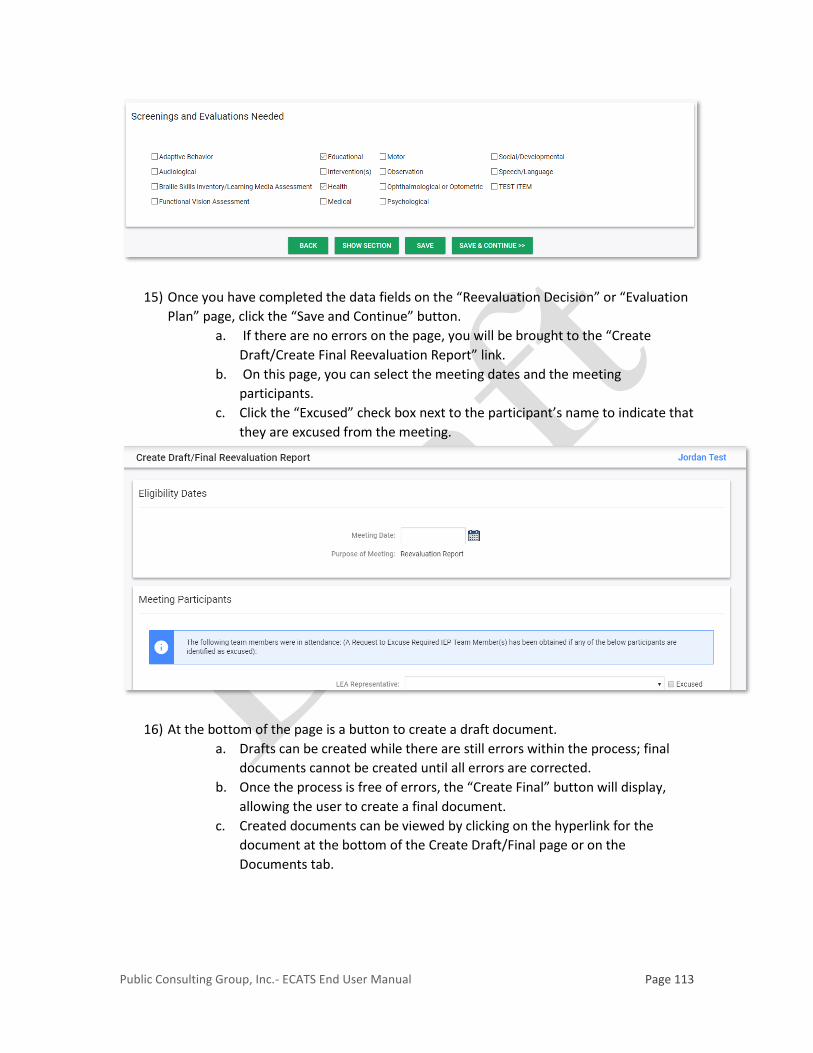
14) If formal evaluations are required, then the Evaluation Plan section will appear in the
Reevaluation Process where you can select the needed Screenings and Evaluations.
Public Consulting Group, Inc.- ECATS End User Manual Page 113
15) Once you have completed the data fields on the “Reevaluation Decision” or “Evaluation
Plan” page, click the “Save and Continue” button.
a. If there are no errors on the page, you will be brought to the “Create
Draft/Create Final Reevaluation Report” link.
b. On this page, you can select the meeting dates and the meeting
participants.
c. Click the “Excused” check box next to the participant’s name to indicate that
they are excused from the meeting.
16) At the bottom of the page is a button to create a draft document.
a. Drafts can be created while there are still errors within the process; final
documents cannot be created until all errors are corrected.
b. Once the process is free of errors, the “Create Final” button will display,
allowing the user to create a final document.
c. Created documents can be viewed by clicking on the hyperlink for the
document at the bottom of the Create Draft/Final page or on the
Documents tab.

Public Consulting Group, Inc.- ECATS End User Manual Page 114
MANIFESTATION DETERMINATION TAB
1) Hover over the EC Process tab in the menu bar and click on “Manifestation
Determination” from the tree menu.
a. On the Manifestation Determination process page, you will see the links for
each section in the process.
b. If there is no data entered in any of the sections, the compliance check
marks will appear clear.
c. As data is entered and saved in each section, the check marks will change to
green check marks (all error checks are met) or red X signs (there are errors
within that section that need to be addressed before a final document can
be created.)
2) Click on the first link in the process, “Current Disciplinary Event.” Fill in the necessary
data regarding the event.

Public Consulting Group, Inc.- ECATS End User Manual Page 115
3) At the bottom of the page, click the “Save and Continue” button. Any errors found in
this section will display in a red box at the top of the page.
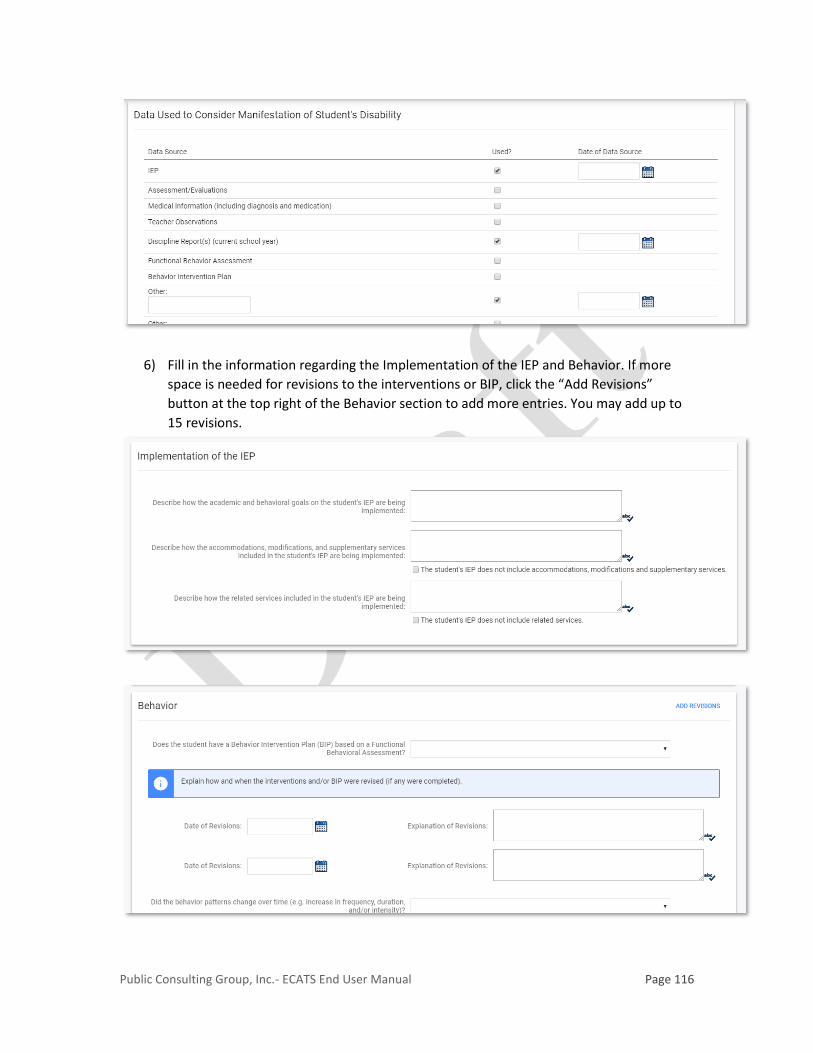
4) If there are no errors on the page, you will be brought to the “Data Used to Consider
Manifestation of Student's Disability” link. Check the checkbox for each Data Source
used.
5) As you check the checkboxes, date fields will display allowing you to enter the date of
the data source. If other data sources are used to consider the manifestation of the
student’s disability but do not appear on the list, select the checkboxes for “Other” and
a text box will display for you to type in the data source.
Public Consulting Group, Inc.- ECATS End User Manual Page 116
6) Fill in the information regarding the Implementation of the IEP and Behavior. If more
space is needed for revisions to the interventions or BIP, click the “Add Revisions”
button at the top right of the Behavior section to add more entries. You may add up to
15 revisions.

Public Consulting Group, Inc.- ECATS End User Manual Page 117
7) Click the “Save and Continue” button at the bottom of the page and if there are no
errors, you will be brought to the “Assessment of Manifestation Determination” link.
Answer the questions by selecting “Yes” or “No” in each dropdown.
8) Based on the selections made in the dropdown, the final question on the page will
automatically populate with “Yes” or “No.”
9) Click the “Save and Continue” button at the bottom of the page and if there are no
errors, you will be brought to the “Manifestation Determination Review of Participants”
link. Fill in the necessary information regarding the meeting date and the meeting
participants.

Public Consulting Group, Inc.- ECATS End User Manual Page 118
10) At the bottom of the page are buttons to create a draft or final document. Drafts can be
created while there are still errors within the process; final documents cannot be
created until all errors are corrected.
11) Created documents can be viewed by clicking on the hyperlink for the document at the
bottom of the Create Draft/Final page or on the Documents tab.
DISCIPLINARY CHANGE IN PLACEMENT TAB
1) Hover over the EC Process tab in the menu bar and click on “Disiciplinary Change in Placement” from the tree menu. This will take you to the process page for the Disciplinary Change in Placement.
2) Click on the first link in the process, “Disiciplinary Change in Placement.” Fill in the necessary data regarding the Manifestation Determination meeting.

Public Consulting Group, Inc.- ECATS End User Manual Page 119
3) At the bottom of the page, click the “Save and Continue” button. Any errors found in
this section will display in a red box at the top of the page.
4) If there are no errors on the page, you will be brought to the “Prior Written Notice –
Disciplinary Change in Placement” link. Enter the explanation of actions in the text boxes
provided.
5) At the bottom of the page, click the “Save and Continue” button. Any errors found in
this section will display in a red box at the top of the page.
6) If there are no errors on the page, you will be brought to the “Invitation to IEP Team
Meeting” link. Fill in the necessary information regarding the meeting date and the
meeting participants.

Public Consulting Group, Inc.- ECATS End User Manual Page 120
7) At the bottom of the page are buttons to create a draft or final document. Drafts can be
created while there are still errors within the process; final documents cannot be
created until all errors are corrected.
8) Created documents can be viewed by clicking on the hyperlink for the document at the
bottom of the Create Draft/Final page or on the Documents tab.
DOCUMENTS TAB
The Documents page allows you to create various types of documents. You can select the type of document you’d like to create by clicking on the radio button next to the document/letter name. A Draft document with no system errors must be completed before Final document can
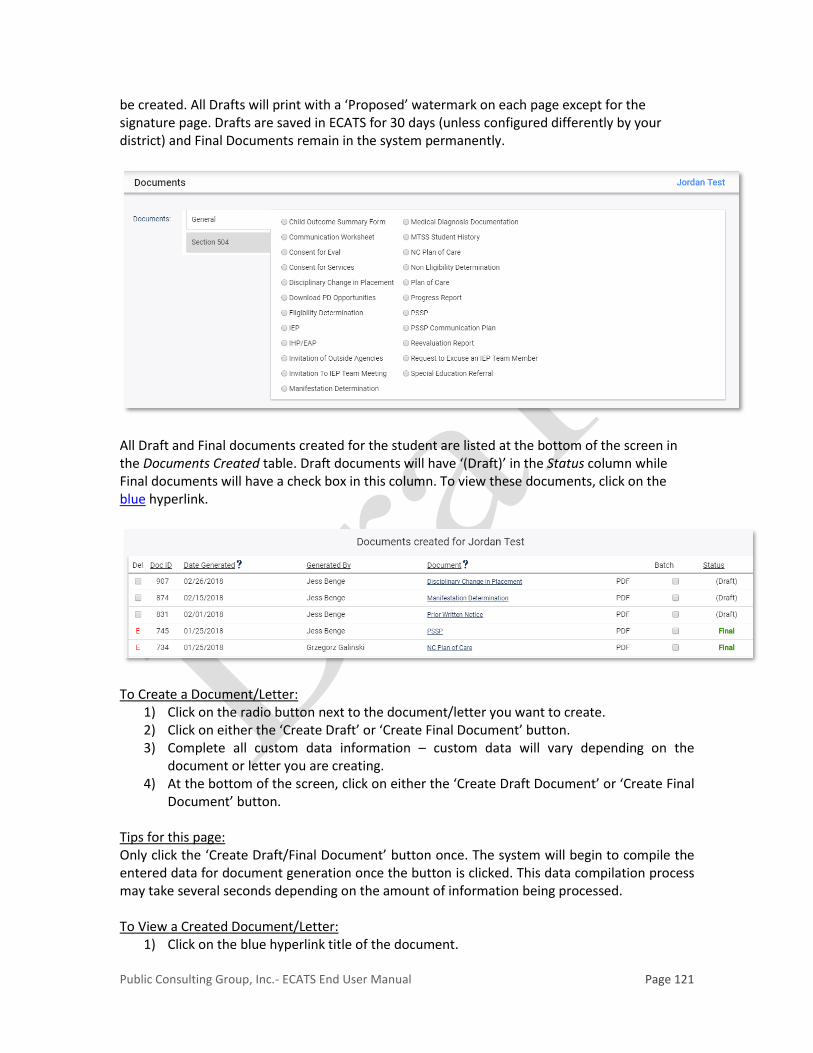
Public Consulting Group, Inc.- ECATS End User Manual Page 121
be created. All Drafts will print with a ‘Proposed’ watermark on each page except for the signature page. Drafts are saved in ECATS for 30 days (unless configured differently by your district) and Final Documents remain in the system permanently.
All Draft and Final documents created for the student are listed at the bottom of the screen in the Documents Created table. Draft documents will have ‘(Draft)’ in the Status column while Final documents will have a check box in this column. To view these documents, click on the blue hyperlink.
To Create a Document/Letter:
1) Click on the radio button next to the document/letter you want to create. 2) Click on either the ‘Create Draft’ or ‘Create Final Document’ button. 3) Complete all custom data information – custom data will vary depending on the
document or letter you are creating. 4) At the bottom of the screen, click on either the ‘Create Draft Document’ or ‘Create Final
Document’ button. Tips for this page: Only click the ‘Create Draft/Final Document’ button once. The system will begin to compile the entered data for document generation once the button is clicked. This data compilation process may take several seconds depending on the amount of information being processed. To View a Created Document/Letter:
1) Click on the blue hyperlink title of the document.

Public Consulting Group, Inc.- ECATS End User Manual Page 122
2) Adobe Acrobat Reader will automatically launch. 3) The document is viewable in a non-editable format. 4) Your browser toolbar, the ECATS menu bar and the Adobe menu bar will all appear. To
return to ECATS, simply click on any of the ECATS menu buttons at the top of the screen. DO NOT close your browser.
5) To print the document, choose the Print icon in the Adobe toolbar. 6) If there are errors in the document, they will display in a list. Click the “View Errors in a
Separate Window” button to open a pop-up window with the errors listed, and click the “Back to Document Creation Page” link to navigate back to the data entry page to fix the errors.
MANAGING YOUR CASELOAD
Using the Caseload Setup Wizard 1) In the “Wizards” tab, select Caseload Setup Wizard link.
2) After selecting the Caseload Setup Wizard, click on the ‘Add More Students to Caseload’ button.

Public Consulting Group, Inc.- ECATS End User Manual Page 123
3) Search for the student(s) you would like to add to your caseload. Keep the search as broad as possible, usually by school.
4) Click on the ‘View Students’ button.
5) Check the Case Manager or Team Member checkbox next to the student(s) you would
like to add to your caseload. 6) The type of service you provide will automatically be selected on the right side of the
screen (i.e. Speech, OT, etc). 7) After clicking ‘Add Students to Caseload,’ the students will be added to your caseload,
along with the type of service that you provide.
Removing a Student from Your Caseload:
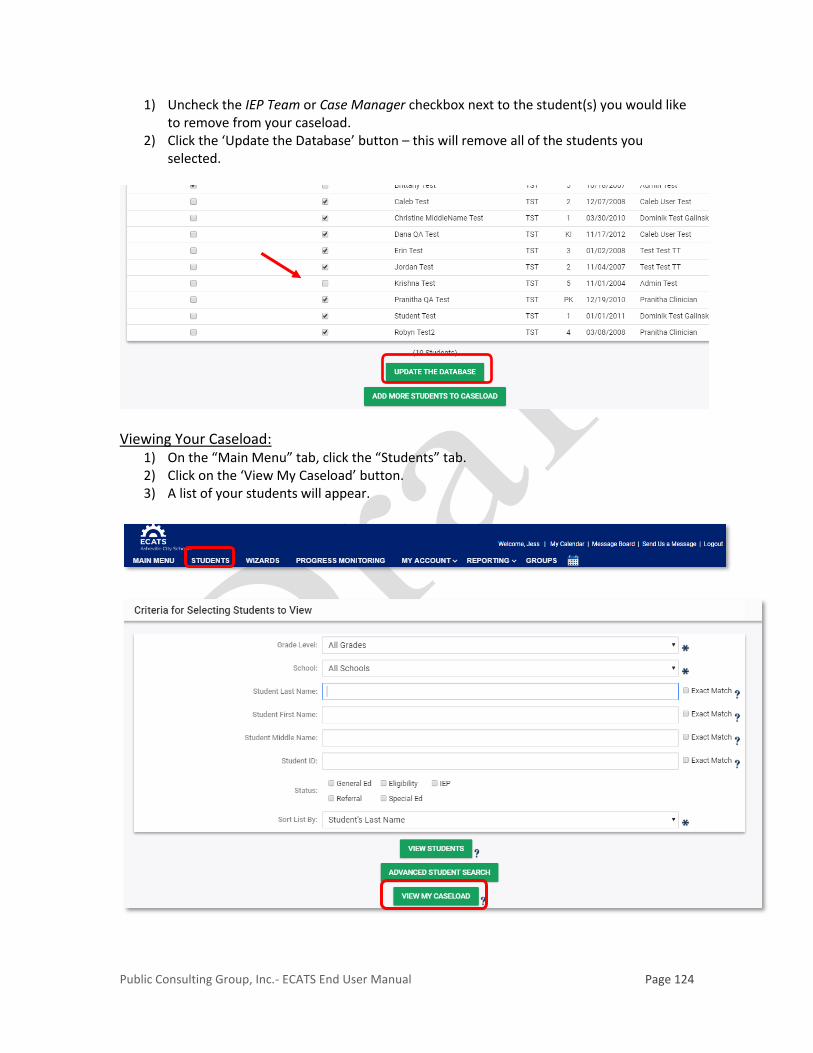
Public Consulting Group, Inc.- ECATS End User Manual Page 124
1) Uncheck the IEP Team or Case Manager checkbox next to the student(s) you would like to remove from your caseload.
2) Click the ‘Update the Database’ button – this will remove all of the students you selected.
Viewing Your Caseload:
1) On the “Main Menu” tab, click the “Students” tab. 2) Click on the ‘View My Caseload’ button. 3) A list of your students will appear.

Public Consulting Group, Inc.- ECATS End User Manual Page 125
PROGRESS REPORT WIZARD
The “Wizards” tab on the Main Menu allows you to create progress reports. As an IEP Team member, you will be able to update the status of goals and/or objectives. To generate progress reports for a student, you must be their Case Manager and they must have a finalized currently valid IEP in the system.
Using the Progress Report Wizard 1) The School Year field defaults automatically to the current school year. 2) Select the appropriate reporting period from the drop-down menu. 3) Select the student(s) for whom you would like to update status and/or generate
Progress Reports for by checking the box next to their name. 4) Click the ‘Continue’ button.
After clicking the ‘Continue’ button, you will be asked to enter the Status for each Annual Goal. Once this is complete, you can click on one of five buttons:
1) ‘Skip this Student’ – Click this if you do not want to create a Progress Report. 2) ‘Create Final Progress Report and Move to Next Student’. 3) ‘Create Draft Report and Move to Next Student’. 4) ‘Just Update the Database’ – This will save the information without creating a Progress
Report. You will return to the Wizards main screen. 5) ‘Update and Move to Next Student’ – This will save the information without creating a
Progress Report. You will go to the next student’s screen.

Public Consulting Group, Inc.- ECATS End User Manual Page 126

Public Consulting Group, Inc.- ECATS End User Manual Page 127
LOGGING OUT OF ECATS
From the Main Menu:
To log out of ECATS: 1) Click the “Log Out” tab at the right of the menu bar. 2) After you log out, close your browser:
• You can log out from any part of the system.
• You do not have to go back to the Main Menu.
• You must log out of ECATS and close your browser if you: o Step away from your computer. o Finish using the system. o Leave for the day.
Always Log Out and Exit the Browser If you do not Log Out and close your browser, anyone can access information in ECATS or record information under your log-in name.