end user quick start guide - · pdf fileend user quick start guide a message from the founders...
TRANSCRIPT

End User Quick Start Guide
A Message From The Founders
Dear New User,
Thanks for choosing EveryCloud. We understand it’s not a simple decision to switch to a new provider and we are grateful that you’re using our service.
We won’t take up much of your precious time before you jump into the guide, but want to explain that we’ve built this business based on great service and support so we try to put our money (well time) where our mouth is. If during your trial of EveryCloud or once you’re signed up, you have any issues, suggestions, thoughts, or would just like say hello, then please just email us directly at [email protected] (CEO) or [email protected] (CMO). It’s always great to hear from you and we’ll do our best to help.
Thanks for being part of the EveryCloud journey and helping us make email better.
! !
Graham O’Reilly & Matt Baker | EveryCloud Technologies Founders
About This Guide
You’ve set up your account, wonderful! Now we need to guide you through the steps towards getting your organisation spam free and ensuring you receive the maximum value from our services. Here we’ll explain how to get your email flowing through our service (with your firewall correctly configured), turning on various features such as infomail filtering, black and white listing, content filtering and more. Then we’ll look at the additional services you can activate including Email Continuity and Email Archiving.
Please be aware that this guide is designed to walk you through the key steps and benefits of the service but there is a lot more functionality that isn’t included. If you have specific needs or questions you can just ask our support team on [email protected] and they’ll be happy to help! We also have a more detailed user manual within the control panel that you can access by pressing the help button in the top left hand corner, or you can watch a video overview of the control panel here.
We have included handy buttons at the bottom of each guide to ensure you are always only one click away from help if you have any questions, please feel free to contact us as much as you need, that’s what we are here for.
Within this guide we’ll walk you through:
Getting Set Up Key Functionality Add on Services
1) Getting your mail server locked down2) Sending us your inbound email
3) Live traffic and mail logs4) Configuring spam reports
5) Setting up your outbound email 6) Black / White List Configuration
7) Mail Footers 8) Content Filter
9) Compliance Filter
10) Email Continuity11) Email Archiving
EveryCloud Technologies – www.everycloudtech.com

End User Quick Start Guide
Getting your mail server locked down >> Sending us your inbound email >> Live traffic and mail logs >> Configuring spam reports >> Setting up your outbound email >> Black / White List Configuration >> Mail Footers >> Content Filter >> Compliance Filter >> Email Continuity >> Email Archiving
1) Getting Your Mail Server Locked Down
Right. Before we can start sending you your email traffic you will need to configure your firewall / mail server properly so that it a) accepts connections from our IP ranges (allowing us to communicate with your servers) and b) doesn’t allow connections from outside of our service, allowing malicious email to bypass your MX records and our filtering entirely, and in turn sending it directly to your mail server.
Please log into your firewall admin area or mail server’s Receive Connector and configure it to accept SMTP connections on port 25 from EveryCloud Technologies IP ranges here:
48 hours after you’ve changed your MX records (step 2) we then suggest you shut of your old providers ranges, closing the firewall to only ours.
Once you’ve made these changes you can use our firewall tester to make sure everything has been set up correctly.
Test structure: Internet (Needs to show '✔') This means connections from IP addresses outside of our ranges are blocked
Test 1 83.246.65.0/24 '✔' Test 2 94.100.128.0/20 '✔' Test 3 94.100.128.0/20 '✔' Test 4 94.100.128.0/20 '✔' Test 2,3 and 4 is equivalent to our single 94.100.128.0/20 range, but divided into 3 smaller ranges
Subnet IP Subnet Mask Net Mask IP Range
83.246.65.0 255.255.255.0 /24 83.246.65.0 - 83.246.65.255
94.100.128.0 255.255.240.0 /20 94.100.128.0 - 94.100.143.255
107.170.168.72 255.255.255.255 /32 107.170.168.72
�
�
EveryCloud Technologies – www.everycloudtech.com
End User Quick Start Guide
Need Help Configuring Your Firewall? Click here to email support.
Getting your mail server locked down >> Sending us your inbound email >> Live traffic and mail logs >> Configuring spam reports >> Setting up your outbound email >> Black / White List Configuration >> Mail Footers >> Content Filter >> Compliance Filter >> Email Continuity >> Email Archiving
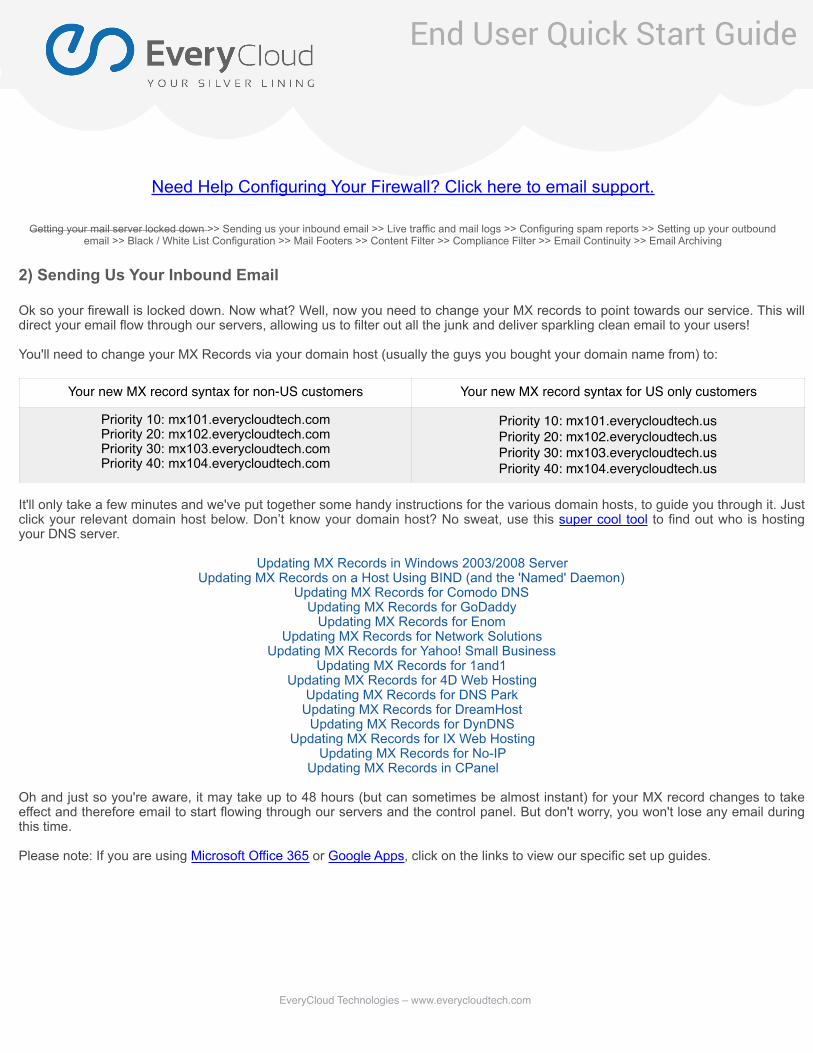
2) Sending Us Your Inbound Email
Ok so your firewall is locked down. Now what? Well, now you need to change your MX records to point towards our service. This will direct your email flow through our servers, allowing us to filter out all the junk and deliver sparkling clean email to your users!
You'll need to change your MX Records via your domain host (usually the guys you bought your domain name from) to:
It'll only take a few minutes and we've put together some handy instructions for the various domain hosts, to guide you through it. Just click your relevant domain host below. Don’t know your domain host? No sweat, use this super cool tool to find out who is hosting your DNS server.
Updating MX Records in Windows 2003/2008 Server Updating MX Records on a Host Using BIND (and the 'Named' Daemon)
Updating MX Records for Comodo DNS Updating MX Records for GoDaddy
Updating MX Records for Enom Updating MX Records for Network Solutions
Updating MX Records for Yahoo! Small Business Updating MX Records for 1and1
Updating MX Records for 4D Web Hosting Updating MX Records for DNS Park
Updating MX Records for DreamHost Updating MX Records for DynDNS
Updating MX Records for IX Web Hosting Updating MX Records for No-IP
Updating MX Records in CPanel
Oh and just so you're aware, it may take up to 48 hours (but can sometimes be almost instant) for your MX record changes to take effect and therefore email to start flowing through our servers and the control panel. But don't worry, you won't lose any email during this time.
Please note: If you are using Microsoft Office 365 or Google Apps, click on the links to view our specific set up guides.
Your new MX record syntax for non-US customers Your new MX record syntax for US only customers
Priority 10: mx101.everycloudtech.com Priority 20: mx102.everycloudtech.com Priority 30: mx103.everycloudtech.com Priority 40: mx104.everycloudtech.com
Priority 10: mx101.everycloudtech.usPriority 20: mx102.everycloudtech.usPriority 30: mx103.everycloudtech.usPriority 40: mx104.everycloudtech.us
EveryCloud Technologies – www.everycloudtech.com

End User Quick Start Guide
Need Help Changing Your MX Records? Click here to email support.
Getting your mail server locked down >> Sending us your inbound email >> Live traffic and mail logs >> Configuring spam reports >> Setting up your outbound email >> Black / White List Configuration >> Mail Footers >> Content Filter >> Compliance Filter >> Email Continuity >> Email Archiving
3) Live Traffic and Mail Logs
To check that your inbound email traffic is now being routed through our service, just log into the control panel using the username and password we provided you in your welcome email.
!
If you can see lines of emails for today, then congratulations you’re live with EveryCloud!
As you can see here you now have 90 day logs of your businesses emails. Here you can preview messages, sort or filter by multiple headings and even export the data to .csv files. But most importantly we’re now filtering your email for you and stopping any spam, virus, phishing or other malicious emails from reaching your mail server.
Just a note about user creation
There’s no need to import a list of your users into our control panel. By default we’ve set your relay check settings to SMTP, which means we’ll automatically create new users each 24 hour period when we see that at least more than 2 clean emails have been delivered to a mailbox (indicating to us that this is a fully functioning mailbox).
You do also have the option to use Microsoft’s directory, LDAP, to set up users, or import a list or add them manually. For more details on user creation click here.
EveryCloud Technologies – www.everycloudtech.com

End User Quick Start Guide
Need Help with Logs or User Creation? Click here to email support.
Getting your mail server locked down >> Sending us your inbound email >> Live traffic and mail logs >> Configuring spam reports >> Setting up your outbound email >> Black / White List Configuration >> Mail Footers >> Content Filter >> Compliance Filter >> Email Continuity >> Email Archiving
4) Configuring Spam Reports
Activating the spam report reduces the workload for IT administrators and gives value to the user, by making them more self-sufficient.
The spam report is an email that is sent to users to inform them of any emails that have been stopped on their behalf to give them additional control over the service. It indicates why the email has stopped and allows the user to either deliver the email, or whitelist and deliver it.By whitelisting the email, the user is confirming they are happy to receive emails in future from this sender, without it being stopped by our filter.
!
To activate the spam report navigate to the ‘Management’ button on the top modules bar, expand your domain in the list on the left hand side, expand ‘domains’ and click on your primary domain. Then click on spam report from the tabs on the right.
From here tick the spam report box to activate, choose the settings you want (as above) and click on save at the bottom. You can choose the emails you’d like to show in the report, the actions the user can take as well as select the deliver times you wish your users to receive the reports.
!
!
EveryCloud Technologies – www.everycloudtech.com

End User Quick Start Guide
Need Help Setting Up Spam Reports? Click here to email support.
Getting your mail server locked down >> Sending us your inbound email >> Live traffic and mail logs >> Configuring spam reports >> Setting up your outbound email >> Black / White List Configuration >> Mail Footers >> Content Filter >> Compliance Filter >> Email Continuity >> Email Archiving
5. Setting Up Your Outbound Email
If you send your organisations outbound emails via EveryCloud you’ll get the same 90 day logs as you have for inbound filtering plus we’ll filter your outbound emails for malicious content. There are 3 steps you need to take to set this set up.
1. Activate Outbound Sending and Add Your IP Address
If you gave us your outbound IP address when you set up your account you can skip this step or double check using it.
You will need to configure the service to accept emails from the public facing IP address, where we see connection attempts being sent from. Navigate to the ‘Management’ button on the top modules bar, expand your domain in the list on the left hand side, expand ‘domains’ and click on your primary domain. Then click on ‘Filtering’ from the tabs on the right.
!
Check the 'Outgoing relay / Email traffic' box, enter the public facing IP address, click 'Save' and you’re done.
!! Please make sure you allow 45 minutes propagation into our system before moving to step two!!
2. Configure your Send Connector / Smart Host
You now need to make some changes on your exchange server to route your outbound email via us.
EveryCloud's Non US customers EveryCloud's US customers
Please configure your send connector to send outbound through our dedicated Smart-host:
outbound.everycloudtech.comPlease configure your send connector to send outbound
through our dedicated Smart-host: outbound.everycloudtech.us
EveryCloud Technologies – www.everycloudtech.com

End User Quick Start Guide
European continent customers should connect to our Smart host on port 25, North American customers may connect on port 25 or 587 Our dedicated outbound smart-hosts are also defined as a wildcard DNS entry *.outbound.everycloudtech.com and *.outbound.everycloudtech.us that means you may also use any variant of the Smart host eg:
yourdomain.com.outbound.everycloudtech.com or yourdomain.com.outbound.everycloudtech.us
Please ensure that you have inserted the correct public facing, sending/relaying IP address in your control panel account, as this is how we authenticate outbound traffic connecting to our Smart-host. If your sending/relaying IP address is not contained/inserted within your control panel account, our system will not allow you send outbound through our smart-host 3. Configure Your SPF Records
If you intend to send outbound through our service by connecting to our smart-host, you should construct an SPF/TXT record, which authorizes our sending servers to send on behalf of you domain. If you currently have a TXT record in place, you should alter it, by adding an additional 'include:' statement. EveryClouds include statement is: 'include:spf.everycloudtech.com' or 'include:spf.everycloudtech.us' If you do not currently have a TXT record in place, please construct one within your DNS admin console. Example TXT record "v=spf1 include:spf.everycloudtech.com -all" or "v=spf1 include:spf.everycloudtech.us -all
For more information on setting up your SPF records view our guide.
EveryCloud Technologies – www.everycloudtech.com

End User Quick Start Guide
Need Help Setting Up Outbound Sending? Click here to email support. Getting your mail server locked down >> Sending us your inbound email >> Live traffic and mail logs >> Configuring spam reports >> Setting up your outbound
email >> Black / White List Configuration >> Mail Footers >> Content Filter >> Compliance Filter >> Email Continuity >> Email Archiving
6) Black / White List Configuration
You may wish to black (block) or whitelist (allow) certain senders, or perhaps import a list of blocked / allowed senders from a previous provider. This can be done at the domain admin level for the whole domain or on behalf of individual users or at the individual user level via their own login.
Navigate to the ‘Black / Whitelist’ and use the sender box to manually add individual address (e.g. [email protected]) or whole domains (e.g. domain.com). You can delete any previously entered address by highlighting the line and clicking on the "Remove" button.
Additionally you have the option to import existing black / white lists, which is detailed in this guide.
! Users Black / Whitelist View
! Admins Black / Whitelist View
EveryCloud Technologies – www.everycloudtech.com

End User Quick Start Guide
Need Help Setting Up Black / Whitelists? Click here to email support. Getting your mail server locked down >> Sending us your inbound email >> Live traffic and mail logs >> Configuring spam reports >> Setting up your outbound
email >> Black / White List Configuration >> Mail Footers >> Content Filter >> Compliance Filter >> Email Continuity >> Email Archiving
7) Mail Footers
If you want to add an email footer or disclaimer to the bottom of all your outbound emails, either HTML or Plain text footer then this is really easy to configure from within the control panel. You can use HTML messages to advertise your service or mention recent awards you may have won or have been nominated for.
!
EveryCloud Technologies – www.everycloudtech.com

End User Quick Start Guide
Need Help Configuring Your Mail Footers? Click here to email support.
Getting your mail server locked down >> Sending us your inbound email >> Live traffic and mail logs >> Configuring spam reports >> Setting up your outbound email >> Black / White List Configuration >> Mail Footers >> Content Filter >> Compliance Filter >> Email Continuity >> Email Archiving
8) Content Filter
OK, so the bad guys have found a way to infect you with damaging viruses and malware and they can do this by sending you targeted emails that are perfectly harmless as there is no malware or virus in the email.
“If they are perfectly harmless how can they hurt me?” We hear you ask!
What’s in the email is a MS Office document (could be .doc or .xls) that contains a Macro (basically a set of instructions to your computer to automatically follow), the Macro has given these instructions (which are carried out automatically by your machine with no input from you) to your computer to go to a certain website and download a Virus/Malware.
EveryCloud to the rescue! Using our content filter we will automatically block Macro enabled documents for you in the cloud, so you don’t need to worry about these types of Phishing and Virus emails. The content filter can go even further, we can block a whole range of file types should you wish, for example if you don’t want your staff receiving (or sending) MP3, MP4 or AVI files then you can simply manage this from within the control panel as per below. We’ll block any file type you tell us.
!
EveryCloud Technologies – www.everycloudtech.com

End User Quick Start Guide
Need Help Configuring Your Content Filter? Click here to email support. Getting your mail server locked down >> Sending us your inbound email >> Live traffic and mail logs >> Configuring spam reports >> Setting up your outbound
email >> Black / White List Configuration >> Mail Footers >> Content Filter >> Compliance Filter >> Email Continuity >> Email Archiving
9) Compliance Filter
The compliance filter is an extremely powerful tool for the manipulation of both inbound and outbound email and it can bring you many benefits such as certain email addresses being BCC’d on an email if it contains a “keyword” or “trigger word”. For example the CEO might want to be copied in to any email that contains the trigger word “Purchase Order” and this compliance filter rule would then automatically BCC the CEO on every email that contained the words “Purchase Order”
“With great power comes great responsibility” and this was never a truer saying than with the compliance filter, as you could drastically alter the filtering and the protection we are giving you, It is strongly recommended that you seek advice from our team of email experts before setting up or configuring compliance filter rules.
Need Help Configuring Your Compliance Filter? Click here to email support.
EveryCloud Technologies – www.everycloudtech.com

End User Quick Start Guide
Getting your mail server locked down >> Sending us your inbound email >> Live traffic and mail logs >> Configuring spam reports >> Setting up your outbound email >> Black / White List Configuration >> Mail Footers >> Content Filter >> Compliance Filter >> Email Continuity >> Email Archiving
10) Email Continuity You only realise how important something is to you when it’s gone and that’s the way it is with email. Our email continuity service will provide your staff with the ability to still send and receive email even when your mail server is unavailable. You only need to activate the service in the control panel and we’ll do everything automatically, if we can’t deliver emails to your mail server, then we’ll route all emails to either webmail or emergency POP/IMAP accounts to keep your business running smoothly. We are keeping a 90 day rolling archive of historical emails too so if your mail server is unavailable, just log in to our web portal and send or receive email as normal and you can also release all your historical emails from our archives (should you wish) so you can continue to carry on working as normal.
Activating continuity service is easy – One click and you’re protected!
!
Need Help Activating Email Continuity? Click here to email support.
EveryCloud Technologies – www.everycloudtech.com

End User Quick Start Guide
Getting your mail server locked down >> Sending us your inbound email >> Live traffic and mail logs >> Configuring spam reports >> Setting up your outbound email >> Black / White List Configuration >> Mail Footers >> Content Filter >> Compliance Filter >> Email Continuity >> Email Archiving
11) Email Archiving
There are many reasons that businesses today need email archiving, whether it’s for compliance, legal, support or storage reasons, having the data easy to hand and easily searchable is a must. Activating Email Archiving in the control panel you are saving your company hundreds of man hours per year in terms of your IT staff running backups of email and the associated costs and hassles of managing that in-house.
We are already filtering your emails in the cloud, with us keeping a copy of the emails in our archive, replicated over our data centres and giving you access to them in an easy to search, easy to release format, all from within the intuitive control panel not only are you protected from local storage issues but you save money too.
Click and activate now to start enjoying the benefits and advantages of Cloud Archiving.
!
EveryCloud Technologies – www.everycloudtech.com

End User Quick Start Guide
Need Help Activating Email Archiving? Click here to email support.
EveryCloud Technologies – www.everycloudtech.com