endless summer grilling - dcsgrills · endless summer grilling ... summer grilling recipes that are...
TRANSCRIPT

Recipes from america’s test kitchen
Endless Summer GrillingWITH DCS BY FISHER AND PAYKEL

Long, sun-filled afternoons and a bounty of fresh food and vegetables are enough to
bring out the grilling fanatic in all of us. Get ready to kick your backyard cooking
skills into high gear with the help of America’s Test Kitchen and DCS. We want to
make grilling a part of your everyday life just as much as you do, so read our secrets to
cooking over a hot fire and salivate over some sizzling recipes that you will be dying to
try. No matter what you’re craving, there is a recipe for everyone. Whether it’s a stack
of seared veggies or a savory grilled pizza, we are excited to introduce these Endless
Summer grilling recipes that are sure to keep the barbecue going all year round.
Are you a carnivore, vegetarian, or pescatarian? Do you seek gluten-free dishes? Our
collection of recipes has a delicious option for every food preference. If you love
fish, you will absolutely salivate over our Tuna Steaks and Shrimp Skewers. Feeling
experimental? Make your favorite takeout food, pizza, outside on the grill for the best
flatbread of your life. Looking for some protein that will keep you full until dessert?
Our Bone-In Chicken Breasts, Best Smoked Pork Chops, Rack of Lamb, or California
Barbecued Tri-Tip will satisfy the hungriest appetites. Want lots of smoky flavor and
moist, tender meat? Try out the easy-to-follow Barbecued Baby Back Ribs recipe!
Craving lighter, vegetarian fare? Potatoes or Asparagus with Garlic Butter hot off the
grill are guaranteed to deliver on both nutrients and flavor.
So grab your grilling utensils and sunscreen and head outside! America’s Test Kitchen
and DCS proudly say hello to another Endless Summer with these grilling favorites
that will make you never want to cook inside again.
1 CELEBRATE AN ENDLESS SUMMER with AMERICA'S TEST KITCHEN GRILLING RECIPES
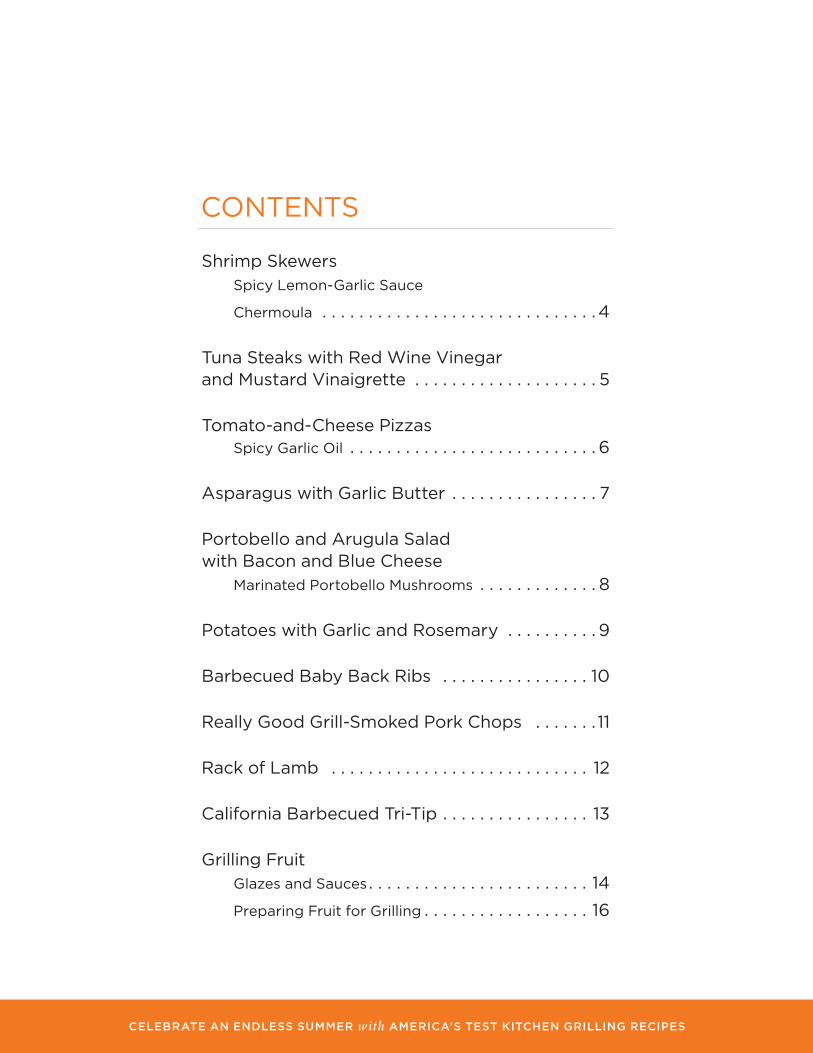
Shrimp SkewersSpicy Lemon-Garlic Sauce
Chermoula . . . . . . . . . . . . . . . . . . . . . . . . . . . . . . 4
Tuna Steaks with Red Wine Vinegar and Mustard Vinaigrette . . . . . . . . . . . . . . . . . . . . 5
Tomato-and-Cheese PizzasSpicy Garlic Oil . . . . . . . . . . . . . . . . . . . . . . . . . . . 6
Asparagus with Garlic Butter . . . . . . . . . . . . . . . . 7
Portobello and Arugula Salad with Bacon and Blue Cheese
Marinated Portobello Mushrooms . . . . . . . . . . . . . 8
Potatoes with Garlic and Rosemary . . . . . . . . . . 9
Barbecued Baby Back Ribs . . . . . . . . . . . . . . . . 10
Really Good Grill-Smoked Pork Chops . . . . . . . 11
Rack of Lamb . . . . . . . . . . . . . . . . . . . . . . . . . . . . 12
California Barbecued Tri-Tip . . . . . . . . . . . . . . . . 13
Grilling FruitGlazes and Sauces . . . . . . . . . . . . . . . . . . . . . . . . 14
Preparing Fruit for Grilling . . . . . . . . . . . . . . . . . . 16
CONTENTS
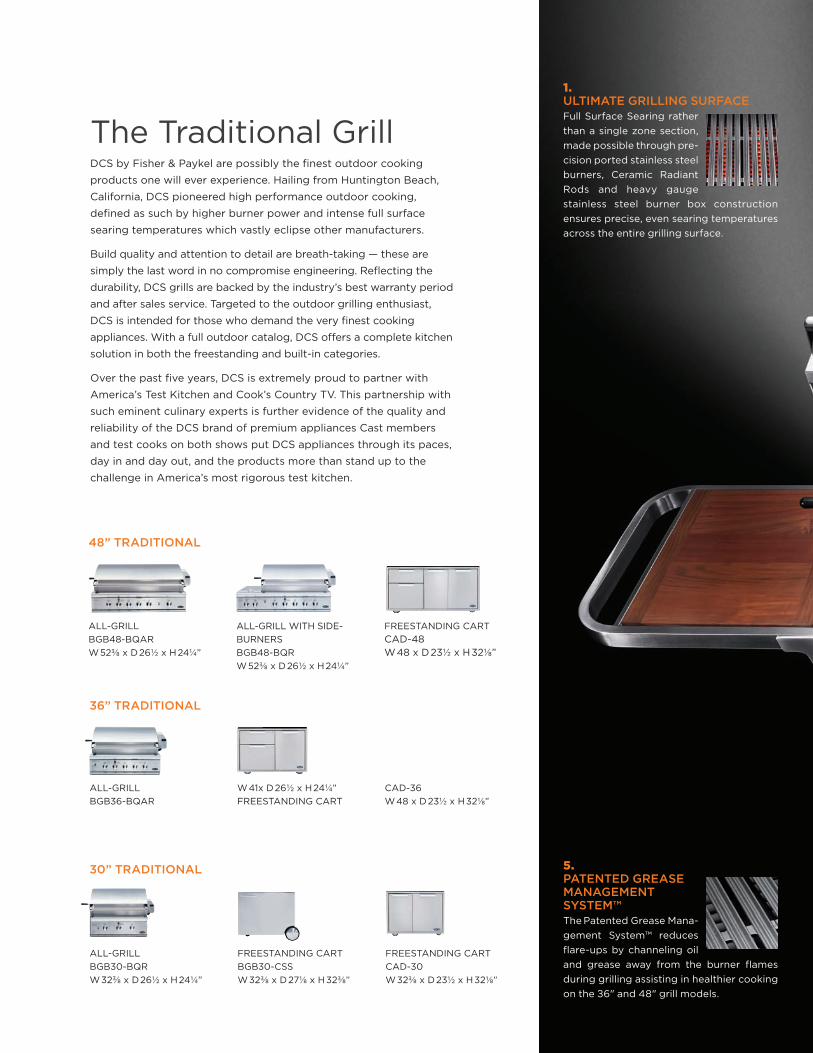
1. ULTIMATE GRILLING SURFACEFull Surface Searing rather than a single zone section, made possible through pre-cision ported stainless steel burners, Ceramic Radiant Rods and heavy gauge stainless steel burner box construction ensures precise, even searing temperatures across the entire grilling surface .
5. PATENTED GREASE MANAGEMENT SYSTEM™The Patented Grease Mana- gement System™ reduces flare-ups by channeling oil and grease away from the burner flames during grilling assisting in healthier cooking on the 36" and 48" grill models .
The Traditional GrillDCS by Fisher & Paykel are possibly the finest outdoor cooking
products one will ever experience . Hailing from Huntington Beach,
California, DCS pioneered high performance outdoor cooking,
defined as such by higher burner power and intense full surface
searing temperatures which vastly eclipse other manufacturers .
Build quality and attention to detail are breath-taking — these are
simply the last word in no compromise engineering . Reflecting the
durability, DCS grills are backed by the industry’s best warranty period
and after sales service . Targeted to the outdoor grilling enthusiast,
DCS is intended for those who demand the very finest cooking
appliances . With a full outdoor catalog, DCS offers a complete kitchen
solution in both the freestanding and built-in categories .
Over the past five years, DCS is extremely proud to partner with
America’s Test Kitchen and Cook’s Country TV . This partnership with
such eminent culinary experts is further evidence of the quality and
reliability of the DCS brand of premium appliances Cast members
and test cooks on both shows put DCS appliances through its paces,
day in and day out, and the products more than stand up to the
challenge in America’s most rigorous test kitchen .
ALL-GRILL BGB36-BQAR
W 41x D 26½ x H 24¼” FREESTANDING CART
CAD-36 W 48 x D 23½ x H 32⅛”
36” TRADITIONAL
ALL-GRILL BGB30-BQR W 32⅜ x D 26½ x H 24¼”
FREESTANDING CART BGB30-CSS W 32⅜ x D 27⅛ x H 32⅜”
FREESTANDING CART CAD-30 W 32⅜ x D 23½ x H 32⅛”
30” TRADITIONAL
ALL-GRILL BGB48-BQAR W 52⅜ x D 26½ x H 24¼”
ALL-GRILL WITH SIDE-BURNERS BGB48-BQR W 52⅜ x D 26½ x H 24¼”
FREESTANDING CART CAD-48 W 48 x D 23½ x H 32⅛”
48” TRADITIONAL
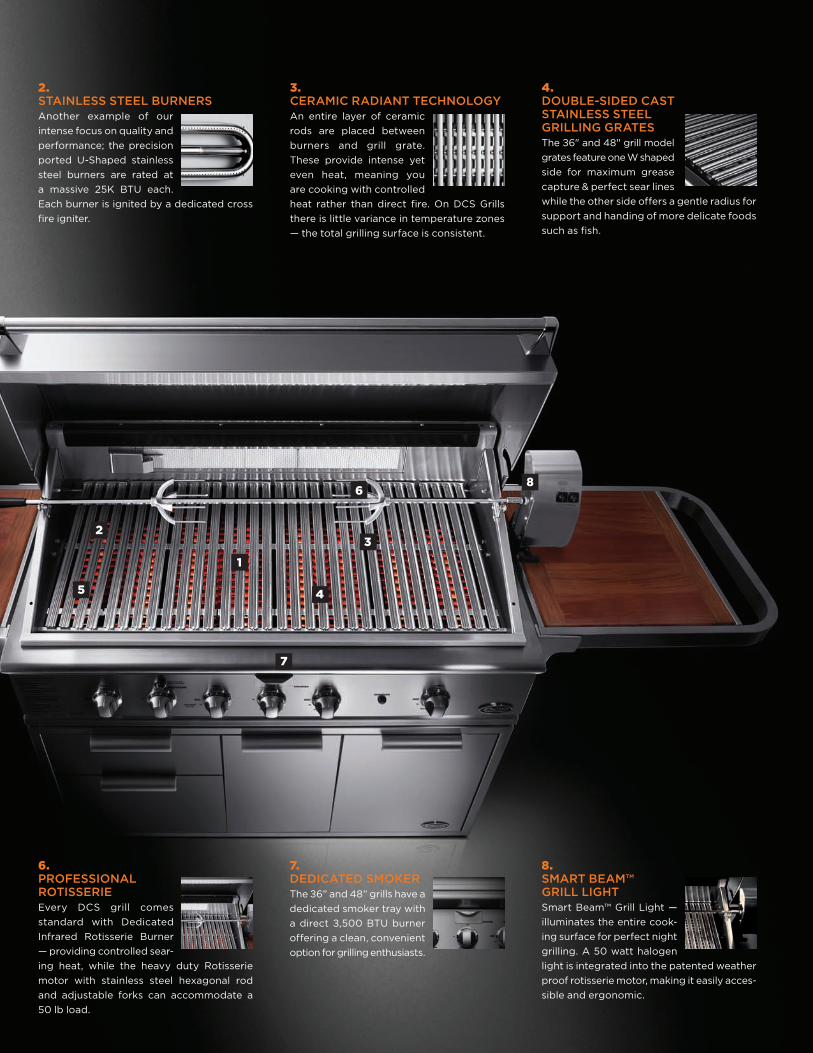
2
1
4
7
3
6
5
8
3. CERAMIC RADIANT TECHNOLOGYAn entire layer of ceramic rods are placed between burners and grill grate . These provide intense yet even heat, meaning you are cooking with controlled heat rather than direct fire . On DCS Grills there is little variance in temperature zones — the total grilling surface is consistent .
2. STAINLESS STEEL BURNERSAnother example of our intense focus on quality and performance; the precision ported U-Shaped stainless steel burners are rated at a massive 25K BTU each . Each burner is ignited by a dedicated cross fire igniter .
6. PROFESSIONAL ROTISSERIEEvery DCS grill comes standard with Dedicated Infrared Rotisserie Burner — providing controlled sear-ing heat, while the heavy duty Rotisserie motor with stainless steel hexagonal rod and adjustable forks can accommodate a 50 lb load .
7. DEDICATED SMOKERThe 36” and 48” grills have a dedicated smoker tray with a direct 3,500 BTU burner offering a clean, convenient option for grilling enthusiasts .
4. DOUBLE-SIDED CAST STAINLESS STEEL GRILLING GRATESThe 36" and 48" grill model grates feature one W shaped side for maximum grease capture & perfect sear lines while the other side offers a gentle radius for support and handing of more delicate foods such as fish .
8. SMART BEAM™ GRILL LIGHTSmart Beam™ Grill Light —illuminates the entire cook-ing surface for perfect night grilling . A 50 watt halogen light is integrated into the patented weather proof rotisserie motor, making it easily acces-sible and ergonomic .

CELEBRATE AN ENDLESS SUMMER with AMERICA'S TEST KITCHEN GRILLING RECIPES 4
© 2013 America’s Test Kitchen . All rights reserved . PHOTOGRAPHY: Carl Tremblay
Shrimp Skewers with Spicy Lemon-Garlic Sauce or ChermoulaSERVES 4 AS A MAIN DISH OR 6 AS AN APPETIZER
The shrimp and sauce (recipes follow) finish cooking together
on the grill, so prepare the sauce ingredients while the coals
are heating. To fit all the shrimp on the cooking grate at once,
you’ll need three 14-inch metal skewers for this recipe. Serve
with grilled bread, if desired.
1½ pounds extra-large shrimp (21 to 25 per pound),
peeled and deveined
2–3 tablespoons olive oil for brushing skewers
Salt and pepper
¼ teaspoon sugar
1 recipe Spicy Lemon-Garlic Sauce or Chermoula
(recipes follow)
Lemon wedges
1. Pat shrimp dry with paper towels. Thread shrimp onto 3 skewers, alternating direction of heads and tails. Brush both sides of shrimp with olive oil and season lightly with salt and pepper. Sprinkle 1 side of each skewer evenly with sugar.
2. Turn all burners to high, cover, and heat grill until very hot, about 15 minutes. Leave primary burner on high and turn other burners to medium-low.
3. Scrape grate clean with grill brush. Lightly dip wad of paper towels in vegetable oil; holding wad with tongs, wipe grate. Continue to wipe grate with oiled paper towels, redipping towels in oil between applications, until grate is black and glossy, 5 to 10 times. Set disposable aluminum pan with sauce ingredients on hotter side of grill and cook with lid down; transfer pan to cooler side of grill. Place shrimp skewers, sugared sides down, on hotter side of grill; use tongs to push shrimp together on skewer if they have separated. Grill shrimp, uncovered, until lightly charred, 4 to 5 minutes. Using tongs, flip and grill until second side is pink and slightly translucent, 1 to 2 minutes longer.
4. Using potholder, carefully lift each skewer from grill; use tongs to slide shrimp off skewers into pan with sauce. Toss shrimp and sauce to combine and transfer pan to hotter side of grill; cook, stirring, until shrimp are opaque and fully cooked, about 30 seconds. Remove from grill, add remaining sauce ingredients, and toss to com-bine. Transfer to serving platter and serve immediately with lemon wedges.
Spicy Lemon-Garlic SauceMAKES ENOUGH TO SAUCE 1½ POUNDS SHRIMP This spicy sauce gets its heat from red pepper flakes.
4 tablespoons unsalted butter, cut into 4 pieces
¼ cup lemon juice (2 lemons)
3 garlic cloves, minced
½–¾ teaspoon red pepper flakes
⅛ teaspoon salt
Disposable aluminum pan or pie plate
⅓ cup minced fresh parsley
Combine butter, lemon juice, garlic, pepper f lakes to taste, and salt in disposable pan. Cook mixture over hotter side of grill, stirring occasionally, until butter melts, about 1½ minutes; transfer to cooler side of grill and proceed to grill shrimp, adding parsley just before serving.
ChermoulaMAKES ENOUGH TO SAUCE 1½ POUNDS SHRIMPChermoula is a traditional Moroccan sauce.
¼ cup extra-virgin olive oil
1 small red bell pepper, stemmed, seeded,
and minced (½ cup)
½ small red onion, chopped fine (⅓ cup)
3 garlic cloves, minced
1 teaspoon paprika
½ teaspoon ground cumin
¼ teaspoon cayenne pepper
⅛ teaspoon salt
Disposable aluminum pan or pie plate
⅓ cup minced fresh cilantro
2 tablespoons lemon juice
Combine oil, bell pepper, onion, garlic, paprika, cumin, cayenne, and salt in disposable pan. Cook over hotter side of grill, stirring occasionally, until vegetables soften, 7 to 8 minutes; transfer to cooler side of grill and proceed to grill shrimp, adding cilantro and lemon juice before serving.
CELEBRATE AN ENDLESS SUMMER with AMERICA'S TEST KITCHEN GRILLING RECIPES 5
© 2013 America’s Test Kitchen . All rights reserved . PHOTOGRAPHY: Carl Tremblay
Tuna Steaks with Red Wine Vinegar and Mustard VinaigretteSERVES 6
We prefer our tuna served rare or medium-rare. If you like
your fish cooked medium, observe the timing for medium-
rare tuna and then tent the steaks loosely with aluminum
foil for 5 minutes before serving. To achieve a nicely grilled
exterior and a rare center, use fish steaks that are at least
1 inch thick. Covering the grate with foil is not recommend
for grills with a ceramic heating apparatus as it will damage
the ceramic.
3 tablespoons plus 1 teaspoon red wine vinegar
2 tablespoons Dijon mustard
2 teaspoons honey
2 tablespoons chopped fresh thyme or rosemary
Salt and pepper
¾ cup olive oil
6 (8-ounce) tuna steaks, 1 inch thick
1. Loosely cover cooking grate with large piece of heavy-duty aluminum foil. Turn all burners to high, cover, and heat grill until very hot, about 15 minutes.
2. While grill heats, whisk vinegar, mustard, honey, thyme, and ½ teaspoon salt together in large bowl. Whisking constantly, slowly drizzle oil into vinegar mix-ture until lightly thickened and emulsified. Measure out ¾ cup vinaigrette and set aside.
3. When grill is hot, remove foil with tongs and dis-card. Clean cooking grate, then repeatedly brush grate with well-oiled paper towels until grate is black and glossy, 5 to 10 times.
4. Brush both sides of fish liberally with reserved vin-aigrette and season with salt and pepper. Grill fish, covered, until grill marks form and bottom surface is opaque, about 1½ minutes. Using 2 spatulas, carefully flip and continue to cook until grill marks form on second side, about 1½ minutes longer for rare (fish is opaque at perimeter and translucent red at center when checked with tip of paring knife) or about 3 minutes longer for medium-rare (fish is opaque at perimeter and reddish pink at center). Transfer to large plate and serve immediately, passing remaining vinaigrette separately.
GAS-GRILLED TUNA STEAKS WITH PROVENÇAL VINAIGRETTEFollow recipe for Gas-Grilled Tuna Steaks with Red Wine Vinegar and Mustard Vinaigrette, substituting ¼ cup chopped pitted oil-cured black olives, 2 tablespoons minced fresh parsley, 1 tablespoon minced fresh oregano, 2 minced anchovies, and 1 minced garlic clove for thyme in step 2.
GAS-GRILLED TUNA STEAKS WITH CHERMOULA VINAIGRETTEFollow recipe for Gas-Grilled Tuna Steaks with Red Wine Vinegar and Mustard Vinaigrette, substituting ¼ cup minced fresh cilantro, 2 tablespoons minced fresh parsley, 4 minced garlic cloves, 1 teaspoon paprika, 1 tea-spoon ground cumin, and ½ teaspoon ground coriander for thyme in step 2.
GAS-GRILLED TUNA STEAKS WITH SOY-GINGER VINAIGRETTEFollow recipe for Gas-Grilled Tuna Steaks with Red Wine Vinegar and Mustard Vinaigrette, substituting rice vin-egar for red wine vinegar and omitting salt. Substitute 2 thinly sliced scallions, 3 tablespoons soy sauce, 1 tablespoon toasted sesame oil, 2 teaspoons grated fresh ginger, and ½ teaspoon red pepper f lakes for thyme in step 2.
CELEBRATE AN ENDLESS SUMMER with AMERICA'S TEST KITCHEN GRILLING RECIPES 6
© 2013 America’s Test Kitchen . All rights reserved . PHOTOGRAPHY: Carl Tremblay
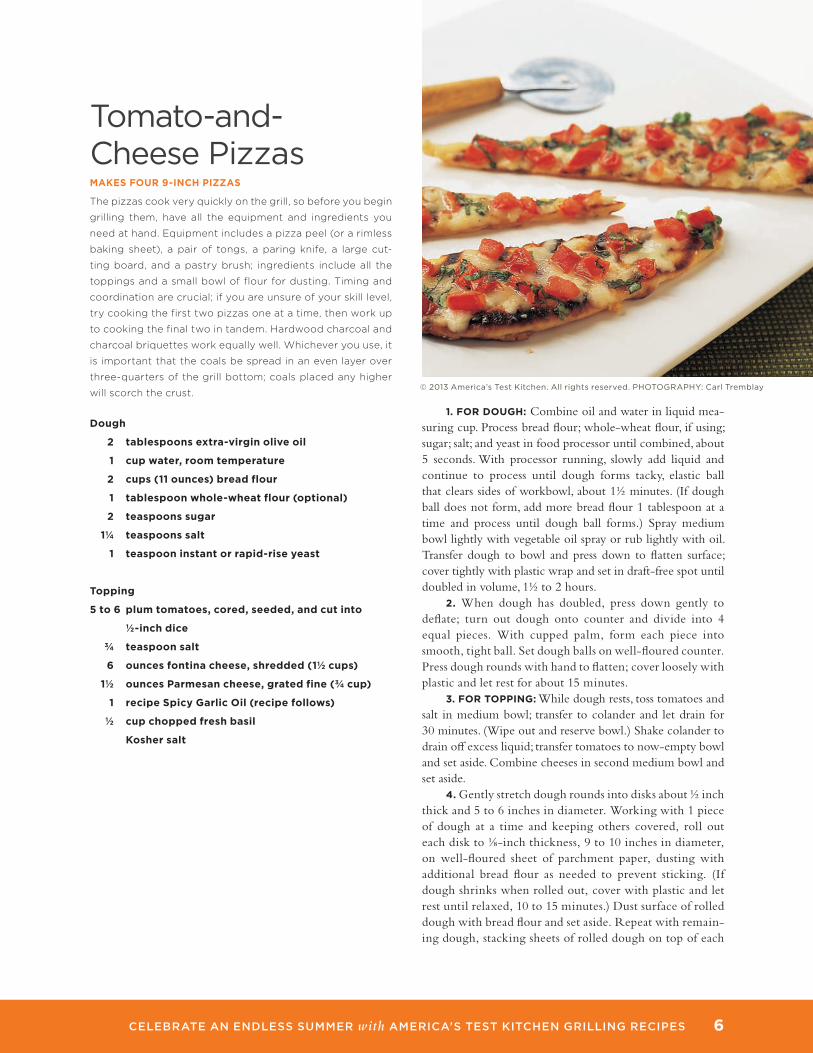
Tomato-and-Cheese PizzasMAKES FOUR 9-INCH PIZZAS
The pizzas cook very quickly on the grill, so before you begin
grilling them, have all the equipment and ingredients you
need at hand. Equipment includes a pizza peel (or a rimless
baking sheet), a pair of tongs, a paring knife, a large cut-
ting board, and a pastry brush; ingredients include all the
toppings and a small bowl of flour for dusting. Timing and
coordination are crucial; if you are unsure of your skill level,
try cooking the first two pizzas one at a time, then work up
to cooking the final two in tandem. Hardwood charcoal and
charcoal briquettes work equally well. Whichever you use, it
is important that the coals be spread in an even layer over
three-quarters of the grill bottom; coals placed any higher
will scorch the crust.
Dough
2 tablespoons extra-virgin olive oil
1 cup water, room temperature
2 cups (11 ounces) bread flour
1 tablespoon whole-wheat flour (optional)
2 teaspoons sugar
1¼ teaspoons salt
1 teaspoon instant or rapid-rise yeast
Topping
5 to 6 plum tomatoes, cored, seeded, and cut into
½-inch dice
¾ teaspoon salt
6 ounces fontina cheese, shredded (1½ cups)
1½ ounces Parmesan cheese, grated fine (¾ cup)
1 recipe Spicy Garlic Oil (recipe follows)
½ cup chopped fresh basil
Kosher salt
1. FOR DOUGH: Combine oil and water in liquid mea-suring cup. Process bread flour; whole-wheat flour, if using; sugar; salt; and yeast in food processor until combined, about 5 seconds. With processor running, slowly add liquid and continue to process until dough forms tacky, elastic ball that clears sides of workbowl, about 1½ minutes. (If dough ball does not form, add more bread flour 1 tablespoon at a time and process until dough ball forms.) Spray medium bowl lightly with vegetable oil spray or rub lightly with oil. Transfer dough to bowl and press down to flatten surface; cover tightly with plastic wrap and set in draft-free spot until doubled in volume, 1½ to 2 hours.
2. When dough has doubled, press down gently to deflate; turn out dough onto counter and divide into 4 equal pieces. With cupped palm, form each piece into smooth, tight ball. Set dough balls on well-floured counter. Press dough rounds with hand to flatten; cover loosely with plastic and let rest for about 15 minutes.
3. FOR TOPPING: While dough rests, toss tomatoes and salt in medium bowl; transfer to colander and let drain for 30 minutes. (Wipe out and reserve bowl.) Shake colander to drain off excess liquid; transfer tomatoes to now-empty bowl and set aside. Combine cheeses in second medium bowl and set aside.
4. Gently stretch dough rounds into disks about ½ inch thick and 5 to 6 inches in diameter. Working with 1 piece of dough at a time and keeping others covered, roll out each disk to ⅛-inch thickness, 9 to 10 inches in diameter, on well-floured sheet of parchment paper, dusting with additional bread flour as needed to prevent sticking. (If dough shrinks when rolled out, cover with plastic and let rest until relaxed, 10 to 15 minutes.) Dust surface of rolled dough with bread flour and set aside. Repeat with remain-ing dough, stacking sheets of rolled dough on top of each

CELEBRATE AN ENDLESS SUMMER with AMERICA'S TEST KITCHEN GRILLING RECIPES 7
other (with parchment in between) and covering stack with plastic; set aside until grill is ready.
5. Turn all burners to high and heat grill with lid down until very hot, about 15 minutes. Leave primary burner on high and turn other burner(s) to medium. 6. Clean and oil cooking grate. Lightly flour pizza peel; invert 1 dough round onto peel, gently stretching it as needed to retain shape. (Do not stretch dough too thin; thin spots will burn quickly.) Peel off and discard parchment; carefully slide round onto hotter side of grill. Cook, covered, until bubbles appear on surface of dough (pierce larger bubbles with tip of paring knife) and bottom is grill-marked and charred in spots, 2 to 3 minutes. Transfer crust to cutting board, browned side up, and repeat process with remaining rounds. While rounds cook, check undersides and slide to cooler side of grill if browning too quickly.
7. Turn primary burner to medium. Brush 2 crusts generously with Spicy Garlic Oil; top each evenly with one-quarter of cheese mixture and one-quarter of toma-toes. Return pizzas to grill and cover; cook until bottoms are well browned and cheese is melted, 2 to 4 minutes, checking bottoms frequently to prevent burning. Transfer pizzas to cutting board; repeat with remaining 2 crusts. Sprinkle pizzas with basil and season with kosher salt to taste; cut into wedges and serve immediately. (Pizzas are best served hot off grill but can be kept warm for 20 to 30 minutes on wire rack in 200-degree oven.)
Spicy Garlic OilMAKES ABOUT 1/3 CUP; ENOUGH FOR 4 PIZZAS
⅓ cup extra-virgin olive oil
4 garlic cloves, minced
½ teaspoon red pepper flakes
Combine all ingredients in small saucepan and cook over medium heat, stirring occasionally, until garlic begins to sizzle, 2 to 3 minutes. Transfer to small bowl and set aside.
Asparagus with Garlic ButterSERVES 4 TO 6
Use asparagus that is at least ½ inch thick near the base. Do
not use pencil-thin asparagus; it can’t withstand the heat and
will overcook. For the best flavor, buy spears that are bright
green and firm, with tightly closed tips.
3 tablespoons unsalted butter, melted
3 small garlic cloves, minced
1½ pounds asparagus, trimmed
Salt and pepper
1. Combine butter and garlic in small bowl. Brush asparagus with butter mixture, sprinkle with 1/4 teaspoon salt, and season with pepper to taste.
2. Turn all burners to high and heat grill until very hot, about 15 minutes. Turn primary burner to medium-high and turn off other burner(s).
3. Scrape grate clean with grill brush and oil grate. Grill asparagus, with lid up, using tongs to flip once, until just tender and caramelized, 2 to 5 minutes per side (move asparagus as needed to ensure even cooking). Transfer asparagus to platter and serve.
GAS-GRILLED ASPARAGUS WITH ORANGE-THYME BUTTERFollow recipe for Gas-Grilled Asparagus with Garlic Butter, substituting 1 teaspoon finely grated orange zest and 1 teaspoon finely chopped thyme for garlic.
© 2013 America’s Test Kitchen . All rights reserved . PHOTOGRAPHY: Carl Tremblay
TECHNIQUE: TRIMMING ASPARAGUS
Holding the asparagus about halfway down the stalk, bend it until the hard, woody end snaps off . Using this piece of asparagus as a guide, trim the remaining asparagus to the same length with a knife .
CELEBRATE AN ENDLESS SUMMER with AMERICA'S TEST KITCHEN GRILLING RECIPES 8
© 2013 America’s Test Kitchen . All rights reserved . PHOTOGRAPHY: Carl Tremblay
Portobello and Arugula Salad with Bacon and Blue CheeseSERVES 4 AS A MAIN DISH OR 6 TO 8 AS A SIDE DISH
Cut the mushrooms while they are still hot and immediately
add them to the arugula; their heat will cause the arugula to
wilt and create a pleasant texture. The test kitchen’s winning
balsamic vinegar is Cavalli Gold Seal Extra Vecchio Aceto
Balsamico Tradizionale de Reggio Emilia. If you can’t find it,
our favorite supermarket brand, and runner-up in our tasting,
is Lucini Gran Riserva Balsamico.
3 ounces (3 cups) baby arugula, torn into bite-size
pieces
8 slices bacon, cut into 1-inch pieces and fried
until crisp
1 recipe Gas-Grilled Marinated Portobello
Mushrooms, cut into 1⁄2-inch cubes while still
hot (recipe follows)
1 tablespoon balsamic vinegar
1 shallot, minced
1 teaspoon salt
2 tablespoons olive oil
4 ounces blue cheese, crumbled (1 cup)
Pepper
1. Toss arugula with bacon and hot mushrooms in large bowl.
2. Combine vinegar, shallot, and salt in medium bowl. Whisk in oil in slow, steady stream. Sprinkle blue cheese over arugula mixture and season with pepper to taste. Pour dressing over salad and toss well to combine. Serve immediately.
Gas-Grilled Marinated Portobello MushroomsMAKES FOUR 5- TO 6-INCH MUSHROOM CAPSIf you can’t find mushrooms whose caps measure 5 to 6
inches across, use six 4- to 5-inch portobellos, which are typi-
cally sold three to a package. Be sure to decrease the grilling
time of the smaller mushrooms when wrapped in aluminum
foil to about 9 minutes.
½ cup olive oil
3 tablespoons lemon juice
6 garlic cloves, minced
¼ teaspoon salt
4 (5- to 6-inch) portobello mushroom caps
1. Combine oil, lemon juice, garlic, and salt in large zipper-lock bag. Add mushrooms; seal bag and gently shake to coat mushrooms with marinade. Let stand at room tem-perature until seasoned, about 1 hour. Meanwhile, cut four 12-inch-square pieces of aluminum foil.
2. Remove mushrooms from marinade. Place foil square on counter and set mushroom on top, gill side up; fold foil edges over to enclose mushroom and seal edges. Repeat with remaining mushrooms.
3. When mushrooms are almost done marinating, turn all burners to high, cover, and heat grill until very hot, about 15 minutes.
4. Clean and oil cooking grate. Grill mushrooms with sealed side of foil packet facing up until juicy and tender, 7 to 9 minutes. Using tongs, unwrap mushrooms and set them on cooking grate gill side up; discard foil. Cook until mushrooms develop grill marks, 30 to 60 seconds. Remove mushrooms from grill and serve.

CELEBRATE AN ENDLESS SUMMER with AMERICA'S TEST KITCHEN GRILLING RECIPES 9
© 2013 America’s Test Kitchen . All rights reserved . PHOTOGRAPHY: Carl Tremblay
Potatoes with Garlic and RosemarySERVES 4
This recipe works best with small potatoes that are about
1½ inches in diameter. If using medium potatoes (2 to 3
inches in diameter), cut potatoes into quarters. If potatoes
are larger than 3 inches in diameter, cut each potato into
eighths. Since the potatoes are cooked in the microwave,
use wooden skewers.
¼ cup olive oil
9 garlic cloves, minced
1 teaspoon chopped fresh rosemary
Kosher salt and pepper
2 pounds small red potatoes (about 18), scrubbed,
halved, and skewered
Disposable 13 by 9-inch aluminum roasting pan
2 tablespoons chopped fresh chives
1. Turn all burners to high, cover, and heat grill until very hot, about 15 minutes. Leave primary burner on high and reduce other burner(s) to medium.
2. Meanwhile, heat olive oil, garlic, rosemary, and ½ teaspoon salt in small skillet over medium heat until sizzling, about 3 minutes. Reduce heat to medium-low and continue to cook until garlic is light blond, about 3 minutes. Pour mixture through fine-mesh strainer into small bowl; press on solids. Measure 1 tablespoon solids and 1 tablespoon oil into large bowl and set aside. Discard remaining solids but reserve remaining oil.
3. Place skewered potatoes in single layer on large plate and poke each potato several times with skewer. Brush with 1 tablespoon strained oil and season liberally with salt. Microwave on high power until tip of paring knife inserted in potatoes meets slight resistance, about 8 minutes, turn-ing them halfway through cooking. Transfer potatoes to baking sheet coated with 1 tablespoon strained oil. Brush with remaining 1 tablespoon strained oil; season with salt and pepper.
4. Clean and oil cooking grate. Place potatoes on hot-ter side of grill and cook, covered, turning once until grill marks appear, about 4 minutes. Move potatoes to cooler side of grill; cover with disposable pan and continue to cook until paring knife slips in and out of potatoes eas-ily, 5 to 8 minutes longer. Remove potatoes from skewers and transfer to bowl with reserved garlic-oil mixture; add chives and toss until thoroughly coated. Serve immediately.
TECHNIQUE: SKEWERING POTATOES FOR THE GRILL
Place the potato half cut side down on the work surface and pierce it through the center with a skewer . Repeat the process, holding the already skewered potatoes for better leverage .

CELEBRATE AN ENDLESS SUMMER with AMERICA'S TEST KITCHEN GRILLING RECIPES 10
© 2013 America’s Test Kitchen . All rights reserved . PHOTOGRAPHY: Carl Tremblay
Barbecued Baby Back RibsSERVES 4
For the most potent spice flavor, be sure to brine and dry the
ribs as directed in the recipe before coating them with the
spice rub, wrapping them tightly in plastic wrap, and refrig-
erating them overnight.
Ribs and Brine
½ cup salt
½ cup sugar
2 (2-pound) racks baby back or loin back pork ribs
Spice Rub
1 tablespoon plus 1/2 teaspoon paprika
1¾ teaspoons ground cumin
1½ teaspoons chili powder
1½ teaspoons packed dark brown sugar
1 teaspoon white pepper
¾ teaspoon salt
¾ teaspoon dried oregano
¾ teaspoon pepper
½ teaspoon cayenne pepper
2 cups wood chips, soaked in water for 15 minutes
and drained
Disposable aluminum pan
1. FOR RIBS AND BRINE: Dissolve salt and sugar in 4 quarts cold water in stockpot or large plastic container. Submerge ribs in brine and refrigerate for 1 hour, until fully seasoned. Remove ribs from brine and thoroughly pat dry with paper towels.
2. FOR SPICE RUB: Combine all ingredients in small bowl. Rub each side of dried ribs with 1 tablespoon spice rub; refrigerate ribs for 30 minutes.
3. Place soaked wood chips in disposable pan and place pan over primary burner. Turn all burners to high and heat grill with lid down until very hot and wood chips begin to smoke heavily, about 15 minutes.
4. Clean and oil cooking grate. Leave primary burner on high and turn off other burner(s). Place ribs on cooler side of grill and cover. (Grill temperature should register about 275 degrees on grill thermometer.) Cook ribs for about 4 hours, flipping and rotating ribs 180 degrees every 30 minutes until ribs are deep red and smoky. Transfer ribs to carving board, cut between bones to separate ribs, and serve.
LOCATING BABY BACK RIBS Baby back ribs (also referred to as loin back ribs) are cut from the section of the rib cage closest to the backbone . Lean center-cut roasts and chops come from the same part of the pig, which explains why baby back ribs can be expensive . Spareribs are cut closer to the belly of the pig, which is also where bacon comes from . Spareribs are larger and much fattier than baby back ribs .
CELEBRATE AN ENDLESS SUMMER with AMERICA'S TEST KITCHEN GRILLING RECIPES 11
© 2013 America’s Test Kitchen . All rights reserved . PHOTOGRAPHY: Carl Tremblay
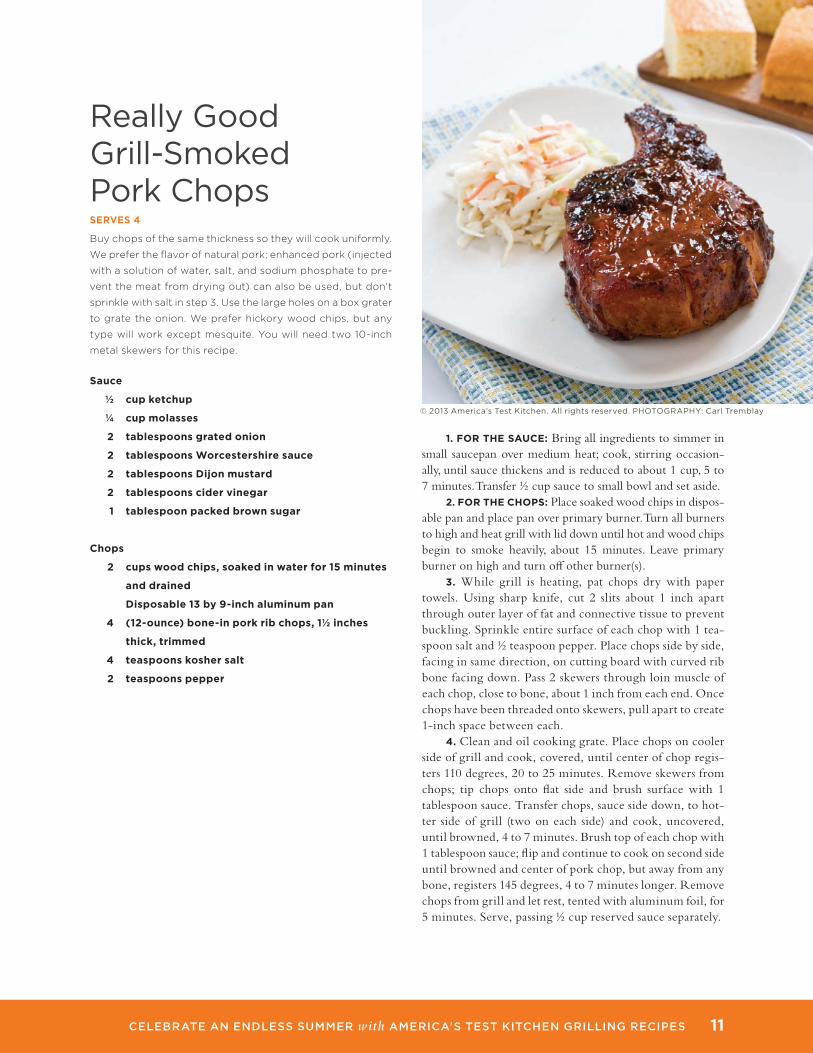
Really Good Grill-Smoked Pork ChopsSERVES 4
Buy chops of the same thickness so they will cook uniformly.
We prefer the flavor of natural pork; enhanced pork (injected
with a solution of water, salt, and sodium phosphate to pre-
vent the meat from drying out) can also be used, but don’t
sprinkle with salt in step 3. Use the large holes on a box grater
to grate the onion. We prefer hickory wood chips, but any
type will work except mesquite. You will need two 10-inch
metal skewers for this recipe.
Sauce
½ cup ketchup
¼ cup molasses
2 tablespoons grated onion
2 tablespoons Worcestershire sauce
2 tablespoons Dijon mustard
2 tablespoons cider vinegar
1 tablespoon packed brown sugar
Chops
2 cups wood chips, soaked in water for 15 minutes
and drained
Disposable 13 by 9-inch aluminum pan
4 (12-ounce) bone-in pork rib chops, 1½ inches
thick, trimmed
4 teaspoons kosher salt
2 teaspoons pepper
1. FOR THE SAUCE: Bring all ingredients to simmer in small saucepan over medium heat; cook, stirring occasion-ally, until sauce thickens and is reduced to about 1 cup, 5 to 7 minutes. Transfer ½ cup sauce to small bowl and set aside.
2. FOR THE CHOPS: Place soaked wood chips in dispos-able pan and place pan over primary burner. Turn all burners to high and heat grill with lid down until hot and wood chips begin to smoke heavily, about 15 minutes. Leave primary burner on high and turn off other burner(s).
3. While grill is heating, pat chops dry with paper towels. Using sharp knife, cut 2 slits about 1 inch apart through outer layer of fat and connective tissue to prevent buckling. Sprinkle entire surface of each chop with 1 tea-spoon salt and ½ teaspoon pepper. Place chops side by side, facing in same direction, on cutting board with curved rib bone facing down. Pass 2 skewers through loin muscle of each chop, close to bone, about 1 inch from each end. Once chops have been threaded onto skewers, pull apart to create 1-inch space between each.
4. Clean and oil cooking grate. Place chops on cooler side of grill and cook, covered, until center of chop regis-ters 110 degrees, 20 to 25 minutes. Remove skewers from chops; tip chops onto flat side and brush surface with 1 tablespoon sauce. Transfer chops, sauce side down, to hot-ter side of grill (two on each side) and cook, uncovered, until browned, 4 to 7 minutes. Brush top of each chop with 1 tablespoon sauce; flip and continue to cook on second side until browned and center of pork chop, but away from any bone, registers 145 degrees, 4 to 7 minutes longer. Remove chops from grill and let rest, tented with aluminum foil, for 5 minutes. Serve, passing ½ cup reserved sauce separately.

CELEBRATE AN ENDLESS SUMMER with AMERICA'S TEST KITCHEN GRILLING RECIPES 12
© 2013 America’s Test Kitchen . All rights reserved . PHOTOGRAPHY: Carl Tremblay
Rack of LambSERVES 4
We prefer the milder taste and bigger size of domestic lamb,
but you may substitute imported lamb from New Zealand
or Australia; in that case, since imported racks are gener-
ally smaller than domestic racks, follow the shorter cooking
times given in the recipe. While most lamb is sold frenched
(meaning part of each rib bone is trimmed of fat and gristle
and exposed), chances are there will still be some extra fat
between the bones. Remove the majority of this fat, leaving
an inch at the top of the small eye of meat. Also, make sure
that the chine bone (along the bottom of the rack) has been
removed to ensure that it will be easy to cut between the
ribs after cooking. Ask the butcher to do it; it’s very hard to
cut off at home.
4 teaspoons olive oil
4 teaspoons chopped fresh rosemary
2 teaspoons chopped fresh thyme
2 garlic cloves, minced
2 (1½ pounds) racks of lamb, trimmed
Salt and pepper
1. Turn all burners to high and heat grill with lid down until very hot, about 15 minutes.
2. Meanwhile, combine 1 tablespoon oil, rosemary, thyme, and garlic in small bowl; set aside. Rub lamb with remaining 1 teaspoon oil and season generously with salt and pepper.
3. Clean and oil cooking grate. Leave primary burner on high and turn off other burner(s). Place racks bone side up on cooler side of grill with meaty side of racks very close to, but not over, hotter side of grill. Cook with lid down until meat is lightly browned, faint grill marks appear, and fat has begun to render, 8 to 10 minutes.
4. Flip racks over, bone side down, and move them to hotter side of grill. Grill, without moving them, until well browned, 3 to 4 minutes. Brush racks with herb-garlic mixture. Flip racks so that bone side is up and continue to grill over hotter side of grill until well browned, 3 to 4 minutes. Stand racks up and lean them against each other; continue to grill over hotter side of grill until bottom is well browned and center of rack, but away from any bone, registers 120 to 125 degrees (for medium-rare) or 130 to 135 degrees (for medium), 3 to 8 minutes longer.
5. Transfer lamb to cutting board, cover with alumi-num foil, and let rest for 15 minutes. Cut between ribs to separate chops and serve immediately.
GAS-GRILLED RACK OF LAMB WITH SWEET MUSTARD GLAZEFollow recipe for Gas-Grilled Rack of Lamb, omitting rosemary and adding 3 tablespoons Dijon mustard, 2 table-spoons honey, and ½ teaspoon grated lemon zest to oil, thyme, and garlic in step 2. Brush racks with mustard glaze as directed in step 4, reserving 2 tablespoons. Brush racks with reserved glaze once removed from grill in step 5.
STEP BY STEP: TRIMMING FAT FROM THE RACK
1. Using boning knife, peel back outer layer of fat from exterior of rack . Cut away any tissue connecting fat cap to rack .
2. Trim remaining thin layer of fat covering loin, leaving thin strip of fat between loin and bone .
3. Make straight cut along top side of bones, 1 inch up from small eye of meat .
4. Remove any fat above this line and scrape any remaining meat or fat from exposed bones .

CELEBRATE AN ENDLESS SUMMER with AMERICA'S TEST KITCHEN GRILLING RECIPES 13
© 2013 America’s Test Kitchen . All rights reserved . PHOTOGRAPHY: Carl Tremblay
California Barbecued Tri-TipSERVES 4 TO 6
If you can’t find tri-tip at your local market, bottom round is
an acceptable alternative. A traditional accompaniment to
tri-tip is baked beans.
1 (2-pound) tri-tip roast, trimmed
6 garlic cloves, minced
2 tablespoons olive oil
¾ teaspoon salt
2 cups wood chips, preferably oak, soaked in
water for 15 minutes and drained
Disposable aluminum pie plate
1 teaspoon pepper
¾ teaspoon garlic salt
1. Pat roast dry with paper towels. Using fork, prick roast about 20 times on each side. Combine garlic, oil, and salt and rub all over roast. Cover with plastic wrap and refrigerate for at least 1 hour or up to 24 hours.
2. Place drained wood chips in disposable and place pan over primary burner. Turn all burners to high and heat grill with lid down until very hot and wood chips begin to smoke heavily, about 15 minutes.
3. Clean and oil cooking grate. Using paper towels, wipe garlic paste off roast. Rub pepper and garlic salt all over roast. Place roast on grate opposite primary burner and grill, covered, until well browned, about 5 minutes per side. Leave primary burner on high and turn off other burner(s); cook until center of roast registers 120 to 125 degrees (for medium-rare), about 20 minutes. Transfer roast to cutting board, tent loosely with aluminum foil, and let rest for 20 minutes. Slice roast thin against grain. Serve.
TECHNIQUE: SLICING THE SUBSTITUTE Since the tri-tip cut for our California Barbecued Tri-Tip can be hard to find in some parts of the country, we looked for a widely available substitute steak . We tried flank steak (too thin), shoulder steak (too tough), and strip steak (too pricey) before we arrived at bottom round steak . Aside from being similar to tri-tip in thickness and weight (and therefore cooking time and yield), bottom round also has the big, beefy flavor of tri-tip at a modest price . Unfortunately, the long muscle fibers of this cut can make it extremely tough . We
found that thinly slicing the meat at a 45-degree angle against the grain shortened the muscle fibers and dramatically reduced the chewiness .
CELEBRATE AN ENDLESS SUMMER with AMERICA'S TEST KITCHEN GRILLING RECIPES 14
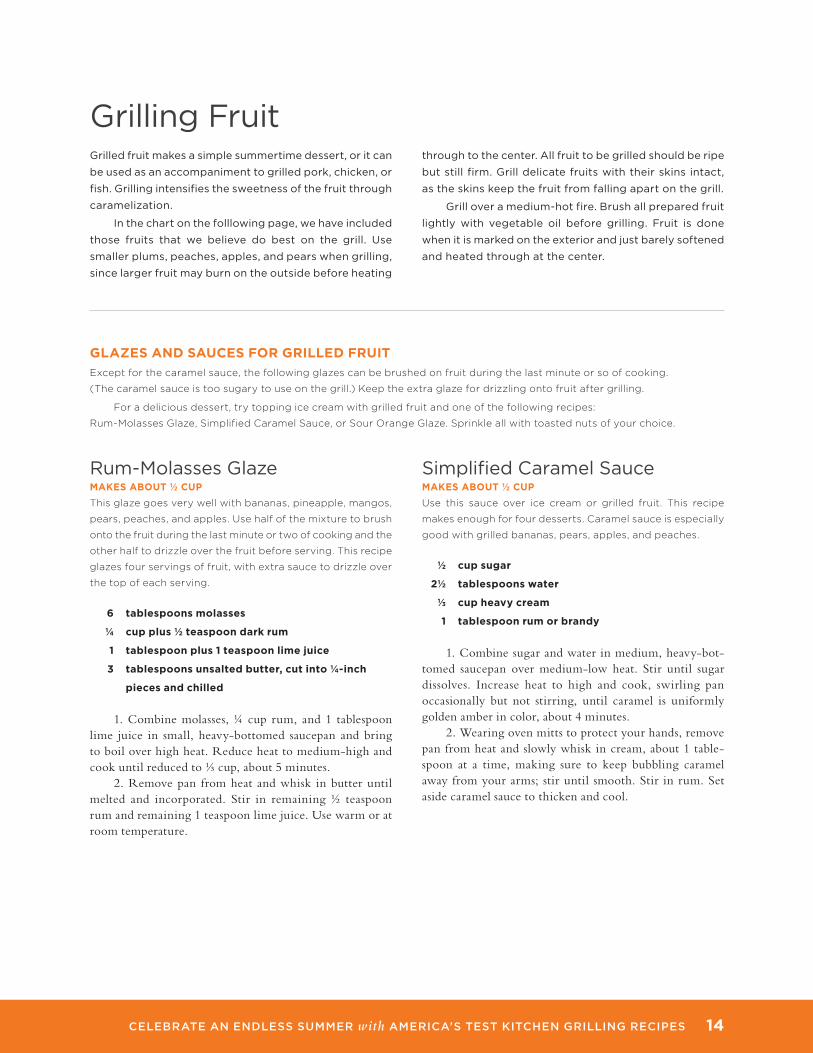
Grilling FruitGrilled fruit makes a simple summertime dessert, or it can
be used as an accompaniment to grilled pork, chicken, or
fish . Grilling intensifies the sweetness of the fruit through
caramelization .
In the chart on the folllowing page, we have included
those fruits that we believe do best on the grill . Use
smaller plums, peaches, apples, and pears when grilling,
since larger fruit may burn on the outside before heating
through to the center . All fruit to be grilled should be ripe
but still firm . Grill delicate fruits with their skins intact,
as the skins keep the fruit from falling apart on the grill .
Grill over a medium-hot fire . Brush all prepared fruit
lightly with vegetable oil before grilling . Fruit is done
when it is marked on the exterior and just barely softened
and heated through at the center .
GLAZES AND SAUCES FOR GRILLED FRUITExcept for the caramel sauce, the following glazes can be brushed on fruit during the last minute or so of cooking.
(The caramel sauce is too sugary to use on the grill.) Keep the extra glaze for drizzling onto fruit after grilling.
For a delicious dessert, try topping ice cream with grilled fruit and one of the following recipes:
Rum-Molasses Glaze, Simplified Caramel Sauce, or Sour Orange Glaze. Sprinkle all with toasted nuts of your choice.
Rum-Molasses GlazeMAKES ABOUT ½ CUPThis glaze goes very well with bananas, pineapple, mangos,
pears, peaches, and apples. Use half of the mixture to brush
onto the fruit during the last minute or two of cooking and the
other half to drizzle over the fruit before serving. This recipe
glazes four servings of fruit, with extra sauce to drizzle over
the top of each serving.
6 tablespoons molasses
¼ cup plus ½ teaspoon dark rum
1 tablespoon plus 1 teaspoon lime juice
3 tablespoons unsalted butter, cut into ¼-inch
pieces and chilled
1. Combine molasses, ¼ cup rum, and 1 tablespoon lime juice in small, heavy-bottomed saucepan and bring to boil over high heat. Reduce heat to medium-high and cook until reduced to ⅓ cup, about 5 minutes.
2. Remove pan from heat and whisk in butter until melted and incorporated. Stir in remaining ½ teaspoon rum and remaining 1 teaspoon lime juice. Use warm or at room temperature.
Simplified Caramel SauceMAKES ABOUT ½ CUPUse this sauce over ice cream or grilled fruit. This recipe
makes enough for four desserts. Caramel sauce is especially
good with grilled bananas, pears, apples, and peaches.
½ cup sugar
2½ tablespoons water
⅓ cup heavy cream
1 tablespoon rum or brandy
1. Combine sugar and water in medium, heavy-bot-tomed saucepan over medium-low heat. Stir until sugar dissolves. Increase heat to high and cook, swirling pan occasionally but not stirring, until caramel is uniformly golden amber in color, about 4 minutes.
2. Wearing oven mitts to protect your hands, remove pan from heat and slowly whisk in cream, about 1 table-spoon at a time, making sure to keep bubbling caramel away from your arms; stir until smooth. Stir in rum. Set aside caramel sauce to thicken and cool.
CELEBRATE AN ENDLESS SUMMER with AMERICA'S TEST KITCHEN GRILLING RECIPES 15
Sour Orange GlazeMAKES ABOUT ½ CUPAs with Rum-Molasses Glaze, this glaze can be brushed onto
the fruit during the last minute or two of cooking. This recipe
glazes four servings of fruit, with extra sauce to drizzle over
the top of each serving. This glaze goes well with all the fruit
included in the chart.
½ cup orange juice
¼ cup packed (1¾ ounces) brown sugar
3 tablespoons lime juice (2 limes)
3 tablespoons unsalted butter, cut into ¼-inch
pieces and chilled
1. Combine orange juice, sugar, and 2½ tablespoons lime juice in small saucepan and bring to boil over high heat. Reduce heat to medium-high and cook until reduced to ⅓ cup, about 7 minutes.
2. Remove pan from heat and whisk in butter until melted and incorporated. Stir in remaining ½ tablespoon lime juice. Use warm or at room temperature.
Sweet and Spicy Hoisin GlazeMAKES A GENEROUS ¼ CUPFruit served with this glaze should be used as a side dish for
the main meal. Use this glaze on stone fruit such as peaches
or plums; it also goes well with grilled pineapple or mangoes.
This recipe makes enough glaze to coat four servings of fruit.
2 tablespoons hoisin sauce
1 tablespoon soy sauce
1 tablespoon rice vinegar
1 tablespoon honey
½ teaspoon red pepper flakes
Mix all ingredients together in a small bowl.

CELEBRATE AN ENDLESS SUMMER with AMERICA'S TEST KITCHEN GRILLING RECIPES 16
FRUIT PREPARATION GRILLING DIRECTIONS
Apple (small) Cut in half through the core. Remove the core with a melon baller or a sturdy teaspoon measure. Use a paring knife to cut out the stem.
Grill, skin side up, for 5 to 6 minutes; turn and grill, skin side down, for 5 to 6 minutes.
Banana Leave the skin on; cut in half length-wise using a sharp paring knife.
Grill, skin side up, for 2 minutes; turn and grill, skin side down, for another 2 minutes.
Mango Peel, pit, and cut into four pieces. Grill larger pieces for 5 minutes and smaller pieces for 4 minutes, turning all the pieces once halfway through the grilling time.
Peach (small) Cut in half and remove the pit. Grill, skin side up, for 4 minutes; turn and grill, skin side down, for 3 to 4 minutes.
Pear (small) Cut in half lengthwise. Remove the core with a melon baller or a sturdy teaspoon measure. Use a paring knife to cut out the stem.
Grill, skin side up, for 5 minutes; turn and grill, skin side down, for 5 minutes.
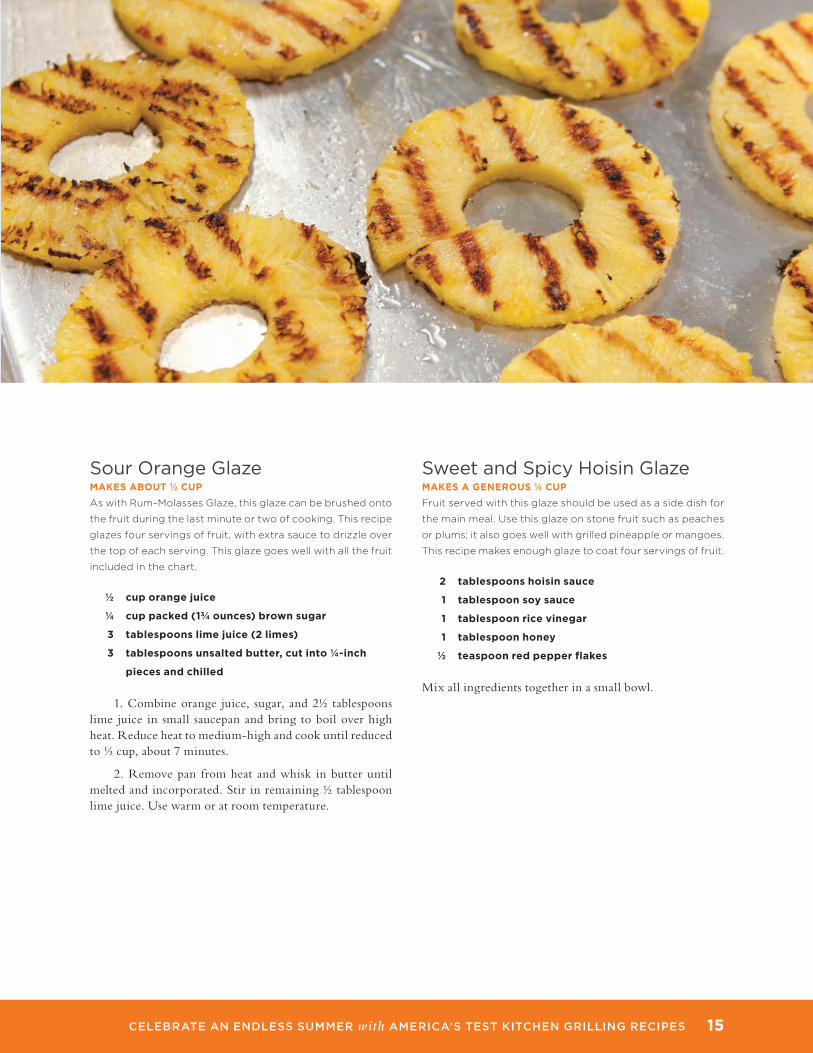
Pineapple Cut into half circles. Grill for 6 minutes, turning once halfway through the cooking time.
Plum (small) Cut in half and remove the pit. Grill, skin side up, for 4 minutes; turn and grill, skin side down, for another 2 minutes.
AT A GLANCE: GRILLING FRUITUse this chart as a guide to grilling the following fruits. Use a grill brush to scrape the cooking grate clean. Lightly brush the
prepared fruit with vegetable oil. These fruits should be cooked over a medium-hot fire.

CELEBRATE AN ENDLESS SUMMER with AMERICA'S TEST KITCHEN GRILLING RECIPES 17
PREPARING A MANGO FOR GRILLING
1. A sharp paring knife makes it easy to peel a mango. Start by removing a thin slice from one end of the mango so that it sits flat on a work surface.
2. Hold the mango, cut side down, and remove the skin in thin strips with the paring knife, working from top to bottom.
3. Once the peel has been completely removed, cut down along the side of the flat pit to remove the flesh from one side of the mango. Do the same thing on the other side of the pit.
4. Trim around the pit to remove any remaining flesh.
PREPARING A PINEAPPLE FOR GRILLINGWhen preparing a pineapple for grilling, you need to cut pieces large enough that they won’t fall through the cooking grate.
1. Using a chef ’s knife, cut off ½ inch from the top and bottom of the pine-apple, removing the leaves at the same time. Discard the top and bottom.
3. Cut the peeled pine-apple lengthwise through the center.
4. Cut each piece in half crosswise to yield a total of four equal pieces.
5. Remove the core of each piece, cutting at an angle to one side of the core and then cutting at an angle to the other side to meet the first cut, forming a V-shaped cut. Remove the core and discard.
6. Cut each cored quarter crosswise into ½-inch-thick slices. Each piece should resemble half of a pineapple ring.
2. Set the flat bottom of the pineapple on the cut-ting board. Using a sharp knife, cut the outer ½ inch off the pineapple, run-ning from the top to the bottom of the pineapple. Discard the outer portion.
STEP 2
STEP 6

www .dcsappliances .com DCS Toll Free Sales & Service: 888-936-7872
DCSBR0407 May 2013