enicq 5 quick start guide - vtoxford.org 5 quick start guide vermont oxford network – enicq 5...
TRANSCRIPT

eNICQ 5 Quick Start Guide
Vermont Oxford Network – eNICQ 5 Documentation
Release 2.0
Published November 2014
©2014 Vermont Oxford Network. All Rights Reserved.

Copyright © 2014 Vermont Oxford Network – Release 2.0 1
eNICQ 5 Quick Start Guide
Contents
1. About eNICQ 5 and the Quick Start Guide ............................................................................................................. 2
1. Starting eNICQ 5 for the First Time ........................................................................................................................ 5
2. Replacing the Default Administrator Account ....................................................................................................... 7
3. Adding Center Information .................................................................................................................................. 10
4. Backup Settings .................................................................................................................................................... 15
5. Entering Patient Data ........................................................................................................................................... 17
6. Submitting Data ................................................................................................................................................... 22
7. Deleting a Center from eNICQ 5 .......................................................................................................................... 24

Copyright © 2014 Vermont Oxford Network – Release 2.0 2
1. About eNICQ 5 and the Quick Start Guide
The eNICQ 5 Quick Start Guide will assist you in getting started as a new user of eNICQ 5. This guide assumes that the application has already been successfully installed, but has not yet been set up for use. Most of the tasks in this Quick Start Guide can be performed by a user with average computer skills. A few of the tasks, such as configuring backups, may require the assistance of your local IT staff.
Other Available Resources
In addition to this Quick Start Guide, there are other resources available to assist you in setting up eNICQ 5.
The following resources are available at www.vtoxford.org/enicq:
The eNICQ 5 Installation Guide will walk you through installing eNICQ 5 if you have not
yet done so.
The eNICQ 5 System Administrator’s Guide will assist your center’s IT staff with
advanced installations and security issues.
Tutorials are available to guide you through common tasks.
The eNICQ 5 User’s Guide is available both within the application and online.
Additional resources:
Within the eNICQ 5 application itself, context-sensitive help is available by clicking on
the help icons located through the program:
It is also possible to contact the Vermont Oxford Network directly if you have a question
that is not addressed in these other resources.
o Your Vermont Oxford Network Account Manager can assist with questions about
data definitions, data submission, or data queries. The Account Management
team can be reached by phone at 802-865-4814.
o The eNICQ Technical Support Team can assist with questions or problems
installing, configuring, or using eNICQ 5. The eNICQ Technical Support Team
can be reached by phone at 802-865-4814, extension 240, or by email at

Copyright © 2014 Vermont Oxford Network – Release 2.0 3
eNICQ 5 Technical Overview
This Quick Start Guide has been written to assist you with eNICQ 5, the latest major release of the eNICQ application. The eNICQ 5 software has a SQL Server® database as its back end
and a Windows® client using the Microsoft® .NET framework as its front end. The eNICQ 5
software began with version number 5.0.0 and will be numbered upward from there.
Understanding Passwords for eNICQ 5
You may have several different accounts and passwords in your interactions with the Vermont Oxford Network. It is important to understand the differences between these passwords and what they are used for. Two of these account/password combinations will be important in setting up eNICQ 5.
eNICQ 5 Login & Password: This login and password combination is used when you start the eNICQ application. Each user of eNICQ should be assigned a unique login name and password. You are free to add and edit user accounts in the eNICQ application.
EDS Password: Your center has been assigned a single unique password for electronic data submission. This password will be a minimum of 8 characters long and will consist of both letters and numbers. You will need to know this password in order to complete the instructions in this Quick Start Guide. If you do not know your EDS Password, please contact your Account Manager for assistance.
Vermont Oxford Network Web Services: You may have another account and password to access the Vermont Oxford Network Member’s Area and Nightingale Internet Reporting System. This account is only used to access Vermont Oxford Network’s Web Services and is not used with eNICQ.
Protected Health Information and HIPAA
Confidential patient data items are stored in your local eNICQ 5 database. Patient identifiers are protected health information as specified in the US Health Insurance Portability and Accountability Act of 1996 (HIPAA) and the regulations implementing HIPAA. eNICQ 5 has been designed to ensure that patient identifiers cannot be sent to Vermont Oxford Network unless the submitting member has the appropriate agreement(s) in place with the Vermont Oxford Network. Hospitals in the US must implement measures to protect protected health information from unauthorized access, as specified in the HIPAA Privacy and Security regulations. Users of eNICQ software should be sure to comply with local hospital policies and good information security practices to protect data in the eNICQ database. Hospitals outside of the US should work with their legal and information security departments to determine the appropriate safeguards required in their jurisdiction(s).
To avoid access to the eNICQ 5 tables by unauthorized personnel, system administrators should review the security options available in the eNICQ 5 System Administrator’s Guide, available at www.vtoxford.org/enicq, and ensure that the application is implemented to be

Copyright © 2014 Vermont Oxford Network – Release 2.0 4
accessible only to hospital staff members who have permission to access the data.
If you are unsure about the sufficiency of your information security safeguards, or have any difficulty implementing the instructions in the guide, please consult your IT department or a qualified information security professional for assistance, in order to avoid and prevent HIPAA violations and potential breaches of information security.

Copyright © 2014 Vermont Oxford Network – Release 2.0 5
1. Starting eNICQ 5 for the First Time
To start the eNICQ 5 application, double-click on its desktop shortcut icon:
Or locate the shortcut under your Windows® Start Menu under the Vermont Oxford Network
grouping.
After a few seconds, a splash screen will appear as the program begins loading.
Once the application has loaded, a Login screen will appear asking for your Login and Password. The eNICQ 5 application is installed with a default administrator account. When starting eNICQ 5 for the first time, enter the following responses in lower case to log in to the application:
Login: admin
Password: enicq

Copyright © 2014 Vermont Oxford Network – Release 2.0 6
Click Login to continue.

Copyright © 2014 Vermont Oxford Network – Release 2.0 7
2. Replacing the Default Administrator Account
To ensure security, it is suggested that you replace the default “admin” account with a new account that has a different name and password. To do this, click on the Tools menu and select Users…
The Users listing will appear with the “admin” account selected:

Copyright © 2014 Vermont Oxford Network – Release 2.0 8
Click Add to create a new account. The New User dialogue will appear, allowing you to enter a name and password for this account:
This new account should be assigned to someone who will take over setup and administration of the eNICQ application. The primary user of the application is a good choice, but it could be anyone your organization chooses to designate.
Please complete the entries on the New User dialog for the person you’ve chosen for your new administrative account.
User Name: Enter the user's actual name. The user’s name is not used for anything but your center’s internal identification.
Login: Enter the abbreviated name the user will use to log in. This is not case sensitive. The login name is not used for anything but your center’s internal identification.
Initials: Enter the initials of the user. The initials are not used for anything but your center’s internal identification.
Password: The password is case sensitive and must contain a minimum of 8 characters, including at least two alphabetic characters, and at least 1 number or special character such as: !@#$%^&*+-=:?`~. An example of a valid password is “Sample$123.” Be sure that the password will be remembered by the new user.
Security Level: Set this to “Administrator” so that this new account can replace the default “admin” account.
“Centers” Tab: You will not be able to use this feature until you have added centers to eNICQ 5 (see Chapter 4). If your eNICQ 5 database contains data for more than one center and has multiple users, you may want to allow users to access data for some centers but not others. By default, a new user is granted access only to the center the Administrator creating the account is logged in with. To modify the centers a user can access, select the Centers tab and check or uncheck the Allowed box for each center to set the appropriate access rights.
Click OK on the New User dialog.
Click Close on the Users listing.
Click File… Exit to close the eNICQ 5 application, or use the Log Off button on the top right.
Start the application again and log in using the new administrative account that you have

Copyright © 2014 Vermont Oxford Network – Release 2.0 9
created.
With eNICQ 5 restarted and while logged into your new administrative account, click on the Tools menu and select Users…
The Users listing will appear.
Select the “admin” account from the listing.
Click Delete.
A dialogue will appear asking you to confirm this deletion:
Click Yes to remove the default “admin” account.
Close the Users list.
You have now replaced the default “admin” account with a new administrative account that is unique to your center. You will use this new administrative account to complete the setup instructions in the remainder of this Quick Start Guide.
Creating Additional User Accounts
Repeat this process for each additional user. You must have at least one administrative account in order to access all the administrative settings, but you may choose to use different security levels when creating additional user accounts.
Security Level: Set this to either “Administrator” or “User,” depending on whether this person will need to access the settings and utilities available under the Tools menu. Only an Administrator level account can create new user accounts or edit existing user accounts, add centers to eNICQ 5, change settings that affect other users and run some of the eNICQ 5 utilities.
Copyright © 2014 Vermont Oxford Network – Release 2.0 10
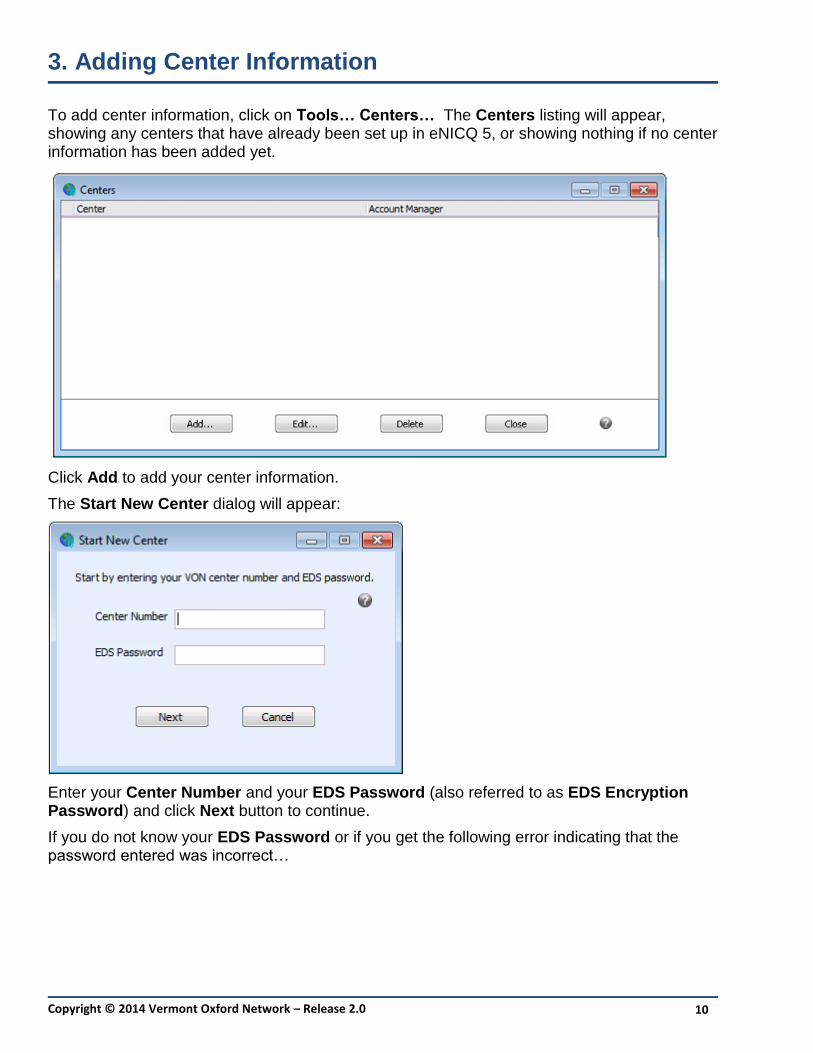
3. Adding Center Information
To add center information, click on Tools… Centers… The Centers listing will appear, showing any centers that have already been set up in eNICQ 5, or showing nothing if no center information has been added yet.
Click Add to add your center information.
The Start New Center dialog will appear:
Enter your Center Number and your EDS Password (also referred to as EDS Encryption Password) and click Next button to continue.
If you do not know your EDS Password or if you get the following error indicating that the password entered was incorrect…

Copyright © 2014 Vermont Oxford Network – Release 2.0 11
…please contact your Account Manager at the Vermont Oxford Network for the correct EDS Password in order to continue.
Once the correct Center Number / EDS Password combination has been entered, the information necessary to setup your center will be retrieved automatically from the Vermont Oxford Network website and added to your eNICQ 5 application.
The Center Settings window will then appear:
Most of the center information will have already been completed for you.
On the General tab, basic information about your center and Account Manager’s contact information will appear. If any of the information is incorrect, please contact your Account Manager before continuing.
Copyright © 2014 Vermont Oxford Network – Release 2.0 12
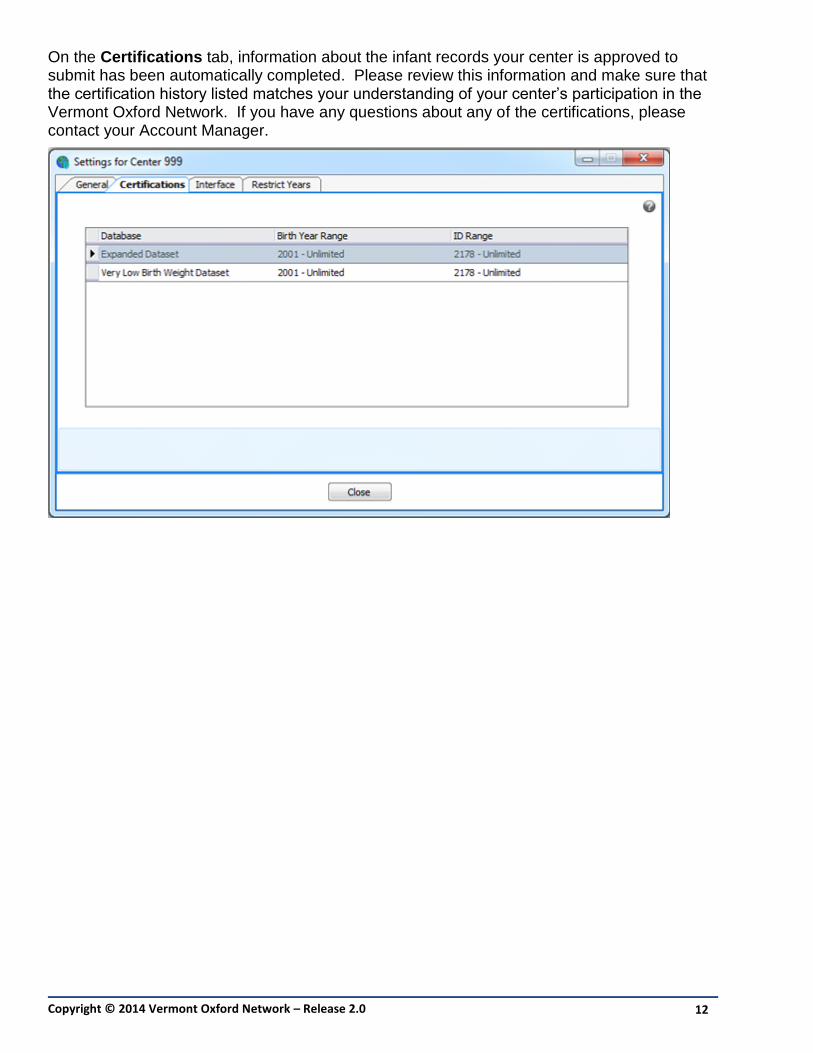
On the Certifications tab, information about the infant records your center is approved to submit has been automatically completed. Please review this information and make sure that the certification history listed matches your understanding of your center’s participation in the Vermont Oxford Network. If you have any questions about any of the certifications, please contact your Account Manager.

Copyright © 2014 Vermont Oxford Network – Release 2.0 13
The Interface tab is used to configure eNICQ 5 to accept data from an external source like an electronic health record system. If you do not intend to set up a data interface, you can skip this tab. With the Interface tab you can select which data items can be incorporated into the eNICQ 5 database from another application. Only items in the external system that have been completed using the Vermont Oxford Network data definitions should be checked as acceptable in the interface. Configuring the interface requires coordination with whoever manages the external data source. For more information about interfacing with external systems, see the eNICQ 5 External Data Interface Guide at www.vtoxford.org/enicq.

Copyright © 2014 Vermont Oxford Network – Release 2.0 14
The Restrict Years tab allows you to apply or remove restriction of all records for one or more birth years. Restricting a birth year prevents new records from being created for that year, and prevents existing records from being edited or submitted to the Vermont Oxford Network. For more information about restricting birth years, see the Restrict Years Settings topic within the eNICQ 5 User’s Guide, available online at www.vtoxford.org/enicq.
Adding Additional Centers
If you manage more than one center, you can add additional centers by repeating the instructions above for each center that you manage.

Copyright © 2014 Vermont Oxford Network – Release 2.0 15
4. Backup Settings
Note: Backup configuration should be completed in consultation with your local IT
department. Technical assistance may be required to answer some of the questions and perform some of the steps necessary for backup configuration.
To prevent data loss, the eNICQ 5 database should be backed up on a regular basis according to your organization’s IT policies and procedures. The Vermont Oxford Network recommends daily backup of the eNICQ 5 database.
To configure the eNICQ 5 application for backup, click Options on the Tools menu. The Backup tab allows you to enter the Backup File Location where backup files of your data will be stored when the Backup Database option is accessed from the Tools menu.
Setting the Backup File Location will depend on the way you have installed the eNICQ 5 application and its database. Your IT department or the person who installed eNICQ 5 should know whether the database was created in SQL Server Express® or a full version of SQL
Server®. Your IT department should also be able to grant sufficient rights to create a backup
file to the machine that the SQL Server® database is on.
If you are using SQL Server Express:
First, confirm which machine SQL Server Express® is installed on. You should recognize that
when the backup routine runs it will be carried out by the machine that SQL Server Express® is installed on, not by the machine that the eNICQ 5 client application is installed on.

Copyright © 2014 Vermont Oxford Network – Release 2.0 16
Second, enter a full Uniform Naming Convention (UNC) path into the Backup File Location on the Backup tab. This path must be accessible to the machine that SQL Server Express® is installed on. This path should also point to a location that will be a safe place for the database backup to be stored, such as a network drive that is subject to regular backups. If you unsure what an appropriate UNC path would be, please consult your local IT staff. (An example of a UNC path’s format would be: \\Computer Name\Shared Folder\eNICQ)
Third, confirm that the computer account of the machine that SQL Server Express® is installed
on has read and write access to the location identified by your UNC path. You can test this by clicking Test Backup. If the backup fails, your local IT staff may need to grant additional rights to the machine that SQL Server Express® is installed on.
Fourth, browse to the location where you are storing backups to confirm that the backup file was successfully created. If you are unable to create a backup file, please stop working in the eNICQ 5 application until this problem is resolved.
If you are using a full version of SQL Server®:
If your hospital is using a full version of SQL Server®, do NOT enter a Backup File Location
on the Backup tab. Instead, contact your local Database Administrator for assistance in setting up a backup plan for the eNICQ 5 database in accordance with your IT department’s policies. You will NOT use Backup Database in the eNICQ 5 application. Instead, your Database Administrator will be responsible for scheduling the backups directly from SQL Server®.
Ask your Database Administrator to perform an initial backup and confirm that a backup file has been created before continuing with data entry.
You may want to use the Disable Backup option in eNICQ 5 when backups are being handled by your center’s Database Administration team. For more information about disabling backups in eNICQ 5, see the Backup Settings Tab topic within the eNICQ 5 User’s Guide, available online at www.vtoxford.org/enicq.
If you are unable to perform a backup with SQL Server® or SQL Server® Express:
Ideally, we advise that you not use the software until an adequate backup plan is in place. If you cannot arrange for an adequate backup plan, having a minimal backup is better than having no backup at all. Please see the document “Moving the eNICQ 5 Database” at www.vtoxford.org/enicq for information on how to output patient records and audit logs from eNICQ to a text file. If you are operating without IT support, this is a way you can move your center’s infant data to a secure location. Please note that text files will contain PHI and should be handled according to all relevant policies.

Copyright © 2014 Vermont Oxford Network – Release 2.0 17
5. Entering Patient Data
To enter a new patient record, click Patients and then click the Add Record icon on the toolbar.
This will create a new record and place your cursor in the ID box on the Patient Information form. The next available ID for your center will be assigned automatically. The ID number can be changed at this time, but once you move from the ID box to another data item the ID is assigned and can no longer be changed. You will receive an error message if you try to use an ID number that has already been used or is outside your center’s certification range.
The Patient Information items must be completed in order to proceed to other forms. As the Patient Information is completed, the ID, patient name, date of birth and MRN are added to the Patient Header at the top of the form. The Patient Header is visible from the Patient Log and all the data entry forms.

Copyright © 2014 Vermont Oxford Network – Release 2.0 18
Protected Health Information
The Patient Information form contains protected health information. The eNICQ 5 application is designed to ensure that patient identifiers cannot be sent to the Vermont Oxford Network unless the submitting member has the appropriate agreement(s) in place with the Vermont Oxford Network.

Copyright © 2014 Vermont Oxford Network – Release 2.0 19
Using Data Entry Boxes and Accessing Help
Four types of data entry boxes are used in the eNICQ 5 application. Text boxes (for example, Patient’s First Name) allow for text entry, while drop-down list boxes (like Initial Disposition) allow you to select from a list of choices. Category boxes are paired with some drop-down list boxes to allow you to filter the drop-down list. Transfer code boxes consist of a series of category boxes that are used to filter a drop-down list of locations.
Details about the different types of data entry boxes are contained in the eNICQ 5 User’s Guide at www.vtoxford.org/enicq, which can be accessed online or from anywhere in the application by clicking the Help icon on the toolbar.
Context sensitive help is also available for various features of the application, as well as for each data item.
Status Icons and Data Entry Assistants
As you enter data, eNICQ 5 will evaluate the information you have entered and provide feedback on your responses. Each submitted data item will display a status icon to indicate
whether the item has a status of (Correct), (Error), (Blank), or (Warning). The Data Entry Assistants provide details about the status of the item, the item’s definition, and the range of acceptable responses.
The Data Forms
As you complete each data form, the next applicable form becomes available. The Next Form button at the bottom of the data entry form will take you to the next applicable form. For

Copyright © 2014 Vermont Oxford Network – Release 2.0 20
example, if you complete the Patient Information form and indicate that the patient died in the delivery room, the Next Form button will take you to the Delivery Room Death Form. Individual data items may be left blank and completed later. Do not use “Unknown” or “N/A” as placeholders for data that will later be obtained. These responses should be used only if the answer to an item is truly unknown and cannot be obtained, or is not applicable based on the item’s definition.
Each data form will also have a status icon, which will be visible from the Patient Log. The
form status is based on the status of the data items within the form. A form status of
(Correct) can be obtained only if all data items have a status of (Correct). Data forms are
categorized in groups called modules. A module status of (Correct) can be obtained only if
all applicable data forms within the module have a status of (Correct). For example, if data
item “2b-Gestational Age, Days” has a status of (Error), the 28 Day Form will have a status
of (Error), and the Primary VON Module will also have a status of (Error).
The status icons displayed on the Patient Log allow you to identify records that need additional work. Single-clicking on a record will select it and display the forms applicable to that record in the navigation tree within the sidebar on the left. The navigation tree allows you to identify which forms are incomplete or contain errors. Single-clicking on a form within the navigation tree will take you to that form, where you can search for the data item or items that require completion or correction. The data item status icons within the data forms will indicate which of the items are correct and which are incomplete or contain errors.
Copyright © 2014 Vermont Oxford Network – Release 2.0 21
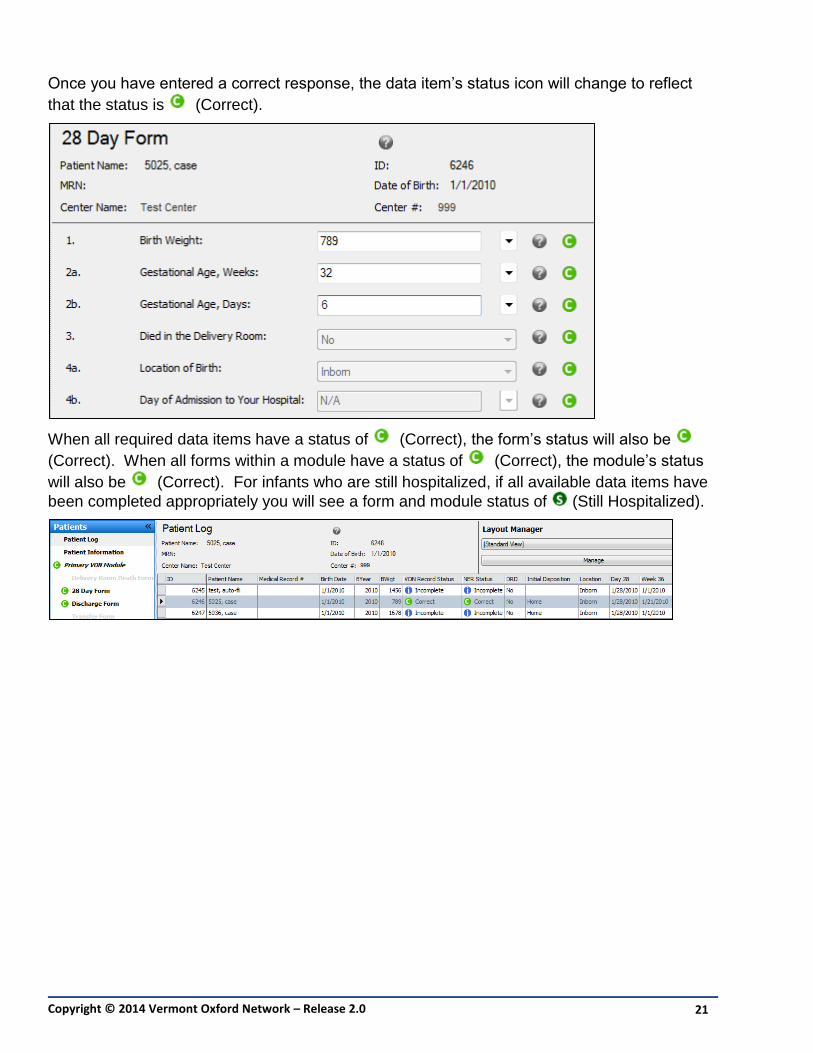
Once you have entered a correct response, the data item’s status icon will change to reflect
that the status is (Correct).
When all required data items have a status of (Correct), the form’s status will also be
(Correct). When all forms within a module have a status of (Correct), the module’s status
will also be (Correct). For infants who are still hospitalized, if all available data items have
been completed appropriately you will see a form and module status of (Still Hospitalized).

Copyright © 2014 Vermont Oxford Network – Release 2.0 22
6. Submitting Data
Once you have entered at least one record and obtained a (Correct) or (Still Hospitalized) status for at least one module, you are ready to submit data. Select Submissions from the bottom left corner.
The Submit box will be checked automatically for each module with updated and new data available for submission. You can uncheck the Submit box for any module you do not want to include. The Count for each module will display how many records have data that is ready to be included with the submission. Click Preview to display a list of the records that contain data ready for submission.
When you are done viewing the preview, click Close to return to Submissions. Click Submit Data to send all available data for the checked modules.
If you have records you thought were ready for submission that do not appear in the preview, go back to the Patient Log to check the module status. Individual forms will not be submitted
if the module they are part of does not have a status of (Correct) or (Still Hospitalized).

Copyright © 2014 Vermont Oxford Network – Release 2.0 23
In the following example, even though the 28 Day Form has a (Correct) status, no data for this record would be eligible for submission because the Primary VON Module has a status of
(Error) due to an error on the Discharge Form.
Submission History
You can view information about your submissions from Submission History. You can view submissions for a particular module, or for all modules. Highlight a submission and click View Data for information on which records had data included with the submission.
Copyright © 2014 Vermont Oxford Network – Release 2.0 24
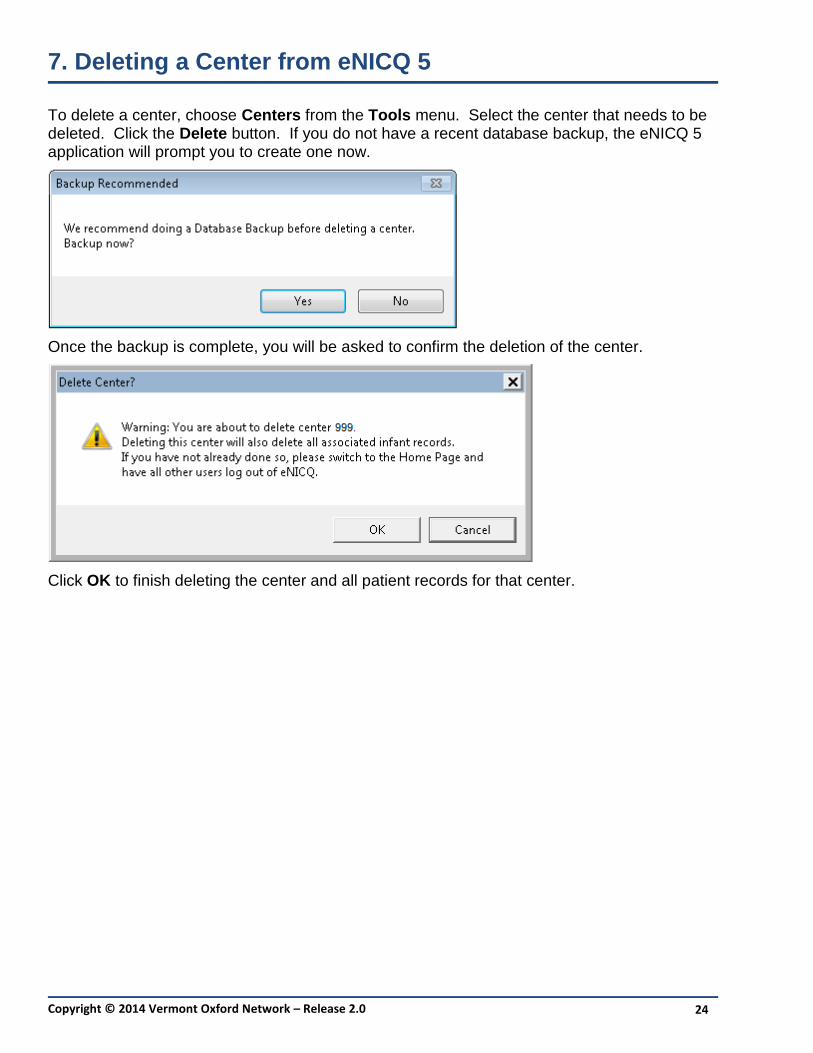
7. Deleting a Center from eNICQ 5
To delete a center, choose Centers from the Tools menu. Select the center that needs to be deleted. Click the Delete button. If you do not have a recent database backup, the eNICQ 5 application will prompt you to create one now.
Once the backup is complete, you will be asked to confirm the deletion of the center.
Click OK to finish deleting the center and all patient records for that center.