entering administrative mode editing/publishing a page … · once your file(s) has been uploaded...
TRANSCRIPT
HALF HOLLOW HILLS
Website Curator Instructions
Entering Administrative mode
Editing/Publishing a page
Uploading files
Inserting/Editing a link
Sending an E-Notification
Entering
Administrative Mode
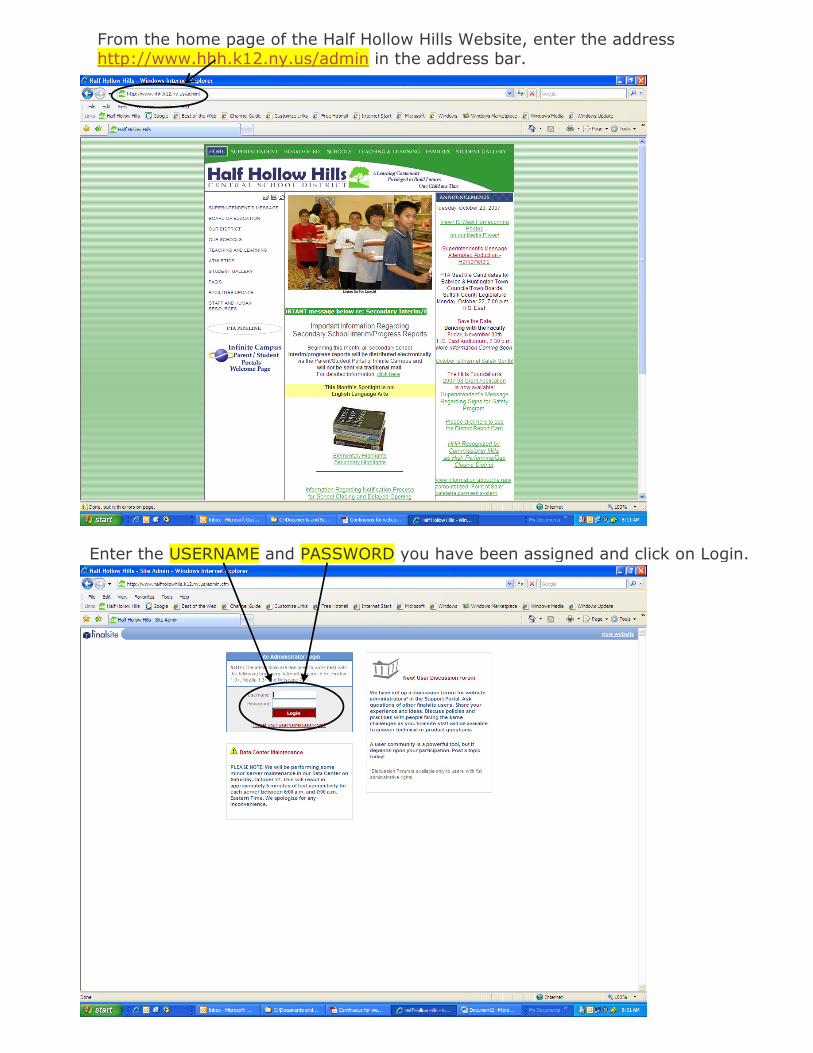
From the home page of the Half Hollow Hills Website, enter the address http://www.hhh.k12.ny.us/admin in the address bar.
Enter the USERNAME and PASSWORD you have been assigned and click on Login.
Uploading files
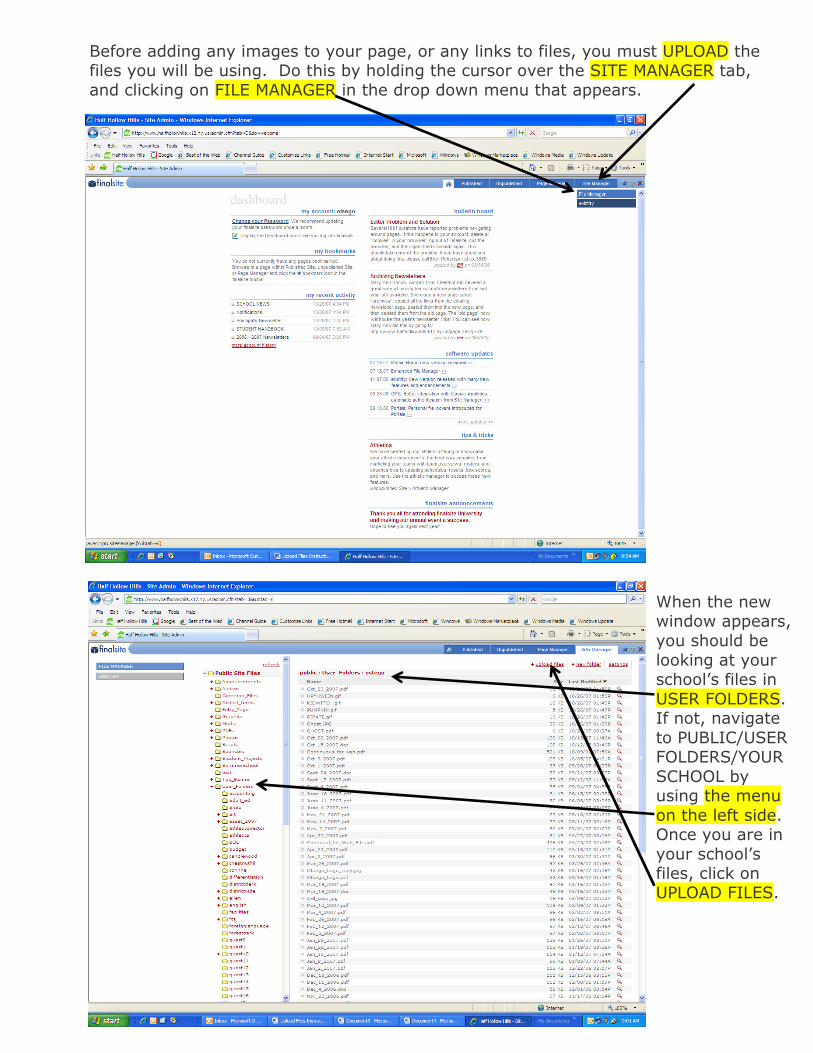
Before adding any images to your page, or any links to files, you must UPLOAD the files you will be using. Do this by holding the cursor over the SITE MANAGER tab,
and clicking on FILE MANAGER in the drop down menu that appears.
When the new window appears,
you should be
looking at your school’s files in
USER FOLDERS. If not, navigate
to PUBLIC/USER FOLDERS/YOUR
SCHOOL by using the menu
on the left side. Once you are in
your school’s files, click on UPLOAD FILES.
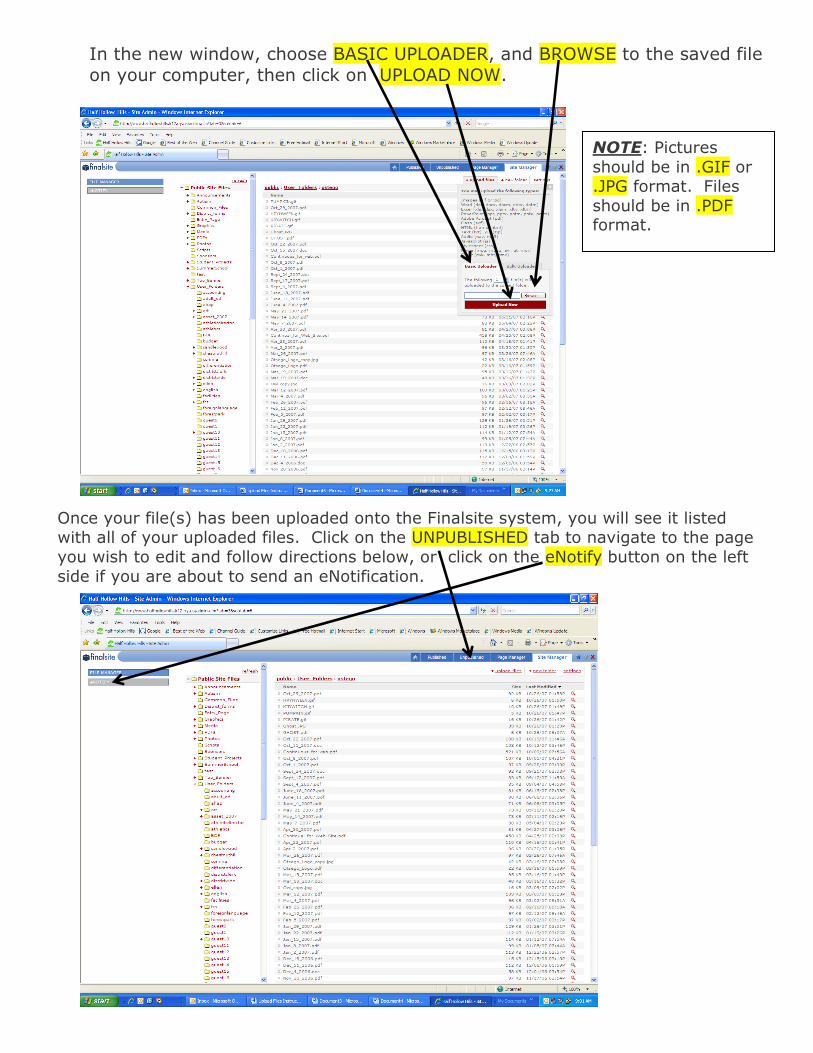
Once your file(s) has been uploaded onto the Finalsite system, you will see it listed with all of your uploaded files. Click on the UNPUBLISHED tab to navigate to the page
you wish to edit and follow directions below, or click on the eNotify button on the left
side if you are about to send an eNotification.
In the new window, choose BASIC UPLOADER, and BROWSE to the saved file
on your computer, then click on UPLOAD NOW.
NOTE: Pictures
should be in .GIF or .JPG format. Files
should be in .PDF format.
Editing/Publishing
A Page
and
Inserting/Editing
A Link
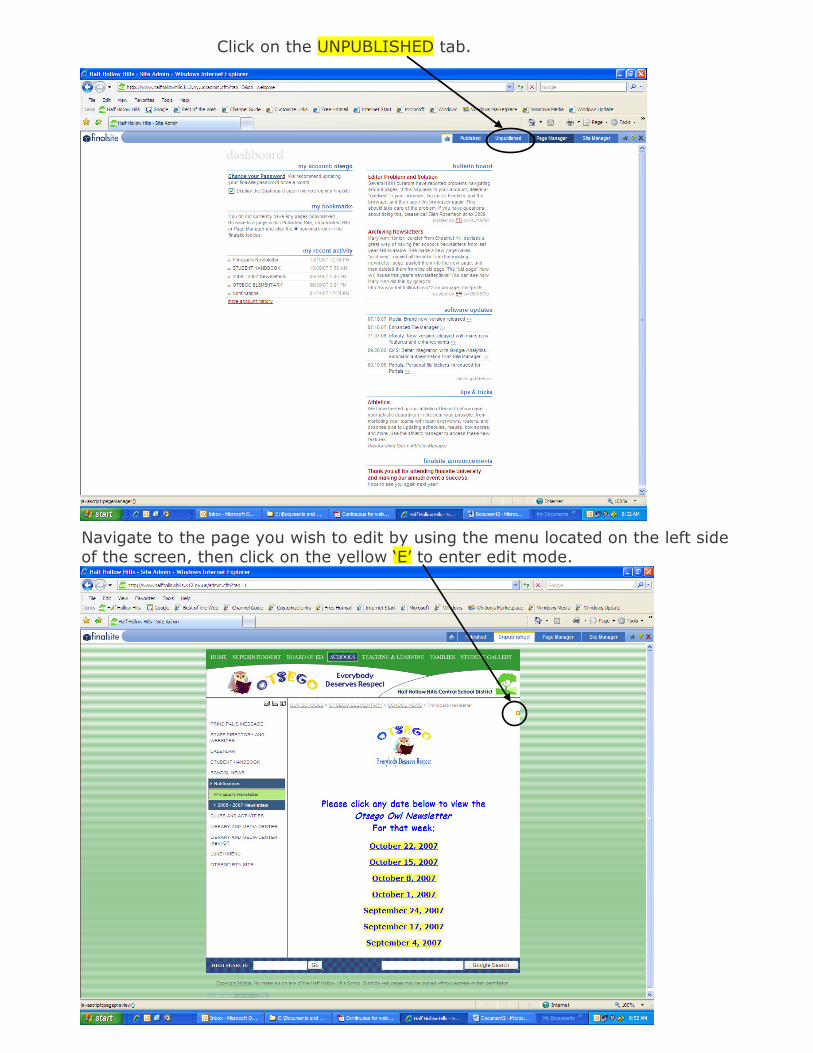
Navigate to the page you wish to edit by using the menu located on the left side of the screen, then click on the yellow ‘E’ to enter edit mode.
Click on the UNPUBLISHED tab.
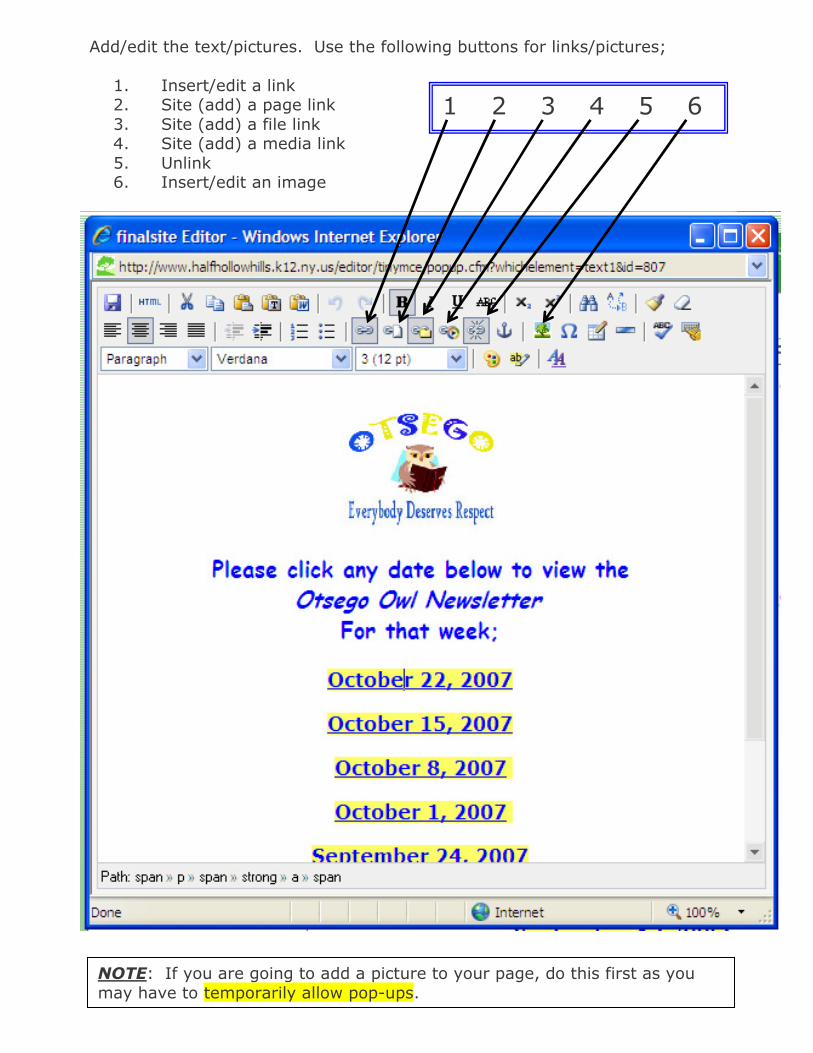
Add/edit the text/pictures. Use the following buttons for links/pictures;
1. Insert/edit a link 2. Site (add) a page link
3. Site (add) a file link 4. Site (add) a media link
5. Unlink 6. Insert/edit an image
1 2 3 4 5 6
NOTE: If you are going to add a picture to your page, do this first as you
may have to temporarily allow pop-ups.
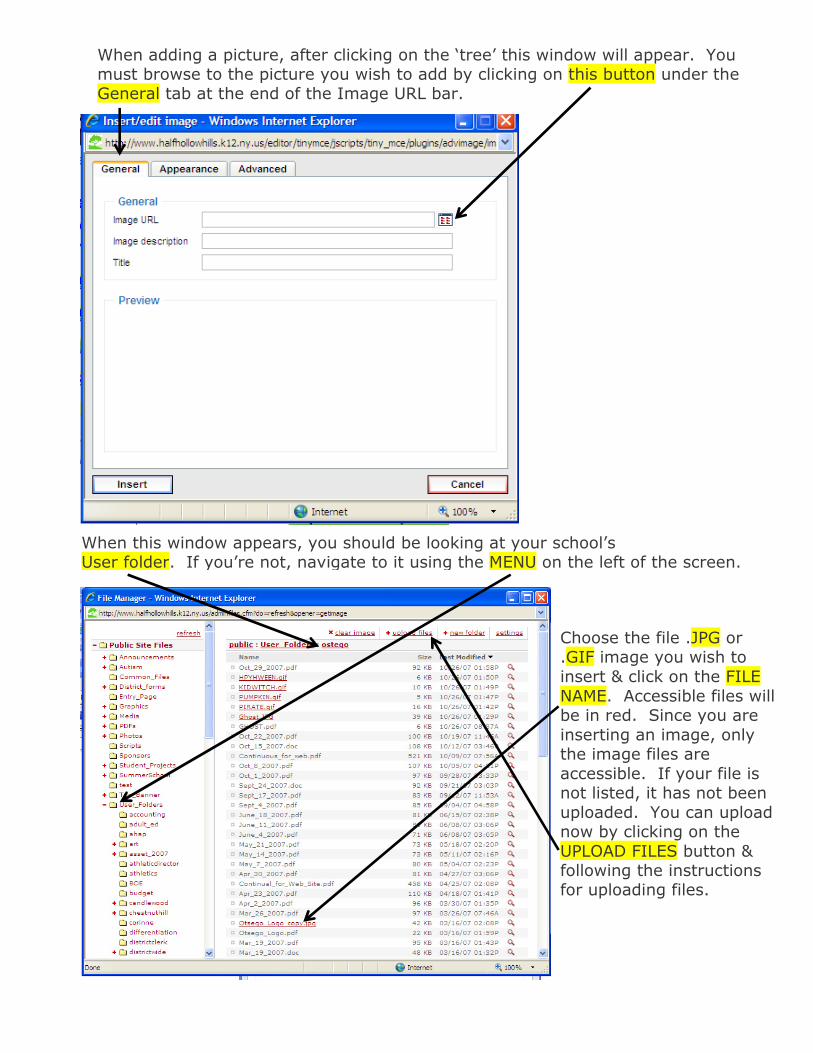
When adding a picture, after clicking on the ‘tree’ this window will appear. You must browse to the picture you wish to add by clicking on this button under the General tab at the end of the Image URL bar.
When this window appears, you should be looking at your school’s User folder. If you’re not, navigate to it using the MENU on the left of the screen.
Choose the file .JPG or .GIF image you wish to
insert & click on the FILE
NAME. Accessible files will be in red. Since you are
inserting an image, only the image files are
accessible. If your file is not listed, it has not been
uploaded. You can upload now by clicking on the
UPLOAD FILES button & following the instructions for uploading files.
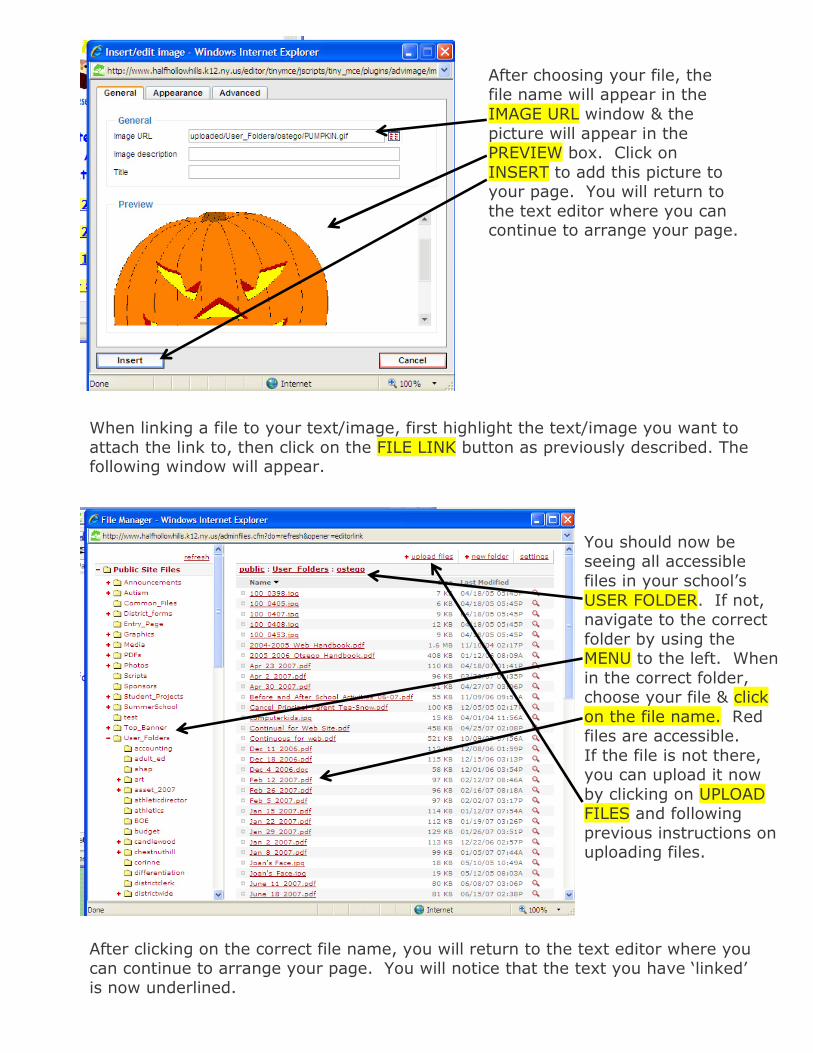
When linking a file to your text/image, first highlight the text/image you want to
attach the link to, then click on the FILE LINK button as previously described. The following window will appear.
After choosing your file, the file name will appear in the
IMAGE URL window & the
picture will appear in the PREVIEW box. Click on
INSERT to add this picture to your page. You will return to
the text editor where you can continue to arrange your page.
You should now be seeing all accessible
files in your school’s
USER FOLDER. If not, navigate to the correct
folder by using the MENU to the left. When
in the correct folder, choose your file & click
on the file name. Red files are accessible.
If the file is not there, you can upload it now
by clicking on UPLOAD FILES and following
previous instructions on uploading files.
After clicking on the correct file name, you will return to the text editor where you can continue to arrange your page. You will notice that the text you have ‘linked’ is now underlined.
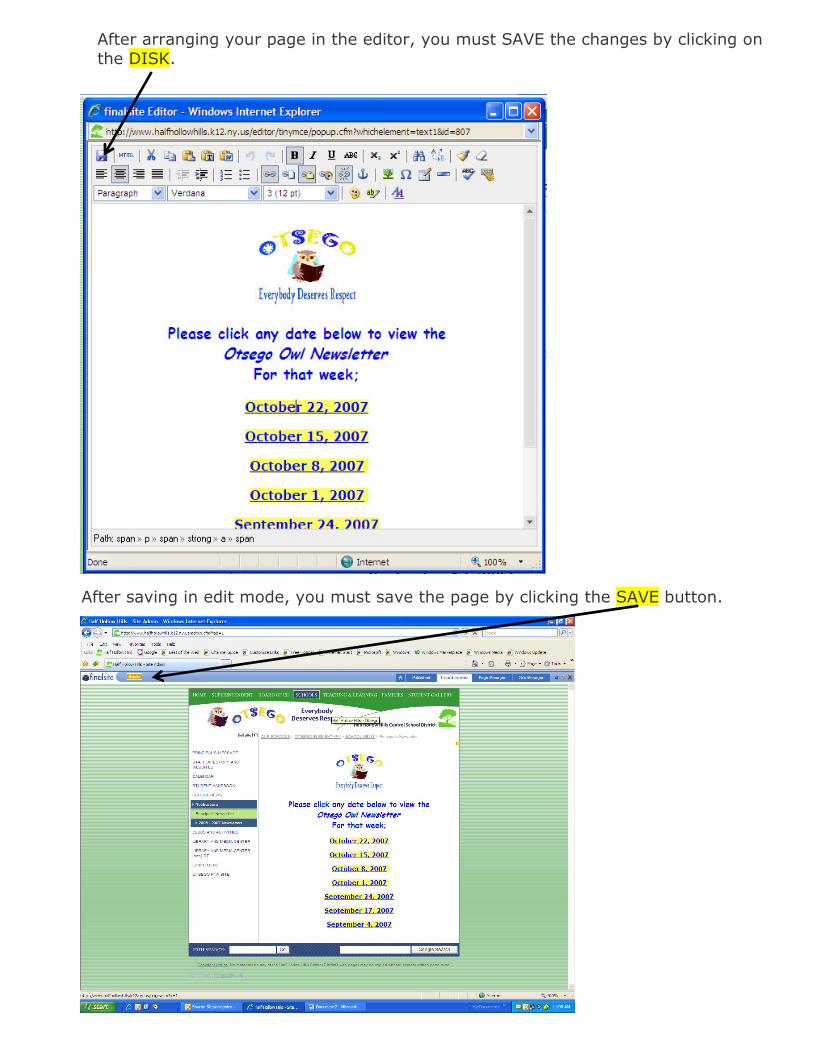
After arranging your page in the editor, you must SAVE the changes by clicking on the DISK.
After saving in edit mode, you must save the page by clicking the SAVE button.
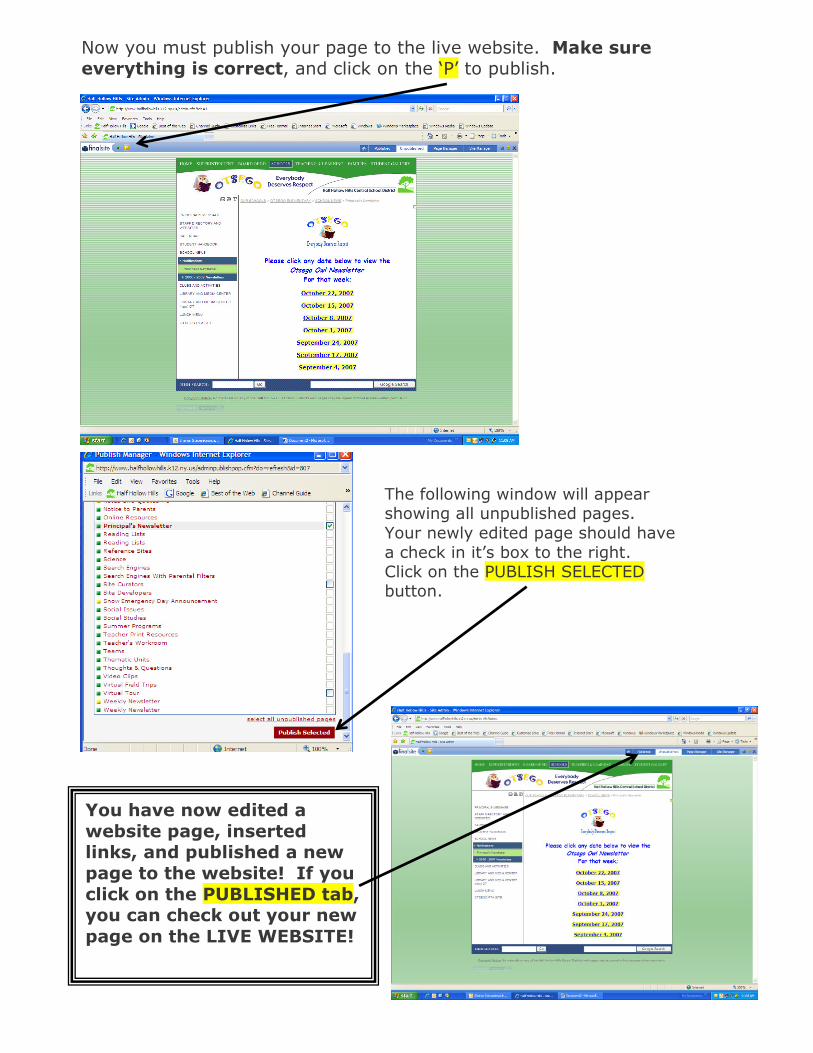
Now you must publish your page to the live website. Make sure
everything is correct, and click on the ‘P’ to publish.
The following window will appear showing all unpublished pages.
Your newly edited page should have
a check in it’s box to the right. Click on the PUBLISH SELECTED button.
You have now edited a
website page, inserted
links, and published a new
page to the website! If you
click on the PUBLISHED tab,
you can check out your new
page on the LIVE WEBSITE!
Sending an
E-Notification
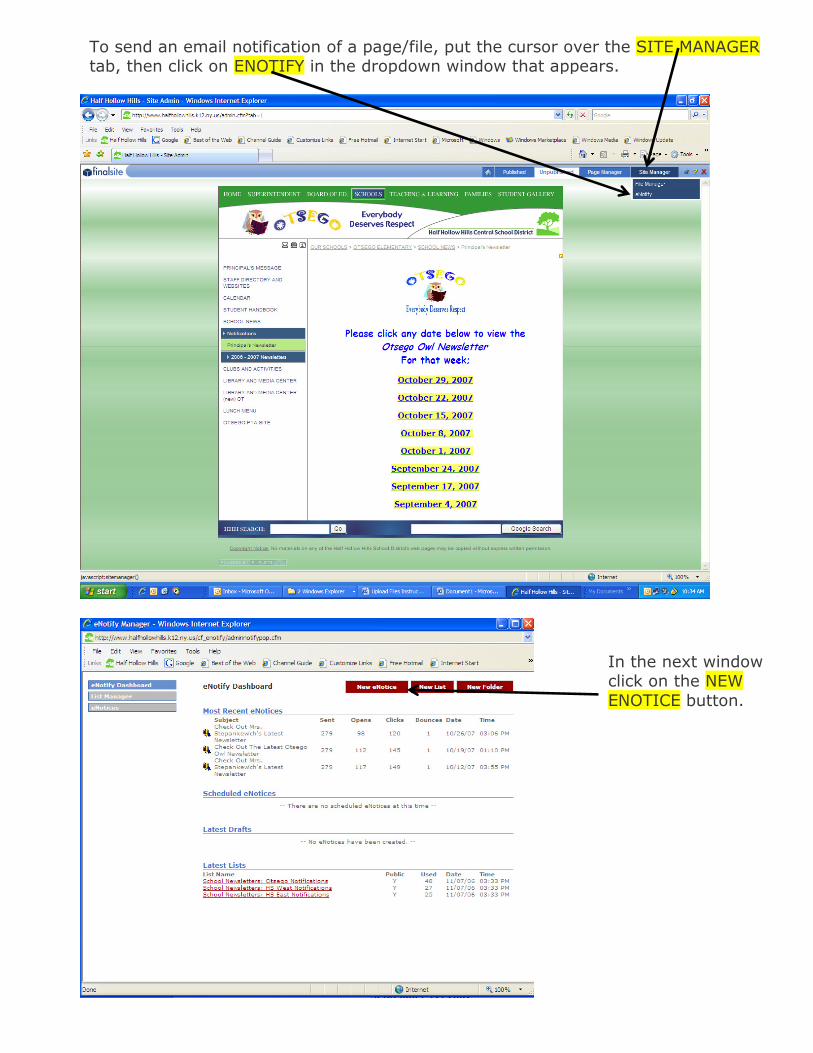
To send an email notification of a page/file, put the cursor over the SITE MANAGER tab, then click on ENOTIFY in the dropdown window that appears.
In the next window click on the NEW
ENOTICE button.
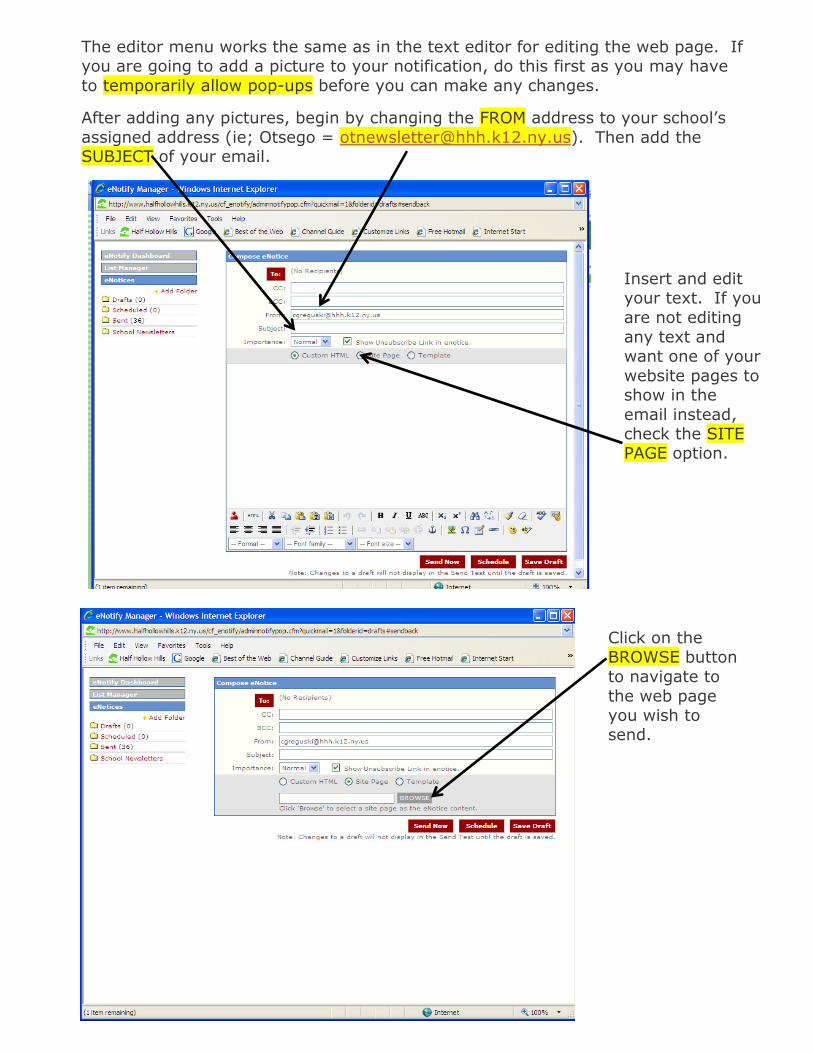
The editor menu works the same as in the text editor for editing the web page. If you are going to add a picture to your notification, do this first as you may have
to temporarily allow pop-ups before you can make any changes.
After adding any pictures, begin by changing the FROM address to your school’s
assigned address (ie; Otsego = [email protected]). Then add the SUBJECT of your email.
Insert and edit your text. If you
are not editing
any text and want one of your
website pages to show in the
email instead, check the SITE PAGE option.
Click on the BROWSE button
to navigate to
the web page you wish to send.

Navigate to the web page you wish to site in your notification by clicking on the + signs on the left side until you find your page, then click on the PAGE NAME.
Pages for your school will always be under OUR SCHOOLS then your SCHOOL NAME. (Continue to use the + signs until you reach the exact page you want.)
You will now see NEW PARENT
SELECTED in the
file name bar. Skip past the following
Text/HTML instructions to the
SAVE DRAFT section to send your page.
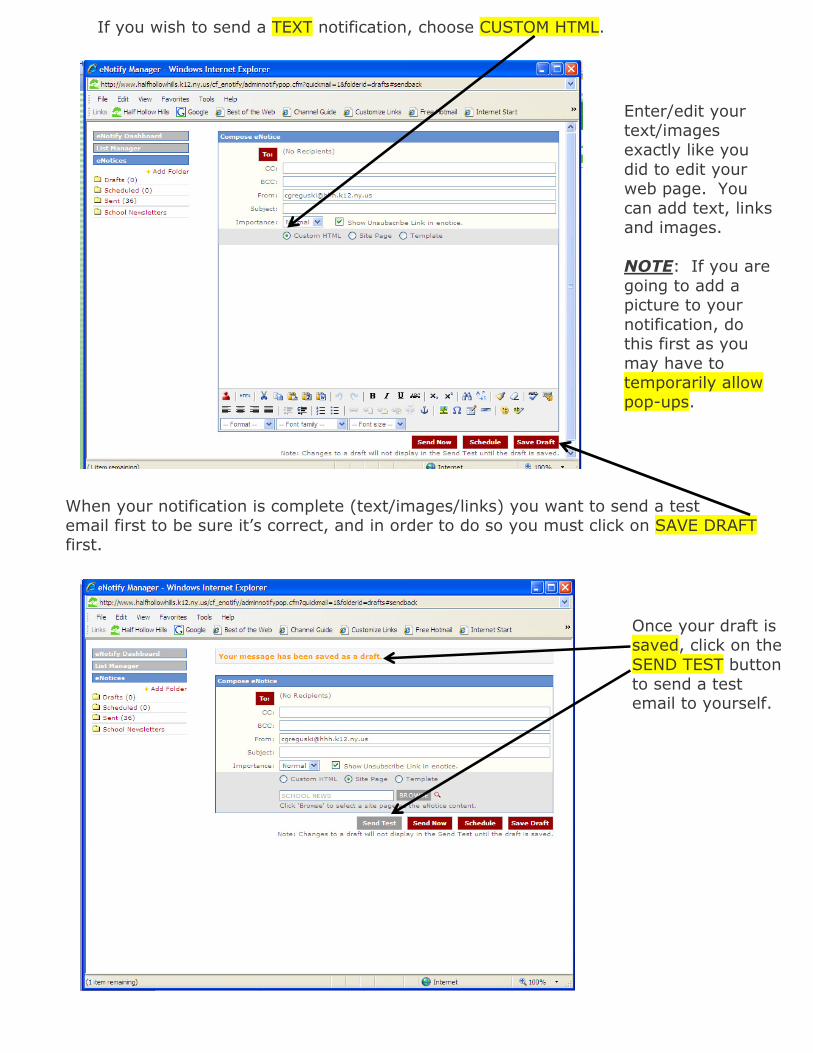
If you wish to send a TEXT notification, choose CUSTOM HTML.
Enter/edit your text/images
exactly like you
did to edit your web page. You
can add text, links and images.
NOTE: If you are
going to add a picture to your
notification, do this first as you
may have to temporarily allow pop-ups.
When your notification is complete (text/images/links) you want to send a test email first to be sure it’s correct, and in order to do so you must click on SAVE DRAFT first.
Once your draft is saved, click on the
SEND TEST button
to send a test email to yourself.
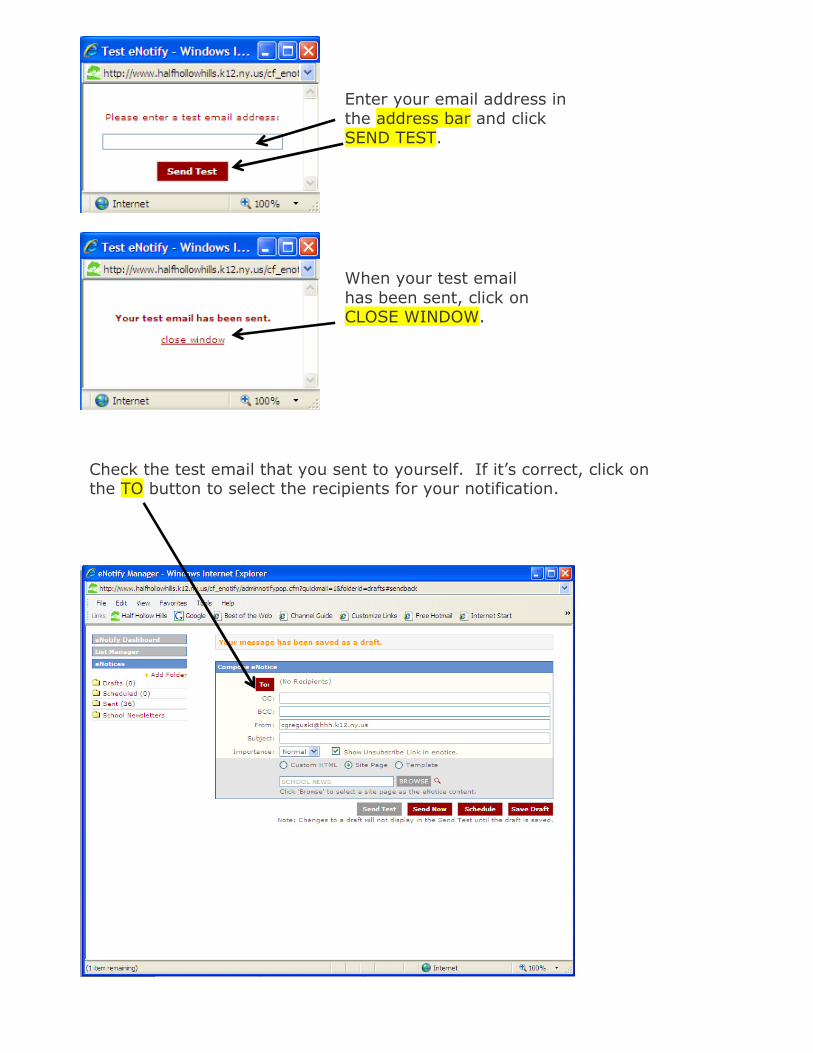
Enter your email address in the address bar and click SEND TEST.
When your test email
has been sent, click on CLOSE WINDOW.
Check the test email that you sent to yourself. If it’s correct, click on the TO button to select the recipients for your notification.

Click on (check) the box before your school’s group, then click the ADD button.
You will now see the
recipient list next to the TO button. Click on the
SEND NOW button to send your completed eNotice!