enterprise edition for mac os x user guide vnc server - realvnc
TRANSCRIPT
E n t e r p r i s e E d i t i o n f o r M a c O S X
U s e r G u i d e
V N C S e r v e r 4 . 4

- 2 -
Copyright © RealVNC Ltd 2008. All Rights Reserved.
Copyright and Confidentiality
Copyright Statement
Copyright © RealVNC Ltd, 2008. All rights reserved.
No part of this documentation may be reproduced in any form or by any means or be used to
make any derivative work (including translation, transformation or adaptation) without explicit
written consent of RealVNC.
Confidentiality Statement
All information contained in this document is provided in commercial confidence for the sole
purpose of use by an authorised user in conjunction with RealVNC’s products. The pages of this
document shall not be copied, published, or disclosed wholly or in part to any party without
RealVNC prior permission in writing, and shall be held in safe custody. These obligations shall not
apply to information which is published or becomes known legitimately from some source other
than RealVNC.
Registered office:
VNC House,
Sturton Street,
Cambridge,
CB1 2SN
United Kingdom
www.realvnc.com

Contents
Introduction to VNC ...................................................................................................................................................................... 4
Security ......................................................................................................................................................................................... 4
Authentication ...................................................................................................................................................................... 4
VNC link encryption ............................................................................................................................................................ 4
VNC Server Operating Modes .............................................................................................................................................. 5
Service Mode ......................................................................................................................................................................... 5
User Mode .............................................................................................................................................................................. 5
Installation & Setup ...................................................................................................................................................................... 6
Configuration................................................................................................................................................................................. 10
To display the VNC Server Status dialog ........................................................................................................................ 10
To configure VNC Server for maximum security ......................................................................................................... 12
To configure VNC Server for maximum speed ............................................................................................................ 13
Using the VNC Service ............................................................................................................................................................... 14
Starting the service ................................................................................................................................................................. 14
Closing the service .................................................................................................................................................................. 14
Using the VNC Server menu bar icon .............................................................................................................................. 15
Advanced Configuration & Reference ................................................................................................................................. 17
Connection Settings .................................................................................................................................................................... 17
Ports ............................................................................................................................................................................................. 17
Accept connections on port ........................................................................................................................................... 17
Serve Java viewer on port ............................................................................................................................................... 17
Authentication Options ........................................................................................................................................................ 18
VNC Password usage ........................................................................................................................................................ 19
Mac Password ..................................................................................................................................................................... 20
Single sign-on ..................................................................................................................................................................... 20
No authentication .............................................................................................................................................................. 20
Encryption Options ................................................................................................................................................................. 20
Other Security Settings ......................................................................................................................................................... 21
Input Options ................................................................................................................................................................................ 22
Listening Viewer (Server initiated connection) .................................................................................................................. 23
To create a listening viewer connection .................................................................................................................... 23
To end a listening viewer connection ......................................................................................................................... 24
Technical Support ........................................................................................................................................................................ 25
Appendix ......................................................................................................................................................................................... 26
Ports ............................................................................................................................................................................................. 26
Firewalls ...................................................................................................................................................................................... 27
IP Addresses .............................................................................................................................................................................. 28
Mac Version Support ............................................................................................................................................................. 29
- 3 -
Copyright © RealVNC Ltd 2008. All Rights Reserved.

- 4 -
Copyright © RealVNC Ltd 2008. All Rights Reserved.
Introduction to VNC
Virtual Network Computing (VNC) is remote desktop access software which allows one computer (the
viewer) to take full control of another (the server), whether on a local network or anywhere in the world
over the internet. Applications of VNC include remote access, home-working, remote maintenance,
helpdesks and business collaboration.
As shown in the diagram below, VNC consists of a server and a viewer:
• The VNC Server is the software application on the computer to be remotely accessed.
• The VNC Viewer is the software application that watches and interacts with the VNC server on
the remote computer.
This guide provides information on the installation, configuration, and use of VNC Server. For detailed
information on the VNC Viewer, please see the separate user guide.
Security
Authentication
Open network connections pose a number of security challenges and the VNC system has now been
updated to provide robust solutions. In addition to the possibility of attackers attempting to gain server
access, there is also the chance that false servers can be “spoof” or mimic real ones and lure users into
disclosing important information. To defend against server attackers, VNC Server Enterprise Edition
provides secure password protection. To defeat server “spoofers”, VNC Servers are now required to
prove their authenticity by providing a unique identity code before any viewer details are declared.
These features are combined with the new high strength link encryption to present a sizeable barrier to
attackers.
VNC link encryption
Network links in general and the internet in particular, pose an ever present threat of system spoofing
and eavesdropping on connections between systems. The VNC Enterprise Edition authentication system
defeats the former threat, while strong data encryption of the type used by VNC presents a significant

barrier to eavesdroppers. When either VNC Viewer or VNC Server enable encryption, both parties
exchange codes called encryption. From that moment, all information is encrypted prior to transmission.
VNC Server Operating Modes
When you install VNC Enterprise Edition, two operating modes will be available:
• Service Mode (Default).
• User Mode.
Service Mode
This is the most commonly used mode. VNC Server starts in this mode by default.
Service Mode is suited to a system administrator controlled, multi-user environment where users
frequently need to offer remote access to their computers. In Service mode, VNC Enterprise Edition
operates in the following way:
• Is available as soon as the system has started up.
• Is available even when the user has logged out, or if the computer is locked.
• Is configured with a single set of system-wide options.
User Mode
User Mode is suitable for a single user who may require occasional help from a remote third party, and
infrequently shares work. In user mode, VNC Enterprise Edition operates in the following way:
• Runs as a normal application, according to the current user’s system rights.
• Is not available when the user logs out.
• Can be configured by each user independently.
- 5 -
Copyright © RealVNC Ltd 2008. All Rights Reserved.
- 6 -
Copyright © RealVNC Ltd 2008. All Rights Reserved.
Installation & Setup
VNC Enterprise Edition is available as a self-extracting installer, and can be downloaded from
www.realvnc.com
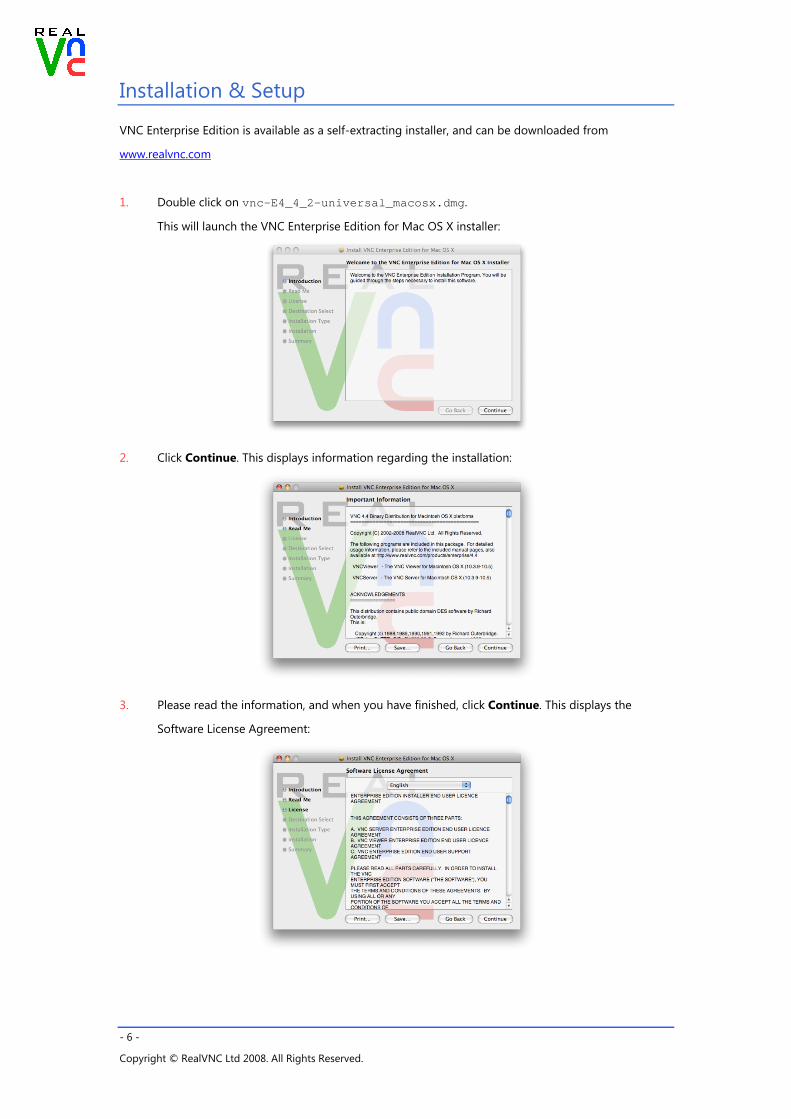
1. Double click on vnc-E4_4_2-universal_macosx.dmg.
This will launch the VNC Enterprise Edition for Mac OS X installer:
2. Click Continue. This displays information regarding the installation:
3. Please read the information, and when you have finished, click Continue. This displays the
Software License Agreement:

4. Please review the licence agreement, and then click Continue. This displays the following dialog:
5. If you agree to the terms and conditions, click Agree.
6. This displays the Select a Destination dialog:
7. Select the system volume where you would like to install the VNC Enterprise Edition for Mac OS X
software, and then click Continue. The following dialog is displayed, which shows which volume
you have selected:
8. If the correct volume is listed, click Continue.
This displays the following dialog which displays the amount of space that is required for
installation, and confirms which volume the software will be installed on:
- 7 -
Copyright © RealVNC Ltd 2008. All Rights Reserved.
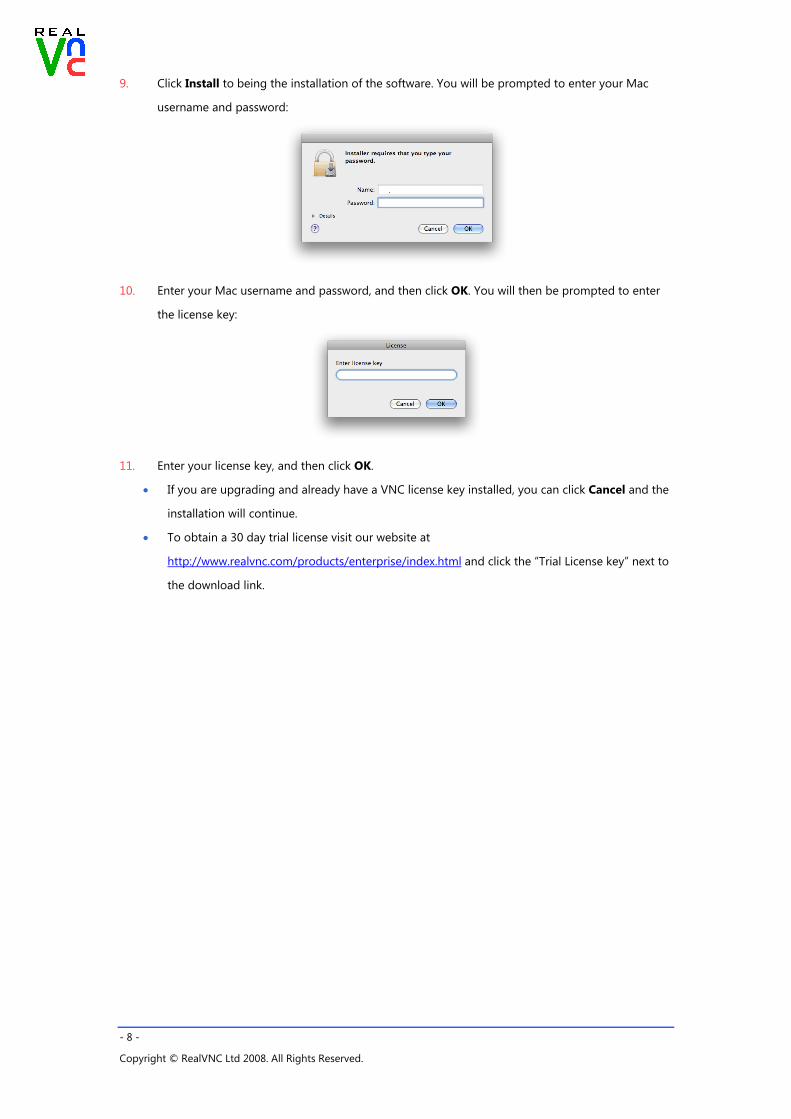
9. Click Install to being the installation of the software. You will be prompted to enter your Mac
username and password:
10. Enter your Mac username and password, and then click OK. You will then be prompted to enter
the license key:
11. Enter your license key, and then click OK.
• If you are upgrading and already have a VNC license key installed, you can click Cancel and the
installation will continue.
• To obtain a 30 day trial license visit our website at
http://www.realvnc.com/products/enterprise/index.html and click the “Trial License key” next to
the download link.
- 8 -
Copyright © RealVNC Ltd 2008. All Rights Reserved.
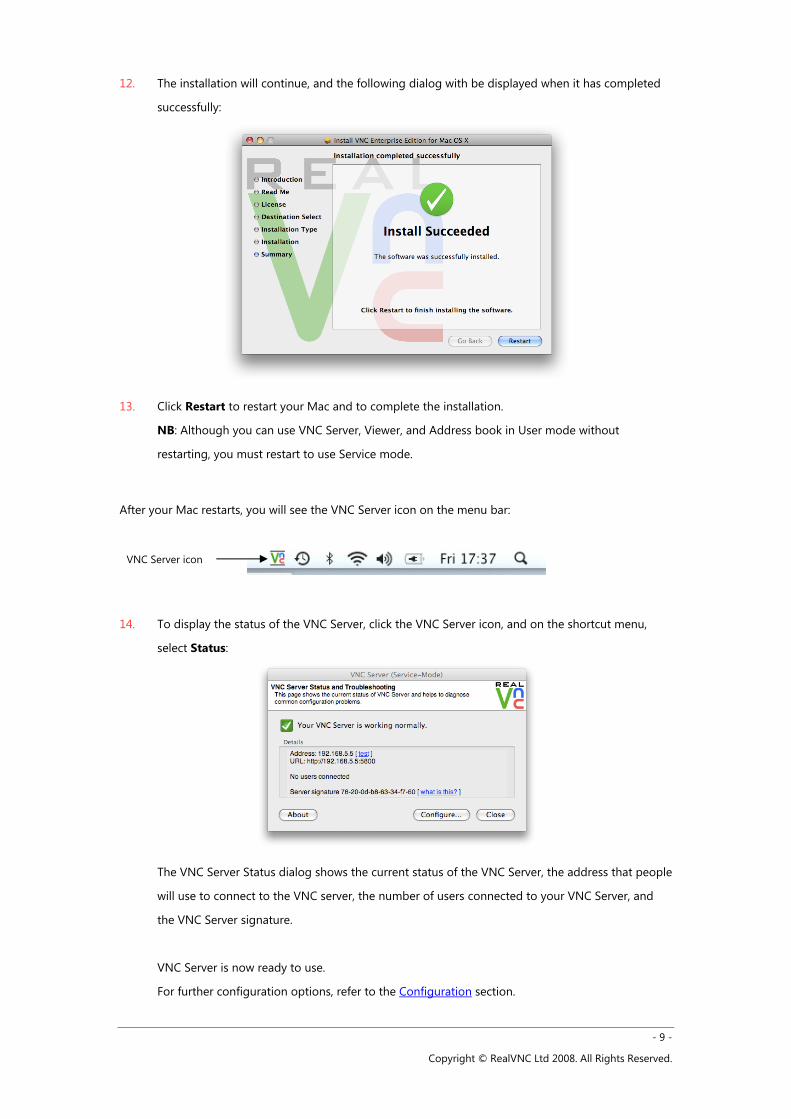
12. The installation will continue, and the following dialog with be displayed when it has completed
successfully:
13. Click Restart to restart your Mac and to complete the installation.
NB: Although you can use VNC Server, Viewer, and Address book in User mode without
restarting, you must restart to use Service mode.
After your Mac restarts, you will see the VNC Server icon on the menu bar:
VNC Server icon
14. To display the status of the VNC Server, click the VNC Server icon, and on the shortcut menu,
select Status:
The VNC Server Status dialog shows the current status of the VNC Server, the address that people
will use to connect to the VNC server, the number of users connected to your VNC Server, and
the VNC Server signature.
VNC Server is now ready to use.
For further configuration options, refer to the Configuration section.
- 9 -
Copyright © RealVNC Ltd 2008. All Rights Reserved.
- 10 -
Copyright © RealVNC Ltd 2008. All Rights Reserved.
Configuration
You can optimise VNC Server for particular types of use; this section will focus on the following:
• Maximum security required.
• Maximum speed is required.
The VNC Server configuration can be edited at any time by clicking Configure on the VNC Server Status
dialog.
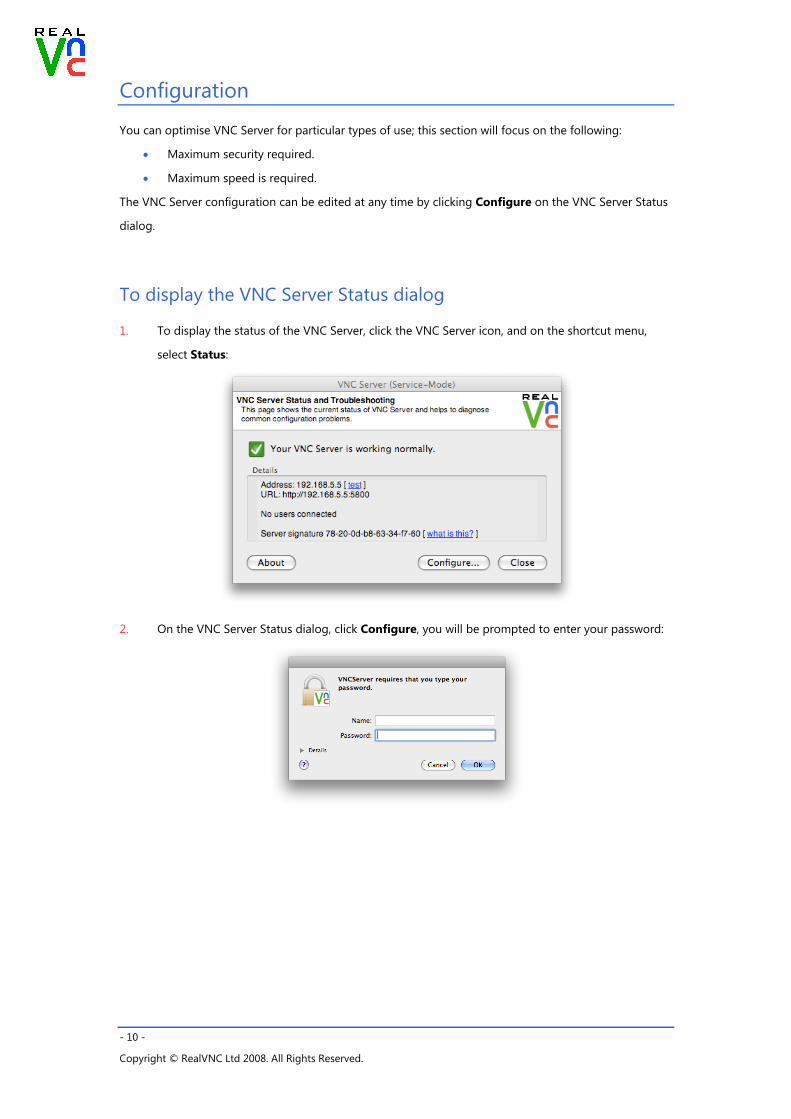
To display the VNC Server Status dialog
1. To display the status of the VNC Server, click the VNC Server icon, and on the shortcut menu,
select Status:
2. On the VNC Server Status dialog, click Configure, you will be prompted to enter your password:
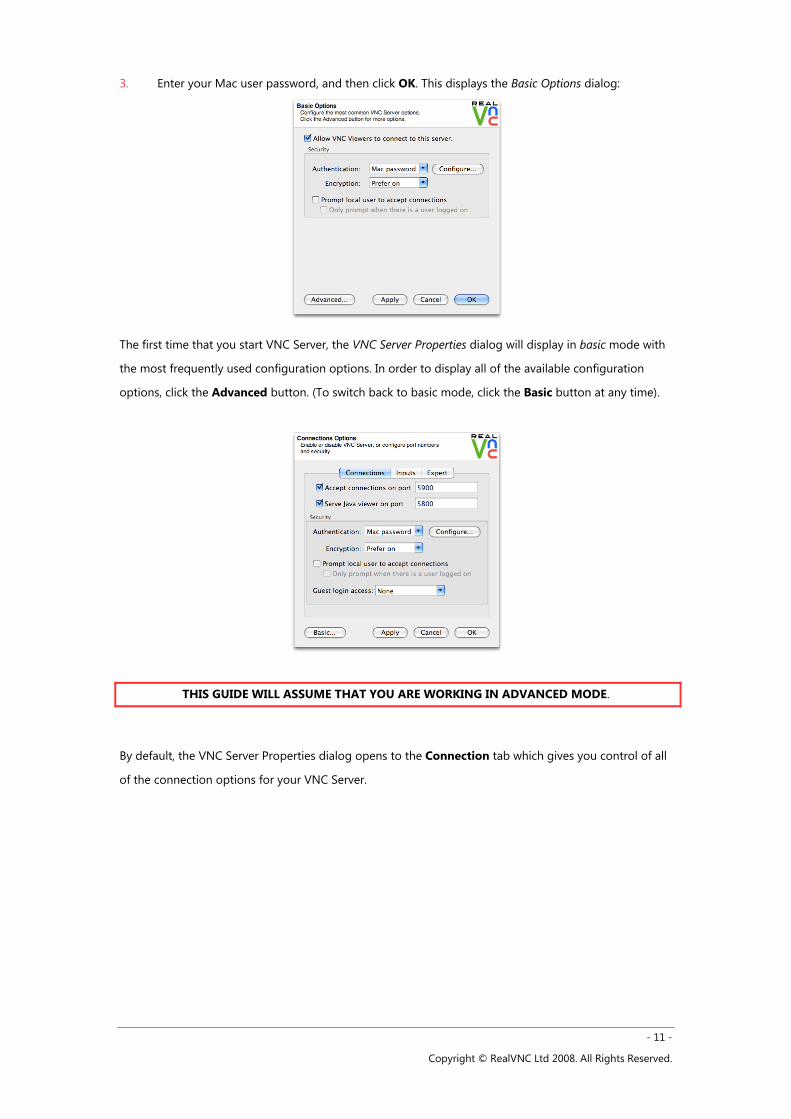
3. Enter your Mac user password, and then click OK. This displays the Basic Options dialog:
The first time that you start VNC Server, the VNC Server Properties dialog will display in basic mode with
the most frequently used configuration options. In order to display all of the available configuration
options, click the Advanced button. (To switch back to basic mode, click the Basic button at any time).
THIS GUIDE WILL ASSUME THAT YOU ARE WORKING IN ADVANCED MODE.
By default, the VNC Server Properties dialog opens to the Connection tab which gives you control of all
of the connection options for your VNC Server.
- 11 -
Copyright © RealVNC Ltd 2008. All Rights Reserved.

- 12 -
Copyright © RealVNC Ltd 2008. All Rights Reserved.
To configure VNC Server for maximum security
Authentication and Encryption are the most important factors when configuring VNC Server for
maximum security.
1. For maximum security, in the Security area, your settings should match those below:
Security Option Setting
Authentication Mac password
Encryption Always on
Prompt local user to accept connections Yes
Only prompt where there is a user logged on -
Guest login access None
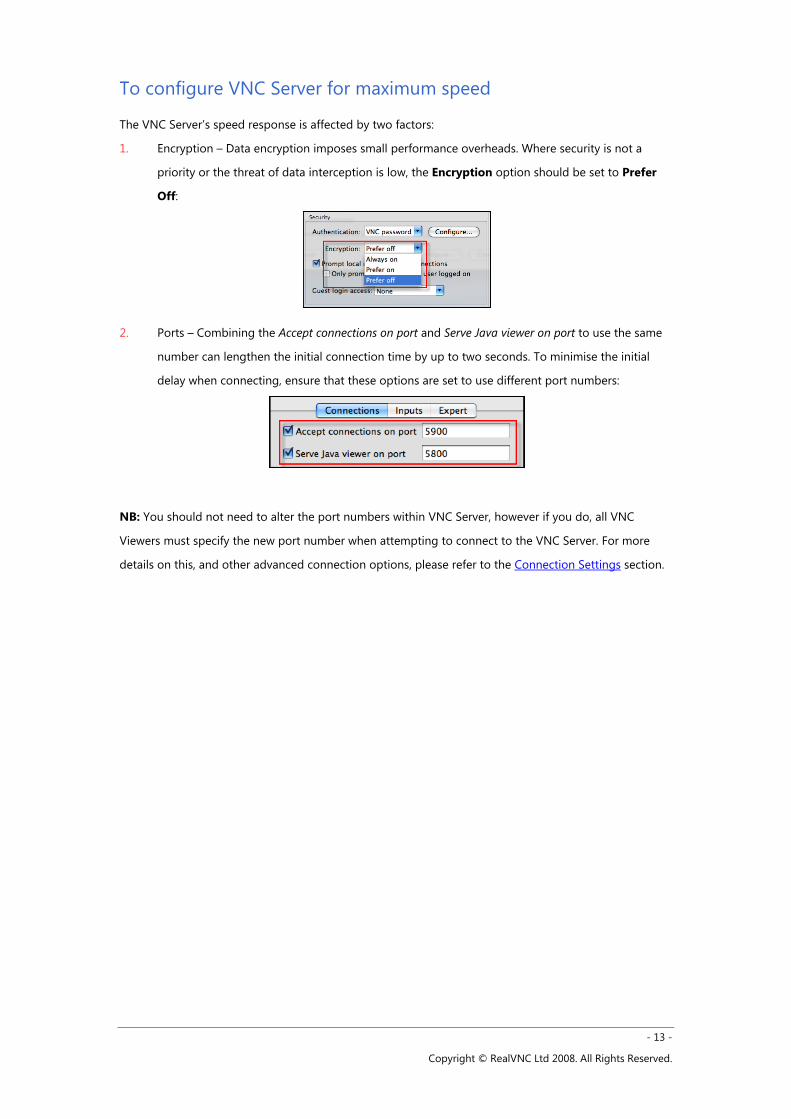
To configure VNC Server for maximum speed
The VNC Server’s speed response is affected by two factors:
1. Encryption – Data encryption imposes small performance overheads. Where security is not a
priority or the threat of data interception is low, the Encryption option should be set to Prefer
Off:
2. Ports – Combining the Accept connections on port and Serve Java viewer on port to use the same
number can lengthen the initial connection time by up to two seconds. To minimise the initial
delay when connecting, ensure that these options are set to use different port numbers:
NB: You should not need to alter the port numbers within VNC Server, however if you do, all VNC
Viewers must specify the new port number when attempting to connect to the VNC Server. For more
details on this, and other advanced connection options, please refer to the Connection Settings section.
- 13 -
Copyright © RealVNC Ltd 2008. All Rights Reserved.
- 14 -
Copyright © RealVNC Ltd 2008. All Rights Reserved.
Using the VNC Service
By default, VNC Server is configured to start automatically when your Mac starts. You can also start and
stop the service manually.
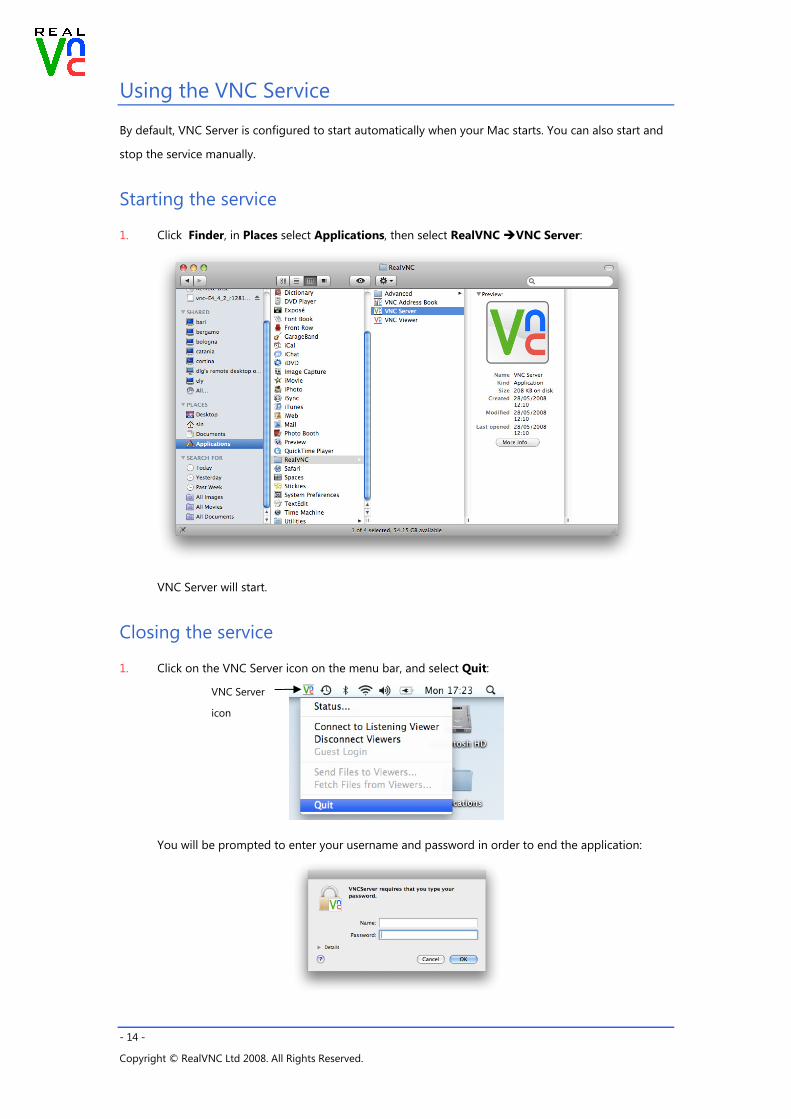
Starting the service
1. Click Finder, in Places select Applications, then select RealVNC VNC Server:
VNC Server will start.
Closing the service
1. Click on the VNC Server icon on the menu bar, and select Quit:
You will be prompted to enter your username and password in order to end the application:
VNC Server
icon
2. Enter your Mac password, and then click OK.
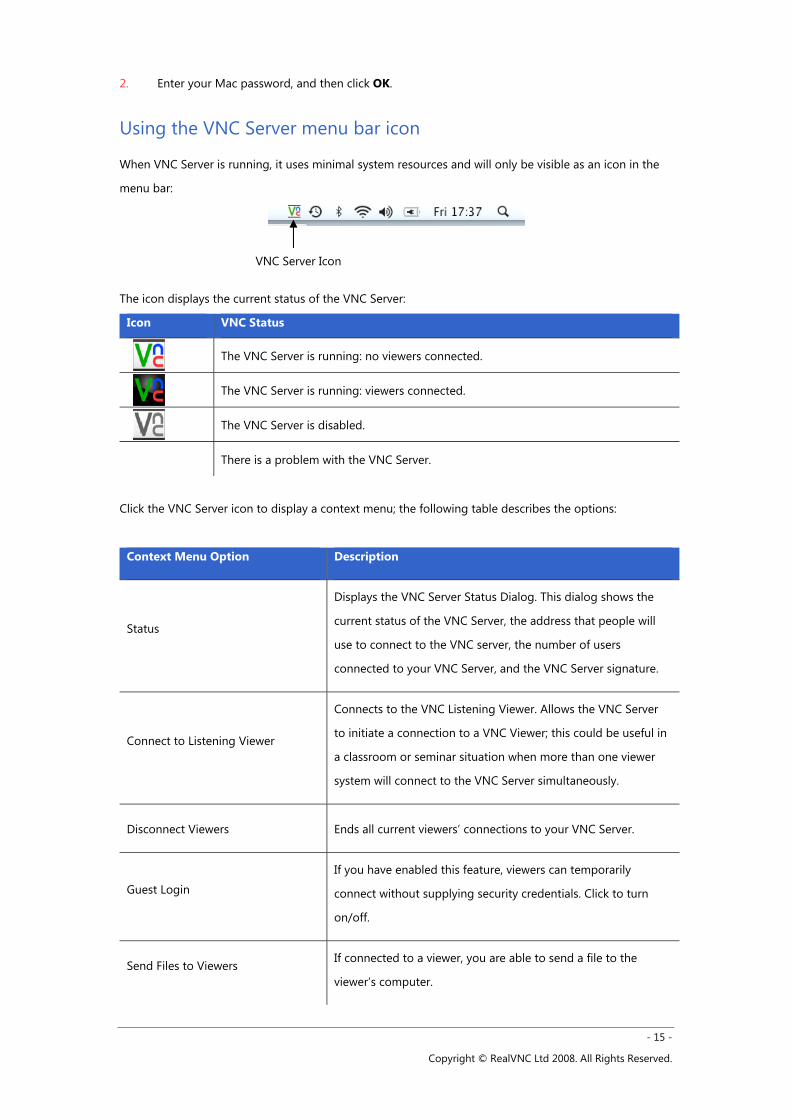
Using the VNC Server menu bar icon
When VNC Server is running, it uses minimal system resources and will only be visible as an icon in the
menu bar:
The icon displays the current status of the VNC Server:
Icon VNC Status
The VNC Server is running: no viewers connected.
The VNC Server is running: viewers connected.
The VNC Server is disabled.
There is a problem with the VNC Server.
VNC Server Icon
Click the VNC Server icon to display a context menu; the following table describes the options:
Context Menu Option Description
Status
Displays the VNC Server Status Dialog. This dialog shows the
current status of the VNC Server, the address that people will
use to connect to the VNC server, the number of users
connected to your VNC Server, and the VNC Server signature.
Connect to Listening Viewer
Connects to the VNC Listening Viewer. Allows the VNC Server
to initiate a connection to a VNC Viewer; this could be useful in
a classroom or seminar situation when more than one viewer
system will connect to the VNC Server simultaneously.
Disconnect Viewers Ends all current viewers’ connections to your VNC Server.
Guest Login
If you have enabled this feature, viewers can temporarily
connect without supplying security credentials. Click to turn
on/off.
Send Files to Viewers If connected to a viewer, you are able to send a file to the
viewer’s computer.
- 15 -
Copyright © RealVNC Ltd 2008. All Rights Reserved.

- 16 -
Copyright © RealVNC Ltd 2008. All Rights Reserved.
Fetch Files from Viewers
If connected to a viewer, you are able to fetch a file from the
viewer’s computer.
Quit Closes the VNC Server and disconnects any connected viewers.
Advanced Configuration & Reference
The following sections provide full reference information for all of the advanced configuration options
available in VNC Server.
Connection Settings
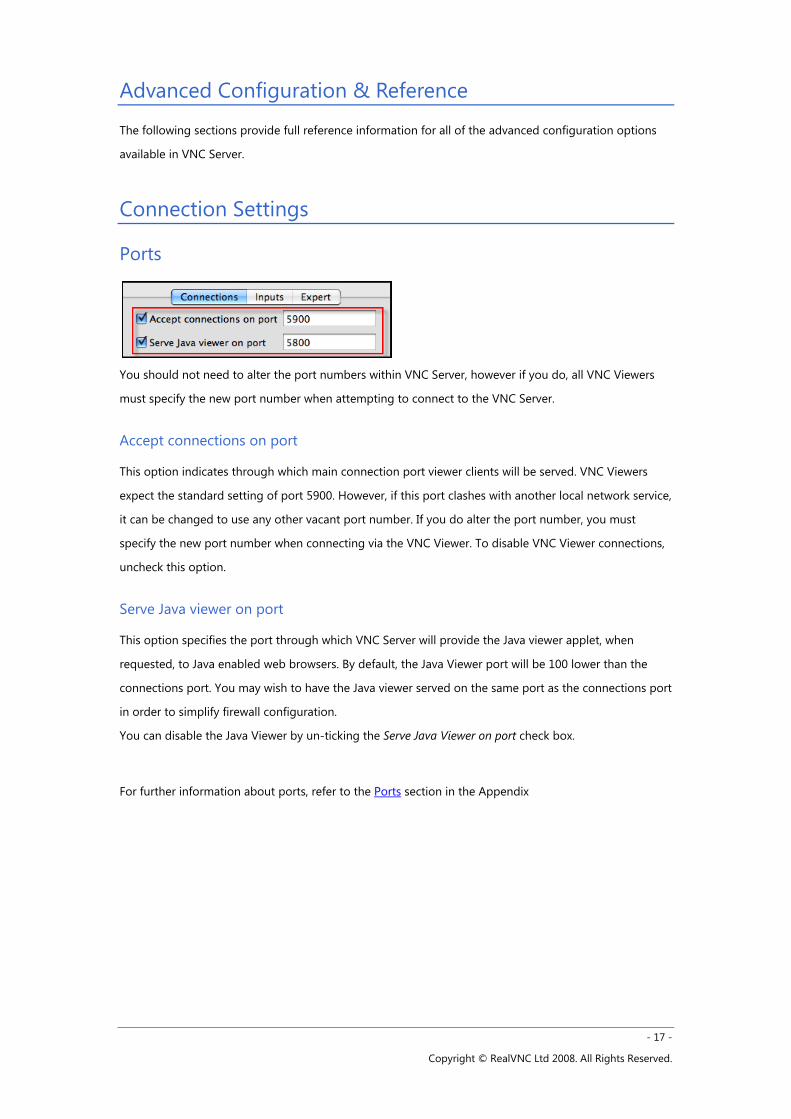
Ports
You should not need to alter the port numbers within VNC Server, however if you do, all VNC Viewers
must specify the new port number when attempting to connect to the VNC Server.
Accept connections on port
This option indicates through which main connection port viewer clients will be served. VNC Viewers
expect the standard setting of port 5900. However, if this port clashes with another local network service,
it can be changed to use any other vacant port number. If you do alter the port number, you must
specify the new port number when connecting via the VNC Viewer. To disable VNC Viewer connections,
uncheck this option.
Serve Java viewer on port
This option specifies the port through which VNC Server will provide the Java viewer applet, when
requested, to Java enabled web browsers. By default, the Java Viewer port will be 100 lower than the
connections port. You may wish to have the Java viewer served on the same port as the connections port
in order to simplify firewall configuration.
You can disable the Java Viewer by un-ticking the Serve Java Viewer on port check box.
For further information about ports, refer to the Ports section in the Appendix
- 17 -
Copyright © RealVNC Ltd 2008. All Rights Reserved.

- 18 -
Copyright © RealVNC Ltd 2008. All Rights Reserved.
Authentication Options
To display:
• Click the VNC Server icon on the menu bar, click Status, and then click Configure. This displays
the VNC Server Properties dialog, ensure that the Connections tab is selected. Authentication
options are displayed in the Security area:
There are four authentication options available from the Authentication drop-down list:
• VNC password
• Mac password
• Single Sign-on
• None
Authentication Option Description
VNC Password
Requires any Viewer application to supply a valid password before access to the
Server system is allowed.
Mac Password
Links to the internal Mac security system within Mac OS X. This enables you to
grant different permissions for different types of users, e.g. administrators,
guests, users, using Mac User Configurations.
Single sign-on
If supported, this option allows you to connect using your Mac password and
username. You will not be prompted again for a username or password when
using VNC. Both the Server and Viewer must have this option enabled.
None
Allows VNC Viewer applications to connect to the VNC Server without supplying
a username or password. This is useful when the VNC Server is operating within a
completely secure environment such as a Local Area Network or Virtual Private
Network.
NB: Do not use unless the host network is known to be completely secure
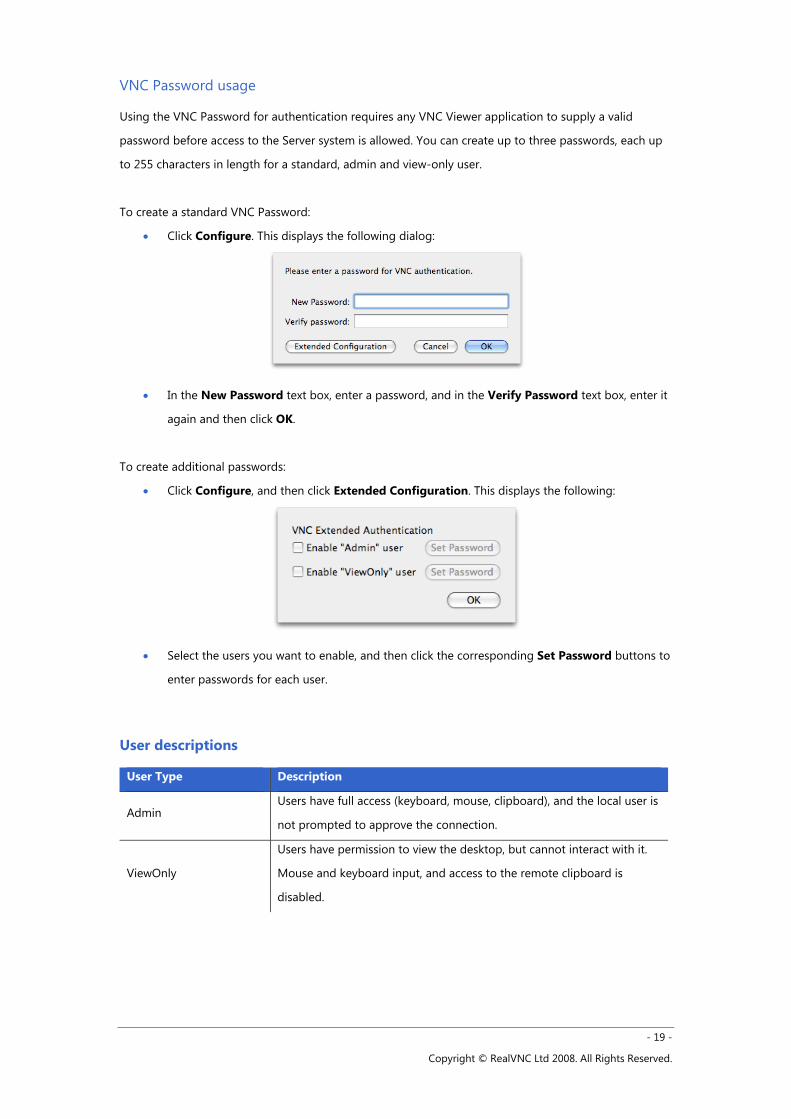
VNC Password usage
Using the VNC Password for authentication requires any VNC Viewer application to supply a valid
password before access to the Server system is allowed. You can create up to three passwords, each up
to 255 characters in length for a standard, admin and view-only user.
To create a standard VNC Password:
• Click Configure. This displays the following dialog:
• In the New Password text box, enter a password, and in the Verify Password text box, enter it
again and then click OK.
To create additional passwords:
• Click Configure, and then click Extended Configuration. This displays the following:
• Select the users you want to enable, and then click the corresponding Set Password buttons to
enter passwords for each user.
User descriptions
User Type Description
Admin Users have full access (keyboard, mouse, clipboard), and the local user is
not prompted to approve the connection.
ViewOnly
Users have permission to view the desktop, but cannot interact with it.
Mouse and keyboard input, and access to the remote clipboard is
disabled.
- 19 -
Copyright © RealVNC Ltd 2008. All Rights Reserved.

- 20 -
Copyright © RealVNC Ltd 2008. All Rights Reserved.
Mac Password
Using the Mac Password for authentication allows you to connect using VNC with the same password as
you would use to log in to OS X. This enables you to grant different permissions/user rights to different
users.
Single sign-on
If a supported third-party solution is installed, VNC will attempt to sign-on automatically to any VNC
server you connect to. It will attempt to use the username and password you used to log into your Mac,
without prompting you for them again. If no supported third-party solution is found, or your Mac logon
username and password are not accepted by the VNC server you connect to, then you will be prompted
to enter a username and password as normal.
No authentication
If selected, this option allows Viewer applications to connect to the VNC Server without supplying a
username or password. This option is useful when the VNC Server is operating within a completely
secure environment such as a Local Area Network or Virtual Private Network, to remove the requirement
for authentication.
NB: Do not use unless the host network is known to be completely secure.
NB: Encryption can be used even if No authentication is selected.
Encryption Options
There are three encryption options available for VNC Server:
Each option determines how encryption will be applied to user connections:
Encryption Option Description
Always on Viewer connections will always be encrypted.
Prefer On Viewer connections will be encrypted unless a VNC Viewer has
encryption set to Prefer Off, in which case encryption would be off.
Prefer Off Viewer connections will not be encrypted unless a VNC Viewer has
encryption set to Prefer On or Always on.

Other Security Settings
In addition to the encryption and authentication options, there are three other options on the
Connections page that affect security:
The following table describes these options:
Option Description
Prompt local user to
accept connections
A confirmation dialog is displayed on the VNC Server system indicating
that a Viewer is attempting to connect. The dialog will display the
Viewer’s IP address and their user name. If no response is given by the
Server user within 10 seconds, the Viewer request is rejected.
Only prompt where there
is a user logged on
If no server user is logged on, viewers will be able to connect (subject to
their established user rights).
Guest login access
Server users can use Guest login to temporary allow access to the server
system. It is accessed from the right-click context menu on the VNC
Server icon in the task tray.
• None disables the Guest Login access from the task tray icon.
• View-only enables the Viewer to connect to the Server with
View Only user rights.
• Interactive enables the Viewer to connect to the Server with
interactive user rights.
- 21 -
Copyright © RealVNC Ltd 2008. All Rights Reserved.
- 22 -
Copyright © RealVNC Ltd 2008. All Rights Reserved.
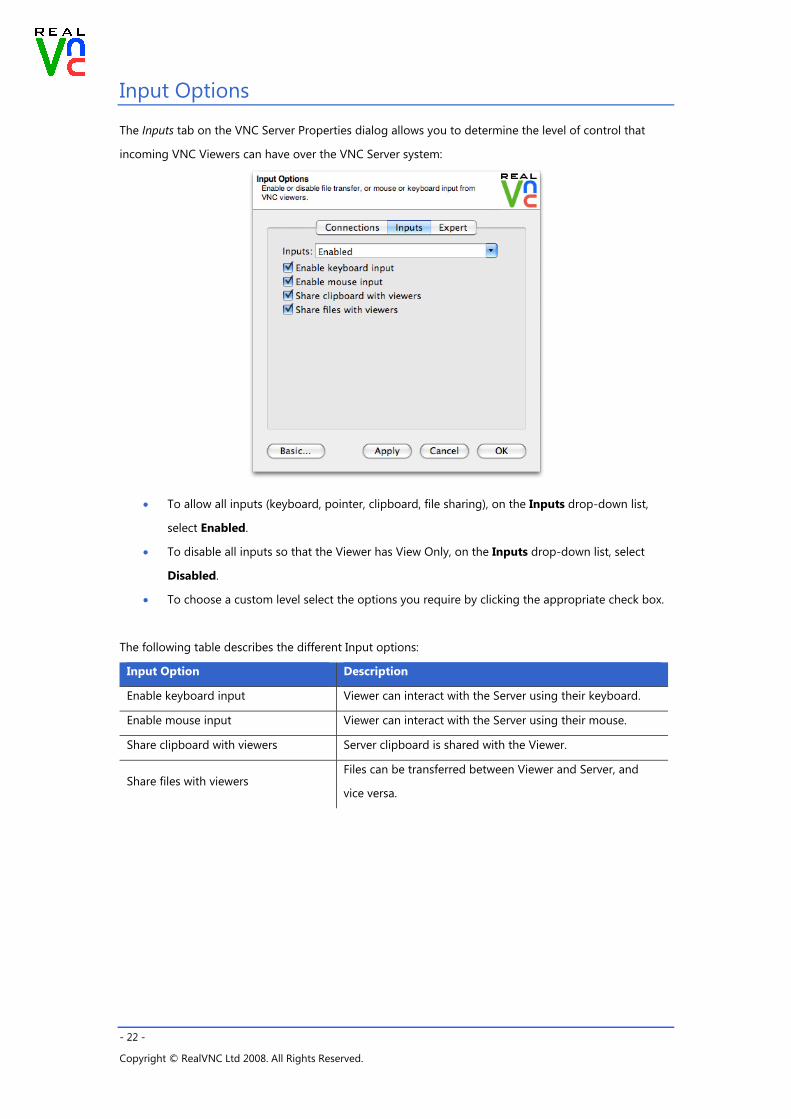
Input Options
The Inputs tab on the VNC Server Properties dialog allows you to determine the level of control that
incoming VNC Viewers can have over the VNC Server system:
• To allow all inputs (keyboard, pointer, clipboard, file sharing), on the Inputs drop-down list,
select Enabled.
• To disable all inputs so that the Viewer has View Only, on the Inputs drop-down list, select
Disabled.
• To choose a custom level select the options you require by clicking the appropriate check box.
The following table describes the different Input options:
Input Option Description
Enable keyboard input Viewer can interact with the Server using their keyboard.
Enable mouse input Viewer can interact with the Server using their mouse.
Share clipboard with viewers Server clipboard is shared with the Viewer.
Share files with viewers Files can be transferred between Viewer and Server, and
vice versa.

Listening Viewer (Server initiated connection)
In certain circumstances it can be preferable for the VNC Server to initiate connections to one or more
viewers, rather than the other way round. For instance:
• Firewalls can often cause problems for incoming connections to server systems. When the
server initiates the connection to a viewer, this problem is overcome. The firewall must,
however, allow outgoing connections through port 5500. Also, if the viewer system is behind its
own firewall, then that must allow incoming connections, also at port 5500.
• Where VNC is used in a classroom or presentation environment, the tutor/presenter can make
his server initiate connections to each of the viewer systems. In this way greater overall control
is retained and this method obviates the need to provide server connection information to each
user.
To create a listening viewer connection
On the VNC Viewer system:
1. Start the listening viewer by clicking the Mac Finder Places, Applications RealVNC
VNC Viewer. This displays the VNC Viewer dialog:
NB: A VNC Viewer icon will be displayed in the Dock.
2. On the Menu bar, click VNCViewer, and then click Launch Listener:
An additional VNC Viewer icon will be displayed in the dock:
- 23 -
Copyright © RealVNC Ltd 2008. All Rights Reserved.
- 24 -
Copyright © RealVNC Ltd 2008. All Rights Reserved.
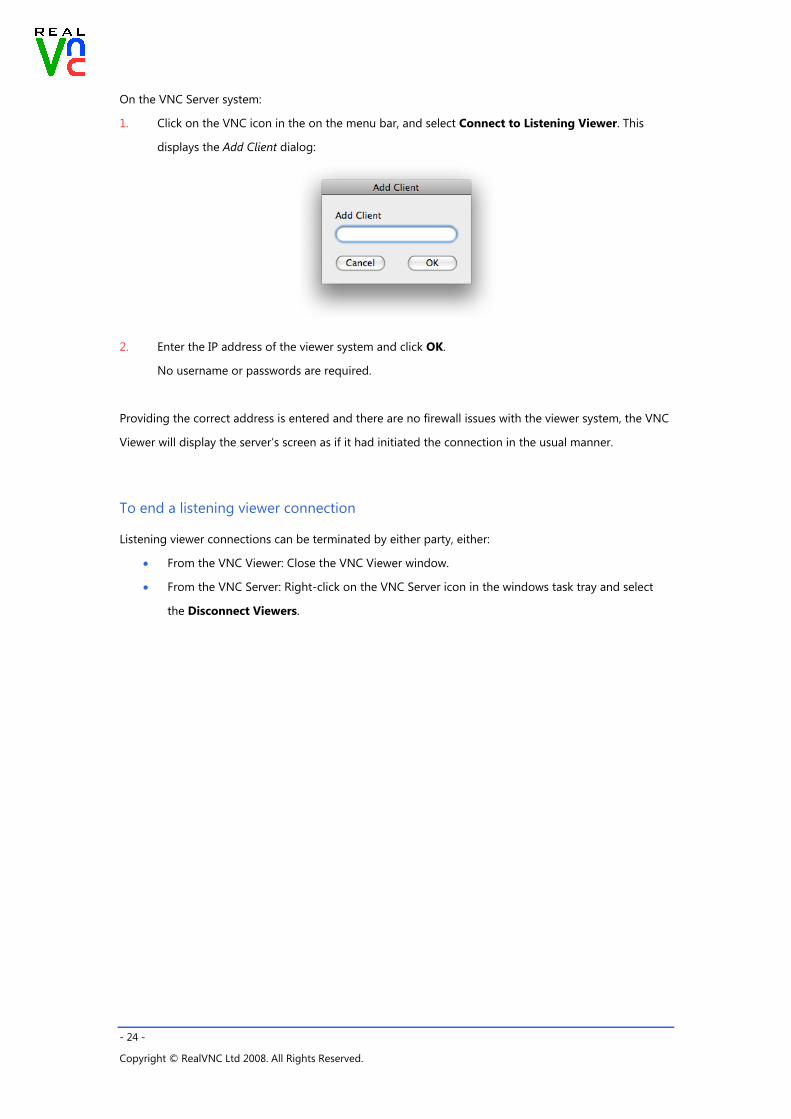
On the VNC Server system:
1. Click on the VNC icon in the on the menu bar, and select Connect to Listening Viewer. This
displays the Add Client dialog:
2. Enter the IP address of the viewer system and click OK.
No username or passwords are required.
Providing the correct address is entered and there are no firewall issues with the viewer system, the VNC
Viewer will display the server’s screen as if it had initiated the connection in the usual manner.
To end a listening viewer connection
Listening viewer connections can be terminated by either party, either:
• From the VNC Viewer: Close the VNC Viewer window.
• From the VNC Server: Right-click on the VNC Server icon in the windows task tray and select
the Disconnect Viewers.
Technical Support
If you have a problem, please refer to our online FAQ page on the RealVNC website. If you still cannot
find a solution, then please don’t hesitate to contact us for further assistance using the product support
request page
Support request
This section allows you to send queries directly to a VNC support representative:
www.realvnc.com/support.html
Please include as much information as possible about the problem, including the exact text of any error
messages you see (including the error number) and what you’re doing when you see them. Please also
include your customer number and registered email address and the version of VNC Server and VNC
Viewer that you are using, and operating system you are running at both ends of the connection.
Acknowledgements
VNC Enterprise Edition contains software from more than one source.
For full details of this software and the terms under which it is distributed, see the RealVNC website.
www.realvnc.com/products/enterprise/4.4/acknowledgements.html
- 25 -
Copyright © RealVNC Ltd 2008. All Rights Reserved.

- 26 -
Copyright © RealVNC Ltd 2008. All Rights Reserved.
Appendix
Ports
What is a port?
Not to be confused with a physical port (such as a USB, or printer port) to which you connect devices, a
Port in this context could be more accurately described as a ‘service contact point’. It provides an
indication of where to locate an appropriate known service that can deal with the kind of data being
transmitted.
Imagine the problem that exists for networking equipment. A disparate mixture of messages and
information are continually flowing from system to system, via gateways and routers, and each needs to
find the correct destination. In this process, the IP address plays a critical role in making sure that the
right items arrive at the right places, however, the unsung hero is definitely the port number. While the
IP address directs the postman to the correct building, it is the port number that gets the package
through the door of the correct apartment. Without the port number, there would be piles of unclaimed
packages filling the foyer.
Every application that sends or receives information across a network uses a port number. In many cases
they are fixed numbers that are always used by particular applications, and because they are not often
changed, they are not normally mentioned. For instance, if you send an email (via the most common
method), then your message will be marked with port number 25. Whenever you browse the Web, the
information will always be denoted with port number 80, and VNC applications almost always send and
receive using port number 5900. The systems at the receiving end then know to route messages marked
as port 25 to the email server, port 80 to the web server, port 5900 to the VNC server and so on.
You should not normally need to change the VNC port number within VNC Server 4, however,
if you do, then all viewers must declare the new port number when connecting to the server system. For
instance, if the port number was changed to 5950, then to reach a server at IP address 192.168.0.2, the
VNC Viewer user would need to enter:
192.168.0.2::5950
(note the double colons)
Port numbers can range from 0 to 65,535 and are generally divided into three ranges:
• 0 to 1023 are well known ports.
• 1024 to 49151 are registered ports.
• 49152 to 65535 are dynamic and/or private ports.
A list of valid port numbers and their uses is maintained by the Internet Assigned Numbers Authority
and can be viewed at http://www.iana.org/assignments/port-numbers. Port 5900 is officially registered
with IANA for VNC use.

Firewalls
Dealing with firewalls
A common cause of VNC operational failures are related to firewalls. One of the key functions of a
network firewall is to block the use of most port numbers by incoming network traffic in order to
prevent access by unauthorised or malicious users. Therefore, unless an exception is made for the
specific ports used by VNC, any attempt to connect to a VNC Server situated behind a firewall will be
denied.
There are a number of options available to you in these situations:
• Adjust the firewall rules to allow incoming traffic via the ports required by VNC, i.e. Port 5900
and port 5800.
NB: Firewall rule changes should be carried out only by an experienced operator. Incorrect
configuration could leave a network open to attack. The exact details for changing rules alter
between differing firewall types and are beyond the scope of this guide.
• Place the VNC Server system outside the firewall and use its security to allow only authorised
users.
NB: When placing the VNC Server externally to a firewall, i.e. with open access to an outer
network, such as the Internet, it is vital that full security features are employed, both within VNC
Server 4 and also for the operating system upon which the server is running. See the
Connection Settings section more details.
• Set VNC viewers to ‘listen’ and initiate connections from the VNC Server 4.
This removes the need to make the server accessible from outside the firewall. See Listening
viewer for details.
- 27 -
Copyright © RealVNC Ltd 2008. All Rights Reserved.

- 28 -
Copyright © RealVNC Ltd 2008. All Rights Reserved.
IP Addresses
What is an IP address?
An IP address is a unique address given to every device connected to a network of any size: from a two
system link up at home, to every system on the Internet. IP addresses are written as four decimal
numbers separated by full stops, such as 192.168.0.4
This is called dotted decimal notation and is used as a means of concealing the equivalent real address
that is actually used by computers and networking equipment. At the inception of the Internet in the
1960s and 1970s, even by wildest estimates, no one ever expected they would need more than the
seemingly inexhaustible 4.2 billion unique address patterns. However, two factors have proved this to be
wrong:
1. The proliferation and expansion of the Internet,
2. The inefficient way in which those addresses were originally handed out to organisations and
companies.
The result was that by the early 1990s, it was already apparent that at the projected growth rates, the
reserve of 4.2 billion addresses would soon all be gone. In order to prolong the current stocks of
numbers, the allocation of addresses was greatly tightened and the idea of public and private addresses
was introduced. Of the 4.2 billion possible addresses, almost all of them are still used as unique public
addresses.
However, in the revised plan, three groups of addresses were held aside for use as private addresses:
• 10.0.0.0 to 10.255.255.255
• 172.16.0.0 to 172.31.255.255
• 192.168.0.0 to 192.168.255.255
To avoid confusion, these ranges are never used as public addresses. However, when company xyz needs
to connect their many internal computers to the Internet, they might only be given a single public
address, say 80.42.0.252. They would then connect a Gateway system to the Internet and give it that
unique public address. Situated on the other side of that gateway would be the company’s local network
and every system in that local network would receive a private IP address. For small local networks, the
most common private address range is that which starts at 192.168.0.0.
Every computer in the local network (or subnet) will use their number that is unique to them within the
local network. However, the public identity for all of those local systems, as they pass information out
across the Internet, will always be that of the gateway: 80.42.0.252. It is the job of the gateway to
translate addresses between the local and wider networks. The gateway must ensure that messages and
data are sent through to the correct locations without the private addresses ever leaking out. Assisting
with this task are port numbers. In this way, there are now many systems using similar private IP
addresses, however, because those numbers only ever exist in local domains, there is never any
confusion. Of course, most people never see an IP address. To make network addresses even more
memorable than the dotted decimal notations, they are usually converted into named addresses. Such
conversions are handled by the Domain Name System, and your browser uses it every time you visit a
web site.
Mac Version Support
VNC supports versions Mac 0SX 10.3-10.5.
- 29 -
Copyright © RealVNC Ltd 2008. All Rights Reserved.