epicor part creation - wacom quartz part creation ... click on actions menu > check out revision,...
TRANSCRIPT
Doc # WI-EPC01 Quality System Documentation Release # A Revision # 3
EPICOR PART CREATION
Being a detailed Work Instruction level documentation of the Wacom Quartz implementation of the ANSI/ISO/ASQ Q9001-2008
Standard, paragraph 7.1
Approved By: Dan Lee John Smalling President Quality Manager Carol Stewart Tony Cortese Customer Service Buyer Randy Wombacher Gary Fuller Production Manager Internal Auditor
Released: 8/31/2013
Doc # WI-EPC01 Release # A Revision # 3
Red Text on Electronic view is a Controlled Copy. Printed copies are non-controlled; for information purposes only, and will NOT be updated with new revisions.
Page 2 of 16
Table of Contents
Changes in This Revision: ________________________________________________________ 3
1.0 Purpose and Scope __________________________________________________________ 4
2.0 Definitions _________________________________________________________________ 4
3.0 Procedure _________________________________________________________________ 4
3.1 Part Number Creation – Manufactured Parts __________________________________ 4
3.2 Part Number Creation – Purchased Parts ____________________________________ 11
3.3 Part Records ____________________________________________________________ 16
4.0 Quality Records & References ________________________________________________ 16
4.1 Quality Records __________________________________________________________ 16 Part (Electronic Record) _____________________________________________________ 16
4.2 References ______________________________________________________________ 16 None ____________________________________________________________________ 16

Doc # WI-EPC01 Release # A Revision # 3
Red Text on Electronic view is a Controlled Copy. Printed copies are non-controlled; for information purposes only, and will NOT be updated with new revisions.
Page 3 of 16
Changes in This Revision:
Paragraph Prior Text or Intent
All Release A, Revision 1, 6/1/09, Initial Release 3.1 Revision 2, 9/7/11, inserted section to control specifically “manufactured” parts. Former
paragraph 3.1 remains as 3.2, meant to control “purchased” part creation. Following sections also re-numbered accordingly.
Title Page Revision 3, 8/31/13. “Approved By” names updated.

Doc # WI-EPC01 Release # A Revision # 3
Red Text on Electronic view is a Controlled Copy. Printed copies are non-controlled; for information purposes only, and will NOT be updated with new revisions.
Page 4 of 16
1.0 Purpose and Scope This work instruction details the procedure for entering and saving a new material record in Wacom Quartz Corporation’s Epicor Vista computer system. This procedure can only be performed by Purchasing, Production Control, Customer Service, or other personnel with an Epicor account and password having the correct rights assigned within the system.
2.0 Definitions
Epicor Vista Enterprise Resource Planning software and database used at Wacom Quartz to control Sales, Purchasing, Production and Inventory data.
Part Number Unique identifier of a material record in the Epicor Vista system. Can be a raw material, finished good, or sub-assembly.
3.0 Procedure
3.1 Part Number Creation – Manufactured Parts
3.1.1 To create a “Manufactured Part” also known as a Finished Good, you need a Quote to work
from. These also include “pass through” or “resale” parts where the only manufacturing done is inspection and or stocking.
3.1.2 Run the Part creation program in Epicor by double-mouse-clicking on the “Part” icon found in
any of the “Setup” folders found in multiple sections of the Vista main menu. 3.1.3 Follow the numbered steps found after each diagram on the following pages:

Doc # WI-EPC01 Release # A Revision # 3
Red Text on Electronic view is a Controlled Copy. Printed copies are non-controlled; for information purposes only, and will NOT be updated with new revisions.
Page 5 of 16
1. Click New 2. Enter the customer’s part number for the manufactured part. If the part number already exists, and
an additional revision is being asked to be maintained (instead of just updating to a new revision) include the new revision number in the part number after a hyphen; i.e.: 16-321411C01-B.
3. Fill in description using the customer’s description as space allows. 4. Select the type of part (manufactured.) 5. Select the appropriate part Group. 6. Select “Finished Goods” for the Class; and Save. 7. As needed, click track serial numbers and enter in the format, and/or track lots. 8. Under GL account enter 9999 (for use in reports) 9. Set the purchasing and selling unit of measures and provide a conversion factor if different. 10. Select desired costing method, check non-stock if it is a manufactured. 11. Click save. 12. Click on the PLANTS tab.
1
2 3
4 5
6
7
9
8
12
10
Doc # WI-EPC01 Release # A Revision # 3
Red Text on Electronic view is a Controlled Copy. Printed copies are non-controlled; for information purposes only, and will NOT be updated with new revisions.
Page 6 of 16
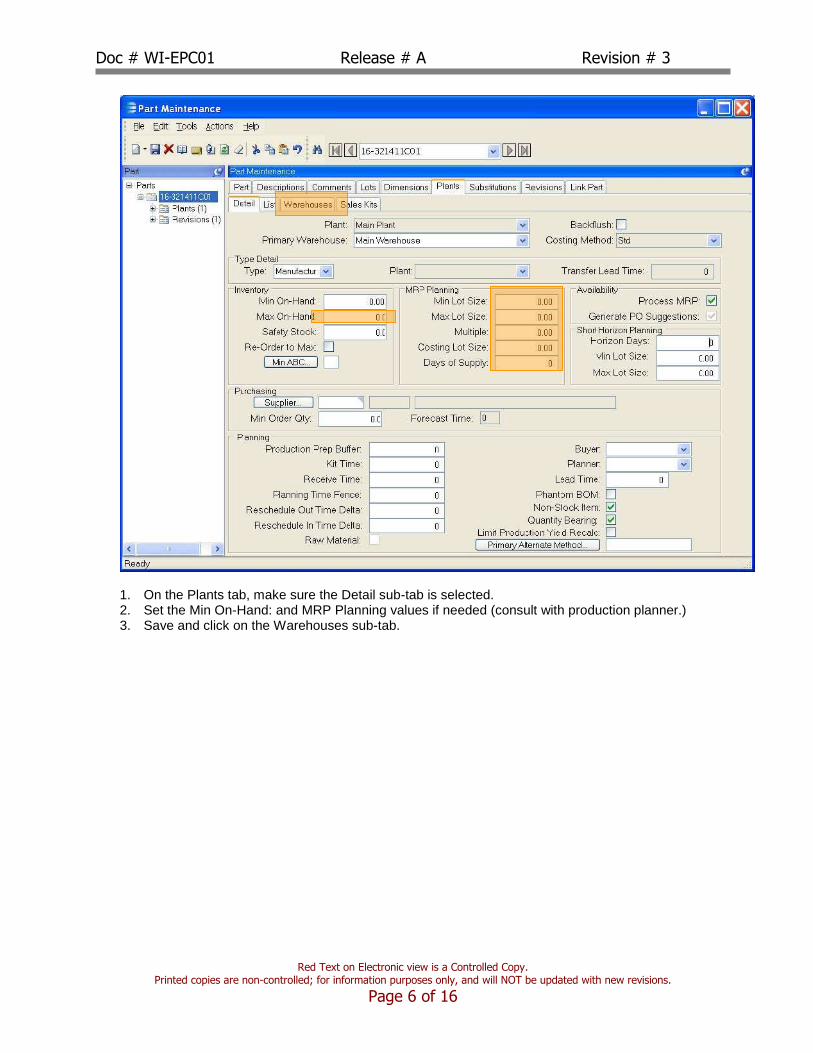
1. On the Plants tab, make sure the Detail sub-tab is selected. 2. Set the Min On-Hand: and MRP Planning values if needed (consult with production planner.) 3. Save and click on the Warehouses sub-tab.
Doc # WI-EPC01 Release # A Revision # 3
Red Text on Electronic view is a Controlled Copy. Printed copies are non-controlled; for information purposes only, and will NOT be updated with new revisions.
Page 7 of 16
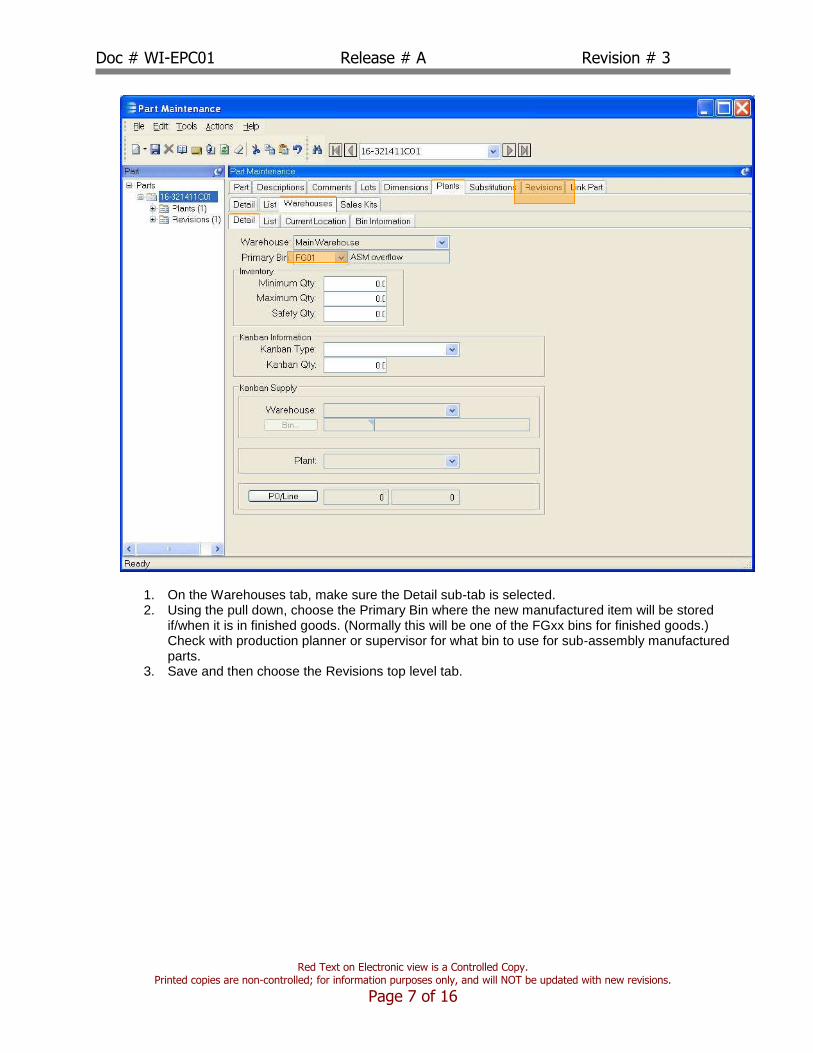
1. On the Warehouses tab, make sure the Detail sub-tab is selected. 2. Using the pull down, choose the Primary Bin where the new manufactured item will be stored
if/when it is in finished goods. (Normally this will be one of the FGxx bins for finished goods.) Check with production planner or supervisor for what bin to use for sub-assembly manufactured parts.
3. Save and then choose the Revisions top level tab.
Doc # WI-EPC01 Release # A Revision # 3
Red Text on Electronic view is a Controlled Copy. Printed copies are non-controlled; for information purposes only, and will NOT be updated with new revisions.
Page 8 of 16
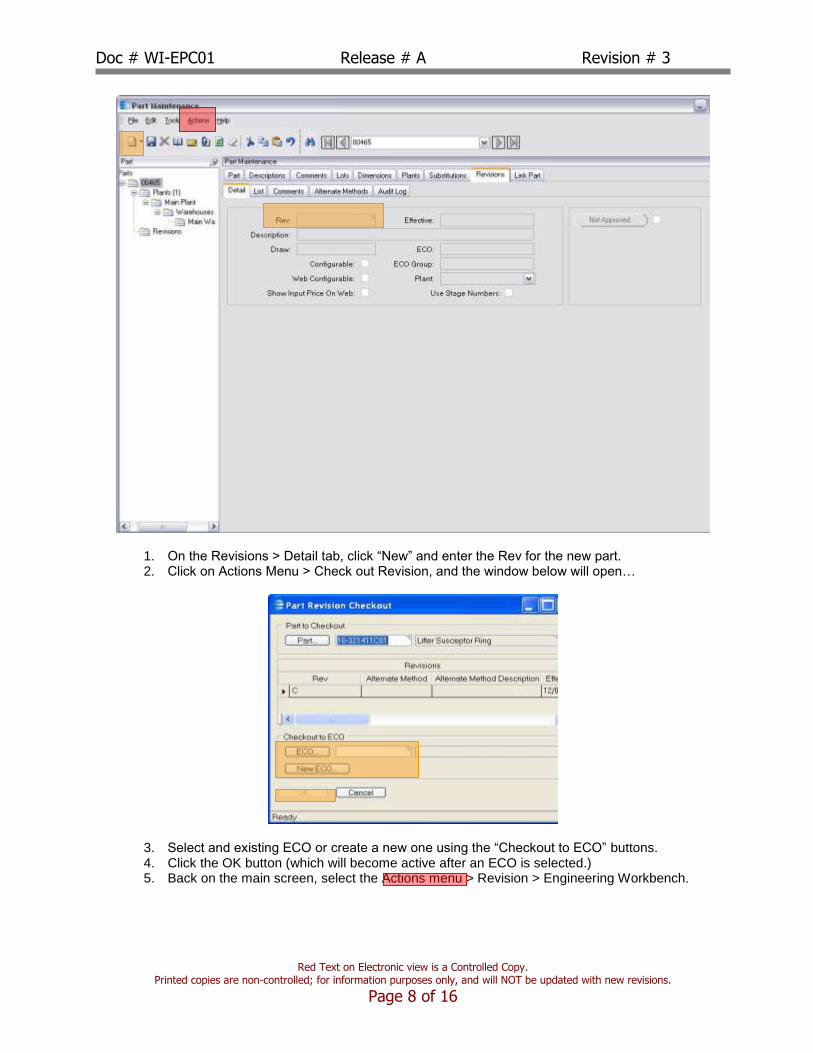
1. On the Revisions > Detail tab, click “New” and enter the Rev for the new part. 2. Click on Actions Menu > Check out Revision, and the window below will open…
3. Select and existing ECO or create a new one using the “Checkout to ECO” buttons. 4. Click the OK button (which will become active after an ECO is selected.) 5. Back on the main screen, select the Actions menu > Revision > Engineering Workbench.
Doc # WI-EPC01 Release # A Revision # 3
Red Text on Electronic view is a Controlled Copy. Printed copies are non-controlled; for information purposes only, and will NOT be updated with new revisions.
Page 9 of 16
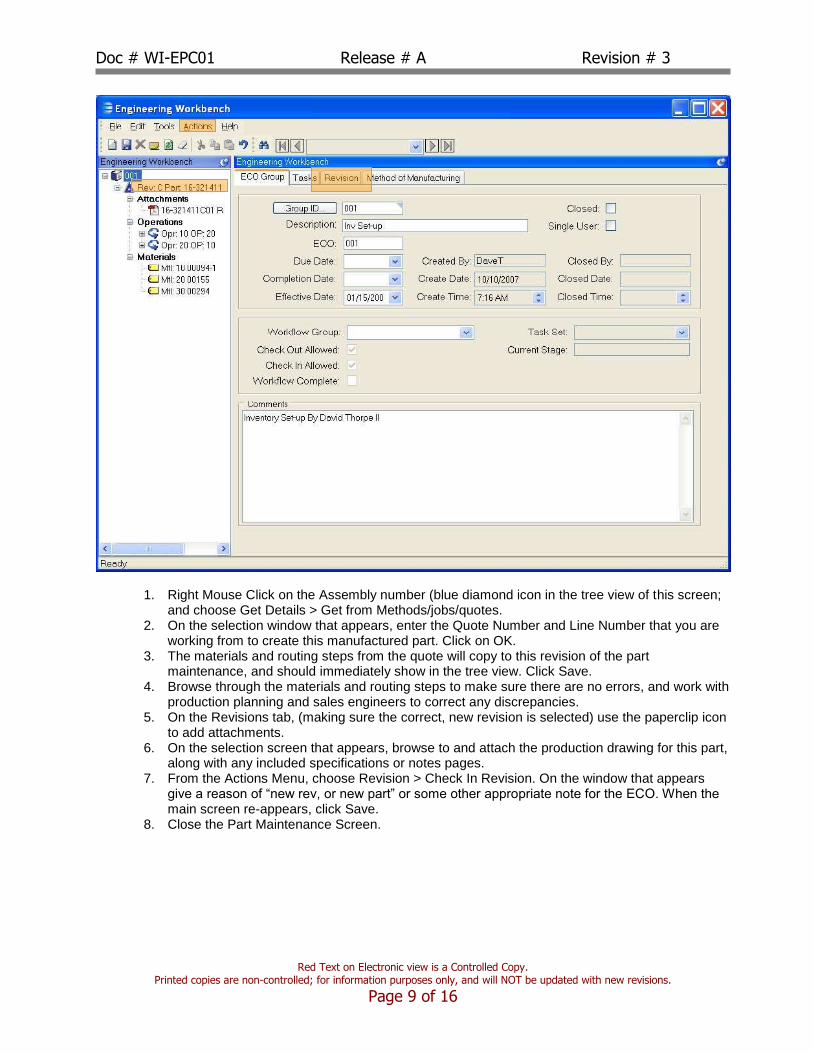
1. Right Mouse Click on the Assembly number (blue diamond icon in the tree view of this screen; and choose Get Details > Get from Methods/jobs/quotes.
2. On the selection window that appears, enter the Quote Number and Line Number that you are working from to create this manufactured part. Click on OK.
3. The materials and routing steps from the quote will copy to this revision of the part maintenance, and should immediately show in the tree view. Click Save.
4. Browse through the materials and routing steps to make sure there are no errors, and work with production planning and sales engineers to correct any discrepancies.
5. On the Revisions tab, (making sure the correct, new revision is selected) use the paperclip icon to add attachments.
6. On the selection screen that appears, browse to and attach the production drawing for this part, along with any included specifications or notes pages.
7. From the Actions Menu, choose Revision > Check In Revision. On the window that appears give a reason of “new rev, or new part” or some other appropriate note for the ECO. When the main screen re-appears, click Save.
8. Close the Part Maintenance Screen.

Doc # WI-EPC01 Release # A Revision # 3
Red Text on Electronic view is a Controlled Copy. Printed copies are non-controlled; for information purposes only, and will NOT be updated with new revisions.
Page 10 of 16
1. Go to Folder Material Management > Inventory Management > General Operations > Cost adjustment, the screen above should appear.
2. Search or enter your part number. 3. Referring back to the quote worksheet, enter the quoted costs (not prices) for Unit Material and
Unit Labor in the appropriate column based on the costing method. 4. Choose Reason: Inv Set-Up. 5. Click Save and exit the Cost Adjustment screen.

Doc # WI-EPC01 Release # A Revision # 3
Red Text on Electronic view is a Controlled Copy. Printed copies are non-controlled; for information purposes only, and will NOT be updated with new revisions.
Page 11 of 16
3.2 Part Number Creation – Purchased Parts
3.2.1 To create a “Purchased Part” also known as a Raw Material, you need a quotation from the
vendor or vendors we will purchase the part from. You may also have a Sales Opportunity/Quote to work from.
3.2.2 Run the Part creation program in Epicor by double-mouse-clicking on the “Part” icon found in
any of the “Setup” folders found in multiple sections of the Vista main menu. 3.2.3 Follow the numbered steps found after each diagram on the following pages:
1. Click New 2. Make sure you know the next unused part number and enter it in. 3. Fill in description using the format: CLASS, Descriptive Name, dimension, note(s. 4. Select the type of part (purchased,) Group (Raw Material) and appropriate Class. 5. Check Whole unit only if it absolutely will not be cut into pieces. 6. As needed, click track serial numbers and enter in the format, and/or track lots. 7. Under GL account enter 9999 (for use in reports) 8. Set the purchasing and selling unit of measures and provide a conversion factor if different. 9. Select desired costing method. 10. Check non-stock if it this part is not normally kept on the shelf (ordered only for jobs.) 11. Uncheck quantity bearing if we will not keep the part on inventory (such as welding rod.) 12. Click Save as much as possible throughout this process. 13. Click on the PLANTS tab.
13
6
7
8
9 10 11
12
5
4
3 2
1
8

Doc # WI-EPC01 Release # A Revision # 3
Red Text on Electronic view is a Controlled Copy. Printed copies are non-controlled; for information purposes only, and will NOT be updated with new revisions.
Page 12 of 16
1. On the plants tab selected sub-tabs Warehouses > Detail; 2. Set the primary Bin to the location of the part where it will have a home on the shelf. 3. Click save then Plants > Detail tab.
Doc # WI-EPC01 Release # A Revision # 3
Red Text on Electronic view is a Controlled Copy. Printed copies are non-controlled; for information purposes only, and will NOT be updated with new revisions.
Page 13 of 16
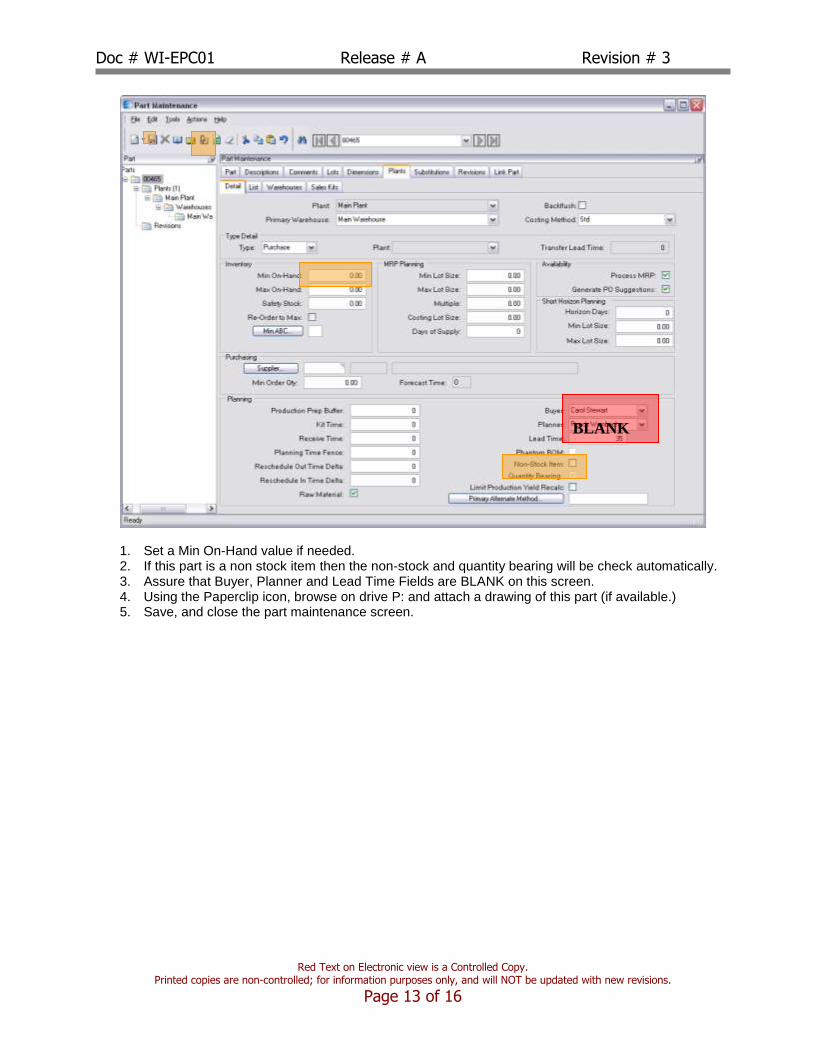
1. Set a Min On-Hand value if needed. 2. If this part is a non stock item then the non-stock and quantity bearing will be check automatically. 3. Assure that Buyer, Planner and Lead Time Fields are BLANK on this screen. 4. Using the Paperclip icon, browse on drive P: and attach a drawing of this part (if available.) 5. Save, and close the part maintenance screen.
BLANK
Doc # WI-EPC01 Release # A Revision # 3
Red Text on Electronic view is a Controlled Copy. Printed copies are non-controlled; for information purposes only, and will NOT be updated with new revisions.
Page 14 of 16
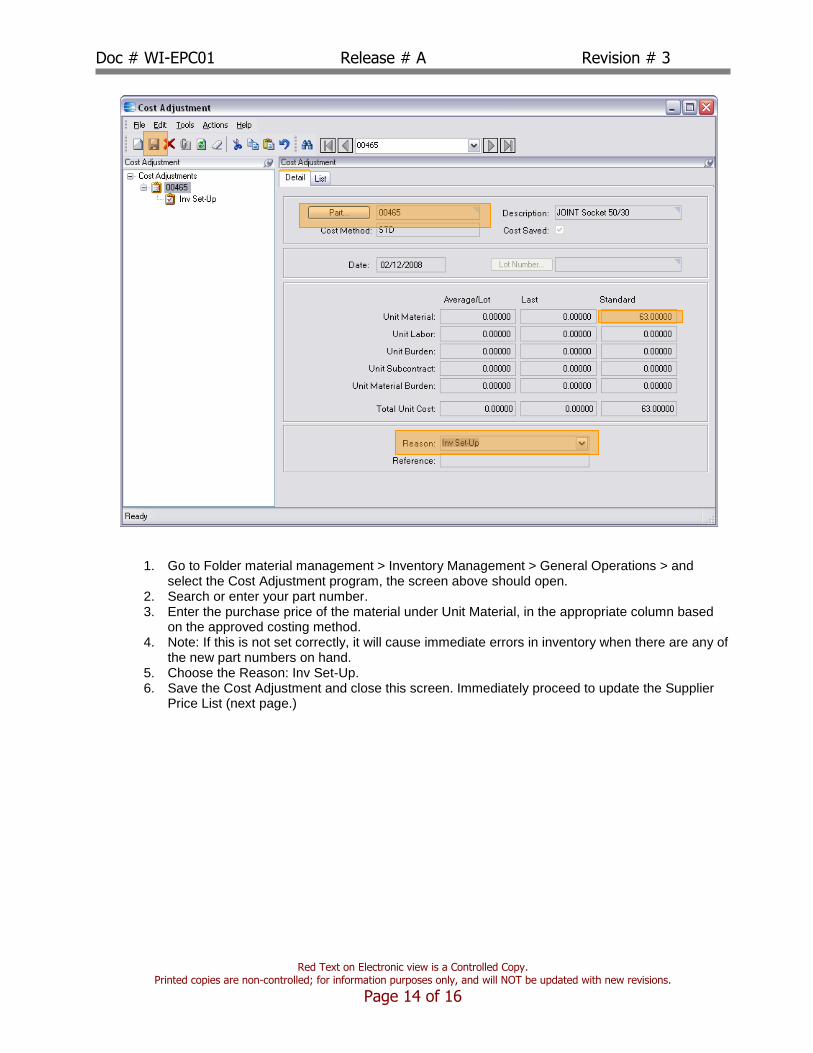
1. Go to Folder material management > Inventory Management > General Operations > and select the Cost Adjustment program, the screen above should open.
2. Search or enter your part number. 3. Enter the purchase price of the material under Unit Material, in the appropriate column based
on the approved costing method. 4. Note: If this is not set correctly, it will cause immediate errors in inventory when there are any of
the new part numbers on hand. 5. Choose the Reason: Inv Set-Up. 6. Save the Cost Adjustment and close this screen. Immediately proceed to update the Supplier
Price List (next page.)

Doc # WI-EPC01 Release # A Revision # 3
Red Text on Electronic view is a Controlled Copy. Printed copies are non-controlled; for information purposes only, and will NOT be updated with new revisions.
Page 15 of 16
1. Navigate to folder: Material Management>Purchase Management>Setup, and select the Supplier Price List program. The screen above should open (initially appearing blank.)
2. Select the Supplier that has given a price for the new purchased part. 3. Click on the pulldown menu for the New Icon, and select New Part. 4. Enter the part number you have just created and by hitting the Tab key or moving to a different
field, most of the screen should populate with information you entered just prior to this step. 5. Enter an Expires: date for this price, if the vendor did not give one, use the Wacom standard of
180 Days. 6. If this is the only supplier check the box next to “Primary Supplier.” Note: if prices are to be
maintained for several different suppliers, then the steps on this section must be repeated for each supplier with this same part; but only one can be chosen as Primary Supplier.
7. Enter the Purchase Factor and Direction (if the supplier Unit of Measure is different than ours.) 8. Enter the Lead time quoted by the supplier. 9. Enter the Supplier Part number (if different) and a Reference part (if known.) 10. If this supplier quotes one or more price breaks, enter each as a line item in the bottom right
window, start by again using the pulldown for New, and selecting, New Price Break. 11. In the Minimum Qty field (partially hidden in the screen shot above) enter in the first quantity
that you will receive a break. Then enter the price modifier (this should be a negative number because that is what you will save per part) the effective price will automatically populate.
12. Repeat steps 10 and 11 for every break quoted by this supplier on this part. 13. Enter any comments associated with this supplier price list and part, this will not print on any
reports. 14. Save and exit the supplier price list.
2
3
4
5
6
7
8
9
10
11
13

Doc # WI-EPC01 Release # A Revision # 3
Red Text on Electronic view is a Controlled Copy. Printed copies are non-controlled; for information purposes only, and will NOT be updated with new revisions.
Page 16 of 16
3.3 Part Records
3.3.1 When completed, be sure to SAVE the new part number. It is now saved in the Epicor Vista system and searchable via many of the fields populated during the procedure above. 3.3.2 Part records have no expiration date, they may be deleted by users with appropriate rights only if not used in other transactions such as jobs, invoices, etc.
4.0 Quality Records & References
4.1 Quality Records
The following table lists records generated and maintained during the Procedures section of this controlled document. Next to each record is show the paragraph number of this or other controlled document where the specific procedures for Identification (I), Collection (C), Indexing (X), Access (A), Filing (F), Storage (S), Maintenance (M), and Disposition (D) of said record can be found.
Record Name I C X A F S M D
Part (Electronic Record)
3.1, 3.2
3.3.1 3.3.1 3.3.1 3.3.1 3.3.1 3.3.1 3.3.2
4.2 References
The following table lists reference materials mentioned in this controlled document along with their probable accessibility. Unless otherwise noted, these are documents NOT controlled by Wacom Quartz. Note* All references listed with the name in the format “FORM #xxx” are controlled forms; a complete list of which can be found in the Control of Quality Records Procedure, document # SOP #CQR01.
Name Description Accessibility
None