eprofile - peoplesoft training
TRANSCRIPT

Contra Costa County PeopleSoft Training
Training Guide
eProfile

Training Guide
Employee Self Service--eProfile
Page ii
Table of Contents Employee Self Service--eProfile ....................................................................................... 1
eProfile ........................................................................................................................................ 1 Overview of eProfile .............................................................................................................................. 1 Working with Personal Details Page ...................................................................................................... 2
Using the Personal Details Page ......................................................................................................................... 3 Submitting Name Change Requests ..................................................................................................... 13
Requesting a Name Change .............................................................................................................................. 13 Maintaining Address Information ........................................................................................................ 19
Maintaining Home and Mailing Addresses ...................................................................................................... 19 Maintaining Phone Information ........................................................................................................... 25
Editing an Existing Phone Number .................................................................................................................. 26 Adding an Additional Phone Number............................................................................................................... 31 Deleting a Phone Number ................................................................................................................................. 37
Maintaining Email Addresses .............................................................................................................. 42 Adding an Email Address ................................................................................................................................. 43 Editing Email Addresses .................................................................................................................................. 50 Deleting an Email Address ............................................................................................................................... 54
Maintaining Emergency Contact Information ...................................................................................... 58 Adding Emergency Contact Information .......................................................................................................... 59 Editing Emergency Contact Information .......................................................................................................... 73 Adding an Additional Emergency Contact ....................................................................................................... 80 Deleting Emergency Contact Information ........................................................................................................ 94
Maintaining Ethnicity Self-Identifications ......................................................................................... 100 Entering an Ethnic Group Self- Identification ................................................................................................ 101 Editing an Existing Ethnic Group Self-Identification ..................................................................................... 108 Deleting an Ethnic Group Self-Identification ................................................................................................. 117
Maintaining Disability and Veteran Self- Identifications .................................................................. 121 Updating Disability Self-Identification ........................................................................................................... 121 Updating Veteran Self-Identification .............................................................................................................. 127

Training Guide Employee Self Service--eProfile
Page 1
Employee Self Service--eProfile
eProfile
Overview of eProfile
Overview of eProfile
The eProfile portion of PeopleSoft enables employees to complete the following tasks online:
Description
Personal Details Review Personal Information
Submit name change
Update Address information
Update phone information
Review email information
Update emergency contact information
Update Ethnic Group self-identification
Review additional Personal Information
Maintain Name Information Submit a request to change your name
Maintain Address Information Update your mailing and home addresses
Maintain Phone Information Update existing phone information
Add an additional phone number
Delete an existing phone number
Maintain Email Information Review your business email address
Add a home email
Review your home email
Update/delete your home email
Maintain Emergency Contact
Information
Add an emergency contact
Update emergency contact information
Add additional emergency contacts
Delete an emergency contact
Maintain Ethnicity Information Add an ethnic group self-identification
Edit an ethnic group self-identification
Delete an ethnic group self-identification

Training Guide
Employee Self Service--eProfile
Page 2
Maintain Veteran and Disability
Self-Identifications
Record your disability status
Record your military status
Changes you make to your personal information using eProfile take place immediately, with the
exception of requests to change your name. Name change requests must be processed by Human
Resources before they take effect.
Each of these tasks is covered in one of the lessons in the eProfile section of Employee Self
Service Training:
Working with Personal Details Page
Submitting Name Change Requests Maintaining Address Information Maintaining Phone Information Maintaining Email Information Maintaining Emergency Contact Information Maintaining Ethnicity Self-Identifications Maintaining Veteran and Disability-Self Identifactions
Working with Personal Details Page
Working with Personal Details Page
The Employee Self Service feature of PeopleSoft 9.2 allows you to view and update your
personal information online.
The Personal Details page allows you to review and make updates to your personal information
from a single page. You can review and update your
Name (submit a request for it to be changed in the system)
Your Home and Mailing Addresses
Your Phone information
Your email addresses
Your emergency contacts
Your Ethnic Group Self- Identification
View additional personal information
The steps involved in using the Personal Details page are covered in a single topic in this lesson:
Using the Personal Details page
This topic is available for play-back through the UPK player in
See-It! Mode—allows you to attach a “video” demonstration of the topic
Try-It! Mode—allows you to use your mouse and keyboard to complete transactions in a
simulated environment

Training Guide Employee Self Service--eProfile
Page 3
Both See-It! And Try-It! Provide guided instructions and explanations of important features of
PeopleSoft transactions. The full text of the instructions and explanations included in the UPK
Payer are also available in two printed documents—a Training Guide and a Job Aid.
Here are some key points to keep in mind about using the Personal Details page:
The Personal Details page can be accessed from the Employee Self-Service home page
You can use this page to review your personal information as it is currently stored in the
system
You can use this page to change (or request changes) to your personal information
The Additional Personal information page presents information in view only mode
Using the Personal Details Page
The basic steps to using the Personal Details page are:
1. Click the Personal Details tile on the Employee Self Service home page.
2. Click on each of the links in the Actions panel.
3. Review information that displays in the Information panel
See the other topics in this course for instruction on how to add, edit, and or delete your personal
information using this page.
Procedure

Training Guide
Employee Self Service--eProfile
Page 4
Step Action
1. Click the Personal Details tile.
Step Action
2. The Personal Details page displays.
This page contains three panels:
-- Header panel
-- Left Side Actions panel
-- Right Side Information panel

Training Guide Employee Self Service--eProfile
Page 5
Step Action
3. The Header panel displays your name and your position description.
To the right of your name is the Related Actions Menu button. Use this button to
access other portions of Employee Self Service.

Training Guide
Employee Self Service--eProfile
Page 6
Step Action
4. Click the Related Action Menu button.
Step Action
5. You can click on the links in the Actions menu to go to other portions of Employee
Self Service, e.g. Benefits (eBenefits) and Payroll (ePay).
These are covered in other portions of Contra Costa County PeopleSoft Employee
Self Service training.
6. Click the Close button.

Training Guide Employee Self Service--eProfile
Page 7
Step Action
7. The right side information panel displays the Addressees grids. This grid lists your
current Home Address and Mailing Address.
You can use this page to edit one or both of these addresses. Maintaining your
address information is covered in another topic in the Contra Costa County
Employee Self Service eProfile training.
8. Click the Contact Details link.

Training Guide
Employee Self Service--eProfile
Page 8
Step Action
9. The right side information panel now displays your Contact Details. This panel
contains two grids:
-- Phone: this grid lists your phone numbers as stored in the system. You can store
up to 4 phone number--Business, Home, Cell, and Pager1.
-- Email: this grid lists your email address as stored on the system. Your business
email address is stored in the system. You cannot edit or delete this address. You
cannot add additional email addresses.
You can use this page to edit, add, or delete address information. These actions are
covered in other topics in Contra County PeopleSoft Employee Self Service
eProfile training.
10. Click the Name link.

Training Guide Employee Self Service--eProfile
Page 9
Step Action
11. The right side information panel now displays your current name information as
stored in the system.
You can use this page to request that your name information be changed. This action
is covered in another topic in Contra Costa County PeopleSoft Employee Self
Service eProfile training.
12. Click the Ethnic Groups link.

Training Guide
Employee Self Service--eProfile
Page 10
Step Action
13. The right side information panel now displays your current Ethnic Group Self
Identification.
You can use this page to edit, add, or delete an ethnic group self identification.
These actions are covered in other topics in Contra Costa County PeopleSoft
Employee Self Service eProfile training.
14. Click the Emergency Contacts link.

Training Guide Employee Self Service--eProfile
Page 11
Step Action
15. The right side information panel now displays your current emergency contact
information.
You can use this page to add, edit, and/or delete emergency contacts.
These actions are covered in other topics in Contra Costa County PeopleSoft
Employee Self Service eProfile training.
16. Click the Additional Information link.

Training Guide
Employee Self Service--eProfile
Page 12
Step Action
17. The right side information panel now displays additional information. This
information is presented in view only mode. You cannot edit or delete this
information.
If any of this information is incorrect, you must contact Human Resources to have it
changed.
18. Click the Disability link.
19. The Voluntary Self-Identification of Disability page displays in the information
panel.
You can use this page to indicate whether or not you have a disability. Or you can
decline to answer.
20. Click the Veteran Status link.
21. The Veteran Status page displays in the information panel.
Use this page to indicate your status as a veteran If you are not a veteran you can
also indicate that using this page.
22. Click the My Homepage button.

Training Guide Employee Self Service--eProfile
Page 13
Step Action
23.
End of Procedure.
Submitting Name Change Requests
Submitting Name Change Requests
The Employee Self Service feature of PeopleSoft 9.2 allows you to request a name change online.
The steps involved in requesting a name change are covered in a single topic in this lesson:
Requesting a Name Change
This topic is available for play-back through the UPK player in
See-It! Mode—allows you to attach a “video” demonstration of the topic
Try-It! Mode—allows you to use your mouse and keyboard to complete transactions in a
simulated environment
Both See-It! And Try-It! provide guided instructions and explanations of important features of
PeopleSoft transactions. The full text of the instructions and explanations included in the UPK
Payer are also available in two printed documents—a Training Guide and a Job Aid.
Here are some key points to keep in mind about requesting a name change:
The date you enter in the Change As Of field indicates the date on which you want the
name change to become effective
You can enter the current date (the default value), a past date, or a future date in the
Change As Of field.
You may be required to supply proof of your name change to Human Resources
Your name as stored in the system must match your name as it appears on your Social
Security Card
The Current Name section of the Name Change page will continue to display your
original name until your request for a name change has been processed by Human
Resources.
Requesting a Name Change
The basic steps to request a name change are:
1. Click the Personal Details tile on the Employee Self Service home page.
2. Click the Name link in the Actions panel.
3. Click on the current row in the Information panel.
4. Select/enter a date in the Change As Of field on the Name dialog page.
5. Edit your name information using the Prefix, First Name, Middle Name, Last Name,
and Suffix fields.
6. Click the Save button.

Training Guide
Employee Self Service--eProfile
Page 14
Procedure
Step Action
1. Click the Personal Details tile.

Training Guide Employee Self Service--eProfile
Page 15
Step Action
2. The Personal Details page displays. You can use this page to view and/or change
your personal information.
For this example, you will request that your name as stored in the system be changed
from David Smith to David Smyth.

Training Guide
Employee Self Service--eProfile
Page 16
Step Action
3. Click the Name link.
Step Action
4. Notice the right side panel now displays the Name grid. This grid lists your name as
it is currently stored in the system.
To edit your name information, you can click anywhere on the row displaying your
name.
In this example, you will correct the spelling of your last name. Your last name is
spelled Smyth not as currently listed, Smith.
5. Click the Current link.

Training Guide Employee Self Service--eProfile
Page 17
Step Action
6. The Name dialog page displays. You can use the fields on this page to edit your
name information.
The Changes As Of field defaults to the current date. Use this field to enter or select
the date on which the change will be effective. This date can be a past or a future
date. For this example, you will accept the default value.
Accept the default value in the Name Format field of English.
7. Click in the Last Name field.
8. Enter the desired information into the Last Name field. Enter "Smyth".

Training Guide
Employee Self Service--eProfile
Page 18
Step Action
9. Click the Save button.
Step Action
10. Notice the Name grid in the right panel on the Personal Details page now displays
two rows.
The first row lists your current name as it is stored in the system.
The second row lists the change you have requested. This row indicates that this
new name is as of the current date, 9/8/2016 and that your request has been
submitted for approval by Human Resources.
Human Resources must process your request before the change you have requested
will display as your current name.

Training Guide Employee Self Service--eProfile
Page 19
Step Action
11. Click the My Homepage button.
12.
End of Procedure.
Maintaining Address Information
Maintaining Address Information
the Employee Self Service feature of PeopleSoft 9.2 allows you to review and update your home
and mailing addresses that are stored in the system..
The steps involved in requesting a name change are covered in a single topic in this lesson:
Maintaining Home and Mailing Addresses
This topic is available for play-back through the UPK player in
See-It! Mode—allows you to attach a “video” demonstration of the topic
Try-It! Mode—allows you to use your mouse and keyboard to complete transactions in a
simulated environment
Both See-It! And Try-It! provide guided instructions and explanations of important features of
PeopleSoft transactions. The full text of the instructions and explanations included in the UPK
Payer are also available in two printed documents—a Training Guide and a Job Aid.
Here are some key points to keep in mind about maintaining your address information:
You can store two addresses in the system, a home address and a mailing address
These addresses may be the same or they may be different
The Change As Of field indicates the date on which the address change should take
effective
The Change As Of date can be the current date, a future date, or a past date
Maintaining Home and Mailing Addresses
The basic steps to change your address information are:
1. Click the Personal Details tile on the Employee Self Service home page.
2. Click the Addresses link in the Actions panel.
3. Click the current row in the Information panel for the address you want to change, i.e.
Home or Mailing.
4. Select/enter a date in the Change As Of field on the Address dialog page.

Training Guide
Employee Self Service--eProfile
Page 20
5. Edit your name information using the Address 1, Address 2, Address 3, City, State,
Postal and County fields.
6. Click the Save button.
Procedure
Step Action
1. Click the Personal Details tile.

Training Guide Employee Self Service--eProfile
Page 21
Step Action
2. The Information panel displays your current Home and Mailing addresses as they
are stored in the system.
You can edit either or both of these addresses.
For this example you will edit both your Home and Mailing address. You will
change both to:
2641 Prospect Street
Concord, CA 94518
Note: your home and mailing addresses can be the same or you can have a different
mailing address than you home address. Changes to your address information does
not require processing by Human Resources. The changes you make are
immediately effective.
3. Click the Home Address row.

Training Guide
Employee Self Service--eProfile
Page 22
Step Action
4. The Address dialog page for your home address displays.
The Change As Of field defaults to the current date. You can use this field to
enter/select the date on which your address changed. For this example, you will
accept the default value.
For this example, you will change your street address from 1000 Pine Drive to 2641
Prospect street. Both street addresses are in Concord and both share the same Zip
code. You will need to edit the value in the Address 1 field. You do not need to edit
values in the other fields.
5. Click in the Address 1 field.

Training Guide Employee Self Service--eProfile
Page 23
Step Action
6. Enter the desired information into the Address 1 field. Enter "2641 Prospect
Street".
7. Click the Save button.
Step Action
8. Notice the system displays a confirmation message indicating that the changes you
just made have been successfully.
Your current home address is now listed as 2641 Prospect Street in Concord.
Next you will make the same change to your mailing address.

Training Guide
Employee Self Service--eProfile
Page 24
Step Action
9. Click the Mailing Address row.
10. Click in the Address 1 field.
11. Enter the desired information into the Address 1 field. Enter "2641 Prospect
Street".
12. Click the Save button.

Training Guide Employee Self Service--eProfile
Page 25
Step Action
13. The system display a confirmation message indicating that the changes you made
have successfully saved.
Your current mailing address is now listed as 2641 Prospect Street in Concord.
14. Click the My Homepage button.
15.
End of Procedure.
Maintaining Phone Information
Maintaining Phone Information
The Employee Self Service feature of PeopleSoft 9.2 allows you to review and update your phone
numbers that are stored in the system.
The steps involved in maintaining phone information are covered in a three topics in this lesson:
Editing an Existing Phone Number
Adding an Additional Phone Number
Deleting a Phone Number

Training Guide
Employee Self Service--eProfile
Page 26
This topic is available for play-back through the UPK player in
See-It! Mode—allows you to attach a “video” demonstration of the topic
Try-It! Mode—allows you to use your mouse and keyboard to complete transactions in a
simulated environment
Both See-It! And Try-It! provide guided instructions and explanations of important features of
PeopleSoft transactions. The full text of the instructions and explanations included in the UPK
Payer are also available in two printed documents—a Training Guide and a Job Aid.
Here are some key points to keep in mind about maintaining your phone number information:
The system stores four types of phone numbers—Business, Home, Pager 1 and Mobile
(Cell)
The Business phone number should always be designated as your preferred phone
number
You cannot have multiple preferred phone numbers
You cannot have multiple Mobile phone numbers in the system
If you already have a Mobile phone number listed in the Phone Numbers section and you
use the Add Phone Number button you will not be able to add an additional phone
number. The drop down for the Phone Type field will be empty. You cannot have
multiple phone numbers of the same type in the system.
Editing an Existing Phone Number
The basic steps to edit an existing phone number are:
1. Click the Personal Details tile on the Employee Self Service home page.
2. Click the Contact Details link in the Actions panel.
3. Click the current row in the Information panel Phone grid for the phone number you
want to change
4. Edit your phone number information using the Number and Extension fields.
5. Click the Save button.
Procedure

Training Guide Employee Self Service--eProfile
Page 27
Step Action
1. Click the Personal Details button.
2. Click the Contact Details link.

Training Guide
Employee Self Service--eProfile
Page 28
Step Action
3. The Information panel now displays your contact information: phone numbers and
email addresses.
You have two phone numbers stored in the system: a business number and a home
number. You business phone is marked as your preferred number.
For this example, you will edit your home phone number. Your number as currently
listed in the system is incorrect. Your correct home phone number is 925/558-
5524 not, as currently listed, 925/558-5523.
4. Click the row in the Phone grid that displays your current Home phone, 925/558-
5523 .

Training Guide Employee Self Service--eProfile
Page 29
Step Action
5. The Phone Number dialog box page displays. Use the fields on this page to enter
your correct home phone number.
For this example, you will edit the value in the Number field to change it to your
correct home phone. You will not mark this number as your preferred number. Only
one phone number can be marked as preferred.
6. Click in the Number field.
7. Enter the desired information into the Number field. Enter "925/558-5524".

Training Guide
Employee Self Service--eProfile
Page 30
Step Action
8. Click the Save button.
Step Action
9. Notice the system issues a message across the top of the page indicating that you
have successfully updated your home phone.
Also notice that the Phone grid now lists the correct number for your home phone
and that your business number is still your preferred number.
10. Click the My Homepage button.
11.
End of Procedure.

Training Guide Employee Self Service--eProfile
Page 31
Adding an Additional Phone Number
The basic steps to adding a new phone number are:
1. Click the Personal Details tile on the Employee Self Service home page.
2. Click the Contact Details link in the Actions panel.
3. Click the Add Phone button (Plus sign) in the Phone grid.
4. Select a type in the Type field on the Phone Number dialog page.
5. Edit your phone number information using the Number and Extension fields.
6. Click the Save button.
Procedure
Step Action
1. Click the Personal Details button.

Training Guide
Employee Self Service--eProfile
Page 32
Step Action
2. Click the Contact Details link.
Step Action
3. The Information panel now displays your contact information: phone numbers and
email addresses.
You currently have two phone numbers stored in the system: a business number and
a home number. Your business phone is marked as your preferred number.
For this example, you will add your cell (mobile) phone number, 925/556-2112, to
the system. You will leave the business phone as your preferred phone.

Training Guide Employee Self Service--eProfile
Page 33
Step Action
4. Click the Add Phone button.
Step Action
5. The Phone Number dialog box page displays. Use the fields on this page to enter
your cell (mobile) phone number, 925/556-2112.
You will not mark this number as your preferred number. Only one phone number
can be marked as preferred.
6. Click the Type list.

Training Guide
Employee Self Service--eProfile
Page 34
Step Action
7. Notice the Type field drop down lists contains only two types: Mobile and Page 1.
You can store up to 4 phone numbers in the system--one of each of the following
types:
-- Business
-- Home
-- Mobile
-- Pager 1
You cannot simultaneously store two phone numbers of the same type in the system.
The system only allows you to select phone types that are currently available to you.

Training Guide Employee Self Service--eProfile
Page 35
Step Action
8. Click the Mobile list item.

Training Guide
Employee Self Service--eProfile
Page 36
Step Action
9. Click in the Number field.
10. Enter the desired information into the Number field. Enter "925/556-2112".
11. Click the Save button.

Training Guide Employee Self Service--eProfile
Page 37
Step Action
12. Notice the system issues a message across the top of the page indicating that you
have successfully added your mobile phone.
Also notice that the Phone grid now lists three phone types and that your business
number is still your preferred number.
13. Click the My Homepage button.
14.
End of Procedure.
Deleting a Phone Number
The basic steps to deleting an existing phone number are:
1. Click the Personal Details tile on the Employee Self Service home page.
2. Click the Contact Details link in the Actions panel.
3. Click on the row on the Phone grid for the phone number you want to delete.
4. Click the Delete button on the Phone Number dialog page.
5. Click the Yes button on the Delete Confirmation page.

Training Guide
Employee Self Service--eProfile
Page 38
Procedure
Step Action
1. Click the Personal Details tile.

Training Guide Employee Self Service--eProfile
Page 39
Step Action
2. Click the Contact Details link.

Training Guide
Employee Self Service--eProfile
Page 40
Step Action
3. The Information panel now displays your contact information: phone numbers and
email addresses.
You currently have three phone numbers stored in the system: a business number, a
mobile (cell) number, and a home number. Your business phone is marked as your
preferred number. You can edit any of these numbers.
For this example, you will delete your cell (mobile) phone number, 925/556-2112.
4. Click the the row in the Phone grid for your mobile (cell) number, 925/556-2112.

Training Guide Employee Self Service--eProfile
Page 41
Step Action
5. The Phone Number dialog page displays with information for your mobile (cell)
number.
For this example, you will use the Delete button to delete this number.
6. Click the Delete button.
7. Click the Yes button.

Training Guide
Employee Self Service--eProfile
Page 42
Step Action
8. Notice the system issues a message across the top of the page indicating that you
have successfully deleted your mobile phone.
Also notice that the Phone grid now lists two phone types and that your business
number is still your preferred number.
9. Click the My Homepage button.
10.
End of Procedure.
Maintaining Email Addresses
Maintaining Email Addresses
The Employee Self Service feature of PeopleSoft 9.2 allows you to review and update your email
addresses that are stored in the system.
The steps involved in maintaining email addresses are covered in a three topics in this lesson:
Adding an Email Addresses
Editing an Email Address
Deleting an Email Address

Training Guide Employee Self Service--eProfile
Page 43
This topic is available for play-back through the UPK player in
See-It! Mode—allows you to attach a “video” demonstration of the topic
Try-It! Mode—allows you to use your mouse and keyboard to complete transactions in a
simulated environment
Both See-It! And Try-It! provide guided instructions and explanations of important features of
PeopleSoft transactions. The full text of the instructions and explanations included in the UPK
Payer are also available in two printed documents—a Training Guide and a Job Aid.
Here are some key points to keep in mind about maintaining your email address information:
The system stores two types of email Addresses—Business and Home
You cannot edit or delete your Business email address
The Business email address should always be designated as your primary email address
You cannot have multiple primary email Addresses
You cannot have multiple Home email addresses in the system
If you already have a Home email address listed in the Email Addresses section and you
use the Add Email Address button you will not be able to add an additional email
address. The drop down for the Email Type field will be empty. You cannot have
multiple email addresses of the same type in the system.
Adding an Email Address
The basic steps to adding a new email address are:
1. Click the Personal Details tile on the Employee Self Service home page.
2. Click the Contact Details link in the Actions panel.
3. Click the Add Email button (Plus sign) in the Email grid.
4. Select a type in the Email Type field on the Email Address dialog page..
5. Edit your email information using the Email Address field.
6. Click the Save button.
Procedure

Training Guide
Employee Self Service--eProfile
Page 44
Step Action
1. Click the Personal Details button.
2. Click the Contact Details link.

Training Guide Employee Self Service--eProfile
Page 45
Step Action
3. The Information panel now displays your contact information: phone numbers and
email addresses.
You currently have one email address stored in the system--your business email
address. This address is marked as your preferred email. You cannot edit or delete
this address.
You can have only two emails in the system: a business email (all employees have a
business email) and a home email. Your home email cannot be marked as your
preferred email.
For this example, you will add a home email, [email protected].
4. Click the Add Email button.

Training Guide
Employee Self Service--eProfile
Page 46
Step Action
5. The Email Address dialog page displays. Use the Email Type and Email Address
fields to enter your home email address, [email protected].
6. Click the Email Type list.

Training Guide Employee Self Service--eProfile
Page 47
Step Action
7. Note you can only store two email addresses in the system, a business email (every
employee has been assigned a business email) and a home email. You can list only
one home email address.
Home is the only choice available.
Training Guide
Employee Self Service--eProfile
Page 48
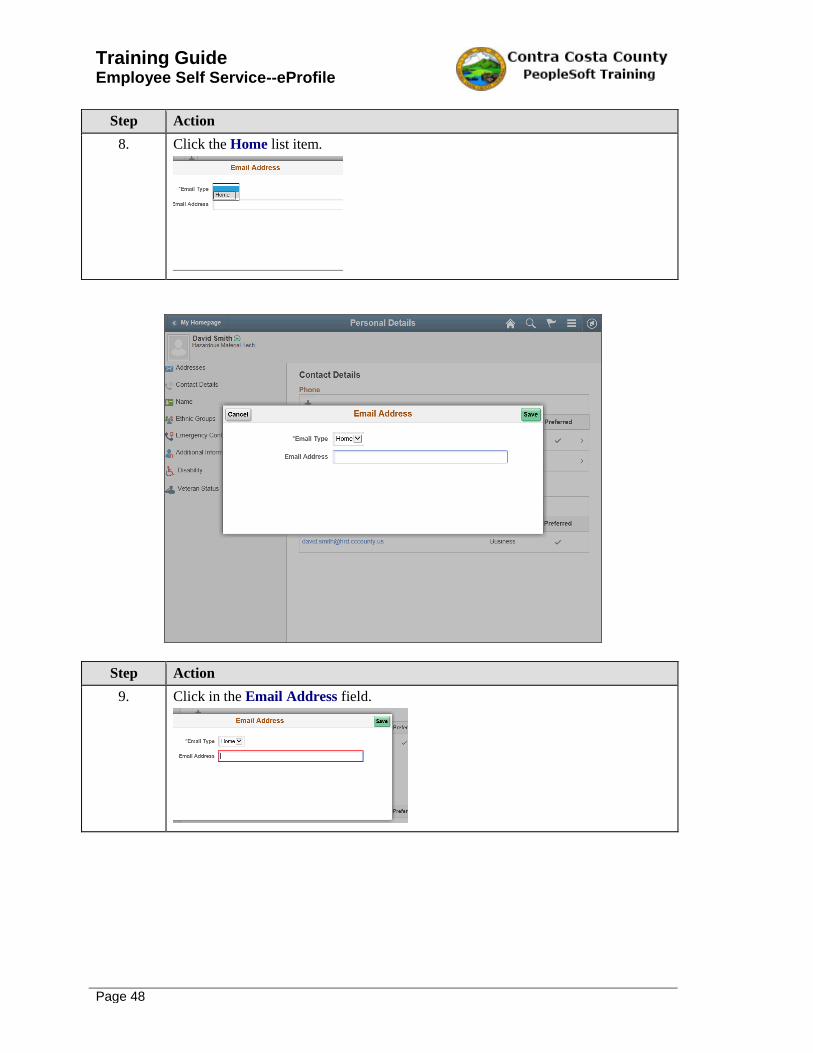
Step Action
8. Click the Home list item.
Step Action
9. Click in the Email Address field.

Training Guide Employee Self Service--eProfile
Page 49
Step Action
10. Enter the desired information into the Email Address field. Enter "[email protected]".
11. Click the Save button.
Step Action
12. Notice the system issues a message across the top of the page indicating that you
have successfully added your home email address.
Also notice that the Email grid now lists 2 email types and that your business
number is still your preferred email address.

Training Guide
Employee Self Service--eProfile
Page 50
Step Action
13. Click the My Homepage button.
14.
End of Procedure.
Editing Email Addresses
The basic steps to edit an existing email address are:
1. Click the Personal Details tile on the Employee Self Service home page.
2. Click the Contact Details link in the Actions panel.
3. Click the current row in the Information panel Email grid for the email address you
want to change.
4. Edit your email address information using the Email Address field.
5. Click the Save button.
Procedure

Training Guide Employee Self Service--eProfile
Page 51
Step Action
1. Click the Personal Details button.
2. Click the Contact Details link.

Training Guide
Employee Self Service--eProfile
Page 52
Step Action
3. The Information panel now displays your contact information: phone numbers and
email addresses.
You have two email addresses stored in the system: a business email and a home
email. Your business email is marked as your preferred email.
You cannot edit or delete your business email. It must be your preferred email.
You can edit your home email.
For this example, you will edit your home email address. You will change it from
[email protected] to [email protected].
4. Click the row in the Email grid containing your home email address,

Training Guide Employee Self Service--eProfile
Page 53
Step Action
5. The Email Address dialog page displays.
Use the Email Address field to enter your new email address. You do not have to
change the type. You can have only two email addresses in the system--one of each
type: a business email and a home email.
The system will not allow you to add a second home email or to edit or delete your
business email.
6. Click in the Email Address field.
7. Enter the desired information into the Email Address field. Enter
8. Click the Save button.
9. Notice the system issues a message across the top of the page indicating that you
have successfully updated your home email address.
Also notice that the email grid now lists the updated address for your home email
and that your business email is still your preferred email.

Training Guide
Employee Self Service--eProfile
Page 54
Step Action
10. Click the My Homepage button.
11.
End of Procedure.
Deleting an Email Address
The basic steps to deleting an existing email address are:
1. Click the Personal Details tile on the Employee Self Service home page.
2. Click the Contact Details link in the Actions panel.
3. Click on the row on the Email grid for the email address you want to delete.
4. Click the Delete button on the Email address dialog page.
5. Click the Yes button on the Delete Confirmation page.
Procedure

Training Guide Employee Self Service--eProfile
Page 55
Step Action
1. Click the Personal Details tile.
2. Click the Contact Details link.

Training Guide
Employee Self Service--eProfile
Page 56
Step Action
3. The Information panel now displays your contact information: phone numbers and
email addresses.
You currently have 2 email addresses stored in the system: a business email and a
home email. Your email is marked as your preferred email. You cannot edit or
delete this email. It must be your preferred email.
For this example, you will delete your home email, [email protected].
4. Click the row in the Email grid containing your home email, [email protected].
Step Action
5. The Email Address dialog page displays with information for your home email
address.
For this example, you will use the Delete button to delete this address.

Training Guide Employee Self Service--eProfile
Page 57
Step Action
6. Click the Delete button.
7. Click the Yes button.
Step Action
8. Notice the system issues a message across the top of the page indicating that you
have successfully deleted your home email address.
Also notice that the Email grid now lists one email--your business email address
and that this address is marked as your preferred email address.

Training Guide
Employee Self Service--eProfile
Page 58
Step Action
9. Click the My Homepage button.
10.
End of Procedure.
Maintaining Emergency Contact Information
Maintaining Emergency Contact Information
The Employee Self Service feature of PeopleSoft 9.2 allows you to review and update your
emergency contact information that are stored in the system.
The steps involved in requesting managing emergency contact information are covered in a four
topics in this lesson:
Adding Emergency Contact Information
Editing Emergency Contact Information
Adding an Additional Emergency Contact
Deleting an Emergency Contact
This topic is available for play-back through the UPK player in
See-It! Mode—allows you to attach a “video” demonstration of the topic
Try-It! Mode—allows you to use your mouse and keyboard to complete transactions in a
simulated environment
Both See-It! And Try-It! provide guided instructions and explanations of important features of
PeopleSoft transactions. The full text of the instructions and explanations included in the UPK
Payer are also available in two printed documents—a Training Guide and a Job Aid.
Here are some key points to keep in mind about maintaining your emergency contact information:
You can designate multiple emergency contacts
There is no limit to how many emergency contacts you can add
If you have only one emergency contact, that contact will be designated your preferred
contact by default
If you have more than one emergency contact, you must select one to be your preferred
contact
You cannot have more than one preferred emergency contact
You cannot delete the preferred emergency contact
If you have only one contact and want to delete that contact, you must
o First add a new emergency contact
o Second make the new contact your preferred contact
o Third, then you will be able to delete the original contact

Training Guide Employee Self Service--eProfile
Page 59
Adding Emergency Contact Information
The basic steps to adding an emergency contact are:
1. Click the Personal Details tile on the Employee Self Service home page.
2. Click the Emergency Contacts link in the Actions panel.
3. Click the Add Emergency Contact button (Plus sign) in the Emergency Contacts grid.
4. Enter the contact’s name (first and last name) in the Contact Name field on the
Emergency Contact dialog page.
5. Select a value in the Relationship field.
6. Select the Preferred checkbox (optional if another contact is the preferred contact)
7. Click the Add Address button.
8. Enter the contact’s address information on the Address dialog page or select the Same as
mine checkbox (and then click the Done button).
9. Click the Done button.
10. Click the Add Phone Number button on the Emergency Contact dialog page.
11. Select a value in the Type field on the Phone Number dialog page or select the Same as
mine check box (and then click the Done button).
12. Enter the contact’s phone number in the Number field.
13. Enter the extension, if any, in the Extension field.
14. Click the Done button
15. Click the Save button.
Procedure

Training Guide
Employee Self Service--eProfile
Page 60
Step Action
1. Click the Personal Details tile.
2. Click the Emergency Contacts link.

Training Guide Employee Self Service--eProfile
Page 61
Step Action
3. The Emergency Contacts page displays in the Information panel.
Currently you have no emergency contacts listed in the system. Use the Add
Emergency Contact button to add a contact.
For this example, you will add Susan Jones, a friend. Susan's contact information is:
1803 Devon Court
Concord, CA 94520
510/556-4896 (cell phone)
4. Click the Add Emergency Contact button.

Training Guide
Employee Self Service--eProfile
Page 62
Step Action
5. The Emergency Contact dialog page displays. Use this page to add your contact;'s
information.
The Contact Name and Relationship fields are required fields. You must
enter/select values in these fields in order to save the contact.
The Preferred check box is selected by default since this is the first contact you will
add. You must designate one contact as your preferred contact. You cannot not have
more than one preferred contact.
6. Click in the Contact Name field.
7. Enter the desired information into the Contact Name field. Enter "Susan Jones".
8. Click the Relationship list.

Training Guide Employee Self Service--eProfile
Page 63
Step Action
9. Click the Friend list item.

Training Guide
Employee Self Service--eProfile
Page 64
Step Action
10. Next, you will add address information for the contact. Address information is
optional. You can save a contact without adding any address information.
Use the Add Address button in the Address grid to begin adding address
information for the contact.
Step Action
11. Click the Add Address button.

Training Guide Employee Self Service--eProfile
Page 65
Step Action
12. The Address dialog page displays. Use this page to add address information for the
contact.
If the contact's address is the same as your address, select the Same as mine check
box. The system will populate your address in information. You will be able to
select whether to use your home address or your mailing address.
For this example you will enter your contact's address:
1803 Devon Court
Concord, CA 94520
Contra Costa County
13. Click in the Address 1 field.

Training Guide
Employee Self Service--eProfile
Page 66
Step Action
14. Enter the desired information into the Address 1 field. Enter "1803 Devon Court".
15. Click in the City field.
16. Enter the desired information into the City field. Enter "Concord".
17. Click in the State field.
18. Enter the desired information into the State field. Enter "CA".
19. Click the Ca object.

Training Guide Employee Self Service--eProfile
Page 67
Step Action
20. Click in the Postal field.
21. Enter the desired information into the Postal field. Enter "94520".
22. Click in the County field.
23. Enter the desired information into the County field. Enter "Contra Costa".
24. Click the Done button.

Training Guide
Employee Self Service--eProfile
Page 68
Step Action
25. Notice the Address grid now displays the address you just entered.
Next, you will enter phone information for your contact. Phone information is
required. You cannot save the contact without entering phone information.
For this example, you will use your contact's cell (mobile) number:
510/556-4896
Use the Add Phone Number button to begin adding your contact's phone
information.
26. Click the Add Phone Number button.

Training Guide Employee Self Service--eProfile
Page 69
Step Action
27. The Phone Number dialog page displays. The Type and Number fields are
required fields. You must enter/select a value in these fields in order to save the
phone information.
If your contact shares a phone with you, you can use the Same as mine checkbox.
The system will populate the fields on this page with your phone information. If you
have stored more than one type of phone information in the system, you can use the
Type field to select the phone number you want to use for the contact. You cannot
edit your phone information using this page.
For this example, you will use your contact's cell (mobile) phone number:
510/556-4896.
28. Click the Type list.

Training Guide
Employee Self Service--eProfile
Page 70
Step Action
29. Click the Mobile list item.
Step Action
30. Click in the Number field.

Training Guide Employee Self Service--eProfile
Page 71
Step Action
31. Enter the desired information into the Number field. Enter "510/556-4896".
32. Click the Done button.

Training Guide
Employee Self Service--eProfile
Page 72
Step Action
33. The Emergency Contact dialog page displays. The Phone Number grid now
displays the phone number you just added.
You can use the Add Phone Number button (the Plus sign) to additional phone
numbers. You can store up to 4 phone numbers for a contact, one of each of the
following types:
-- Business
-- Home
-- Mobile
-- Pager 1
You cannot list multiple phone numbers for a type., e.g. you cannot list two business
phones or two home phones, etc.
34. Click the Save button.

Training Guide Employee Self Service--eProfile
Page 73
Step Action
35. Notice the system displays a confirmation message indicating that you successfully
added an emergency contact.
The Emergency Contact grid now displays a single contact, Susan Jones--the
contact you just added. This contact is listed as your preferred contact.
You must designate one contact as your preferred contact and you can have only one
contact designated as preferred.
36. Click the My Homepage button.
37.
End of Procedure.
Editing Emergency Contact Information
The basic steps to edit an emergency contact are:
1. Click the Personal Details tile on the Employee Self Service home page.
2. Click the Emergency Contacts link in the Actions panel.
3. Click on the row on the Emergency Contacts grid for the contact you want to edit
4. Edit the contact’s name, address, and/or phone using the fields on the Emergency
Contact dialog page.
5. Click the Save button.
Procedure

Training Guide
Employee Self Service--eProfile
Page 74
Step Action
1. Click the Personal Details button.
2. Click the Emergency Contacts link.

Training Guide Employee Self Service--eProfile
Page 75
Step Action
3. The Information panel displays your current emergency contacts.
Currently you have a single emergency contact, Susan Jones. Susan's phone number
has changed.
In the example, you will edit the phone information for Susan. Her new phone is her
new cell phone, 925/558-5555.
4. Click the the row for Susan Jones in the Emergency Contacts grid.
5. The Emergency Contact dialog page displays. This page lists your emergency
contact's address and phone information. It also lists the contact's relation to you and
whether the contact is your preferred emergency contact.
If you have only one emergency contact listed, that contact is marked by default as
your preferred contract. You must have one contact listed as your preferred contact.
You can edit the information on this page. For this example, you will edit the phone
information.

Training Guide
Employee Self Service--eProfile
Page 76
Step Action
6. Click the row in the Phone Number grid for the phone number you want to edit. In
this case, click the row for phone 510/556-4896.
Note: you can use the Plus (Add a New Phone Number button) to add additional
phones for this contact. For this example, you will not add additional phone numbers
Step Action
7. The Phone Number dialog page displays. Use this page to edit the contact's phone
information.
Use the Same as mine check box to indicate that the contact shares a phone with
you. If you have a home and business number listed, you can select which will be
associated with the contact.
For this example, Susan does not share phone number with you.
You will change the number listed to indicate that the new number is 925/558-5555
and that this is her Mobile phone.

Training Guide Employee Self Service--eProfile
Page 77
Step Action
8. Click the Type list.
Step Action
9. Click the Mobile list item.

Training Guide
Employee Self Service--eProfile
Page 78
Step Action
10. Click in the Number field.
11. Enter the desired information into the Number field. Enter "925/558-5555".
12. Click the Done button.

Training Guide Employee Self Service--eProfile
Page 79
Step Action
13. Click the Save button.
Step Action
14. The system displays a confirmation message indicating that the contact's
information was successfully updated.
15. Click the My Homepage button.
16.
End of Procedure.

Training Guide
Employee Self Service--eProfile
Page 80
Adding an Additional Emergency Contact
The basic steps to adding an emergency contact are:
1. Click the Personal Details tile on the Employee Self Service home page.
2. Click the Emergency Contacts link in the Actions panel.
3. Click the Add Emergency Contact button (Plus sign) in the Emergency Contacts grid.
4. Enter the contact’s name (first and last name) in the Contact Name field on the
Emergency Contact dialog page.
5. Select a value in the Relationship field.
6. Select the Preferred checkbox (optional if another contact is the preferred contact)
7. Click the Add Address button.
8. Enter the contact’s address information on the Address dialog page or select the Same as
mine checkbox (and then click the Done button).
9. Click the Done button.
10. Click the Add Phone Number button on the Emergency Contact dialog page.
11. Select a value in the Type field on the Phone Number dialog page or select the Same as
mine check box (and then click the Done button).
12. Enter the contact’s phone number in the Number field.
13. Enter the extension, if any, in the Extension field.
14. Click the Done button
15. Click the Save button.
Procedure

Training Guide Employee Self Service--eProfile
Page 81
Step Action
1. Click the Personal Details button.
2. Click the Emergency Contacts link.

Training Guide
Employee Self Service--eProfile
Page 82
Step Action
3. The Information panel displays your emergency contact information.
Currently you have listed a single emergency contact, Susan Jones.
For this example you will add an additional emergency contact, your brother James.
James shares your home address and your home phone number.
Use the Plus (Add Emergency Contact button) to add another contact.
4. Click the Add Emergency Contact button.

Training Guide Employee Self Service--eProfile
Page 83
Step Action
5. The Emergency Contact dialog page displays. Use this page to add information
about your emergency contact.
The Contact Name and Relationship fields are required. You must enter/select
values in these fields.
Address information is optional. Phone information is not optional. In order to save
the contact, you must enter at least one phone number for the contact.
For this example, you will add James Smyth, your brother as an emergency contact.
James shares your home address and home phone number.
6. Click in the Contact Name field.
7. Enter the desired information into the Contact Name field. Enter "James Smyth".
8. Click the Relationship list.

Training Guide
Employee Self Service--eProfile
Page 84
Step Action
9. Click the Sibling list item.

Training Guide Employee Self Service--eProfile
Page 85
Step Action
10. Note, one contact must be marked as preferred contact. Currently, Susan Jones is
your preferred contact.
For this example, you will leave her as your preferred contact. You can have only
one preferred contact.

Training Guide
Employee Self Service--eProfile
Page 86
Step Action
11. Click the Add Address button.
12. Your new contact shares your home address.
Click the Same as mine option.

Training Guide Employee Self Service--eProfile
Page 87
Step Action
13. Notice the system populated the fields on the Address page with your home address
information.
If you want to list the contact with your mailing address, you can use the Address
Type field to select your mailing address. The other address fields are presented in
view only mode. You cannot edit the values in these fields.
If you deselect the Same as mine check box, the system will clear the address
information and you will be able to enter the contact's address information. The
Address Type field will not display.
14. Click the Done button.
15. Next you will add phone information for the contact. The contact shares your home
phone.
Phone information is required in order to save the contact.
Click the Add Phone Number button.
16. Click the Same as mine option.

Training Guide
Employee Self Service--eProfile
Page 88
Step Action
17. Notice the system populated the fields on the Phone Number page with your
Business phone information.
If you want to list the contact with your home phone, you can use the Type field to
select your home phone. The other address fields are presented in view only mode.
You cannot edit the values in these fields.
For this example, young will change the phone information from your business to
your home phone.
If you deselect the Same as mine check box, the system will clear the phone
information and you will be able to enter the contact's phone information. The Type
field will display.
18. Click the Type list.

Training Guide Employee Self Service--eProfile
Page 89
Step Action
19. Click the Home list item.

Training Guide
Employee Self Service--eProfile
Page 90
Step Action
20. Notice, the Phone Number page now displays your home phone number. You
cannot edit this information on this page.

Training Guide Employee Self Service--eProfile
Page 91
Step Action
21. Click the Done button.
Step Action
22. The Emergency Contact Page now displays the contact information you just
entered for the contact.

Training Guide
Employee Self Service--eProfile
Page 92
Step Action
23. You can user the Add a Phone Number button to add another phone number for the
contact. You can store up to 5 phone numbers for a contact:
-- Same as mine
-- Home
-- Business
-- Mobile
-- Pager 1
For this example you will not add additional phone numbers.

Training Guide Employee Self Service--eProfile
Page 93
Step Action
24. Click on the address information and/or one of the listed phone numbers to edit
and/or delete the information. If only one phone is listed, you cannot delete it.
For this example you will not edit/delete the address or phone information.
25. Click the Save button.

Training Guide
Employee Self Service--eProfile
Page 94
Step Action
26. The Information panel now displays a confirmation message indicating that you
have successfully added an emergency contact.
You now have two contacts, James Smyth and Susan Jones. Susan remains your
preferred contact.
27. Click the My Homepage button.
28.
End of Procedure.
Deleting Emergency Contact Information
The basic steps to deleting an emergency contact are:
1. Click the Personal Details tile on the Employee Self Service home page.
2. Click the Emergency Contacts link in the Actions panel.
3. Click on the row on the Emergency Contacts grid for the contact you want to delete.
4. Click the Delete button on the Emergency Contact dialog page.
5. Click the Yes button on the Delete Confirmation page.
Training Guide Employee Self Service--eProfile
Page 95
Procedure
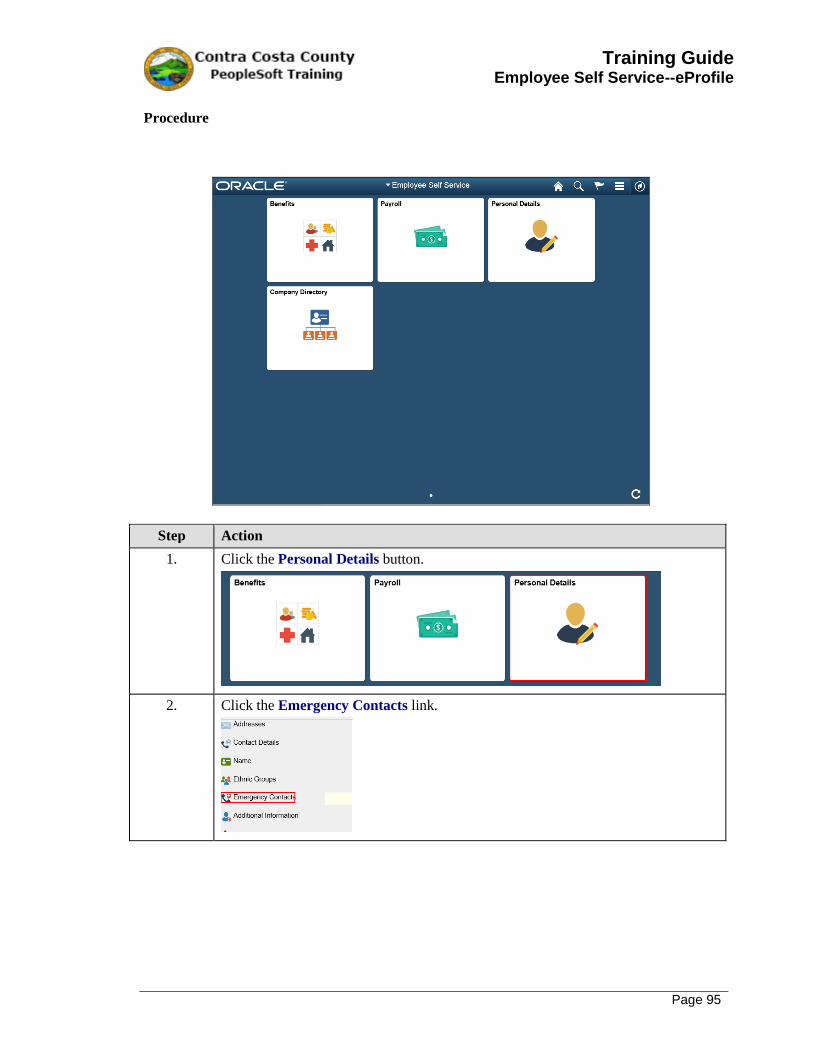
Step Action
1. Click the Personal Details button.
2. Click the Emergency Contacts link.

Training Guide
Employee Self Service--eProfile
Page 96
Step Action
3. The Information panel displays your Emergency Contact information.
You currently have two contacts: James Smyth and Susan Jones. Susan is designated
as your Preferred contact.
For this example, you will delete Susan as an emergency contact. Prior to doing so,
you will make James your Preferred contact.
4. Click the row for James Smyth in the Emergency Contacts grid.

Training Guide Employee Self Service--eProfile
Page 97
Step Action
5. The Emergency Contact dialog page displays with information for James Smyth.
Currently James is not your preferred contact. For this example you will mark him
as your preferred contact. When you do so, the system will automatically deselect
the Preferred check box for Susan Jones--your current preferred contact.
You can designate only one contact as your preferred contact. If you have multiple
contacts, one must marked as Preferred.
6. Click the Preferred option.
7. Click the Save button.

Training Guide
Employee Self Service--eProfile
Page 98
Step Action
8. Notice the system displays a confirmation message indicating that you successfully
updated James Smyth.
Also notice that James, not Susan Jones, is now your preferred contact.
Next, you will delete Susan Jones as an emergency contact.
9. Click the row for Susan Jones in the Emergency Contacts grid.

Training Guide Employee Self Service--eProfile
Page 99
Step Action
10. The Emergency Contact dialog page displays with information for Susan Jones.
Use the Delete button to delete Susan as a contact.
11. Click the Delete button.
12. Click the Yes button.

Training Guide
Employee Self Service--eProfile
Page 100
Step Action
13. Notice, the system displays a confirmation message indicating that Susan Jones has
been successfully deleted as an emergency contact.
The Emergency Contacts grid now lists a single contact, James Smyth. James is
marked as your Preferred contact.
14. Click the My Homepage button.
15.
End of Procedure.
Maintaining Ethnicity Self-Identifications
Maintaining Ethnicity Self-Identifications
The Employee Self Service feature of PeopleSoft 9.2 allows you to review and update your
ethnicity self-identification information that are stored in the system.
The steps involved in managing your ethnicity self-identification information are covered in a
three topics in this lesson:
Entering an Ethnicity Self-Identification
Editing an Ethnicity Self-Identification

Training Guide Employee Self Service--eProfile
Page 101
Deleting an Ethnicity Self-Identification
This topic is available for play-back through the UPK player in
See-It! Mode—allows you to attach a “video” demonstration of the topic
Try-It! Mode—allows you to use your mouse and keyboard to complete transactions in a
simulated environment
Both See-It! And Try-It! provide guided instructions and explanations of important features of
PeopleSoft transactions. The full text of the instructions and explanations included in the UPK
Payer are also available in two printed documents—a Training Guide and a Job Aid.
Here are some key points to keep in mind about maintaining your ethnicity self-identification
information:
Ethnicity information may not exist for you in the system
Providing this information is voluntary
You can self-identify with multiple ethnic groups
One Ethnic self-identification must be marked as your primary self-identification
The first group you enter is automatically marked as your primary self dedication
You cannot self-identify as Hispanic/Latino and White or as Hispanic/Latino and Black
Entering an Ethnic Group Self- Identification
Entering an Ethnicity Self-Identification
The basic steps to entering/adding an ethnicity self-identification are,
1. Navigate to the Ethic Groups page
2. Click the Add an Ethic Group button
3. Select a value from the Description field drop down list
4. Click the Save button on the Ethic Groups page
5. The Save Confirmation page displays
6. Click the OK button
Procedure

Training Guide
Employee Self Service--eProfile
Page 102
Step Action
1. Click the Personal Details button.
2. Click the Ethnic Groups link.

Training Guide Employee Self Service--eProfile
Page 103
Step Action
3. The Ethnic Groups page displays. The Ethnic Groups grid displays the ethnic
group that you self identified as.
You can use this page to add an ethnic group self-identification.
For this example, have no ethnic group self-identifications in the system.
Use the Add an Ethnic Group button to add a self identification.
For this example, you will attempt to add two self-identifications--one as White and
the other as Hispanic/Latino.
4. Click the Add an Ethnic Group button.

Training Guide
Employee Self Service--eProfile
Page 104
Step Action
5. The Ethic Group dialog page displays. Use the lookup button for the Ethic Group
field to select an ethnic group.
Use the Ethnic Group field to select an Ethnic Group. Use the Primary option
slider to mark an Ethnic Group as your primary ethnic group.
One group must be marked as primary. The system automatically assigns the first
ethnic group you enter as Primary on Save. You can also select this option
manually. If you have self-identified with multiple ethnic groups and you delete a
primary ethnic group, the system automatically marks one of the remaining self-
identifications as primary.
For this example, you will select White and indicate that this is your primary group.
6. Click the Look up Ethnic Group button.

Training Guide Employee Self Service--eProfile
Page 105
Step Action
7. Click the WHITE object.
8. Click the Primary option.
9. Click the Save button.

Training Guide
Employee Self Service--eProfile
Page 106
Step Action
10. The Ethnic Groups page displays.
A confirmation message displays indicating that you have successfully added an
ethic group self identification.
The Ethnic Groups grid now has one row:
-- White
This group is marked as your primary group.
Next, you will attempt to add a second self-identification as Hispanic/Latino.
11. Click the Add an Ethnic Group button.
12. Click the Look up Ethnic Group button.

Training Guide Employee Self Service--eProfile
Page 107
Step Action
13. Notice, Hispanic/Latino is not listed among the Ethnic Groups.
If you have self-identified as White you can not also identify as Hispanic/Latino. In
like manner if you have self-identified as Black you cannot also self-identify as
Hispanic/Latino.
If you have self-identified as Hispanic/Latino, you cannot add a self-identification as
White or Black.
14. Click the Cancel button.
15. Click the Cancel button.

Training Guide
Employee Self Service--eProfile
Page 108
Step Action
16. Click the My Homepage button.
17.
End of Procedure.
Editing an Existing Ethnic Group Self-Identification
The basic steps to editing an existing ethnic group self-identification are:
1. Click the Personal Details tile on the Employee Self Service home page.
2. Click Ethnic Groups link in the Actions panel.
3. Click the row to edit in the Ethnic Groups grid.
4. Click the Look Up button for the Ethnic Group field on the Ethnic Group dialog page.
5. Select the new ethnic group from the Search Results.
6. Click the Save button
Procedure

Training Guide Employee Self Service--eProfile
Page 109
Step Action
1. Click the Personal Details tile.
Step Action
2. Click the Ethnic Groups link.

Training Guide
Employee Self Service--eProfile
Page 110
Step Action
3. The Ethnic Group page displays.
Currently you have one ethnic group self-identification: White. This is marked as
your primary Ethnic Group.
For this example, you will add another Ethnic Group self-identification as American
Indian/Alaska native and mark this as Primary.
Then you will edit the existing self-identification of White to change it to
Hispanic/Latino.
4. Click the Add an Ethnic Group button.
5. Click the Look up Ethnic Group link.

Training Guide Employee Self Service--eProfile
Page 111
Step Action
6. Notice White and Hispanic/Latino are not available to select.
You have already selected White. With White selected, you cannot also self-identify
as Hispanic/Latino.
The system does not permit self-identification as
-- Hispanic/ Latino and White
-- Hispanic/Latino and Black
7. Click the AMIND object.

Training Guide
Employee Self Service--eProfile
Page 112
Step Action
8. Click the Primary option.
9. Click the Save button.
Step Action
10. The Ethnic Group page displays a confirmation message indicating that you have
added an ethnic group.
The Ethnic Group grid now displays two rows--one for American Indian/Alaska
Native (marked as Primary) and one for White.
Next you will edit the self-identification of White to change it to Hispanic/Latino.

Training Guide Employee Self Service--eProfile
Page 113
Step Action
11. Click the White link.
12. Click the Look up Ethnic Group button.
Step Action
13. Notice, Hispanic/Latino is not available as an option.
You cannot select Hispanic/Latino, because you have self-identified as white.
In order to change your self-identification from White to Hispanic/Latino, you must
first delete the identification as White and then add a new identification as
Hispanic/Latino.
Training Guide
Employee Self Service--eProfile
Page 114
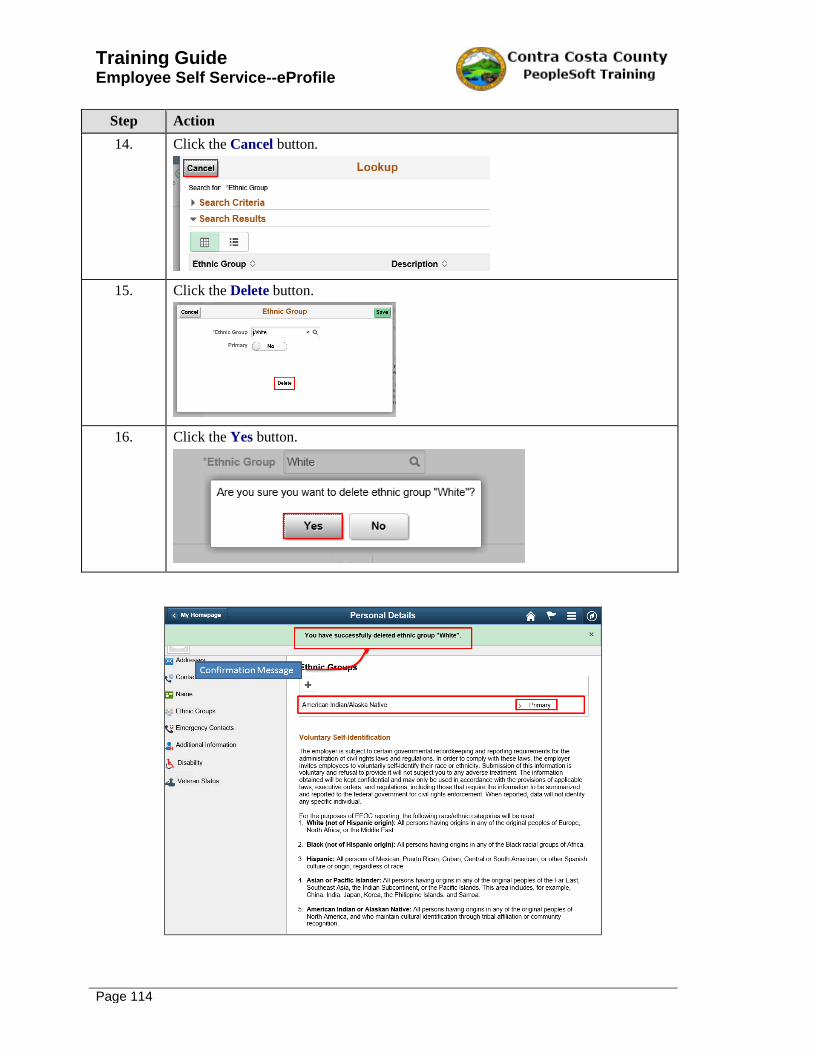
Step Action
14. Click the Cancel button.
15. Click the Delete button.
16. Click the Yes button.
Training Guide Employee Self Service--eProfile
Page 115
Step Action
17. Notice the Ethnic Groups page displays a confirmation message indicating that you
have deleted your self-identification as White.
Your self-identification as American Indian/Alaska native remains. It is still your
primary ethnic group.
Next you will add an additional self-identification as Hispanic/Latino. You will
maintain American Indian/Alaska Native as your primary ethnic group.
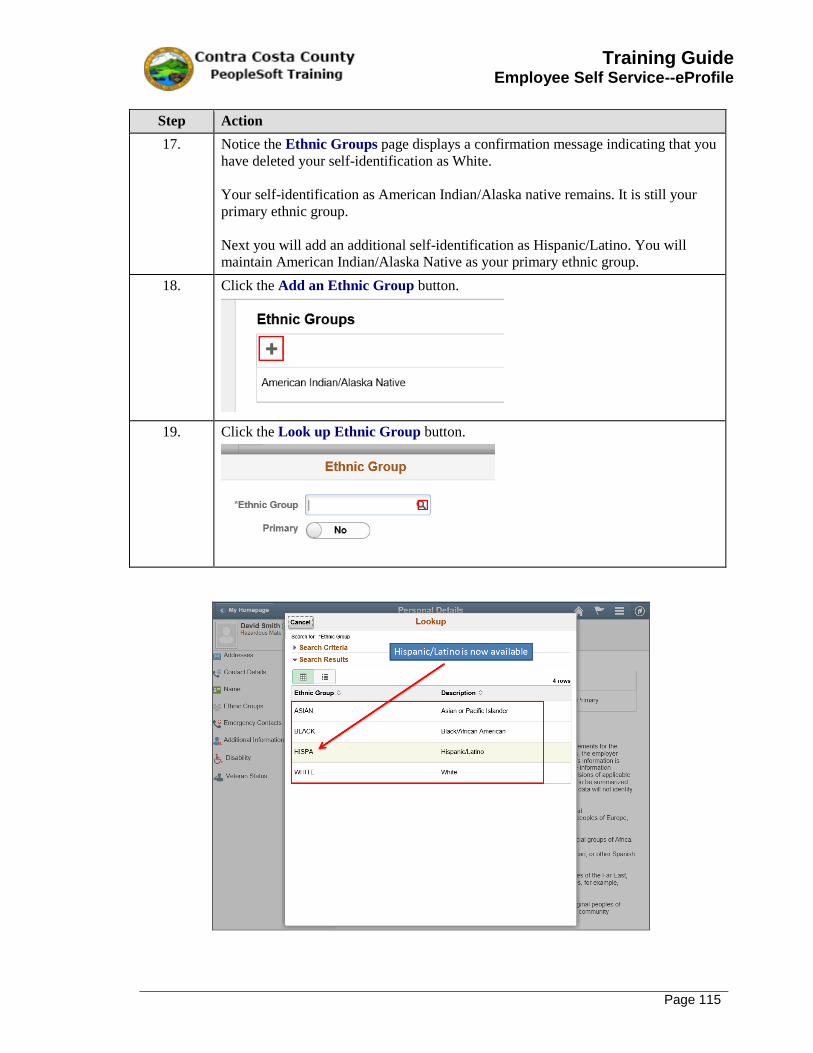
18. Click the Add an Ethnic Group button.
19. Click the Look up Ethnic Group button.

Training Guide
Employee Self Service--eProfile
Page 116
Step Action
20. Notice Hispanic/Latino is now available, because you do not have an existing self-
identification as White or as Black.
You can not self-identify as Hispanic/Latino and White or Hispanic/Latino and
Black.
21. Click the HISPA object.
22. Click the Save button.

Training Guide Employee Self Service--eProfile
Page 117
Step Action
23. Notice the Ethnic Groups page displays a confirmation message indicating that you
have added an ethnic group of Hispanic/Latino.
The Ethnic Group grid now lists two ethnic groups
-- American Indian/Alaska Native (Primary)
-- Hispanic/Latino
These are listed in alphabetical order.
24. Click the My Homepage button.
25.
End of Procedure.
Deleting an Ethnic Group Self-Identification
Deleting an Ethnicity Self-Identification
The basic steps to deleting an ethnicity self-identification are,
1. Navigate to the Ethic Groups page
2. Click the Delete button for the designation you want to delete
3. The Delete Confirmation page displays
4. Click the OK button
5. Click the Save button on the Ethic Groups page
6. The Save Confirmation page displays
7. Click the Ok button
Procedure

Training Guide
Employee Self Service--eProfile
Page 118
Step Action
1. Click the Personal Details button.
2. Click the Ethnic Groups link.

Training Guide Employee Self Service--eProfile
Page 119
Step Action
3. The Ethnic Group page displays.
The Ethnic Group grid lists two ethnic groups:
-- American Indian/Alaska (primary)
-- Hispanic/Latino
For this example you will delete your primary ethnic group, American Indian/Alaska
Native.
The system will automatically mark the remaining ethnic group, Hispanic/Latino as
your primary group.
4. Click the American Indian/Alaska Native link.

Training Guide
Employee Self Service--eProfile
Page 120
Step Action
5. Click the Delete button.
6. Click the Yes button.
Step Action
7. The Ethnic Groups page displays a message indicating that you have deleted an
ethnic group.
The system has automatically assigned the Hispanic/Latino ethnic Group as your
primary group.

Training Guide Employee Self Service--eProfile
Page 121
Step Action
8. Click the My Homepage button.
9.
End of Procedure.
Maintaining Disability and Veteran Self- Identifications
Maintaining Disability and Veteran Self- Identifications
The Employee Self Service feature of PeopleSoft 9.2 allows you to review and update
your Disability and Military self-identification information that are stored in the system.
The steps involved in managing your disability and military self-identification information are
covered in a two topics in this lesson:
Updating Disability Self- Identification
Updating Veteran Self- Identification
This topic is available for play-back through the UPK player in
See-It! Mode—allows you to attach a “video” demonstration of the topic
Try-It! Mode—allows you to use your mouse and keyboard to complete transactions in a
simulated environment
Both See-It! And Try-It! provide guided instructions and explanations of important features of
PeopleSoft transactions. The full text of the instructions and explanations included in the UPK
Payer are also available in two printed documents—a Training Guide and a Job Aid.
Here are some key points to keep in mind about maintaining your disability and military status
self-identifications:
Providing this information is voluntary
You must update your disability self-identification every five years
If you are disabled and/or a disabled veteran, you are entitled to reasonable
accommodations
Reasonable accommodations include: making a change to the application process or work
procedures, providing documents in an alternate format, using a sign language interpreter,
or using specialized equipment.
Updating Disability Self-Identification
Updating Disability Self- Identification
The basic steps to your disability self-identification are,

Training Guide
Employee Self Service--eProfile
Page 122
1. Navigate to the Voluntary Self- Identification of Disability page
2. Review information on the page
3. Select one of the options to indicate if you have a disability, do not have a disability,or
chose not to provide this information
4. Click the Submit button
5. Click the OK button on the Submit Confirmation page
Procedure
Navigation: Employee Self Service Home page > Personal Details tile
Step Action
1. Click the Personal Details tile.

Training Guide Employee Self Service--eProfile
Page 123
Step Action
2. Click the Disability link.

Training Guide
Employee Self Service--eProfile
Page 124
Step Action
3. The Voluntary Self- Identification of Disability page displays.
The text in the Why are you being asked to complete this form? and the How do
I know if I have a disability? sections.

Training Guide Employee Self Service--eProfile
Page 125
Step Action
4. Select one of the options in the Please select one of the options below section.
5. Click the No, I DON"T HAVEA DISABILITY option.
Step Action
6. Notice the system populates the Your Name field with you name as it is stored in
the system and the Today's Date field with the current date.
You cannot edit the values in these fields.
7. Click the scrollbar.

Training Guide
Employee Self Service--eProfile
Page 126
Step Action
8. Review the text in the Reasonable Accommodation Notice section.
9. Click the Submit button.
10. A confirmation page displays.
Click the OK button.
11. Note the system displays a message indicating that your submission was successful.

Training Guide Employee Self Service--eProfile
Page 127
Step Action
12. Click the My Homepage button.
13.
End of Procedure.
Updating Veteran Self-Identification
Updating Veteran Self- Identification
The basic steps to your Veteran self-identification are,
1. Navigate to the Veteran page
2. Review information on the page
3. Select one of the options to indicate your veteran status
1. A Protected Veteran (and class)
2. A Protected Veteran but choose not to identify the class
3. A veteran, but not a protected Veteran
4. Not a veteran
4. If you indicated that you are a veteran, enter your discharge date in the Military
Discharge Date field
5. Click the Submit button
6. Click the OK button on the Submit Confirmation page
Procedure
Navigation: Employee Self Service Home page > Personal Details tile

Training Guide
Employee Self Service--eProfile
Page 128
Step Action
1. Click the Personal Details tile.

Training Guide Employee Self Service--eProfile
Page 129
Step Action
2. Click the Veteran Status link.

Training Guide
Employee Self Service--eProfile
Page 130
Step Action
3. The Veteran Status page displays.
Review the text in the Definitions and Self- Identification sections.
4. Click the scrollbar.

Training Guide Employee Self Service--eProfile
Page 131
Step Action
5. Select one of the options in the Self- Identification section.
6. Click the I am NOT a veteran. option.
Step Action
7. If you select the I am NOT a veteran. option, the Military Discharge Date field
becomes inactive.

Training Guide
Employee Self Service--eProfile
Page 132
Step Action
8. If you select one of the other options, you must enter or select a value in the
Military Discharge Date field. The filed will be active.
Step Action
9. Review the text in the Reasonable Accommodation Notice section.

Training Guide Employee Self Service--eProfile
Page 133
Step Action
10. Click the Submit button.
11. Click the OK button.
Step Action
12. The system displays a submit confirmation message indicating that your submission
was successful.
13. Click the My Homepage button.
14.
End of Procedure.