erules napoleonic wars - wargamesystems · 7. before taking turns to move and fire, both sides lay...
TRANSCRIPT

eRules Napoleonic Wars.txt
Published by WargameSystems
1

Published 2011Version 1
Copyright Simon Harding © 2011
2

ContentsSetting up Armies ................................................................................................................................... 1 Preparation ............................................................................................................................................. 1 Deployment ............................................................................................................................................ 1 Sequence of Play .................................................................................................................................... 2 Movement, Command and Control ........................................................................................................ 2 Standing Orders ...................................................................................................................................... 3 Reaction Tests ........................................................................................................................................ 4 Artillery firing Round Shot and Shell .................................................................................................... 8 Musket Fire and Artillery Firing Canister ............................................................................................ 12 Melee .................................................................................................................................................... 13 Move Distances .................................................................................................................................... 16 Movement Penalties ............................................................................................................................. 17 Appendix 1: Scales ............................................................................................................................... 20 Appendix 2: Base Sizes ........................................................................................................................ 21
Setting up Armies
1. For information on ground, figure and time scales, see Appendix 1.
2. For information on basing figures, see Appendix 2.
Preparation
3. Review the terrain laid out on the table and agree on the following categorizations.3.1. Slopes should be classified as steep, moderate or gentle.3.2. Streams and rivers should be classed as fordable or not.3.3. The edges of woods, built-up areas, rocky, boggy and marshy areas should be defined.3.4. Woods should be classified as dense or open.3.5. Cliffs should be classified as scalable or not.3.6. Fences, walls, palisades, hedges and earthworks should be classified as over two metres or
under.3.7. Buildings should be classed as hard cover (if made of stone or brick) or soft (if made of
wood).
4. Agree on weather conditions, including heavy rain or snow, fog or blizzard.
5. Agree on the forces involved. Here are three ways:5.1. determined for you in a campaign game;5.2. determined by reference to a historical scenario (use the figure scale at Appendix 2 or a
multiple of it);5.3. use the points system at Appendix 3.
6. Command elements affect the results of reaction tests and therefore the ability of an army to do what the player wants.6.1. Unless agreed otherwise, each side should use the same ratio of command elements to other
figures: a suggested ratio is 1 : 250.
Deployment
3
7. Before taking turns to move and fire, both sides lay out their units on the table, except those that are due to arrive later.7.1. In a historical game, players need to agree what movements are inherited from the historical
scenario and where the players’ own decisions take over.7.2. In a campaign game, starting positions will be known in advance.7.3. In a game based on points values, the manner of deployment should follow the format of the
battle, so that:7.3.1. Where one side defends a position and the other attacks, the defenders should deploy up
to one third of the way in from their table edge; the attackers should enter from their table edge or any agreed line further on table.
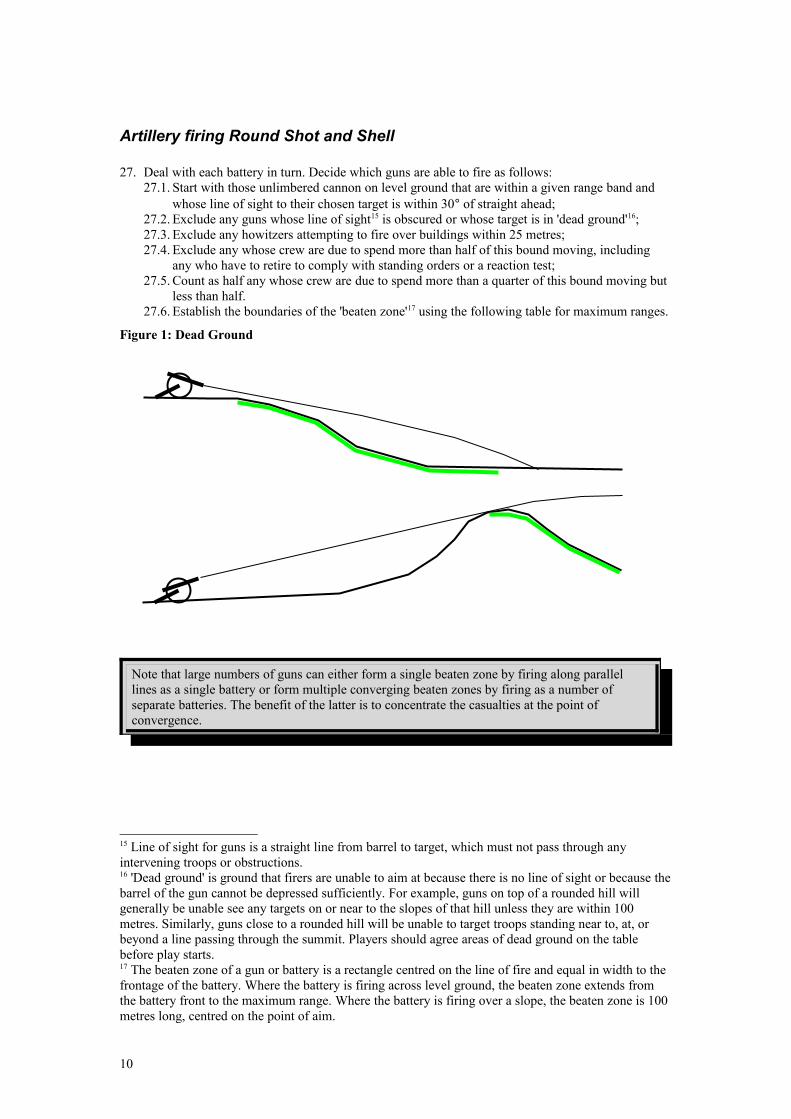
7.3.2. In an encounter battle, both sides should deploy no less than 600 scale metres from the table centre line, or at the table edge if smaller.
7.3.3. An attacking side may keep units off-table and introduce them from his table edge at any time, but the defending side must place all units on-table at the start.
7.3.4. An attacking side may commit up to a third of its strength to a flank march, arriving at any preselected point on a side edge of the table.
7.3.4.1. The attacker must write down the number of the bound in which the flanking force is to arrive on table, the precise position at which it is to arrive (e.g. ‘my left side, 1050m from baseline’). This information should be placed in a sealed envelope and handed to the opponent to open when invited to do so.
7.3.4.2. In the movement phase of the bound in which the flank marchers are due, the attacking player should announce this and invite his opponent to open the sealed envelope and confirm the arrangements.
7.3.4.3. Before the flanking force can be brought on table, the attacking player must throw a six on a normal die. (This means that flanking forces will arrive 4 bounds later, on average, than notified and have a 1 in 10 risk of being later than 12 bounds.)
Sequence of Play
8. Players take alternate turns (bounds) to use weapons and move their troops. Each should follow the following sequence in their own bound:8.1. Declare new charges and take a reaction test if required (see para 20 below);8.2. Make all moves required by reaction tests and move enemy charging units to the lesser of
their full charge move or back into base contact with any units that have reacted;8.3. Fire weapons if permitted by reaction tests and standing orders and not in base contact with
enemy at the start of the bound;8.4. Fight hand-to-hand if in contact from the start of the bound;8.5. Make all charge moves, marking the full charge limit for any units that have contacted enemy
before reaching the limit of their charge move, and normal moves permitted under rules 9 and 10.
Movement, Command and Control
9. In a side’s first bound, the player may set in motion in any direction at any permitted speed any of his units placed on-table.
10. In the second and subsequent bounds, the speed and direction of movement of a unit1 or formation2
will be the same as at the end of its last bound, except:10.1. skirmishers or scouts deploying or rejoining up to 150 meters from their main body, or10.2. it is led by the CinC element in base contact for the whole bound, or
1 A unit is a body of troops currently in continuous base contact.2 A formation is a group of units that maintain fixed positions relative to each other. All units in a formation will conform to changes in speed or direction of the formation unless they are out of sight at the time. In this case, they will continue as in the previous bound, until they come into sight or receive an order.
4

10.3. one formation only may change speed or direction at the discretion of the CinC, who need not be in base contact for this purpose;
10.4. it is obliged to detour3 round an obstacle or friendly formed troops or is marching in column of route along a road or track, or
10.5. a reaction test or standing orders obliges or permits it to take other action.
eRules Napoleonic Wars attempts to represent in a simple way the difficulties faced by real commanders in having their plans carried out by the troops under their command. In the real napoleonic wars, commanding officers had neither god-like knowledge of events across the whole battlefield, nor instant radio communications with each unit. Plans therefore had to be carried out by delegating objectives to successively lower levels of command. In a wargame, it is difficult to reproduce precisely this system because there is no way of deciding whether a subordinate is conforming to the orders of his superior without either eliminating his discretion altogether or leaving a lot of room for argument between the players. If discretion is eliminated altogether, then lower levels of command serve no purpose, and units are likely to act more stupidly than they did historically.
In real battles, armies manoeuvred in large formations in order to bring weapons to bear effectively and, given the impossibility of communicating orders quickly over more than shouting distance, these formations were largely incapable of orderly changes of direction on the move, especially when close to the enemy. ERules reproduces this by severely restricting the discretionary moves permitted to units and giving strong incentives to create large formations and make good use of command elements.
Standing Orders
15. All units/formations will obey standing orders unless overridden by reaction tests or by a higher command element in base contact.
However, Standing Orders in eRules are meant to be enabling rather than restrictive. That is, they trigger sensible actions that might otherwise be ruled out by rule 10. Players may elect to use a higher command element to overrule a unit's standing order, though rule 10 will then still apply.
16. Standing orders for infantry are:16.1. When firing and several targets are available, adopt the following priority order:
16.1.1. Cavalry charging the firers;16.1.2. Infantry charging the firers;16.1.3. The nearest target.
16.2. When advancing, units with firearms move to no less than 50 meters4 from close-order enemy blocking the line of advance and open fire. Units without firearms attempt to charge.
16.3. When engaged in a standing fire fight, deploy into line formation if space permits.
17. Additional standing orders for regular infantry5 are:
3 When a unit or formation has been delayed by a necessary detour or reaction test, it will take every opportunity to regain its original station within its parent formation, e.g. if the latter halts.4 If a unit’s skirmishers are in front, the 50m is measured from the skirmishers; the main body halts when the skirmishers halt unless the skirmish line is withdrawn.5 Regular infantry are troops trained to manoeuvre in straight ranks and files and to obey fire control orders. Untrained militia and most non-European armies count as irregular, therefore are not covered
5

17.1. Form square if formed enemy cavalry not in melee are sighted within cavalry charge distance.
17.2. If charged in flank or rear, halt to form line or square to threatened face and open fire with part or all of the unit, reaction test results permitting.
18. Standing orders for cavalry are:18.1. Attempt to charge6 all unformed or irregular troops within charge range or any artillery not
protected by infantry or field works.18.2. Attempt to charge7 enemy infantry advancing within musket range unless in square.18.3. When advancing, attempt to charge8 troops within range and blocking the line of advance of
the unit or of its parent formation, adopting the following priority order:18.3.1. Formed cavalry;18.3.2. Unformed or irregular cavalry;18.3.3. Artillery;18.3.4. Staff;18.3.5. Unformed or irregular infantry;18.3.6. Formed infantry not in square;18.3.7. Infantry in square.
18.4. Deploy scouts to any face where no friendly unit is visible within 500 metres.
19. Standing orders for artillery are:19.1. Foot artillery crews may retire behind friendly, close-order troops or obstacles impassable to
horses within 150 meters if formed enemy infantry or cavalry are seen advancing within their charge range, unless defending field works. Horse artillery may also limber up and make the same move with their guns.
19.2. When not required to move with their parent formation, unlimber, terrain permitting9, and fire on highest-priority targets within range and sight.
19.3. When firing and several targets are available, adopt the following priority order:19.3.1. The nearest close-order troops seen attacking the parent formation;19.3.2. The nearest close-order troops on the line of advance of the parent formation;19.3.3. Any other target likely to suffer casualties and within range and line of sight.
Optional Rule: players wishing to substitute their own standing orders may do so as long as they write down the amendments and declare them to their opponent before the game starts.
Reaction Tests
20. Reaction tests are taken at the beginning of each side's bound before any firing. 20.1. All troops must take a reaction test in the following circumstances:
20.1.1. If contacted by charging enemy in the preceding enemy bound.20.1.2. After receiving casualties from enemy fire or melee in the enemy's preceding bound.20.1.3. To rally from rout.
20.2. In addition to 6.1:20.2.1. Close-order infantry and cavalry must take a reaction test before beginning a charge
move10 or any movement to within 50 metres or less of close-order formed troops. Units not in close order, including artillery and skirmishers may not make such moves.
20.2.2. Cavalry and irregular infantry must take a reaction test to rally from pursuit unless unable to maintain contact with routers.
by rule 17.6 Requires a reaction test.7 As above.8 As above.9 Artillery cannot fire on slopes or in woods. Except for howitzers, they cannot fire when their line of sight is blocked by friendly troops or obstacles such as buildings.10 A charge move is a move forwards without turning or changing face that is intended to end in base contact with an enemy unit or with a building or fortification occupied by enemy troops.
6

20.2.3. Artillerymen must take a reaction test if approached by advancing enemy cavalry within the cavalry’s charge distance and the artillery choose not to follow standing orders at 19.1 above.
20.3. Throw 2 normal dice.20.4. The result of a reaction test is either that troops continue to execute their latest orders and
standing orders, or else they are forced to carry out some other action, as follows:20.4.1. ‘retire shaken’ means move away from the enemy and end the bound halted but
facing the enemy;20.4.2. ‘rout’ means move back a whole move at rout speed; end the bound facing away
from the enemy; and continue in the next bound unless able to rally;20.4.3. troops pursuing routing or retiring opponents are unable to receive new orders or
cease pursuit unless able to rally or unable to maintain contact with defeated opponents;20.4.4. troops forced to ‘halt in disorder’ when trying to charge recover automatically at the
beginning of their next move (except as a result of any further reaction test required by action in the enemy’s next move).
Reaction tests are needed to decide what happens when neither commanders' intentions nor standing orders are sufficient to govern a unit's actions. Examples include the effects of fatigue and casualties, and the close proximity of enemies ready to fight. Accounts of battles often describe attacks that falter and come to a halt or retreat, as well as defenders breaking before a charging enemy. Units sometimes gave way after a long period under fire, though there are also many cases of units fighting on even after very heavy casualties.
21. The following rules apply to units contacted by charging enemy.21.1. Routing units continue their rout.21.2. Units that retired shaken in their last move rout automatically.21.3. Units in good order test their reaction: apply the following modifiers, then look up the
outcome in the next table.
Modifier Score to Add/Subtract
Militia or raw conscripts. -1Irregulars, gunners or others in open order. -2Charged in flank or rear11. -2For each friendly unit seen retiring or in rout. -1If charged by cavalry and not protected by high walls or enclosed buildings.
-2
A command element is in contact. +1Defenders are elite, Russian or British. +1For each face supported12 by another friendly unit or (infantry) self-supported in square formation.
+1
Occupying buildings or fortifications. +2
Score Outcome
8 or more Receive charge in good order. Cavalry countercharge13.5, 6 or 7 Retire 50 metres shaken. Cavalry try to evade14.4 or less Rout.
11 Units in square formation at the time of testing reaction do not have a flank or rear.12 A unit is counted as giving support to a face (flank or rear) of a friendly unit if its position would impede any enemy charge against the supported face.13 A countercharge following a move forwards is assumed to meet the chargers at the point where both sides meet after completing the same proportion of their charge range (normally half way). A countercharge from rest or from a move backwards meets the chargers 200 metres from the counterchargers’ starting point. In this case, the chargers are moved back from the point of contact.
7
22. The following tactical factors apply to units receiving casualties.
Modifier Score to Add/Subtract
Militia or raw recruits. -2Each friendly unit seen retiring or routing. -1Casualties more than 10% this bound -3Casualties more than 20% since start -2Elite troops +1Command element in contact +1Defending buildings or fortifications +2
Score Outcome
4 or more No effect.3 or less Advancing troops halt in good order.
Troops in melee or halted in good order retire 50m shaken.Troops that have retired shaken rout.
23. The following tactical factors apply to units wishing to rally from rout.
Modifier Score to SubtractMore than 20% casualties since start -2Militia or raw conscripts -2Casualties received from last enemy bound -1Command element in contact +2For each friendly unit of at least equal size in good order visible within testers’ charge distance.
+1
Score Outcome
9 or more Halt immediately and recover good order by the end of the bound unless still in contact with enemy.
8 or less Continue rout.
24. The following rules apply to units wishing to initiate a charge.24.1. Units may not charge against opponents protected by impassable obstacles, including any
standing on steep hills.24.2. Units that were forced to halt last move as a result of a reaction test may not charge.24.3. Units that routed last move without rallying may not charge.24.4. In other circumstances, apply the following modifiers and outcomes.
14 An evade move is a normal move backwards. If the evade move fails to outdistance charging enemy, the evade move becomes a rout automatically.
8

Modifier Score to Add/Subtract
Enemy units able to counter-charge the testing unit are seen to a flank or rear.
-2
For each friendly unit seen retiring or in rout. -1Defenders are uphill or in hard defences -1Defenders are close-order infantry -1Chargers are infantry -1Attackers are militia, raw conscripts. -1[Fatigue, casualties?]Attackers are British or elite +1Command element leading +2Defenders are artillery in the open or disordered. +1Defenders are downhill +1Chargers are cavalry +1For each face of the charging unit supported by other friendly units.
+1
Score Outcome
9 or more Charge home.7 or 8 Halt in disorder at 50 metres from front of target infantry
unit. Cavalry charge home against opponents other than close-order infantry.
6 or less Halt instead of charging, infantry open fire.
25. The following tactical factors apply to units wishing to rally from pursuit.
Modifier Score to SubtractBritish or irregular cavalry -1Militia or raw recruits -2Command element in contact +1Each previous bound of pursuit +1Elite troops +2
Score Outcome
10 or more Break off pursuit at start of bound and regain order by the end.
7 to 9 Cavalry pursuing infantry continue. Others break off as above.
6 or less Continue pursuit.
26. Deal with artillery units approached within 200 metres by advancing enemy cavalry as follows.26.1. Where there are no supporting close-order troops within evade distance and no obstacles
impassable to cavalry, the unit will stand26.2. Otherwise apply the same tactical factors as for units contacted by a charge, but the outcomes
are as follows.
Score Outcome
8 or more Defend guns.7 or less Retire behind supporting units or impassable obstacles.
9
Artillery firing Round Shot and Shell
27. Deal with each battery in turn. Decide which guns are able to fire as follows:27.1. Start with those unlimbered cannon on level ground that are within a given range band and
whose line of sight to their chosen target is within 30° of straight ahead;27.2. Exclude any guns whose line of sight15 is obscured or whose target is in 'dead ground'16;27.3. Exclude any howitzers attempting to fire over buildings within 25 metres;27.4. Exclude any whose crew are due to spend more than half of this bound moving, including
any who have to retire to comply with standing orders or a reaction test;27.5. Count as half any whose crew are due to spend more than a quarter of this bound moving but
less than half.27.6. Establish the boundaries of the 'beaten zone'17 using the following table for maximum ranges.
Figure 1: Dead Ground
Note that large numbers of guns can either form a single beaten zone by firing along parallel lines as a single battery or form multiple converging beaten zones by firing as a number of separate batteries. The benefit of the latter is to concentrate the casualties at the point of convergence.
15 Line of sight for guns is a straight line from barrel to target, which must not pass through any intervening troops or obstructions.16 'Dead ground' is ground that firers are unable to aim at because there is no line of sight or because the barrel of the gun cannot be depressed sufficiently. For example, guns on top of a rounded hill will generally be unable see any targets on or near to the slopes of that hill unless they are within 100 metres. Similarly, guns close to a rounded hill will be unable to target troops standing near to, at, or beyond a line passing through the summit. Players should agree areas of dead ground on the table before play starts.17 The beaten zone of a gun or battery is a rectangle centred on the line of fire and equal in width to the frontage of the battery. Where the battery is firing across level ground, the beaten zone extends from the battery front to the maximum range. Where the battery is firing over a slope, the beaten zone is 100 metres long, centred on the point of aim.
10

Maximum RangesType of Gun Max. Range
3-4pdr gun 9506-7pdr gun 10508-9pdr gun 115010-12pdr gun 125016pdr gun 135024pdr gun 1450
28. Test each unit within the beaten zone for casualties as follows.28.1. Throw two normal dice and add their scores together.28.2. Subtract any of the following modifiers that apply.
Modifier Score to Add/SubtractLevel Slopes
Target in hard cover -8 -8Heavy rain or snow and range is more than 200 metres.
-6 -10
Fog or blizzard and range is more than 50 metres. -3 -5Firing at gunners or staff -6Firing at troops in skirmish order. -4
29. Count the number of figures in the target unit, then look up the number of casualties in the following table.
30. Reduce casualties by the proportion of the bound that the target was not in the beaten zone, rounding up to the nearest whole number.
In most battles in the field, roundshot is unlikely to have any important effect on either the protection afforded by buildings and obstacles or on their effect on movement. For example, a stone building might be largely ruined by gun fire, but the resulting ruin might be no less useful as ‘hard cover’. Similarly, a bridge.
31. Test for damage to buildings, etc [by ?]. Then go on to the next battery.
11

Figure 2: Beaten Zones
12

Table
Casualties from Roundshot
Modified Dice Score
Number of figures in Beaten Zone1 2 3 4 5 6 7 8 9 10 11 12 13 14 15 16 17 18 19 20 21 22 23 24 25 26 27 28 29 30 31 32 33
-10 1 1-9 1 1 1 1 1 1-8 1 1 1 1 1 1 1 1 1-7 1 1 1 1 1 1 1 1 1 1 1 1-6 1 1 1 1 1 1 1 1 1 1 1 1 1 1 1-5 1 1 1 1 1 1 1 1 1 1 1 1 1 1 1 1 1 1-4 1 1 1 1 1 1 1 1 1 1 1 1 1 1 1 1 1 1 1 1-3 1 1 1 1 1 1 1 1 1 1 1 1 1 1 1 1 1 1 1 1 1-2 1 1 1 1 1 1 1 1 1 1 1 1 1 1 1 1 1 1 1 1 1 2 2-1 1 1 1 1 1 1 1 1 1 1 1 1 1 1 1 1 1 1 2 2 2 2 2 20 1 1 1 1 1 1 1 1 1 1 1 1 1 1 1 1 2 2 2 2 2 2 2 2 2 21 1 1 1 1 1 1 1 1 1 1 1 1 1 1 2 2 2 2 2 2 2 2 2 2 2 2 22 1 1 1 1 1 1 1 1 1 1 1 1 2 2 2 2 2 2 2 2 2 2 2 2 3 3 33 1 1 1 1 1 1 1 1 1 1 2 2 2 2 2 2 2 2 2 2 2 3 3 3 3 3 3 34 1 1 1 1 1 1 1 1 1 2 2 2 2 2 2 2 2 2 3 3 3 3 3 3 3 3 3 4 45 1 1 1 1 1 1 1 1 2 2 2 2 2 2 2 2 3 3 3 3 3 3 3 3 4 4 4 4 4 46 1 1 1 1 1 1 1 2 2 2 2 2 2 2 3 3 3 3 3 3 3 4 4 4 4 4 4 4 5 57 1 1 1 1 1 1 2 2 2 2 2 2 3 3 3 3 3 3 4 4 4 4 4 4 5 5 5 5 5 5 68 1 1 1 1 1 2 2 2 2 2 2 3 3 3 3 3 4 4 4 4 4 5 5 5 5 5 6 6 6 6 69 1 1 1 1 2 2 2 2 2 3 3 3 3 4 4 4 4 4 5 5 5 5 6 6 6 6 6 7 7 7 7
10 1 1 1 1 2 2 2 2 3 3 3 3 4 4 4 4 5 5 5 5 6 6 6 6 7 7 7 7 8 8 8 811 1 1 1 1 2 2 2 3 3 3 3 4 4 4 5 5 5 6 6 6 6 7 7 7 8 8 8 8 9 9 9 10 12 1 1 1 2 2 2 3 3 3 4 4 4 5 5 5 6 6 6 7 7 7 8 8 8 9 9 9 10 10 10 11 11

Musket Fire and Artillery Firing Canister
31. Deal with each target unit in turn, and all the troops able to fire within a given range band18. Decide which troops are able to fire as follows:31.1. Start with those cannon, or front-rank troops armed with muskets, that are within a given
range band and whose line of sight is within 30° of straight ahead;31.2. Count one model gun or howitzer as 10 close-order infantry figures;31.3. Exclude any who are due to spend more than half of this bound moving;31.4. Count as half any who are due to spend more than a quarter of this bound moving but less
than half, including any who retire shaken from a reaction test for being charged.
32. Throw two normal dice and add their scores together. Subtract any of the following modifiers that apply. Then look up the result using the 'Fire' column of the Casualty Table below.
18 The two range bands for musketry are Short, 0 to 75 meters, and Long, 75 to 200 meters.
Table 1
Modifier Score to Add/SubtractHeavy rain or snow -10Firing at gunners or staff -10Target in hard cover -8Fog or blizzard -5Infantry fired last bound or otherwise disordered -5Firing at skirmishers -4Approaching target19. -2Receding target20 2Close range21 +8
The justification for treating canister in this way is straightforward. Each light canister shot contained about 80 shot, with about the same killing potential, therefore, as 100 muskets, but with longer range. However, a consistent ground scale implies that if 1 model gun represents 3 real ones, then 1 model infantryman represents 33 real ones. Therefore, one model gun should have the same killing power as 3 x 100 ÷ 33 ≈ 10 infantry models, assuming the same rate of fire. Heavy canister contained about half the number of shot, but of larger calibre and longer range. It seems reasonable to assume a casualty rate about one third of that achieved at the shorter range.
Melee
A melee occurs when a charge ends in contact with opponents. Opposing units are so close together that sabres and bayonets can be used, fire control breaks down and both units are disordered [at what precise point?].22 Casualties from melee are decided during the firing phase of each side's bound, therefore the charging unit will take casualties from the defenders before they have the opportunity to inflict any.
33. Units inflict casualties only after the firing phase of their own bound.34. To determine casualties inflicted by a unit in melee:
34.1. count the number of figures in base contact but halve the number of staff figures and figures not facing the enemy23;
34.2. deal with cavalry separately from infantry;34.3. throw 2 normal dice and add the scores;34.4. add or subtract the following modifiers;34.5. look up casualties in the casualty table below.
19 Range was measured when the target was closest during the enemy's last bound.20 Range was measured when the target was most distant during the enemy's last bound.21 Close range is up to 75 metres for muskets, 250 metres for guns firing canister.22 Disordered units are ones in which command and control has largely broken down and action is left to the initiative of small groups or to herd instinct. They therefore cannot respond to orders unless they are able to rally for a whole move out of contact with their opponents.23 Do not count cavalry attempting to enter buildings, nor count any troops who are routing.
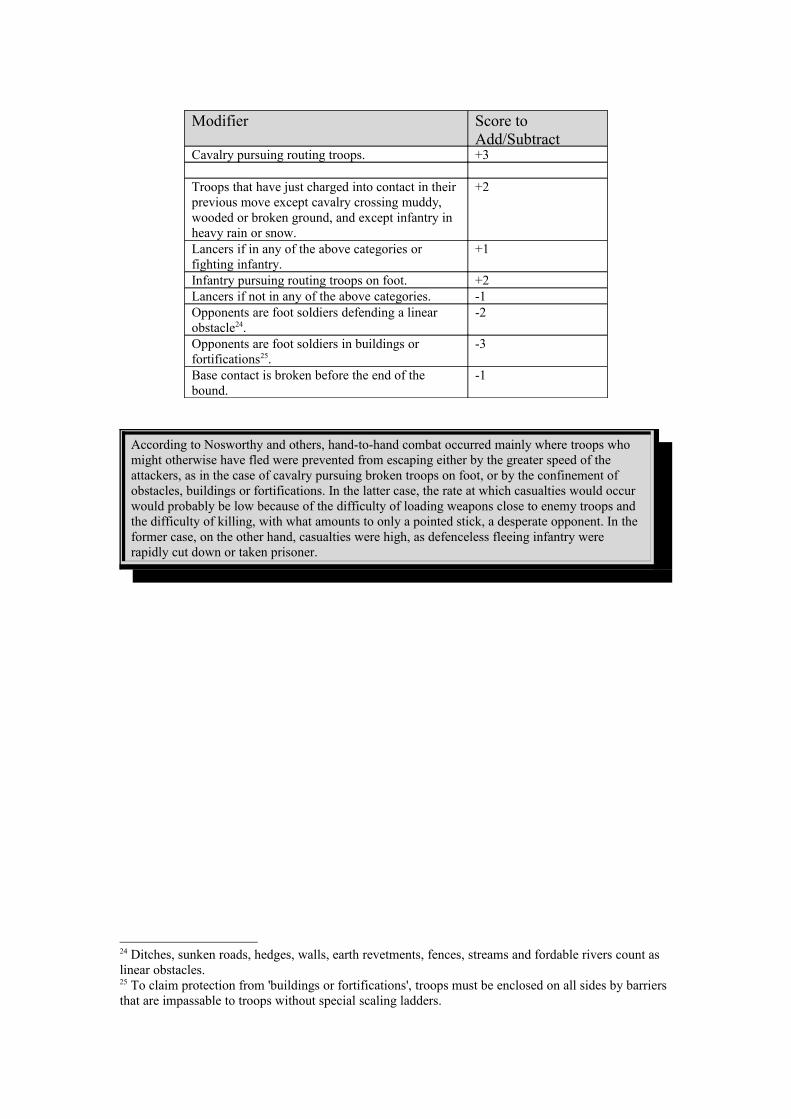
Modifier Score to Add/Subtract
Cavalry pursuing routing troops. +3
Troops that have just charged into contact in their previous move except cavalry crossing muddy, wooded or broken ground, and except infantry in heavy rain or snow.
+2
Lancers if in any of the above categories or fighting infantry.
+1
Infantry pursuing routing troops on foot. +2Lancers if not in any of the above categories. -1Opponents are foot soldiers defending a linear obstacle24.
-2
Opponents are foot soldiers in buildings or fortifications25.
-3
Base contact is broken before the end of the bound.
-1
According to Nosworthy and others, hand-to-hand combat occurred mainly where troops who might otherwise have fled were prevented from escaping either by the greater speed of the attackers, as in the case of cavalry pursuing broken troops on foot, or by the confinement of obstacles, buildings or fortifications. In the latter case, the rate at which casualties would occur would probably be low because of the difficulty of loading weapons close to enemy troops and the difficulty of killing, with what amounts to only a pointed stick, a desperate opponent. In the former case, on the other hand, casualties were high, as defenceless fleeing infantry were rapidly cut down or taken prisoner.
24 Ditches, sunken roads, hedges, walls, earth revetments, fences, streams and fordable rivers count as linear obstacles.25 To claim protection from 'buildings or fortifications', troops must be enclosed on all sides by barriers that are impassable to troops without special scaling ladders.


Casualty Table
Modified Dice ScoreNumber of Figures Striking
Fire Melee 2 3 4 5 6 7 8 9 10 11 12 13 14 15 16 17 18 19 20 21 22 23 24 25
-6 -3 1 1-5 -2 1 1 1 1 1-4 -1 1 1 1 1 1 1 1 1-3 0 1 1 1 1 1 1 1 1 1 1-2 1 1 1 1 1 1 1 1 1 1 1 1 1-1 2 1 1 1 1 1 1 1 1 1 1 1 1 1 10 3 1 1 1 1 1 1 1 1 1 1 1 1 1 1 1 11 4 1 1 1 1 1 1 1 1 1 1 1 1 1 1 1 1 12 5 1 1 1 1 1 1 1 1 1 1 1 1 1 1 1 2 2 23 6 1 1 1 1 1 1 1 1 1 1 1 1 1 2 2 2 2 2 24 7 1 1 1 1 1 1 1 1 1 1 1 1 2 2 2 2 2 2 2 25 8 1 1 1 1 1 1 1 1 1 1 2 2 2 2 2 2 2 2 2 2 36 9 1 1 1 1 1 1 1 1 1 2 2 2 2 2 2 2 2 3 3 3 37 10 1 1 1 1 1 1 1 1 2 2 2 2 2 2 2 3 3 3 3 3 3 38 11 1 1 1 1 1 1 2 2 2 2 2 2 2 3 3 3 3 3 3 3 4 49 12 1 1 1 1 1 1 2 2 2 2 2 2 3 3 3 3 3 3 4 4 4 4 4
10 13 1 1 1 1 1 2 2 2 2 2 3 3 3 3 3 4 4 4 4 4 5 5 511 14 1 1 1 1 2 2 2 2 3 3 3 3 3 4 4 4 4 5 5 5 5 6 612 15 1 1 1 1 2 2 2 2 3 3 3 3 4 4 4 5 5 5 5 6 6 6 6 713 16 1 1 1 2 2 2 2 3 3 3 4 4 4 5 5 5 5 6 6 6 7 7 7 814 n/a 1 1 1 2 2 2 3 3 4 4 4 5 5 5 6 6 6 7 7 7 8 8 8 915 n/a 1 1 2 2 2 3 3 4 4 4 5 5 6 6 6 7 7 8 8 8 9 9 10 1016 n/a 1 1 2 2 3 3 4 4 5 5 6 6 6 7 7 8 8 9 9 10 10 11 11 1217 n/a 1 2 2 3 3 4 4 5 5 6 6 7 7 8 8 9 10 10 11 11 12 12 13 1318 n/a 1 2 2 3 4 4 5 5 6 7 7 8 9 9 10 10 11 12 12 13 13 14 15 1519 n/a 1 2 3 4 4 5 6 6 7 8 8 9 10 11 11 12 13 13 14 15 15 16 17 18

20 n/a 2 2 3 4 5 6 6 7 8 9 10 10 11 12 13 14 15 15 16 17 18 19 19 20

These casualty tables may seem to give very low casualties. This is a departure from other popular sets of rules, which, seem to suggest casualty rates far above those found in history. Nosworthy and Hughes review the main sources. From these it is clear that the effectiveness of muskets in battle conditions was on average very low. This explains why in historical battles, fire fights between battalions carried on for up to an hour before the casualties built up sufficiently to cause one side to give way. In most current sets of rules these losses are inflicted within a few moves, supposedly lasting only a few minutes.
Some rule authors are vague or ambiguous about their time scales, suggesting one for tactical moves and another for campaign purposes. However, allowing realistic casualty rates to be out of line with realistic movement rates leads to serious anomalies.
On the other hand, strictly realistic rules might lead to tedious games in which opponents march up to each other quickly and then spend the next ten to twenty bounds just exchanging fire with little effect. Commanders probably spent a lot of time just getting their forces organized and set in the right formations to attack, which is why these rules deal with command and control in the way that they do. This is an alternative to assuming that every move contains an average amount of time for commanders to do their work.
Move Distances
34. Look up movement rates in the following table.
Movement RatesTroop Type Movement Category
Normal Evade Charge/Rout/Pursuit
Infantry in close order. 225 n/a 335Infantry skirmishers, foot artillery, pioneers, engineers, etc.
275 275 n/a
Horse artillery. 750 60026 60027
Cavalry scouts, messengers, staff, artillery outriders.
600 750 n/a
Regular cavalry. 450 45028 750Irregular cavalry. 600 600 850
Movement Penalties
35. Distances are reduced by turning, wheeling, obstacles and difficult terrain.
26 Horse artillery evade moves include limbering up and end facing to the rear of the deployed gun position.27 Horse artillery charge moves include moving forward and unlimbering guns ready to fire. 28 Cavalry evade moves include facing about, moving to the rear and facing about again at the end of the move.

35.1. In general, formation changes and changes of direction reduce move distances only in as much as some elements of the formation are required to remain stationary or move in the opposite direction to the unit as a whole. Special cases are as follows.
35.1.1. Forming square from a closed column (one with no spaces between the ranks): shaking out the ranks into the faces of the square (which must be done at the halt) is assumed to take half a move in addition to the physical distance moved by each element.
35.1.2. Turning about in column requires officers, standard bearers and musicians to march to the rear of the column before the unit as a whole can begin to move. For a unit in line, this is almost instantaneous.
35.1.3. Wheeling to the right in line requires the rightmost front-rank man to mark time while the leftmost man marches in an arc of 90 degrees. The length of this arc depends on the unit’s frontage and is the distance to be covered before the unit as a whole can move off in its new direction.
35.1.4. Wheeling to the right in column is more complicated because the rear ranks must march forward to where the front rank started before they can begin wheeling. This manoeuvre will normally require the unit to advance to a point where its rear rank is in line with the unit’s original right flank.
1 2 3

35.1.5. Forming line from column or square or vice versa requires the unit to halt before the formation change. However, cavalry in open column needing to form line in a charge move may move to echelon formation without any movement penalty.
35.2. Artillery batteries can move from line to column and vice versa most conveniently by wheeling each team 90 degrees to right or left and therefore moving off, or halting, at 90 degrees to their original direction. It is best to use individual gun bases (representing 2 guns in line), without adding horse teams, to represent artillery moving in line, because this will mean that the bases will occupy the right amount of space. For artillery in column, it will look better visually if a battery of 3 or 4 gun models is replaced by a single limbered gun with horse team. This will also occupy about the right amount of space, though it assumes that the column in real life is 2 teams wide by 3 or 4 deep. Rule 36.4 also refers.
35.3. For movements affected by terrain or obstacles, apply the following adjustments to the measured distances.
.
Movement PenaltiesObstacle Category Change from Normal Move Distance
Foot Horse Wheeled
1 Bogs, marsh, rocks, steep slopes, dense woods.
÷ 2 ÷ 2, charge disallowed.
Impassable29
2 Moderate slopes. No penalty ± 50m30 Impassable31
3 Hedges, fences, walls, palisades and earthworks all lower than 2m, ditches.
- 25m No penalty Impassable
4 Scalable cliffs, larger earthworks. - height x 1032
Impassable Impassable
5 Fordable rivers and streams. ÷ 2 ÷ 2 ÷ 26 Open woods No penalty Charge Impassable33
29 Except on roads.30 Cavalry on moderate slopes reduce speed uphill but increase speed downhill.31 Except on roads.32 For example, if a cliff is 10 metres high, infantry are assumed to scale it in the time it would take them to move 10 x 10 = 100 meters.

disallowed.7 Built-up areas (except along roads) ÷ 2 Impassable Impassable8 Fences, walls, palisades all higher than 2m. Impassable Impassable Impassable
35.4. Obstacles can be removed or modified by engineers or special equipment.35.4.1. Troops equipped with scaling ladders climb high fences, walls, etc. as if these are
scalable cliffs.35.4.2. Engineer or pioneer elements clear their frontage of Category 3 obstacles for passage
by wheeled elements in 3 bounds of continuous base contact.35.4.3. Engineer or pioneer elements clear open woods for wheeled elements at the rate of 10
metres per bound across their frontage. Reducing the frontage of a constant number of engineer or pioneer figures increases the rate of progress proportionately.34
33 Except on roads.34 E.g. four engineer figures in line clear 10 metres per bound, but 20 metres per bound on half the frontage if in column of twos or 40 metres per bound on a quarter of the frontage if in column in single file.

Appendix 1: Scales
36. These rules give all distances in real-life metres and all casualty figures are given in terms of model figures. This means that players can adopt any ground scale and troop scale that they can agree on as long as the number of troops represented by a model is the same as the number that would occupy the area represented by the base dimensions. Suggestions for 6mm models are:36.1. 1mm equals 1metre;36.2. 1 model cavalry or infantryman mounted shoulder-to-shoulder equals 33 close-order
troops formed in 2 or 3 ranks;36.3. 1 model gun equals 2 howitzers or guns in line with limbers and ammunition wagons to
the rear (if in firing position) or to the front (if moving).36.4. 1 horse team of 4 or 6 plus limbered gun represents 6 or 8 real life counterparts in
column of twos.
37. The movement distances and casualty rates quoted in these rules are based on a time scale of 1 bound equals 2.5 minutes. However, the rules will not be distorted unduly by any multiple of this scale, as long as move distances and casualties are increased by the same multiple. Bounds of different lengths will be useful whenever long, unopposed movements are taking place, or lengthy static exchanges of fire.
Time scale, ground scale, model scale and troop scale are connected. The ground scale determines the area of ground in real life represented by the bases on which model soldiers are mounted. Given the troop scale, this also implies a certain number of troops in real life. Time scale is not so strictly determined, except that movement rates across the wargame table can seem tediously slow at very small ground scales and alarmingly fast at large ground scales. Similarly, model scales can be combined with a wide range of troop and ground scales, the main problem being that large scale models will look very odd if combined with scenery at a very small ground scale.

Appendix 2: Base Sizes
38. Within reason, base sizes do not matter as long as both players use the same system. These rules may sometimes require temporary tallies of casualties to be kept, so players whose armies are not based for casualty removal will not be inconvenienced. On the other hand, casualty removal where possible avoids confusion. The following basing system may suit those building new armies.38.1. Close order infantry - 4 per base, in line, shoulder to shoulder, or 2 ranks of 4 on each base
(useful for 6mm figures);38.2. Skirmishers - 2 per base;38.3. For casualty removal - 1 per base;38.4. Cavalry in close order - 3 per base in line, stirrup to stirrup;38.5. Cavalry scouts, casualties, generals - 1 per base;38.6. Guns, howitzers - 1 per base plus 4 or 5 crew figures;38.7. Artillery draught teams and limbers - 4 or 6 horses per base;
Base Sizes Figure Scale5,6 mm 9,10 mm 15 mm 25 mmFrontage Depth Frontage Depth Frontage Depth Frontag
eDepth
Per close-order infantry figure
5mm 7.5mm 9mm 13mm 12mm 18mm 15mm 25mm
Per deployed skirmisher on foot.
10mm 7.5mm 18mm 13mm 24mm 18mm 30mm 25mm
Cavalry, staff 6mm 15mm 10mm 26mm 14mm 36mm 20mm 50mmDraught team (including gun)
20mm 50-60mm
36mm 95mm 48mm 130mm 50mm 160mm
Gun or howitzer 20mm 24mm 36mm 42mm 72mm 55mm 50mm 60mm
Problems will of course arise if players adopt conflicting base systems. More closely packed armies might gain an advantage in fire fights and melees. On the other hand, it is no good encouraging players to bring ‘armies’ to the wargame table that are made up of bases with hardly any figures on them. The following adjustments may help. A side with denser basing than the above standards should measure the frontage of units firing or in melee and calculate the number of figures that would fit into that frontage at the standard base size instead of counting the actual number. A side with less dense basing than the above standards should just count the actual number. Thus, players are rewarded for smaller bases down to the standard, but gain no advantage beyond that.