escape mini bags - amazon web services · m escape mini bags finished size: 8" x 10" x...
TRANSCRIPT
TMEscape Mini BagsFinished size: 8" x 10" x 2"
Makes 2 Bags
BEFORE YOU BEGINRead all instructions before beginning project. Do not pre-wash fabrics. Before cutting, press fabrics with a dry iron on cotton setting. Use a ¼" seam allowance and sew fabrics with right sides together (RST) unless otherwise noted. Follow manufacturer’s instructions when applying fusible products and use a press cloth to protect your iron when pressing fusible fleece surfaces.
CUTTING Label pieces as you cut.
Brown Floral: Note: This is a directional print. Check that all pieces are in the correct orientation before cutting. 1 - 4" x 42" (Bag 1 strap) 4 - 10 ½" x 12" (Bag 1 and lining 1) 2 - 10 ½" x 8 ½" (Bag 2 pockets) 1 - 6" x 6 ½" (Bag 2 large inner pocket) 1 - 6" x 4 ½" (Bag 2 small inner pocket)
Multi Chevron: Note: When cutting the Multi Chevron pieces, cut the fabric with the design running parallel to the top and bottom edges. 1 - 4" x 42" (Bag 2 strap) 4 - 10 ½" x 12" (Bag 2 and lining 2) 2 - 10 ½" x 8 ½" (Bag 1 pockets) 1 - 6" x 6 ½" (Bag 1 large inner pocket) 1 - 6" x 4 ½" (Bag 1 small inner pocket)
Green Floral: 4 - 10 ½" x 10 ½" (Bag pocket linings) 2 - 6" x 8 ½" (Large inner pocket linings) 2 - 6" x 6 ½" (Small inner pocket linings)
Fusible Fleece: 4 - 10 ½" x 12" (Bag)
Craft Fuse Backing: 4 - 10 ½" x 9 ¼" (Bag pocket backings) 2 - 1" x 42" (Strap backings) 2 - 6" x 7 ¼" (Large inner pocket backings) 2 - 6" x 5 ¼" (Small inner pocket backings) 4 - 1" x 1" (Snap reinforcements)
Separate the Bag 1 and Bag 2 pieces into two stacks. Divide the Green Floral, fusible fleece, and Craft Fuse pieces evenly between the two stacks. Set the Bag 2 pieces aside.
BAG 1:
QUILTING
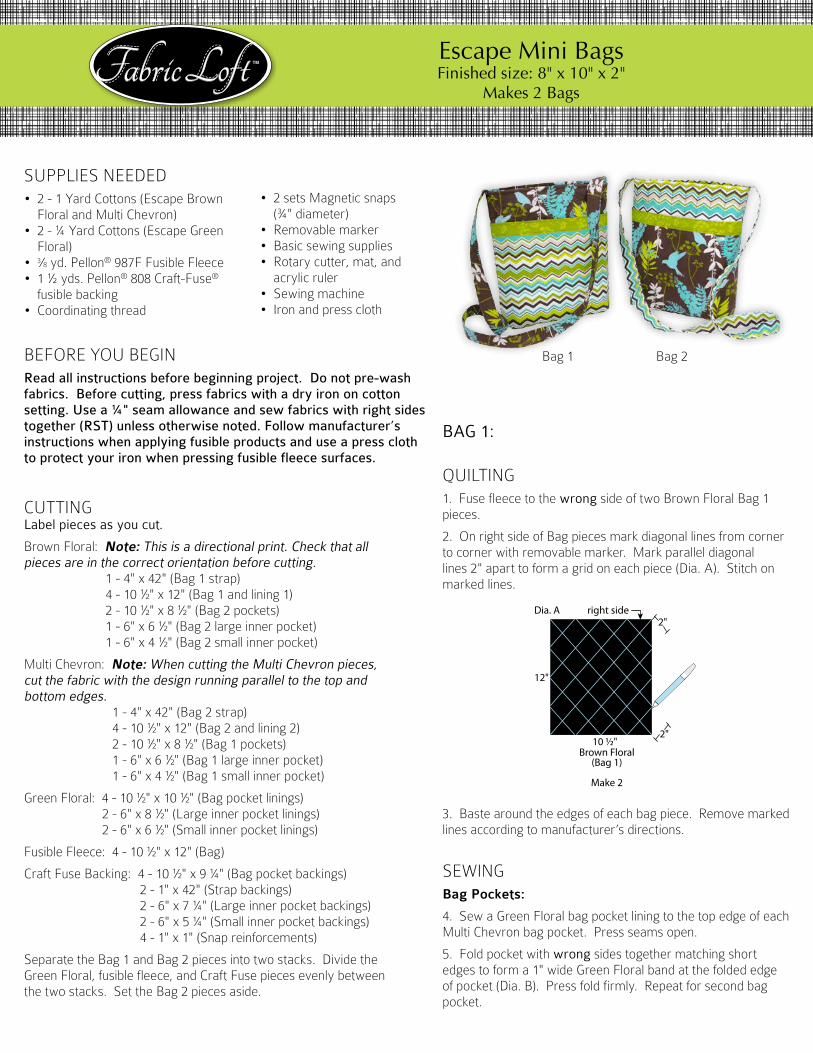
1. Fuse fleece to the wrong side of two Brown Floral Bag 1 pieces.
2. On right side of Bag pieces mark diagonal lines from corner to corner with removable marker. Mark parallel diagonal lines 2" apart to form a grid on each piece (Dia. A). Stitch on marked lines.
3. Baste around the edges of each bag piece. Remove marked lines according to manufacturer’s directions.
SEWINGBag Pockets:
4. Sew a Green Floral bag pocket lining to the top edge of each Multi Chevron bag pocket. Press seams open.
5. Fold pocket with wrong sides together matching short edges to form a 1" wide Green Floral band at the folded edge of pocket (Dia. B). Press fold firmly. Repeat for second bag pocket.
SUPPLIES NEEDED• 2 - 1 Yard Cottons (Escape Brown Floral and Multi Chevron)• 2 - ¼ Yard Cottons (Escape Green Floral)• 3⁄8 yd. Pellon® 987F Fusible Fleece• 1 ½ yds. Pellon® 808 Craft-Fuse® fusible backing• Coordinating thread
• 2 sets Magnetic snaps (¾" diameter)• Removable marker• Basic sewing supplies• Rotary cutter, mat, and acrylic ruler• Sewing machine• Iron and press cloth
Bag 1 Bag 2
right sideDia. A2"
12"
10 ½"2"
Brown Floral (Bag 1)
Make 2

PAGE 2 OF 5
6. Open and place pockets wrong side up on pressing surface. With the 10 ½" edges aligned, apply the bag pocket backing on the seamed end (Dia. C). Repeat for the second bag pocket.
7. Fold pockets in half with wrong sides together. Press well then baste bottom edges together. Topstitch 1 ⁄8" from each long edge of the Green Floral band on both pockets.
Bag:
8. Place Multi Chevron pockets on Brown Floral bag pieces (Dia. D). Align bottom edges and sides of pockets with each bag piece. Pin in place then baste sides and bottom edges of pockets to bag pieces.
9. Place Bag 1 pieces RST; sew sides and bottom seams leaving the top edge open. Note: Match edges of band pieces along side seams. Press seams open. Leave bag as sewn and remove basting stitches.
10. To box the corners, refold the bag RST to form a point by bringing the side and bottom seams together. Tip: Stick a pin straight through both seams to align layers. Pin layers together and draw a line 1" from the tip of the corner (Dia. E). Sew on marked line. Repeat for the second corner then trim seams to ¼".
Strap:
11. Fold Brown Floral strap in half lengthwise with wrong sides together. Press well to form a center crease.
12. Open strap out flat with wrong side up and fuse the long edge of Craft Fuse strip along the center crease (Dia. F).
13. Fold outer edges to the center crease and press edges well. Fold in half to make a 1" x 42" strap and topstitch 1 ⁄8" from long edges.
14. Fold short ends in half to find the centers; mark. On right side of bag, pin the ends of strap to the top edges of bag matching the center marks to the side seams. Sew securely in place. Turn bag right side out.
Inner Pockets, Lining and Snap:
15. Sew Multi Chevron large inner pocket and Green Floral large inner pocket lining RST along 6" edges. Press seams open. Fold in half WST matching bottom edges and sides. Repeat with Multi Chevron small inner pocket and Green Floral small inner pocket lining.
16. Open pockets with wrong sides up on pressing surface and apply corresponding Craft Fuse pieces to the seamed sections of each pocket (refer to Dia. C). Fold pockets in half RST matching short ends. Sew sides and bottom seams leaving a 3" opening in the bottom for turning pockets right side out. Trim corners diagonally.
Dia. E
Bagwrong side
1"
Make 2
10 ½"
Dia. D
Multi Chevron Pocket
Baste ∕8"
Brown Floral Bag(right side)
9 ¼"
2 ∕4"3
1
Dia. C
10 ½"Make 2
9 ¼"
Bag Pocket
wrongside
crease
Craft Fuse Backing(bag pocket backing)
alignedges
Dia. B
10 ½"Make 2
9 ¼"
1"fold
Dia. F
center crease
wrong sideright side
Craft Fuse (strap backing)
Topstitch ∕8"from each long edge
1
17. Turn pockets right side out and press well. Topstitch 1 ⁄8" from each long edge of Green Floral bands.
18. Fold each lining and pocket in half RST so short edges meet and press center creases well.
19. Place top edges of pockets (with Green Floral bands) 2 ½" from top edges of lining with center creases aligned. Stitch 1 ⁄8" around sides and bottoms to attach pockets to lining and close the opening (Dia. G).
20. On wrong side of each lining mark 1 ½" along center creases for magnetic snap placement. Fuse 1" square of Craft Fuse on wrong side of each bag, centered 1 ½" from top edges to reinforce snaps. Remove round discs from snap. Place disc on wrong side of lining with the center hole aligned with mark (Dia. H). Mark through slots. Repeat for second lining. Use a seam ripper or craft knife to cut slits.
21. From the right side of the lining, insert the magnetic snap prongs through the slots in lining and Craft Fuse then place the disc on prongs on wrong side of lining and bend prongs flat. Repeat for second part of magnetic snap.
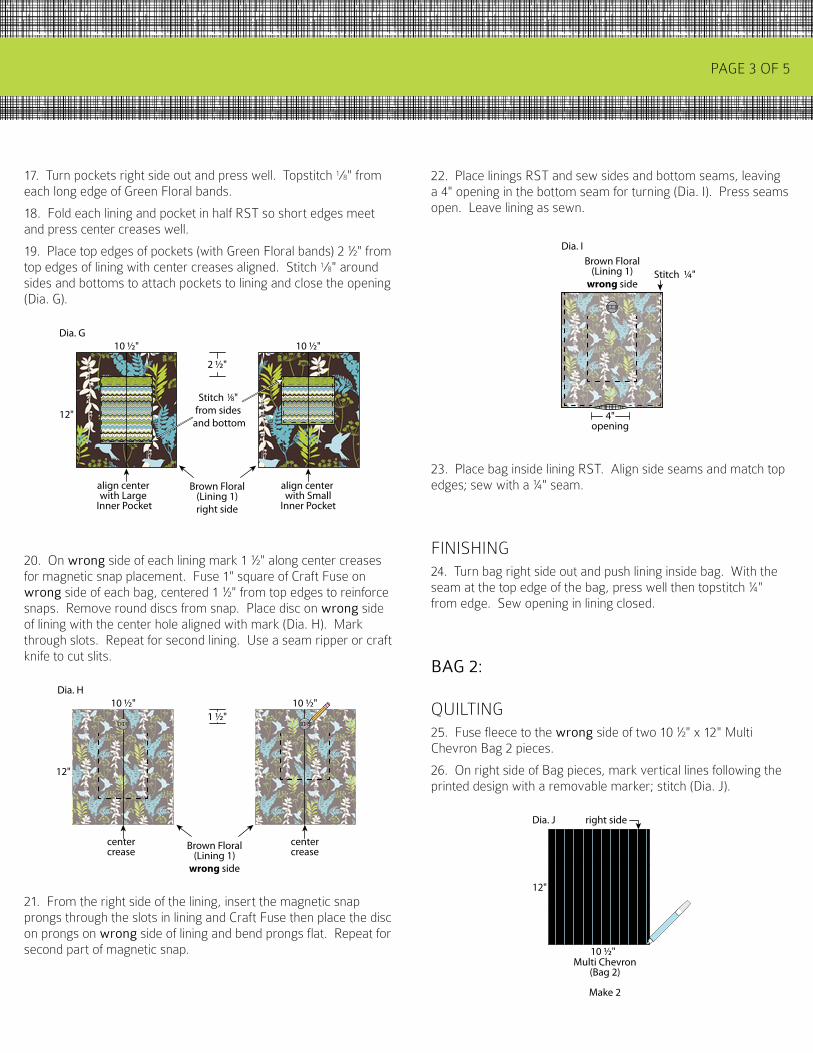
22. Place linings RST and sew sides and bottom seams, leaving a 4" opening in the bottom seam for turning (Dia. I). Press seams open. Leave lining as sewn.
23. Place bag inside lining RST. Align side seams and match top edges; sew with a ¼" seam.
FINISHING24. Turn bag right side out and push lining inside bag. With the seam at the top edge of the bag, press well then topstitch ¼" from edge. Sew opening in lining closed.
BAG 2:
QUILTING 25. Fuse fleece to the wrong side of two 10 ½" x 12" Multi Chevron Bag 2 pieces.
26. On right side of Bag pieces, mark vertical lines following the printed design with a removable marker; stitch (Dia. J).
PAGE 3 OF 5
4"opening
Brown Floral (Lining 1)
wrong side
Dia. I
Stitch ¼"
Dia. G
2 ½"
align center with Large
Inner Pocket
align center with Small
Inner Pocket
12"
10 ½" 10 ½"
Brown Floral(Lining 1)right side
Stitch ∕8" from sides
and bottom
1
right sideDia. J
12"
10 ½"Multi Chevron
(Bag 2)
Make 2
centercrease
centercrease
Dia. H
1 ½"
12"
10 ½" 10 ½"
Brown Floral(Lining 1)
wrong side

32. Place Brown Floral pockets on Multi Chevron bag pieces. Align bottom edges and sides of pockets with each bag piece (Dia. M). Pin in place then baste sides and bottom edges of pockets to bag pieces.
Bag:
33. Place Bag 2 pieces RST; sew sides and bottom seams leaving the top edge open. Note: Match edges of band pieces along side seams. Press seams open. Leave bag as sewn and remove basting stitches.
34. To box the corners, refold the bag RST to form a point by bringing the side and bottom seams together. Tip: Stick a pin straight through both seams to align layers. Pin layers together and draw a line 1" from the tip of the corner (Dia. N). Sew on marked line. Repeat for the second corner then trim seams to ¼".
Strap:
35. Fold Multi Chevron strap in half lengthwise with wrong sides together. Press well to form a center crease.
36. Open strap out flat with wrong side up and fuse the long edge of 1" x 42" Craft Fuse strip along the center crease (Dia. O).
27. Remove marked lines according to manufacturer’s directions.
SEWINGBag Pockets:
28. Sew a Green Floral bag pocket lining to the top edge of each Brown Floral bag pocket. Press seams open.
29. Fold pocket with wrong sides together matching short edges to form a 1" wide Green Floral band at the folded edge of pocket (Dia. K). Press fold firmly. Repeat for second bag pocket.
30. Open and place pockets wrong side up on pressing
surface. With the 10 ½" edges aligned, apply the bag pocket backing on the seamed end (Dia. L). Repeat for the second bag pocket.
31. Fold pockets in half with wrong sides together. Press well then baste bottom edges together. Topstitch 1 ⁄8" from each long edge of the Green Floral band on both pockets.
Make 2
10 ½"
Dia. M
BrownFloral Pocket
Baste ∕8"
Multi Chevron Bag(right side)
9 ¼"
2 ∕4"3
1
Dia. N
Bagwrong side
1"
PAGE 4 OF 5
Dia. L
10 ½"Make 2
9 ¼"
Bag Pocket
wrongside
crease
Craft Fuse Backing(bag pocket backing)
alignedges
Dia. O
center crease
wrong sideright side
Craft Fuse (strap backing)
Topstitch ∕8" from each long edge
1
Dia. K
10 ½"Make 2
9 ¼"
1"fold
37. Fold outer edges to the center crease and press edges well. Fold in half to make a 1" x 42" strap and topstitch 1 ⁄8" from long edges.
38. Fold short ends of strap in half to find the centers; mark. On right side of bag, pin the ends of strap to the top edges of bag matching the center marks to the side seams. Sew securely in place. Turn bag right side out.
Inner Pockets, Lining and Snap:
39. Sew the Brown Floral large inner pocket and Green Floral large inner pocket lining RST along matching edges. Press seams open. Fold in half WST matching top edges and sides. Repeat with Brown Floral small inner pocket and Green Floral small inner pocket lining pieces.
40. Open pockets with wrong sides up on pressing surface and apply corresponding Craft Fuse pieces to the seamed sections of each pocket (as in Step 6). Fold pockets in half RST matching short ends. Sew sides and bottom seams leaving a 3" opening in the bottom for turning pockets right side out. Trim corners diagonally.
41. Turn pockets right side out and press well. Topstitch 1 ⁄8" from each long edge of Green Floral bands.
42. Fold each lining and pocket in half RST so short edges meet and press center creases well.
43. Place top edges of pockets (with Green Floral bands) 2 ½" from top edges of lining with center creases aligned. Stitch 1 ⁄8" around sides and bottoms to attach pockets to lining and close the opening (Dia. P).
44. On wrong side of each lining mark 1 ½" along center creases for magnetic snap placement. Fuse 1" x 1" square Craft Fuse on the wrong side of each bag, centered 1 ½" from top edges to reinforce snaps. Remove round discs from snap. Place disc on wrong side
of lining with the center hole aligned with mark (Dia. Q). Mark through slots. Repeat for second lining. Use a seam ripper or craft knife to cut slits.
45. From the right side of the lining, insert the magnetic snap prongs through the slots in lining then place the disc on prongs on wrong side of lining and bend prongs flat. Repeat for second part of magnetic snap.
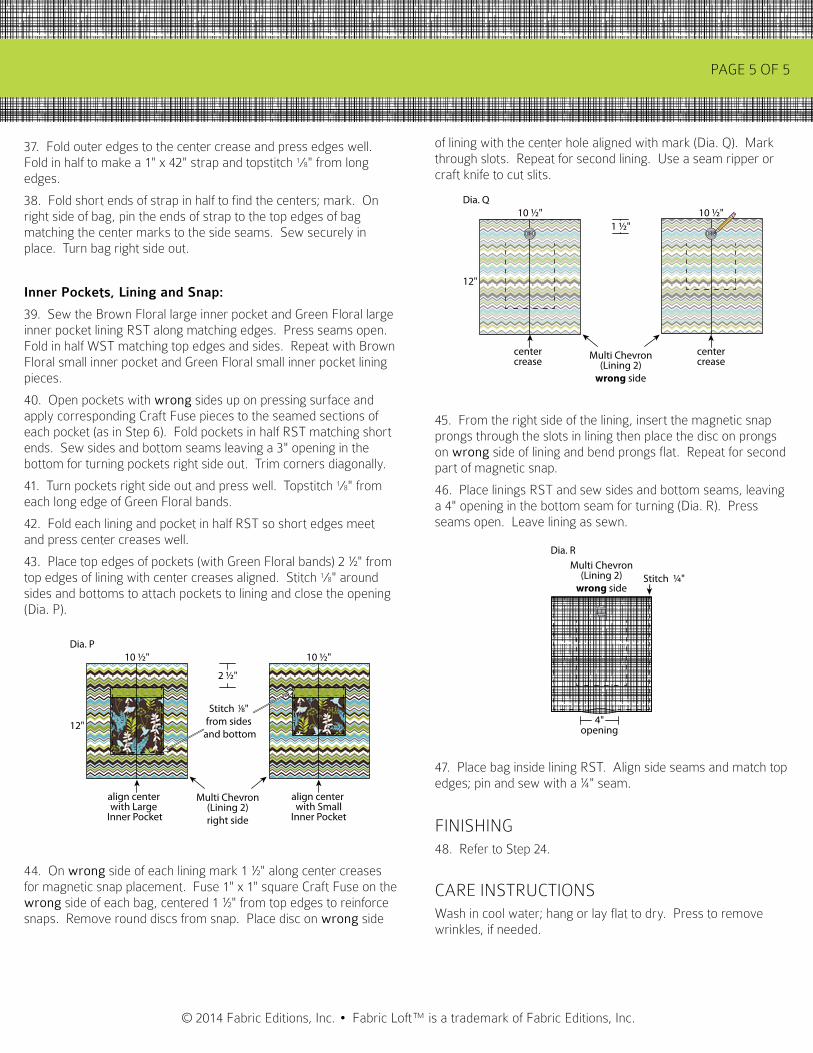
46. Place linings RST and sew sides and bottom seams, leaving a 4" opening in the bottom seam for turning (Dia. R). Press seams open. Leave lining as sewn.
47. Place bag inside lining RST. Align side seams and match top edges; pin and sew with a ¼" seam.
FINISHING48. Refer to Step 24.
CARE INSTRUCTIONSWash in cool water; hang or lay flat to dry. Press to remove wrinkles, if needed.
© 2014 Fabric Editions, Inc. • Fabric Loft™ is a trademark of Fabric Editions, Inc.
PAGE 5 OF 5
4"opening
Multi Chevron(Lining 2)
wrong side
Dia. R
Stitch ¼"
Dia. P
2 ½"
align center with Large
Inner Pocket
align center with Small
Inner Pocket
12"
10 ½" 10 ½"
Multi Chevron(Lining 2)right side
Stitch ∕8" from sides
and bottom
1
centercrease
centercreaseMulti Chevron
(Lining 2)wrong side
Dia. Q
1 ½"
12"
10 ½" 10 ½"