evaluation board for the adp5051/adp5053 4-channel ... sheets/analog devices...4-channel power...
TRANSCRIPT

One Technology Way · P.O. Box 9106 · Norwood, MA 02062-9106 · Tel: 781.329.4700 · Fax: 781.461.3113 · www.analog.com
Rev 21 Jan 2014 15:09 | Page 1
Evaluation Board for the ADP5051/ADP50534-Channel Power Management Unit (PMU)with Supervisory
Features
Wide input voltage range: 4.5 V to 15 VFull featured evaluation board for the ADP5051/ADP5053CH1: programmable 1.2 A/2.5 A/4 A buck regulatorCH2: programmable 1.2 A/2.5 A/4 A buck regulatorCH3: 1.2 A sync buck regulatorCH4: 1.2 A sync buck regulatorStandalone operation capabilityUSB dongle and GUI software support ADP5051 only)Dedicated enable option for each channelMode option to select PSM or FPWM operationProgrammable switching frequency from 250 kHz to 1.4 MHzFrequency synchronization input or outputSimple device measurements and demonstrable withVoltage supplyVoltmeterAmmeterLoad resistors or electrical loadOpen-drain processor reset with external adjustable threshold monitoringManual reset input
Hardware Requirement
USB-to-I2C dongle: USB-SDP-CABLEZ (The USB-SDP-CABLEZ is not included in theevaluation kit and must be ordered separately. Only one dongle is required in amultiboard cascade setup)
Software Requirement

Rev 21 Jan 2014 15:09 | Page 2
ADP505x DEMO GUI software
General Description
This user guide describes the hardware and software for the evaluation of the ADP5051/ADP5053,including detailed schematics and printed circuit board (PCB) layouts.
The ADP5051/ADP5053 evaluation board combines four high performance buck regulators andsupervisory in a 48-lead LFCSP package to meet demanding performance and board spacerequirements. The ADP5051/ADP5053 evaluation board can connect to high input voltages, up to 15 Vdirectly, without any preregulators.
The ADP5051/ADP5053 share a common PCB evaluation board; however, whereas the ADP5051 boardcan support an external USB dongle connection and GUI software to evaluate the comprehensivefunctionalities provided by an I2C interface, the ADP5053 has no I2C interface capability. Both theADP5051 and the ADP5053 operate in the same manner and are available in an adjustable voltageoption.
Full details on the devices are provided in the ADP5051/ADP5053 data sheet available from AnalogDevices, Inc., and should be consulted in conjunction with this evaluation board user guide.
ADP5051/ADP5053 EVALUATION BOARD

Rev 21 Jan 2014 15:09 | Page 3
Figure 1.
INSTALLING THE SOFTWARE (ADP5051 ONLY)
Note that the ADP5051 evaluation board can be powered up in standalone operation without the GUIsoftware. Using the GUI software to access the advanced functionality of the ADP5051 product isoptional. Before starting the software installation, ensure that the ADP5051 evaluation board is notconnected to the USB port of the PC.
INSTALLING LABVIEW
Note that if the PC has LabVIEW™ already installed, this following step is not needed.The application software is a compiled LabVIEW program, which requires LabVIEW 8.5 or later and a

Rev 21 Jan 2014 15:09 | Page 4
run-time engine installed on the PC. You can download the LabVIEW run-time engine on the NationalInstrument website. A LabVIEW 8.5 run-time installation is available on the ADP5051 installation CD.
INSTALLING THE ADP5051 GUI SOFTWARE
After installation, it may be necessary to reboot the PC to complete the operation.
1. Launch the Setup.exe file. When the dialog box shown in Figure 2 appears, click Next to continue.
Figure 2. ADP5051 Evaluation Software Setup
2. Click Next to install the files to the default destination folder or click Browse… to choose adifferent file (see Figure 3).

Rev 21 Jan 2014 15:09 | Page 5
Figure 3. Choose Destination Location
3. Click Next to install the program (see Figure 4).
Figure 4. Select Program Folder
4. Click Finish to complete the installation (see Figure 5).

Rev 21 Jan 2014 15:09 | Page 6
Figure 5. Install Shield Wizard Complete
INSTALLING THE ANALOG DEVICES SDP DRIVERS (ADP5051ONLY)
To install the Analog Devices SDP Drivers, complete the following steps:
1. After installing ADP505x Demo GUI software properly, the installation of the Analog Devices SDPdrivers begins.
2. Click Next to install the drivers (see Figure 6).

Rev 21 Jan 2014 15:09 | Page 7
Figure 6. ADI SDP Drivers Setup Wizard
3. Click Install after verifying the program folder. Ensure that the system environment has enoughspace (see Figure 7).
Figure 7. Verify the Destination Folder
4. Click Finish to complete the driver installation (see Figure 8).

Rev 21 Jan 2014 15:09 | Page 8
Figure 8. Driver Installation Complete
5. To verify that the USB driver is installed properly, click Start. Then select Control Panel >System and open the Device Manager (see Figure 9).
Figure 9. Verify Driver Installation

Rev 21 Jan 2014 15:09 | Page 9
When the USB dongle is connected to a PC port different from the one used to install the driver, thePC device driver may ask you to install the driver again for that specific port. If this happens, repeatthe first four steps listed in this section.
USING THE EVALUATION BOARD
POWERING UP THE EVALUATION BOARD
The ADP5051/ADP5053 evaluation board is supplied fully assembled and tested. Before applyingpower to the evaluation board, follow the procedures in this section.
Enable Jumpers
Each channel has its own enable pin, which must be pulled high to enable that channel (see Table 1).To disable the channel, pull the enable pin low or leave it floating.
The enable control for each regulator has a 0.8 V precision enable threshold, which allows theADP5051/ADP5053 to be easily sequenced between channels or other input/output supplies. It canalso be used as a programmable UVLO input by the resistor divider.
When the external hardware enable pin is high, the CHx_ON enable register setting in the ADP5051GUI software can be used to power down each channel operation.
Table 1. Channels of the Enable Pins
Channel Pin Enable Jumpers DescriptionCH1: Buck EN1 J-EN1 0.8 V precision enableCH2: Buck EN2 J-EN2 0.8 V precision enableCH3: Buck EN3 J-EN3 0.8 V precision enableCH4: Buck EN4 J-EN4 0.8 V precision enable
Power Input Jumpers
Each channel has its own power input jumper, which enables support for either a separate inputvoltage or cascaded options for all channels.

Rev 21 Jan 2014 15:09 | Page 10
The power input for the buck regulators is 4.5 V to 15 V. Shunt S1, S2, and S3 to allow for easy setupby using all of the same input voltages for the buck regulators.
The power supply for the VDDIO pin in the I2C interface block is 1.7 V to 3.6 V; shunt LK7 to use VDD(3.0 V) as the VDDIO supply. See Table 2 for the power input details.
Table 2. Channels of Power Input Pins
Channel Pin Input Jumper Input RangeCH1: Buck PVIN1 J11 4.5 V to 15 VCH2: Buck PVIN2 S1 4.5 V to 15 VCH3: Buck PVIN3 S2 4.5 V to 15 VCH4: Buck PVIN4 S3 4.5 V to 15 VVDDIO VDDIO LK7 1.7 V to 3.6 V
Jumper J-SYNC (SYNC/MODE)
The Jumper J-SYNC, as shown in Figure 1, connects the SYNC/MODE pin of the device to either low orhigh. Shunt the center contact of the J-SYNC jumper (SYNC/MODE) to the left pin header to pull theSYNC/MODE pin high to VREG (5 V) to allow the buck regulators into forced PWM operation. In thissetting, use the PSMx_ON register setting in the ADP5051 GUI software to configure individualPSM/FPWM operation for each buck.
Shunt the center contact of the J-SYNC jumper to the right pin header to pull the MODE pin low, whichforces the buck regulators to operate in automatic PWM/PSM operation. The PSMx_ON setting in theADP5051 GUI software is ignored.
Input Power Source
Before connecting the power source to the ADP5051/ADP5053 evaluation boards, ensure that theevaluation board is turned off. If the input power source includes a current meter, use that meter tomonitor the input current. Connect the positive terminal of the power source to the PVIN1_4 terminal(J11) on the evaluation board, and connect the negative terminal of the power source to the GNDterminal (J12) of the board.
If the power source does not include a current meter, connect a current meter in series with the inputsource voltage. Connect the positive terminal of the power source to the positive lead (+) of thecurrent meter, connect the negative terminal of the power source to the GND terminal (J12) on theevaluation board, and the connect the negative lead (−) of the current meter to the PVIN1_4 terminal(J11) on the board.

Rev 21 Jan 2014 15:09 | Page 11
Output Load
Ensure that the board is turned off before connecting the load.
Connect an electronic load or resistor to set the load current. If the load includes an ammeter, or ifthe current is not measured, connect the load directly to the evaluation board, with the positive (+)load connected to one of the channels. For example, connect Buck 1, J16 (VOUT1), and the negative(−) load connection to J15 (GND).
If an ammeter is used, connect it in series with the load. Connect the positive (+) ammeter terminalto the evaluation board for Buck 1, J16 (VOUT1), connect the negative (−) ammeter terminal to thepositive (+) load terminal, and connect the negative (−) load terminal to the evaluation board at J15(GND).
Input and Output Voltmeters
Measure the input and output voltages with voltmeters. Ensure that the voltmeters are connected tothe appropriate evaluation board terminals and not to the load or power sources themselves.
If the voltmeters are not connected directly to the evaluation board, the measured voltages areincorrect due to the voltage drop across the leads and/or connections between the evaluation board,the power source, and/or the load.
Connect the input voltage measuring voltmeter positive terminal (+) to the evaluation board at J11(PVIN1_4) and connect the input voltage measuring voltmeter negative (−) terminal to the evaluationboard at J12(GND). Connect the output voltage measuring voltmeter positive (+) terminal to theevaluation board at J16 (VOUT1) for measuring the output voltage of Buck 1, and connect the outputvoltage measuring voltmeter negative (−) terminal to the evaluation board at J15 (GND).
Quick Start
Ensure that the software and USB driver are installed as described in the Installing the Softwaresection. Ensure that
The power source voltage for the buck regulators (PVIN1, PVIN2, PVIN3, PVIN4) is 4.5 V to 15 V.●
Shunt the S1, S2, and S3 jumpers to use all of the same input voltages for the buck regulators.Optional for I2C interface evaluation: shunt LK7 to use VDD as the VDDIO supply, and connect the●
USB dongle to the I2C head jumper in the board.Input the WDI toggle signal, which is required as an evaluation WDI feature.●
Use the J-EN1, J-EN2, J-EN3, and J-EN4 jumpers to enable or disable the desirable channel.●
Figure 10 shows the ADP5051 board connection diagram. The ADP5053 works in a similar manner,

Rev 21 Jan 2014 15:09 | Page 12
but does not have a USB dongle connection.
Figure 10. ADP5051 Board Connection Diagram (USB Dongle is Optional)
When the power source and load are connected to the evaluation board, the board can be poweredfor operation. If the load is not enabled, enable the load. Verify that it is drawing the proper currentand that the output voltage maintains voltage regulation. After the power-up, the following outputvoltage can be measured:
VOUT1 = 1.2 V, supply up to a 4 A output load●
VOUT2 = 3.3 V, supply up to a 4 A output load●
VOUT3 = 1.8 V, supply up to a 1.2 A output load●
VOUT4 = 5.0 V, supply up to a 1.2 A output load●
VREG = 5.0 V, supply up to a 50 mA output load●
ADP5051 GUI SOFTWARE
To run the ADP5051 GUI, click Start > All Programs > Analog Devices ADP505x > ADP505xDEMO GUI-cg. If the program starts correctly and the board is detected, the ADP5051 GUI appears,as shown in Figure 11. The program default settings are as follows:

Rev 21 Jan 2014 15:09 | Page 13
Choose the correct device I2C address. Select WDI Ver 0x4A for the ADP5051/ADP5053.●
All registers are initialized to default values.●
Check the I2C status.●
Figure 11. ADP5051 GUI Software
MEASURING EVALUATION BOARD PERFORMANCE
Measuring Output Voltage Ripple of the Buck Regulator
To observe the output voltage ripple of Buck 1, place an oscilloscope probe across the outputcapacitor (COUT_1) with the probe ground lead at the negative (−) capacitor terminal and the probetip at the positive (+) capacitor terminal. Figure 12 shows the typical output ripple waveform.

Rev 21 Jan 2014 15:09 | Page 14
Figure 12. Output Ripple, VIN = 12 V, VOUT = 1.2 V, L = 1 μH,COUT = 47 μF × 2, fSW = 700 kHz, FPWM Mode
Set the oscilloscope to ac, 10 mV/division, and 2 µs/division time base, with the bandwidth set to 20MHz to avoid noise interference with the measurements. To minimize coupling, shorten the groundloop of the oscilloscope probe.
To effectively measure the output voltage ripple, solder a wire to the negative (−) capacitor terminaland wrap it around the barrel of the probe and connect the tip directly to the positive (+) capacitorterminal, as shown in Figure 13.
Figure 13. Measuring Output Voltage Ripple
Measuring the Switching Waveform of Buck
To observe the switching waveform with an oscilloscope, place the oscilloscope probe tip at the end ofthe inductor with the probe ground at GND. Set the oscilloscope to dc,5 V/division, and 1 µs/division time base.
Rev 21 Jan 2014 15:09 | Page 15
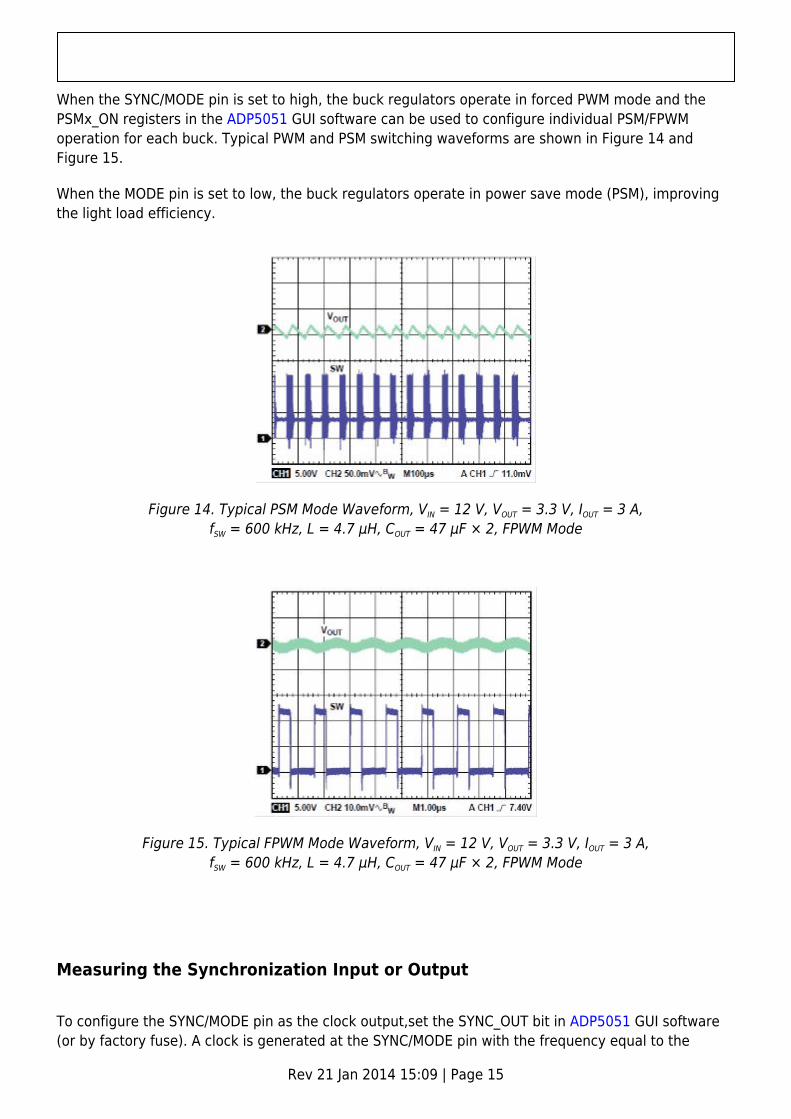
When the SYNC/MODE pin is set to high, the buck regulators operate in forced PWM mode and thePSMx_ON registers in the ADP5051 GUI software can be used to configure individual PSM/FPWMoperation for each buck. Typical PWM and PSM switching waveforms are shown in Figure 14 andFigure 15.
When the MODE pin is set to low, the buck regulators operate in power save mode (PSM), improvingthe light load efficiency.
Figure 14. Typical PSM Mode Waveform, VIN = 12 V, VOUT = 3.3 V, IOUT = 3 A,fSW = 600 kHz, L = 4.7 μH, COUT = 47 µF × 2, FPWM Mode
Figure 15. Typical FPWM Mode Waveform, VIN = 12 V, VOUT = 3.3 V, IOUT = 3 A,fSW = 600 kHz, L = 4.7 μH, COUT = 47 µF × 2, FPWM Mode
Measuring the Synchronization Input or Output
To configure the SYNC/MODE pin as the clock output,set the SYNC_OUT bit in ADP5051 GUI software(or by factory fuse). A clock is generated at the SYNC/MODE pin with the frequency equal to the

Rev 21 Jan 2014 15:09 | Page 16
internal frequency set by the RT pin.
When the SYNC/MODE pin is configured as the input, the ADP5051/ADP5053 can be synchronized toan external clock applied to the SYNC/MODE pin. Note that the internal clock set by the RT pin mustbe programmed close to the external clock.
Measuring Load Regulation of the Buck
Test the load regulation by increasing the load at the output and looking at the change in outputvoltage. The input voltage must be held constant during this measurement. To minimize voltage drop,use short low resistance wires, especially for loads approaching maximum current. Typical buck loadregulation is shown in Figure 16.
Figure 16. Buck Load Regulation
Measuring Line Regulation
To measure line regulation, vary the input voltage and examine the change in the output voltage.Typical buck line regulation is shown in Figure 17.

Rev 21 Jan 2014 15:09 | Page 17
Figure 17. Buck Line Regulation
Measuring Efficiency of the Buck
Measure the efficiency, η, by comparing the input power with the output power.
To reduce the effect of IR drops, measure the input and output voltages as near as possible to theinput and output capacitors.
Figure 18. Buck1/Buck2 Efficiency, VIN = 12 V, fSW = 600 kHz,MOSFET = SI7232DN, FPWM and PSM Mode
Measuring Inductor Current
Rev 21 Jan 2014 15:09 | Page 18
Measure the inductor current by removing one end of the inductor from its pad and connecting acurrent loop in series. A current probe can be connected to this wire.
Modifying the Board
Setting the Output Voltage of the Bucks (CH1 to CH4)
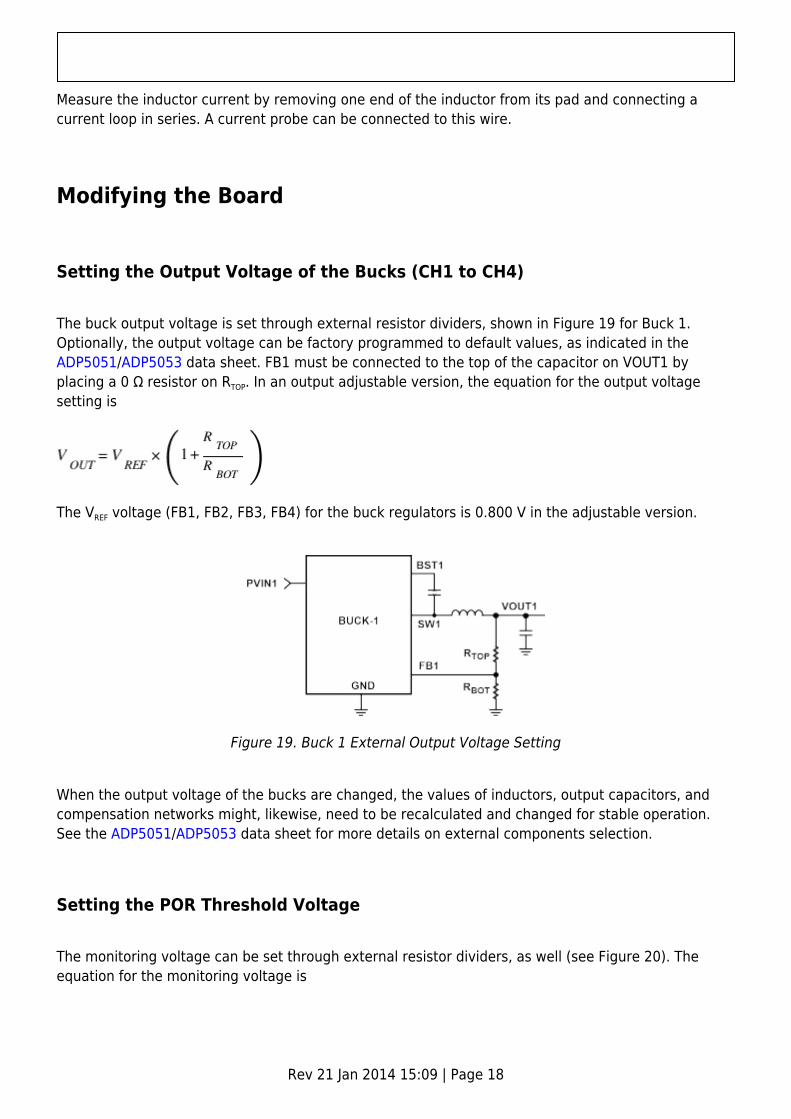
The buck output voltage is set through external resistor dividers, shown in Figure 19 for Buck 1.Optionally, the output voltage can be factory programmed to default values, as indicated in theADP5051/ADP5053 data sheet. FB1 must be connected to the top of the capacitor on VOUT1 byplacing a 0 Ω resistor on RTOP. In an output adjustable version, the equation for the output voltagesetting is
The VREF voltage (FB1, FB2, FB3, FB4) for the buck regulators is 0.800 V in the adjustable version.
Figure 19. Buck 1 External Output Voltage Setting
When the output voltage of the bucks are changed, the values of inductors, output capacitors, andcompensation networks might, likewise, need to be recalculated and changed for stable operation.See the ADP5051/ADP5053 data sheet for more details on external components selection.
Setting the POR Threshold Voltage
The monitoring voltage can be set through external resistor dividers, as well (see Figure 20). Theequation for the monitoring voltage is

Rev 21 Jan 2014 15:09 | Page 19
The voltage of VTH is 0.500 V.
Figure 20. Monitoring Voltage Threshold Setting
External Resistor Divider Setting for Bucks and POR
The ADP5051/ADP5053 evaluation boards are supplied with the resistor divider for a target outputvoltage. Varying the resistor values of the resistor divider networks varies the output voltageaccordingly. Table 3 shows the external resistor divider for each channel.
Table 3. External Resistor Dividers in Each Channel
Resistor Divider Buck 1 Buck 2 Buck 3 Buck 4RTOP R2 R4 R6 R5RBOT R28 R29 R31 R30
The POR function, by default, monitors the Channel 2 output voltage; optionally, another channel canbe selected using VOUT1, VOUT3, or VOUT4. Table 4 lists the external resistor for each channel.
Table 4. External Resistor Dividers for VTH Setting
Resistor Divider Buck 1 Buck 2 Buck 3 Buck 4RTOP R62 R61 R60 R59RBOT R13 R13 R13 R13
Changing the Switching Frequency
The switching frequency of theADP5051/ADP5053 on the evaluation board is programmed at 650 kHz.To change the switching frequency, replace the R3 resistor at the RT pin with a different value, asshown in Figure 21.

Rev 21 Jan 2014 15:09 | Page 20
Figure 21. Switching Frequency vs. RT Resistor
There is a frequency-halved bit (FREQ1 and FREQ3 in Register 7) for Channel 1 and Channel 3,respectively. Each bit can be used to program its switching frequency to be half that of the masterswitching frequency, which is set by the RT pin.
When the switching frequency is changed, the values of inductors, the output capacitors, and thecompensation networks must, likewise, be recalculated and changed for stable operation. Refer to theADP5051/ADP5053 data sheet for more details on external components selection.
Changing the Peak Current-Limit Threshold in Channel 1/Channel 2
The peak current limit of the ADP5051/ADP5053 evaluation board in Channel 1 and Channel 2 is set to6.4 A. To change the peak current limit threshold, replace the R8 resistor for Channel 1 (R7 forChannel 2) with a different value, as shown in Table 5. The programmable current-limit thresholdfeature allows for the use of a small size inductor for low current applications.
Table 5. Load Capability Setting on Channel 1
RILIM1/RILIM2 IOUT in Channel 1/Channel 2Floating 2.5 A, with 4.4 A typical peak current limit47 kΩ 1.2 A, with 2.6 A typical peak current limit22 kΩ 4.0 A, with 6.4 A typical peak current limit
Changing the Soft Start Time
The soft start time of the ADP5051/ADP5053 on the evaluation board is programmed at 2 ms for thefour buck regulators. To change the soft start time, replace the R39 and R16 resistors for Channel 1and Channel 2 (R40 and R18 for Channel 3 and Channel 4) with a different value, as shown in Table 6(note that N/A means not applicable).
Table 6. Softstart Time Configuration by SS12/SS34 Pins
Rev 21 Jan 2014 15:09 | Page 21
RTOP RBOTTOM SS12 Pin SS34 Pin(kΩ) (kΩ) CH1 CH2 CH3 CH40 N/A 2 ms 2 ms 2 ms 2 ms100 600 2 ms Parallel 2 ms 4 ms200 500 2 ms 8 ms 2 ms 8 ms300 400 4 ms 2 ms 4 ms 2 ms400 300 4 ms 4 ms 4 ms 4 ms500 200 8 ms 2 ms 4 ms 8 ms600 100 8 ms Parallel 8 ms 2 msN/A 0 8 ms 8 ms 8 ms 8 ms
Changing Channel 1/Channel 2 to a 2-Phase Parallel Output
Channel 1 and Channel 2 are programmed as individual outputs on the ADP5051/ADP5053 evaluationboards. To configure Channel 1/Channel 2 as a 2-phase parallel output operation, the following stepsare required:
Short the jumper, S4.1.Change R39 = 100 kΩ and R16 = 600 kΩ (or R39 = 600 kΩ and R16 = 100 kΩ) in the SS12 pin2.setting.Remove R17 and C8 from the COMP2 pin.3.Remove R4, and replace R29 with 0 Ω on the FB2 pin.4.Shunt the J-EN2 jumper to low.5.Use the FB1 pin (R2 and R28) to set the output voltage.6.Use J-EN1 (EN1 pin) to enable or disable the regulator.7.
During the parallel configuration, the input voltage and the current-limit threshold for both channelsshould be the same, and FPWM mode operation on both Channel 1 and Channel 2 are recommended.See the ADP5051/ADP5053 data sheet for details regarding 2-phase parallel output.
Changing the Phase Shift (0°, 90°, 180°, 270°) in the Buck Regulators
On the ADP5051/ADP5053 evaluation board, the phase shift is 180° between Channel 1 and Channel2, and 180° between Channel 3 and Channel 4. Channel 1 and Channel 3 operate in 0° phase shift.
With the ADP5050 only, the phase shift can be programmed at 0°, 90°, 180°, or 270° from Channel 2to Channel 4 with reference to Channel 1 via PHASE2, PHASE3, and PHASE4 in the ADP5051 GUIsoftware. See the ADP5051/ADP5053 data sheet for details regarding 2-phase parallel output.
Changing the Power-Good (PWRGD) Output Options
On the ADP5051/ADP5053 evaluation board, the PWRGD output becomes active high when theselective regulator is under normal operation. The PWRGD hardware output is logically AND'ed of an
Rev 21 Jan 2014 15:09 | Page 22
internal unmasked PWRGD signal.
With the ADP5051 only, each immediate PWRGD signal in each buck can be read back by thePWRGDx bit in the ADP5051 GUI software. The only desirable channels from Channel 1 to Channel 4can be configured by factory fuse or I2C interface. Use the ADP5051 GUI software to configureMASK_CHx in Register 0x08 to obtain a desirable PWRGD output signal.
Changing the Interrupt Output Options
With the ADP5051 only, use the pin for the fault condition warning. During normal operation, theinterrupt output is pulled high. When any fault occurs, the ADP5050 pulls the pin low to raise thefault warning to the I2C host. There are six interrupt sources available in the ADP5051, as shown inTable 6.
Table 6. Interrupt Options in ADP5051
Name DescriptionPWRG1_INT Power-good failure detected on Channel 1PWRG2_INT Power-good failure detected on Channel 2PWRG3_INT Power-good failure detected on Channel 3PWRG4_INT Power-good failure detected on Channel 4LVIN_INT PVIN1 voltage drops below the specified threshold (adjustable in Register 7)TEMP_INT Junction temperature rises above the specified threshold (adjustable in Register 7)MR_INT The button has been pressed
The interrupt (if any) that appears on the pin is determined by the mask bits mapped in RegisterINT_MASK. To clear an interrupt, write 1b to the detected bit in INT_STATUS, or reset the device usingUVLO.
Reading the interrupt or writing a 0b has no effect.
Enabling the Overheat Detection (ADP5051 Only)
In addition to the thermal shutdown protection, the ADP5051 has another overheat warning function,which compares the junction temperature against the specified overheat threshold: 105°C, 115°C, or125°(adjustable in Register 8, TEMP_TH).
Unlike thermal shutdown, the overheat warning function only sends out a warning signal without anyshutdown. When the junction temperature rises above the threshold, the status bit, TEMP_INT, goeshigh. To clear the TEMP_INT status bit, write 1b to the status bit. The TEMP_INT bit status is latcheduntil the bit is cleared.
Use the ADP5051 GUI software to set the TEMP_TH register to enable the overheat feature. ConfigureTEMP_INT to source this overheat fault into the pin.

Rev 21 Jan 2014 15:09 | Page 23
Enabling the Low Input Voltage Detection (ADP5051 Only)
In addition to the undervoltage lockout (UVLO), the ADP5051 includes a low input voltage detectioncircuit (to monitor PVIN1 only) that compares the input voltage against the specified voltage threshold,which is adjustable from 4.2 V to 11.2 V with 0.5 V steps in Register 8, TH_CFG.
Unlike the UVLO shutdown, the low input voltage warning function only sends out a warning signalwithout any shutdown. When the input voltage drops below the threshold, the status bit, LVIN_INT,goes high. To clear the LVIN_INT status bit, write 1b to the status bit. The LVIN_INT bit status islatched until the bit is cleared.
Use the ADP5051 GUI software to set the LVIN_TH bit to enable the low input voltage detectionfeature. Configure LVIN_INT to source the low input fault into the nINT pin.
Enabling the Dynamic Voltage Scaling (ADP5051 Only)
The ADP5051 provides a dynamic voltage scaling (DVS) function for Channel 1 and Channel 4, andthose outputs can be real-time settings via I2C interface. Because only fixed output options supportthe DVS function, FB1 and FB4 must be connected to the output by placing a 0 Ω resistor on RTOP.
Use the ADP5051 GUI software to set DVSx-INTVAL and enable DVSx-ON in Register 0x05. Then,change the different VID options in the CHx VOUTx register to obtain a real-time output voltage stepup or step down.
Note that to avoid rapid output voltage changes to the next target value that result in abnormalproblems, such as PWRGD failure, OVP latch-off, or hiccup, enable the DVS function prior tosetting VID.
EVALUATION BOARD SCHEMATICS ANDARTWORK

Rev 21 Jan 2014 15:09 | Page 24
Figure 22. Evaluation Board Schematic of the ADP5051/ADP5053 Evaluation Board
Figure 23. Top Layer, Recommended Layout for the ADP5051/ADP5053 Evaluation Board

Rev 21 Jan 2014 15:09 | Page 25
Figure 24. Second Layer, Recommended Layout for the ADP5050/ADP5052 Evaluation Board
Figure 25. Third Layer, Recommended Layout for the ADP5051/ADP5053 Evaluation Board

Rev 21 Jan 2014 15:09 | Page 26
Figure 26. Bottom Layer, Recommended Layout for the ADP5051/ADP5053 Evaluation Board
Ordering Information
Bill of Materials
Note that connection points listed in the Reference Designator column match the imprint on theevaluation board. When these refer to pin connections, the imprint may not match the pin nameexactly, for example, NMR rather than .
Table 7. Bill of Materials
Qty. ReferenceDesignator Description Manufacturer Part Number
1 U1 Micro PMU Analog Devices ADP5051 or ADP50531 U2 Dual MOSFETs, 16.4 mΩ Vishay Si7232DN
4 CIN_1, CIN_2, CIN_3,CIN_4
Capacitor, MLCC, 10 µF, 25 V,1206 Murata GRM31CR61E106KA12L
4 COUT_2, COUT_3,COUT_4, COUT_6
Capacitor, MLCC, 47 µF, 6.3 V,0805 Murata GRM21BR60J476ME15
2 COUT_9, COUT_10 Capacitor, MLCC, 22 µF, 6.3 V,0805 T-Y LMK212BJ226MG-T
1 L1 Inductor, 1.0 µH, 11.2 A Toko FDV0530-1R0M

Rev 21 Jan 2014 15:09 | Page 27
1 L2 Inductor, 2.2 µH, 7.1 A Toko FDV0530-2R2M1 L3 Inductor, 4.7 µH, 2.7 A Coilcraft XAL4020-4721 L4 Inductor, 10 µH, 2.3 A Taiyo Yuden NR5040T-100M
5 C1, C3, C4, C5, C13 Capacitor, MLCC, 0.1 µF, 16 V,0402 Murata GRM155R71C104KA88D
2 C2, C14 Capacitor, MLCC, 1 µF, 6.3 V,0402 Murata GRM155R60J105KE19D
2 C7, C8 Capacitor, MLCC, 560 pF, 50V, 0402 Murata GRM155R71H561KA01D
2 C9, C10 Capacitor, MLCC, 2.7 nF, 50 V,0402 Murata GRM2165C1H272JA01D
1 R2 Resistor, 4.99 kΩ, 1%, 0402 Panasonic ERJ-2RKF4991X1 R3 Resistor, 32.4 kΩ, 1%, 0402 Panasonic ERJ-2RKF2322X1 R4 Resistor, 31.6 kΩ, 1%, 0402 Vishay CRCW040231K6F1 R5 Resistor, 52.3 kΩ, 1%, 0402 Vishay CRCW040252K3F1 R6 Resistor, 12.4 kΩ, 1%, 0402 Panasonic ERJ-2RKF1242X2 R7, R8 Resistor, 22 kΩ, 1%, 0402 Panasonic ERJ-2GEJ223X2 R12, R17 Resistor, 20 kΩ, 1%, 0402 Panasonic ERJ-2RKF2002X
11 R13, R19, R24 to R26,R28 to R31, R58, R61 Resistor, 10 kΩ, 1%, 0402 Panasonic ERJ-2RKF1002X
1 R15 Resistor, 10 kΩ, 1%, 0603 Vishay CRCW060310K0F2 R39, R40 Resistor, 0 kΩ, 1%, 0402 Panasonic ERJ-2GE0R00X1 R20 Resistor, 24 kΩ, 1%, 0402 Panasonic ERJ-2RKF24023 D1, D2, D3 LED, 0603 Panasonic LNJ208R8ARA
6 J-EN1, J-EN2, J-EN3,J-EN4, J-SYNC, JP2 3-Pin Header Samtec TSW-103-08-G-S
16 J11, J12, J15 to J22, LK7,LK8, S1, S2, S3, S4 2-Pin Header Samtec TSW-150-07-T-S
1 SW1 Switcher button MULTICOMP MC32829
10TP9, TP10, TP11, nINT,VREG, VDDIO, PWRGD,WDI, NMR, NRSTO
Test Point, 1206 MAC8 HK-1-G
10 R16, R18, R53 to R57,R59, R60, R62 No assembly No assembly No assembly
6COUT_1, COUT_7,COUT_8 COUT_11,COUT_12, COUT_13
No assembly No assembly No assembly
RELATED LINKSResource Description
ADP5051 4-channel integrated power solution with quad buck regulators and POR/WDI with an I2Cinterface
ADP5053 4-channel integrated power solution with quad buck regulators and POR/WDI

Rev 21 Jan 2014 15:09 | Page 28
© Analog Devices, Inc. All rights reserved. Trademarks andregistered trademarks are the property of their respectiveowners. www.analog.com