ew-7611ulb quick installation guide - edimax€¦ · click the ew-7611ulb wireless usb adapter to...
TRANSCRIPT
EW-7611ULB
Quick Installation Guide 05-2016 / v1.0

I. Product Information .............................................................................. 1
I-1. Package Contents .................................................................................................................. 1
I-2. LED Status .............................................................................................................................. 1
I-3. System Requirements ............................................................................................................ 1
I-4. Safety ..................................................................................................................................... 2
II. Installation ............................................................................................ 3
III. Windows ............................................................................................... 4
III-1. Driver Installation .................................................................................................................. 4
III-2. Driver Uninstallation .............................................................................................................. 8
IV. Mac OS ................................................................................................. 9
IV-1. Driver Installation .................................................................................................................. 9
IV-2. Driver Uninstallation ............................................................................................................ 14
V. Disabling Network Adapters ................................................................. 15
V-1. Windows 7 ........................................................................................................................... 15
V-2. Windows 8.1 & 10 ................................................................................................................ 16
V-3. Mac ...................................................................................................................................... 17
VI. Using The Adapter ................................................................................ 18
VI-1. Windows .............................................................................................................................. 18
VI-2. Mac ...................................................................................................................................... 22

MMuullttii--LLaanngguuaaggee QQuuiicckk IInnssttaallllaattiioonn GGuuiiddee ((QQIIGG)) oonn tthhee CCDD
Čeeššttiinnaa: Českého průvodce rychlou instalací naleznete na přiloženém CD s ovladači
DDeeuuttsscchh:: Finden Sie bitte das deutsche S.A.L. beiliegend in der Treiber CD
EEssppaaññooll: Incluido en el CD el G.R.I. en Español.
FFrraannççaaiiss:: Veuillez trouver l’français G.I.R ci-joint dans le CD
IIttaalliiaannoo:: Incluso nel CD il Q.I.G. in Italiano.
MMaaggyyaarr:: A magyar telepítési útmutató megtalálható a mellékelt CD-n
NNeeddeerrllaannddss: De nederlandse Q.I.G. treft u aan op de bijgesloten CD
PPoollsskkii: Skrócona instrukcja instalacji w języku polskim znajduje się na załączonej płycie CD
PPoorrttuugguuêêss: Incluído no CD o G.I.R. em Portugues
РРууссссккиийй:: Найдите Q.I.G. на pусскoм языке на приложеном CD
TTüürrkkççee:: Ü rün ile beraber gelen CD içinde Türkçe Hızlı Kurulum Kılavuzu'nu bulabilirsiniz
УУккррааїїннссььккаа:: Для швидкого налаштування Вашого пристрою, будь ласка, ознайомтесь з інструкцією на CD

1
I. Product Information I-1. Package Contents
I-2. LED Status
I-3. System Requirements
- Windows 7 - 10, Mac OS X 10.7 – 10.11 - USB 2.0 Port - Hard Disk: 100MB - CD-ROM Drive
LED LED Status Description
WLAN On
Wireless activity: transmitting or receiving data.
Off No wireless activity. LED
2
I-4. Safety In order to ensure the safe operation of the device and its users, please read and act in accordance with the following safety instructions. 1. The wireless adapter is designed for indoor use only; do not place the
wireless adapter outdoors. 2. Do not place the wireless adapter in or near hot/humid places, such as a
kitchen or bathroom. 3. The wireless adapter contains small parts which are a danger to small
children under 3 years old. Please keep the wireless adapter out of reach of children.
4. There are no user-serviceable parts inside the wireless adapter. If you
experience problems with the wireless adapter, please contact your dealer of purchase and ask for help.
5. The wireless adapter is an electrical device and as such, if it becomes wet
for any reason, stop using it immediately. Contact an experienced electrical technician for further help.
3
II. Installation
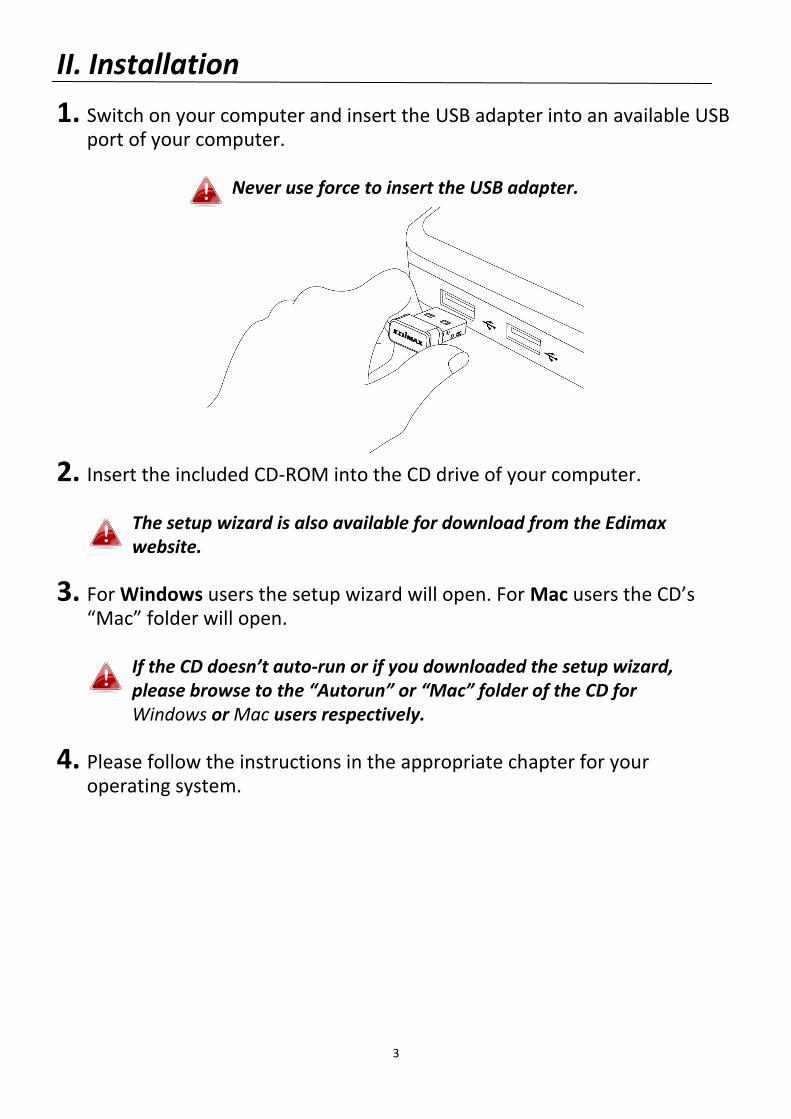
1. Switch on your computer and insert the USB adapter into an available USB port of your computer.
Never use force to insert the USB adapter.
2. Insert the included CD-ROM into the CD drive of your computer.
The setup wizard is also available for download from the Edimax website.
3. For Windows users the setup wizard will open. For Mac users the CD’s
“Mac” folder will open.
If the CD doesn’t auto-run or if you downloaded the setup wizard, please browse to the “Autorun” or “Mac” folder of the CD for Windows or Mac users respectively.
4. Please follow the instructions in the appropriate chapter for your
operating system.
4
III. Windows
III-1. Driver Installation
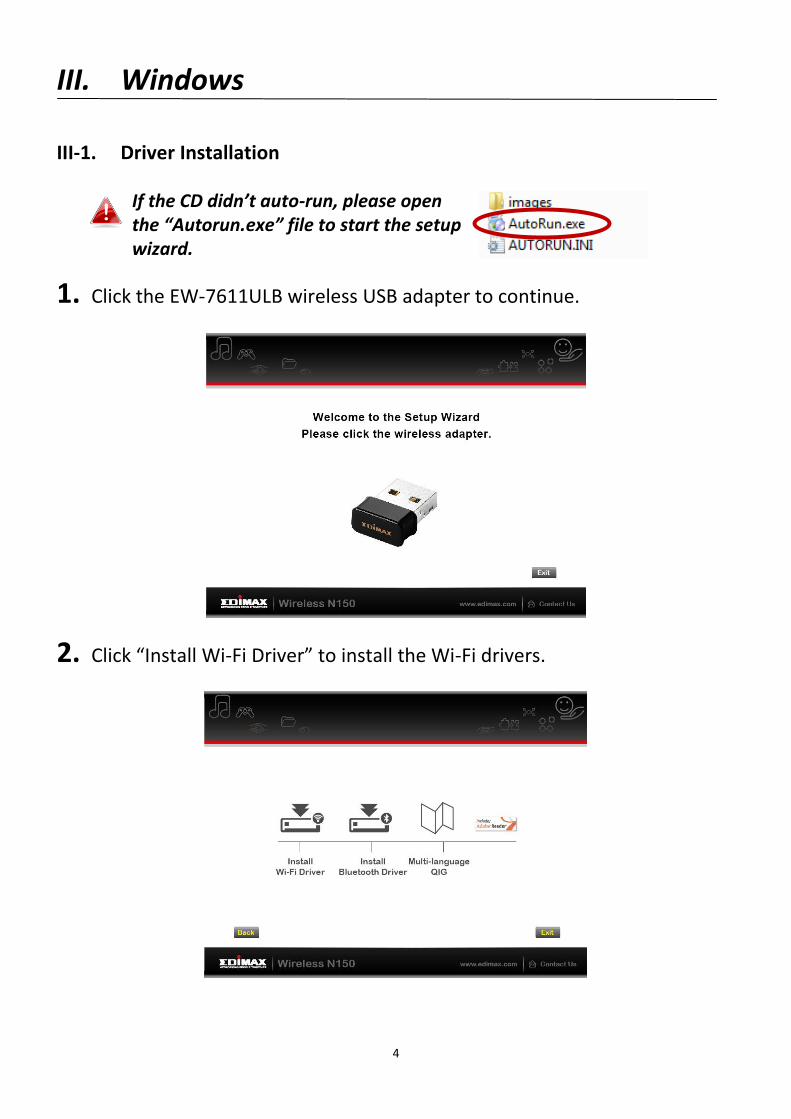
If the CD didn’t auto-run, please open the “Autorun.exe” file to start the setup wizard.
1. Click the EW-7611ULB wireless USB adapter to continue.
2. Click “Install Wi-Fi Driver” to install the Wi-Fi drivers.

5
3. Click “Next” to continue and follow the instructions on-screen until installation is complete.
4. You need to install the Bluetooth drivers next, so select restart your computer later and click “Finish”.

6
5. Click “Install Bluetooth Driver” to install the Bluetooth drivers.
6. Click “Next” to continue and follow the instructions on-screen until installation is complete.

7
7. You need to restart your computer before using the adapter. Choose whether to restart now or later and click “Finish” to continue.
8. Click “Exit” to close the setup wizard.
The multi-language QIG is also included on the CD-ROM. To open it click “Multi-language QIG”.
9. Please disable any other wireless adapters as described in V. Disabling
Network Adapters. Then, Windows users can connect to an available Wi-Fi network or Bluetooth device as usual. For guidance on doing so, please refer to VI. Using The Adapter.

8
III-2. Driver Uninstallation To uninstall drivers for your adapter, use the Windows Control Panel built-in Programs and Features, Uninstall a Program or Add or Remove Programs feature. An example is shown below: 1. Open Control Panel using the Start menu
or Search function. 2. Select Uninstall a program under the
Programs category.
3. Select Edimax Wi-Fi N150 (or similar) and Edimax Bluetooh 4.0 (or similar)
and click Uninstall.

9
IV. Mac OS IV-1. Driver Installation
Bluetooth connectivity is Windows only. 1. Open the “RTLWLANU_MacOS..” folder and double click the
“Installer.pkg” file to open the driver installation wizard.
2. Click “Continue” to proceed to the next step.
3. The next screen displays important information, please read it carefully.
Click “Continue” when you are ready to continue.

10
4. Select a language (the default language is English) and click “Continue” to install the driver.
5. To read the software license click “Read License” and then click “Agree” to
confirm you agree to the terms. You must agree to the terms to continue installing the software.

11
6. If prompted, select which user to install the software for and click “Continue”.
7. Click “Install” to install the driver.
12
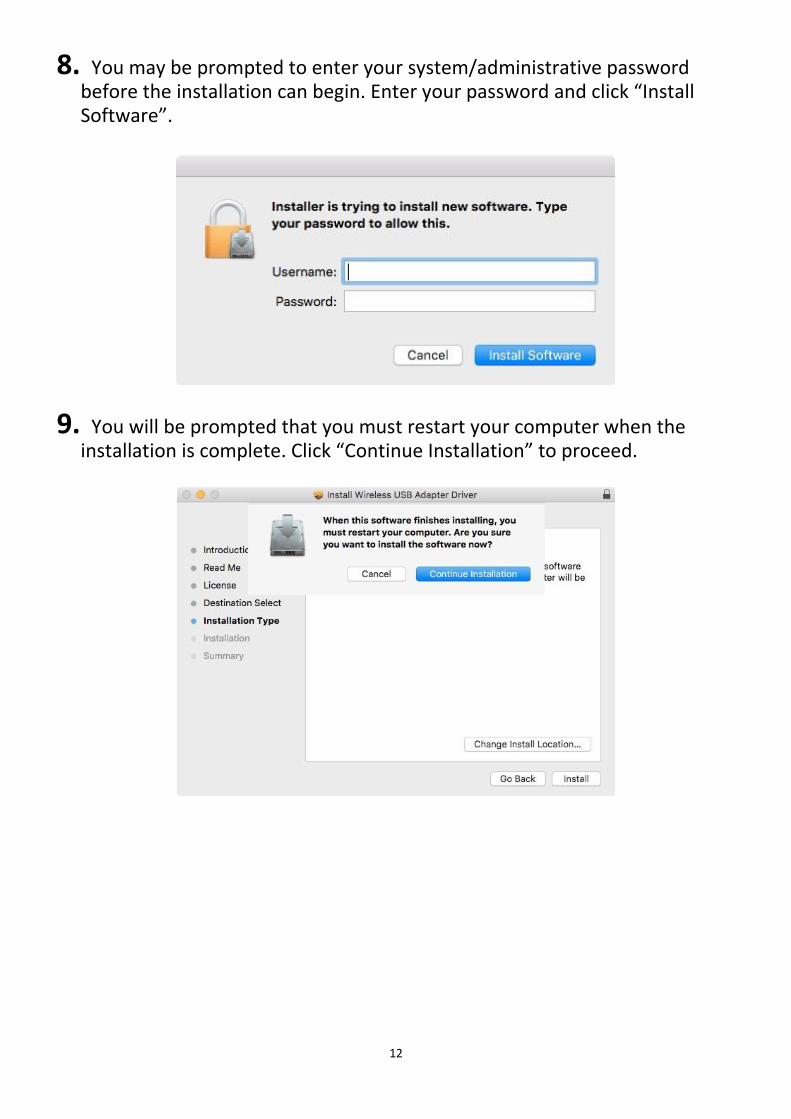
8. You may be prompted to enter your system/administrative password before the installation can begin. Enter your password and click “Install Software”.
9. You will be prompted that you must restart your computer when the installation is complete. Click “Continue Installation” to proceed.
13
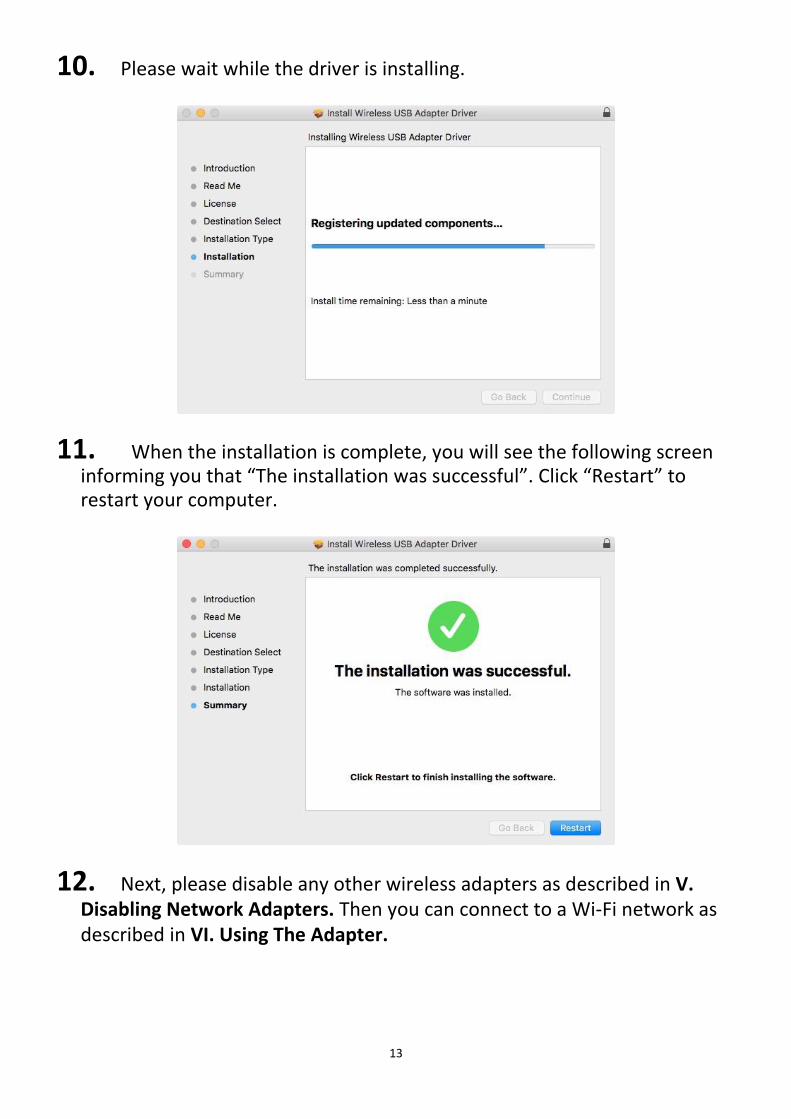
10. Please wait while the driver is installing.
11. When the installation is complete, you will see the following screen informing you that “The installation was successful”. Click “Restart” to restart your computer.
12. Next, please disable any other wireless adapters as described in V.
Disabling Network Adapters. Then you can connect to a Wi-Fi network as described in VI. Using The Adapter.
14
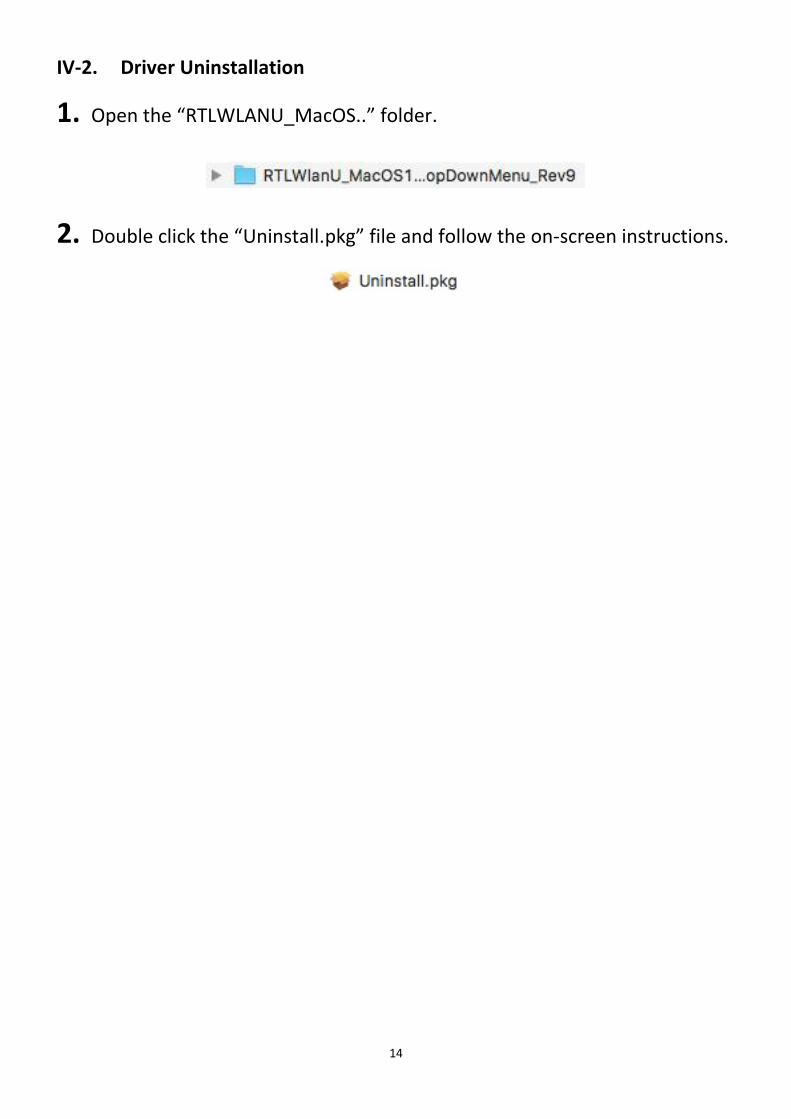
IV-2. Driver Uninstallation 1. Open the “RTLWLANU_MacOS..” folder.
2. Double click the “Uninstall.pkg” file and follow the on-screen instructions.

15
V. Disabling Network Adapters
To ensure that your USB wireless adapter can function correctly, it is recommended that you disable any other existing wireless network and Bluetooth adapters installed on your computer. If you are unsure how to do so, you can refer to the user manual for your computer, or follow the examples below.
V-1. Windows 7
Go to Start > Control Panel. Click View network status and tasks > Wireless Network Connection and click Disable.

16
V-2. Windows 8.1 & 10
1. Go to File Explorer > Network (right click) > Properties > Change adapter settings.
2. Right click your wireless adapter, select “Properties” and then “Disable”.
17
V-3. Mac
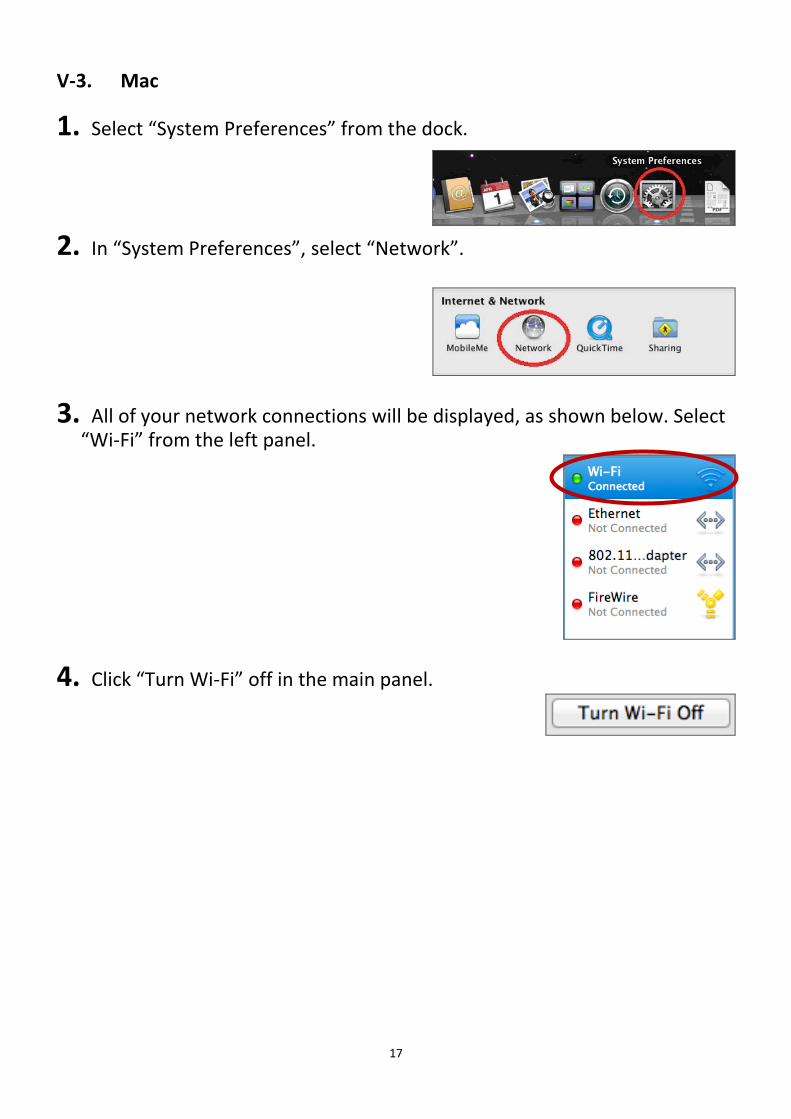
1. Select “System Preferences” from the dock.
2. In “System Preferences”, select “Network”.
3. All of your network connections will be displayed, as shown below. Select
“Wi-Fi” from the left panel.
4. Click “Turn Wi-Fi” off in the main panel.
18
VI. Using The Adapter
After you have installed the driver and if necessary disabled other adapters, Windows users can connect to a Wi-Fi network or Bluetooth device as usual. Mac users need to connect to a Wi-Fi network using the included utility, as described in VI-2. Mac
VI-1. Windows Below is an example of how to connect - the process may vary according to your Windows edition.
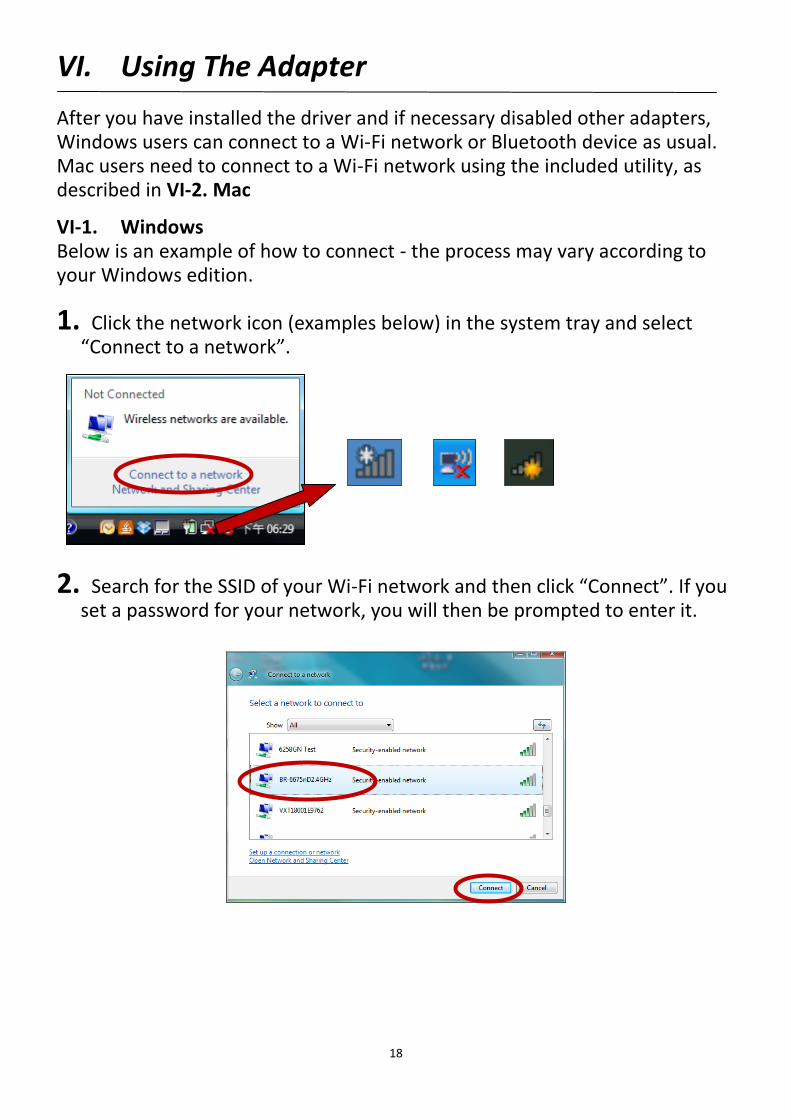
1. Click the network icon (examples below) in the system tray and select “Connect to a network”.
2. Search for the SSID of your Wi-Fi network and then click “Connect”. If you
set a password for your network, you will then be prompted to enter it.

19
3. After correctly entering your password, you will be successfully connected to your Wi-Fi network.
4. To connect to a Bluetooth device, go to Windows Bluetooth settings by using the search bar, or by right clicking the Bluetooth icon in the task bar and choosing Add a Bluetooth Device.

20
5. Select your Bluetooth device and click Pair and then confirm the passcode.
21
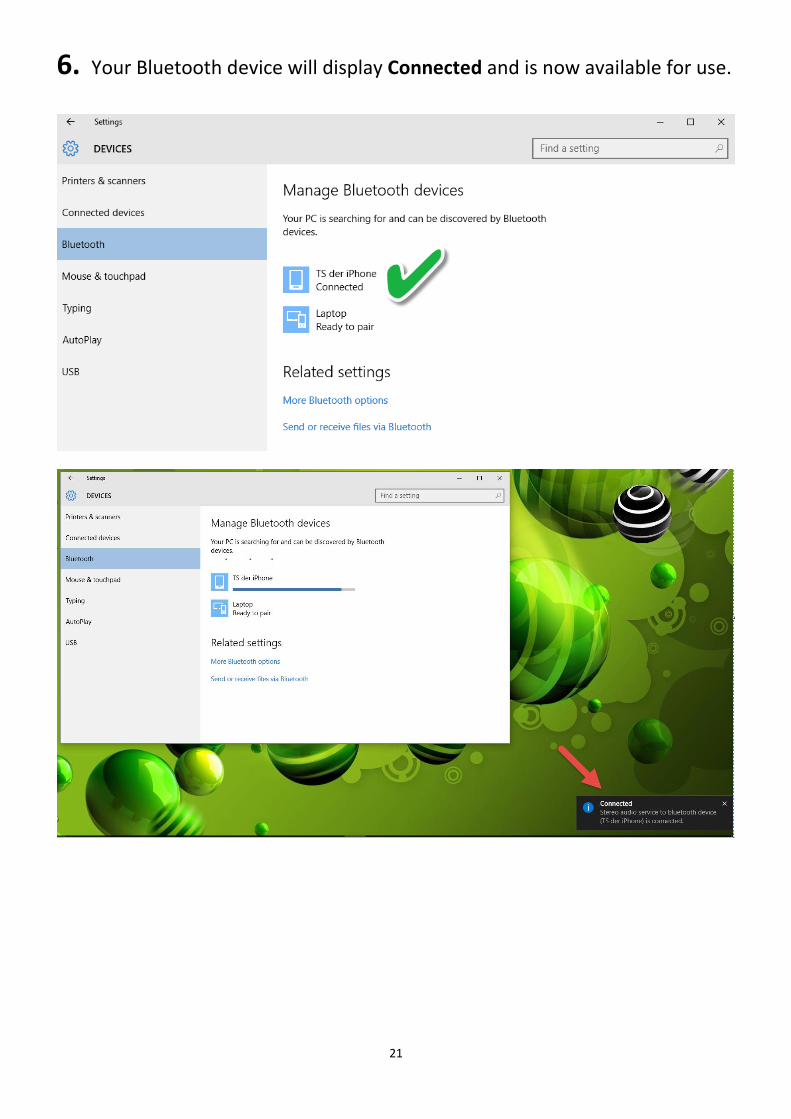
6. Your Bluetooth device will display Connected and is now available for use.
22
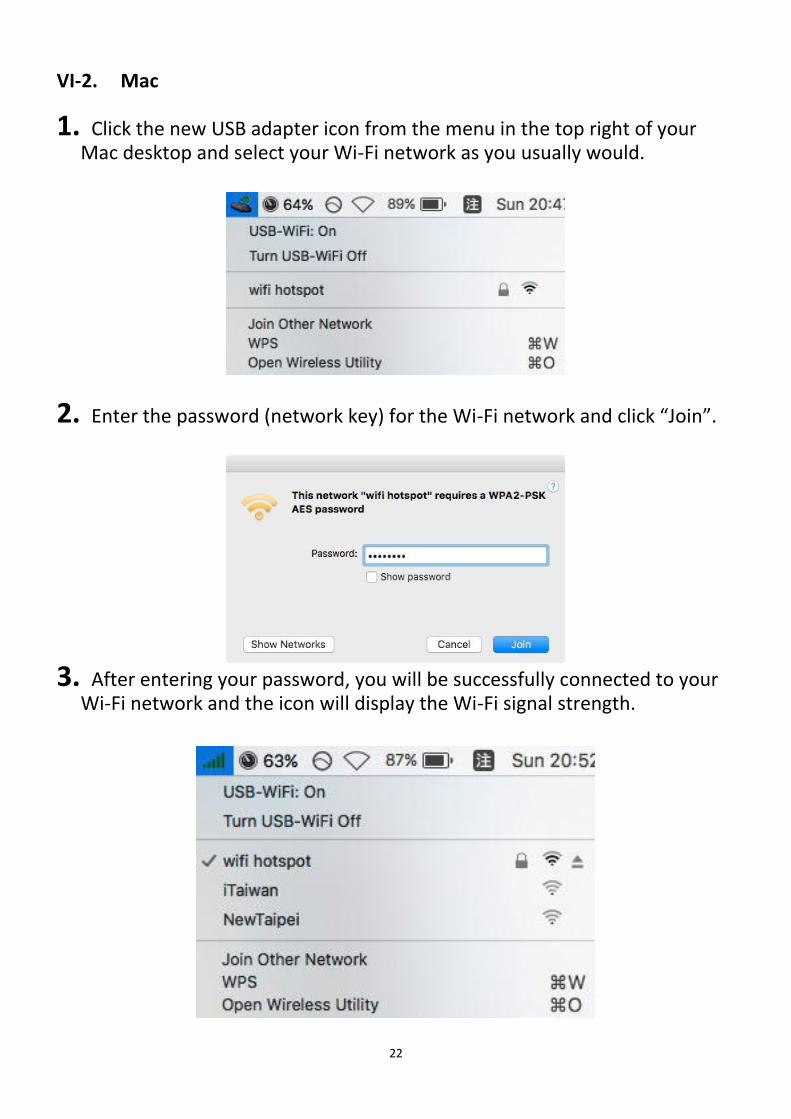
VI-2. Mac 1. Click the new USB adapter icon from the menu in the top right of your
Mac desktop and select your Wi-Fi network as you usually would.
2. Enter the password (network key) for the Wi-Fi network and click “Join”.
3. After entering your password, you will be successfully connected to your Wi-Fi network and the icon will display the Wi-Fi signal strength.

23
4. You can use the other items in the menu to switch your USB adapter
on/off, join another network (manually enter SSID name) display WPS PIN or activate WPS push button mode.
WPS (Wi-Fi Protected Setup) is a simple, alternative way to establish connections between WPS compatible devices. Most modern wireless network devices feature a built-in WPS button, which activates WPS on that device. When WPS is activated in the correct manner and at the correct time for two compatible devices, they will automatically connect to each other. WPS can be activated via the Wi-Fi utility, which has the same effect as physically pushing the WPS button (known as PBC or “push button configuration”). PIN code WPS is an additional variation of WPS which can be activated from a device’s web user interface, and includes the use of a PIN code between the two devices for identification and verification.

24
COPYRIGHT Copyright Edimax Technology Co., Ltd. all rights reserved. No part of this publication
may be reproduced, transmitted, transcribed, stored in a retrieval system, or translated
into any language or computer language, in any form or by any means, electronic,
mechanical, magnetic, optical, chemical, manual or otherwise, without the prior written
permission from Edimax Technology Co., Ltd.
Edimax Technology Co., Ltd. makes no representations or warranties, either expressed or
implied, with respect to the contents hereof and specifically disclaims any warranties,
merchantability, or fitness for any particular purpose. Any software described in this
manual is sold or licensed as is. Should the programs prove defective following their
purchase, the buyer (and not this company, its distributor, or its dealer) assumes the
entire cost of all necessary servicing, repair, and any incidental or consequential damages
resulting from any defect in the software. Edimax Technology Co., Ltd. reserves the right
to revise this publication and to make changes from time to time in the contents hereof
without the obligation to notify any person of such revision or changes.
The product you have purchased and the setup screen may appear slightly different from
those shown in this QIG. The software and specifications are subject to change without
notice. Please visit our website www.edimax.com for updates. All brand and product
names mentioned in this manual are trademarks and/or registered trademarks of their
respective holders.

25
Federal Communication Commission Interference Statement This equipment has been tested and found to comply with the limits for a Class B digital device, pursuant to Part 15 of FCC Rules. These limits are designed to provide reasonable protection against harmful interference in a residential installation. This equipment generates, uses, and can radiate radio frequency energy and, if not installed and used in accordance with the instructions, may cause harmful interference to radio communications. However, there is no guarantee that interference will not occur in a particular installation. If this equipment does cause harmful interference to radio or television reception, which can be determined by turning the equipment off and on, the user is encouraged to try to correct the interference by one or more of the following measures:
1. Reorient or relocate the receiving antenna. 2. Increase the separation between the equipment and receiver. 3. Connect the equipment into an outlet on a circuit different from that to which the receiver is connected. 4. Consult the dealer or an experienced radio technician for help.
FCC Caution This device and its antenna must not be co-located or operating in conjunction with any other antenna or transmitter. This device complies with Part 15 of the FCC Rules. Operation is subject to the following two conditions: (1) this device may not cause harmful interference, and (2) this device must accept any interference received, including interference that may cause undesired operation. Any changes or modifications not expressly approved by the party responsible for compliance could void the authority to operate equipment. Federal Communications Commission (FCC) Radiation Exposure Statement This equipment complies with FCC radiation exposure set forth for an uncontrolled environment. In order to avoid the possibility of exceeding the FCC radio frequency exposure limits, human proximity to the antenna shall not be less than 2.5cm (1 inch) during normal operation. Federal Communications Commission (FCC) RF Exposure Requirements This EUT is compliance with SAR for general population/uncontrolled exposure limits in ANSI/IEEE C95.1-1999 and had been tested in accordance with the measurement methods and procedures specified in OET Bulletin 65 Supplement C. The equipment version marketed in US is restricted to usage of the channels 1-11 only. This equipment is restricted to indoor use when operated in the 5.15 to 5.25 GHz frequency range.
R&TTE Compliance Statement
This equipment complies with all the requirements of DIRECTIVE 1999/5/EC OF THE EUROPEAN PARLIAMENT AND THE COUNCIL of March 9, 1999 on radio equipment and telecommunication terminal equipment and the mutual recognition of their conformity (R&TTE). The R&TTE Directive repeals and replaces in the directive 98/13/EEC (Telecommunications Terminal Equipment and Satellite Earth Station Equipment) As of April 8, 2000. Safety This equipment is designed with the utmost care for the safety of those who install and use it. However, special attention must be paid to the dangers of electric shock and static electricity when working with electrical equipment. All guidelines of this and of the computer manufacture must therefore be allowed at all times to ensure the safe use of the equipment. EU Countries Intended for Use The ETSI version of this device is intended for home and office use in Austria, Belgium, Bulgaria, Cyprus, Czech, Denmark, Estonia, Finland, France, Germany, Greece, Hungary, Ireland, Italy, Latvia, Lithuania, Luxembourg, Malta, Netherlands, Poland, Portugal, Romania, Slovakia, Slovenia, Spain, Sweden, Turkey, and United Kingdom. The ETSI version of this device is also authorized for use in EFTA member states: Iceland, Liechtenstein, Norway, and Switzerland. EU Countries Not Intended for Use None
26
EU Declaration of Conformity English: This equipment is in compliance with the essential requirements and other relevant
provisions of Directive 1999/5/EC, 2009/125/EC. Français: Cet équipement est conforme aux exigences essentielles et autres dispositions de la
directive 1999/5/CE, 2009/125/CE. Čeština: Toto zařízení je v souladu se základními požadavky a ostatními příslušnými ustanoveními
směrnic 1999/5/ES, 2009/125/ES. Polski: Urządzenie jest zgodne z ogólnymi wymaganiami oraz szczególnymi warunkami
określonymi Dyrektywą UE 1999/5/EC, 2009/125/EC. Română: Acest echipament este în conformitate cu cerinţele esenţiale şi alte prevederi relevante ale
Directivei 1999/5/CE, 2009/125/CE. Русский: Это оборудование соответствует основным требованиям и положениям Директивы
1999/5/EC, 2009/125/EC. Magyar: Ez a berendezés megfelel az alapvető követelményeknek és más vonatkozó irányelveknek
(1999/5/EK, 2009/125/EC). Türkçe: Bu cihaz 1999/5/EC, 2009/125/EC direktifleri zorunlu istekler ve diğer hükümlerle ile
uyumludur. Українська: Обладнання відповідає вимогам і умовам директиви 1999/5/EC, 2009/125/EC. Slovenčina: Toto zariadenie spĺňa základné požiadavky a ďalšie príslušné ustanovenia smerníc
1999/5/ES, 2009/125/ES. Deutsch: Dieses Gerät erfüllt die Voraussetzungen gemäß den Richtlinien 1999/5/EC, 2009/125/EC. Español: El presente equipo cumple los requisitos esenciales de la Directiva 1999/5/EC,
2009/125/EC. Italiano: Questo apparecchio è conforme ai requisiti essenziali e alle altre disposizioni applicabili
della Direttiva 1999/5/CE, 2009/125/CE. Nederlands: Dit apparaat voldoet aan de essentiële eisen en andere van toepassing zijnde bepalingen
van richtlijn 1999/5/EC, 2009/125/EC. Português: Este equipamento cumpre os requesitos essênciais da Directiva 1999/5/EC, 2009/125/EC. Norsk: Dette utstyret er i samsvar med de viktigste kravene og andre relevante regler i Direktiv
1999/5/EC, 2009/125/EC. Svenska: Denna utrustning är i överensstämmelse med de väsentliga kraven och övriga relevanta
bestämmelser i direktiv 1999/5/EG, 2009/125/EG. Dansk: Dette udstyr er i overensstemmelse med de væ sentligste krav og andre relevante
forordninger i direktiv 1999/5/EC, 2009/125/EC. Suomi: Tämä laite täyttää direktiivien 1999/5/EY, 2009/125/EY oleelliset vaatimukset ja muut
asiaankuuluvat määräykset.
----------------------------------------------------------------------------------------------------------------------- WEEE Directive & Product Disposal
At the end of its serviceable life, this product should not be treated as household or general waste. It should be handed over to the applicable collection point for the recycling of electrical and electronic equipment, or returned to the supplier for disposal.

27
Declaration of Conformity
We, Edimax Technology Co., Ltd., declare under our sole responsibility, that the
equipment described below complies with the requirements of the European R&TTE
directives.
Equipment: N150 WiFi Bluetooth 4.0 USB Adapter
Model No.: EW-7611ULB
The following European standards for essential requirements have been followed:
Directives 1999/5/EC
Spectrum : ETSI EN 300 328 V1.9.1 (2015-02);
EMC : EN 301 489-1 V1.9.2 (2011-09);
EN 301 489-17 V2.2.1 (2012-09);
Directives 2014/35/EC
Safety (LVD) : I EC 60950-1:2005 (2nd Edition)+Am 1:2009+Am 2:2013
EN 60950-1:2006+A11:2009+A1:2010+A12:2011+A2:2013
Edimax Technology Europe B.V. a company of :
Fijenhof 2, Edimax Technology Co., Ltd.,
5652 AE Eindhoven, No. 3, Wu Chuan 3rd Road,
THE NETHERLANDS Wu-Ku Industrial Park,
New Taipei City, Taiwan
Date of Signature: June, 2016
Signature:
Printed Name: Albert Chang
Title: Director
Edimax Technology Co., Ltd.
Signature:
Printed Name: Vivian Ma
Title:
Director
Edimax Technology Europe B.V.

28