excel 07 cs - cev multimedia sheet tab, type in new double-click sheet tab, type in new name and...
TRANSCRIPT
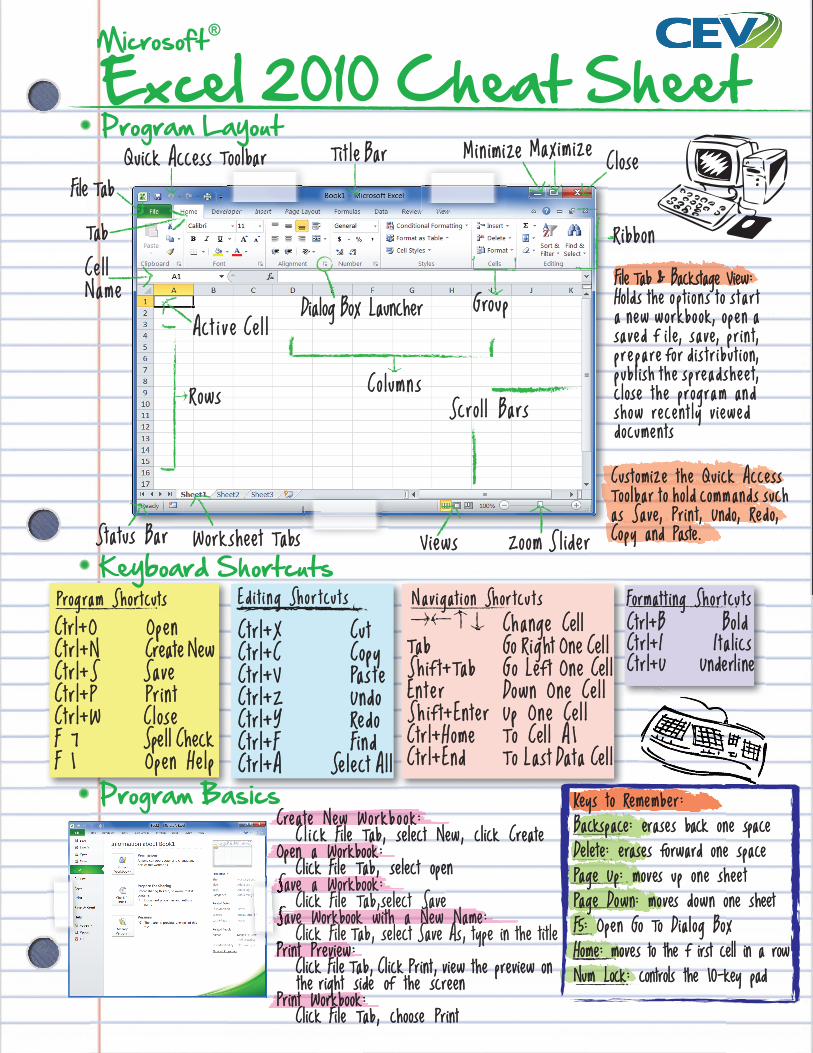
Program Layout
Co lum n sC o lum n s
Ed i t i n g Sho r t cu t sEd i t i n g Sho r t cu t s
C tr l+X Cu tCtr l+X Cu tCtr l+C CopyCtr l+C CopyCtr l+V Pas t eCtr l+V Pas t eCtr l+Z UndoCtr l+Z UndoCtr l+Y RedoCtr l+Y Red oCtr l+F Fin dCtr l+F Fin dCtr l+A Ctr l+A Select Al lSe lect Al l
N a v i gat i o n Shor t cu t sN a v i gat i o n Shor t cu t s Change Cell Change CellTab Go Ri ght One Cel lTab Go Ri ght One Cel lSh i f t+Tab Go Lef t One Cel lSh i f t+Tab Go Lef t One Cel lEn t e r Down One Cel lEn t e r Down One Cel lS h i f t+Enter Up One Cel lS h i f t+Enter Up One Cel lC tr l+Home To Cel l A 1Ctr l+Home To Cel l A 1Ctr l+EndCtr l+End To Last Data Cel l To Last Data Cel l
Prog ram Short cu tsProg ram Short cu ts
Ctrl+O OpenCtrl+O OpenCtr l+N Create NewCtr l+N Create NewCtr l+S SaveCtr l+S SaveCtr l+P Pr in tC tr l+P Pr in tC tr l+W C loseCtr l+W C loseF 7 Spell CheckF 7 Spell CheckF 1 Open HelpF 1 Open Help
Format t in g Sho r t cu tsFormat t in g Sho r t cu tsCtrl+B BoldCtrl+B BoldCt r l+I I ta l icsCt r l+I I ta l icsCtr l+U Underl i neCtr l+U Underl i ne
File Tab & Backstage View:File Tab & Backstage View:Hold s the o pt i o n s to s t a r t Hold s the o pt i o n s to s t a r t a new workb o ok, open a a new workb o ok, open a sa ved f i l e, sa v e, pr i n t, saved f i l e, sa ve, pr i n t, pr e pa re fo r d i s t r i b u t i o n, pr e pa re fo r d i s t r i b u t i o n, pub l i sh the sp read s hee t, pub l i sh the sp read s hee t, close the pr og ram an d close the pr og ram an d show recen t l y v i ewed show recen t l y v i ewed documen tsd o cumen ts
Cus tom ize the Quick Access Custom ize the Quick Access Too lbar to ho ld comm and s such Too lbar to ho ld comm and s such as Save, Prin t, Undo, Red o, as Save, Prin t, Undo, Red o, Co py and Paste.Co py and Paste.
Microsoft ®®
Keyboard Shortcuts
Keys to Remember:Keys to Remember:Backspace: erases back one spaceBackspace: erases back one spaceDelete: erases forward one spaceDelete: erases forward one spacePage Up: moves up one sheetPage Up: moves up one sheetPage Down: moves down one sheetPage Down: moves down one sheetF5: Open Go To Dial og BoxF5: Open Go To Dialog BoxHome: moves to the f irst cell in a rowHome: moves to the f irst cell in a rowNum Lock: controls the 10-key padNum Lock: controls the 10-key pad
Create New Workb o o k: Create New Workb o o k: C l i ck File Tab, select New, click Create C l i ck File Tab, select New, click Create Open a Workbook: Open a Workbook: Click File Tab, select openSave a Workbook: Click File Tab,select SaveSave Workbook with a New Name: Click File Tab, select Save As, type in the titlePrint Preview: Click File Tab, Click Print, view the preview on Click File Tab, Click Print, view the preview on the right side of the screen the right side of the screenPrint Workbook:Print Workbook: Click File Tab, choose Print Click File Tab, choose Print
SSSSSSSSSSSSS SSSSSSSSSSSSSSSSSSSSSSSSSSSS
SSSSSSSSSSSSSSSSSSSSSSSSSSSSSSSSSSSSSSSSSSSSSSSSSS SSSSSS
Program Basics
RibbonRibbon
Work sheet TabsWork sheet Tabs
Ce llCe l lNameName
Act i v e Ce l lAct i v e Ce l l
RowsRows
Max im izeMax im ize
File TabFile TabQuick Access Toolbar Ti t l e BarTi t le Bar M i n im i zeM i n im i ze C loseC lose
ZoomZoom S l id erS l id erV iewsV iewsStatus BarStatus Bar
Scro l l BarsScro l l Bars
oolbaoolba
Grou pGrou p
TabTab
Dialog Box LauncherDialog Box Launcher
Excel 2010 Cheat Sheet

Workbook TipsppAdd Worksheet: Add Worksheet: Click Insert Worksheet tab next to sheet Click Insert Worksheet tab next to sheet tabs at the bottom of the program screen tabs at the bottom of the program screenDelete Worksheet: Delete Worksheet: Select the worksheet, click the delete Select the worksheet, click the delete button in the Cells group on the Home button in the Cells group on the Home tab and select Delete Sheet tab and select Delete Sheet
Rename Worksheet: Rename Worksheet: Double-click sheet tab, type in new Double-click sheet tab, type in new name and press enter name and press enterAdd Illustrations to Worksheet: Add Illustrations to Worksheet: Click on the Insert tab and look in the Click on the Insert tab and look in the Illustrations group Illustrations groupAdjust Margins, Orientation, Size and Breaks: Adjust Margins, Orientation, Size and Breaks: Click the Page Layout tab on the Ribbon Click the Page Layout tab on the Ribbon and use the Page Setup group and use the Page Setup group
Page Setup GroupPage Setup GroupI l l u s t r a t i o n s G r o u pI l l u s t r a t i o n s G r o u p
Formulas & Functions
Always start with Always start with an equals sign.an equals sign.
Formu las Tab
Funct i on LibraryFunct i on LibraryFormu la Aud i t i ngFormu la Aud i t i ng
TabTab
Ca lcu la t i onCa lcu la t i on
D e f i n e d Nam e sD e f i n e d Nam e s
Formu la BarFormu la BarCe l l Name Cel l Name Box Box
Formulas
Formulas
Functions
Functions
To Insert a Formula:To Insert a Formula: Select the cell, press = and enter the Select the cell, press = and enter the formula formula
Math Operators for Formulas:Addition + Multiplication *Subtraction - Division /
If multiple operators, If multiple operators, Excel will Excel will
follow the order of follow the order of operations.operations.
To Insert a Function:To Insert a Function: Select the cell, click the Insert Select the cell, click the Insert Function button on the Formula Bar or Function button on the Formula Bar or on the Formulas Tab on the Formulas Tab
Inser t Funct i on But tonInser t Funct i on But ton
Inser t Funct i on Inser t Funct i on But ton But ton
Symbols used in Functions:Symbols used in Functions:To indicate a range of cells use a colon :To indicate a range of cells use a colon :Always place parentheses around the cellsAlways place parentheses around the cells

Chart GroupChart Group
Items to AddAHeader & Footer:Header & Footer:Click the Insert tab on the Ribbon and click the Header & Footer Click the Insert tab on the Ribbon and click the Header & Footer button in the Text groupbutton in the Text groupHyperlinks:Hyperlinks:Select the cell, click hyperlink in the Links group, on the Insert tabSelect the cell, click hyperlink in the Links group, on the Insert tabComments:Comments:Select the cell, click the Review tab on the Ribbon, click the New Select the cell, click the Review tab on the Ribbon, click the New Comment button in the Comments group, type the comment, then Comment button in the Comments group, type the comment, then click outside the comment text boxclick outside the comment text box
Spreadsheet Views-Spreadsheet Views-Normal View- allows worksheet to take up the Normal View- allows worksheet to take up the entire windowentire windowPage Layout View- breaks down worksheet Page Layout View- breaks down worksheet page by pagepage by pageFull Screen View- expands spreadsheet to f it Full Screen View- expands spreadsheet to f it your screen sizeyour screen size
Chart DataChart Data
Use the Chart Tools secti on of the Ribbon to change the Design, the Ribbon to change the Design, Layout and Form at of the char t.Layout and Form at of the char t.
Charts
Ch t T l t i ftCh t T l tttlT ltthhCCU th Cth ChhttU i ftttllTt TtthhCChthttU
To Create a Chart:To Create a Chart:Select the cell range containing Select the cell range containing the data youthe data you want to want to make make a chart a chart and click the Insert and click the Insert tab on the Ribbon. tab on the Ribbon. Click a Click a chart type in the Char ts group chart type in the Char ts group and select the chart and select the chart you want to you want to use use from from the l ist.the l ist.
Bar ChartBar Chart
Chart ToolsChart Tools
Links GroupLinks GroupHeader & Footer ButtonHeader & Footer Button
Insert TabInsert Tab
Pivot TablePivot Table Illustrations GroupIllustrations Group
Workbook ViewsWorkbook Views Show/Hide OptionsShow/Hide Options Window OptionsWindow OptionsZoomZoom
Sparklines GroupSparklines Group

Formatting Basics
Adjust Row Height:djust Row Height: Drag the bottom border of the row header Drag the bottom border of the row headerAdd Cell Borders:Add Cell Borders: Select the cell, click the Border button list Select the cell, click the Border button list arrow arrow in the Font group on the Home tab in the Font group on the Home tab and select a border type and select a border typeAdd Cell Shading:Add Cell Shading: Select the cell, click the Fill Color button list Select the cell, click the Fill Color button list arrow arrow in the Font group on the Home tab and in the Font group on the Home tab and select a colorselect a color
Font GroupFont GroupAlignment ButtonsAlignment Buttons
Ed i t i n g Sho r t cu t sEd i t i n g Sho r t cu t sC tr l+X Cu tCtr l+X Cu tCtr l+C CopyCtr l+C CopyCtr l+V Pas t eCtr l+V Pas t e
Insert a Row or Column:Insert a Row or Column:Right-click the row or column heading to thecright of Right-click the row or column heading to thecright of the column or below the row you want to insert, select the column or below the row you want to insert, select Insert from the menuInsert from the menuDelete a Row or Column:Delete a Row or Column:Select the row or column heading, right-click and Select the row or column heading, right-click and choose Delete from the menuchoose Delete from the menu
Edit a Cell’s Contents:Edit a Cell’s Contents:Select the cell and begin typingSelect the cell and begin typingClear a Cell’s Contents:Clear a Cell’s Contents:Select the cell and press Delete Select the cell and press Delete Drag and Drop to Move Cells:Drag and Drop to Move Cells:Select the cells, point the mouse over any Select the cells, point the mouse over any border of the cells, then drag to the destinationborder of the cells, then drag to the destinationDrag and Drop to Copy Cells:Drag and Drop to Copy Cells:Select the cells you want, point to any border Select the cells you want, point to any border of the cells and press the Ctrl key while draggingof the cells and press the Ctrl key while dragging
Editing Basics
Format Text:Format Text: Use the Font group on the Home tab Use the Font group on the Home tabFormat Values:Format Values: Use the Number group on the Home tab Use the Number group on the Home tabChange Cell Alignment:Change Cell Alignment: Select cell and click the alignment button Select cell and click the alignment button in in the Alignment group on the Home tabthe Alignment group on the Home tabAdjust Column Width:Adjust Column Width: Drag the right border of the column header Drag the right border of the column header
Your Notes...