exception reporting portal (erp) servicer user manual
TRANSCRIPT
Fannie Mae Confidential and Proprietary © 2021 Fannie Mae 12.22.21 Page 1 of 35
Exception Reporting Portal (ERP) Servicer User Manual Version 1.03
Effective Date: 12/22/2021

© 2021 Fannie Mae. Trademarks of Fannie Mae. 12.22.21 Page 2 of 35
Revision History
Version Date Revised Description/Reason for Revision
1.00 10/01/2018 New Document
1.01 07/16/2019 Illustration of Save Icon added to page 26 for clarity.
Report Types Retired and Removed page 45.
DQR_FNMA_MOD_TERM_QC
DQR_FNMA_MOD_PRIORELG
DQR_FNMA_MOD_INTRT_QC DQR_MOD_PROP_VAL_QC
DQR_FNMA_MOD_RT_DIFF
DQR_MOD_PI_0_PCT
DQR_SVC_FEE_NOTE_RT
DQR_MOD_DELQ_INT_CALC
Report Types Added page 45.
DQR_FLEX_MOD_INT_RATE
DQR_DISASTER_CAP_EXT
DQR_FLEX_MOD_FORB
CMDS
1.02 08/03/2020 Added two new sections: Updating User Email Notifications, Bulk Decisioning
Tasks or Exceptions
Updated steps/screenshots throughout manual to mirror the existing ERP
Retired the HAMP_Mismatch_Recon Report
Added the Forbearance Duration Report and the Unapproved Attorney List
Report
1.03 12/22/2021 Added “Follow-Up” Report Status

© 2021 Fannie Mae. Trademarks of Fannie Mae. 12.22.21 Page 3 of 35
Table of Contents
Exception Reporting Portal Overview .................................................................................................................................... 4
Logging into the ERP ............................................................................................................................................................... 5
New User Login ................................................................................................................................................................... 5
Username Reset .................................................................................................................................................................. 6
Password Reset .................................................................................................................................................................. 7
Main Menu – Home Screen ...................................................................................................................................................... 9
ERP Basic Navigation .............................................................................................................................................................. 9
Navigation Icons ................................................................................................................................................................. 9
Actionable Icons ............................................................................................................................................................... 10
Page Setup ........................................................................................................................................................................ 11
Dashboard ............................................................................................................................................................................. 12
Exception Reporting Portal (KPIs) ................................................................................................................................... 12
Active Loan Pipeline Aging ............................................................................................................................................... 13
Active Loan Pipeline by Report Type and Status ............................................................................................................. 13
Workstation ........................................................................................................................................................................... 14
Navigation ......................................................................................................................................................................... 14
Action Icons ...................................................................................................................................................................... 17
+ Action ............................................................................................................................................................................. 20
Export to Excel .................................................................................................................................................................. 23
Repository ............................................................................................................................................................................. 23
Reports .................................................................................................................................................................................. 24
Users – Administration Only ................................................................................................................................................. 25
Active Users ...................................................................................................................................................................... 26
Inactive Users ................................................................................................................................................................... 27
Create New User ............................................................................................................................................................... 28
Disable Users .................................................................................................................................................................... 30
Updating User Email Notifications................................................................................................................................... 31
Bulk Decisioning Tasks or Exceptions .............................................................................................................................. 32
Appendices ............................................................................................................................................................................ 34
Appendix A - Report Statuses and Definitions ................................................................................................................. 34
Appendix B - Report Types ............................................................................................................................................... 34

© 2021 Fannie Mae. Trademarks of Fannie Mae. 12.22.21 Page 4 of 35
Exception Reporting Portal Overview
This document provides process instructions for the Exception Reporting Portal (ERP). The ERP portal is simple to
navigate and allows Fannie Mae servicers to maximize efficiency and easily manage pipelines with features such as:
▪ Simple reporting capabilities,
▪ Real-time access to pipeline activities and communication with Fannie Mae Analysts,
▪ Easy access to loan details, and
▪ The ability to resolve case issues in one place.

© 2021 Fannie Mae. Trademarks of Fannie Mae. 12.22.21 Page 5 of 35
Logging into the ERP
New User Login
New users are provided with an ERP username and password to login for the first time.
1. Access the ERP.
2. Enter the User Name and temporary Password provided.
3. Click Submit.
Use the criteria listed below to update the temporary password.
4. Enter the new password.
5. Re-enter the new password.
6. Click Set New Password.

© 2021 Fannie Mae. Trademarks of Fannie Mae. 12.22.21 Page 6 of 35
Username Reset
Perform the following steps to request a user’s username:
1. Click Forgot My Password/Username from the menu on the left-hand side of the screen.
2. Click the Username radio button to display the Request Username pop-up window.
3. Enter the email address associated with the account.
4. Click Submit.
The username is sent to the email address on file. Allow several minutes for the reset to process and the email to be
delivered.
5. Log in using the credentials provided.

© 2021 Fannie Mae. Trademarks of Fannie Mae. 12.22.21 Page 7 of 35
Password Reset
Perform the following steps to reset a user’s password:
1. Click Forgot My Password/Username from the menu on the left-hand side of the screen.
2. Click the Password radio button to display the Password Reset pop-up window and perform the following:
a. Enter the Username.
b. Enter the email address associated with the account.
c. Click Submit once.
A pop-up message displays notifying the user that the password has been reset and sent to the user. DO NOT
select Submit again as the system will send additional password reset requests. The request may take a few
moments to process.

© 2021 Fannie Mae. Trademarks of Fannie Mae. 12.22.21 Page 8 of 35
3. Click the red X to exit.
The user receives an email with a temporary password.
4. Log in using the credentials provided.
The user is prompted to enter a new password.
5. Use the criteria listed to update the temporary password.
The password must comply with ALL the requirements listed below.

© 2021 Fannie Mae. Trademarks of Fannie Mae. 12.22.21 Page 9 of 35
Main Menu – Home Screen
After the user logs in successfully, the application displays the Home screen as well as the main menu items on the left-hand side
of the screen.
Alerts such as announcements, scheduled outages, and enhancements are displayed in the My Alerts box on the Home screen.
Enter a loan number in the FNMA Loan # search field in the upper-right corner to display all the instances of that loan within ERP
Reports. This search functionality is available on all ERP screens.
ERP Basic Navigation
Review the tables below for common navigation features and definitions.
Navigation Icons
Icon Name Icon Definition
FNMA LN #
Link
Fannie Mae loan number link to Workstation.
FNMA Loan #
Search
Located in the upper-right corner of every
screen.
Enter the FNMA Loan # to search for this loan in all
reports.
© 2021 Fannie Mae. Trademarks of Fannie Mae. 12.22.21 Page 10 of 35
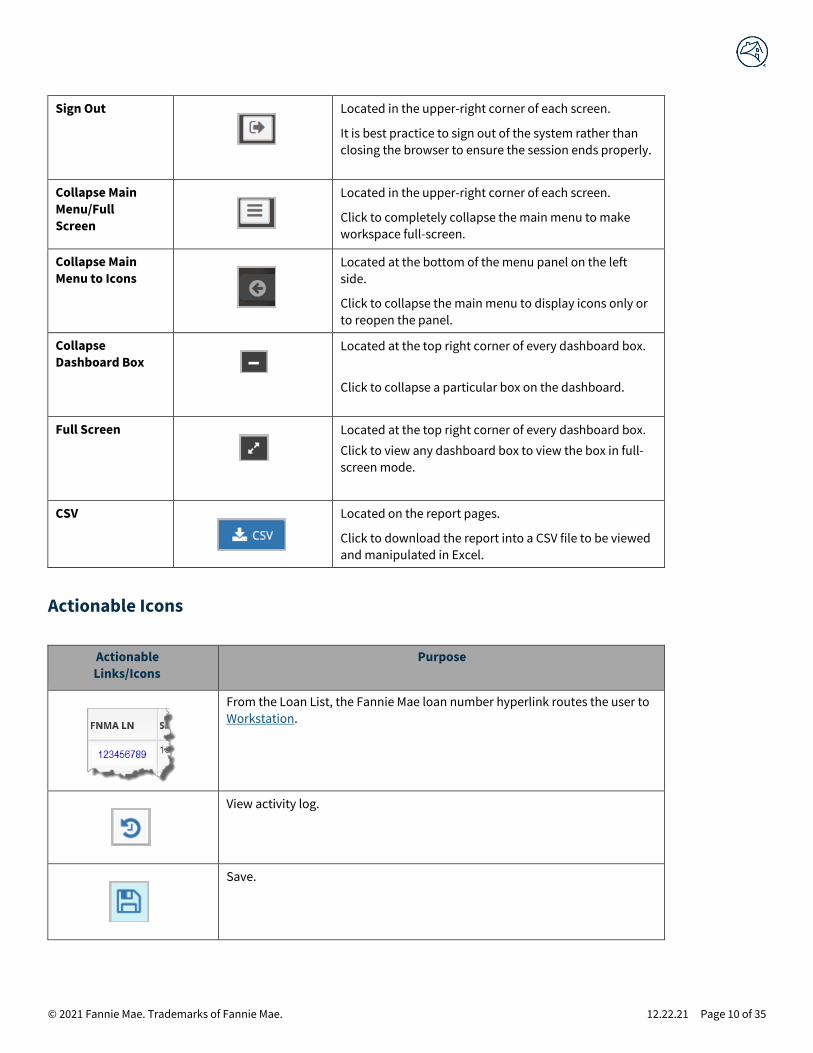
Sign Out
Located in the upper-right corner of each screen.
It is best practice to sign out of the system rather than
closing the browser to ensure the session ends properly.
Collapse Main
Menu/Full
Screen
Located in the upper-right corner of each screen.
Click to completely collapse the main menu to make
workspace full-screen.
Collapse Main
Menu to Icons
Located at the bottom of the menu panel on the left
side.
Click to collapse the main menu to display icons only or
to reopen the panel.
Collapse
Dashboard Box
Located at the top right corner of every dashboard box.
Click to collapse a particular box on the dashboard.
Full Screen
Located at the top right corner of every dashboard box.
Click to view any dashboard box to view the box in full-
screen mode.
CSV
Located on the report pages.
Click to download the report into a CSV file to be viewed
and manipulated in Excel.
Actionable Icons
Actionable
Links/Icons
Purpose
From the Loan List, the Fannie Mae loan number hyperlink routes the user to
Workstation.
View activity log.
Save.

© 2021 Fannie Mae. Trademarks of Fannie Mae. 12.22.21 Page 11 of 35
Vendor questions to Fannie Mae.
Allows the servicer to mark an exception that has been reviewed without
taking action.
View comments. The circled number indicates the number of
comments present.
View/add attachments.
View activity log.
Page Setup
When creating reports through the Dashboard, Workstation, Repository, or Reports options, the default setting for results per
page is 100. This can be customized.
1. Click the Results per Page drop-down in the lower-left corner to change the setting to 20 or 50 results per page.
2. Use the Previous and Next buttons to navigate from page to page.
3. Note the total number of pages in the bottom, lower-right corner of the report.

© 2021 Fannie Mae. Trademarks of Fannie Mae. 12.22.21 Page 12 of 35
Dashboard
The Dashboard provides pipeline monitoring at a glance. Click on the blue number links to display the Workstation and
review/decision exceptions.
Click and drag dashboard boxes to rearrange according to user preference. Dashboard modules and their functions are outlined
below.
Exception Reporting Portal (KPIs)
Servicers can monitor response times for questions submitted to Fannie Mae.
1. Click the blue number link to view the Loan List associated with each timeframe (KPI).
The Loan List displays.
2. Click Actionable Icons to view recent activity on a loan.

© 2021 Fannie Mae. Trademarks of Fannie Mae. 12.22.21 Page 13 of 35
Active Loan Pipeline Aging
Manage the pipeline by exception age from less than 30 days to greater than 90 days.
1. Click the blue number link associated with each aging period to be routed directly to that loan population.
The Loan List displays.
2. Click Actionable Icons to view recent activity on a loan.
Active Loan Pipeline by Report Type and Status
Manage the pipeline by report type and status. The Dashboard view is segmented by report type and loan count by status.
Click on the blue number link(s) to be routed to the applicable Loan List(s), view recent activity, and access the Workstation to
take the appropriate action.
• CUST In Progress: Routes user to tasks that need to be completed in the Workstation.
• Follow Up: Routes user to a list of exceptions pending a follow-up review within 60 days.
• Pending System Update: Routes user to list of items that have been completed.
A full list of report statuses and report types and their definitions can be found in the appendix section of this document.

© 2021 Fannie Mae. Trademarks of Fannie Mae. 12.22.21 Page 14 of 35
Workstation
The Workstation allows users to view the active loan exception population as well as receive work assignments. Exceptions can
be actioned using the +Action icons located on the right-hand side of the screen.
Navigation
Report Types and Definitions The Workstation enables users to view reports that have assigned exceptions and prioritize the work on these reports
accordingly. Reference the Report Types table to view a list of available reports and corresponding descriptions. Use the steps
below to pull a report, filter, sort the results, and save the report as a CSV file, if applicable.
Column Headers Some column headers are designed to be filterable. Some columns can be drilled down with options while other
fields allow specific information to be entered.
To filter a report by characteristics such as File Date, Aging, Status, Err Reason, or Resolution:
1. Click on an active field in the top row and select the applicable filtering criteria from the drop-down menu(s).

© 2021 Fannie Mae. Trademarks of Fannie Mae. 12.22.21 Page 15 of 35
2. Click Filter.
3. Click Clear to remove filters.
To filter based on a specific data element such as FNMA Ln #, Servicer ID, Servicer, Servicer Loan Number, Darts Case
ID, and ACKN:
1. Click in an open field in the grey banner above the column and enter free text.
2. Click Filter.
3. Click Clear to remove filters.
NOTE: First name, last name, or any portion of a name or number can be entered for the search.
The filtered columns are highlighted in yellow. The results can be filtered further by repeating these steps in another column, if
necessary.
Report Selection Different data elements may be required to address the inquiries in a user’s pipeline. Each report in the Report List
can be drilled down to display different data sets.
Reference the Report Types table to view a list of available reports and corresponding descriptions.
NOTE: Reports that do not contain active items are not displayed as an option in the drop-down menu.

© 2021 Fannie Mae. Trademarks of Fannie Mae. 12.22.21 Page 16 of 35
To quickly move between reports within the Workstation, use the Report List drop-down menu.
The Workstation defaults to the first report in the menu and displays the results. Select a report from the Report List
drop-down menu.
Perform the following steps to search for a specific loan within a report:
1. Select the report from the Report List drop-down menu or enter the loan number in the Search field and click the
magnifying glass icon.
The list of loans associated with this report displays.
The columns are defined in the table below.
Column Name Definition
A FNMA Loan Number Identification number assigned by Fannie Mae
B Servicer ID Identification number assigned to the servicer by Fannie Mae
C Servicer Servicer name
D Servicer Loan Number Loan identification number assigned by the servicer
E DARTS Case ID Unique identification number assigned in the DARTS system
F File Date The date the record was added to the system
G Aging Number of days in the active pipeline
H Assigned User Analyst’s user name
I Current Status Reference the Report Statuses and Definitions table
J Err Reason The cause of the exception
K Resolution The solution to the issue
L Acknowledge Non-required field that allows the servicer to mark an
exception that has been reviewed without taking action

© 2021 Fannie Mae. Trademarks of Fannie Mae. 12.22.21 Page 17 of 35
Report results may be sorted and filtered using the column header controls.
Action Icons
Actionable icons appear on the far right side of each row. Use these icons to manage assigned inquiries in the pipeline,
individually or in bulk. Action icon functions are outlined in the Actionable Icons section of this manual.
To complete actions, review the steps below.
Acknowledgment The Acknowledge checkmark icon indicates that the task or exception has been received but has not been worked.
1. Click the checkmark icon to acknowledge receipt of the task.
The user’s name and the date auto-populate in the ACKN (Acknowledge) column and the checkmark icon disappears
from the +Action column.
Comments Users may view external comments by clicking the comment bubble icon in the +Action column. The number next to the
comment bubble icon indicates how many comments have been added to the task or exception.
1. Click the Comment bubble icon. The Comments pop-up window displays.
2. Click inside the Comment text box to enter external comments.
3. Click Save.
4. Enter key words or a name in the search box to search for specific comments.
5. View the documents in chronological order with the most recent appearing first or click the arrows next to the Created Date
column header to reverse the order.
6. Adjust how many comments display per page by clicking the results per page drop-down arrow. Choose 10, 25,
50 or 100 comments per page.

© 2021 Fannie Mae. Trademarks of Fannie Mae. 12.22.21 Page 18 of 35
7. Navigate through pages of comments using the Previous and Next controls.
Documents Supporting documentation is often required. These documents can be attached using the Documents icon in the +Action
column. The green number next to the icon indicates how many documents are attached.
1. Click the Documents icon. The Documents pop-up box window displays.
2. Enter a description in the required Document Description field.
3. Click Browse to locate the document file and select the desired document. Only PDF, DOC, DOCX, XLS, and XLSX
files are acceptable formats.
4. Click Save.
5. Enter key words or a name in the search box to search for a specific attachment.
6. View the documents in chronological order with the most recent appearing first or click the arrows next to the
Created Date column header to reverse the order.
7. Adjust how many documents display per page by clicking the results per page drop --down arrow. Choose 10, 25,
50 or 100 comments per page.
8. Navigate through pages of documents using the Previous and Next controls.

© 2021 Fannie Mae. Trademarks of Fannie Mae. 12.22.21 Page 19 of 35
Loan History The loan history screen displays all loan activity, including a description of the activity, who was assigned to the loan, who
performed the action task and when the task was completed.
1. Click the Loan History icon in the +Action column.
2. View the loan history activity.
3. Click the results per page drop-down to change the number of results that display on the page.
4. Use the Previous and Next navigation buttons to scroll through the search results.
Save Use the Save icon to complete the vendor decisioning process.
1. Click the Save icon in the +Action column. The Vendor Decision pop-up window displays.
2. Click Select Error Reason to choose a reason from the drop-down menu.

© 2021 Fannie Mae. Trademarks of Fannie Mae. 12.22.21 Page 20 of 35
3. Click Select Resolution to choose a resolution from the drop-down menu.
4. Click Save.
+ Action
Loans can be selected to be worked in bulk using the + Action button.
1. Use the Sort and Filter options to drill down to the desired loans within the pipeline.
2. Click the Checkbox at the end of each row to make selections.
3. Click the + Action button.
4. Select a task from the + Action drop-down menu.
Bulk Decision
1. Click the + Action button.
2. Select Bulk Decision from the drop-down menu.
The Vendor Decision pop-up window displays.

© 2021 Fannie Mae. Trademarks of Fannie Mae. 12.22.21 Page 21 of 35
3. Click Select Error Reason to choose a reason from the drop-down menu.
4. Click Select Resolution to choose a resolution from the drop-down menu.
5. Click Save. The decisioned tasks are cleared from the pipeline.
Sending a Bulk Question to Fannie Mae
1. Select loans to be handled in bulk by checking the box at the end of each row.
2. Click + Action.
3. Select Bulk Question to FNMA from the drop-down menu.
© 2021 Fannie Mae. Trademarks of Fannie Mae. 12.22.21 Page 22 of 35
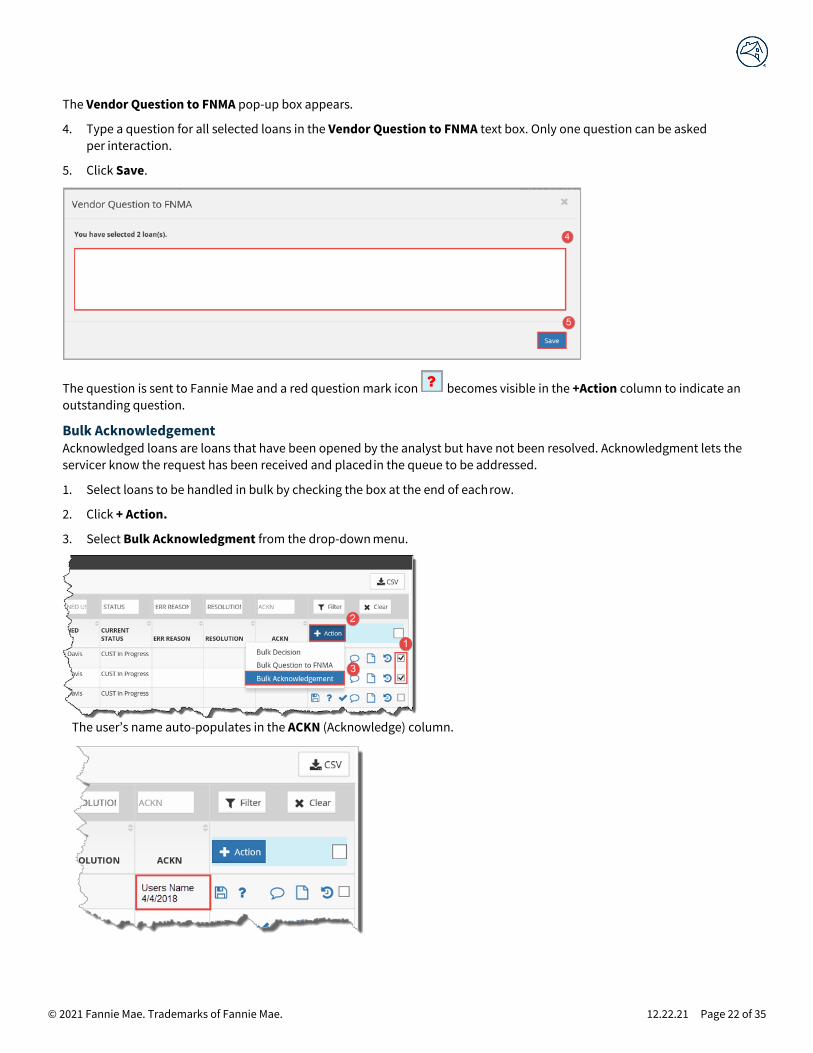
The Vendor Question to FNMA pop-up box appears.
4. Type a question for all selected loans in the Vendor Question to FNMA text box. Only one question can be asked
per interaction.
5. Click Save.
The question is sent to Fannie Mae and a red question mark icon becomes visible in the +Action column to indicate an
outstanding question.
Bulk Acknowledgement Acknowledged loans are loans that have been opened by the analyst but have not been resolved. Acknowledgment lets the
servicer know the request has been received and placed in the queue to be addressed.
1. Select loans to be handled in bulk by checking the box at the end of each row.
2. Click + Action.
3. Select Bulk Acknowledgment from the drop-down menu.
The user’s name auto-populates in the ACKN (Acknowledge) column.

© 2021 Fannie Mae. Trademarks of Fannie Mae. 12.22.21 Page 23 of 35
Export to Excel
Reports may be downloaded to Excel. The data may be sorted and filtered within ERP or the entire report can be sent as a CSV file
to Excel and may be manipulated there.
1. Click the CSV button. A pop-up box displays in the top-right corner.
2. Click Open to open the file directly in Excel OR
3. Click Save to save the file directly to the PC.
Repository
Create ad hoc reports from the ERP common data elements across all reports.
1. Click the arrows for each menu (Report Type, Loan Status, and Aging), as applicable.
2. Drill down further by adding a Received Date, Closed Date and/or Last Activity Date .
3. Click Filter to generate results.
4. Click Reset to clear filter settings and start over.

© 2021 Fannie Mae. Trademarks of Fannie Mae. 12.22.21 Page 24 of 35
Filter Criteria Function
Report Type Select a report to query.
Loan Status Select a report to query.
Aging Select an aging category to query.
Received Date Enter FROM and TO dates as needed for the query.
Closed Date Enter FROM and TO dates as needed for the query.
Last Activity Date Enter FROM and TO dates as needed for the query.
5. Click the “-“ in the corner of the Filter Criteria box to collapse it and click + to expand.
6. Click the CSV icon to export the file to Excel. Findings can be manipulated within Excel.
Reports
The Reports tab differs from the Repository tab as it only utilizes common data elements for a specific report. Only one report
type can be referenced at a time. A Report Type selection is required to generate findings.
1. Select a Report Type (required) and any other filtering criteria, as appropriate.
2. Select Loan Status and Aging, if necessary.

© 2021 Fannie Mae. Trademarks of Fannie Mae. 12.22.21 Page 25 of 35
Filter Criteria Function
Report Type Select a report to query.
Loan Status Select a loan status to query.
Aging Select an aging category to query.
Received Date Enter FROM and TO dates as needed for the query.
Closed Date Enter FROM and TO dates as needed for the query.
Last Activity Date Enter FROM and TO dates as needed for the query.
3. Select date ranges, if necessary.
4. Click Reset to clear filter selections.
5. Click CSV. This report is not displayed in ERP and must be exported to Excel to view.
6. Click Save to name the report and save it or Open to view it in Excel.
Users – Administration Only
Servicer Administrators have the authority to activate, deactivate, and reactivate users. System permission changes are reflected
immediately.
To perform administrator tasks, perform one of the following steps:
1. Click on ERP – Exception Reporting Portal from the Decision Ready Solutions (DRS) homepage.

© 2021 Fannie Mae. Trademarks of Fannie Mae. 12.22.21 Page 26 of 35
2. Click Admin from the drop-down menu in the top-left corner of the screen.
Active Users
Search active users before adding new users to ensure they are not already in the system or locate existing active users for
deactivation.
Search Active Users
To search the list of active users, take the following steps:
1. Select ERP Vendor Primary or ERP Vendor Secondary from the Role drop-down menu. The vendor name auto-populates
in the Vendor field.
2. Click Filter to display results.
OR
3. Enter the username, if known, in the search box.
Any portion of the username, first or last name, can be used in the search box.
Take Action The Administrator may click on the following action buttons to perform user maintenance and research.
Action Icons Definition
Reset password

© 2021 Fannie Mae. Trademarks of Fannie Mae. 12.22.21 Page 27 of 35
NOTE: If the password is reset by clicking this icon, the
Administrator must choose a temporary password and notify
the user to change it again login.
View activity history
Inactive Users
Users cannot be deleted from the system, but their access can be deactivated. It may become necessary to enable a deactivated
user or to research the activities of an inactive user.
To locate an inactive user:
1. Select ERP Vendor Primary or ERP Vendor Secondary from the Role drop-down menu. The vendor name auto-populates
in the Vendor field.
2. Click Filter for results.
OR
3. Enter the inactive username, if known, in the search box.
4. Click the Edit/View User Details icon to be routed to the Manage User screen to re-enable the user.
5. Click Enabled from the Login Status drop-down menu.

© 2021 Fannie Mae. Trademarks of Fannie Mae. 12.22.21 Page 28 of 35
The user performs the following steps to reset their password at initial login.
Action Icons Definition
Reset profile to reactivate user. This is an alternate way to reach the
Manage User screen.
1. Follow prompts to set a temporary password.
2. Click Submit Changes.
3. Notify the user of the reactivation along with temporary
password and instructions on how to reset it at initial login.
View activity history
Edit user information
Create New User
The administrator may perform the followings to add a new user or user group to ERP.
1. Click Create User from the Users menu on the left-hand side of the screen.
2. Enter Account Details in the Users screen. The OverAll user type defaults to External.
3. Fields with a red asterisk (*) denote required fields.

© 2021 Fannie Mae. Trademarks of Fannie Mae. 12.22.21 Page 29 of 35
4. Select the applicable ERP Role from the drop-down menu.
▪ ERP Vendor Primary – Admin role at the servicer or vendor.
▪ ERP Vendor Secondary – Analyst role at the servicer or vendor.
The ERP Vendor defaults to the proper vendor name based on the administrator’s login.
The ERP Type defaults to Servicer.
5. Complete the required user information.
A. Enter the new User Name or Group Name
B. Enter a temporary password in the Password field using the following criteria:
▪ Minimum 8 characters. Maximum 30 characters.
▪ Cannot be the same as the User Name.
▪ Must contain one alpha, one numeric, and one special character.
▪ Cannot match simple words like welcome, account, proper names, dictionary words, database name or
User Name.
C. Enter the temporary password in the Re-Type Password field.
D. Set Login Status to Enabled (Default).
6. Complete the Personal Details section. Fields marked with an asterisk (*) are required fields. All other fields can be
entered, as needed.

© 2021 Fannie Mae. Trademarks of Fannie Mae. 12.22.21 Page 30 of 35
7. Click Save. The user profile is now saved.
A pop-up window appears and indicates if the username, personal details, or email address already exists in the
system. If this occurs, the administrator is unable to save the profile.
NOTE: The administrator must notify the user of the temporary password along with instructions on how to reset it at
the initial login.
Disable Users
Users that are disabled become inactive users. Users or their activity history do not get deleted from the system.
1. Enter the UserName or any part of the user’s first or last name in the search field to locate the user name in Active Users.
2. Click on the Edit/View User Details icon to be routed to the Manage User screen to re-enable the user.
3. Click Disabled from the Login Status drop-down menu.
4. Click Save.

© 2021 Fannie Mae. Trademarks of Fannie Mae. 12.22.21 Page 31 of 35
Updating User Email Notifications
1. Click on the Edit/View User Detail icon.
2. Click on Email Notification.
3. Click in the Yes or No radio buttons to indicate if the user should receive a notification for a report(s).
NOTE: If Yes is selected, the user receives the applicable report(s) each Monday.
4. Click Save toward the bottom of the screen to save the changes.

© 2021 Fannie Mae. Trademarks of Fannie Mae. 12.22.21 Page 32 of 35
Bulk Decisioning Tasks or Exceptions
1. Click Workstation in the menu tree on the left-hand side of the screen.
2. Select the applicable report from the Report List drop-down menu.
3. Click CSV to export the data to an Excel file.
4. Click Open when the pop-up window appears at the bottom of the screen.
The Excel file opens.
5. Scroll to the left to display the Error Reason and Resolution columns.

© 2021 Fannie Mae. Trademarks of Fannie Mae. 12.22.21 Page 33 of 35
6. Enter the Error Reason and Resolution exactly as identified in the ERP portal to populate the corresponding columns in
Excel.
NOTE: Users can create a dynamic drop-down menu in Excel or manually enter the Error Reason and Resolution for
each line item.
7. Enter all applicable comments in the Bulk Decision Comment column. Comments entered in this column can be viewed
by Fannie Mae.
8. Save the Excel file to your desktop.
9. Click Bulk Decision Update below Workstation on the left-hand side of the screen.
10. Click the applicable report from the Select Report drop-down menu.

© 2021 Fannie Mae. Trademarks of Fannie Mae. 12.22.21 Page 34 of 35
11. Click Browse and select the Excel file saved earlier in this section.
12. Click Upload.
NOTE: The uploaded report is sent to Fannie Mae.
Appendices
Appendix A - Report Statuses and Definitions
Status Definition
Closed Report updated and loan requires no further action.
CUST In Progress Required actions are outstanding and require attention.
Exclusion/Exclusion and Referral Status to be used when a servicer can take no action to update a system to resolve the issue and it will never be closed within the ERP tool.
Follow-Up This status is for exceptions needing to remain in their current exception
status for more than 60 days. Servicers should review exceptions in a
follow-up status within 60 days of the follow-up date.
FNMA In Progress Indicates Fannie Mae has action(s) to complete
Pending System Update Required actions are complete and waiting for the report to update
and close.
Appendix B - Report Types
ERP Name Report Name Report Description
DQR_FLEX_MOD_INT_ RATE Flex Modification - Interest Rate Compares post modification Interest Rate in HSSN/DARTS against the Fannie Mae effective rate per policy guidelines

© 2021 Fannie Mae. Trademarks of Fannie Mae. 12.22.21 Page 35 of 35
DQR_DISASTER_CAP_EXT Disaster Cap & Extend Compares post modification Forbearance amount in HSSN/DARTS against policy guidelines
MOD_W_ACTIVE_TRAX_
CASE
Mods with active TRAX case HAMP Mods that are in a trial period and the Servicers have sent them to FC Sale so there is a case in TRAX for the active REO
LOSS_GOOD_STANDING HAMP 6th year Incentive report Loans that have potentially lost good standing (reached 90 days delinquent during the modification history)
HAMP_CASE_MISSING_
DARTS
HAMP 6th year Incentive report Loans where a Non HAMP subsequent modification has occurred.
CMDS Consecutive Months
Delinquency Status
Identifies loans that have exceeded the expected threshold for the Delinquent Status Code reported in HSSN/DARTS
DQR_FLEX_MOD_FORB Flex Modification - Forbearance Compares post modification Forbearance amount in HSSN/DARTS against policy guidelines
Forb. Duration 12+ Months Forbearance Duration Report This report identifies forbearances reporting
with a duration of greater than 12 months. The
duration is based on the delinquency reporting
of start and completion dates. Servicers will
remediate by correcting the start and
completion dates to equal 12 months or less.
ERP_UAL Unapproved Attorney List (UAL) Identifies a foreclosure or bankruptcy case
opened in DMRS by an attorney not listed on
the Fannie Mae no objection list for that
particular jurisdiction or state.