exchange of large data volumes between s7 … · exchange of large data volumes between s7-300/400...
TRANSCRIPT

Cover Sheet
Exchange of large Data Volumes between S7-300/400 and WinCC with BSEND/BRCV
WinCC
Configuration Example September 2009
Applications & Tools
Answers for industry.

Warranty, liability and support
2 Exchange of large Data Volumes between S7-300/400 and WinCC with BSEND/BRCV
Version 1.0, ID Number: 37873547
Co
pyr
igh
t
Sie
me
ns
AG
20
09
200
9 A
ll rig
hts
re
serv
ed
3
787
354
7_
Win
CC
_BS
EN
D_
BR
CV
_en
.do
c
Warranty, liability and support Note The application examples are not binding and do not claim to be complete
regarding the circuits shown, equipping and any eventuality. The application examples do not represent customer-specific solutions. They are only intended to provide support for typical applications. You are responsible for ensuring that the described products are correctly used. These application examples do not relieve you of the responsibility of safely and professionally using, installing, operating and servicing equipment. When using these application examples, you recognize that we cannot be made liable for any damage/claims beyond the liability clause described. We reserve the right to make changes to these application examples at any time without prior notice. If there are any deviations between the recommendations provided in these application examples and other Siemens publications – e.g. Catalogs – then the contents of the other documents have priority.
We do not accept any liability for the information contained in this document.
Any claims against us – based on whatever legal reason – resulting from the use of the examples, information, programs, engineering and performance data etc. described in this application example shall be excluded. Such an exclusion shall not apply in the case of mandatory liability, e.g. under the German Product Liability Act (“Produkthaftungsgesetz”), in case of intent, gross negligence, or injury of life, body or health, guarantee for the quality of a product, fraudulent concealment of a deficiency or breach of a condition which goes to the root of the contract (“wesentliche Vertragspflichten”). However, claims arising from a breach of a condition which goes to the root of the contract shall be limited to the foreseeable damage which is intrinsic to the contract, unless caused by intent or gross negligence or based on mandatory liability for injury of life, body or health. The above provisions do not imply a change in the burden of proof to your detriment.
It is not permissible to transfer or copy these application examples or excerpts of them without first having prior authorization from Siemens Industry Sector in writing.
For questions about this document please use the following e-mail address:
Industry Automation and Drive Technologies Service & Support Portal
This document is from the Internet service portal of Siemens AG, Industry Automation and Drive Technologies. The link below takes you directly to the download page of this document.
http://support.automation.siemens.com/WW/view/en/37873547

Automation Problem
2.1 Overall solution – overview
Exchange of large Data Volumes between S7-300/400 and WinCC with BSEND/BRCV V1.0, ID Number: 37873547 3
Co
pyr
igh
t S
iem
en
s A
G 2
00
920
09 A
ll rig
hts
rese
rve
d
37
873
547
_W
inC
C_B
SE
ND
_B
RC
V_
en.d
oc
Table of Contents 1 Automation Problem............................................................................. 4 2 Automation Solution ............................................................................. 4 2.1 Overall solution – overview .................................................................. 4 2.2 Hardware and software components used........................................... 5 2.2.1 Hardware components ......................................................................... 5 2.2.2 Software components........................................................................... 5 2.2.3 Sample files and projects ..................................................................... 5 2.3 Alternative solutions ............................................................................. 6 3 Functional Mechanisms........................................................................ 7 3.1 Functional description of the application.............................................. 7 3.2 Functional description of the blocks ..................................................... 7 4 Installation ............................................................................................ 9 4.1 Hardware and software installation ...................................................... 9 4.2 Application software installation ........................................................... 9 4.2.1 Requirements ....................................................................................... 9 4.2.2 Using the supplied library..................................................................... 9 4.2.3 Using the supplied WinCC picture ..................................................... 10 5 Configuration ...................................................................................... 11 5.1 Configuration in SIMATIC STEP 7 ..................................................... 11 5.1.1 Inserting and configuring the AS ........................................................ 11 5.1.2 Creating the connection in NetPro ..................................................... 12 5.1.3 Creating the shared data block .......................................................... 16 5.1.4 Calling BSEND/BRCV........................................................................ 16 5.1.5 Compiling and downloading the CPU ................................................ 18 5.2 Configuration in SIMATIC WinCC...................................................... 18 5.2.1 Inserting the WinCC station and checking the network settings........ 18 5.2.2 Settings in the WinCC project ............................................................ 19 5.2.3 Setting the PG/PC interface ............................................................... 23 5.2.4 Creating the WinCC picture ............................................................... 24 5.2.5 Creating the C scripts......................................................................... 25 6 Operation of the Application............................................................... 27 7 History ................................................................................................ 30

Automation Problem
2.1 Overall solution – overview
4 Exchange of large Data Volumes between S7-300/400 and WinCC with BSEND/BRCV
Version 1.0, ID Number: 37873547
Co
pyr
igh
t S
iem
en
s A
G 2
00
920
09 A
ll rig
hts
rese
rve
d
1 Automation Problem
Description of the automation problem
Large data volumes are to be transferred from the controller to WinCC. This functionality is to be executable in the S7-300 and in the S7-400.
2 Automation Solution
2.1 Overall solution – overview
Automation solution
To transfer large data volumes from the controller to WinCC or from WinCC to the controller, a BSEND/BRCV communication is established in the following example. In this process, the data volume is divided into individual segments and sent to the respective partner.
Structure
When establishing the communication, it is assumed that the configurations are standard WinCC configurations. This document considers the connection of an automation controller and WinCC.
Figure 2-1
Controller WinCC
Data n
BSEND
BRCV Data …
Data B
Data A
Raw Array

Automation Solution
2.2 Hardware and software components used
Exchange of large Data Volumes between S7-300/400 and WinCC with BSEND/BRCV V1.0, ID Number: 37873547 5
Co
pyr
igh
t S
iem
en
s A
G 2
00
920
09 A
ll rig
hts
rese
rve
d
37
873
547
_W
inC
C_B
SE
ND
_B
RC
V_
en.d
oc
2.2 Hardware and software components used
This application was created using the following components:
2.2.1 Hardware components
Table 2-1
Component No. MLFB/order number Note
Rack 1 6ES7400-1JA00-0AA0
PS 405 power supply 1 6ES7405-0KA00-0AA0
S7-416-2 1 6ES7416-2XK02-0AB0
S7-317-2 PN/DP 1 6ES7317-2EK13-0AB0
Or
Table 2-2
Component No. MLFB/order number Note
DIN rail 1 6ES7390-1???0-0AA0
PS 307 power supply 1 6ES7307-1EA00-0AA0
S7-317-2 PN/DP 1 6ES7317-2EK13-0AB0
Note When using an S7-300 CPU, this CPU must have an integrated Ethernet interface.
2.2.2 Software components
Table 2-3
Component No. MLFB/order number Note
STEP 7 V5.4 SP4 1 6ES7810-4CC08-0YA7
WinCC 7.0 SP1 1 6AV6381-2BM07-0AX0
2.2.3 Sample files and projects
The software examples are available on the HTML page from which you downloaded this document.
The link below takes you directly to the download page of this document.
http://support.automation.siemens.com/WW/view/en/37873547
The download is a ZIP file that can be unzipped with any unzip program. The ZIP file contains the following files:

Automation Solution
2.3 Alternative solutions
6 Exchange of large Data Volumes between S7-300/400 and WinCC with BSEND/BRCV
Version 1.0, ID Number: 37873547
Co
pyr
igh
t S
iem
en
s A
G 2
00
920
09 A
ll rig
hts
rese
rve
d
Table 2-4
Component Contents
37873547_WinCC_BSEND_BRCV_Bib.zip STEP 7 project (WinCC integrated)
37873547_WinCC_BSEND_BRCV_PDL.zip WinCC operating screen
2.3 Alternative solutions
To archive a large number of process values with very fast cycles, the “block-by-block data transmission“ method can be used in conjunction with the STEP 7 “AR_SEND” block (SFB 37 for S7-400). However, it must be observed that “AR_SEND” can only be used on an S7-400 controller. The “AR_SEND” functionality is described in the following document.
http://support.automation.siemens.com/WW/view/en/23780904

Functional Mechanisms
3.1 Functional description of the application
Exchange of large Data Volumes between S7-300/400 and WinCC with BSEND/BRCV V1.0, ID Number: 37873547 7
Co
pyr
igh
t S
iem
en
s A
G 2
00
920
09 A
ll rig
hts
rese
rve
d
37
873
547
_W
inC
C_B
SE
ND
_B
RC
V_
en.d
oc
3 Functional Mechanisms
3.1 Functional description of the application
To realize the BSEND/BRCV functionality, it is necessary to create a data memory in the controller.
This data memory is necessary to be able to store the data structured as an array. This array serves as a database in the controller. From this array, the data is written to the WinCC raw data tag with the aid of “BSEND”. WinCC can then interpret this raw data tag and read or display the data from this tag. This way works also in the other direction. WinCC has the functionality to change raw data tags. This data is now transferred to the controller, evaluated with the aid of “BRCV” and written to the array of the data block. This changes the data in the array and transfers it back to WinCC during the next “BSEND” process.
Figure 3-1
Data A
Data B
Data …
Data n
Array
Data AData BData …Data n
BSEND
WinCC
Raw data
BRCV
Raw data
Controller
3.2 Functional description of the blocks
Data blocks
DB1:
DB1 contains the array in which the data is stored.
DB2:
DB2 is the data block associated with FB2 that is automatically created in OB1 when calling FB2.
DB12 and DB13:
DB12 and DB13 are the two associated data blocks of “BSEND” and “BRCV” that are automatically created when calling the blocks in FB2.
Function block
FB2:
FB2 contains the call of “BSEND” and of “BRCV” and sets the necessary flags.

Functional Mechanisms
3.2 Functional description of the blocks
8 Exchange of large Data Volumes between S7-300/400 and WinCC with BSEND/BRCV
Version 1.0, ID Number: 37873547
Co
pyr
igh
t S
iem
en
s A
G 2
00
920
09 A
ll rig
hts
rese
rve
d
Organization block
OB1:
This block contains merely the call of FB2 to ensure execution of this block.
OB100:
This block contains the code to perform the evaluation of the BSEND-LEN parameter in FW 204.
System function blocks
SFB12 and SFB13:
These two blocks are the two “BSEND/BRCV” system function blocks.

Installation
4.1 Hardware and software installation
Exchange of large Data Volumes between S7-300/400 and WinCC with BSEND/BRCV V1.0, ID Number: 37873547 9
Co
pyr
igh
t S
iem
en
s A
G 2
00
920
09 A
ll rig
hts
rese
rve
d
37
873
547
_W
inC
C_B
SE
ND
_B
RC
V_
en.d
oc
4 Installation
Preliminary remark
To test the BSEND/BRCV functionality, we offer you a description of the necessary settings and adjustments as a download. Furthermore, we also provide the blocks as a source and the fully configured WinCC picture.
Usage
The functionality described here can be configured with STEP 7 and WinCC. For the necessary steps, please refer to chapter 5 Configuration.
4.1 Hardware and software installation
When using hardware components that differ from the ones used in the sample projects, they must be adjusted in HW Config before starting the configuration. How to adjust the hardware is described in detail in chapter 5.1 “Configuration in SIMATIC STEP 7”. In addition, you must note the following points:
Make sure that the times in the CPU and in WinCC have the same settings (UTC or local time zone).
PC/PG interface: Select the interface you are using. How to set this interface is described in chapter 5.2.3 “Setting the PG/PC interface”.
4.2 Application software installation
4.2.1 Requirements
The following points form the basis for integrating the BSEND/BRCV functionality into a new or an existing project and will not be explained in the following configuration.
A project has been created in the Simatic Manager.
The hardware has been installed and a network connection has been established from WINCC to the controller.
4.2.2 Using the supplied library
If you want to use the supplied library of the function and data block, proceed as follows:
1. Unzip the BSEND_BRCV.zip file to a local folder.
2. Open your project with the Simatic Manager.
3. Retrieve the supplied “BSEND_BRCV_Bib.zip” library.
4. Select all blocks and the variable table and copy these files to the block folder of your CPU.
5. Select the “File” > “Open” menu command, go to the Libraries tab and open the “Standard Library” with a double-click.
6. Confirm the write protection message with “OK” and in the library’s tree view, open the following path “Standard Library” > “Communication Blocks” > “Blocks”.

Installation
4.2 Application software installation
10 Exchange of large Data Volumes between S7-300/400 and WinCC with BSEND/BRCV
Version 1.0, ID Number: 37873547
Co
pyr
igh
t S
iem
en
s A
G 2
00
920
09 A
ll rig
hts
rese
rve
d
7. Copy the “FB12” and “FB13” blocks to the block folder of your CPU.
8. If it has already been created, insert the following code into a network of “OB1”. Otherwise, OB1 must be created and the code has to be inserted into the first network.
CALL FB 2 , DB2
After integrating the blocks into the library, continue with chapter 5.1 “Configuration in SIMATIC STEP 7”.
Note By integrating the blocks from the library, chapters 5.1.3 “Creating the shared data block” and 5.1.4 “Calling BSEND/BRCV” can be skipped.
4.2.3 Using the supplied WinCC picture
If you want to use the supplied WinCC picture, proceed as follows:
1. Unzip the BSEND_BRCV.zip file to a local folder.
2. Copy the WinCC BSEND_BRCV.pdl picture to the “GraCS” folder of your WinCC project.
After integrating the WinCC picture, continue with chapter 5.1 “Configuration in SIMATIC STEP 7”.
Note By integrating the WinCC picture, chapters 5.2.4 “Creating the WinCC picture” and 5.2.5 “Creating the C scripts” can be skipped.

Configuration
5.1 Configuration in SIMATIC STEP 7
Exchange of large Data Volumes between S7-300/400 and WinCC with BSEND/BRCV V1.0, ID Number: 37873547 11
Co
pyr
igh
t S
iem
en
s A
G 2
00
920
09 A
ll rig
hts
rese
rve
d
37
873
547
_W
inC
C_B
SE
ND
_B
RC
V_
en.d
oc
5 Configuration
General
This chapter describes the integration of the BSEND/BRCV functionality into a new or an existing project.
5.1 Configuration in SIMATIC STEP 7
The following steps explain which actions are necessary in Step7 and WinCC to use the BSEND/BRCV functionality. When using the supplied library, you can skip chapters 5.1.3 “Creating the shared data block” and 5.1.4 “Calling BSEND/BRCV”.
5.1.1 Inserting and configuring the AS
1. Use the Simatic Manager to open the project into which you want to integrate the BSEND/BRCV functionality.
2. Insert a new “SIMATIC 400 Station” by selecting “Insert” > “Station” > “SIMATIC 400 Station”.
3. Open HW Config by selecting the station you have just inserted and in the right window, double-click on “Hardware”.
4. Insert the components into HW Config according to your hardware.
5. Assign the respective IP address (in the example: 192.168.0.31) and possibly the MAC address (in the example: 08-00-06-6D-A1-A1) for your AS or its CP.

Configuration
5.1 Configuration in SIMATIC STEP 7
12 Exchange of large Data Volumes between S7-300/400 and WinCC with BSEND/BRCV
Version 1.0, ID Number: 37873547
Co
pyr
igh
t S
iem
en
s A
G 2
00
920
09 A
ll rig
hts
rese
rve
d
Figure 5-1
6. Compile and download HW Config to your CPU.
5.1.2 Creating the connection in NetPro
1. In the HW Config Editor, open the “NetPro” Editor by selecting “Options” > “Configure Network”.
2. Select the CPU module and right-click on the connection table.
Configuration
5.1 Configuration in SIMATIC STEP 7
Exchange of large Data Volumes between S7-300/400 and WinCC with BSEND/BRCV V1.0, ID Number: 37873547 13
Co
pyr
igh
t S
iem
en
s A
G 2
00
920
09 A
ll rig
hts
rese
rve
d
37
873
547
_W
inC
C_B
SE
ND
_B
RC
V_
en.d
oc
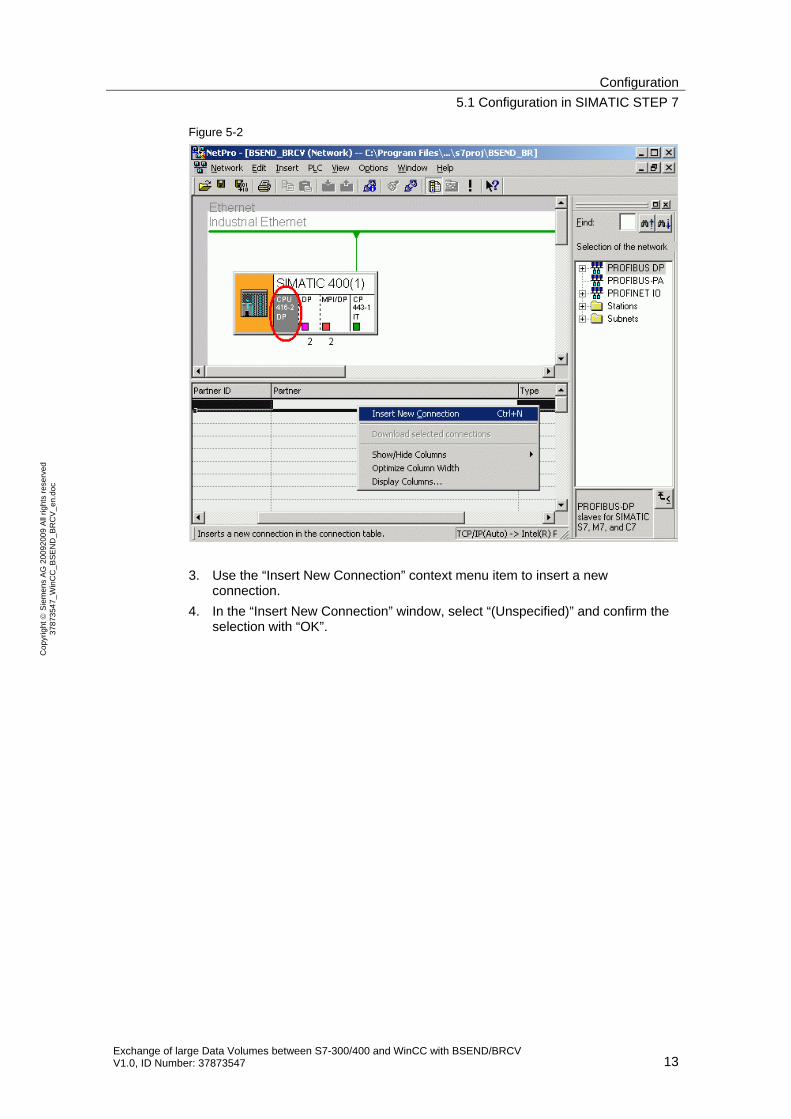
Figure 5-2
3. Use the “Insert New Connection” context menu item to insert a new connection.
4. In the “Insert New Connection” window, select “(Unspecified)” and confirm the selection with “OK”.

Configuration
5.1 Configuration in SIMATIC STEP 7
14 Exchange of large Data Volumes between S7-300/400 and WinCC with BSEND/BRCV
Version 1.0, ID Number: 37873547
Co
pyr
igh
t S
iem
en
s A
G 2
00
920
09 A
ll rig
hts
rese
rve
d
Figure 5-3
5. In the “Properties – S7 connection” window, make the following settings:
a) In “Partner Address:”, enter the IP address of WINCC (in the example: 192.168.0.28).
b) Note down the “Local ID” for the later Step7 configuration.
c) Uncheck the “Establish an active connection” option.

Configuration
5.1 Configuration in SIMATIC STEP 7
Exchange of large Data Volumes between S7-300/400 and WinCC with BSEND/BRCV V1.0, ID Number: 37873547 15
Co
pyr
igh
t S
iem
en
s A
G 2
00
920
09 A
ll rig
hts
rese
rve
d
37
873
547
_W
inC
C_B
SE
ND
_B
RC
V_
en.d
oc
Figure 5-4
6. Select the “Address Details...” button.
7. Change the “Partner Connection Resource (hex):” parameter to the value 10 and confirm the dialog box with “OK”.
Figure 5-5

Configuration
5.1 Configuration in SIMATIC STEP 7
16 Exchange of large Data Volumes between S7-300/400 and WinCC with BSEND/BRCV
Version 1.0, ID Number: 37873547
Co
pyr
igh
t S
iem
en
s A
G 2
00
920
09 A
ll rig
hts
rese
rve
d
8. Confirm all dialog boxes with “OK” and compile the settings you have made in “NetPro”.
9. Once again, select the CPU module in the NetPro Editor and download the configuration information to your CPU.
5.1.3 Creating the shared data block
1. In the tree view of the Simatic Manager, select your “SIMATIC 400 Station” and in the detail view, click on the following icons: “CPU…” > “S7 Program” > “Blocks”.
2. In the tree view, select the “Blocks” folder and insert a “Data Block” (in the example: DB1) using the “Insert” > “S7 Block” > “Data Block” menu command and confirm the properties with “OK”.
3. In the detail view, open the data block (in the example: DB1) with a double-click.
4. In this data block (in the example: DB1), create an “array” as shown in the screen shot.
Figure 5-6
5. Save the changes in the data block (in the example: DB1) and close the editor.
5.1.4 Calling BSEND/BRCV
1. Select the “File” > “Open” menu command, go to the Libraries tab and open the “Standard Library” with a double-click.
2. Confirm the write protection message with “OK” and in the library’s tree view, open the following path “Standard Library” > “Communication Blocks” > “Blocks”.
3. Copy the “FB12” and “FB13” blocks to the block folder of your CPU.
4. In the tree view of the Simatic Manager, select the “Blocks” folder and insert a “Function Block” (FB2) using the “Insert” > “S7 Block” > “Function Block” menu command and confirm the properties with “OK”.

Configuration
5.1 Configuration in SIMATIC STEP 7
Exchange of large Data Volumes between S7-300/400 and WinCC with BSEND/BRCV V1.0, ID Number: 37873547 17
Co
pyr
igh
t S
iem
en
s A
G 2
00
920
09 A
ll rig
hts
rese
rve
d
37
873
547
_W
inC
C_B
SE
ND
_B
RC
V_
en.d
oc
5. Open the “FB2” block and insert the following code into the first network:
CALL "BSEND" , DB12 REQ :=M200.0 R :=M200.1 ID :=W#16#1 R_ID :=DW#16#15 DONE :=M200.2 ERROR :=M200.3 STATUS:=MW202 SD_1 :=P#DB1.DBX0.0 BYTE 8000 LEN :=MW204 A M 200.2 R M 200.0
6. In “FB2”, create a second network by selecting “Insert” > “Network”.
7. Insert the following code into the second network of “FB2”:
AN M 300.0 AN M 300.1 AN M 300.2 S M 300.0 CALL "BRCV" , DB13 EN_R :=M300.0 ID :=W#16#1 R_ID :=DW#16#15 NDR :=M300.1 ERROR :=M300.2 STATUS:=MW302 RD_1 :=P#DB1.DBX0.0 BYTE 8000 LEN :=MW304
8. Save the changes in “FB2” and close the block editor.
9. In the tree view of the Simatic Manager, select your “SIMATIC 400 Station” and in the detail view, click on the following icons: “CPU 416-2 DP” > “S7 Program” > “Blocks”.
10. In the detail view, open “OB1” with a double-click.
11. Confirm the properties of “OB1” with “OK”.
12. Insert the following code into the first network of “OB1”:
CALL FB 2 , DB2
13. Confirm the message with the question whether the DB data block is to be created with “OK” and save the changes on the block.
14. In the tree view, select your “SIMATIC 400 Station” and in the detail view, click on the following icons: “CPU 416-2 DP” > “S7 Program” > “Blocks”.
15. If an OB100 does not yet exist in your project, select the “Blocks” folder in the tree view and insert an “Organization Block” using the “Insert” > “S7 Block” > “Organization Block” menu command and change the name in the properties window of the “Organization Block” to “OB100”.
16. In the detail view, open “OB100” with a double-click.
17. Insert the following code into the first network of “OB100”:
L 8000 T MW 204
18. Save the changes in “OB100” and close the block editor.

Configuration
5.2 Configuration in SIMATIC WinCC
18 Exchange of large Data Volumes between S7-300/400 and WinCC with BSEND/BRCV
Version 1.0, ID Number: 37873547
Co
pyr
igh
t S
iem
en
s A
G 2
00
920
09 A
ll rig
hts
rese
rve
d
5.1.5 Compiling and downloading the CPU
1. Select your “SIMATIC 400 Station“ in the tree view of the Simatic Manager.
2. Use the Simatic Manager menu to select “PLC” > “Compile And Download Objects”.
3. In the “Compile and Download Objects” dialog box, select the following options:
a) Check the “Compile only” option.
b) Select all option buttons in the “Compile” area.
Figure 5-7
4. Close the compilation log.
5. Start downloading the data to the CPU using the “PLC” > “Download” menu command.
6. Confirm the messages whether the data on the CPU is to be overwritten with “Yes” and start the CPU.
5.2 Configuration in SIMATIC WinCC
The following steps explain which actions are necessary in WinCC to use the BSEND/BRCV functionality. When integrating the supplied WinCC picture into your project, you can skip chapters 5.2.4 “Creating the WinCC picture” and 5.2.5 “Creating the C scripts”.
5.2.1 Inserting the WinCC station and checking the network settings
1. In the tree view, select your project and insert a new PC station by selecting “Insert” > “Station” > “SIMATIC PC Station”.
2. In the tree view of the Simatic Manager, select the newly inserted PC station and open HW Config by double-clicking on “Configuration” in the detail view.
3. Insert the components into HW Config according to your hardware and make the necessary settings such as the IP address.
4. Compare the IP address of the WinCC station to the IP address entered in chapter “5.1.2 Creating the connection in NetPro” in step 5 a) and possibly adjust it.
5. If necessary, adjust the computer name.

Configuration
5.2 Configuration in SIMATIC WinCC
Exchange of large Data Volumes between S7-300/400 and WinCC with BSEND/BRCV V1.0, ID Number: 37873547 19
Co
pyr
igh
t S
iem
en
s A
G 2
00
920
09 A
ll rig
hts
rese
rve
d
37
873
547
_W
inC
C_B
SE
ND
_B
RC
V_
en.d
oc
5.2.2 Settings in the WinCC project
1. Open the newly created WinCC project in the Simatic Manager.
2. Select the “Tag Management” item in the WinCC Explorer tree view.
3. In the Tag Management context menu, select “Add New Driver…”.
4. In the opened “Add new driver” window, select “SIMATIC S7 Protocol Suite.chn” and confirm the selection with “Open”.
Figure 5-8
5. In the WinCC Explorer tree view, select the following path “WINCC Project” > “Tag Management” > “SIMATIC S7 PROTOCOL SUITE” > “TCP/IP” and in the context menu of the “TCP/IP” item, select “New Driver Connection…”.
6. In the following window, enter a name for the connection (in the example: “BSEND_BRCV”) and select the “Properties” button.
7. In the “Connection Parameter” window, change the connection parameters as follows:
a) In the “IP Address”, “Rack Number” and “Slot Number” parameters, enter the parameters of your CPU.
b) Check the “Send/receive raw data block” option.
c) In the “Connection Resource” parameter, enter the same value as in chapter “5.1.2 Creating the connection in NetPro”, step 7, (the value 10 was used in the example).

Configuration
5.2 Configuration in SIMATIC WinCC
20 Exchange of large Data Volumes between S7-300/400 and WinCC with BSEND/BRCV
Version 1.0, ID Number: 37873547
Co
pyr
igh
t S
iem
en
s A
G 2
00
920
09 A
ll rig
hts
rese
rve
d
Figure 5-9
8. Confirm all dialog boxes with “OK”.
9. Select the connection you have just created in the WinCC Explorer tree view and in the detail view, create a “New Tag” by selecting the relevant item in the context menu.
10. In the “Tag properties” window, assign a name to the tag (in the example: “Raw”), select “Raw Data Type” as data type and use the “Select” button.

Configuration
5.2 Configuration in SIMATIC WinCC
Exchange of large Data Volumes between S7-300/400 and WinCC with BSEND/BRCV V1.0, ID Number: 37873547 21
Co
pyr
igh
t S
iem
en
s A
G 2
00
920
09 A
ll rig
hts
rese
rve
d
37
873
547
_W
inC
C_B
SE
ND
_B
RC
V_
en.d
oc
Figure 5-10
11. In the “Address properties” window, check the “BSEND/BRCV” option and enter the R_ID (in the example: R_ID 15) you have used in chapter “5.1.4 Calling BSEND/BRCV”, step 7, when calling BRCV.

Configuration
5.2 Configuration in SIMATIC WinCC
22 Exchange of large Data Volumes between S7-300/400 and WinCC with BSEND/BRCV
Version 1.0, ID Number: 37873547
Co
pyr
igh
t S
iem
en
s A
G 2
00
920
09 A
ll rig
hts
rese
rve
d
Figure 5-11
12. Confirm all dialog boxes with “OK”.
13. Once again, select the “TCP/IP” item in the WinCC Explorer tree view and in the context menu, select “System Parameter”.
14. In the “System Parameter” window, go to the “Unit” tab and in the “Logical device name” parameter, select your interface.

Configuration
5.2 Configuration in SIMATIC WinCC
Exchange of large Data Volumes between S7-300/400 and WinCC with BSEND/BRCV V1.0, ID Number: 37873547 23
Co
pyr
igh
t S
iem
en
s A
G 2
00
920
09 A
ll rig
hts
rese
rve
d
37
873
547
_W
inC
C_B
SE
ND
_B
RC
V_
en.d
oc
Figure 5-12
15. Confirm the dialog box with “OK”.
16. Confirm the messages indicating that WinCC has to be restarted.
5.2.3 Setting the PG/PC interface
1. In the Windows Start menu, select the “Set PG/PC Interface” item in “Start” > “SIMATIC” > “STEP 7”.
2. In the “Set PG/PC Interface” window, select the desired interface in “Interface Parameter Assignment Used”.

Configuration
5.2 Configuration in SIMATIC WinCC
24 Exchange of large Data Volumes between S7-300/400 and WinCC with BSEND/BRCV
Version 1.0, ID Number: 37873547
Co
pyr
igh
t S
iem
en
s A
G 2
00
920
09 A
ll rig
hts
rese
rve
d
Figure 5-13
3. Confirm the dialog box with “OK”.
5.2.4 Creating the WinCC picture
1. In the WinCC Explorer tree view, select the “Graphics Designer” and in the detail view, use the right mouse button to add a “New picture”.
2. Assign a name (in the example: BSEND_BRCV.pdl).
3. Open the picture with a double-click.
4. From the “Object Palette Standard”, add two “buttons” from the “Windows Objects” category and assign the “GetRawData” and “SetRawData” labeling texts.
5. From the “Object Palette Standard”, add an “application window” from the “Smart Objects” category, select “Global Script” mode and confirm this selection with “OK”.
6. In the “Template” window, select the “GSC – Diagnostics” item for the “application window” and confirm this selection by clicking on “OK”.

Configuration
5.2 Configuration in SIMATIC WinCC
Exchange of large Data Volumes between S7-300/400 and WinCC with BSEND/BRCV V1.0, ID Number: 37873547 25
Co
pyr
igh
t S
iem
en
s A
G 2
00
920
09 A
ll rig
hts
rese
rve
d
37
873
547
_W
inC
C_B
SE
ND
_B
RC
V_
en.d
oc
5.2.5 Creating the C scripts
1. In the WinCC picture, select the “GetRawData” button and open the “Properties” of the button using the context menu.
2. Go to the “Events” tab and in the tree view, select the following path “Button” > “Mouse”.
3. In the detail view, create a “C action” using the context menu on the “Mouse Action” item.
Figure 5-14
4. Replace the comment by the script below and confirm the change with “OK”.
BYTE a[10000]; long i; GetTagRaw("Raw",a,8000); printf("New Request:\r\n"); printf("a[0]=%d\r\n", a[0]); printf("a[1]=%d\r\n", a[1]); printf("a[2]=%d\r\n", a[2]); printf("a[3]=%d\r\n", a[3]); printf("a[4]=%d\r\n", a[4]); printf("a[5]=%d\r\n", a[5]); printf("a[100]=%d\r\n", a[100]); printf("a[1000]=%d\r\n", a[1000]); printf("a[7999]=%d\r\n", a[7999]); printf("\r\n");
5. Confirm the following message with “Yes” to compile the code changes.

Configuration
5.2 Configuration in SIMATIC WinCC
26 Exchange of large Data Volumes between S7-300/400 and WinCC with BSEND/BRCV
Version 1.0, ID Number: 37873547
Co
pyr
igh
t S
iem
en
s A
G 2
00
920
09 A
ll rig
hts
rese
rve
d
6. Repeat steps 1-5 for the “SetRawData” button and add the following scripts.
BYTE a[10000]; long i; for (i=0;i<8000;i++) { a[i]=(BYTE)i; } SetTagRaw("Raw",a,8000);
7. Now save the changes by selecting “File” > “Save” and close the Graphics Designer.
Note To be able to select it in WinCC Runtime, the created WinCC picture has to be integrated into the existing structure or defined as a “start picture” for a new project.

Operation of the Application
5.2 Configuration in SIMATIC WinCC
Exchange of large Data Volumes between S7-300/400 and WinCC with BSEND/BRCV V1.0, ID Number: 37873547 27
Co
pyr
igh
t S
iem
en
s A
G 2
00
920
09 A
ll rig
hts
rese
rve
d
37
873
547
_W
inC
C_B
SE
ND
_B
RC
V_
en.d
oc
6 Operation of the Application
Overview
This chapter describes the operation and the characteristics of the BSEND/BRCV functionality with the created test picture.
Starting WinCC Runtime and calling the test picture
To test the BSEND/BRCV functionality, the picture must have been either entered as a start picture (for a new project) or integrated into the existing structure (for example, for BasicProcessControl).
1. In WinCC Explorer, click on “File” and then on “Activate”. Runtime is started.
2. Now check the status of the connection (in the example: “BSEND_BRCV”) to the controller by selecting “Start” > “SIMATIC” > “WinCC” > “Tools” > ”Channel Diagnosis”. (If it is “Disconnected”, please check the previously described settings and the network connection.)

Operation of the Application
5.2 Configuration in SIMATIC WinCC
28 Exchange of large Data Volumes between S7-300/400 and WinCC with BSEND/BRCV
Version 1.0, ID Number: 37873547
Co
pyr
igh
t S
iem
en
s A
G 2
00
920
09 A
ll rig
hts
rese
rve
d
Creating a variable table
To enable the data exchange between WinCC and the BSEND block, it is required that a rising edge be generated at the “REQ” input. In the example, this can be realized with the M200.0 flag. To modify the addresses used in the example (flags, etc.), a variable table will be created in the following steps.
1. In the tree view of the Simatic Manager, select your “SIMATIC 400 Station” and in the detail view, click on the following icons: “CPU 416-2 DP” > “S7 Program” > “Blocks”.
2. In the tree view, select the “Blocks” folder and insert a “Variable Table” (in the example: VAT_1) using the “Insert” > “S7 Block” > “Variable Table” menu command.
3. Enter the addresses in the variable table as shown in the screen shot.
Figure 6-1
4. Save and download the variable table to your controller.
Note The variable table is also included in the supplied library. Chapter “4.2.2” “Using the supplied library” provides a detailed description of how to integrate this library into your project.

Operation of the Application
5.2 Configuration in SIMATIC WinCC
Exchange of large Data Volumes between S7-300/400 and WinCC with BSEND/BRCV V1.0, ID Number: 37873547 29
Co
pyr
igh
t S
iem
en
s A
G 2
00
920
09 A
ll rig
hts
rese
rve
d
37
873
547
_W
inC
C_B
SE
ND
_B
RC
V_
en.d
oc
Opening and operating the WinCC picture
When opening the BSEND_BRCV picture, you have the following view with two buttons (SetRawData and GetRawData) and a diagnostics window that displays the scripts.
In this example, the M200.0 flag is assigned to the “REQ” input that enables the data exchange between WinCC and the BSEND block with a rising edge. Modify this flag value “0” to the value “1”.
After the data exchange has been enabled, you can use the two buttons (SetRawData and GetRawData) to read the values of the array from the controller and write the values to the controller.
In the following screen shot, the “GetRawData” button has been selected after starting WinCC Runtime. With this step, the first entry is written to the application window.
In the next step, the “SetRawData” button has been selected. The values have then been written to the controller according to the stored script.
The second entry has been written to the application window by reselecting the “GetRawData” button. In this case, the values sent by the second step are now displayed.
Figure 6-2

History
30 Exchange of large Data Volumes between S7-300/400 and WinCC with BSEND/BRCV
Version 1.0, ID Number: 37873547
Co
pyr
igh
t
Sie
me
ns
AG
20
09
All
righ
ts r
ese
rve
d
37
873
547
_W
inC
C_B
SE
ND
_B
RC
V_
en.d
oc
7 History Table 7-1 History
Version Date Modification
V1.0 08/13/09 First edition