exercise 9.2 – ping hats web serviceexercise 9.2 - ping hats web service 2. 4. start your eclipse...
TRANSCRIPT
Exercise 9.2 – Ping HATS Web ServiceBy Gilbert Herschberger (http://www.mindspring.com/~gchii/)Date Written : 4 April 2010
GoalIn this exercise, we will create “pingwsh”, the smallest possible web application for a HATS web service. This HATS web service simply confirms (a) a connection from a web service client to a web service and (b) a connection from a web service to a host.
We recommend that work through this exercise and then review your existing HATS web service projects. The procedures in this exercise can be applied to every HATS web service project, and should be. When creating a new project, it might be easier to start with a well-documented project and use it as a template. In this exercise, we will build an application that can be used as a template.
The word “ping” comes from the world of sonar, an electronic device to measure a distance and direction with underwater sound. A “ping” program is available on many operating systems to measure the distance to another host on the network. The “pingws” project enables us to confirm a connection to a web service. (See exercise 9.1 in this series.) The “pingwsh” project goes beyond “pingws” to confirm a connection to a host.
SeriesThis document is part of an education and training series. Other exercises include:
● Exercise 9.1 - “pingws” EGL Web Service. In this exercise, it takes only a few minutes to create your first web service. This exercise features EGL Community Edition.
● Exercise 9.4 - “pingwscall” EGL Web Service. In this exercise, call CL and RPG from EGL using the “call” mechanism and Java Toolkit. This exercise features EGL Community Edition.
Target Runtime EnvironmentThe completed web service can be deployed to the following target environments on i5/OS, Linux or Windows operating system.
● IBM WebSphere Application Server 6.1, or
● IBM WebSphere Application Server 6.1 Express
Target Development EnvironmentIn this exercise, the following software is used to develop a web service application.
● Rational Developer for Power 7.5
● Rational Business Developer 7.5
● Rational HATS 7.5
● WebSphere Application Server Test Environment 6.1 for Windows
Exercise 9.2 - Ping HATS Web Service 1
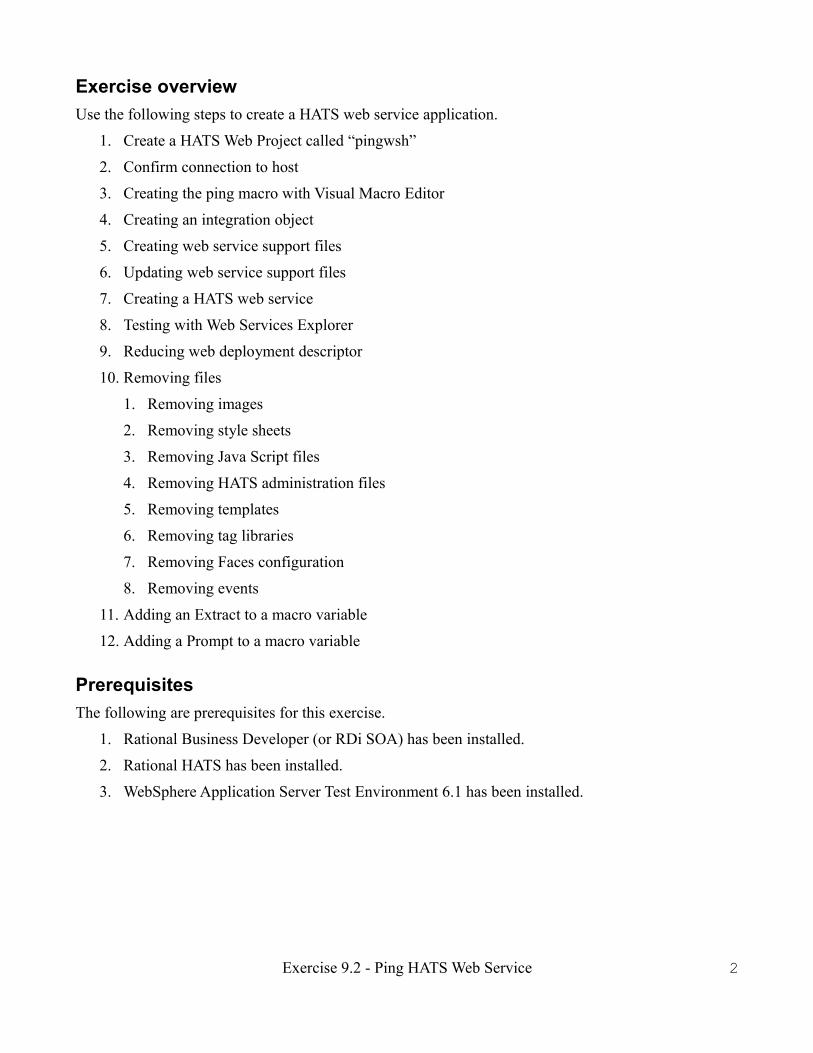
Exercise overviewUse the following steps to create a HATS web service application.
1. Create a HATS Web Project called “pingwsh”
2. Confirm connection to host
3. Creating the ping macro with Visual Macro Editor
4. Creating an integration object
5. Creating web service support files
6. Updating web service support files
7. Creating a HATS web service
8. Testing with Web Services Explorer
9. Reducing web deployment descriptor
10. Removing files
1. Removing images
2. Removing style sheets
3. Removing Java Script files
4. Removing HATS administration files
5. Removing templates
6. Removing tag libraries
7. Removing Faces configuration
8. Removing events
11. Adding an Extract to a macro variable
12. Adding a Prompt to a macro variable
PrerequisitesThe following are prerequisites for this exercise.
1. Rational Business Developer (or RDi SOA) has been installed.
2. Rational HATS has been installed.
3. WebSphere Application Server Test Environment 6.1 has been installed.
Exercise 9.2 - Ping HATS Web Service 2

4. Start your Eclipse IDE, such as Rational Business Developer or RDi SOA, with Rational HATS installed.
1. For Microsoft Windows, double-click the HATS Toolkit 7.5 ( ) icon on your
Windows desktop to start your Eclipse IDE.
5. Switch to the hatsws workspace.
1. For Microsoft Windows, type “C:\lab\hatsws” in the directory field and press the OK button.
6. Close the HATS Tips dialog box.
1. Check the Do not show this tip again field.
Exercise 9.2 - Ping HATS Web Service 3

2. Check the Do not show any tips field.
3. Press the OK button.
7. Switch to the Host Access Transformation Services perspective, if necessary.
8. In your workspace, confirm the Build Automatically feature has been disabled.
9. The Servers view contains a server document called WebSphere Application Server v6.1 at localhost.
10. In this server document, confirm the Publish Automatically feature has been disabled.
1. Right-click on the WebSphere Application Server v6.1 at localhost document and select the Open option.
2. In the Publish Automatically section, select Never Publish Automatically option.
Exercise 9.2 - Ping HATS Web Service 4

3. Save the document.
11. Close the HATS Welcome document.
Procedure 1: Creating a HATS Web Project called “pingwsh”A HATS web project is the closest thing to a HATS web service project. It provides more functionality than we want. We must first create a HATS web project and then work to remove the bits that are not required. Unfortunately, creating a pure web service project for HATS is not yet supported by our tools for version 7.5. The following procedure illustrates how to create a HATS web project called “pingwsh”.
1. Pull down the File menu on the menu bar and select New | HATS Project option.
2. Result: The Create a Project wizard is displayed.
Exercise 9.2 - Ping HATS Web Service 5
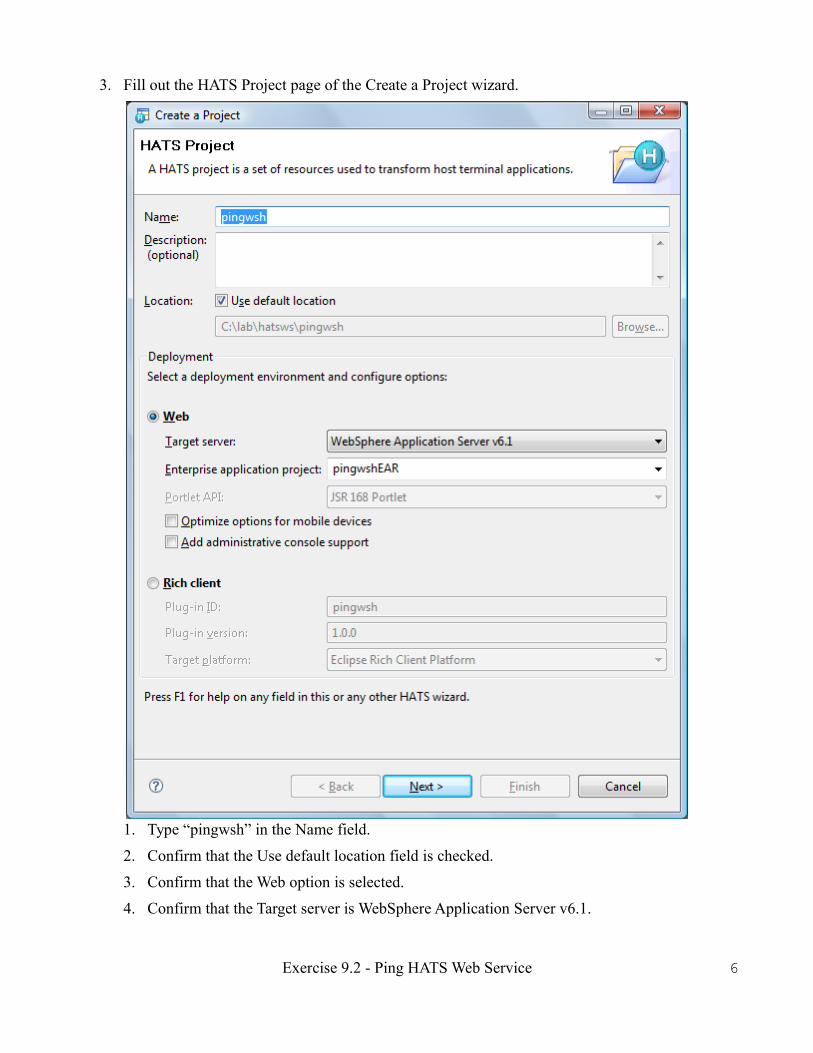
3. Fill out the HATS Project page of the Create a Project wizard.
1. Type “pingwsh” in the Name field.
2. Confirm that the Use default location field is checked.
3. Confirm that the Web option is selected.
4. Confirm that the Target server is WebSphere Application Server v6.1.
Exercise 9.2 - Ping HATS Web Service 6
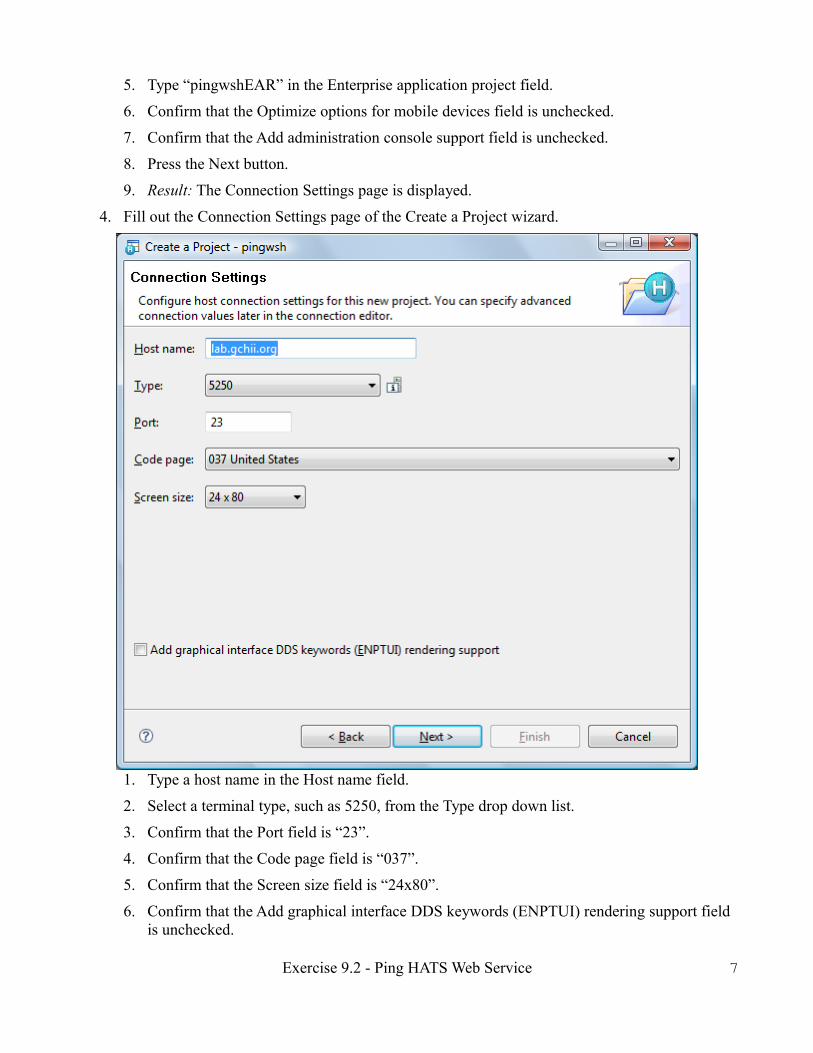
5. Type “pingwshEAR” in the Enterprise application project field.
6. Confirm that the Optimize options for mobile devices field is unchecked.
7. Confirm that the Add administration console support field is unchecked.
8. Press the Next button.
9. Result: The Connection Settings page is displayed.
4. Fill out the Connection Settings page of the Create a Project wizard.
1. Type a host name in the Host name field.
2. Select a terminal type, such as 5250, from the Type drop down list.
3. Confirm that the Port field is “23”.
4. Confirm that the Code page field is “037”.
5. Confirm that the Screen size field is “24x80”.
6. Confirm that the Add graphical interface DDS keywords (ENPTUI) rendering support field is unchecked.
Exercise 9.2 - Ping HATS Web Service 7
7. Press the Next button.
8. Result: The Project Theme page is displayed.
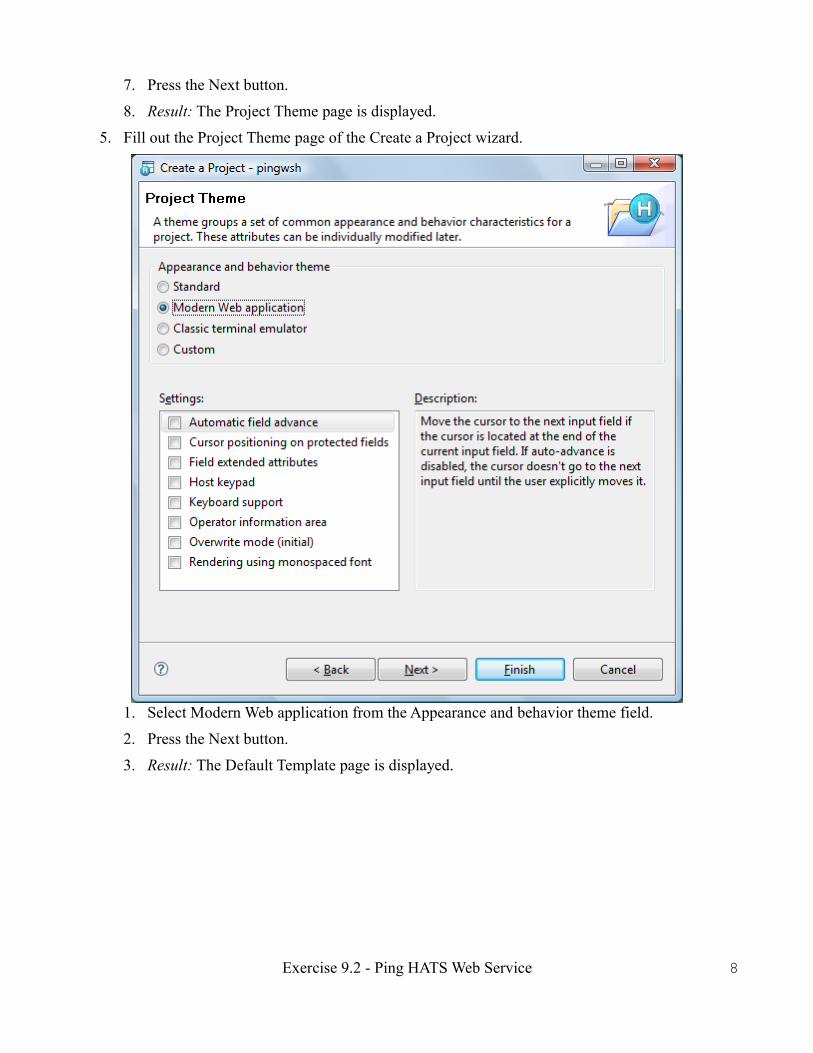
5. Fill out the Project Theme page of the Create a Project wizard.
1. Select Modern Web application from the Appearance and behavior theme field.
2. Press the Next button.
3. Result: The Default Template page is displayed.
Exercise 9.2 - Ping HATS Web Service 8
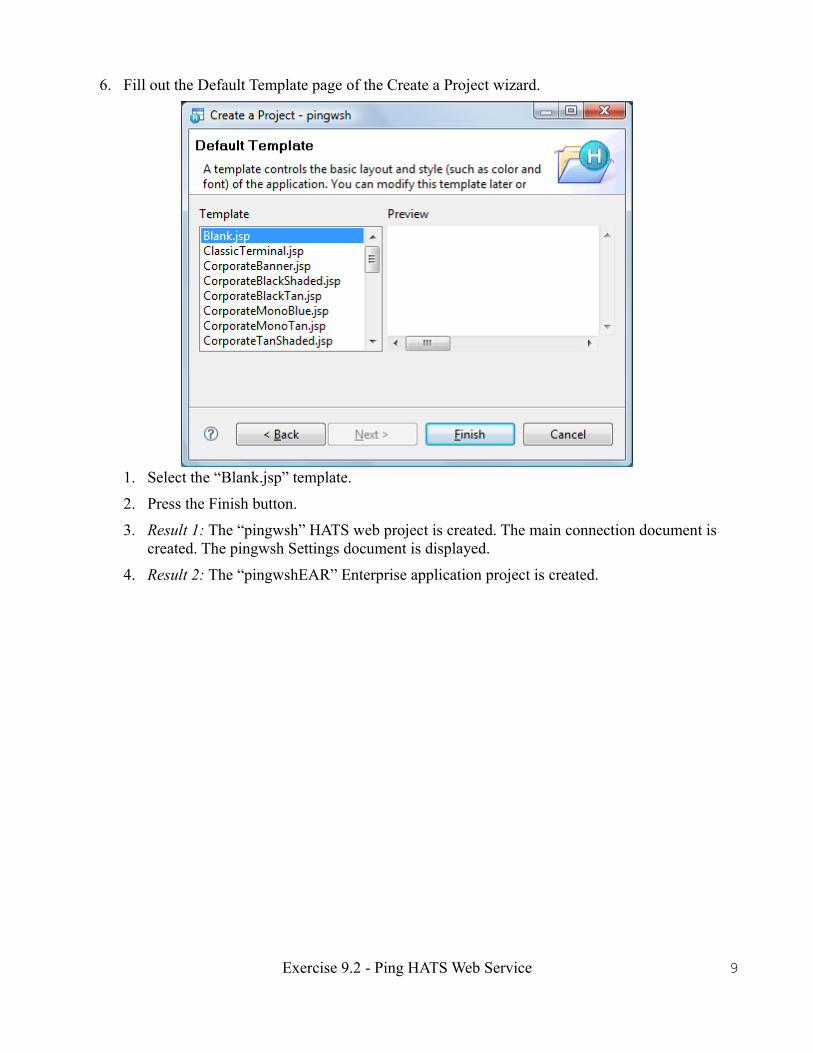
6. Fill out the Default Template page of the Create a Project wizard.
1. Select the “Blank.jsp” template.
2. Press the Finish button.
3. Result 1: The “pingwsh” HATS web project is created. The main connection document is created. The pingwsh Settings document is displayed.
4. Result 2: The “pingwshEAR” Enterprise application project is created.
Exercise 9.2 - Ping HATS Web Service 9
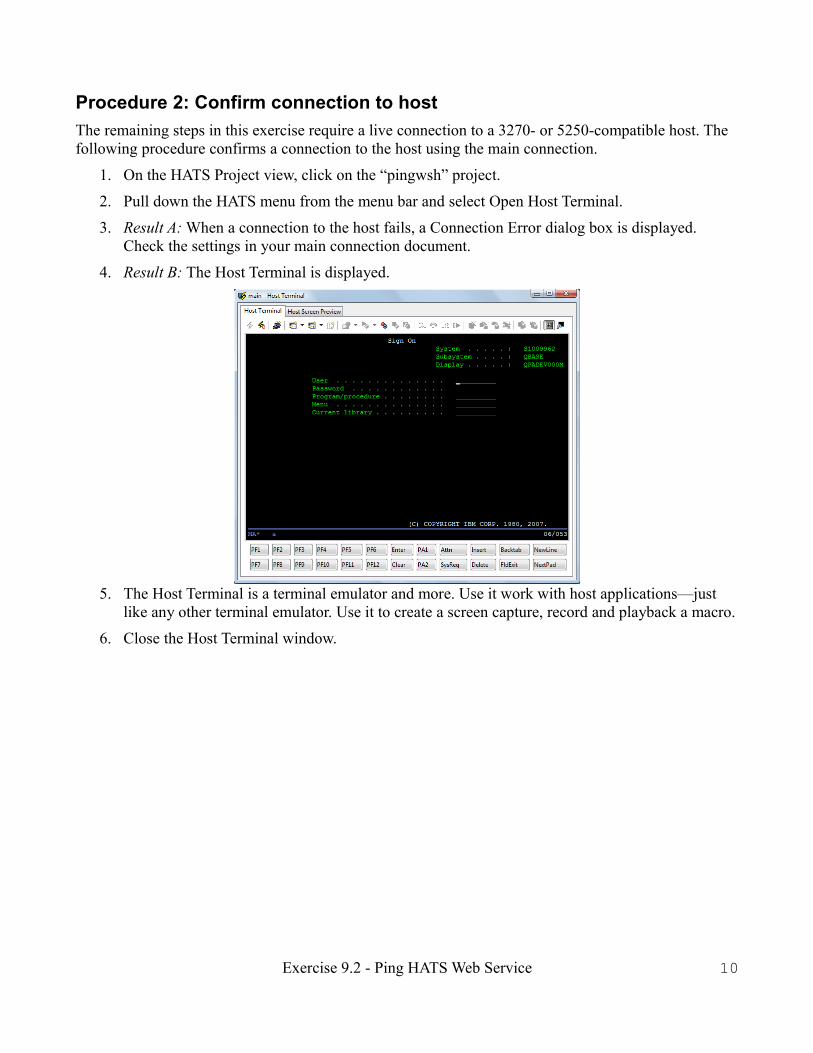
Procedure 2: Confirm connection to hostThe remaining steps in this exercise require a live connection to a 3270- or 5250-compatible host. The following procedure confirms a connection to the host using the main connection.
1. On the HATS Project view, click on the “pingwsh” project.
2. Pull down the HATS menu from the menu bar and select Open Host Terminal.
3. Result A: When a connection to the host fails, a Connection Error dialog box is displayed. Check the settings in your main connection document.
4. Result B: The Host Terminal is displayed.
5. The Host Terminal is a terminal emulator and more. Use it work with host applications—just like any other terminal emulator. Use it to create a screen capture, record and playback a macro.
6. Close the Host Terminal window.
Exercise 9.2 - Ping HATS Web Service 10
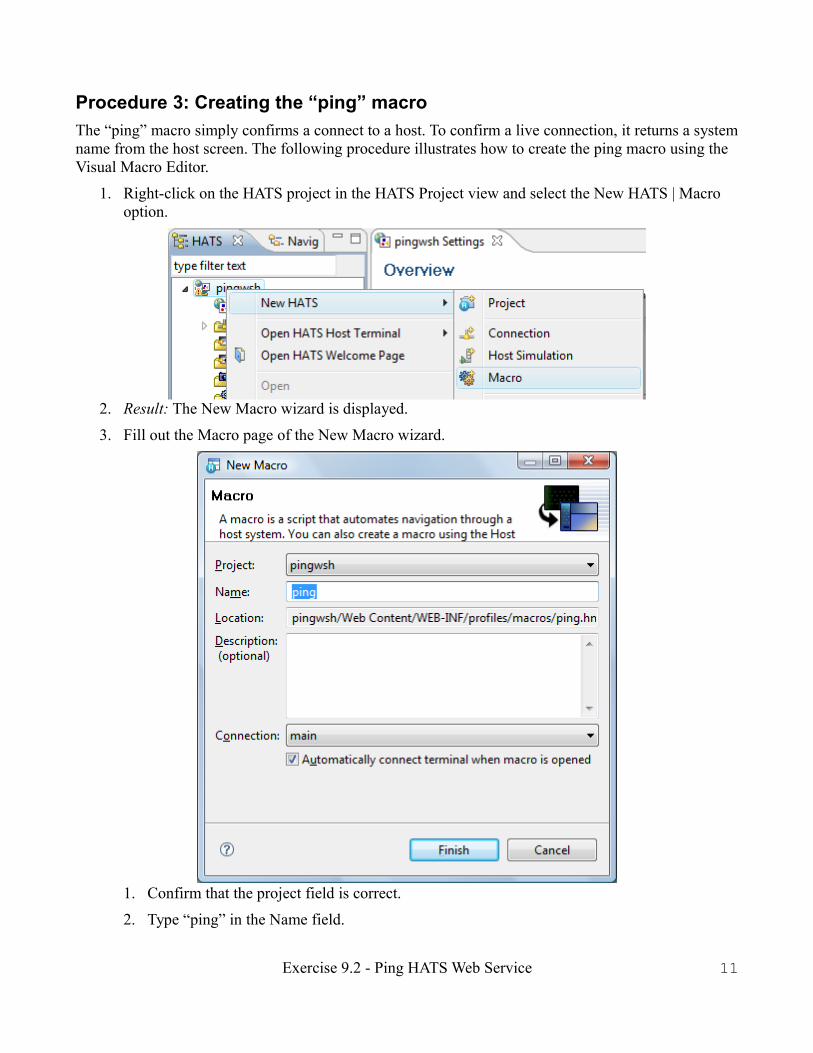
Procedure 3: Creating the “ping” macroThe “ping” macro simply confirms a connect to a host. To confirm a live connection, it returns a system name from the host screen. The following procedure illustrates how to create the ping macro using the Visual Macro Editor.
1. Right-click on the HATS project in the HATS Project view and select the New HATS | Macro option.
2. Result: The New Macro wizard is displayed.
3. Fill out the Macro page of the New Macro wizard.
1. Confirm that the project field is correct.
2. Type “ping” in the Name field.
Exercise 9.2 - Ping HATS Web Service 11
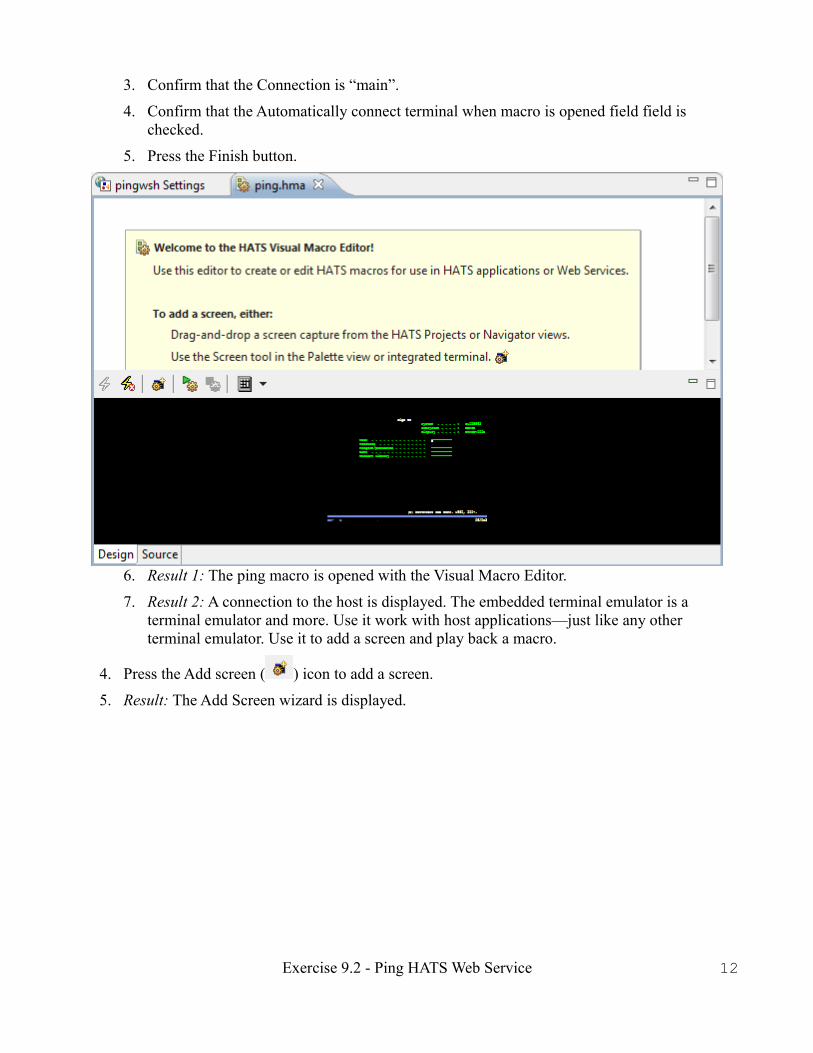
3. Confirm that the Connection is “main”.
4. Confirm that the Automatically connect terminal when macro is opened field field is checked.
5. Press the Finish button.
6. Result 1: The ping macro is opened with the Visual Macro Editor.
7. Result 2: A connection to the host is displayed. The embedded terminal emulator is a terminal emulator and more. Use it work with host applications—just like any other terminal emulator. Use it to add a screen and play back a macro.
4. Press the Add screen ( ) icon to add a screen.
5. Result: The Add Screen wizard is displayed.
Exercise 9.2 - Ping HATS Web Service 12
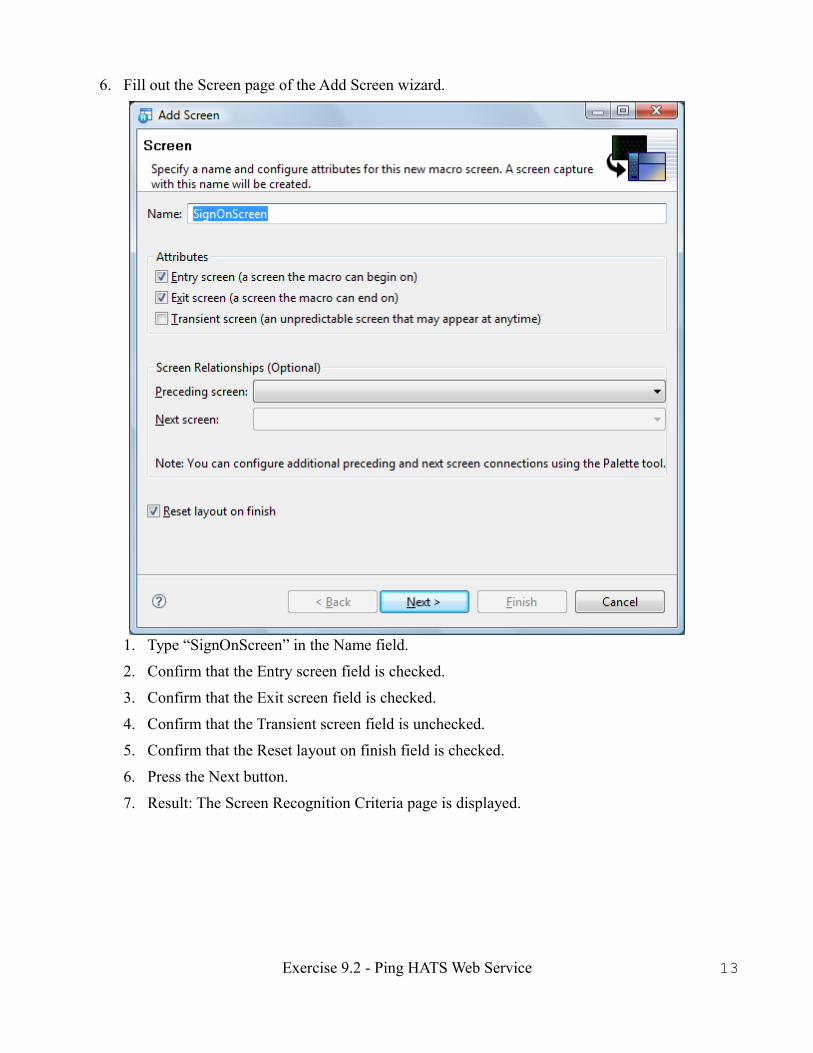
6. Fill out the Screen page of the Add Screen wizard.
1. Type “SignOnScreen” in the Name field.
2. Confirm that the Entry screen field is checked.
3. Confirm that the Exit screen field is checked.
4. Confirm that the Transient screen field is unchecked.
5. Confirm that the Reset layout on finish field is checked.
6. Press the Next button.
7. Result: The Screen Recognition Criteria page is displayed.
Exercise 9.2 - Ping HATS Web Service 13
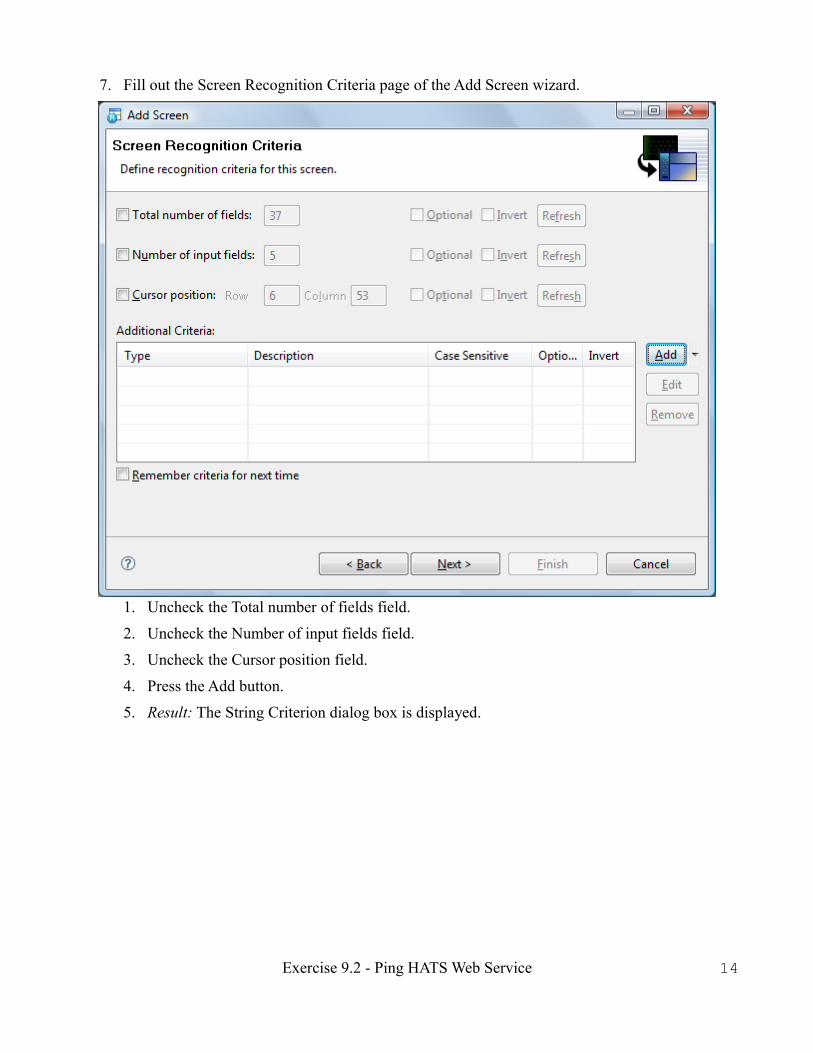
7. Fill out the Screen Recognition Criteria page of the Add Screen wizard.
1. Uncheck the Total number of fields field.
2. Uncheck the Number of input fields field.
3. Uncheck the Cursor position field.
4. Press the Add button.
5. Result: The String Criterion dialog box is displayed.
Exercise 9.2 - Ping HATS Web Service 14

6. Fill out the String Criterion dialog box.
1. Draw a rectangle around the text “Sign On”.
2. Select the At a specified position option in the String position field.
3. Check the Case sensitive field.
4. Press the OK button.
5. Result: The Add Screen wizard is displayed again. The first criteria is added to the criteria list.
7. Press the Add button (again).
8. Result: The String Criterion dialog box is displayed.
Exercise 9.2 - Ping HATS Web Service 15

9. Fill out the String Criterion dialog box.
1. Draw a rectangle around the text “System . . . . . :”.
2. Select the At a specified position option in the String position field.
3. Check the Case sensitive field.
4. Press the OK button.
5. Result: The Add Screen wizard is displayed. The second criteria is added to the criteria list.
Exercise 9.2 - Ping HATS Web Service 16
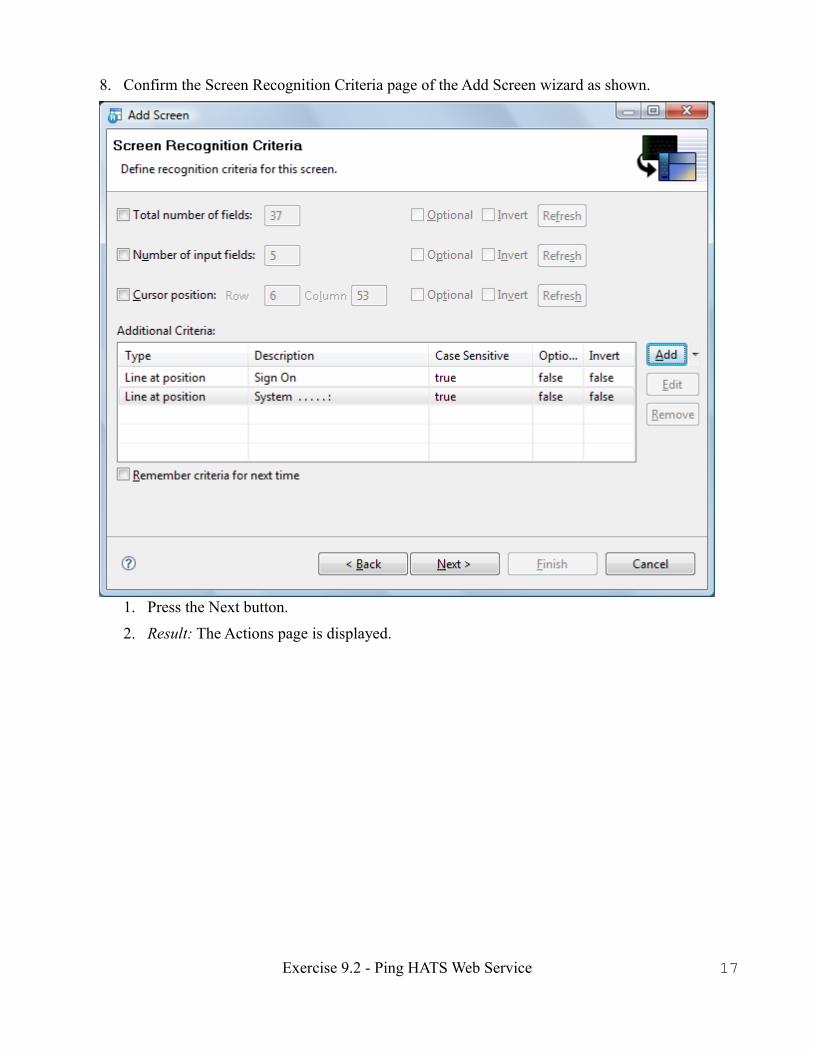
8. Confirm the Screen Recognition Criteria page of the Add Screen wizard as shown.
1. Press the Next button.
2. Result: The Actions page is displayed.
Exercise 9.2 - Ping HATS Web Service 17
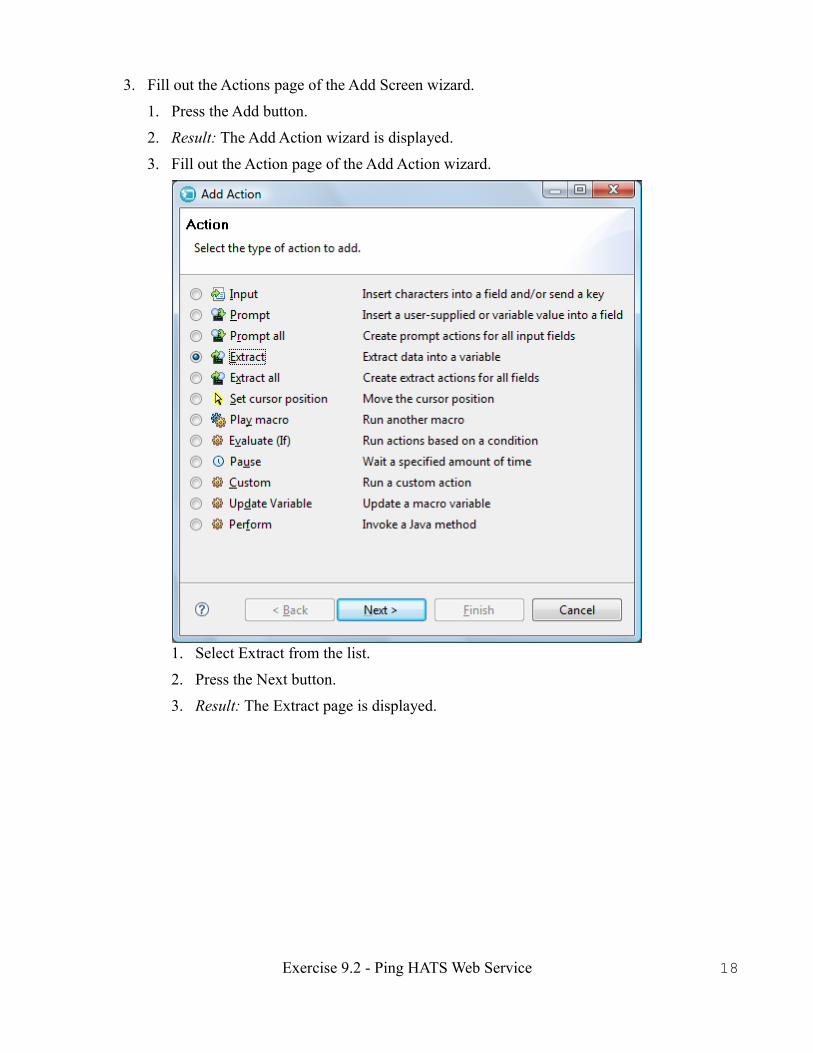
3. Fill out the Actions page of the Add Screen wizard.
1. Press the Add button.
2. Result: The Add Action wizard is displayed.
3. Fill out the Action page of the Add Action wizard.
1. Select Extract from the list.
2. Press the Next button.
3. Result: The Extract page is displayed.
Exercise 9.2 - Ping HATS Web Service 18

4. Fill out the Extract page of the Add Action wizard.
1. Type “systemName” in the Name field.
2. Draw a rectangle around the System field, row 2, columns 70 to 77.
3. Confirm the Extract this region as one string option in the Extraction Format field.
4. Press the Finish button.
5. Result: The Add Screen wizard is displayed. The first action is added to the list of actions.
Exercise 9.2 - Ping HATS Web Service 19
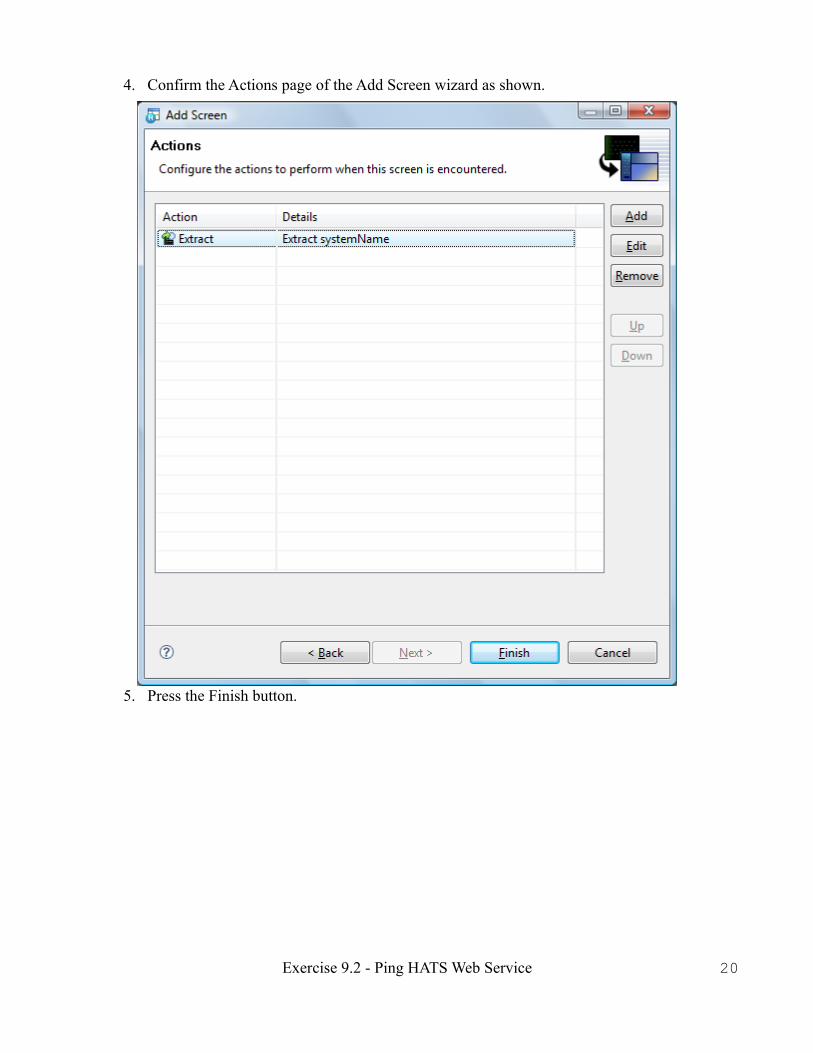
4. Confirm the Actions page of the Add Screen wizard as shown.
5. Press the Finish button.
Exercise 9.2 - Ping HATS Web Service 20

6. Results:
1. Result 1: The SignOnScreen screen is added to the macro.
2. Result 2: The layout of the Visual Macro Editor is reset.
9. Save the macro.
1. Press the Save ( ) icon.
Exercise 9.2 - Ping HATS Web Service 21

10. Press the Play Macro ( ) icon.
11. Result 1: The macro is played.
12. Result 2: The Extract Results dialog box is displayed.
13. Confirm that the systemName has been extracted from the screen.
14. Close the Extract Result dialog box.
Procedure 4: Creating an Integration ObjectAn integration object is a Java wrapper for a HATS macro. A Java wrapper is required for a HATS web service. The following procedure illustrates how to create an Integration Object using the ping macro as an example.
1. In the HATS Project view, expand the “pingwsh” project.
2. Expand the Macros folder.
Exercise 9.2 - Ping HATS Web Service 22

3. Right-click on the ping macro and select the Create Integration Object option.
4. Result: An Integration Object is created.
5. Pull down the Project menu and select the Build All option.
6. Result: There should be no error messages in the Problems view.
Procedure 5: Creating web service support classesWeb service support classes are a wrapper for an integration object. These classes are required for a HATS web service. The following procedure illustrates how to create web service support classes using the Ping integration object as an example.
1. In the HATS Project view, expand the “pingwsh” project.
2. Expand the Source folder.
3. Expand the IntegrationObject folder.
4. Result: A list of integration objects is displayed.
Exercise 9.2 - Ping HATS Web Service 23
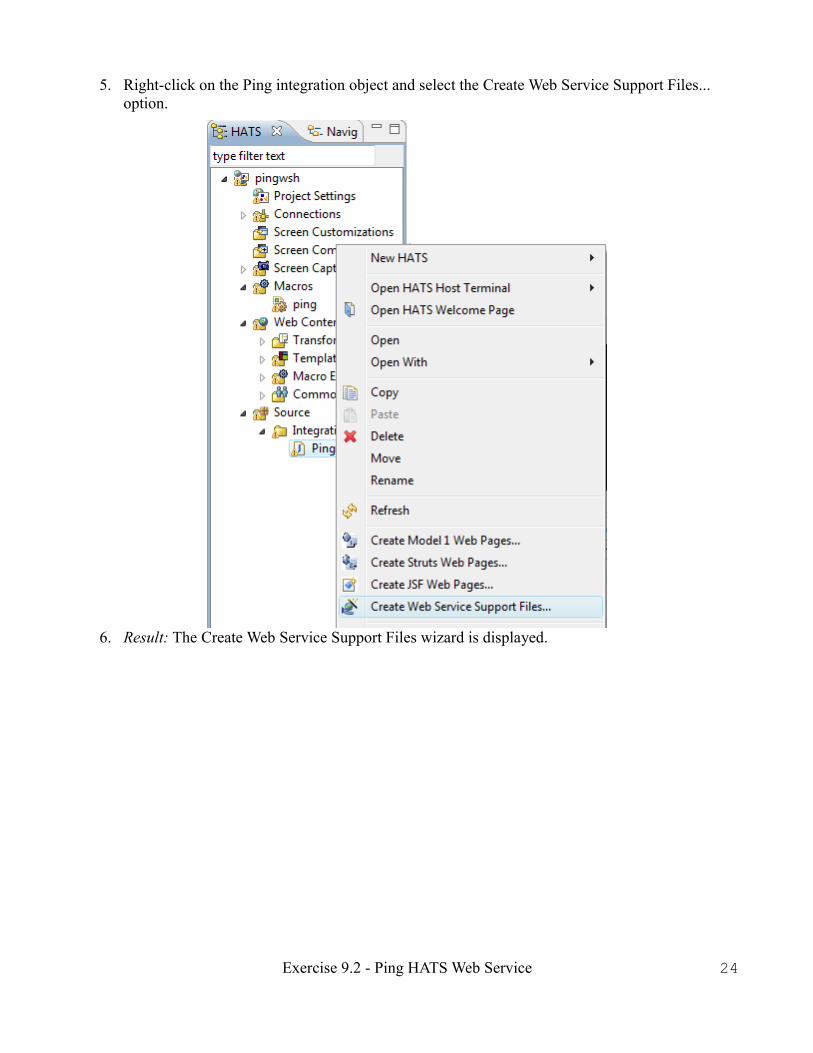
5. Right-click on the Ping integration object and select the Create Web Service Support Files... option.
6. Result: The Create Web Service Support Files wizard is displayed.
Exercise 9.2 - Ping HATS Web Service 24
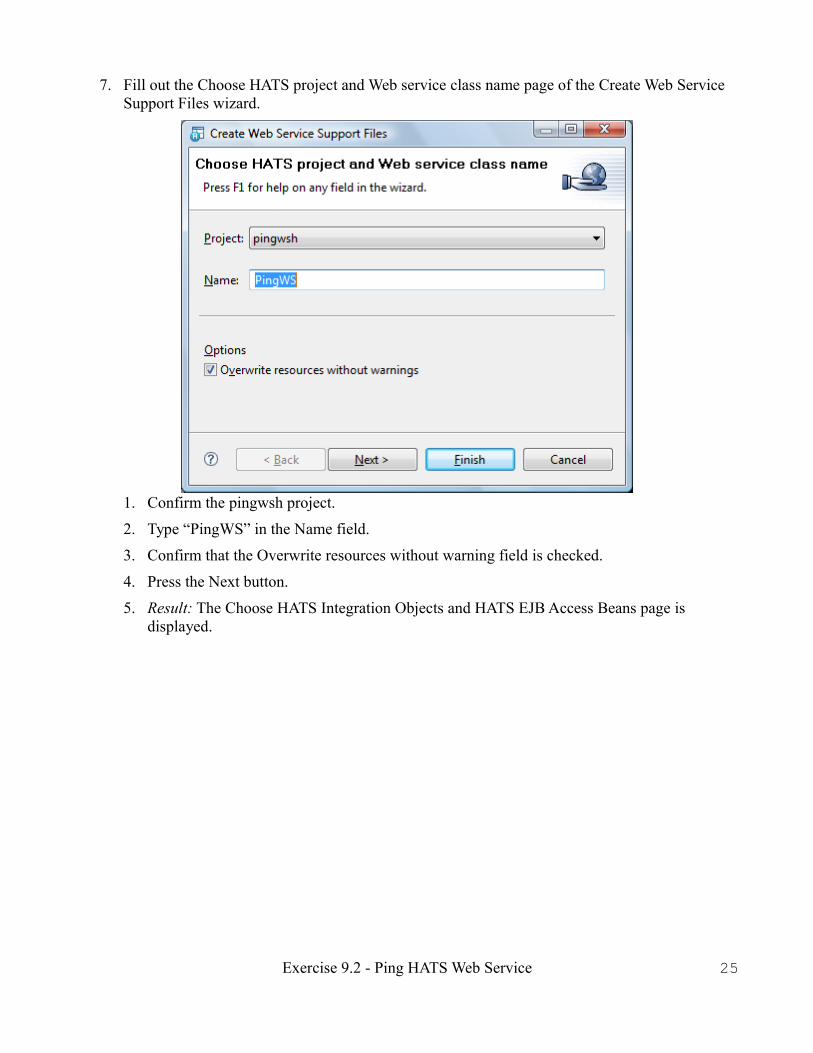
7. Fill out the Choose HATS project and Web service class name page of the Create Web Service Support Files wizard.
1. Confirm the pingwsh project.
2. Type “PingWS” in the Name field.
3. Confirm that the Overwrite resources without warning field is checked.
4. Press the Next button.
5. Result: The Choose HATS Integration Objects and HATS EJB Access Beans page is displayed.
Exercise 9.2 - Ping HATS Web Service 25

8. Fill out the Choose HATS Integration Objects and HATS EJB Access Beans page of the Create Web Services Support Files wizard.
1. Confirm that the Ping Integration Object is checked.
2. Press the Finish button.
3. Result: Web Service Support files are generated.
9. Pull down the Project menu and select the Build All option.
10. Result: There should be no error messages in the Problems view. If there are error messages in the Problems view, try procedure 6 to correct the errors.
Procedure 6: Updating web service support classesSometimes, the following procedure is needed to resolve error messages in the Problems view.
1. In the HATS Project view, expand the “pingwsh” project.
2. Expand the Source folder.
3. Expand the webserviceclasses folder.
4. Right-click on the PingWS web service support file and select the Update Web Service Support Files... option.
Exercise 9.2 - Ping HATS Web Service 26

5. Result: The Update Web Service Support Files wizard is displayed.
6. Confirm the project.
7. Confirm the name.
8. Press the Next button.
9. Result: The Choose HATS Integration Objects and HATS EJB Access Beans page is displayed.
10. Confirm that the Ping integration object is checked.
11. Press the Finish button.
12. Pull down the Project menu and select the Build All option.
13. Result: There should be no error messages in the Problems view.
Procedure 7: Creating a HATS Web ServiceWe have created and tested a macro, created an integration object and web service support files. From the web service support files, we create a web service. The following procedure illustrates how to create a HATS web service.
1. Start WebSphere Application Server v6.1 at localhost.
1. Switch to the Servers view.
2. Select the WebSphere Application Server v6.1 at localhost server.
3. Press the Start icon and wait for the server to start.
2. In the HATS Project view, expand the “pingwsh” project.
3. Expand the Source folder.
4. Expand the webserviceclasses folder.
Exercise 9.2 - Ping HATS Web Service 27

5. Right-click on the PingWS web service support file and select the Web Services | Create Web Service option.
6. Result: The Web Service wizard is displayed.
Exercise 9.2 - Ping HATS Web Service 28

7. Fill out the Web Services page of the Web Service wizard.
1. Confirm that the Web service type is Bottom-up Java bean Web Service.
2. Confirm that the service implementation is “webserviceclasses.PingWS”.
3. Confirm that the service configuration is as follows:
1. Server: WebSphere Application Server v6.1
2. Web service runtime: JAX-RPC
Exercise 9.2 - Ping HATS Web Service 29
3. Service project: pingwsh
4. Service EAR project: pingwshEAR
4. Confirm that the client configuration is No client.
5. Press the Next button.
6. Result: The Service Endpoint Interface Selection page is displayed.
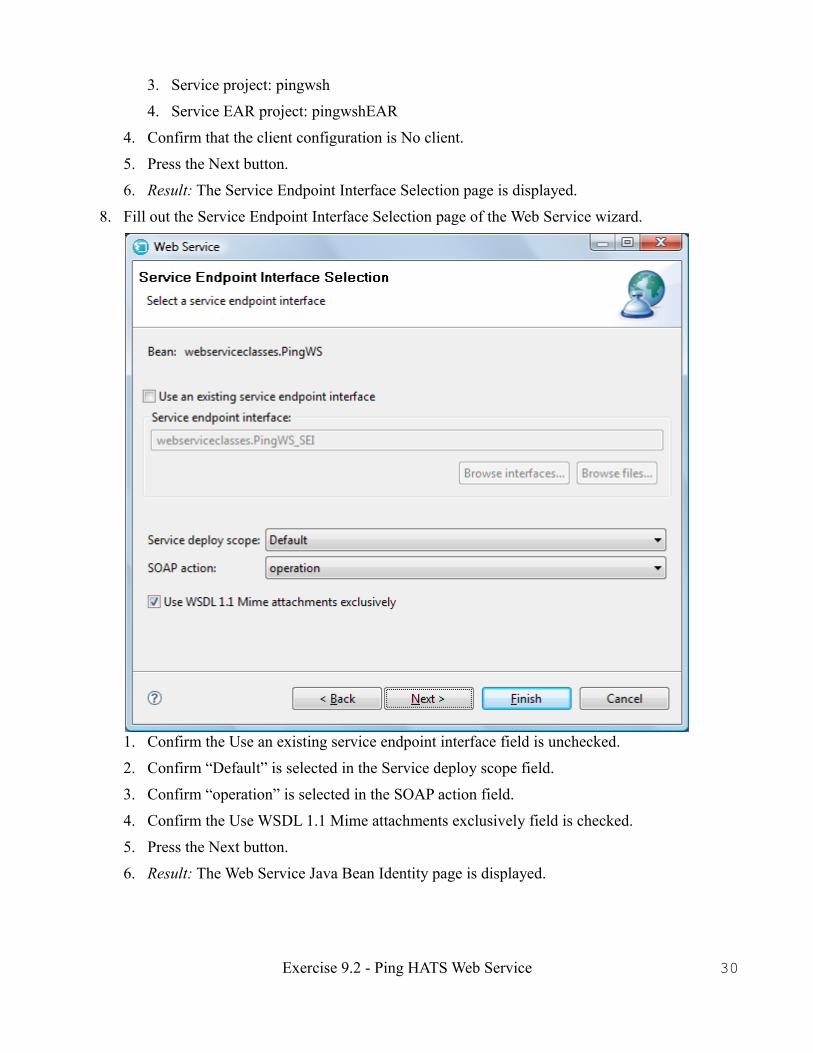
8. Fill out the Service Endpoint Interface Selection page of the Web Service wizard.
1. Confirm the Use an existing service endpoint interface field is unchecked.
2. Confirm “Default” is selected in the Service deploy scope field.
3. Confirm “operation” is selected in the SOAP action field.
4. Confirm the Use WSDL 1.1 Mime attachments exclusively field is checked.
5. Press the Next button.
6. Result: The Web Service Java Bean Identity page is displayed.
Exercise 9.2 - Ping HATS Web Service 30

9. Fill out the Web Service Java Bean Identity page of the Web Service wizard as shown.
1. Uncheck the getNestedBeanNames() method.
2. Press the Next button.
3. Result 1: The Java code for the web service is generated.
4. Result 2: The WSDL file for the web service is generated.
5. Result 3: The Web Service Publication page is displayed.
Exercise 9.2 - Ping HATS Web Service 31

10. Fill out the Web Service Publication page of the Web Service wizard as shown.
11. Press the Finish button.
Procedure 8: Test with Web Services ExplorerThe following procedure illustrates how to test a HATS web service with the Web Services Explorer.
1. In the HATS Project view, expand the “pingwsh” project.
2. Expand the Web Content folder.
3. Expand the /WEB-INF/Web Service Definitions folder.
4. Right-click the PingWS web service definition and select the Web Services | Test with Web Services Explorer option.
5. Result: The Web Services Explorer is displayed.
6. In the Actions tab, click the pingProcessWS operation.
7. Result: The Invoke a WSDL Operation page is displayed.
8. Press the Go button.
9. Result 1: The pingProcessWS operation of the PingWS web service is invoked.
10. Result 2: The result is displayed in the Status tab.
11. Confirm that the systemName field contains the system name.
Procedure 9: Reducing web deployment descriptorServlets, filters, security roles, security constraints, welcome pages, context parameters and tag libraries are declared in a web deployment descriptor. The following procedure illustrates how to remove unneeded references from a web deployment descriptor.
1. In the Navigator view, expand the “pingwsh” project.
2. Expand the Web Content folder.
Exercise 9.2 - Ping HATS Web Service 32
3. Expand the WEB-INF folder.
4. Open the “web.xml” document with the Deployment Descriptor editor.
5. Result: The Web Deployment Descriptor for the project is displayed.
6. Switch to the Servlets tab. Unlike a HATS web project, a HATS web service project does not depend upon servlets, except for “EntryServlet” and one or more servlets we have generated. In this exercise, we have generated a servlet called “webserviceclasses_PingWS”. We can safely remove other servlets.
7. Remove all servlets except EntryServlet and webserviceclasses_PingWS. Always remove the Java servlet class.
8. Switch to Filters tab. A HATS web service does not depend upon a filter. We can safely remove them.
9. Remove all filters. Always remove the filter Java class.
10. Switch to the Security tab. A HATS web service project does not depend upon any role. We can safely remove them.
11. Remove all security roles.
12. Remove all security constraints.
13. Switch to the Pages tab. A HATS web service project does not depend upon welcome pages. We can safely remove them.
14. Remove all welcome pages.
1. Optionally, remove all welcome pages except for index.html and create an index.html document to summarize your web service project.
15. Switch to the Variables tab. A HATS web service project depend upon neither context parameters nor tag libraries. We can safely remove them.
16. Remove all context parameters.
17. Remove all tag lib references.
18. Switch to the Extension tab.
19. Uncheck the Reloading enabled field.
20. Uncheck the File serving enabled field.
21. Uncheck the serve servlets by classname field.
22. Press the Save icon.
Procedure 10.1: Removing imagesA HATS web service application does not use images. The following procedure illustrates how to remove images from a HATS web project.
1. In the Navigator view, expand the “pingwsh” project.
2. Expand the Web Content folder.
Exercise 9.2 - Ping HATS Web Service 33

3. Expand the common folder.
4. Expand the images folder.
5. Select all images, from AmberToRustVertical.jpg to WhiteButtonBackground.jpg.
6. Right-click on a selected image and select the Delete option.
7. Result: The Delete Resources dialog box is displayed.
8. Press the OK button.
9. Result: The images folder is empty.
Procedure 10.2: Removing style sheetsA HATS web service application does not use cascading style sheets. The following procedure illustrates how to remove style sheets from a HATS web project.
1. In the Navigator view, expand the “pingwsh” project.2. Expand the Web Content folder.3. Expand the common folder.4. Expand the stylesheets folder.5. Select all style sheets, from blacktheme.css to xsmallFont.css.6. Right-click on a selected image and select the Delete option.7. Result: The Delete Resources dialog box is displayed.8. Press the OK button.9. Result: The stylesheets folder is empty.
Procedure 10.3: Removing Java Script filesA HATS web service application does not use Java Script files. The following procedure illustrates how to remove these from a HATS web project.
1. In the Navigator view, expand the “pingwsh” project.
2. Expand the Web Content folder.
3. Expand the common folder.
4. Select all Java Script (.js) files, from bidishape.js to xhtmlbasic.js.
5. Right-click on a selected file and select the Delete option.
6. Result: The Delete Resources dialog box is displayed.
7. Press the OK button.
8. Result: There are no more Java Script files in the project.
Exercise 9.2 - Ping HATS Web Service 34
Procedure 10.4: Removing HATS Administration files.A HATS web service application does not use HATS Administration files. The following procedure illustrates how to remove these from a HATS web project.
1. In the Navigator view, expand the “pingwsh” project.
2. Expand the Web Content folder.
3. Expand the hatsadmin folder.
4. Select all JSP pages.
5. Right-click on a selected JSP page and select the Delete option.
6. Result: The Delete Resources dialog box is displayed.
7. Press the OK button.
8. Result: The hatsadmin folder is empty.
Procedure 10.5: Removing templates.A HATS web service application does not use templates. The following procedure illustrates how to remove these from a HATS web project.
1. In the HATS Project view, expand the “pingwsh” project.2. Expand the Web Content folder.3. Expand the Templates folder.4. Select all templates, except Blank,jsp.5. Right-click on a selected template and select the Delete option.6. Result: The Delete Resources dialog box is displayed.7. Press the OK button.8. Result: Blank.jsp is the only template in the project.
Procedure 10.6: Removing tag librariesA HATS web service application does not use tag libraries. The following procedure illustrates how to remove these from a HATS web project.
1. In the Navigator view, expand the “pingwsh” project.2. Expand the Web Content folder.3. Expand the WEB-INF folder.4. Expand the tld folder.5. Select all tag libraries, such as hats.tld.6. Right-click on a selected file and select the Delete option.7. Result: The Delete Resources dialog box is displayed.
Exercise 9.2 - Ping HATS Web Service 35

8. Press the OK button.9. Result: There are no tag libraries in the project.
Procedure 10.7: Removing Faces configurationA HATS web service application does not use Java Server Faces (JSF). Therefore, it does not need a faces configuration. The following procedure illustrates how to remove this from a HATS web project.
1. In the Navigator view, expand the “pingwsh” project.2. Expand the Web Content folder.3. Expand the WEB-INF folder.4. Right-click on the faces-config.xml file and select the Delete option.5. Result: The Delete Resources dialog box is displayed.6. Press the OK button.7. Result: There are no tag libraries in the project.
Procedure 10.8: Removing application eventsA HATS web service application does not use application events (.evnt files). The following procedure illustrates how to remove this from a HATS web project.
1. In the Navigator view, expand the “pingwsh” project.
2. Expand the Web Content folder.
3. Expand the WEB-INF folder.
4. Expand the profiles folder.
5. Expand the events folder.
6. Expand the application folder.
7. Select all event files, from blankScreen.evnt to unmatchedScreen.evnt.
8. Right-click on a selected file and select the Delete option.
9. Result: The Delete Resources dialog box is displayed.
10. Press the OK button.
11. Result: There are no event files in the project.
Production System – First StepsIn a production environment, the “pingwshEAR” enterprise application confirms a connection to the web service and a connection to the host. It can be used by your web service client to confirm an active 3270 or 5250 host and its host name before invoking any other HATS web service.
This application can be the first HATS web service installed in a production system. Install it early in a HATS web service project to identify and resolve any problems with a production environment. This is
Exercise 9.2 - Ping HATS Web Service 36
part of a general troubleshooting strategy.
In general, the following steps are used.
1. Install and start the “pingwshEAR.ear” enterprise application. Likely, you will use the Administration Console of the target instance of WebSphere to install an enterprise application from “pingwshEAR.ear”. The exact steps required to deploy an enterprise application on WebSphere belongs to you. It is beyond the scope of this document.
2. Test with Web Services Explorer. Obtain a WSDL document from the production web service using the standard “?WSDL” suffix. In our exercise, the WSDL document is found at “http://localhost:9080/pingwsh/services/PingWSService?WSDL”. Substitute “localhost:9080” with a production host and port.
3. Generate your web service client from the WSDL. Many web service clients are available. The only web service client that needs to be tested is the one that you are going to be using in a production system. Therefore, the exact procedure for testing your web service client belongs to you. It is beyond the scope of this document.
Exercise 9.2 - Ping HATS Web Service 37
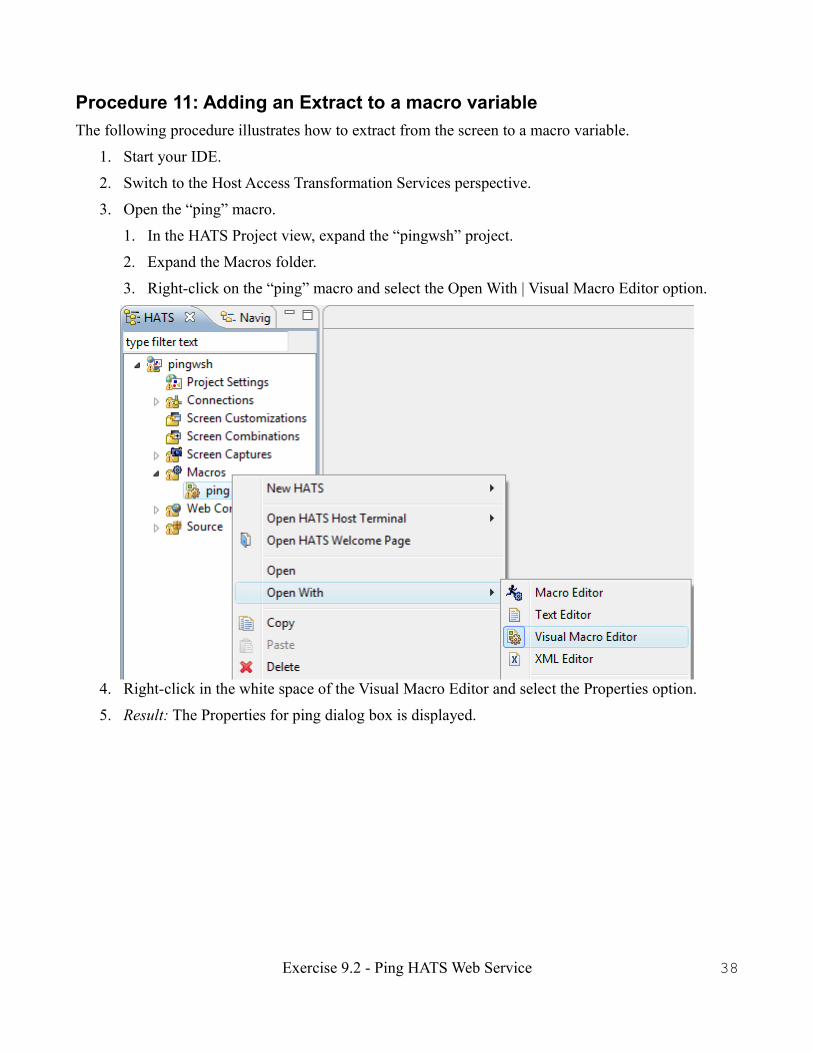
Procedure 11: Adding an Extract to a macro variableThe following procedure illustrates how to extract from the screen to a macro variable.
1. Start your IDE.
2. Switch to the Host Access Transformation Services perspective.
3. Open the “ping” macro.
1. In the HATS Project view, expand the “pingwsh” project.
2. Expand the Macros folder.
3. Right-click on the “ping” macro and select the Open With | Visual Macro Editor option.
4. Right-click in the white space of the Visual Macro Editor and select the Properties option.
5. Result: The Properties for ping dialog box is displayed.
Exercise 9.2 - Ping HATS Web Service 38

6. On the General folder, uncheck the Pause between actions field.
7. On the Variables and Types folder, check the Enable support
8. Result: The Confirm dialog box is displayed.
9. Press the Yes button.
10. Result: The macro is converted to advanced macro format.
11. Press the Add button.
12. Result: The Add Variable dialog box is displayed.
Exercise 9.2 - Ping HATS Web Service 39
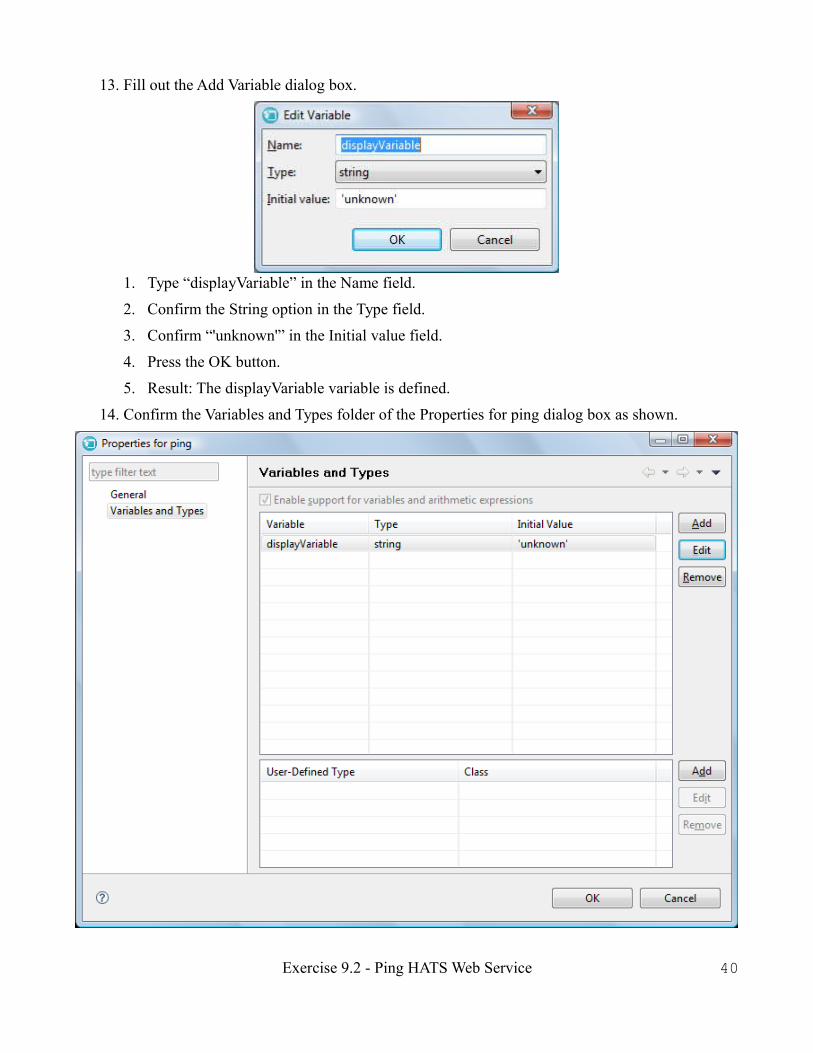
13. Fill out the Add Variable dialog box.
1. Type “displayVariable” in the Name field.
2. Confirm the String option in the Type field.
3. Confirm “'unknown'” in the Initial value field.
4. Press the OK button.
5. Result: The displayVariable variable is defined.
14. Confirm the Variables and Types folder of the Properties for ping dialog box as shown.
Exercise 9.2 - Ping HATS Web Service 40

15. Press the OK button.
16. Double-click the SignOnScreen screen in the Visual Macro Editor.
17. Result: The Properties for SignOnScreen dialog box is displayed.
18. Switch to the Actions folder and press the Add button.
19. Result: The Add Action wizard is displayed.
20. Fill out the Action page of the Add Action wizard.
1. Select the Extract option and press the Next button.
2. Result: The Extract page is displayed.
21. Fill out the Extract page of the Add Action wizard.
1. Type “displayName” in the Name field.
2. Draw a box around the Display Name field.
3. Confirm the Extract this region as one string option in the Extraction Format field.
4. Check the Save as macro variable field.
Exercise 9.2 - Ping HATS Web Service 41

5. Select “displayVariable” in the Variable field.
6. Press the Finish button.
7. Result: The Properties for SignOnScreen dialog box is displayed.
22. Confirm the Properties for SignOnScreen dialog box.
23. Press the OK button.
24. Result: An extract to macro variable action is added to the screen.
25. Save the macro.
26. Play the macro.
27. Generate the Integration Object.
28. Update the Web Service Support files.
29. Generate the Web Service.
30. Test with Web Services Explorer.
Exercise 9.2 - Ping HATS Web Service 42
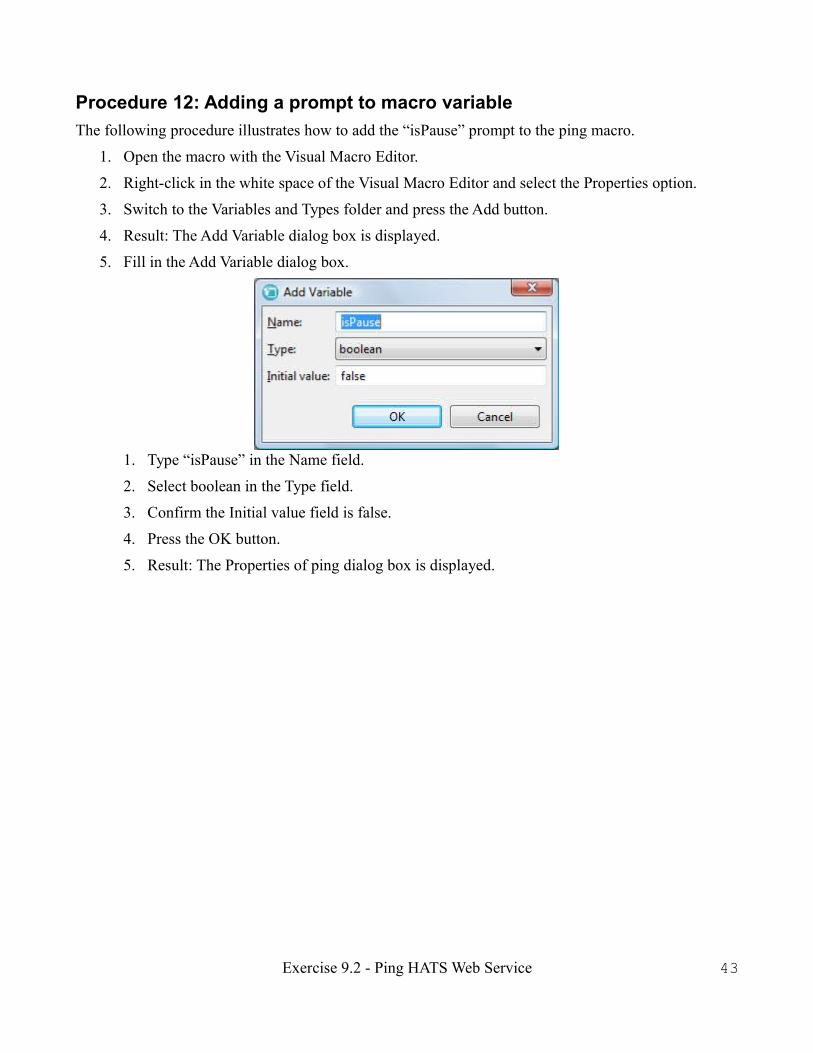
Procedure 12: Adding a prompt to macro variableThe following procedure illustrates how to add the “isPause” prompt to the ping macro.
1. Open the macro with the Visual Macro Editor.
2. Right-click in the white space of the Visual Macro Editor and select the Properties option.
3. Switch to the Variables and Types folder and press the Add button.
4. Result: The Add Variable dialog box is displayed.
5. Fill in the Add Variable dialog box.
1. Type “isPause” in the Name field.
2. Select boolean in the Type field.
3. Confirm the Initial value field is false.
4. Press the OK button.
5. Result: The Properties of ping dialog box is displayed.
Exercise 9.2 - Ping HATS Web Service 43

6. Confirm the Variables and Types folder of the Properties of ping dialog box.
7. Press the OK button.
8. Result: The “isPause” variable is added to the macro.
9. Double-click the SignOnScreen screen in the Visual Macro Editor.
10. Result: The Properties for SignOnScreen dialog box is displayed.
11. Switch to the Actions folder and press the Add button.
12. Result: The Add Action wizard is displayed.
Exercise 9.2 - Ping HATS Web Service 44
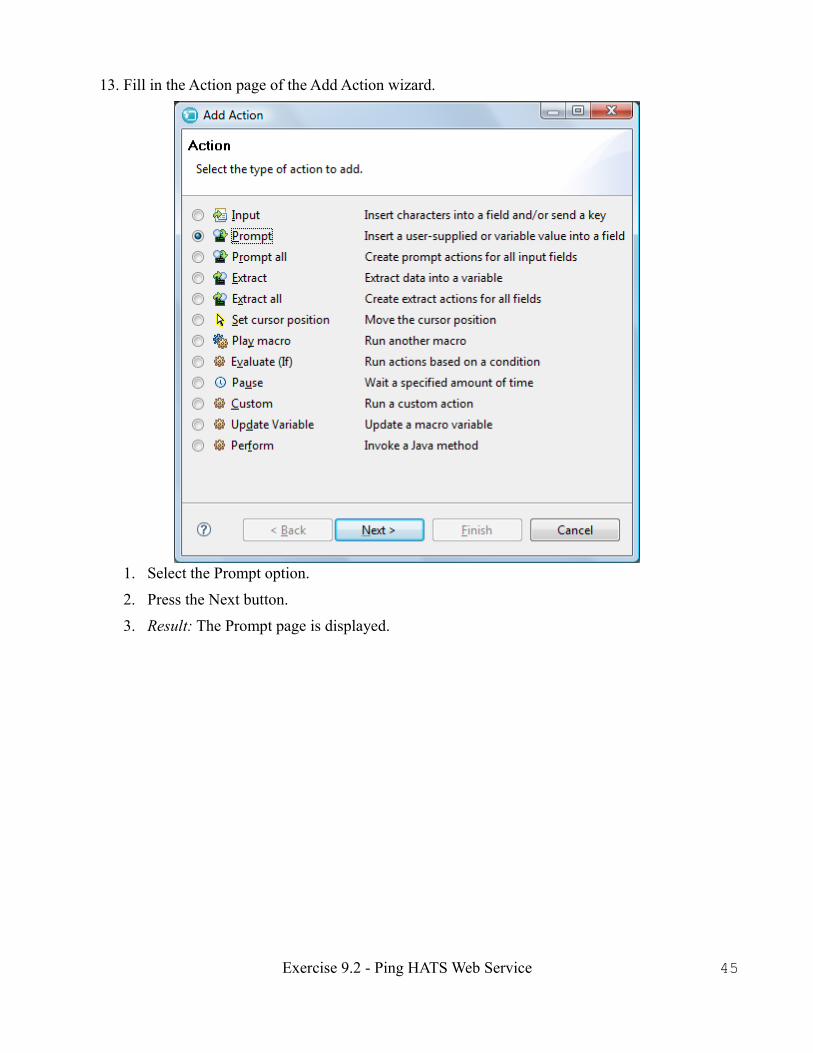
13. Fill in the Action page of the Add Action wizard.
1. Select the Prompt option.
2. Press the Next button.
3. Result: The Prompt page is displayed.
Exercise 9.2 - Ping HATS Web Service 45
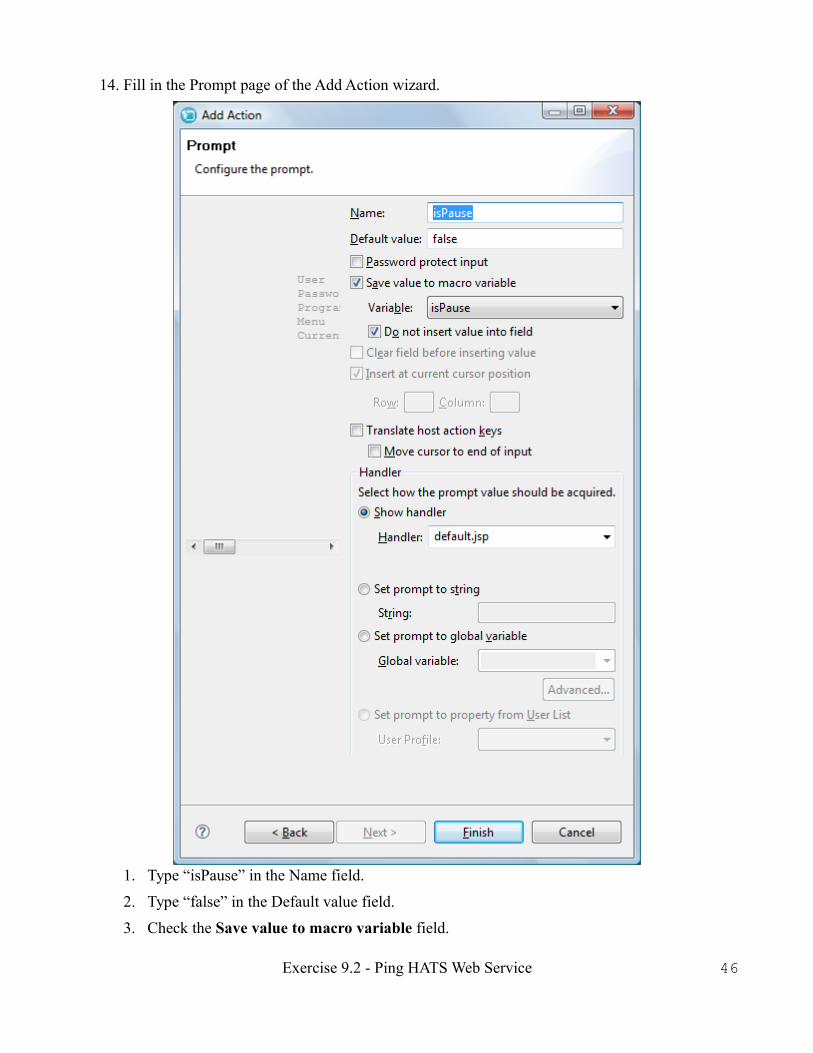
14. Fill in the Prompt page of the Add Action wizard.
1. Type “isPause” in the Name field.
2. Type “false” in the Default value field.
3. Check the Save value to macro variable field.
Exercise 9.2 - Ping HATS Web Service 46

4. Select the “isPause” variable in the Variable field.
5. Check the Do not insert value into field field.
6. Uncheck the Translate host action keys field.
7. Press the Finish button.
15. Press the Add button (again).
16. Result: The Add Action wizard is displayed.
17. Fill in the Action page of the Add Action wizard.
1. Select the Evaluate (If) option.
2. Press the Next button.
3. Result: The Evaluate (If) page is displayed.
18. Fill in the Evaluate (If) page of the Add Action wizard.
1. Type “$isPause$” in the Condition field.
2. From the If True tab, press the Add button.
3. Result: The second Add Action wizard is displayed.
4. Fill in the Action page of the Add Action (2) wizard.
Exercise 9.2 - Ping HATS Web Service 47
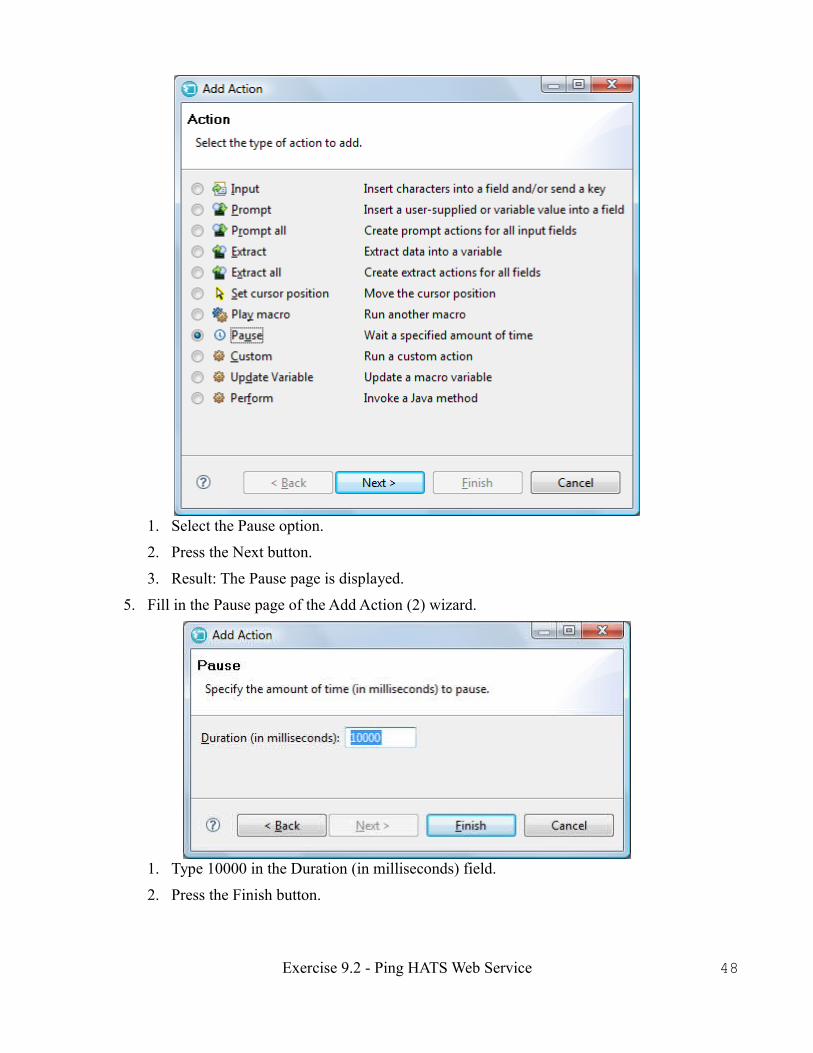
1. Select the Pause option.
2. Press the Next button.
3. Result: The Pause page is displayed.
5. Fill in the Pause page of the Add Action (2) wizard.
1. Type 10000 in the Duration (in milliseconds) field.
2. Press the Finish button.
Exercise 9.2 - Ping HATS Web Service 48
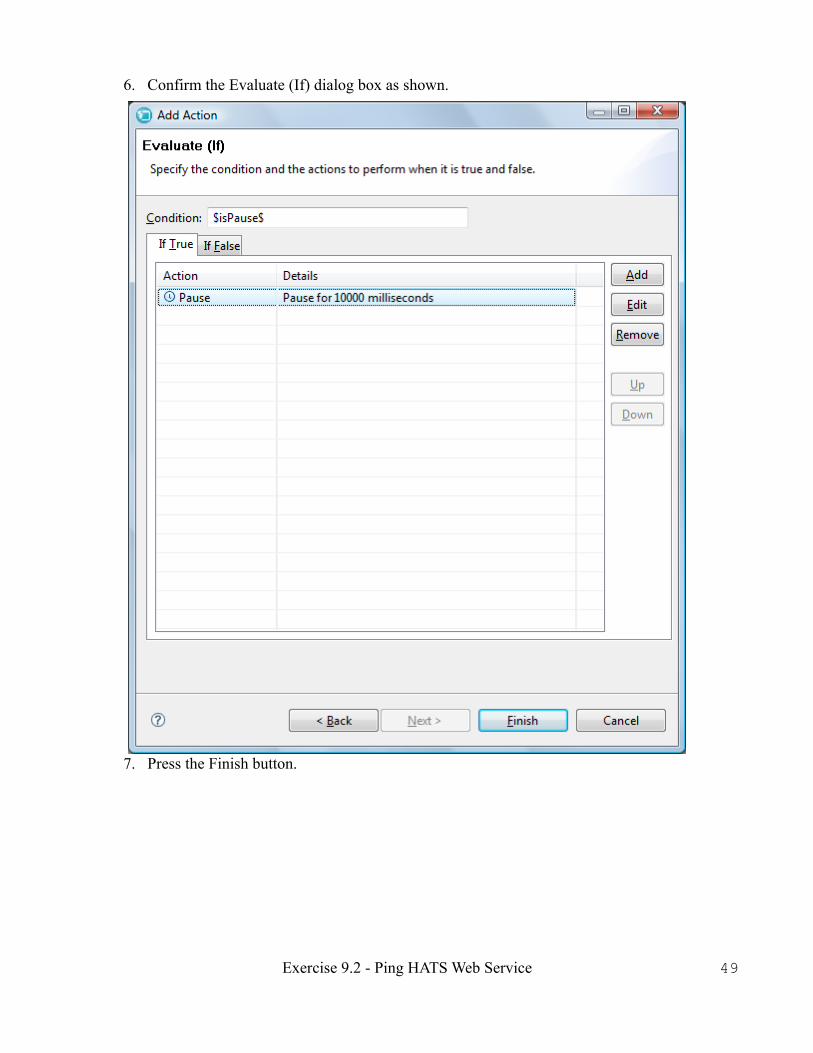
6. Confirm the Evaluate (If) dialog box as shown.
7. Press the Finish button.
Exercise 9.2 - Ping HATS Web Service 49

19. Confirm the Properties for SignOnScreen dialog box as shown.
20. Press the OK button.
21. Save the macro.
22. Play the macro.
23. Create an Integration Object.
24. Update Web Service Support files.
25. Create a web service.
26. Test with Web Services Explorer.
Exercise 9.2 - Ping HATS Web Service 50