exium intelligent cyber security mesh
TRANSCRIPT
Exium Intelligent Cyber Security Mesh- User Guides
08th February 2021
Integration with OKTA SCIM
www.exium.net 2
OverviewExium’s Intelligent Cybersecurity Mesh™ provides secure access to distributed workforce and IoT devices, protecting businesses from malware, ransomware, phishing, denial of service, and botnet infections in one easy to use cloud service.
From single sign-on to enhanced user provisioning Okta’s Exium integration handles users and groups seamless access to Exium. Administrators can easily attach Exium security policy groups to Okta user groups.
The remainder of this guide is focused on enabling you to configure both Exium and Okta to get provisioning up and running for your organization.
1. Supported Features
2. Requirements
3. Configuration Steps
4. Known Issues/Troubleshooting
www.exium.net 3
The following provisioning features are supported by Exium at present:
• Push New Users:• Users in Okta that are assigned to the Exium application in Okta are automatically added as members to your
workspace in Exium.• Push Profile Updates:
• Updates made to the user's profile through OKTA will be pushed to the Exium application.• Push Groups:
• Groups and their members in Okta can be pushed to Exium (as Exium user groups and users).• Push User Deactivation
Deactivating the user or disabling the user's access to the application through OKTA will deactivate the user in Exium.In this case, Exium will remove access to service for user, but maintains user’s information as inactive user.
• Reactivate UsersUser accounts can be reactivated in the application.
Presently, Exium does not support the following Okta provisioning features, but may in the future:• Remove users* (This is supported in Exium, but not by Okta)• Enhanced group push
Features
www.exium.net 4
• SCIM-based user provisioning is available to Exium administrators. • Administrator has to create a workspace on Exium to get Okta SCIM2.0 Bearer token. In workspace is not created
on Exium, please refer https://exium.net/help-center/ for workspace creation.• SAML should be provisioned before SCIM provisioning. Please refer https://saml-
doc.okta.com/SAML_Docs/How-to-Configure-SAML-2.0-for-Exium.html for SAML provisioning.
Requirements
www.exium.net 5
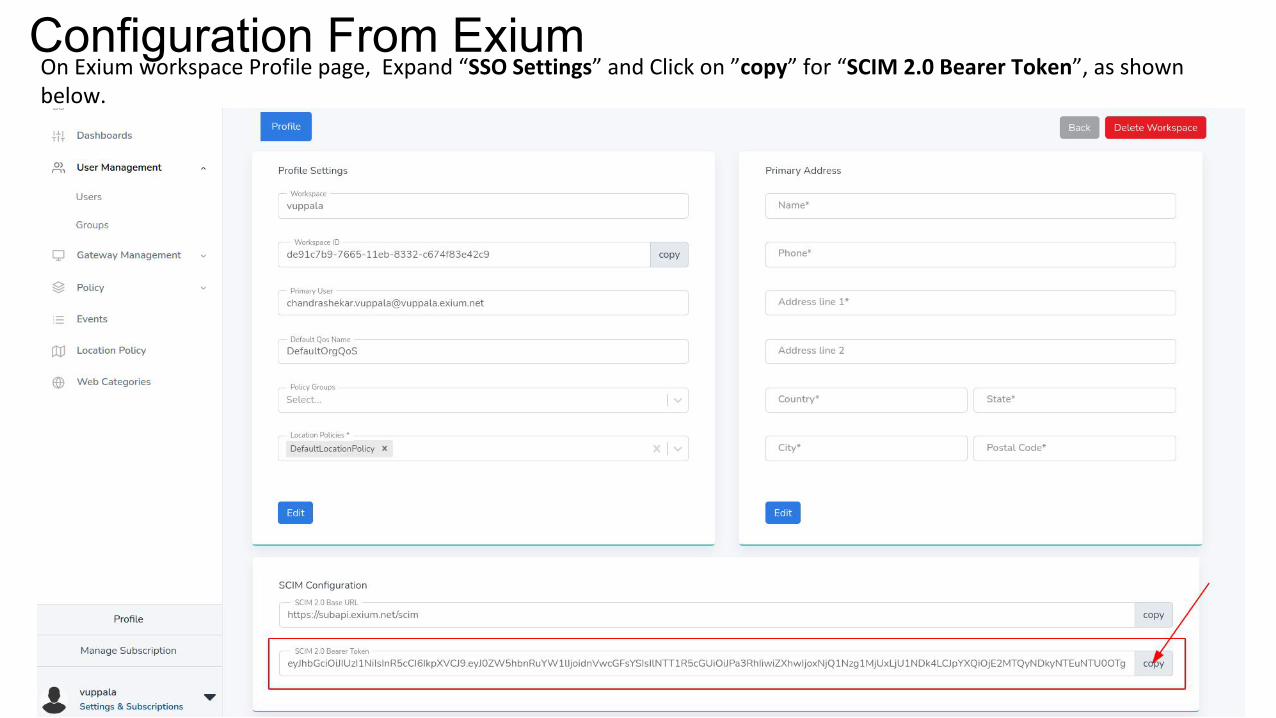
Configuration From Exium On Exium workspace Profile page, Expand “SSO Settings” and Click on ”copy” for “SCIM 2.0 Bearer Token”, as shown below.
www.exium.net 6
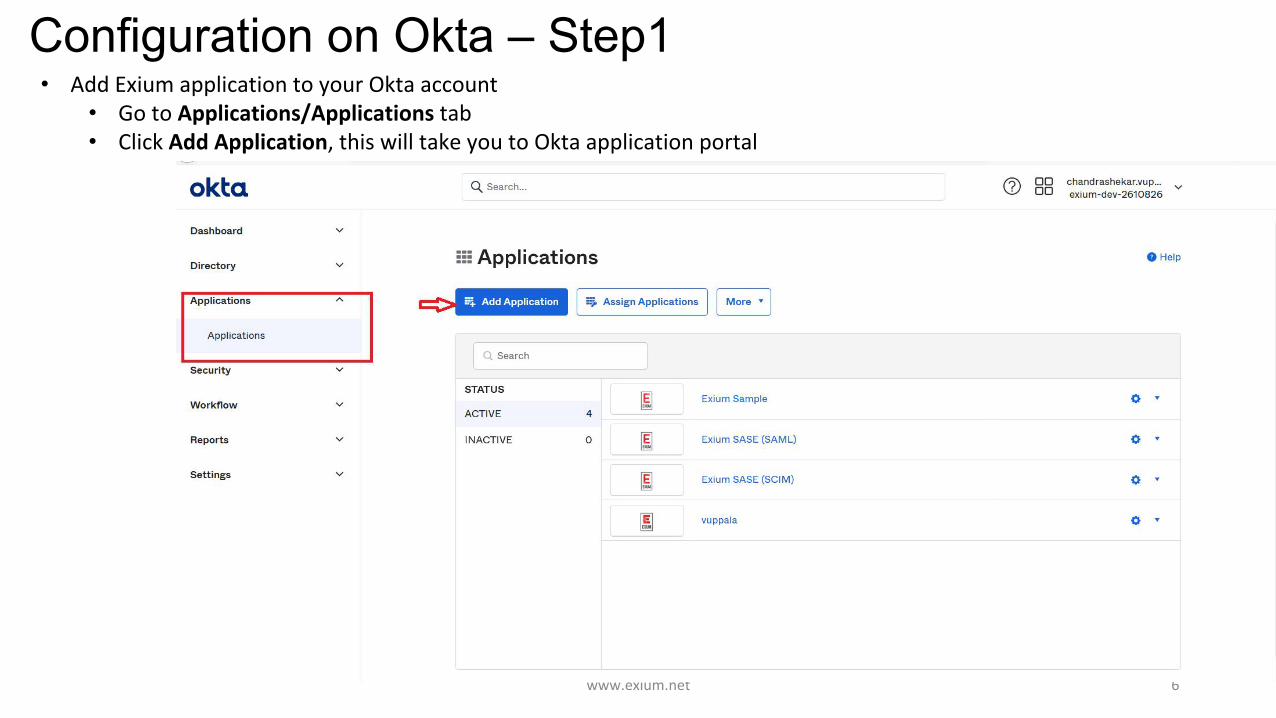
Configuration on Okta – Step1 • Add Exium application to your Okta account
• Go to Applications/Applications tab• Click Add Application, this will take you to Okta application portal
www.exium.net 7
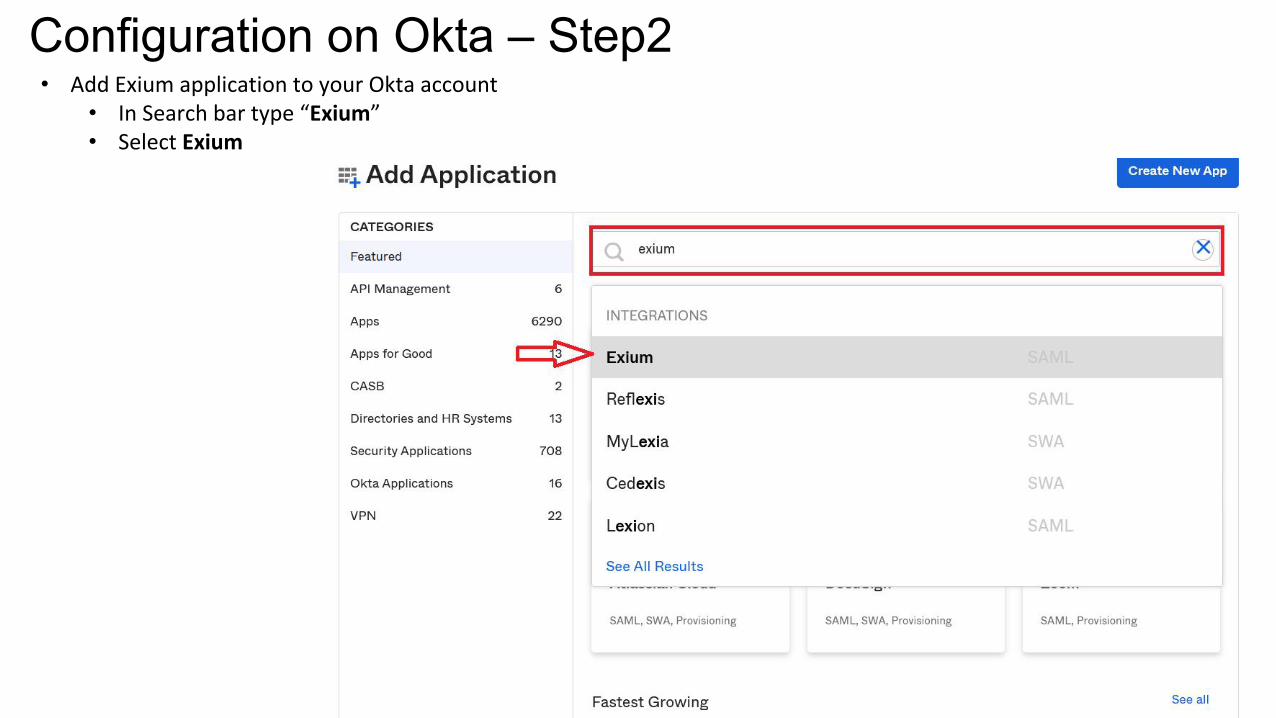
Configuration on Okta – Step2 • Add Exium application to your Okta account
• In Search bar type “Exium”• Select Exium
www.exium.net 8
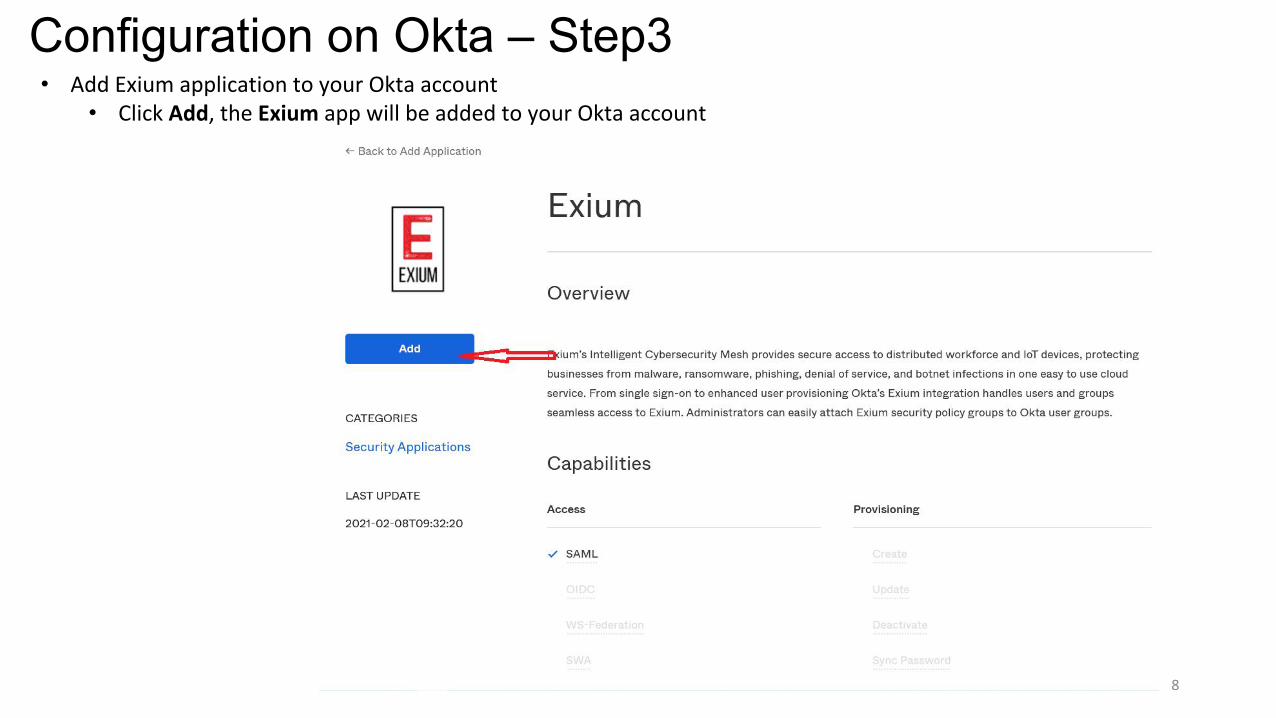
Configuration on Okta – Step3 • Add Exium application to your Okta account
• Click Add, the Exium app will be added to your Okta account
www.exium.net 9
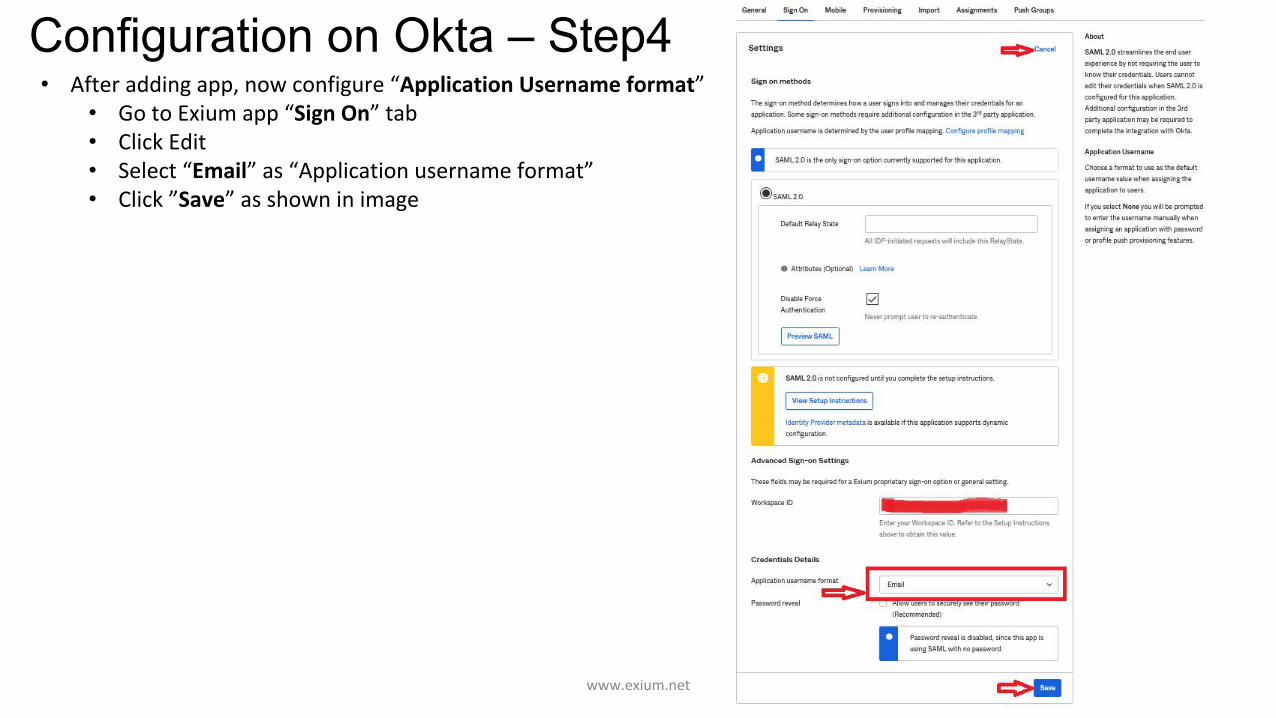
Configuration on Okta – Step4 • After adding app, now configure “Application Username format”
• Go to Exium app “Sign On” tab• Click Edit• Select “Email” as “Application username format”• Click ”Save” as shown in image
www.exium.net 10
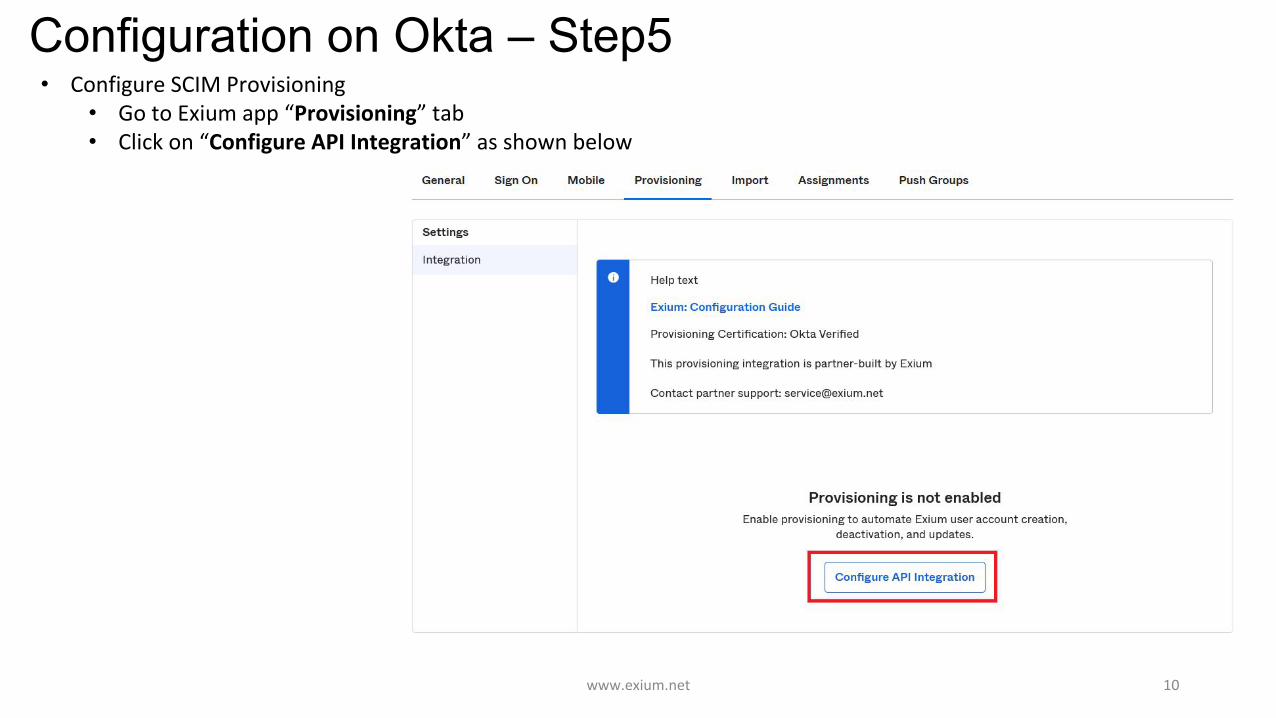
Configuration on Okta – Step5 • Configure SCIM Provisioning
• Go to Exium app “Provisioning” tab• Click on “Configure API Integration” as shown below
www.exium.net 11
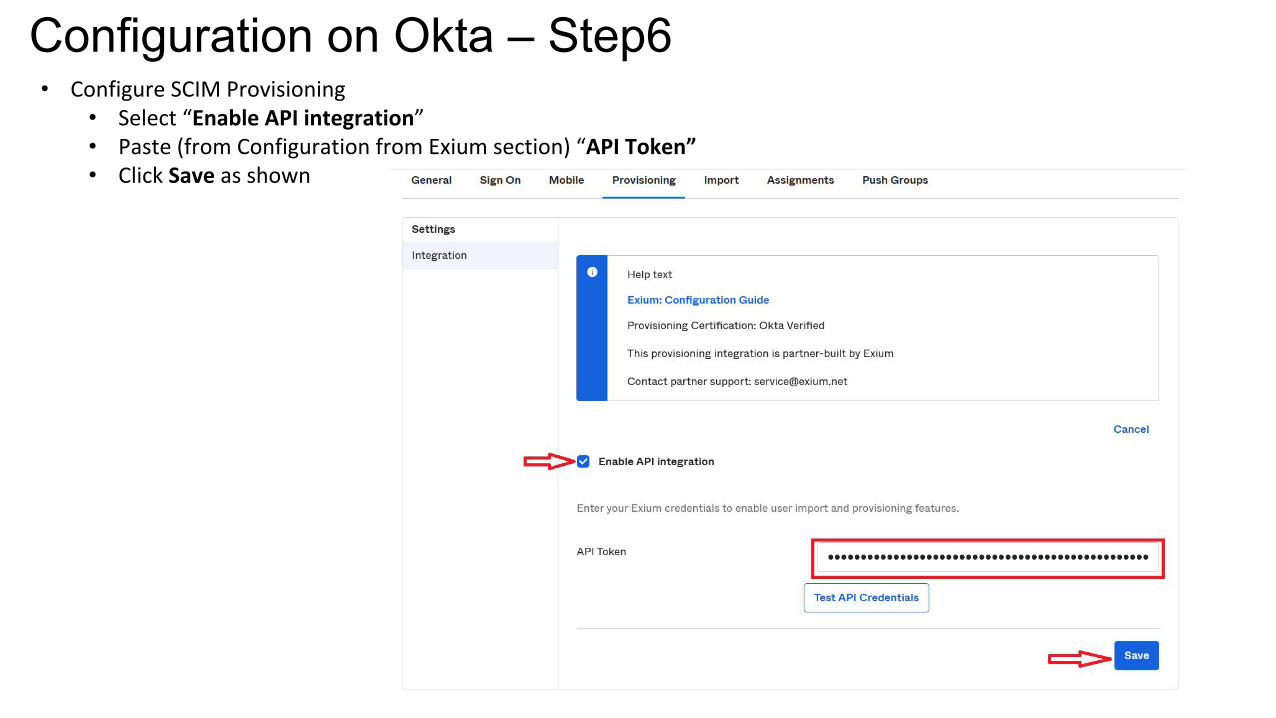
Configuration on Okta – Step6 • Configure SCIM Provisioning
• Select “Enable API integration”• Paste (from Configuration from Exium section) “API Token”• Click Save as shown

www.exium.net 12
Configuration on Okta – Step7 • After configuration of “API Token”, configure “To APP” Provisioning allowed operations
• Click on Edit • Enable Create Users, Update User Attributes, Deactivate Users operations• Click Save as shown
www.exium.net 13
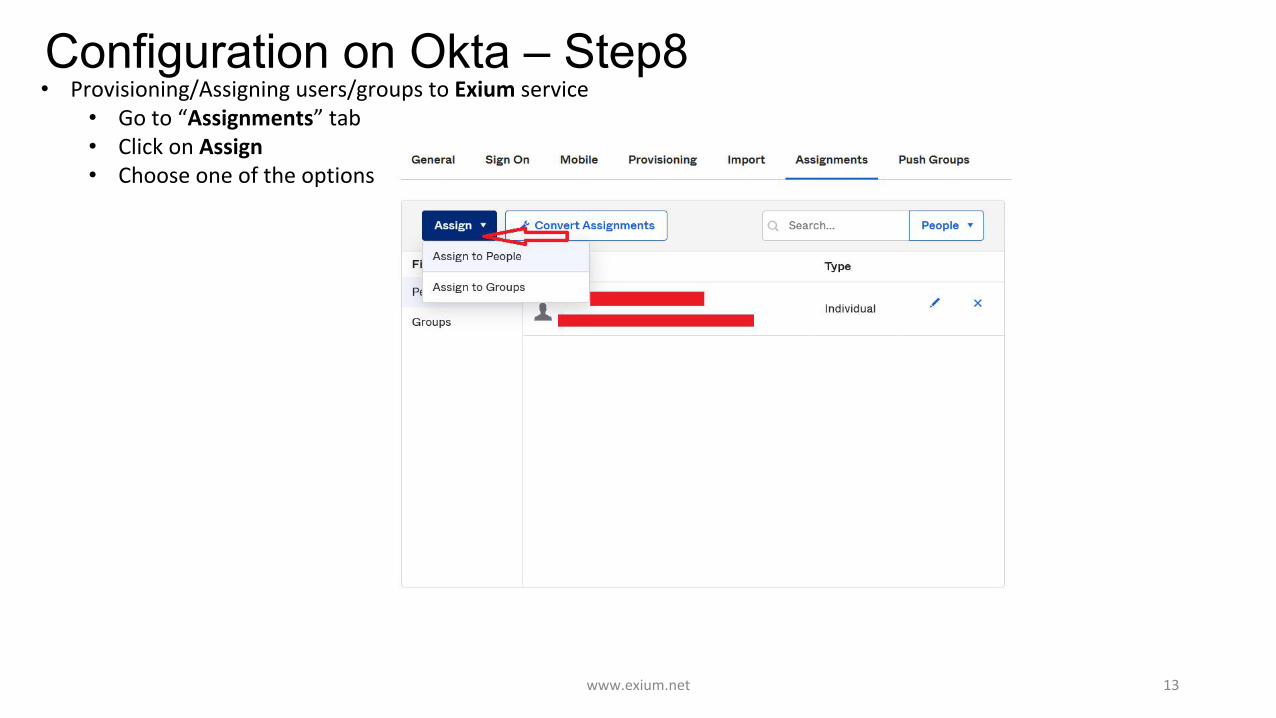
Configuration on Okta – Step8• Provisioning/Assigning users/groups to Exium service
• Go to “Assignments” tab• Click on Assign• Choose one of the options
www.exium.net 14
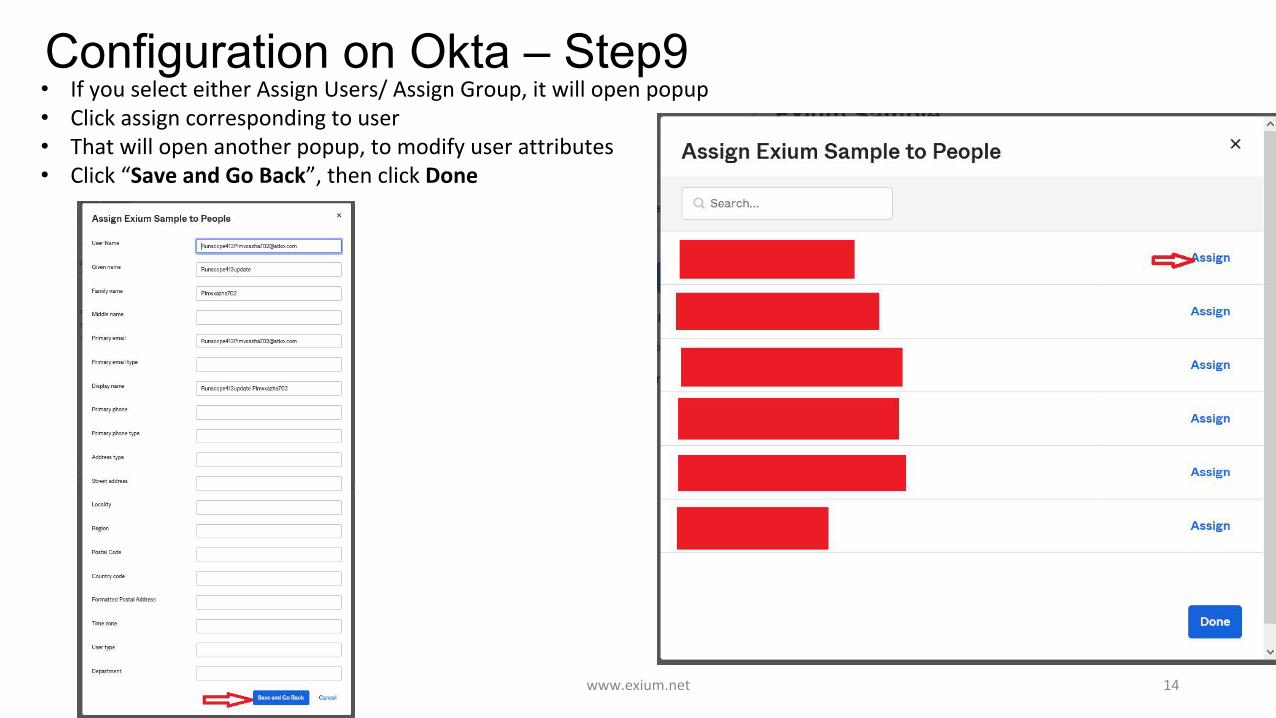
Configuration on Okta – Step9• If you select either Assign Users/ Assign Group, it will open popup• Click assign corresponding to user• That will open another popup, to modify user attributes• Click “Save and Go Back”, then click Done
www.exium.net 15
Known Issues/Troubleshooting• Exium does not support modifications to the username or email address.• When users are deactivated in Okta, they will be deactivated in Exium. Users will not be able to login and use Exium, but
their data will remain available as an ‘inactive user’. To permanently delete user data, administrator can do so by logging into Exium workspace.
• When users are added from Exium portal and associate these users to the group created from Okta, Okta will not overwrite of the overall membership and does not makes Okta complete owner of the group.
• The user/group which is created from Exium Admin Portal can be linked to the same user/group added from Okta Portal, but entity(Okta/Exium Portal) which is creating the user/group in the Exium Portal can only delete the user/group. eg. suppose from Okta one group is created and associated to the Exium app in the Okta portal, deleting this group from Exium Portal will not delete the group, only from Okta can be deleted this group.