exo-com um 030221 f5-en - scorpion sports
TRANSCRIPT

Powered by
USER MANUAL
POWERED BY
4-Rider DynaMESH Intercom
Intercom Range: Up to 0.8KM
(.5 mile) per person
Dual Boomless Microphones

1
INDEX
PACKAGE CONTENTS 2
LED INDICATOR
SPEAKER/MIC INSTALLATION
CONTROLLER INSTALLATION
BATTERY INSTALLATION
WIRE STORAGE
PAIRING EXO-COM TO APP
ACTIVATE PHONE PAIRING
BASIC CONTROL
MUSIC
INTERCOM GROUP PAIRING SETUP
INTERCOM CONTROL
INTERCOM PAIRING SETUP (OTHER BRAND)
IMPORTANT NOTICES & WARRANTY INFO
9
10
ACTIVATE SIRI/GOOGLE ASSISTANT 10
11
12
RESET 12
13
MUSIC SHARING 14-15
BATTERY RECHARGE 15
VOICE PROMPT LANGUAGE SETTING 16-18
MOUNTING ADAPTER 22
MOUNTING ADAPTER ASSEMBLE 23-24
25-34
FIRMWARE UPDATE 19-21
3
4
5
5
6
7
8
USER MANUAL

2
PackageContents
UP button
DOWN buttonQUICK ACCESS (Google/Siri)
MIC/SPEAKER
USB-C CABLE
BATTERY
VELCRO
QUICK START GUIDE
POWER button
LED light
2 x Circular Velcro for Speaker/Mic, 3 x Capsule Velcro for wire management
- EN, FR, DE, ES, IT
Mounting Adapter forEXO-COM controller
Mounting Adapter forEXO-COM battery
MOUNTING ADAPTER
RETAIL PACKAGE ONLY

3
LEDIndicator
BLUE RED
PURPLE
GREEN
BLUE/RED
Blinking - Power on stateDouble Blink - Phone call in progress Music Playing
Blinking - Intercom Pairing Mode
Blinking - Intercom connecteed
Alternate - Bluetooth phone pairing modeBlinking - Music Share Pairing, Incoming call
Blinking - Powering off Battery low

4
Mic/SpeakerInstallation
1. INSTALLING CIRCLE VELCROCircle Velcro may need to be attached to the speaker pockets first to fix the mic/speaker.
1) Remove the liner completely referring to helmet manual.
2) Find the speaker pockets on EPS, peel off the sticker paper on Velcro, and put one of each circle Velcro inside them.
2. MIC/SPEAKER INSTALLATIONAfter the Velcro sits properly on the speaker pocket, peel off the sticker paper on the Fabric (that was paired to Velcro), and attach it to the back of mic/speaker.
Attach the mic/speaker to the Velcro. Make sure the mic is positioned at bottom, and mic hole is facing front (for best position to accept voices).
Put the mic/speaker cable on the back of bottom EPS referring to the above picture. You can tidy it up by fixing it with Ellipse Velcro.Make sure the male connector (3a) is properly positioned to be paired with female connector (3A) in the Controller.
3a
3a

5
ControllerInstallation
Battery Installation
Push up the Locking Lever (1) to remove EXO-COM Controller Cover (2), and put Mic/Speaker Female Connector (3A) into the hole first, and then Battery Pack Male Connector (3B) referring to the above picture.
Install the EXO-COM Controller (4), and make sure it is properly positioned by sitting on two bumps (5) at the bottom.
Connect the mic/speaker’s female connector (3A) to its male connector (3a).
Reverse the process to remove the EXO-COM.
1. Remove the Battery Pack Cover from the back/bottom side of the helmet.
2. Assemble it to the Battery Pack.
3. Plug the Battery Pack male connector (3B) to the Battery Pack referring to the above picture.
Mic/SpeakerFemaleConnector
Battery PackMale Connector
12
4
3A
3B5
5
Battery PackMale Connector
1 2
3
3BMale connector

6
WireStorage
4. Put the Battery Pack back to the slot where the Battery Pack Cover is originally positioned.
Make sure the EXO-COM Controller, the Battery Pack Assembly, Mic/Speaker and its wire are all properly set.
To find detailed information about using the EXO-COM Controller, refer to the EXO-COM Quick Start Guide, or User’s Manual by scanning QR code in the EXO-COM Quick Start Guide.
4
Put the wires into the pocket of left cheek pad.It will help you ride comfortably.
NOTE: WHEN YOU RE-INSTALL THE LINER, CHECK IF ANY PART OF EXO-COM WIRE IS ON THE LINER SNAP HOLE. IT MAY CAUSE WIRE DISCONNECTION IF THE SNAP STRONGLY PUSHES THE WIRE.

7
ActivatePhone Pairing
►Pick up Incoming Call
►End / Reject Incoming Call
►Last Number Redial
►Swap Call
Hold UP+DOWN 2 sec.
Press POWER once, or just say “Hello”
Hold POWER 2 sec.
Hold POWER+UP 2 sec.
Press POWER once
1
2
3
Bluetooth List
Available DeviceEXO-COM
Bluetooth List
EXO-COM Connected
Once paired, LED turns blue. Device is ready for calls and media streaming.
Find EXO-Com in your phone's Bluetooth device list, and tap the name to pair the device.
LED blinking

8
EXO-COM 1
1 2Homepage Connect EXO-Com
3 Device Information
Easy firmware update: Click update button on EXO-COM app, and follow on-screen instructions.
Firmware update via PC: Visit www.uclear.euor www.ucleardigital.com (North Amercia)
Firmware Update
4 Configuration
Pairing EXO-COMto App
1. Turn on the EXO-Com, and pair it to the phone first.2. Press POWER once.3. Now it is ready to connect to the app.

9
BasicControl
Hold POWER 2 sec. Hold POWER 5 sec.
Press UP once. Press DOWN once.
On Off
Volume Up Volume Down
Press Press Twice Hold 2 sec.
Hold 5 sec. Hold until light changes

10
Music
► Play
►► Skip track
◄◄ BacktrackPress UP x 2 times.
Press DOWN x 2 times.
Press POWER x 2 times
Pause
Press POWER once
ActivateSiri/Google Assistant
Press QUICK ACCESS twice, wait for tone
Product Support &Manual Download
SCORPIONSPORTS.EU (EU)SCORPIONUSA.COM (USA)

11
Intercom GroupPairing Setup
Power ON Status
1
Press and hold QUICK ACCESSfor 5 secs until LED blinks purple.
Verify all units to be paired areblinking purple before next step.
2
The last unit to pair continues to blink purplefor 15 secs before system ends the pairing process.
Optional: Press POWER once on the last unit blinkingpurple to end pairing manually.
4
Press POWER on one EXO-COM device to initiatepairing process. The units will blink green oncethey are connected.
3
The initial setup

12
ResetIntercomControl
Reset
Press UP+POWER+DOWN together once
Hold DOWN 2 sec.
After initial setup
►Intercom Disconnect
Hold UP 2 sec.
►Intercom Connect
Press POWER 3 times
►Microphone Mute/Unmute
To manually reboot EXO-COM devices, use the 3-buttonreset (does not erase your settings).
Press & hold POWER + UP + DOWN at the same for afew seconds.
Afterwards, power the unit back on. If the unit doesnot power on, try resetting again while it is pluggedinto its charger.
If you experience further problems, please contact UCLEAR Support.
NOTE: 3-Button reset is a clearing/rebootprocess. It will NOT reset your EXO-COM deviceto factory defaults, or erase settings or pairings.

13
Intercom PairingSetup (Other Brand)
Intercom Pairing (Other Brand) Setup
2
1 3
4
If the LED is purple, take off your hand from the device, and wait until LED turns green.
If the LED is green, you are succesfully connected. If the LED is purple, go back to step 1.
Set up other brand in "Phone Pairing mode” (please refer to other brand usermanual)
From OFF MODE,Press POWER until LED turns to purple (about 15 sec.)
14
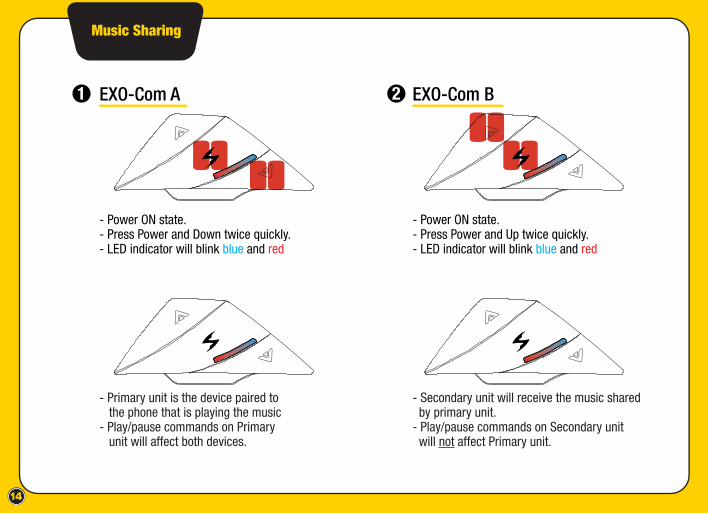
Music Sharing
EXO-Com A
- Power ON state.- Press Power and Down twice quickly.- LED indicator will blink blue and red
EXO-Com B
- Power ON state.- Press Power and Up twice quickly.- LED indicator will blink blue and red
1 2
- Primary unit is the device paired to the phone that is playing the music- Play/pause commands on Primary unit will affect both devices.
- Secondary unit will receive the music shared by primary unit. - Play/pause commands on Secondary unit will not affect Primary unit.

15
To charge the battery, we recommend using the USB-C cable includedinto the package.
LED turns red while charging.LED turns blue when fully charged.
EXO-Com A & B
- Both EXO-COM units will start blinking blue when pairing completes.- Control music playback and volume as shown on ‘Music’
Example: Press POWER twice to start music play. Press POWER once to pause music.
3
Battery Recharge

16
Voice PromptLanguage Setting
7 Languages are prepared : - English, French, German, Spanish, Italian, Chinese, Korean
English and French are default setting.
If you need to change the voice prompt setting, you can change it via PC or APP(iOS, Android)
2-3 min. via PC update10 min. via App(Andorid)4 hrs. via App(Apple iOS)
Select CONFIGURATION 1 Select VOICE PROMPT 2
We recommend using PC or Android rather than Apple iOS as Apple iOS only supports a slow BLE data transmission.

17
Select Language 3 Confirm Download 4 Download and FirmwareUpdate
5
Select Language andUpdate Firmware

18
Update Firmware6 Update the Languageand Reboot
7 Complete the Update8

19
FirmwareUpdate
Method 1. EXO-COM Mobile AppMethod 2. PC or Mac
2-3 min. via PC update10 min. via App(Andorid)4 hrs. via App(Apple iOS)
We recommend using PC or Android rather than Apple iOS as Apple iOS only supports a slow BLE data transmission.
Update Firmware
Connect device to EXO-COM Mobile Appas shown on pages 7-8. Tap ‘UPDATE FIRMWARE’ and follow on-screen instructions.
Firmware Update can be done via
Firmware Update via Android/Apple iOS
Method 1

20
3. Start EXO-COM firmware Update Wizard
4. Click ‘OK’
If you see the ‘device not detected’ alert, please repeat steps 1 & 2.
1. Press all three front buttons simultaneously to reset the EXO-COM unit. The LED will switch off during this reset.
2. After releasing the three buttons, IMMEDIATELY press and hold the power button for about three seconds until the LED goes off again.
The LED is off, and EXO-COM is now in the update mode.
Firmware Update via PC or Mac
Method 2
FirmwareUpdate

21
5. Click ‘Next’
6.Check the language you want, and click ‘Next’
7. Click ‘Finish’. Firmware update completed.

22
MountingAdapter
- Mounting Adapter kit is for EXO-COM users who have EXO HX1, EXO S1, EXO-Tech Carbon only.
Mounting Adapter forEXO-COM controller
Included only in EXO-Com retail package,or sold separately as an individual accessory part.
Mounting Adapter forEXO-COM battery
- We do not recommend attaching/detaching EXO-COM mount adhesives more than once.
DisclaimerMounting Adapter kit is designed for the Scorpion EXO HX1, EXO S1, and EXO-Tech Carbon exclusively. Mounting Adapter kit is intended to be sold, distributed, and used in Europe with the listed models only. If installed on any other Scorpion model or any other helmet brand, or used for unintended purpose, the EXO-Com warranty will be considered void.

23
Mounting Adapter assembly forEXO-COM controller
Mounting Adapter assembly forEXO-COM battery
Mounting AdapterAssembly

24
For EXO-Tech Carbon, please check if there isenough space between chin bar and battery housing.
Exclusively Compatible Models
EXO-S1
EXO-HX1
EXO-TECH(Carbon)

25
Notice
BATTERY WARNING
CHARGING NOTICE
The UCLEAR™ /ScorpionExo® helmet communicator contains a rechargeable lithium ion polymer battery. To reduce risks of fire or burns, do not disassemble, crush, puncture, short external contacts or dispose in fire or water.
To reduce the risk of personal injury, electrical shock, fire or damage to equipments, please follow all the instructions below:- Do not immerse the product, AC adaptor or speakers in water.- Do not install, place or use the product near any source of heat for example: stove, radiator, oven, toaster, coffee maker or other apparatus that gives off heat.- Always use the provided AC power adaptor and cable included in the package to charge the product. Use of any incorrect power supply to charge the product may cause permanent damage to the product and render the warranty void.

26
WARRANTY
LIMITATIONS OF WARRANTY
Without prejudice of legal warranty, the product is covered under a 2 year warranty (control units),and 1 year warranty (accessories) by manufacturer from the date of purchase. Please producethe proof of purchase when you return the item to the supplier.The warranty covers material and manufacturing defects only.The warranty is voided by any unauthorized repairs, misuse, misapplication, tampering of the product,modifications, upgrading or results of any failures to follow the guidelines as set out in the productbrochure by any of the actions specified in this brochure or anywhere in our technical publishingreleased to the public from time to time which would have voided the warranty.Warranty does not cover data recovery and physical deterioration due to use, damages resulting from accidents, storage, loss or data loss or damage during repairs or transits.The sender will bear all transportation charges for functioning products but which were declared defective.All product warranties for the product by UCLEAR™ /ScorpionExo® are limited to those mentioned in the product manual.
All product warranties for the product by UCLEAR™ /ScorpionExo® are limited to those mentioned in the product manual.
Notice

27
WAIVER AND DISCLAIMER
BITwave Pte Ltd. /Kido Sports Co., Ltd. and all their representatives, agents, distributors, suppliers and resellers shall not be liable and will be held harmless from any and all litigation, claims, debts, demands, actions and liability which may arise, directly or indirectly, from operating or using the product for any damages, losses, distress, pain, suffering, discomfort, loss and injuries including bodily harm illness, strains, fractures, partial and/or total paralysis, death or other ailments that could cause serious disability either to any persons, or any parties whether the user or other third parties or their possessions, or to any goods, vehicles, properties, assets among others including your own suffered by any persons, organizations, or any third parties whether physical or otherwise and which may accrue to you in the future, to the fullest extent permitted by law as a result of the use, operation, malfunctioning, misuse, disposal or repairs of the product or any other reasons, conditions or circum-stances or attempts to do so whether due negligence, omissions or otherwise of BITwave Pte Ltd. /Kido Sports Co., Ltd. or any of their representatives, partners, agents, distributors, suppliers, resellers, designer, manufacturer or any others in its supply and distribution chain or any third parties involved.
Notice

28
WAIVER AND DISCLAIMER (CON’T)
All risks from operating or usage of the product rest solely and entirely with the user of this product, the original purchaser or any third parties, who assumes full responsibility for all injuries, losses and/ or damages, whether caused in whole or in part by the negligence, omissions or other conduct of others, including that of BITwave Pte Ltd. /Kido Sports Co., Ltd. and all their representatives, partners, agents, distributors, suppliers, resellers and all others in its supply and distribution chain either due to the designer’s or manufacturer’s negligence or omissions or any third parties involved. Always comply with the local law and traffic regulations. Where use of the product is not permitted or allowed by any laws and regulations including the traffic laws of your country, we warn you not to go against such restrictions.You will bear the full responsibilities of any breaches of law and regulations.You should not allow the operations or use of the product or any attempts to use it by any persons including yourself to compromise anyone’s safety including your own or to cause harm to any vehicles, property, objects, livestock, inventories, assets and the like under any circumstances.You or any users of the product are to take all necessary safety measures and precautions and to remain alert to all surrounding conditions.
Notice

29
WAIVER AND DISCLAIMER (CON’T)
CORRECT DISPOSAL OF THIS PRODUCT
You are warned not to operate the product if you are not physically capable of doing so in a safe manner, if you have or will consume any alcohol or any mind-altering substance during its operation so that your alertness is compromised or if you have any medical conditions or needs that may compromise your abilities to do so in a safe manner.We warn you of the inherent, unforeseeable and unlimited risks and dangers in using the product while in traffic, including injury or illness, strains, fractures, partial and/or total paralysis, death or other ailments that could cause serious disability due to any causes.This product is only for use by persons eighteen (18) years of age and above who have understood the warnings, risks and the terms of use. You confirm that you have read this release of liability and fully understand its termsand that you have given up substantial rights by using or attempting to use the product.
Do not dispose this product with other household wastes at the end of its working life.There is a separate collection system for used electronic products in accordance with legislation that requires proper treatment, recovery and recycling.Household users should contact either the retailer where they purchased this product, or their local government office, for details of where and how they can take this item for environmentally safe recycling.Business users should contact their suppliers and refer to the terms and conditions of the purchase contract. This product should not be mixed with other commercial wastes for disposal.
Notice

30
PRODUCT INFORMATION
PERSONAL SAFETY
BITwave Pte Ltd. /Kido Sports Co., Ltd. and all their representatives, agents, distributors, suppliers or resellers shall not be held responsible for any consequences arising from any errors or omissions in the guide or resulting directly or indirectly from the use of the information herein. BITwave Pte Ltd. /Kido Sports Co., Ltd. reserves the right to amend or improve the product design or user guide without any restrictions and without any obligation to notify users. All information here is accurate as of the date of printing.Please check for latest versions of the product, firmware and accessories at www.ucleardigital.com.
Do not open the seal of the hardware, tamper, repair or modify any parts.Do not touch the product with metal objects or parts or chemical products.Violation of the above will lead to potential fire hazards and mishaps.Please contact the technical support or your local supplier if your product malfunctions.
Notice

31
For technical or warranty support, please visit: WWW.SCORPIONUSA.COM (USA)
TECHNICAL SUPPORT (NORTH AMERICA)
SCORPIONSPORTS.EU (EU)
TECHNICAL SUPPORT (EUROPE)
Copyright © 2018 BITwave Pte Ltd. All rights reserved.No part of this guide may be reproduced in any form or by any process whatsoever withoutprior written consent from BITwave Pte Ltd.
COPYRIGHTS
The UCLEAR™ trademark and logo is exclusively owned by BITwave Pte Ltd.Any use of the mark by any other parties without prior written permission of BITwave Pte Ltd.constitutes an infringement of legal rights.The Bluetooth™ trademark is owned by Bluetooth SIG and is used under license by BITwave Pte Ltd.
LICENCES
Notice

32
This EUT is compliance with SAR for general population/uncontrolled exposure limits in IC RSS-102 and had been tested in accordance with the measurement methods and procedures specified in IEEE 1528 and IEC 62209.This equipment should be installed and operated with minimum distance 0 mm between the radiator and your head. This device and its antenna(s) must not be co-located or operating in conjunction with any other antenna or transmitter.
Cet appareil est conforme aux limites d'exposition DAS incontrôlée pour la population générale de la norme CNR-102 d'Industrie Canada et a été testé en conformité avec les méthodes de mesure et procédures spécifiées dans IEEE 1528 et IEC 62209. Cet équipement doit être installé et utilisé avec une distance minimale de 0 mm entre le radiateur et votre tête. Cet appareil et sa ou ses antennes ne doivent pas être co-localisés ou fonctionner en conjonction avec tout autre antenne ou transmetteur. Cété testé en conformité avec les méthodes de mesure et procédures spécifiées dans IEEE 1528 et IEC 62209. Cet équipement doit être installé et utilisé avec une distance minimale de 0 mm entre le radiateur et votre tête. Cet appareil et sa ou ses antennes ne doivent pas être co-localisés ou fonctionner en conjonction avec tout autre antenneou transmetteur.
IC SAR STATEMENT
Notice

33
Changes or modifications not expressly approved by the party responsible for compliance could void the user’s authority to operate the equipment. This equipment has been tested and found to comply with the limits for a Class B digital device, pursuant to Part 15 of the FCC Rules. These limits are designed to provide reasonable protection against harmful interference in a residential installation. This equipment generates, uses and can radiate radio frequency energy and, if not installed and used in accordance with the instructions, may cause harmful interference to radio communications. However, there is no guarantee that interference will not occur in aparticular installation.If this equipment does cause harmful interference to radio or television reception, which can be determined by turning the equipment off and on, the user is encouraged to try to correct the interference by one or more of the following measures:- Reorient or relocate the receiving antenna.- Increase the separation between the equipment and receiver.- Connect the Equipment into an outlet on a circuit different from that to which the receiver is connected.- Consult the dealer or an experienced radio/TV technician for help.
FCC/SAR COMPLIANCE STATEMENT
Notice

34
This equipment complies with FCC radiation exposure limits set forth for an uncontrolled environment. End user must follow the specific operating instructions for satisfying RF exposure compliance. This transmitter must not be co-located or operating in conjunction with any other antenna or transmitter. The portable device is designed to meet the requirements for exposure to radio waves established by the Federal Communications Commission (USA). These requirements set a SAR limit of 1.6 W/kg averaged over one gram of tissue. The highest SAR value reported under this standard during product certification for use when properly worn on the body is 0.919 W/kg.
Note: The manufacturer is not responsible for any radio or tv interference caused by unauthorized modifications to this equipment. Such modifications could void the user’s authority to operate the equipment.
FCC/SAR COMPLIANCE STATEMENT
This equipment complies with CE radiation exposure limits set forth for an uncontrolled environment. End user must follow the specific operating instructions for satisfying RF exposure compliance. These requirements set a SAR limit of 2.0 W/kg averaged over one gram of tissue. To meet the above requirement, the device should be placed at least 5mm away from human body in normal use condition.
CE SAR COMPLIANCE STATEMENT
Notice