exp_0005
DESCRIPTION
EXP_0005TRANSCRIPT

7/14/2019 EXP_0005
http://slidepdf.com/reader/full/exp0005-563109e5297db 1/55
0
© SAP AG 2006
User Administration
Course overview
Navigation in the EP and BPESS services in the BP for ESS
Setting up the Enterprise Portal for ESS
User administration
Customizing ESS in the R/3 System
Technology and adjustment options
Appendix: 1 Customizing ESS for Release4.7 in the R/3 system
Appendix: 2 Planning an implementation
Appendix: 3 Enhanced Customizing of ESS applications
Appendix: 4 SAP NetWeaver: Web Dynpro andSAP Enterprise Portal – Two
Converging Technologies
© SAP AG HR250 5-1

7/14/2019 EXP_0005
http://slidepdf.com/reader/full/exp0005-563109e5297db 2/55
0.2
© SAP AG 2003
User Administration
User administration in the R/3 System
User administration in EP6.0
User administration in R/3 and in EP6.0
© SAP AG HR250 5-2

7/14/2019 EXP_0005
http://slidepdf.com/reader/full/exp0005-563109e5297db 3/55
0.3
© SAP AG 2003
User Administration
User administration in the R/3 System
User administration in EP6.0
User administration in R/3 and in EP6.0
© SAP AG HR250 5-3

7/14/2019 EXP_0005
http://slidepdf.com/reader/full/exp0005-563109e5297db 4/55
0.4
© SAP AG 2003
User Administration
Central User Administration (CUA)
Transaction HRUSER
User administration in the R/3 System
© SAP AG HR250 5-4

7/14/2019 EXP_0005
http://slidepdf.com/reader/full/exp0005-563109e5297db 5/55
0.5
© SAP AG 2003
User Administration
Central User Administration (CUA)
Transaction HRUSER
User administration in the R/3 System
© SAP AG HR250 5-5

7/14/2019 EXP_0005
http://slidepdf.com/reader/full/exp0005-563109e5297db 6/55
0.6
© SAP AG 2003
User Management in the Backend Systems
CentralSystem
Comp.System 1
Comp.System 2
Comp.System n
...User
maintenance
User maintenance
User
maintenance
User maintenance
The maintenance effort for keeping user master records up to date in complex system
infrastructures with multiple systems and clients is considerable. Employees are hired, leave the
company or change their jobs internally. Usually employees have to access various systems and
clients in order to perform their tasks and therefore they need multiple users.
Users are client-specific, and therefore need to be maintained separately for each client in the system
infrastructure. A separate user master record must be created manually in each client and each
system to which an employee has access.
The user master records can be maintained in a separate client. The existing user master records can
be copied to a new client. The corresponding single roles and composite roles are also copied when
the profiles are copied. You cannot select individual users when you use the copy functions - it isonly possible to copy all the users. Furthermore, there is no mechanism for synchronizing the user
master reocrds for maintenance purposes between the clients.
The administrative effort for maintaining users in the component systems and in the central system
can be reduced by using the Central User Administration (CUA).
Central User Administration is recommended when using the central system and thus also
when using SAP ESS, but is not mandatory.
© SAP AG HR250 5-6

7/14/2019 EXP_0005
http://slidepdf.com/reader/full/exp0005-563109e5297db 7/55
0.7
© SAP AG 2003
ALE
Backend Systems
Central
System
Comp.System n
Comp.System 2
Comp.System 1
User
maintenance
Data
distribution...
Central User Administration: Idea
When the central system is used, all the users for the component systems must be declared on the
central system. It is therefore ideal for central administration of all the users of the mySAP.com
environment. The purpose of the CUA is to use a central client in its own system. It can be used to
maintain the user master records of all other clients in the system infrastructure. You can specify
which single or composite roles are assigned to which users in the particular clients. This
considerably reduces the maintenance effort for user management.
You can define the client in which each user may log on. CUA therefore does not mean that all users
can automatically be used in all clients of the system infrastructure.
You can also define what user data should be maintained centrally and what data locally. Sometimes
it is practical to have the user or an administrator maintain the data locally. Authorization data is exchanged using ALE. ALE means "Application Link Enabling". This is a
technique for implementing and running distributed SAP applications. ALE enables the process-
controlled exchange of business news between loosely coupled SAP systems. Asynchronous
communications ensure that the application can run smoothly and without disturbance.
The name "central system" in the following refers to the client of the central system on which the
users are maintained. The term "component system" refers to clients that are linked to the CUA.
Such component systems must have at least Release 4.5.
© SAP AG HR250 5-7

7/14/2019 EXP_0005
http://slidepdf.com/reader/full/exp0005-563109e5297db 8/55
0.8
© SAP AG 2003
ALE
Central
System
Comp.System
User master data
Function assignment Single or composite role (system-
dependent)
Profile (system-dependent)
Initial password
What Data can be Distributed?
The following data can be distributed with the CUA:
User master records: address, logon data, user fixed values and parameters
The corresponding single and composite roles and profiles are assigned to users for all
component systems. The use of CUA has the advantage that you need not log onto the individual
clients in oder to maintain these assignments locally. You can do this centrally via the central
system
Initial password: An initial password is sent to the component systems when a new user is
created. The user can change this password in the usual manner.
Lock status: In addition to the known reasons for locking (failed attempt to logon or lock by anadministrator), there is a new "general lock". This lock takes effect in all component systems in
which the particular user is authorized. It can be removed both centrally and in the particular
component system.
Single and composite roles and authorization profiles can be passed on. However, they are usually
maintained locally and not centrally. Other system settings and releases might require that you
adapt the roles.
© SAP AG HR250 5-8

7/14/2019 EXP_0005
http://slidepdf.com/reader/full/exp0005-563109e5297db 9/55
0.9
© SAP AG 2003
Address
Logon data
Fixed values
Parameters
Profiles
RolesLocks
Group
Address
Logon data
Fixed values
Parameters
Profiles
RolesLocks
Group
Global
Proposed
Redistributed
Local data
Everywhere
Central System
CUA Configuration: Field Attributes
You can define whether each element of the user data should be maintained in the central system or
locally in the component systems. You can do this with Transaction SCUM (from transaction SALE :
Model and implement business processes Configure predefined ALE business processes
Cross-Application Business Processes Implement Central User Administration Set distribution
parameters for fields) on the central system.
You can assign one of the following field attributes for each field of Transaction SU01:
Fields with attribute global can only be maintained in the central system. The data is distributed to
the component systems after being saved. Global fields can only be displayed, but not changed, in
the component systems.
Entries made in the central system are distributed to the component systems for fields with
attribute Proposal. These fields are maintained locally there. They are not redistributed.
You can maintain data both locally and centrally for fields with attribute Redistribution. If data is
changed in one component sytsem, the changes are passed back to the central system and from
there to the other component systems.
Fields with attribute local can only be maintained in the component systems. There is no
distribution.
The data of fields with attribute Everywhere can be maintained in all systems. There is no
redistribution. This attribute only exists for the Lock tab.
© SAP AG HR250 5-9

7/14/2019 EXP_0005
http://slidepdf.com/reader/full/exp0005-563109e5297db 10/55
0.10
© SAP AG 2006
CentralSystem
Comp.System n
Comp.
System 1
User maintenance
n e w
n e w
n e w
CentralSystem
Comp.System n
Comp.
System 1
Integration in Existing User Environment
User maintenance
o ld
o ld
n e wUser
maintenance
Initial Configuration of aUser Environment
User
maintenance... ...
Integration of Existing Systems
Existing systems can be coupled with the CUA in two ways: Either the users are newly created or
existing users are copied to the CUA.
When a user is newly created, CUA is used on the central system from the beginning and the user
master records are distributed automatically. This ensures that the data is consistent in all systems.
If CUA is implemented when there are already existing users, these users must be copied to the
central system. The copied user master records must be adapted and checked there.
The single and composite roles assigned to the users must also be stored on the central system. Such
assignments can then be made centrally. Existing assignments can be reused.
The assignment of authorizations to single roles must still be maintained in the existing distributedcomponent systems.
© SAP AG HR250 5-10

7/14/2019 EXP_0005
http://slidepdf.com/reader/full/exp0005-563109e5297db 11/55
0.11
© SAP AG 2003
CentralSystem
Comp.System
Copy
users New user Identical user
Different users
Migration Tool
Central System
Existing user master records are copied from the component systems to the central system using the
migration transaction SCUG. The migration is run once for each component system. The copied
master records can then only be maintained in the central system.
User is the name under which the employee logs onto the SAP System. The user must be defined in
all component systems of the CUA with the same first and last names.
On the central system start Transaction SCUG (from Transaction SALE : Model and implement
business processes Configure predefined ALE business processes Cross-Application Business
Processes Implement Central User Administration Copy users from new systems) and select
the component systemfrom which the user master records should be copied. Choose Copy user .
© SAP AG HR250 5-11

7/14/2019 EXP_0005
http://slidepdf.com/reader/full/exp0005-563109e5297db 12/55
0.12
© SAP AG 2003
Migration ToolMigration Tool
Copy user Copy user Copy user Maintainuser and
restart
MaintainMaintainuser anduser and
restartrestart
Newuser
Identical
user Different
user
Alreadycentralusers
Copy Users
Central System
There are three different cases:
The user from the component system does not exist in the central system. The corresponding user
is displayed in the New users tab page. You can copy these users directly to the central system by
selecting and clicking on Copy users. Composite roles are created in the central system. The
component system to which it belongs and the role and profile assignment are recorded.
The user in the component system already exists with the same first and last names in the central
system. The corresponding user is displayed in the Identical users tab page. You can copy these
users directly to the central system by selecting and clicking on Copy users. The component
system to which it belongs and the role and profile assignment are created anew.
The user in the component system already exists in the central system, but with a different first
and last name. The corresponding user is displayed in the Different users tab page. You first have
to resolve the inconsistency. If the name is correct in the central system, you can copy the user. On
the other hand, if the name from the component system is correct, you have to change the name in
the central system using transaction SU01. The user account is displayed on the tab page Identical
users after the correction. If the user account really has two different owners, an owner must be
changed either in the component system or in the central system.
The user accounts that were copied and that are administered centrally are displayed on the Already
central users tab page.
© SAP AG HR250 5-12

7/14/2019 EXP_0005
http://slidepdf.com/reader/full/exp0005-563109e5297db 13/55
0.13
© SAP AG 2003
... Systems Roles Profiles Groups
PRDCLNT100
PRQCLNT200
PRDCLNT100
PRQCLNT200
Superuser
Staff
Ad ministrator T-...........
Central System
User Maintenance
Central System
The SU01 display changes after the CUA has been activated (Tools Administration User
Maintenance User ).
The central system also contains the Systems tab page. It lists the logical systems to which the user
data should be distributed. The corresponding user can only be used for these systems. There is also
a column for systems on the Roles and Profiles tab pages. You can thus assign single and composite
roles as well as profiles separately for each component system. By choosing Save you distribute the
data to the component systems.
Single and composite roles are maintained and created in the component systems. To assign single
and composite roles as well as profiles that are only stored in certain component systems, choose
Text comparison from subsystems on the Roles and Profiles tab pages. The names of the single andcomposite roles as well as the profiles (specified in the component systems) are copied to the central
system together with their short descriptions. You can find out the names using F4. Since this data
can be changed in the component systems, you should repeat the copy from time to time.
In the component systems you can only maintain those fields of Transaction SU01 whose global
attribute is not set. New users cannot be created in the component systems.
© SAP AG HR250 5-13

7/14/2019 EXP_0005
http://slidepdf.com/reader/full/exp0005-563109e5297db 14/55
0.14
© SAP AG 2003
Check distribution
using logs
Complete logs
Status informationErrors: 0
Warnings: 2Successf ul: 15
New /unconfirmed: 5
Redistribute
usersError
Log Display for CUA
Central System
Changes to the user data are distributed to the component systems asynchronously. The component
systems react by sending back a success, warning or error message.
You can access the relevant logs using transaction SCUL. You can display the logs according to
system, user name, error status or other specified criteria There is no log for unconfirmed changes
because it was not yet sent by the component system, perhaps because it is temporarily out of order.
Once the user data has been distributed, up to three logs may be sent to the central system from each
component system because the assignments of the single roles, composite roles and profiles can be
confirmed separately from the other user data. If there is an error, SCUL suggests a possible solution.
This transaction also provides an alternative method for redistributing the user data.
Change logs are created in all systems. Local changes are logged under the name of the executinguser. In this case nothing is sent to the central system. Changes to user data in the central system are
logged in the component systems under the name of the ALE user used for the particular RFC
connection.
© SAP AG HR250 5-14

7/14/2019 EXP_0005
http://slidepdf.com/reader/full/exp0005-563109e5297db 15/55
0.15
© SAP AG 2003
User Administration
Central User Administration (CUA)
Transaction HRUSER
User administration in the R/3 System
© SAP AG HR250 5-15

7/14/2019 EXP_0005
http://slidepdf.com/reader/full/exp0005-563109e5297db 16/55
0.16
© SAP AG 2003
An SAP ESS user is a SAP system user who is enabled for SAP ESS.
Defining characteristics:
Individualized; assigned to one employee only
Assigned to the customer-defined ESS role
Used exclusively by one employee
SAP user who is not necessarily limited to using SAP ESS
Definition of an SAP ESS User
Technically a SAP ESS user is a SAP user with the following defining characteristics:
Individualized - assigned to and used exclusively by one employee
This employee can only maintain his or her own data.
Assigned to a customer-specific role
Not limited to SAP ESS use only, but can have additional authorization for tasks that can only
be performed directly in R/3 and only using the SAPGUI
An Enterprise Human Resources (EHR) user is a pricing concept that defines a certain price for an
SAP user that is then licensed for ESS use.
© SAP AG HR250 5-16

7/14/2019 EXP_0005
http://slidepdf.com/reader/full/exp0005-563109e5297db 17/55
0.17
© SAP AG 2006
Basic Procedure
Component System
Central System
Providing SAP ESS for Employees
If they do not yet exist, create users onthe central system and in the HR
component system
Assign an SAP user to an employeewith Infotype Communication (0105) inthe HR component system
Assign the SAP R/3 user to thecomposite role Employee Self-Service(copy of SAP_EMPLOYEE_ERP) on thecentral system
Automatically distribute (with CUA) theSAP user from the central system to thecomponent systems
© SAP AG HR250 5-17

7/14/2019 EXP_0005
http://slidepdf.com/reader/full/exp0005-563109e5297db 18/55
0.18
© SAP AG 2006
ESS User Creation Process
Employees with
existing SAP R/3
system users
Select the employees who will use SAP ESS
(personnel numbers)
Employees (users) are given authorization
for SAP ESS
Copy composite role (SAP_EMPLOYEE_ERP) to thecustomer namespace (all <> SAP_*)
Create new user
Assign ESS roleIT0105: Relate PerNo
2
3
3b3a
1
4b
Employees without SAP R/3
system users
Transfer existing user
Assign ESS role
IT0105: Relate PerNo
4a
To install users, you must first copy composite role SAP_EMPLOYEE_ERP, containing the single
roles and system authorizations needed for SAP ESS, to the customer namespace in the central
system.
You must then decide which employees you intend to enable for SAP ESS (component system).
There are two groups:
Employees with existing SAP users who are not yet authorized to use SAP ESS. For these
employees you must:
Establish a link between the master records and the existing SAP users
Authorize them to use SAP ESS
Employees who do not have SAP users. For these employees you must:
Create SAP users
Authorize them to use SAP ESS
For new users, you can define in the User Attributes how your employees can log onto SAP ESS.
SAP provides a tool to guide you through the installation. The tool is available using the transaction
HRUSER.
© SAP AG HR250 5-18

7/14/2019 EXP_0005
http://slidepdf.com/reader/full/exp0005-563109e5297db 19/55
0.19
© SAP AG 2003
Employee Selection for SAP ESS
You must decide which employees you intend to enable for SAP ESS. If you do not want to enable
all employees, you may choose a certain department, or you may choose employees of a particular
employee group.
The user installation tool (transaction HRUSER) offers you different selection criteria for choosing
employees. You can pre-select employees by their organizational assignment, or by their employee
data, such as the employee status.
The user selection process also enables you to exclude inactive or retired employees. You can define
employee status to ensure that you do not include inactive employees in the group of employees to
be authorized for SAP ESS.
© SAP AG HR250 5-19

7/14/2019 EXP_0005
http://slidepdf.com/reader/full/exp0005-563109e5297db 20/55
0.20
© SAP AG 2003
Set Up and Maintain ESS Users (Start)
Preparation
Assign employees to existing users
Copy SAP role tocustomer namespace
Correction
Delete ESS users
Change user attributes/key date
Select employees using employee master
Preselect employees using org. assignment
User/Authorization Assignment
User At tributes
User/Authorization Assignment
Z_HR250_SAP_WP_EMPLOYEE
User group ESSUSER
Role
Central User Administration
RFC destination W70CLNT400
CUA is active
Compo nent System
Employee Selection Details
You can pre-select employees using their organizational assignment.
Choose Preselect employees using org. assignment in the User/Authorization Assignment
group box of the Set Up and Maintain ESS Users (Start) screen. The Choose Personnel Numbers
using Org. Assignment screen appears.
Enter the relevant search criteria and choose Execute.
The Choose Personnel Numbers using Employee Master screen appears. Enter relevant search
criteria and choose Execute. Only the employees in the original organizational units will be
displayed.
You can also select employees by employee data.
Select Select employees using employee master in the User/Authorization Assignment group box
of the Setup and Maintain ESS Users (Start) screen. The Choose Personnel Numbers using
Employee Master screen appears.
Enter the relevant search criteria and choose Execute.
The Set Up and Maintain ESS Users (List) screen appears.
You now have a selected group of employees that you can maintain for SAP ESS.
© SAP AG HR250 5-20

7/14/2019 EXP_0005
http://slidepdf.com/reader/full/exp0005-563109e5297db 21/55
0.21
© SAP AG 2003
Set Up and Maintain ESS Users (Start)
Preparation
Assign employees to existing users
Copy SAP role tocustomer namespace
Correction
Delete ESS users
Change user attributes/key date
Select employees using employee master
Preselect employees using org. assignment
User/Authorization Assignment
User At tributes
User/Authorization Assignment
Z_HR250_SAP_WP_EMPLOYEE
User group ESSUSER
Role
Central User Administration
RFC destination W70CLNT400
CUA is active
Establish a linkbetween the employee
master records and the
existing SAP R/3 users
Compo nent System
Employees with SAP R/3 System Users (1)
Some of your employees might already have SAP users, but not authorization for SAP ESS. You
therefore have to assign the employee master records to existing SAP users. It is a one-to-one
assignment and has to be done manually. While assigning your SAP ESS users ('employees') to
existing SAP users, you can check the employee's master data and the user master record.
In the Set Up and Maintain ESS Users (Start) screen, select Assignment of employees to existing
users in the Preparation area. The Compare User Master with HR Master screen appears. There are
various methods for selecting users.
Select a method and choose Execute. The Assign Employees to Existing Users screen appears.
Select Assign employees. The Choose Person dialog box appears.
Select an employee. The Create Relationship dialog box appears. Change the validity date if
necessary and select Create.
The users still need authorization for SAP ESS.
© SAP AG HR250 5-21

7/14/2019 EXP_0005
http://slidepdf.com/reader/full/exp0005-563109e5297db 22/55
0.22
© SAP AG 2003
Employees with SAP R/3 System Users (2)
Personnel No. 250995001
EE Group 1 Ac ti ve employee Pers . area
EE Subgroup X1 Hourly wage earn...
From 01/01/2000 to 12/31/2000
Communication
Type 0001 System user nameID/number HR250-01
Change Communication
Communication infotype (0105):Assign an SAP R/3 user to anemployee master record
Assign ESS role to user
Component System
You can view the relationship in the Communication infotype (0105). The SAP user must be
assigned to the employee with subtype 0001.
The assignment of the user to the SAP ESS role authorizes the SAP user to access SAP ESS.
© SAP AG HR250 5-22

7/14/2019 EXP_0005
http://slidepdf.com/reader/full/exp0005-563109e5297db 23/55
0.23
© SAP AG 2003
Set Up and Maintain ESS Users (Overview)
Inactive employees without user assignment (ok)Total number of employees selected
Extended list
ESS Participants
Employees with users and ESS roles
ESS role
Inactive employees with users
Employees with deleted users
Employees with inconsistencies
Employees with users without ESS role
Employees without users
ESS Participants without users/authorization
Key date
0 Reconcile User
Z_SAP_WP_EMPLOYEE
Background
Background
Background
Background
09.11.2000
1
0
0
0
0
0
Assign user authorization
for SAP ESS
Compo nent System
Employees with SAP R/3 System Users (3)
You can now set up ESS authorization. In the Set Up and Maintain ESS Users (Overview) screen,
select Employees with users without ESS role.
The Relate Users to Persons screen appears. Select the employee you are working with and
choose Authorization Assignment .
The Attributes of Users to be Created screen appears. Choose Execute.
If a large number of employees is involved, you can generate the users for SAP ESS in background
mode (Option Background ).
© SAP AG HR250 5-23

7/14/2019 EXP_0005
http://slidepdf.com/reader/full/exp0005-563109e5297db 24/55
0.24
© SAP AG 2003
Set Up and Maintain ESS Users (Overview)
Inactive employees without user assignment (ok)Total number of employees selected
Extended lis t
ESS Participants
Employees with users and ESS roles
ESS role
Inactive employees with users
Employees with deleted users
Employees with inconsistencies
Employees with users without ESS role
Employees without users
ESS Participants without users/authorization
Key date
0 Reconcile User
Z_SAP_EMPLOYEE
Background
Background
Background
Background
09.11.2000
0
1
0
0
0
0
Create SAP R/3
users andauthorize them to
use SAP ESS.
Compo nent System
Employees without SAP R/3 System Users (1)
If you have employees who do not have SAP users, first create SAP users for them and then
authorize them to use SAP ESS.
In the Set Up and Maintain ESS Users (Overview) screen:
Choose Employees Without Users.
If you select Background , the Attributes of Users to be Created screen appears.
If you select Overview, the Create Users for Persons screen appears.
Select a person and choose Create User . The Attributes of Users to be Created screen appears.
Choose Execute.
© SAP AG HR250 5-24

7/14/2019 EXP_0005
http://slidepdf.com/reader/full/exp0005-563109e5297db 25/55
0.25
© SAP AG 2003
Employees without SAP R/3 System Users (2)
Personnel No. 250991001
EE Group 1 Acti ve employee Pers . area
EE Subgroup X1 Hourly wage earn...
From 01/01/2000 to 12/31/2000
Communication
Type 0001 System user name
ID/number P25099101
Change Communication
Communication infotype (0105):Assign an SAP R/3 user to an
employee master record
Assign ESS role to user
Component System
You can view the relationship in the Communication infotype (0105). The SAP user must be
assigned to the employee with subtype 0001.
Whereas you had to assign employees having SAP users ESS authorization manually, it is assigned
automatically here. .
© SAP AG HR250 5-25

7/14/2019 EXP_0005
http://slidepdf.com/reader/full/exp0005-563109e5297db 26/55
0.26
© SAP AG 2003
Password
User Group
Role
Authorization Assignment
Decimal Format
Data Format
Start Menu
Logon Data
User Attributes
You must decide how you would like your employees to log on to SAP ESS.
The user group ESSUSER is a fixed user attribute. It is used to distinguish between SAP ESS users
and other system users, such as administrators.
You can change user attributes in the Set up and Maintain ESS User (Start) screen. In the Attributes
of users, you can modify the Password field. The initial password is INIT. You cannot change the
entry ESSUSER in the User group field because it is important to differentiate users authorized for
SAP ESS from other users. In the Role field, the SAP role (which you have copied into your
namespace) is the default.
SAP delivers a user exit, which you can use to determine your own password routine and user name.
SAP delivers user exit Exit_saplehus_001 as part of the enhancement HRESSWWW. This user exitenables you to change the name and password that the user installation tool creates for each SAP
ESS user that is generated.
Existing users keep their attributes, such as user group, password, date and decimal format and start
menu. The existing setting are not overwritten.
© SAP AG HR250 5-26

7/14/2019 EXP_0005
http://slidepdf.com/reader/full/exp0005-563109e5297db 27/55
0.27
© SAP AG 2006
Set Up and Maintain ESS Users (Start)
Preparation
Assign employees to existing users
Copy SAP role to customer namespace
Correction
Delete ESS users
Change user attributes/key date
Select employees using employee master
Preselect employees using org.assignment
User/Authorization Assignment
User Attributes
User/Authorization Assignment
Z_HR250_SAP_WP_EMPLOYEE
User group ESSUSER
Role
Central User Administration
RFC destination W70CLNT400
CUA is active
Users on the central
system server and in the
component systems
Central SystemServer
ComponentSystem
HRUSER and CUA
If CUA is active, transaction HRUSER accesses the central system and hereby permits direct
assignment in the component system of the composite role (copy of SAP_EMPLOYEE_ERP),
which resides on the central system. The user is created locally in the HR component system and on
the central system. The user is assigned to the employee in the component system with Infotype 105
and is assigned to the composite role in the central system. The CUA then distributes the user data to
all the component systems.
© SAP AG HR250 5-27
7/14/2019 EXP_0005
http://slidepdf.com/reader/full/exp0005-563109e5297db 28/55
0.28
© SAP AG 2003
Component System
User Maintenance in SAP ESS
Functions to support periodic user maintenance
in SAP ESS
Check inactive employees with users
Delete users
User exit
The system contains functions that support periodic user maintenance in SAP ESS. You should look
for inconsistencies on a regular basis by selecting:
Inactive employees with users. These are employees who have retired or left the company and still
have SAP users. You delimit their user assignment because you do not want them to be able to use
SAP ESS.
Employees with deleted users.
New employees who need ESS users.
SAP delivers workflow support for SAP ESS user maintenance. Work items prompt system
administrators to create SAP ESS users for new employees and to delimit the SAP ESS users of employees leaving the company.
© SAP AG HR250 5-28

7/14/2019 EXP_0005
http://slidepdf.com/reader/full/exp0005-563109e5297db 29/55
0.29
© SAP AG 2003
Set Up and Maintain ESS Users (Overview)
Inactive employees without user assignment (ok)Total number of employees selected
Extended list
ESS Participants
Employees with users and ESS roles
ESS role
Inactive employees with users
Employees with deleted users
Employees with inconsistencies
Employees with users without ESS role
Employees without users
ESS Participants without users/authorization
Key date
0 Reconcile User
Z_SAP_WP_EMPLOYEE
Background
Background
Background
Background
09.11.2000
0
0
0
1
0
0
Employees with
inconsistencies
Component System
User Maintenance: Employees with Inconsistencies
In the user installation tool (transaction HRUSER) there is an option for Maintaining employees
with inconsistencies. The options are:
Inactive employees with users:
In the Set Up and Maintain ESS Users (Overview) screen choose the Overview/List icon.
The Delimit User Assignments to Inactive Persons screen appears. Select the employee you
wish to delimit and choose Delimit .
Employees with deleted users. Users cost money and perhaps you have created too many. To
delete users, proceed as follows: In the Set Up and Maintain ESS Users (Start) screen, select Delete ESS Users.
The Delete ESS Users (Selection) screen appears. Enter the name of the user you want to delete
and choose Execute.
The Delete ESS Users (Overview) screen appears. Select the users you want to delete and
choose Delete users (online) . The users are deleted from the user master in the system.
You can only delete SAP ESS users that are assigned to the user group ESSUSER here.
© SAP AG HR250 5-29

7/14/2019 EXP_0005
http://slidepdf.com/reader/full/exp0005-563109e5297db 30/55
0.30
© SAP AG 2003
SAP ESS Tools
Helpful tools for creating and authorizing
users in SAP ESS:
Log
Background processing
View data
Role maintenance
SAP Employee Self-Service provides a number of useful tools for creating and authorizing users:
Log: All the steps you perform are recorded in a log file. They are written to a log file and
displayed as historical information. You can display the log at any time. To do so, choose Log . To
reset the log, choose Delete log .
Background processing: You can perform most of the tasks in SAP ESS in the background. SAP
recommends the use of background processing if your user group has more than 100 employees.
To do so, select Background .
View data: Select HR master data to view or change the HR master of the employee you are
working with. To do so, select User master record.
Role maintenance: You can access role maintenance with transaction PFCG or in the Attributes
of Users screen by choosing Display.
© SAP AG HR250 5-30

7/14/2019 EXP_0005
http://slidepdf.com/reader/full/exp0005-563109e5297db 31/55
0.31
© SAP AG 2003
User Administration
User administration in the R/3 System
User administration in EP6.0
User administration in R/3 and in EP6.0
© SAP AG HR250 5-31

7/14/2019 EXP_0005
http://slidepdf.com/reader/full/exp0005-563109e5297db 32/55
0.32
© SAP AG 2003
User Administration
Overview
The LDAP directory as User Store
The R/3 System as User Store
User administration in the Enterprise Portal
© SAP AG HR250 5-32

7/14/2019 EXP_0005
http://slidepdf.com/reader/full/exp0005-563109e5297db 33/55
0.33
© SAP AG 2003
User Administration
Overview
The LDAP directory as User Store
The R/3 System as User Store
User administration in the Enterprise Portal
© SAP AG HR250 5-33

7/14/2019 EXP_0005
http://slidepdf.com/reader/full/exp0005-563109e5297db 34/55
0.34
© SAP AG 2003
Software Architecture of SAP Enterprise Portal
Portal ClientsPortal Clients
Data sourcesData sources
SAP Enterprise PortalSAP Enterprise Portal
Portal desktop Collaboration
Portal servicesPortal services Portal ComponentsPortal Components
Page Builder
Admin. tools
User management
Portal ContentDirectory
User User
ManagementManagement
EngineEngine
Connector framework
ConnectorsConnectors
Portalsystem
database
User persistence
store
KnowledgeManagement
TREXTREXCMCM
Unification
Database Unifier Database Unifier
Application UnifiersApplication Unifiers
Portal RuntimePortal Runtime
Various storage locations are conceivable for the user data.
The Portal System Database is the storage location for the portal data including, among other things,
the user data (read/write/edit).
This is saved via an LDAP directory.
The User Management Engine (UME) enables other data sources to be selected as the "User
Persistence Store" for the users. For example, the users of a specific R/3 client can be read directly.
Thus SU01 users from an R/3 System can also be accessed directly (read only).
© SAP AG HR250 5-34

7/14/2019 EXP_0005
http://slidepdf.com/reader/full/exp0005-563109e5297db 35/55
0.35
© SAP AG 2003
Data Flow when User Logs On
Request Flow
User Persistence
Store
Portal ServicesPortal Services Portal ComponentsPortal Components
Page Builder
Admin. tools
User Management
Portal ContentDirectory
PortalSystem
Database
Portal RuntimePortal Runtime
User User
ManagementManagement
EngineEngine
Portal User Portal User
1 URL request
2
3
4
HTML
When a user logs on to the SAP Enterprise Portal (1), his or her logon data is either verified via the
Portal System Database, or the portal connects to the User Persistence Store via the UME and
compares the logon data with an R/3 System, for example. The assigned role is assembled in the
Page Builder (3) and sent to the client in HTML format.
© SAP AG HR250 5-35

7/14/2019 EXP_0005
http://slidepdf.com/reader/full/exp0005-563109e5297db 36/55
0.36
© SAP AG 2003
User Administration
Overview
The LDAP directory as User Store
The R/3 System as User Store
User administration in the Enterprise Portal
© SAP AG HR250 5-36

7/14/2019 EXP_0005
http://slidepdf.com/reader/full/exp0005-563109e5297db 37/55
0.37
© SAP AG 2003
LDAP: Characteristics of Directory Services
Directory
Server
Characteristics of directory services
Directory service s provide a central repository for data that is
used by different applications.
Typically, information about users, documents or hardware
resources are stored – but other objects are also conceivable.
Access is accommodated by a standard protocol, for example
LDAP (Lightweight Directory Access Protocol)
or X.500 DAP (Directory Access Protocol) or
DSML (Directory Services Markup Language).
Typically, directory services are used to store information about users, documents or hardware - but
other objects are also conceivable.
What is LDAP?
LDAP is a protocal that controls access to a directory service.
LDAP stands for Lightweight Directory Access Protocol and describes how operations are to be
formulated for a directory service. The most frequent operation is the retrieval of entries, but the
creation, modification or deletion of entries is also possible.
© SAP AG HR250 5-37

7/14/2019 EXP_0005
http://slidepdf.com/reader/full/exp0005-563109e5297db 38/55
0.38
© SAP AG 2003
LDAP: Sample Scenario with Directory Service
Sample scenario with directory service
© SAP AG 2004
HRsystem
SAP
Web AS
SAP
Enterprise
Portal
Central
User Administration
Exchange
of roles
SAP or non-SAP
S AP Sys tems Oth er application s
Operating system
Phone/fax
Corporate
Directory
Server
A company hires a new employee. This new employee is created first in the HR system (from SAP
or other vendor). Some attributes (such as name, pesonnel number, telephone number, e-mail
address, department and group assignment) are transferred to the Corporate Directory Server while
others (such as hiring date, manager, salary) are deliberately kept only in the HR system. By means
of the connection of various applications to the directory server...
the new employee can immediately log on to the company domain at operating system level
the employee immediately has a working e-mail account
telephone and fax numbers were assigned to the user
logon to the Enterpise Portal functions
the employee has access to particular SAP Systems (such as SAP ERP, to place orders)
additional non-SAP systems can be easily integrated.
© SAP AG HR250 5-38

7/14/2019 EXP_0005
http://slidepdf.com/reader/full/exp0005-563109e5297db 39/55
0.39
© SAP AG 2003
LDAP: CUA and Directory Services
CUA and Directory Services
CUA central system
SAP Web AS
AL E AL E
Directory Server
LDAP
Child system
SAP Basis 4.5
Child system
SAP Basis 4.6
SAP System
SAP Web AS
Child system
SAP Web AS
AL E LDAP LDAPLDAP
HRsystem
SAP or non-SAP
Other
Applications
Central User Administration (CUA) and directory services both make it possible to maintain user
data in one place and to synchronize it in several systems. Both concepts can be implemented
independently of each other, but can also be combined.
In this way, CUA could be used to connect additional SAP systems. In this kind of scenario, the
LDAP synchronization works like a "remote control" for the CUA. Therefore, all limitations and
prerequisites of the CUA are also valid for the synchronization function.
© SAP AG HR250 5-39

7/14/2019 EXP_0005
http://slidepdf.com/reader/full/exp0005-563109e5297db 40/55
0.40
© SAP AG 2003
LDAP: Connection of Directory Services and R/3
Maintain LDAP connector
Maintain system users
Maintain connectiondata
Transaction LDAP
Transaction SM59RFC destination
RFC destination and LDAP connector
Since SAP Basis 4.6, the LDAP Connector belongs to the standard SAP System delivery.
Communication with the LDAP Connector is based on RFC function calls. This requires an RFC
destination of the type T (TCP/IP) that activates the LDAP Connector as a registered server
program.
© SAP AG HR250 5-40
7/14/2019 EXP_0005
http://slidepdf.com/reader/full/exp0005-563109e5297db 41/55
0.41
© SAP AG 2003
LDAP: Data Exchange with Directory Services
Roadmap for data exchange with directory services
Optional: Schema extensionof the Directory Server
TransactionLDAP
(Server tab page)
ReportRSLDAPSCHEMAEXT
TransactionLDAPLOG
Transaction or reportRSLDAPSYNC_USER
TransactionSLG2 Delete logs
Read logs
Execute synchronization
Synchronization indicator
Mapping indicator
Linking details
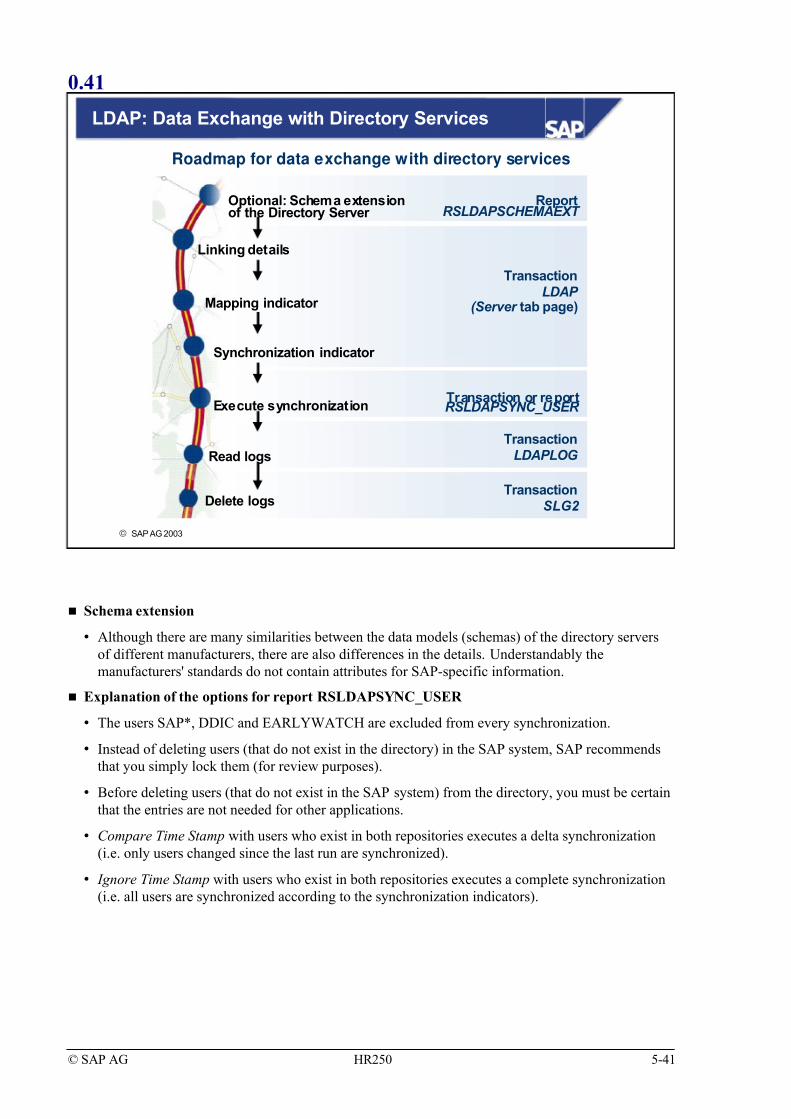
Schema extension
Although there are many similarities between the data models (schemas) of the directory servers
of different manufacturers, there are also differences in the details. Understandably the
manufacturers' standards do not contain attributes for SAP-specific information.
Explanation of the options for report RSLDAPSYNC_USER
The users SAP*, DDIC and EARLYWATCH are excluded from every synchronization.
Instead of deleting users (that do not exist in the directory) in the SAP system, SAP recommends
that you simply lock them (for review purposes).
Before deleting users (that do not exist in the SAP system) from the directory, you must be certain
that the entries are not needed for other applications.
Compare Time Stamp with users who exist in both repositories executes a delta synchronization
(i.e. only users changed since the last run are synchronized).
Ignore Time Stamp with users who exist in both repositories executes a complete synchronization
(i.e. all users are synchronized according to the synchronization indicators).
© SAP AG HR250 5-41

7/14/2019 EXP_0005
http://slidepdf.com/reader/full/exp0005-563109e5297db 42/55
0.42
© SAP AG 2003
LDAP:Mapping of SAP Data Fields to Directory Attributes
Directory Server
Mapping of SAP Data Fields to Directory Attributes
LHEEPMANNuid
06227 7-47474telephoneNumber
LHEEPMANNsapUserName
AIOCLNT100: INSTRUCTOR
CRMCLNT500: EXPERT
sapRoles
LHeepmanncn
Heepmannsn
LinusgivenName
inetOrgPerson
sapAddOnUM
objectclass
47474Extension
INSTRUCTOR (AIOCLNT100)
EXPERT (CRMCLNT500)
Roles
LHEEPMANNUser Name
6227 7Telephone
HeepmannLast Name
LinusFirst Name
Mapping
Mapping
A mapping describes the assignment of SAP fields to directory attributes. In the simplest case, this
is a 1:1 assignment, however more complex relationship rules may be required.
© SAP AG HR250 5-42

7/14/2019 EXP_0005
http://slidepdf.com/reader/full/exp0005-563109e5297db 43/55
0.43
© SAP AG 2003
LDAP: User Administration in the SAP System
User administration in the SAP System
ALE LDAP
Directory
Server
LDAP
CUA central system
SAP W eb AS
Child system
Other
Applications
Ad min.
The principle of this scenario is that the leading system is the connected SAP System. Users created
in this system are distributed immediately to the relevant child systems. After the next
synchronization, these users are transferred to the Directory Server to which other applications have
access.
The actual synchronization with the Directory Server is always triggered from the SAP System by
means of transaction RSLDAPSYNC_USER or the identically named report
(RSLDAPSYNC_USER). You can run the report online (for example, using transaction SA38) or
schedule it as a background job using a suitable variant. You specify the relevant LDAP Server in
the input screen (the LDAP Connector can be determined automatically). You can also restrict
synchronization to specific user names.
© SAP AG HR250 5-43

7/14/2019 EXP_0005
http://slidepdf.com/reader/full/exp0005-563109e5297db 44/55
0.44
© SAP AG 2003
LDAP: User Administration in the Directory Server
ALELDAP
Directory
Server
LDAP
CUA central system
SAP W eb AS
Child system
Other
Applications
Ad min.
Ad min.
User administration in the directory server
Ad min.
In the illustrated case, users are either created manually in the directory server or are generated by an
external application, such as an HR system. Newly created users would then be created the next time
synchronization takes place in the SAP System. If this system is the central system for CUA, the user
is also included in the specified child systems.
This scenario enables an SAP administrator to continue to administer the user master in the central
system and (depending on the configuration) also in the child systems.
© SAP AG HR250 5-44

7/14/2019 EXP_0005
http://slidepdf.com/reader/full/exp0005-563109e5297db 45/55
0.45
© SAP AG 2003
User Administration
Overview
The LDAP directory as User Store
The R/3 System as User Store
User administration in the Enterprise Portal
© SAP AG HR250 5-45

7/14/2019 EXP_0005
http://slidepdf.com/reader/full/exp0005-563109e5297db 46/55
0.46
© SAP AG 2003
User Management Engine Architecture
Appl ication accessing
User Management
Engine
SAP Enterprise Portal
User Management
Core Layer
User
API
User
Account
API
API
groups
API
roles
Persistence Manager Replication
Manager
SAPSystem
Persistence Adapter
User Management
Data Source
DatabaseDirectoryService
SAPSystem
The UME comprises different interfaces (API) and managers.
The Persistence Manager enables user-related data to be stored in one or more data sources
(repositories). Each repository has its own persistence adapter. Persistence adapters are available
for directory services, databases and SAP systems. In the persistence manager, you configure
which data is written to or read from which data source. The applications using the API thus do
not have to know any details about where user management data is stored.
The Replication Manager provides functions for replicating user data to external SAP or non-
SAP systems. The replication manager generates an XML document and sends it to the external
system. The external system processes it and performs subsequent actions.
© SAP AG HR250 5-46

7/14/2019 EXP_0005
http://slidepdf.com/reader/full/exp0005-563109e5297db 47/55
0.47
© SAP AG 2003
Scenario: HR with ESS and Web AS
1 SAP Web AS with ABAP + Java
Java UME
ABAP HRSAP R/3 w ith
HR
User data management
Employee
Self-Service
+
This figure shows an SAP System on which ABAP and Java instances are installed. A Java
application runs on the SAP Web Application Server for Java and uses services from the SAP Web
Application Server for ABAP. This application has to use the user data from ABAP User
Management for the SAP Web Application Server for Java. SAP provides such a scenario when an
SAP R/3 System running the application component Human Resources (HR) and the Employee Self-
Service are in use. SAP recommends that you configure ABAP User Management as the data source
for the UME here.
© SAP AG HR250 5-47

7/14/2019 EXP_0005
http://slidepdf.com/reader/full/exp0005-563109e5297db 48/55
0.48
© SAP AG 2003
User data distribution
ABAP
ABAP ABAP ABAP
Java
(with CUA)
Scenario: Many SAP Systems with CUA
Central User
Ad ministration (CUA)
e.g. SAPEnterprise Portal
Infrastructure with many SAP
systems
User data management
In this scenario, Central User Administration is used for the SAP Web Application Server ABAP to
centrally administer the user data. In this infrastructure, if an SAP Web Application Server Java is
integrated with an application that constantly communicates with several SAP systems, SAP
recommends that you configure the UME to use the user management of the SAP Web Application
Server ABAP on which CUA is active.
© SAP AG HR250 5-48
7/14/2019 EXP_0005
http://slidepdf.com/reader/full/exp0005-563109e5297db 49/55
0.49
© SAP AG 2003
The R/3 System as User Persistence Store
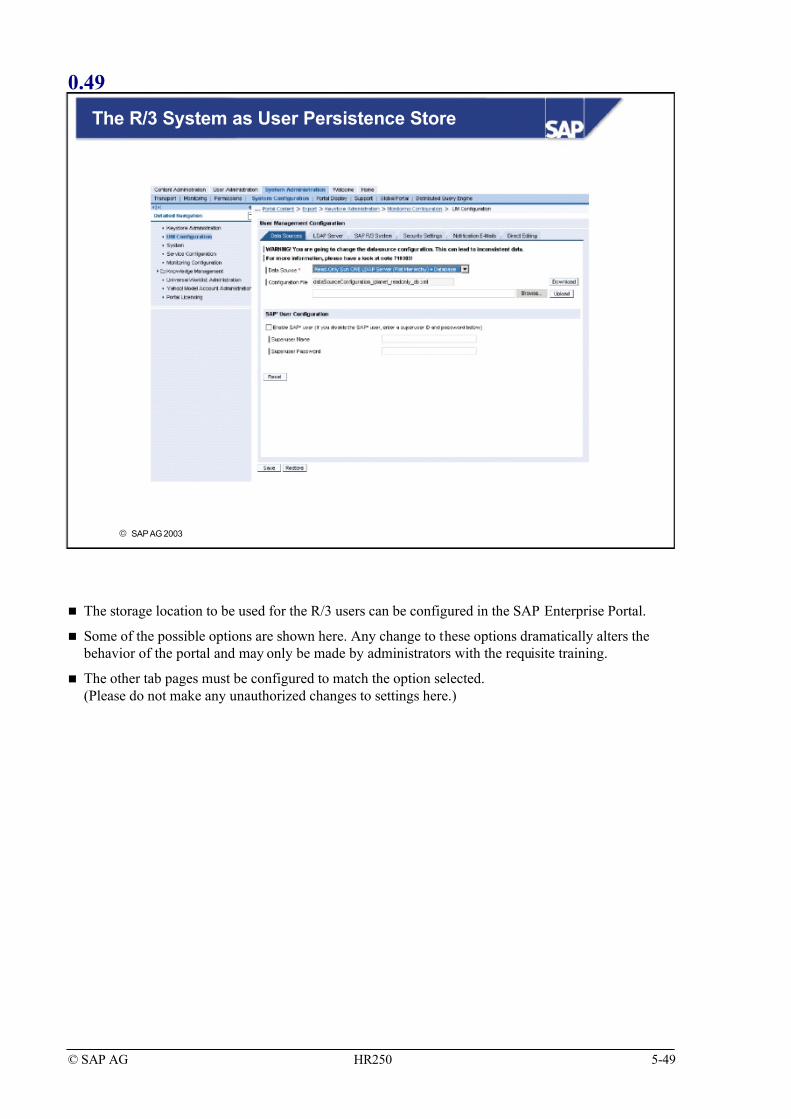
The storage location to be used for the R/3 users can be configured in the SAP Enterprise Portal.
Some of the possible options are shown here. Any change to these options dramatically alters the
behavior of the portal and may only be made by administrators with the requisite training.
The other tab pages must be configured to match the option selected.
(Please do not make any unauthorized changes to settings here.)
© SAP AG HR250 5-49

7/14/2019 EXP_0005
http://slidepdf.com/reader/full/exp0005-563109e5297db 50/55
© SAP AG HR250 5-50

7/14/2019 EXP_0005
http://slidepdf.com/reader/full/exp0005-563109e5297db 51/55
0.50Exercises
Unit: User Administration
Topic: Users
Note:
Use the role HR250_ALL_EMPLOYEE_ERP in this exercise.
In transaction HRUSER, it is only possible to work with one role.
Therefore, if you select your own role in this exercise you will impede
the progress of other participants.
1. Find out which steps are necessary to create ESS users for employees with and without
R/3 users in transaction HRUSER and complete the records.
1.1 If the employee already has an R/3 user, you must:
________________________________________________
________________________________________________
Solution
Use the Communication infotype (0105, subtype 0001) to create a link between
the employee and the user and grant the user authorization for SAP ESS.
1.2 If the employee does not yet have an R/3 user, you must:
________________________________________________ ________________________________________________
Solution:
Create a user for the employee and grant this user authorization for SAP ESS.
© SAP AG HR250 5-51

7/14/2019 EXP_0005
http://slidepdf.com/reader/full/exp0005-563109e5297db 52/55
2. Link an existing user (HR250.A-##) with an employee (250995##) using the option
Assign employees to existing users. Use the role HR250_ALL_EMPLOYEE_ERP.
Transaction: HRUSER or IMG Path: Personnel Management → Employee Self -
Service→ Employee Self - Service ITS Version→ General Setting for ESS → Create
SAP Users for ESS
2-1 In the Set Up and Maintain ESS Users (Start) screen, select Assign employees toexisting users in the Preparation area.
2-2 In the Reconcile User Master with HR Master screen, enter HR250.A-## in the
User name field and select all other setting that are relevant to your company.
Choose Execute.
2-3 Select user HR250.A-## in the Assign Employees to Existing Users screen.
2-4 Select Assign employees.
2-5 Enter employee number 250995## in the Choose person dialog box and choose
Enter .
2-6 Select Create in the Create Relationships dialog up box.
2-7 Confirm the message “User HR250.A-## was related to employee 250995## ”
with Enter .
2-8 Return to the HRUSER screen and select Select employees using employee
master data in the User/authorization assignment area.
2-9 Enter employee number 250995## in the Choose person numbers using employee
master screen and choose Execute.
2-10 An entry appears in the Employees with users without ESS role. Choose the
List/Overview pushbutton.
2-11 In the Relate User with Persons screen, select the personnel number and choose
Authorization assignment .
2-12 In the dialog box Attributes of Users, make sure that the correct role
HR250_ALL_EMPLOYEE_ERP is used and choose Execute.
2-13 Choose Enter to confirm the message “Profile(s) for role
HR250_ALL_EMPLOYEE_ERP assigned to user HR250.A-## ”.
2-14 Choose Refresh to see the changes.
© SAP AG HR250 5-52

7/14/2019 EXP_0005
http://slidepdf.com/reader/full/exp0005-563109e5297db 53/55
3. Create users for the organizational unit ## Customer Service in the Caliber A Bicycle
Company. Use the evaluation path Organization-Position-Job (O-S-P) and technical path
3 to pre-select the employee with the organizational unit in the current plan version.
Transaction: HRUSER or IMG Path: Personnel Management → Employee Self -
Service→ Employee Self - Service ITS Version→ General Setting for ESS → Create
SAP Users for ESS
3-1 Select Preselect employees using org. assignment in the User/Authorization
assignment area of the Setup and Maintain ESS Users screen.
3-2 Enter 01 in the Plan version field, and O in the Object type field. Use the structure
search function to locate ## Customer Service organizational unit ## in the
Caliber A Bicycle company and choose Execute.
3-3 The personnel numbers for the employees in the selected organizational unit are
displayed in the Choose Personnel Numbers Using Employee Master screen.
Choose Execute.
3-4 In the Setup and Maintain ESS Users (Overview) screen, you see an entry for the
number of employees without users in the Employees without users field in the
User/authorization assignment area.
3-5 Choose List /Overview.
3-6 The Create Users for Persons screen appears with a list of all of the employees
that exist in the preselected organizational unit that do not have users.
3-7 Choose Select All .
3-8 Choose Users with authorization.
3-9 Make your desired settings for the new users in the Attributes of users dialog box.
You can change the logon data and the password that is assigned to the employeeswhen their users are created. Choose Execute.
3-10 The new users are listed for the employees in the Create persons for users screen.
3-11 Choose Refresh to see the changes.
© SAP AG HR250 5-53

7/14/2019 EXP_0005
http://slidepdf.com/reader/full/exp0005-563109e5297db 54/55
4. Review the entries you made in the R/3 System when setting up the users. Look at the
Communication infotype and the user master records for employee 250995## in the ##
Customer Service organization unit. View the entries from transaction HRUSER.
Transaction: HRUSER or IMG Path: Personnel Management → Employee Self -
Service→ Employee Self - Service ITS Version→ General Setting for ESS → Create
SAP Users for ESS
4-1 Select Select employees using employee master in the User/Authorization
assignment area of the Setup and Maintain ESS Users screen.
4-2 Enter the personnel numbers for the employees in your group (250991## to
250995## - Do not use the range option) in the Choose Personnel Numbers Using
Employee Master screen. Choose Execute.
4-3 In the Setup and Maintain ESS Users (Overview) screen, select Display to get the
Total number of employees selected .
4-4 Select employee 250995## and choose HR master data. Check the entry in
infotype Communication (0105, subtype 0001).
4-5 Return to the overview, select User Master Data and check the role and profiles
for the user.
5. Log on to the R/3 System with your created user P2509941##. Change the password to
HR250.-##. Check the user in the R/3 System. Is the correct role assigned?
6. Optional: Manually Create and Test User in the Enterprise Portal
This task is automatically performed in the production system when synchronization with
the directory server takes place. To test the users, you can carry out the synchronizationmanually.
If you now want to test your role and user in the Enterprise Portal, you can manually
create a separate user and assign your role to it. This user will not be created in the R/3
System. For this reason, use exactly the same user name and password in the Enterprise
Portal that you created in the R/3 System with transaction HRUSER:
ID: p250991## and
Password: HR250-## .
Assign your role HR250_Role## to this user. Log on to the portal with this user.
© SAP AG HR250 5-54

7/14/2019 EXP_0005
http://slidepdf.com/reader/full/exp0005-563109e5297db 55/55
Detailed Description:
Create User
You are logged on to the portal with user HR250.a-##.
Navigate to User Administration -> User.
Enter the user ID p250991## and PW hr250-##.
Choose any e-mail address and name. Make entries in all required fields.
To save the user, choose Create.
Assign Role
You are logged on to the portal with user HR250.a-##.
Navigate to User Administration -> Roles.
Select Roles and enter the name of the ESS role ess_role.
Choose Start .
Choose Edit , which is displayed after your role that has been found.
Select User und enter the name of your end user p250991##. Choose Start .
Select the user found and choose Add .
To save the assignment, choose Save.
Alternatively, you can assign the role you have created to the user.