expense management asset management user guide (r9.8)
TRANSCRIPT
NEC NEC Corporation
Expense ManagementAsset Management
User Guide
November 2010NDA-31136, Revision 1
Liability Disclaimer
NEC Corporation reserves the right to change the specifications, functions, or features, at any time, without notice.
NEC Corporation has prepared this document for the exclusive use of its employees and customers. The information contained herein is the property of NEC Corporation and shall not be reproduced
without prior written approval from NEC Corporation
© 2010 NEC Corporation
Windows®, and Microsoft® are registered trademarks of Microsoft Corporation.
All other brand or product names are or may be trademarks or registered trademarks of, and are used to identify products or services
of, their respective owners.
i
Expense Management Asset Managment User Guide - Revision 1
Contents
Introduction 1-1
Asset Management Overview . . . . . . . . . . . . . . . . . . . . . . . . . . . . . . . . . . . . . . 1-1
How This Guide is Organized . . . . . . . . . . . . . . . . . . . . . . . . . . . . . . . . . . . . . . 1-2
Getting Started 2-1
Accessing the Asset Management Module . . . . . . . . . . . . . . . . . . . . . . . . . . . . 2-1
Asset Management Main Window. . . . . . . . . . . . . . . . . . . . . . . . . . . . . . . . . . . 2-1Navigation Pane . . . . . . . . . . . . . . . . . . . . . . . . . . . . . . . . . . . . . . . . . . . . . . . . 2-2Data (Grid) Pane. . . . . . . . . . . . . . . . . . . . . . . . . . . . . . . . . . . . . . . . . . . . . . . . 2-2
Asset Types 3-1
Asset Types - Introduction. . . . . . . . . . . . . . . . . . . . . . . . . . . . . . . . . . . . . . . . . 3-1Defining Asset Types . . . . . . . . . . . . . . . . . . . . . . . . . . . . . . . . . . . . . . . . . . . . 3-1Deleting a Defined Asset Type . . . . . . . . . . . . . . . . . . . . . . . . . . . . . . . . . . . . . 3-2
Defining Info Fields . . . . . . . . . . . . . . . . . . . . . . . . . . . . . . . . . . . . . . . . . . . . . . 3-3Editing Asset Type’s Info Fields . . . . . . . . . . . . . . . . . . . . . . . . . . . . . . . . . . . . 3-3
Assets 4-1
Assets - Introduction . . . . . . . . . . . . . . . . . . . . . . . . . . . . . . . . . . . . . . . . . . . . . 4-1
Managing Assets. . . . . . . . . . . . . . . . . . . . . . . . . . . . . . . . . . . . . . . . . . . . . . . . 4-1Adding a New Asset . . . . . . . . . . . . . . . . . . . . . . . . . . . . . . . . . . . . . . . . . . . . . 4-2Viewing and Editing an Asset . . . . . . . . . . . . . . . . . . . . . . . . . . . . . . . . . . . . . . 4-2Deleting an Asset . . . . . . . . . . . . . . . . . . . . . . . . . . . . . . . . . . . . . . . . . . . . . . . 4-3

ii Contents
Expense Management Asset Managment User Guide - Revision 1
Asset Dialog Box . . . . . . . . . . . . . . . . . . . . . . . . . . . . . . . . . . . . . . . . . . . . . . . . 4-3General Tab . . . . . . . . . . . . . . . . . . . . . . . . . . . . . . . . . . . . . . . . . . . . . . . . . . . 4-4Charges Tab . . . . . . . . . . . . . . . . . . . . . . . . . . . . . . . . . . . . . . . . . . . . . . . . . . . 4-6Attachments Tab. . . . . . . . . . . . . . . . . . . . . . . . . . . . . . . . . . . . . . . . . . . . . . . . 4-9
iii
Expense Management Asset Managment User Guide - Revision 1
Figures
Figure Title Page
2-1 Module Selection Bar. . . . . . . . . . . . . . . . . . . . . . . . . . . . . . . . . . . . . . . . 2-1
2-2 Asset Management Main Window (Assets sub-module selected). . . . . . 2-2
2-3 Filtering Results . . . . . . . . . . . . . . . . . . . . . . . . . . . . . . . . . . . . . . . . . . . . 2-4
2-4 Saving Favorites . . . . . . . . . . . . . . . . . . . . . . . . . . . . . . . . . . . . . . . . . . . 2-4
3-1 Create Asset Type Dialog Box. . . . . . . . . . . . . . . . . . . . . . . . . . . . . . . . . 3-2
3-2 Data Protection Dialog Box (for asset type deletion) . . . . . . . . . . . . . . . . 3-3
3-3 Info Fields Grid . . . . . . . . . . . . . . . . . . . . . . . . . . . . . . . . . . . . . . . . . . . . 3-4
4-1 Asset Dialog Box . . . . . . . . . . . . . . . . . . . . . . . . . . . . . . . . . . . . . . . . . . . 4-4
4-2 Charges Tab . . . . . . . . . . . . . . . . . . . . . . . . . . . . . . . . . . . . . . . . . . . . . . 4-6
4-3 Edit Recurring Charge Assignment Dialog Box . . . . . . . . . . . . . . . . . . . . 4-8
4-4 Delete Recurring Charge Assignment Dialog Box. . . . . . . . . . . . . . . . . . 4-8
4-5 Attachments Tab . . . . . . . . . . . . . . . . . . . . . . . . . . . . . . . . . . . . . . . . . . . 4-9

iv Figures
Expense Management Asset Managment User Guide - Revision 1
v
Expense Management Asset Managment User Guide - Revision 1
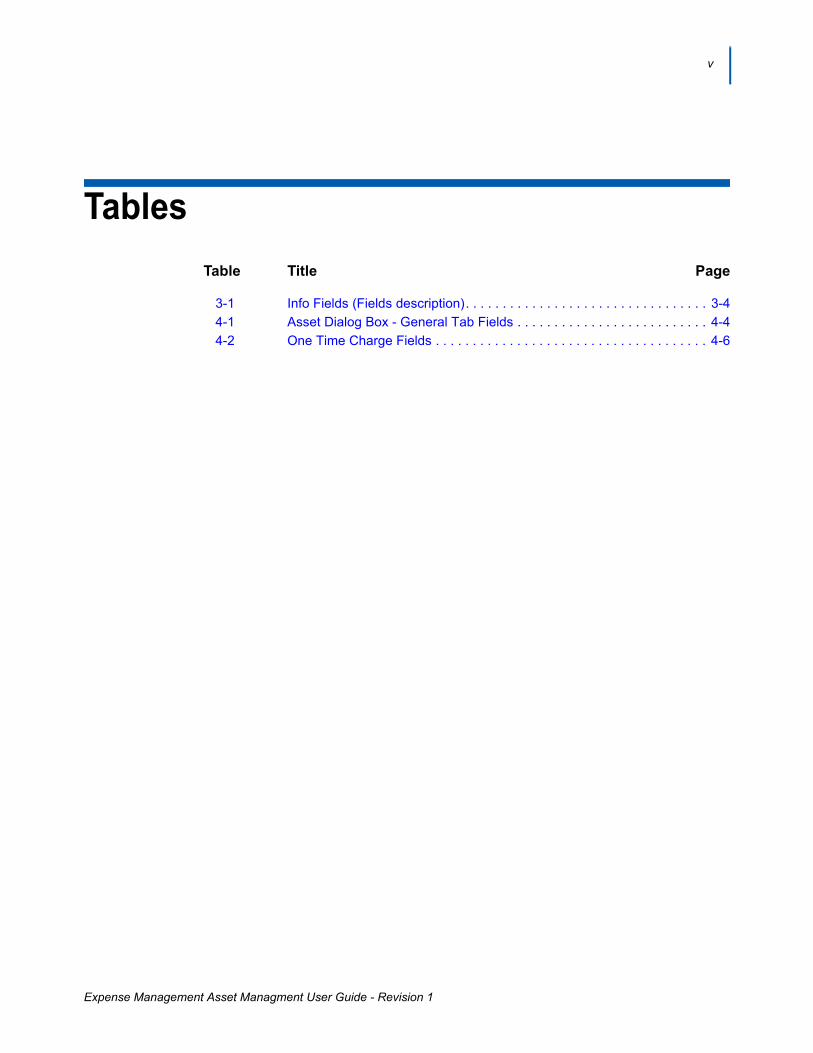
Tables
Table Title Page
3-1 Info Fields (Fields description). . . . . . . . . . . . . . . . . . . . . . . . . . . . . . . . . 3-4
4-1 Asset Dialog Box - General Tab Fields . . . . . . . . . . . . . . . . . . . . . . . . . . 4-4
4-2 One Time Charge Fields . . . . . . . . . . . . . . . . . . . . . . . . . . . . . . . . . . . . . 4-6

vi Tables
Expense Management Asset Managment User Guide - Revision 1
1-1
Expense Management Asset Managment User Guide - Revision 1
1Introduction
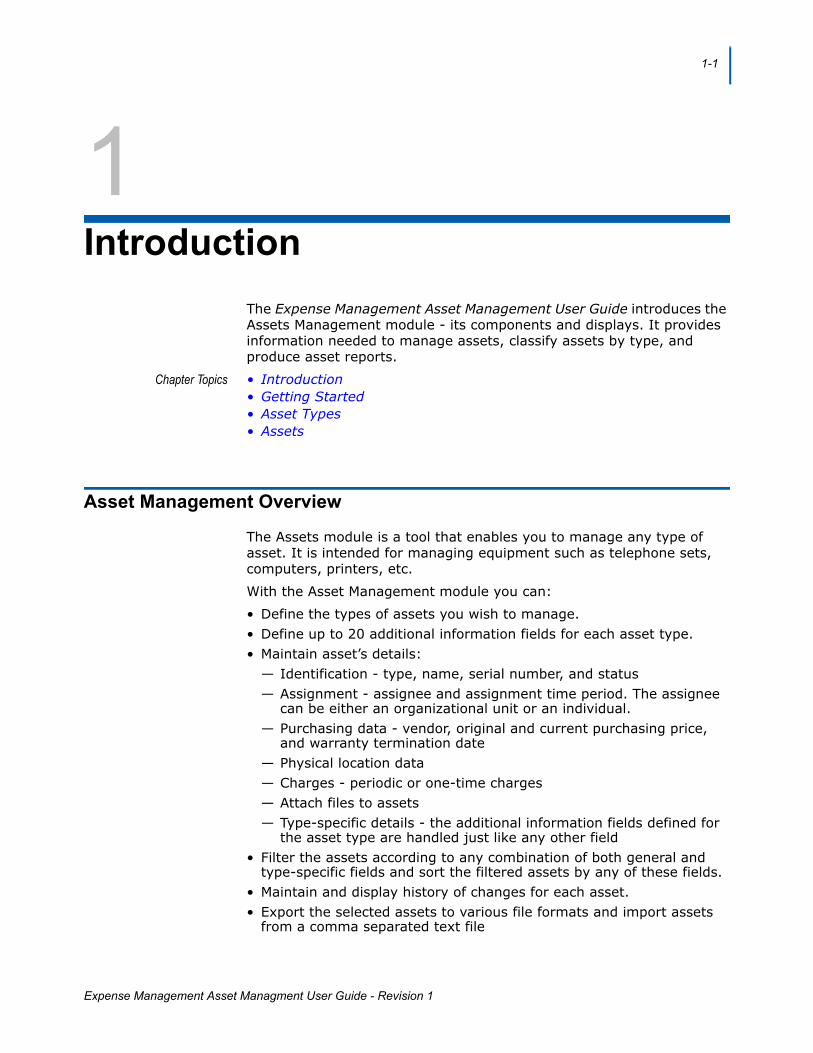
The Expense Management Asset Management User Guide introduces the Assets Management module - its components and displays. It provides information needed to manage assets, classify assets by type, and produce asset reports.
Chapter Topics • Introduction• Getting Started• Asset Types• Assets
Asset Management Overview
The Assets module is a tool that enables you to manage any type of asset. It is intended for managing equipment such as telephone sets, computers, printers, etc.
With the Asset Management module you can:
• Define the types of assets you wish to manage.• Define up to 20 additional information fields for each asset type.• Maintain asset’s details:
— Identification - type, name, serial number, and status— Assignment - assignee and assignment time period. The assignee
can be either an organizational unit or an individual.— Purchasing data - vendor, original and current purchasing price,
and warranty termination date— Physical location data— Charges - periodic or one-time charges— Attach files to assets— Type-specific details - the additional information fields defined for
the asset type are handled just like any other field• Filter the assets according to any combination of both general and
type-specific fields and sort the filtered assets by any of these fields.• Maintain and display history of changes for each asset.• Export the selected assets to various file formats and import assets
from a comma separated text file
1-2 Introduction
Expense Management Asset Managment User Guide - Revision 1
How This Guide is Organized
Chapter 1 Introduction
This chapter outlines how to use the manual including the organization and chapter layout of the Asset Management Module User Guide.
Chapter 2 Getting Started
This chapter introduces you to the Asset Management Module basics.
Chapter 3 Asset Types
This chapter explains how to define and manage asset types and their asset type Info fields.
Chapter 4 Assets
This chapter explains assets, including the way they are recorded, modified, or deleted. It also covers asset details including purchasing and assignment data.
2-1
Expense Management Asset Managment User Guide - Revision 1
2Getting Started
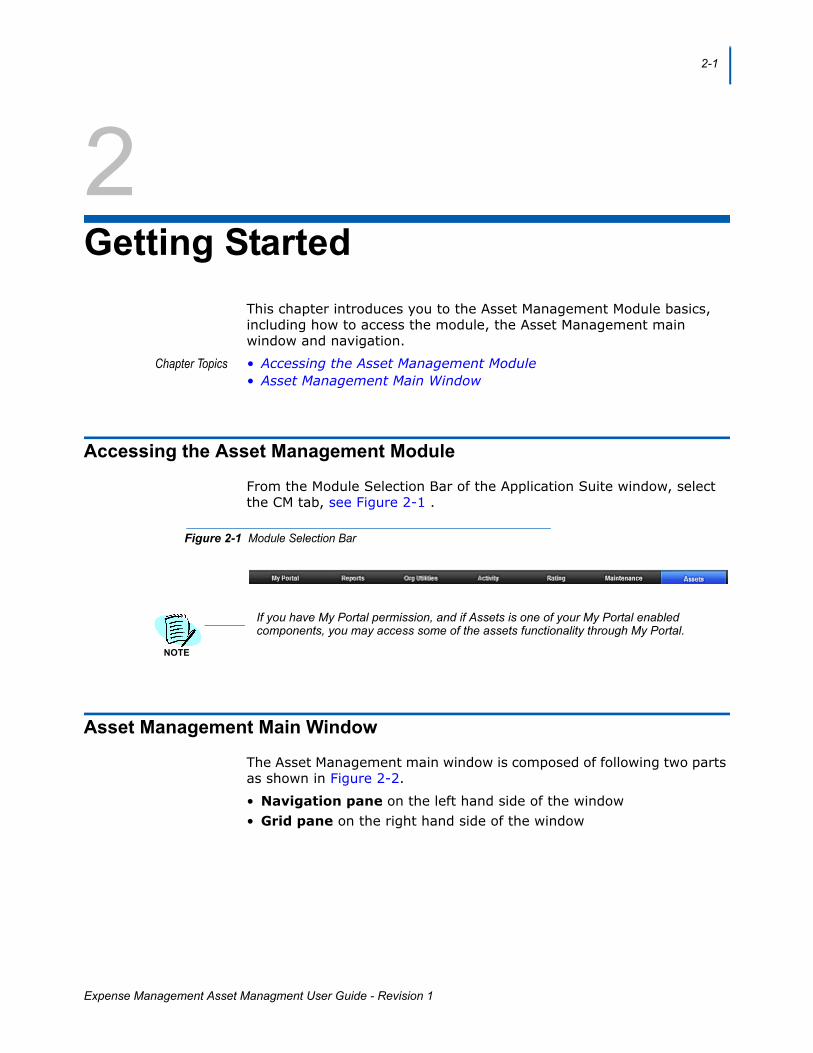
This chapter introduces you to the Asset Management Module basics, including how to access the module, the Asset Management main window and navigation.
Chapter Topics • Accessing the Asset Management Module• Asset Management Main Window
Accessing the Asset Management Module
From the Module Selection Bar of the Application Suite window, select the CM tab, see Figure 2-1 .
Figure 2-1 Module Selection Bar
If you have My Portal permission, and if Assets is one of your My Portal enabled components, you may access some of the assets functionality through My Portal.
Asset Management Main Window
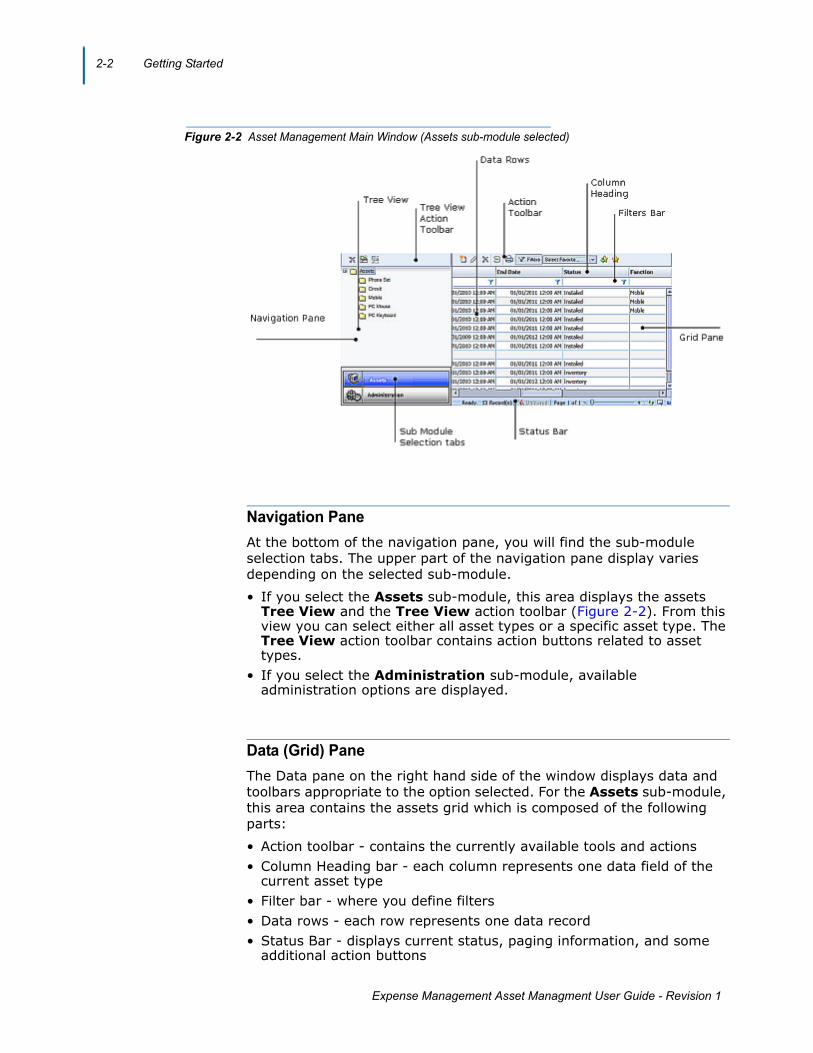
The Asset Management main window is composed of following two parts as shown in Figure 2-2.
• Navigation pane on the left hand side of the window• Grid pane on the right hand side of the window
NOTE
2-2 Getting Started
Expense Management Asset Managment User Guide - Revision 1
Figure 2-2 Asset Management Main Window (Assets sub-module selected)
Navigation Pane
At the bottom of the navigation pane, you will find the sub-module selection tabs. The upper part of the navigation pane display varies depending on the selected sub-module.
• If you select the Assets sub-module, this area displays the assets Tree View and the Tree View action toolbar (Figure 2-2). From this view you can select either all asset types or a specific asset type. The Tree View action toolbar contains action buttons related to asset types.
• If you select the Administration sub-module, available administration options are displayed.
Data (Grid) Pane
The Data pane on the right hand side of the window displays data and toolbars appropriate to the option selected. For the Assets sub-module, this area contains the assets grid which is composed of the following parts:
• Action toolbar - contains the currently available tools and actions• Column Heading bar - each column represents one data field of the
current asset type• Filter bar - where you define filters• Data rows - each row represents one data record• Status Bar - displays current status, paging information, and some
additional action buttons
Getting Started 2-3
Expense Management Asset Managment User Guide - Revision 1
Sorting Grid Records
In the assets grid, you can sort the displayed assets by any of the columns, but only by one column at a time. A small triangle in the column heading indicates the sort field and sort order.
Follow the steps below to sort grid records.
— Click in a column heading to sort by that column.
—The first time you click in the column heading, it is sorted in ascending
order. A small triangle in the column heading indicates the sort
order.
—To revers the sort order, click in the column heading again. The small
triangle is reversed indicating descending sort order.
Filtering Grid Records
By setting filtering conditions, filtering enables you to display only records that match the defined filter fields. If more than one filter field is defined, only records matching all non-empty filter fields are displayed. To filter cable records, perform the following steps.
Step 1 If the filter bar is not shown, right-click any of the column headings and
select Filter Bar, or click Filters on the action toolbar.
Step 2 In a column to which you wish to apply a filter, click the filter icon
and select from the popup menu the appropriate relation for the filter.
Step 3 Click in the filter cell (not on the icon). A value entering text box
displays.
Step 4 Enter the appropriate value.
Step 5 To activate all currently set filters now, press Enter, or wait until all filters are set and then activate all set filters at once in Step 7.
Step 6 Repeat steps 2 to 5 for each column to which you wish to apply a filter.
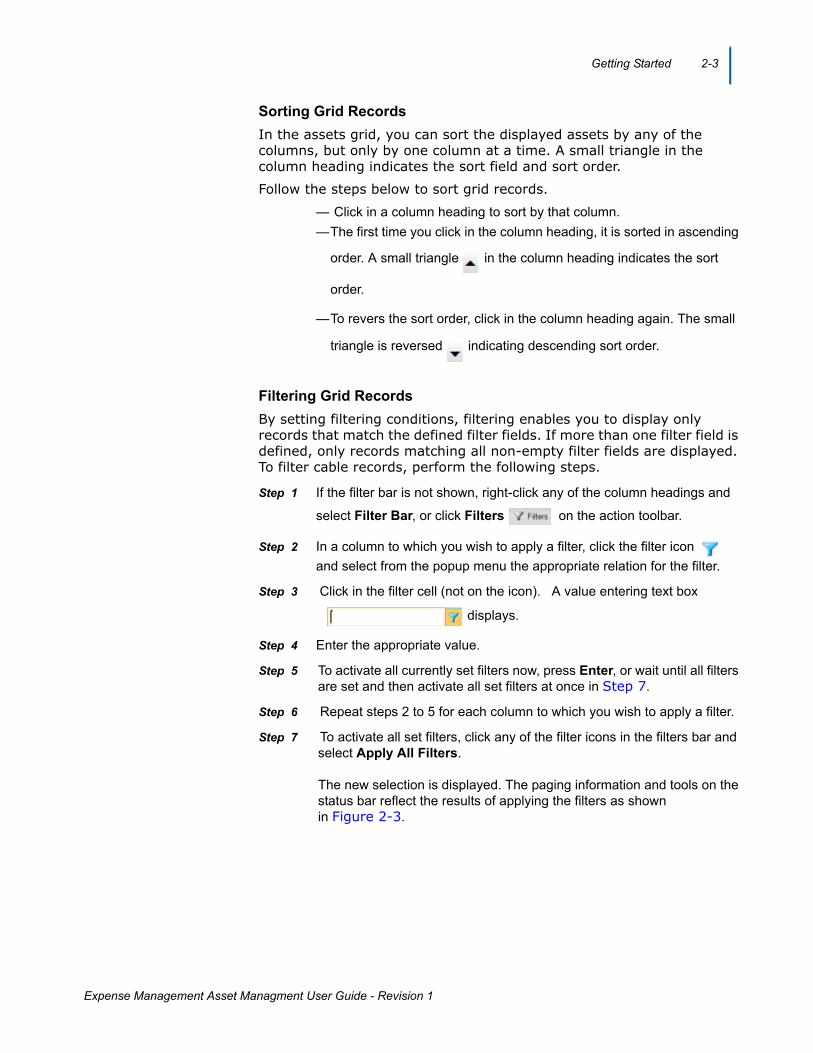
Step 7 To activate all set filters, click any of the filter icons in the filters bar and select Apply All Filters.The new selection is displayed. The paging information and tools on the status bar reflect the results of applying the filters as shown in Figure 2-3.
2-4 Getting Started
Expense Management Asset Managment User Guide - Revision 1
Figure 2-3 Filtering Results
Managing Favorites
Favorites enable you to assign a name and save the current filter and column setting so that you can use them again whenever you need them.
Saving a Setting as a Favorite
To save the setting as a favorite, do the following.
Step 1 Set the desired filter and activate it to ensure the setting is correct.
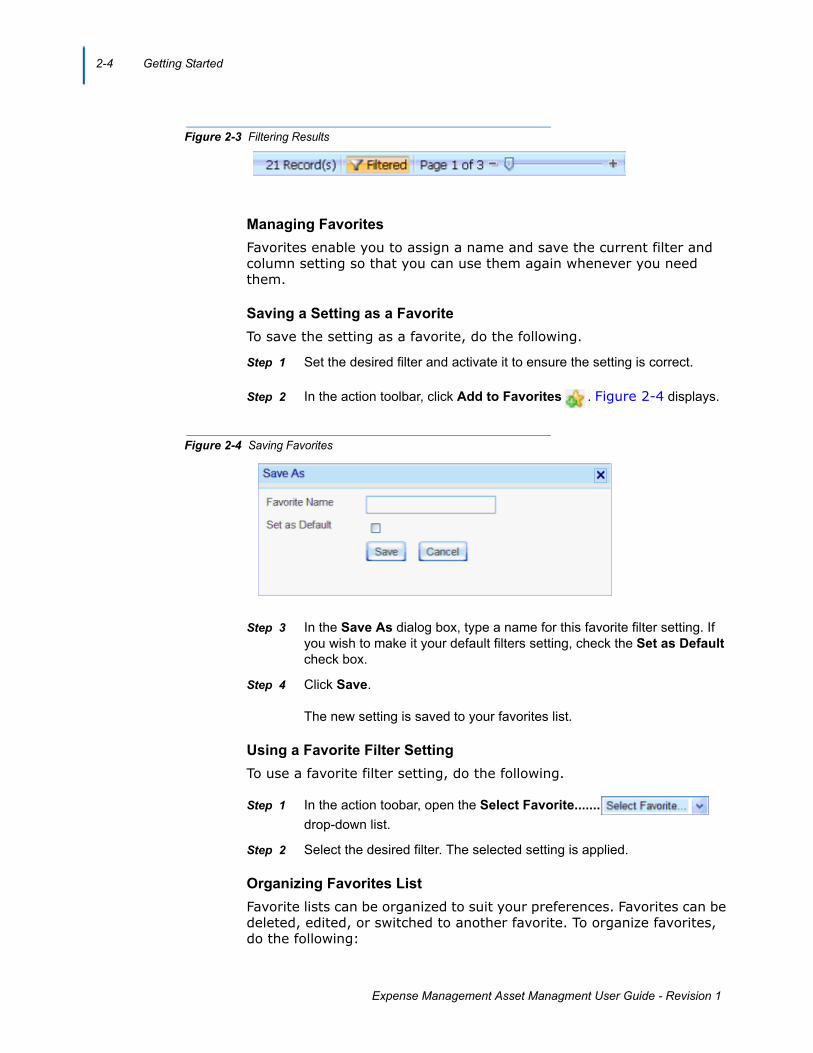
Step 2 In the action toolbar, click Add to Favorites . Figure 2-4 displays.
Figure 2-4 Saving Favorites
Step 3 In the Save As dialog box, type a name for this favorite filter setting. If you wish to make it your default filters setting, check the Set as Default check box.
Step 4 Click Save.The new setting is saved to your favorites list.
Using a Favorite Filter Setting
To use a favorite filter setting, do the following.
Step 1 In the action toobar, open the Select Favorite....... drop-down list.
Step 2 Select the desired filter. The selected setting is applied.
Organizing Favorites List
Favorite lists can be organized to suit your preferences. Favorites can be deleted, edited, or switched to another favorite. To organize favorites, do the following:
Getting Started 2-5
Expense Management Asset Managment User Guide - Revision 1
Step 1 In the action toolbar, click Organize Favorites .
Step 2 In the Organize Favorites dialog box do one of the following:
—To delete a favorite, click in the favorite row to select it, then click
delete .
—To edit a favorite, click in the favorite row to select it, and then click
Edit .
—To change the default favorite, check or uncheck the default check box. There can be only one default favorite.
Step 3 Close the Organize Favorites dialog box.
Managing the Displayed Columns
You can control which columns to show and their order. However, this setting is not saved and is valid only for the current display.
Hiding Columns
To hide one column from the display, right-click the heading of the column you wish to hide and select Remove This Column from the popup menu.
Selecting the Displayed Column
To select the displayed columns, do the following.
Step 1 Right-click anywhere in the column heading row and select Select Columns from the popup menu. A second popup menu opens with all the available asset columns displayed.
Step 2 Click next to each column’s name to alternately check or uncheck that column.
Step 3 Once all columns are checked or unchecked to suit your needs, select Apply Changes from the second popup menu.
Displaying All Columns
To display all columns, do the following.
Step 1 Right-click anywhere in the column heading row and select Select Columns from the popup menu.
Step 2 Select Reset from the second popup menu.
Changing Column Order
The order the columns appear on the Asset Management main window can be changed by following the steps below.
2-6 Getting Started
Expense Management Asset Managment User Guide - Revision 1
Step 1 Drag a column heading to another place in the column heading row until the border between two adjacent column headings becomes bold.
Step 2 Drop the column heading in its new place.
3-1
Expense Management Asset Managment User Guide - Revision 1
3Asset Types
This chapter explains how to define and manage asset types as well as their corresponding Info fields.
Chapter Topics • Asset Types - Introduction• Defining Info Fields
Asset Types - Introduction
Asset types enable you to partition the managed assets into different types. Asset types constitute a flat (two-level) tree structure. All the defined asset types are displayed in the tree view.
Each asset type has 20 additional information fields called Info Fields. These fields can be used to store type-specific data. You can define how many of these fields to use, the type of data each fields should hold, whether or not to show it in the grid display, etc. Once these fields are defined, they are used just like any of the predefined fields. For example, you can:
• Enter and edit field value through the asset dialog box• Sort and filter assets of that type according to this field
Defining Asset Types
To define a new asset type, perform the following steps.
Step 1 From the tree view, do one of the following:
—Click the assets root folder, then click Create Asset Type in the
tree view toolbar.
—Right-click the assets root folder and select Create Asset Type from the popup menu.
The Create Asset Type dialog box displays, Figure 3-1.
3-2 Asset Types
Expense Management Asset Managment User Guide - Revision 1
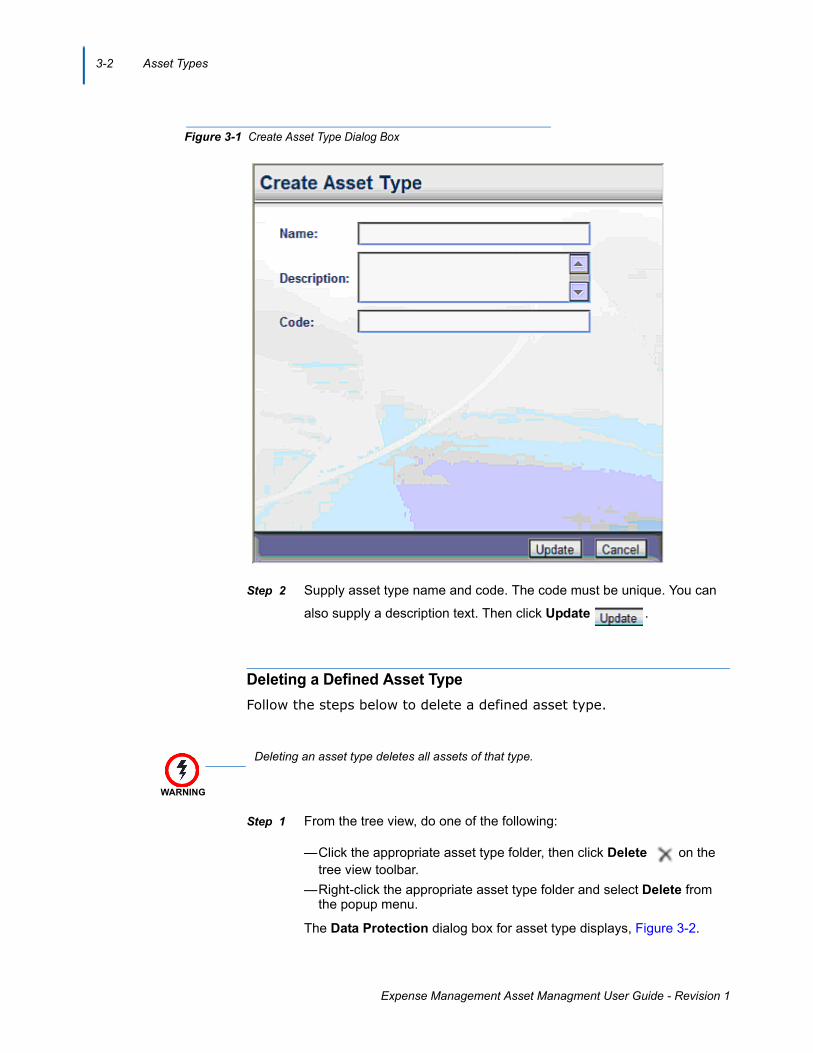
Figure 3-1 Create Asset Type Dialog Box
Step 2 Supply asset type name and code. The code must be unique. You can
also supply a description text. Then click Update .
Deleting a Defined Asset Type
Follow the steps below to delete a defined asset type.
Step 1 From the tree view, do one of the following:
—Click the appropriate asset type folder, then click Delete on the tree view toolbar.
—Right-click the appropriate asset type folder and select Delete from the popup menu.
The Data Protection dialog box for asset type displays, Figure 3-2.
WARNING
Deleting an asset type deletes all assets of that type.

Asset Types 3-3
Expense Management Asset Managment User Guide - Revision 1
Figure 3-2 Data Protection Dialog Box (for asset type deletion)
Step 2 In the Data Protection dialog box, do one of the following:
—To delete the asset type, supply your password and click Delete.
—To cancel the deletion, click Cancel.
Defining Info Fields
When you define a new asset type, it is created with all its potential 20 Info fields. Their names in the database are Info1 through Info20. You cannot add or delete Info fields or change their names. To use these raw fields, you have to make them visible and define their properties to suit your needs; otherwise, they remain invisible and cannot be used.
Editing Asset Type’s Info Fields
To edit the Info fields of an asset type, perform the following steps.
Step 1 From the tree view, do one of the following:
—Click the appropriate asset type folder, then click Create Asset on
the tree view toolbar.
—Right-click the appropriate asset type folder and select Manage Additional Info from the popup menu.
The Info fields grid displays, Figure 3-3.
3-4 Asset Types
Expense Management Asset Managment User Guide - Revision 1
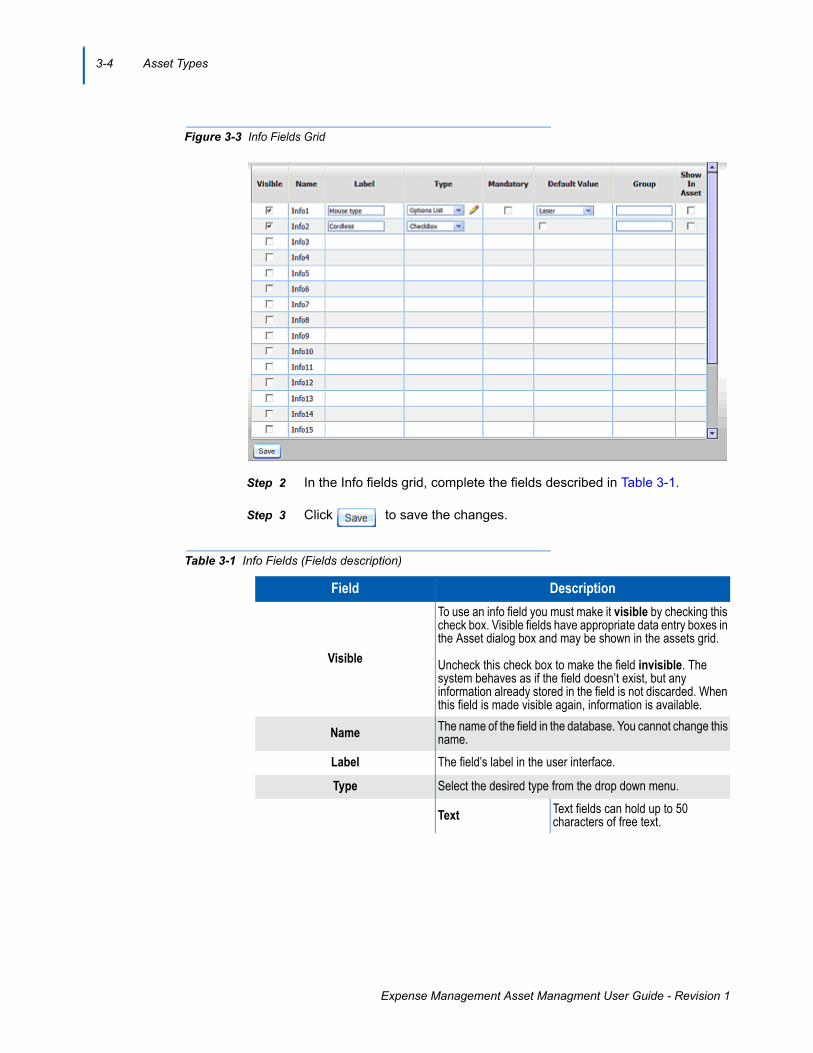
Figure 3-3 Info Fields Grid
Step 2 In the Info fields grid, complete the fields described in Table 3-1.
Step 3 Click to save the changes.
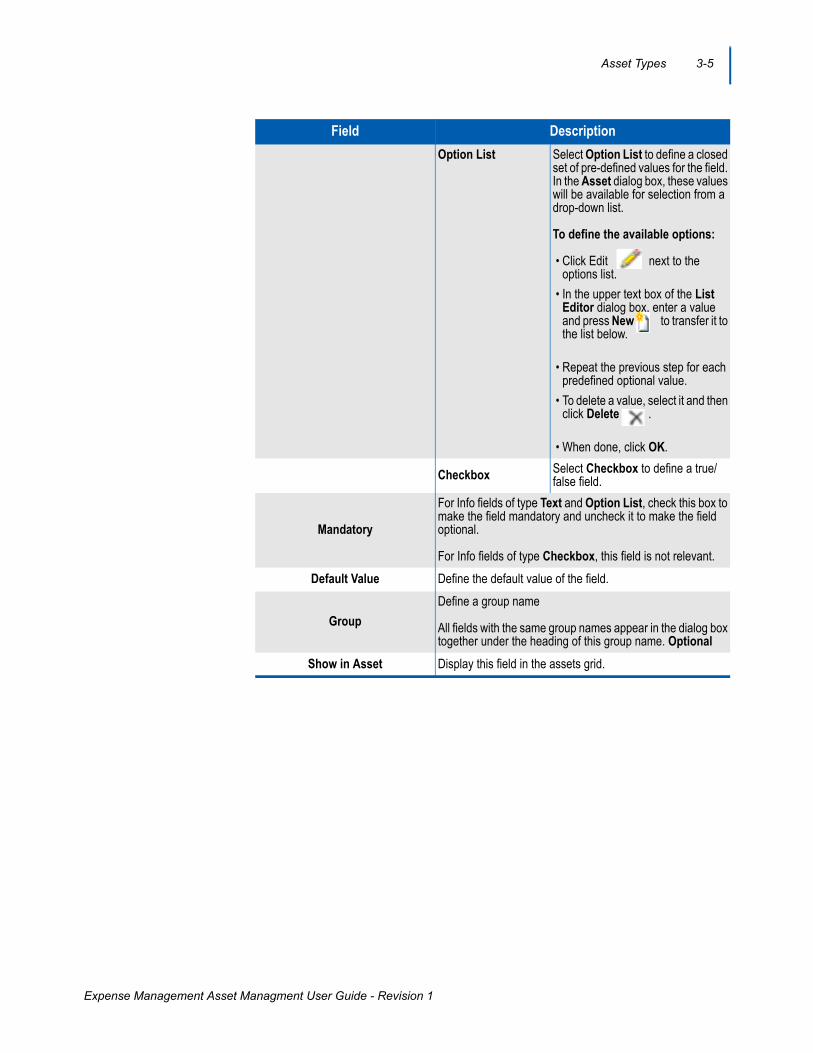
Table 3-1 Info Fields (Fields description)
Field Description
Visible
To use an info field you must make it visible by checking this check box. Visible fields have appropriate data entry boxes in the Asset dialog box and may be shown in the assets grid.
Uncheck this check box to make the field invisible. The system behaves as if the field doesn’t exist, but any information already stored in the field is not discarded. When this field is made visible again, information is available.
Name The name of the field in the database. You cannot change this name.
Label The field’s label in the user interface.
Type Select the desired type from the drop down menu.
Text Text fields can hold up to 50 characters of free text.
Asset Types 3-5
Expense Management Asset Managment User Guide - Revision 1
Option List Select Option List to define a closed set of pre-defined values for the field. In the Asset dialog box, these values will be available for selection from a drop-down list.
To define the available options:
• Click Edit next to the options list.
• In the upper text box of the List Editor dialog box, enter a value and press New to transfer it to the list below.
• Repeat the previous step for each predefined optional value.
• To delete a value, select it and then click Delete .
• When done, click OK.
Checkbox Select Checkbox to define a true/false field.
Mandatory
For Info fields of type Text and Option List, check this box to make the field mandatory and uncheck it to make the field optional.
For Info fields of type Checkbox, this field is not relevant.
Default Value Define the default value of the field.
Group
Define a group name
All fields with the same group names appear in the dialog box together under the heading of this group name. Optional
Show in Asset Display this field in the assets grid.
Field Description

3-6 Asset Types
Expense Management Asset Managment User Guide - Revision 1
4-1
Expense Management Asset Managment User Guide - Revision 1
4Assets
This chapter explains assets, including the way they are recorded, modified, or deleted. It also covers asset details including purchasing and assignment data.
Chapter Topics • Assets - Introduction• Managing Assets• Asset Dialog Box
Assets - Introduction
Once an asset type and its type-dependent fields are defined, you can start entering or importing assets of that type.
Assets enable you to:
• Enter or modify asset details.• Define periodic and/or one-time charges for the asset.• Attach files to the asset.Asset details include:
• Identification data - type, name, serial number, and status• Assignment data - organizational unit or person and assignment time
period• Purchasing data - vendor, origin al and current purchasing price, and
warranty termination date• Physical location data - location, building, floor, room• Additional info - up to 20 asset type-specific fields (see “Defining Info
Fields” on page 3-3).
Managing Assets
Assets are managed by adding new assets, editing assets, or deleting assets.
4-2 Assets
Expense Management Asset Managment User Guide - Revision 1
Adding a New Asset
Follow the steps below to add a new asset.
Step 1 In the assets main window, do one of the following:
—Click Add in the action toolbar.
—Right-click any asset’s data row and select Add from the popup menu.
The Asset dialog box displays with the General tab on top.
Step 2 Complete the assets General tab fields as described in .
Step 3 If you wish to define charge(s) for the asset, click the Charges tab and proceed as detailed in .
Step 4 If you wish to attach document(s) to the asset, click the Attachments tab and proceed as described in .
Step 5 When done, do one of the following:
—Click Save to save the asset.
—Click Save & New to save the asset and continue adding assets.
—Click one of the other asset tabs to continue entering or editing the asset.
Viewing and Editing an Asset
Follow the procedure below to view and/or edit an asset.
Step 1 In the assets main window, do one of the following:
—Select an asset, then click Edit on the action toolbar.
—Right-click any assets data row and select Edit from the popup menu.
—Double-click on an asset.
The Asset dialog box displays with the General tab on top.
Step 2 Edit the assets General tab fields as described in .
Step 3 If you wish to view, edit, or define charge(s) for the asset, click the Charges tab and proceed as described in section.
Step 4 If you wish to view, edit, or add to the asset’s attachments, click the Attachments tab and proceed as described in section.
Step 5 If you wish to view the change history of an asset, do one of the following:
Assets 4-3
Expense Management Asset Managment User Guide - Revision 1
—Select an asset and click History on the action toolbar.
—Right-click any assets data row and select History from the popup menu.
You cannot add, edit, or delete history records. Instead, every time one of the assets general tab fields is changed, a new history record is created documenting when the change was done, who did it, and what was changed.
Step 6 When done, do one of the following:
—Click Save to save the assets.
—Click Save & New to save the asset and continue adding assets.
—Click one of the other asset tabs to continue editing the asset.
Deleting an Asset
Use the procedure below to delete an asset.
Step 1 In the assets main window, do one of the following:
—Click Delete in the action toolbar.
—Right-click any asset’s data row and select Delete from the popup menu.
Step 2 In the Delete Confirmation dialog box, select .
Asset Dialog Box
The Asset dialog box contains three tabs where asset information is entered. The three tabs are:
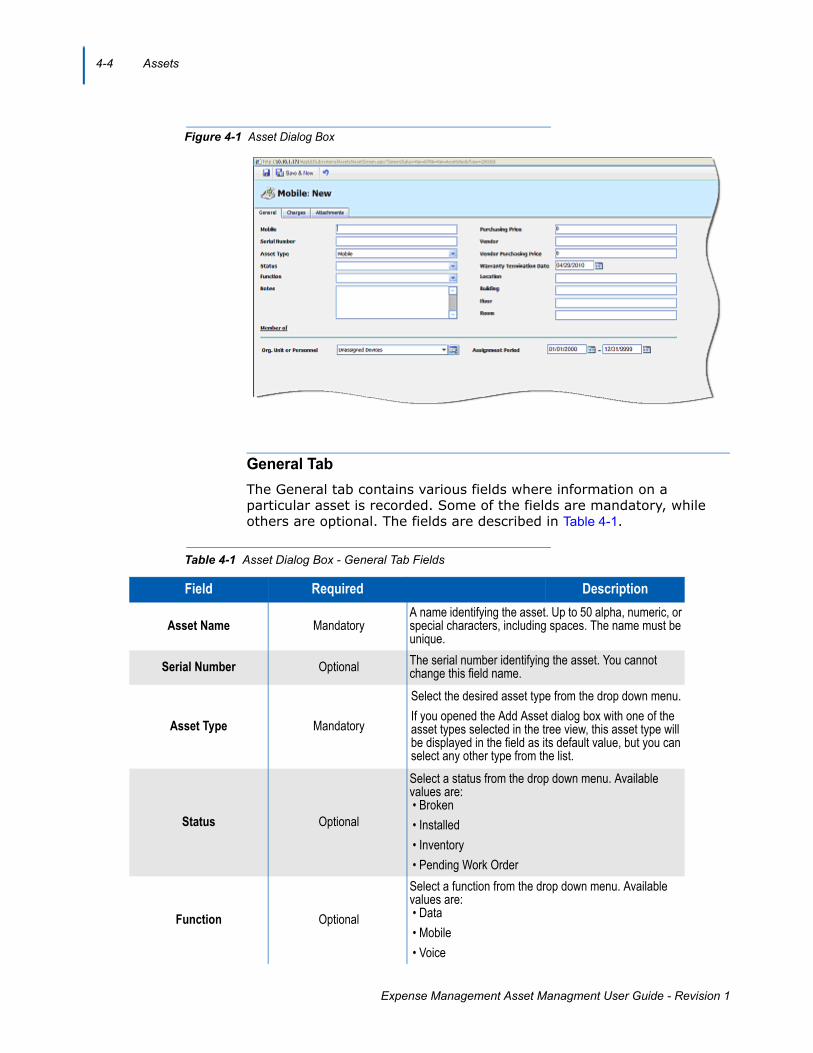
• General• Charges• AttachmentsThe Asset dialog box opens with the General tab on top, as depicted in Figure 4-1.
NOTE
4-4 Assets
Expense Management Asset Managment User Guide - Revision 1
Figure 4-1 Asset Dialog Box
General Tab
The General tab contains various fields where information on a particular asset is recorded. Some of the fields are mandatory, while others are optional. The fields are described in Table 4-1.
Table 4-1 Asset Dialog Box - General Tab Fields
Field Required Description
Asset Name MandatoryA name identifying the asset. Up to 50 alpha, numeric, or special characters, including spaces. The name must be unique.
Serial Number Optional The serial number identifying the asset. You cannot change this field name.
Asset Type Mandatory
Select the desired asset type from the drop down menu.
If you opened the Add Asset dialog box with one of the asset types selected in the tree view, this asset type will be displayed in the field as its default value, but you can select any other type from the list.
Status Optional
Select a status from the drop down menu. Available values are:• Broken
• Installed
• Inventory
• Pending Work Order
Function Optional
Select a function from the drop down menu. Available values are:• Data
• Mobile
• Voice
Assets 4-5
Expense Management Asset Managment User Guide - Revision 1
Notes Optional Free text field. This field is not displayed in the grid.
Purchasing Price Optional The actual cost paid when this specific item was purchased.
Vendor Optional Enter vendor ID.
Vendor Purchasing Price Optional Price of purchasing a similar asset from the vendor. Default is 0.
Warranty Termination Date Optional The date on which the warranty on the asset terminates. Default value is today’s date.
Location Optional
Use these fields to describe the physical location of the asset.
Building Optional
Floor Optional
Room Optional
Assigned to Mandatory
The person or organizational unit to which the asset is assigned. If you leave this field empty, it will be “assigned” to Unassigned Devices.
You can select the assignee in one of two ways.• Enter the name of the assignee.
• Enter a sub-string of the assignee name. While you type, a list of all possible assignees (people and units alike) whose name contains the string entered so far displays. With each additional character entered, the list gets smaller. A click on one of the assignees in the list selects that assignee.
• Click on the Select icon . The Organization Units and Personnel Selection dialog box opens. You can search by name, path, or both, and you can limit your search to specific organizational unit. Enter any part of the required name or path and click Search
. Double-click the requiredunit or person to select it and click OK.
Assignment Period Mandatory Start
The date the assignment starts. Default value is Jan 1, 2000. Enter a date manually, or click the calendar icon
to select a date.
Assignment End Date Mandatory End
The date the assignment ends. Default value is Dec 31, 9999. Enter a date manually, or click the calendar icon
to select a date.
Info Fields Enter values for the Info Fields defined for the asset type.
Field Required Description
4-6 Assets
Expense Management Asset Managment User Guide - Revision 1
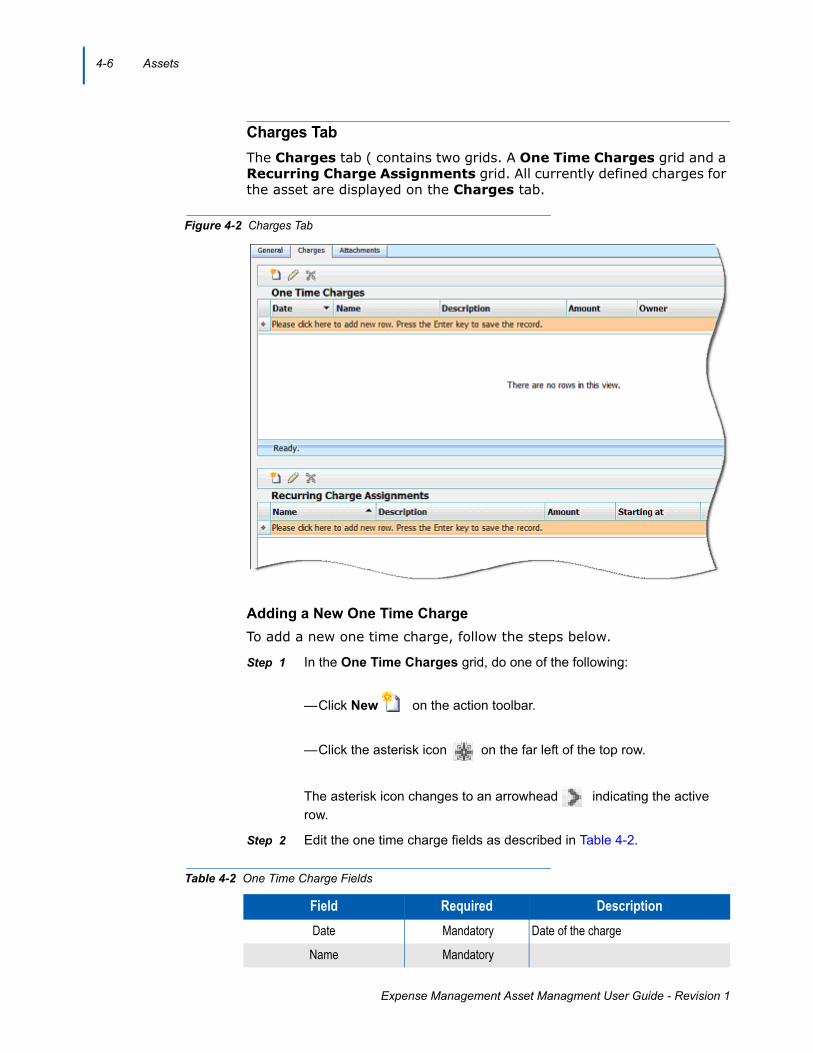
Charges Tab
The Charges tab ( contains two grids. A One Time Charges grid and a Recurring Charge Assignments grid. All currently defined charges for the asset are displayed on the Charges tab.
Figure 4-2 Charges Tab
Adding a New One Time Charge
To add a new one time charge, follow the steps below.
Step 1 In the One Time Charges grid, do one of the following:
—Click New on the action toolbar.
—Click the asterisk icon on the far left of the top row.
The asterisk icon changes to an arrowhead indicating the active
row.
Step 2 Edit the one time charge fields as described in Table 4-2.
Table 4-2 One Time Charge Fields
Field Required Description
Date Mandatory Date of the charge
Name Mandatory
Assets 4-7
Expense Management Asset Managment User Guide - Revision 1
Assigning a New Recurring Charge
Recurring charges are defined in Recurring Charges in the Administration sub-module of the Rating module of the Application Suite. Here you only assign an existing recurring charge to the asset.
To assign a new recurring charge, follow the steps below.
Step 1 In the Recurring Charges Assignment grid, do one of the following.
—Click New in the action toolbar.
—Click the asterisk icon on the far left of the top row.
The asterisk icon changes to an arrowhead indicating the active row.
Step 2 Enter the name of the defined recurring charge. When you start typing, a list of charges whose name starts with the characters entered so far displays. With each additional character entered, the list gets smaller. A click on one of the recurring charges in the list selects that charge.
Step 3 Select when to start charging the new recurring charge, then click OK.
Step 4 Press Enter to move the new charge to the grid.
Editing an Existing Assignment of a Recurring Charge
To edit an existing recurring charge assignment, follow the steps below.
Step 1 In the Recurring Charges Assignment grid, do one of the following.
—Double-click a charge.
—Select a charge, then click Edit on the action toolbar. The Edit
Recurring Charge Assignment dialog box displays, Figure 4-3.
Description Mandatory Text describing the charge
Amount Mandatory The amount to charge
Owner Display only Assignee - the person or unit to whom the asset is assigned. Display only field.
Applied By Display only The user who entered the charge. Display only field.
Field Required Description
4-8 Assets
Expense Management Asset Managment User Guide - Revision 1
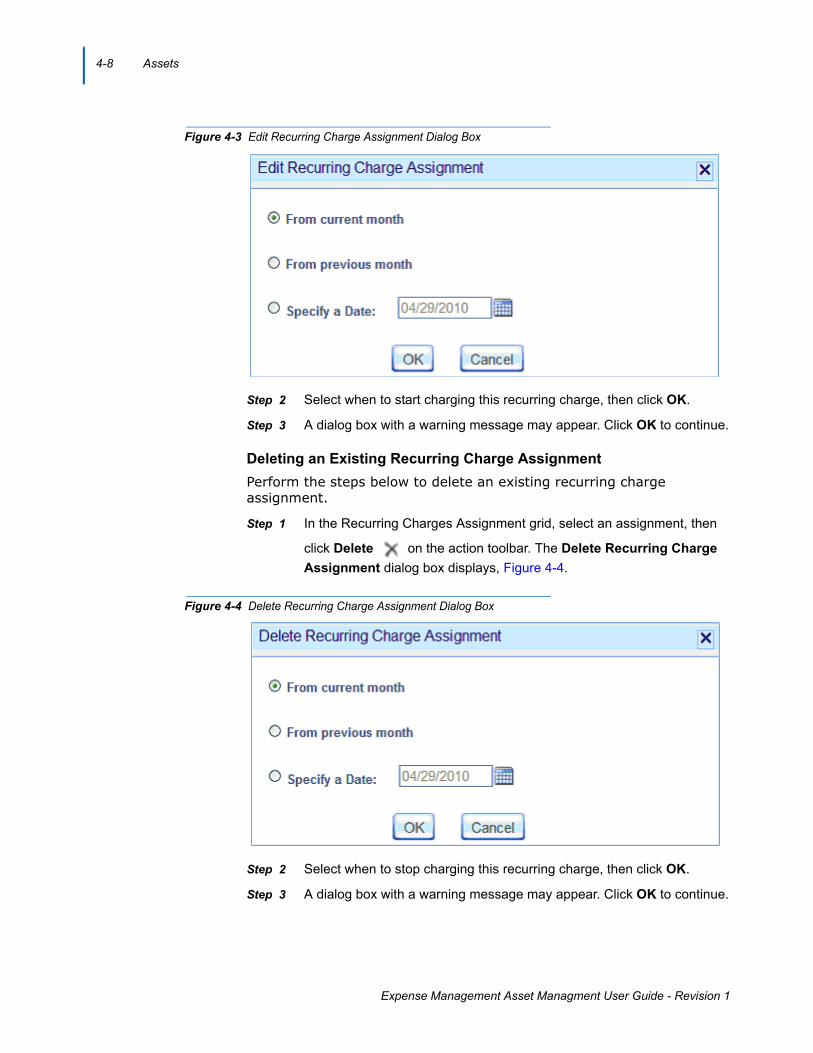
Figure 4-3 Edit Recurring Charge Assignment Dialog Box
Step 2 Select when to start charging this recurring charge, then click OK.
Step 3 A dialog box with a warning message may appear. Click OK to continue.
Deleting an Existing Recurring Charge Assignment
Perform the steps below to delete an existing recurring charge assignment.
Step 1 In the Recurring Charges Assignment grid, select an assignment, then
click Delete on the action toolbar. The Delete Recurring Charge
Assignment dialog box displays, Figure 4-4.
Figure 4-4 Delete Recurring Charge Assignment Dialog Box
Step 2 Select when to stop charging this recurring charge, then click OK.
Step 3 A dialog box with a warning message may appear. Click OK to continue.
Assets 4-9
Expense Management Asset Managment User Guide - Revision 1
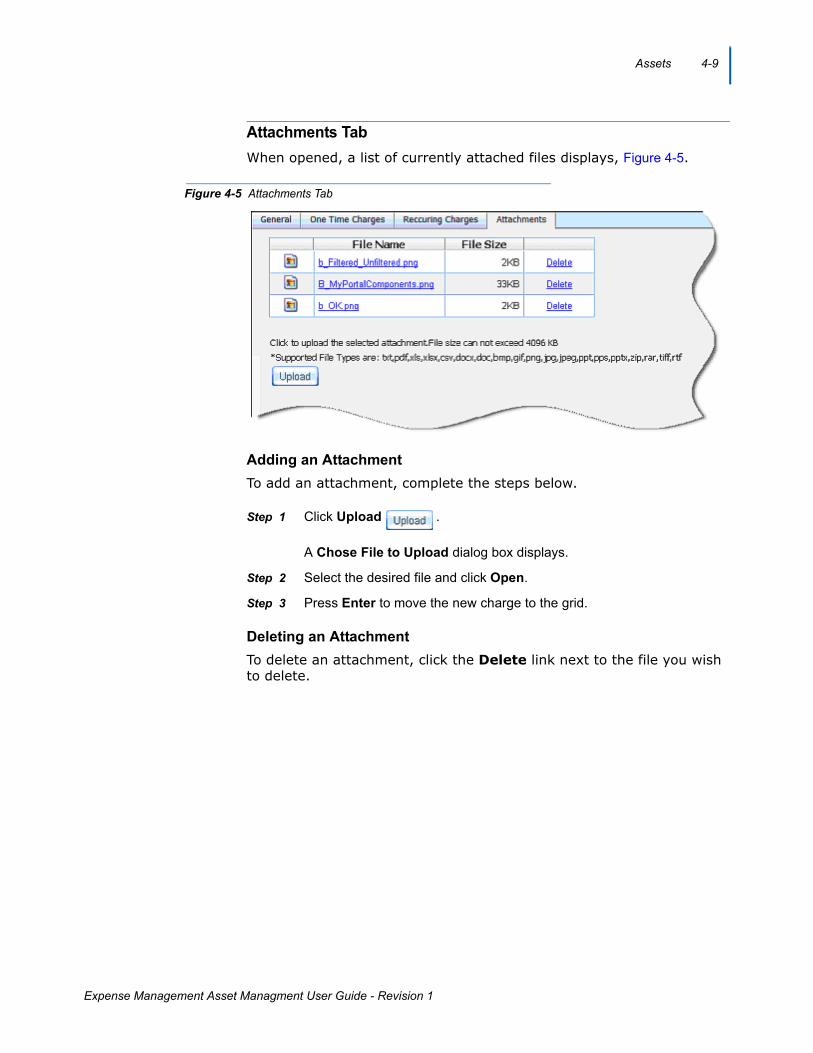
Attachments Tab
When opened, a list of currently attached files displays, Figure 4-5.
Figure 4-5 Attachments Tab
Adding an Attachment
To add an attachment, complete the steps below.
Step 1 Click Upload .
A Chose File to Upload dialog box displays.
Step 2 Select the desired file and click Open.
Step 3 Press Enter to move the new charge to the grid.
Deleting an Attachment
To delete an attachment, click the Delete link next to the file you wish to delete.

4-10 Assets
Expense Management Asset Managment User Guide - Revision 1
For additional information or support on this NEC Corporation product, contact your NEC Corporation representative.

Expense Management Asset Managment User Guide
NEC NEC Corporation
NDA-31136, Revision 1