experiment a1 - university of rochester files/a1... · web viewthe electronics consoles also...
TRANSCRIPT

EXPERIMENT A1
Mechanical Testing of Materials
Summary:
Welcome to the ME-242 laboratory! In this laboratory you will perform hands-on experiments with the Instron tensile test machine and conduct analyses that will allow you to determine the materials properties of several test articles. These materials properties will include:
yield strength tensile strength elongation
Before testing, you will learn to calibrate the load cell and extensometer and select appropriate operating conditions. After testing you will need the graphs from your chart recorders along with the various measurements of sample geometry to calculate sample properties. Your samples will include some or all of the following:
a hot worked steel a cold worked steel an aluminum alloy and several plastics with various properties
Instructions:Your key to success in this lab is to come prepared!
Before arriving at the lab, read through this lab module so that you will understand what the lab procedure is and how the lab equipment is used.
Each group should answer all the questions on the preliminary question sheet to be turned in at the beginning of the lab.
Each group will write one report. General guidelines for writing this report may be found in the section on weekly laboratory reports contained in the lab manual.
Timing: This lab takes the majority of one afternoon (approximately 4-5 hours).
What’s an “Instron?”The term Instron is frequently bandied about test labs and in industry. An Instron is a universal test machine. But be careful! Instron is a brand name and there are many brands of universal test machines including MTS and Tinius-Olsen, among others. The labs in the Department of Mechanical Engineering feature both Instron and MTS test machines.
Instron was established in 1946 in Boston, Massachusetts by Harold Hindman and George Burr. Mr. Hindman was working on a project to determine the properties of new materials to be used in parachutes. Since test machines available at that time did not have the necessary performance criteria to adequately evaluate these new materials, Mr. Hindman teamed up with Mr. Burr to design a material testing machine based on strain gauge load cells and servo control systems.
The resulting prototype was so successful that Mr. Hindman and
Example of a Universal Test
Machine
A1-1

Mr. Burr formed Instron Engineering Corporation. The name was derived from the ‘ins’ in the word instruments and the ‘tron’ in the word electronics.
A1-2

Background:The background for this lab can be found in most introductory materials science texts
such as Materials Science and Engineering, by Callister.
Engineering stress is the force per unit (original) area.Engineering strain is the elongation per unit (original) length. They are represented
by the following symbols:
Engineering Stress, and Engineering Strain,
Where = original cross sectional area of specimen= original length of the gauge section= applied force= change in length
For a linear elastic material, these parameters are related by Hooke's law,
where is Young's modulus. It is implicit here that only axial stresses and strains are of interest. Otherwise, Hooke's Law is significantly more complex since stress is also dependent on the strain in other directions. Note, it is assumed when so that
represents a line that passes through the origin with as the slope.
True stress and true strain differ from engineering stress and strain by referring to the instantaneous areas and gauge lengths respectively. The symbols for these values are the Greek letters and :
True stress, and True Strain,
where = instantaneous length of gauge section= instantaneous cross-sectional area.
The strain has a natural logarithm dependence because it is determined from the instantaneous gauge length. To show this, we can integrate the instantaneous true strain increment
to obtain
.
Note that
,
A1-3

so that when ,
.
For strains of about 1%, the "error" is of order of or 10 -4. Consequently, there is no significant difference in the engineering and true strains when all measurements are of small strains. The true stress and strain are also related by the modulus , since the modulus is established at a small strain level where is approximately equal to and is approximately equal to .
For large strains in plastic deformation, the volume of specimens is approximately conserved. Because of this, the instantaneous area can be calculated from the true strain. Assuming volume is conserved, Volume = . Or, rearranging and taking the natural logarithm, we obtain
.
Thus, . Note that a tensile true strain followed by an equal compressive true strain reproduces that initial length of the specimen. This is not true for engineering strain.
Tensile Test SpecimensDuring a tension test, it is desirable to apply forces to the specimen large enough to break it. Hence, some test engineers spend their careers breaking things for a living!
In order to collect useful data in a tension test the grip region of the test specimen must have a large enough area to transmit the forces without significant deformation or slipping. Consequently, most specimens have a reduced gauge length and enlarged grip regions.
While most material properties are supposed to be specimen geometry and grip independent, there are some weak dependencies. Thus, the American Society for Testing Materials (ASTM) has specified standard specimen geometries.
ASTM has also prescribed test methods so that data reported for design purposes is obtained in a standardized way. The specimen geometry is usually reported as part of the test results.More info on the ASTM may be found at: www.astm.org
Example of a tensile test specimen
Returning to our discussion of the properties, the data we will record is the load elongation curve. Since many materials are rate sensitive, the rate of elongation is controlled during the tensile test by moving one of the grips at a fixed displacement rate relative to the other. Usual testing rates correspond to engineering strain rates of about where the represents differentiation with respect to time. For example, if the specimen had one inch gauge length, the displacement of the machine is 10-3 inches per sec. and the load is recorded on a strip chart traveling at constant speed, say 1/10 inch per second, then it is
A1-4
Gauge Length
Grip Area

clear that the 10-3s-1 strain rate will produce 10-3 inch displacement in 1/10 inch of chart or
1% strain in one inch of chart. Chart length and strain are then parametric variables, both dependent on time. This is the simplest way of measuring the load-elongation curve and is the most common. However, the elongation determined in this way also included the elongation of the grips, the ends of specimen, the load measuring transducer (load cell) and the deflection of all the test frame. Typically, at the yield strength of a steel, the other elongation outside the gauge length is about 5 times larger than the elongation inside the gauge length.
Consequently, we cannot measure the elastic modulus from the slope of the load vs. elongation curve determined in this way. To circumvent this problem and make direct measurements, an extensometer is installed on the specimen that measures displacement within the gauge length. This transducer is designed to produce a linear voltage output with respect to displacement. Since the initial gauge length is fixed, the output is then proportional to the engineering strain. If the load signal (voltage which is proportional to the applied force) and the extensometer signals are plotted using an X-Y plotter, the initial slope is then the elastic modulus.
For stability, the load must increase all the time. The tensile deformation is unstable and strain is no longer uniform when the load reaches a maximum. Deformation stability is achieved when the specimen hardens during deformation. The result is uniform elongation. If the hardening rate is too low, a runaway situation called necking develops. To avoid neck formation, the hardening rate must be faster than the decrease in cross sectional area
.
Now if the volume remains constant or ,The strain can be written in terms of the change in area as
.Substituting, we obtain the requirement for stability
.
When , then and the sample is unstable. This can be shown as follows. By definition
or .
Differentiate this equation to obtain
.
When the load is maximum, and
or .
This is the critical value for the work hardening rate. As a result the specimen may neck down and begin local deformation. This occurs at the peak load. To determine the true stress strain behavior beyond the peak load requires knowledge of the non-uniform
A1-5

geometry of the neck in both the calculation of strain and the stress distribution. In certain materials, the true stress at fracture can be several times the engineering stress.
Most data you will be exposed to are engineering stress and strain unless otherwise specified. If there is a yield point, namely, a sharp transition between elastic and plastic deformation, yield stress is defined as the stress at the yield point. If there is a yield drop, the maximum stress is the upper yield point and the minimum stress is the lower yield point. If the curve is smooth, yield stress is defined at a specific amount of plastic strain. Usually 0.2% permanent strain is used to define the yield stress. Then the yield stress is so identified as S. The proportional limit is the stress where the flow curve first deviates from linearity. This is intrinsically difficult to measure because it is related to the sensitivity of your instruments. Try to estimate the proportional limit when you analyze your data. The ultimate tensile strength is the largest engineering stress achieved during the test to failure.
The elongation to failure is the permanent engineering strain at fracture determined at zero load. It does not include elastic strain but does include both the uniform strain and the localized, necking, strain. The elongation to failure is usually stated as percent strain over a given gauge length. The reduction in area is also a measure of ductility. The true strain at fracture is determined by measuring the areas of the fractured specimen at the fracture site. Recall using the constant volume approximation that
.
The area under the engineering stress-strain curve is a measure of the energy needed to fracture the specimen. It has units of energy per unit volume of the gauge length and it is sometimes referred to as a measure of a material's "toughness." However, the term fracture toughness more commonly refers to the energy required to propagate a crack per unit area increase of crack size.
Advanced Test Applications
The Instron you will be using today can apply a load…either tensile or compressive…in one axis.
In industry, test engineers might want to apply multiple loads across a variety of axes in order to determine ultimate performance of a product or device.
One example of this is the structural tests that were performed on the Chandra Space Telescope’s optical metering bench. The Chandra Telescope is one of NASA’s Great Observatories and it’s optical metering bench was designed, fabricated, and tested by the Eastman Kodak Company in Rochester, NY.
In order to perform a structural test a special 3-story test frame was constructed in which
A1-6

dozens of actuators were mounted. The actuators were attached to the Chandra optical bench and various loads were applied that simulated conditions that the structure might experience during it’s launch into orbit. In function these actuators are similar to the Instron’s in that they apply a controlled load in a specific direction.
For more information: http://chandra.harvard.edu/
This 26 ft-long by 100in. diameter optical bench was designed and built by Kodak for NASA's Chandra X-ray observatory. Weighing 675 lbs., the honeycomb structure is the largest composite metering device ever built for use in space.
A1-7

Apparatus:
In this experiment we will use an Instron machine designed to do tensile tests of specimens. The machine has a 5000 lb. capacity. It consists of a large heavy duty test frame with a fixed beam at the top, a moving beam (referred to as the crosshead) and a gearbox and very large motor located in its base. The specimen is mounted between two grips, one attached to the fixed top beam and the other attached to the moving crosshead. The fixed beam at the top contains a load cell (which works on the principle of strain gauges). It measures the applied force on the tensile specimen. The movement of the crosshead relative to the fixed beam generates the strain within the specimen and
consequently the corresponding load. The gearbox below selects high and low speed ranges for movement of the crosshead.
A1-8
Specimen Grips
Fixed Beam
Start / Stopand
Speed control
Console
Load Cell bridge gain
Load Cell Shunt Circuit
Calibration
Speed Selector
Up / Down / Stop
Buttons
Figures 2 & 3: Control Consoles for Instron Tensile Tester
crosshead
Load Cell Bridge control
andChart Recorder
Console
Figures 1 Instron Tensile Tester

Next to the test frame is the associated electronics consoles. They contain the main start/stop controls for testing and the adjustments for the sensitivity of the strain gauge load cell (a strain gauge bridge) as well as a chart recorder to read the output of the load cell bridge. The electronics consoles also contains the gear speed selection box for the gearbox (allows us to select the various strain rates) and the main on/off switches for the instrument, one to turn the instrument on directly and the other to turn the amplifier for the gearbox motor on/off (called the Amplidyne switch).
In order to enhance the accuracy of our measurements of Young's Modulus we will add an extensometer directly to the sample to measure the actual elongation between two given points on the sample to record the load vs. elongation curve for the elastic region of the sample only.
Finally, a data acquisition system utilizing a PC, a National Instruments data acquisition card, and LabVIEW software will be provided to collect data directly from the extensometer and load cell. Data will be gathered from this system and post processed with a spread sheet program such as Excel.
A1-9
Figure 4: Instron Tensile Tester virtual Instrument.

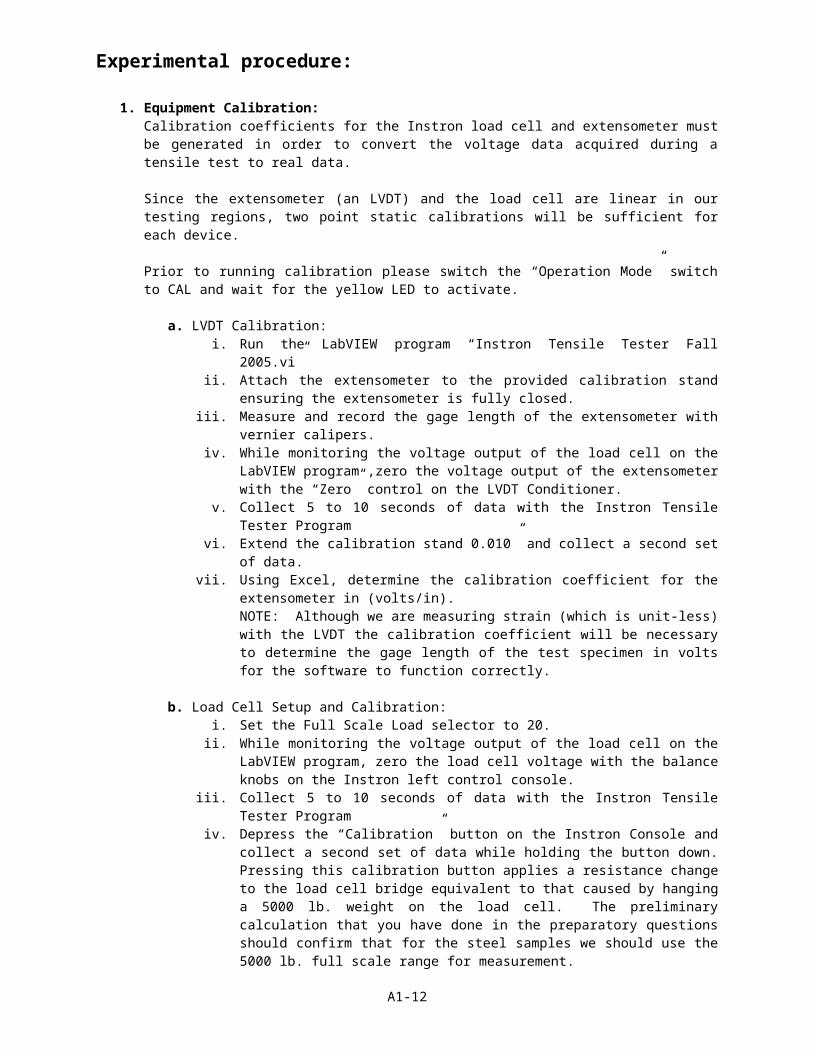
Experimental procedure:
1. Equipment Calibration:Calibration coefficients for the Instron load cell and extensometer must be generated in order to convert the voltage data acquired during a tensile test to real data.
Since the extensometer (an LVDT) and the load cell are linear in our testing regions, two point static calibrations will be sufficient for each device.
Prior to running calibration please switch the “Operation Mode” switch to CAL and wait for the yellow LED to activate.
a. LVDT Calibration:i. Run the LabVIEW program “Instron Tensile Tester Fall 2005.vi”ii. Attach the extensometer to the provided calibration stand ensuring the
extensometer is fully closed.iii. Measure and record the gage length of the extensometer with vernier
calipers.iv. While monitoring the voltage output of the load cell on the LabVIEW
program ,zero the voltage output of the extensometer with the “Zero” control on the LVDT Conditioner.
v. Collect 5 to 10 seconds of data with the Instron Tensile Tester Program vi. Extend the calibration stand 0.010” and collect a second set of data.vii. Using Excel, determine the calibration coefficient for the extensometer
in (volts/in). NOTE: Although we are measuring strain (which is unit-less) with the LVDT the calibration coefficient will be necessary to determine the gage length of the test specimen in volts for the software to function correctly.
b. Load Cell Setup and Calibration:i. Set the Full Scale Load selector to 20.ii. While monitoring the voltage output of the load cell on the LabVIEW
program, zero the load cell voltage with the balance knobs on the Instron left control console.
iii. Collect 5 to 10 seconds of data with the Instron Tensile Tester Program iv. Depress the “Calibration” button on the Instron Console and collect a
second set of data while holding the button down. Pressing this calibration button applies a resistance change to the load cell bridge equivalent to that caused by hanging a 5000 lb. weight on the load cell. The preliminary calculation that you have done in the preparatory questions should confirm that for the steel samples we should use the 5000 lb. full scale range for measurement.
v. Using Excel, determine the calibration coefficient for the load cell in (lbs/volt). NOTE: For a sanity check of the load cell calibration, place a hanging weight of 30lbs on the load cell and check to see if your calibration coefficient works for the applied load.
After completing calibration please switch the “Operation Mode” switch to Test and wait for the green LED to re-activate.
2. Measure and record the diameter and lengths of all the samples.
3. Install the first specimen in the grips. Be careful to follow the recommended installation procedures as given by the instructor so that no damage occurs to you or the test equipment. Be careful to avoid placing any part of your body at a pinch point. The final coupling should be performed by trial and error by slipping the pin in
A1-10

by hand with the machine stopped. Move the crosshead up and down at a very slow speed until you can do this manually.
4. Install the calibrated extensometer on the specimen. Be sure that it is centered and straight and that it is fully closed. Rezero the extensometer with the zero control on the LVDT Conditioner. Any deviation will be an offset error that will need to be addressed when scaling your results.
Figure 5: Test Specimen in the Grips with Extensometer Attached
5. Select the appropriate crosshead speed for the material being tested by the table provided. The Instron speed scale is in cm/min, and the table gives speeds in in/min. Be sure to do the conversion before continuing!
In the material specs tab on the Instron Tensile Tester.vi, input the following:a. Crosshead Speed in (in/min)b. Gage Length (in volts)c. Strain for LVDT Release (extensometer release) (typically 2% strain is
sufficient)
6. Depress the Strain units button under the Real Time Stacked Plots of Load and Strain tab in the VI (Virtual Instrument) this will enable the conversion of voltage data from the extenosometer to strain values. The gage length must be entered correctly for this feature to work properly.
7. Input a data file name in the VI.
8. Start Saving data, and select the Load – Strain Graph to view the data acquisition
A1-11
(Note, the Load Strain Graph has auto scaling axis, the noisy looking data will transform as the test begins.)
A1-12

9. Double check the following:a. Your test specimen is properly loaded in the grips of the tensile
testerb. The lower grip pin is in placec. The correct crosshead speed is selected.d. The material specs are input into the LabVIEW VI.e. The Strain units button is depressed (in the LabVIEW VI).f. You are saving data.
10. Start the test by pressing the down button on the Instron control console.
11. Observe the specimen. Do not get too close because fracture of the specimen liberates all the stored elastic energy in the specimen. Do you see bands propagating along the steel specimen? These are Luders bands indicating the multiplication and motion of dislocations. They will not be visible unless the specimen is highly polished.
12. Be sure to record both load vs. time and load vs. strain for the initial portion of the test. Remove the extensometer when the LabVIEW VI displays the “REMOVE EXTENSOMETER” on the Load – Strain Graph and continue the test recording the load vs. time curve until fracture. Observe the neck formation. Note that it occurs right after the maximum load.
13. Do this for all of you specimens. (You will not use the extensometer on the 0.5 in diameter plastic specimen.) Use the conditions given in the chart in the appendix for each of these samples.
A1-13
Reduced area observed

Figure 6: As the specimen approaches ultimate stress the reduction in area becomes clearly visible. This is referred to as “necking.”
Discussion:Report the following data for each of the samples if it exists:
Young's modulusProportional limitUpper and lower yield stress0.2% yield strengthUltimate strength % Elongation at fracture% Reduction in area
Compare your results of Young’s modulus, yield stress, and ultimate strength with published values. Explain any discrepancies.
In your discussion please address the following
1. Determine the error that would result if you calculated Young's modulus from the load displacement curve without the extensometer clipped on the specimen. Explain the cause of this error. Consider an in-series spring representing the machine stiffness (that would also include the grips and the part of the specimen outside of the gage length). Determine and compare the values of the machine spring constant calculated from the data for each specimen. Why are these values different?
2. Plot a true-stress versus true-strain curve for the cold rolled steel specimen (Hint: use a constant volume approximation) and compare to the engineering stress versus engineering strain plot. Plot only for the region where the calculation is valuable. What is the limit of the calculation and why?
3. The stress-strain curves for plastics are very different for those of metals (e.g. aluminum and steel). Explain in terms of the differences in atomic or molecular deformation mechanisms.
4. The cold worked steel specimen does not show a yield point, the hot worked steel does. Why? After plastically deforming the sample, would either of these samples show a yield point upon reloading? Why?
A1-14

APPENDIX
Recommended chart speed, crosshead speed and full scale
Materials Color Chart speed Crosshead Speed
Full Scale
(A) 1018 cold-worked white-blue 0.5 in/min 0.02 in/min 5,000 lb(B) ASTM A-36 hot-worked blue-blue 0.5 in/min 0.05 in/min 5,000 lb(C) 2024-T351 Red 0.5 in/min 0.05 in/min 5,000 lb(D) Nylon-101 Blue 1.0 in/min 0.2 in/min 5,000 lb(E) Polyethylene-Hi-density Green 0.5 in/min 1.0 in/min 2,000 lb(F) PVC Gray 0.5 in/min 0.1 in/min 2,000 lb
Caution:Changing the chart speed requires replacement of gears. The chart motor has considerable inertia and requires several seconds to stop. Do not touch the gears while they are moving.
A1-15

EXPERIMENT A1 MECHANICAL TESTING
PRELIMINARY QUESTIONS
Group number (names):_____________________________ Date:______________
1. What are potential safety concerns for this experiment?
2. How does a1030 steel differ from a1040 steel? Be specific. Address what the numbers mean as well as how the properties differ.
3. How does a cold-worked steel differ from a hot-worked steel? Be specific.
4. For a 1020 steel sample with a length of 2.25" and a diameter of .235" calculate the maximum load you would expect to have to apply to fracture the sample. Based on this value, what load cell range would you choose and why? Also, estimate the maximum elongation a 2 inch sample would experience before plastic deformation (estimate this value assuming yield occurs at 0.2% strain). Based on this value, what crosshead rate would you choose for your experiment and why? At this crosshead rate, how long would you predict it would take to fracture the specimen?
5. Assume that the load cell being used is set to a 2000 lb. full scale and has an accuracy of 2% full scale.
(a) What will be the accuracy in reading a 1000 lb. load (in terms of a % of the actual load)?
A1-16

(b) What will be the accuracy in reading a 200 lb. load (in terms of a % of the actual load)?
6. Why do we put an extensometer on the sample rather than just use the extension of the frame of the Instron? Is use of the extensometer important in measuring the elastic modulus? Is the use of an extensometer valuable for measuring the ultimate strength?
7. Consider the Instron machine (with stiffness km ) and the sample (with stiffness ks ) as springs in series with total stiffness kt. What is the relationship between these three stiffnesses? During the test, you must keep track of the scales on each of your charts and label them appropriately. If your computer gives a plot of force versus crosshead position and another plot gives the force versus sample elongation from the extensometer clipped on the specimen, what stiffness would be given by the slopes of each of these plots?
A1-17