external authentication with windows 2008 server with ... 2008 rras... · external authentication...
TRANSCRIPT

External Authentication with Windows 2008 Server with Routing and Remote Access Service
Authenticating Users Using SecurAccess Server by SecurEnvoy
Contact information SecurEnvoy www.securenvoy.com 0845 2600010 1210 Parkview
Arlington Business Park Theale Reading RG7 4TY
Andy Kemshall [email protected] Date 5th Jan 2010

© 2005 SecurEnvoy Ltd. All rights reserved Confidential Page 2
Windows 2008 Server with Routing and Remote Access service Integration Guide This document describes how to integrate a Windows 2008 Server with Routing and remote Access Service both directly or via Microsoft’s Network Policy server with SecurEnvoy two-factor Authentication solution called ‘SecurAccess’.
Microsoft Windows 2008 Routing and Remote Access provides - Secure Remote Access to the internal corporate network.
SecurAccess provides two-factor, strong authentication for remote Access solutions (such as Microsoft), without the complication of deploying hardware tokens or smartcards. Two-Factor authentication is provided by the use of (your PIN and your Phone to receive the one time passcode) SecurAccess is designed as an easy to deploy and use technology. It integrates directly into Microsoft’s Active Directory and negates the need for additional User Security databases. SecurAccess consists of two core elements: a Radius Server and Authentication server. The Authentication server is directly integrated with LDAP or Active Directory in real time. SecurEnvoy Security Server can be configured in such a way that it can use the existing Microsoft password. Utilising the Windows password as the PIN, allows the User to enter their UserID, Windows password and One Time Passcode received upon their mobile phone. This authentication request is passed via the Radius protocol to the SecurEnvoy Radius server where it carries out a Two-Factor authentication. It provides a seemless login into the Windows Server environment by entering three pieces of information. SecurEnvoy utilises a web GUI for configuration, whereas the Microsoft Windows Server environment uses a GUI application. All notes within this integration guide refer to this type of approach. The equipment used for the integration process is listed below: Microsoft Server Any Windows 2008 or 2008R2 server. In this integration guide all tests were completed with Microsoft Windows 2008 server with service pack 1 Microsoft Client In this integration guide all tests were completed with Microsoft Vista SecurEnvoy Windows 2008 server IIS installed with SSL certificate (SSL Cert only required for secure remote administration) Active Directory installed or connection to Active Directory via LDAP protocol. Any version of SecurEnvoy SecurAccess This guide was tested using SecurAccess version 5.3.500

© 2005 SecurEnvoy Ltd. All rights reserved Confidential Page 3
Index
1.0 Pre Requisites ........................................................................................................ 3 1.1 Configuration of RRAS without NPS installed ............................................................. 4 1.2 Configuration of RRAS with NPS installed .................................................................. 5 1.1 Configuration of Dialup Client .................................................................................. 8 2.0 Configuration of SecurEnvoy .................................................................................... 9 3.0 Test Logon ........................................................................................................... 10
1.0 Pre Requisites
It is assumed that you already have a working RRAS connection via IPSec or SSTP with password only authentication. Windows 2008 has its own radius server called Network Policy Server (NPS). If this is installed then you have no option than to authenticate via NPS, see section 1.2. To check if NPS is installed start the server manager and select Roles and check the status of “Network Policy Server” under Role Services
Note Network Access Protection (NAP) is not supported PPTP Should not be used as it has known security vulnerabilities

© 2005 SecurEnvoy Ltd. All rights reserved Confidential Page 4
1.1 Configuration of RRAS without NPS installed
1. Start the Server Manager and expand “Network Policy and Access Services” and select “Routing and Remote Access”, right mouse click and select “Properties” 2. Select the “Security” tab and select “Radius” for Authentication provider and select configure. 3. Populate with Radius information, note that timeout should be at least 10 seconds 4. Press the button “Authentication Methods” and unselect all authentication methods and select only “Unencrypted password (PAP) and press OK
5. Press apply and OK 6. Select “Routing and Remote Access”, right mouse click and select “All Tasks”, “Restart” to restart the Routing and Remote Access Service 7. Skip section 1.2 as no NPS server is installed
Note Both IPSec and SSTP create an encrypted tunnel before passing PAP information. Warning messages only apply to PPTP which shouldn’t be used as it has known security vulnerabilities

© 2005 SecurEnvoy Ltd. All rights reserved Confidential Page 5
1.2 Configuration of RRAS with NPS installed 1. Start the Server Manager and expand “Network Policy and Access Services”, “NPS”, “Policies” then select “Connection Request Policies” 2. Disable any policies related to RRAS such as “Use Windows authentication for all users” 3. Create a new policy with the right hand Actions “New” and it “SecurEnvoy Two Factor Authentication” 4. Change type of network access server to “Remote Access Server(VPN-Dial up) and press Next.
5. Add a new condition “Day and Time Restrictions” and select “Permitted” to allow any time of connection and press OK and Next

© 2005 SecurEnvoy Ltd. All rights reserved Confidential Page 6
6. Select “Forward requests to the following remote RADIUS server group for authentication” and press “New” then name the group “SecurEnvoy Servers” and press “Add” 7. Enter the name or IP address of the SecurEnvoy server, select the “Authentication/Accounting” Tab and enter a shared secret password (remember this as it is required in section 2.0)
8. Select the “Load Balancing” tab and change the number of seconds without responce before request is considered dropped to 10 and Apply changes and press OK, OK and Next 9. No changes are required to this section, press Next and Finish. 10. Select “Connection Request Policies”

© 2005 SecurEnvoy Ltd. All rights reserved Confidential Page 7
11. Disable any policies related to RRAS 12. Create a new policy with the right hand Actions “New” and call it “SecurEnvoy Network Policy” 13. Change type of network access server to “Remote Access Server(VPN-Dial up) and press Next. 14. Add a new condition “Day and Time Restrictions” and select “Permitted” to allow any time of connection and press OK and Next. 15. No changes are required to “Specify Access Permission”, press Next 16. Unselect all authentication methods and select ONLY “Unencrypted authentication (PAP, SPAP)
17. Press Next and answer “No” to the warning message
18. No changes are required to “Configure Constraints”, press Next 19. No changes are required to “Configure Settings”, press Next and Finish 20. Select “Routing and Remote Access”, right mouse click and select “Properties” 21. Select the “Security” tab and press the button “Authentication Methods” and unselect all authentication methods and select only “Unencrypted password (PAP) and press OK
Note Both IPSec and SSTP create an encrypted tunnel before passing PAP information. This warning only applied PPTP which shouldn’t be used as it has known security vulnerabilities
© 2005 SecurEnvoy Ltd. All rights reserved Confidential Page 8
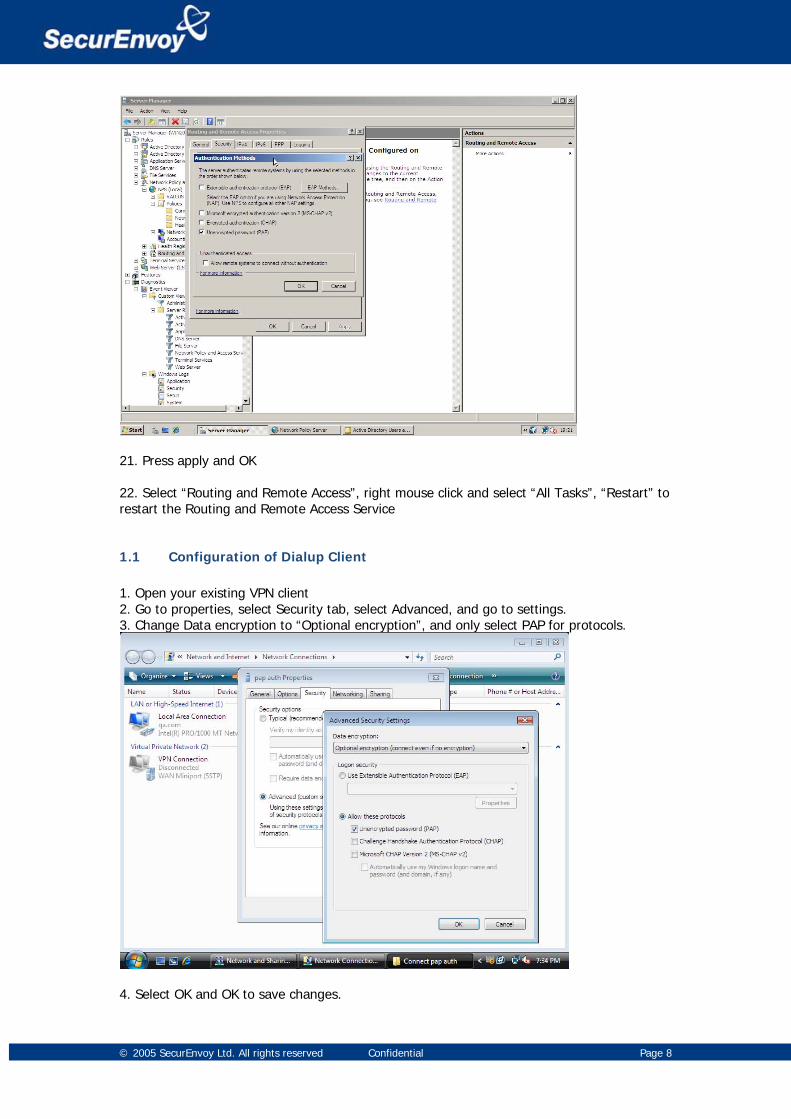
21. Press apply and OK 22. Select “Routing and Remote Access”, right mouse click and select “All Tasks”, “Restart” to restart the Routing and Remote Access Service
1.1 Configuration of Dialup Client 1. Open your existing VPN client 2. Go to properties, select Security tab, select Advanced, and go to settings. 3. Change Data encryption to “Optional encryption”, and only select PAP for protocols.
4. Select OK and OK to save changes.

© 2005 SecurEnvoy Ltd. All rights reserved Confidential Page 9
2.0 Configuration of SecurEnvoy
To help facilitate an easy to use environment, SecurEnvoy can utilise the existing Microsoft password as the PIN. This allows the users to only remember their Domain password. SecurEnvoy supplies the second factor of authentication, which is the dynamic one time passcode (OTP) which is sent to the user’s mobile phone. Launch the “SecurEnvoy admin interface” under “Run – “All Programs” – “SecurEnvoy” Click “Config” Select “External LDAP” LDAP Password is the pin under PIN Management (this is the default) This will now use the users existing Windows password as the PIN. Click “Update” to confirm the changes
Click the “Radius” Button

© 2005 SecurEnvoy Ltd. All rights reserved Confidential Page 10
Enter IP address and Shared secret for each Server that has Routing and Remote Access installed and wishes to use SecurEnvoy Two-Factor authentication. Click “Update” to confirm settings. Click “Logout” when finished. This will log out of the Administrative session.
3.0 Test Logon Enter the UserID in the Username field Enter password and passcode in the password field. E.g. P4ssw0rd678123