ezwrite 4.0 user manual -...
TRANSCRIPT
EZWrite 4.0User Manual

DisclaimerBenQ Corporation makes no representations or warranties, either expressed or implied, with respect to the contents of this document. BenQ Corporation reserves the right to revise this publication and to make changes from time to time in the contents thereof without obligation to notify any person of such revision or changes.
CopyrightCopyright 2017 BenQ Corporation. All rights reserved. No part of this publication may be reproduced, transmitted, transcribed, stored in a retrieval system or translated into any language or computer language, in any form or by any means, electronic, mechanical, magnetic, optical, chemical, manual or otherwise, without the prior written permission of BenQ Corporation.
Table of Contents i
Table of Contents
Introduction .......................................................................... 1NFC function ........................................................................ 3Annotation ............................................................................ 4
Palm eraser ....................................................................................... 4Handwriting recognition .................................................... 5Selecting and modifying texts............................................ 7Tool box................................................................................. 8
Stopwatch....................................................................................... 10Timer............................................................................................... 11Scoreboard..................................................................................... 12Draw................................................................................................ 13Team Post ....................................................................................... 14
Importing images and Office documents...................... 17Screen recording................................................................ 20Adding pages ....................................................................... 21Saving files............................................................................ 22Wireless sharing................................................................. 23
QR code ......................................................................................... 23Email ................................................................................................ 23InstaQPrint..................................................................................... 24
Floating Annotation Toolbar ........................................... 25Comparison Table.............................................................. 26
7/31/17
Introduction1
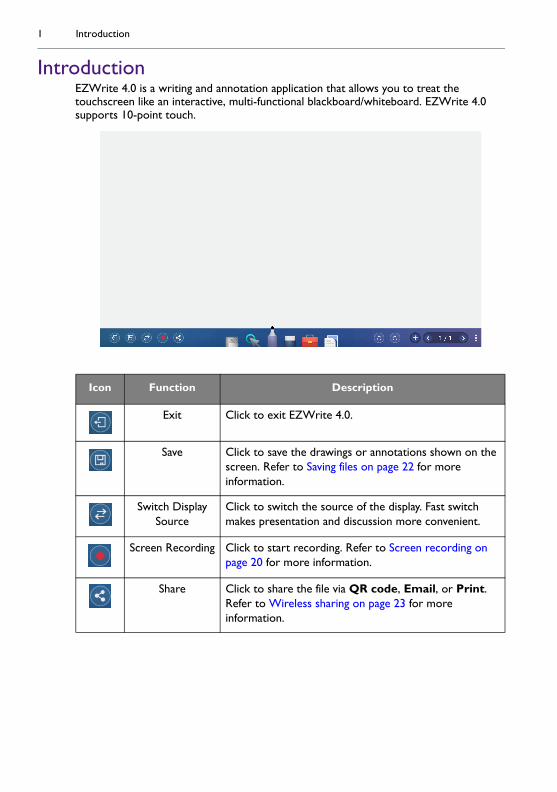
IntroductionEZWrite 4.0 is a writing and annotation application that allows you to treat the touchscreen like an interactive, multi-functional blackboard/whiteboard. EZWrite 4.0 supports 10-point touch.
Icon Function Description
Exit Click to exit EZWrite 4.0.
Save Click to save the drawings or annotations shown on the screen. Refer to Saving files on page 22 for more information.
Switch Display Source
Click to switch the source of the display. Fast switch makes presentation and discussion more convenient.
Screen Recording Click to start recording. Refer to Screen recording on page 20 for more information.
Share Click to share the file via QR code, Email, or Print. Refer to Wireless sharing on page 23 for more information.

Introduction 2
Change Background
Click to change the background for EZWrite 4.0. There are various wallpaper options including traditional colors, music, sports, and grid lines.
Select Click to select multi-objects. Refer to Selecting and modifying texts on page 7 for more information.
Pen Click to set brush type, color, and thickness. Refer to Annotation on page 4.
Eraser Click clear all to erase all drawings/annotations on the screen. Click circle erase to erase the handwriting in the circle.
Tool Box Click to choose from different tools. Refer to Tool box on page 8 for more information.
Import Files Click to import an image or text file into EZWrite 4.0. Refer to Importing images and Office documents on page 17 for more information.
Undo Click to undo the previous operation.
Redo Click to redo the cancelled operation.
Add new page Click to add a new page of writing image. Refer to Adding pages on page 21 for more information.
Page Reveals the page number of the current picture. Click to view the list of pages. Refer to Adding pages on page 21 for more information.
All functions in this manual vary by models. Details are listed on the last page.
Icon Function Description
NFC function3
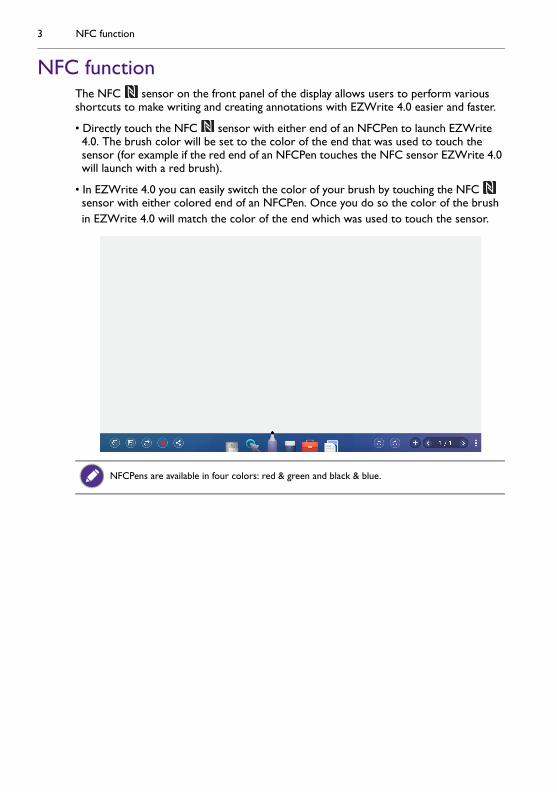
NFC functionThe NFC sensor on the front panel of the display allows users to perform various shortcuts to make writing and creating annotations with EZWrite 4.0 easier and faster.
• Directly touch the NFC sensor with either end of an NFCPen to launch EZWrite 4.0. The brush color will be set to the color of the end that was used to touch the sensor (for example if the red end of an NFCPen touches the NFC sensor EZWrite 4.0 will launch with a red brush).
• In EZWrite 4.0 you can easily switch the color of your brush by touching the NFC sensor with either colored end of an NFCPen. Once you do so the color of the brush in EZWrite 4.0 will match the color of the end which was used to touch the sensor.
NFCPens are available in four colors: red & green and black & blue.
Annotation 4
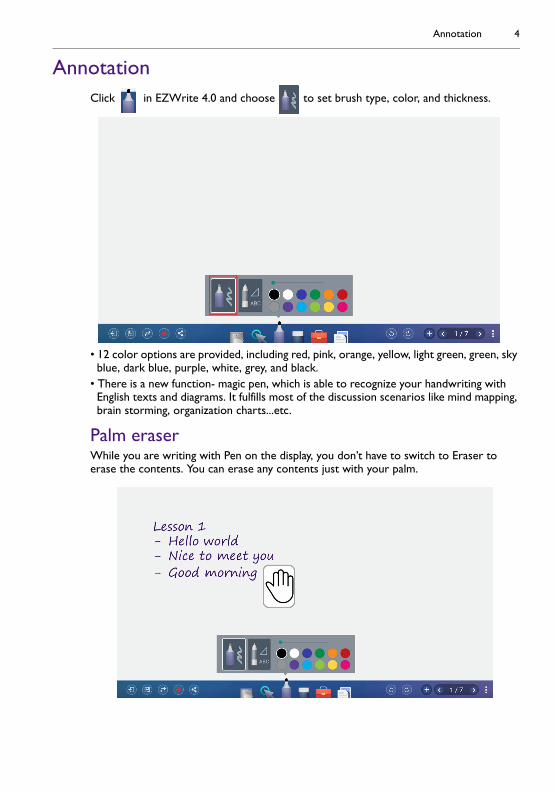
AnnotationClick in EZWrite 4.0 and choose to set brush type, color, and thickness.
• 12 color options are provided, including red, pink, orange, yellow, light green, green, sky blue, dark blue, purple, white, grey, and black.
• There is a new function- magic pen, which is able to recognize your handwriting with English texts and diagrams. It fulfills most of the discussion scenarios like mind mapping, brain storming, organization charts...etc.
Palm eraserWhile you are writing with Pen on the display, you don’t have to switch to Eraser to erase the contents. You can erase any contents just with your palm.
Handwriting recognition5
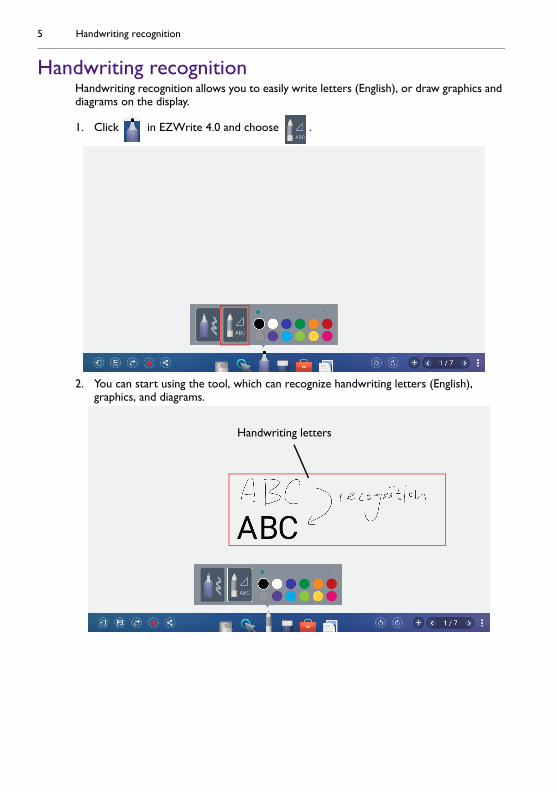
Handwriting recognitionHandwriting recognition allows you to easily write letters (English), or draw graphics and diagrams on the display.
1. Click in EZWrite 4.0 and choose .
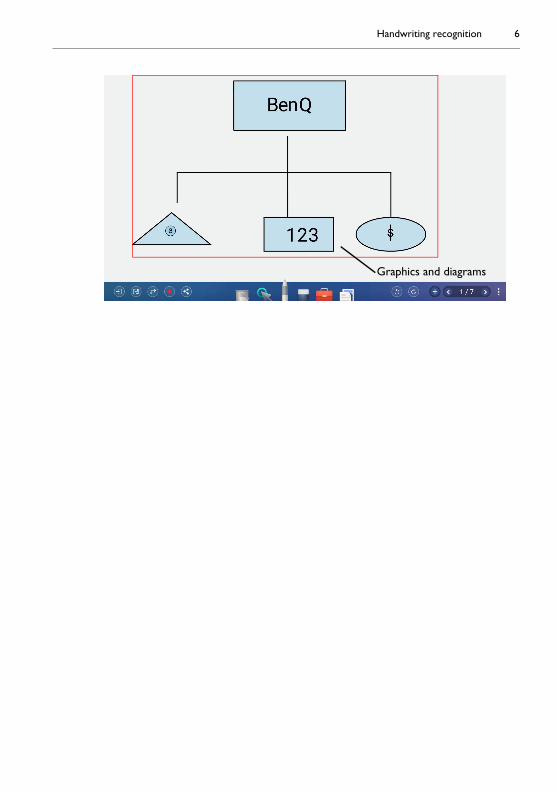
2. You can start using the tool, which can recognize handwriting letters (English), graphics, and diagrams.
Handwriting letters
Handwriting recognition 6
Graphics and diagrams
Selecting and modifying texts7
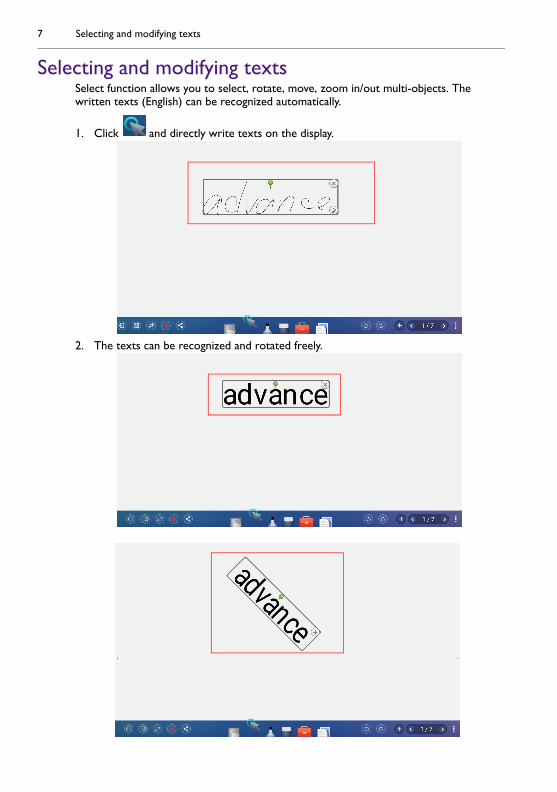
Selecting and modifying textsSelect function allows you to select, rotate, move, zoom in/out multi-objects. The written texts (English) can be recognized automatically.
1. Click and directly write texts on the display.
2. The texts can be recognized and rotated freely.
Tool box 8
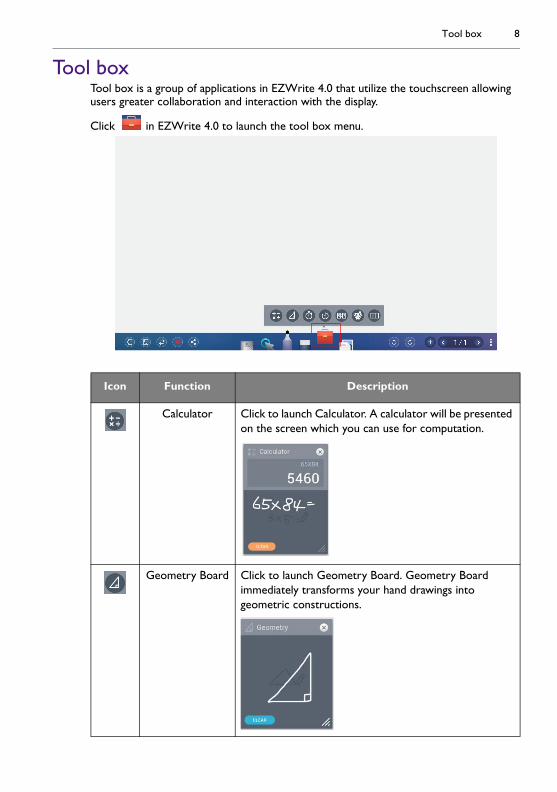
Tool boxTool box is a group of applications in EZWrite 4.0 that utilize the touchscreen allowing users greater collaboration and interaction with the display.
Click in EZWrite 4.0 to launch the tool box menu.
Icon Function Description
Calculator Click to launch Calculator. A calculator will be presented on the screen which you can use for computation.
Geometry Board Click to launch Geometry Board. Geometry Board immediately transforms your hand drawings into geometric constructions.
Tool box9
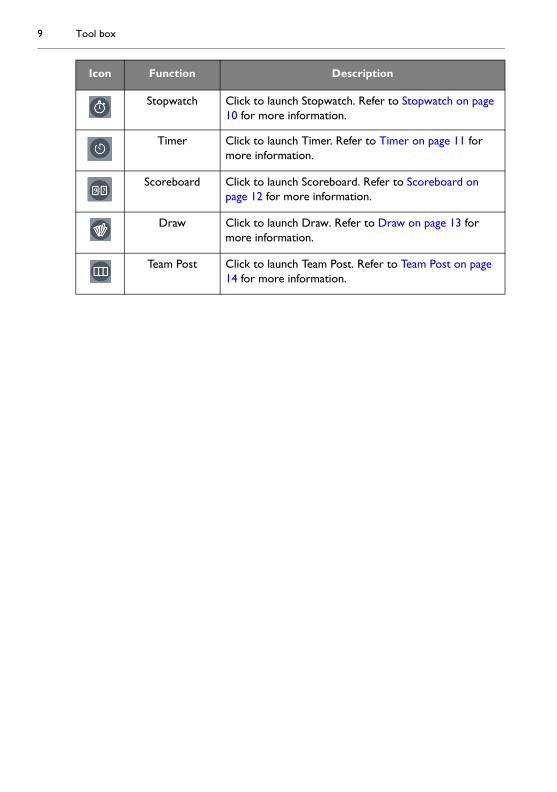
Stopwatch Click to launch Stopwatch. Refer to Stopwatch on page 10 for more information.
Timer Click to launch Timer. Refer to Timer on page 11 for more information.
Scoreboard Click to launch Scoreboard. Refer to Scoreboard on page 12 for more information.
Draw Click to launch Draw. Refer to Draw on page 13 for more information.
Team Post Click to launch Team Post. Refer to Team Post on page 14 for more information.
Icon Function Description
Tool box 10
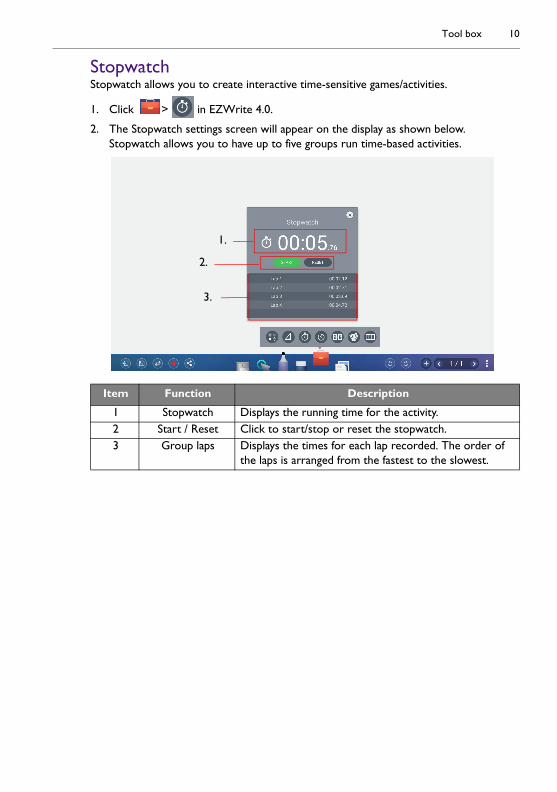
StopwatchStopwatch allows you to create interactive time-sensitive games/activities.
1. Click > in EZWrite 4.0.
2. The Stopwatch settings screen will appear on the display as shown below. Stopwatch allows you to have up to five groups run time-based activities.
Item Function Description
1 Stopwatch Displays the running time for the activity.2 Start / Reset Click to start/stop or reset the stopwatch.3 Group laps Displays the times for each lap recorded. The order of
the laps is arranged from the fastest to the slowest.
1.
2.
3.
Tool box11
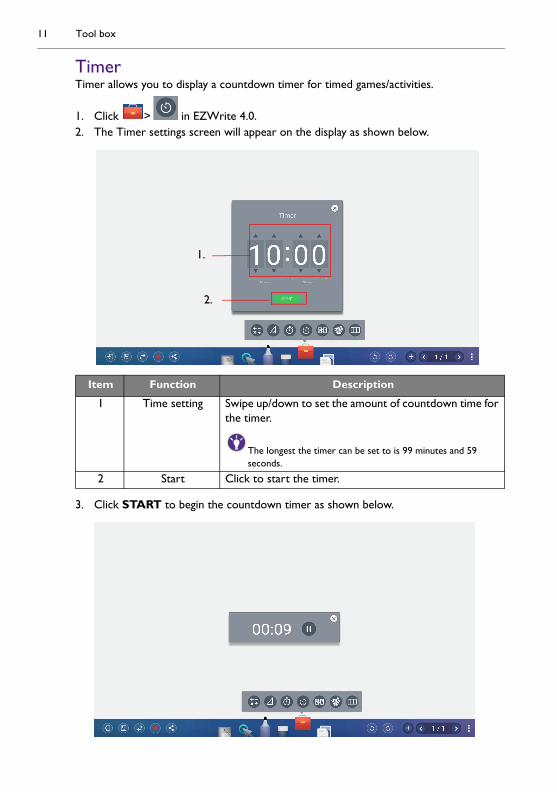
TimerTimer allows you to display a countdown timer for timed games/activities.
1. Click > in EZWrite 4.0.2. The Timer settings screen will appear on the display as shown below.
3. Click START to begin the countdown timer as shown below.
Item Function Description
1 Time setting Swipe up/down to set the amount of countdown time for the timer.
The longest the timer can be set to is 99 minutes and 59 seconds.
2 Start Click to start the timer.
1.
2.
Tool box 12
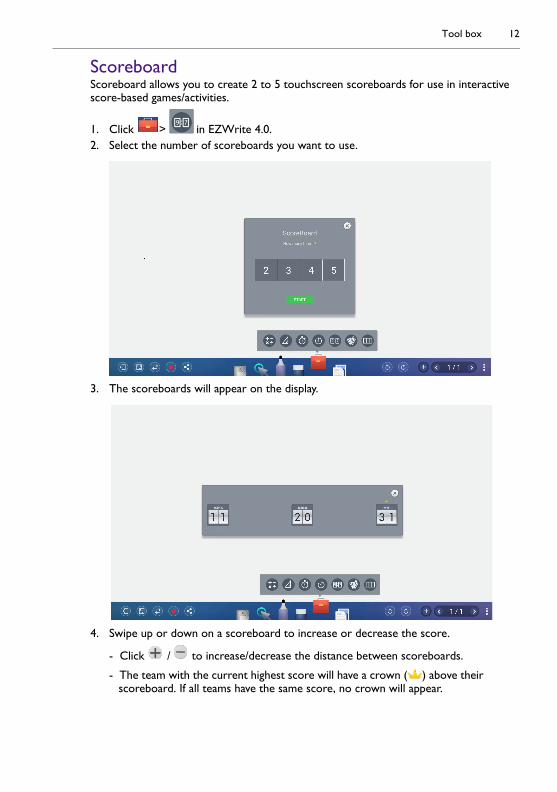
ScoreboardScoreboard allows you to create 2 to 5 touchscreen scoreboards for use in interactive score-based games/activities.
1. Click > in EZWrite 4.0.2. Select the number of scoreboards you want to use.
3. The scoreboards will appear on the display.
4. Swipe up or down on a scoreboard to increase or decrease the score.
- Click / to increase/decrease the distance between scoreboards.
- The team with the current highest score will have a crown ( ) above their scoreboard. If all teams have the same score, no crown will appear.
Tool box13
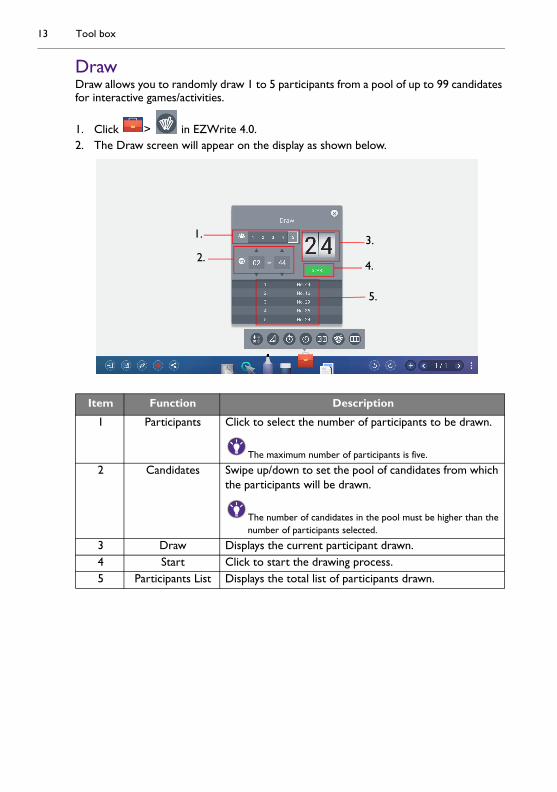
DrawDraw allows you to randomly draw 1 to 5 participants from a pool of up to 99 candidates for interactive games/activities.
1. Click > in EZWrite 4.0.2. The Draw screen will appear on the display as shown below.
Item Function Description
1 Participants Click to select the number of participants to be drawn.
The maximum number of participants is five.
2 Candidates Swipe up/down to set the pool of candidates from which the participants will be drawn.
The number of candidates in the pool must be higher than the number of participants selected.
3 Draw Displays the current participant drawn.4 Start Click to start the drawing process.5 Participants List Displays the total list of participants drawn.
1.
2.3.
4.
5.
Tool box 14
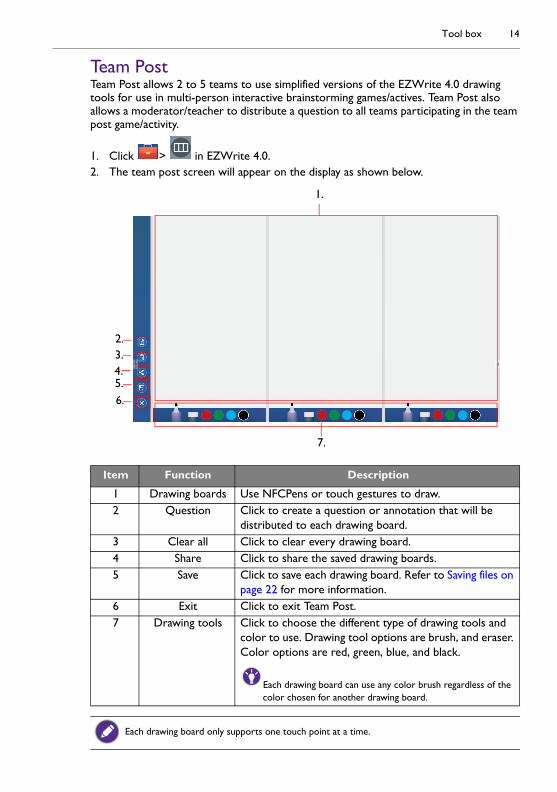
Team PostTeam Post allows 2 to 5 teams to use simplified versions of the EZWrite 4.0 drawing tools for use in multi-person interactive brainstorming games/actives. Team Post also allows a moderator/teacher to distribute a question to all teams participating in the team post game/activity.
1. Click > in EZWrite 4.0.2. The team post screen will appear on the display as shown below.
Item Function Description
1 Drawing boards Use NFCPens or touch gestures to draw.2 Question Click to create a question or annotation that will be
distributed to each drawing board.3 Clear all Click to clear every drawing board.4 Share Click to share the saved drawing boards.5 Save Click to save each drawing board. Refer to Saving files on
page 22 for more information.6 Exit Click to exit Team Post.7 Drawing tools Click to choose the different type of drawing tools and
color to use. Drawing tool options are brush, and eraser. Color options are red, green, blue, and black.
Each drawing board can use any color brush regardless of the color chosen for another drawing board.
Each drawing board only supports one touch point at a time.
1.
6.
2.3.4.5.
7.
Tool box15
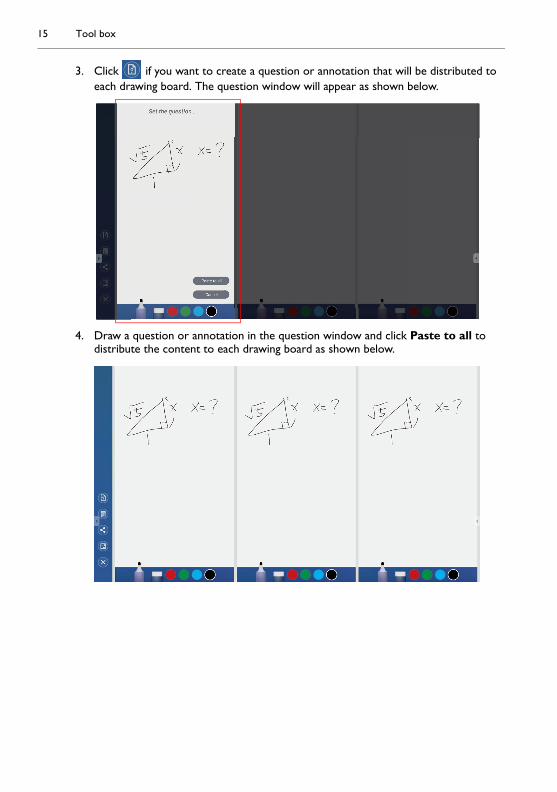
3. Click if you want to create a question or annotation that will be distributed to each drawing board. The question window will appear as shown below.
4. Draw a question or annotation in the question window and click Paste to all to distribute the content to each drawing board as shown below.
Tool box 16
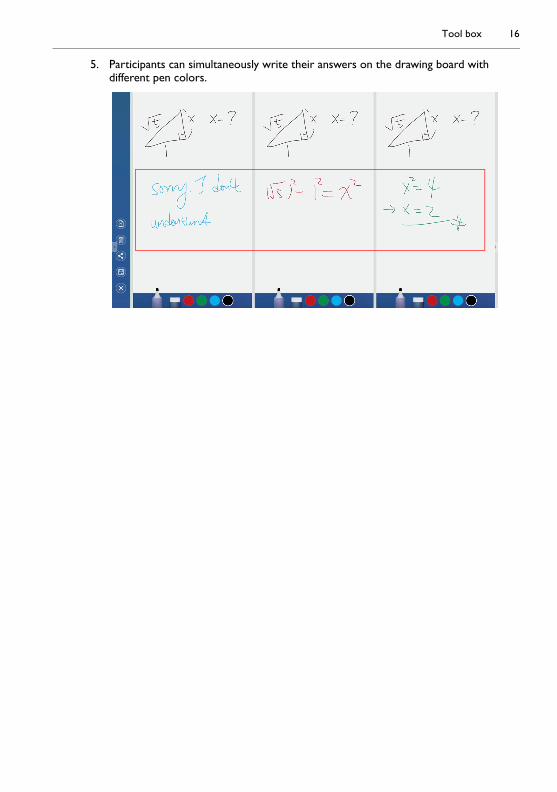
5. Participants can simultaneously write their answers on the drawing board with different pen colors.
Importing images and Office documents17
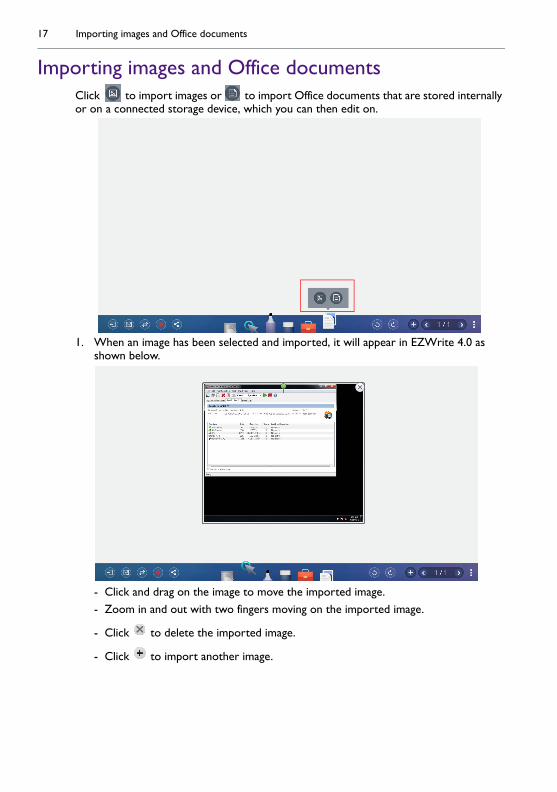
Importing images and Office documentsClick to import images or to import Office documents that are stored internally or on a connected storage device, which you can then edit on.
1. When an image has been selected and imported, it will appear in EZWrite 4.0 as shown below.
- Click and drag on the image to move the imported image.- Zoom in and out with two fingers moving on the imported image.
- Click to delete the imported image.
- Click to import another image.
Importing images and Office documents 18
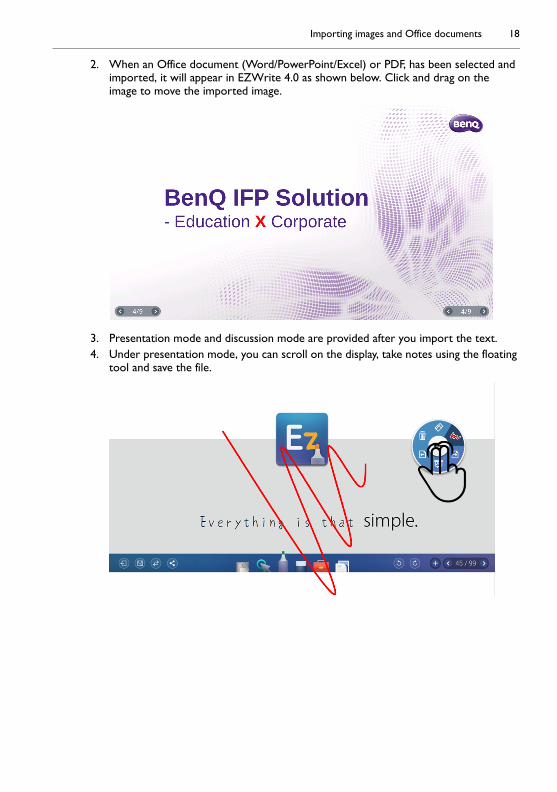
2. When an Office document (Word/PowerPoint/Excel) or PDF, has been selected and imported, it will appear in EZWrite 4.0 as shown below. Click and drag on the image to move the imported image.
3. Presentation mode and discussion mode are provided after you import the text.4. Under presentation mode, you can scroll on the display, take notes using the floating
tool and save the file.
Importing images and Office documents19
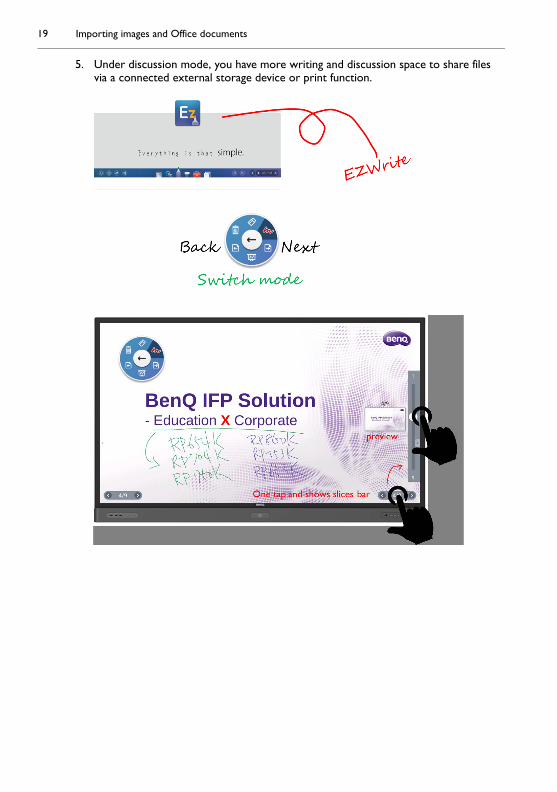
5. Under discussion mode, you have more writing and discussion space to share files via a connected external storage device or print function.
Screen recording 20
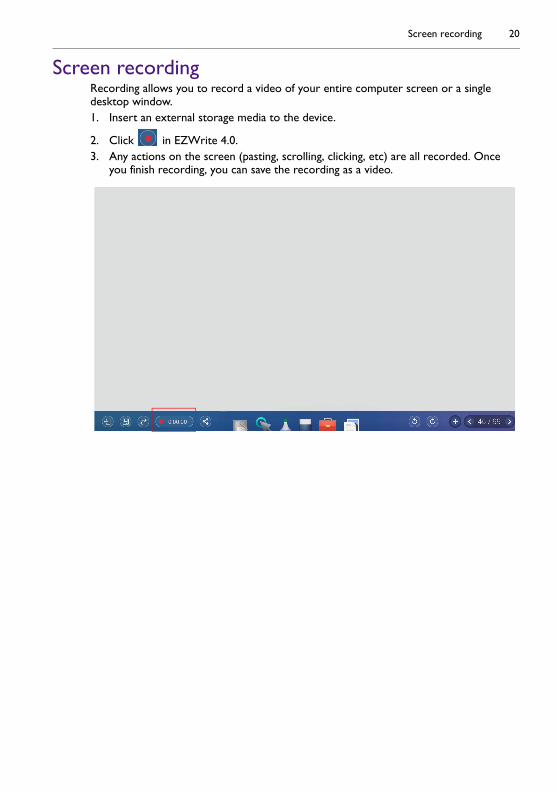
Screen recordingRecording allows you to record a video of your entire computer screen or a single desktop window.1. Insert an external storage media to the device.
2. Click in EZWrite 4.0.3. Any actions on the screen (pasting, scrolling, clicking, etc) are all recorded. Once
you finish recording, you can save the recording as a video.

Adding pages21
Adding pagesClick to view a list of pages which have been added.
- Click / to add a new page to draw or create annotations on.
- Click on a thumbnail or click / to navigate between the pages.
- Select the thumbnail of a page and click to delete the page selected.
- Click to copy the page selected.
- To save multiple pages, delete all undesired pages then click . Refer to Saving files
on page 22 for more information.
The maximum number of pages is 30.
Saving files 22
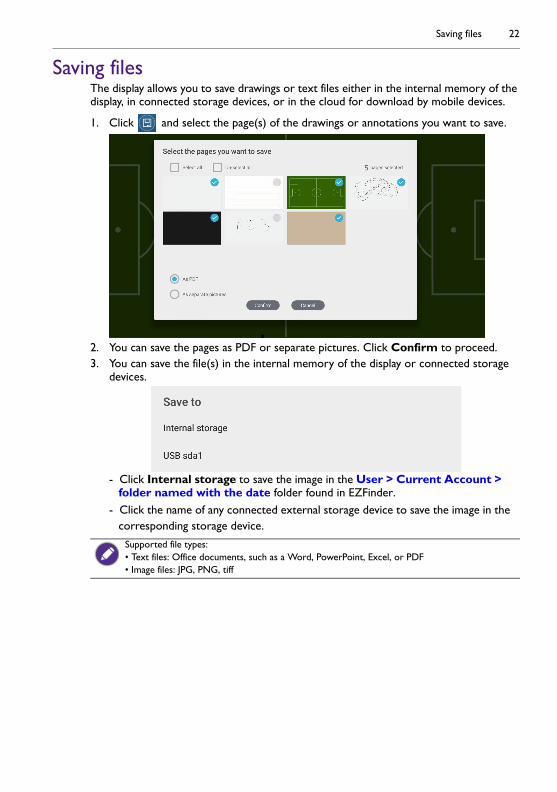
Saving filesThe display allows you to save drawings or text files either in the internal memory of the display, in connected storage devices, or in the cloud for download by mobile devices.
1. Click and select the page(s) of the drawings or annotations you want to save.
2. You can save the pages as PDF or separate pictures. Click Confirm to proceed.3. You can save the file(s) in the internal memory of the display or connected storage
devices.
- Click Internal storage to save the image in the User > Current Account > folder named with the date folder found in EZFinder.
- Click the name of any connected external storage device to save the image in the corresponding storage device.
Supported file types:• Text files: Office documents, such as a Word, PowerPoint, Excel, or PDF• Image files: JPG, PNG, tiff
Wireless sharing23
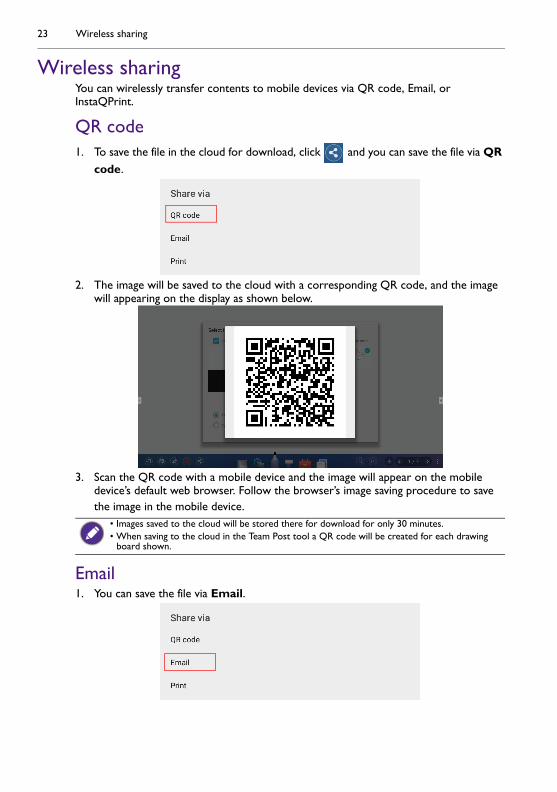
Wireless sharingYou can wirelessly transfer contents to mobile devices via QR code, Email, or InstaQPrint.
QR code1. To save the file in the cloud for download, click and you can save the file via QR
code.
2. The image will be saved to the cloud with a corresponding QR code, and the image will appearing on the display as shown below.
3. Scan the QR code with a mobile device and the image will appear on the mobile device’s default web browser. Follow the browser’s image saving procedure to save the image in the mobile device.
Email1. You can save the file via Email.
• Images saved to the cloud will be stored there for download for only 30 minutes.• When saving to the cloud in the Team Post tool a QR code will be created for each drawing
board shown.

Wireless sharing 24
2. Set up an Internet connection first. Then set up an email account and fill in the
receiver’s information. Click to send the file.
InstaQPrint1. You can save the file via Print.
2. Click Print to proceed. You can transfer files via Wifi, USB, or LAN without printer model, or brand limitation.
For the list of supported printers, see https://printhand.com/list_of_supported_printers.php.
Floating Annotation Toolbar25
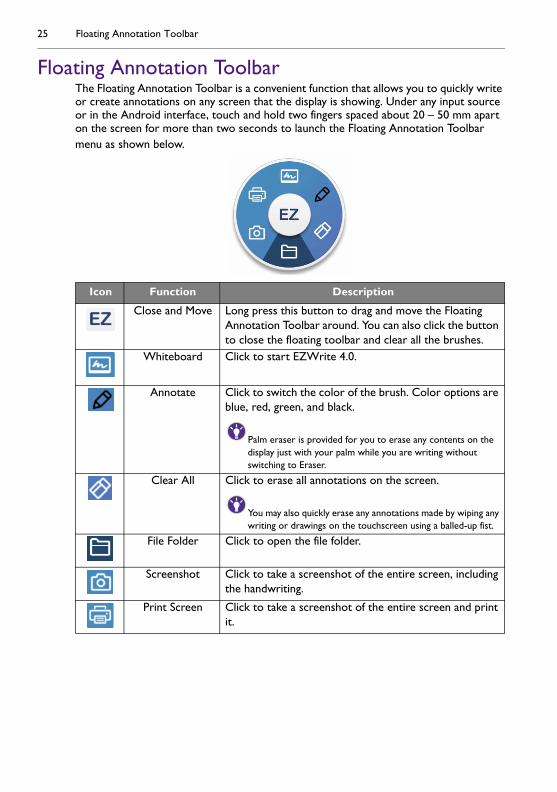
Floating Annotation ToolbarThe Floating Annotation Toolbar is a convenient function that allows you to quickly write or create annotations on any screen that the display is showing. Under any input source or in the Android interface, touch and hold two fingers spaced about 20 – 50 mm apart on the screen for more than two seconds to launch the Floating Annotation Toolbar menu as shown below.
Icon Function Description
Close and Move Long press this button to drag and move the Floating Annotation Toolbar around. You can also click the button to close the floating toolbar and clear all the brushes.
Whiteboard Click to start EZWrite 4.0.
Annotate Click to switch the color of the brush. Color options are blue, red, green, and black.
Palm eraser is provided for you to erase any contents on the display just with your palm while you are writing without switching to Eraser.
Clear All Click to erase all annotations on the screen.
You may also quickly erase any annotations made by wiping any writing or drawings on the touchscreen using a balled-up fist.
File Folder Click to open the file folder.
Screenshot Click to take a screenshot of the entire screen, including the handwriting.
Print Screen Click to take a screenshot of the entire screen and print it.
Comparison Table 26
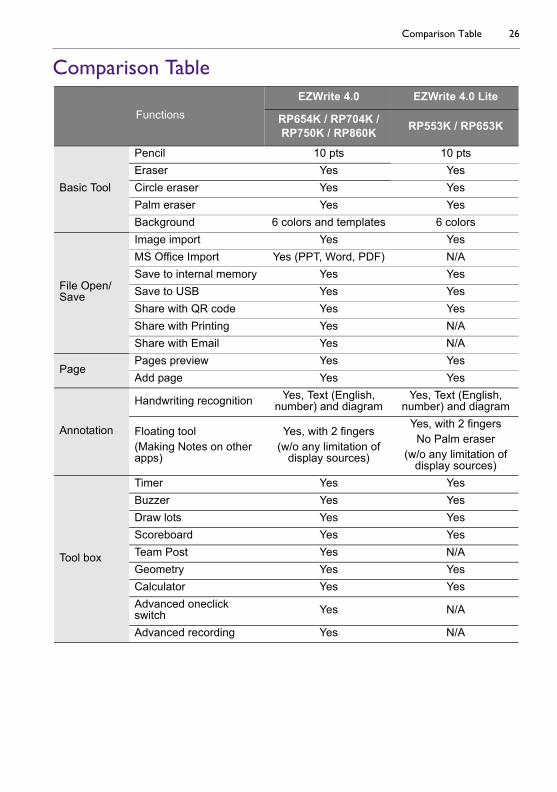
Comparison Table
Functions
EZWrite 4.0 EZWrite 4.0 Lite
RP654K / RP704K /RP750K / RP860K RP553K / RP653K
Basic Tool
Pencil 10 pts 10 pts
Eraser Yes Yes
Circle eraser Yes Yes
Palm eraser Yes Yes
Background 6 colors and templates 6 colors
File Open/Save
Image import Yes Yes
MS Office Import Yes (PPT, Word, PDF) N/A
Save to internal memory Yes Yes
Save to USB Yes Yes
Share with QR code Yes Yes
Share with Printing Yes N/A
Share with Email Yes N/A
PagePages preview Yes Yes
Add page Yes Yes
Annotation
Handwriting recognition Yes, Text (English, number) and diagram
Yes, Text (English, number) and diagram
Floating tool(Making Notes on other apps)
Yes, with 2 fingers (w/o any limitation of
display sources)
Yes, with 2 fingers No Palm eraser
(w/o any limitation of display sources)
Tool box
Timer Yes Yes
Buzzer Yes Yes
Draw lots Yes Yes
Scoreboard Yes Yes
Team Post Yes N/A
Geometry Yes Yes
Calculator Yes Yes
Advanced oneclick switch Yes N/A
Advanced recording Yes N/A