f6 4-channel dc smart charger operating instructions
TRANSCRIPT
F6 4-Channel DC Smart Charger Operating Instructions

Thank you for purchasing the HOTA series of smart
chargers. Please read this Instructions careful ly
before use so as to use the product better . Keep
this Instruct ion in a place safe for easy access.
If you want to know more about our smart chargers,
please visit our website: www.hota-exp.com
F6 4-Channel DC Smart ChargerThank you for using
Ver 1.0.5
01
01
02
03
04
07
07
08
18
20
22
Product Overview 1、Specifications
2、Introduction
3、Warnings and Safety Notes
4、Recommended Way of Connection
5、Balance port connection and Notes
6、Mutli-Function port
7、Standard battery types and task parameters
Operation and setup 1、How to confirm the Charging Current
2、Operative Skills
3、Display of the working status
4、Charger Settings
5、Charger Settings >Task Parameters
6、Charger Settings >System Parameters
7、Charger Settings > Tools
8、Task Settings 9、Task Settings and Notes
Product Qualification DeclarationTroubleshootingWarranty and ServicesSafety TipsSafety Notes
21
19
27
23
28
28
29
30
07
05
06
03
Contents

F6 4-Channel DC Smart Charger
Product Overview Multiple Outputs , High Performance
Safety Protection , make things simpleBased on advanced design of the circuit and the software algorithm , this charger assures users that no matter in charging or in discharging , troubles such as over-voltage ,over-current overheat and short circuit can be handled easily.
Support various types of batteriesBy using innovative , self-defined algorithm for charging lithium batteries , F6 charger not only charges smart batteries and other standard types of batteries , but charges them much quicker than others
InternationalizationFull support for simplified Chinese, traditional Chinese, Japanese, English, German, etc. to
ensure unobstructed use.
A 4-Channel DC charging system that can handle tasks under any circumstance.
A powerful function of combined chargingF6 can concentrate the output power of two channels on one battery, making the
combined charging power up to 500W and combined charging current up to 22A .
IPS sunlight screenHigh contrast, full color, full viewing angle, even under sunlight ,images are clearly displayed.
Abundant mainstream interfaces , meet requirements of any applicationsThe front panel is equipped with dual USB charging ports, plug and play, capable of performingany applications with ease.More to emphasize is the Type-C interface which gets excellent currentoutput capability that supports charging of laptops, tablets and other devices, making user's travel much easier.
High efficiency in heat dissipationSeemingly simple and easy-to-use intelligence that hides powerful technology
Four channel outputs, 250W 15A eachHighly optimized algorithm for management of charging, up to 94% operating efficiency ,
four channel high-power output , a temperament of supremacy that makes others envy.

Product Overview
Specifications
Net weight
Input Voltage
Charge Power
Discharge Power
475g
USB output 5V / 2.1A
Type-C Output Max. 45W
Regenerative Discharge current 0.1~15A x 4
DC 10.5~30V
250W x 4 @ Input Voltage > 23V
Protection Function
Temperature protection, Time Protection, Capacity protection, Input reverse protection,Output reverse protection, Short circuit protection, Output overcurrent protection, Output overvoltage protection, overcharge protection,over discharge protection .
Internal Discharge: 12W x 4
(balance port6Wx4)
Regenerative Discharge: 250W x 4 (1000W)
Balance Current
Screen Size
Charge Current Discharge Current 0.1~3A x 4
Combined charge power
500W x 2 @Input voltage>>23V
1000mA x 4
2.8“ IPS 320x240,260,000 colors
Dimensions 115mm×121mmx46mm
Storage Temperature -20~60°C
Operating Temperature 0~40°C
Battery Type
LiHV/LiPo/LiFe/Lilon/Lixx : 1~6S
NiZn/NiCd/NiMH : 1~14S
Smart Battery : 1~6S
Lead Acid(Pb) : 1~12S(2~24V)
Eneloop : 1~14S
0.1~15A x 4
F6 4-Channel DC Smart Charger 01

Product Overview
An introduction
1.Speed shuttle key
2. Screen
3. Channel switch key
4. Balance port
5. Battery port
6. Ventilation air out
7. Support
8. DC Input port
9. Balance port
10. Battery port
11. Type-C output
12. USB-A Output
13. Update port for 1 and 2 channels14. Multi-function port
15. Update port for 3 and 4 channels
02F6 4-Channel DC Smart Charger
1 2 3
64 45 5

Recommended way of connection
Product Overview
Warnings and Safety Notes
LiPo 6S
03F6 4-Channel DC Smart Charger
LiPo 6S
1. Do not use the charger in an unattended manner, in case of any functional abnormality,please stop using it and refer to the manual.2. Keep the charger away from dust, humidity, rain and high temperature, as well as direct expo sure to sunlight and intense vibration.3. Input voltage of the charger is 10.5-30V DC. When connecting to the power supply, make sure that the input voltage match the operating voltage range of the charger.4. Please place the charger on a heat-resisting, non-flammable and insulating surface. Do not use it by placing it on the car's seat, carpet or other similar place. Keep inflammable and explosive objects away from operation areas of the charger.5. Make sure the heat dissipation hole at the bottom of the charger is not covered while in use, and ensure the cooling fan smoothly extracts heat.6. Please fully understand the charging and discharge characteristics as well as the battery‘s specifications. Additionally, set up proper charging parameters in the charger. Incorrect setting of parameters can cause damage to the charger and battery ,even give rise to disastrous consequences such as fire and explosion.7. When charging or discharging is completed, please first press the speed shuttle key to terminate the current task, then remove the battery when the charger shows the standby screen.
1、Connect power supply to the charger, wait for the system to complete its self-checking ;2、Choose the channel that is linked with the battery ;3、Through scrolling the Speed Shuttle key and the screen to set the task parameters suitable for the battery ;4、Enjoy。

Balance Port Connection and Notes
Product OverviewLiPo 6S
LiPo 6S
1S2S
3S4S
5S6S
04F6 4-Channel DC Smart Charger
1. The detection balance port of this product is suitable for lithium battery packs;2. When the battery is connected, it is aligned with the " - " sign . The diagram above shows the alignment of the balance plug;

Multi-Function Port
Product Overview
05F6 4-Channel DC Smart Charger
RC airplane control servo connects to the Multi-function port
RC airplane receiver or RF transmitterconnects to the Multi-function port
Multi-Function Port
1. Connect to the RC airplane control servo2. Connect to the RC airplane receiver or RF transmitter
Product Overview
06F6 4-Channel DC Smart Charger
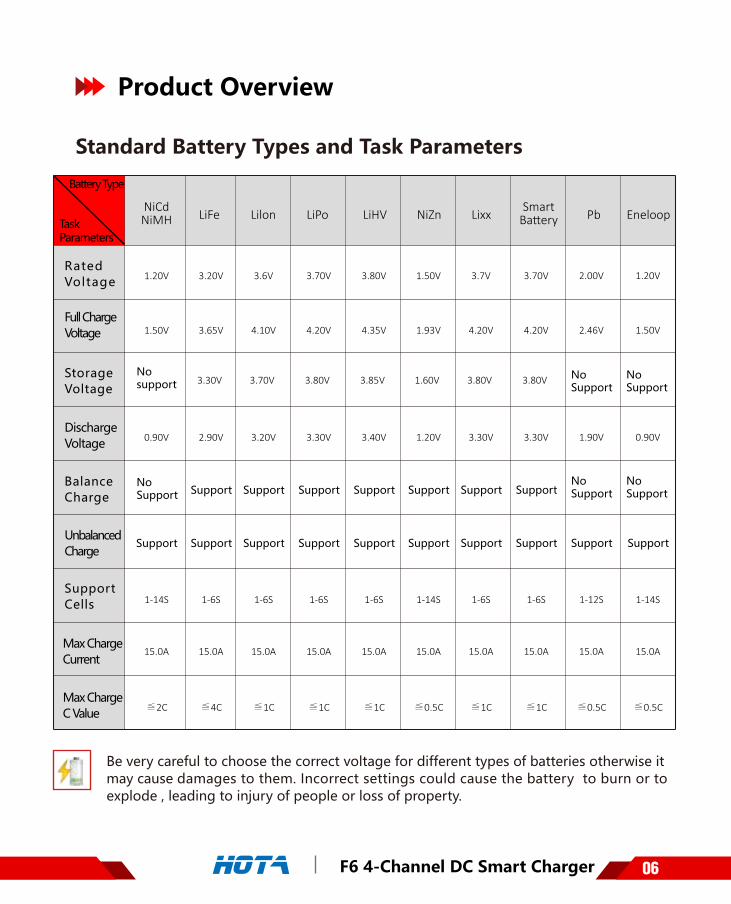
Be very careful to choose the correct voltage for different types of batteries otherwise it may cause damages to them. Incorrect settings could cause the battery to burn or to explode , leading to injury of people or loss of property.
Standard Battery Types and Task Parameters
Rated Voltage
Battery Type
Task Parameters
Full Charge Voltage
Storage Voltage
No support
No Support
Support
Discharge Voltage
Balance Charge
Unbalanced Charge
Support Cells
Max Charge Current
NiCdNiMH LiFe
1.20V
1.50V
0.90V
1-14S
15.0A
3.30V
Support
Support
3.20V
3.65V
2.90V
1-6S
15.0A
3.70V
Support
Support
3.6V
4.10V
3.20V
1-6S
15.0A
3.80V
Support
Support
3.70V
4.20V
3.30V
1-6S
15.0A
3.85V
Support
Support
3.80V
4.35V
3.40V
1-6S
15.0A
1.60V
Support
Support
1.50V
1.93V
1.20V
1-14S
15.0A
3.80V
Support
Support
3.7V
4.20V
3.30V
1-6S
15.0A
3.80V
Support
Support
3.70V
4.20V
3.30V
1-6S
15.0A
Support
2.00V
2.46V
1.90V
1-12S
15.0A
Support
1.20V
1.50V
0.90V
Max Charge C Value ≦2C ≦4C ≦1C ≦1C ≦1C ≦0.5C ≦1C ≦1C ≦0.5C ≦0.5C
1-14S
15.0A
Lilon LiPo LiHV NiZn Lixx PbSmart Ba�ery Eneloop
No Support
No Support
No Support
No Support

07F6 4-Channel DC Smart Charger
How to conform the charging current
Operative Skills
It is important to know the maximum charging current of the battery before charging as excessive current could influence the life span of battery ,even cause damages. In addi-tion, excessive current can cause heating even explosion of the battery during the charging process.
The charging and discharge capacity of battery is usually marked with C value. Multiply-ing the charging C value and battery capacity equals to the maximum charging current supported by the battery. For example, for a 1000 mAh battery with a charging capacity of 5C, its maximum charging current would be l000 * 5 = 5000mA; that is , the maximum charging current is 5A.
For a lithium battery, if it is impossible to confirm the supported charging C value, please set the charging current below 1C for the sake of its (lithium battery) safety.
The reference relation between C value and charging time: charging time >= 60 minutes/ charging C value (it therefore needs around 60~70 minutes to complete charging with 1C). Due to the differences in battery power conversion efficiency, this period of time to complete the charging may be extended.
1. Connect power supply to the charger and wait for the system to complete its self-check-ing. In standby interface, connect well the battery to the charger. Short press the Channel switch key to choose whatever channel prefers . After having chosen the channel, short press the speed shuttle key to pop up the “ Task Settings “ menu ;
2.2.When a task is being executed, short press the speed shuttle key to pop up the " Adjust Task" menu to adjust the task’s current ;
3.Long press the Channel switch key can end the task of current channel quickly or enter the "Task Settings" menu of the channel .
Operation and Setup
Channel switch key Speed Shuttle Key
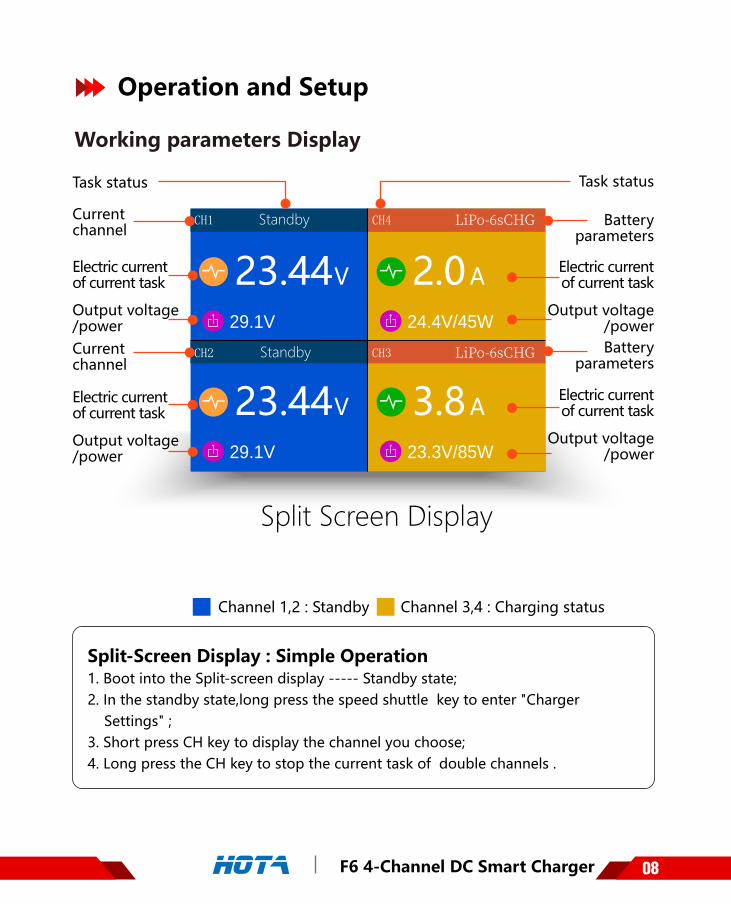
StandbyCH1
StandbyCH2
LiPo-�sCHGCH4
LiPo-�sCHGCH3
23.44V
29.1V
23.44V
29.1V
2.0A
24.4V/45W
3.8A
23.3V/85W
StandbyCH1
StandbyCH2
LiPo-�sCHGCH4
LiPo-�sCHGCH3
23.44V
29.1V
23.44V
29.1V
2.0A
24.4V/45W
3.8A
23.3V/85W
Working parameters Display
Operation and Setup
Split Screen Display
08F6 4-Channel DC Smart Charger
Current channel
Current channel
Electric current of current task
Output voltage /power
Electric current of current task
Output voltage /power
Electric current of current task
Output voltage /power
Electric current of current task
Output voltage /power
Battery parameters
Battery parameters
Channel 1,2 : Standby Channel 3,4 : Charging status
Task status Task status
Split-Screen Display : Simple Operation1. Boot into the Split-screen display ----- Standby state;2. In the standby state,long press the speed shuttle key to enter "Charger Settings" ;3. Short press CH key to display the channel you choose;4. Long press the CH key to stop the current task of double channels .

Standby
Name 00:00:00CH1
Standby 00:00:00CH2
0 mAh 22.84 V
0.0A 0W
3.991V3.989V
1
43.991V3.989V
2
53.991V3.989V
3
6
09F6 4-Channel DC Smart Charger
Operation and Setup
Working parameters Display
Standby
Operation Time
Operation time
C a p a c i t y charged
Task status
Output Current
Output Power
Total Battery Voltage
Cell Voltage
Device NameCurrent channel
Current channel
Standby State : Simple Operation1.Connect power supply to the charger, wait for the system to complete its self-checking. Connect the battery to the charger in the standby interface;2. In the standby state, the screen is in blue color .At that time, the output current, total battery voltage ,capacity completed and operation time are all shown as zero .Scroll the speed shuttle key can switch the display information in the lower half of the screen, which are cell voltage and the operating data.
3. After selecting the corresponding channel, short press the speed shuttle key can pop upthe "Task Settings" menu.4. Short press CH key can switch the channel ;5. Long press the speed shuttle key to enter the “Charger Settings” menu.

Charging
LiPo-6S(4.20V) 43% 00:00:01CH1
0 mAh 22.83 V
0.0A 0W
3.802V3.807V
1
43.808V3.801V
2
53.801V3.814V
3
6Standby 00:00:00CH2
10F6 4-Channel DC Smart Charger
Charging
Operation Time
C a p a c i t y charged
Task Status
Output Current
Total Battery Voltage
Output Power
Operation Time
Cell Voltage
Current channel
Current channel
Battery parameters and Percentage of completion
Operation and Setup
Working parameters Display
Charging Status : Simple Operation1. Connect power supply to the charger, wait for the system to complete its self-checking. Connect the battery to the charger in the standby interface;
2. After selecting the corresponding channel, short press the speed shuttle key to pop up the "Task Settings" menu, set the task to "Charge" ; adjust the task parameters, and short press the speed shuttle key to start the task; Scroll the speed shuttle key can switch the display information in the lower half of the screen, which are cell voltage, cell internal resistance and the operating data. Cell voltage can only be displayed in the mode of balance charging and the internal resistance can only be displayed while measurement is valid ( not in precharged status and none of the cells reaches fully charged status within 2 minutes);
3. When the charge task is executing, short press the speed shuttle key can pop up the "Adjust Task” menu to adjust the charge current ; long press the CH key can stop the current task ;
4. Enjoy.
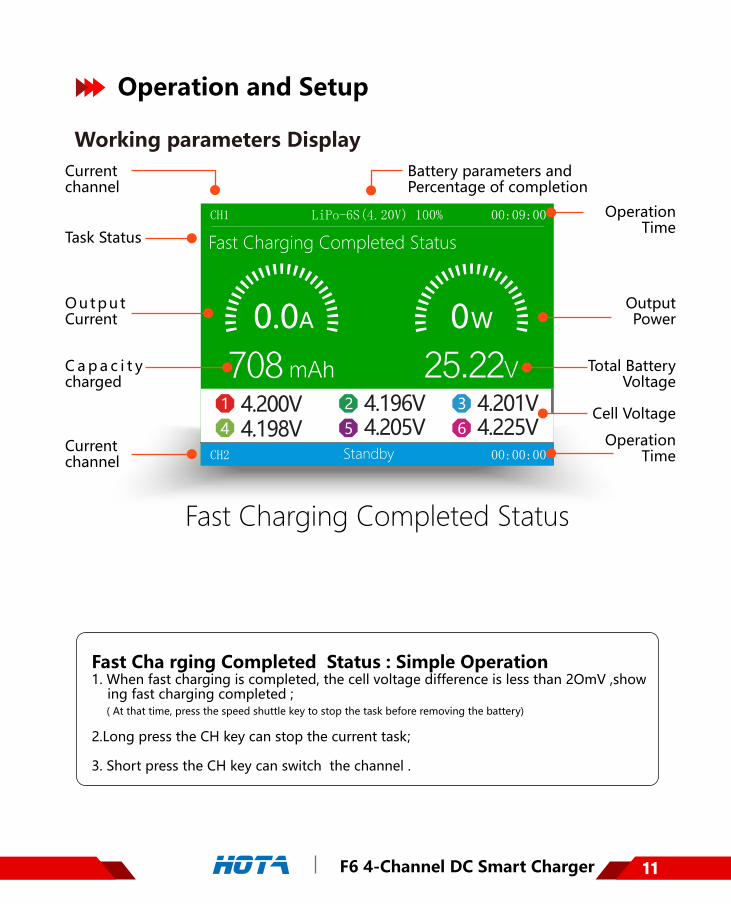
11
Fast Charging Completed Status
LiPo-6S(4.20V) 100% 00:09:00CH1
708 mAh 25.22V
0.0A 0W
4.200V4.198V
1
44.196V4.205V
2
54.201V4.225V
3
6
00:00:00CH2 Standby
F6 4-Channel DC Smart Charger
Operation and Setup
Working parameters Display
Fast Cha rging Completed Status : Simple Operation1. When fast charging is completed, the cell voltage difference is less than 2OmV ,show ing fast charging completed ; ( At that time, press the speed shuttle key to stop the task before removing the battery)
2.Long press the CH key can stop the current task;
3. Short press the CH key can switch the channel .
Fast Charging Completed Status
Operation Time
C a p a c i t y charged
Task Status
Output Current
Total Battery Voltage
Output Power
Operation Time
Cell Voltage
Current channel
Current channel
Battery parameters and Percentage of completion
12F6 4-Channel DC Smart Charger
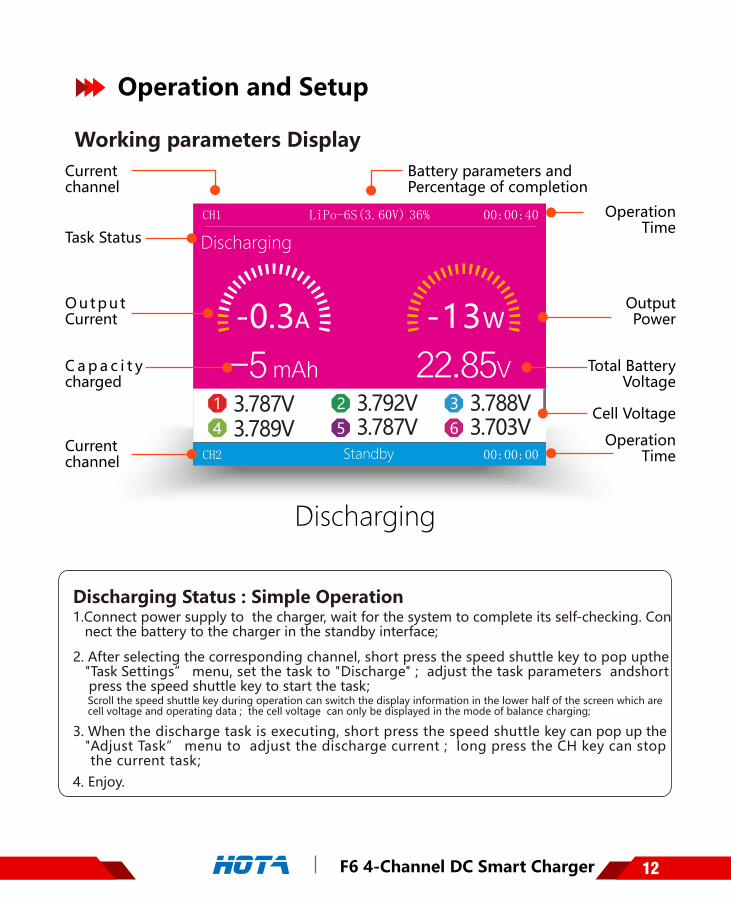
Discharging
Discharging
LiPo-6S(3.60V) 36% 00:00:40CH1
-5 mAh 22.85V
-0.3A -13W
3.787V3.789V
1
43.792V3.787V
2
53.788V3.703V
3
6
00:00:00CH2 Standby
Operation and Setup
Working parameters Display
Discharging Status : Simple Operation1.Connect power supply to the charger, wait for the system to complete its self-checking. Con nect the battery to the charger in the standby interface;
2. After selecting the corresponding channel, short press the speed shuttle key to pop upthe "Task Settings” menu, set the task to "Discharge" ; adjust the task parameters andshort press the speed shuttle key to start the task; Scroll the speed shuttle key during operation can switch the display information in the lower half of the screen which are cell voltage and operating data ; the cell voltage can only be displayed in the mode of balance charging;
3. When the discharge task is executing, short press the speed shuttle key can pop up the "Adjust Task” menu to adjust the discharge current ; long press the CH key can stop the current task;4. Enjoy.
Operation Time
C a p a c i t y charged
Task Status
Output Current
Total Battery Voltage
Output Power
Operation Time
Cell Voltage
Current channel
Current channel
Battery parameters and Percentage of completion

External Discharging
Pb-12S(1.90V) 00:00:45CH1
-111 mAh 26.79V
-9.1A -245W
00:00:00CH2
0pcs36 C 2.99mWh26.79V
Standby
External Discharging
13F6 4-Channel DC Smart Charger
Operation and Setup
Working parameters Display
External Discharging status : Simple Operation1. Connect the battery, which is going to discharge ,to the input ends( DC port) of the charger, and wait for the system to complete its self—checking, then in the standby interface, connect the high power resistance load to the charger's output ends ;
2. After selecting the corresponding channel, short press the speed shuttle key to pop up the "Task Settings” menu, set the task to "External Discharge” ; adjust the task parameters and short press the speed shuttle key to start the task;
3. When the External discharge task is executing, short press the speed shuttle key can pop up the “Adjust Task" menu to adjust the external discharge current ; long press the CH key can stop the current task;
4. Enjoy.
Operation Time
C a p a c i t y charged
Task Status
Output Current
Total Battery Voltage
Output Power
Operation Time
Cell Voltage
Current channel
Current channel
Battery parameters and Percentage of completion
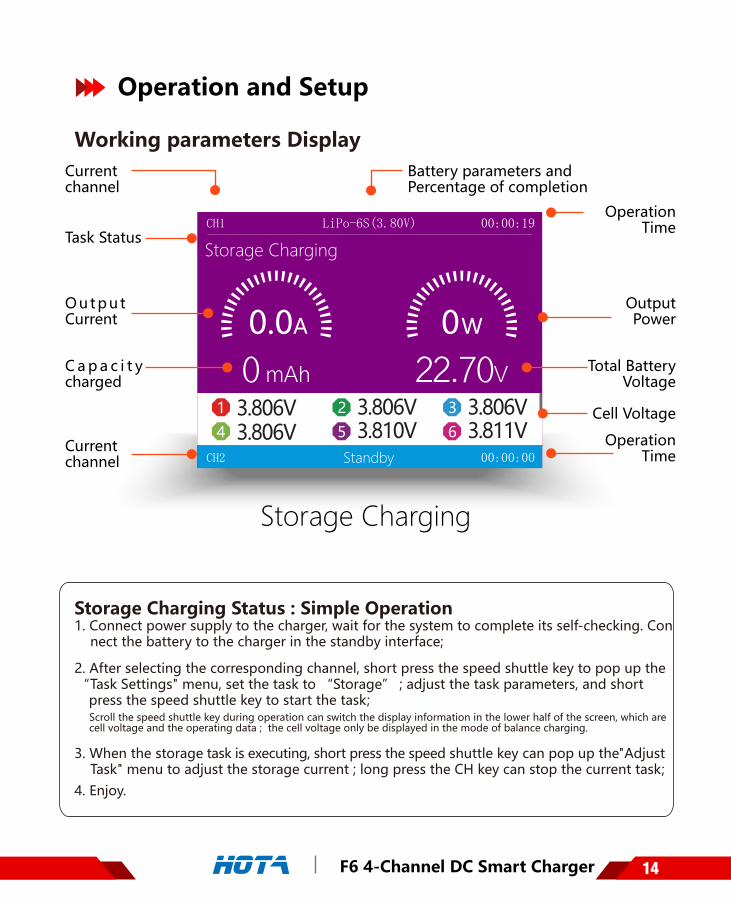
14F6 4-Channel DC Smart Charger
Storage Charging
Storage Charging
LiPo-6S(3.80V) 00:00:19CH1
0 mAh 22.70V
0.0A 0W
3.806V3.806V
1
43.806V3.810V
2
53.806V3.811V
3
6
00:00:00CH2 Standby
Operation and Setup
Working parameters Display
Storage Charging Status : Simple Operation1. Connect power supply to the charger, wait for the system to complete its self-checking. Con nect the battery to the charger in the standby interface;
2. After selecting the corresponding channel, short press the speed shuttle key to pop up the “Task Settings" menu, set the task to “Storage” ; adjust the task parameters, and short press the speed shuttle key to start the task; Scroll the speed shuttle key during operation can switch the display information in the lower half of the screen, which are cell voltage and the operating data ; the cell voltage only be displayed in the mode of balance charging.
3. When the storage task is executing, short press the speed shuttle key can pop up the"Adjust Task" menu to adjust the storage current ; long press the CH key can stop the current task;4. Enjoy.
Operation Time
C a p a c i t y charged
Task Status
Output Current
Total Battery Voltage
Output Power
Operation Time
Cell Voltage
Current channel
Current channel
Battery parameters and Percentage of completion

15
Balancing
LiPo-6S(3.80V) 40% 00:00:22CH1
1 mAh 22.70V
0.0A -6W
3.801V3.799V
1
43.799V3.798V
2
53.797V3.703V
3
6
00:00:00CH2 Standby
F6 4-Channel DC Smart Charger
Balancing
Operation and Setup
Working parameters Display
Balancing Status : Simple Operation1. Connect power supply to the charger, wait for the system to complete its self-checking. Connect the battery to the charger in the standby interface;2. After selecting the corresponding channel, short press the speed shuttle key to pop up the “Task Settings" menu, set the task to “Balance” ; adjust the task parameters, and short press the speed shuttle key to start the task; Scroll the speed shuttle key during operation can switch the display information in the lower half of the screen which are cell voltage and the operating data;
3. When the balance task is executing, short press the speed shuttle key can pop up the“Adjust Task" menu to adjust the balance current ; long press the CH key can stop the current task;4. Enjoy.
Operation Time
C a p a c i t y charged
Task Status
Output Current
Total Battery Voltage
Output Power
Operation Time
Cell Voltage
Current channel
Current channel
Battery parameters and Percentage of completion
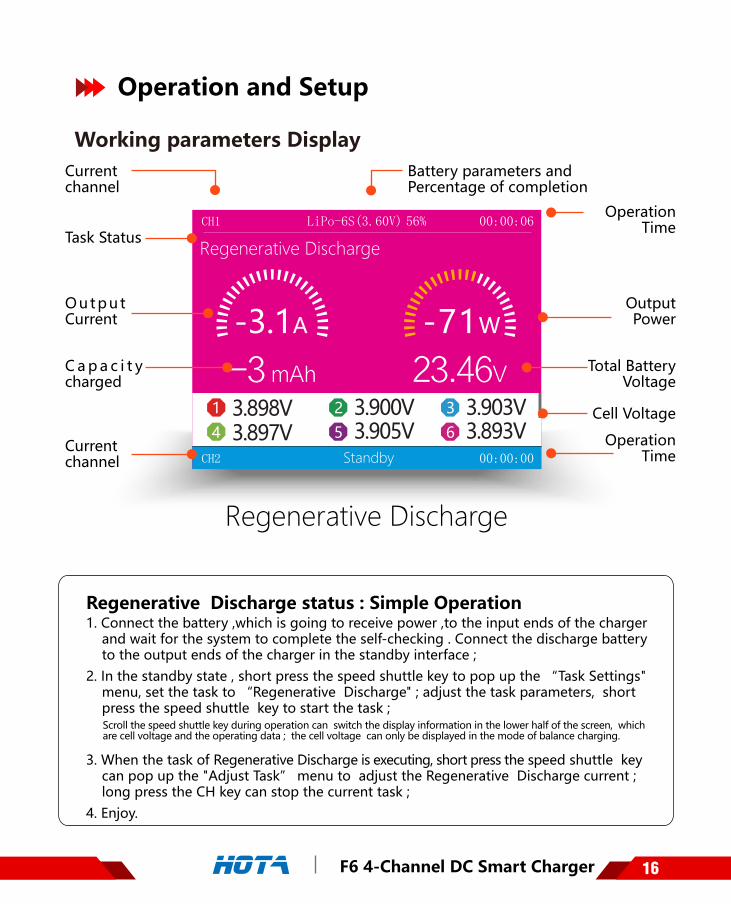
Regenerative Discharge
16
Regenerative Discharge
LiPo-6S(3.60V) 56% 00:00:06CH1
-3 mAh 23.46V
-3.1A -71W
3.898V3.897V
1
43.900V3.905V
2
53.903V3.893V
3
6
00:00:00CH2 Standby
F6 4-Channel DC Smart Charger
Operation and Setup
Working parameters Display
Regenerative Discharge status : Simple Operation1. Connect the battery ,which is going to receive power ,to the input ends of the charger and wait for the system to complete the self-checking . Connect the discharge battery to the output ends of the charger in the standby interface ;2. In the standby state , short press the speed shuttle key to pop up the “Task Settings" menu, set the task to “Regenerative Discharge" ; adjust the task parameters, short press the speed shuttle key to start the task ; Scroll the speed shuttle key during operation can switch the display information in the lower half of the screen, which are cell voltage and the operating data ; the cell voltage can only be displayed in the mode of balance charging.
3. When the task of Regenerative Discharge is executing, short press the speed shuttle key can pop up the "Adjust Task” menu to adjust the Regenerative Discharge current ; long press the CH key can stop the current task ;4. Enjoy.
Operation Time
C a p a c i t y charged
Task Status
Output Current
Total Battery Voltage
Output Power
Operation Time
Cell Voltage
Current channel
Current channel
Battery parameters and Percentage of completion

17F6 4-Channel DC Smart Charger
Combined Charging
LiPo-6S(4.20V) 55% 00:00:52CH1
172 mAh 23.33V
21.2A 500W
3.886V3.902V
1
43.885V3.884V
2
53.891V3.884V
3
6
Standby 00:00:00CH2
Combined Charging
Operation and Setup
Working parameters Display
Combined Charging status: Simple Operation 1. Connect power supply to the charger and wait for the system to complete its self-checking .Connect the battery to the two output ports of the charger in the standby interface ;
2. After selecting corresponding channel , short press the speed shuttle key to pop up the “Task Settings" menu, set the task to “Combined Charging" ; adjust the task parameters, then short press the speed shuttle key to start the task ; Scroll the speed shuttle key during operation can switch the display information in the lower half of the screen, which are cell voltage , cell internal resistance and the operating data. The cell voltage can only be displayed in the mode of balance charging ; cell internal resistance will only be displayed in the balance mode while measurement is valid ( not in precharged status and none of the cells reaches fully charged status within 2 minutes ).
3. When the task of charging is executing, short press the speed shuttle key can pop up the "Adjust Task” menu to adjust the charging current ; long press the CH key can stop the current task.4. Enjoy.
Operation Time
C a p a c i t y charged
Task Status
Output Current
Total Bat-tery Voltage
Output Power
Operation Time
Cell Voltage
Current channel
Current channel
Battery parameters and Percentage of completion
18F6 4-Channel DC Smart Charger
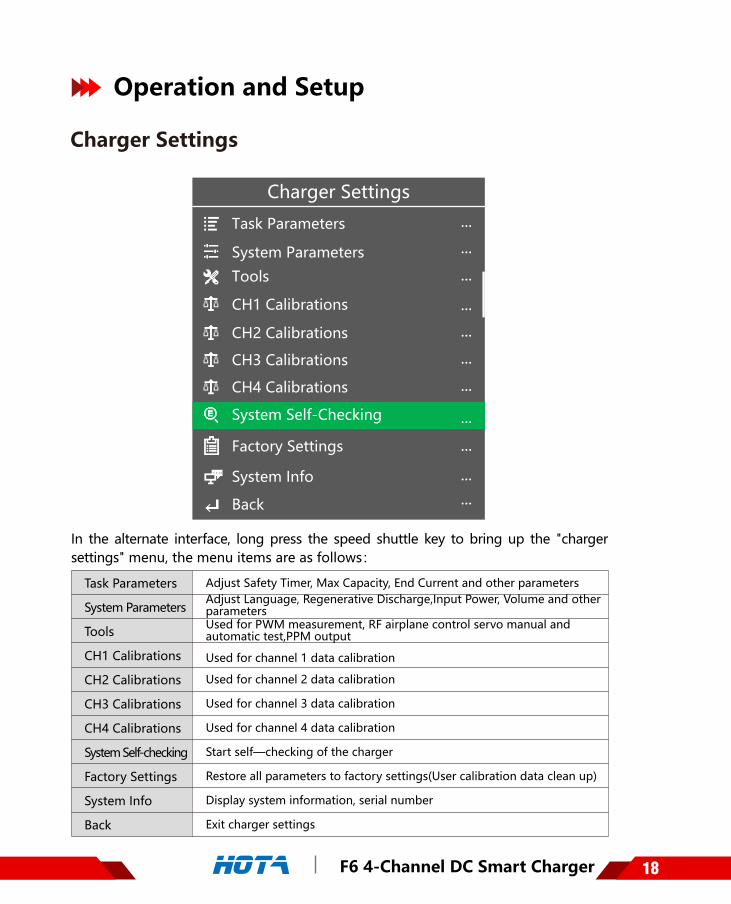
Adjust Safety Timer, Max Capacity, End Current and other parametersAdjust Language, Regenerative Discharge,Input Power, Volume and other parametersUsed for PWM measurement, RF airplane control servo manual and automatic test,PPM output
Used for channel 1 data calibration
Used for channel 2 data calibration
Used for channel 3 data calibration
Used for channel 4 data calibration
Start self—checking of the charger
Restore all parameters to factory settings(User calibration data clean up)
Display system information, serial number
Exit charger settings
Task Parameters
System Parameters
Tools
CH1 Calibrations
CH2 Calibrations
CH3 Calibrations
CH4 Calibrations
System Self-checking
Factory Settings
System Info
Back
Charger Settings
Task Parameters
System Parameters
Tools
CH2 Calibrations
CH1 Calibrations
System Self-Checking
Factory Settings
System Info
Back
CH3 Calibrations
CH4 Calibrations
Charger Settings
Operation and Setup
In the alternate interface, long press the speed shuttle key to bring up the "charger settings" menu, the menu items are as follows:

19F6 4-Channel DC Smart Charger
Safety Timer
Max. Capacity
Trickle Charge
End Current
Back
< Task Parameters
2400minutes
999999mAh
10%
On
Charger Settings > Task Parameters
Operation and Setup
In the standby interface, Long press the speed shuttle key to pop up the “Charger Settings”Menu , then choose "Task parameters” ; the menu items are as follows:
Allow maximum running time; running beyond this setting, automaticprotection will stop the task.Allow maximum charging capacity; running beyond this setting, automatic protection will stop the task.Cut off when the current is less than the ratio between task completed current and set up current
Whether to turn on trickle charge: On or Off
Exit to the upper menu
Safety Timer
Max.Capacity
End Current
Trickle Charge
Back

20F6 4-Channel DC Smart Charger
Language
Max. Input Power
LCD Backlight
Min.Input Voltage
Volume
< System Settings
English
1200W
10.5V
High
High
Repeat
Name
Completion Signal
Device Name
Back
Charger Settings > System Parameters
Operation and Setup
In the standby interface, long press the speed shuttle key to pop up the “Charger Settings" menu, then choose “System parameters" ; menu items are as follows:
Buzzer volume:if set as OFF, the operation sound will be blocked, but not the sound of error warning
Input power limit setting
Input voltage limit setting
Backlight adjustment: high, middle, low
Buzzer volume adjustment: high, middle, low
Single or Repeat
Press the speed shuttle key to enter ; need to manually enter the name ofthe device, long press the speed shuttle key to exit
Exit to the upper menu
Max.Input Power
Min.Input Voltage
LCD backlight
Volume
Completion Signal
Device Name
Back
Regenerative Discharge ...
Language System language setting
Regenerative Discharge Set current, voltage and power

21F6 4-Channel DC Smart Charger
PWM Measurement
< Tools
PPM Out
Charger Settings > Tools
Operation and Setup
In the standby interface, long press the speed shuttle key to pop up the "Charger Settings" menu,then choose the item “Tools” ; menu items are as follows:
Test parameters : PWM signal frequency ,duty cycle and pulse width
Regulate the parameters of the output signal, cycle and pulse widthof the RF airplane control servoAutomatically regulate the parameters of the output signal, cycle and pulse width of the RF airplane control servoControl the RC airplane receiver’s PPM input signal ; change the signal output of those eight channels
Back to the upper menu
PWM Measurement
Servo Manual Test
Servo Automatic Test
PPM Out
Back
Back
Servo Manual Test
Servo Automatic Test
The RC airplane control servo signal analyzes the PWM protocol, links to the signal output of the RC receiver , and the signal period and pulse width of the PWM output are automat-ically detected, then converted into the steering output shaft rotation angle value.
PWM Measurement
T 1 T 2
P W M M e a s u re m e n t
1500us
15000us
T1
T2
66.6Hz
16500us
F
P
80%R
The RF airplane PWM protocol is directly connected to the servo; through setting the T1 ( cycle ) and the size of the pulse width, it controls the angle of the swing arm.
Servo Manual TestS e r vo M a n u a l Te s t
20msT1
2200usP
The RF airplane PWM protocol is directly connected to the servo; through automatically setting the T1 ( cycle ) and adjusting the size of the pulse width , it automatically controls the angle of the swing arm.
Servo Automatic TestS e r vo A u to m a t i c Te s t
LowSpeed:
1000----2000uSRange:
50Hz/20000uSCycle:
100010001900150015001800
1000
RF airplane receiver receives the PPM protocol, through altering signal cycles of those 8 channels, it controls the signal output of the receiver.
PPM OutputP P M O u t p u t
CH1:CH2:CH3:CH4:CH5:CH6:CH7:CH8:
1500

F6 4-Channel DC Smart Charger 22
Task Settings
Operation and Setup
Select task options: Power supply , charging , discharge, external discharge, storage, balance, regenerative discharge ,combined chargingSelect battery types: Smart battery, LiHV, LiPo, Lilon, LiFe, LiXX, NiZn, Pb,NiCd, NiMH, Eneloop
Fine-tuning the End-voltage
Select battery's strings: 1~6S ; if balance port is inserted, it is automatically tested, no
need to do any settingsSelect current, charging/storage 0.1~ 15.0A, discharge 0.1 ~ 3.0A , external discharge1.0~ 15.0 A
Start to execute task
Back
Select Task
Battery Type
Cell Voltage
Cell Count
Current Setting
Start Task
Back
Select Task
Battery Type
Cell Count
Cell Voltage
Current Settings
Start Task
Task Settings
Charging
LiPo
4.20V
6S(22.2V)
1.0A
Back
Connect power supply to the charger, wait for the system to complete its Self-checking. In standby interface , connect the battery to the charger , then after selecting the corresponding channel , short press the speed shuttle key to pop up the "Task Setting" menu .

23F6 4-Channel DC Smart Charger
Task Settings and Notes
Operation and Setup
The F6 smart charger operates in a series charging mode. When connecting to thebattery, the battery output cable must be connected. For lithium batteries, it is stronglyrecommended to connect the balance ports for balanced charging so as to ensure that thecharger can accurately monitor the voltage of each cell and balance the cells having poorconsistency. When charging in unbalanced mode (without connecting to the battery balanceport), the charger will have a warning before starting the task.
Charge FunctionWhen charging is in progress, the screen is marked in orange ; the screen turns green or blue when charging is completed. When the charging is completed, the cell voltage differ-ence is less than 20mV, and the screen turns green. If user needs to use it urgently, he can stop charging it. If charging is not stopped at that time, the charger will continue to balance the battery. When the voltage difference is less than 10mV, the screen will turn blue. After it turned blue, the charger will still continue to accurately balance the battery.After having the battery charged, the voltage will drop back due to the difference in perfor-mance and it is normal. As the number of charging increases, the performance of the batterygradually declines, such a phenomenon will become obvious. Charging with a larger charging current will also cause the voltage to fall back after a full charge, which is more obvious.
Tips: lf you are charging batteries outdoors, and you want to finish it quickly, you can stop charging when you see the appearance of green state. When there is enough time, and you hope that the battery can achieve a better balance, ,then wait for the blue color to appear, or wait for a while more after the blue appear to get more accurate effect.
Discharge FunctionThe discharge function can discharge the battery. It is recommended to connect the balance port for discharge, which is faster and the detection of the end of discharge more accurate. Due to the limitation of the internal discharge power, the discharge process may be slower, which is normal.
Power supply FunctionWhen the power function is selected, the entire charger is equivalent to an adjustable powersupply, the voltage of the output port and the output power can be set . The output port volt-age can be set between 5V~ 24V, and the output power can be set between 100W ~ 300W. The output port wires must not be stuck together to avoid causing any short circuit and cannot be overloaded so that it burns the machine.

Load1
Load2
Input port
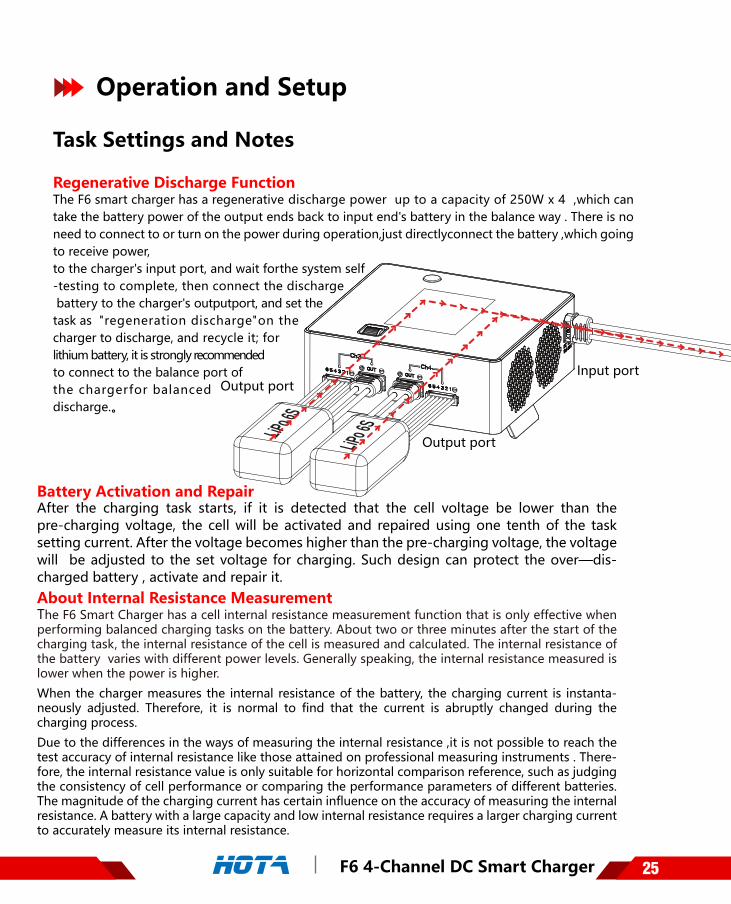
6S LiPo 16000mAh
24F6 4-Channel DC Smart Charger
Task Settings and Notes
Operation and Setup
External Discharge FunctionsThe external discharge function uses an external high-power load resistor to quickly discharge the battery in an accurate way. When using it, the battery to be discharged needs to be connected to the input port, and the output is connected to the resister load. It is recommended that the resistance of the load be between 1.5 and 2.5 ohms. Other resistance values can also be used normally, but may not be able to operate at full power. While the external discharge is running, the load is very hot, please pay attention to safety and avoid accidents or personal injury.
Storage Function When the storage function is selected and if the battery is lower than the preset storage voltage, the charging task will be automatically performed; if the battery voltage is higher than the preset storage voltage, the discharge task will be automatically performed. In order to save the task time, the storage and discharge tasks do not accurately balance the cell voltage. There may have some error between the cell voltage and the preset value at the end of the task, which is a normal phenomenon.
Balance FunctionThe balance function is used to balance the voltage of batteries and make them equal. The balance time is related to the battery voltage difference and the target voltage. When the menu is switched to the balance mode, the charger automatically analyzes and sets the initial balance voltage value, and the user can freely adjust it. The charger's charging ability is much larger than the discharge capacity; in the balance operation , selecting voltage equal or larger than the current battery voltage usually lets user attain faster effect in balancing.
25F6 4-Channel DC Smart Charger
Input port
Output port
Output port
LiPo 6S
LiPo 6S
Task Settings and Notes
Operation and Setup
Regenerative Discharge FunctionThe F6 smart charger has a regenerative discharge power up to a capacity of 250W x 4 ,which can take the battery power of the output ends back to input end's battery in the balance way . There is no need to connect to or turn on the power during operation,just directlyconnect the battery ,which going to receive power, to the charger's input port, and wait forthe system self-testing to complete, then connect the discharge battery to the charger's outputport, and set the task as "regeneration discharge"on the charger to discharge, and recycle it; forlithium battery, it is strongly recommendedto connect to the balance port of the chargerfor balanced discharge.。
Battery Activation and Repair After the charging task starts, if it is detected that the cell voltage be lower than the pre-charging voltage, the cell will be activated and repaired using one tenth of the task setting current. After the voltage becomes higher than the pre-charging voltage, the voltage will be adjusted to the set voltage for charging. Such design can protect the over—dis-charged battery , activate and repair it.About Internal Resistance MeasurementThe F6 Smart Charger has a cell internal resistance measurement function that is only effective when performing balanced charging tasks on the battery. About two or three minutes after the start of the charging task, the internal resistance of the cell is measured and calculated. The internal resistance of the battery varies with different power levels. Generally speaking, the internal resistance measured is lower when the power is higher.
When the charger measures the internal resistance of the battery, the charging current is instanta-neously adjusted. Therefore, it is normal to find that the current is abruptly changed during the charging process.
Due to the differences in the ways of measuring the internal resistance ,it is not possible to reach the test accuracy of internal resistance like those attained on professional measuring instruments . There-fore, the internal resistance value is only suitable for horizontal comparison reference, such as judging the consistency of cell performance or comparing the performance parameters of different batteries. The magnitude of the charging current has certain influence on the accuracy of measuring the internal resistance. A battery with a large capacity and low internal resistance requires a larger charging current to accurately measure its internal resistance.

26F6 4-Channel DC Smart Charger
LiPo 6S
LiPo 6S
Output port Output port
Output port Output port
Input port
Task Settings and Notes
Operation and Setup
Combined charging FunctionWhen the combined charging is in progress, the screen is marked in orange. After the com-bined charging is completed, the screen will change to green or blue. When the combined charging is completed and the battery cell voltage difference is less than 20mV, the screen will change to green . If in urgent usage , the charging can be stopped at that moment. If you don't stop it at that time, the charger will continue to balance the battery until the voltage difference becomes less than 10mV,then the screen will turn blue. After it turned blue,the charger will continue to accurately balance the battery. After the battery is charged, the voltage will drop to a certain extent due to the difference in performance, which is a normal phenomenon. And as the battery recharges more and more,the performance of it gradually decreases, this phenomenon of voltage drop will become more and more obvious. Using larger charging current for charging will also lead to more significant voltage drop after a fully charge.

27F6 4-Channel DC Smart Charger
F6 Smart Charger confirms to the relevant commands in Chapter 15B :2017 of the FCC
Product Qualification Declaration
yes
yes
yes
yes
EN 60950-1:2006+A11:2009+A1:2010+A12:2011+A2:2013
ETSI EN 301 489-1 V2.2.0(2017-03)ETSI EN 301 489-3 V2.1.1(2017-03)
EN 62311:2008
ETSI EN 303 417 V1.1.1(2017-09)
ResultTesting Standards
28F6 4-Channel DC Smart Charger
Error handling during “System self—checking “ : when the charger is performing the System self—checking and if the output port is connected to the battery, it will cause a self-checking error ; at that time, the battery should be removed and wait for 5 seconds before retest. Do not insert or detach battery from the DC port during the System self-checking. Wait for the self—checking to complete before performing any other operations.
Battery connection error handling: Re-plug the battery and ensure that all connections are in secure contact. If the error messages repeatedly appear, check the battery connec-tion metal parts for oxidation or burning that may affect the contact status.
Troubleshooting
If it is necessary to replace parts out of the warranty time, we will charge you some-component fee and maintenance fee.During the warranty period, repairs are not free of charge if:
1)Failure or damage caused by improper use or disassembly, attachment or modifi cation as specified in the Instructions.
2)Failure or damage caused by natural disasters, falls, collisions, and improper voltage.
Warranty and Service
We provide one-year warranty for this charger from the date of purchase. Within oneyear, our company will repair the product for you free of charge. We will not provide free repair service if it is caused by improper use or modification of the customer. If there is a problem with your product and it is covered by the warranty, please contact us immediately , we will assist you with the relevant maintenance.
29F6 4-Channel DC Smart Charger
The electronic products with this mark in the Instructions must be disposed
of separately from household waste when handling scrapped products.
Take it to the garbage collection center for classification.
Do not charge/store the following types of batteries:
Batteries of different manufacturers, different models, different types or different capacity
Non-rechargeable battery (may cause an explosion)
Battery of unrecognized type or unknown parameters
Battery with special requirements for charging technology
Battery that is damaged or defective
Battery with built-in combined circuit or protection circuit
Battery installed in another device or connected to other components
Rechargeable battery suitable for carrying current of this charger yet without confir
mation from the manufacturer
Safety Tips
StatementThe F6 Smart Charger is designed for the battery types listed in this Instructions.The company does not bear any responsibility if the user uses the charger for purposes other than those listed in the Instructions. We can not be sure if you ever read the instructions carefully before using them, nor can we control how you use and store the product.
Copyright © 2021 Shenzhen HOTA Technology Co., Ltd. All rights reserved
The products described in this Instructions, including software, product features, appearance, Ul design, etc., have property rights protection, any individuals or organi-zations must not copy or plagiarize. Once discovered, HOTA will pursue its legal rights.
All specifications and parameters are subject to change without prior notice!

30F6 4-Channel DC Smart Charger
Before using the charger for the first time, please read the details in the "Safety Notes“. Make sure you use this charger safely and correctly.
Safety Notes
Safety Precautions:
1、Please read the complete Instructions carefully before using the charger;2、Make sure that the charger is kept away from heat and humid environment during use, pay attention to ventilation and heat dissipation, put it away from flammable materials;3、Do not let the child operate the charger. Do not let the charger work not under your attention;4、Correctly set the battery charging and discharging parameters, wrong settings may lead to accidents;5、Failure to follow safety procedures may result in property damage or personal injury;6、If the operation is not proper, the charger and battery will have a serious fire risk;7、After use, disconnect the input power and remove the battery as soon as possible;
NEVER USE CHARGER UNSUPERVISED!
Warning !
Fire Hazard !
1. Do not modify or disassemble the charger2. Do not place the charger or battery near flammable objects during use. Do not charge or dischar geon the carpet, paper, plastic products, vinyl, leather, wood, or charge or discharge inside the aircraft model or inside the car.3. Do not place the charger within reach of children.4. Do not drop wires or other conductive objects into the charger.5. Ensure that the battery type and parameters are selected correctly. lf you choose the wrong one, it may not only damage the battery, but it may also be dangerous (the lithium battery cannot beovercharged, it will cause a fire).6. Do not mix batteries of different types, capacities, or manufacturers to use.7. Do not attempt to charge a dry battery that cannot be recharged.8. Do not charge or discharge if the battery leaks, swells, peels, changes in color, or deformed.9. Do not exceed the maximum charge limit specified by the battery manufacturer.10. Follow the instructions and safety advice of the charger manufacturer.11. Please do not cover the fan outlet on the charger. Do not use it in direct sunlight, confined spaceor high temperature environment. In those cases, the temperature protection mecha nism insidethe charger may activate so that charging and discharge cannot be performed normally.

Add: Floor 2, Building 2, Guorun Industrial Park, Min Zhi, Longhua District, Shenzhen, China
Tel: 0755-28180135
Website: www.hota-exp.com
E-mail: [email protected]