fabricating replacement glass prisms for the piedras
TRANSCRIPT

Fabricating Replacement Glass Prisms for the Piedras Blancas Lighthouse
Daniel Garcken
Advisors: Dr. Kathy Chen and Prof. Lee McFarland
Materials Engineering
California Polytechnic State University, San Luis Obispo

Approval Page Project Title: Fabricating Replacement Glass Prisms for the Piedras Blancas
Lighthouse
Author: Daniel Garcken
Date Submitted: June 8, 2012
CAL POLY STATE UNIVERSITY Materials Engineering Department
Since this project is a result of a class assignment, it has been graded and accepted as fulfillment of the course requirements. Acceptance does not imply technical accuracy or reliability. Any use of the information in this report, including numerical data, is done at the risk of the user. These risks may include catastrophic failure of the device or infringement of patent or copyright laws. The students, faculty, and staff of Cal Poly State University, San Luis Obispo cannot be held liable for any misuse of the project. Prof. Kathy Chen ____________________________ Faculty Advisor Signature Prof. Trevor Harding ____________________________ Department Chair Signature

1
Table of Contents Page
List of Figures 2
List of Tables 3
Appendices 4
Acknowledgements 5
Abstract 6
Introduction 7
Background Literature 9
Methods and Materials 11
Results 22
Discussion 23
Summary 26
Conclusions 27
References 28

2
List of Figures
Figure Description Page
1 Each metal array holds 19 prisms, with a total of 14 arrays in the floor of the beacon room (266 total prisms). 7
2 Some deck prisms were rectangular or hexagonal, and others were hemispherical. 9
3 Sidewalk prisms supply daylight to the cellars below. 10
4 Isometric CAD rendering of the virtual model. 11
5 Acrylic physical model of the prism. 12
6 The concave feature of the prism indicated by the arrow prevented the mold from being a single piece. 13
7 The closed mold (left) and the open mold (right). 13
8 The pyramids and corresponding indentations (highlighted red) keep the cavities of the two halves aligned. 14
9 The rapid-prototyped mold was used as a physical reference for creating CNC codes and for machining the mold. 14
10 The donated graphite block was milled down to two blocks (2” x 2.5” x 4.625”), each of which were milled into half of the mold. 16
11 The graphite mold partially machined. 17
12 The coolant outlet hoses could be positioned close to the cutting bit, which allowed the vacuum’s hose to be close to the source of the graphite shavings. 17
13 The completed proof of concept mold, consisting of the two graphite halves. 18
14 Graph of viscosity of borosilicate with respect to temperature. 19
15 The glass gathered on the end of the rod glowed white hot. 19
16 The molten glass must be forced downward into the mold to fill all the details. 20
17 The cast glass is still attached to the initial rod. 20
18 A six-wire claw-grabber firmly held the six facets of the prism. 21
19 The 4 prisms cast out of borosilicate next to the rapid-prototyped prism. 22
20 The acrylic prism placed into one half of the mold to show the ideal height. 22
21 A glass prism placed into one half of the mold to show the achieved height. 22
22 Handling marks (circled in red) left by the ends of the wires of the claw-grabber. 24
23 Pouring molten glass from a crucible requires full heat protection attire. 24
24 Depiction of the general steps taken to complete the project. 26

3
List of Tables
Table Description Page
I Comparison of thermal properties of bronze, graphite, and stainless steel. 16
II Material properties of borosilicate glass. 18
III Material properties of leaded glass. 23
IV Comparison of glass transition temperatures of various glass compositions. 23

4
Appendices
Appendix I Engineering drawing of the original prism
Appendix II Engineering drawing of the handle side of the mold
Appendix IV Engineering drawing of the base side of the mold
Appendix VI Engineering drawing of the handle
Appendix VII Engineering drawing of the base plate

5
Acknowledgements
• Prof. Lee McFarland
• Dr. Kathy Chen
• Dr. Richard Savage
• Sam Kaplan – IME Junior
• Eric Dandurand – Harmony Glassworks
• Piedras Blancas Lighthouse Staff
• Cal Poly Craft Center – Associated Students, Inc.

6
Abstract
The objective of this project was to design and create a process for manufacturing replacement glass
prisms for the Piedras Blancas lighthouse and several other lighthouses nationwide. The prisms were
designed to be in multiple metal arrays spread across the floor of the beacon room (the topmost room of
the lighthouses). The prisms functioned to transmit extra, radiant light from the beacon light through the
floor of the beacon room and disperse it into the maintenance room below. Using computer aided drafting
(CAD) software, an original prism was measured and modeled; the corresponding mold was also
modeled. G-codes for controlling the movement of a computer numerically controlled (CNC) mill were
created to machine the two halves of the mold. A donated block of graphite was machined according to
the developed G-codes. As a proof of concept method for casting these prisms, I used a lampworking
setup – consisting of a propane-oxygen torch, the associated hoses, regulators, and tanks, an annealing
kiln, and the necessary lampworking tools – to melt one end of a borosilicate glass rod into a large gather
of molten glass. I forced this gather into the mold, thereby filling the mold, and allowed the glass to
solidify. Then I opened the mold, removed the prism, melted off the extra rod, and flattened the top face
of the prism. This method, although suitable for the proof of concept, will not be efficient for casting the
needed quantity of prisms due to the additional, time consuming steps required. For producing large
quantities of these prisms, suggested future work may involve pouring molten glass into the mold via the
use of a crucible.
Keywords: glass, borosilicate, prism, lighthouse, Piedras Blancas, cast, manufacture

7
1. Introduction
The Piedras Blancas lighthouse, located about 5 miles north of San Simeon Bay on the central
coast of California, needs replacement glass prisms. These prisms will also be used in multiple additional
lighthouses nationwide (one such lighthouse is San Island lighthouse in Alabama). This project’s
objectives were to create accurately dimensioned engineering drawings of the prism and of the mold used
to cast the prism, manufacture the mold, and cast glass into the mold, thereby creating replacement
prisms.
The topmost room of most lighthouses is the beacon room, in which a light turns 360° emitting the
beacon light. Below this beacon room is a maintenance room. To illuminate the maintenance room, the
lighthouse designers incorporated metal arrays of these glass prisms (Figure 1) into the floor of the
beacon room (the ceiling of the maintenance room). The prisms – the top surface flush with the beacon
room’s floor and the bottom facets protruding into the maintenance room – transmit and disperse ambient
light from the beacon light into the maintenance room.
Figure 1: Each metal array holds 19 prisms, with a total of 14 arrays in the floor of the beacon room (266
total prisms).1, 2
1.1 Stakeholders There are multiple people who are affected by the success or failure of this project including:
• Myself
• My advisors:
- Kathy Chen (Materials Engineering Faculty)
- Lee McFarland (Mechanical Engineering Faculty)
• The lighthouses in need of replacement prisms.
Funding for this project is supported by the Materials Engineering Department of California
Polytechnic State University, San Luis Obispo and by the Piedras Blancas lighthouse staff board. I have
completed this project on my own, aside from assistance received from my advisors and three other
important people:

8
• Richard Savage (Materials Engineering Faculty)
• Sam Kaplan (Manufacturing Engineering Student)
• Eric Dandurand (Harmony Glassworks)
1.2 Broader Impact
Due to the important safety aspects of lighthouses, their proper function and maintenance is
critical. Proper function of these prisms may ensure the possibility of effective maintenance, which in turn
will ensure the effective function of the lighthouse. The Piedras Blancas Lighthouse staff board intends to
maintain the historical integrity of the lighthouse; therefore, it is important to ensure that the replacement
prisms are as historically accurate as possible. This project requires an understanding of the union
between the scientific and artistic aspects of making glass for practical applications.
1.3 Design Constraints
Funding may be limited for this project; therefore all efforts will be made to decrease the cost of
completing this project. The material used for the prisms must have high resistance to degradation from
ocean air (salt water), ultraviolet (UV) radiation, temperature fluctuations, and possibly mechanical oil or
cleaners/solvents. The purpose for the prism is to be a sustainable form of lighting. Therefore, ideally the
processing would utilize sustainable methods. The prism’s manufacturability is a question of the feasibility
of casting glass into the desired shape without excessive (if any) post casting cold work such as grinding
and polishing.
There are several safety concerns in terms of the fabrication processes. Melting glass requires
extreme temperatures; therefore, precautions should be taken to avoid burns. In addition to the molten
glass and the torch’s flame, the tools and molds used to manipulate the molten glass can get hot enough
to burn flesh. While working with glass, one must always be aware that everything in the studio has the
potential to be hot enough to cause a burn. Other safety concerns include the risk of incisions due to
sharp, razor-like edges of broken glass and the risk of inhaling harmful fumes given off by the torch (such
as NOx gases).

9
2. Background Literature
When the lighthouse was first built, the beacon light was illuminated by a kerosene lamp. As
opposed to installing multiple kerosene lamps throughout the maintenance room, these prisms utilized the
light from the main beacon lamp. When the kerosene beacon lamp was replaced by an electric light bulb,
these prisms eliminated the need for additional electrical lines to power additional light bulbs for
illuminating the maintenance room.
Prisms such as these were first used as “deck prisms” in sea faring vessels. Vessels such as
brigs or schooners – vessels that lay low on the water – had no room on their sides for the placement of
portholes to let daylight into the lower compartments.3 In place of portholes on the sides, deck prisms
were placed in the top decks to transmit and disperse light into the lower rooms. There were multiple
shapes of these deck prisms (Figure 2) but all the shapes were similar in that they all had flat tops that
were flush with the surface of the deck and faceted or spherical bottom surfaces that acted to disperse
the transmitted light.
Figure 2: Some deck prisms were rectangular or hexagonal, and others were hemispherical.4
These deck prisms also improved the safety of sea vessels. Without these deck prisms, the lower
compartments of the ship were illuminated by use of oil, kerosene, or whale blubber lamps (all of which

10
were open flames). These lamps presented obvious fire hazards to the wooden ships, especially those
carrying gunpowder, coal, or other flammable/explosive materials. The utilization of these deck prisms
eliminated the need for lamps in the lower compartments, thereby reducing the chance of fire.
Deck prisms have also been used in some cities’ streets. They are installed in the cement
sidewalk to illuminate cellar rooms below (Figure 3). Similar to the deck prisms of sea vessels, these
sidewalk prisms are flush with the top surface of the sidewalk and have faceted bottoms to disperse the
transmitted light.
Figure 3: Sidewalk prisms supply daylight to the cellars below.5

11
3. Methods and Materials
3.1 The Original Prism The first step to manufacturing replacement prisms was to produce a 3-dimensional model of the
original prism using computer aided drafting (CAD) software (Creo Pro-Engineer). This model needed to
accurately represent the shape and dimensions of the original prism. The original prism, provided to us by
the Sand Island lighthouse in Alabama, was in poor condition; some of its edges were chipped and its
surfaces were worn and scratched. In addition to the chipped edges, the rounds on all edges made
extrapolating the corners difficult.
To measure the prism’s dimensions I first used digital calipers. I then created a CAD model based
on these rough dimensions. To obtain more accurate dimensions I utilized an optical comparator; a
machine normally used by inspectors that magnifies an image of the part, thereby allowing more accurate
measurements.6 The digital optical comparator that I used imaged the part with a camera and used
software to analyze the image generated by the camera. I then updated the model’s dimensions with
those I obtained from the comparator (Figure 4). The final dimensions of the prism are shown in the
engineering drawing of the prism (Appendix I).
Figure 4: Isometric CAD rendering of the virtual model.
I enlisted the help of Dr. Richard Savage to determine the original prism’s material. He utilized a
handheld x-ray fluorescence (XRF) machine to analyze the prism’s glass. The XRF results revealed a 4.5
weight percentage of lead but could not measure the composition percentage of lighter elements (most
likely sodium, silicon, and oxygen). This is due to the fact that this handheld XRF tool does not employ a
vacuum; therefore the x-rays emitted by these lighter elements were absorbed by the air molecules
between the sample (the prism) and the detector and thereby not detected.

12
3.2 Dimensional Verification
The dimensions obtain through the use of the digital calipers and the optical comparator needed
to be verified. The CAD model was printed on a rapid-prototyping machine out of a semitransparent
acrylic material (Figure 5). This physical model of the virtual CAD model was then sent to the Sand Island
lighthouse to be test fitted into the metal array. With word back form the lighthouse that the rapid-
prototyped model did indeed fit into the metal array, I used the verified dimensions of the prism’s CAD
model as the dimensions of the mold’s cavity (Appendix II and Appendix IV).
Figure 5: Acrylic physical model of the prism.
After verifying the model’s dimensions, I created an engineering drawing of the prism (Appendix
I). I sent this drawing to multiple different mold-making companies to get quotes for the cost of making a
mold or of casting the actual prisms. The quotes I received were all surprisingly expensive – one
company quoted $650 for making a single mold, another company quoted $600 per prism for up to 100
prisms and $400 per prism for up to 500 prisms. These quotes were taken to the Piedras Blancas
lighthouse staff board meeting to attempt to obtain funds; however, the staff board was unable to proffer
such funds. Therefore I needed to create a mold here at Cal Poly.
3.3 CAD Model of the Casting Mold
The ideal design of a mold for casting glass would be a single piece mold; the mold would be
filled with molten glass, the glass would be allowed to solidify in the mold, and then the mold would be
inverted and the part would simply fall out. However, due to the undercut feature (Figure 6) of this prism,
the mold needed to split open to allow for removal of the solidified glass.

13
Figure 6: The concave feature of the prism indicated by the arrow prevented the mold from being a single
piece.
I chose to follow a basic “kick-mold” design (Figure 7): the two mold halves were hinged together
with one half bolted to a baseplate and the other half free to rotate about the hinge. The operator would
stand on the baseplate with his left foot and hold the mold closed by pressing his right foot against a
handle attached to the freely rotating mold half. The operator would then fill the mold with molten glass,
allowing it to solidify completely within the mold, and then kick open the mold to release the solidified part.
Figure 7: The closed mold (left) and the open mold (right).
To align the two halves with respect to each other – to ensure that the two halves of the cavity
were aligned – I incorporated pyramid shaped alignment protrusions and corresponding indentations on
the adjoining faces of the two halves (Figure 8) (Appendix III and Appendix V). I designed the
dimensions of the hinge to allow for some play so as to not interfere with the alignment provided by the
pyramids and indentations.

14
Figure 8: The pyramids and corresponding indentations (highlighted red) keep the cavities of the two
halves aligned.
With a basic design of the mold modeled in CAD software, I dimensioned the mold’s cavity with
respect to the verified dimensions of the rapid-prototyped prism. I designed the hinge to correspond to a
purchasable shoulder bolt I found on McMaster Carr’s online catalog. After completing the CAD model of
the mold, I decided to rapid-prototype a physical model of the mold out of acrylonitrile butadiene styrene
(ABS) (Figure 9).
Figure 9: The rapid-prototyped mold was used as a physical reference for creating CNC codes and for
machining the mold.

15
3.4 Generating CNC Code
The CAD model I created of the mold was used to create G-codes for machining the actual mold.
G-code is a programming language that controls the movement of the cutter of a CNC mill with respect to
the material being machined. They define the speed of the spindle, the tool that should be in the spindle,
the position of the material with respect to the spindle (X and Y position of the table and Z height of the
spindle), and the feed rate at which to move the material.
I consider myself to be sufficiently experienced to create CAD models of the prism and the mold
halves. However I have had no experience with creating G-codes. Therefore, I enlisted the help of a
Manufacturing Engineering Junior, Sam Kaplan, to create the G-codes and machine the two halves of the
mold. He utilized a program “Expert Machinist” (which is a sub-program of the Pro-Engineer software) to
create the G-code program.
3.5 Choosing Mold Material
I was able to narrow the material selection down to a few possibilities for the mold material:
bronze, graphite, or stainless steel. Bronze is a commonly used material for glass molds because it has a
high thermal conductivity (which allows the molten glass to cool faster, thereby increasing production
rates). Bronze is extraordinarily easily machined, and could produce excellent surface finishes with
minimal post-milling processing. However, a solid block of bronze in the size that we needed for the mold
would have been too expensive ($199.33 plus shipping and handling for a 2” x 2.5” x 12” bar on
McMaster Carr’s online catalog).
Before we ordered a bar of material for machining the mold, we were donated a block of graphite
(Figure 10) by Eric Dandurand of Harmony Glassworks. This graphite block (approximately 3” x 5” x 12”)
was large enough to machine the two halves of the mold. For a proof of concept, we decided to use the
donated graphite. However, the brittleness of graphite presented a concern in terms of the mold’s design:
the hinge features, if machined into the graphite, would likely have made the graphite too weak.
Therefore, for our proof of concept mold, we decided to exclude the features that would weaken the
graphite, such as the hinges and the external rounds. The exclusion of these features in no way affected
the performance of the actual cavity of the mold.
Graphite has high temperature resistance that can withstand the molten temperature of glass
(which is expected to be approximately 820°C – as determined by the temperature at which the viscosity
is low enough to allow the glass to deform under its own weight7), a high thermal conductivity (which
allows for faster production), and a low coefficient of thermal expansion (CTE) (Table I). The low CTE
means that as the mold’s temperature is raised, the cavity’s dimensions change minimally; which
therefore minimizes the variation in dimension of the cast prism. Because solid graphite is so soft (it is the
same thing as pencil lead) and can be easily flaked away, graphite is easily machined. The ease of
machining graphite allows for extremely smooth milled surfaces; which in turn eliminates the need for
post-milling processing (polishing).

16
Table I: Comparison of thermal properties of bronze, graphite, and stainless steel.8
Material Melting Temperature (°C)
CTE (10-6 K-1)
Thermal Conductivity (W ∙ m-1 ∙ °C-1)
Bronze 947 – 1070 16.5 – 17.5 84 – 86
Graphite 3220 – 3420 0.4 – 0.7 113 – 163
Stainless Steel 1370 – 1450 13 – 20 12 – 24
Stainless steel has sufficient thermal properties (high temperature resistance, high thermal
conductivity, and low CTE) but is not as optimal as graphite or bronze. Also, stainless steel is not as
easily machined as graphite or bronze. However, the durability of stainless steel would allow for the
hinges to safely be machined into the two halves without the chance of breaking.
Figure 10: The donated graphite block was milled down to two blocks (2” x 2.5” x 4.625”), each of which
were milled into half of the mold.
3.6 Milling the Mold Halves
The generated G-codes were uploaded to the Haas 3-axis CNC mill in Cal Poly’s Industrial and
Manufacturing Engineering lab. One of the blocks of graphite was placed into the vice of the mill and the
coordinate system of the CNC mill was zeroed to the appropriate corner of the graphite block. The G-
code program first utilized a 5/8” flat end mill bit to cut away the bulk of the material needed to be
removed, then it switched to a 1/4” flat end mill bit to remove more material that could not be reached by
the 5/8” mill bit (Figure 11). Finally, the program used a 1/8” ball end mill bit to define the actual surfaces
of the mold’s cavity and the registering pyramids and indentations.

17
Figure 11: The graphite mold partially machined.
To prevent the graphite from making an enormous mess inside the mill, a cardboard box was cut
to surround the graphite block and a vacuum’s hose was fixed to the coolant outlets (Figure 12).
Figure 12: The coolant outlet hoses could be positioned close to the cutting bit, which allowed the
vacuum’s hose to be close to the source of the graphite shavings.
The decision to ignore (and not machine) the external, insignificant features allowed Sam Kaplan
to complete machining the two halves in about 3 hours total. With the mold cavity and the registering
pyramids and indentations machined (Figure 13) the mold could viably be used to cast glass.

18
Figure 13: The completed proof of concept mold, consisting of the two graphite halves.
3.7 Casting Borosilicate Glass
Utilizing my artistic glass working skills I decided to cast proof of concept prisms out of
borosilicate glass. Borosilicate glass (commonly known as Pyrex) is used for artistic lampworking: the
craft of melting solid glass rods (colored or clear) in a propane-oxygen torch and manipulating the molten
glass to make small scale glass art. I have instructed craft classes in lampworking for the last three years
of my college career and have thereby developed advanced skills in lampworking. These advanced skills
allowed me to successfully create proof of concept prisms. It proved to be extremely convenient that I had
these skills for working with borosilicate not only because was I able to create prisms using these skills,
but also because borosilicate is a viable (if not optimal) material for these prisms.
Borosilicate glass has high clarity (high transmission percentage) and a high refractive index
(transmitted light is spread to a wide angle) (Table II). Borosilicate is used for the production of chemistry
glassware due to its extreme resistance to degradation (both physical and chemical): it can withstand
corrosive environments (such as that of the salty sea air), ultraviolet radiation, and physical abrasion (high
resistance to surface scratches) with negligible degradation. Additionally, Pyrex is known to have a low
CTE (Table II); which is why it is used to make baking dishes that can endure rapid thermal shock without
fracturing (e.g. moving a Pyrex dish from a hot oven to cool sink water). In regards to the prisms,
borosilicate’s low CTE will prevent the glass from drastically shrinking in size as it cools from molten
temperature to room temperature.
Table II: Material properties of borosilicate glass.9
CTE (10-6 K-1) 3.2 – 3.3
Index of Refraction 1.46 – 1.48

19
To cast the proof of concept prisms, I used the facilities at Cal Poly’s Craft Center (part of
Associated Students, Inc.) and began by acquiring a 1 inch diameter, solid, clear rod of borosilicate. I
introduced one end of this rod into a propane-oxygen torch’s flame. Rotating the rod about its axis
continuously, I heated the glass rod slowly at first to avoid creating a drastic stress concentration between
the surface and the interior of the solid rod; which could potentially fracture the glass. Once I preheated
the end of the rod I brought it closer to the torch’s tip and into the hottest portion of the flame. As the glass
on the end of the rod melted (Figure 14), the rotation of the rod, as well as the surface tension of the
molten glass, kept the molten glass from dripping off the end of the rod. The molten glass formed a ball
on the end of the rod and, as I continued to heat it, the molten glass gathered larger (Figure 15).
Figure 14: Graph of viscosity of borosilicate with respect to temperature.10
Figure 15: The glass gathered on the end of the rod glowed white hot.
0
2
4
6
8
10
12
500 700 900 1100 1300 1500
Log1
0[Vi
scos
ity (P
a∙S)
Temperature (°C)
20
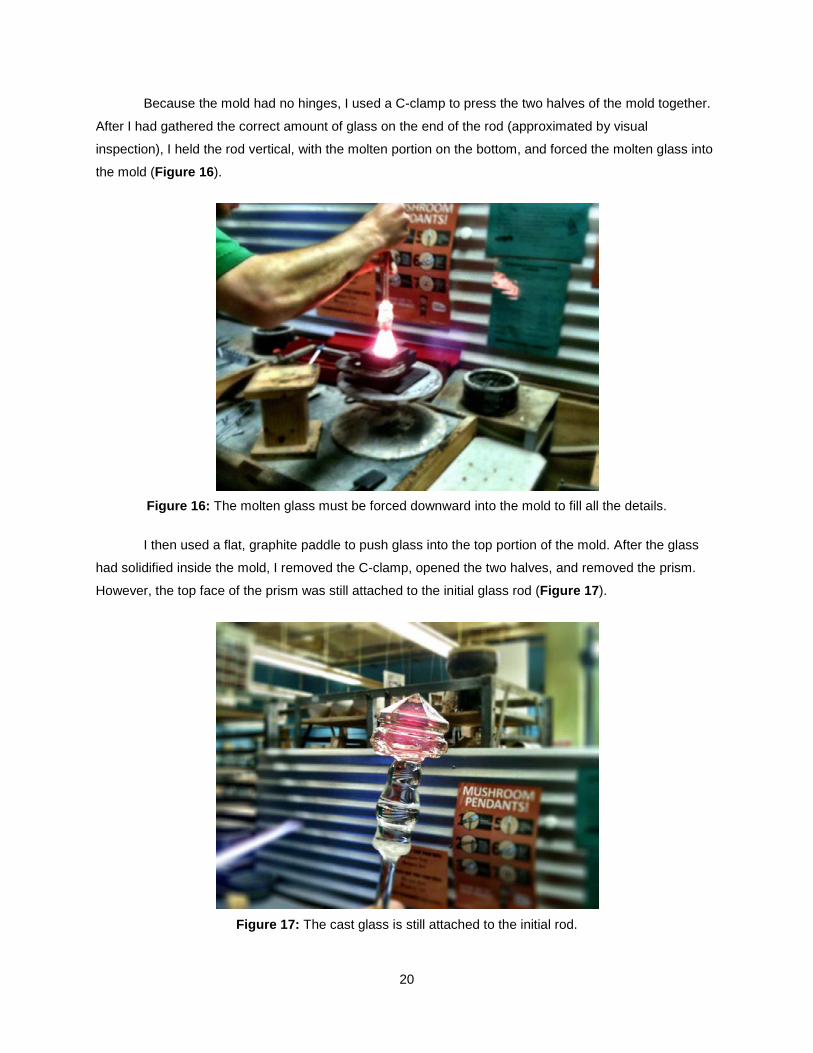
Because the mold had no hinges, I used a C-clamp to press the two halves of the mold together.
After I had gathered the correct amount of glass on the end of the rod (approximated by visual
inspection), I held the rod vertical, with the molten portion on the bottom, and forced the molten glass into
the mold (Figure 16).
Figure 16: The molten glass must be forced downward into the mold to fill all the details.
I then used a flat, graphite paddle to push glass into the top portion of the mold. After the glass
had solidified inside the mold, I removed the C-clamp, opened the two halves, and removed the prism.
However, the top face of the prism was still attached to the initial glass rod (Figure 17).
Figure 17: The cast glass is still attached to the initial rod.

21
To remove the prism from the rod, I used a tool called a “claw-grabber” (Figure 18) to hold onto
the bottom of the prism and I heated the glass rod just above the top face of the prism. With that glass
molten I was able to stretch it out (thereby decreasing its diameter) until the diameter was small enough
to allow surface tension to cut the molten glass and separate the rod from the prism.
Figure 18: A six-wire claw-grabber firmly held the six facets of the prism.11
This method of flame cutting the prism off the rod left a significant amount of extra glass on the
top face of the prism. To remove this extra glass, I heated the top face to molten without heating the other
features of the prism and tweezed away the extra glass. I repeated this until sufficient glass had been
removed. To flatten the top face I heated the entire top face to molten and pressed it on a flat graphite
pad.
After completely shaping the prism, I placed the prism in a kiln to cool it from working temperature
(560°C) to room temperature over a period of approximately 12 hours. This slow cooling was necessary
to eliminate any stresses that could have developed if the surface cooled significantly faster than the
interior.

22
4. Results
I have cast 4 prisms using the lampworking techniques stated previously. These 4 prisms all had
excellent surface finishes and showed no evidence of any marks made by the parting line of the mold
(Figure 19). Due to the fact that I had to approximate the size of the gather necessary to completely fill
the mold, I consistently overfilled the mold. I had determined that it was possible to remove extra glass
from the prisms’ top surfaces but it would have been impossible (or at least impractical) to under-fill the
mold and attempt to add addition glass to get the top surface to the correct height. Therefore, I
consistently had to remove extra glass from the top surface.
Figure 19: The 4 prisms cast out of borosilicate next to the rapid-prototyped prism.
This process (done by hand and by eye) inherently created variation in the height of the prisms.
The ideal height of the prisms would be the height at which the top surface of the prism is flush with the
top surface of the mold (Figure 20). However, the top surfaces of the prisms I had produced were about
1/16” to 1/8” above the top surface of the mold (Figure 21).
Figure 20: The acrylic prism placed into one half of the mold to show the ideal height.
Figure 21: A glass prism placed into one half of the mold to show the achieved height.

23
5. Discussion
5.1 Leaded Glass I was not surprised to find 4.5 weight percent lead in the original prism; leaded glass is
commonly used for optics because it has high clarity (analogous to high brightness or a high transmission
percentage) and a high refractive index (it disperses the light to a wide angle) (Table III). The addition of
lead to silica glass decreases the glass transition temperature of the glass (Table IV), thereby making
manufacturing easier.
Table III: Material properties of leaded glass.12
CTE (10-6 K-1) 9.7 – 10.1
Index of Refraction 1.52 – 1.54
Table IV: Comparison of glass transition temperatures of various glass compositions.13
Material Glass Transition Temperature (°C)
Leaded Silica Glass 432 – 580
Soda-Lime Silica Glass 454 – 607
Borosilicate Glass 488 – 648
However, although leaded glass has these desirable optical properties, it also has poor
resistance to surface scratches. The fact that the prisms’ top faces are flush with the floor of the beacon
room means that they are walked on repeatedly. The original prism’s top surface was scratched and
scuffed, which effectively decreases the amount of light that could possibly be transmitted. Additionally, I
would not feel comfortable being exposed leaded glass at molten temperature. At this elevated
temperature lead particles could potentially escape the glass, enter the surrounding air, and then be
inhaled (which logically presents health concerns).
5.2 Imperfect Prisms Although the additional height of the top surface of the prisms is not ideal, it is not extremely
detrimental. This extra height could potentially capture more light from the beacon light; however, it also
means that the top surface of the prism will not be perfectly flush with the beacon room’s floor, which may
create an uneven walking surface in the floor of the beacon room. There is also a greater chance of
scratching the more exposed top surface of the prism.
Additionally, the claw-grabber tool used to maintain control of the prism as the initial rod is melted
off tended to leave indentations in the glass where the end of the wires touched the glass (Figure 22).
This could be minimized by waiting longer between removing the solidified part from the mold and placing
the claw-grabber onto the prism (allowing it to more completely solidify). However, even when I did this,

24
the claw-grabber would inevitably leave indentations as the glass heated up while I was working on the
top face.
Figure 22: Handling marks (circled in red) left by the ends of the wires of the claw-grabber.
5.3 Future Method for Casting Prisms The lampworking methods used to create the proof of concept casts produced prisms that were
slightly too tall and that had handling marks from the claw-grabber. I suggest that future casting methods
should focus on minimizing the variation in height and eliminating the handling marks. One possibility is to
cast these prisms by filling the mold with molten glass poured from a crucible (Figure 23).
Figure 23: Pouring molten glass from a crucible requires full heat protection attire.14

25
This method would, after sufficient practice, allow the casting technician to more accurately
gauge the amount of glass that is poured into the mold. The fact that glass would be poured into the mold
from a crucible means that there is no solid glass rod from which the prism needs to be removed; thereby
eliminating the need for removing the prism from the mold, attaching the claw-grabber, cutting the prism
free from the initial rod, and flattening the top surface. Once the appropriate amount of glass has been
poured into the mold, the glass poured into the mold would separate itself from the stream of glass
coming from the crucible due to surface tension and ample superheat of the molten glass. Pouring the
glass from a crucible effectively decreases the number of processing steps, eliminates the unnecessary
handling marks, and allows the height of the prisms to be honed to more accurately resemble the height
of the original prism.
In addition to eliminating the additional processing steps, production rates would be increased if
the mold used was made of stainless steel. Unlike the graphite mold, the hinge features of a stainless
steel mold would be able to withstand repeated opening and closing; and with all the features of the mold
included in the machining process, the mold could be used as its design intended (as a kick-mold).
Possible costs associated with this crucible method may include the cost of studio use (for a studio that
contains a furnace in which to heat the crucible), an increased cost of manufacturing the mold (due to
slower feed rates and therefore longer machining times), and a greater cost of energy for powering the
furnace as compared to the energy required to power the small kiln I used to anneal the prisms in the
Craft Center.
26
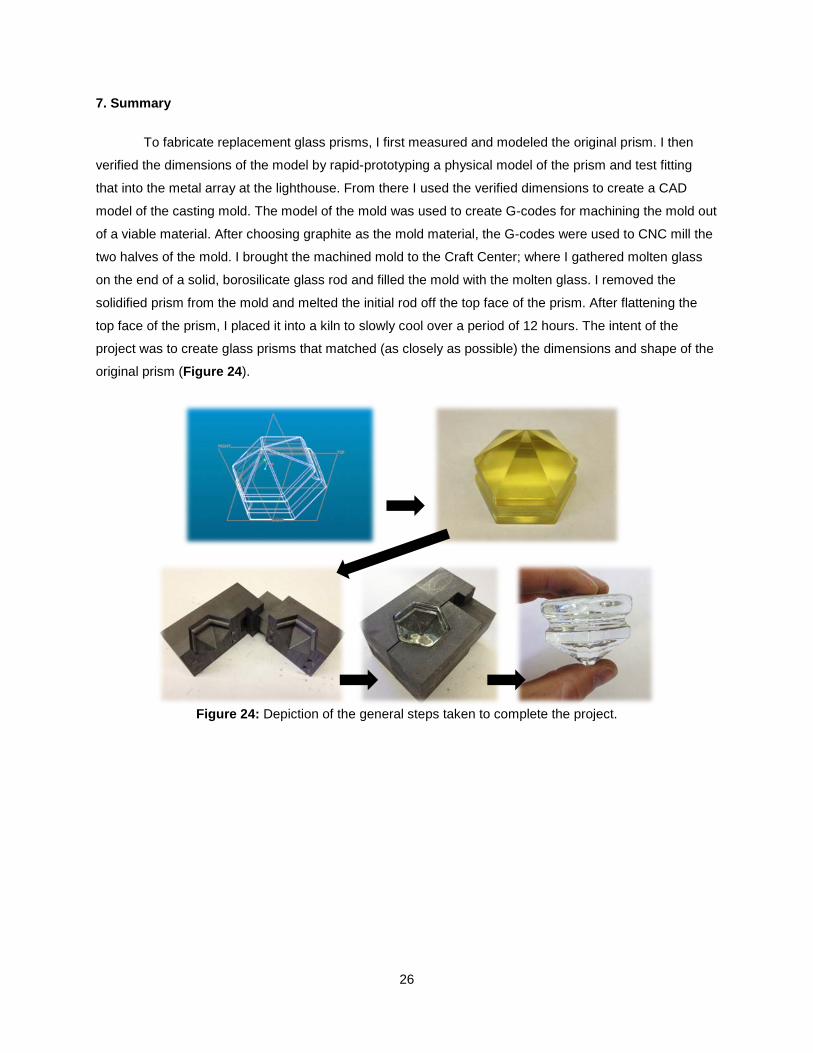
7. Summary
To fabricate replacement glass prisms, I first measured and modeled the original prism. I then
verified the dimensions of the model by rapid-prototyping a physical model of the prism and test fitting
that into the metal array at the lighthouse. From there I used the verified dimensions to create a CAD
model of the casting mold. The model of the mold was used to create G-codes for machining the mold out
of a viable material. After choosing graphite as the mold material, the G-codes were used to CNC mill the
two halves of the mold. I brought the machined mold to the Craft Center; where I gathered molten glass
on the end of a solid, borosilicate glass rod and filled the mold with the molten glass. I removed the
solidified prism from the mold and melted the initial rod off the top face of the prism. After flattening the
top face of the prism, I placed it into a kiln to slowly cool over a period of 12 hours. The intent of the
project was to create glass prisms that matched (as closely as possible) the dimensions and shape of the
original prism (Figure 24).
Figure 24: Depiction of the general steps taken to complete the project.
27
6. Conclusions
The initial CAD model of the prism accurately represented the size and shape of original prism
since a rapid prototyped prism did indeed fit properly into the metal array. The mold design allowed for
easy manufacture and accurate alignment of the two mold halves. The mold material withstood the high
temperature conditions of casting molten glass. Although the graphite mold was not able to accommodate
the hinge, a stainless steel mold would be a viable replacement.
The prisms created as proof of concept prisms (those created at the Craft Center by lampworking
methods) can be utilized as replacement prisms. They have clean, smooth surfaces with no evidence of a
parting line. They are made of borosilicate; which has optimum optical and degradation properties for this
specific application. The dimensions of the prism (aside from the overall height of the top surface)
accurately represent the dimensions of the original prism and therefore will efficiently illuminate the
maintenance room.
The suggested method for creating the prisms in the future will eliminate the problems associated
with the proof of concept method. Casting glass prisms with a crucible will eliminate additional processing
steps, thereby increasing productivity and eliminating unnecessary handling marks, and it will produce
prisms with more accurately dimensioned top surfaces.
28
7. References
1. Janem5. Point Sur LS Deck Prism Walkway. 2007. Photograph. Flickr. Point Sur, California. Web. 7 Jun 2012. <http://www.flickr.com/photos/22745381@N08/3467813439/>.
2. Drozda, Dr. Robert. Deck Prisms. 2010. Photograph. Flickr. Newport, Oregon. Web. 7 Jun 2012. <http://www.flickr.com/photos/dr_ozda/5208565250/>.
3. Vlierman, Karel. "A note on deck-lights, -glasses, or -prisms from 19th-century wrecks in Flevoland, The Netherlands." International Journal of Nautical Archaeology. 23.4 (1994): 319-323. Web. 7 Jun. 2012.
4. Makey, Ian. Group of Deck Prisms. 2010. Photograph. Wikipedia. Web. 7 Jun 2012. <http://en.wikipedia.org/wiki/File:Group_of_Deck_Prisms.jpg>.
5. Vault Lights/Pavement Lights/Sidewalk Prisms. 2012. Photograph. Glassian.orgWeb. 7 Jun 2012. <http://glassian.org/Prism/Vault/index.html>.
6. Suga, Nobuo. "Optical Comparator Basics." Quality. 44.6 (2005): 18-22. Web. 7 Jun. 2012. <http://proquest.umi.com/pqdlink?did=857281801&Fmt=7&clientId=17878&RQT=309&VName=PQD>.
7. Fluegel, Alexander. "Glass Viscosity Fixpoints & Viscosity Units." Glass Technology. 48.1 (2007): 13-30. Web. 7 Jun. 2012. <http://glassproperties.com/viscosity/Glass-Viscosity-Fixpoints.htm>.
8. Cambridge Engineering Selector EduPack (Version 7.0.0) [Software]. (2011). Rustat House, 62 Clifton Road, Cambridge, United Kingdom: Granta Design Limited
9. Cambridge Engineering Selector EduPack (Version 7.0.0) [Software]. (2011). Rustat House, 62 Clifton Road, Cambridge, United Kingdom: Granta Design Limited
10. Fluegel, Alexander. "Glass Viscosity Fixpoints & Viscosity Units." Glass Technology. 48.1 (2007): 13-30. Web. 7 Jun. 2012. < http://glassproperties.com/references/NIST_Certificates/717a_pg2.gif >.
11. Claw-Grabber Finger Holder. 2011. Photograph. Sundance Art Glass, Paradise, California. Web. 7 Jun 2012. <http://www.sundanceglass.com/lampworking-glassblowing-pyrex-borosilicate-tools-equipment-supplies/claw-grabber-glassblowing-1sm.jpg>.
12. Cambridge Engineering Selector EduPack (Version 7.0.0) [Software]. (2011). Rustat House, 62 Clifton Road, Cambridge, United Kingdom: Granta Design Limited
13. Cambridge Engineering Selector EduPack (Version 7.0.0) [Software]. (2011). Rustat House, 62 Clifton Road, Cambridge, United Kingdom: Granta Design Limited
14. Steger, Volker. Technician pours molten glass from a crucible. 2012. Photograph. Science Photo Library, London, United Kingdom. Web. 7 Jun 2012. <http://www.sciencephoto.com/media/357430/enlarge>.

Appendix I

1.250
.625
2.500
1.250 TYP.
.400 TYP.
1.225 TYP
1.225 TYP.
.500
.500 1.110
1.750
.605 TYP.
2.625
R1.625
R.375
1.000
(.291)
(.539)
(.760)
(.850)
.500 TYP.
TYP.60
(.256)
MODEL NAME TITLE
SCALE 1 : 2SHEET 1 OF 2
TITLE
DATEAPPROVED BY
DATECHECKED BY
DATEDRAWN BYUNLESS OTHERWISE SPECIFIED ALL DIMENSIONS ARE IN INCHES.TOLERANCES ARE:X.X +/- 0.1X.XX +/- 0.01X.XXX +/- 0.005ANG +/- 1
DRAWING 1 OF 4
Handle Side of Kick Mold
27 Apr. 2012Daniel Garcken
MOLD_A Handle Side of Kick Mold
MATERIAL
Bronze
PROJECT
Kick Mold
NOTEUNLESS OTHERWISE SPECIFIEDR .075 ON ALL ROUNDED EDGES
3/8 - 16 3A SEE DETAIL ASEE DETAIL B
A
A SEE DETAIL ASEE DETAIL B
Appendix II

1.440
.415
TYP.39
TYP.8
R.125
.957 TYP..400 TYP.
.125 TYP.
.150 TYP.
.405 TYP. TYP.45
TYP.45
MODEL NAME TITLE
SCALE 1 : 1SHEET 2 OF 2
TITLE
DATEAPPROVED BY
DATECHECKED BY
DATEDRAWN BYUNLESS OTHERWISE SPECIFIED ALL DIMENSIONS ARE IN INCHES.TOLERANCES ARE:X.X +/- 0.1X.XX +/- 0.01X.XXX +/- 0.005ANG +/- 1
DRAWING 1 OF 4
Handle Side of Kick Mold (Cont.)
27 Apr. 2012Daniel Garcken
MOLD_A Handle Side of Kick Mold (Cont.)
MATERIAL
Bronze
PROJECT
Kick Mold
NOTEUNLESS OTHERWISE SPECIFIEDR .075 ON ALL ROUNDED EDGES
SECTION A-ASCALE 1:1
DETAIL ASCALE 4:1
R.050 TYP.
DETAIL BSCALE 4:1
R.050 TYP.
Appendix III

1.260 2.50
R1.625
R.3752.625
1.00
.400
.400 SQ. TYP.
1.250
1.2251.225
1.00
1.125
.375
.370
R.250R.193
.620
TYP.60
(.291)
(.539)
(.760)
(.850)
MODEL NAME TITLE
SCALE 1 : 2SHEET 1 OF 2
TITLE
DATEAPPROVED BY
DATECHECKED BY
DATEDRAWN BYUNLESS OTHERWISE SPECIFIED ALL DIMENSIONS ARE IN INCHES.TOLERANCES ARE:X.X +/- 0.1X.XX +/- 0.01X.XXX +/- 0.005ANG +/- 1
DRAWING 2 OF 4
Base Side of Kick Mold
27 Apr. 2012Daniel Garcken
MOLD_B Base Side of Kick Mold
MATERIAL
Bronze
PROJECT
Kick Mold
3 X 1/4 - 20 UNC 2BTAP #7 DRILL (0.201)
SEE DETAIL A
SEE DETAIL B
NOTEUNLESS OTHERWISE SPECIFIEDR .075 ON ALL ROUNDED EDGES
A
A
SEE DETAIL A
SEE DETAIL B
Appendix IV

TYP.8
1.440
.953 TYP..415
.750 TYP.
TYP.39
R.125
.400 TYP.
.405 TYP. TYP.45
.150 TYP.
.125 TYP.
TYP.45
MODEL NAME TITLE
SCALE 1 : 1SHEET 2 OF 2
TITLE
DATEAPPROVED BY
DATECHECKED BY
DATEDRAWN BYUNLESS OTHERWISE SPECIFIED ALL DIMENSIONS ARE IN INCHES.TOLERANCES ARE:X.X +/- 0.1X.XX +/- 0.01X.XXX +/- 0.005ANG +/- 1
DRAWING 2 OF 4
Base Side of Kick Mold (Cont.)
27 Apr. 2012Daniel Garcken
MOLD_B Base Side of Kick Mold (Cont.)
MATERIAL
Bronze
PROJECT
Kick Mold
SECTION A-ASCALE 1:1
NOTEUNLESS OTHERWISE SPECIFIEDR .075 ON ALL ROUNDED EDGES
DETAIL ASCALE 4:1
R.050 TYP.
R.050 TYP.
DETAIL BSCALE 4:1
Appendix V

1.750
R1.630
R5.0
12.0
1.0
1.00
R.50
20
1.00
.50
R TYP..250
R TYP..135
.25 TYP.
.75
MODEL NAME TITLE
SCALE 1 : 2SHEET 1 OF 1
TITLE
DATEAPPROVED BY
DATECHECKED BY
DATEDRAWN BYUNLESS OTHERWISE SPECIFIED ALL DIMENSIONS ARE IN INCHES.TOLERANCES ARE:X.X +/- 0.1X.XX +/- 0.01X.XXX +/- 0.005ANG +/- 1
DRAWING 3 OF 4
Kick Mold Handle
27 Apr. 2012Daniel Garcken
HANDLE Kick Mold Handle
MATERIAL
Aluminum
PROJECT
Kick Mold
NOTEUNLESS OTHERWISE SPECIFIEDR .075 ON ALL ROUNDED EDGES
Appendix VI

10.0
10.0
.375
5.00
1.00
1.00
3.13
.75 TYP.
MODEL NAME TITLE
SCALE 1 : 3SHEET 1 OF 1
TITLE
DATEAPPROVED BY
DATECHECKED BY
DATEDRAWN BYUNLESS OTHERWISE SPECIFIED ALL DIMENSIONS ARE IN INCHES.TOLERANCES ARE:X.X +/- 0.1X.XX +/- 0.01X.XXX +/- 0.005ANG +/- 1
DRAWING 4 OF 4
Kick Mold Base
27 Apr. 2012Daniel Garcken
BASE Kick Mold Base
MATERIAL
Aluminum
PROJECT
Kick Mold
NOTEUNLESS OTHERWISE SPECIFIEDR .075 ON ALL ROUNDED EDGES
.270 TYP.
Appendix VII