fall 2019 woodworking - woodpeck.com 2019_catalog_rev1019 lowres.pdf• japanese toolbox proudly...
TRANSCRIPT
woodpeck.com
FALL 2019
WOODWORKING
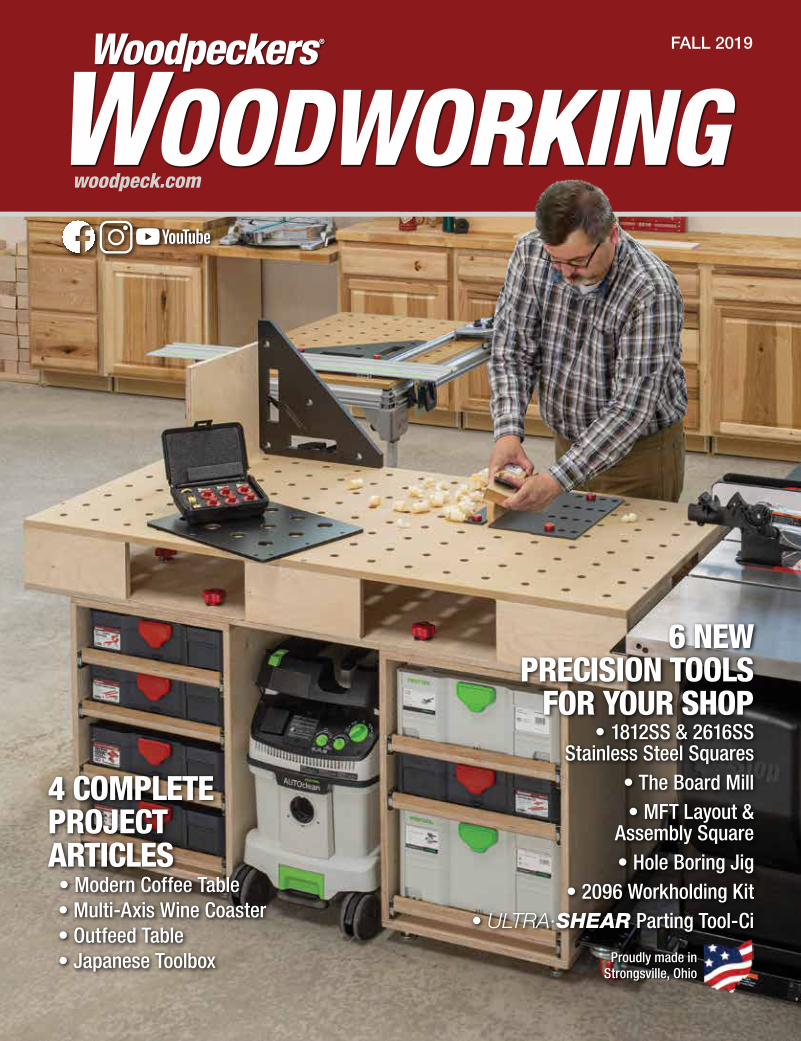
6 NEW PRECISION TOOLS
FOR YOUR SHOP • 1812SS & 2616SS
Stainless Steel Squares• The Board Mill• MFT Layout &
Assembly Square• Hole Boring Jig
• 2096 Workholding Kit • ULTRA∙SHEAR Parting Tool-Ci
4 COMPLETEPROJECTARTICLES • Modern Coffee Table • Multi-Axis Wine Coaster • Outfeed Table • Japanese Toolbox Proudly made in
Strongsville, Ohio
2 Woodpeckers, LLC • 1-800-752-0725 • woodpeck.com
MEA
SURI
NG &
MAR
KING
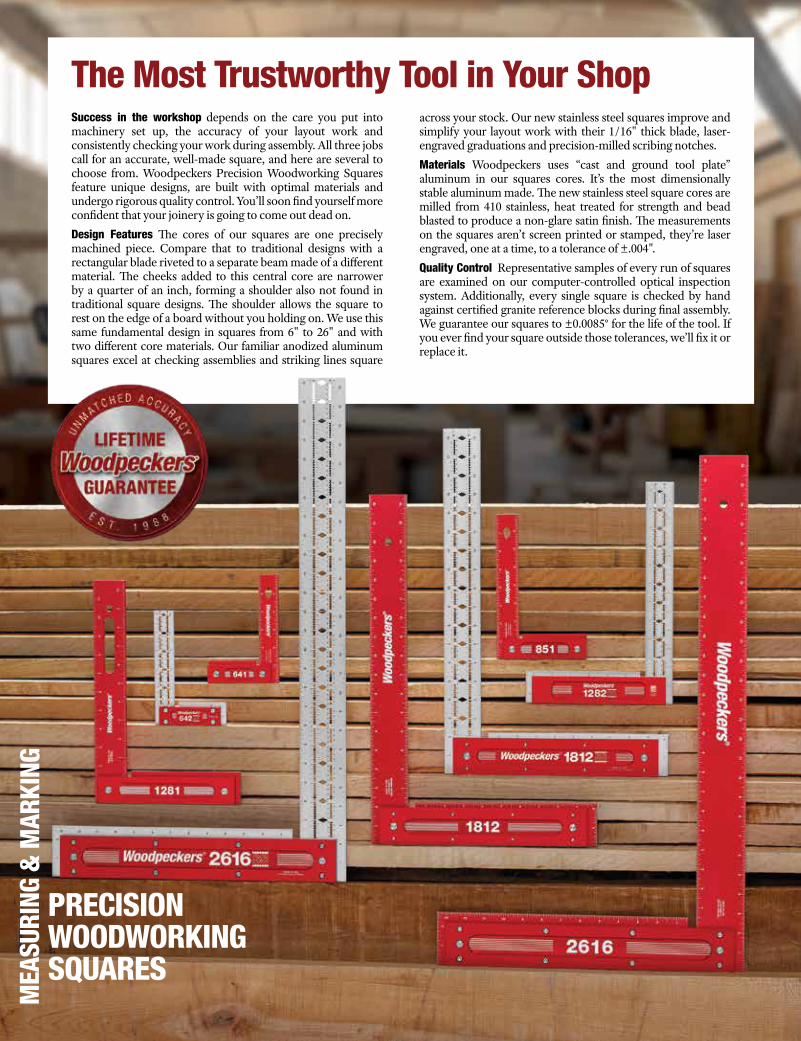
Success in the workshop depends on the care you put into machinery set up, the accuracy of your layout work and consistently checking your work during assembly. All three jobs call for an accurate, well-made square, and here are several to choose from. Woodpeckers Precision Woodworking Squares feature unique designs, are built with optimal materials and undergo rigorous quality control. You’ll soon find yourself more confident that your joinery is going to come out dead on. Design Features The cores of our squares are one precisely machined piece. Compare that to traditional designs with a rectangular blade riveted to a separate beam made of a different material. The cheeks added to this central core are narrower by a quarter of an inch, forming a shoulder also not found in traditional square designs. The shoulder allows the square to rest on the edge of a board without you holding on. We use this same fundamental design in squares from 6" to 26" and with two different core materials. Our familiar anodized aluminum squares excel at checking assemblies and striking lines square
across your stock. Our new stainless steel squares improve and simplify your layout work with their 1/16" thick blade, laser-engraved graduations and precision-milled scribing notches. Materials Woodpeckers uses “cast and ground tool plate” aluminum in our squares cores. It’s the most dimensionally stable aluminum made. The new stainless steel square cores are milled from 410 stainless, heat treated for strength and bead blasted to produce a non-glare satin finish. The measurements on the squares aren’t screen printed or stamped, they’re laser engraved, one at a time, to a tolerance of ±.004".Quality Control Representative samples of every run of squares are examined on our computer-controlled optical inspection system. Additionally, every single square is checked by hand against certified granite reference blocks during final assembly. We guarantee our squares to ±0.0085° for the life of the tool. If you ever find your square outside those tolerances, we’ll fix it or replace it.
The Most Trustworthy Tool in Your Shop
PRECISION WOODWORKINGSQUARES
3
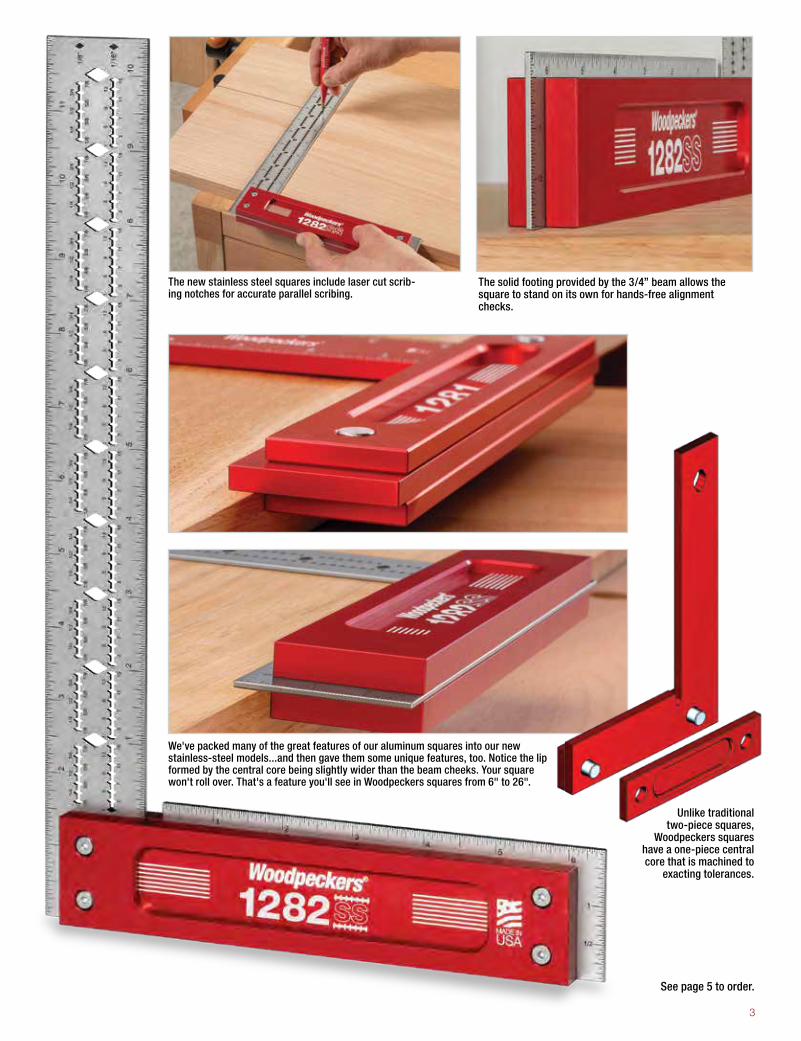
We've packed many of the great features of our aluminum squares into our new stainless-steel models...and then gave them some unique features, too. Notice the lip formed by the central core being slightly wider than the beam cheeks. Your square won't roll over. That's a feature you'll see in Woodpeckers squares from 6" to 26".
Unlike traditional two-piece squares,
Woodpeckers squares have a one-piece central core that is machined to
exacting tolerances.
See page 5 to order.
The solid footing provided by the 3/4” beam allows the square to stand on its own for hands-free alignment checks.
The new stainless steel squares include laser cut scrib-ing notches for accurate parallel scribing.
4 Woodpeckers, LLC • 1-800-752-0725 • woodpeck.com
Some would say that “set in my ways” is a laughable understatement when describing me. So, my friends were stunned when they found out I was working in metric measurements on the project I designed and built for this edition. It worked well and the world did not stop turning. I’m not a complete convert yet, but when working with Baltic Birch plywood, I’ll certainly do it again. If you’re in the transition zone with me, you’ll be happy to know, almost everything Woodpeckers makes has a metric version. More about the projects later, first here's a glimpse into the exciting new products in this edition. We took inspiration from our Slab Flattening Mill and designed the Board Mill. Now you can flatten and straight edge wide stock right in your own shop. See it on page 31. Following the success of our Ultra-Shear turning tools, we’ve put a narrow, razor-sharp insert on an even narrower blade, giving you ultra-smooth, incredibly narrow parting cuts. It's our Ultra-Shear Parting Tool Ci. Our family of precision woodworking squares has grown by two. Our large panel squares are now available with stainless steel blades. See the 2616SS and 1812SS in our new “family portrait” on the inside front cover.If you’re a Festool user we have three great new products for you. First is a router template you can use to make replacement table tops for your MFT or to build your own custom grid-work tables (see the cover photo for inspiration). Put that new Swiss cheese workbench you just built (or the MFT you already had) to work with our Workholding Kit. It’s a collection of wedges and dogs you can use to hold just about anything. And, there's a new solid phenolic square to align your MFT. This edition’s projects start with Nick Cook's multi-axis wine coaster that makes a great gift (does anyone else hear Jingle Bells?). My Outfeed/Assembly Workbench is next. If you spend much time on YouTube or Instagram, you’ll probably recognize Chis Salomone, known on the web as “Four-Eyes”, Chris built a cool Mid-Century Modern coffee table and shares his measurements and methods. Last but not least, Woodpeckers Marketing Manager, George Snyder, shows you how to build a simple and clever Japanese Tool Box.
Jeff FarrisEditorWoodpeckers Woodworking
4FEATURE ARTICLES
Coffee Table..........64-67
Wine Coaster..........18-21 Outfeed Table..........52-57
Japanese Toolbox..........70-73
4MEASURING & MARKING | 2-17Precision Woodworking Squares .....2,3,5 (In use 53)Precision T-Squares ................................ 6 (In use 55)Saddle T-Squares .....................................7 (In use 67)Precision Triangles ................................................. 8Carpenters Square ................................................. 8Mini Square ............................................................. 8Story Stick ............................................................... 9Straight Edge Rule................................................ 10Paolini Pocket Rules............................... 11 (In use 71)Woodworking Rules ................. 12-13 (In use 55,71,73)Rule Stops ............................................................. 13Hook Stop .............................................................. 13Woodworkers Edge Rules ..............................14-15Saw Gauges .....................................................16-174WOODTURNING | 22-25
Ultra-Shear Woodturning Tools .......22 (In use 19,20)Ultra-Shear Pen Tools .......................................... 23Center Finders ...................................................... 23 Pen Mill-Ci ............................................................. 24Pilot Reamers ........................................................ 24Carbide Inserts ..................................................... 24Insert Saver ........................................................... 24Parting Tool-Ci ...................................................... 254CLAMPING & ASSEMBLY | 26-30
Clamp Rack-It System ................................... 26-27Clamp Rack-It (Single) ......................................... 28Clamp Cart ............................................................ 28Miter Clamping Tool ............................................. 28Universal Clamp Support .................................... 28Clamping Square Plus ......................................... 29CSP Clamp ............................................................ 29Box Clamp ...............................................30 (In use 71)4POWER TOOL ACCESSORIES | 31-63Board Mills........................................................ 31,75Slab Flattening Mills .................................. 32-33,75Router Plate ................................................34,40-41Router Plate Template .....................................34,39 Free-Hand Guard ................................................. 34Twist-Lock Ring Set ........................................34,41Precision Router Lift ............................35,40-41,43Push Guard ............................................ 35 (In use 56)Super Fence ..........................................36,40-41,43Flip Stops ..........................................36,44,45,46,58Micro Adjust ................................................ 37,41,43Downdraft Dust Cabinet .......................37,41,42-43Coping Sled ......................................................38,41Variable Pressure Featherboard ....................38,41Miter Slot Nut ...................................................38,49Router Table Tops ...................................... 39,40-41Router Table Leg Sets ............................... 39,40-41Wheel Kit ..................................................... 39,40-41Router Table Packages .................................. 40-41Extension Wing Router Tables ...................... 42-43Drill Press Table .............................................. 44-45Drill Press Fence (DP3) ........................................ 46Hold Down Clamp............................................45,46Knuckle Clamp .................................................45,46Combo Shelf Pin Template ....................47 (In use 53)Multi-Knobs .................................48 (In use cover,52,57)Oval Nuts ............................................................... 48Tracks ..................................................................... 49Universal Cross Dowel Jig ................................... 50Cross Dowels & Connector Bolts ....................... 51Parallel Guide System ............................58(In use 53)Adjustable Track Square ...................... 59 (In use 65)Hole Boring Jig................................60 (In use cover,54)MFT Layout & Assembly Square ......61 (In use cover)2096 Workholding Kit .....................61 (In use cover,56)Variable Router Jig ............................................... 62Offset Base System ......................63 (In use 53,61,67)4SHOP ACCESSORIES | 68-74
BladeSaver ............................................................ 68Cubby Drawers ..................................................... 68Mini-Scraper ......................................................... 69Woodpeckers Mug ............................................... 69Shop Notepad ....................................................... 74Mechanical Pencil ................................................ 74
All of our Woodpeckers Brand Products arePROUDLY Made in our Strongsville, Ohio factory!
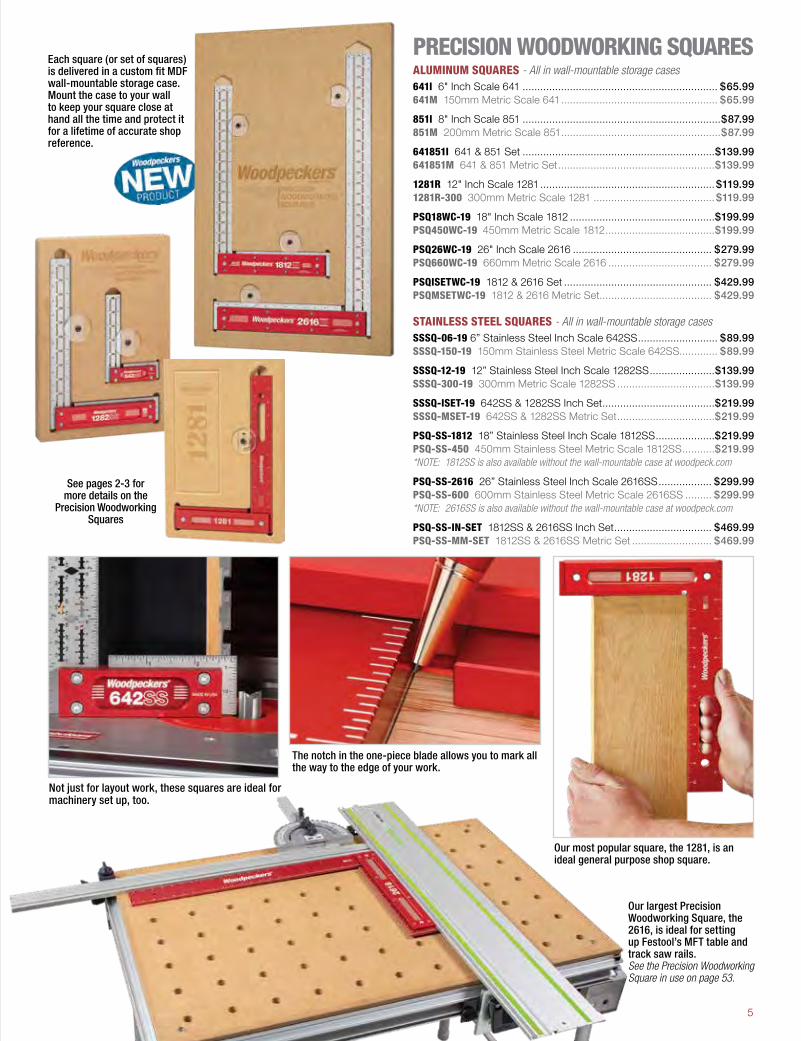
PRECISION WOODWORKING SQUARESALUMINUM SQUARES - All in wall-mountable storage cases641I 6" Inch Scale 641 .................................................................. $65.99641M 150mm Metric Scale 641 ..................................................... $65.99
851I 8" Inch Scale 851 ...................................................................$87.99851M 200mm Metric Scale 851 ......................................................$87.99
641851I 641 & 851 Set .................................................................$139.99641851M 641 & 851 Metric Set .....................................................$139.99
1281R 12" Inch Scale 1281 ...........................................................$119.991281R-300 300mm Metric Scale 1281 .........................................$119.99
PSQ18WC-19 18" Inch Scale 1812 .................................................$199.99PSQ450WC-19 450mm Metric Scale 1812 .....................................$199.99
PSQ26WC-19 26" Inch Scale 2616 ............................................... $279.99PSQ660WC-19 660mm Metric Scale 2616 ................................... $279.99
PSQISETWC-19 1812 & 2616 Set .................................................. $429.99 PSQMSETWC-19 1812 & 2616 Metric Set...................................... $429.99
STAINLESS STEEL SQUARES - All in wall-mountable storage casesSSSQ-06-19 6” Stainless Steel Inch Scale 642SS ........................... $89.99SSSQ-150-19 150mm Stainless Steel Metric Scale 642SS............. $89.99
SSSQ-12-19 12” Stainless Steel Inch Scale 1282SS ......................$139.99SSSQ-300-19 300mm Metric Scale 1282SS .................................$139.99
SSSQ-ISET-19 642SS & 1282SS Inch Set ......................................$219.99SSSQ-MSET-19 642SS & 1282SS Metric Set .................................$219.99
PSQ-SS-1812 18” Stainless Steel Inch Scale 1812SS ....................$219.99 PSQ-SS-450 450mm Stainless Steel Metric Scale 1812SS ...........$219.99 *NOTE: 1812SS is also available without the wall-mountable case at woodpeck.com
PSQ-SS-2616 26” Stainless Steel Inch Scale 2616SS .................. $299.99PSQ-SS-600 600mm Stainless Steel Metric Scale 2616SS ......... $299.99 *NOTE: 2616SS is also available without the wall-mountable case at woodpeck.com
PSQ-SS-IN-SET 1812SS & 2616SS Inch Set ................................. $469.99PSQ-SS-MM-SET 1812SS & 2616SS Metric Set ........................... $469.99
Our largest Precision Woodworking Square, the 2616, is ideal for setting up Festool’s MFT table and track saw rails. See the Precision Woodworking Square in use on page 53.
Each square (or set of squares) is delivered in a custom fit MDF wall-mountable storage case. Mount the case to your wall to keep your square close at hand all the time and protect it for a lifetime of accurate shop reference.
The notch in the one-piece blade allows you to mark all the way to the edge of your work.
Our most popular square, the 1281, is an ideal general purpose shop square.
5
Not just for layout work, these squares are ideal for machinery set up, too.
See pages 2-3 for more details on the
Precision Woodworking Squares
6 Woodpeckers, LLC • 1-800-752-0725 • woodpeck.com
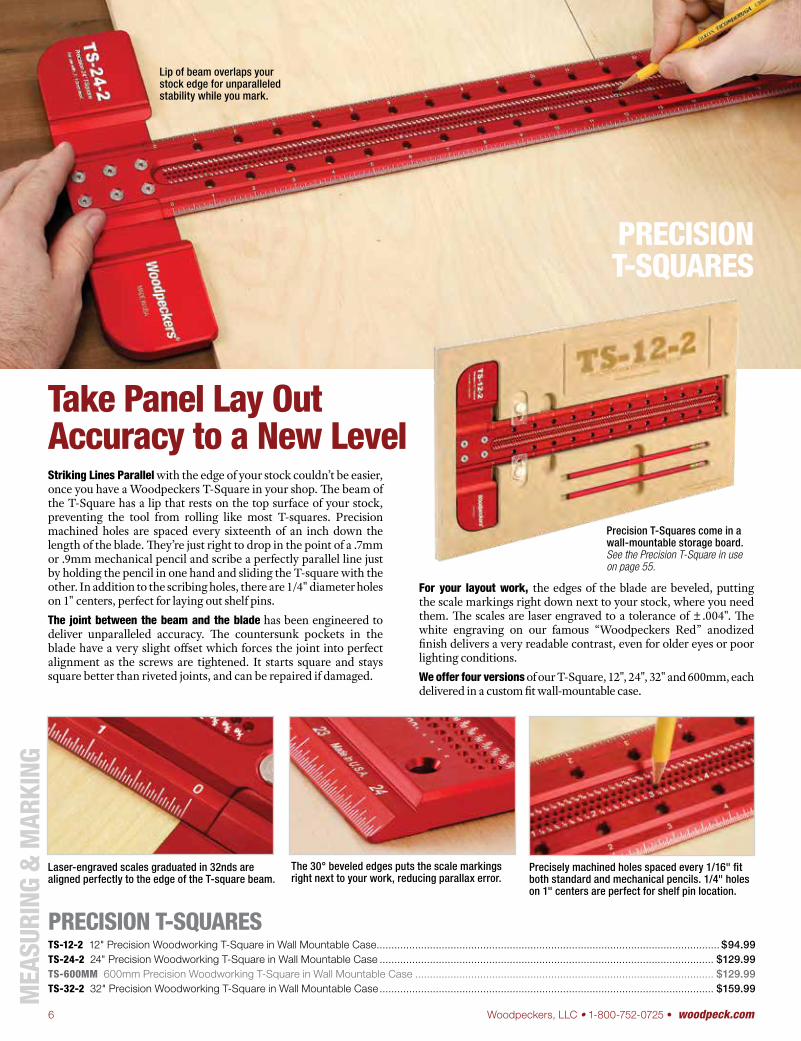
Striking Lines Parallel with the edge of your stock couldn’t be easier, once you have a Woodpeckers T-Square in your shop. The beam of the T-Square has a lip that rests on the top surface of your stock, preventing the tool from rolling like most T-squares. Precision machined holes are spaced every sixteenth of an inch down the length of the blade. They’re just right to drop in the point of a .7mm or .9mm mechanical pencil and scribe a perfectly parallel line just by holding the pencil in one hand and sliding the T-square with the other. In addition to the scribing holes, there are 1/4" diameter holes on 1" centers, perfect for laying out shelf pins. The joint between the beam and the blade has been engineered to deliver unparalleled accuracy. The countersunk pockets in the blade have a very slight offset which forces the joint into perfect alignment as the screws are tightened. It starts square and stays square better than riveted joints, and can be repaired if damaged.
PRECISION T-SQUARESTS-12-2 12" Precision Woodworking T-Square in Wall Mountable Case .................................................................................................................... $94.99TS-24-2 24" Precision Woodworking T-Square in Wall Mountable Case ................................................................................................................. $129.99TS-600MM 600mm Precision Woodworking T-Square in Wall Mountable Case ..................................................................................................... $129.99TS-32-2 32" Precision Woodworking T-Square in Wall Mountable Case ................................................................................................................. $159.99
The 30° beveled edges puts the scale markings right next to your work, reducing parallax error.
Laser-engraved scales graduated in 32nds are aligned perfectly to the edge of the T-square beam.
Precisely machined holes spaced every 1/16" fit both standard and mechanical pencils. 1/4" holes on 1" centers are perfect for shelf pin location.
MEA
SURI
NG &
MAR
KING
Lip of beam overlaps your stock edge for unparalleled stability while you mark.
Precision T-Squares come in a wall-mountable storage board.See the Precision T-Square in use on page 55.
Take Panel Lay OutAccuracy to a New Level
For your layout work, the edges of the blade are beveled, putting the scale markings right down next to your stock, where you need them. The scales are laser engraved to a tolerance of ±.004". The white engraving on our famous “Woodpeckers Red” anodized finish delivers a very readable contrast, even for older eyes or poor lighting conditions. We offer four versions of our T-Square, 12", 24", 32" and 600mm, each delivered in a custom fit wall-mountable case.
PRECISION T-SQUARES
7
SADDLE T-SQUARESSDLTSET-IS19 Saddle T-Square Set of 4 in Systainer - Inch........................... $369.99 SDLTSET-MS19 Saddle T-Square Set of 4 in Systainer - Metric ...................... $369.99 SDLTSET-IW19 Saddle T-Square Set of 4 in Woodpeckers Case - Inch ......... $329.99 SDLTSET-MW19 Saddle T-Square Set of 4 in Woodpeckers Case - Metric ..... $329.99SDLTSET-IRI19 Saddle T-Square Set of 4 & Rack-It- Inch ............................. $299.99 SDLTSET-MRI19 Saddle T-Square Set of 4 & Rack-It- Metric ........................ $299.99SDLT0419 4" Saddle-T4 ................................................................................... $54.99SDLT10019 100mm Saddle-T100 .................................................................... $54.99SDLT0619 6" Saddle-T6 ...................................................................................$74.99SDLT15019 150mm Saddle-T150 .....................................................................$74.99 SDLT819 8" Saddle-T8 .................................................................................... $94.99 SDLT20019 200mm Saddle-T200 .................................................................. $94.99SDLT1219 12" Saddle-T12 ............................................................................. $114.99 SDLT30019 300mm Saddle-T300 .................................................................. $114.99SLDTRI Saddle-T Rack-It .................................................................................$14.99
CALIFORNIA RESIDENTS WARNING: Cancer. For more information go to www.P65Warnings.ca.gov. See pg 74.
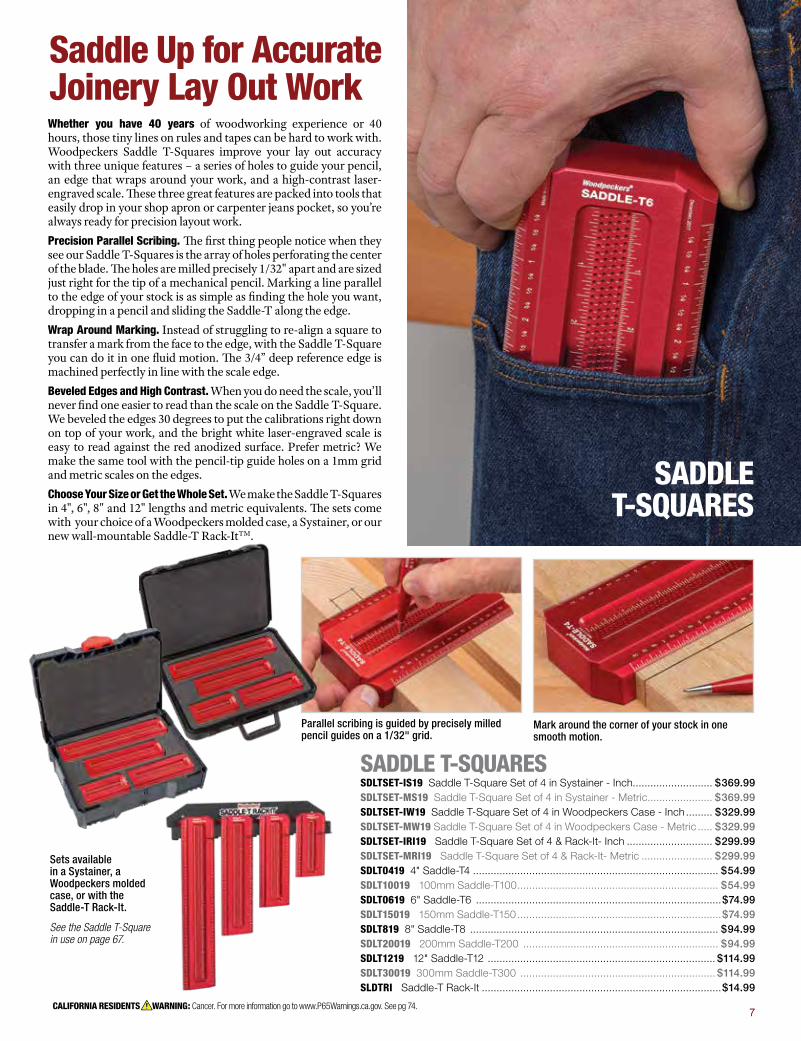
Sets available in a Systainer, a Woodpeckers molded case, or with the Saddle-T Rack-It.
See the Saddle T-Square in use on page 67.
Whether you have 40 years of woodworking experience or 40 hours, those tiny lines on rules and tapes can be hard to work with. Woodpeckers Saddle T-Squares improve your lay out accuracy with three unique features – a series of holes to guide your pencil, an edge that wraps around your work, and a high-contrast laser-engraved scale. These three great features are packed into tools that easily drop in your shop apron or carpenter jeans pocket, so you’re always ready for precision layout work. Precision Parallel Scribing. The first thing people notice when they see our Saddle T-Squares is the array of holes perforating the center of the blade. The holes are milled precisely 1/32" apart and are sized just right for the tip of a mechanical pencil. Marking a line parallel to the edge of your stock is as simple as finding the hole you want, dropping in a pencil and sliding the Saddle-T along the edge. Wrap Around Marking. Instead of struggling to re-align a square to transfer a mark from the face to the edge, with the Saddle T-Square you can do it in one fluid motion. The 3/4” deep reference edge is machined perfectly in line with the scale edge. Beveled Edges and High Contrast. When you do need the scale, you’ll never find one easier to read than the scale on the Saddle T-Square. We beveled the edges 30 degrees to put the calibrations right down on top of your work, and the bright white laser-engraved scale is easy to read against the red anodized surface. Prefer metric? We make the same tool with the pencil-tip guide holes on a 1mm grid and metric scales on the edges. Choose Your Size or Get the Whole Set. We make the Saddle T-Squares in 4", 6", 8" and 12" lengths and metric equivalents. The sets come with your choice of a Woodpeckers molded case, a Systainer, or our new wall-mountable Saddle-T Rack-ItTM.
Saddle Up for Accurate Joinery Lay Out Work
Parallel scribing is guided by precisely milled pencil guides on a 1/32" grid.
Mark around the corner of your stock in one smooth motion.
7
SADDLET-SQUARES

8 Woodpeckers, LLC • 1-800-752-0725 • woodpeck.com
6" Carpenters SquareOur 6" Carpenters Square is a perfectly machined combination 90° and 45° miter square with cheeks added to the base leg and a laser-engraved inch scale on the vertical leg. It's handy square to have with you in the shop all the time, but particularly handy when working with framing lumber. It's a fast and accurate tool to have in your belt when you're framing. Quality begins with the blade being machined from cast and ground aluminum tool plate. The solid aluminum cheeks are milled from solid bar stock and fastened to the body with high-strength socket screws. The bolted-on cheeks ensure the tool can be re-calibrated to the blade if knocked out of position.
CRPSQ6-INRD 6" Carpenters Square ............................................$79.99
You can use any square for checking a chisel or plane blade, but they’re usually too long to clear the handle, not wide enough to make it easy to align to the edge and generally poorly designed for the job.For sharpening, the Woodpeckers Mini Square is just the right size, made out of the right material and is one of the only squares specifically designed for sharpening.The inside dimensions are 1-1/8" x 2". Each square is machined from a solid block of aluminum, which ensures a very square and stable tool. Being made of aluminum has other advantages as well: It’s resistant to corrosion, is easy to handle and won’t damage fragile cutting edges.An anodized surface adds more durability to the tool and the red color offers greater contrast against the gray color of most tool steels. Fits in your pocket or its own custom-fit case.
MINISQUARE Mini Square in Protective Case ................................ $27.49
Mini Square
MEA
SURI
NG &
MAR
KING
PTR4 4.375" Precision Triangle .................................................... $36.99 PTR6 6.25" Precision Triangle. ..................................................... $40.99PTR46SET Precision Triangle Set in Wall Mountable Case .............$79.99
Few things are handier in the furniture or cabinet shop than an accurate tool that can check for square and 45° in tight spaces. Woodpeckers Precision Triangles certainly fit that description. These 90°-45°-45° triangles are machined to the same stringent tolerances as our Precision Woodworking Squares and lie flat on a machine table top or the bottom of a drawer you’re assembling. They’re available in 4" and 6" sizes. If you buy the pair, they nest together with three brass knobs. When they’re fastened together, the combined tool has a nice heft, but if space is tight or you need both at the same time, they come apart in seconds.
Precision Triangle Set comes in a wall-mountable MDF case.
STORY STICKSSPRO-24 Story Stick Pro-24 ..................................................................................$43.99 SSPRO-600 Story Stick Pro-600 ..............................................................................$43.99 SSPRO-48 Story Stick Pro-48..................................................................................$65.99SSPRO-1200 Story Stick Pro-1200 ..........................................................................$65.99SSPRO-96 Story Stick Pro-96 (metric/inch) .......................................................... $129.99 SSPRO-CA Story Stick Pro Caliper Arms (1 set) ....................................................... $21.99SSPRO-TABPK Story Stick Pro Standard Tabs (4pk) ................................................ $19.99SSPRO-OFFTB Story Stick Pro Offset Tabs (4pk) ...................................................... $19.99SSPRO-CON Story Stick Pro Connectors (2pk) ......................................................... $19.99
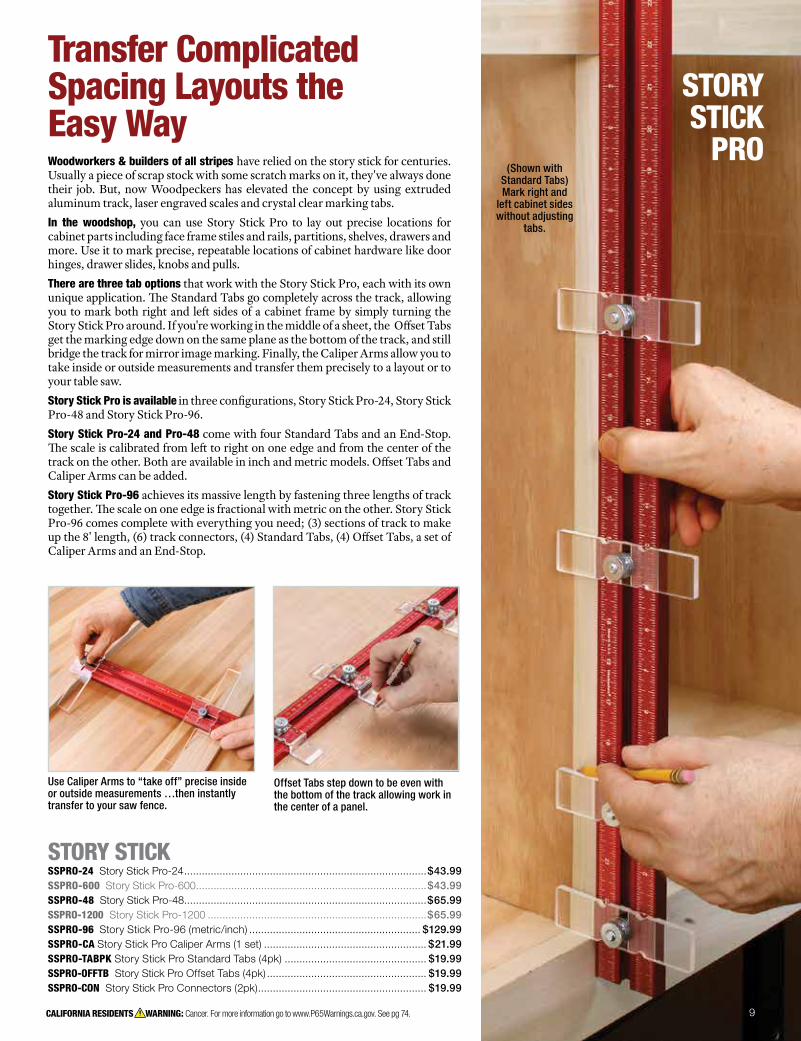
Woodworkers & builders of all stripes have relied on the story stick for centuries. Usually a piece of scrap stock with some scratch marks on it, they've always done their job. But, now Woodpeckers has elevated the concept by using extruded aluminum track, laser engraved scales and crystal clear marking tabs. In the woodshop, you can use Story Stick Pro to lay out precise locations for cabinet parts including face frame stiles and rails, partitions, shelves, drawers and more. Use it to mark precise, repeatable locations of cabinet hardware like door hinges, drawer slides, knobs and pulls. There are three tab options that work with the Story Stick Pro, each with its own unique application. The Standard Tabs go completely across the track, allowing you to mark both right and left sides of a cabinet frame by simply turning the Story Stick Pro around. If you're working in the middle of a sheet, the Offset Tabs get the marking edge down on the same plane as the bottom of the track, and still bridge the track for mirror image marking. Finally, the Caliper Arms allow you to take inside or outside measurements and transfer them precisely to a layout or to your table saw. Story Stick Pro is available in three configurations, Story Stick Pro-24, Story Stick Pro-48 and Story Stick Pro-96. Story Stick Pro-24 and Pro-48 come with four Standard Tabs and an End-Stop. The scale is calibrated from left to right on one edge and from the center of the track on the other. Both are available in inch and metric models. Offset Tabs and Caliper Arms can be added.Story Stick Pro-96 achieves its massive length by fastening three lengths of track together. The scale on one edge is fractional with metric on the other. Story Stick Pro-96 comes complete with everything you need; (3) sections of track to make up the 8' length, (6) track connectors, (4) Standard Tabs, (4) Offset Tabs, a set of Caliper Arms and an End-Stop.
Use Caliper Arms to “take off” precise inside or outside measurements …then instantly transfer to your saw fence.
(Shown with Standard Tabs) Mark right and
left cabinet sides without adjusting
tabs.
Offset Tabs step down to be even with the bottom of the track allowing work in the center of a panel.
CALIFORNIA RESIDENTS WARNING: Cancer. For more information go to www.P65Warnings.ca.gov. See pg 74. 9
Transfer ComplicatedSpacing Layouts the Easy Way
STORY STICK
PRO
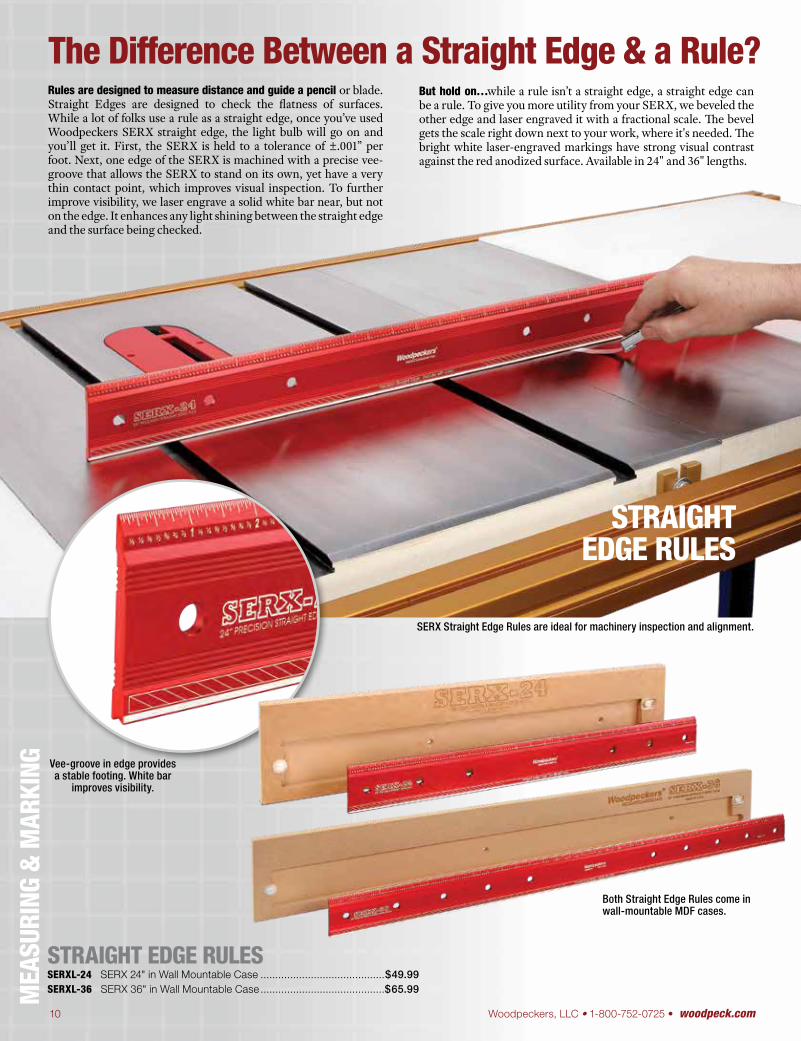
Rules are designed to measure distance and guide a pencil or blade. Straight Edges are designed to check the flatness of surfaces. While a lot of folks use a rule as a straight edge, once you’ve used Woodpeckers SERX straight edge, the light bulb will go on and you’ll get it. First, the SERX is held to a tolerance of ±.001” per foot. Next, one edge of the SERX is machined with a precise vee-groove that allows the SERX to stand on its own, yet have a very thin contact point, which improves visual inspection. To further improve visibility, we laser engrave a solid white bar near, but not on the edge. It enhances any light shining between the straight edge and the surface being checked.
But hold on…while a rule isn’t a straight edge, a straight edge can be a rule. To give you more utility from your SERX, we beveled the other edge and laser engraved it with a fractional scale. The bevel gets the scale right down next to your work, where it's needed. The bright white laser-engraved markings have strong visual contrast against the red anodized surface. Available in 24" and 36" lengths.
STRAIGHT EDGE RULESSERXL-24 SERX 24" in Wall Mountable Case ..........................................$49.99SERXL-36 SERX 36" in Wall Mountable Case ..........................................$65.99
10 Woodpeckers, LLC • 1-800-752-0725 • woodpeck.com
SERX Straight Edge Rules are ideal for machinery inspection and alignment.
Vee-groove in edge provides a stable footing. White bar
improves visibility.
Both Straight Edge Rules come in wall-mountable MDF cases.
The Difference Between a Straight Edge & a Rule?
STRAIGHTEDGE RULES
MEA
SURI
NG &
MAR
KING
11CALIFORNIA RESIDENTS WARNING: Cancer. For more information go to www.P65Warnings.ca.gov. See pg 74.
PAOLINI POCKET RULE - STAINLESS STEEL PRSS-6-19 PPR SS 6” Inch Only ................................................. $42.99 PPRSS-150-19 PPR SS 150mm Metric Only ................................ $42.99 PPRSS-6150-19 PPR SS 6”/150mm Combo Scales ................... $42.99PPRSS-8-19 PPR SS 8” Inch Only................................................$47.99 PPRSS-200-19 PPR SS 200mm Metric Only .................................$47.99 PPRSS-8200-19 PPR SS 8”/200mm Combo Scales ...................$47.99 PPRSS-12-19 PPR SS 12” Inch Only ............................................ $52.99 PPRSS-300-19 PPR SS 300mm Metric Only............................... $52.99PPRSS-12300-19 PPR SS 2”/300mm Combo Scales .................. $52.99PPRSS-SET-I19 PPR SS Inch Set ...............................................$139.99 PPRSS-SET-M19 PPR SS Metric Set ...........................................$139.99PPRSS-SET-C19 PPR SS Combo Set ..........................................$139.99 PPRRI-SI PPR SS Inch Set & PPR Rack-It ..................................$149.99 PPRRI-SM PPR SS Metric Set & PPR Rack-It ............................$149.99PPRRI-SC PPR SS Combo Set & PPR Rack-It .............................$149.99
PPRRI PPR Rack-It ........................................................................$12.99
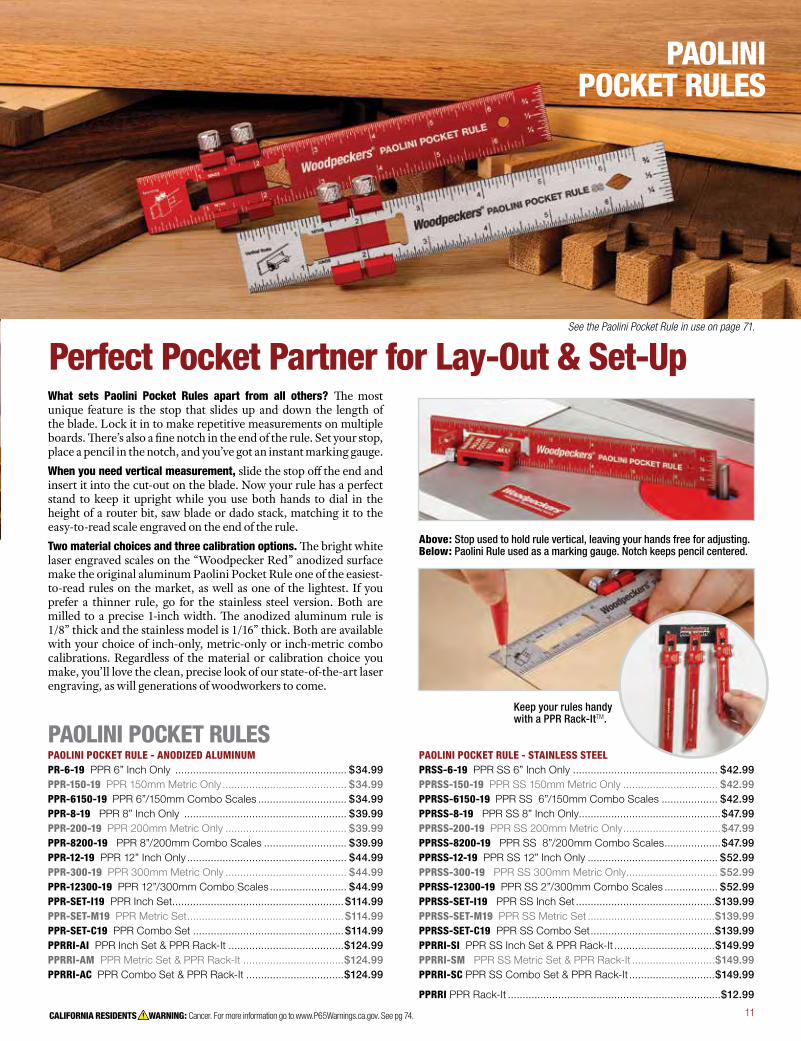
What sets Paolini Pocket Rules apart from all others? The most unique feature is the stop that slides up and down the length of the blade. Lock it in to make repetitive measurements on multiple boards. There’s also a fine notch in the end of the rule. Set your stop, place a pencil in the notch, and you’ve got an instant marking gauge. When you need vertical measurement, slide the stop off the end and insert it into the cut-out on the blade. Now your rule has a perfect stand to keep it upright while you use both hands to dial in the height of a router bit, saw blade or dado stack, matching it to the easy-to-read scale engraved on the end of the rule.Two material choices and three calibration options. The bright white laser engraved scales on the “Woodpecker Red” anodized surface make the original aluminum Paolini Pocket Rule one of the easiest-to-read rules on the market, as well as one of the lightest. If you prefer a thinner rule, go for the stainless steel version. Both are milled to a precise 1-inch width. The anodized aluminum rule is 1/8” thick and the stainless model is 1/16” thick. Both are available with your choice of inch-only, metric-only or inch-metric combo calibrations. Regardless of the material or calibration choice you make, you’ll love the clean, precise look of our state-of-the-art laser engraving, as will generations of woodworkers to come.
PAOLINI POCKET RULE - ANODIZED ALUMINUM PR-6-19 PPR 6” Inch Only .......................................................... $34.99 PPR-150-19 PPR 150mm Metric Only .......................................... $34.99 PPR-6150-19 PPR 6”/150mm Combo Scales .............................. $34.99PPR-8-19 PPR 8” Inch Only ....................................................... $39.99 PPR-200-19 PPR 200mm Metric Only ......................................... $39.99 PPR-8200-19 PPR 8”/200mm Combo Scales ............................ $39.99 PPR-12-19 PPR 12” Inch Only ...................................................... $44.99 PPR-300-19 PPR 300mm Metric Only ......................................... $44.99PPR-12300-19 PPR 12”/300mm Combo Scales .......................... $44.99 PPR-SET-I19 PPR Inch Set ..........................................................$114.99 PPR-SET-M19 PPR Metric Set .....................................................$114.99PPR-SET-C19 PPR Combo Set ...................................................$114.99 PPRRI-AI PPR Inch Set & PPR Rack-It .......................................$124.99 PPRRI-AM PPR Metric Set & PPR Rack-It ..................................$124.99PPRRI-AC PPR Combo Set & PPR Rack-It .................................$124.99
Keep your rules handywith a PPR Rack-ItTM.
Perfect Pocket Partner for Lay-Out & Set-Up
PAOLINI POCKET RULES
PAOLINIPOCKET RULES
Above: Stop used to hold rule vertical, leaving your hands free for adjusting.Below: Paolini Rule used as a marking gauge. Notch keeps pencil centered.
See the Paolini Pocket Rule in use on page 71.
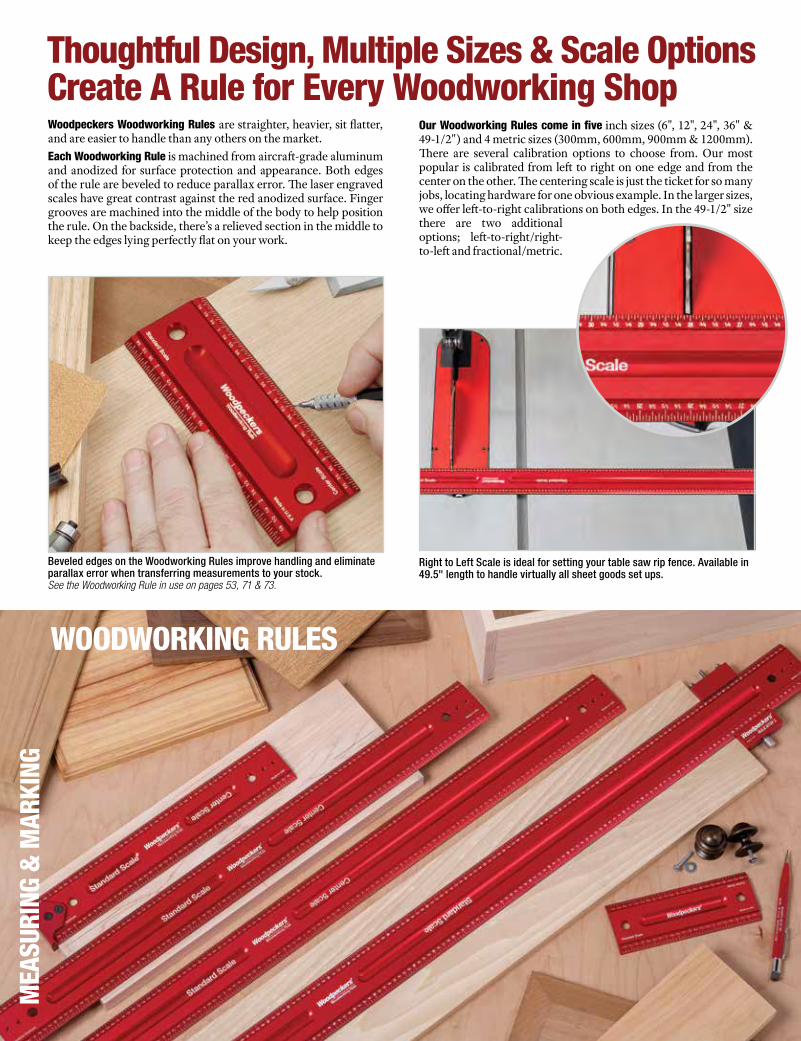
Woodpeckers Woodworking Rules are straighter, heavier, sit flatter, and are easier to handle than any others on the market. Each Woodworking Rule is machined from aircraft-grade aluminum and anodized for surface protection and appearance. Both edges of the rule are beveled to reduce parallax error. The laser engraved scales have great contrast against the red anodized surface. Finger grooves are machined into the middle of the body to help position the rule. On the backside, there’s a relieved section in the middle to keep the edges lying perfectly flat on your work.
Our Woodworking Rules come in five inch sizes (6", 12", 24", 36" & 49-1/2") and 4 metric sizes (300mm, 600mm, 900mm & 1200mm). There are several calibration options to choose from. Our most popular is calibrated from left to right on one edge and from the center on the other. The centering scale is just the ticket for so many jobs, locating hardware for one obvious example. In the larger sizes, we offer left-to-right calibrations on both edges. In the 49-1/2" size there are two additional options; left-to-right/right-to-left and fractional/metric.
Right to Left Scale is ideal for setting your table saw rip fence. Available in 49.5" length to handle virtually all sheet goods set ups.
Beveled edges on the Woodworking Rules improve handling and eliminate parallax error when transferring measurements to your stock.See the Woodworking Rule in use on pages 53, 71 & 73.
MEA
SURI
NG &
MAR
KING
Thoughtful Design, Multiple Sizes & Scale Options Create A Rule for Every Woodworking Shop
WOODWORKING RULES
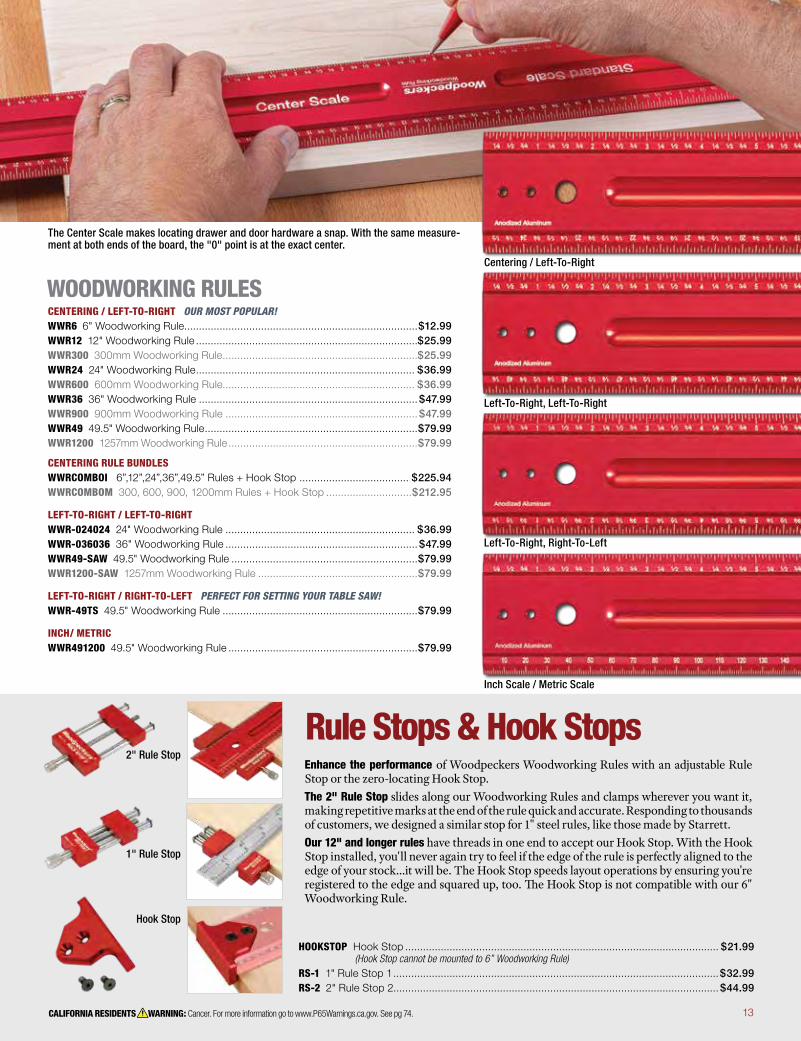
Enhance the performance of Woodpeckers Woodworking Rules with an adjustable Rule Stop or the zero-locating Hook Stop. The 2" Rule Stop slides along our Woodworking Rules and clamps wherever you want it, making repetitive marks at the end of the rule quick and accurate. Responding to thousands of customers, we designed a similar stop for 1" steel rules, like those made by Starrett. Our 12" and longer rules have threads in one end to accept our Hook Stop. With the Hook Stop installed, you'll never again try to feel if the edge of the rule is perfectly aligned to the edge of your stock...it will be. The Hook Stop speeds layout operations by ensuring you're registered to the edge and squared up, too. The Hook Stop is not compatible with our 6" Woodworking Rule.
1" Rule Stop
2" Rule Stop
Hook Stop
HOOKSTOP Hook Stop .......................................................................................................... $21.99 (Hook Stop cannot be mounted to 6” Woodworking Rule)RS-1 1" Rule Stop 1 ..............................................................................................................$32.99RS-2 2" Rule Stop 2.............................................................................................................. $44.99
The Center Scale makes locating drawer and door hardware a snap. With the same measure-ment at both ends of the board, the "0" point is at the exact center.
Rule Stops & Hook Stops
CALIFORNIA RESIDENTS WARNING: Cancer. For more information go to www.P65Warnings.ca.gov. See pg 74. 13
CENTERING / LEFT-TO-RIGHT OUR MOST POPULAR! WWR6 6" Woodworking Rule...............................................................................$12.99WWR12 12" Woodworking Rule ...........................................................................$25.99WWR300 300mm Woodworking Rule ..................................................................$25.99WWR24 24" Woodworking Rule .......................................................................... $36.99WWR600 600mm Woodworking Rule................................................................. $36.99WWR36 36" Woodworking Rule ..........................................................................$47.99WWR900 900mm Woodworking Rule .................................................................$47.99WWR49 49.5" Woodworking Rule ........................................................................$79.99WWR1200 1257mm Woodworking Rule ................................................................$79.99
CENTERING RULE BUNDLES WWRCOMBOI 6”,12”,24”,36”,49.5” Rules + Hook Stop ..................................... $225.94 WWRCOMBOM 300, 600, 900, 1200mm Rules + Hook Stop .............................$212.95
LEFT-TO-RIGHT / LEFT-TO-RIGHT WWR-024024 24" Woodworking Rule ................................................................ $36.99WWR-036036 36" Woodworking Rule .................................................................$47.99WWR49-SAW 49.5" Woodworking Rule ...............................................................$79.99WWR1200-SAW 1257mm Woodworking Rule ......................................................$79.99
LEFT-TO-RIGHT / RIGHT-TO-LEFT PERFECT FOR SETTING YOUR TABLE SAW!WWR-49TS 49.5" Woodworking Rule ..................................................................$79.99
INCH/ METRIC WWR491200 49.5" Woodworking Rule ................................................................$79.99
WOODWORKING RULES
Left-To-Right, Left-To-Right
Centering / Left-To-Right
Left-To-Right, Right-To-Left
Inch Scale / Metric Scale
C
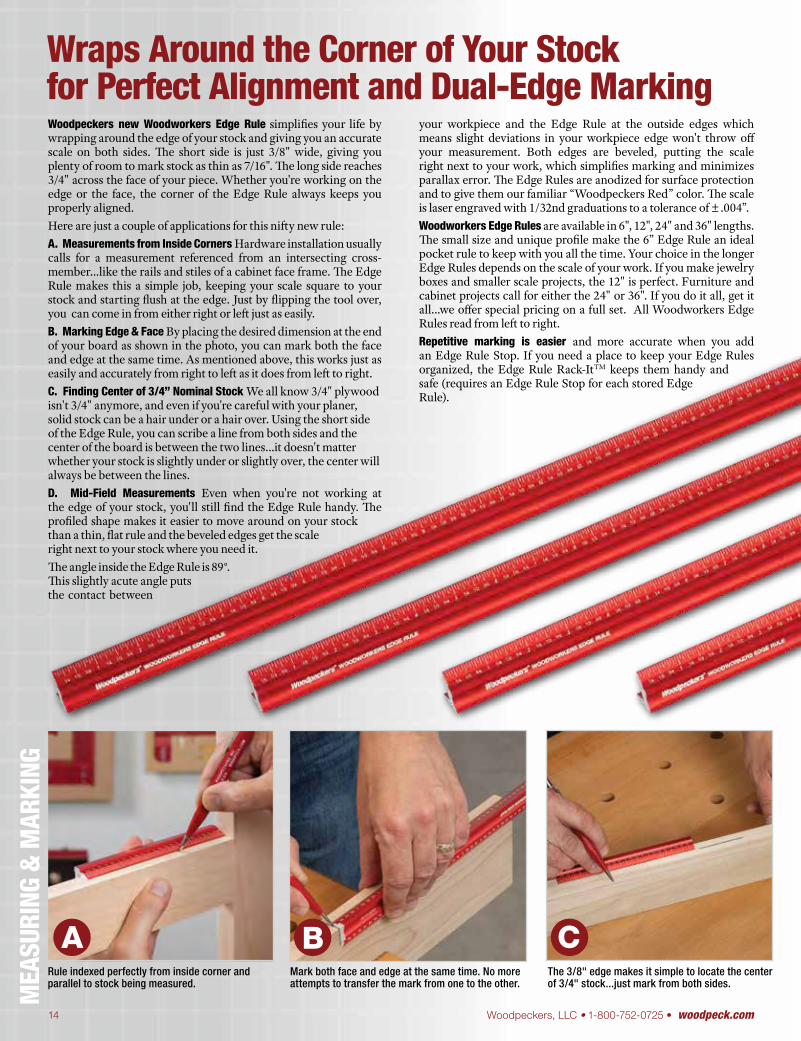
Woodpeckers new Woodworkers Edge Rule simplifies your life by wrapping around the edge of your stock and giving you an accurate scale on both sides. The short side is just 3/8" wide, giving you plenty of room to mark stock as thin as 7/16". The long side reaches 3/4" across the face of your piece. Whether you're working on the edge or the face, the corner of the Edge Rule always keeps you properly aligned.Here are just a couple of applications for this nifty new rule:A. Measurements from Inside Corners Hardware installation usually calls for a measurement referenced from an intersecting cross-member…like the rails and stiles of a cabinet face frame. The Edge Rule makes this a simple job, keeping your scale square to your stock and starting flush at the edge. Just by flipping the tool over, you can come in from either right or left just as easily.B. Marking Edge & Face By placing the desired dimension at the end of your board as shown in the photo, you can mark both the face and edge at the same time. As mentioned above, this works just as easily and accurately from right to left as it does from left to right.C. Finding Center of 3/4” Nominal Stock We all know 3/4" plywood isn't 3/4" anymore, and even if you're careful with your planer, solid stock can be a hair under or a hair over. Using the short side of the Edge Rule, you can scribe a line from both sides and the center of the board is between the two lines…it doesn't matter whether your stock is slightly under or slightly over, the center will always be between the lines.D. Mid-Field Measurements Even when you're not working at the edge of your stock, you'll still find the Edge Rule handy. The profiled shape makes it easier to move around on your stock than a thin, flat rule and the beveled edges get the scale right next to your stock where you need it.The angle inside the Edge Rule is 89°. This slightly acute angle puts the contact between
your workpiece and the Edge Rule at the outside edges which means slight deviations in your workpiece edge won't throw off your measurement. Both edges are beveled, putting the scale right next to your work, which simplifies marking and minimizes parallax error. The Edge Rules are anodized for surface protection and to give them our familiar “Woodpeckers Red” color. The scale is laser engraved with 1/32nd graduations to a tolerance of ±.004”.Woodworkers Edge Rules are available in 6", 12", 24" and 36" lengths. The small size and unique profile make the 6” Edge Rule an ideal pocket rule to keep with you all the time. Your choice in the longer Edge Rules depends on the scale of your work. If you make jewelry boxes and smaller scale projects, the 12" is perfect. Furniture and cabinet projects call for either the 24" or 36". If you do it all, get it all…we offer special pricing on a full set. All Woodworkers Edge Rules read from left to right.Repetitive marking is easier and more accurate when you add an Edge Rule Stop. If you need a place to keep your Edge Rules organized, the Edge Rule Rack-ItTM keeps them handy and safe (requires an Edge Rule Stop for each stored Edge Rule).
A BRule indexed perfectly from inside corner and parallel to stock being measured.
Mark both face and edge at the same time. No more attempts to transfer the mark from one to the other.
The 3/8" edge makes it simple to locate the center of 3/4" stock...just mark from both sides.
MEA
SURI
NG &
MAR
KING
Wraps Around the Corner of Your Stockfor Perfect Alignment and Dual-Edge Marking
14 Woodpeckers, LLC • 1-800-752-0725 • woodpeck.com

CALIFORNIA RESIDENTS WARNING: Cancer. For more information go to www.P65Warnings.ca.gov. See pg 74.
WOODWORKERS EDGE RULEERULE-6 Woodworkers Edge Rule 6" .....................................................................................................................$12.99ERULE-150 150mm Woodworkers Edge Rule .........................................................................................................$12.99
ERULE-12 Woodworkers Edge Rule 12" .................................................................................................................$22.99ERULE-300 300mm Woodworkers Edge Rule ........................................................................................................$22.99
ERULE-24 Woodworkers Edge Rule 24" ................................................................................................................$29.99ERULE-600 600mm Woodworkers Edge Rule ........................................................................................................$29.99
ERULE-36 Woodworkers Edge Rule 36" ................................................................................................................$34.99ERULE-900 900mm Woodworkers Edge Rule ........................................................................................................$34.99
ERULE-I Woodworkers Edge Rule Set of 4 - Inch ..................................................................................................$89.99ERULE-M Woodworkers Edge Rule Set of 4 - Metric ..............................................................................................$89.99
ERULE-I-KIT Woodworkers Edge Rule Set of 4 - with Rack-It and 4 Stops - Inch ...............................................$109.99ERULE-M-KIT Woodworkers Edge Rule Set of 4 - with Rack-It and 4 Stops - Metric............................................$109.99
ERRIKIT Edge Rule Rack-It (with 4 Stops) ..............................................................................................................$29.99ERSTOP Edge Rule Stop (ea) ...................................................................................................................................$4.99
DKeep your Edge Rules organized and accessible with the Edge Rule Rack-It.
Edge Rules work just as well when you're working in the center of a large panel.
Edge Rule Stops ensure accuracy on repetitive marking.
Edge Rule Stops available individually. Edge Rule Rack-ItTM includes 4 stops.
Patent Pending
Edge Rule wraps around your stock insuring parallel alignment and simplifying simultaneous edge and face marking.
WOODWORKERSEDGE RULES
15

16 Woodpeckers, LLC • 1-800-752-0725 • woodpeck.com
U.S. Patent 7,856,733
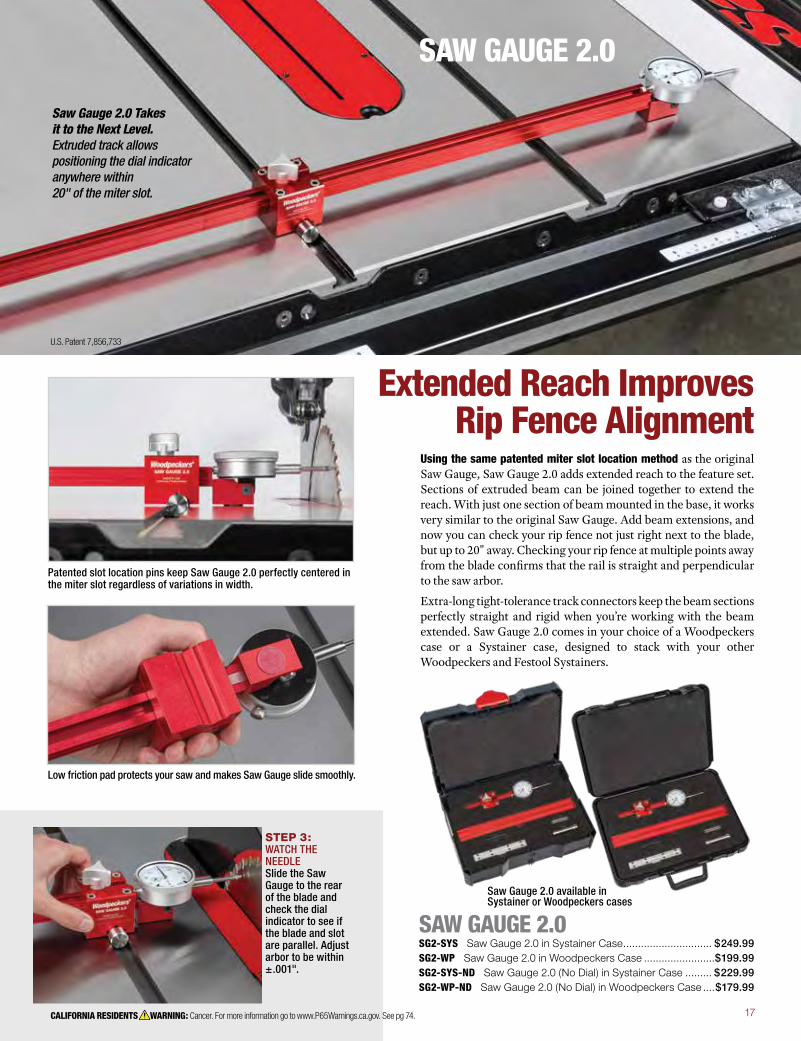
STEP 1: DROP IN THE PINS By stacking a large pin on two smaller pins, the base of either Saw Gauge is perfectly centered on your miter slot, even if the slot varies from end to end.
STEP 2: SET THE SAW GAUGE Align the base on the pins so the dial indicator contacts the blade and has range of motion in both directions. Rotate the bezel to zero and you’re ready to check your saw.
Using theSawGauges
MEA
SURI
NG &
MAR
KING
| S
AW G
AUGE
Tune Up Your Table Saw forCleaner, More Accurate Results
MUST HAVE
SHOPESSENTIAL!
SAW GAUGE
Original Saw Gauge in custom-molded Woodpeckers case
SAW GAUGESG-WP Saw Gauge in Woodpeckers Case ................................ $89.99SG-WP-ONLY Saw Gauge (No Dial) in Woodpeckers Case ........ $65.99
Adjusting the alignment between the blade and the miter slot of your table saw is the single most important thing you can do to improve your woodworking. The next item on that list is adjusting your rip fence to be parallel to the miter slot. Woodpeckers Saw Gauge makes checking those critical alignments a simple process. What sets Woodpeckers Saw Gauge apart from the rest is our method of registering the gauge in the miter slot. After-market table saw accessories have always faced the same dilemma; miter gauge slots vary widely by both design and manufacturing tolerance. Woodpeckers founder, Rich Hummel, solved the problem (and received a patent for it) while designing the Saw Gauge. By dropping two small polished pins in the miter slot and placing a larger pin between them, the middle pin stays precisely centered regardless of the miter slot width or any deviation from end to end. Just drop the pins in the miter slot, find the vee-slot in the indicator holder that puts the dial indicator into contact with your saw blade, and check at the front and back of the blade. It’s that easy. The original Saw Gauge has a reach of 6-1/2", enabling you to reach from the miter gauge slot to the saw blade on just about every saw ever made. It also works on your rip fence when it’s moved in close to the saw blade. The mount for the dial indicator is an industry standard, so we also offer the Saw Gauge without a dial indicator.
16 Woodpeckers, LLC • 1-800-752-0725 • woodpeck.com
Bring fence up to the Saw Gauge and check it at a few points along its length to confirm that the fence is parallel to the miter gauge slot.
SAW GAUGE
SAW GAUGE 2.0SG2-SYS Saw Gauge 2.0 in Systainer Case .............................. $249.99SG2-WP Saw Gauge 2.0 in Woodpeckers Case ........................$199.99SG2-SYS-ND Saw Gauge 2.0 (No Dial) in Systainer Case ......... $229.99SG2-WP-ND Saw Gauge 2.0 (No Dial) in Woodpeckers Case ....$179.99
STEP 3: WATCH THE NEEDLE Slide the Saw Gauge to the rear of the blade and check the dial indicator to see if the blade and slot are parallel. Adjust arbor to be within ±.001".
SAW GAUGE 2.0
Saw Gauge 2.0 Takes it to the Next Level. Extruded track allows positioning the dial indicator anywhere within 20" of the miter slot.
Saw Gauge 2.0 available in Systainer or Woodpeckers cases
Extended Reach Improves Rip Fence Alignment
U.S. Patent 7,856,733
CALIFORNIA RESIDENTS WARNING: Cancer. For more information go to www.P65Warnings.ca.gov. See pg 74. 17
Using the same patented miter slot location method as the original Saw Gauge, Saw Gauge 2.0 adds extended reach to the feature set. Sections of extruded beam can be joined together to extend the reach. With just one section of beam mounted in the base, it works very similar to the original Saw Gauge. Add beam extensions, and now you can check your rip fence not just right next to the blade, but up to 20" away. Checking your rip fence at multiple points away from the blade confirms that the rail is straight and perpendicular to the saw arbor.
Extra-long tight-tolerance track connectors keep the beam sections perfectly straight and rigid when you’re working with the beam extended. Saw Gauge 2.0 comes in your choice of a Woodpeckers case or a Systainer case, designed to stack with your other Woodpeckers and Festool Systainers.
Patented slot location pins keep Saw Gauge 2.0 perfectly centered in the miter slot regardless of variations in width.
Low friction pad protects your saw and makes Saw Gauge slide smoothly.
18 Woodpeckers, LLC • 1-800-752-0725 • woodpeck.com
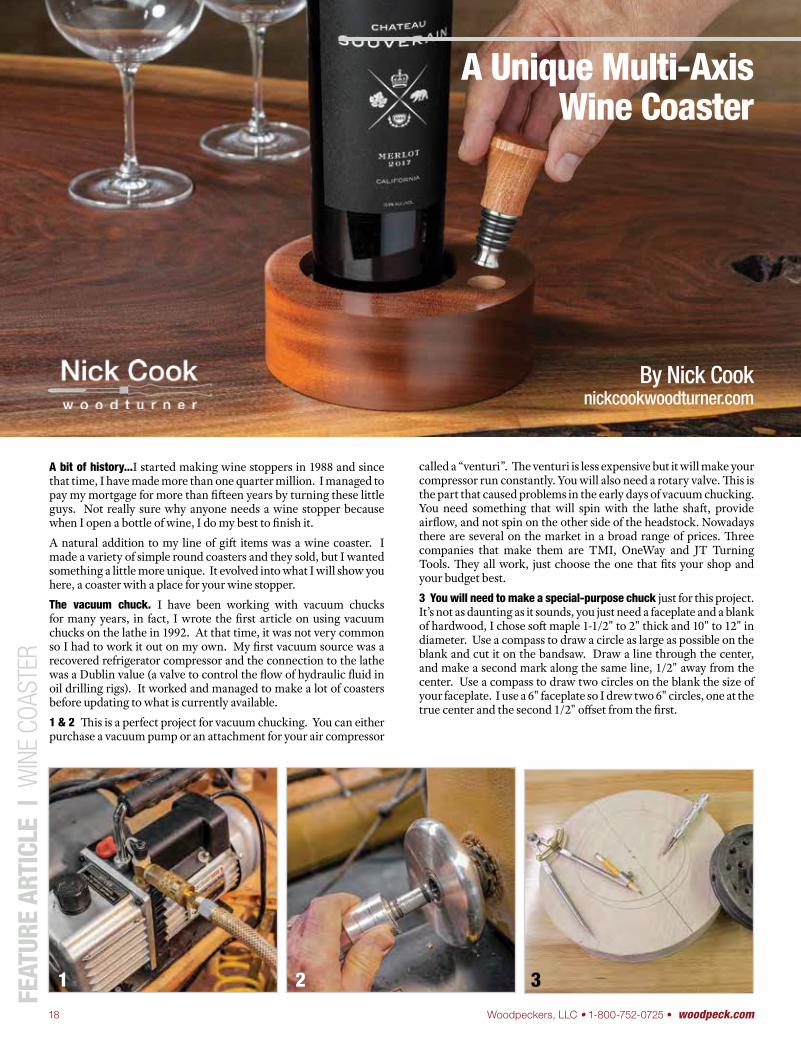
A bit of history...I started making wine stoppers in 1988 and since that time, I have made more than one quarter million. I managed to pay my mortgage for more than fifteen years by turning these little guys. Not really sure why anyone needs a wine stopper because when I open a bottle of wine, I do my best to finish it.
A natural addition to my line of gift items was a wine coaster. I made a variety of simple round coasters and they sold, but I wanted something a little more unique. It evolved into what I will show you here, a coaster with a place for your wine stopper.
The vacuum chuck. I have been working with vacuum chucks for many years, in fact, I wrote the first article on using vacuum chucks on the lathe in 1992. At that time, it was not very common so I had to work it out on my own. My first vacuum source was a recovered refrigerator compressor and the connection to the lathe was a Dublin value (a valve to control the flow of hydraulic fluid in oil drilling rigs). It worked and managed to make a lot of coasters before updating to what is currently available.
1 & 2 This is a perfect project for vacuum chucking. You can either purchase a vacuum pump or an attachment for your air compressor
A Unique Multi-AxisWine Coaster
By Nick Cooknickcookwoodturner.com
called a “venturi”. The venturi is less expensive but it will make your compressor run constantly. You will also need a rotary valve. This is the part that caused problems in the early days of vacuum chucking. You need something that will spin with the lathe shaft, provide airflow, and not spin on the other side of the headstock. Nowadays there are several on the market in a broad range of prices. Three companies that make them are TMI, OneWay and JT Turning Tools. They all work, just choose the one that fits your shop and your budget best.
3 You will need to make a special-purpose chuck just for this project. It’s not as daunting as it sounds, you just need a faceplate and a blank of hardwood, I chose soft maple 1-1/2" to 2" thick and 10" to 12" in diameter. Use a compass to draw a circle as large as possible on the blank and cut it on the bandsaw. Draw a line through the center, and make a second mark along the same line, 1/2" away from the center. Use a compass to draw two circles on the blank the size of your faceplate. I use a 6" faceplate so I drew two 6" circles, one at the true center and the second 1/2" offset from the first.
FEAT
URE
ARTI
CLE
| W
INE
COAS
TER
1 2 3
19
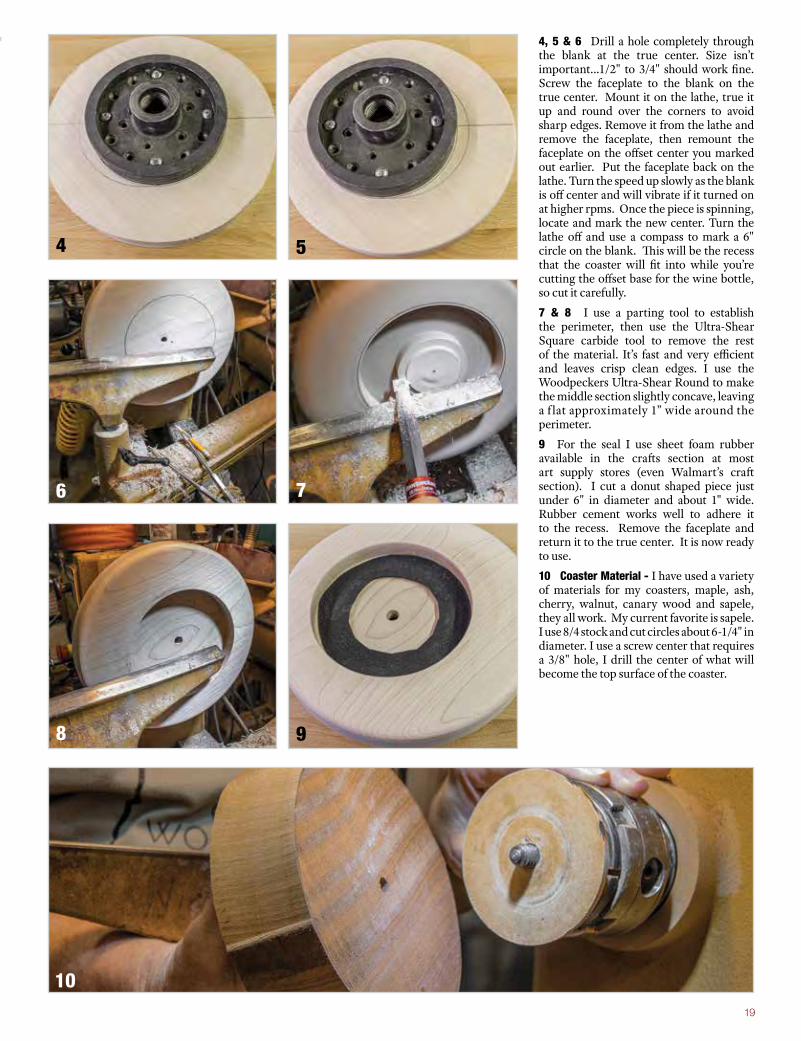
4, 5 & 6 Drill a hole completely through the blank at the true center. Size isn’t important…1/2" to 3/4" should work fine. Screw the faceplate to the blank on the true center. Mount it on the lathe, true it up and round over the corners to avoid sharp edges. Remove it from the lathe and remove the faceplate, then remount the faceplate on the offset center you marked out earlier. Put the faceplate back on the lathe. Turn the speed up slowly as the blank is off center and will vibrate if it turned on at higher rpms. Once the piece is spinning, locate and mark the new center. Turn the lathe off and use a compass to mark a 6" circle on the blank. This will be the recess that the coaster will fit into while you’re cutting the offset base for the wine bottle, so cut it carefully.
7 & 8 I use a parting tool to establish the perimeter, then use the Ultra-Shear Square carbide tool to remove the rest of the material. It’s fast and very efficient and leaves crisp clean edges. I use the Woodpeckers Ultra-Shear Round to make the middle section slightly concave, leaving a f lat approximately 1” wide around the perimeter.
9 For the seal I use sheet foam rubber available in the crafts section at most art supply stores (even Walmart’s craft section). I cut a donut shaped piece just under 6" in diameter and about 1" wide. Rubber cement works well to adhere it to the recess. Remove the faceplate and return it to the true center. It is now ready to use.
10 Coaster Material - I have used a variety of materials for my coasters, maple, ash, cherry, walnut, canary wood and sapele, they all work. My current favorite is sapele. I use 8/4 stock and cut circles about 6-1/4" in diameter. I use a screw center that requires a 3/8" hole, I drill the center of what will become the top surface of the coaster.
4
6
8
5
7
9
10
20 Woodpeckers, LLC • 1-800-752-0725 • woodpeck.com
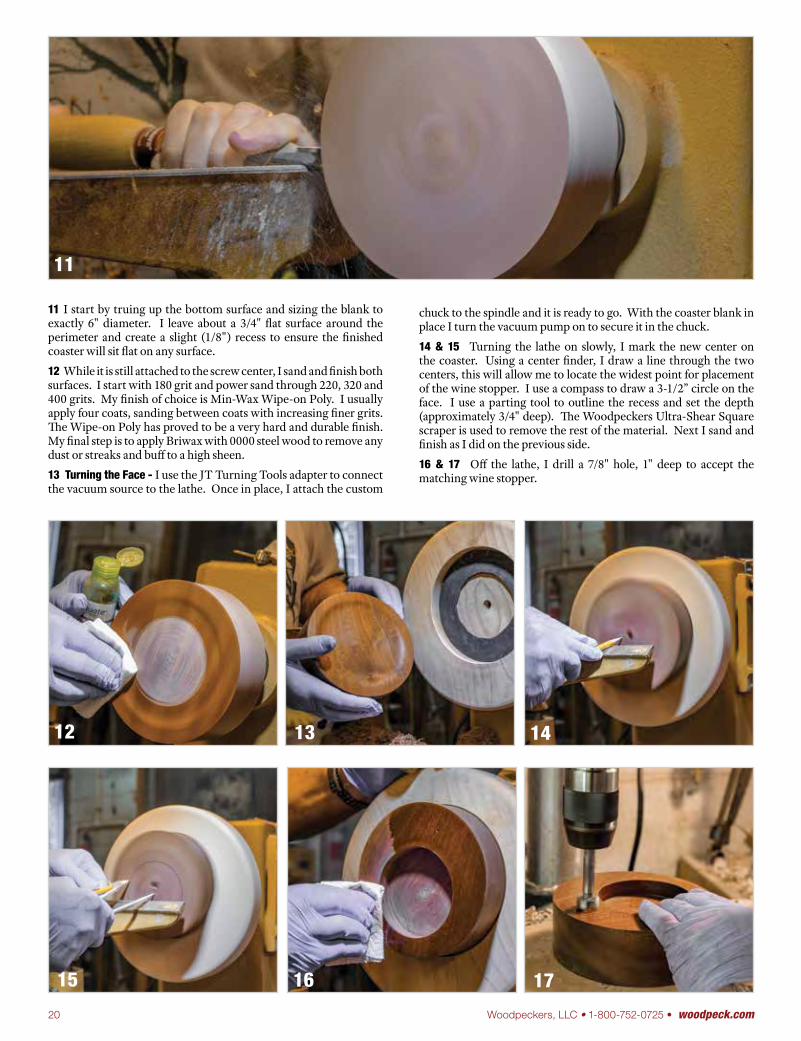
11 I start by truing up the bottom surface and sizing the blank to exactly 6" diameter. I leave about a 3/4" flat surface around the perimeter and create a slight (1/8") recess to ensure the finished coaster will sit flat on any surface.
12 While it is still attached to the screw center, I sand and finish both surfaces. I start with 180 grit and power sand through 220, 320 and 400 grits. My finish of choice is Min-Wax Wipe-on Poly. I usually apply four coats, sanding between coats with increasing finer grits. The Wipe-on Poly has proved to be a very hard and durable finish. My final step is to apply Briwax with 0000 steel wood to remove any dust or streaks and buff to a high sheen.
13 Turning the Face - I use the JT Turning Tools adapter to connect the vacuum source to the lathe. Once in place, I attach the custom
chuck to the spindle and it is ready to go. With the coaster blank in place I turn the vacuum pump on to secure it in the chuck.
14 & 15 Turning the lathe on slowly, I mark the new center on the coaster. Using a center finder, I draw a line through the two centers, this will allow me to locate the widest point for placement of the wine stopper. I use a compass to draw a 3-1/2” circle on the face. I use a parting tool to outline the recess and set the depth (approximately 3/4" deep). The Woodpeckers Ultra-Shear Square scraper is used to remove the rest of the material. Next I sand and finish as I did on the previous side.
16 & 17 Off the lathe, I drill a 7/8" hole, 1" deep to accept the matching wine stopper.
11
12 14
16
13
15 17
21
18
19
20
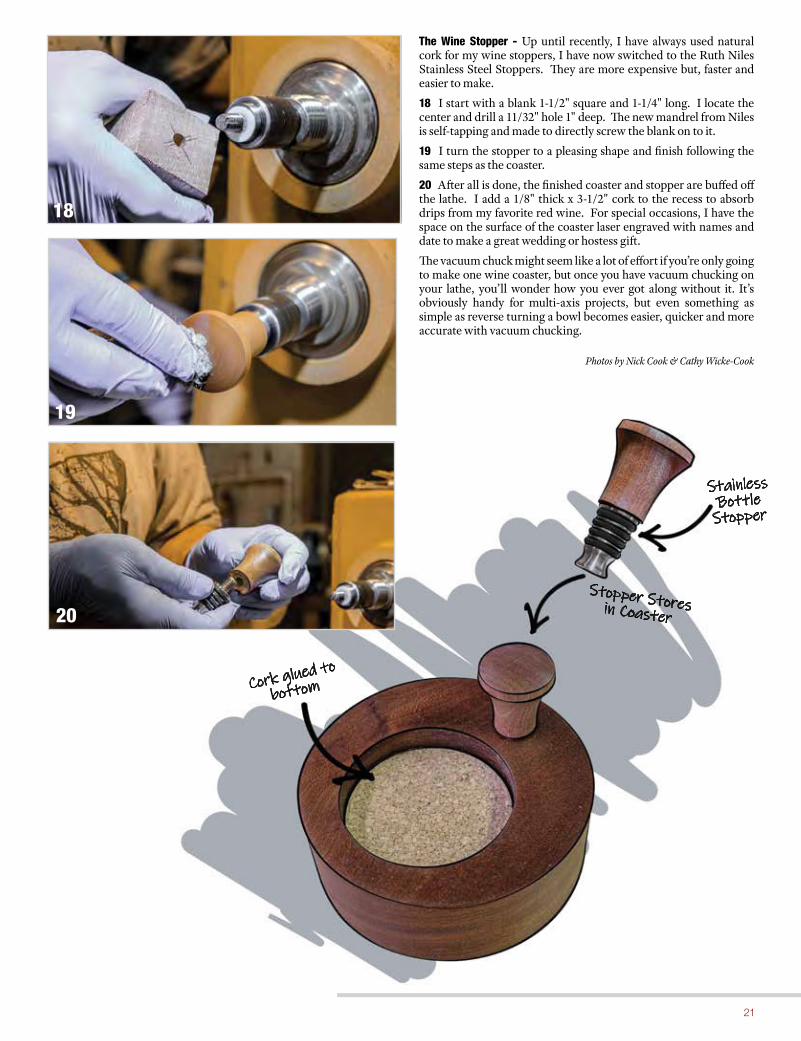
The Wine Stopper - Up until recently, I have always used natural cork for my wine stoppers, I have now switched to the Ruth Niles Stainless Steel Stoppers. They are more expensive but, faster and easier to make.
18 I start with a blank 1-1/2" square and 1-1/4" long. I locate the center and drill a 11/32" hole 1" deep. The new mandrel from Niles is self-tapping and made to directly screw the blank on to it.
19 I turn the stopper to a pleasing shape and finish following the same steps as the coaster.
20 After all is done, the finished coaster and stopper are buffed off the lathe. I add a 1/8" thick x 3-1/2" cork to the recess to absorb drips from my favorite red wine. For special occasions, I have the space on the surface of the coaster laser engraved with names and date to make a great wedding or hostess gift.
The vacuum chuck might seem like a lot of effort if you’re only going to make one wine coaster, but once you have vacuum chucking on your lathe, you’ll wonder how you ever got along without it. It’s obviously handy for multi-axis projects, but even something as simple as reverse turning a bowl becomes easier, quicker and more accurate with vacuum chucking.
Photos by Nick Cook & Cathy Wicke-Cook
Cork glued to
bottom
Stopper Storesin Coaster
StainlessBottleStopper

TM
by
Not just easier…better. Carbide insert woodturning has gone viral over the last few years. And, why not? The learning curve is much shorter than traditional tools and you don’t have to buy (and learn to use) expensive and complicated sharpening equipment. But, when the Woodpeckers team decided to develop a line of carbide insert woodturning tools, we didn’t just want them to be easier to use, we wanted them to actually deliver the same nearly flawless surface finish a professional turner can get with a perfectly sharpened traditional tool.
Three profiles in two sizes. The insert pocket for each of the profiles has been designed to fully support the insert when installed. It performs and feels like a one-piece tool when you’re turning. Use the square tool for roughing cuts and to create smooth outside curves. Use the round tool for inside curves -- like coves in spindle work or the inside of bowls. Create crisp detail lines and sharp transitions with the full-sharp detail tool. All three profiles are available in full-size (23-3/4") and mid-size (15-1/2") versions. You can buy each tool individually or save some money with a set of three.
Square creates beads on spindles and the outside of bowls.See the Woodturning Tool in use on pages 19 & 20.
Detail creates crisp accent lines and sharp transitions.
Patent Pending
The Evolution of Carbide Insert Woodturning
FSS Full-Size Woodturning Tool - Square ...................$139.99FSD Full-Size Woodturning Tool - Detail .....................$139.99FSR Full-Size Woodturning Tool - Round ....................$139.99FSK Full-Size Woodturning Tool - Set of Three ...........$379.99
FULL & MID-SIZE WOODTURNING TOOLS
Round creates coves in spindle work and the inside of bowls.
22
It all starts at the cutting edge. We started the project by interviewing dozens of carbide manufacturers, seeking out a partner that recognized the unique requirements of woodturning. The result of months of testing and trials is a unique nano-grain carbide matrix, polished to a mirror-finish on the cutting surface and precision ground on the bevel. They are the sharpest, longest lasting inserts on the market, and coincidentally, also made right here in Ohio.
Change from fast stock removal to fine finishing in the blink of an eye. After initial shaping with the tool flat, roll it right or left and you’ll feel it land on another bearing plane, 45° from horizontal. With the tool at this angle, the wood fibers slice cleanly, leaving a surface that needs little or no sanding. It’s a technique called shear scraping, that's been around forever, but until now, it’s been one of those things that separates the masters from the rest of us. Ultra∙Shear’s shaft geometry makes shear scraping a simple approach even beginners can use.
MSS Mid-Size Woodturning Tool - Square ............... $99.99MSD Mid-Size Woodturning Tool - Detail .................. $99.99MSR Mid-Size Woodturning Tool - Round ................ $99.99MSK Mid-Size Woodturning Tool - Set of Three ..... $269.99USK Master Set of Nine Woodturning Tools ............$799.99W
OODT
URNI
NG
See page 24 for Replacement
CarbideInserts

23
WOODTURNINGTOOLS
CALIFORNIA RESIDENTS WARNING: Cancer. For more information go to www.P65Warnings.ca.gov. See pg 74.
Just like the larger tools, the Pen Tool shanks are machined from a high-strength alloy and go through a two-step heat treating process that makes them corrosion resistant, extremely rigid and silky smooth on your tool rest. The Rock Maple handles are comfortably balanced to the tool size. The Pen Tools have the same three profiles...square for outside curves, round for inside curves and a fully sharp detail tool.
It's not really fair to call these "Pen Tools". We learned after about a year on the market, that name just isn’t fair. There’s so much more to these tools than just pen turning. Sure, they’re great for pen turning…even handling wood/acrylic hybrid material with ease. But, their nimble size and shape makes them great for delicate finials, lace bobbins, miniature goblets and a host of other small, intricate turnings. Cut Cleaner. Sand Less. Pens and small projects are turned these days in a world full of exotic materials; acrylics, polymer clays, stabilized wood, and even mixtures of all the above. Shear scraping works, but the 45° angle that works for most solid wood is sometimes not the optimum angle for synthetics. Also, tiny diameter work often requires you to “tweak” the shear angle. Ultra∙Shear Pen Tools feature round sides allowing you to locate the optimum shear angle for whatever material, shape or dimension you’re cutting. But, rather than being completely round, the bottom is machined flat, so roughing and shaping cuts are solidly supported.
Small Tools...Huge Results
Pen Tools excel at all small projects. Hybrid cast blanks cut with ease.
Pen-Size Tools offer excellent control when working on delicate projects.
Patent Pending
PSS Pen-Size Woodturning Tool - Square .........................$79.99PSD Pen-Size Woodturning Tool - Detail ...........................$79.99PSR Pen-Size Woodturning Tool - Round ..........................$79.99PSK Pen-Size Woodturning Tool - Set of Three ...............$219.99USK Master Set of Nine Woodturning Tools ....................$799.99
PEN SIZE WOODTURNING TOOLS
Locate the exact center of your stock in seconds! Center Finders work equally well on square and round stock. The larger will work to the center of an 8" bowl blank. The smaller is perfect for pens, bottle stoppers and handle projects. Stainless steel construction delivers a virtually indestructible tool that is compatible with any marking device, including marking knives that would mutilate plastic center finders.
Center Finders
CFP 2” Center Finder Pen ........................................................................................ $29.99CFF 8” Center Finder Full .......................................................................................... $39.99
Center Finders locate center of stock by scribing across diagonals. Full Size locates center of 8" bowl blank. Pen Size works up to 3" diameter.
See page 24 for Replacement
CarbideInserts
24 Woodpeckers, LLC • 1-800-752-0725 • woodpeck.com
UPGRADEEasy Wood Tools*with
CarbideInserts
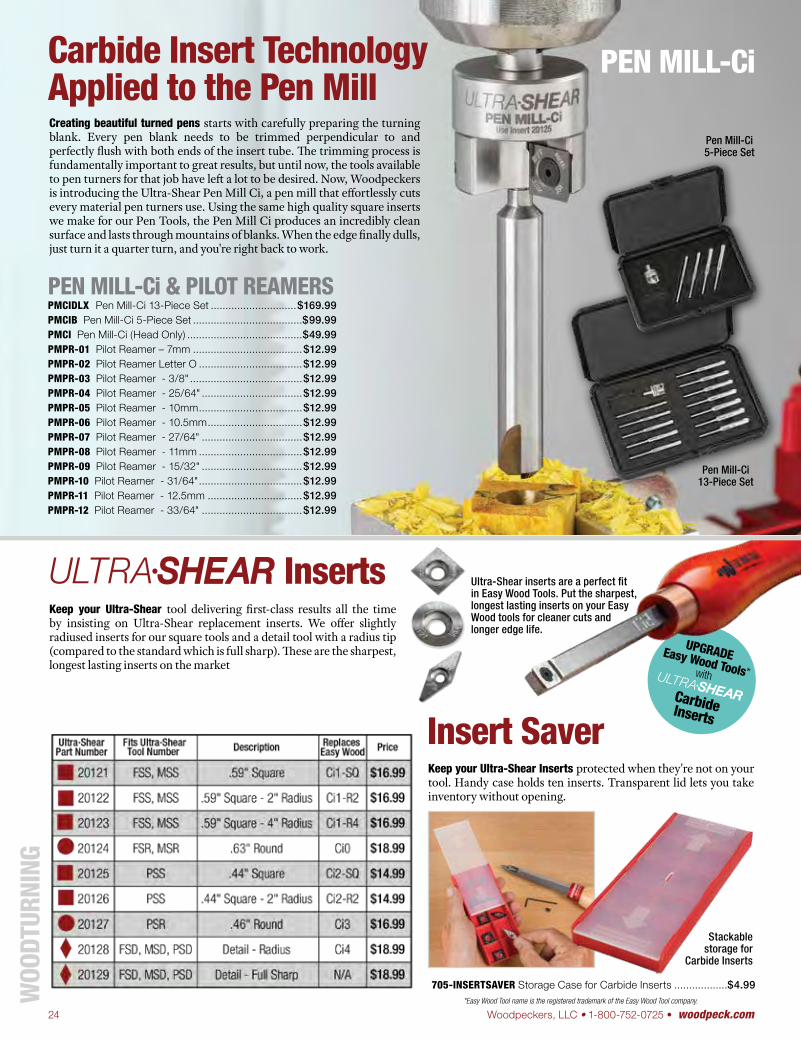
Creating beautiful turned pens starts with carefully preparing the turning blank. Every pen blank needs to be trimmed perpendicular to and perfectly flush with both ends of the insert tube. The trimming process is fundamentally important to great results, but until now, the tools available to pen turners for that job have left a lot to be desired. Now, Woodpeckers is introducing the Ultra-Shear Pen Mill Ci, a pen mill that effortlessly cuts every material pen turners use. Using the same high quality square inserts we make for our Pen Tools, the Pen Mill Ci produces an incredibly clean surface and lasts through mountains of blanks. When the edge finally dulls, just turn it a quarter turn, and you're right back to work.
PEN MILL-Ci & PILOT REAMERSPMCIDLX Pen Mill-Ci 13-Piece Set .............................$169.99PMCIB Pen Mill-Ci 5-Piece Set .....................................$99.99PMCI Pen Mill-Ci (Head Only) .......................................$49.99PMPR-01 Pilot Reamer – 7mm .....................................$12.99PMPR-02 Pilot Reamer Letter O ...................................$12.99PMPR-03 Pilot Reamer - 3/8" ......................................$12.99PMPR-04 Pilot Reamer - 25/64" ..................................$12.99PMPR-05 Pilot Reamer - 10mm ...................................$12.99PMPR-06 Pilot Reamer - 10.5mm ................................$12.99PMPR-07 Pilot Reamer - 27/64" ..................................$12.99PMPR-08 Pilot Reamer - 11mm ...................................$12.99PMPR-09 Pilot Reamer - 15/32" ..................................$12.99PMPR-10 Pilot Reamer - 31/64" ...................................$12.99PMPR-11 Pilot Reamer - 12.5mm ................................$12.99PMPR-12 Pilot Reamer - 33/64" ..................................$12.99
*Easy Wood Tool name is the registered trademark of the Easy Wood Tool company.
PatentPending
Pen Mill-Ci 5-Piece Set
Pen Mill-Ci 13-Piece Set
Carbide Insert Technology Applied to the Pen Mill
PEN MILL-Ci
Stackable storage for
Carbide Inserts
InsertsKeep your Ultra-Shear tool delivering first-class results all the time by insisting on Ultra-Shear replacement inserts. We offer slightly radiused inserts for our square tools and a detail tool with a radius tip (compared to the standard which is full sharp). These are the sharpest, longest lasting inserts on the market
Ultra-Shear inserts are a perfect fit in Easy Wood Tools. Put the sharpest, longest lasting inserts on your Easy Wood tools for cleaner cuts and longer edge life.
Insert Saver
705-INSERTSAVER Storage Case for Carbide Inserts ..................$4.99
Keep your Ultra-Shear Inserts protected when they're not on your tool. Handy case holds ten inserts. Transparent lid lets you take inventory without opening.
WOO
DTUR
NING
25CALIFORNIA RESIDENTS WARNING: Cancer. For more information go to www.P65Warnings.ca.gov. See pg 74.
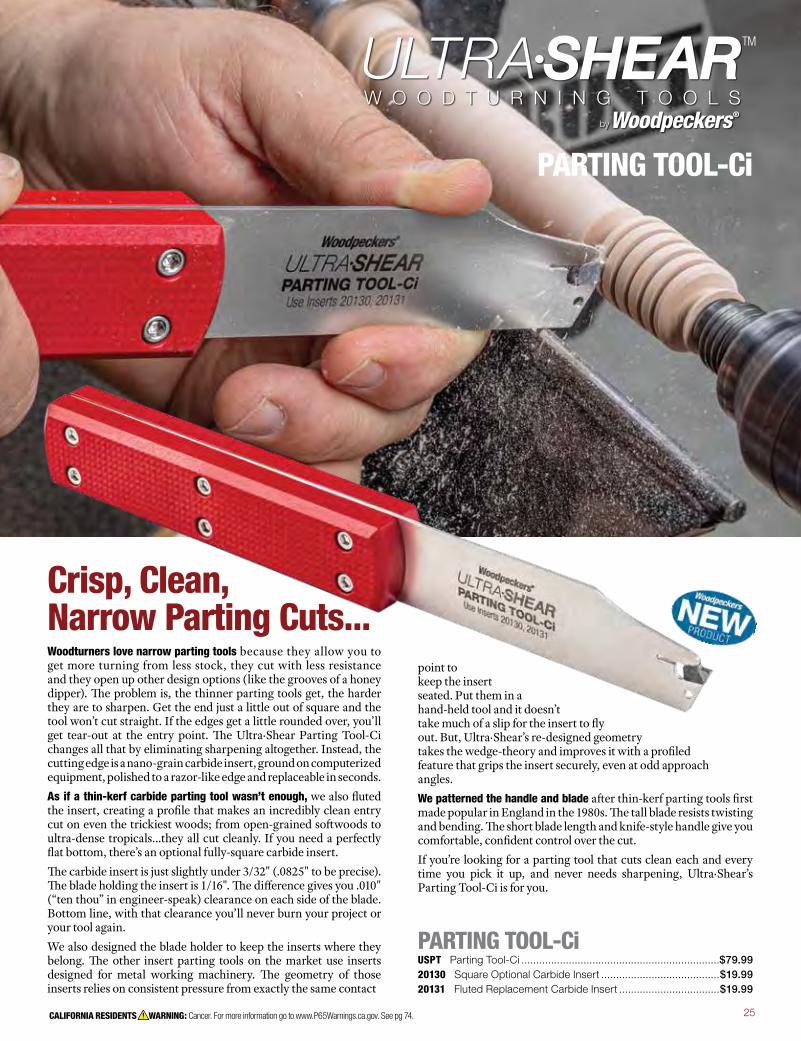
Woodturners love narrow parting tools because they allow you to get more turning from less stock, they cut with less resistance and they open up other design options (like the grooves of a honey dipper). The problem is, the thinner parting tools get, the harder they are to sharpen. Get the end just a little out of square and the tool won’t cut straight. If the edges get a little rounded over, you’ll get tear-out at the entry point. The Ultra∙Shear Parting Tool-Ci changes all that by eliminating sharpening altogether. Instead, the cutting edge is a nano-grain carbide insert, ground on computerized equipment, polished to a razor-like edge and replaceable in seconds. As if a thin-kerf carbide parting tool wasn’t enough, we also fluted the insert, creating a profile that makes an incredibly clean entry cut on even the trickiest woods; from open-grained softwoods to ultra-dense tropicals…they all cut cleanly. If you need a perfectly flat bottom, there’s an optional fully-square carbide insert. The carbide insert is just slightly under 3/32" (.0825" to be precise). The blade holding the insert is 1/16". The difference gives you .010" (“ten thou” in engineer-speak) clearance on each side of the blade. Bottom line, with that clearance you’ll never burn your project or your tool again. We also designed the blade holder to keep the inserts where they belong. The other insert parting tools on the market use inserts designed for metal working machinery. The geometry of those inserts relies on consistent pressure from exactly the same contact
Crisp, Clean,Narrow Parting Cuts...
PARTING TOOL-CiUSPT Parting Tool-Ci ...................................................................$79.99 20130 Square Optional Carbide Insert ........................................$19.99 20131 Fluted Replacement Carbide Insert ..................................$19.99
point to keep the insert seated. Put them in a hand-held tool and it doesn’t take much of a slip for the insert to fly out. But, Ultra∙Shear’s re-designed geometry takes the wedge-theory and improves it with a profiled feature that grips the insert securely, even at odd approach angles. We patterned the handle and blade after thin-kerf parting tools first made popular in England in the 1980s. The tall blade resists twisting and bending. The short blade length and knife-style handle give you comfortable, confident control over the cut. If you’re looking for a parting tool that cuts clean each and every time you pick it up, and never needs sharpening, Ultra∙Shear’s Parting Tool-Ci is for you.
PARTING TOOL-Ci
by
TM
26 Woodpeckers, LLC • 1-800-752-0725 • woodpeck.com
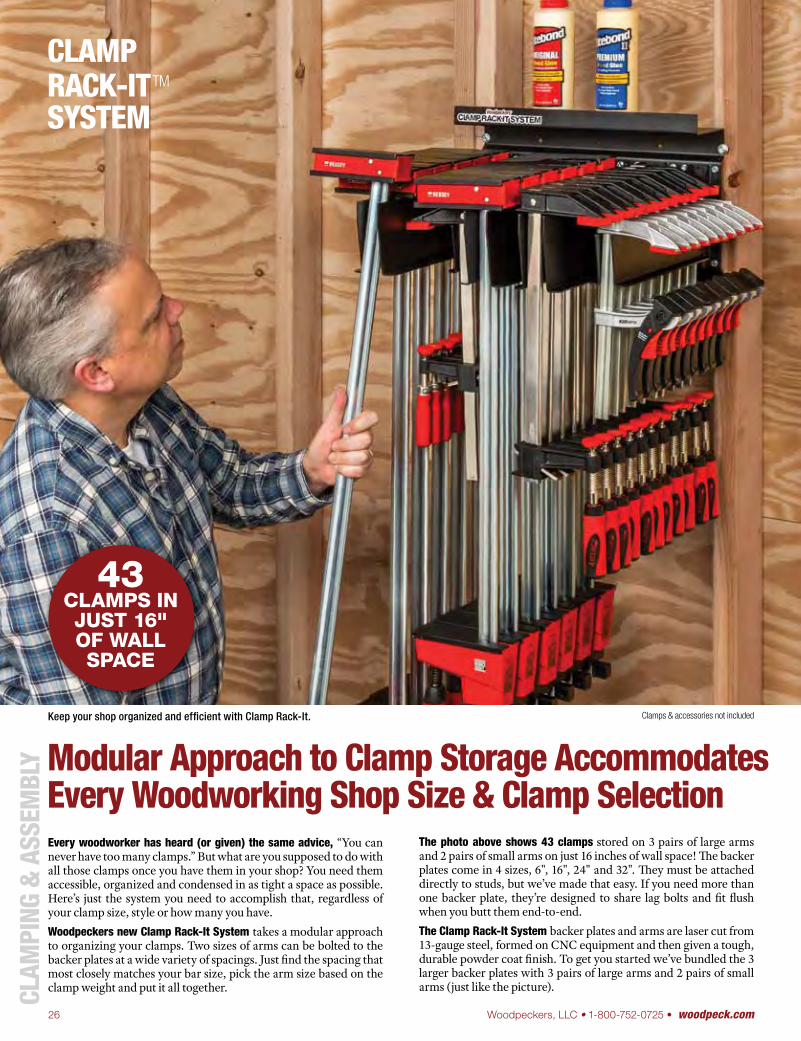
Every woodworker has heard (or given) the same advice, “You can never have too many clamps.” But what are you supposed to do with all those clamps once you have them in your shop? You need them accessible, organized and condensed in as tight a space as possible. Here’s just the system you need to accomplish that, regardless of your clamp size, style or how many you have. Woodpeckers new Clamp Rack-It System takes a modular approach to organizing your clamps. Two sizes of arms can be bolted to the backer plates at a wide variety of spacings. Just find the spacing that most closely matches your bar size, pick the arm size based on the clamp weight and put it all together.
43CLAMPS IN JUST 16"OF WALL SPACE
The photo above shows 43 clamps stored on 3 pairs of large arms and 2 pairs of small arms on just 16 inches of wall space! The backer plates come in 4 sizes, 6", 16", 24" and 32". They must be attached directly to studs, but we’ve made that easy. If you need more than one backer plate, they’re designed to share lag bolts and fit flush when you butt them end-to-end.The Clamp Rack-It System backer plates and arms are laser cut from 13-gauge steel, formed on CNC equipment and then given a tough, durable powder coat finish. To get you started we’ve bundled the 3 larger backer plates with 3 pairs of large arms and 2 pairs of small arms (just like the picture). CL
AMPI
NG &
ASS
EMBL
Y
Clamps & accessories not includedKeep your shop organized and efficient with Clamp Rack-It.
Modular Approach to Clamp Storage AccommodatesEvery Woodworking Shop Size & Clamp Selection
CLAMP RACK-ITTM
SYSTEM
27CALIFORNIA RESIDENTS WARNING: Cancer. For more information go to www.P65Warnings.ca.gov. See pg 74.
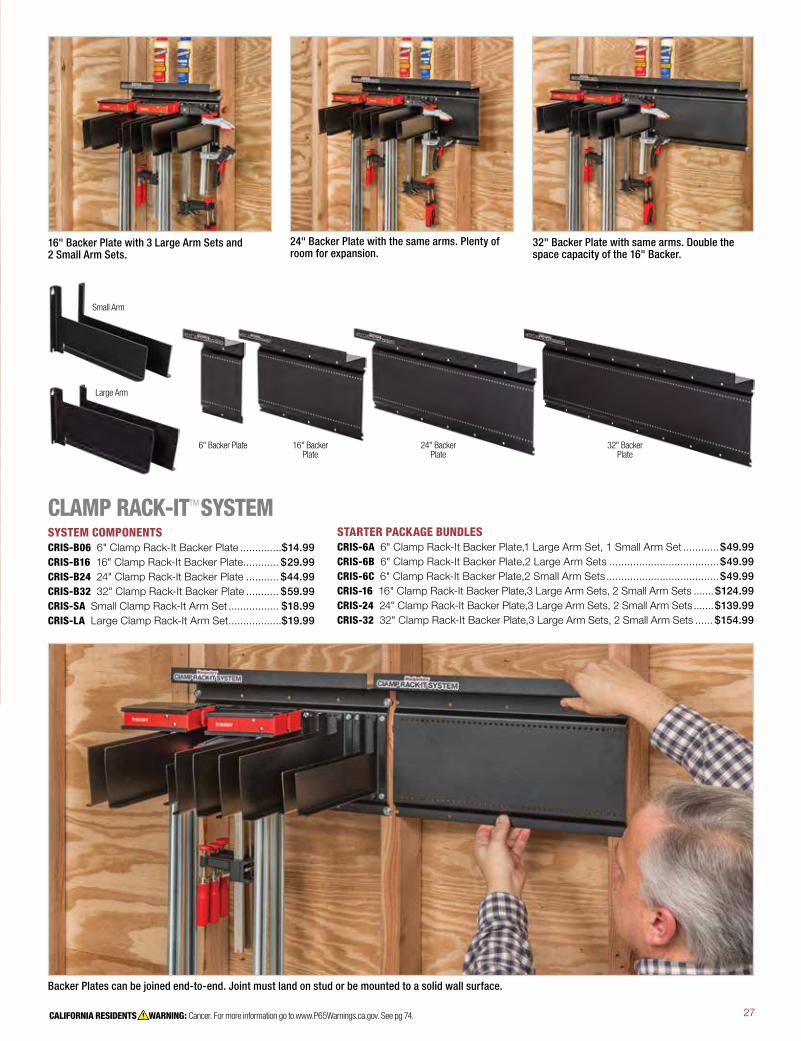
CLAMP RACK-ITTM SYSTEMSYSTEM COMPONENTSCRIS-B06 6" Clamp Rack-It Backer Plate ..............$14.99 CRIS-B16 16" Clamp Rack-It Backer Plate ............ $29.99 CRIS-B24 24" Clamp Rack-It Backer Plate ........... $44.99 CRIS-B32 32" Clamp Rack-It Backer Plate ........... $59.99 CRIS-SA Small Clamp Rack-It Arm Set ................. $18.99 CRIS-LA Large Clamp Rack-It Arm Set ..................$19.99
32" Backer Plate
24" BackerPlate
16" BackerPlate
6" Backer Plate
Small Arm
Large Arm
16" Backer Plate with 3 Large Arm Sets and 2 Small Arm Sets.
24" Backer Plate with the same arms. Plenty of room for expansion.
32" Backer Plate with same arms. Double the space capacity of the 16" Backer.
Backer Plates can be joined end-to-end. Joint must land on stud or be mounted to a solid wall surface.
Modular Approach to Clamp Storage AccommodatesEvery Woodworking Shop Size & Clamp Selection
STARTER PACKAGE BUNDLESCRIS-6A 6" Clamp Rack-It Backer Plate,1 Large Arm Set, 1 Small Arm Set ............$49.99 CRIS-6B 6" Clamp Rack-It Backer Plate,2 Large Arm Sets .....................................$49.99 CRIS-6C 6" Clamp Rack-It Backer Plate,2 Small Arm Sets ......................................$49.99 CRIS-16 16" Clamp Rack-It Backer Plate,3 Large Arm Sets, 2 Small Arm Sets .......$124.99 CRIS-24 24" Clamp Rack-It Backer Plate,3 Large Arm Sets, 2 Small Arm Sets .......$139.99 CRIS-32 32" Clamp Rack-It Backer Plate,3 Large Arm Sets, 2 Small Arm Sets ...... $154.99
28 Woodpeckers, LLC • 1-800-752-0725 • woodpeck.com
PatentPending
Clamps not included
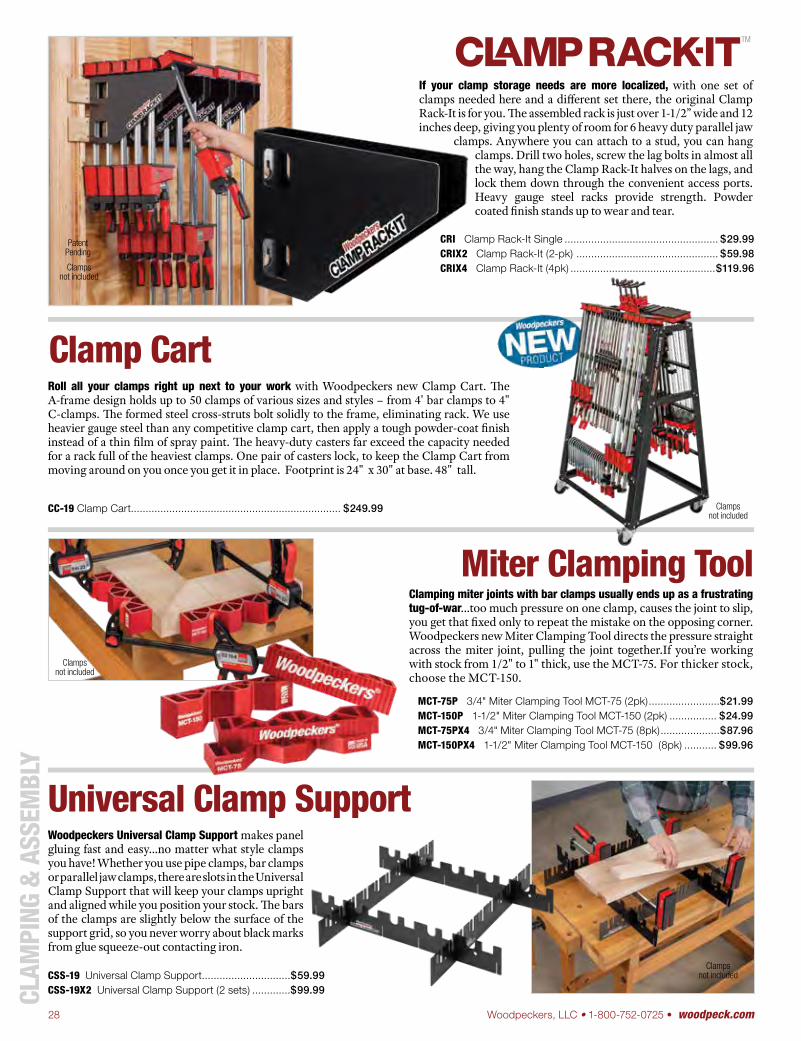
If your clamp storage needs are more localized, with one set of clamps needed here and a different set there, the original Clamp Rack-It is for you. The assembled rack is just over 1-1/2” wide and 12 inches deep, giving you plenty of room for 6 heavy duty parallel jaw
clamps. Anywhere you can attach to a stud, you can hang clamps. Drill two holes, screw the lag bolts in almost all the way, hang the Clamp Rack-It halves on the lags, and lock them down through the convenient access ports. Heavy gauge steel racks provide strength. Powder coated finish stands up to wear and tear.
CRI Clamp Rack-It Single .................................................... $29.99CRIX2 Clamp Rack-It (2-pk) ................................................ $59.98 CRIX4 Clamp Rack-It (4pk) .................................................$119.96
TM
Clamp Cart
CLAM
PING
& A
SSEM
BLY
MCT-75P 3/4" Miter Clamping Tool MCT-75 (2pk) ........................$21.99MCT-150P 1-1/2" Miter Clamping Tool MCT-150 (2pk) ................ $24.99 MCT-75PX4 3/4" Miter Clamping Tool MCT-75 (8pk) ....................$87.96 MCT-150PX4 1-1/2" Miter Clamping Tool MCT-150 (8pk) ........... $99.96
Clamping miter joints with bar clamps usually ends up as a frustrating tug-of-war…too much pressure on one clamp, causes the joint to slip, you get that fixed only to repeat the mistake on the opposing corner. Woodpeckers new Miter Clamping Tool directs the pressure straight across the miter joint, pulling the joint together.If you’re working with stock from 1/2" to 1" thick, use the MCT-75. For thicker stock, choose the MCT-150.
Clamps not included
Miter Clamping Tool
Woodpeckers Universal Clamp Support makes panel gluing fast and easy…no matter what style clamps you have! Whether you use pipe clamps, bar clamps or parallel jaw clamps, there are slots in the Universal Clamp Support that will keep your clamps upright and aligned while you position your stock. The bars of the clamps are slightly below the surface of the support grid, so you never worry about black marks from glue squeeze-out contacting iron.
Universal Clamp Support
CSS-19 Universal Clamp Support ..............................$59.99 CSS-19X2 Universal Clamp Support (2 sets) .............$99.99
CC-19 Clamp Cart....................................................................... $249.99
Roll all your clamps right up next to your work with Woodpeckers new Clamp Cart. The A-frame design holds up to 50 clamps of various sizes and styles – from 4' bar clamps to 4" C-clamps. The formed steel cross-struts bolt solidly to the frame, eliminating rack. We use heavier gauge steel than any competitive clamp cart, then apply a tough powder-coat finish instead of a thin film of spray paint. The heavy-duty casters far exceed the capacity needed for a rack full of the heaviest clamps. One pair of casters lock, to keep the Clamp Cart from moving around on you once you get it in place. Footprint is 24" x 30" at base. 48" tall.
Clamps not included
Clamps not included
29
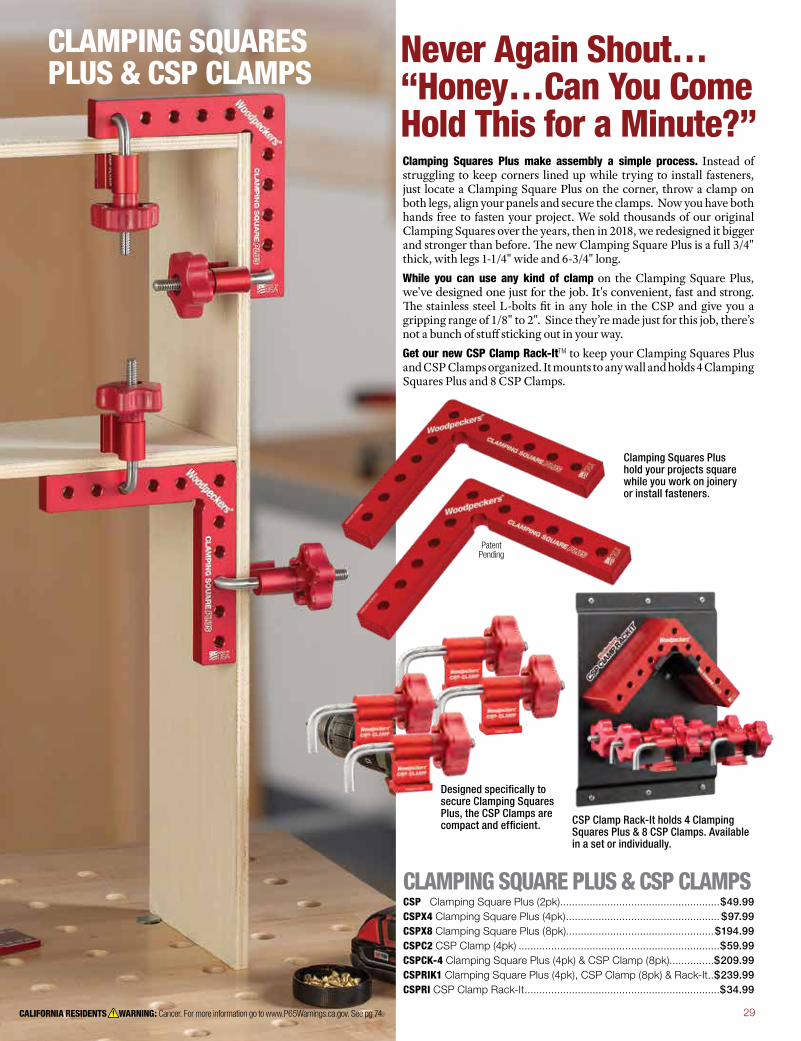
Clamping Squares Plus make assembly a simple process. Instead of struggling to keep corners lined up while trying to install fasteners, just locate a Clamping Square Plus on the corner, throw a clamp on both legs, align your panels and secure the clamps. Now you have both hands free to fasten your project. We sold thousands of our original Clamping Squares over the years, then in 2018, we redesigned it bigger and stronger than before. The new Clamping Square Plus is a full 3/4" thick, with legs 1-1/4" wide and 6-3/4" long. While you can use any kind of clamp on the Clamping Square Plus, we've designed one just for the job. It's convenient, fast and strong. The stainless steel L-bolts fit in any hole in the CSP and give you a gripping range of 1/8" to 2". Since they’re made just for this job, there’s not a bunch of stuff sticking out in your way. Get our new CSP Clamp Rack-ItTM to keep your Clamping Squares Plus and CSP Clamps organized. It mounts to any wall and holds 4 Clamping Squares Plus and 8 CSP Clamps.
CLAMPING SQUARE PLUS & CSP CLAMPS CSP Clamping Square Plus (2pk)......................................................$49.99 CSPX4 Clamping Square Plus (4pk) .................................................... $97.99 CSPX8 Clamping Square Plus (8pk)..................................................$194.99 CSPC2 CSP Clamp (4pk) ....................................................................$59.99 CSPCK-4 Clamping Square Plus (4pk) & CSP Clamp (8pk) ...............$209.99 CSPRIK1 Clamping Square Plus (4pk), CSP Clamp (8pk) & Rack-It ..$239.99CSPRI CSP Clamp Rack-It ..................................................................$34.99
PatentPending
CSP Clamp Rack-It holds 4 Clamping Squares Plus & 8 CSP Clamps. Available in a set or individually.
Never Again Shout…“Honey…Can You Come Hold This for a Minute?”
Clamping Squares Plus hold your projects square while you work on joinery or install fasteners.
Designed specifically to secure Clamping Squares Plus, the CSP Clamps are compact and efficient.
CLAMPING SQUARES PLUS & CSP CLAMPS
CALIFORNIA RESIDENTS WARNING: Cancer. For more information go to www.P65Warnings.ca.gov. See pg 74.
30 Woodpeckers, LLC • 1-800-752-0725 • woodpeck.com
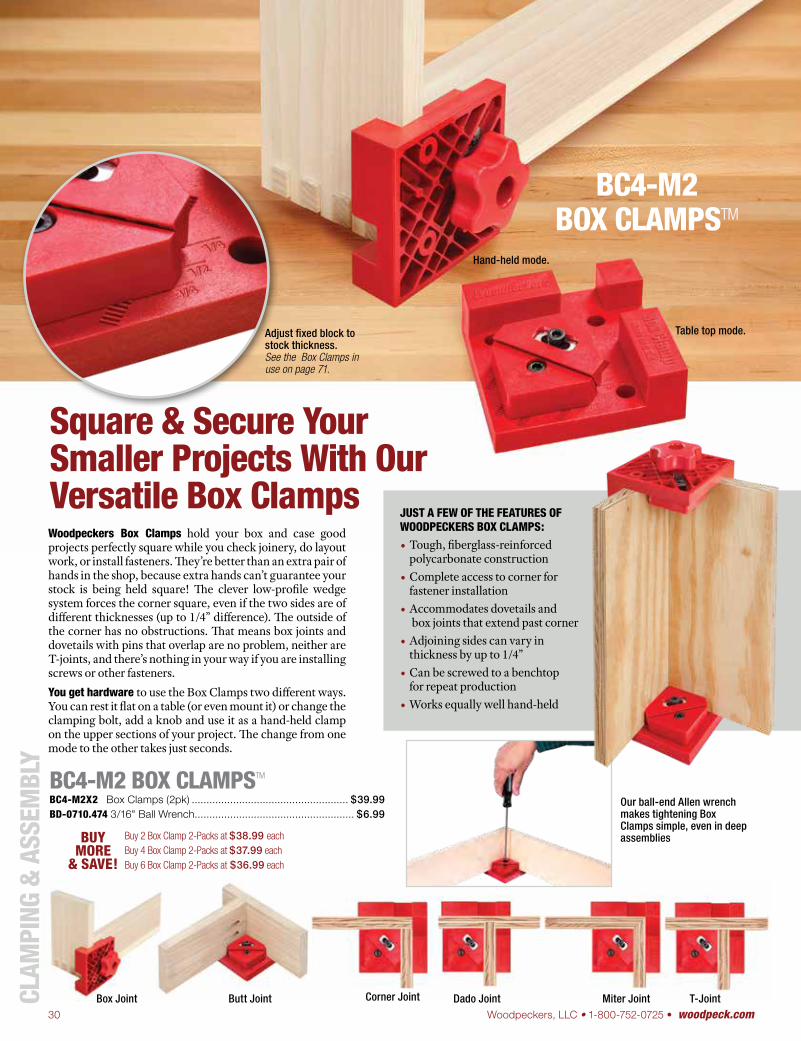
Adjust fixed block to stock thickness.See the Box Clamps in use on page 71.
Square & Secure YourSmaller Projects With OurVersatile Box ClampsWoodpeckers Box Clamps hold your box and case good projects perfectly square while you check joinery, do layout work, or install fasteners. They’re better than an extra pair of hands in the shop, because extra hands can’t guarantee your stock is being held square! The clever low-profile wedge system forces the corner square, even if the two sides are of different thicknesses (up to 1/4” difference). The outside of the corner has no obstructions. That means box joints and dovetails with pins that overlap are no problem, neither are T-joints, and there’s nothing in your way if you are installing screws or other fasteners. You get hardware to use the Box Clamps two different ways. You can rest it flat on a table (or even mount it) or change the clamping bolt, add a knob and use it as a hand-held clamp on the upper sections of your project. The change from one mode to the other takes just seconds.
JUST A FEW OF THE FEATURES OF WOODPECKERS BOX CLAMPS:• Tough, fiberglass-reinforced polycarbonate construction• Complete access to corner for fastener installation• Accommodates dovetails and box joints that extend past corner• Adjoining sides can vary in thickness by up to 1/4”• Can be screwed to a benchtop for repeat production• Works equally well hand-held
Table top mode.
BC4-M2 BOX CLAMPSTM
BC4-M2X2 Box Clamps (2pk) ..................................................... $39.99BD-0710.474 3/16" Ball Wrench ...................................................... $6.99
Box Joint Butt Joint Corner Joint Dado Joint Miter Joint T-Joint
BC4-M2BOX CLAMPSTM
Hand-held mode.
Buy 2 Box Clamp 2-Packs at $38.99 each Buy 4 Box Clamp 2-Packs at $37.99 each Buy 6 Box Clamp 2-Packs at $36.99 each
BUYMORE
& SAVE!
Our ball-end Allen wrench makes tightening Box Clamps simple, even in deep assemblies
CLAM
PING
& A
SSEM
BLY
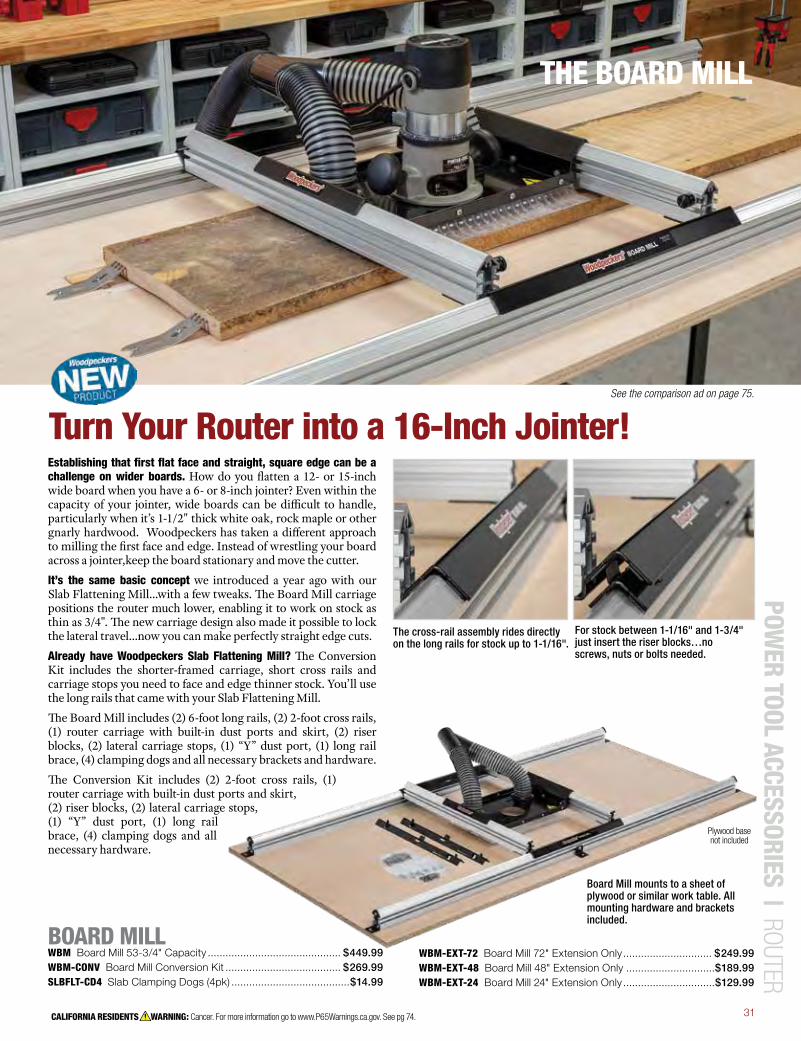
31CALIFORNIA RESIDENTS WARNING: Cancer. For more information go to www.P65Warnings.ca.gov. See pg 74.
Square & Secure YourSmaller Projects With OurVersatile Box Clamps
Table top mode.
Establishing that first flat face and straight, square edge can be a challenge on wider boards. How do you flatten a 12- or 15-inch wide board when you have a 6- or 8-inch jointer? Even within the capacity of your jointer, wide boards can be difficult to handle, particularly when it’s 1-1/2" thick white oak, rock maple or other gnarly hardwood. Woodpeckers has taken a different approach to milling the first face and edge. Instead of wrestling your board across a jointer,keep the board stationary and move the cutter.
It’s the same basic concept we introduced a year ago with our Slab Flattening Mill...with a few tweaks. The Board Mill carriage positions the router much lower, enabling it to work on stock as thin as 3/4". The new carriage design also made it possible to lock the lateral travel...now you can make perfectly straight edge cuts.
Already have Woodpeckers Slab Flattening Mill? The Conversion Kit includes the shorter-framed carriage, short cross rails and carriage stops you need to face and edge thinner stock. You’ll use the long rails that came with your Slab Flattening Mill.
The Board Mill includes (2) 6-foot long rails, (2) 2-foot cross rails, (1) router carriage with built-in dust ports and skirt, (2) riser blocks, (2) lateral carriage stops, (1) “Y” dust port, (1) long rail brace, (4) clamping dogs and all necessary brackets and hardware.
The Conversion Kit includes (2) 2-foot cross rails, (1) router carriage with built-in dust ports and skirt, (2) riser blocks, (2) lateral carriage stops, (1) “Y” dust port, (1) long rail brace, (4) clamping dogs and all necessary hardware.
Turn Your Router into a 16-Inch Jointer!
WBM-EXT-72 Board Mill 72" Extension Only .............................. $249.99 WBM-EXT-48 Board Mill 48" Extension Only ..............................$189.99 WBM-EXT-24 Board Mill 24" Extension Only ...............................$129.99
See the comparison ad on page 75.
THE BOARD MILL
Board Mill mounts to a sheet of plywood or similar work table. All mounting hardware and brackets included.
The cross-rail assembly rides directly on the long rails for stock up to 1-1/16".
Plywood basenot included
BOARD MILLWBM Board Mill 53-3/4" Capacity ............................................. $449.99 WBM-CONV Board Mill Conversion Kit ....................................... $269.99SLBFLT-CD4 Slab Clamping Dogs (4pk) ........................................$14.99
POWER TOOL ACCESSORIES | ROUTER
For stock between 1-1/16" and 1-3/4" just insert the riser blocks…no screws, nuts or bolts needed.
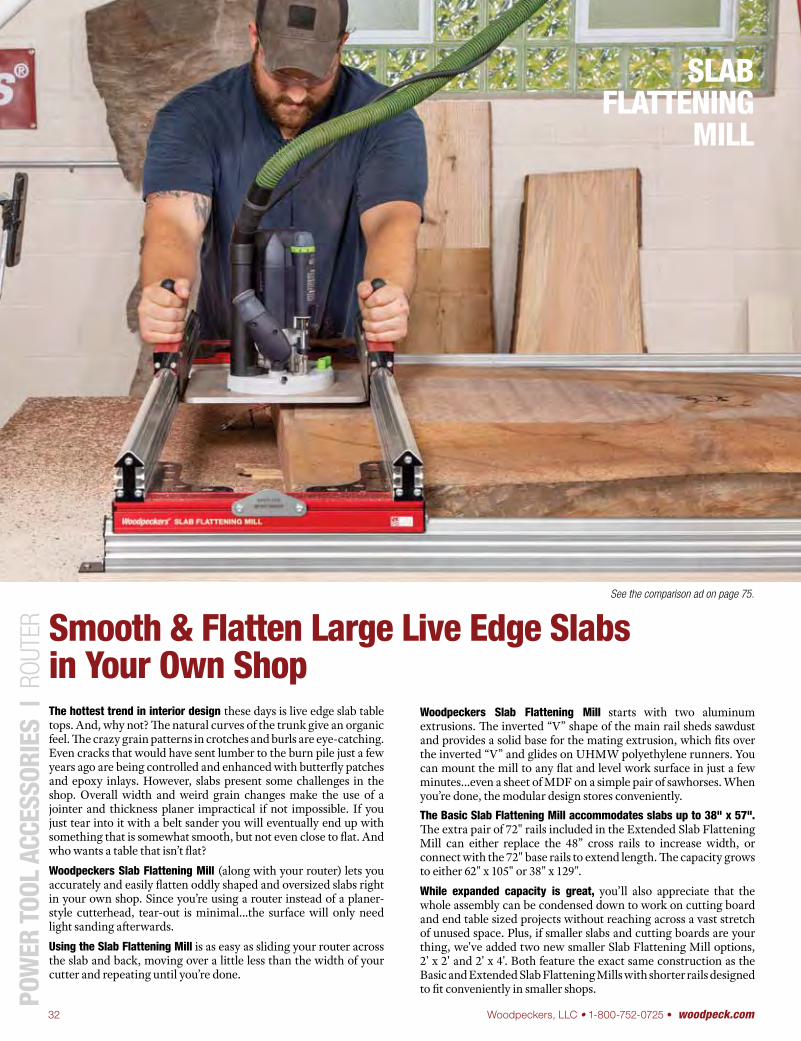
32 Woodpeckers, LLC • 1-800-752-0725 • woodpeck.com
The hottest trend in interior design these days is live edge slab table tops. And, why not? The natural curves of the trunk give an organic feel. The crazy grain patterns in crotches and burls are eye-catching. Even cracks that would have sent lumber to the burn pile just a few years ago are being controlled and enhanced with butterfly patches and epoxy inlays. However, slabs present some challenges in the shop. Overall width and weird grain changes make the use of a jointer and thickness planer impractical if not impossible. If you just tear into it with a belt sander you will eventually end up with something that is somewhat smooth, but not even close to flat. And who wants a table that isn’t flat?
Woodpeckers Slab Flattening Mill (along with your router) lets you accurately and easily flatten oddly shaped and oversized slabs right in your own shop. Since you’re using a router instead of a planer-style cutterhead, tear-out is minimal…the surface will only need light sanding afterwards.
Using the Slab Flattening Mill is as easy as sliding your router across the slab and back, moving over a little less than the width of your cutter and repeating until you’re done.
Woodpeckers Slab Flattening Mill starts with two aluminum extrusions. The inverted “V” shape of the main rail sheds sawdust and provides a solid base for the mating extrusion, which fits over the inverted “V” and glides on UHMW polyethylene runners. You can mount the mill to any flat and level work surface in just a few minutes…even a sheet of MDF on a simple pair of sawhorses. When you’re done, the modular design stores conveniently.The Basic Slab Flattening Mill accommodates slabs up to 38" x 57". The extra pair of 72" rails included in the Extended Slab Flattening Mill can either replace the 48” cross rails to increase width, or connect with the 72" base rails to extend length. The capacity grows to either 62" x 105" or 38" x 129".
While expanded capacity is great, you’ll also appreciate that the whole assembly can be condensed down to work on cutting board and end table sized projects without reaching across a vast stretch of unused space. Plus, if smaller slabs and cutting boards are your thing, we've added two new smaller Slab Flattening Mill options, 2' x 2' and 2' x 4'. Both feature the exact same construction as the Basic and Extended Slab Flattening Mills with shorter rails designed to fit conveniently in smaller shops.PO
WER
TOO
L AC
CESS
ORIE
S |
ROU
TER Smooth & Flatten Large Live Edge Slabs
in Your Own Shop
SLABFLATTENING
MILL
See the comparison ad on page 75.
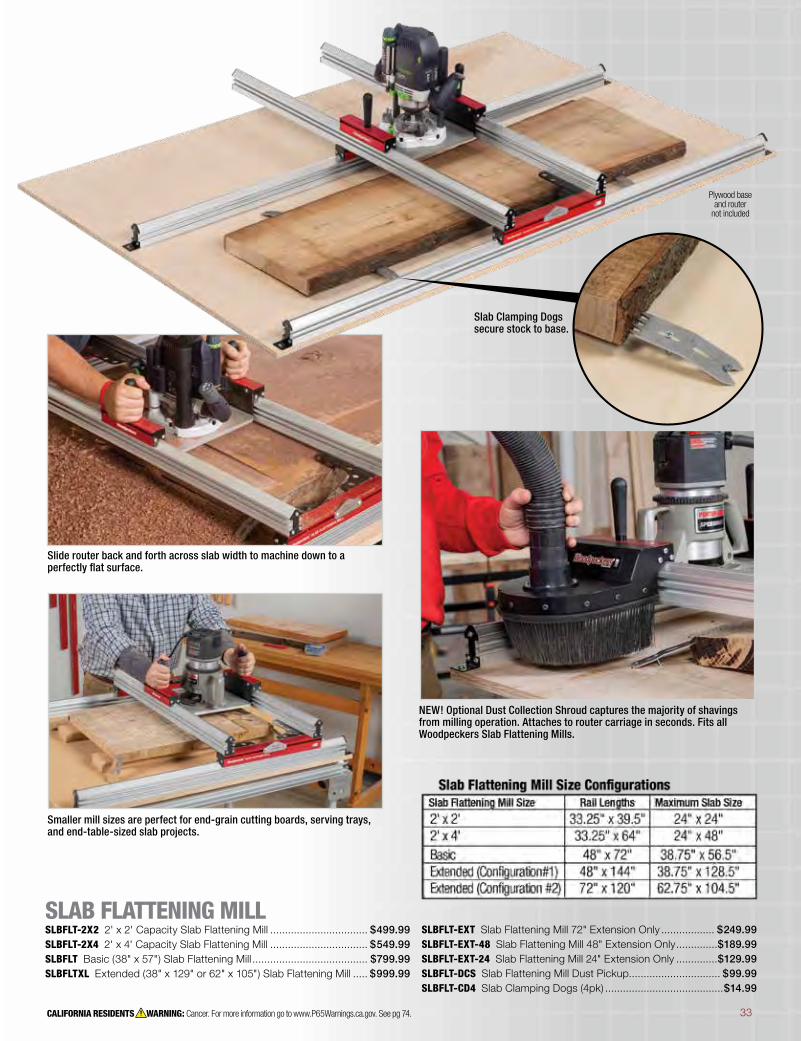
33
SLAB FLATTENING MILLSLBFLT-2X2 2' x 2' Capacity Slab Flattening Mill ................................. $499.99 SLBFLT-2X4 2' x 4' Capacity Slab Flattening Mill ................................. $549.99 SLBFLT Basic (38" x 57") Slab Flattening Mill ....................................... $799.99 SLBFLTXL Extended (38" x 129" or 62" x 105") Slab Flattening Mill ..... $999.99
Plywood base and router
not included
Slide router back and forth across slab width to machine down to a perfectly flat surface.
Slab Clamping Dogs secure stock to base.
Smaller mill sizes are perfect for end-grain cutting boards, serving trays, and end-table-sized slab projects.
CALIFORNIA RESIDENTS WARNING: Cancer. For more information go to www.P65Warnings.ca.gov. See pg 74. 33
Smooth & Flatten Large Live Edge Slabsin Your Own Shop
NEW! Optional Dust Collection Shroud captures the majority of shavings from milling operation. Attaches to router carriage in seconds. Fits all Woodpeckers Slab Flattening Mills.
SLBFLT-EXT Slab Flattening Mill 72" Extension Only .................. $249.99 SLBFLT-EXT-48 Slab Flattening Mill 48" Extension Only ..............$189.99 SLBFLT-EXT-24 Slab Flattening Mill 24" Extension Only ..............$129.99 SLBFLT-DCS Slab Flattening Mill Dust Pickup............................... $99.99 SLBFLT-CD4 Slab Clamping Dogs (4pk) ........................................$14.99
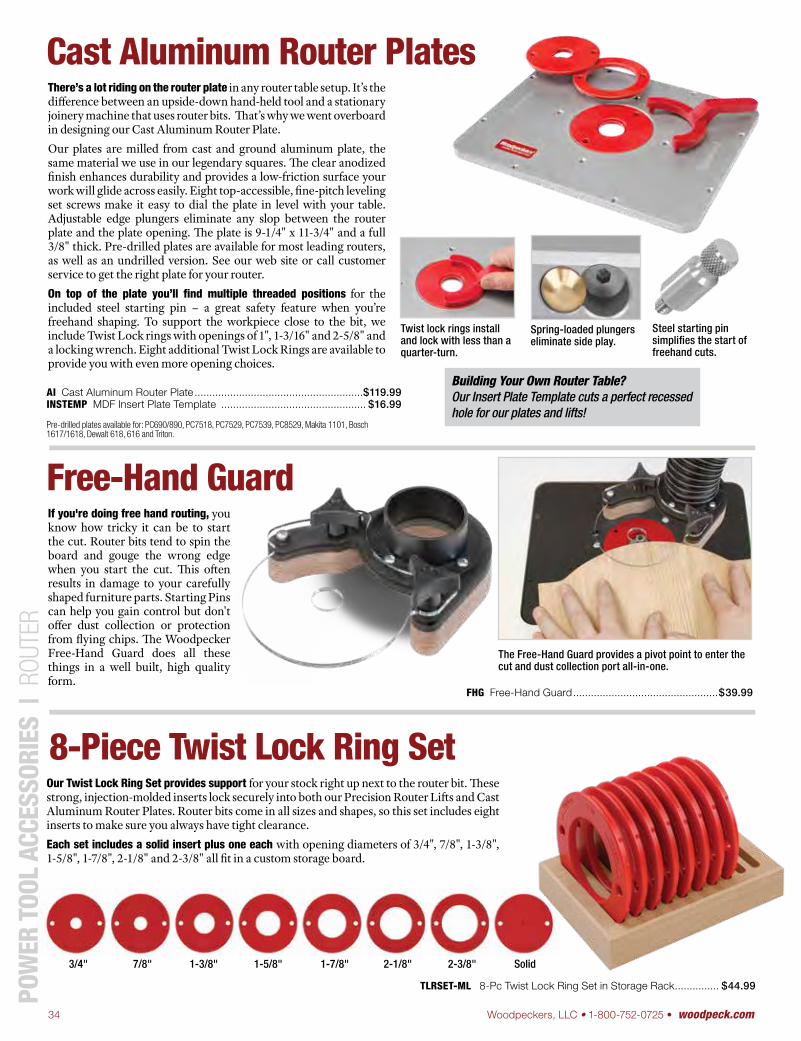
34 Woodpeckers, LLC • 1-800-752-0725 • woodpeck.com
Our Twist Lock Ring Set provides support for your stock right up next to the router bit. These strong, injection-molded inserts lock securely into both our Precision Router Lifts and Cast Aluminum Router Plates. Router bits come in all sizes and shapes, so this set includes eight inserts to make sure you always have tight clearance. Each set includes a solid insert plus one each with opening diameters of 3/4", 7/8", 1-3/8", 1-5/8", 1-7/8", 2-1/8" and 2-3/8" all fit in a custom storage board.
POW
ER T
OOL
ACCE
SSOR
IES
| R
OUTE
RCast Aluminum Router Plates
8-Piece Twist Lock Ring Set
There’s a lot riding on the router plate in any router table setup. It’s the difference between an upside-down hand-held tool and a stationary joinery machine that uses router bits. That’s why we went overboard in designing our Cast Aluminum Router Plate. Our plates are milled from cast and ground aluminum plate, the same material we use in our legendary squares. The clear anodized finish enhances durability and provides a low-friction surface your work will glide across easily. Eight top-accessible, fine-pitch leveling set screws make it easy to dial the plate in level with your table. Adjustable edge plungers eliminate any slop between the router plate and the plate opening. The plate is 9-1/4" x 11-3/4" and a full 3/8" thick. Pre-drilled plates are available for most leading routers, as well as an undrilled version. See our web site or call customer service to get the right plate for your router. On top of the plate you’ll find multiple threaded positions for the included steel starting pin – a great safety feature when you’re freehand shaping. To support the workpiece close to the bit, we include Twist Lock rings with openings of 1", 1-3/16" and 2-5/8" and a locking wrench. Eight additional Twist Lock Rings are available to provide you with even more opening choices.
AI Cast Aluminum Router Plate .........................................................$119.99 INSTEMP MDF Insert Plate Template ................................................. $16.99
Pre-drilled plates available for: PC690/890, PC7518, PC7529, PC7539, PC8529, Makita 1101, Bosch 1617/1618, Dewalt 618, 616 and Triton.
3/4" 7/8" 1-3/8" 1-5/8" 1-7/8" 2-1/8" 2-3/8" Solid
Twist lock rings install and lock with less than a quarter-turn.
Spring-loaded plungers eliminate side play.
Steel starting pin simplifies the start of freehand cuts.
TLRSET-ML 8-Pc Twist Lock Ring Set in Storage Rack ............... $44.99
Free-Hand GuardIf you're doing free hand routing, you know how tricky it can be to start the cut. Router bits tend to spin the board and gouge the wrong edge when you start the cut. This often results in damage to your carefully shaped furniture parts. Starting Pins can help you gain control but don't offer dust collection or protection from flying chips. The Woodpecker Free-Hand Guard does all these things in a well built, high quality form.
The Free-Hand Guard provides a pivot point to enter the cut and dust collection port all-in-one.
FHG Free-Hand Guard .................................................$39.99
Building Your Own Router Table? Our Insert Plate Template cuts a perfect recessed hole for our plates and lifts!
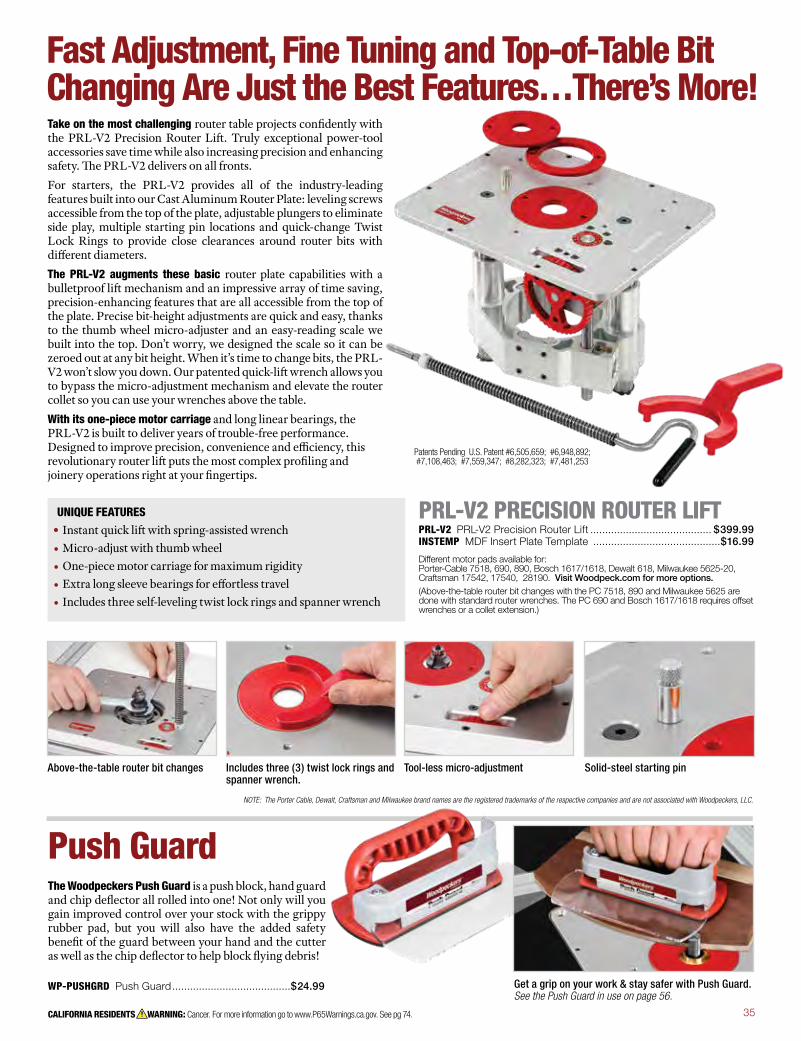
35CALIFORNIA RESIDENTS WARNING: Cancer. For more information go to www.P65Warnings.ca.gov. See pg 74.
Take on the most challenging router table projects confidently with the PRL-V2 Precision Router Lift. Truly exceptional power-tool accessories save time while also increasing precision and enhancing safety. The PRL-V2 delivers on all fronts.For starters, the PRL-V2 provides all of the industry-leading features built into our Cast Aluminum Router Plate: leveling screws accessible from the top of the plate, adjustable plungers to eliminate side play, multiple starting pin locations and quick-change Twist Lock Rings to provide close clearances around router bits with different diameters. The PRL-V2 augments these basic router plate capabilities with a bulletproof lift mechanism and an impressive array of time saving, precision-enhancing features that are all accessible from the top of the plate. Precise bit-height adjustments are quick and easy, thanks to the thumb wheel micro-adjuster and an easy-reading scale we built into the top. Don’t worry, we designed the scale so it can be zeroed out at any bit height. When it’s time to change bits, the PRL-V2 won’t slow you down. Our patented quick-lift wrench allows you to bypass the micro-adjustment mechanism and elevate the router collet so you can use your wrenches above the table. With its one-piece motor carriage and long linear bearings, the PRL-V2 is built to deliver years of trouble-free performance. Designed to improve precision, convenience and efficiency, this revolutionary router lift puts the most complex profiling and joinery operations right at your fingertips.
UNIQUE FEATURES• Instant quick lift with spring-assisted wrench• Micro-adjust with thumb wheel• One-piece motor carriage for maximum rigidity• Extra long sleeve bearings for effortless travel• Includes three self-leveling twist lock rings and spanner wrench
PRL-V2 PRECISION ROUTER LIFT PRL-V2 PRL-V2 Precision Router Lift ......................................... $399.99 INSTEMP MDF Insert Plate Template ...........................................$16.99
Different motor pads available for: Porter-Cable 7518, 690, 890, Bosch 1617/1618, Dewalt 618, Milwaukee 5625-20, Craftsman 17542, 17540, 28190. Visit Woodpeck.com for more options.(Above-the-table router bit changes with the PC 7518, 890 and Milwaukee 5625 are done with standard router wrenches. The PC 690 and Bosch 1617/1618 requires offset wrenches or a collet extension.)
Patents Pending U.S. Patent #6,505,659; #6,948,892; #7,108,463; #7,559,347; #8,282,323; #7,481,253
NOTE: The Porter Cable, Dewalt, Craftsman and Milwaukee brand names are the registered trademarks of the respective companies and are not associated with Woodpeckers, LLC.
Above-the-table router bit changes Includes three (3) twist lock rings and spanner wrench.
Tool-less micro-adjustment Solid-steel starting pin
Fast Adjustment, Fine Tuning and Top-of-Table BitChanging Are Just the Best Features…There’s More!
Push GuardThe Woodpeckers Push Guard is a push block, hand guard and chip deflector all rolled into one! Not only will you gain improved control over your stock with the grippy rubber pad, but you will also have the added safety benefit of the guard between your hand and the cutter as well as the chip deflector to help block flying debris!
WP-PUSHGRD Push Guard ........................................$24.99 Get a grip on your work & stay safer with Push Guard.See the Push Guard in use on page 56.
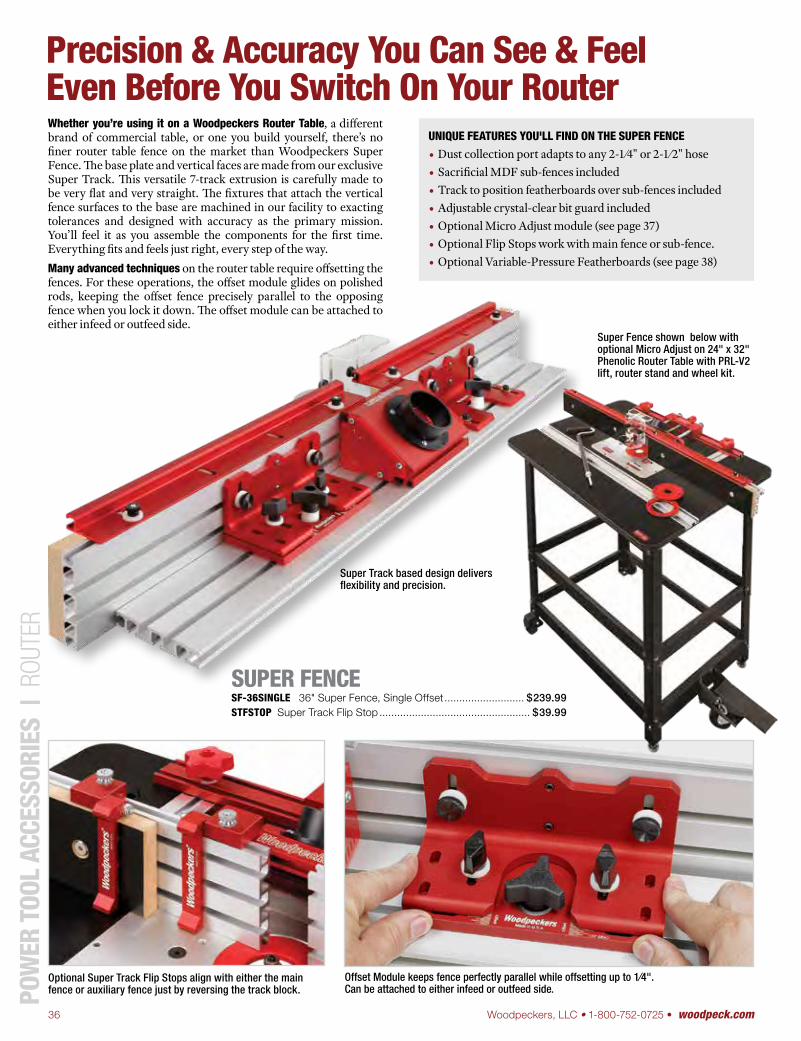
36 Woodpeckers, LLC • 1-800-752-0725 • woodpeck.com
Offset Module keeps fence perfectly parallel while offsetting up to 1⁄4". Can be attached to either infeed or outfeed side.
Optional Super Track Flip Stops align with either the main fence or auxiliary fence just by reversing the track block.
SUPER FENCE SF-36SINGLE 36" Super Fence, Single Offset ........................... $239.99STFSTOP Super Track Flip Stop ................................................... $39.99
Whether you’re using it on a Woodpeckers Router Table, a different brand of commercial table, or one you build yourself, there’s no finer router table fence on the market than Woodpeckers Super Fence. The base plate and vertical faces are made from our exclusive Super Track. This versatile 7-track extrusion is carefully made to be very flat and very straight. The fixtures that attach the vertical fence surfaces to the base are machined in our facility to exacting tolerances and designed with accuracy as the primary mission. You’ll feel it as you assemble the components for the first time. Everything fits and feels just right, every step of the way. Many advanced techniques on the router table require offsetting the fences. For these operations, the offset module glides on polished rods, keeping the offset fence precisely parallel to the opposing fence when you lock it down. The offset module can be attached to either infeed or outfeed side.
Super Fence shown below with optional Micro Adjust on 24" x 32" Phenolic Router Table with PRL-V2 lift, router stand and wheel kit.
POW
ER T
OOL
ACCE
SSOR
IES
| R
OUTE
R
Super Track based design delivers flexibility and precision.
Precision & Accuracy You Can See & FeelEven Before You Switch On Your Router
UNIQUE FEATURES YOU'LL FIND ON THE SUPER FENCE• Dust collection port adapts to any 2-1 ⁄4" or 2-1 ⁄2" hose• Sacrificial MDF sub-fences included • Track to position featherboards over sub-fences included• Adjustable crystal-clear bit guard included• Optional Micro Adjust module (see page 37)• Optional Flip Stops work with main fence or sub-fence. • Optional Variable-Pressure Featherboards (see page 38)
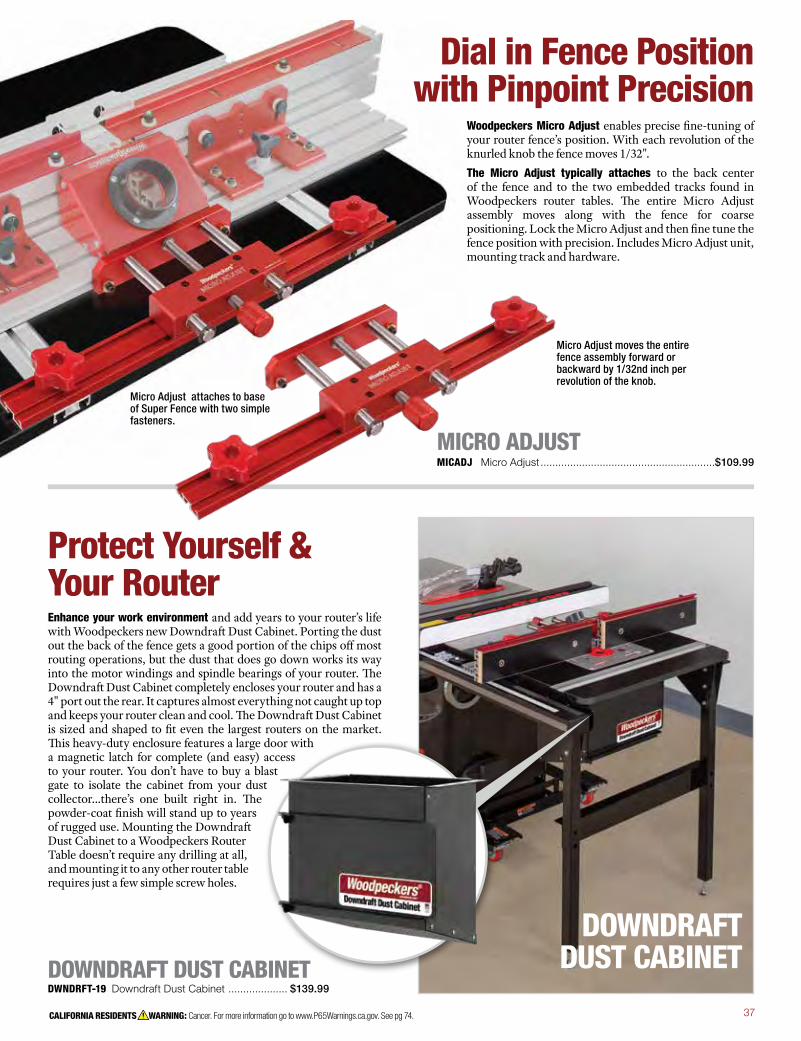
37CALIFORNIA RESIDENTS WARNING: Cancer. For more information go to www.P65Warnings.ca.gov. See pg 74.
Woodpeckers Micro Adjust enables precise fine-tuning of your router fence’s position. With each revolution of the knurled knob the fence moves 1/32". The Micro Adjust typically attaches to the back center of the fence and to the two embedded tracks found in Woodpeckers router tables. The entire Micro Adjust assembly moves along with the fence for coarse positioning. Lock the Micro Adjust and then fine tune the fence position with precision. Includes Micro Adjust unit, mounting track and hardware.
MICRO ADJUST MICADJ Micro Adjust ...........................................................$109.99
Dial in Fence Position with Pinpoint Precision
Micro Adjust attaches to base of Super Fence with two simple fasteners.
Micro Adjust moves the entire fence assembly forward or backward by 1/32nd inch per revolution of the knob.
DOWNDRAFT DUST CABINETDWNDRFT-19 Downdraft Dust Cabinet .................... $139.99
Enhance your work environment and add years to your router’s life with Woodpeckers new Downdraft Dust Cabinet. Porting the dust out the back of the fence gets a good portion of the chips off most routing operations, but the dust that does go down works its way into the motor windings and spindle bearings of your router. The Downdraft Dust Cabinet completely encloses your router and has a 4" port out the rear. It captures almost everything not caught up top and keeps your router clean and cool. The Downdraft Dust Cabinet is sized and shaped to fit even the largest routers on the market. This heavy-duty enclosure features a large door with a magnetic latch for complete (and easy) access to your router. You don’t have to buy a blast gate to isolate the cabinet from your dust collector…there’s one built right in. The powder-coat finish will stand up to years of rugged use. Mounting the Downdraft Dust Cabinet to a Woodpeckers Router Table doesn’t require any drilling at all, and mounting it to any other router table requires just a few simple screw holes.
Protect Yourself &Your Router
DOWNDRAFTDUST CABINET
38 Woodpeckers, LLC • 1-800-752-0725 • woodpeck.com
Woodpeckers Coping Sled handles the most challenging coping cuts with ultimate precision and safety. We’ve built this rock-solid sled using the best materials available and a true “belt and suspenders” approach, eliminating the problems we found in lesser sleds.The design starts with a rigid 3/8" phenolic base that slides smoothly on the table surface. On top of this foundation, the workpiece is effectively trapped between a fixed fence and a slotted top plate that adjusts to handle stock up to 5-1/2" wide. Maximum workpiece thickness is 1-1/2". To lock the stock down, a rigid clamp beam with two hold-downs slides into place directly over the workpiece. Unlike coping sleds that ride in the miter slot, Woodpeckers Coping Sled uses a guide that rides against the router fence. This allows you to concentrate your feed pressure where it counts the most - toward the bit and fence. The clear fence guide provides a good view of the cut and doubles as a chip deflector and bit guard. If you need more depth of cut, the optional 15" Guide gives you a longer guide and up to 3 inches of depth. Woodpeckers Coping Sled has no sacrificial parts. Just use a piece of scrap as a backer board to prevent tear-out. Woodpeckers Coping Sled sets you up for success with any end grain cutting challenge — with simple, solid adjustments and safe, accurate performance that no other coping sled can match.
COPING SLED COPESLED1 Coping Sled ............................................................$149.99CSGUIDE-15 15" Coping Sled Guide ..............................................$14.99
Optional 15" CopingSled Guide
Whether you use a featherboard on the router table, band saw or table saw, the goal is always the same; enhance precision and safety by keeping the workpiece in contact with the fence and table. But, getting a featherboard’s clamping pressure just right has always been a trial-and-error process, until now. Woodpeckers Variable-Pressure Featherboards eliminate this fuss and frustration. Now you can lock the featherboard in place on the fence or table, then slide a tensioning plate up or down to fine-tune the finger pressure. A single thumbscrew locks in the tension setting.Sold in pairs, our Variable-Pressure Featherboards are designed to attach to any 1 ⁄4" T-track. Buy our optional Miter Slot Nut hardware package to attach featherboards to a standard 3/4" x 3/8" T-miter channel.
VARIABLE-PRESSURE FEATHERBOARDVPFB Variable Pressure Featherboards (2pk) ................................................ $39.99MSN-4PC Miter Slot Nuts & Hardware (4pk) ....................................................$21.99 PO
WER
TOO
L AC
CESS
ORIE
S |
ROU
TER
Special optional hardware kit locks featherboard into any 3/4" T-slot miter track.
Get a Grip on Tricky End-Grain Cuts
Keep Your Stock in Position With Something Other Than Your Hands
CALIFORNIA RESIDENTS WARNING: Cancer. For more information go to www.P65Warnings.ca.gov. See pg 74.
Phenolic Router Table Tops
MDF Router Table Tops
Woodpeckers isn’t the first company to offer phenolic router tables, but we can say with confidence that ours are the best. Phenolic sheet stock can vary greatly. We tested samples extensively before finding a grade that met our requirements for strength, durability, flatness and uniformity. But, our quality control didn’t end there. We machine all our phenolic router tables on our own state-of-the-art CNC equipment. In-house manufacturing allows us to offer the best quality and also the best value.If you want an exceptional level of durability that includes resistance to moisture, chemicals, impact, abrasion and temperature variation, you won't find a better option than a Woodpeckers Phenolic Router Table Top. Both table sizes feature a 9-1/4" x 11-3/4" router plate opening, fence-mounting tracks, and a combination miter channel/T-track. All features perfectly match our other router accessories, Super Fence, router plates and router lifts. Plus, we pre-drill the underside of each table for effortless mounting to our router stands.
It takes careful attention to ensure an MDF router table delivers premium performance, and here’s the result. Instead of gluing two layers of MDF together like you would in your shop, we chemically weld our two-layer MDF core in a 50-ton press to ensure flatness and strength. The micro-dot laminate bonded to the MDF core features a low-friction surface that outperforms standard plastic laminate, and to maximize dimensional stability, it’s bonded to both table faces. (Lesser tables have a cheaper laminate on the underside of the table.)The aluminum extrusions we use for the combination miter/T-track and fence-mounting tracks are bolted in place from the underside of the table, so it’s never going to let you down by loosening or lifting. The durable PVC edging helps to protect against moisture and dinged edges. Like our phenolic tables, both sizes of our MDF Router Table Tops are fully compatible with all our router accessories and stands.
RT2432-PH 24" x 32" Solid Phenolic Router Table Top ............. $279.99RT2743C-PH 27" x 43" Solid Phenolic Router Table Top ........... $389.99
RTS2027-BLK Adjustable Router Table Stand 20" x 27" .......... $189.99RTS2037-BLK Adjustable Router Table Stand 20" x 37" .......... $209.99WHEELKIT-BLK Wheel Kit ............................................................. $54.99
20" x 37" Router Table Stand shown with optional Wheel Kit.
Phenolic Router Table Tops Available in Two Sizes.
Router Table Stands
Detail view of the Micro-Dot laminate low friction surface.
RT2432P 24" x 32" MDF/Micro Dot Router Table Top ................$169.99 RT2743C 27" x 43" MDF/Micro Dot Router Table Top ................$219.99
Woodpeckers Router Table Stands adjust from 36" to 42", allowing you to set up your router table at just the right height for you. The 20" x 27" leg set fits our 24" x 32" router tables and the 20" x 37" leg set fits our 27" x 43" tables. Both router stands and table tops are machined on CNC equipment, ensuring perfect fastener alignment. The legs and stretchers are pre-drilled for the wheel kit…whether you get it now or later. The stands are built from 14-gauge steel right here in the USA. The powder coated finish will stand up to years of heavy use. Includes leveling feet, hardware and complete instructions.
20" x 27" Router Table Stand shown with standard feet.
Wheel Kit provides full mobility for your router table. Once the pivot wheel is raised, the table is rock solid.
39
We make some really great router table equipment. In fact, we make so much of it, it’s pretty easy to get confused and a little lost. To help you out with that, we’ve put together five Router Table Packages. While there are still other accessories you might want to add, these packages put a world-class router table in your shop. Here’s a chart that shows you which components are included with each package. Once you decide which Package you want, the next step is to determine what router you’re going to install. We have versions of the PRL-V2 Lift and the Router Plate that will fit most popular routers on the market…you’ll just need to know which one you have before you go online or call Customer Service.
POW
ER T
OOL
ACCE
SSOR
IES
| R
OUTE
RSix Pages of Router Table Parts…Want Some Help?
A. MDF Tables (page 39)• Micro-dot laminate reduces friction and stays clean•Laminated under pressure for stability• Same laminate on both sides for long-term balance
B. Phenolic Tables (page 39)• Impervious to moisture, chemicals, impact or abrasion• Unmatched for flatness, strength and durability• Surface under leveling screws will not wear
C. Cast Aluminum Router Plate (page 34)• Twist lock rings to accommodate different bit diameters• Models drilled for many popular routers or un-drilled• Adjustable tension side plungers (also on PRL-V2)
D. PRL-V2 (page 35)• Rapid adjustment for bit changes and coarse positioning• Above-the-table, thumbwheel fine adjustment of router bit• Twist lock rings to accommodate different bit diameters• Leveling screws accessed from above the table• Indexable height indicator built into top of router lift
E. Super Fence (page 36)• Dust port compatible with both 2-1/4" and 2-1/2" vacuum hose• Offset module keeps outfeed and infeed fences parallel• Sacrificial sub-fences included and easily replaced
F. Adjustable Router Stand (page 39)• Height adjusts from 36" to 42" for operator comfort• Pre-drilled for easy attachment to Woodpeckers Router Tables• Powder-coat finish stands up to heavy shop use
G. Wheel Kit (page 39)• Step on pedal to lower swivel wheel and move table• Kick pedal up to drop table back onto leveling feet• Can be added to any Woodpeckers Router Table anytime
HERE ARE THE HIGHLIGHTS OF EACH COMPONENT OF THE PACKAGE:
PRP-Basic - Our most economical router table.
40
41
ROUTER TABLE PACKAGES
PRP-4 Package shown with optional Micro Adjust and
Featherboards.
What Else Do I Want?• Coping Sled If you're going to do raised panel doors. (page 38)• Featherboards Hold stock against the fence and down to the table. (page 38 & above photo)• Micro Adjust Simplifies fine adjustment of the fence position. (page 37 & above photo)
• Downdraft Dust Cabinet Collects dust and debris from under the table. (page 37)• Twist Lock Ring Set Closely match opening to router bit size. (page 34)• Router Motors Check out Woodpeck.com for top quality routers.
CALIFORNIA RESIDENTS WARNING: Cancer. For more information go to www.P65Warnings.ca.gov. See pg 74.

42 Woodpeckers, LLC • 1-800-752-0725 • woodpeck.com
top-of-the-line router table enhancements...the PRL-V2 Router Lift, Super Fence, Micro Adjust and the new Downdraft Dust Cabinet. As with our free-standing router tables, you'll need to know the motor diameter of your router to get the right model. Once you know that, these comprehensive packages take the decision making out of your life. You're getting a fully loaded router table capable of the most demanding joinery and molding work.
One hard and fast rule we’ve learned from our customers is that no matter how much room you have for your shop, it’s not enough. If you’ve been dreaming of having a Woodpeckers Router Table, but just can’t figure out where you would put it, we’ve got the answer for you. Replace the wasted real estate taken up by your table saw’s extension table with our new Extension Wing Router Table.We offer two sizes of the Extension Wing Router Table; 27" x 23" and 27" x 45". Either size will fit on either side of any 27" deep table saw. That would include all SawStop models (except the Industrial), most PowerMatic 10" models, most Delta/Rockwell Contractors Saws, most Unisaws, most Craftsman table saws and many more. Simply measure your table saw’s cast table from front to back. If it is 27" (and it probably is), the Extension Wing Router Table will fit. The package includes heavy-duty legs with adjustable feet to ensure your extension is stable and level with the main saw table. The 45" extension is available either with or without a combination miter channel and T-track. The choice gets down to how you’ll use your router table. The track model has the router placed closer to the edge, just like our free-standing router tables. The track-less model has the router plate more central, giving you more support when working large panels.There are two ways to order your Extension Wing Router Table, as a basic router table, or as a complete package. The Packages include all our PO
WER
TOO
L AC
CESS
ORIE
S |
ROU
TER
Tight on Shop Space? Put Your Router Table in Your Table Saw
EXTENSION WING ROUTER TABLE
Extension Wing Router Table attaches directly
to your cast iron saw table. Instructions
included.
42
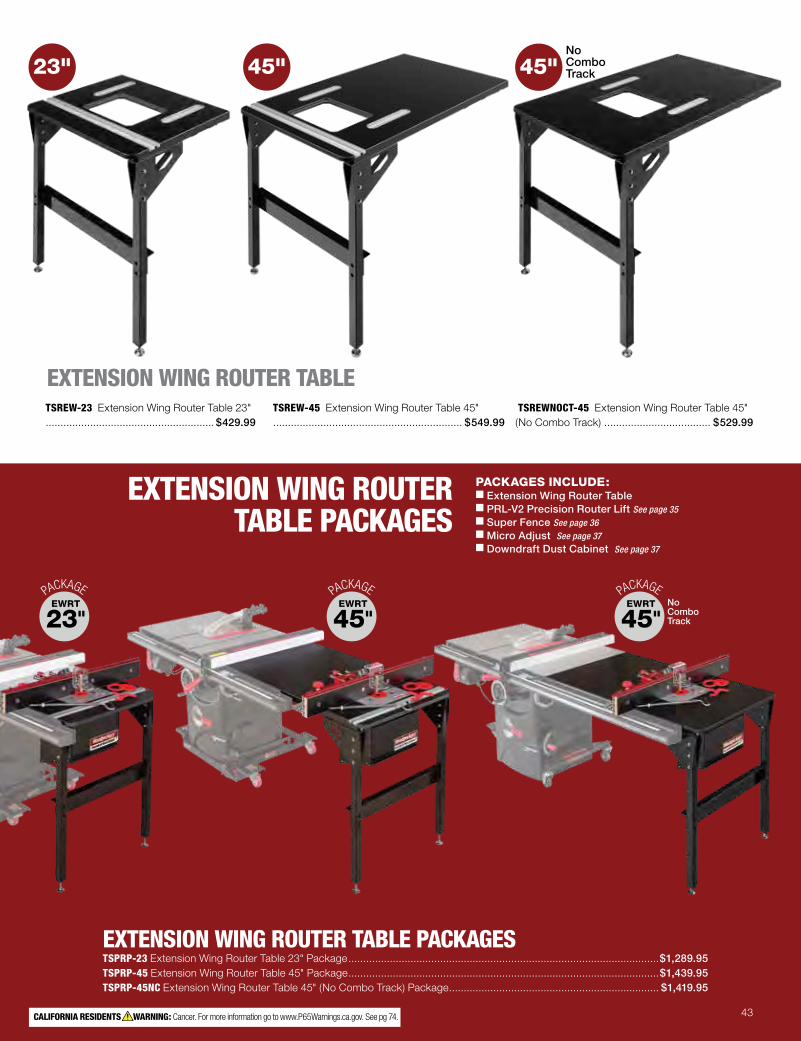
43CALIFORNIA RESIDENTS WARNING: Cancer. For more information go to www.P65Warnings.ca.gov. See pg 74.
EXTENSION WING ROUTERTABLE PACKAGES
EWRT
45" EWRT
45" NoCombo Track
PACKAGES INCLUDE:�■�Extension Wing Router Table■�PRL-V2 Precision Router Lift See page 35■��Super Fence See page 36■�Micro Adjust See page 37■�Downdraft Dust Cabinet See page 37
EWRT
23"
EXTENSION WING ROUTER TABLE PACKAGESTSPRP-23 Extension Wing Router Table 23" Package .........................................................................................................$1,289.95TSPRP-45 Extension Wing Router Table 45" Package .........................................................................................................$1,439.95TSPRP-45NC Extension Wing Router Table 45" (No Combo Track) Package ....................................................................... $1,419.95
EXTENSION WING ROUTER TABLE
23" 45" NoCombo Track45"
TSREW-23 Extension Wing Router Table 23" ......................................................... $429.99
TSREW-45 Extension Wing Router Table 45" ................................................................ $549.99
TSREWNOCT-45 Extension Wing Router Table 45" (No Combo Track) .................................... $529.99
43
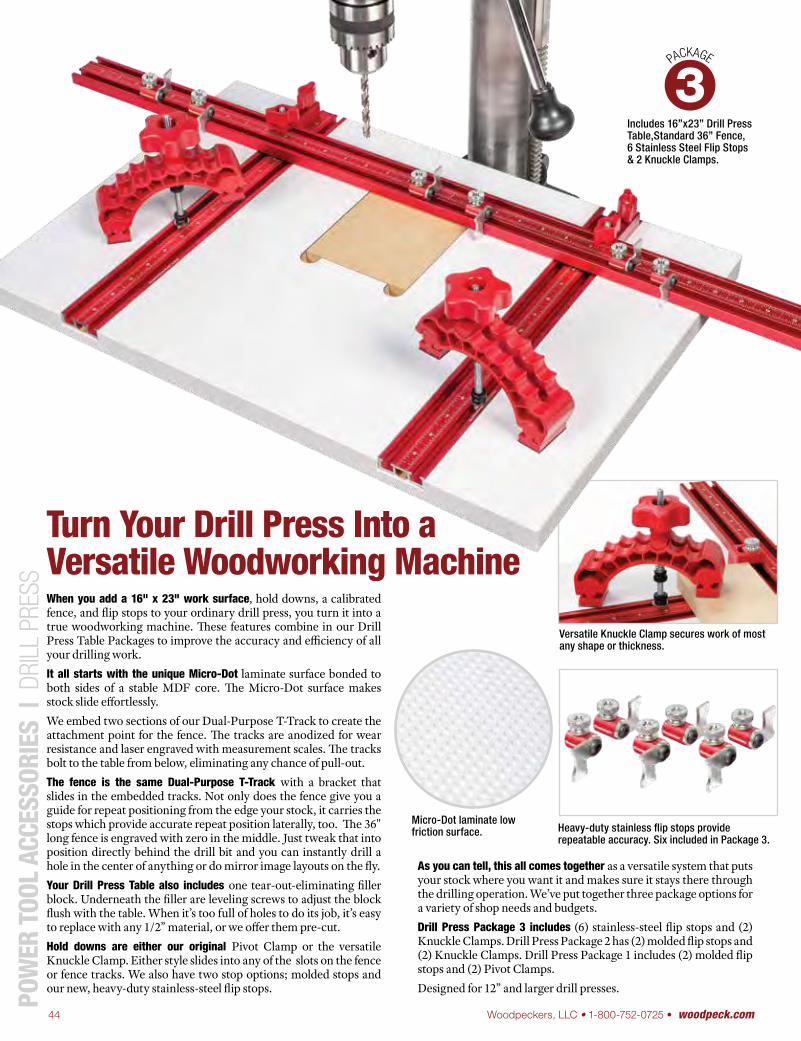
44 Woodpeckers, LLC • 1-800-752-0725 • woodpeck.com
When you add a 16" x 23" work surface, hold downs, a calibrated fence, and flip stops to your ordinary drill press, you turn it into a true woodworking machine. These features combine in our Drill Press Table Packages to improve the accuracy and efficiency of all your drilling work. It all starts with the unique Micro-Dot laminate surface bonded to both sides of a stable MDF core. The Micro-Dot surface makes stock slide effortlessly. We embed two sections of our Dual-Purpose T-Track to create the attachment point for the fence. The tracks are anodized for wear resistance and laser engraved with measurement scales. The tracks bolt to the table from below, eliminating any chance of pull-out. The fence is the same Dual-Purpose T-Track with a bracket that slides in the embedded tracks. Not only does the fence give you a guide for repeat positioning from the edge your stock, it carries the stops which provide accurate repeat position laterally, too. The 36" long fence is engraved with zero in the middle. Just tweak that into position directly behind the drill bit and you can instantly drill a hole in the center of anything or do mirror image layouts on the fly. Your Drill Press Table also includes one tear-out-eliminating filler block. Underneath the filler are leveling screws to adjust the block flush with the table. When it’s too full of holes to do its job, it’s easy to replace with any 1/2” material, or we offer them pre-cut. Hold downs are either our original Pivot Clamp or the versatile Knuckle Clamp. Either style slides into any of the slots on the fence or fence tracks. We also have two stop options; molded stops and our new, heavy-duty stainless-steel flip stops. PO
WER
TOO
L AC
CESS
ORIE
S |
DRI
LL P
RESS
3
As you can tell, this all comes together as a versatile system that puts your stock where you want it and makes sure it stays there through the drilling operation. We’ve put together three package options for a variety of shop needs and budgets. Drill Press Package 3 includes (6) stainless-steel flip stops and (2) Knuckle Clamps. Drill Press Package 2 has (2) molded flip stops and (2) Knuckle Clamps. Drill Press Package 1 includes (2) molded flip stops and (2) Pivot Clamps. Designed for 12” and larger drill presses.
Includes 16”x23” Drill Press Table,Standard 36” Fence,6 Stainless Steel Flip Stops& 2 Knuckle Clamps.
Versatile Knuckle Clamp secures work of most any shape or thickness.
Heavy-duty stainless flip stops provide repeatable accuracy. Six included in Package 3.
Micro-Dot laminate low friction surface.
Turn Your Drill Press Into a Versatile Woodworking Machine
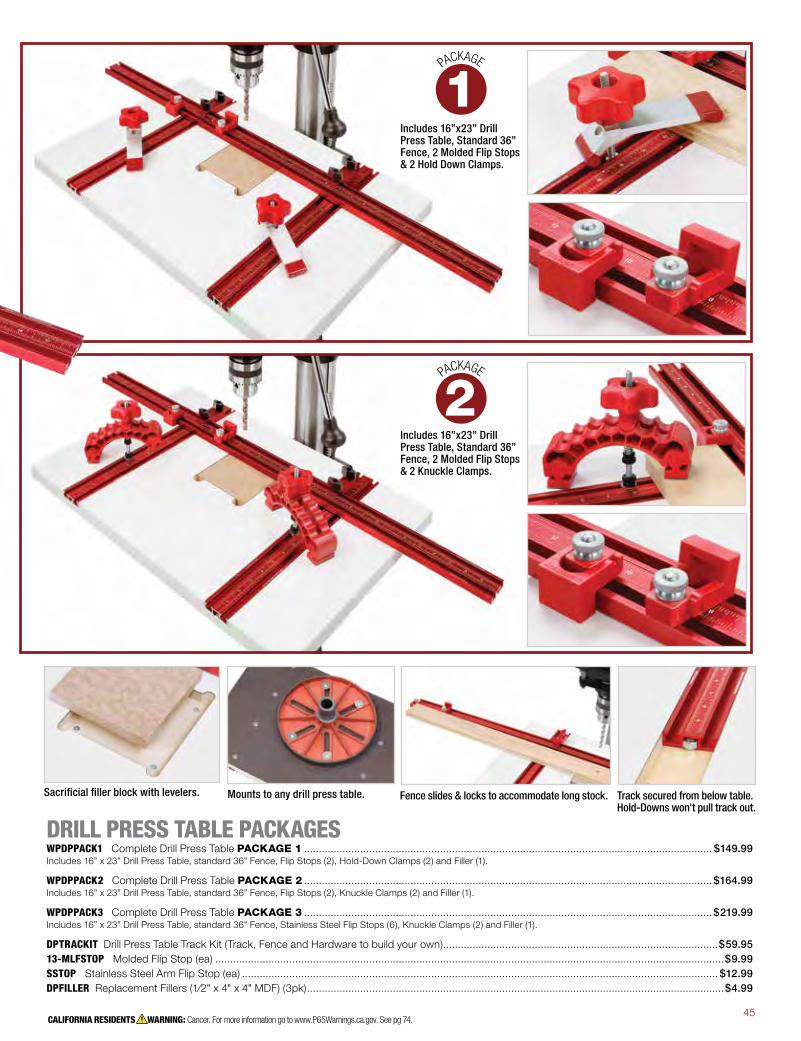
45CALIFORNIA RESIDENTS WARNING: Cancer. For more information go to www.P65Warnings.ca.gov. See pg 74.
DRILL PRESS TABLE PACKAGES WPDPPACK1 Complete Drill Press Table PACKAGE 1 .......................................................................................................................................... $149.99 Includes 16” x 23” Drill Press Table, standard 36" Fence, Flip Stops (2), Hold-Down Clamps (2) and Filler (1).
WPDPPACK2 Complete Drill Press Table PACKAGE 2 ..........................................................................................................................................$164.99Includes 16” x 23” Drill Press Table, standard 36” Fence, Flip Stops (2), Knuckle Clamps (2) and Filler (1).
WPDPPACK3 Complete Drill Press Table PACKAGE 3 ..........................................................................................................................................$219.99Includes 16” x 23” Drill Press Table, standard 36" Fence, Stainless Steel Flip Stops (6), Knuckle Clamps (2) and Filler (1).
DPTRACKIT Drill Press Table Track Kit (Track, Fence and Hardware to build your own) .............................................................................................$59.9513-MLFSTOP Molded Flip Stop (ea) ............................................................................................................................................................................$9.99SSTOP Stainless Steel Arm Flip Stop (ea) ................................................................................................................................................................. $12.99DPFILLER Replacement Fillers (1⁄2" x 4" x 4" MDF) (3pk) .............................................................................................................................................$4.99
Includes 16”x23” Drill Press Table, Standard 36” Fence, 2 Molded Flip Stops& 2 Hold Down Clamps.
Includes 16”x23” Drill Press Table, Standard 36” Fence, 2 Molded Flip Stops & 2 Knuckle Clamps.
Sacrificial filler block with levelers. Mounts to any drill press table. Track secured from below table. Hold-Downs won't pull track out.
Fence slides & locks to accommodate long stock.

46 Woodpeckers, LLC • 1-800-752-0725 • woodpeck.com
Knuckle Clamps owe their distinctive name to the seven circular pivot positions for the clamping knob. The multiple lock-in points maximize your clamping capabilities, enabling you to deal with different workpiece thicknesses and odd shapes.The flat, pivoting feet are padded, allowing you to apply even, targeted pressure without marring your stock. Molded from reinforced polycarbonate, Knuckle Clamps are virtually indestructible.
KNCLAMP Knuckle Clamp (ea) ............................ $17.99
Clamp work anywhere along a T-track — quickly, easily and securely. The rubber-tipped ends allow you to increase clamping pressure without marring the work. The pivot slug design ensures that the clamp bolt always sits perpendicular to the work surface.
HDCG-PIV Hold Down Clamp Pivot Style (ea) ....... $11.99
Stainless Steel Flip Stops are the perfect choice for your Woodpeckers Drill Press Table fence. The flip arm is laser cut from 13 gauge stainless steel and can be positioned on either side of the machined aluminum body. Effortless arm motion combined with no measurable slop makes this a top notch flip stop!
SSTOP Stainless Steel Arm Flip Stop (ea) ..........$12.99
POW
ER T
OOL
ACCE
SSOR
IES
While the standard low-profile fence on the Drill Press Table is just what you want most of the time, when you’re drilling in the edge of wider boards, a taller fence is just the ticket and swapping from one fence to the other takes just seconds. Woodpeckers DP3 Fence gives you a full 3 inches of height for solid support and plenty of room to clamp your stock. The fence face and the bottom are machined on our CNC mills to be precisely square with each other, then a slight recess is cut in the center of the base to reduce friction and compensate for chips and dust. The clamping knobs are extended, giving you easy access. You’ll appreciate the mass of this fence when doing heavy mortise drilling…the 3" wide base and 3" tall face are 3/8" thick and the fence is 23-1/2" long. Our familiar anodized finish reduces friction and protects your work from aluminum staining.
DRILL PRESS FENCE DP3FENCE DP3 Drill Press Fence ................................................ $87.99
DP-3 Fence provides extended vertical support. Edge drilling is the most obvious example of where the DP-3 is needed.
Hold Down Clamp
Knuckle Clamp
Stainless Steel Flip Stop
Extra Support forVertical Work
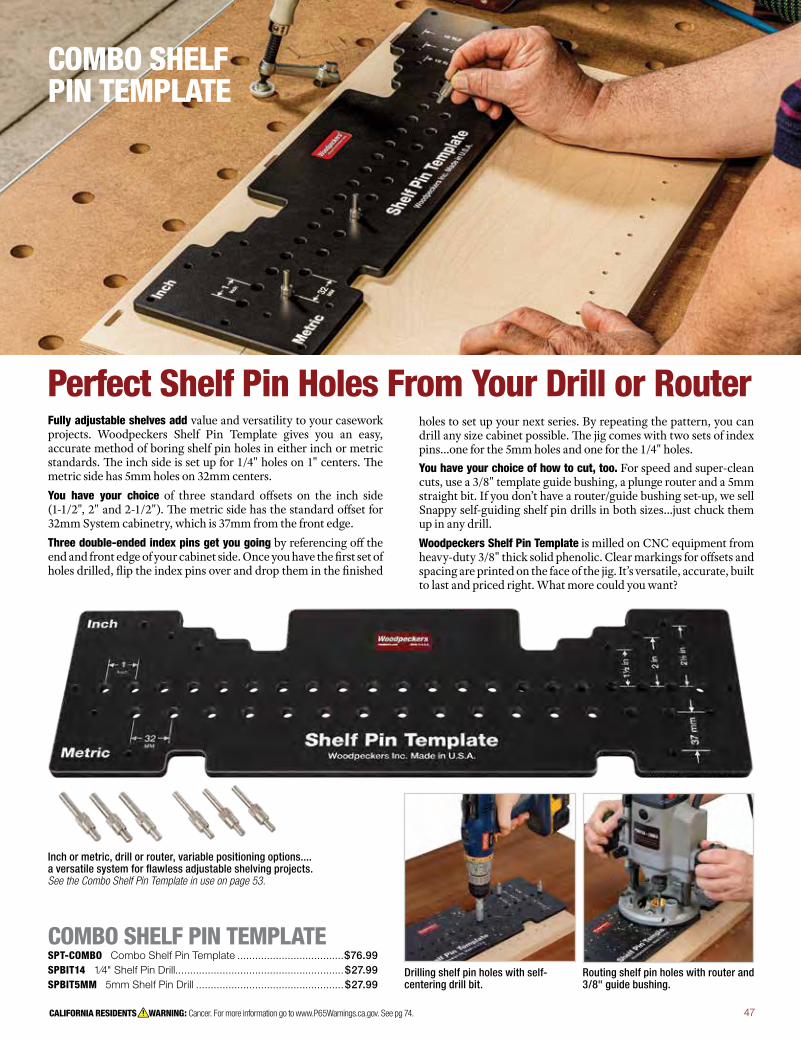
47CALIFORNIA RESIDENTS WARNING: Cancer. For more information go to www.P65Warnings.ca.gov. See pg 74.
Fully adjustable shelves add value and versatility to your casework projects. Woodpeckers Shelf Pin Template gives you an easy, accurate method of boring shelf pin holes in either inch or metric standards. The inch side is set up for 1/4" holes on 1" centers. The metric side has 5mm holes on 32mm centers. You have your choice of three standard offsets on the inch side (1-1/2", 2" and 2-1/2"). The metric side has the standard offset for 32mm System cabinetry, which is 37mm from the front edge. Three double-ended index pins get you going by referencing off the end and front edge of your cabinet side. Once you have the first set of holes drilled, flip the index pins over and drop them in the finished
COMBO SHELF PIN TEMPLATE SPT-COMBO Combo Shelf Pin Template ....................................$76.99SPBIT14 1⁄4" Shelf Pin Drill.........................................................$27.99SPBIT5MM 5mm Shelf Pin Drill ..................................................$27.99
holes to set up your next series. By repeating the pattern, you can drill any size cabinet possible. The jig comes with two sets of index pins…one for the 5mm holes and one for the 1/4" holes. You have your choice of how to cut, too. For speed and super-clean cuts, use a 3/8" template guide bushing, a plunge router and a 5mm straight bit. If you don’t have a router/guide bushing set-up, we sell Snappy self-guiding shelf pin drills in both sizes…just chuck them up in any drill. Woodpeckers Shelf Pin Template is milled on CNC equipment from heavy-duty 3/8" thick solid phenolic. Clear markings for offsets and spacing are printed on the face of the jig. It’s versatile, accurate, built to last and priced right. What more could you want?
Drilling shelf pin holes with self-centering drill bit.
Routing shelf pin holes with router and 3/8" guide bushing.
Inch or metric, drill or router, variable positioning options.... a versatile system for flawless adjustable shelving projects. See the Combo Shelf Pin Template in use on page 53.
Perfect Shelf Pin Holes From Your Drill or Router
COMBO SHELFPIN TEMPLATE
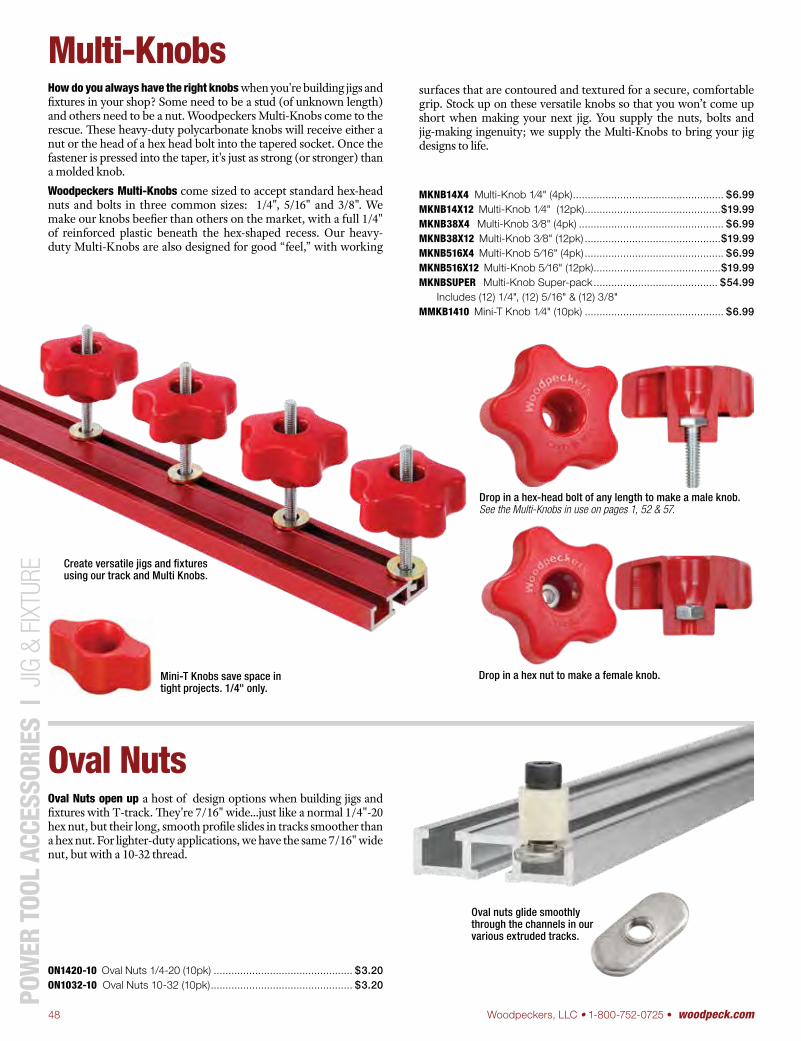
48 Woodpeckers, LLC • 1-800-752-0725 • woodpeck.com
How do you always have the right knobs when you're building jigs and fixtures in your shop? Some need to be a stud (of unknown length) and others need to be a nut. Woodpeckers Multi-Knobs come to the rescue. These heavy-duty polycarbonate knobs will receive either a nut or the head of a hex head bolt into the tapered socket. Once the fastener is pressed into the taper, it's just as strong (or stronger) than a molded knob. Woodpeckers Multi-Knobs come sized to accept standard hex-head nuts and bolts in three common sizes: 1/4", 5/16" and 3/8". We make our knobs beefier than others on the market, with a full 1/4" of reinforced plastic beneath the hex-shaped recess. Our heavy-duty Multi-Knobs are also designed for good “feel,” with working
MKNB14X4 Multi-Knob 1⁄4" (4pk) ................................................... $6.99MKNB14X12 Multi-Knob 1⁄4" (12pk) ..............................................$19.99MKNB38X4 Multi-Knob 3⁄8" (4pk) ................................................. $6.99MKNB38X12 Multi-Knob 3⁄8" (12pk) ..............................................$19.99MKNB516X4 Multi-Knob 5⁄16" (4pk) ............................................... $6.99MKNB516X12 Multi-Knob 5⁄16" (12pk) ...........................................$19.99MKNBSUPER Multi-Knob Super-pack .......................................... $54.99 Includes (12) 1/4", (12) 5/16" & (12) 3/8"MMKB1410 Mini-T Knob 1⁄4" (10pk) ............................................... $6.99
Multi-Knobs
Create versatile jigs and fixtures using our track and Multi Knobs.
Drop in a hex-head bolt of any length to make a male knob. See the Multi-Knobs in use on pages 1, 52 & 57.
Drop in a hex nut to make a female knob. Mini-T Knobs save space in tight projects. 1/4" only.
Oval nuts glide smoothly through the channels in our various extruded tracks.
POW
ER T
OOL
ACCE
SSOR
IES
| J
IG &
FIX
TURE
Oval NutsOval Nuts open up a host of design options when building jigs and fixtures with T-track. They're 7/16" wide...just like a normal 1/4"-20 hex nut, but their long, smooth profile slides in tracks smoother than a hex nut. For lighter-duty applications, we have the same 7/16" wide nut, but with a 10-32 thread.
ON1420-10 Oval Nuts 1/4-20 (10pk) ............................................... $3.20ON1032-10 Oval Nuts 10-32 (10pk) ................................................ $3.20
surfaces that are contoured and textured for a secure, comfortable grip. Stock up on these versatile knobs so that you won’t come up short when making your next jig. You supply the nuts, bolts and jig-making ingenuity; we supply the Multi-Knobs to bring your jig designs to life.
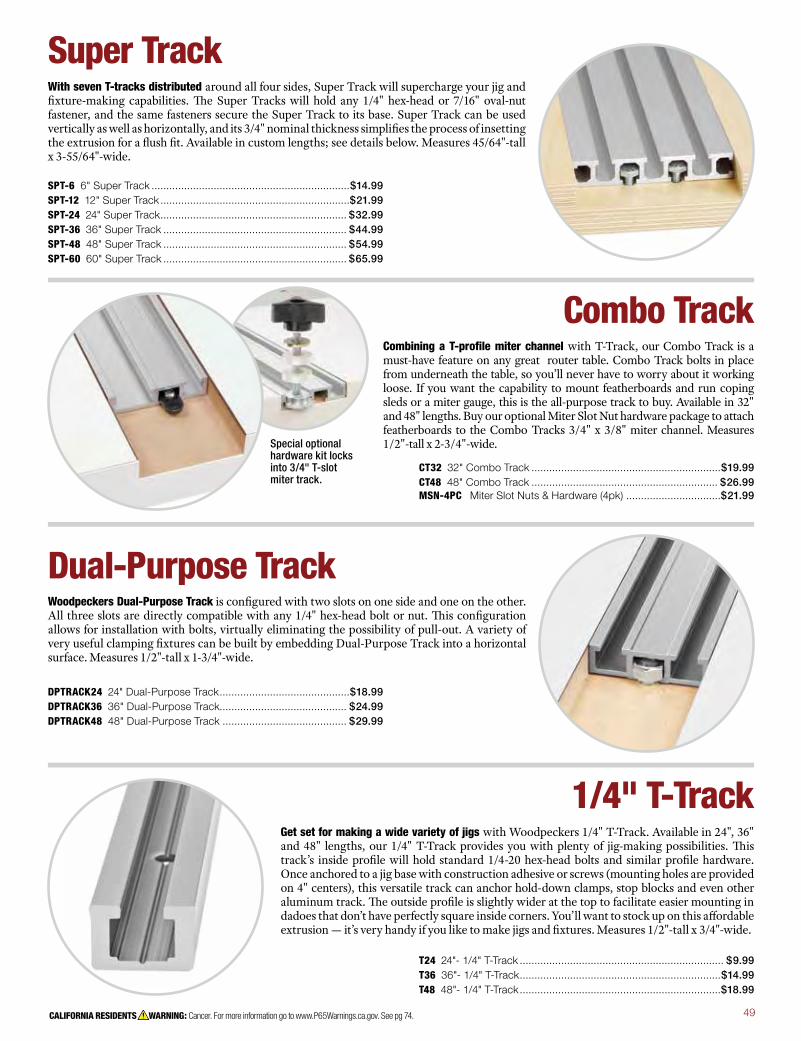
49CALIFORNIA RESIDENTS WARNING: Cancer. For more information go to www.P65Warnings.ca.gov. See pg 74.
1/4" T-Track Get set for making a wide variety of jigs with Woodpeckers 1/4" T-Track. Available in 24", 36" and 48" lengths, our 1/4" T-Track provides you with plenty of jig-making possibilities. This track’s inside profile will hold standard 1/4-20 hex-head bolts and similar profile hardware. Once anchored to a jig base with construction adhesive or screws (mounting holes are provided on 4" centers), this versatile track can anchor hold-down clamps, stop blocks and even other aluminum track. The outside profile is slightly wider at the top to facilitate easier mounting in dadoes that don’t have perfectly square inside corners. You’ll want to stock up on this affordable extrusion — it’s very handy if you like to make jigs and fixtures. Measures 1/2"-tall x 3/4"-wide.
With seven T-tracks distributed around all four sides, Super Track will supercharge your jig and fixture-making capabilities. The Super Tracks will hold any 1/4" hex-head or 7/16" oval-nut fastener, and the same fasteners secure the Super Track to its base. Super Track can be used vertically as well as horizontally, and its 3/4" nominal thickness simplifies the process of insetting the extrusion for a flush fit. Available in custom lengths; see details below. Measures 45/64"-tall x 3-55/64"-wide.
SPT-6 6" Super Track ...................................................................$14.99SPT-12 12" Super Track ................................................................$21.99SPT-24 24" Super Track ............................................................... $32.99SPT-36 36" Super Track .............................................................. $44.99SPT-48 48" Super Track .............................................................. $54.99SPT-60 60" Super Track .............................................................. $65.99
T24 24"- 1/4" T-Track ..................................................................... $9.99T36 36"- 1/4" T-Track ....................................................................$14.99T48 48"- 1/4" T-Track ....................................................................$18.99
Super Track
Combo Track Combining a T-profile miter channel with T-Track, our Combo Track is a must-have feature on any great router table. Combo Track bolts in place from underneath the table, so you’ll never have to worry about it working loose. If you want the capability to mount featherboards and run coping sleds or a miter gauge, this is the all-purpose track to buy. Available in 32" and 48" lengths. Buy our optional Miter Slot Nut hardware package to attach featherboards to the Combo Tracks 3/4" x 3/8" miter channel. Measures 1/2"-tall x 2-3/4"-wide.
CT32 32" Combo Track ................................................................$19.99CT48 48" Combo Track ............................................................... $26.99MSN-4PC Miter Slot Nuts & Hardware (4pk) ................................$21.99
Dual-Purpose Track Woodpeckers Dual-Purpose Track is configured with two slots on one side and one on the other. All three slots are directly compatible with any 1/4" hex-head bolt or nut. This configuration allows for installation with bolts, virtually eliminating the possibility of pull-out. A variety of very useful clamping fixtures can be built by embedding Dual-Purpose Track into a horizontal surface. Measures 1/2"-tall x 1-3/4"-wide.
DPTRACK24 24" Dual-Purpose Track ............................................$18.99DPTRACK36 36" Dual-Purpose Track........................................... $24.99DPTRACK48 48" Dual-Purpose Track .......................................... $29.99
Special optional hardware kit locks into 3/4" T-slot miter track.
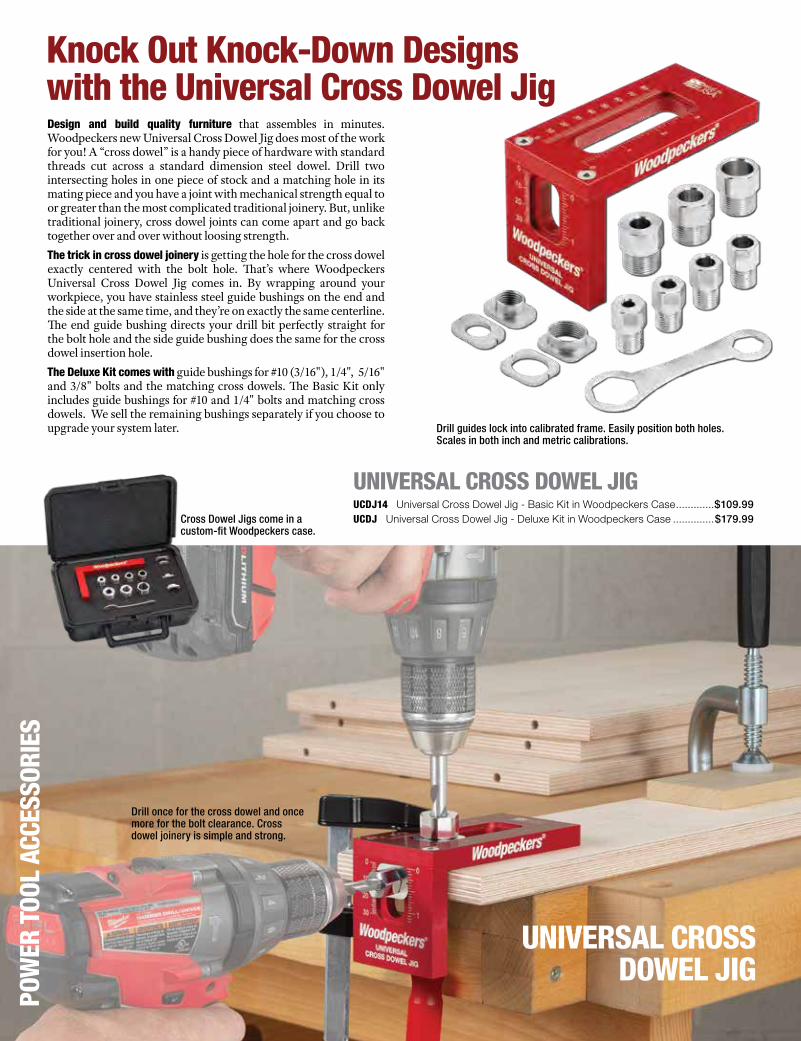
50 Woodpeckers, LLC • 1-800-752-0725 • woodpeck.com
Design and build quality furniture that assembles in minutes. Woodpeckers new Universal Cross Dowel Jig does most of the work for you! A “cross dowel” is a handy piece of hardware with standard threads cut across a standard dimension steel dowel. Drill two intersecting holes in one piece of stock and a matching hole in its mating piece and you have a joint with mechanical strength equal to or greater than the most complicated traditional joinery. But, unlike traditional joinery, cross dowel joints can come apart and go back together over and over without loosing strength. The trick in cross dowel joinery is getting the hole for the cross dowel exactly centered with the bolt hole. That’s where Woodpeckers Universal Cross Dowel Jig comes in. By wrapping around your workpiece, you have stainless steel guide bushings on the end and the side at the same time, and they’re on exactly the same centerline. The end guide bushing directs your drill bit perfectly straight for the bolt hole and the side guide bushing does the same for the cross dowel insertion hole.The Deluxe Kit comes with guide bushings for #10 (3/16"), 1/4", 5/16" and 3/8" bolts and the matching cross dowels. The Basic Kit only includes guide bushings for #10 and 1/4" bolts and matching cross dowels. We sell the remaining bushings separately if you choose to upgrade your system later.
UNIVERSAL CROSS DOWEL JIG UCDJ14 Universal Cross Dowel Jig - Basic Kit in Woodpeckers Case .............$109.99 UCDJ Universal Cross Dowel Jig - Deluxe Kit in Woodpeckers Case ..............$179.99
Drill guides lock into calibrated frame. Easily position both holes. Scales in both inch and metric calibrations.
Cross Dowel Jigs come in a custom-fit Woodpeckers case.
Drill once for the cross dowel and once more for the bolt clearance. Cross dowel joinery is simple and strong.
POW
ER T
OOL
ACCE
SSOR
IES
Knock Out Knock-Down Designswith the Universal Cross Dowel Jig
UNIVERSAL CROSS DOWEL JIG
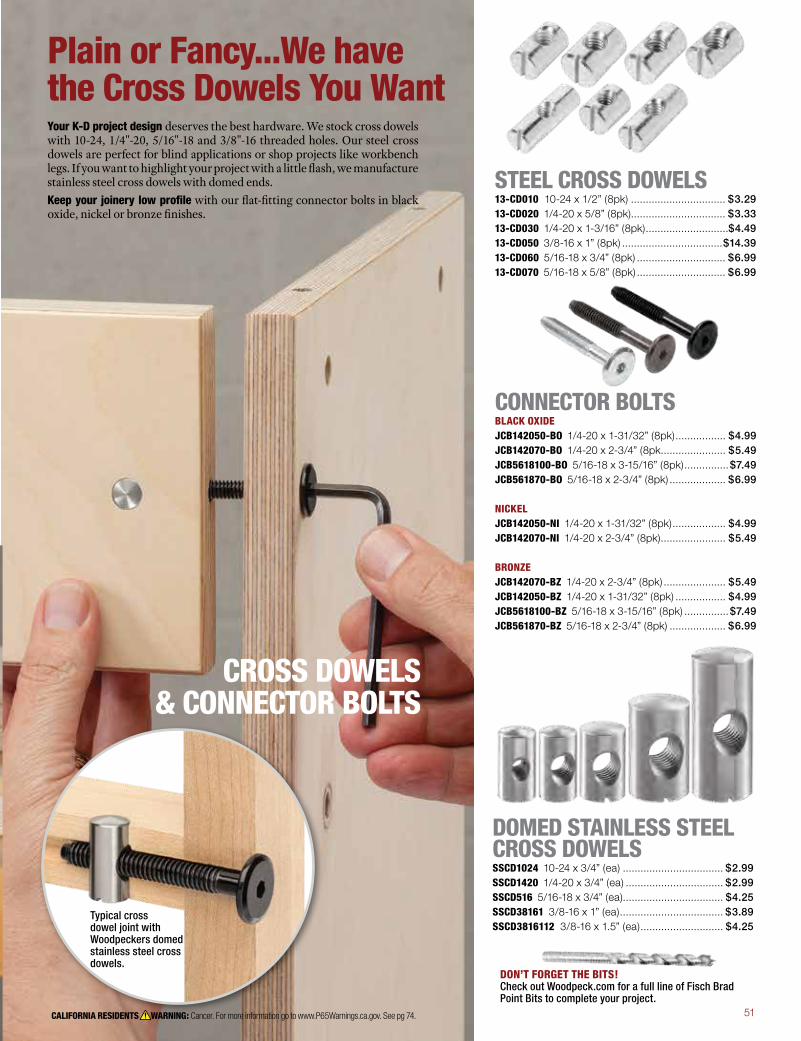
51CALIFORNIA RESIDENTS WARNING: Cancer. For more information go to www.P65Warnings.ca.gov. See pg 74.
Your K-D project design deserves the best hardware. We stock cross dowels with 10-24, 1/4"-20, 5/16"-18 and 3/8"-16 threaded holes. Our steel cross dowels are perfect for blind applications or shop projects like workbench legs. If you want to highlight your project with a little flash, we manufacture stainless steel cross dowels with domed ends. Keep your joinery low profile with our flat-fitting connector bolts in black oxide, nickel or bronze finishes.
STEEL CROSS DOWELS 13-CD010 10-24 x 1/2” (8pk) ................................ $3.29 13-CD020 1/4-20 x 5/8” (8pk) ................................ $3.33 13-CD030 1/4-20 x 1-3/16” (8pk) ............................$4.49 13-CD050 3/8-16 x 1” (8pk) ..................................$14.39 13-CD060 5/16-18 x 3/4” (8pk) .............................. $6.99 13-CD070 5/16-18 x 5/8” (8pk) .............................. $6.99
DOMED STAINLESS STEEL CROSS DOWELS SSCD1024 10-24 x 3/4” (ea) .................................. $2.99 SSCD1420 1/4-20 x 3/4” (ea) ................................. $2.99 SSCD516 5/16-18 x 3/4” (ea) .................................. $4.25 SSCD38161 3/8-16 x 1” (ea) ................................... $3.89 SSCD3816112 3/8-16 x 1.5” (ea) ............................ $4.25
DON’T FORGET THE BITS!Check out Woodpeck.com for a full line of Fisch Brad Point Bits to complete your project.
Plain or Fancy...We have the Cross Dowels You Want
CONNECTOR BOLTSBLACK OXIDE JCB142050-BO 1/4-20 x 1-31/32” (8pk) ................. $4.99 JCB142070-BO 1/4-20 x 2-3/4” (8pk ...................... $5.49 JCB5618100-BO 5/16-18 x 3-15/16” (8pk) ...............$7.49 JCB561870-BO 5/16-18 x 2-3/4” (8pk) ................... $6.99
NICKELJCB142050-NI 1/4-20 x 1-31/32” (8pk) .................. $4.99 JCB142070-NI 1/4-20 x 2-3/4” (8pk) ...................... $5.49 BRONZEJCB142070-BZ 1/4-20 x 2-3/4” (8pk) ..................... $5.49 JCB142050-BZ 1/4-20 x 1-31/32” (8pk) ................. $4.99 JCB5618100-BZ 5/16-18 x 3-15/16” (8pk) ...............$7.49 JCB561870-BZ 5/16-18 x 2-3/4” (8pk) ................... $6.99
CROSS DOWELS& CONNECTOR BOLTS
Typical cross dowel joint with Woodpeckers domed stainless steel cross dowels.
52 Woodpeckers, LLC • 1-800-752-0725 • woodpeck.com
Flexibility. That’s what I wanted to design into this work table. I wanted it to work with just about any table saw, provide storage in its base and have a versatile work surface. I built this one for the new Saw Stop that’s been added to our model shop, but as you’ll see, you can make the table as wide as you want it, as long as you want it, and can make it match the height of any saw made.
The foundation of the table is four cabinets sized to store Systainers. Each cabinet is about 15" deep and about 18" wide (more on the “about” part later). By arranging them with variable spacing back-to-back and side-to-side you create the base for whatever size table you want, from a minimum of 30" x 36" up to several feet wide and deep.
The work surface is a sheet of MDF machined with a gridwork of holes. The grid lets you use all sorts of stops, clamps and hold-downs when you’re working on your project, but to use it, you need to be able to reach under the table, too, so the gridwork top is attached to a plywood base with a series of spacers. The spacers are the variable used to tweak the overall height of the table right where you want it for your specific saw.
Early in the design process I decided to drill 32mm spaced holes in the cabinet bases. This lets you put a drawer slide or shelf anywhere you want it. I planned to build this table using European Baltic Birch plywood, which is exactly 18mm thick. I started doing my initial hand sketching and calculator punching in inches, like I have for the last 40 years. But there was a lot of converting going on. Enough to drive me over the edge. I bought a metric tape measure and grabbed a couple metric rules and built the cabinets using metric measurements. It made the job much simpler. I’m not quite
All-in-One Outfeed & Assembly TableBy Jeff Farris
FEAT
URE
ARTI
CLE
| O
UTFE
ED TA
BLE
a metric convert…I still can’t “think” in metric, but I didn’t miss the fractional math that always gets involved in building something.
I started by cutting up the parts for the 4 base cabinets. One sheet yields the parts for 2 base cabinets, with the left-over piece just about the right size for a shelf. Even with a huge shop and a big table saw sitting in the middle, I chose to cut up the plywood using a track saw, the Woodpeckers Parallel Guide System and the new Woodpeckers Adjustable Track Square. I personally feel that a track saw is more accurate than a table saw in the early stages of breaking down a full sheet… and it is undeniably safer when working by yourself.
53
I first cross-cut the sheet slightly over-sized for the components using the Adjustable Track Square. Then I made a rip cut with the Adjustable Track Square, just taking off the factory edge. I checked the resulting corner for square and used the Parallel Guide System to cut the components down to final width and length. See the Material List for the dimensions of each component.
Woodpeckers Offset Base System for the Festool Domino located mortises perfectly centered in the 18mm plywood. Between the
Cutting the plywood panels for the cabinet bases with Woodpeckers Parallel Guide System and Adjustable Track Square.
built-in stops on the Domino and stops on the Offset Base outrigger I was able to quickly cut three-tenon joints on all sides and the top and bottom.
Next, I used Woodpeckers Shelf Pin Template to cut 5mm holes on 32mm centers on all the cabinet sides. The starting pins locate the first row of holes 37mm from the front edge, which is the 32mm system standard. To match up with the Knapp & Voigt 14" full extension drawer slides I used, the second row needed to be 261mm from the edge. I wanted the 32mm grid to start closer to the bottom of the cabinet than the standard 32mm, so I used a 7mm spacer under the end index pin to move my starting point to 25mm.
I used a plunge router with a 3/8" template guide bushing and a 5mm bit specifically made for drilling shelf pin holes. It’s a router bit that looks like a brad point drill bit. It cut very clean holes very quickly. The Shelf Pin Template made the job quick and accurate. Once you have the first group of holes cut, you simply turn the index pins over and drop them in the finished holes with the template moved down the board. On the second row of holes, I struck a line the length of the board and lined up the holes in the template with the line on the
Cabinets are joined at each corner with three Dominoes…one at each end and one on the middle. Woodpeckers Offset Base makes it a snap.
Drilling 32mm System holes in the cabinet sides.
board. After I got the first few holes drilled, I dropped in the index pins to keep things lined up. With the 32mm holes bored and the mortises cut, I glued up all four cabinets.
I installed the same non-skid rubber feet we put on our router tables on each cabinet. I drilled a 1/2" hole 1-3/4" in from both the end and the side in each corner. I put in 3/8" x 16tpi threaded inserts and screwed the inserts down. With a jam nut on the adjustable feet they’re just the right length to not interfere with the bottom drawer.
54 Woodpeckers, LLC • 1-800-752-0725 • woodpeck.com
Cabinets glued up with leveling feet installed.
First corner starts with the edge index pins, then move the template and put field index pins in finished holes.
Each hole should be milled, cleaned out (great time to have an air compressor) and then re-milled. A router with good dust collection makes the project go smoother.
Rigid foam insulation is sandwiched between the MDF top and the sub-top. The insulation minimizes tear-out. Hole Boring Jig mills perfect 20mm holes on 96mm centers.
With the four cabinets assembled, it was time to line them up behind the table saw and decide how wide and long I wanted the top. There are lots of ways to approach this. I decided 5' was about the right length (a full sheet would still be balanced on a finished cut). Width was a little harder. Standing at the saw, I had visions of a vast support area behind it. But when I looked at it as an assembly table, I wanted to be able to reach at least most of the way across it. In the end, I decided on 32".
The holes in a Festool MFT start 70mm from the edges and are spaced 96mm apart in both directions. I wanted to use the same edge margin on my home-made work table. To get the spacing to work out evenly in both directions, the final dimension needs to be a multiple of 96mm plus 140mm. So, working backwards from my 60" x 32" “ballpark” measurement, I ended up at 1580mm x 812mm. See the chart for how I did the math.
I cut a sheet of Baltic Birch plywood and a sheet of MDF to 1580mm x 812mm, sandwiched a piece of 3/4" rigid foam insulation between the two and set up the Woodpeckers Hole Boring Jig.Similar to the Shelf Pin Jig, the Hole Boring Jig uses a router with a template guide bushing to cut the holes. The template is 3/8" thick solid phenolic. It comes with specially sized Porter-Cable style template guide bushings for either 20mm holes or 3/4" holes when used with a 1/2" straight router bit. Also like the Shelf Pin Jig, it has starter pins to locate the template correctly on the starting corner. Then you switch to pins that drop into the finished holes to proceed across the sheet.
I removed the foam from between the two sheets, set them on the cabinet bases and started figuring out where I wanted the top in relation to the table saw. I decided I wanted it a half inch below. This made sure there was no interference with the miter gauge. Should I want it perfectly flush, I just have to throw a sheet of 1/2" material on top.
55
Joined with three Dominoes in each joint. Vertical spacers placed at the corners and middle of the sub-top.
Once your top is made, play with the spacing to get the table top close to the rear edge of the table saw, but position the cabinet bases so they don’t interfere with dust ports or casters.
I drilld two holes through the cabinet top and the sub-top and installed flanged threaded inserts in the cabinet tops.
With the sub-top upside down on saw horses, I scribed the offset for the cabinet bases and positioned each one to the line.
This calculated out to a 5-1/2" spacer. I cut 6 spacers 12" long and 5-1/2" wide and 4 spacers 11-1/4" long and 5-1/2" wide using some of the plywood offcuts (or 140mm x 305mm and 140mm x 287mm if you want to keep it strictly metric). I attached them to the plywood sub-top with Dominoes, placing the 12" pieces equally spaced along the length and the shorter spacers forming corners on the ends. When the glue was dry, I dry-positioned the MDF top in line with the edges, rolled the table saw up and started deciding how to position the top in relation to the bases.
To accommodate the mobile base and the dust collector port of the table saw, I needed to keep the cabinet a few inches away. I played around with the spacing to accommodate either flexible dust collector hose or rigid duct work we might put in later. I settled on a 5-1/2" overhang on both ends, which, coincidentally, left a space between the cabinets perfectly sized for my shop vacuum. The overhang on the end is just right to sit down and get close to the bench when doing detail work.
To make mounting the sub-top to the base cabinets simpler, I put the sub-top upside down on a pair of sawhorses, laid out my offset from the ends, and put each cabinet base upside down on the sub-top. I drilled two 1/2" holes in each cabinet, drilling through both the cabinet tops and the sub-tops at once, with a piece of scrap clamped below to prevent tear-out. I installed threaded inserts
inside the cabinets then positioned each cabinet back on the ground in its approximate position. I made male threaded knobs with Woodpeckers Multi-Knobs and 3/8"-16 x 1-1/2" hex head bolts. I nudged each cabinet into position to line the threaded inserts up with the holes in the sub-top and installed the knobs with fender washers.
I wanted to make sure I could change the grid-work top, if (when) it got beat up. I opted for flat-headed cabinet installation screws and put one in each corner of the top.
The last phase of the project was to install drawer slides and trays to hold Systainers. I have a few old Systainers with 4 latches and lots of the newer “T-Loc” style. I also wanted the trays to work well with any other type of fitted tool case. Playing around with prototypes I discovered that a simple piece of 18mm ply with a 3/4" tall front lip captures the front edge of just about any case.
I prepped a batch of hardwood scrap that was around the shop to 1/2" thick by 2" wide and 396mm long. I cut 4mm Domino mortises in both edges then went to the table saw and ripped them down to 3/4" width. Cutting the mortises on stock 2" wide was much easier than trying to balance the Domino on 3/4". I went from the table saw to the router table where I used a 1/4" round-over bit to bullnose the upper edges of all the front lips. I made about 15 of these.
Use the height of the spacers to match your saw. Domino mortises machined into bottom edge.
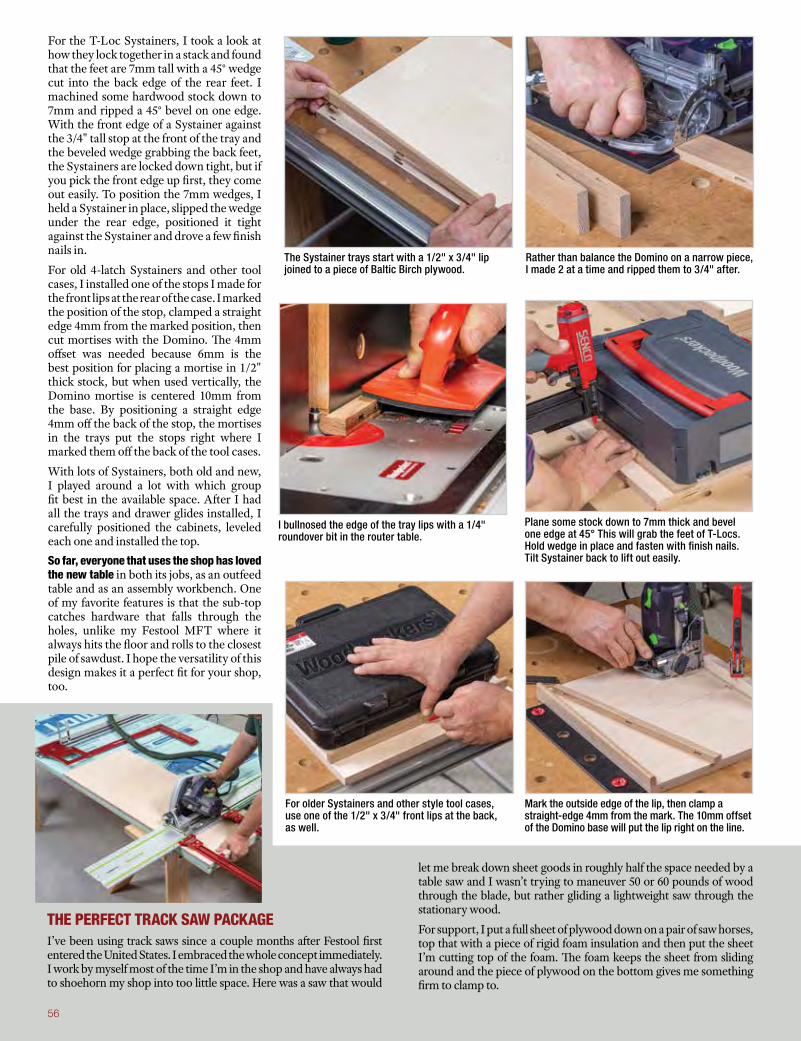
56 Woodpeckers, LLC • 1-800-752-0725 • woodpeck.com
I bullnosed the edge of the tray lips with a 1/4" roundover bit in the router table.
The Systainer trays start with a 1/2" x 3/4" lip joined to a piece of Baltic Birch plywood.
Mark the outside edge of the lip, then clamp a straight-edge 4mm from the mark. The 10mm offset of the Domino base will put the lip right on the line.
Plane some stock down to 7mm thick and bevel one edge at 45° This will grab the feet of T-Locs. Hold wedge in place and fasten with finish nails. Tilt Systainer back to lift out easily.
For older Systainers and other style tool cases, use one of the 1/2" x 3/4" front lips at the back, as well.
For the T-Loc Systainers, I took a look at how they lock together in a stack and found that the feet are 7mm tall with a 45° wedge cut into the back edge of the rear feet. I machined some hardwood stock down to 7mm and ripped a 45° bevel on one edge. With the front edge of a Systainer against the 3/4" tall stop at the front of the tray and the beveled wedge grabbing the back feet, the Systainers are locked down tight, but if you pick the front edge up first, they come out easily. To position the 7mm wedges, I held a Systainer in place, slipped the wedge under the rear edge, positioned it tight against the Systainer and drove a few finish nails in.
For old 4-latch Systainers and other tool cases, I installed one of the stops I made for the front lips at the rear of the case. I marked the position of the stop, clamped a straight edge 4mm from the marked position, then cut mortises with the Domino. The 4mm offset was needed because 6mm is the best position for placing a mortise in 1/2" thick stock, but when used vertically, the Domino mortise is centered 10mm from the base. By positioning a straight edge 4mm off the back of the stop, the mortises in the trays put the stops right where I marked them off the back of the tool cases.
With lots of Systainers, both old and new, I played around a lot with which group fit best in the available space. After I had all the trays and drawer glides installed, I carefully positioned the cabinets, leveled each one and installed the top. So far, everyone that uses the shop has loved the new table in both its jobs, as an outfeed table and as an assembly workbench. One of my favorite features is that the sub-top catches hardware that falls through the holes, unlike my Festool MFT where it always hits the floor and rolls to the closest pile of sawdust. I hope the versatility of this design makes it a perfect fit for your shop, too.
Rather than balance the Domino on a narrow piece, I made 2 at a time and ripped them to 3/4" after.
THE PERFECT TRACK SAW PACKAGEI’ve been using track saws since a couple months after Festool first entered the United States. I embraced the whole concept immediately. I work by myself most of the time I’m in the shop and have always had to shoehorn my shop into too little space. Here was a saw that would
let me break down sheet goods in roughly half the space needed by a table saw and I wasn’t trying to maneuver 50 or 60 pounds of wood through the blade, but rather gliding a lightweight saw through the stationary wood.
For support, I put a full sheet of plywood down on a pair of saw horses, top that with a piece of rigid foam insulation and then put the sheet I’m cutting top of the foam. The foam keeps the sheet from sliding around and the piece of plywood on the bottom gives me something firm to clamp to.
56
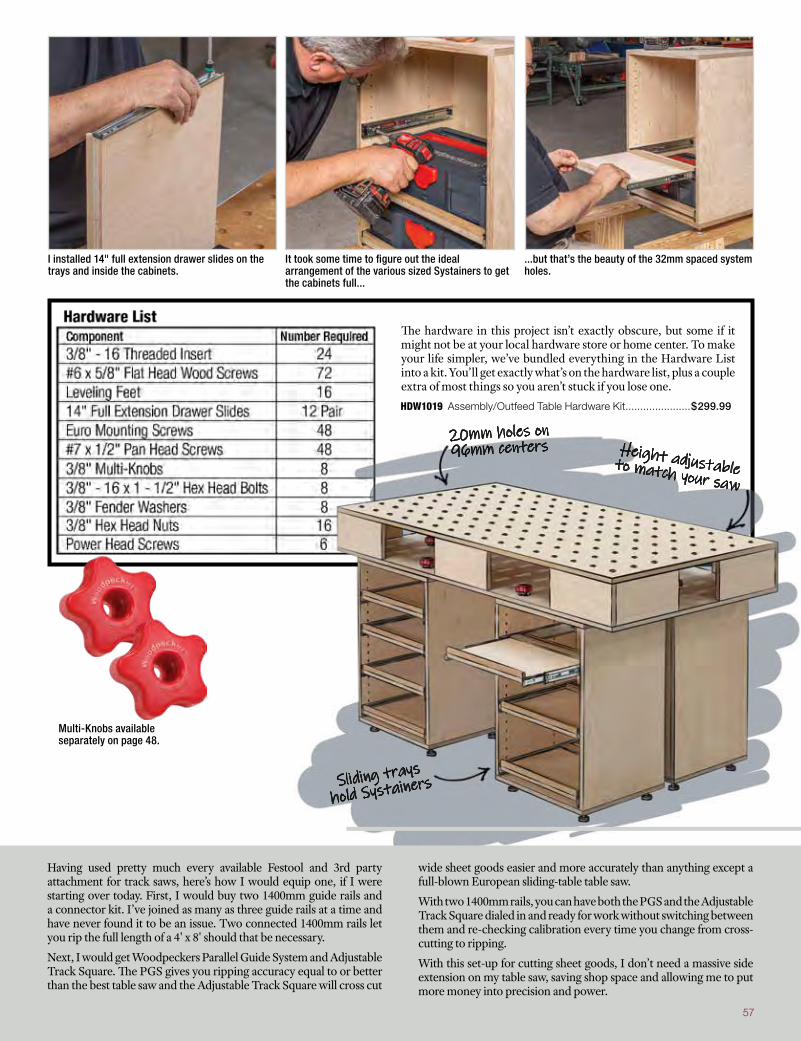
57
...but that’s the beauty of the 32mm spaced system holes.
I installed 14" full extension drawer slides on the trays and inside the cabinets.
It took some time to figure out the ideal arrangement of the various sized Systainers to get the cabinets full...
The hardware in this project isn’t exactly obscure, but some if it might not be at your local hardware store or home center. To make your life simpler, we’ve bundled everything in the Hardware List into a kit. You’ll get exactly what’s on the hardware list, plus a couple extra of most things so you aren’t stuck if you lose one. HDW1019 Assembly/Outfeed Table Hardware Kit ......................$299.99
Multi-Knobs available separately on page 48.
Sliding trays
hold Systainers
20mm holes on 96mm centers Height adjustable to match your saw
Having used pretty much every available Festool and 3rd party attachment for track saws, here’s how I would equip one, if I were starting over today. First, I would buy two 1400mm guide rails and a connector kit. I’ve joined as many as three guide rails at a time and have never found it to be an issue. Two connected 1400mm rails let you rip the full length of a 4' x 8' should that be necessary.
Next, I would get Woodpeckers Parallel Guide System and Adjustable Track Square. The PGS gives you ripping accuracy equal to or better than the best table saw and the Adjustable Track Square will cross cut
wide sheet goods easier and more accurately than anything except a full-blown European sliding-table table saw.
With two 1400mm rails, you can have both the PGS and the Adjustable Track Square dialed in and ready for work without switching between them and re-checking calibration every time you change from cross-cutting to ripping.
With this set-up for cutting sheet goods, I don’t need a massive side extension on my table saw, saving shop space and allowing me to put more money into precision and power.
57
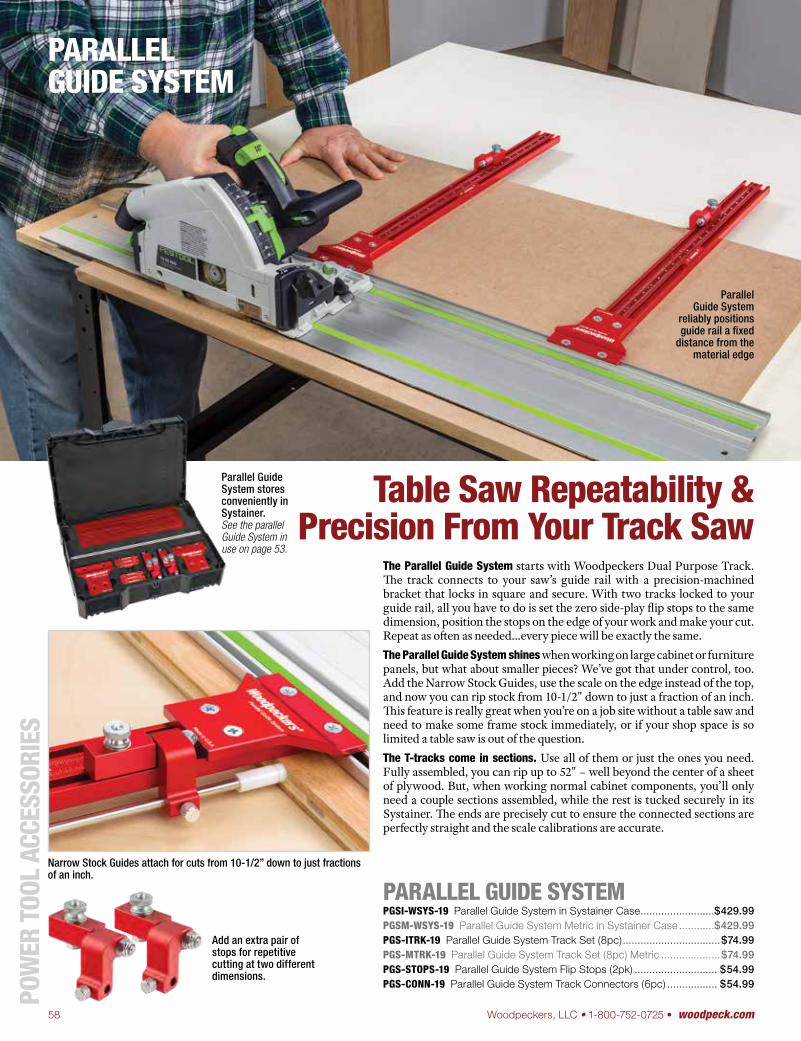
58 Woodpeckers, LLC • 1-800-752-0725 • woodpeck.com
The Parallel Guide System starts with Woodpeckers Dual Purpose Track. The track connects to your saw’s guide rail with a precision-machined bracket that locks in square and secure. With two tracks locked to your guide rail, all you have to do is set the zero side-play flip stops to the same dimension, position the stops on the edge of your work and make your cut. Repeat as often as needed…every piece will be exactly the same.The Parallel Guide System shines when working on large cabinet or furniture panels, but what about smaller pieces? We’ve got that under control, too. Add the Narrow Stock Guides, use the scale on the edge instead of the top, and now you can rip stock from 10-1/2" down to just a fraction of an inch. This feature is really great when you’re on a job site without a table saw and need to make some frame stock immediately, or if your shop space is so limited a table saw is out of the question.The T-tracks come in sections. Use all of them or just the ones you need. Fully assembled, you can rip up to 52" – well beyond the center of a sheet of plywood. But, when working normal cabinet components, you’ll only need a couple sections assembled, while the rest is tucked securely in its Systainer. The ends are precisely cut to ensure the connected sections are perfectly straight and the scale calibrations are accurate.
Parallel Guide System stores conveniently in Systainer.See the parallel Guide System in use on page 53.
Narrow Stock Guides attach for cuts from 10-1/2” down to just fractions of an inch.
ParallelGuide System
reliably positions guide rail a fixed
distance from the material edge
Add an extra pair of stops for repetitive cutting at two different dimensions.
POW
ER T
OOL
ACCE
SSOR
IES
PARALLEL GUIDE SYSTEM PGSI-WSYS-19 Parallel Guide System in Systainer Case .........................$429.99 PGSM-WSYS-19 Parallel Guide System Metric in Systainer Case ............$429.99 PGS-ITRK-19 Parallel Guide System Track Set (8pc) .................................$74.99 PGS-MTRK-19 Parallel Guide System Track Set (8pc) Metric ....................$74.99 PGS-STOPS-19 Parallel Guide System Flip Stops (2pk) ............................ $54.99 PGS-CONN-19 Parallel Guide System Track Connectors (6pc) ................. $54.99
Table Saw Repeatability &Precision From Your Track Saw
PARALLELGUIDE SYSTEM
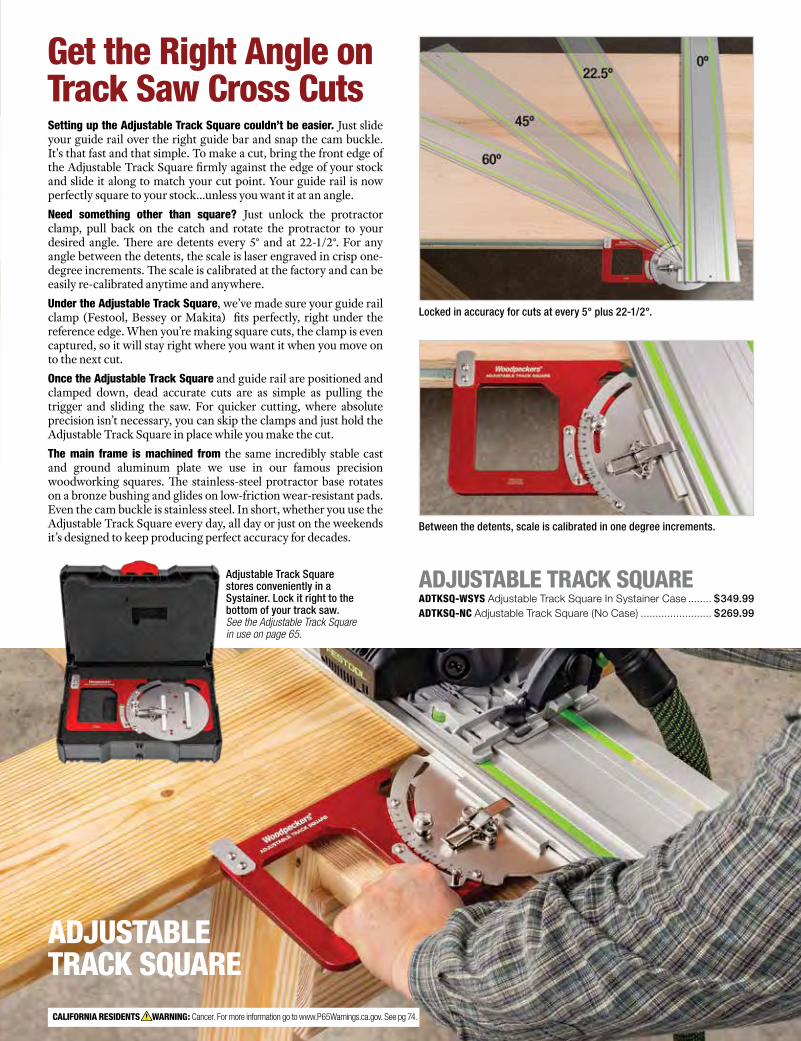
CALIFORNIA RESIDENTS WARNING: Cancer. For more information go to www.P65Warnings.ca.gov. See pg 74.
Setting up the Adjustable Track Square couldn’t be easier. Just slide your guide rail over the right guide bar and snap the cam buckle. It's that fast and that simple. To make a cut, bring the front edge of the Adjustable Track Square firmly against the edge of your stock and slide it along to match your cut point. Your guide rail is now perfectly square to your stock…unless you want it at an angle. Need something other than square? Just unlock the protractor clamp, pull back on the catch and rotate the protractor to your desired angle. There are detents every 5° and at 22-1/2°. For any angle between the detents, the scale is laser engraved in crisp one-degree increments. The scale is calibrated at the factory and can be easily re-calibrated anytime and anywhere. Under the Adjustable Track Square, we’ve made sure your guide rail clamp (Festool, Bessey or Makita) fits perfectly, right under the reference edge. When you’re making square cuts, the clamp is even captured, so it will stay right where you want it when you move on to the next cut. Once the Adjustable Track Square and guide rail are positioned and clamped down, dead accurate cuts are as simple as pulling the trigger and sliding the saw. For quicker cutting, where absolute precision isn’t necessary, you can skip the clamps and just hold the Adjustable Track Square in place while you make the cut. The main frame is machined from the same incredibly stable cast and ground aluminum plate we use in our famous precision woodworking squares. The stainless-steel protractor base rotates on a bronze bushing and glides on low-friction wear-resistant pads. Even the cam buckle is stainless steel. In short, whether you use the Adjustable Track Square every day, all day or just on the weekends it’s designed to keep producing perfect accuracy for decades.
ADJUSTABLE TRACK SQUARE ADTKSQ-WSYS Adjustable Track Square In Systainer Case ........ $349.99 ADTKSQ-NC Adjustable Track Square (No Case) ........................ $269.99
Adjustable Track Square stores conveniently in a Systainer. Lock it right to the bottom of your track saw.See the Adjustable Track Square in use on page 65.
Between the detents, scale is calibrated in one degree increments.
CALIFORNIA RESIDENTS WARNING: Cancer. For more information go to www.P65Warnings.ca.gov. See pg 74.
Locked in accuracy for cuts at every 5° plus 22-1/2°.
Get the Right Angle onTrack Saw Cross Cuts
ADJUSTABLETRACK SQUARE
60 Woodpeckers, LLC • 1-800-752-0725 • woodpeck.com
HOLE BORING JIG HBJ-19 Hole Boring Jig 3/4" & 20mm In Woodpeckers Case ......$199.99 HBJI-NC-19 Hole Boring Jig 3/4" Inch Only .................................$139.99 HBJM-NC-19 Hole Boring Jig 20mm Metric Only .........................$139.99
Woodworkers around the world have embraced the idea of a work surface milled with a gridwork of holes. Dozens of companies (large and small) produce devices that fit into the grid to hold your work. The milled work surface itself is available from several companies, often as part of a workbench or work table. Now, with Woodpeckers Hole Boring Jig, you can make your own gridwork top, right in your shop, for a fraction of the cost of a ready-made top. Whether you’re building a custom work table or replacing the top on something like a Festool MFT, you can mill the top with near-CNC accuracy with nothing fancier than a good router and a sharp bit.Woodpeckers Hole Boring Jig is a 3/8" thick solid phenolic, CNC-machined template. Index pins placed against the corner of your table position the template for the first group of holes. Then, you’ll use the already-milled holes to index across the rest of the table surface. All you need is a router that accepts Porter-Cable style guide bushings and a 1/2" straight router bit (up-cut spiral bits are best). Two standards have developed for these table tops. Festool and several other European-based companies use 20mm holes. Veritas and several others use 3/4" holes. Woodpeckers has you covered no matter which standard you use. You can get the Hole Boring Jig with the right guide bushings and index pins to cut either 20mm or 3/4" holes. Or, if you’re like most American woodworkers and have “some of this and some of that,” get the complete kit which has the guide bushings and index pins for both sizes.
Machine Your Own MFT Style Bench Tops
Index pins used for starting at the first corner. After that, red mid-field pins use previously milled holes to position the next group. See the Hole Boring Jig in use on pages 1 & 54.
HOLEBORING JIG
POW
ER T
OOL
ACCE
SSOR
IES
For less than the price of one replacement top for a Festool MFT, you can get the jig, make your own replacement top and then start adding gridwork tops for the other work surfaces in your shop. With an array of clamps and end-stops there’s no limit to the workholding arrangements you can set up on a gridwork table.
Combined set has guide bushing and mid-field index pins for both 20mm and 3/4" holes. Or get just the size you want.
61
MFT LAYOUT & ASSEMBLY SQUARE MFTLASQR-19 MFT Layout & Assembly Square & 2 Positioning Dogs .......$79.99 MFTPOSDOG2-19 MFT Positioning Dogs (2pk) .............................................$16.99
Woodpeckers MFT Layout & Assembly Square makes quick work of the often-tedious task of aligning your track saw guide rail with the fence of your Festool Multi-Function Table. At 3/4" thick, this solid phenolic square can rest flat on the table and intersect with both the fence and the rail at the same time. No more trying to hold a framing square along the guide rail and hoping you’ve got it aligned. If that was this tool’s only trick, it would be a great addition your shop, but there’s more.Slots are milled into the phenolic along both edges. This lets you clamp the square to a workbench and your workpiece to the square. Now your work is perpendicular to the bench. You can also clamp the square to two joining workpieces, holding them square to each other. Don’t worry if you get a little too generous with the glue…in won’t stick to the square.
MFT Layout &Assembly Square
3/4" thickness and 15" edges deliver simple, accurate MFT set up. See the MFT Layout & Assembly Square in use on page 1.
Not just for your MFT...milled slots give access for clamps. Use it to position work square to a bench
Same phenolic material used in our famous router tables.
2096 WORKHOLDING KIT WHK2096S-19 2096 Workholding Kit In Systainer Case ............. $359.99 WHK2096SB-19 2096 Workholding Kit (No Case) ....................... $299.99
If you agree that the simplest solution is usually the correct solution, you’ll love Woodpeckers 2096 Workholding Kit. Few things are simpler than two opposing wedges, and that’s one of the principles behind this kit. With one wedge fixed, the opposing wedge can apply amazing gripping strength with the tiniest application of pressure. When you’re done and ready for the next piece, a simple tap on the narrow end of the floating wedge and it’s free. Another simple approach is a bench stop or “dog” with a fixed height…no springs, no clamps, just a shoulder that keeps it in place. The kit has a gaggle of them. "2096" refers to the spacing on Festool's MFT table...20mm holes on 96mm centers. This kit works perfectly with an MFT or with any table you make with our Hole Boring Jig.
2096 Workholding Kit
Secure work while using power tools. Support rabbets with Adjustable Dogs
2096 Workholding Kit stores conveniently in a Systainer. See the 2096 Workholding Kit in use on pages 1 & 56.
CALIFORNIA RESIDENTS WARNING: Cancer. For more information go to www.P65Warnings.ca.gov. See pg 74.
62 Woodpeckers, LLC • 1-800-752-0725 • woodpeck.com
NOTE: The Festool MFT brand names are the registered trademarks of the respective companies and are not associated with Woodpeckers, LLC.
The Variable Router Jig and router guide bushings are a perfect match. You’ll keep this versatile jig right beside your set of router guide bushings, because every guide bushing operation needs a template, and the VRJ configures in minutes to any square or rectangular shape you want. Rout mortises for joinery. Mortise in hardware like hinges and locks. Rout dadoes for inlay work, adding visually stunning details to your projects. Once you see how easy it is to set up and use, you’ll start inventing ways to use it to make your projects go faster and smoother.You can assemble the jig in minutes. Both metric and fractional scales are laser engraved on tracks. Put the scale you prefer on the inside, slide the lockbars into the edges, adjust to dimension, tighten the clamps with the supplied ball tip wrench and you’re ready to rout. When you need to reconfigure for the next step, just loosen the socket head cap screws, slide the tracks to the new dimensions, lock it back up and get back to work.Of course, you have to clamp the jig in place along with the workpiece. In the kit you’ll find four clever hold-down brackets that slip into the edge of the track and allow you to clamp your work securely and quickly. If you’re working on a perforated table like Festool’s MFT, you can clamp your project without anything sticking above the level of the VRJ. The same thing can be done on almost any workbench surface with the proper clamps and a little planning.The tracks for the Variable Router Jig are clear anodized to create a tough, abrasion-resistant surface. The lockbars are a special polycarbonate that slides easily and locks solidly in the track. We offer two complete kits, one with four 18" tracks and one with two 18" tracks and two 32" tracks. Both come with all the lockbars and hold-down brackets you need. If you buy the smaller kit and later need more capacity, we sell the 32" tracks separately.
VARIABLE ROUTER JIGVRJ-19 Variable Router Jig 18" x 18" .........................................................................................$219.99 VRJ-191832 Variable Router Jig 18" x 32" ................................................................................ $269.99 VRJ-19-TR32 Variable Router Jig 32" Accessory Track (2pk) ..................................................... $119.99 VRJ-19-LBK Variable Router Jig Lockbar Kit ...............................................................................$13.99 VRJ-19-BC Variable Router Jig Clamp Brackets (2pk) .................................................................$13.99 VRJ19-SPT48 Variable Router Jig 48" Accessory Track (2pk) ..................................................... $89.99 VRJ19-SPT60 Variable Router Jig 60" Accessory Track (2pk) .....................................................$109.99
1
2
3
4
Secure to workbench and you're ready to rout.
Adjust to position and lock with ball end wrench.
Drop the rectangular washers through the slots.
Create any rectangular guide bushing template by just sliding the tracks into position.
POW
ER T
OOL
ACCE
SSOR
IES
Configure Square & RectangularTemplates in Seconds
Slide the locking bars in the Super Track edge.
VARIABLEROUTER JIG
63 63CALIFORNIA RESIDENTS WARNING: Cancer. For more information go to www.P65Warnings.ca.gov. See pg 74.
Woodpeckers Offset Base gives Festool’s two Domino joinery tools a much larger and more robust indexing platform. Originally designed for the Domino DF-500, you can get it ready for your Domino XL simply by adding the XL700 5mm Adapters.The system starts with a very flat plate that fastens securely to the base of either Domino. The reference surface that you will hold against your stock is joined to the attachment plate through 3/4" diameter stainless steel spacers. By simply changing the spacers between the attachment plate and the reference plate, you can center your mortises precisely in five different material thicknesses, nominal 3/4" plywood (23/32"), 12mm and 18mm metric plywood and actual dimension 3/4" and 1/2". There are .005" shims to tweak the mortise position to even tighter tolerance. There’s also an optional expanded spacer set that gives you more options for thicker material.The heavy-duty extruded aluminum outriggers extend up to 54” either right or left of the Domino cutter. By using the zero-lateral-play flip-stops, you can precisely locate mortises over a 9-foot span in a dependably repeatable pattern.The outrigger comes in five sections, carefully machined to precise lengths. They're made from our Dual Purpose Track, anodized, then laser engraved with inch or metric scales. The first section is marked with "0" at the center and extends 6" right and left. The second section can be locked in place on either side. The ends are carefully machined to match and the scale calibration continues across the joint. With all five sections connected, the outrigger extends to 54".The complete “System” includes the Offset Base, five outrigger bars with connectors, five sets of spacers and four flip stops. You can also order the Offset Base without the outrigger set up. The “Base” includes the attachment plate, reference plate and five sets of spacers. For either configuration, add the optional 5mm spacers if you’re using a Domino XL. Both configurations are available with inch or metric scales, and both come in a Systainer, compatible with your Festool cases.
OFFSET BASE SYSTEM DF500-OBSI-18 Offset Base System in Systainer Case ..........................$429.99DF500-OBSM-18 Offset Base System Metric in Systainer Case ..............$429.99 DF500-OBI-18 Offset Base -Systainer Case ...........................................$259.99DF500-OBM-18 Offset Base Metric -Systainer Case ...............................$259.99 DF500-OBOI-18 Offset Base Outrigger Inch Scale ..................................$199.99DF500-OBOM-18 Offset Base Outrigger Metric Scale .............................$199.99 DF500-OBES-18 Offset Expanded Spacer Set ..........................................$79.99 DF500-OBTA-18 Offset Base Table Apron Spacers ................................. $34.99DF500-OB5A-18 Offset Base XL700 5mm Adapters .................................$14.99
Table Apron SpacersExpanded Spacer Set XL700 5mm Adapters
Offset Base on Domino XL
Added Stability & Improved Spacing for Your Domino
Offset Base and Outriggerson Domino DF-500.
Stores conveniently in Systainer. Lock it right to the bottom of your Domino.See the Offset Base System in use on pages 53, 61 & 67.
OFFSETBASE SYSTEM
NOTE: The Festool Domino brand name is the registered trademark of the respective companies and are not associated with Woodpeckers, LLC.
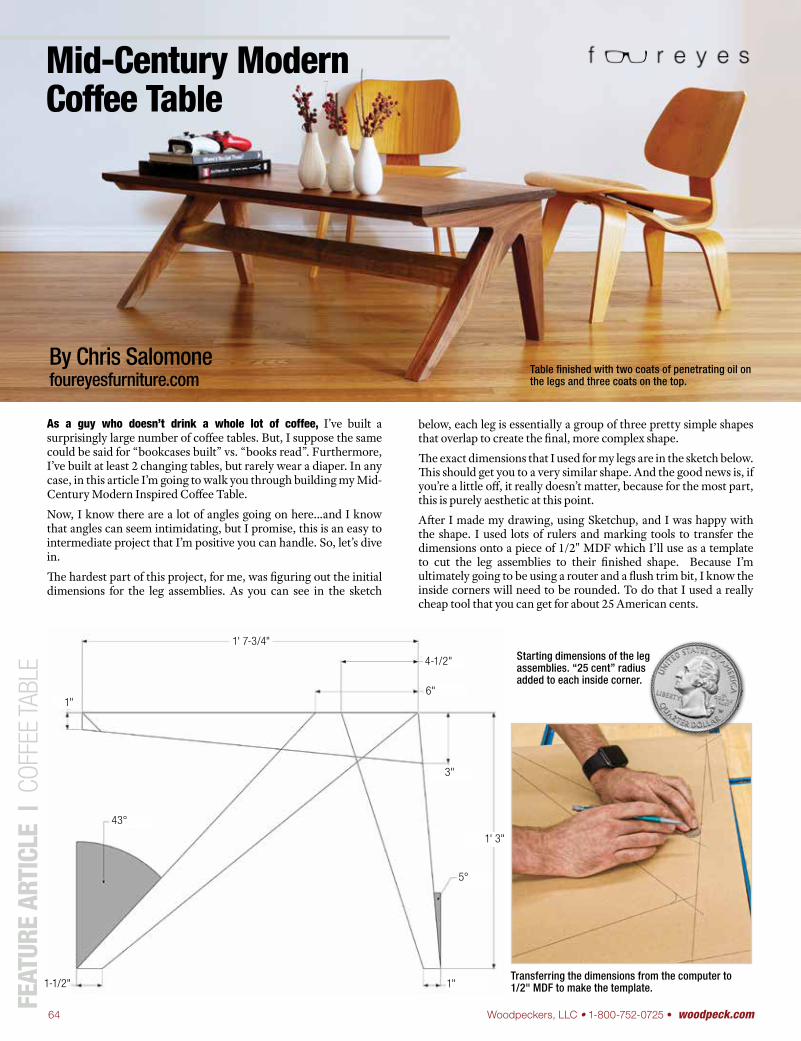
64 Woodpeckers, LLC • 1-800-752-0725 • woodpeck.com
FEAT
URE
ARTI
CLE
| C
OFFE
E TA
BLE
As a guy who doesn’t drink a whole lot of coffee, I’ve built a surprisingly large number of coffee tables. But, I suppose the same could be said for “bookcases built” vs. “books read”. Furthermore, I’ve built at least 2 changing tables, but rarely wear a diaper. In any case, in this article I’m going to walk you through building my Mid-Century Modern Inspired Coffee Table.
Now, I know there are a lot of angles going on here…and I know that angles can seem intimidating, but I promise, this is an easy to intermediate project that I’m positive you can handle. So, let’s dive in.
The hardest part of this project, for me, was figuring out the initial dimensions for the leg assemblies. As you can see in the sketch
By Chris Salomonefoureyesfurniture.com
Mid-Century Modern Coffee Table
below, each leg is essentially a group of three pretty simple shapes that overlap to create the final, more complex shape.
The exact dimensions that I used for my legs are in the sketch below. This should get you to a very similar shape. And the good news is, if you’re a little off, it really doesn’t matter, because for the most part, this is purely aesthetic at this point.
After I made my drawing, using Sketchup, and I was happy with the shape. I used lots of rulers and marking tools to transfer the dimensions onto a piece of 1/2" MDF which I’ll use as a template to cut the leg assemblies to their finished shape. Because I’m ultimately going to be using a router and a flush trim bit, I know the inside corners will need to be rounded. To do that I used a really cheap tool that you can get for about 25 American cents.
Transferring the dimensions from the computer to 1/2" MDF to make the template.
Starting dimensions of the leg assemblies. “25 cent” radius added to each inside corner.
Table finished with two coats of penetrating oil on the legs and three coats on the top.
1' 7-3/4"
4-1/2"
6"
3"
1' 3"
5°
1"
43°
1"
1-1/2"
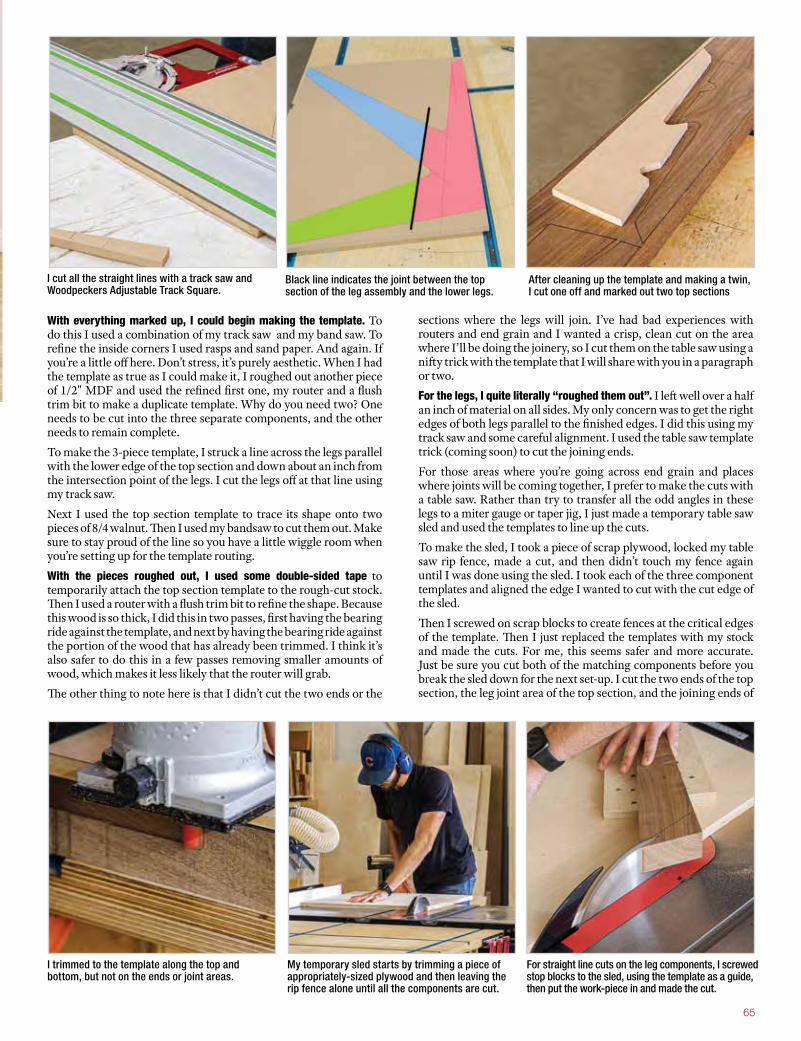
65
With everything marked up, I could begin making the template. To do this I used a combination of my track saw and my band saw. To refine the inside corners I used rasps and sand paper. And again. If you’re a little off here. Don’t stress, it’s purely aesthetic. When I had the template as true as I could make it, I roughed out another piece of 1/2" MDF and used the refined first one, my router and a flush trim bit to make a duplicate template. Why do you need two? One needs to be cut into the three separate components, and the other needs to remain complete.
To make the 3-piece template, I struck a line across the legs parallel with the lower edge of the top section and down about an inch from the intersection point of the legs. I cut the legs off at that line using my track saw.
Next I used the top section template to trace its shape onto two pieces of 8/4 walnut. Then I used my bandsaw to cut them out. Make sure to stay proud of the line so you have a little wiggle room when you’re setting up for the template routing.
With the pieces roughed out, I used some double-sided tape to temporarily attach the top section template to the rough-cut stock. Then I used a router with a flush trim bit to refine the shape. Because this wood is so thick, I did this in two passes, first having the bearing ride against the template, and next by having the bearing ride against the portion of the wood that has already been trimmed. I think it’s also safer to do this in a few passes removing smaller amounts of wood, which makes it less likely that the router will grab.
The other thing to note here is that I didn’t cut the two ends or the
After cleaning up the template and making a twin, I cut one off and marked out two top sections
Black line indicates the joint between the top section of the leg assembly and the lower legs.
I cut all the straight lines with a track saw and Woodpeckers Adjustable Track Square.
sections where the legs will join. I’ve had bad experiences with routers and end grain and I wanted a crisp, clean cut on the area where I’ll be doing the joinery, so I cut them on the table saw using a nifty trick with the template that I will share with you in a paragraph or two.
For the legs, I quite literally “roughed them out”. I left well over a half an inch of material on all sides. My only concern was to get the right edges of both legs parallel to the finished edges. I did this using my track saw and some careful alignment. I used the table saw template trick (coming soon) to cut the joining ends.
For those areas where you’re going across end grain and places where joints will be coming together, I prefer to make the cuts with a table saw. Rather than try to transfer all the odd angles in these legs to a miter gauge or taper jig, I just made a temporary table saw sled and used the templates to line up the cuts.
To make the sled, I took a piece of scrap plywood, locked my table saw rip fence, made a cut, and then didn’t touch my fence again until I was done using the sled. I took each of the three component templates and aligned the edge I wanted to cut with the cut edge of the sled.
Then I screwed on scrap blocks to create fences at the critical edges of the template. Then I just replaced the templates with my stock and made the cuts. For me, this seems safer and more accurate. Just be sure you cut both of the matching components before you break the sled down for the next set-up. I cut the two ends of the top section, the leg joint area of the top section, and the joining ends of
For straight line cuts on the leg components, I screwed stop blocks to the sled, using the template as a guide, then put the work-piece in and made the cut.
My temporary sled starts by trimming a piece of appropriately-sized plywood and then leaving the rip fence alone until all the components are cut.
I trimmed to the template along the top and bottom, but not on the ends or joint areas.
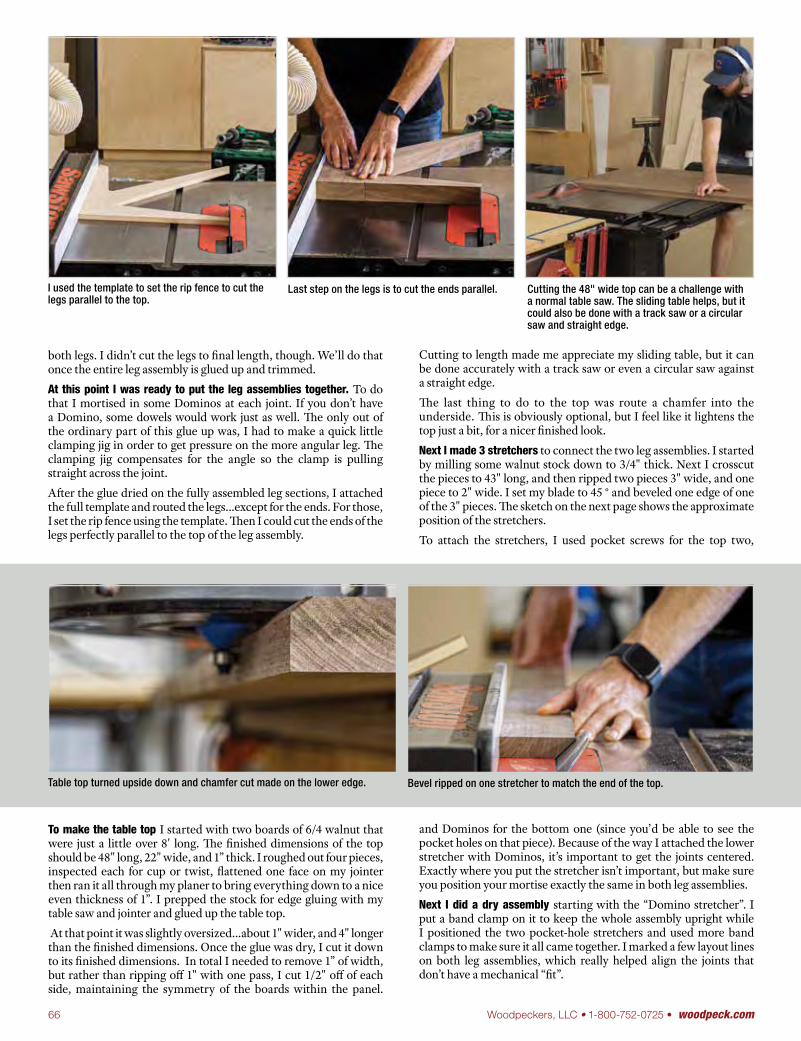
66 Woodpeckers, LLC • 1-800-752-0725 • woodpeck.com
both legs. I didn’t cut the legs to final length, though. We’ll do that once the entire leg assembly is glued up and trimmed.
At this point I was ready to put the leg assemblies together. To do that I mortised in some Dominos at each joint. If you don’t have a Domino, some dowels would work just as well. The only out of the ordinary part of this glue up was, I had to make a quick little clamping jig in order to get pressure on the more angular leg. The clamping jig compensates for the angle so the clamp is pulling straight across the joint.
After the glue dried on the fully assembled leg sections, I attached the full template and routed the legs…except for the ends. For those, I set the rip fence using the template. Then I could cut the ends of the legs perfectly parallel to the top of the leg assembly.
Cutting the 48" wide top can be a challenge with a normal table saw. The sliding table helps, but it could also be done with a track saw or a circular saw and straight edge.
Last step on the legs is to cut the ends parallel. I used the template to set the rip fence to cut the legs parallel to the top.
To make the table top I started with two boards of 6/4 walnut that were just a little over 8' long. The finished dimensions of the top should be 48" long, 22" wide, and 1” thick. I roughed out four pieces, inspected each for cup or twist, flattened one face on my jointer then ran it all through my planer to bring everything down to a nice even thickness of 1”. I prepped the stock for edge gluing with my table saw and jointer and glued up the table top.
At that point it was slightly oversized…about 1" wider, and 4" longer than the finished dimensions. Once the glue was dry, I cut it down to its finished dimensions. In total I needed to remove 1” of width, but rather than ripping off 1" with one pass, I cut 1/2" off of each side, maintaining the symmetry of the boards within the panel.
Cutting to length made me appreciate my sliding table, but it can be done accurately with a track saw or even a circular saw against a straight edge.
The last thing to do to the top was route a chamfer into the underside. This is obviously optional, but I feel like it lightens the top just a bit, for a nicer finished look.
Next I made 3 stretchers to connect the two leg assemblies. I started by milling some walnut stock down to 3/4" thick. Next I crosscut the pieces to 43" long, and then ripped two pieces 3" wide, and one piece to 2" wide. I set my blade to 45 ° and beveled one edge of one of the 3" pieces. The sketch on the next page shows the approximate position of the stretchers.
To attach the stretchers, I used pocket screws for the top two,
and Dominos for the bottom one (since you’d be able to see the pocket holes on that piece). Because of the way I attached the lower stretcher with Dominos, it’s important to get the joints centered. Exactly where you put the stretcher isn’t important, but make sure you position your mortise exactly the same in both leg assemblies.
Next I did a dry assembly starting with the “Domino stretcher”. I put a band clamp on it to keep the whole assembly upright while I positioned the two pocket-hole stretchers and used more band clamps to make sure it all came together. I marked a few layout lines on both leg assemblies, which really helped align the joints that don’t have a mechanical “fit”.
Bevel ripped on one stretcher to match the end of the top.Table top turned upside down and chamfer cut made on the lower edge.
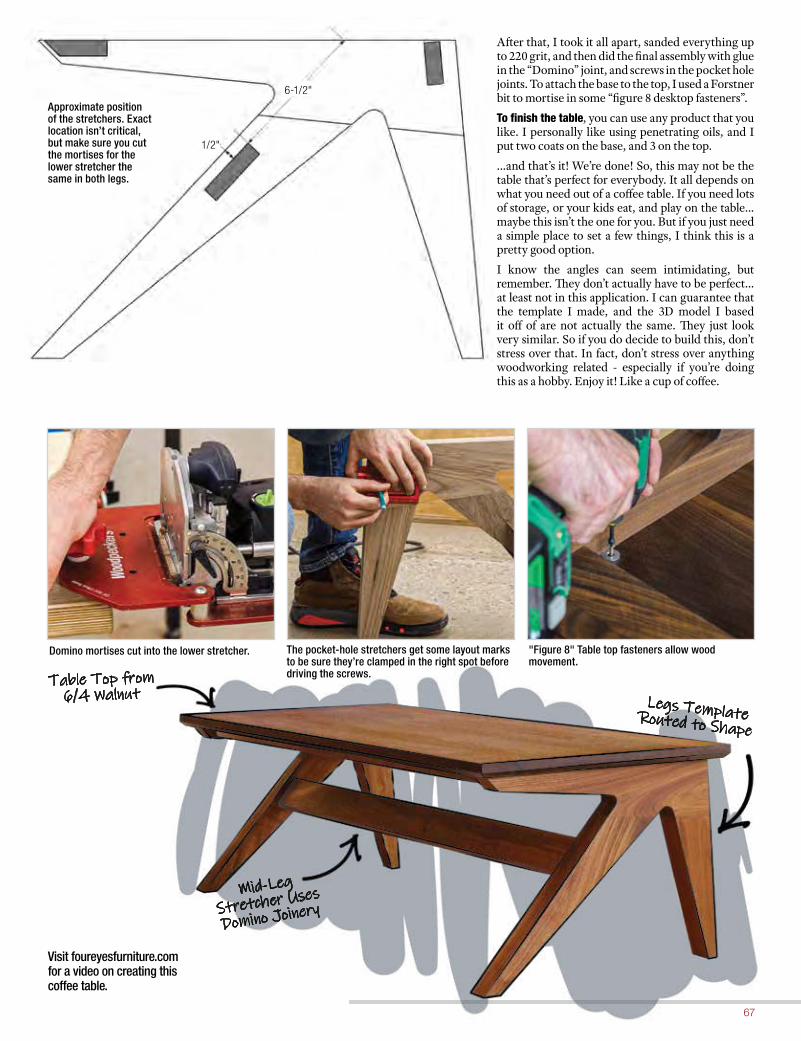
67
6-1/2"
1/2"
Approximate position of the stretchers. Exact location isn’t critical, but make sure you cut the mortises for the lower stretcher the same in both legs.
After that, I took it all apart, sanded everything up to 220 grit, and then did the final assembly with glue in the “Domino” joint, and screws in the pocket hole joints. To attach the base to the top, I used a Forstner bit to mortise in some “figure 8 desktop fasteners”.
To finish the table, you can use any product that you like. I personally like using penetrating oils, and I put two coats on the base, and 3 on the top.
…and that’s it! We’re done! So, this may not be the table that’s perfect for everybody. It all depends on what you need out of a coffee table. If you need lots of storage, or your kids eat, and play on the table…maybe this isn’t the one for you. But if you just need a simple place to set a few things, I think this is a pretty good option.
I know the angles can seem intimidating, but remember. They don’t actually have to be perfect…at least not in this application. I can guarantee that the template I made, and the 3D model I based it off of are not actually the same. They just look very similar. So if you do decide to build this, don’t stress over that. In fact, don’t stress over anything woodworking related - especially if you’re doing this as a hobby. Enjoy it! Like a cup of coffee.
"Figure 8" Table top fasteners allow wood movement.
The pocket-hole stretchers get some layout marks to be sure they’re clamped in the right spot before driving the screws.
Domino mortises cut into the lower stretcher.
Table Top from6/4 Walnut
Mid-Leg
Stretcher Uses
Domino Joinery
Legs Template Routed to Shape
Visit foureyesfurniture.com for a video on creating this coffee table.
Carbide-tipped circular saw blades are a substantial investment and, like all investments, deserve protection. With the Woodpeckers BladeSaver, you never need to touch the blade’s sharp teeth. To attach the BladeSaver, simply lay the blade flat, wrap it around the teeth, then latch the master link and store it away using the handy hanging hook. Each blade is individually protected ensuring blade teeth can’t contact or strike other blades or objects. BladeSavers are molded using tough, ABS plastic that will provide years of protection for your valuable 10" and 12" saw blades.
BLADE SAVERTM
BLADESAV-10 BladeSaver 10"......................................................$13.99BLADESAV-12 BladeSaver 12" ......................................................$14.99
Put wasted shop space to work. Every shop has space going to waste under shelves, below upper hanging cabinets, even under your workbench top. Cubby Drawers put that unused space to work and help you organize small parts, fasteners and more. Store nails, screws, dowels, biscuits, nuts, bolts, washers and dozens of other shop necessities. Our Cubby Drawers are made right here in the U.S.A. using high-impact ABS plastic. This is the same material many auto parts are made from. Each drawer interior measures 2" wide x 6" long x 1-7/16" deep. You can divide drawers using supplied dividers that slide into notches. Cubby Drawers come with drawer hangers that are easy to install using four screws. The drawers glide effortlessly in their hangers. When you need the contents of a drawer just slip it out of its hanger and place it right where you need it, like on your bench while you assemble a project. You’ll use just the items you need cutting down on waste. You’ll find the drawer you need fast because you can label (and wipe-off then relabel) drawer fronts using dry erase type markers (not included). CUBBY DRAWERS
CUBDRWR Cubby Drawers - Set of 6 .............................................$21.99
These drawers are so handy, so useful, and so affordable, you’ll want a bunch. Like many of the best things, they come in six-packs. Get some for your workshop and order more for other family members. You’ll find lots of uses for them around the house.
Four simple screws secure a small parts drawer wherever you want.
Wrap around your blade and snap the master link closed. Store flat or hang by the hook.
SHOP
ACC
ESSO
RIES
Protect Yourself & YourValuable Saw Blades
A Drawer Anywhere& Everywhere
68 Woodpeckers, LLC • 1-800-752-0725 • woodpeck.com

69CALIFORNIA RESIDENTS WARNING: Cancer. For more information go to www.P65Warnings.ca.gov. See pg 74.
You’ll Wonder How You Ever Got Along Without It. This tool excels at glue removal and is an effective wood scraper that gets into tight places regular scrapers can’t reach.Our solid carbide blade starts sharp, stays sharp. Carbide tooling holds a sharp edge for a long time. The Mini- Scraper delivers long-life with four edges. The blade edges have a slight camber to help prevent marring your wood. We also offer an optional, perfectly square insert for getting into square corners. Replacement blades are available.The Mini-Scraper’s rugged carbide blade will pop the toughest dried glue right off your work. When you find dried glue in a tight corner, the Mini-Scraper with the optional square insert removes it with ease.You can scrape dry wood using a pushing motion at a low angle for an aggressive, bulldozer-like cut. To produce a finish quality cut, use a pulling motion with the handle held at a high angle. Easily clean wet glue off your scraper with just a damp rag.
MINI-SCRAPER MSCRAPE Mini-Scraper..............................................$21.99MSCRAPE-CB Replacement Carbide Blade ................ $11.99MSCRAPE-SQ Square Carbide Blade .......................... $11.99
The Carbide Blade easily removes dried glue from your work.
The standard cambered edge insert protects surfaces from gouging. The optional Square Carbide Blade gets tight in corners.
Love our red tools? Then you’ll love our new hand-thrown 14-ounce mug. While each one looks very similar, no two are the same…just like snowflakes. Our mugs are made by Deneen Pottery in Minnesota. Their unique “Glaze Engraving” technique lifts the Woodpeckers logo and square off the surface of the mug and gives it dimension. Deneen Pottery is specifically designed to go from the freezer to an oven or microwave and then to the dishwasher, all perfectly safe for both the pottery and you. Sized to last you a while, whether you’re working in the shop or just relaxing in the kitchen.
WOODPECKERS 14OZSIGNATURE MUG WP-MUG Woodpeckers 14oz. Signature Mug .............................. $24.99
StandardCarbide Blade
SquareCarbideBlade
Have Your “Morning Joe”with Your Favorite Tools
Cleans Glue ResidueEven in the Tightest Spots
70 Woodpeckers, LLC • 1-800-752-0725 • woodpeck.com
FEAT
URE
ARTI
CLE
| J
APAN
ESE
TOOL
BOX The centuries-old methods of Japanese joinery have captivated
western woodworkers for the last few decades. Saws and planes that work backwards from ours seem foreign, until you try them out and see how they use gravity instead of fighting against it. Japanese carpenters all begin their careers with the same simple project – a box to store the tools of their new profession.
I’ve made several Japanese Toolboxes over the years. I’ve made them as gift boxes, toy boxes, seasonal storage, and some even hold Japanese tools! All of them have the same basic design. Why mess with centuries of success?
This project can be as elaborate or as simple as you want. You can make it an exercise in using hand tools only, or use a mix of hand and power tools, as I did. Paulownia is the traditional material for Japanese Toolboxes because of its balance between light weight and good strength. It’s hard to find in the States so I opted for Eastern White Pine. It’s similar in weight and works easily. I bought the stock from a reliable supplier who had nice clear boards wide enough I didn’t have to do any glue-up and they were planed to a nice uniform thickness.
What makes a Japanese Toolbox a Japanese Toolbox is the clever way the top installs, not its size. They can be any size at all. Traditionally, you select the largest tool you plan to store in the box, and make the box long enough, then follow a similar logic to plan the width and depth. Having been through this several times, I’ve landed on basic dimensions of 31" long x 11-1/2" wide and 12-1/4" tall. I used 3/4" stock everywhere except the bottom. I planed it down to 1/2" to save some weight.
Japanese ToolboxSimple, Functional& Fun to Build
These boxes typically aren’t “high end joinery”. They consist mostly of simple butt joints fastented with nails, but after making several of these, I’ve found routing a dado in the sides to locate the ends adds strength and eases assembly. I rout a 3/4" wide dado 3/4" in from the edge and 3/8” deep. The setback moves the nails away from the edge of the board and creates room for the handles. I marked out the first dado completely just to be sure I had everything spaced out right.
The Woodpeckers Router Table and Precision Router Lift made easy work of this step of the project. I set the fence by placing a piece of stock between the router bit and the fence, and set the height to 3/8" using the micro-adjust feature on the Precision Router Lift. I supported the back edge of the boards with a piece of scrap to eliminate tear-out.For both aesthetics and additional strength, I used cut nails for this
By George Snyder
71
3/4" wide dado cut 3/8" deep and 3/4" from the end. Space the fence by placing stock between the fence and the router bit.
project. The wedge-shaped shank gives you better pull out resistance than similar-sized wire nails. I drilled pilot holes everywhere I wanted a nail. The diameter of the pilot holes were roughly equal to the width of the nail right in the middle of its length. I drilled them about 3/4 the length of the nail. When placing a nail in a pilot hole I was careful to orient the wide side of the nail with the grain to avoid splitting. This is imperative if you are using hard, dense wood.
Since there’s no attempt to hide the nails, they look much better if they’re spaced out uniformly. I used the standard scale on a Woodpeckers Woodworking Rule to mark the position of a nail in from each edge, then used the Centering Scale to mark another position half-way between those two. In the case of the bottom, I marked two more positions half way between the center and the end nails. Then I went back over all those and crossed the lines to place the nails in the centers of all the boards…3/8" everywhere except the offset ends, which were 1-1/8" in from the sides and bottom.
I used Woodpeckers Box Clamps to hold the sides and ends square while I drilled pilot holes and nailed the box together. As you can see in the photos, I was able to drill pilot holes and drive the nails without
Mark nail positions in from each edge and centered on width.
Locate position of nails from the edge using a stopped rule such as the Paolini Pocket Rule.
Woodpeckers Box Clamps held the box square while I drilled pilot holes and drove the nails.
71

72 Woodpeckers, LLC • 1-800-752-0725 • woodpeck.com
I angled the nails in the bottom of the box. This gives them a better hold against the load inside.
I used longer (2-1/2") nails and clinched them over inside the box for added strength on the handles.
End cleats are nailed on at an angle, similar to the bottom. Cleats align flush with the sides of the box and the top of the handle.
Fixed batten is 2-1/2” wide and nailed one inch from the end of the lid.
ever releasing the box clamps. I was making several boxes, all the same size, so I took advantage of the ability to mount the clamps to a board for easy repeat clamping.
Once the sides and ends were nailed up, it was time to attach the bottom. To improve the holding power of the nails, I put them in at an angle. In the photo you’ll see I put pairs in at opposing angles. The nails holding the bottom should be set below the surface to prevent marring any bench, table or floor the tool box is resting on.
Next, I made the handles. The handles fit between the sides, flush with the top of the box. I used a Japanese smoothing plane to chamfer the inside edge of the handles to make them easier to grip. I made a mark about 1/4" from the outside edge, then planed the inside edge at about 45° until I reached the mark. You can adjust the angle and the size of the flat to suit your grip. I used longer, 2-1/2" nails to attach the handle and clinched over the points protruding into the box.
Then is was time to add the part that makes this a Japanese Toolbox…the sliding top with the wedge lock. It starts with 4" wide cleats nailed to both ends of the assembled box. As before, I spaced the nails out carefully and drilled the pilot holes at an angle to increase holding strength.
On my 31" long box I made the lid 6” shorter -- 25". I made it 1/8" narrower than the finished inside dimension of my assembled box. The top could be as thin as 1/2" to reduce weight, but I use my toolbox as a work surface, so I kept it 3/4" thick.
The battens for the top of the lid should be cut to length equal to the width of the finished box. The first batten is 2-1/2" wide and nailed 1" from the end of the lid. I used 2-1/2" nails and clinched them over, like the handles.
The second batten forms the lock. I looked at the tapered wedge, trying to figure out how to set up a table saw to do it, then realized I could do it by hand before I could find my taper jig. It’s just a matter of ripping a 5" board at something in the neighborhood of a 5° taper in two directions. I marked one end 2-3/4" from an edge and the other end 2-1/4" from the same edge. Then I connected the two marks, giving me my 5ish-degree taper. I ripped along this line with the saw not perpendicular to the board (the amount of bevel isn’t important…just so there’s some). Now all I had to do was smooth out the cut with a plane and keep the bevels close to how they were cut. It sounds complicated, but in truth, if you keep your cut reasonably straight with the layout line, it’s hard to mess up. I softened all the edges with a block plane before moving on.
I held the two-part batten together, with the inside half bevel-facing-down. I lined
I set the nails in the bottom so they won't mar whatever the box is sitting on.
I beveled the inside lower edge of the handles with a small plane to create a grip.
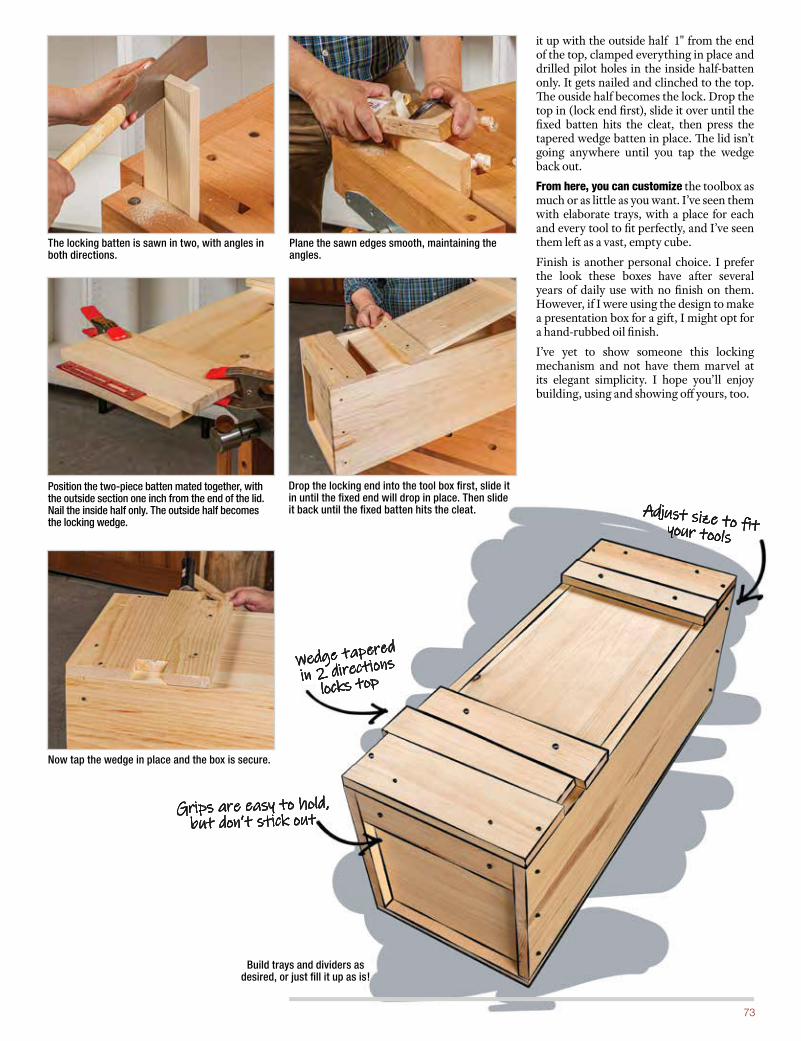
73
The locking batten is sawn in two, with angles in both directions.
Plane the sawn edges smooth, maintaining the angles.
Position the two-piece batten mated together, with the outside section one inch from the end of the lid. Nail the inside half only. The outside half becomes the locking wedge.
Drop the locking end into the tool box first, slide it in until the fixed end will drop in place. Then slide it back until the fixed batten hits the cleat.
Now tap the wedge in place and the box is secure.
Build trays and dividers as desired, or just fill it up as is!
it up with the outside half 1" from the end of the top, clamped everything in place and drilled pilot holes in the inside half-batten only. It gets nailed and clinched to the top. The ouside half becomes the lock. Drop the top in (lock end first), slide it over until the fixed batten hits the cleat, then press the tapered wedge batten in place. The lid isn’t going anywhere until you tap the wedge back out.
From here, you can customize the toolbox as much or as little as you want. I’ve seen them with elaborate trays, with a place for each and every tool to fit perfectly, and I’ve seen them left as a vast, empty cube.
Finish is another personal choice. I prefer the look these boxes have after several years of daily use with no finish on them. However, if I were using the design to make a presentation box for a gift, I might opt for a hand-rubbed oil finish.
I’ve yet to show someone this locking mechanism and not have them marvel at its elegant simplicity. I hope you’ll enjoy building, using and showing off yours, too.
Wedge tapered
in 2 directions
locks top
Adjust size to fit your tools
Grips are easy to hold, but don’t stick out
74 Woodpeckers, LLC • 1-800-752-0725 • woodpeck.com
This new larger version of our Heavy-Duty .9mm Mechanical Pencil measures .425” in diameter compared to .325” of our original version. This Heavy-Duty model also features 10 flats along the length. When you combine the larger diameter and the flats, the result is the easiest to grip Woodpeckers Mechanical Pencil yet! This is a very high quality, American made Mechanical Pencil.Robust .9mm pencil lead is ideal for marking heavy grained wood like oak. Fits perfectly in 1mm holes of Woodpeckers T-Squares. This lead does not fit Incra rules.
MECHANICAL PENCIL WPHD9MM Heavy-Duty .9mm Mechanical Pencil ...........................$8.99PENCIL-ERASER Pencil Erasers (4pk) ............................................. $1.99PENCIL-LEAD-9MM .9mm Pencil Lead (12pk) .................................$2.50
Not quite ready for Sketchup or some other drawing software? These superior quality graph Shop Notepads allow you to get your ideas on paper and with the handy grids, you can even clear up any details. Layout a new joint, or visualize a construction problem, nothing makes the process as easy or as simple. With measurements on
all four sides of the page, you can layout your work vertically and horizontally. Each 8-1/2" x 11" Shop Notepad has 50 sheets of 20lb bond paper. The dot matrix grid is laid out using 1/4" spaced squares with a dot every 1/16". Set includes 3 Notepads.
SHOP NOTEPAD GR-NOTEPADX3 Shop Notepad (3-pk) . ......................... $14.99
CALIFORNIA RESIDENTS WARNING! Many of our products require a California Prop 65 warning, either because they are used to produce sawdust or because their manufacture involves chemicals known to the state of California to cause cancer, birth defects or other reproductive harm. Because we list several items per page, we have posted ample warning throughout the catalog with clear and reasonable access to Prop 65 Warnings. For more information on your rights under California Proposition 65 visit www.p65warnings.ca.gov or call 916-445-6900.
ORDERING Order 24 hours a day, 7 days a week at Woodpeck.com.
To order via phone, call a Customer Service Representative toll free at 800-752-0725 Monday - Friday 9:00 am to 5:00pm (EDT).
Woodpeckers accepts the following forms of payment.
Woodpeckers, LLC reserves the right to limit quantities.
SHIPPING Express shipping services are available at an additional charge, pending availability of stock. Please speak to a Customer Service Representative toll free at 800-752-0725 Monday - Friday 9:00 am to 5:00pm (EDT) for further details, or visit woodpeck.com.
PRICING Prices are subject to change. Prices on Woodpeck.com may vary from catalog prices. Pictorial and typographical errors are subject to correction when orders are placed.
PRODUCT INFORMATION For more product information or for questions, please call a Customer Service Representative toll free at 800-752-0725 Monday - Friday 9:00 am to 5:00pm (EDT) or email us at mail [email protected].
INTERNATIONAL & CANADIAN ORDERSThe customer must pay customs upon delivery of the merchandise. Canadian customers pay in U.S. funds at current exchange rates. Please call a Customer Service Representative toll free at 800-752-0725 Monday - Friday 9:00 am to 5:00pm (EDT) for more information.
CUSTOMER SERVICE, EXCHANGES & RETURNS To return or exchange an order call a Customer Service Representative toll free at 800-752-0725 Monday - Friday 9:00 am to 5:00pm (EDT) or email us at mail [email protected] for further information. Please send returns by UPS within 90 days. Returns after 90 days are subject to a 25% restocking fee.
MAILING LIST PRIVACY If you do not wish to be included in our database, please let a Customer Service Representative know and we will honor your request. Visit https://www.woodpeck.com/privacypolicy.html for a complete policy disclosure.
74 Woodpeckers, LLC • 1-800-752-0725 • woodpeck.com
Once You Try This Notepad...You’ll Be Hooked!
Heavy-Duty .9mmMechanical Pencil
SHOP
ACC
ESSO
RIES
75
We launched the Board Mill in the summer of 2019 and were flooded with questions about the differences between it and our wildly popular Slab Flattening Mill. While they appear very similar, there are differences that make them more suited to their purpose. The framework that supports the router sled on the Slab Flattening Mill lifts the router up, giving you more clearance for thick slabs. It’s designed to traverse across as much as 62" of material with minimal deflection. In short, it’s all about very thick and very wide.
Slab Flattening Mill Board MillVS
The Board Mill framework uses the same sliding sled idea, but moves the router lower…down between the rails. It’s set up for 3/4" and 1-1/2" stock to be milled without shimming the material up, like you would have to with the Slab Flattening Mill. This makes it ideal for reclaimed lumber and wide, rough-sawn stock that won’t fit on your jointer. The trade-off is, the low-slung sled can’t span the vast area the Slab Flattening Mill can. Think about it like the difference between an Off-road 4x4 and a compact 4-door sedan…both will get you down the road, but the roads they’re designed for aren’t the same.
woodpeck.com
The Board Mill lowers the router base inside the main rails.
The Board Mill is located on
page 31.
Board Mill
The Slab Flattening Mill elevates the router base above themain rails.
The Slab Flattening Millis located onpages 32-33.
Slab Flattening Mill
WHAT’S THE DIFFERENCE?
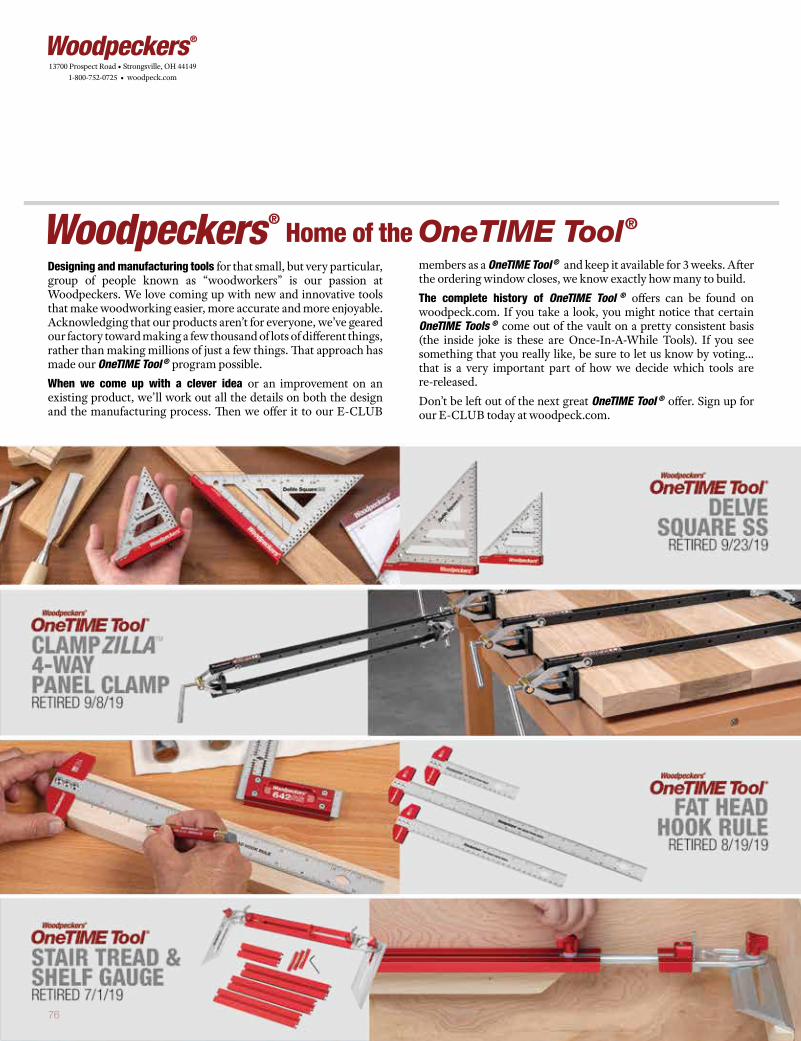
76 Woodpeckers, LLC • 1-800-752-0725 • woodpeck.com
13700 Prospect Road • Strongsville, OH 441491-800-752-0725 • woodpeck.com
Designing and manufacturing tools for that small, but very particular, group of people known as “woodworkers” is our passion at Woodpeckers. We love coming up with new and innovative tools that make woodworking easier, more accurate and more enjoyable. Acknowledging that our products aren’t for everyone, we’ve geared our factory toward making a few thousand of lots of different things, rather than making millions of just a few things. That approach has made our OneTIME Tool ® program possible. When we come up with a clever idea or an improvement on an existing product, we’ll work out all the details on both the design and the manufacturing process. Then we offer it to our E-CLUB
members as a OneTIME Tool ® and keep it available for 3 weeks. After the ordering window closes, we know exactly how many to build. The complete history of OneTIME Tool ® offers can be found on woodpeck.com. If you take a look, you might notice that certain OneTIME Tools ® come out of the vault on a pretty consistent basis (the inside joke is these are Once-In-A-While Tools). If you see something that you really like, be sure to let us know by voting…that is a very important part of how we decide which tools are re-released. Don’t be left out of the next great OneTIME Tool ® offer. Sign up for our E-CLUB today at woodpeck.com.
Home of the OneTIME Tool®