farmers vs. empire bloody veld: battle of magersfontein 11...
TRANSCRIPT

Farmers vs. EmpireBloody veld: Battle of Magersfontein 11 XII 1899
TACTICAL WARGAMERulebook
Table of Contents. Chapter I - General rules...................................................................................... Chapter II - Maneuvers.......................................................................................... Chapter III - Command......................................................................................... Chapter IV - British cavalry and mounted infantry. Boer commandos...... Chapter V - Terrain control and reactions................................................... Chapter VI - Stacking.............................................................................................. Chapter VII - Movement........................................................................................ Chapter VIII - Visibility.......................................................................................... Chapter IX - Trenches and concealment...................................................... Chapter X - Infantry and cavalry fire............................................................. Chapter XI - Artillery fire...................................................................................... Chapter XII - Attacking with cold steel.......................................................... Chapter XIII - Commanders in combat......................................................... Chapter XIV - Units after combat..................................................................... Literature.......................................................................................................................
23 4 6 6 7 8 8 9 101011131416
STRATEGEMATA Battle of Magersfontein 11 XII 1899
2
Chapter IGENERAL RULES
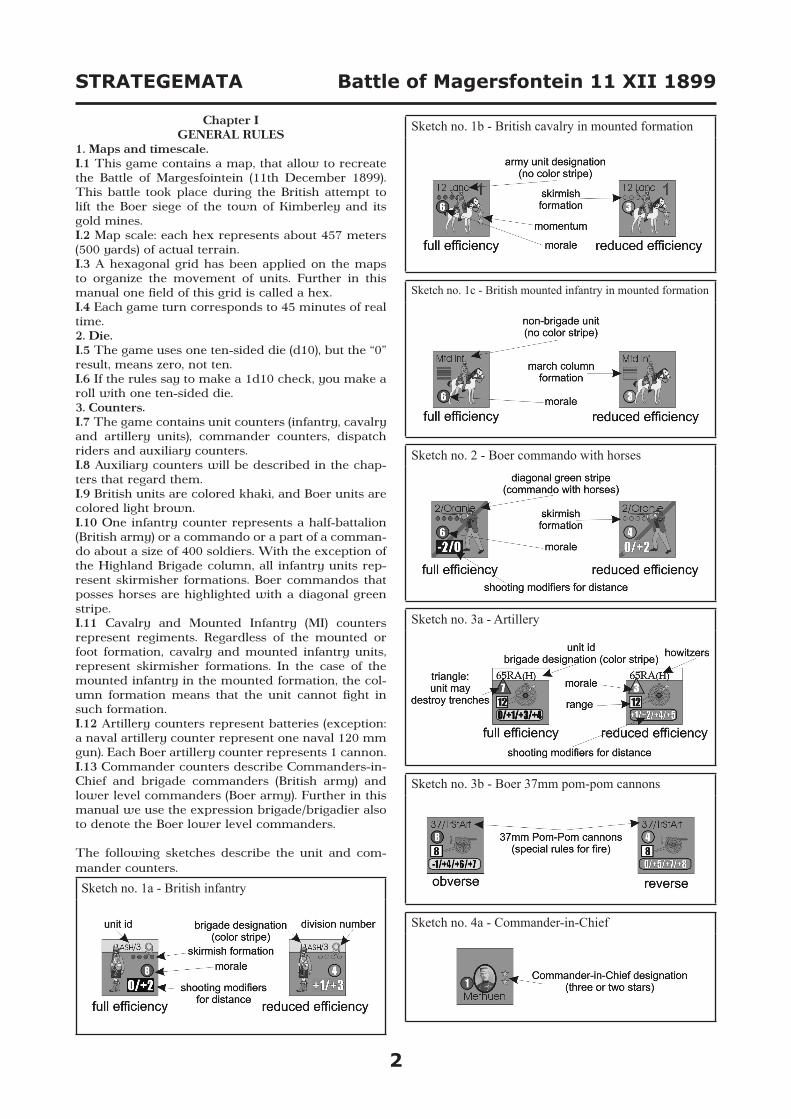
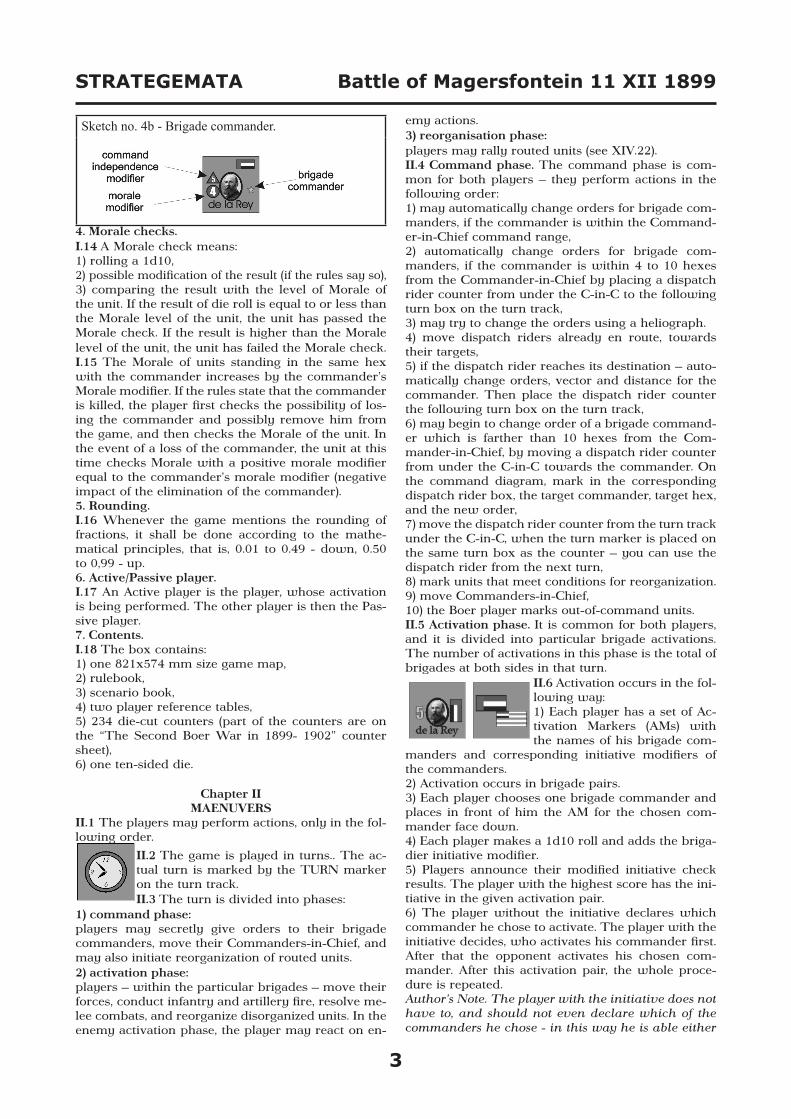
1. Maps and timescale.I.1 This game contains a map, that allow to recreate the Battle of Margesfointein (11th December 1899). This battle took place during the British attempt to lift the Boer siege of the town of Kimberley and its gold mines.I.2 Map scale: each hex represents about 457 meters (500 yards) of actual terrain. I.3 A hexagonal grid has been applied on the maps to organize the movement of units. Further in this manual one field of this grid is called a hex.I.4 Each game turn corresponds to 45 minutes of real time. 2. Die.I.5 The game uses one ten-sided die (d10), but the “0” result, means zero, not ten. I.6 If the rules say to make a 1d10 check, you make a roll with one ten-sided die.3. Counters.I.7 The game contains unit counters (infantry, cavalry and artillery units), commander counters, dispatch riders and auxiliary counters. I.8 Auxiliary counters will be described in the chap-ters that regard them. I.9 British units are colored khaki, and Boer units are colored light brown. I.10 One infantry counter represents a half-battalion (British army) or a commando or a part of a comman-do about a size of 400 soldiers. With the exception of the Highland Brigade column, all infantry units rep-resent skirmisher formations. Boer commandos that posses horses are highlighted with a diagonal green stripe. I.11 Cavalry and Mounted Infantry (MI) counters represent regiments. Regardless of the mounted or foot formation, cavalry and mounted infantry units, represent skirmisher formations. In the case of the mounted infantry in the mounted formation, the col-umn formation means that the unit cannot fight in such formation. I.12 Artillery counters represent batteries (exception: a naval artillery counter represent one naval 120 mm gun). Each Boer artillery counter represents 1 cannon. I.13 Commander counters describe Commanders-in-Chief and brigade commanders (British army) and lower level commanders (Boer army). Further in this manual we use the expression brigade/brigadier also to denote the Boer lower level commanders.
The following sketches describe the unit and com-mander counters. Sketch no. 1a - British infantry
Sketch no. 1b - British cavalry in mounted formation
Sketch no. 1c - British mounted infantry in mounted formation
Sketch no. 2 - Boer commando with horses
Sketch no. 3a - Artillery
Sketch no. 3b - Boer 37mm pom-pom cannons
Sketch no. 4a - Commander-in-Chief
STRATEGEMATA Battle of Magersfontein 11 XII 1899
3
Sketch no. 4b - Brigade commander.
4. Morale checks.I.14 A Morale check means:1) rolling a 1d10,2) possible modification of the result (if the rules say so),3) comparing the result with the level of Morale of the unit. If the result of die roll is equal to or less than the Morale level of the unit, the unit has passed the Morale check. If the result is higher than the Morale level of the unit, the unit has failed the Morale check.I.15 The Morale of units standing in the same hex with the commander increases by the commander’s Morale modifier. If the rules state that the commander is killed, the player first checks the possibility of los-ing the commander and possibly remove him from the game, and then checks the Morale of the unit. In the event of a loss of the commander, the unit at this time checks Morale with a positive morale modifier equal to the commander’s morale modifier (negative impact of the elimination of the commander).5. Rounding.I.16 Whenever the game mentions the rounding of fractions, it shall be done according to the mathe-matical principles, that is, 0.01 to 0.49 - down, 0.50 to 0,99 - up.6. Active/Passive player.I.17 An Active player is the player, whose activation is being performed. The other player is then the Pas-sive player.7. Contents.I.18 The box contains:1) one 821x574 mm size game map,2) rulebook,3) scenario book,4) two player reference tables,5) 234 die-cut counters (part of the counters are on the “The Second Boer War in 1899- 1902” counter sheet),6) one ten-sided die.
Chapter IIMAENUVERS
II.1 The players may perform actions, only in the fol-lowing order.
II.2 The game is played in turns.. The ac-tual turn is marked by the TURN marker on the turn track.II.3 The turn is divided into phases:
1) command phase:players may secretly give orders to their brigade commanders, move their Commanders-in-Chief, and may also initiate reorganization of routed units.2) activation phase:players – within the particular brigades – move their forces, conduct infantry and artillery fire, resolve me-lee combats, and reorganize disorganized units. In the enemy activation phase, the player may react on en-
emy actions.3) reorganisation phase:players may rally routed units (see XIV.22).II.4 Command phase. The command phase is com-mon for both players – they perform actions in the following order:1) may automatically change orders for brigade com-manders, if the commander is within the Command-er-in-Chief command range,2) automatically change orders for brigade com-manders, if the commander is within 4 to 10 hexes from the Commander-in-Chief by placing a dispatch rider counter from under the C-in-C to the following turn box on the turn track,3) may try to change the orders using a heliograph.4) move dispatch riders already en route, towards their targets,5) if the dispatch rider reaches its destination – auto-matically change orders, vector and distance for the commander. Then place the dispatch rider counter the following turn box on the turn track,6) may begin to change order of a brigade command-er which is farther than 10 hexes from the Com-mander-in-Chief, by moving a dispatch rider counter from under the C-in-C towards the commander. On the command diagram, mark in the corresponding dispatch rider box, the target commander, target hex, and the new order,7) move the dispatch rider counter from the turn track under the C-in-C, when the turn marker is placed on the same turn box as the counter – you can use the dispatch rider from the next turn,8) mark units that meet conditions for reorganization.9) move Commanders-in-Chief,10) the Boer player marks out-of-command units.II.5 Activation phase. It is common for both players, and it is divided into particular brigade activations. The number of activations in this phase is the total of brigades at both sides in that turn.
II.6 Activation occurs in the fol-lowing way:1) Each player has a set of Ac-tivation Markers (AMs) with the names of his brigade com-
manders and corresponding initiative modifiers of the commanders. 2) Activation occurs in brigade pairs.3) Each player chooses one brigade commander and places in front of him the AM for the chosen com-mander face down.4) Each player makes a 1d10 roll and adds the briga-dier initiative modifier. 5) Players announce their modified initiative check results. The player with the highest score has the ini-tiative in the given activation pair.6) The player without the initiative declares which commander he chose to activate. The player with the initiative decides, who activates his commander first. After that the opponent activates his chosen com-mander. After this activation pair, the whole proce-dure is repeated.Author’s Note. The player with the initiative does not have to, and should not even declare which of the commanders he chose - in this way he is able either

STRATEGEMATA Battle of Magersfontein 11 XII 1899
4
2. Orders – issuing and obeying orders.III.5 Brigade commanders, are obliged to carry out one of two possible orders during gameplay. Excep-tion: Piet Cronje does not need to obey any orders. The troops commanded by him may move freely. III.6 Orders:1) are given by the C-in-C to brigade commanders in the command phase,2) they can be changed by brigade commanders, us-ing the independent command procedure in the ac-tivation phase.3. Brigade commanders and out-of-command units.III.7 Out-of-command units are not obliged to move. III.8 Out-of-command units cannot attack and counter-attack. Except that, an out-of-command unit defends, reorganizes and moves like an in-command unit.III.9 An out-of-command unit is:1) Unit that is out of command range of the com-mander of its own brigade or units not directly sub-ordinated to the brigade out of command range of any brigade commander. Exception: British cavalry and mounted infantry are considered to always be in-command. They can be activated in any British activation.2) Boer troops outside the command range of any of their commanders (including Piet Cronje).
III.10 At the beginning of the activation the British player marks out-of-command bri-gade units with an OUT-OF-COMMAND counter. The Boer player marks his out-of-com-
mand units at the end of the command phase. III.11 Out-of-command brigade units move first in the brigade activation towards their own brigadier until they enter his command range. Out-of-com-mand army units move in the last activation of the player, in the direction of any of their own, previ-ously selected commanders and until the entry into his command range. Out-of-command Boer units are activated at the end of the Boer player last activation. Out-of-command units do not have to move. III.12 Routed units, even out-of-command, may move freely outside the command range of their own com-mander.III.13 When the activation of a brigade ends, the player removes the OUT-OF-COMMAND markers from its units.4. Types of orders.III.14 British player orders. The British player may issue the following orders: 1) Attack: The brigade commander, during the turn, must move along the action vector towards the designated map edge, minimum one hex and maximum the number of hexes that he has MPs, but no more than the given number of hexes. Units subordinated to the com-mander may initiate melee, counterattack, charge, countercharge, fire combat, reorganize and move.2) Defense: The brigade commander cannot move from the oc-cupied hex. Units subordinated to the commander may not initiate melee or charge, but may counterat-tack, countercharge, shoot, reorganize and move. Bri-
to surprise his opponent or force him to move without the knowledge of who will be activated.II.7 An active brigade may perform actions in the fol-lowing order:1) The player may try to change the order/vector of the commander – if he succeeds, on a commander in-dependence check, he immediately changes the order on the command chart - the new order automatically obliges the commander. If he fails, he must comply with the previous order.2) the British player indicates out-of-command units and commanders.3) The player may move brigade commander and his units (move, fire, initiate melee attacks, recover the full efficiency combat level and morale points) - the enemy may react by firing. The opponent may also initiate counterattacks.4) Attacks, counterattacks and countercharges are re-solved immediately during the active player move-ment. The passive player may try to withdraw before the melee.II.8 In a given turn, a brigade may be activated only once.II.9 After all activations are complete, the reorganiza-tion phase occurs, which is common for both players. During the phase the players may rally routed units.II.10 After the reorganizations are finished, move the turn marker on the next box on the turn track. A new turn begins and players repeat the procedure described in II.3.II.11 The game ends with the completion of the last turn of the game or at the time indicated by the de-scription of the scenario (automatic victory).
Chapter IIICOMMAND
1. The chain of command.III.1 There are two command levels in the game:1) C-in-C level – the C-in-C is represented by a sepa-rate counter. His role is to give orders to his subordi-nate brigades.2) Brigade level – the brigade commander has to implement commands received from his C-in-C, or change them on his own, to adapt to the changing tactical situation. Activations in the game are based on this level.III.2 Boer troops are subject to special command rules. Each Boer commander can lead any number of units, provided they are located within his command range. Additionally, Piet Cronje is the Commander-in-Chief of the Boer army, but moves in its own acti-vation phase.
Boer units that moved in the activation of one of the commanders must be covered with a STOP counter when they enter the command range of another Boer com-mander that has not yet been activated.
Remove the counter in the reorganization phase in a given turn. III.3 British army units (not subordinate to any bri-gade) may be led by any brigade commander. III.4 Commander movement. Every commander has 10 Movement Points (MP) and pays 1 MP for every hex it moves onto.

STRATEGEMATA Battle of Magersfontein 11 XII 1899
5
the occupied hex.2) Defense:The brigade commander cannot – without changing the order – move from the occupied hex.III.20 The Attack order is marked on the command diagram by writing the kind of order, action vector and the distance. After the commander moves, enter the appropriate number of hexes remaining to move (subtract the number of hexes moved).III.21 When the number of hexes left to go comes down to zero, the commander automatically stops and is given the Defense order.III.22 The commander must move to the map edge on the shortest possible way, free of enemy com-manders and units. The momentary inability to move the commander on the action vector caused by ene-my units standing in the way does not mean an auto-matic change of order - the commander must resume the march, when it will be possible (the obstacle is removed). III.23 The obligation of movement by the command-er on the action vector does not apply to a situation in which the commander would be forced to cross the hexside or to enter the hex impassable for him. In such a situation the commander must move through the shortest route as possible to hex, from which will be able to continue the march on the prescribed vec-tor. Until the implementation of movement in the di-rection of the prescribed map edge the player does not reduce the amount of hexes to remaining to move by the given commander. 6. Changing orders/action vector/distance.III.24 The brigade commander can change the order for any available. III.25 The Attack order can only be issued in regard of a hex, not currently occupied by the given com-mander. III.26 If in the given brigade more than half of the units (valid at the time of check) are disorganized or routed, its commander may at any time change the order to Defense (without the use of a dispatch rider and a d10 roll). III.27 It is allowed to change the order without changing the action vector/distance, to change the distance without changing the action vector/order, or to change the action vector without changing the order/distance.III.28 The change of the order is immediately marked on the command diagram for the commander. 7. Command range, dispatch riders.III.29 The British C-in-C command range is 3 hexes. III.30 Each Boer commander command range is 4 hexes. That includes Piet Cronje, the Boer C-in-C. III.31 A British brigade commander command range is 3 hexes. III.32 During the command phase the player may change orders of the brigade commander who is in the C-in-C command range, without using the dis-patch rider.
III.33 If the brigade commander is outside the C-in-C command range, the order may be changed only by sending a dispatch rider or using the heliograph.
gade units cannot voluntarily move outside the com-mand range of its commander (this does not apply to routed units).III.15 Boer player orders. The Boer player may issue the following orders: 1) Attack: Rules are the same as for the British players - see above.2) Defense: The commander cannot move from the occupied hex. Units subordinated to the commander may move freely. 5. Action vector, distance.III.16 An action vector is a straight line starting from the hex that contains the brigade commander to the map edge. This line has to lie within the angle de-fined in the command diagram.III.17 The angle defining the action vector is a 60 de-grees angle the arms of which are included in two hexes adjacent to the hex occupied by the commander.
Sketch no. 5 - Orders-Vector-Distance.
1 - The gray dashed lines define the range of possible action vectors including hexes, through which the lines run. To avoid confusion, ac-tion vectors are marked in the command diagram basing on the arrows applied on the game map. Grey arrows show possible action vectors. 2 - Distance specified here with a 2 digit means the number of hexes that the commander must move toward the point of the map to execute the order. 3 - The letter “A” indicates the type of order (here “Attack”). The letter “D” means that the order is “Defense”.
Sketch no. 6 - Dispatch riders changing orders.
III.18 The distance is the number of hexes that the brigade commander has to move towards a point in the map edge designated by the action vector. Play-ers write the distance on the command diagram for the given commander. The hex occupied by the bri-gade commander is not included in the distance to be moved. III.19 The command is recognized as carried out when:1) Attack:The brigade commander moves the given number of hexes according to the action vector. The com-mander is automatically given the Defense order of

STRATEGEMATA Battle of Magersfontein 11 XII 1899
6
infantry can only fight on foot, but may move mount-ed. For simplicity, the mounted infantry counter in mounted formation is described with a column, but the unit moves as if it is in skirmish formation. IV.3 Changing formation. Changing the formation from mounted to foot and vice versa is done by changing the counter with mounted formation for the counter with foot formation and vice versa. Changes must be made so that the combat efficiency level and morale levels corresponded to the values before the change. IV. 4. Changing formation – remaining Movement Points. If you change the formation from mounted to foot, the remaining Movement Points are divided by 2 and rounded down. These are the remaining Movement Points for the unit in foot formation. If you change the formation from foot to mounted, the re-maining Movement Points are multiplied by 2. These are the remaining Movement Points for the unit in mounted formation.IV.5 Changing formation is considered movement for the rules for reactions. IV.6 Boer units marked with a diagonal stripe possess horses. IV.7 At a distance of 4 or more hexes of the enemy, a Boer unit moves as cavalry and it is treated as such in the event of artillery fire. If the Boer unit begins or ends movement 3 hexes or less from an enemy unit, the remainder of Movement Points before crossing such boundary is:- divided by 2, if it is moving towards the enemy,- multiplied by 2, if it is moving from the enemy.
Chapter VCONTROLING TERRAIN AND REACTIONS
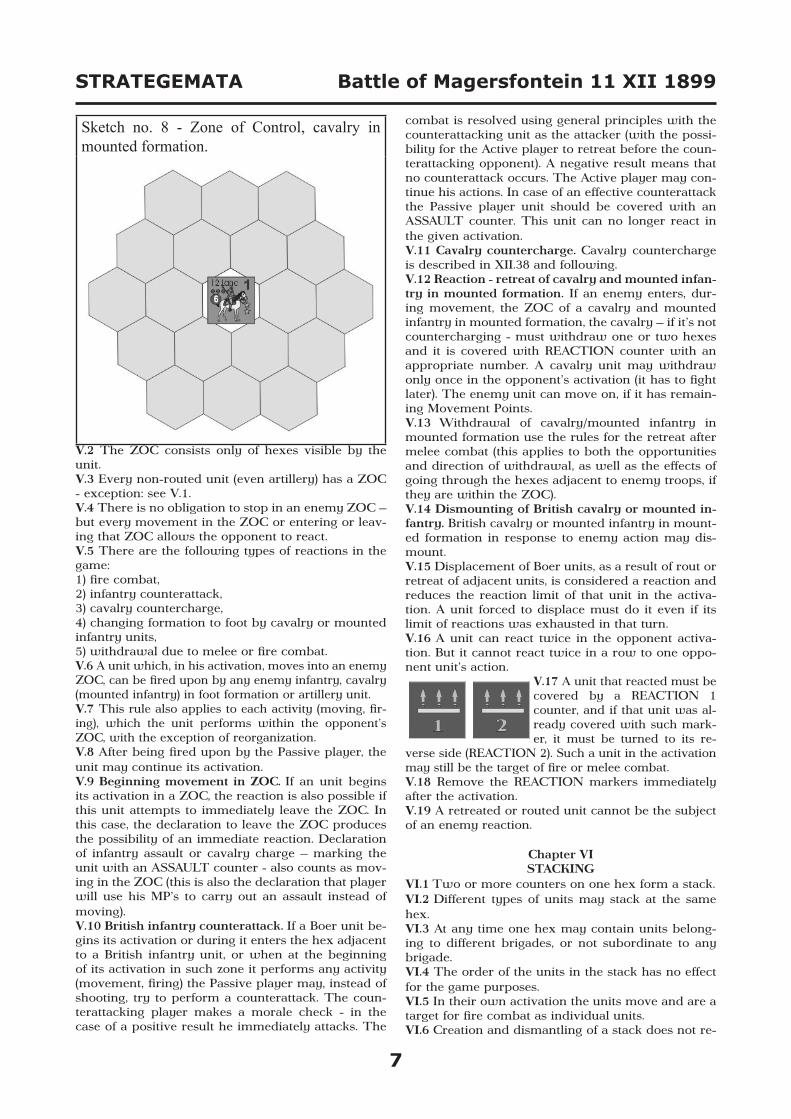
V.1 The infantry and cavalry in foot formation Zone of Control (ZOC) consists of hexes in the range of fire of the unit. Zone of Control of the cavalry in mount-ed formation consists of hexes within a distance of 2 hexes from the unit. Mounted infantry in mounted formation do not have a ZOC.
Sketch no. 7 - Zone of Control of infantry and cavalry in foot formation, shooting range 2 hexes.
III.34 To change the command using a dispatch rider, the player marks on his command diagram, the new order (action vector and distance) and the number of a dispatch rider, who carries the order. Then he moves the dispatch rider 10 hexes towards the brigade com-mander, who is the target of the new order. In the next command phase, the player moves the dispatch rider until he reaches the hex with the target of the order, which is the appropriate brigade commander. III.35 When the dispatch rider reaches its destina-tion, place the counter on the next turn box on the turn track. He is available in the next turn’s com-mand phase. III.36 If the brigade commander is 4 to 10 hexes (5 to 10 for the Boer player) away from the C-in-C, the play-er changes the order on the command diagram, and then places the dispatch rider on the turn track on the turn, when the dispatch rider gets back to the game. III.37 If the brigade commander independently changes his order, the arrival of the dispatch rider automatically changes the order that was carried by the dispatch rider, III.38 The dispatch rider has 10 Movement Points (MP) and pays 1 MP for every hex moved. The dis-patch rider cannot enter a hex containing an enemy unit, and a hex adjacent to it, if it there are no friendly units on it. III.39 If an enemy unit enters the hex with an alone standing dispatch rider, then:a) If the enemy unit is an infantry unit, the active player moves the dispatch rider in either direction by 1 hex (he does so every time even, when the same unit enters a hex adjacent to an alone standing dis-patch rider).b) If the enemy unit is a cavalry unit in mounted for-mation, the active player performs a 1d10 roll. If the result is 0 - 8 - proceed as above. If the result is 9 the active player removes the dispatch rider from the map and places him on the turn track on the box two turns later. In this case, the order transfered is cancelled. III.40 The aforementioned rule should be also ap-plied when a dispatch rider remains alone in a hex due to combat. However, the dispatch rider can re-treat or rout with a friendly unit. III.41 Each C-in-C can transmit orders using a helio-graph. Passing orders through the heliograph requires existing visibility between the C-in-C and the brigade commander. Troops (your own or enemy) do not block visibility. The scenario specifies additional con-ditions for the transfer of orders using the heliograph. III.42 The brigade commander may, at the beginning of his activation, try to change his current order by making a 1d10 roll. A result equal to or lower than the Independence Factor means that the commander can immediately change the order. A higher result means that no change occurs and the commander has to carry out his current order.
Chapter IVBRITISH CAVALRY AND MOUNTED INFANTRY.
BOER COMMANDOSIV.1 British cavalry. British cavalry units can fight both mounted or on foot. IV.2 British Mounted Infantry (MI). British mounted
STRATEGEMATA Battle of Magersfontein 11 XII 1899
7
combat is resolved using general principles with the counterattacking unit as the attacker (with the possi-bility for the Active player to retreat before the coun-terattacking opponent). A negative result means that no counterattack occurs. The Active player may con-tinue his actions. In case of an effective counterattack the Passive player unit should be covered with an ASSAULT counter. This unit can no longer react in the given activation. V.11 Cavalry countercharge. Cavalry countercharge is described in XII.38 and following.V.12 Reaction - retreat of cavalry and mounted infan-try in mounted formation. If an enemy enters, dur-ing movement, the ZOC of a cavalry and mounted infantry in mounted formation, the cavalry – if it’s not countercharging - must withdraw one or two hexes and it is covered with REACTION counter with an appropriate number. A cavalry unit may withdraw only once in the opponent’s activation (it has to fight later). The enemy unit can move on, if it has remain-ing Movement Points.V.13 Withdrawal of cavalry/mounted infantry in mounted formation use the rules for the retreat after melee combat (this applies to both the opportunities and direction of withdrawal, as well as the effects of going through the hexes adjacent to enemy troops, if they are within the ZOC). V.14 Dismounting of British cavalry or mounted in-fantry. British cavalry or mounted infantry in mount-ed formation in response to enemy action may dis-mount. V.15 Displacement of Boer units, as a result of rout or retreat of adjacent units, is considered a reaction and reduces the reaction limit of that unit in the activa-tion. A unit forced to displace must do it even if its limit of reactions was exhausted in that turn. V.16 A unit can react twice in the opponent activa-tion. But it cannot react twice in a row to one oppo-nent unit’s action.
V.17 A unit that reacted must be covered by a REACTION 1 counter, and if that unit was al-ready covered with such mark-er, it must be turned to its re-
verse side (REACTION 2). Such a unit in the activation may still be the target of fire or melee combat. V.18 Remove the REACTION markers immediately after the activation. V.19 A retreated or routed unit cannot be the subject of an enemy reaction.
Chapter VISTACKING
VI.1 Two or more counters on one hex form a stack. VI.2 Different types of units may stack at the same hex. VI.3 At any time one hex may contain units belong-ing to different brigades, or not subordinate to any brigade. VI.4 The order of the units in the stack has no effect for the game purposes. VI.5 In their own activation the units move and are a target for fire combat as individual units. VI.6 Creation and dismantling of a stack does not re-
Sketch no. 8 - Zone of Control, cavalry in mounted formation.
V.2 The ZOC consists only of hexes visible by the unit.V.3 Every non-routed unit (even artillery) has a ZOC - exception: see V.1.V.4 There is no obligation to stop in an enemy ZOC – but every movement in the ZOC or entering or leav-ing that ZOC allows the opponent to react. V.5 There are the following types of reactions in the game:1) fire combat,2) infantry counterattack,3) cavalry countercharge,4) changing formation to foot by cavalry or mounted infantry units,5) withdrawal due to melee or fire combat.V.6 A unit which, in his activation, moves into an enemy ZOC, can be fired upon by any enemy infantry, cavalry (mounted infantry) in foot formation or artillery unit. V.7 This rule also applies to each activity (moving, fir-ing), which the unit performs within the opponent’s ZOC, with the exception of reorganization. V.8 After being fired upon by the Passive player, the unit may continue its activation. V.9 Beginning movement in ZOC. If an unit begins its activation in a ZOC, the reaction is also possible if this unit attempts to immediately leave the ZOC. In this case, the declaration to leave the ZOC produces the possibility of an immediate reaction. Declaration of infantry assault or cavalry charge – marking the unit with an ASSAULT counter - also counts as mov-ing in the ZOC (this is also the declaration that player will use his MP’s to carry out an assault instead of moving). V.10 British infantry counterattack. If a Boer unit be-gins its activation or during it enters the hex adjacent to a British infantry unit, or when at the beginning of its activation in such zone it performs any activity (movement, firing) the Passive player may, instead of shooting, try to perform a counterattack. The coun-terattacking player makes a morale check - in the case of a positive result he immediately attacks. The

STRATEGEMATA Battle of Magersfontein 11 XII 1899
8
pending on the type and current formation – is de-scribed in the TERRAIN EFFECTS CHART.
Chapter VIIIVISIBILITY
VIII.1 A Line of Sight (LoS) is used to determine whether an infantry or artillery unit can fire at an enemy unit and whether the cavalry unit can make a charge (whether the hex is in the unit’s ZOC), or if a commander can issue an order using a heliograph. VIII.2 The Line of Sight is a stretch, which begins in the middle of the hex with a commander or a unit, and ends in the middle of the hex you want to see. VIII.3 Visibility exists when there is no object that could block the Line of Sight. VIII.4 Visibility does not exist when:1) A hex on the LoS is higher than the hex occupied by the viewer and the target.2) A hex on the LoS includes a scrub, farm, or a dam, and neither the viewer nor the target is above the ter-rain blocking the visibility.3) A hex on the LoS includes a unit friendly or enemy. Exception: both players units do not block visibility for artillery.4) If the viewer is higher than the target and higher than the hex blocking visibility, and the object block-ing the visibility is closer to the target (including the hex occupied by the target).5) If the viewer is lower than the target and lower than the hex blocking visibility, and the object block-ing the visibility is closer to the viewer (including the hex occupied by the viewer).6) The unit is located in a basin - the unit is visible only from the adjacent hex, and its vision also ex-tends only to adjacent hexes.VIII.5 Visibility does not exist if there is difference in levels between the viewer and the target and hex containing the edge level is:1) closer to the viewer if he is lower,2) closer to the target if he is higher.VIII.6 If the difference in levels between the viewer and the target is higher than 1, when checking vis-ibility for each additional level, “move” the hex con-taining an obstacle by one. “Move” toward the target, if the viewer is lower, or toward the viewer, if the target is higher. VIII.7 To check whether the LoS exist compare only the distance in hexes between the viewer and hex blocking visibility and visibility between the hex blocking and the target. In any case, do not take into account the hex occupied by an object blocking vis-ibility. VIII.8 Visibility exists, if the LoS runs right through the edge of the hex that blocks visibility. VIII.9 You can always shoot or charge the hex block-ing the visibility, if it is visible. VIII.10 You can always shoot or charge from the hex blocking the visibility. VIII.11 Auxiliary rule. If in doubt, the players must settle for themselves, if in this case visibility exists or not.
quire extra Movement Points. VI.7 At the end of an activation there can be up to 3 friendly units on the same hex. Do not count com-manders and dispatch riders to this limit. Six (inclu-sive) Boer artillery units are considered as 1 unit for stacking purposes. If, after combat, at any point in the game, there will be more than 3 units on one hex, each unit loses 1 additional Morale Point. VI.8 Routed units and stack. All units in the stack are routed if at the end of an activation of a brigade one of the units in the stack is routed. VI.9 Moving a routed unit through the stack or the stack through a hex containing a routed unit, requires a morale check for non-routed units. The failed check means losing 1 Morale Point for the non-routed units. VI.10 The effects of shooting are subject to the target of fire combat. The effects of melee are always sub-ject to the entire stack. VI.11 A morale check is made by all units in the stack. Exception: bayonet or cavalry charge (but see attack rules on the Boer artillery). VI.12 The melee combat involves all units in the stack (regardless of their location in the stack). Fire combat is performed by all units individually.
Chapter VIIMOVEMENT
VII.1 Each unit has a number of Movement Points (MPs), used for movement, recovering combat effi-ciency levels and Morale Points. During movement the British player initiates and resolves melee attacks. VII.2 The mobility of the units depends on its type (see UNITS FORMATIONS CHART). VII.3 A unit must move hex by hex, spending for each of them an appropriate amount of Movement Points. A unit cannot jump over hexes. A unit cannot save MPs for the next activation or transfer MPs to other unit. Unused MPs in an activation are forfeit. VII.4 Players must always take into account the ter-rain of hex on which the movement occurs, or the edge of the hex, through which a unit takes move-ment. VII.5 During movement, a unit cannot move into the hex if this involves spending a greater amount of MPs than the unit currently has. The rule does not apply to the unit beginning its movement – it can move onto such hex, even if it involves spending more MPs than it currently has and stop there, unless the hex or hexside is impassable for the unit.VII.6 A unit cannot enter a hex impassable for the type and formation in which it is. VII.7 A unit cannot enter a hex occupied by an en-emy unit. VII.8 Units must be moved one by one, it is forbid-den to split the movement (move the first unit, then the second, and then come back to the first). Splitting movement can only be done as a part of reaction – after reacting to the opponent, the unit may still move using the remaining Movement Points. VII.9 An another unit can move only after the previ-ous unit finished its movement. Exception: bayonet/cavalry charge. VII.10 Always move out-of-command units first.VII.11 The influence of terrain on movement - de-

STRATEGEMATA Battle of Magersfontein 11 XII 1899
9
camouflaging them. The Boer player cannot build fortifications, but it can use them placing them at the beginning of the game.
IX.2 The existence of the trenches is marked with a spe-cial auxiliary counter (TRENCHES/HIDE), which at
its back side has a hidden unit indication. IX.3 At the beginning of the game (in the indicated in the scenario moment) the Boer player puts the TRENCHES/HIDE counters on his units with the “concealed” side up. IX.4 Once the Boer unit is detected, the Boer play-er switches the TRENCHES/HIDE counter on the trenches side. IX.5 If the Boer unit is concealed and also in the for-tifications, the modifiers on combat for trenches and concealment accumulates. IX.6 Destroying trenches – British artillery. Only ar-tillery units marked with the morale factor in a tri-angle may destroy the trenches. Author’s Note: This limitation was related to the type of ammunition used by artillery. The destruction of the trenches was only possible using High Explosive ammunition, and that was exclusively used in how-itzers and Royal Navy artillery (improvised naval guns on land carriages).IX.7 The trench is considered to be destroyed, if during artillery bombardment a result marked with an asteriks (*) will be obtained. In this case, the TRENCHES counter should immediately be removed from the unit, in addition to taking into account the loss of unit’s morale. IX.8 Leaving the trench by a Boer unit does not de-stroy the fortifications. British unit entering such hex also does not destroy the trenches. The trenches may also be used by British troops. IX.9 A unit immediately benefits from the trenches, if during its movement it enters a hex containing a TRENCHES counter. Only units within the limit of units per stack may use the trenches. (see VII.7).IX.10 Concealment – basic rules. At the beginning of the game the Boer player can hide all the units lo-cated on the map. IX.11 Concealment affects the accuracy of infantry and artillery fire. Artillery can shoot a concealed Boer unit only when it approaches such a unit at a distance of two hexes. IX.12 Location of the unit is exposed (the unit is ex-posed or the TRENCHES/HIDE counter is reversed on the trenches side) if the unit:1) Moves from the occupied hex.2) Loses at least two morale points during fire combat in one activation.3) It will be attacked with melee and even though one unit of the British player makes a positive first morale check (assault will happen), even if the assault will be lost by the British player.An exposed unit cannot be concealed again.IX.13 A concealed unit, that intends to leave the hex, as the first step removes the HIDE counter. This ac-tion immediately allows the opponent to react. IX.14 A unit is not concealed when it enters a hex with the friendly unit covered with a HIDE counter.
Sketch no. 9 - Visibility and ZOC.
A hex covered with the unit ZOC (seen by the unit)
A hex not controlled by the unit (shooting forbidden) – – no visibility.
Sketch no. 10 - Visibility
1 - No visibility exists between these two units. The hex be-tween them is higher than the hexes they occupy.2 - Visibility exists. Obscuring hex (scrub) is lower than the viewer (artillery) and on top of that it is closer to that unit.3 - No visibility exists between the Boer unit and the British unit in a hex 1323 (British mounted infantry obscures visibil-ity).4 - Visibility exists between artillery (hex 1223) and the Boer unit (hex 1719).5 - Visibility exists. The edge of the hex is indeed exactly in the middle between the two units, but the Boer unit (hex 1519) is as much as 3 levels higher, it means that the edge of the first level (between hexes 1418 and 1518) should be, for the purposes of visibility, “moved” one hex in the direction of the viewer (here it even could be two hexes).6 - No visibility exists. The target is higher, and the edge of the hex is closer to the viewing Boer unit.
Chapter IXTRENCHES AND CONCEALMENT
IX.1 The Boer player can use trenches. The number and arrangement of the trenches are determined in the scenarios. Author’s note: the Boer commandos in advance were preparing trenches with stone parapets, perfectly

STRATEGEMATA Battle of Magersfontein 11 XII 1899
10
X.12 The effects of firing at units in the stack - see VI.10.
Chapter XIARTILLERY FIRE
XI.1 Unless these rules provide otherwise, artillery fire combat uses the same rules as infantry fire combat. XI.2 Artillery units fire in their own activation during movement, or during the activation of the opponent, as a reaction to his actions, using ARTILLERY FIRE CHART.XI.3 Each artillery unit fires separately, even if it is in a stack with other artillery units. XI.4 Firing an artillery salvo in their own activation cost:1) for foot artillery 2 Movement Points,2) for horse artillery 4 Movement Points.XI.5 Artillery firing after movement gets a negative modifier to the die roll. XI.6 During its activation phase an artillery unit can fire any number of salvos, using its own Movement Points.XI.7 As a reaction for the opponent’s movement and fire, an artillery unit can fire a maximum of 2 salvos in an opponent’s activation, but one cannot respond twice for the same activity of one opponent’s unit.XI.8 Modifiers for the distance are set according to the following key - A/B/C/D, where:A: 1-3 hexes awayB: 4-6 hexes awayC: 7-10 hexes awayD: 11 hexes and more away.If the counter does not contain a factor for further field range, this means that it cannot shoot at that distance (it is out of range of fire).XI.9 37mm Maxim-Nordenfelt cannons (POM-POMs). Boer 37 mm Maxim-Nordenfelt automatic cannons (ie. POM-POM - marked as 37/TrStArt) move like artillery, however, they conduct fire using the infan-try fire chart. For each volley the Boer player makes two rolls and both results come into effect. 37 mm guns use infantry fire modifiers. Firing a volley costs 2 Movement Points (same as in the case of foot artillery). XI.10 Maxim-Nordenfelt cannons modifiers for the distance are set according to a different key:A: 1-2 hexes awayB: 3-4 hexes awayC: 5-6 hexes awayD: 7-8 hexes away
Sketch no. 12 – Artillery ZOC and range modifiers.
In this situation, the stack may contain either a con-cealed unit and an exposed one.
Chapter XINFANTRY AND CAVALRY FIRE
X.1 A non-artillery unit can shoot:1) in their own activation, during the movement (at any time, but not after melee combat),2) in the opponent’s activation - as a reaction (see V.6).X.2 Fire combat is performed by individual units. X.3 You can only shoot a target in the unit’s ZOC. X.4 Firing a volley in its own activation does not cost any Movement Points. You can fire twice during the activation, in any of its course, even after spending all Movement Points. After each volley the enemy can react. X.5 As a reaction on enemy movement and fire, the unit may react twice and fire on the enemy, but one unit cannot respond twice for the same activity of one opponent’s unit. X.6 Infantry firing ranges, together with modifiers for range, are shown on the unit counters. X.7 Other modifiers are shown in the INFANTRY AND CAVALRY FIRE MODIFIERS CHART and TER-RAIN EFFECTS ON COMBAT CHART. X.8 Shooting is performed by rolling a 1d10. The re-sult is modified by the modifiers shown in INFAN-TRY AND CAVALRY FIRE MODIFIERS CHART. Then find the result in INFANTRY AND CAVALRY FIRE CHART in the row corresponding to the current morale level of the shooting unit. X.9 Modifiers for fire combat are cumulative. X.10 The results of fire are applied immediately. X.11 The rules for modifiers for distance are shown in the following sketch:
Sketch no. 11 - Fire combat modifiers for non-artillery units.
1 – Boers shoot at British infantryModifiers for fire combat:a) +0 for distanceb) no modifier for terrain (the target is in the open terrain – “veld”)A total modifier to the roll is +0 (with the morale of the shooter “6”).
2 – British infantry shoot at Boers hidden in a copseModifiers for fire combat:a) +2 for distanceb) +2 for copseA total modifier to the roll is +4 (with the morale of the shooter “8”).

STRATEGEMATA Battle of Magersfontein 11 XII 1899
11
Sketch no. 13 – Combined attack
1 – a half-battalion from Argyll and Sutherland Highlanders regiment and a half-battalion from Highland Light Infantry regiment can attack together - before the attack they are on adjacent hexes.2 – a half-battalion from Argyll and Sutherland Highlanders regiment and a half-battalion from Highland Light Infantry regiment cannot attack together - before the attack they are not on adjacent hexes.
XII.10 If the next unit moved by the player does not move on the hex adjacent to the unit that is the target of attack (adjacent to a friendly unit covered with an ASSAULT counter), or if it moves in, but does not declare a desire to participate in a combined attack, previously placed ASSAULT counter is immediately removed and the units covered by it end their activa-tion in this turn. XII.11 A unit (stack) can be attacked only once dur-ing an activation. After the attack, cover it with an ASSAULT counter. XII.12 A unit (stack) can attack only once during an activation (except for the continuation of charge - but not countercharge!). XII.13 In the event of an attack of several units:1) Make a morale check for the whole stack, using the average morale of all units in the stack, rounded down.2) If the attack is carried out from several hexes - each stack separately checks morale (using the av-erage morale in the stack). A negative result means that the stack cannot participate in the attack. Units that passed the morale check must take part in an ongoing attack. You must test the morale for all units covered with an ASSAULT counter - even if the first stack fail the morale check, consecutive stacks must test their morale, and if they pass, they must perform the attack.3) Modifier to morale for force ratio applies to each stack of the attacking player, which has been covered with an ASSAULT counter, combining the Strength of units covered by this counter. The ratio of forces is taken into an account for each of the attacking units, except that we take into account the number of units involved in the combat at the moment. Example: One of the units in the stack has a morale of 5, the second a morale of 6. The average of modifiers
XI.11 Modifiers for the terrain which the target occu-pies are shown in the TERRAIN EFFECTS ON COM-BAT CHART. XI.12 Other modifiers for artillery fire are shown in the ARTILLERY FIRE MODIFIERS CHART. XI.13 The effect of the artillery commander on artil-lery fire - see XIII.3.XI.14 British howitzers (Royal Artillery 62nd howit-zer battery). British howitzers can only fire at an op-ponent which does not move, even if he is not in trenches. They cannot fire at a unit, which declares the intention to move. Author’s note: the British caliber 127 mm (5 in.) how-itzers did not carry shrapnel ammunition, but only high explosive ammo, so shooting at a moving en-emy was much more difficult. For simplicity (not to increase the number of modifiers) a battery of howit-zers can shoot only at not moving units.
Chapter XIIATTACKING WITH COLD STEEL
1) Common rules. XII.1 The game distinguishes infantry melee attacks (British infantry bayonet assaults) and the cavalry charge attacks (British cavalry charges).XII.2 Infantry can attack in their own activation phase and in the activation phase of the opponent, making a counterattack (see V.10).XII.3 Cavalry can attack in their own activation phase and in the activation phase of the opponent, making a countercharge (see XII.38).XII.4 An attack in their own activation is performed during unit’s movement, if the unit, after entering the hex adjacent to the target hex, has enough Movement Points allowing for entering the target hex. This does not mean moving the unit onto the hex with the op-ponent, just the need to have enough MPs, that allow such move.
XII.5 If the unit intends to attack the op-ponent and has enough Movement Points, cover it with an ASSAULT counter. This marker is removed immediately from the active player unit after resolving the at-
tack, and placed on the attacked unit. XII.6 You can attack one hex from a couple of hexes. From one hex you can attack only one hex.XII.7 The procedure of attack follows: - indicating attacking units, - indicating the attacked hex, - checking the results of battles and putting them into effect. XII.8 Attacks are not mandatory. XII.9 Units may attack together only when:1) they are in a stack, or2) they stand on the hexes adjacent to each other - it is possible to attack from several hexes, if all the units are adjacent to each other, or3) on a hex adjacent to the target of the attack there are other units already covered with an ASSAULT counter, and the player, before moving another unit, declares combined attack.

STRATEGEMATA Battle of Magersfontein 11 XII 1899
12
all stacks, means that no attack occurs and we end the combat procedure. If the morale of the Attacker drops to 0 or less, the unit is routed.C) A positive result – see 4.4) Defender morale check phase.A) A positive result – go to phase 5 (Attacker second morale check).B) A negative result means:a) Loss of Morale Points corresponding to the differ-ence between the result and the Morale level before combat.b) If the morale of the Defender drops to 0 or less, the Defender is routed.c) Defender retreats 2 hexes or moves 3 hexes in the case of a rout.d) If the Attacker is a cavalry unit – a failed morale check always means a rout.e) The Attacker pursuit. The infantry moves on the attacked hex, but the cavalry may chase the Defender and can attack another unit.5) Attacker second morale check phase.A) During the second morale check the Attacker must apply an additional “+1” modifier.B) A positive result means losing 1 Morale Point for all Attacker units.C) A negative result means:- Loss of Morale Points corresponding to the differ-ence between the result and the Morale level before combat, but minimum 2 Morale Points.- If the morale of the Attacker drops to 0 or less, the Attacker is routed and flees 3 hexes.XII.20 If the Defender failed his morale check, he is treated as the loser of the combat.XII.21 If the Defender passed his morale check, the Attacker is treated as the loser of the combat (inde-pendently from the Attackers second morale check result).XII.22 If the Attacker lost, he stays on the occupied hexes. XII.23 If the Defender lost, he must retreat or flight. The Attacker is obliged to pursue the Defender at least on the hex vacated by him. Further pursuit may be ex-ecuted according to the rules. XII.24 Melee combat expends all remaining Move-ment Points for the units – the unit finished its activa-tion in the turn. XII.25 Modifiers for melee combat are described in the MELEE COMBAT MODIFIERS CHART.2) Cavalry charge – detailed rules. XII.26 Cavalry units cannot make a combined attack with infantry units. Only cavalry in mounted forma-tion may charge.XII.27 Charges are resolved as infantry melee com-bat, with the following modifications. XII.28 A charge is possible, if at the beginning of movement by the cavalry:1) a LoS exists between the target and the charging unit, and2) the cost of movement is not more than 2 Move-ment Points for each hex, including the hex occupied by the enemy unit, and3) the Boer unit is not hidden.XII.29 Cavalry in mounted formation can enter the hex adjacent to the hex occupied by the enemy only
is 5.5, rounded down to 5.XII.14 To determine the effect on the morale of the force ratio we take into consideration the number of units on the Attacker side and divide it by the number of units on the Defender side, and the result rounded up according to mathematical principles (0.49 or less is rounded down to 0, and 0.5 and greater rounded up to 1). Example: During the first morale check of the Attack-er, take into account all units which declared the at-tack. If some of those units failed to pass the check, in phases B and C of combat only those Attacker units who passed this test are taken into account. In this way, as a result of a failed test the force ratio may change.The British player declares assault with four units in two stacks. The Defender has one unit. When check-ing the result of the first morale check, the player takes into account the 4:1 (four British units vs. one Boer unit). One of the British stacks (2 units) failed the morale check. The Defender checking his morale takes into account the 2:1 force ratio. In the repeated morale check of the attacking units, that fought in this combat, use the 2:1 force ratio.XII.15 Withdrawal before melee. Immediately after declaring an attack (but before the morale check of the attacker) the Boer player may declare to with-draw before the melee. The defender must retreat up to 2 hexes. The attacker can move on using his available Movement Points (the attack does not oc-cur, the opponent retreats). Withdrawal is not a unit’s reaction. XII.16 After withdrawing the defender must perform a morale check – a negative result means the loss of 3 Morale Points. XII.17 Retreat through a hex in an enemy ZOC means +1 modifier to the morale check for each such hex. XII.18 Each unit that was the target of a counterat-tack or a countercharge, or a unit that initiated a me-lee attack, or failed to initiate such an attack, ends its movement in its activation. Cavalry units may how-ever continue their charge – see XII.35. The Passive player unit is covered with an ASSAULT counter, and it cannot be attacked again or fired upon in this Ac-tive player activation. The counter is removed at the end of the Active player activation. Such unit cannot react in this activation. Exception 1: Continuation of charge. Exception 2: A unit can be attacked when a friendly unit, already with an ASSAULT marker, withdraws on the hex with this unit. In such a situation the al-ready covered with an ASSAULT counter unit cannot participate in combat, however, it is subject to its ef-fects.XII.19 Attacks are resolved using the following pro-cedure: 1) British player declares the attack.2) The Defender can shoot the Attacker, if he still has that option as an reaction.3) Attacker first morale check phase.A) The Attacker makes a morale check for each at-tacking stack. If he passes the test, he must attack.B) A negative result – each unit in the stack that failed the check loses 1 Morale Point. A negative result for

STRATEGEMATA Battle of Magersfontein 11 XII 1899
13
the force ratio. If an attack occurs on an alone stand-ing Boer artillery unit, do not take into consideration the force ratio. Individually check each British unit’s morale. Each morale check is additionally modified by ‘-5’, and the Boer unit morale check is additionally modified by ‘+5’. XII.42 In the case, when attacked stack consists of more than one Boer artillery without any non-artil-lery unit, the entire stack checks its morale (not indi-vidual units). The modifier test is always ‘+5’, and ‘-5’ for British units.Example 1: Three British units in a stack attack one Boer artillery unit located in undergrowth. Each Brit-ish unit modifies its morale check by -5 (attack on the alone standing Boer artillery unit) and +3 (attack in the undergrowth). Thus, the British check each unit morale with a -2 modifier. Boer artillery unit checks its morale with a +2 modifier.Example 2 Three British units in a stack attack three Boer artillery unit located in undergrowth. Each Brit-ish unit modifies its morale check with a -2 modifier and the whole Boer stacks checks its morale with a +2 modifier.XII.43 The combat of an alone standing (ie. without any commandos) Boer artillery is resolved according to the general rules (with the aforementioned modi-fications), except that the successful morale check of the Boer artillery means the necessity of its with-drawal from the occupied hex and the loss of 1 Mo-rale Point. In the event of a failed morale check each Boer artillery unit loses 1 Morale Point. XII.44 A successful morale check of a charging cav-alry unit on an alone standing artillery unit means that the artillery is automatically destroyed.
Chapter XIIICOMMANDERS AND COMBAT
XIII.1 If a brigade commander with a morale fac-tor takes part in combat (he is located on one of the hexes from which the attack is carried out, or which are the target of the attack), or he is a part of stack being fired upon, the player increases the morale of his troops by the commander’s modifier. XIII.2 The commander modifier affects melee com-bat and fire results, if the unit with the commander is the target. It does not affect fire results if the unit with the commander is the shooter. XIII.3 The artillery commander modifier is subtract-ed from the die roll for each firing artillery unit locat-ed with the commander, if that commander did not move in this activation and has the DEFENCE order. XIII.4 One combat can be supported only by one commander. XIII.5 If, as a result of melee or fire combat the unit, on which the commander is placed, suffers a loss of Strength Points or Movement Points, the player makes a 1d10 roll. A result of 9 means the loss of the commander. XIII.6 If during the activation, an enemy infantry unit enters the hex adjacent to an alone standing com-mander, move the commander on the nearest unit subordinate to the commander, unless the hex is completely surrounded by enemy units. In such a case the commander is lost. If there are several units
to attack the enemy. XII.30 A cavalry unit which begins its activation with an enemy unit in its ZOC may immediately charge the enemy unit. After the charge declaration, the op-ponent may react. XII.31 Each unit of cavalry in mounted formation, which entered the hex adjacent to enemy unit, must charge, as long as the conditions for its implementa-tion are met. XII.32 Momentum factor. A cavalry unit in combat modifies their morale check result by subtracting their own momentum modifier and then adding the enemy momentum modifier. The momentum factor is used in 4 and 5 combat phases.XII.33 The momentum factor is described with a number of stars on cavalry counters. Example: The momentum of the Attacker ‘2’ (2 stars) and the Defender ‘0’ (no stars) means that the At-tacker has a ’-2’ modifier and the Defender a ‘+2’ modifier. XII.34 The momentum of a commando or an artillery unit is always ‘0’. XII.35 Continuation of charge. A cavalry unit, which forced the enemy to rout (not to retreat!), after pur-suing one hex, has 3 Movement Points - may move freely (the opponent may react) and attack any en-emy unit, including the unit that was just charged. Another charge on a non-routed unit is resolved by standard rules. Continuation of charge is resolved by standard rules. Cavalry units that meet the conditions for the continuation of charge are again covered by a ASSAULT counter. XII.36 Continuation of charge is conducted in a way that, after the first successful charge, the cavalry per-forms pursuit and checks if it continues the charge. Then we resolve other charges and pursuits of other cavalry units (not continuations!) in this activation. Af-ter resolving all charges and pursuits in the activation we resolve continuation of charge and resulting com-bat. So the order is: charge and pursuit of all units in the brigade – then continuation of charge. XII.37 A unit may continue the charge only once in the activation. 3) Countercharge – detailed rules.XII.38 If an enemy unit, in his own activation, begins movement or enters a hex in the ZOC of a cavalry unit in mounted formation, the cavalry may attempt to perform a countercharge. The countercharging player makes a morale check (but does not modify the result by the momentum factor) - in the case of a positive result he moves one hex forward to be ad-jacent to the target. A negative morale check means a loss of 1 Morale Point for each unit that tried to countercharge. XII.39 After a successful morale check of the counter-charging unit a melee combat occurs with the coun-tercharging unit as the Attacker. XII.40 If a countercharging unit fails its morale check, the Active player may continue to move his units or – after a successful morale check – attack the cavalry unit which attempted to countercharge.4) Boer artillery direct combat.XII.41 A Boer artillery unit stacked with a non-artil-lery unit is not taken into account when determining
STRATEGEMATA Battle of Magersfontein 11 XII 1899
14
at an equal distance from the commander, the player chooses a unit on which the commander moves on. Also, in a situation in which the commander is trans-ferred in its own activation, it does not change nei-ther order nor the distance to be moved. XIII.7 If during the activation, an enemy cavalry unit or a commando with horses enters the hex adjacent to an alone standing commander, the player makes a 1d10 roll. A result of 9 means the loss of the com-mander. If the result is 0 - 8 apply the XIII.6 rule. XIII.8 The lost commander is placed on the turn track on an appropriate box two turns forward. XIII.9 If the commander is not eliminated during the combat, he withdraws or routs together with the unit on which he was placed. Pursuit or withdrawal ac-cordingly affect the order (they change the distance) held by the commander. XIII.10 Effects of commander loss.1) Loss of Commander-in-Chief – means the lack of ability to issue orders by the player - until the return of the Commander-in-Chief on the map again the lower level commanders must command themselves only. 2) Loss of a British brigadier -– units subordinate to this commander cannot move and initiate melee combat or counterattack until the return of the com-mander on the map. They can normally fire, and defend, recover morale and combat efficiency levels and reorganize.Loss of a lower level Boer commander means only the lack of a commander.Units that lost their commander, during the activa-tion segment, immediately become out-of-command (cover them with an auxiliary counter) with all the consequences of the lack of command. Boer troops that are within range of another commanders are still in-command. The value of the initiative for the ab-sent commander is always 0.XIII.11 A lost brigade commander appears on the map at the beginning of an appropriate turn, at any of their brigade units. A lost Commander-in-Chief ap-pears on any unit.
Chapter XIV UNITS AFTER COMBAT
1. Loss of Morale and combat efficiency level.XIV.1 Each unit always has one of three possible levels of combat efficiency:- full combat efficiency,- reduced combat efficiency,- routed.
XIV.2 Change of the combat efficiency fol-lows from lowering morale (due to fire or melee combat) or is a result of the reorga-nization of the unit. Changing the level consists of:
- covering the unit with a BROKEN counter or re-moving this counter (reorganization),- turning the unit’s counter on the front side (full com-bat efficiency) or back side (unit with reduced effi-ciency).XIV.3 Loss of Morale Point is the effect of:1) Artillery or infantry fire,2) Melee combat (also failed initiation of melee com-
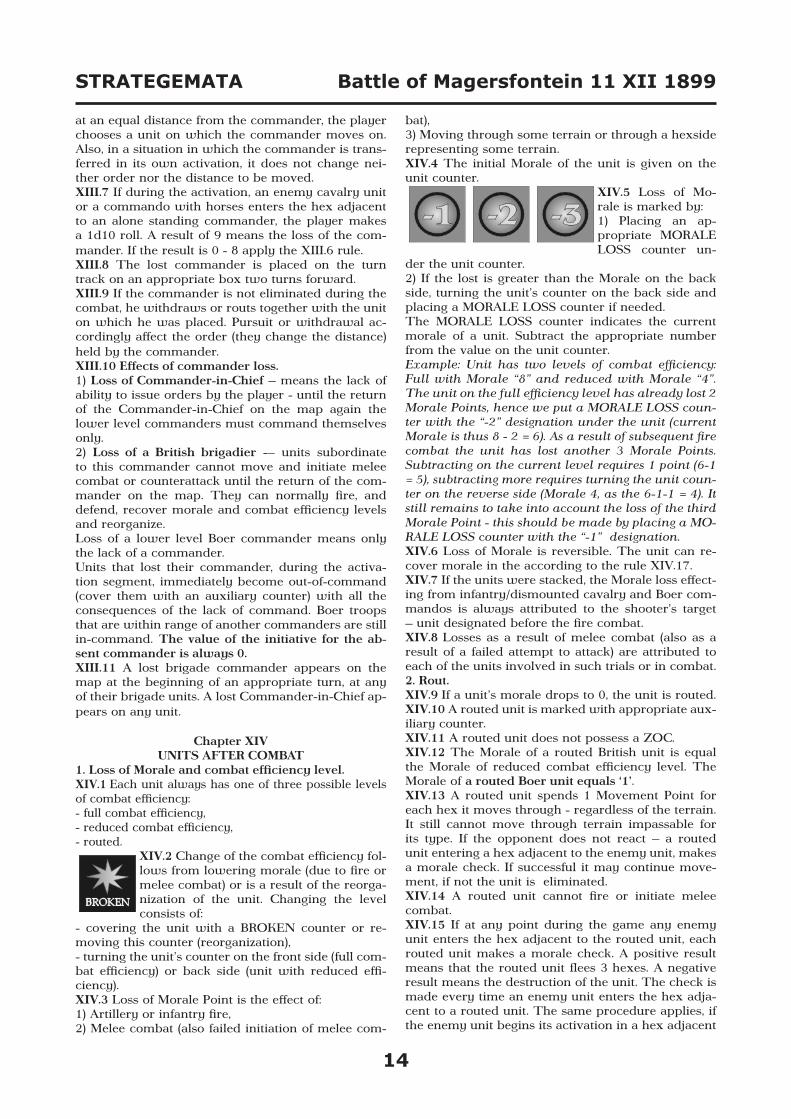
bat),3) Moving through some terrain or through a hexside representing some terrain.XIV.4 The initial Morale of the unit is given on the unit counter.
XIV.5 Loss of Mo-rale is marked by:1) Placing an ap-propriate MORALE LOSS counter un-
der the unit counter.2) If the lost is greater than the Morale on the back side, turning the unit’s counter on the back side and placing a MORALE LOSS counter if needed.The MORALE LOSS counter indicates the current morale of a unit. Subtract the appropriate number from the value on the unit counter.Example: Unit has two levels of combat efficiency: Full with Morale “8” and reduced with Morale “4”. The unit on the full efficiency level has already lost 2 Morale Points, hence we put a MORALE LOSS coun-ter with the “-2” designation under the unit (current Morale is thus 8 - 2 = 6). As a result of subsequent fire combat the unit has lost another 3 Morale Points. Subtracting on the current level requires 1 point (6-1 = 5), subtracting more requires turning the unit coun-ter on the reverse side (Morale 4, as the 6-1-1 = 4). It still remains to take into account the loss of the third Morale Point - this should be made by placing a MO-RALE LOSS counter with the “-1” designation. XIV.6 Loss of Morale is reversible. The unit can re-cover morale in the according to the rule XIV.17.XIV.7 If the units were stacked, the Morale loss effect-ing from infantry/dismounted cavalry and Boer com-mandos is always attributed to the shooter’s target – unit designated before the fire combat.XIV.8 Losses as a result of melee combat (also as a result of a failed attempt to attack) are attributed to each of the units involved in such trials or in combat.2. Rout.XIV.9 If a unit’s morale drops to 0, the unit is routed. XIV.10 A routed unit is marked with appropriate aux-iliary counter. XIV.11 A routed unit does not possess a ZOC. XIV.12 The Morale of a routed British unit is equal the Morale of reduced combat efficiency level. The Morale of a routed Boer unit equals ‘1’. XIV.13 A routed unit spends 1 Movement Point for each hex it moves through - regardless of the terrain. It still cannot move through terrain impassable for its type. If the opponent does not react – a routed unit entering a hex adjacent to the enemy unit, makes a morale check. If successful it may continue move-ment, if not the unit is eliminated. XIV.14 A routed unit cannot fire or initiate melee combat. XIV.15 If at any point during the game any enemy unit enters the hex adjacent to the routed unit, each routed unit makes a morale check. A positive result means that the routed unit flees 3 hexes. A negative result means the destruction of the unit. The check is made every time an enemy unit enters the hex adja-cent to a routed unit. The same procedure applies, if the enemy unit begins its activation in a hex adjacent

STRATEGEMATA Battle of Magersfontein 11 XII 1899
15
to the routed unit.However, if the situation involves a routed unit other than mounted infantry/cavalry or a commando with horses, and an enemy cavalry unit enters the adjacent hex, the routed unit is automatically eliminated.XIV.16 Each routed unit which is fired upon must make a morale check. If the fire combat resulted in losing at least 1 Morale Point. A positive result means that the routed unit flees 3 hexes. A negative result means the destruction of the unit.3. Recovering morale and reorganization.XIV.17 Units recover morale and the full combat ef-ficiency in their own activation, regardless whether they are in-command or out-of-command. XIV.18 Recovering morale by a full combat effec-tive unit. Recovering the initial morale level by a full combat effective unit requires spending all available Movement Points. Enemy units cannot react. Remove the MORALE LOSS counter. Example: An full combat effective unit lost 2 Morale Points. In its own activation, by spending all Move-ment Points, it can recover all the lost Morale Points (remove the MORALE LOSS counter). XIV.19 Recovering of a combat efficiency level – Brit-ish units, Boer artillery, Scandinavian Corps. Recov-ering of a combat efficiency level takes place during the activation phase of the unit. It requires to spend all Movement Points and does not require a morale check. Exception: recovering of a combat efficiency level in a hex adjacent to the enemy. Recovery is pos-sible no matter the degree of Morale loss at a reduced level of combat efficiency. After turning the unit counter on the front side place a -1 MORALE LOSS counter underneath it, so that the current Morale is 1 lower than the initial Morale of a full combat effec-tive unit. Example: A unit has reduced combat efficiency. At the full combat efficiency level the unit has a Mo-rale of “6” and at the level of reduced combat effi-ciency it has Morale of “3” and has a MORALE LOSS counter of “-2”. In its own activation the player turns the counter on the front side, and places a MORALE LOSS counter of “-1” (the unit will have a morale of “5” - one lower than the initial value).XIV.20 Recovering of a combat efficiency level – Boer commandos. To regain a combat efficiency level, a Boer commando has to recover full morale at reduced efficiency first. In the next turn the Boer player may turn the counter on the front side and place a -1 MO-RALE LOSS counter. The Boer unit must spend all his Movement Points each time. Example: A Boer commando has a reduced combat efficiency and a MORALE LOSS of “-2”. In the first turn the Boer player removes the MORALE LOSS counter, in the second, turns the unit counter on the front side and places underneath it a MORALE LOSS counter of “-1” (so that the morale of the unit is 1 less than the initial Morale). In the third turn, the Boer player removes the MORALE LOSS counter. Each time the Boer unit spends all its Movement Points. XIV.21 Recovering of a combat efficiency level in the enemy ZOC. It is possible to recover a combat efficiency level in an enemy ZOC, but each time it requires a Morale check. Exception: The check is not
required if the recovering unit is not visible by the enemy.
XIV.22 Reorganization of a routed unit. A routed unit raises its level to reduced, in the reorganization phase, if:1) at the beginning of the turn (command phase) the BROKEN counter was turned
on the back side (REORGANIZATION),2) during the entire turn it was not attacked or shot at,3) did not move in its activation phase,4) is at least 5 hexes away from any non-routed en-emy unit during the entire turn, or is on a hex not visible for the enemy on the whole turn XIV.23 If, during the turn, the unit ceases to meet the conditions of the Reorganization, turn the REORGA-NIZATION counter to the BROKEN side again. XIV.24 To reorganize the routed unit, it must first pass a morale check. A positive result indicates an increase in the level of combat efficiency to reduced efficiency with a Morale of ‘1’. Example: A reorganized unit has at reduced efficien-cy a morale of “4”. Place a MORALE LOSS counter of ‘-3’ underneath it. XIV.25 Each unit reorganizes with its own morale check. XIV.26 The C-in-C or a brigade commander to whom the routed unit is subject can support reorganization only when the brigade has a DEFENSE order and the commander is standing together with the routed unit. Support of reorganization means adding the com-mander modifier to the current unit’s Morale. XIV.27 Routing of Boer artillery or the Scandina-vian Corps. Routed Boer artillery or the Scandinavian Corps is eliminated from the game. 4. Withdrawal as a result of fire combat. XIV.28 If during shooting in the enemy activation a Passive player unit loses a number of Morale points set out in MANDATORY RETREAT chart, the unit must withdraw 1 hex. The Active player can pur-suit, if he has enough Movement Points. This result is introduced next to mandatory loss of Morale Points. Take into account the initial Morale at the beginning of and activation. Use the rules for retreating. 5. Retreat/Flight.XIV.29 A unit may be forced to retreat or flee as a result of melee combat. XIV.30 A retreat means that the unit must move 1 hex. Fleeing means that the unit must move 3 hexes. XIV.31 Retreat or Flight is performed in a way so that after its completion the unit is away, by the given number of hexes, from all enemy troops, with which the unit fought. If this is not possible, each unit having to retreat is routed and a routed unit is eliminated. XIV.32 Flight is performed regardless of the limit of Movement Points and the cost of moving through a given terrain.XIV.33 It is impossible to flee through enemy troops. Should a friendly unit stood on the route of a flight, the player may retreat or flee through this unit (op-tionally moving one hex more), but he must make a morale check for the friendly unit – a negative re-sult means losing 1 Morale Point for each unit in the stack, through which the retreat or flight happened. XIV.34 It is impossible to retreat through terrain im-
STRATEGEMATA Battle of Magersfontein 11 XII 1899
16
passable for the type of the unit (in the case of cavalry and mounted infantry take into account the effects of terrain on mounted units). If a retreat/flight is not pos-sible, the unit is automatically eliminated. XIV.35 Retreat/flight through hexes adjacent to the enemy. If the unit retreats through the hexes adjacent to enemy units, the retreating player makes a morale check with a ‘+1’ modifier for each such hex (one check, even if the hex is adjacent to several hexes occupied by enemy). A negative result means a loss of 1 Morale Point. It is possible to end the retreat on a hex adjacent to the enemy. If a flight ends in a hex adjacent to enemy unit, the fleeing unit must make a morale check. If it fails, it is eliminated. XIV.36 Retreat of artillery. Artillery forced to retreat losses an additional 1 Morale Point. 6. Pursuit.XIV.37 In the event of a flight or a retreat, the infantry unit that attacked must perform a pursuit on the at-tacked hex.XIV.38 In the event of a flight a cavalry unit in mount-ed formation must enter the hex abandoned by the Defender, and can make a pursuit in any direction using 3 additional Movement Points and perform an-other charge. In case of retreat the pursuit ends on the hex vacated by the Defender and the second charge is impossible.XIV.39 A unit performing a pursuit does not have to stop in the enemy ZOC. Enemy units cannot react.
LITERATURE:1) Anglo Boer War http://www.angloboerwar.com/other-information/16-other-information/1866-british-artillery, 2) Hall D. D.: Guns in South Africa 1899-1902, The South Afri-can Military History Society Vol 2 No 1, http://samilitaryhistory.org/vol021dh.html, 3) History of the war in South Africa 1899-1902, compiled by di-rection of His Majesty’s Government by major-general sir Fred-erick Maurice, K.C.B http://www.gutenberg.org/files/28158/28158-h/28158-h.htm, 4) Leśniewski M.: Wojna burska 1899-1902, Wydawnictwo Nau-kowe Semper, Warsaw 2001 5) Magersfontein, http://www.edmondchissel.com/magersfon-tein, 6) Pakenham Th.: The Boer War, Abacus 2013, 7) The part played by the 2nd Black Watch in the Battle of Mag-ersfontein December 11th 1899, http://www.blackwatch.50megs.com/mags.html
CREDITS:• Rules, scenarios: Sławomir Łukasik.• Map: Sławomir Łukasik.• Icons on the counters: Katarzyna Tretyn-Zečević (http://kt-z.pl) • Graphic counter design: Sławomir Łukasik.• Playtesters: Jacek Czapla, Bartłomiej Gładyszewski, Adam Niechwiej, Wojciech Szast and Sławomir Łukasik• Box design: Sławomir Łukasik.
Editorial support: Piotr Gołdon, PPHU STRATEGY, Wrocław; http://www.strategy.com.pl/.English rules: Bartosz Bruziak
Cover illustration: Adam Niechwiej, Katarzyna Tretyn-Zečević Images of commanders: Wikipedia photos
Contact the Author: [email protected]: http://www.strategemata.pl/Game forum: http://www.wojenne-planszowki.pl - Dział Gry Polskie/Strategemata/II wojna burska
The author encourages everyone to ask questions and is willing to explain all the doubts.
©2015 STRATEGEMATA and Sławomir Łukasik
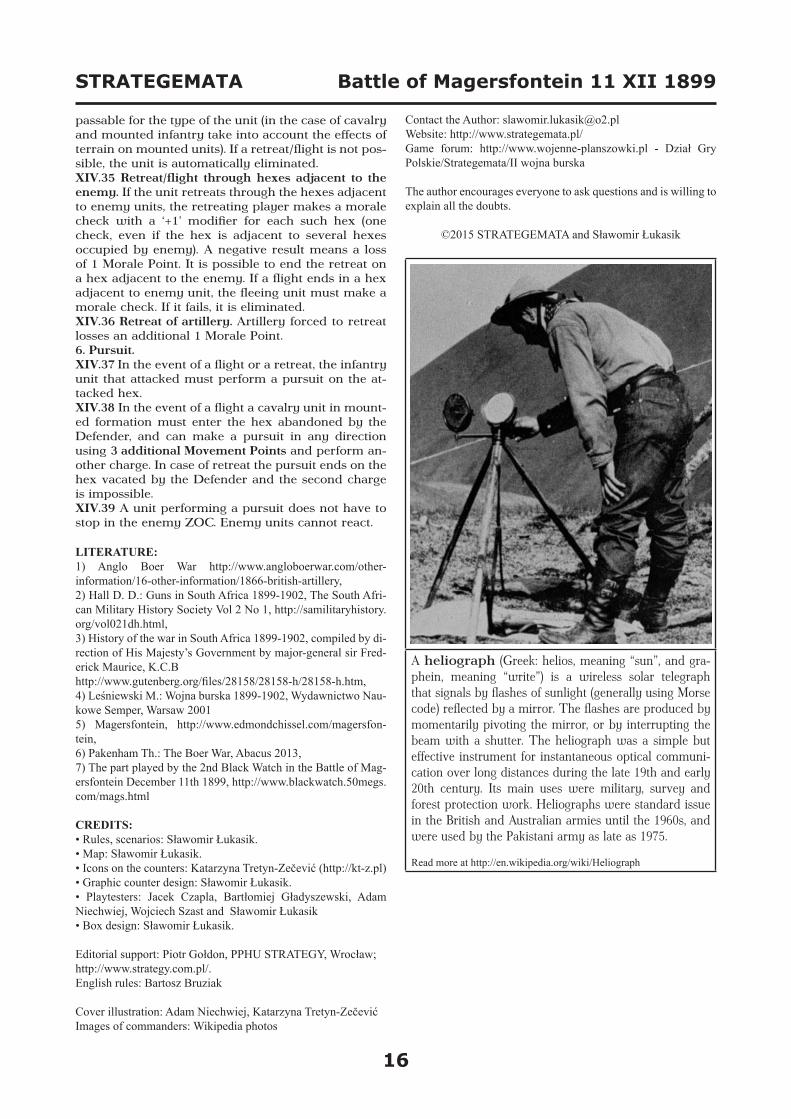
A heliograph (Greek: helios, meaning “sun”, and gra-phein, meaning “write”) is a wireless solar telegraph that signals by flashes of sunlight (generally using Morse code) reflected by a mirror. The flashes are produced by momentarily pivoting the mirror, or by interrupting the beam with a shutter. The heliograph was a simple but effective instrument for instantaneous optical communi-cation over long distances during the late 19th and early 20th century. Its main uses were military, survey and forest protection work. Heliographs were standard issue in the British and Australian armies until the 1960s, and were used by the Pakistani army as late as 1975.
Read more at http://en.wikipedia.org/wiki/Heliograph