featured this month - servo · pdf filefeatured this month: features 26 build report: ......
TRANSCRIPT

Featured This Month:Features26 BUILD REPORT:
Trilobite – a ToughBeetleweight Brick/Wedgeby Pete Smith
29 BUILD REPORT:A Team Building Exerciseby Pete Smith
36 PARTS IS PARTS:Fingertech ‘Silver Spark’Gearmotor Reviewby Thomas Kenney
38 PARTS IS PARTS:Susie’s Saga Continues –The Beginner’s Guideto Motorsby Morgan Berry
40 END OF THE ALKALINESby Pete Smith
41 CARTOON
Events31 Upcoming and Completed
32 EVENT REPORT:Clash of the Bots 2by Pete Smith
33 EVENT REPORT:BOTBLAST RocksColumbia Mallby Dave Graham
26 SERVO 10.2011
Ihave long held the opinion thata good wedge/brick is the best
type of bot for most beginners inthe sport. Too many people try tobuild a complex botwith a weapon beforehaving acquired theexperience andknowledge required tomake one work at all,let alone well. Often,they end up with abot with an ineffectiveor non-functioningweapon on a slowweak chassis. Theresult is usually aboring shoving matchif two such bots meet— or worse — therapid and totaldestruction of thatfirst bot when it meetsone of the moreseasoned teams. Thisexperience is not likelyto encourage them tostay in the sport!
The best first bot is probablyalso the cheapest: hack a RC toy.That’s what my son and I didwhen he wanted his first bot way
Trilobite — a Tough BeetleweightBrick/Wedge
BUILD REPORT:
● by Pete Smith
FIGURE 1.CheepShot damage.
FIGURE 2. XI.
www.servomagazine.com/index.php?/magazine/article/october2011_CombatZone
CombatZone - OCT11.qxd 9/2/2011 10:25 AM Page 26

SERVO 10.2011 27
back in 2003. We built a 12 lbercalled CheepShot (Figure 1). Itnever won a fight but was a “cheep”way to get my son competing, andsoon led to requests for us to buildsomething bigger and better. Thenew bot — a 30 lb class wedge/brickcalled Xhilarating impaX (Figure 2)— was the first robot I fully designedin CAD, and our first reallysuccessful design.
Eight years later, we havemoved on to having only weaponedbots like Surgical Strike and Weta,God of Ugly Things, but those earlybots were essential in making thesteep learning curve in the hobbyjust a little smoother. I havedesigned and produced a range ofweaponed bot kits over the last fewyears, but I felt an easier entry pointto the sport was required: a 3 lbBeetleweight wedge/brick.
Brick/wedge bots are oftenaccused of being boring, but thatneed not be the case. The first stepin avoiding boredom is speed. Aweaponless bot needs to be fast.There are two reasons for this.Firstly, slow is boring and since youhave no weapon, you need to showaggression and take the fight to theopponent. If neither bot suffers
much damage in the bout then youare more likely to win the judge’sdecision.
The second requirement istoughness. You need to be ableto take the biggest hits and (notonly keep working) show littlevisible damage. When a weaponblade strikes your bot, it applies anequal force on the bot that’s doingthe hitting. That’s Newton’s ThirdLaw: For every action, there is anequal and opposite reaction. Youcan use that to your advantagebut only if you can survive the hitsyourself.
The third requirement is power.The best way to stop a weaponedbot is to push it into the arena wall,so your bot needs to have morepower and traction than youropponent. You have the advantagein not having to put so much weightinto a weapon system, so some cango towards a more powerful drive,and one that drives more wheels incontact with the ground.
The UHMW wall and 7075aluminum panel design in Weta hadproved so solid that I used the samestructure in the new design (Figure3 and Figure 4). Designed usingSolidWorks, two 3/8” thick UHMW
walls would run the full length ofthe bot; these would be the majorload bearing members. I decided touse the same 1,000 RPM motorsthat I use in Weta and mount themthe same way. To keep the overallbot size down, I went with 2.25”wheels and planned to use 4S LiPoto keep the speed up despite thesmaller wheels (Weta uses 3” wheelsand 3S).
The wheel base was keptreasonably long since that helps thebot drive in a straight line and makesit easier to control. Too short awheelbase makes a bot very tricky todrive fast. Too long and it can maketurning on the spot hard on themotors and speed controllers — if itcan turn at all.
The rear wheels are exposed atthe back so that they will still makecontact even if the nose of the bot islifted up. This is useful if you aregetting pushed by another wedge;you can still reverse quickly and turnaside to avoid the other bot. Myprevious wedge designs likeXhilarating impaX and CheepShot3.0 both had the wheels fullyprotected, but were very vulnerableagainst wedges since once the nosewas lifted up even a few degrees,
FIGURE 3. Beetlebrick design,
front iso.
FIGURE 4. Beetlebrick design,
rear iso.
FIGURE 5. Routing out side panels.
FIGURE 6.Trial build
of Trilobitechassis,less the
top.
FIGURE 7.Completechassis.
FIGURE 8. Trilobitechassis with motorsadded.
CombatZone - OCT11.qxd 9/2/2011 10:26 AM Page 27

28 SERVO 10.2011
the bot wheels lost contact with theground and the bot was easilypushed about.
The UHMW and 1/16” thick7075 panels are joined togetherusing mini nutstrip and 6-32 screws,plus a few #6 x 1/2” Plastite screwsare used between the bottom andthe UHMW walls.
The top and bottom are thesame panels that are on the frontand rear bulkheads.
The top and bottom extend outpast the wheels on either side sothat 1/8” UHMW side armor canprotect the wheels. This thicknesshad proved effective in Weta, so itshould prove adequate for thisapplication.
Two holes in the main UHMWwalls are used for locating a 1/4”bar than will be used as the pivot forthe front movable wedge.The thickness of the UHMW andtitanium bar should prevent thishinge from being a weak point inthe design.
I kept track of the weight ofeach part in an Excel spreadsheet.This is important because it’s tooeasy to get your bot almost
complete and find yourselfoverweight. Better to get it rightfrom the start.
SolidWorks will work out theweight for you if you input thematerial’s density, and it’sworthwhile investing in an accurateelectronic scale to weigh the otherparts. If your budget does not allowfor buying a scale, you can usuallyfind one at your neighborhood postoffice or UPS agent. Ask politely at aquiet time and they are usually quitehappy to let you use theirs.
Once I was happy with the design,I made dxf files of the aluminumpanel and UHMW parts, and had aset of panels and templates water-cutby www.teamwyhachi.com.
They arrived within a week, andI set the templates up and routedout several sets of UHMW parts(Figure 5).
I had previously made all therequired sections of nutstrip, cuttingthem to length on a chopsaw andthen trimming to size on my mill.Putting all the chassis together fora trial build took only a matter ofminutes (Figure 6). A cordlessscrewdriver comes in very handyhere as there are a lot of screws!
Once all the panels are together,the holes for the Plastite screws canbe drilled using the holes in thealuminum top and bottom panels asguides (Figure 7). The result is aremarkably strong and rigid chassis.
Stripping the chassis back down,I could then fit the drivemotors(Figure 8); each motor was securedin place using my standard“1000RPMMNT” mounting plates(Figure 9). Standard 4 mm “DaveHubs” and 2.25” inch Liteflitewheels (Figure 10) — all fromwww.robotmarketplace.com —were added and the side armorrefitted (Figures 11 and 12).
I originally intended to use oneESC per motor but when two ofthe four ESCs died shortly afterinstallation and with time running outbefore the next event, I changed tousing one of Banebots BB-12-45 perside with the two motors running inparallel. I had the ESCs prewired foruse in Surgical Strike, so there was alot of extra wire and weight over thefour smaller ESCs but I had enoughto spare for that. A standard BR6000receiver (I mix for tank steering inthe DX6 transmitter) and aThunderpower 850 mAh 3S LiPocompleted the wiring, and the botwas ready for its first drive.
Performance — even on 3S —was excellent, certainly fast enoughfor the smaller arenas, and the botwas easy to drive.
I used a holesaw to cut a largehole in the top panel to allow accessto the battery connection, so thiscould be used to power the bot upfor a fight. A strip of duct tape isused to keep the electronics in
FIGURE 9.Mounting the
motors.
FIGURE 12. First chassis assembly withmotors, top front.
FIGURE 13. Trilobitecomplete for Schiele.
FIGURE 10.Dave’s hubsand Liteflite
tires forTrilobite.
FIGURE 11. First chassis assemblywith motors, side view.
CombatZone - OCT11.qxd 9/2/2011 10:27 AM Page 28

SERVO 10.2011 29
My Kitbots bot hockey team“Team Scotch Pies” had
competed in one event andtaken part in a couple ofdemonstrations, but the bots wereretasked for a summer camp andwere less than ideal. The bots werefour wheel drive, but only used twocordless drill motors and they onlyweighed 8 lbs each (rather than theallowed 15 lbs). It was clear whenthey first met other custom-builthockey bots that they were simplyoutclassed.
A planned demonstration at theDurham Museum of Life and Sciencein March ‘11 gave me the impetusneeded to build a new fleet ofcompetitive bots.
To save time, I used as manystandard Kitbotsparts and familiarprocesses as I could.The finished design(Figure 1) usestemplate routedpolycarbonate panelsjoined to togetherwith my 3/8” nutstripand four 18V cordlessdrill motors in thebudget motor mounts, plus 3”Colsons with the standard hubs. Thetop and bottom are identical as arethe two sides and the front and rearpanels. This reduced the number oftemplates required and the work
setting each one up. The top andbottom are 1/4” thick while thesides are 3/8”.
The watercut templateswere ordered from www.teamwhyachi.com and once they
and shrapnel out.There was only one day left
before the bots debut at the SchieleMuseum back in July, so I quicklyput together a wedge using twochunks of 1/2” nutstrip, someUHMW, and a sheet of 1/16” 7075aluminum. This was attached to thebot using a short length of 1/4”titanium rod. This was a tight fit inthe holes and I thought it would
hold up alright, but combat was toprove otherwise. The bot — nownamed Trilobite — was ready to go(Figure 13).
The bot performed reasonablywell at the event. The wedge provedmore a hindrance than a help as itkept getting stuck under thebumpers and the axle came loose.The bot was thrown about by bothWeta and Grande Tambor but it
suffered no more than a fewscratches, A better wedge and somesnowplow type attachments areneeded, but I think it will performwell at its first big test at theFranklin Museum in October.
Kits of the chassis will beavailable from www.kitbots.comby the time you read this. I hopethey help newbies get a good startin the sport. SV
A Team Building Exercise
BUILD REP RT:
FIGURE 1. Bothockey CAD.
FIGURE 2. Routingout the bot hockeytop panel.
FIGURE 3. Routingout the bot hockeyside and front rearpanels.
● by Pete Smith
CombatZone - OCT11.qxd 9/2/2011 10:28 AM Page 29

30 SERVO 10.2011
arrived, I set them up prettymuch as I described in an article inthe March ‘10 issue of SERVO. Icould quickly produce multiplecopies of the top (Figure 2) and sidepanels (Figure 3). I foundthat it is necessary to cut thepolycarbonate blanks close to thecorrect size with a jigsaw beforerouting to the final profile. If you tryto route the full width of the cutter,it proves too much for the guidingbearing and it quickly fails. All therequired screw holes are also in thetemplates, so they are drilled beforethe part is removed.
A bot hockey (www.bothockey.com) team consists of onlythree bots, but it is wise to haveat least four so that you can swapout any bots that developproblems. The routing processallows one to mass-produce theparts easily, so making four botsis not that much more work thanbuilding a one-off design.
Sections of 3.8” nutstrip werecut off using a chopsaw and thentrimmed to length using my mill(Figure 4). One can use a file tosmooth each end or even leavethem rough, but the mill makesquick work of it, especially when somany parts are required. The screw
holes in the bottom panel werecountersunk and then the chassisassembled (Figure 5) using Phillipshead screws that have a lockingpatch (similar to McMaster part96562A245) to ensure they do notvibrate loose.
Similar templates were used toproduce the 32 separate motormounting blocks which are used tofit the modified cordless drill motorsand wheels. The parts required toproduce just one drive assembly canbe seen in Figure 6 and theassemblies required for just one botin Figure 7.
The drive assemblies are fittedto the baseplate (Figure 8) usingfour #10 Plastite screws, but onecan use #10 sheet metal screwsinstead if the Plastite ones provehard to find. The design allows themto be quickly replaced in the eventof a failure since only very minimaldisassembly is required, and eachdrive can be removed and replacedas a complete unit. The old botswould require at least 10 minutes’work to do what can be done in twoin the new design. Reducingcomplexity also reduces theopportunity for mistakes to be madeand this can be important in acompetition environment.
I fitted Team Whyachi MS05power on/off switches to each bot(Figure 9) so that they can easily bepowered up and down withoutremoving the covers. Since a specialtool is required to operate them, itprevents unauthorized power-ups.This is useful at events where thereare a lot of kids, some of whom —like me at that age — have difficultystopping themselves from touchingbuttons!
Three of the bots were fittedwith the latest Scorpion XXL ESCsfrom www.robotpower.com (onthe left in Figure 10) and two 6SA123 battery packs in parallel. Thefourth uses a pair of Victor 833s Ihad left over from our old 30 lbcombat bot, together with 24Vpacks I assembled using thebatteries from the dismantledcordless drills. These are muchbigger and heavier than the A123packs and have only half thecapacity and twice the charge time,but since I was able to have threecomplete sets, this was not an issue.I found the two packs (about 2,400mAH combined) lasted just longenough for the 10 minute matcheswithout a noticeable drop inperformance. The 24V does give aslight speed advantage over the
FIGURE 4. Nutstripgetting cleaned up.
FIGURE 5.Chassis of bot
hockey assembled.
FIGURE 6. Drivetraincomponents for bot
hockey bot.
FIGURE 7. Four completeddrivemotors for bot hockey.
FIGU
RE 8. D
rivemotors
installed in bot hockey bot. FIGURE 9. Main powerswitch fitted to bothockey chassis.
CombatZone - OCT11.qxd 9/6/2011 10:09 AM Page 30

19.8V of the A123s, but their poorercurrent sourcing ability makes thema pretty close match.
I also added a pair of colorcoded 10 mm LED “eyes” to thefront of each bot so that it’s easierto identify your bot in a melee (andbecause it just looks cool!). A 1K
ohm resistor in series with each LEDensures good light output but also along life at the voltages used in thebots.
The new team had its first realtrial at the Schiele Museum Event inJuly ‘11 and they proved equal tothe task. With a good driver, the
bots proved to be more than amatch for the competition and theycan be seen a little tired but happywith their first place trophy in Figure 11.
Further events are in the planningstages and perhaps include a trip toRoboGames next year. SV
Completed Events forJuly-August 2011
Gulf Coast Robot Sports-8 waspresented by Gulf Coast
Robot Sports in Bradenton, FL onAugust 6th.
Schiele Museum Clash Of TheBots 2 was presented by Carolina
Combat Robots in Gastonia, NC onJuly 23rd.
PA Bot Blast2011 was
presented byD.W. Robots inBloomsburg, PA on July 16th.
Upcoming Events forOctober-November2011
Franklin Institute 2011 will bepresented by the North East
Robotics Club in Philadelphia, PA onOctober 15th. Go to www.nerc.usfor more information.
ComBots Cup VI will be presentedby ComBots in San Mateo, CA
on October 29-30. Go to
http://robogames.net/registration/event/view/11 for moreinformation.
Mecha-Mayhem 2011 will bepresented by the Chicago
Robotic Combat Association inRosemont, IL on October 22-23. Goto www.thecrca.org for moreinformation. SV
EVENTSCompleted and Upcoming Events
SERVO 10.2011 31
FIGURE 10. Internal layout withScorpion XXL or Victors.
FIGURE 11. TeamScotch Pies with trophy.
CombatZone - OCT11.qxd 9/2/2011 10:31 AM Page 31

32 SERVO 10.2011
The Schiele Museum(www.schielemuseum.org) in
Gastonia, NC held their second“Clash of the Bots” open day onSaturday, July 23rd. CarolinaCombat (www.carolinacombat.com) organized a BotHockey and Insect Class combatevent as the main attraction.
The combat event had two Fairyweights, four Ants, and five Beetlesentered, and three teams competedin Bot Hockey.
The venue is almost perfect.There was enough space for boththe Bot Hockey and combat arenas,plus the pits in the main room.There was a separate space forcharging LiPos and a rec roomwhere the museum provided snacks,drinks, and lunch for thecompetitors.
The combat fights were roundrobin and there were some great
matches including Weta versusMisdirected Aggression, andperhaps the best fight of all,Misdirected Aggression versusGrande Tambor (Figure 1). Thefights drew standing room onlycrowds (Figure 2) and many can beseen on YouTube by searching“Clash of the Bots.”
The Bot Hockey was much morecompetitive this year with TeamScotch Pies fielding new custom-built bots (Figure 3), last year’swinners Team Pneusance, and anew entry for this year — TeamMeatheads (Figure 4) — with twocustom bot hockey bots andHobbyweight combat bot Apollyon.Team Meatheads bots proved fastand powerful in their matches(Figures 5 and 6) but lacked thebattery life and spare bots of theother teams, so while they held theirown for the first half of the 10
minute matches, they quickly fellbehind in the last minutes as theirbots expired.
Team Pneusance and TeamScotch Pies both won three matcheseach and the latter won the tiebreaker to get first place. BotHockey proved to be very popularwith both the competitors and thecrowds, including one kid from theaudience who had played for a teamlast year and waited patiently for
EVENT REPORT:Clash of the B ts 2
● by Pete Smith
FIGURE 1. MisdirectedAggression vs Grande Tambor.
FIGURE 2. Standing room only.
FIGURE 3. Team Scotch Pies ready.
FIGURE 5. Team Meatheadsvs. Team Pneusance.
FIGURE 6. Team Meatheadsvs. Team Scotch Pies. FIGURE 7. Great big trophies.
FIGURE 4. TeamMeatheads ready.
CombatZone - OCT11.qxd 9/2/2011 10:32 AM Page 32

SERVO 10.2011 33
The Columbia Mall inBloomsburg, PA, hosted the
fourth annual BotBlast competitionon July 16th. Top fighting robotenthusiasts from Florida to Michigantook center stage at the mall(Figure 1) and brought 31 of themost destructive Insect class robotsever assembled for a BotBlastcompetition.
Event organizer JeremyCampbell and Team DreadfullyWicked Robots welcomed six 150gram Flea (a.k.a., Fairy) class robots,eight one pound hungry Ant bots,and 12 three pound voraciousBeetles. Campbell made one changeto this year’s competition, deletingthe 12 pound Hobbyweight classand adding the six poundMantisweight class to the venue.The new Mantis class drew fivecompetitors.
The Flea competition featuredsix bots, four with spinningweapons. In first round action, Idrove my bot, Hedgehog (Figure 2),and Team Mateo to a win overJamison Go and his bot, P150(Figure 3). During the match, thetwo Fleas collided and Hedgehogsliced the tire off P150. Hedgehogwent undefeated in the winner’sbracket to the final match, where hefaced teammate Matt Benjamin,
driving Baby V (Figure4). Hedgehog took thegold and also won theFleaweight rumble.
The Antcompetition pittedsome nasty spinnersagainst anoutnumbered group ofwedges. In secondround action, AndyHoffman-Patalona’shorizontal spinner, Box #5 (Figure5), took out Kyle Singer and FangusUltimate (Figure 6) in a close match.Then, Chris Atwood’s wedge botAntelope (Figure 7) sent Box #5 tothe loser’s bracket and moved on tothe Antweight final match.
The loser’s bracket pitted Box#5 against Fangus Ultimate in arematch for a chance to go to thefinal match against Antelope. Thistime, Fangus Ultimate sent Box #5packing, and squared off withAntelope in the final.
The final match was back andforth with lots of sparks as FangusUltimate’s spinning blade worked onAntelope’s steel front end.Eventually, Fangus Ultimate knockeda wheel off of Antelope winning thematch, and forcing a second matchin the double-elimination format.The second match went the
two hours to get his chance againthis time to play and score a goal.
The museum presented whatwere possibly the biggest trophies(Figure 7) ever awarded in robotcombat, and $50 for each firstplace.
The eventreportedly drew560 payingspectators —double from the year before.SV
FIGURE 1. Group shot of the competitors atColumbia Mall.
FIGURE 2. Fleaweightbot Hedgehog.
FIGURE 3.Fleaweight
bot P150.
RESULTS1st Place Fairyweights: Caterpillar1st Place Antweights: Gilbert1st Place Beetleweights: Weta, God of Ugly things1st Place Bot Hockey: Team Scotch Pies
EVENT REPORT:BOTBLAST R cks
Columbia Mall● by Dave Graham
CombatZone - OCT11.qxd 9/2/2011 10:33 AM Page 33

34 SERVO 10.2011
distance as Antelope’s steel frontplate was effective and all FangusUltimate could do was repeatedlyride up on Antelope’s front end(Figure 8). Fangus Ultimate nevergot a “bite” of Antelope and as aresult, the judges gave the nodand the Antweight title toAntelope. Matt Benjamin, drivingteam namesake bot, Mateo, wonthe Ant rumble.
The Beetleweight class definitelyhad the most twists and turns in thestory line. Gene Burbeck of TeamFierce Robots and his creation,One Fierce Lawn Boy (Figure 9),defeated always tough Kyle Singerand his bot Ripto (Figure 10) inthird round action. One Fierce LawnBoy then took out Jamison Go’s bot,Cake (Figure 11), in the fourthround of the winner’s bracket tomake it to the final match.
Cake’s weapon is a spinningsteel drum, and is unique in thatboth the brushless drive motor andthe electronic speed controller arehoused inside the spinning drum.That makes for an effective weapon,as well as some interesting gyrodance moves.
In an interesting turn of events,lone female competitor Moraima
Ortiz, Team Danger Zone, and hercreation Foofie (Figure 12 — notethe matching flowers in her hair),suffered what appeared to be acareer-ending injury at the hands ofCake in first round action, but cameback and made it to the fourthround of the loser’s bracket beforebeing eliminated by Ripto. Along theway, Foofie went up against EvanSteeves and his bot Hexxus (Figure13). Steeves, in a true show ofsportsmanship, decided not tospin-up the weapon on Hexxus forhis match with Foofie, and Foofiepromptly stuck him on the wallwhere Hexxus was counted out bythe judges for no movement! It wasthe upset of the day.
Steeves had a tough day, butwas named BotBlast “Rookie of theYear” by event organizer Campbell.The Beetleweight class also featuredthe event’s youngest competitor —Brandon Young — shown gettingsome help from his dad before amatch (Figure 14).
The final bout in the Beetle
FIGURE 5.Antweightbot Box #5.
FIGURE 6. Antweightbot Fangus Ultimate.
FIGURE 7. Antweightbot Antelope.
FIGURE 9. Beetleweightbot One FierceLawn Boy.
FIGURE 10.Beetleweight bot Ripto.
FIGURE 11.Beetleweight
bot Cake.
FIGURE 12. Moraima Ortiz and herBeetleweight bot Foofie.
FIGURE 8. Antweight bots Fangus Ultimateand Antelope.
FIGURE 4. Fleaweightbot Baby V.
CombatZone - OCT11.qxd 9/2/2011 10:35 AM Page 34
SERVO 10.2011 35
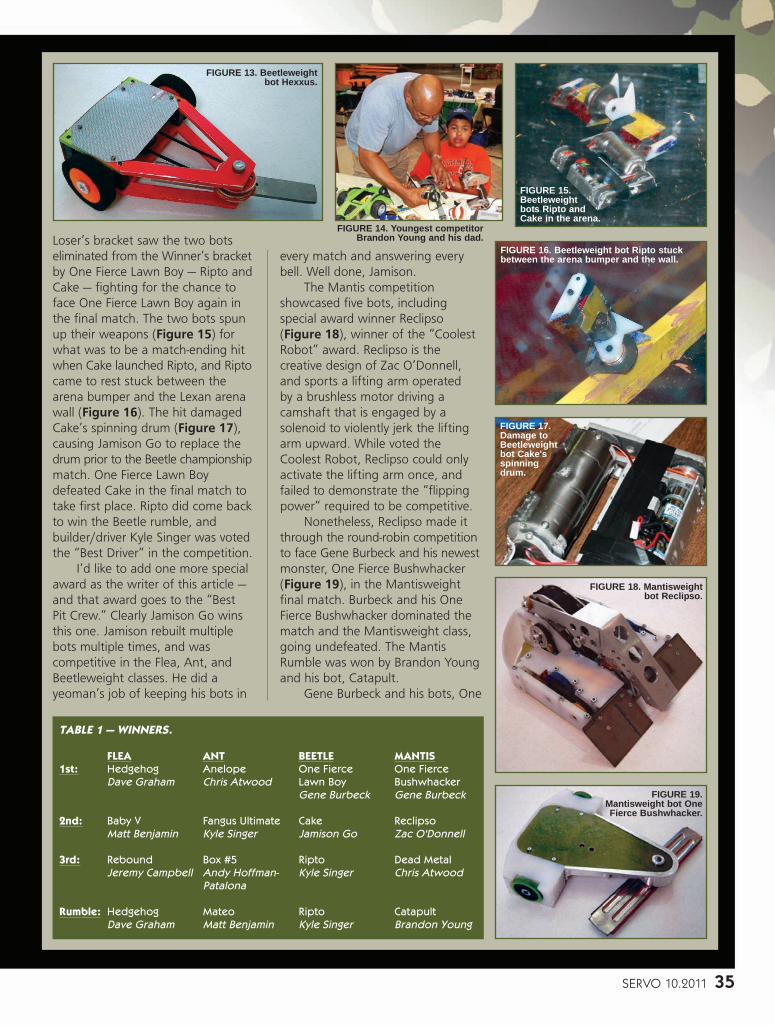
Loser’s bracket saw the two botseliminated from the Winner’s bracketby One Fierce Lawn Boy — Ripto andCake — fighting for the chance toface One Fierce Lawn Boy again inthe final match. The two bots spunup their weapons (Figure 15) forwhat was to be a match-ending hitwhen Cake launched Ripto, and Riptocame to rest stuck between thearena bumper and the Lexan arenawall (Figure 16). The hit damagedCake’s spinning drum (Figure 17),causing Jamison Go to replace thedrum prior to the Beetle championshipmatch. One Fierce Lawn Boydefeated Cake in the final match totake first place. Ripto did come backto win the Beetle rumble, andbuilder/driver Kyle Singer was votedthe “Best Driver” in the competition.
I’d like to add one more specialaward as the writer of this article —and that award goes to the “BestPit Crew.” Clearly Jamison Go winsthis one. Jamison rebuilt multiplebots multiple times, and wascompetitive in the Flea, Ant, andBeetleweight classes. He did ayeoman’s job of keeping his bots in
every match and answering everybell. Well done, Jamison.
The Mantis competitionshowcased five bots, includingspecial award winner Reclipso(Figure 18), winner of the “CoolestRobot” award. Reclipso is thecreative design of Zac O’Donnell,and sports a lifting arm operatedby a brushless motor driving acamshaft that is engaged by asolenoid to violently jerk the liftingarm upward. While voted theCoolest Robot, Reclipso could onlyactivate the lifting arm once, andfailed to demonstrate the “flippingpower” required to be competitive.
Nonetheless, Reclipso made itthrough the round-robin competitionto face Gene Burbeck and his newestmonster, One Fierce Bushwhacker(Figure 19), in the Mantisweightfinal match. Burbeck and his OneFierce Bushwhacker dominated thematch and the Mantisweight class,going undefeated. The MantisRumble was won by Brandon Youngand his bot, Catapult.
Gene Burbeck and his bots, One
FIGURE 13. Beetleweightbot Hexxus.
FIGURE 14. Youngest competitorBrandon Young and his dad.
FIGURE 15.Beetleweightbots Ripto andCake in the arena.
FIGURE 16. Beetleweight bot Ripto stuckbetween the arena bumper and the wall.
FIGURE 17.Damage toBeetleweightbot Cake'sspinningdrum.
FIGURE 18. Mantisweightbot Reclipso.
FIGURE 19.Mantisweight bot OneFierce Bushwhacker.
TABLE 1 — WINNERS.
FLEA ANT BEETLE MANTIS1st: Hedgehog Anelope One Fierce One Fierce
Dave Graham Chris Atwood Lawn Boy BushwhackerGene Burbeck Gene Burbeck
2nd: Baby V Fangus Ultimate Cake ReclipsoMatt Benjamin Kyle Singer Jamison Go Zac O'Donnell
3rd: Rebound Box #5 Ripto Dead MetalJeremy Campbell Andy Hoffman- Kyle Singer Chris Atwood
Patalona
Rumble: Hedgehog Mateo Ripto CatapultDave Graham Matt Benjamin Kyle Singer Brandon Young
CombatZone - OCT11.qxd 9/2/2011 10:36 AM Page 35

36 SERVO 10.2011
Fingertech Robotics’ first line ofInsect-sized gearmotors — the
Gold Sparks — were originallyreleased in 2009 as a drop-inreplacement for the commonly usedBanebots 16 mm models. Popularamong Antweight robots for their
high power/weight ratio,convenience, and availability ofmultiple gear ratios, the buildercommunity felt the Banebotsmotors needed more reliability.The Gold Sparks fixed most ofthe issues, completely replicating
Fierce Lawn Boy and One FierceBushwhacker (Figure 20), tookhome three special awards: BestEngineered Robot, One Fierce LawnBoy; Longest Distance Traveled,Michigan; and Most DestructiveRobot, anything with “One Fierce” in
the name. Zac O’Donnell receivedthe BotBlast “Sportsmanship”award.
A list of the winners is shown inTable 1, and a list of the specialaward winners as either voted on bythe competitors or selected by theevent organizer, is shown in Table 2.The winners shared plenty of prizes,including custom designedsequenced starting lights for firstplace, trophies and plaques forsecond place, third place, rumblewinners, and special awards, alongwith tools from mall merchants and
food gift cards from localvendors. There were also doorprizes for registeredcompetitors (Figure 21).
Event organizer Campbellcredits his family (Figure 22)for making BotBlast 2011 anoverwhelming success. WhileJeremy (second from theright) is the ring leader,
grandmother Margaret Sponenberg(far left) sponsors all the winnertrophies and plaques; mom, Trish(second from the left) takes care ofregistration, voting, and supervisesthe pit area; and dad, Warren (farright) is the best arena man in thesport, taking care of virtually everyaspect of the arena, down to theartwork on the arena floor.
Mark your calendar now formid-July 2012, and plan to attendthis fun event! You can followBotBlast on their website atwww.botblast.webs.com. SV
TABLE 2 — SPECIAL AWARD WINNERS.
• Longest Distance Traveled: Gene Burbeck• Rookie of the Year: Evan Steeves• Sportsmanship: Zac O'Donnell• Best Driver: Kyle Singer• Best Engineered: One Fierce Lawn Boy• Coolest: Reclipso• Most Destructive: Anything starting with
"One Fierce" in the name• Author's Award for Best Pit Crew: Jamison Go
FIGURE 20. Gene Burbeck, Team FierceRobots, and his Beetleweight bot One FierceLawn Boy and Mantisweight bot One FierceBushwhacker.
FIGURE 21.Awards table.
FIGURE 22. Campell family (left to right): grandma MargaretSponenberg, mom Trish, event organizer Jeremy,
and dad, Warren.
FIGURE 1.
PARTS IS PARTS:Fingertech ‘Silver Spark’
Gearmot r Review● by Thomas Kenney
CombatZone - OCT11.qxd 9/2/2011 10:37 AM Page 36

the design for the most part, whilesubstituting more reliable materialsto strengthen the design whereneeded.
Despite the improvements,there were still some weak pointsin the Gold Sparks gearmotor,mainly gears occasionally strippingout and breaking due to the smallpitch, along with the output stagebreaking loose of the drive shaft.Built to combat these issues, themain feature of Fingertech’snewer ‘Silver Spark’ motors arethe larger pitch of the gears(Figure 2) compared to the GoldSparks, while keeping the samebasic dimensions, 11 mm mountingpattern, and not adding more thana few grams for the equivalent gearratio. In addition to all of this,they’ve added a whole new batchof gear ratios, ranging from half ofthe lowest Gold Spark ratio to twiceits highest.
In the months leading up totheir release, Fingertech has had anumber of these motors goingthrough rigorous testing in thearena. I’ve tried out a number ofthe new models in some of myrecent small bots. In August ‘11,I wrote a build report for SERVOon one of these bots — anAntweight wedge. I had beenrunning surplus Maxon 17:1gearmotors for years, and with theMaxon stock starting to dwindle,the lower ratio Sparks nowavailable, and the FK-050’s abilityto run off of 18.5V without burningup, it seemed the perfectopportunity to switch over andbegin looking for an alternativedrive motor. There are moredetails on the build itself inthe mentioned article. Overall,the 11.1:1 Silver Sparks havehandled more abuse over adozen fights that it’s taken to killat least one Maxon motor in thesame time frame.
A few months beforebuilding Rudy, I first tried outthe Silver Sparks in a much moreabusive testing application,
namely using them as the drivefor my three pound weaponedrobot, Misdirected Aggression. Iwas stepping down from the B16motors that were usually thestandard for a Beetle spinner’sdrive train in an attempt to putsome more weight into the armor.I had already tested some 50:1Gold Sparks in the application, andthey had stripped out after a fewseconds of driving around, so Iwasn’t too confident in the newergearmotors at first.
Despite this, the final Silvermodels eventually proved theirworth, and held up fine until amassive impact ripped the motorfrom the gearhead, despite thered-Loctited mounting screws. Thisissue was eventually fixed by press-mounting the full gearmotor in a 1”wide UHMW block (Figure 3)similar to how I had previouslysecured the B16s.
In addition to eliminating theneed for mounting screws to thegearmotor’s face, this press-fitsupported the FK-050 motor,preventing it from being removedfrom the gearhead. The SilverSparks have worked great fromthen onward, with no motor orgearbox failures not related to thebot’s unprotected wheels. I’drecommend a similar mountingmethod for anyone planning onusing a single pair of Silver Sparksin anything over one pound.
To conclude, the Silver Sparkgearmotors have proven their value,holding together in applications wheremost similar small gearmotors wouldhave failed. The Silver Spark gearmotorsare currently available fromwww.fingertechrobotics.com, andFingerTech’s US distributer atwww.robotmarketplace.com. SV
SERVO 10.2011 37
FIGURE 2. The final stage of the SilverSpark gearbox compared to the smaller
pitch of its predecessor (left).
FIGURE 3. Supportive mounting for a 3 lbBeetleweight's Spark drive motor.
CombatZone - OCT11.qxd 9/2/2011 10:39 AM Page 37

In the last issue of SERVO, weintroduced you to Susie — a young
girl trying to begin a career incombat robotics. We’ve had quite afew inquiries into the fate of thisyoung robotics heroine, and we arehappy to report that the informationSusie learned about gears was thefirst stepping stone on her path tocombat robotic greatness. In otherwords, Susie has been kicking someserious robot butt since shecompleted her first robot: TheDestroyer! But now, after a year ofvictory upon victory in the localcompetitions, Susie has her eyes seton a big, national level youthrobotics contest two weeks away,and she realized her little Destroyerisn’t going to cut it for the fiercecompetition she will face.
She decides to rebuild Destroyer,but due to time constraints she can’tpossibly change everything shewould like. What should Susie focuson to give her bot the extra edgeagainst all those other roboticsprodigies? After examining her botclosely, her answer is obvious.
The motor she bought from herlocal hobby shop bargain bin is justdownright puny. She’s geared themotor to increase her torque asmuch as she can, but it’s notenough. All the best driving skills inthe world can’t make up for a weakmotor. Susie immediately sits downat the computer and beginsresearching motors.
One of the older competitors inSusie’s league, Bobby, learns of his
friend’s plan to upgrade her motorand tells her about a great tool thathelped him out the last time hebought a motor. The RobotMarketplace — one of the manyonline stores for robot lovers — has asearch engine to help determinewhat kind of motor a bot needs.This seems like an obvious place forSusie to start, so she logs on andscrolls through the questions: “Doesyour motor need to be brushed orbrushless?” “What nominal motorvoltage do you require?” “What isthe maximum current the motorshould draw?” Susie’s eyes widen;she doesn’t even begin to knowhow to answer the questions. So —like any good scientist — Susie startsat the beginning.
The first question on the list isbrushed or brushless. Susie doessome research and learns that DCmotors typically have an electricalswitch called a commutator whichchanges the direction of the currentin the motor in order to create therotating force, or torque. In abrushed motor, a metal brush is
used to contact the surface of thecommutator and create a current. Abrushless motor replaces this metalbrush with an electrical system,making it more efficient and lesssusceptible to wear than a brushedmotor.
Brushless motors aresubstantially more expensive thanbrushed, provide a monstrousamount of RPM, and use adifferent type of controller. Somealso think the electrical system isnot as hardy as the more basicmechanical brushes. Susie decidesthat brushless motors are tooinvolved for a quick build and — forthe time being at least — she willstick with a brushed motor.
The next question Susie needsto answer is whether her motorwill be geared or gearless.Geared motors — also known asgearmotor’s — come with the gearsneeded already built in; they are apackage deal and take a lot of thework of figuring out ratios and theother factors involved with gears.Gearless motors obviously do not
38 SERVO 10.2011
PARTS IS PARTS:Susie’s Saga Continues –
The Beginner’s Guideto Mot rs
● by Morgan Berry
CombatZone - OCT11.qxd 9/2/2011 10:40 AM Page 38

SERVO 10.2011 39
have these systems and requirepurchasing separate ones.
Although Susie alreadyhas a gear system that sheworked hard to develop(SERVO, September ‘11), thesystem is specific to her old, lesspowerful motor and rather thanchanging the motor and thegears in such a short timeperiod, Susie decides that thissituation calls for a motor withthe gearbox included.
The next questions regardthe voltage, RPM (speed), andtorque of the gearmotor. Thesefactors are all dependent on eachother. For a given motor, RPMand torque are opposing factors; thehigher the RPM, the lowerthe torque, and vice versa. Whilevoltage increases both these factorsoverall, it is constrained by theincrease in the weight of the batterythat accompanies higher voltage.
Antweights typically run in the6V to 18V range. Since RPM andtorque are dependent on eachother, it’s hard to exactly pin downthe balance needed, so Susiedecides to examine each specificmotor and see what fits her needsbest; she leaves these sectionslabeled “no preference.” However,to get a rough idea of the rangesshe is looking for, Susie sits down todo some calculations.
Susie has two inch diameterwheels, so she calculates thecircumference of her wheels to be6.28 in. An Antweight arena isusually between four and eightfeet across. So, at 100 RPM (or 1.6rotations per second) her bot cantravel 10.048 inches in one second;it will take the bot 4.77 seconds totravel across the minimum sizedarena. That’s awfully slow, especiallysince the RPM does not take intoaccount that the differing tractionsof various arenas might influencespeed. So, Susie knows she musthave a significantly higher RPM forher bot.
A rule of thumb for a pusherbot is that the bot should be able to
push three to five times its weight;for the 1 lb Antweight, this is3-5 lb. How does this relate to thetorque? Since torque is measuredin a unit that compares a weightmeasurement to a distancemeasurement (in this case, ounce-inches), the key is to calculate thelength of the lever arm the torque isbeing applied to, or in Susie’s case,the radius of the wheel.
So, Susie takes the one inchradius of her wheel and multiplies itby a hypothetical torque (50 oz-in),then determines that the bot canpush 50 oz, or 3.12 times theweight of her bot. Keeping in mindthat she’ll need a second motor forthe second wheel she needs to spin,this increases the number to 6.24times the weight of her bot. In otherwords, this will give Susie quite apowerful little bot, and she aims tolook for a motor with a torquearound this area.
Susie selects “up to 2 oz” forthe size of the motor becauseanything larger will be too heavy forher 1 lb Antweight. She clicks “Finda match” and begins to scrollthrough the results. She rules out a6V motor with a torque of 103.2 oz-in and 23 RPM; this is much tooslow for her needs. She also quicklynegates another with a 600 RPM;the torque is too low. Finally, shespots a line of Copal motors thatseem to be what she is looking for.Copal is a very popular brand forAntweight bots. The only problem is
that each motor involves a differentgear ratio.
Susie is frustrated; she thoughtthat by selecting a geared motor shecould leave this entire portion out.But, keeping in mind what shepreviously learned about gears, shehas a suspicion she needs a highergear ratio, and clicks the motorwith the 60:1 ratio. Sure enough,the RPM is 410 at 12V, which isabout half of the 30:1 motor; thetorque is 71.44 oz-in, about doublethe torque of the 30:1 motor. Theseare some awesome specs! Susie’sbot will have the power to push ninetimes its own weight, and can travelthree feet in one second. At .88 ozeach, the two motors will only takeup a fraction of her weight limit,and at 12 volts, the battery requiredfor the motor is reasonably light, as well.
The only downside: The motorsare about $20 each, so Susie willhave to dip far into her babysittingearnings to afford them. Since thisis the only purchase Susie willneed to make for her new andimproved bot, however, she decidesto spring for the expensive motors.She is confident that her motorwill make the Destroyer 2.0 afierce competitor in her upcomingcompetition, but realizing that agood motor is only one piece of thepuzzle, she resolves to work hard onimproving her driving skills so theexpense she puts into the motorwon’t be in vain. SV
MOTOR TYPE RPM TIME TO TRAVEL 10 FT. TIME TO TRAVEL 10 FT.WITH TWO INCH WHEELS WITH ONE INCH
WHEELSCOPAL SH50 300 (at 12V) 4.6 seconds 7.7 seconds50:1 Gearmotor
COPAL 50:1 330 3.5 seconds 7.0 secondsGearmotor – 12VDC
COPAL 50:1 500 2.3 seconds 4.6 secondsGearmotor – 6V
COPAL 30:1 770 1.5 seconds 3.0 secondsGearmotor
COPAL 60:1 410 2.8 seconds 5.6 secondsGearmotor
CombatZone - OCT11.qxd 9/2/2011 10:40 AM Page 39

40 SERVO 10.2011
Iwrote an article aboutprogramming cheap 2.4 GHz
HK-T6A transmitters (Figure 1) thatappeared in the January’11 issue ofSERVO. In that, I commented onhow it’s probably a good idea toconvert from the standard AAalkaline batteries to rechargeablebatteries. I use the radios with fourbot hockey bots, and twodemonstration days and a week’ssummer robot camp have eaten upnumerous sets of disposablebatteries. A competition in July wasthe impetus to get the radiosconverted to using the moreenvironmentally friendly andultimately cheaper NiMH (NickelManganese Hydride) rechargeablebatteries.
The various manufacturers usedifferent types of charging plugsand polarities for their radios, so it’simportant that one uses the righttype. I have an old Futuba TX andthe charger had the right size plugand the same polarity on thecontacts as that on the HK-T6A, so Iknew it would be easy to get thewall charger units to match.
There are two ways to addrechargeable batteries. The first andeasiest is to simply fit eightrechargeable AA sized NiMh cellsand plug in a Futuba style charger.This has the advantage that you donot have to open the radio or makeany changes to it. The disadvantageis that there are manyinterconnections between the cells,
and a bad connection due to a loosebattery clip could result in the radiolosing power and you losing a fightor a game of bot hockey. I hadalready experienced loose batteriesin one of the radios, so I decided togo with the second more complex —but ultimately more reliable —solution and the one moreexpensive radios use: a single 9.6VNiMH battery pack.
There are many of theseavailable on the market and almostall would do the job, but I wanted ahigh capacity pack and one forwhich I could get the overalldimensions.
The one I chose (Figure 2) wasfrom www.onlybatterypacks.com.It was a 9.6V NiMH 2,500 mAh packthat has the dimensions to fit thebattery compartment in the HK-T6Aradio. I had previously bought packsfrom them for my two Spektrumradios and they had performed well.A battery pack of this size costsabout $26.
It is necessary to open up theradio in order to gain access to theconnecter that hooks up thebatteries to the rest of theelectronics. There are four screws onthe back (Figure 3) that hold thetwo halves of the radio together.Remove them and then unplug theconnector circled in red (Figure 4)and cut the black and red wireswhere indicated by the blue cross.
Next, remove and discard all themetal battery contacts from the
back half of the radio using a pair ofpliers. These came off easily on allfour of my radios.
The battery was a little largerthan advertised and could not befully seated in the compartment, so Itrimmed off the plastic moldingsthat held the contacts (Figure 5)with a good box cutter. DO NOTREMOVE THE ONE INDICATED INRED. This one is used as the catchfor the cover of the batterycompartment. As can be seen, Itook a small chunk out of this oneby mistake, but it still works.
Next, I soldered the leads on thebattery pack to the connector fromthe radio (Figure 6) and protectedthe joints with heatshrink tubing. Ihad tried to find what — if any —commercial radios used the sameconnectors but was unsuccessful, sothe packs I bought had noconnectors at a slightly reducedprice.
Feed the connector through theopening at the top left of the
End f the Alkalines● by Pete Smith
FIGURE 1.
FIGURE 2. FIGURE 3. FIGURE 4.
CombatZone - OCT11.qxd 9/2/2011 10:41 AM Page 40

compartment. Plug it back into thesocket it came out of and push thebattery into the compartment(Figure 7). It was a snug fit but thecover still fits well.
I purchased new Futuba stylechargers (Figure 8) fromwww.towerhobbies.com foraround $17 each so that I couldcharge my new packs These plugstraight in, and after a couple ofhours of charging, the green LED onthe radios (Figure 9) showed theyhad done their job. Well, three ofthem lit up green. The fourthrefused to go beyond the yellow midcharge stage. That radio alsoseemed to discharge to yellow
earlier than the rest when onalkalines, so I suspect the problem iswith the charge level LED circuit onthat radio and not with the batteryor the charger. A day long eventproved that the new batteries workas planned.
The cost per radio was about$36 but I’ve already spent at leasthalf that per radio on alkalines thisyear. The ease of recharging andlong life when charged means it’sone less expense and worry forfuture events. SV
FIGURE 5. FIGURE 6.
FIGURE 8. FIGURE 9.
FIGURE 7.
MMelty Brains by Kevin Berry
Life lesson #7: Never let your battery Google “chemistry humor”
SERVO 10.2011 41
CombatZone - OCT11.qxd 9/2/2011 1:29 PM Page 41