features - db2 idataagent - commvault · features - db2 idataagent page 1 of 96. ... review general...
TRANSCRIPT
Features - DB2 iDataAgent
TABLE OF CONTENTS
OVERVIEW
SYSTEM REQUIREMENTS - DB2 IDATAAGENT
INSTALLATION
Install the DB2 iDataAgent - Windows
Install the DB2 iDataAgent - Unix
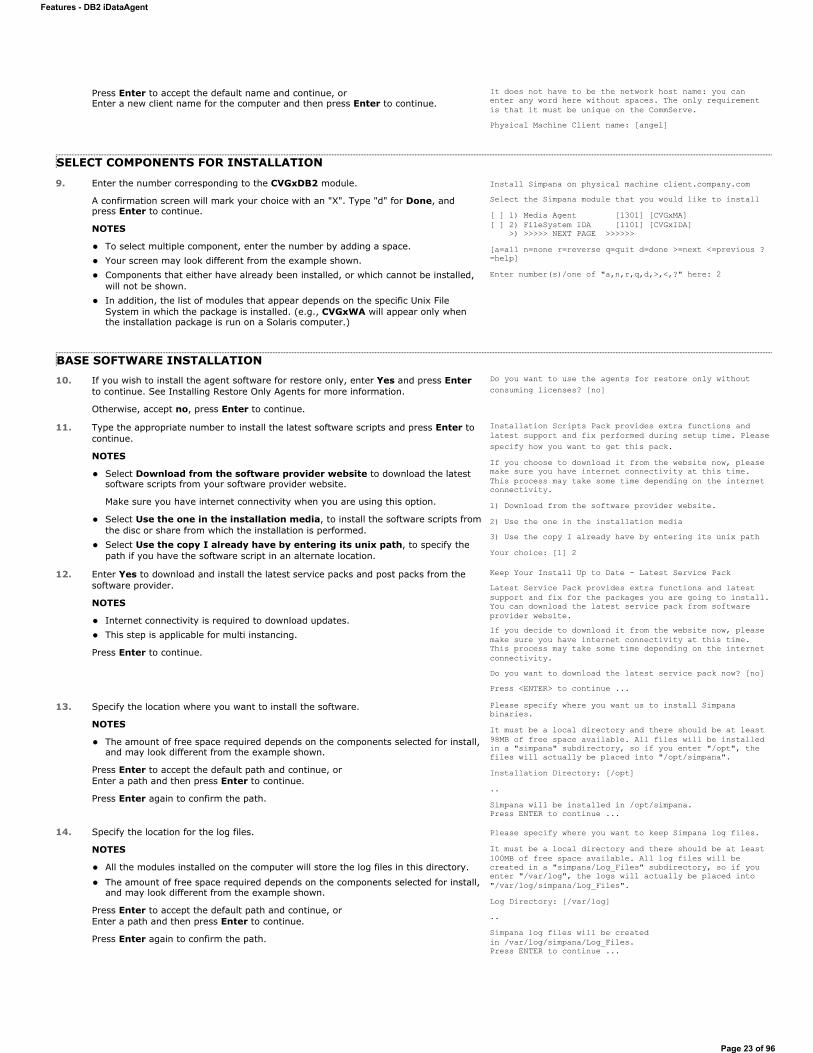
Install the DB2 iDataAgent - Unix - Clustered Environment
BACKUP DATA - DB2 IDATAAGENT
RESTORE DATA - DB2 IDATAAGENT
CONFIGURATION
Instances - DB2 iDataAgent
Backup Sets - DB2 iDataAgent
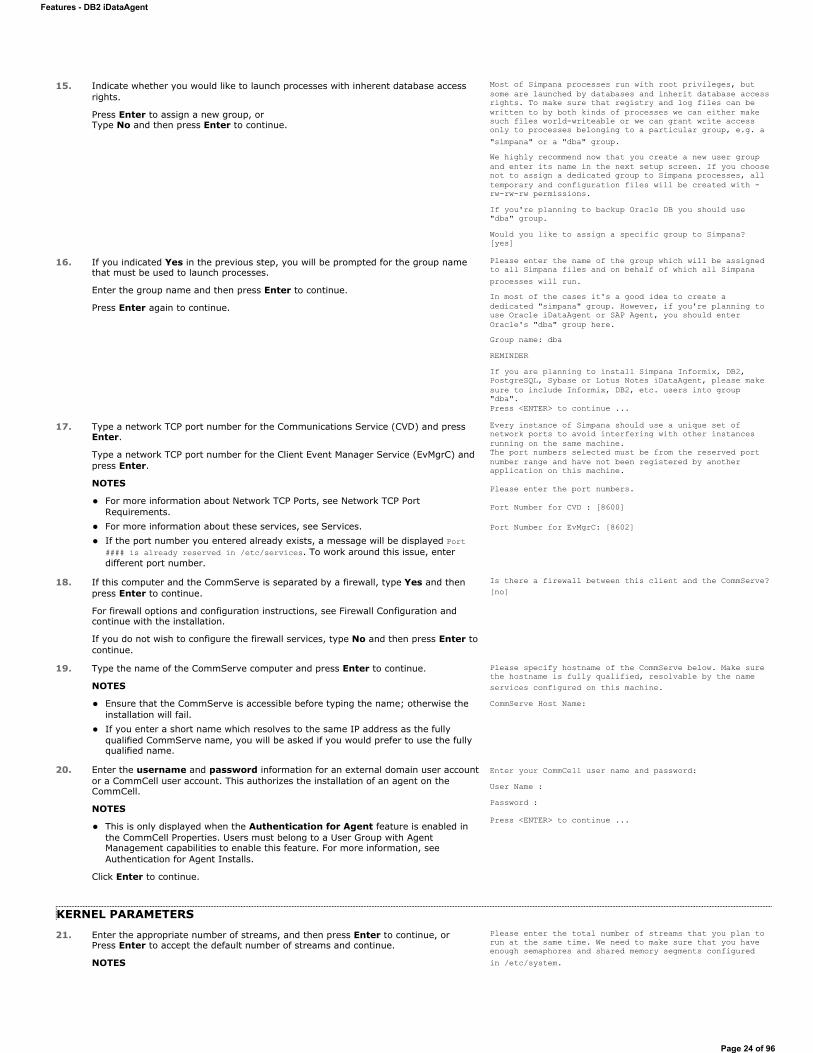
Subclients - DB2 iDataAgent
MANAGEMENT
Backup Job History
Restore Job History
FREQUENTLY ASKED QUESTIONS
Features - DB2 iDataAgent
Page 1 of 96
Overview - DB2 iDataAgent
Choose from the following topics:
Introduction
Client Terminology
Supported Data Types
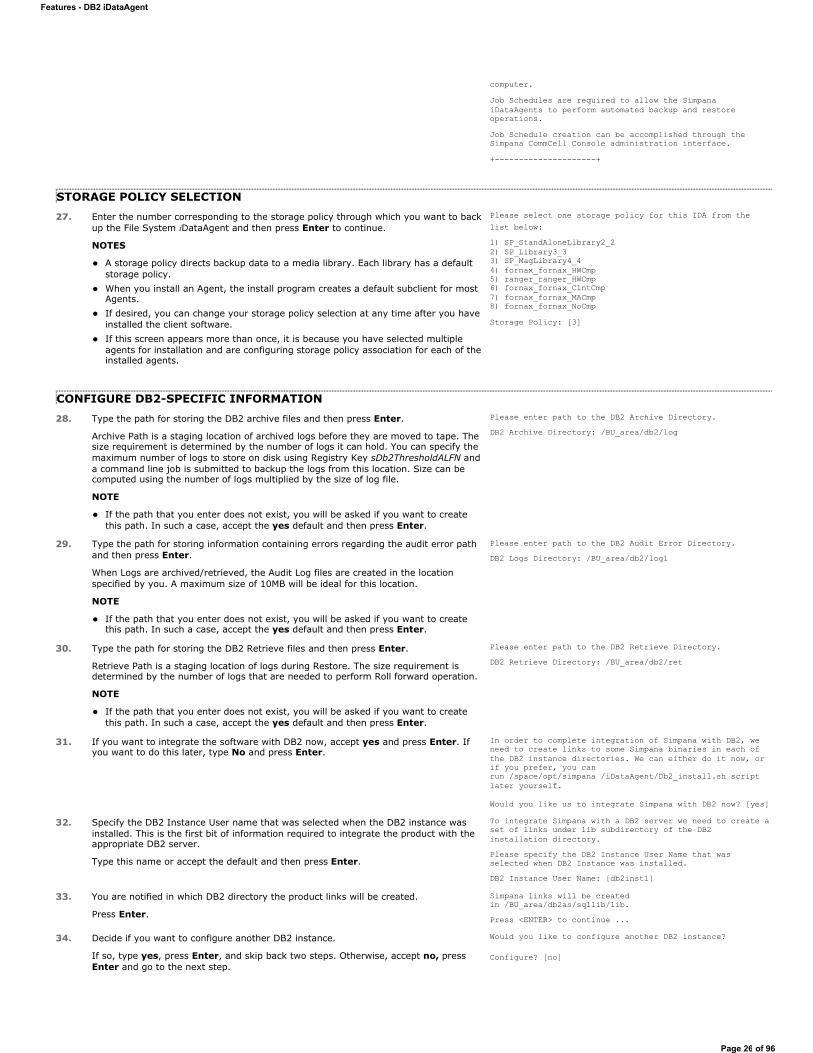
Tree Levels in the DB2 iDataAgent
License Requirement
Databases, Instances, Backup Sets, and Subclients
Securing DB2 Application Data Using the File System iDataAgent
Third-Party Command Line
Disaster Recovery Considerations
INTRODUCTION
The DB2 iDataAgent is responsible for backing up and restoring DB2 databases.
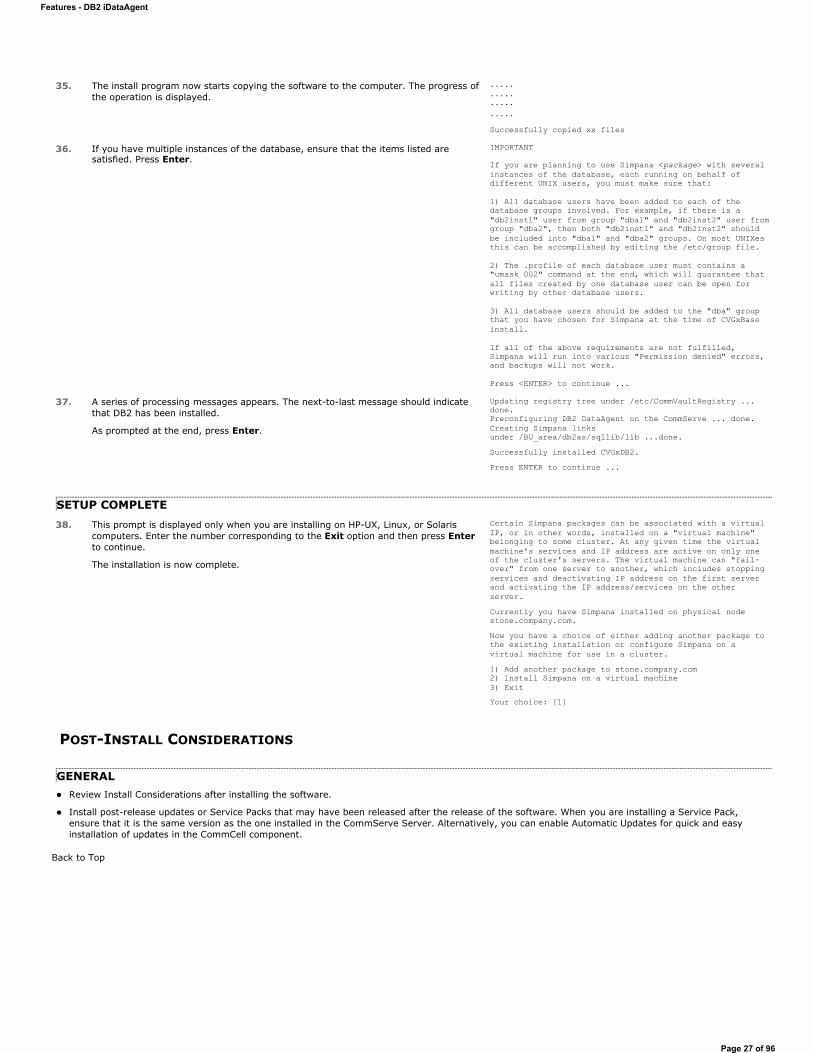
The DB2 iDataAgent is just one of several iDataAgents that provide backup and restore support for different kinds of data in what is often a mixed network environment. Remember that this product secures only the DB2 databases (e.g., system and user databases). To secure DB2 application files that reside on a local hard drive or file system data that resides on an DB2 computer, you must use the File System iDataAgent. (For information on the DB2 entities mentioned, see Databases, Instances, Backup Sets, and Subclients.)
The DB2 database comprises several objects. These objects can be backed up by the DB2 iDataAgent. For more information on the DB2 objects, refer to your DB2 documentation.
Back to Top
CLIENT TERMINOLOGY
The following definitions are applicable to the DB2 iDataAgent.
A client is a computer whose data is backed up via an iDataAgent. This may include DB2, File System, etc.
DB2 clients are computers that contain the DB2 database(s) that you want to back up. Each DB2 client contains the DB2 iDataAgent to back up the various objects in the DB2 database and the File System iDataAgent to back up the DB2 application files and operating system data.
Within the DB2 iDataAgent, each instance can contain one or more backup sets, and each backup set can contain one or more subclients containing a single entire database or portion thereof (i.e., selected table spaces).
The iDataAgent creates a default subclient for each backup set within each instance. At the time of creation, the default subclient contains all the objects in the database (backup set). You can modify the default subclient and create new subclients to suit the backup strategy you have devised.
Back to Top
SUPPORTED DATA TYPES
Data Protection Operations for the following data types are supported by the DB2 iDataAgent:
DB2 database files
History files
Log files
Data Protection Operations for all other data types not mentioned in the previous list are not supported by the DB2 iDataAgent, including:
DB2 application files
Operating system data
Both of these data types can be secured by the appropriate File System iDataAgent.
Back to Top
Features - DB2 iDataAgent
Page 2 of 96
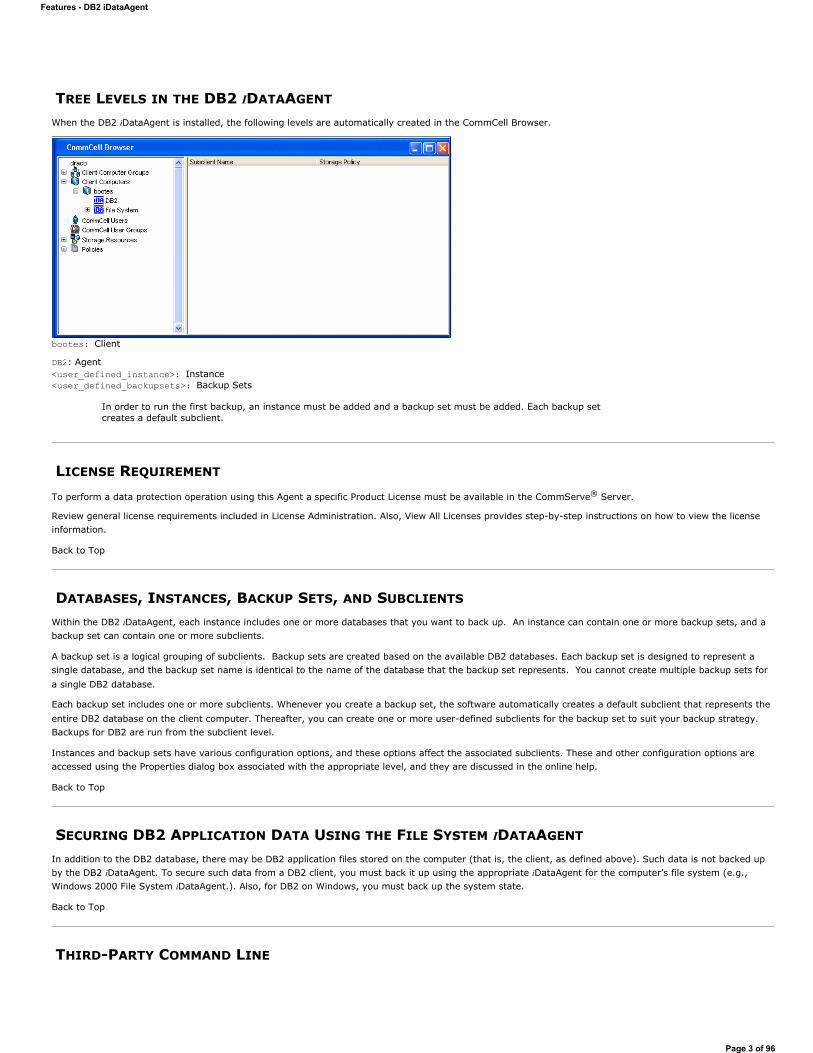
TREE LEVELS IN THE DB2 IDATAAGENT
When the DB2 iDataAgent is installed, the following levels are automatically created in the CommCell Browser.
LICENSE REQUIREMENT
To perform a data protection operation using this Agent a specific Product License must be available in the CommServe® Server.
Review general license requirements included in License Administration. Also, View All Licenses provides step-by-step instructions on how to view the license information.
Back to Top
DATABASES, INSTANCES, BACKUP SETS, AND SUBCLIENTS
Within the DB2 iDataAgent, each instance includes one or more databases that you want to back up. An instance can contain one or more backup sets, and a backup set can contain one or more subclients.
A backup set is a logical grouping of subclients. Backup sets are created based on the available DB2 databases. Each backup set is designed to represent a single database, and the backup set name is identical to the name of the database that the backup set represents. You cannot create multiple backup sets for a single DB2 database.
Each backup set includes one or more subclients. Whenever you create a backup set, the software automatically creates a default subclient that represents the entire DB2 database on the client computer. Thereafter, you can create one or more user-defined subclients for the backup set to suit your backup strategy. Backups for DB2 are run from the subclient level.
Instances and backup sets have various configuration options, and these options affect the associated subclients. These and other configuration options are accessed using the Properties dialog box associated with the appropriate level, and they are discussed in the online help.
Back to Top
SECURING DB2 APPLICATION DATA USING THE FILE SYSTEM IDATAAGENT
In addition to the DB2 database, there may be DB2 application files stored on the computer (that is, the client, as defined above). Such data is not backed up by the DB2 iDataAgent. To secure such data from a DB2 client, you must back it up using the appropriate iDataAgent for the computer’s file system (e.g., Windows 2000 File System iDataAgent.). Also, for DB2 on Windows, you must back up the system state.
Back to Top
THIRD-PARTY COMMAND LINE
bootes: Client
DB2: Agent<user_defined_instance>: Instance<user_defined_backupsets>: Backup Sets
In order to run the first backup, an instance must be added and a backup set must be added. Each backup set creates a default subclient.
Features - DB2 iDataAgent
Page 3 of 96
The DB2 iDataAgent supports the ability to perform backups and restores from the third-party command line. For more information, see Third-Party Command Line Operations.
Back to Top
DISASTER RECOVERY CONSIDERATIONSBefore you use your agent, be sure to review and understand the associated full system restore (or disaster recovery) procedure. The procedure for some agents may require that you plan specific actions or consider certain items before an emergency occurs. See Disaster Recovery for more information regarding your agent.
Back to Top
Features - DB2 iDataAgent
Page 4 of 96
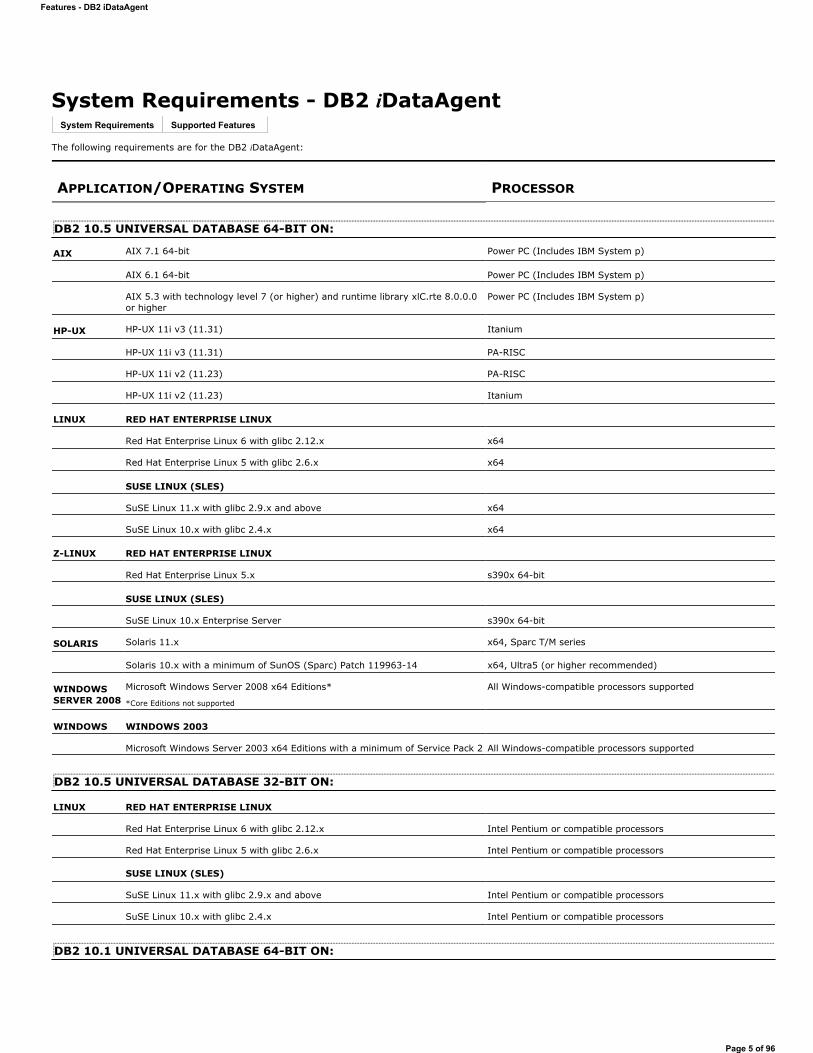
System Requirements - DB2 iDataAgent
The following requirements are for the DB2 iDataAgent:
System Requirements Supported Features
APPLICATION/OPERATING SYSTEM PROCESSOR
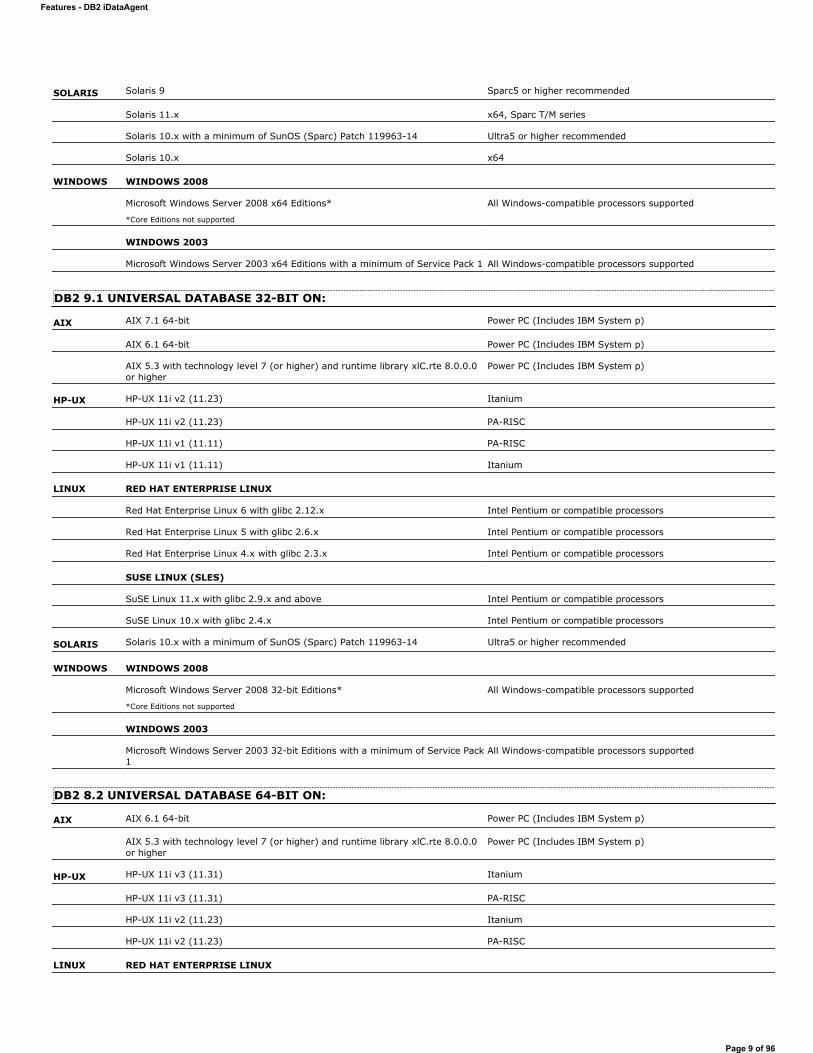
DB2 10.5 UNIVERSAL DATABASE 64-BIT ON:
AIX AIX 7.1 64-bit Power PC (Includes IBM System p)
AIX 6.1 64-bit Power PC (Includes IBM System p)
AIX 5.3 with technology level 7 (or higher) and runtime library xlC.rte 8.0.0.0 or higher
Power PC (Includes IBM System p)
HP-UX HP-UX 11i v3 (11.31) Itanium
HP-UX 11i v3 (11.31) PA-RISC
HP-UX 11i v2 (11.23) PA-RISC
HP-UX 11i v2 (11.23) Itanium
LINUX RED HAT ENTERPRISE LINUX
Red Hat Enterprise Linux 6 with glibc 2.12.x x64
Red Hat Enterprise Linux 5 with glibc 2.6.x x64
SUSE LINUX (SLES)
SuSE Linux 11.x with glibc 2.9.x and above x64
SuSE Linux 10.x with glibc 2.4.x x64
Z-LINUX RED HAT ENTERPRISE LINUX
Red Hat Enterprise Linux 5.x s390x 64-bit
SUSE LINUX (SLES)
SuSE Linux 10.x Enterprise Server s390x 64-bit
SOLARIS Solaris 11.x x64, Sparc T/M series
Solaris 10.x with a minimum of SunOS (Sparc) Patch 119963-14 x64, Ultra5 (or higher recommended)
WINDOWS SERVER 2008
Microsoft Windows Server 2008 x64 Editions*
*Core Editions not supported
All Windows-compatible processors supported
WINDOWS WINDOWS 2003
Microsoft Windows Server 2003 x64 Editions with a minimum of Service Pack 2 All Windows-compatible processors supported
DB2 10.5 UNIVERSAL DATABASE 32-BIT ON:
LINUX RED HAT ENTERPRISE LINUX
Red Hat Enterprise Linux 6 with glibc 2.12.x Intel Pentium or compatible processors
Red Hat Enterprise Linux 5 with glibc 2.6.x Intel Pentium or compatible processors
SUSE LINUX (SLES)
SuSE Linux 11.x with glibc 2.9.x and above Intel Pentium or compatible processors
SuSE Linux 10.x with glibc 2.4.x Intel Pentium or compatible processors
DB2 10.1 UNIVERSAL DATABASE 64-BIT ON:
Features - DB2 iDataAgent
Page 5 of 96
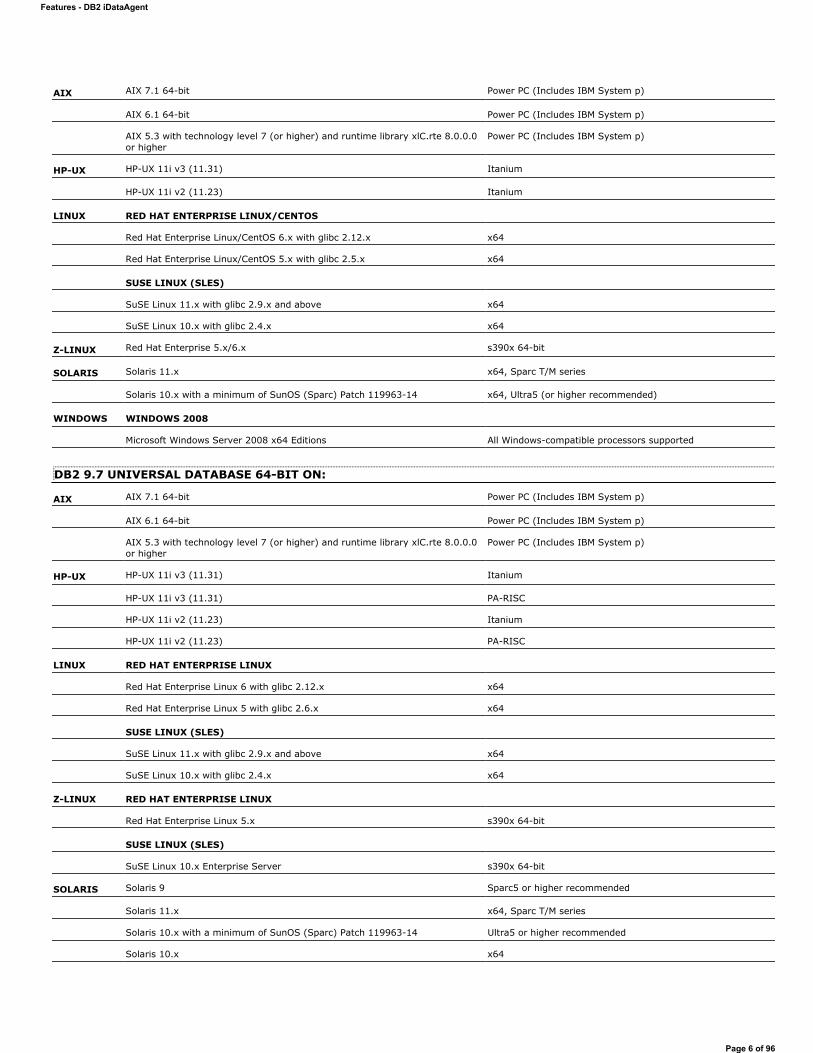
AIX AIX 7.1 64-bit Power PC (Includes IBM System p)
AIX 6.1 64-bit Power PC (Includes IBM System p)
AIX 5.3 with technology level 7 (or higher) and runtime library xlC.rte 8.0.0.0 or higher
Power PC (Includes IBM System p)
HP-UX HP-UX 11i v3 (11.31) Itanium
HP-UX 11i v2 (11.23) Itanium
LINUX RED HAT ENTERPRISE LINUX/CENTOS
Red Hat Enterprise Linux/CentOS 6.x with glibc 2.12.x x64
Red Hat Enterprise Linux/CentOS 5.x with glibc 2.5.x x64
SUSE LINUX (SLES)
SuSE Linux 11.x with glibc 2.9.x and above x64
SuSE Linux 10.x with glibc 2.4.x x64
Z-LINUX Red Hat Enterprise 5.x/6.x s390x 64-bit
SOLARIS Solaris 11.x x64, Sparc T/M series
Solaris 10.x with a minimum of SunOS (Sparc) Patch 119963-14 x64, Ultra5 (or higher recommended)
WINDOWS WINDOWS 2008
Microsoft Windows Server 2008 x64 Editions All Windows-compatible processors supported
DB2 9.7 UNIVERSAL DATABASE 64-BIT ON:
AIX AIX 7.1 64-bit Power PC (Includes IBM System p)
AIX 6.1 64-bit Power PC (Includes IBM System p)
AIX 5.3 with technology level 7 (or higher) and runtime library xlC.rte 8.0.0.0 or higher
Power PC (Includes IBM System p)
HP-UX HP-UX 11i v3 (11.31) Itanium
HP-UX 11i v3 (11.31) PA-RISC
HP-UX 11i v2 (11.23) Itanium
HP-UX 11i v2 (11.23) PA-RISC
LINUX RED HAT ENTERPRISE LINUX
Red Hat Enterprise Linux 6 with glibc 2.12.x x64
Red Hat Enterprise Linux 5 with glibc 2.6.x x64
SUSE LINUX (SLES)
SuSE Linux 11.x with glibc 2.9.x and above x64
SuSE Linux 10.x with glibc 2.4.x x64
Z-LINUX RED HAT ENTERPRISE LINUX
Red Hat Enterprise Linux 5.x s390x 64-bit
SUSE LINUX (SLES)
SuSE Linux 10.x Enterprise Server s390x 64-bit
SOLARIS Solaris 9 Sparc5 or higher recommended
Solaris 11.x x64, Sparc T/M series
Solaris 10.x with a minimum of SunOS (Sparc) Patch 119963-14 Ultra5 or higher recommended
Solaris 10.x x64
Features - DB2 iDataAgent
Page 6 of 96
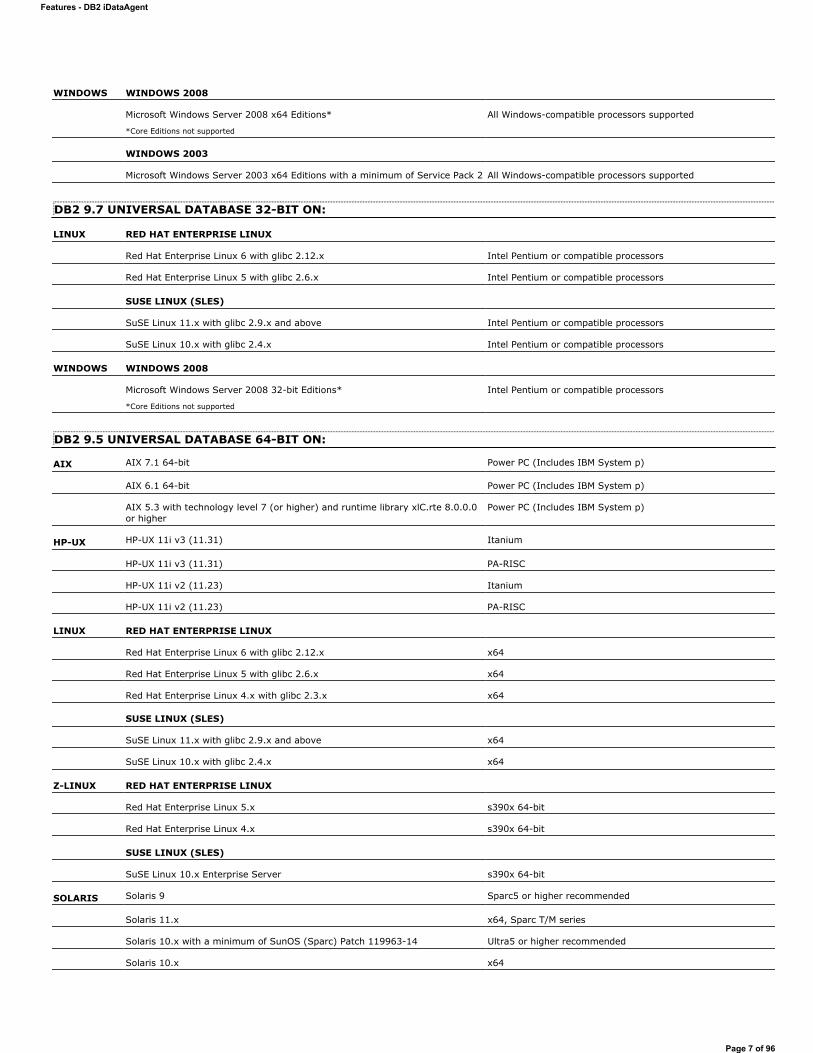
WINDOWS WINDOWS 2008
Microsoft Windows Server 2008 x64 Editions*
*Core Editions not supported
All Windows-compatible processors supported
WINDOWS 2003
Microsoft Windows Server 2003 x64 Editions with a minimum of Service Pack 2 All Windows-compatible processors supported
DB2 9.7 UNIVERSAL DATABASE 32-BIT ON:
LINUX RED HAT ENTERPRISE LINUX
Red Hat Enterprise Linux 6 with glibc 2.12.x Intel Pentium or compatible processors
Red Hat Enterprise Linux 5 with glibc 2.6.x Intel Pentium or compatible processors
SUSE LINUX (SLES)
SuSE Linux 11.x with glibc 2.9.x and above Intel Pentium or compatible processors
SuSE Linux 10.x with glibc 2.4.x Intel Pentium or compatible processors
WINDOWS WINDOWS 2008
Microsoft Windows Server 2008 32-bit Editions*
*Core Editions not supported
Intel Pentium or compatible processors
DB2 9.5 UNIVERSAL DATABASE 64-BIT ON:
AIX AIX 7.1 64-bit Power PC (Includes IBM System p)
AIX 6.1 64-bit Power PC (Includes IBM System p)
AIX 5.3 with technology level 7 (or higher) and runtime library xlC.rte 8.0.0.0 or higher
Power PC (Includes IBM System p)
HP-UX HP-UX 11i v3 (11.31) Itanium
HP-UX 11i v3 (11.31) PA-RISC
HP-UX 11i v2 (11.23) Itanium
HP-UX 11i v2 (11.23) PA-RISC
LINUX RED HAT ENTERPRISE LINUX
Red Hat Enterprise Linux 6 with glibc 2.12.x x64
Red Hat Enterprise Linux 5 with glibc 2.6.x x64
Red Hat Enterprise Linux 4.x with glibc 2.3.x x64
SUSE LINUX (SLES)
SuSE Linux 11.x with glibc 2.9.x and above x64
SuSE Linux 10.x with glibc 2.4.x x64
Z-LINUX RED HAT ENTERPRISE LINUX
Red Hat Enterprise Linux 5.x s390x 64-bit
Red Hat Enterprise Linux 4.x s390x 64-bit
SUSE LINUX (SLES)
SuSE Linux 10.x Enterprise Server s390x 64-bit
SOLARIS Solaris 9 Sparc5 or higher recommended
Solaris 11.x x64, Sparc T/M series
Solaris 10.x with a minimum of SunOS (Sparc) Patch 119963-14 Ultra5 or higher recommended
Solaris 10.x x64
Features - DB2 iDataAgent
Page 7 of 96
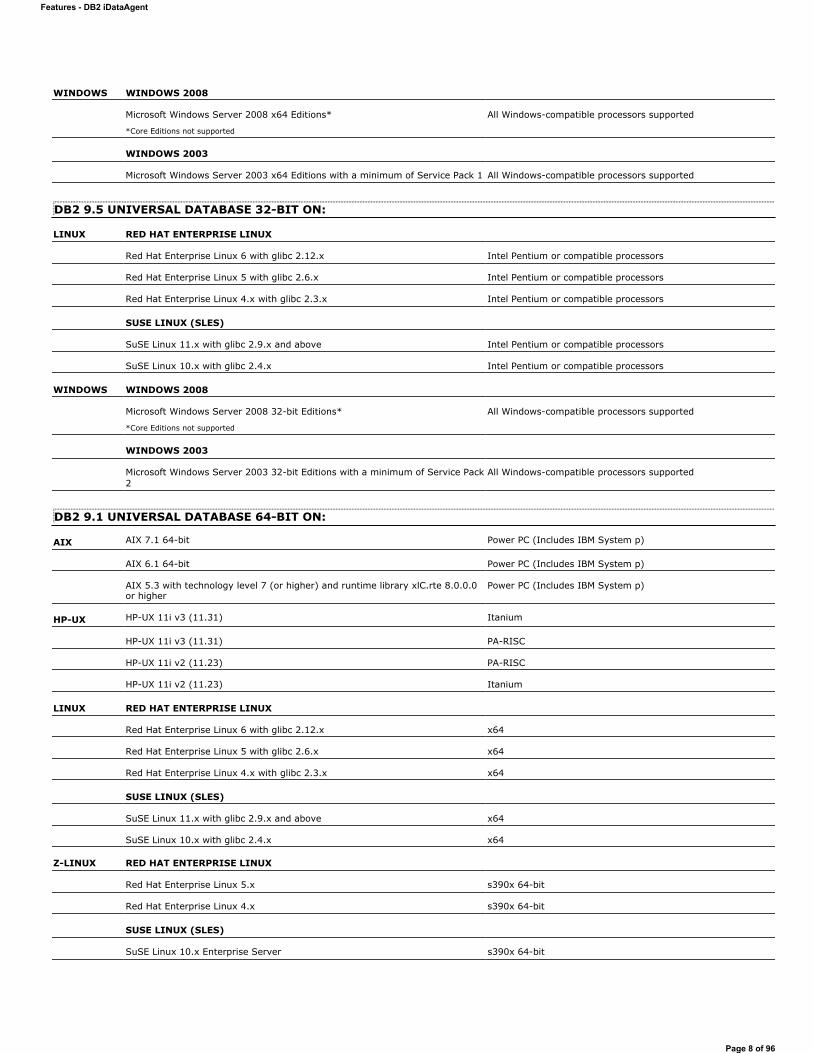
WINDOWS WINDOWS 2008
Microsoft Windows Server 2008 x64 Editions*
*Core Editions not supported
All Windows-compatible processors supported
WINDOWS 2003
Microsoft Windows Server 2003 x64 Editions with a minimum of Service Pack 1 All Windows-compatible processors supported
DB2 9.5 UNIVERSAL DATABASE 32-BIT ON:
LINUX RED HAT ENTERPRISE LINUX
Red Hat Enterprise Linux 6 with glibc 2.12.x Intel Pentium or compatible processors
Red Hat Enterprise Linux 5 with glibc 2.6.x Intel Pentium or compatible processors
Red Hat Enterprise Linux 4.x with glibc 2.3.x Intel Pentium or compatible processors
SUSE LINUX (SLES)
SuSE Linux 11.x with glibc 2.9.x and above Intel Pentium or compatible processors
SuSE Linux 10.x with glibc 2.4.x Intel Pentium or compatible processors
WINDOWS WINDOWS 2008
Microsoft Windows Server 2008 32-bit Editions*
*Core Editions not supported
All Windows-compatible processors supported
WINDOWS 2003
Microsoft Windows Server 2003 32-bit Editions with a minimum of Service Pack 2
All Windows-compatible processors supported
DB2 9.1 UNIVERSAL DATABASE 64-BIT ON:
AIX AIX 7.1 64-bit Power PC (Includes IBM System p)
AIX 6.1 64-bit Power PC (Includes IBM System p)
AIX 5.3 with technology level 7 (or higher) and runtime library xlC.rte 8.0.0.0 or higher
Power PC (Includes IBM System p)
HP-UX HP-UX 11i v3 (11.31) Itanium
HP-UX 11i v3 (11.31) PA-RISC
HP-UX 11i v2 (11.23) PA-RISC
HP-UX 11i v2 (11.23) Itanium
LINUX RED HAT ENTERPRISE LINUX
Red Hat Enterprise Linux 6 with glibc 2.12.x x64
Red Hat Enterprise Linux 5 with glibc 2.6.x x64
Red Hat Enterprise Linux 4.x with glibc 2.3.x x64
SUSE LINUX (SLES)
SuSE Linux 11.x with glibc 2.9.x and above x64
SuSE Linux 10.x with glibc 2.4.x x64
Z-LINUX RED HAT ENTERPRISE LINUX
Red Hat Enterprise Linux 5.x s390x 64-bit
Red Hat Enterprise Linux 4.x s390x 64-bit
SUSE LINUX (SLES)
SuSE Linux 10.x Enterprise Server s390x 64-bit
Features - DB2 iDataAgent
Page 8 of 96
SOLARIS Solaris 9 Sparc5 or higher recommended
Solaris 11.x x64, Sparc T/M series
Solaris 10.x with a minimum of SunOS (Sparc) Patch 119963-14 Ultra5 or higher recommended
Solaris 10.x x64
WINDOWS WINDOWS 2008
Microsoft Windows Server 2008 x64 Editions*
*Core Editions not supported
All Windows-compatible processors supported
WINDOWS 2003
Microsoft Windows Server 2003 x64 Editions with a minimum of Service Pack 1 All Windows-compatible processors supported
DB2 9.1 UNIVERSAL DATABASE 32-BIT ON:
AIX AIX 7.1 64-bit Power PC (Includes IBM System p)
AIX 6.1 64-bit Power PC (Includes IBM System p)
AIX 5.3 with technology level 7 (or higher) and runtime library xlC.rte 8.0.0.0 or higher
Power PC (Includes IBM System p)
HP-UX HP-UX 11i v2 (11.23) Itanium
HP-UX 11i v2 (11.23) PA-RISC
HP-UX 11i v1 (11.11) PA-RISC
HP-UX 11i v1 (11.11) Itanium
LINUX RED HAT ENTERPRISE LINUX
Red Hat Enterprise Linux 6 with glibc 2.12.x Intel Pentium or compatible processors
Red Hat Enterprise Linux 5 with glibc 2.6.x Intel Pentium or compatible processors
Red Hat Enterprise Linux 4.x with glibc 2.3.x Intel Pentium or compatible processors
SUSE LINUX (SLES)
SuSE Linux 11.x with glibc 2.9.x and above Intel Pentium or compatible processors
SuSE Linux 10.x with glibc 2.4.x Intel Pentium or compatible processors
SOLARIS Solaris 10.x with a minimum of SunOS (Sparc) Patch 119963-14 Ultra5 or higher recommended
WINDOWS WINDOWS 2008
Microsoft Windows Server 2008 32-bit Editions*
*Core Editions not supported
All Windows-compatible processors supported
WINDOWS 2003
Microsoft Windows Server 2003 32-bit Editions with a minimum of Service Pack 1
All Windows-compatible processors supported
DB2 8.2 UNIVERSAL DATABASE 64-BIT ON:
AIX AIX 6.1 64-bit Power PC (Includes IBM System p)
AIX 5.3 with technology level 7 (or higher) and runtime library xlC.rte 8.0.0.0 or higher
Power PC (Includes IBM System p)
HP-UX HP-UX 11i v3 (11.31) Itanium
HP-UX 11i v3 (11.31) PA-RISC
HP-UX 11i v2 (11.23) Itanium
HP-UX 11i v2 (11.23) PA-RISC
LINUX RED HAT ENTERPRISE LINUX
Features - DB2 iDataAgent
Page 9 of 96
Red Hat Enterprise Linux 4.x with glibc 2.3.x x64
SOLARIS Solaris 9 Sparc5 or higher recommended
Solaris 8 Sparc5 or higher recommended
Solaris 10.x with a minimum of SunOS (Sparc) Patch 119963-14 Ultra5 or higher recommended
WINDOWS WINDOWS 2003
Microsoft Windows Server 2003 x64 Editions with a minimum of Service Pack 1 All Windows-compatible processors supported
DB2 8.2 UNIVERSAL DATABASE 32-BIT ON:
AIX AIX 6.1 64-bit Power PC (Includes IBM System p)
AIX 5.3 with technology level 7 (or higher) and runtime library xlC.rte 8.0.0.0 or higher
Power PC (Includes IBM System p)
HP-UX HP-UX 11i v2 (11.23) PA-RISC
HP-UX 11i v2 (11.23) Itanium
HP-UX 11i v1 (11.11) Itanium
HP-UX 11i v1 (11.11) PA-RISC
LINUX RED HAT ENTERPRISE LINUX
Red Hat Enterprise Linux 4.x with glibc 2.3.x Intel Pentium or compatible processors
SOLARIS Solaris 9 Sparc5 or higher recommended
Solaris 8 Sparc5 or higher recommended
Solaris 10.x with a minimum of SunOS (Sparc) Patch 119963-14 Ultra5 or higher recommended
WINDOWS WINDOWS 2003
Microsoft Windows Server 2003 32-bit Editions with a minimum of Service Pack 1
All Windows-compatible processors supported
DB2 8.1 UNIVERSAL DATABASE 64-BIT ON:
AIX AIX 6.1 64-bit Power PC (Includes IBM System p)
AIX 5.3 with technology level 7 (or higher) and runtime library xlC.rte 8.0.0.0 or higher
Power PC (Includes IBM System p)
HP-UX HP-UX 11i v1 (11.11) PA-RISC
LINUX RED HAT ENTERPRISE LINUX
Red Hat Enterprise Linux 4.x with glibc 2.3.x Intel Pentium or compatible processors
SOLARIS Solaris 9 Sparc5 or higher recommended
Solaris 8 Sparc5 or higher recommended
Solaris 10.x with a minimum of SunOS (Sparc) Patch 119963-14 Ultra5 or higher recommended
WINDOWS WINDOWS 2003
Microsoft Windows Server 2003 x64 Editions with a minimum of Service Pack 1 All Windows-compatible processors supported
DB2 8.1 UNIVERSAL DATABASE 32-BIT ON:
AIX AIX 6.1 64-bit Power PC (Includes IBM System p)
AIX 5.3 with technology level 7 (or higher) and runtime library xlC.rte 8.0.0.0 or higher
Power PC (Includes IBM System p)
LINUX RED HAT ENTERPRISE LINUX
Red Hat Enterprise Linux 4.x with glibc 2.3.x Intel Pentium or compatible processors
Features - DB2 iDataAgent
Page 10 of 96
CLUSTER - SUPPORT
The software can be installed on a Cluster if clustering is supported by the above-mentioned operating systems.
For information on supported cluster types, see Clustering - Support.
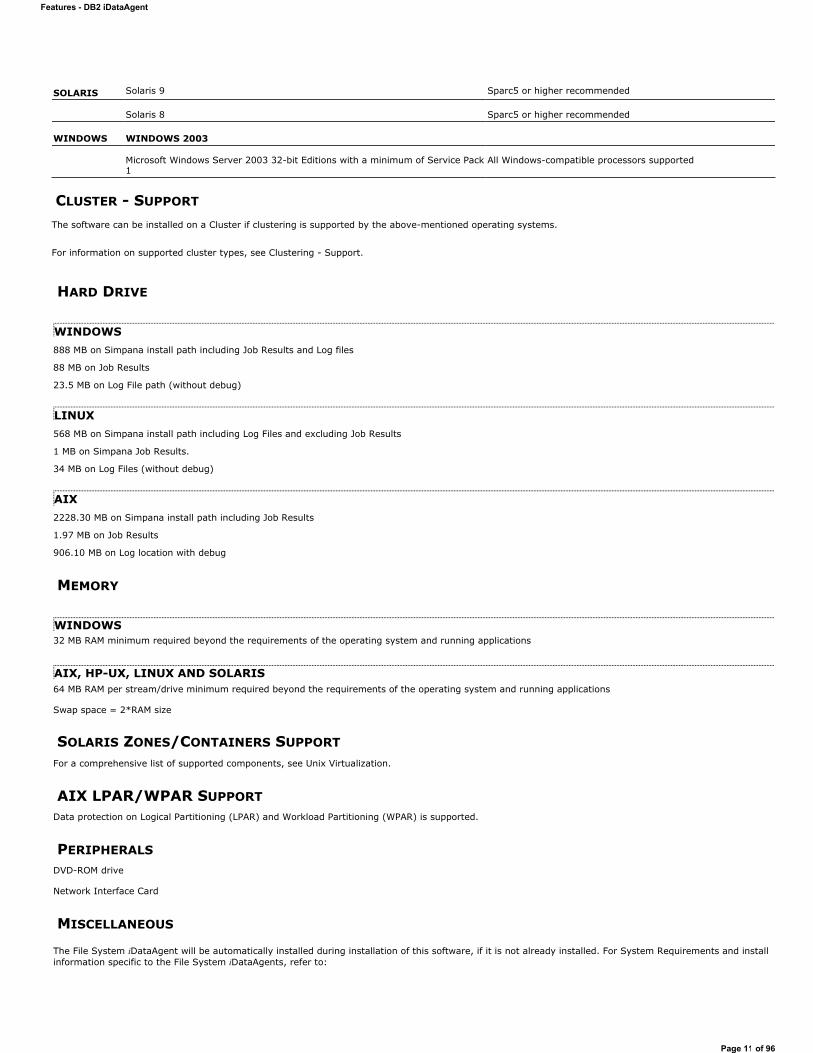
SOLARIS Solaris 9 Sparc5 or higher recommended
Solaris 8 Sparc5 or higher recommended
WINDOWS WINDOWS 2003
Microsoft Windows Server 2003 32-bit Editions with a minimum of Service Pack 1
All Windows-compatible processors supported
HARD DRIVE
WINDOWS888 MB on Simpana install path including Job Results and Log files
88 MB on Job Results
23.5 MB on Log File path (without debug)
LINUX568 MB on Simpana install path including Log Files and excluding Job Results
1 MB on Simpana Job Results.
34 MB on Log Files (without debug)
AIX2228.30 MB on Simpana install path including Job Results
1.97 MB on Job Results
906.10 MB on Log location with debug
MEMORY
WINDOWS32 MB RAM minimum required beyond the requirements of the operating system and running applications
AIX, HP-UX, LINUX AND SOLARIS64 MB RAM per stream/drive minimum required beyond the requirements of the operating system and running applications
Swap space = 2*RAM size
SOLARIS ZONES/CONTAINERS SUPPORTFor a comprehensive list of supported components, see Unix Virtualization.
AIX LPAR/WPAR SUPPORTData protection on Logical Partitioning (LPAR) and Workload Partitioning (WPAR) is supported.
PERIPHERALSDVD-ROM drive
Network Interface Card
MISCELLANEOUS
The File System iDataAgent will be automatically installed during installation of this software, if it is not already installed. For System Requirements and install information specific to the File System iDataAgents, refer to:
Features - DB2 iDataAgent
Page 11 of 96

System Requirements - Microsoft Windows File System iDataAgentSystem Requirements - AIX File System iDataAgentSystem Requirements - HP-UX File System iDataAgentSystem Requirements - Linux File System iDataAgentSystem Requirements - Solaris File System iDataAgent
On Solaris computers, the operating system must have been installed with at least the user level software option selected.
NETWORKTCP/IP Services configured on the computer.
SELINUXIf you have SELinux enabled on the client computer, create the SELinux policy module as a root user before performing a backup. The SELinux Development package must be installed on the client.
To create an SELinux policy module, perform the following steps as user "root":
1. Create the following files in the /usr/share/selinux/devel directory:
2. Create the policy file from command line. Use the following command. Ensure that you give the following commands in the /usr/share/selinux/develdirectory.
[root]# make backup_IDA.ppCompiling targeted backup_IDA module/usr/bin/checkmodule: loading policy configuration from tmp/backup_IDA.tmp/usr/bin/checkmodule: policy configuration loaded/usr/bin/checkmodule: writing binary representation (version 6) to tmp/backup_IDA.modCreating targeted backup_IDA.pp policy packagerm tmp/backup_IDA.mod tmp/backup_IDA.mod.fc[root]# semodule -i backup_IDA.pp
File Name Content of the File<directory>/<file_name>.tewhere:
<directory> is /usr/share/selinux/devel<file_name> is the name of the UNIX file, created to save the policy module statement. It is a good idea to use the same name for policy module and the file.
For example: When you are creating a policy module for backup_IDA application, you can use the following file name: backup_IDA.te
The content of the file should be as follows:
policy_module(<name>,<version>)
##############################
where:
<name> is the name of the policy module. You can give any unique name to the policy module, such as a process or application name.
<version> is the version of the policy module. It can be any number, such as 1.0.0.
For Example: While creating a policy module for the backup_IDA application, you can use the following content.
policy_module(backup_IDA,1.0.0)<directory>/<file_name>.fcwhere:
<directory> is /usr/share/selinux/devel<file_name> is the name of the UNIX file, created to save the policy module statement. It is a good idea to use the same name for policy module and the file.
For example: When you are creating a policy module for backup_IDA application, you can use the following file name: backup_IDA.fc
The content of the file should be as follows:
Note that the following list of files is not exhaustive. If the process fails to launch, check /var/log/messages. Also, if required, add it to the following list of files.
/opt/<software installation directory>/Base/libCTreeWrapper.so -- gen_context(system_u:object_r:texrel_shlib_t,s0)/opt/<software installation directory>/Base/libCVMAGuiImplgso -- gen_context(system_u:object_r:texrel_shlib_t,s0)/opt/<software installation directory>/Base/libdb2locale.so.1 -- gen_context(system_u:object_r:texrel_shlib_t,s0)/opt/<software installation directory>/Base/libdb2osse.so.1 -- gen_context(system_u:object_r:texrel_shlib_t,s0)/opt/<software installation directory>/Base/libDb2Sbt.so -- gen_context(system_u:object_r:texrel_shlib_t,s0)/opt/<software installation directory>/Base/libdb2trcapi.so.1 -- gen_context(system_u:object_r:texrel_shlib_t,s0)/opt/<software installation directory>/Base/libDrDatabase.so -- gen_context(system_u:object_r:texrel_shlib_t,s0)/opt/<software installation directory>/Base/libIndexing.so -- gen_context(system_u:object_r:texrel_shlib_t,s0)/opt/<software installation directory>/Base/libSnooper.so -- gen_context(system_u:object_r:texrel_shlib_t,s0)
Features - DB2 iDataAgent
Page 12 of 96
DISCLAIMER
Minor revisions and/or service packs that are released by application and operating system vendors are supported by our software but may not be individually listed in our System Requirements. We will provide information on any known caveat for the revisions and/or service packs. In some cases, these revisions and/or service packs affect the working of our software. Changes to the behavior of our software resulting from an application or operating system revision/service pack may be beyond our control. The older releases of our software may not support the platforms supported in the current release. However, we will make every effort to correct the behavior in the current or future releases when necessary. Please contact your Software Provider for any problem with a specific application or operating system.
Additional considerations regarding minimum requirements and End of Life policies from application and operating system vendors are also applicable
[root]#
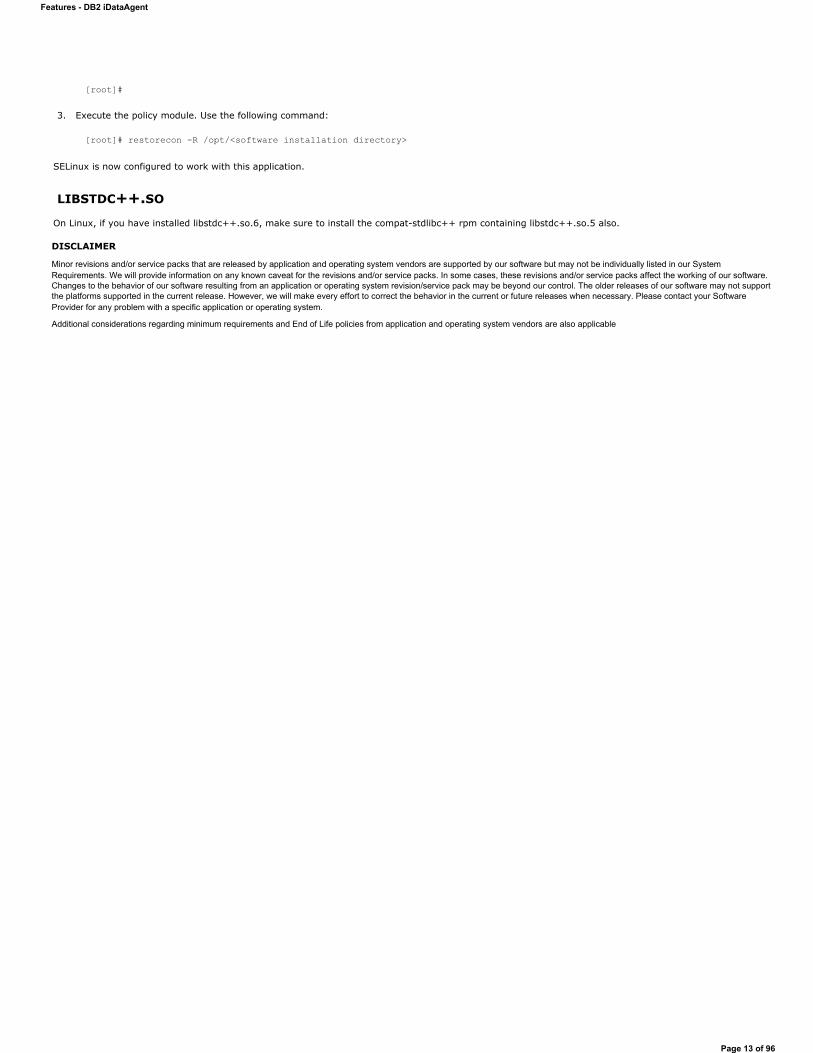
3. Execute the policy module. Use the following command:
[root]# restorecon -R /opt/<software installation directory>
SELinux is now configured to work with this application.
LIBSTDC++.SO
On Linux, if you have installed libstdc++.so.6, make sure to install the compat-stdlibc++ rpm containing libstdc++.so.5 also.
Features - DB2 iDataAgent
Page 13 of 96
Install the DB2 iDataAgent - WindowsTABLE OF CONTENTS
Install Requirements
Before You Begin
Install ProcedureGetting StartedSelect Components for InstallationConfiguration of Other Installation OptionsClient Group SelectionSchedule Automatic UpdateStorage Policy SelectionSelect DB2 PathsVerify Summary of Install OptionsSetup Complete
Post-Install Considerations
INSTALL REQUIREMENTSThe DB2 iDataAgent is installed on the computer from which the iDataAgent secures data. (This computer is referred to as the Client computer in this install procedure.)
Verify that the computer in which you wish to install the software satisfies the minimum requirements specified in System Requirements - DB2 iDataAgent and in System Requirements - Microsoft Windows File System iDataAgent.
Before you review the following list, ensure that the DB2 development tool from the DB2 software is installed on the client.
The following procedure describes the steps involved in installing the Windows File System and DB2 iDataAgents. If you choose to install multiple components simultaneously, refer to the appropriate procedures for installation requirements and steps specific to the component. Note that when you install multiple components, the sequence of the install steps may vary.
Review the following Install Requirements before installing the software:
GENERALReview Install Considerations before installing the software.
Agents should be installed only after the CommServe and at least one MediaAgent have been installed in the CommCell. Also, keep in mind that the
CommServe® software and MediaAgent must be installed and running (but not necessarily on the same computer), before you can install the Agent.
Close all applications and disable any programs that run automatically, including anti-virus, screen savers and operating system utilities. Some of the programs, including many anti-virus programs, may be running as a service. Stop and disable such services before you begin. You can re-enable them after the installation.
Ensure there is an available license on the CommServe software for the Agent.
Verify that you have the Software Installation Disc that is appropriate to the destination computer’s operating system.
BEFORE YOU BEGINLog on to the client as local Administrator or as a member of the Administrators group on that computer.
INSTALL PROCEDURE
GETTING STARTED
1. Place the Software Installation Disc for the Windows platform into the disc drive.
After a few seconds, the installation program is launched.
If the installation program does not launch automatically:
Click the Start button on the Windows task bar, and then click Run. Browse to the installation disc drive, select Setup.exe, click Open, then click OK.
NOTES
If you are installing on Windows Server Core editions, mount to Software Installation Disc through command line, go to the AMD64 folder and run Setup.exe.
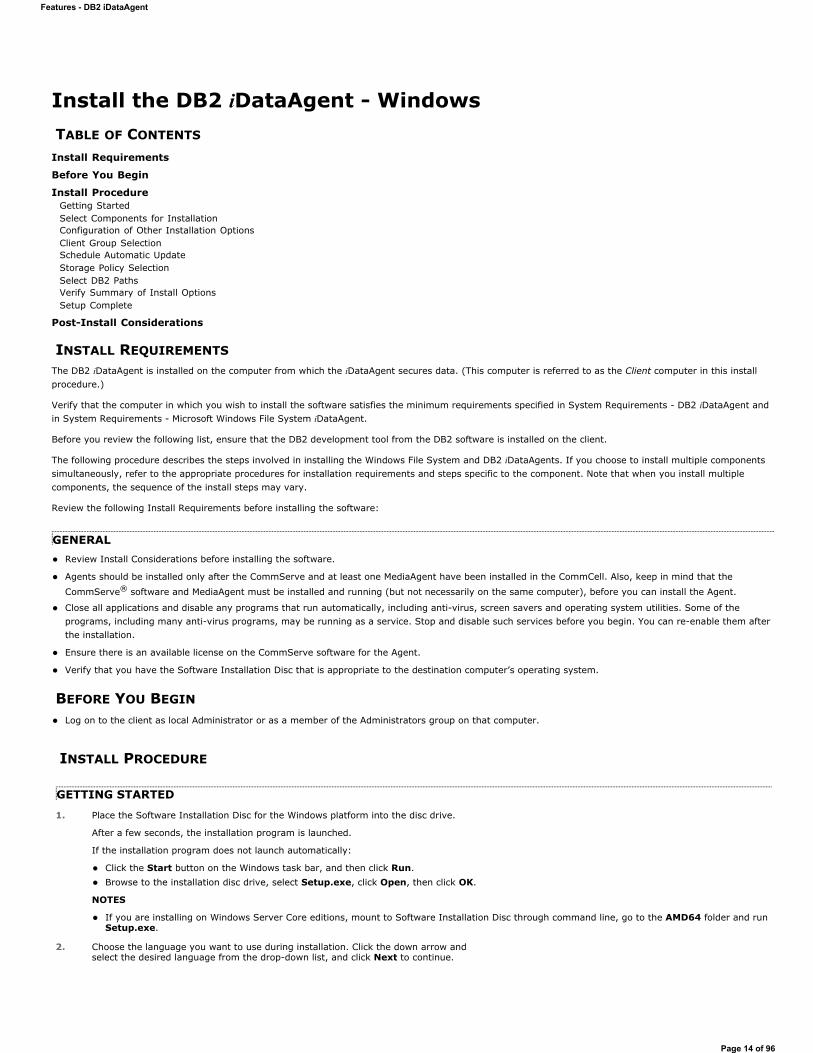
2. Choose the language you want to use during installation. Click the down arrow and select the desired language from the drop-down list, and click Next to continue.
Features - DB2 iDataAgent
Page 14 of 96
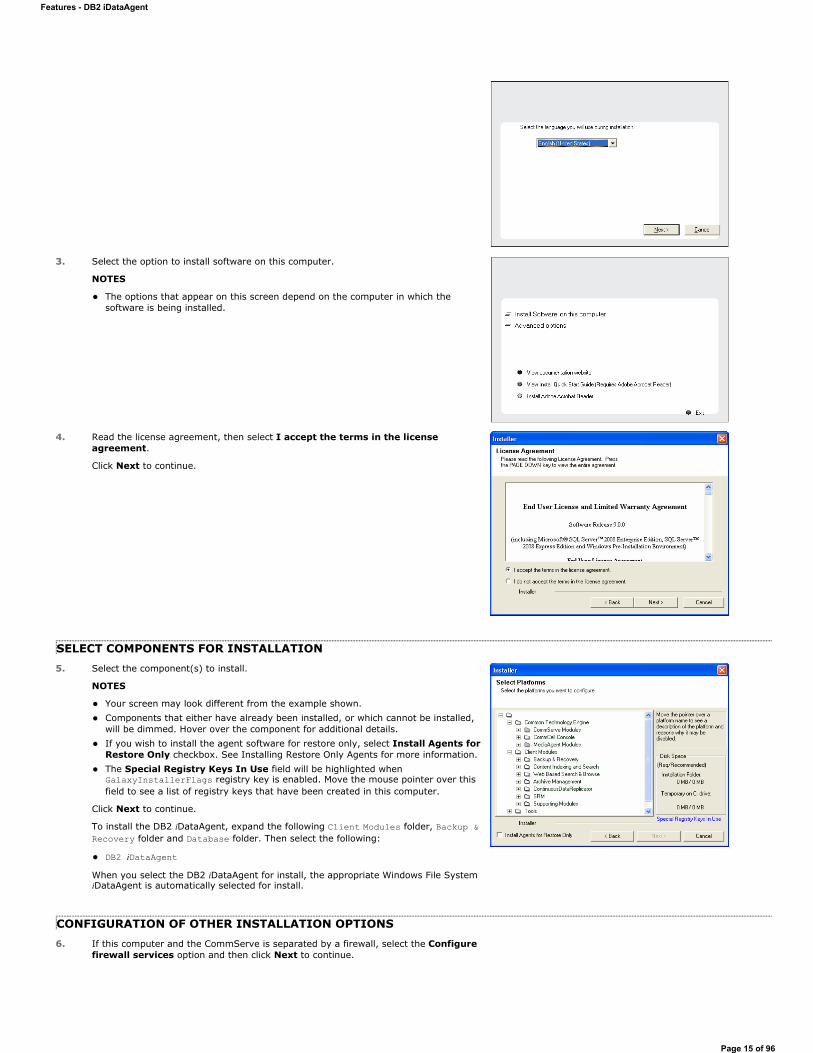
3. Select the option to install software on this computer.
NOTES
The options that appear on this screen depend on the computer in which the software is being installed.
4. Read the license agreement, then select I accept the terms in the license agreement.
Click Next to continue.
SELECT COMPONENTS FOR INSTALLATION5. Select the component(s) to install.
NOTES
Your screen may look different from the example shown. Components that either have already been installed, or which cannot be installed, will be dimmed. Hover over the component for additional details. If you wish to install the agent software for restore only, select Install Agents for Restore Only checkbox. See Installing Restore Only Agents for more information. The Special Registry Keys In Use field will be highlighted when GalaxyInstallerFlags registry key is enabled. Move the mouse pointer over this field to see a list of registry keys that have been created in this computer.
Click Next to continue.
To install the DB2 iDataAgent, expand the following Client Modules folder, Backup & Recovery folder and Database folder. Then select the following:
DB2 iDataAgentWhen you select the DB2 iDataAgent for install, the appropriate Windows File System iDataAgent is automatically selected for install.
CONFIGURATION OF OTHER INSTALLATION OPTIONS6. If this computer and the CommServe is separated by a firewall, select the Configure
firewall services option and then click Next to continue.
Features - DB2 iDataAgent
Page 15 of 96
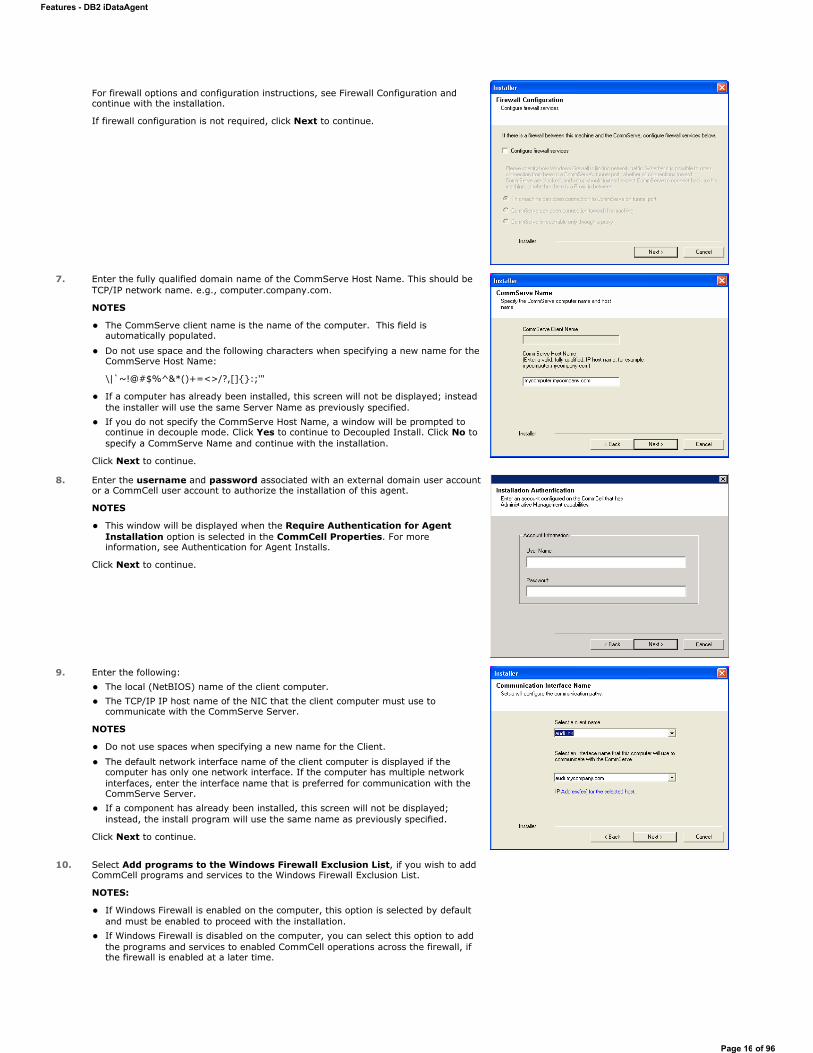
For firewall options and configuration instructions, see Firewall Configuration and continue with the installation.
If firewall configuration is not required, click Next to continue.
7. Enter the fully qualified domain name of the CommServe Host Name. This should be TCP/IP network name. e.g., computer.company.com.
NOTES
The CommServe client name is the name of the computer. This field is automatically populated.
Do not use space and the following characters when specifying a new name for the CommServe Host Name:
\|`~!@#$%^&*()+=<>/?,[]{}:;'"
If a computer has already been installed, this screen will not be displayed; instead the installer will use the same Server Name as previously specified. If you do not specify the CommServe Host Name, a window will be prompted to continue in decouple mode. Click Yes to continue to Decoupled Install. Click No to specify a CommServe Name and continue with the installation.
Click Next to continue.
8. Enter the username and password associated with an external domain user account or a CommCell user account to authorize the installation of this agent.
NOTES
This window will be displayed when the Require Authentication for AgentInstallation option is selected in the CommCell Properties. For more information, see Authentication for Agent Installs.
Click Next to continue.
9. Enter the following: The local (NetBIOS) name of the client computer. The TCP/IP IP host name of the NIC that the client computer must use to communicate with the CommServe Server.
NOTES
Do not use spaces when specifying a new name for the Client.
The default network interface name of the client computer is displayed if the computer has only one network interface. If the computer has multiple network interfaces, enter the interface name that is preferred for communication with the CommServe Server. If a component has already been installed, this screen will not be displayed; instead, the install program will use the same name as previously specified.
Click Next to continue.
10. Select Add programs to the Windows Firewall Exclusion List, if you wish to add CommCell programs and services to the Windows Firewall Exclusion List.
NOTES:
If Windows Firewall is enabled on the computer, this option is selected by default and must be enabled to proceed with the installation. If Windows Firewall is disabled on the computer, you can select this option to add the programs and services to enabled CommCell operations across the firewall, if the firewall is enabled at a later time.
Features - DB2 iDataAgent
Page 16 of 96
You can either select this option during install or add the programs and services after installation. For adding the programs and services after installation, see Configure Windows Firewall to Allow CommCell Communication.
Click Next to continue.
11. Specify the location where you want to install the software.
NOTES
Do not install the software to a mapped network drive. Do not use the following characters when specifying the destination path: / : * ? " < > | #It is recommended that you use alphanumeric characters only. If you intend to install other components on this computer, the selected installation directory will be automatically used for that software as well. If a component is already installed in this computer, this screen may not be displayed. The software will be automatically installed in the same location that was previously specified.
Click Browse to change directories.
Click Next to continue.
CLIENT GROUP SELECTION12. Select a Client Group from the list.
Click Next to continue.
NOTES
This screen will be displayed if Client Groups are configured in the CommCell Console. For more information, see Client Computer Groups.
SCHEDULE AUTOMATIC UPDATE13. If necessary, select this option to schedule an automatic installation of software
updates.
NOTES
Schedule Install of Automatic Updates allows automatic installation of the necessary software updates on the computer on a single or weekly basis. If you do not select this option, you can schedule these updates later from the CommCell Console. To avoid conflict, do not schedule the automatic installation of software updates to occur at the same time as the automatic FTP downloading of software updates.
If a component has already been installed, this screen will not be displayed; instead, the installer will use the same option as previously specified.
Click Next to continue.
STORAGE POLICY SELECTION
Features - DB2 iDataAgent
Page 17 of 96
14. Select the storage policy through which you want to back up/archive the agent.
NOTES
A storage policy directs backup data to a media library. If desired, you can change your storage policy selection at any time after you have installed the client software. This screen may appear more than once, if you have selected multiple agents for installation. You will be prompted to configure the storage policy association for each of the selected agents.
Click Next to continue.
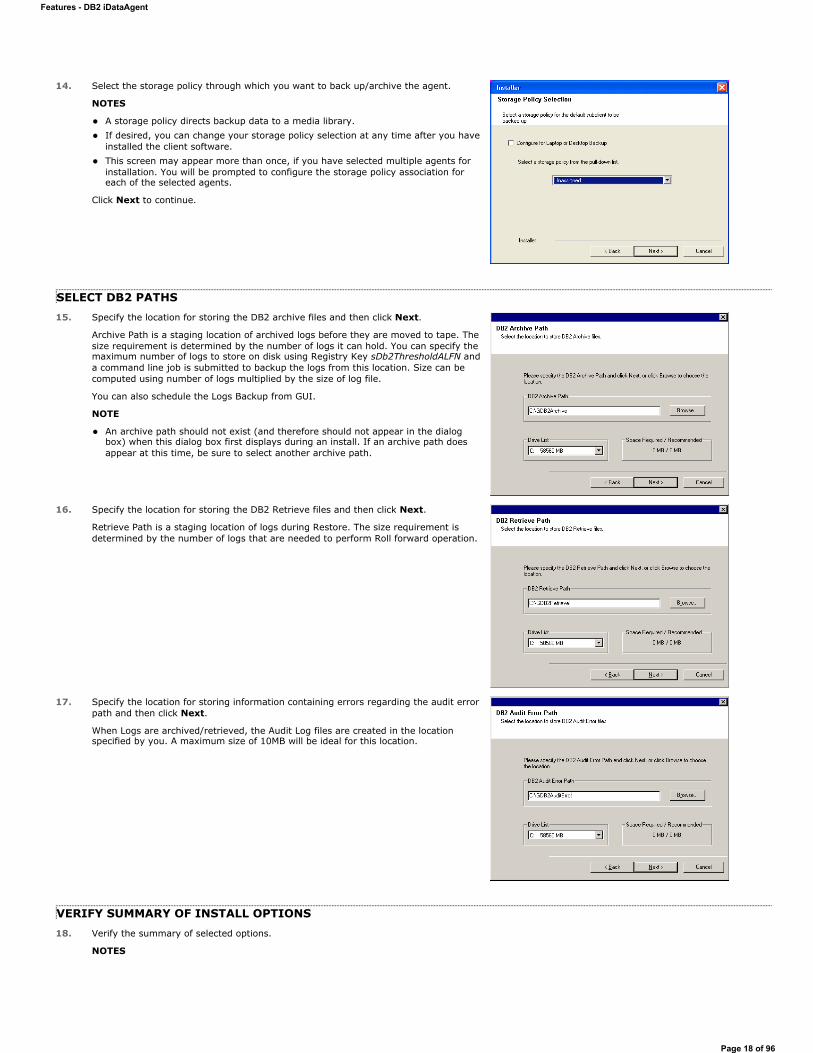
SELECT DB2 PATHS15. Specify the location for storing the DB2 archive files and then click Next.
Archive Path is a staging location of archived logs before they are moved to tape. The size requirement is determined by the number of logs it can hold. You can specify the maximum number of logs to store on disk using Registry Key sDb2ThresholdALFN and a command line job is submitted to backup the logs from this location. Size can be computed using number of logs multiplied by the size of log file.
You can also schedule the Logs Backup from GUI.
NOTE
An archive path should not exist (and therefore should not appear in the dialog box) when this dialog box first displays during an install. If an archive path does appear at this time, be sure to select another archive path.
16. Specify the location for storing the DB2 Retrieve files and then click Next.
Retrieve Path is a staging location of logs during Restore. The size requirement is determined by the number of logs that are needed to perform Roll forward operation.
17. Specify the location for storing information containing errors regarding the audit error path and then click Next.
When Logs are archived/retrieved, the Audit Log files are created in the location specified by you. A maximum size of 10MB will be ideal for this location.
VERIFY SUMMARY OF INSTALL OPTIONS18. Verify the summary of selected options.
NOTES
Features - DB2 iDataAgent
Page 18 of 96
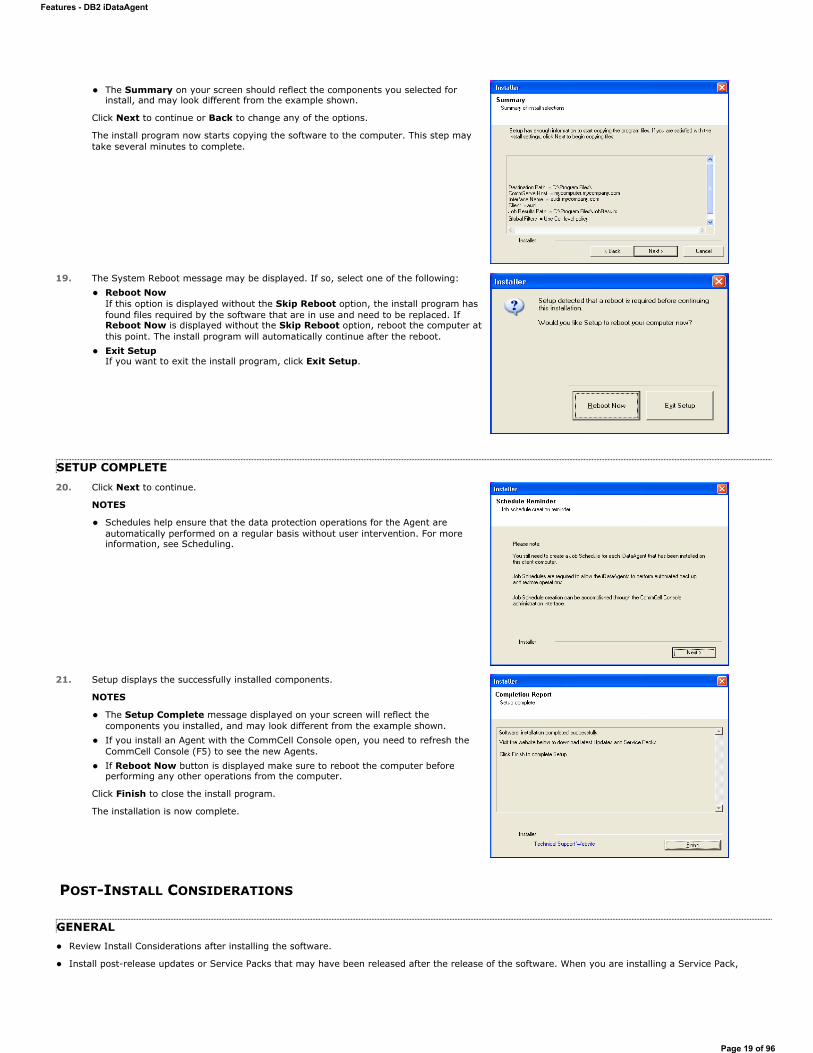
The Summary on your screen should reflect the components you selected for install, and may look different from the example shown.
Click Next to continue or Back to change any of the options.
The install program now starts copying the software to the computer. This step may take several minutes to complete.
19. The System Reboot message may be displayed. If so, select one of the following: Reboot NowIf this option is displayed without the Skip Reboot option, the install program has found files required by the software that are in use and need to be replaced. If Reboot Now is displayed without the Skip Reboot option, reboot the computer at this point. The install program will automatically continue after the reboot. Exit SetupIf you want to exit the install program, click Exit Setup.
SETUP COMPLETE20. Click Next to continue.
NOTES
Schedules help ensure that the data protection operations for the Agent are automatically performed on a regular basis without user intervention. For more information, see Scheduling.
21. Setup displays the successfully installed components.
NOTES
The Setup Complete message displayed on your screen will reflect the components you installed, and may look different from the example shown. If you install an Agent with the CommCell Console open, you need to refresh the CommCell Console (F5) to see the new Agents. If Reboot Now button is displayed make sure to reboot the computer before performing any other operations from the computer.
Click Finish to close the install program.
The installation is now complete.
POST-INSTALL CONSIDERATIONS
GENERALReview Install Considerations after installing the software.
Install post-release updates or Service Packs that may have been released after the release of the software. When you are installing a Service Pack,
Features - DB2 iDataAgent
Page 19 of 96

ensure that it is the same version as the one installed in the CommServe Server. Alternatively, you can enable Automatic Updates for quick and easy installation of updates in the CommCell component.
Features - DB2 iDataAgent
Page 20 of 96
Install the DB2 iDataAgent - UnixTABLE OF CONTENTS
Where to Install
Install Requirements
Before You Begin
Install ProcedureGetting StartedSelect Components for InstallationBase Software InstallationKernel ParametersStorage Policy SelectionEnable Global FiltersClient Group SelectionConfigure DB2-Specific InformationSetup Complete
Post-Install Considerations
WHERE TO INSTALL
INSTALLING ON A UNIX SERVER
Install the software directly on the computer hosting the Unix Server that you wish to protect. Make sure the computer satisfies the minimum requirements specified in the System Requirements.
INSTALLING ON A NON-GLOBAL ZONEInstall the software on each of the non-global zones where you have application data.
Verify that the computer in which you wish to install the software satisfies the minimum requirements specified in the following:
System Requirements - DB2 iDataAgent
System Requirements - AIX File System iDataAgent
System Requirements - HP-UX File System iDataAgent
System Requirements - Linux File System iDataAgent
System Requirements - Solaris File System iDataAgent
It is recommended to install the software on the global zone to protect non-changing or static data on non-global zones. If the data is dynamic or contains application data, install the software on the non-global zone.
INSTALL REQUIREMENTSThe following procedure describes the steps involved in installing DB2 and Unix File System iDataAgents. (This computer is referred to as the Client computer in this install procedure.)
The DB2 iDataAgent is installed on the computer from which the iDataAgent secures data. Before you review the following list, ensure that the DB2 development tool from the DB2 software is installed on the client.
Review the following Install Requirements before installing the software:
GENERALReview Install Considerations before installing the software.
Agents should be installed only after the CommServe and at least one MediaAgent have been installed in the CommCell. Also, keep in mind that the CommServe and MediaAgent must be installed and running (but not necessarily on the same computer), before you can install the Agent.
Ensure there is an available license on the CommServe for the Agent.
Verify that you have the Software Installation Disc that is appropriate to the destination computer’s operating system.
BEFORE YOU BEGINLog on to the client as root.
The install package requires super-user permissions to execute.
INSTALL PROCEDURE
Features - DB2 iDataAgent
Page 21 of 96
GETTING STARTED
1. If you are installing the software on a Unix Server, do the following: Place the software installation disc for the Unix platform into the disc drive.
You can also install the product using a disc drive mounted on another computer on the network.
On Solaris, double-click the cvpkgadd program from the File Manager window. On other Unix platforms, open the Terminal window, navigate to the software installation disc and then enter ./cvpkgadd.
If you are installing the software on a non-global zone, do the following: Mount the installation disc on the non-global zone.
mkdir <Non-Global Zone root location>/<Non-Global Zone local directory> mount –F lofs <Global zone software Install Disc mount point> <Non-Global Zone root location>/<Non-Global Zone local directory>Connect to Non-Global Zone terminalRun the following command from the Software Installation Disc:
./cvpkgadd
2. The product banner and other information is displayed.
Press Enter to continue.
3. Read the license agreement. Type y and press Enter to continue.
4. Enter the number corresponding to the setup task you want to perform.
NOTES
For Install data protection agents on this computer option, follow the steps described in this procedure. Advance options provide additional setup features such as record and play setup, creating a custom package and External Data Connector Agent software.
To create a custom package and for record and play setup, follow the steps described in Custom Package - Unix.
To install the External Data Connector Agent, follow the steps described in External Data Connector - Unix.
Please select a setup task you want to perform from the list below:Advance options provide extra setup features such as creating custom package, recording/replaying user selections and installing External Data Connector software.1) Install data protection agents on this computer2) Advance options3) Exit this menuYour choice: [1]
5. If your computer is 32-bit, press Enter.
If your computer is 64-bit, see Install Unix Agents on 64-bit Platform for step-by-step procedure.
This machine supports both 32 bit and 64 bit binaries. By default, we will install 32 bit binary set that has full support for all the modules included in this package. Please note that 64 bit binary set currently only support limited modules.1) All platforms (32 bit)2) FS and MA only (64 bit)Your choice: [1]
6. This prompt is displayed only when you are installing on AIX, HP-UX, Linux, or Solaris computers.
Press Enter to continue
NOTES
When you install on non-clustered computer, you must select the number associated with the option Install on a physical machine.
Certain Simpana packages can be associated with a virtual IP, or in other words, installed on a "virtual machine" belonging to some cluster. At any given time the virtual machine's services and IP address are active on only one of the cluster's servers. The virtual machine can "fail-over" from one server to another, which includes stopping services and deactivating IP address on the first server and activating the IP address/services on the other server.You now have a choice of performing a regular Simpana install on the physical host or installing Simpana on a virtual machine for operation within a cluster. Most users should select "Install on a physical machine" here. 1) Install on a physical machine 2) Install on a virtual machine 3) Exit Your choice: [1]
7. If you have only one network interface, press Enter to accept the default network interface name and continue.
If you have multiple network interfaces, enter the number corresponding to the network interface that you wish to use as default, and then press Enter to continue.
NOTES
The interface name and IP addresses depend on the computer in which the software is installed and may be different from the example shown.
We found one network interface available on your machine. We will associate it with the physical machine being installed, and it will also be used by the CommServe to connect to the physical machine. Note that you will be able to additionally customize Datapipe Interface Pairs used for the backup data traffic later in the Simpana Java GUI.Please check the interface name below, and make connections if necessary:Physical Machine Host Name: [angel.company.com]
8. Specify the client name for the computer. Please specify the client name for this machine.
Features - DB2 iDataAgent
Page 22 of 96
Press Enter to accept the default name and continue, orEnter a new client name for the computer and then press Enter to continue.
It does not have to be the network host name: you can enter any word here without spaces. The only requirement is that it must be unique on the CommServe.Physical Machine Client name: [angel]
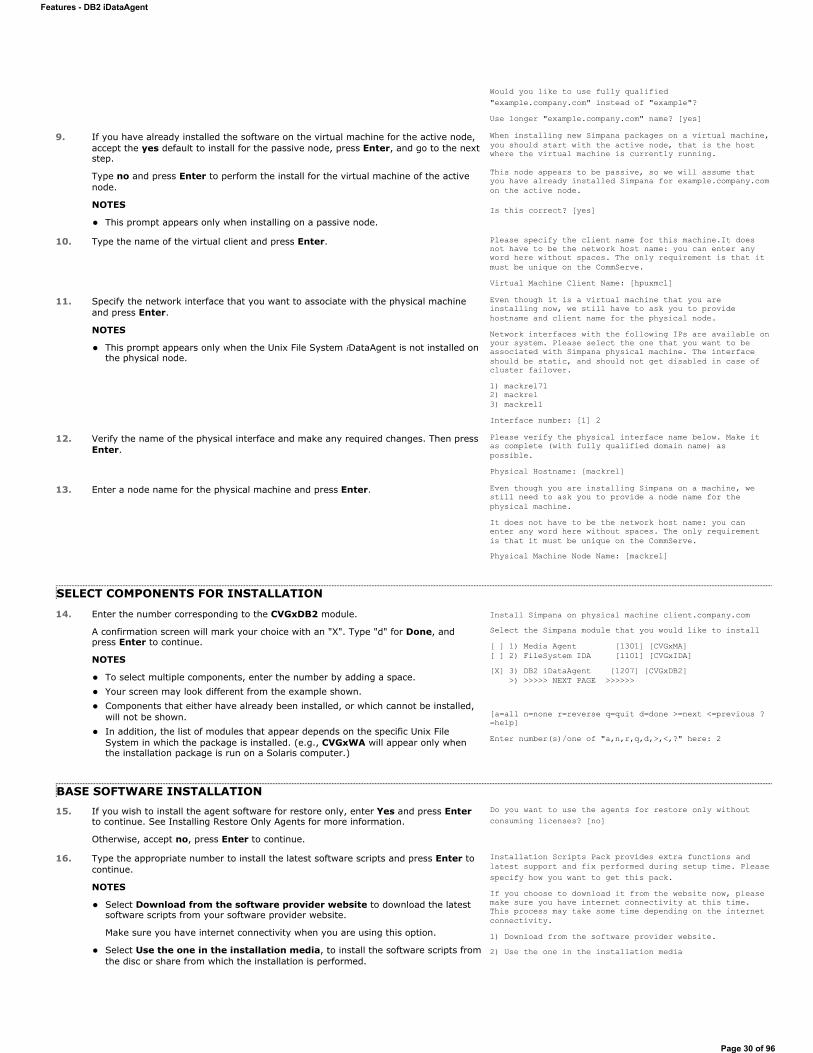
SELECT COMPONENTS FOR INSTALLATION
9. Enter the number corresponding to the CVGxDB2 module.
A confirmation screen will mark your choice with an "X". Type "d" for Done, and press Enter to continue.
NOTES
To select multiple component, enter the number by adding a space. Your screen may look different from the example shown. Components that either have already been installed, or which cannot be installed, will not be shown. In addition, the list of modules that appear depends on the specific Unix File System in which the package is installed. (e.g., CVGxWA will appear only when the installation package is run on a Solaris computer.)
Install Simpana on physical machine client.company.comSelect the Simpana module that you would like to install[ ] 1) Media Agent [1301] [CVGxMA][ ] 2) FileSystem IDA [1101] [CVGxIDA] >) >>>>> NEXT PAGE >>>>>>[a=all n=none r=reverse q=quit d=done >=next <=previous ?=help]Enter number(s)/one of "a,n,r,q,d,>,<,?" here: 2
BASE SOFTWARE INSTALLATION10. If you wish to install the agent software for restore only, enter Yes and press Enter
to continue. See Installing Restore Only Agents for more information.
Otherwise, accept no, press Enter to continue.
Do you want to use the agents for restore only without consuming licenses? [no]
11. Type the appropriate number to install the latest software scripts and press Enter to continue.
NOTES
Select Download from the software provider website to download the latest software scripts from your software provider website.
Make sure you have internet connectivity when you are using this option.
Select Use the one in the installation media, to install the software scripts from the disc or share from which the installation is performed. Select Use the copy I already have by entering its unix path, to specify the path if you have the software script in an alternate location.
Installation Scripts Pack provides extra functions and latest support and fix performed during setup time. Please specify how you want to get this pack.If you choose to download it from the website now, please make sure you have internet connectivity at this time. This process may take some time depending on the internet connectivity.1) Download from the software provider website.2) Use the one in the installation media3) Use the copy I already have by entering its unix pathYour choice: [1] 2
12. Enter Yes to download and install the latest service packs and post packs from the software provider.
NOTES
Internet connectivity is required to download updates. This step is applicable for multi instancing.
Press Enter to continue.
Keep Your Install Up to Date - Latest Service Pack Latest Service Pack provides extra functions and latest support and fix for the packages you are going to install. You can download the latest service pack from software provider website.If you decide to download it from the website now, please make sure you have internet connectivity at this time. This process may take some time depending on the internet connectivity.Do you want to download the latest service pack now? [no] Press <ENTER> to continue ...
13. Specify the location where you want to install the software.
NOTES
The amount of free space required depends on the components selected for install, and may look different from the example shown.
Press Enter to accept the default path and continue, orEnter a path and then press Enter to continue.
Press Enter again to confirm the path.
Please specify where you want us to install Simpana binaries. It must be a local directory and there should be at least 98MB of free space available. All files will be installed in a "simpana" subdirectory, so if you enter "/opt", the files will actually be placed into "/opt/simpana".Installation Directory: [/opt]..Simpana will be installed in /opt/simpana. Press ENTER to continue ...
14. Specify the location for the log files.
NOTES
All the modules installed on the computer will store the log files in this directory.
The amount of free space required depends on the components selected for install, and may look different from the example shown.
Press Enter to accept the default path and continue, orEnter a path and then press Enter to continue.
Press Enter again to confirm the path.
Please specify where you want to keep Simpana log files.It must be a local directory and there should be at least 100MB of free space available. All log files will be created in a "simpana/Log_Files" subdirectory, so if you enter "/var/log", the logs will actually be placed into "/var/log/simpana/Log_Files".Log Directory: [/var/log]..Simpana log files will be created in /var/log/simpana/Log_Files.Press ENTER to continue ...
Features - DB2 iDataAgent
Page 23 of 96
15. Indicate whether you would like to launch processes with inherent database access rights.
Press Enter to assign a new group, orType No and then press Enter to continue.
Most of Simpana processes run with root privileges, but some are launched by databases and inherit database access rights. To make sure that registry and log files can be written to by both kinds of processes we can either make such files world-writeable or we can grant write access only to processes belonging to a particular group, e.g. a "simpana" or a "dba" group.We highly recommend now that you create a new user group and enter its name in the next setup screen. If you choose not to assign a dedicated group to Simpana processes, all temporary and configuration files will be created with -rw-rw-rw permissions. If you're planning to backup Oracle DB you should use "dba" group. Would you like to assign a specific group to Simpana? [yes]
16. If you indicated Yes in the previous step, you will be prompted for the group name that must be used to launch processes.
Enter the group name and then press Enter to continue.
Press Enter again to continue.
Please enter the name of the group which will be assigned to all Simpana files and on behalf of which all Simpana processes will run.In most of the cases it's a good idea to create a dedicated "simpana" group. However, if you're planning to use Oracle iDataAgent or SAP Agent, you should enter Oracle's "dba" group here.Group name: dbaREMINDERIf you are planning to install Simpana Informix, DB2, PostgreSQL, Sybase or Lotus Notes iDataAgent, please make sure to include Informix, DB2, etc. users into group "dba".Press <ENTER> to continue ...
17. Type a network TCP port number for the Communications Service (CVD) and press Enter.
Type a network TCP port number for the Client Event Manager Service (EvMgrC) and press Enter.
NOTES
For more information about Network TCP Ports, see Network TCP Port Requirements. For more information about these services, see Services. If the port number you entered already exists, a message will be displayed Port #### is already reserved in /etc/services. To work around this issue, enter different port number.
Every instance of Simpana should use a unique set of network ports to avoid interfering with other instances running on the same machine.The port numbers selected must be from the reserved port number range and have not been registered by another application on this machine.
Please enter the port numbers.
Port Number for CVD : [8600]
Port Number for EvMgrC: [8602]
18. If this computer and the CommServe is separated by a firewall, type Yes and then press Enter to continue.
For firewall options and configuration instructions, see Firewall Configuration and continue with the installation.
If you do not wish to configure the firewall services, type No and then press Enter to continue.
Is there a firewall between this client and the CommServe? [no]
19. Type the name of the CommServe computer and press Enter to continue.
NOTES
Ensure that the CommServe is accessible before typing the name; otherwise the installation will fail. If you enter a short name which resolves to the same IP address as the fully qualified CommServe name, you will be asked if you would prefer to use the fully qualified name.
Please specify hostname of the CommServe below. Make sure the hostname is fully qualified, resolvable by the name services configured on this machine.CommServe Host Name:
20. Enter the username and password information for an external domain user account or a CommCell user account. This authorizes the installation of an agent on the CommCell.
NOTES
This is only displayed when the Authentication for Agent feature is enabled in the CommCell Properties. Users must belong to a User Group with Agent Management capabilities to enable this feature. For more information, see Authentication for Agent Installs.
Click Enter to continue.
Enter your CommCell user name and password:User Name : Password :
Press <ENTER> to continue ...
KERNEL PARAMETERS
21. Enter the appropriate number of streams, and then press Enter to continue, orPress Enter to accept the default number of streams and continue.
NOTES
Please enter the total number of streams that you plan to run at the same time. We need to make sure that you have enough semaphores and shared memory segments configured in /etc/system.
Features - DB2 iDataAgent
Page 24 of 96

The number of streams specified ensures that concurrent backup/restore streams would have sufficient system resources. For more information on the subject, see Configuring Kernel Parameters for Macintosh and Configuring Kernel Parameters for Solaris.
This prompt is relevant only when you install/upgrade on a Macintosh or Solaris computer as appropriate.
Number of streams: [10]
22. Indicate whether you would like modifications to be made to the /etc/systemconfiguration file.
Type Yes, and then press Enter to automatically update the file and continue, orPress Enter to accept the default No and continue (if you do not want to automatically update the file).
This prompt is displayed only when you install/upgrade on a Solaris (8 or 9) or Macintosh computer.
We now need to modify the /etc/system configuration file on this computer. It is done to make sure that there will be enough shared memory and semaphores available for Simpana programs.Please review the changes below and answer "yes" if you want us to apply them to the /etc/system file. Otherwise, the installation will proceed, the changes will be saved to some other file, and you will have to apply them manually.set shmsys:shminfo_shmmni=8570 (was 7930)set shmsys:shminfo_shmseg=8420 (was 7780)set semsys:seminfo_semmns=10320 (was 9680)set semsys:seminfo_semmni=8570 (was 7930)set semsys:seminfo_semmsl=8570(was 7930)Do you want us to apply these changes now? [no]Changes saved into /etc/system.gal.1744Press <ENTER> to continue.
23. If you indicated No in the previous step, the file to which the changes have been saved is displayed.Make sure that these values are established later to ensure that all the requirements for this setup is satisfied.
NOTES
The settings that are displayed are the maximum or minimum required settings. Value ’640’, which is provided for various shared memory segment or semaphore requirements, is a maximum value based on 10 streams.
Press Enter to continue.
This prompt is displayed only when you install/upgrade on a Solaris (8 or 9) computer, in cases where the install detects that the computer does not have the maximum or minimum required shared memory settings.
Although a ’no’ answer can be selected to this question during install, the user should make sure the min requirements (below) for shared memory are met, otherwise the backups may fail (the message in logs is ’could not start the pipeline’).set shmsys:shminfo_shmmax=4199304set shmsys:shminfo_shmmin=1set semsys:shminfo_shmmni=640set semsys:shminfo_shmseg=640set semsys:seminfo_semmns=640set semsys:seminfo_semmni=640set semsys:seminfo_semmsl=640set maxusers=256
ENABLE GLOBAL FILTERS24. Type the appropriate number for configuring Global Filters for the default subclient
and press Enter to continue.
NOTES
Select Use Cell level Policy to inherit the global filter policy configuration set for the CommCell, i.e., if the Use Global Filters on All Subclients option is selected in the Global Filters dialog box (from the CommCell Console’s Control Panel), then this policy will be applied to the default subclient as well. If is not selected, then the global filters will not be applied to the default subclient. Select Always use Global filters to always apply the global filters policy to the default subclient regardless of the policy set for the CommCell. Select Do not use Global filters to disregard applying the global filters to the default subclient regardless of the policy set for the CommCell.
Commcell Level Global Filters are set through Simpana GUI's Control Panel in order to filter out certain directories or files from backup Commcell-widely. If you turn on the Global filters, they will be effective to the default subclient. There are three options you can choose to set the filters. 1) Use Cell level policy2) Always use Global filters3) Do not use Global filters Please select how to set the Global Filters for the default subclient? [1]
CLIENT GROUP SELECTION25. Type the number of a Client Group and press Enter.
A confirmation screen will mark your choice with an "X". Type d for done with the selection, and press Enter to continue.
NOTES
This screen will be displayed only if Client Groups are configured for the CommCell. For more information, see Client Computer Groups.
Client Group(s) is currently configured on CommServe cs.company.com. Please choose the group(s) that you want to add this client client.company.com to. The selected group(s) will be marked (X) and can be deselected if you enter the same number again. After you are finished with the selection, select "Done with the Selection".
[ ] 1) Unix[ ] 2) DR[ ] 3) DKS [a=all n=none r=reverse q=quit d=done >=next <=previous ?=help]Enter number(s)/one of "a,n,r,q,d,>,<,?" here: 2
26. Press Enter to continue.
NOTES
Schedules help ensure that the data protection operations for the Agent are automatically performed on a regular basis without user intervention. For more information, see Scheduling.
+---------------------+IMPORTANT:In addition to installing Simpana on this computer, you will also need to create a Job Schedule for each iDataAgent that has been installed on this client
Features - DB2 iDataAgent
Page 25 of 96
computer.Job Schedules are required to allow the Simpana iDataAgents to perform automated backup and restore operations.Job Schedule creation can be accomplished through the Simpana CommCell Console administration interface.+---------------------+
STORAGE POLICY SELECTION27. Enter the number corresponding to the storage policy through which you want to back
up the File System iDataAgent and then press Enter to continue.
NOTES
A storage policy directs backup data to a media library. Each library has a default storage policy. When you install an Agent, the install program creates a default subclient for most Agents. If desired, you can change your storage policy selection at any time after you have installed the client software. If this screen appears more than once, it is because you have selected multiple agents for installation and are configuring storage policy association for each of the installed agents.
Please select one storage policy for this IDA from the list below:1) SP_StandAloneLibrary2_22) SP_Library3_33) SP_MagLibrary4_44) fornax_fornax_HWCmp5) ranger_ranger_HWCmp6) fornax_fornax_ClntCmp7) fornax_fornax_MACmp8) fornax_fornax_NoCmpStorage Policy: [3]
CONFIGURE DB2-SPECIFIC INFORMATION28. Type the path for storing the DB2 archive files and then press Enter.
Archive Path is a staging location of archived logs before they are moved to tape. The size requirement is determined by the number of logs it can hold. You can specify the maximum number of logs to store on disk using Registry Key sDb2ThresholdALFN and a command line job is submitted to backup the logs from this location. Size can be computed using the number of logs multiplied by the size of log file.
NOTE
If the path that you enter does not exist, you will be asked if you want to create this path. In such a case, accept the yes default and then press Enter.
Please enter path to the DB2 Archive Directory. DB2 Archive Directory: /BU_area/db2/log
29. Type the path for storing information containing errors regarding the audit error path and then press Enter.
When Logs are archived/retrieved, the Audit Log files are created in the location specified by you. A maximum size of 10MB will be ideal for this location.
NOTE
If the path that you enter does not exist, you will be asked if you want to create this path. In such a case, accept the yes default and then press Enter.
Please enter path to the DB2 Audit Error Directory. DB2 Logs Directory: /BU_area/db2/log1
30. Type the path for storing the DB2 Retrieve files and then press Enter.
Retrieve Path is a staging location of logs during Restore. The size requirement is determined by the number of logs that are needed to perform Roll forward operation.
NOTE
If the path that you enter does not exist, you will be asked if you want to create this path. In such a case, accept the yes default and then press Enter.
Please enter path to the DB2 Retrieve Directory. DB2 Retrieve Directory: /BU_area/db2/ret
31. If you want to integrate the software with DB2 now, accept yes and press Enter. If you want to do this later, type No and press Enter.
In order to complete integration of Simpana with DB2, we need to create links to some Simpana binaries in each of the DB2 instance directories. We can either do it now, or if you prefer, you can run /space/opt/simpana /iDataAgent/Db2_install.sh script later yourself.
Would you like us to integrate Simpana with DB2 now? [yes]
32. Specify the DB2 Instance User name that was selected when the DB2 instance was installed. This is the first bit of information required to integrate the product with the appropriate DB2 server.
Type this name or accept the default and then press Enter.
To integrate Simpana with a DB2 server we need to create a set of links under lib subdirectory of the DB2 installation directory. Please specify the DB2 Instance User Name that was selected when DB2 Instance was installed.DB2 Instance User Name: [db2inst1]
33. You are notified in which DB2 directory the product links will be created.
Press Enter.
Simpana links will be created in /BU_area/db2as/sqllib/lib. Press <ENTER> to continue ...
34. Decide if you want to configure another DB2 instance.
If so, type yes, press Enter, and skip back two steps. Otherwise, accept no, press Enter and go to the next step.
Would you like to configure another DB2 instance?
Configure? [no]
Features - DB2 iDataAgent
Page 26 of 96
Back to Top
35. The install program now starts copying the software to the computer. The progress of the operation is displayed.
.....
.....
.....
.....Successfully copied xx files
36. If you have multiple instances of the database, ensure that the items listed are satisfied. Press Enter.
IMPORTANT
If you are planning to use Simpana <package> with several instances of the database, each running on behalf of different UNIX users, you must make sure that:
1) All database users have been added to each of the database groups involved. For example, if there is a "db2inst1" user from group "dba1" and "db2inst2" user from group "dba2", then both "db2inst1" and "db2inst2" should be included into "dba1" and "dba2" groups. On most UNIXes this can be accomplished by editing the /etc/group file.
2) The .profile of each database user must contains a "umask 002" command at the end, which will guarantee that all files created by one database user can be open for writing by other database users.
3) All database users should be added to the "dba" group that you have chosen for Simpana at the time of CVGxBase install.
If all of the above requirements are not fulfilled, Simpana will run into various "Permission denied" errors, and backups will not work.
Press <ENTER> to continue ...
37. A series of processing messages appears. The next-to-last message should indicate that DB2 has been installed.
As prompted at the end, press Enter.
Updating registry tree under /etc/CommVaultRegistry ... done.Preconfiguring DB2 DataAgent on the CommServe ... done.Creating Simpana links under /BU_area/db2as/sqllib/lib ...done. Successfully installed CVGxDB2.Press ENTER to continue ...
SETUP COMPLETE38. This prompt is displayed only when you are installing on HP-UX, Linux, or Solaris
computers. Enter the number corresponding to the Exit option and then press Enter to continue.
The installation is now complete.
Certain Simpana packages can be associated with a virtual IP, or in other words, installed on a "virtual machine" belonging to some cluster. At any given time the virtual machine's services and IP address are active on only one of the cluster's servers. The virtual machine can "fail-over" from one server to another, which includes stopping services and deactivating IP address on the first server and activating the IP address/services on the other server. Currently you have Simpana installed on physical node stone.company.com.Now you have a choice of either adding another package to the existing installation or configure Simpana on a virtual machine for use in a cluster.1) Add another package to stone.company.com 2) Install Simpana on a virtual machine 3) Exit Your choice: [1]
POST-INSTALL CONSIDERATIONS
GENERALReview Install Considerations after installing the software.
Install post-release updates or Service Packs that may have been released after the release of the software. When you are installing a Service Pack, ensure that it is the same version as the one installed in the CommServe Server. Alternatively, you can enable Automatic Updates for quick and easy installation of updates in the CommCell component.
Features - DB2 iDataAgent
Page 27 of 96
Install the DB2 iDataAgent - Unix - Clustered EnvironmentTABLE OF CONTENTS
Install Requirements
Before You Begin
Install ProcedureGetting StartedCluster SelectionSelect Components for InstallationBase Software InstallationKernel ParametersEnable Global FiltersClient Group SelectionStorage Policy SelectionConfigure DB2 Specific Information
Setup Complete
Post-Install Considerations
INSTALL REQUIREMENTSThe software in a Unix cluster can be installed from the active node in the cluster group using the following procedure. Note that for a passive node in a Unix cluster, you need to install the software separately on the passive node in the cluster group.
For an overview of deploying the software components in a clustered environment, see Clustering Support.
The following procedure provides step-by-step instructions for installing the DB2 iDataAgent on a Unix cluster. If you choose to install multiple components simultaneously, the sequence of the install steps may vary.
Review the following Install Requirements before installing software on a Unix cluster:
GENERALReview Install Considerations before installing the software.
Agents should be installed only after the CommServe and at least one MediaAgent have been installed in the CommCell. Also, keep in mind that the CommServe and MediaAgent must be installed and running (but not necessarily on the same computer), before you can install the Agent.
Ensure there is an available license on the CommServe for the Agent.
Verify that you have the Software Installation Disc that is appropriate to the destination computer’s operating system.
CLUSTERRefer to Installing the Software on the Cluster for important overview information about installing MediaAgent or Agent software in a Unix clustered environment.
Check the following on the cluster computer in which you wish to install the software:
Cluster software is installed and running.
Active and passive nodes are available.
It is required that the DB2 application is installed on both active and passive nodes.
Ensure that the DB2 database is created on the virtual machine.
Make sure that DB2 Archive Directory, DB2 Audit Error Directory, and DB2 Retrieve Directory reside on a shared drive which can be accessed by all the nodes.
If these directory paths are currently residing on a Virtual machine, then while installing the DB2 iDataAgent on a passive node, make sure that the passive node is made active by failover so that these paths on the Virtual Machine can be accessed during the installation on the passive node.
HP-UXIf you are installing on a HP-UX computer, you must manually mount the installation disc as described in Mount the Software Installation Disc.
BEFORE YOU BEGINLog on to the client as root.
The install package requires super-user permissions to execute.
The DB2 iDataAgent must be installed on both the active node and passive node.
Features - DB2 iDataAgent
Page 28 of 96
INSTALL PROCEDURE
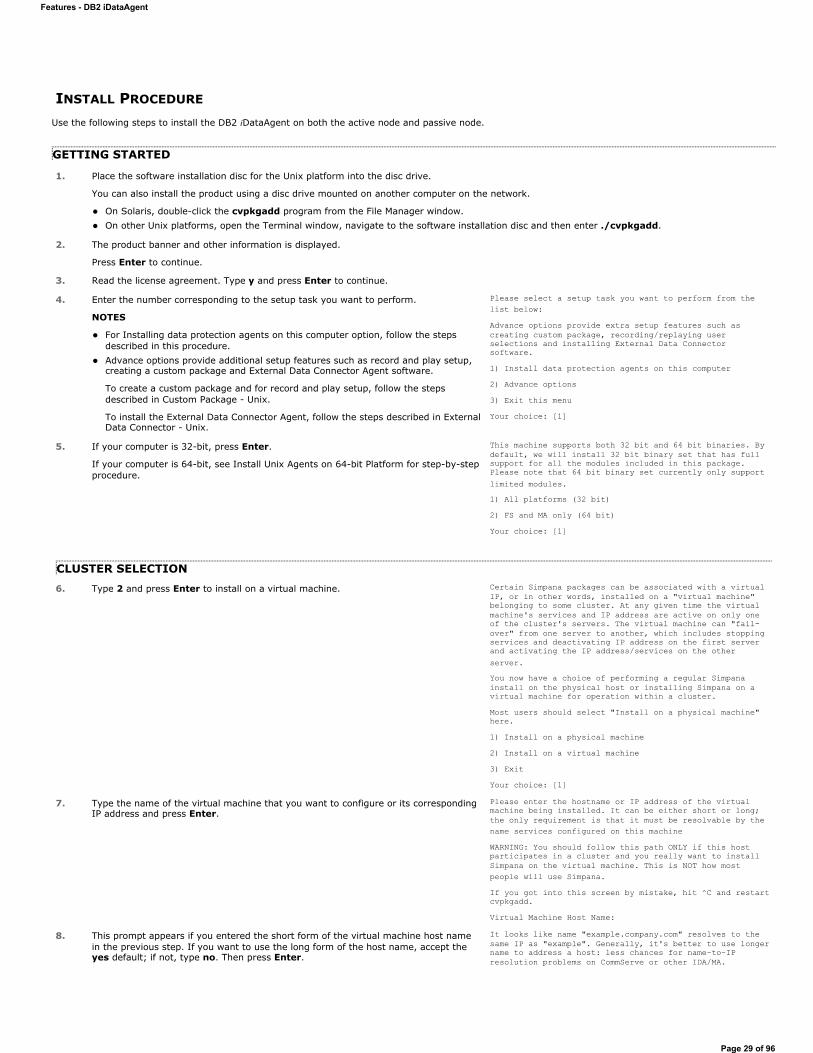
Use the following steps to install the DB2 iDataAgent on both the active node and passive node.
GETTING STARTED
1. Place the software installation disc for the Unix platform into the disc drive.
You can also install the product using a disc drive mounted on another computer on the network.
On Solaris, double-click the cvpkgadd program from the File Manager window. On other Unix platforms, open the Terminal window, navigate to the software installation disc and then enter ./cvpkgadd.
2. The product banner and other information is displayed.
Press Enter to continue.
3. Read the license agreement. Type y and press Enter to continue.
4. Enter the number corresponding to the setup task you want to perform.
NOTES
For Installing data protection agents on this computer option, follow the steps described in this procedure. Advance options provide additional setup features such as record and play setup, creating a custom package and External Data Connector Agent software.
To create a custom package and for record and play setup, follow the steps described in Custom Package - Unix.
To install the External Data Connector Agent, follow the steps described in External Data Connector - Unix.
Please select a setup task you want to perform from the list below:Advance options provide extra setup features such as creating custom package, recording/replaying user selections and installing External Data Connector software.1) Install data protection agents on this computer2) Advance options3) Exit this menuYour choice: [1]
5. If your computer is 32-bit, press Enter.
If your computer is 64-bit, see Install Unix Agents on 64-bit Platform for step-by-step procedure.
This machine supports both 32 bit and 64 bit binaries. By default, we will install 32 bit binary set that has full support for all the modules included in this package. Please note that 64 bit binary set currently only support limited modules.1) All platforms (32 bit)2) FS and MA only (64 bit)Your choice: [1]
CLUSTER SELECTION6. Type 2 and press Enter to install on a virtual machine. Certain Simpana packages can be associated with a virtual
IP, or in other words, installed on a "virtual machine" belonging to some cluster. At any given time the virtual machine's services and IP address are active on only one of the cluster's servers. The virtual machine can "fail-over" from one server to another, which includes stopping services and deactivating IP address on the first server and activating the IP address/services on the other server.You now have a choice of performing a regular Simpana install on the physical host or installing Simpana on a virtual machine for operation within a cluster. Most users should select "Install on a physical machine" here. 1) Install on a physical machine 2) Install on a virtual machine 3) Exit Your choice: [1]
7. Type the name of the virtual machine that you want to configure or its corresponding IP address and press Enter.
Please enter the hostname or IP address of the virtual machine being installed. It can be either short or long; the only requirement is that it must be resolvable by the name services configured on this machineWARNING: You should follow this path ONLY if this host participates in a cluster and you really want to install Simpana on the virtual machine. This is NOT how most people will use Simpana.If you got into this screen by mistake, hit ^C and restart cvpkgadd.Virtual Machine Host Name:
8. This prompt appears if you entered the short form of the virtual machine host name in the previous step. If you want to use the long form of the host name, accept the yes default; if not, type no. Then press Enter.
It looks like name "example.company.com" resolves to the same IP as "example". Generally, it's better to use longer name to address a host: less chances for name-to-IP resolution problems on CommServe or other IDA/MA.
Features - DB2 iDataAgent
Page 29 of 96
Would you like to use fully qualified "example.company.com" instead of "example"?Use longer "example.company.com" name? [yes]
9. If you have already installed the software on the virtual machine for the active node, accept the yes default to install for the passive node, press Enter, and go to the next step.
Type no and press Enter to perform the install for the virtual machine of the active node.
NOTES
This prompt appears only when installing on a passive node.
When installing new Simpana packages on a virtual machine, you should start with the active node, that is the host where the virtual machine is currently running.
This node appears to be passive, so we will assume that you have already installed Simpana for example.company.com on the active node.
Is this correct? [yes]
10. Type the name of the virtual client and press Enter. Please specify the client name for this machine.It does not have to be the network host name: you can enter any word here without spaces. The only requirement is that it must be unique on the CommServe. Virtual Machine Client Name: [hpuxmc1]
11. Specify the network interface that you want to associate with the physical machine and press Enter.
NOTES
This prompt appears only when the Unix File System iDataAgent is not installed on the physical node.
Even though it is a virtual machine that you are installing now, we still have to ask you to provide hostname and client name for the physical node. Network interfaces with the following IPs are available on your system. Please select the one that you want to be associated with Simpana physical machine. The interface should be static, and should not get disabled in case of cluster failover. 1) mackrel712) mackrel3) mackrel1Interface number: [1] 2
12. Verify the name of the physical interface and make any required changes. Then press Enter.
Please verify the physical interface name below. Make it as complete (with fully qualified domain name) as possible. Physical Hostname: [mackrel]
13. Enter a node name for the physical machine and press Enter. Even though you are installing Simpana on a machine, we still need to ask you to provide a node name for the physical machine. It does not have to be the network host name: you can enter any word here without spaces. The only requirement is that it must be unique on the CommServe. Physical Machine Node Name: [mackrel]
SELECT COMPONENTS FOR INSTALLATION
14. Enter the number corresponding to the CVGxDB2 module.
A confirmation screen will mark your choice with an "X". Type "d" for Done, and press Enter to continue.
NOTES
To select multiple components, enter the number by adding a space. Your screen may look different from the example shown. Components that either have already been installed, or which cannot be installed, will not be shown. In addition, the list of modules that appear depends on the specific Unix File System in which the package is installed. (e.g., CVGxWA will appear only when the installation package is run on a Solaris computer.)
Install Simpana on physical machine client.company.comSelect the Simpana module that you would like to install[ ] 1) Media Agent [1301] [CVGxMA][ ] 2) FileSystem IDA [1101] [CVGxIDA][X] 3) DB2 iDataAgent [1207] [CVGxDB2] >) >>>>> NEXT PAGE >>>>>>
[a=all n=none r=reverse q=quit d=done >=next <=previous ?=help]Enter number(s)/one of "a,n,r,q,d,>,<,?" here: 2
BASE SOFTWARE INSTALLATION15. If you wish to install the agent software for restore only, enter Yes and press Enter
to continue. See Installing Restore Only Agents for more information.
Otherwise, accept no, press Enter to continue.
Do you want to use the agents for restore only without consuming licenses? [no]
16. Type the appropriate number to install the latest software scripts and press Enter to continue.
NOTES
Select Download from the software provider website to download the latest software scripts from your software provider website.
Make sure you have internet connectivity when you are using this option.
Select Use the one in the installation media, to install the software scripts from the disc or share from which the installation is performed.
Installation Scripts Pack provides extra functions and latest support and fix performed during setup time. Please specify how you want to get this pack.If you choose to download it from the website now, please make sure you have internet connectivity at this time. This process may take some time depending on the internet connectivity.1) Download from the software provider website.2) Use the one in the installation media
Features - DB2 iDataAgent
Page 30 of 96
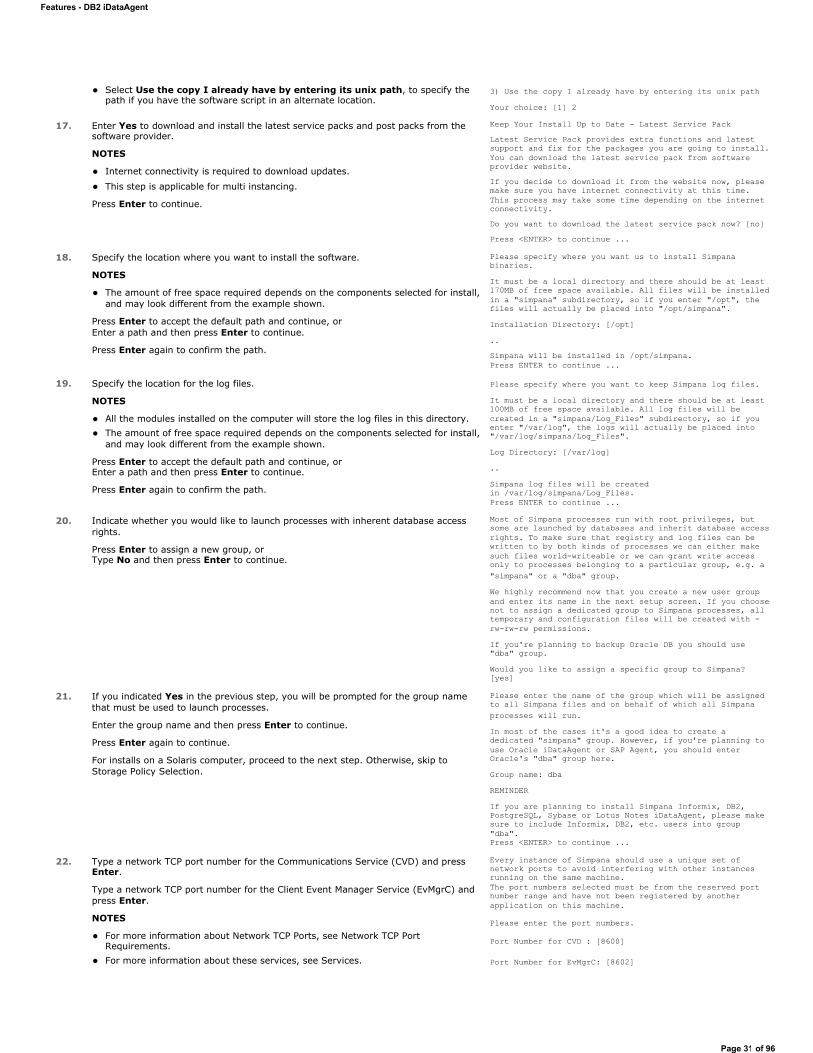
Select Use the copy I already have by entering its unix path, to specify the path if you have the software script in an alternate location.
3) Use the copy I already have by entering its unix pathYour choice: [1] 2
17. Enter Yes to download and install the latest service packs and post packs from the software provider.
NOTES
Internet connectivity is required to download updates.
This step is applicable for multi instancing.
Press Enter to continue.
Keep Your Install Up to Date - Latest Service Pack Latest Service Pack provides extra functions and latest support and fix for the packages you are going to install. You can download the latest service pack from software provider website.If you decide to download it from the website now, please make sure you have internet connectivity at this time. This process may take some time depending on the internet connectivity.Do you want to download the latest service pack now? [no] Press <ENTER> to continue ...
18. Specify the location where you want to install the software.
NOTES
The amount of free space required depends on the components selected for install, and may look different from the example shown.
Press Enter to accept the default path and continue, orEnter a path and then press Enter to continue.
Press Enter again to confirm the path.
Please specify where you want us to install Simpana binaries. It must be a local directory and there should be at least 170MB of free space available. All files will be installed in a "simpana" subdirectory, so if you enter "/opt", the files will actually be placed into "/opt/simpana".Installation Directory: [/opt]..Simpana will be installed in /opt/simpana. Press ENTER to continue ...
19. Specify the location for the log files.
NOTES
All the modules installed on the computer will store the log files in this directory. The amount of free space required depends on the components selected for install, and may look different from the example shown.
Press Enter to accept the default path and continue, orEnter a path and then press Enter to continue.
Press Enter again to confirm the path.
Please specify where you want to keep Simpana log files.It must be a local directory and there should be at least 100MB of free space available. All log files will be created in a "simpana/Log_Files" subdirectory, so if you enter "/var/log", the logs will actually be placed into "/var/log/simpana/Log_Files".Log Directory: [/var/log]..Simpana log files will be created in /var/log/simpana/Log_Files.Press ENTER to continue ...
20. Indicate whether you would like to launch processes with inherent database access rights.
Press Enter to assign a new group, orType No and then press Enter to continue.
Most of Simpana processes run with root privileges, but some are launched by databases and inherit database access rights. To make sure that registry and log files can be written to by both kinds of processes we can either make such files world-writeable or we can grant write access only to processes belonging to a particular group, e.g. a "simpana" or a "dba" group.We highly recommend now that you create a new user group and enter its name in the next setup screen. If you choose not to assign a dedicated group to Simpana processes, all temporary and configuration files will be created with -rw-rw-rw permissions. If you're planning to backup Oracle DB you should use "dba" group. Would you like to assign a specific group to Simpana? [yes]
21. If you indicated Yes in the previous step, you will be prompted for the group name that must be used to launch processes.
Enter the group name and then press Enter to continue.
Press Enter again to continue.
For installs on a Solaris computer, proceed to the next step. Otherwise, skip to Storage Policy Selection.
Please enter the name of the group which will be assigned to all Simpana files and on behalf of which all Simpana processes will run.In most of the cases it's a good idea to create a dedicated "simpana" group. However, if you're planning to use Oracle iDataAgent or SAP Agent, you should enter Oracle's "dba" group here.Group name: dbaREMINDERIf you are planning to install Simpana Informix, DB2, PostgreSQL, Sybase or Lotus Notes iDataAgent, please make sure to include Informix, DB2, etc. users into group "dba".Press <ENTER> to continue ...
22. Type a network TCP port number for the Communications Service (CVD) and press Enter.
Type a network TCP port number for the Client Event Manager Service (EvMgrC) and press Enter.
NOTES
For more information about Network TCP Ports, see Network TCP Port Requirements. For more information about these services, see Services.
Every instance of Simpana should use a unique set of network ports to avoid interfering with other instances running on the same machine.The port numbers selected must be from the reserved port number range and have not been registered by another application on this machine.
Please enter the port numbers.
Port Number for CVD : [8600]
Port Number for EvMgrC: [8602]
Features - DB2 iDataAgent
Page 31 of 96
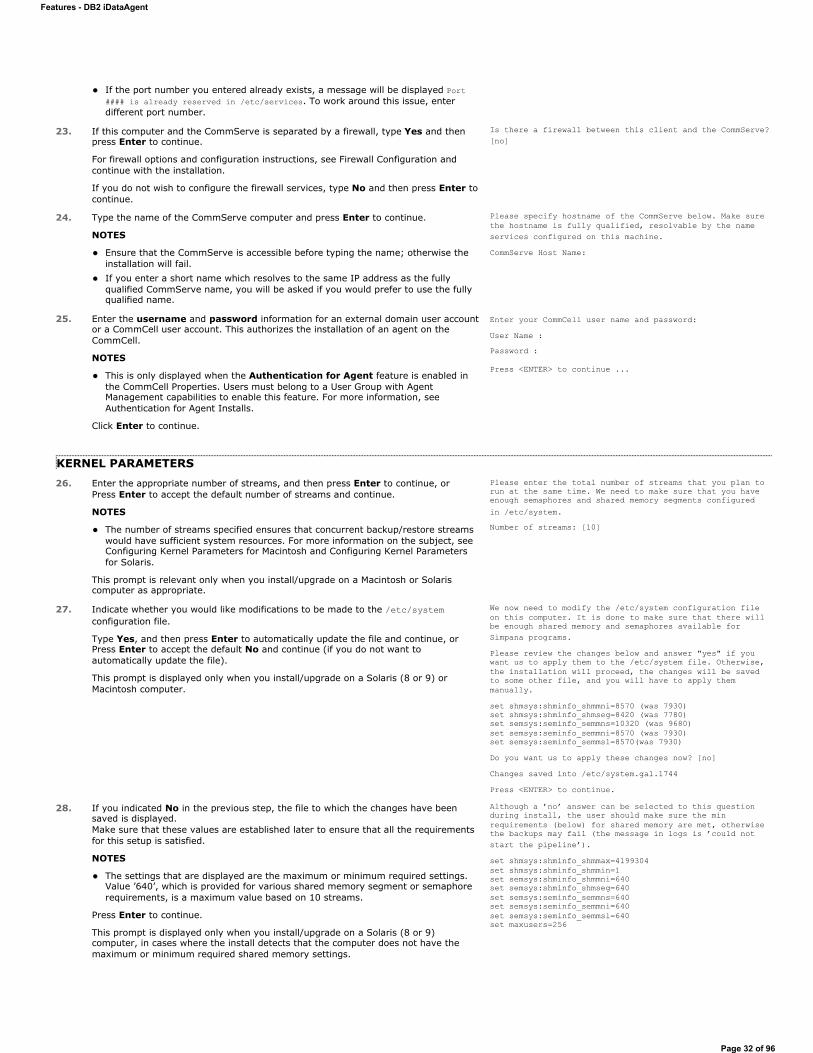
If the port number you entered already exists, a message will be displayed Port #### is already reserved in /etc/services. To work around this issue, enter different port number.
23. If this computer and the CommServe is separated by a firewall, type Yes and then press Enter to continue.
For firewall options and configuration instructions, see Firewall Configuration and continue with the installation.
If you do not wish to configure the firewall services, type No and then press Enter to continue.
Is there a firewall between this client and the CommServe? [no]
24. Type the name of the CommServe computer and press Enter to continue.
NOTES
Ensure that the CommServe is accessible before typing the name; otherwise the installation will fail. If you enter a short name which resolves to the same IP address as the fully qualified CommServe name, you will be asked if you would prefer to use the fully qualified name.
Please specify hostname of the CommServe below. Make sure the hostname is fully qualified, resolvable by the name services configured on this machine.CommServe Host Name:
25. Enter the username and password information for an external domain user account or a CommCell user account. This authorizes the installation of an agent on the CommCell.
NOTES
This is only displayed when the Authentication for Agent feature is enabled in the CommCell Properties. Users must belong to a User Group with Agent Management capabilities to enable this feature. For more information, see Authentication for Agent Installs.
Click Enter to continue.
Enter your CommCell user name and password:User Name : Password :
Press <ENTER> to continue ...
KERNEL PARAMETERS26. Enter the appropriate number of streams, and then press Enter to continue, or
Press Enter to accept the default number of streams and continue.
NOTES
The number of streams specified ensures that concurrent backup/restore streams would have sufficient system resources. For more information on the subject, see Configuring Kernel Parameters for Macintosh and Configuring Kernel Parameters for Solaris.
This prompt is relevant only when you install/upgrade on a Macintosh or Solaris computer as appropriate.
Please enter the total number of streams that you plan to run at the same time. We need to make sure that you have enough semaphores and shared memory segments configured in /etc/system.Number of streams: [10]
27. Indicate whether you would like modifications to be made to the /etc/systemconfiguration file.
Type Yes, and then press Enter to automatically update the file and continue, orPress Enter to accept the default No and continue (if you do not want to automatically update the file).
This prompt is displayed only when you install/upgrade on a Solaris (8 or 9) or Macintosh computer.
We now need to modify the /etc/system configuration file on this computer. It is done to make sure that there will be enough shared memory and semaphores available for Simpana programs.Please review the changes below and answer "yes" if you want us to apply them to the /etc/system file. Otherwise, the installation will proceed, the changes will be saved to some other file, and you will have to apply them manually.set shmsys:shminfo_shmmni=8570 (was 7930)set shmsys:shminfo_shmseg=8420 (was 7780)set semsys:seminfo_semmns=10320 (was 9680)set semsys:seminfo_semmni=8570 (was 7930)set semsys:seminfo_semmsl=8570(was 7930)Do you want us to apply these changes now? [no]Changes saved into /etc/system.gal.1744Press <ENTER> to continue.
28. If you indicated No in the previous step, the file to which the changes have been saved is displayed.Make sure that these values are established later to ensure that all the requirements for this setup is satisfied.
NOTES
The settings that are displayed are the maximum or minimum required settings. Value ’640’, which is provided for various shared memory segment or semaphore requirements, is a maximum value based on 10 streams.
Press Enter to continue.
This prompt is displayed only when you install/upgrade on a Solaris (8 or 9) computer, in cases where the install detects that the computer does not have the maximum or minimum required shared memory settings.
Although a ’no’ answer can be selected to this question during install, the user should make sure the min requirements (below) for shared memory are met, otherwise the backups may fail (the message in logs is ’could not start the pipeline’).set shmsys:shminfo_shmmax=4199304set shmsys:shminfo_shmmin=1set semsys:shminfo_shmmni=640set semsys:shminfo_shmseg=640set semsys:seminfo_semmns=640set semsys:seminfo_semmni=640set semsys:seminfo_semmsl=640set maxusers=256
Features - DB2 iDataAgent
Page 32 of 96
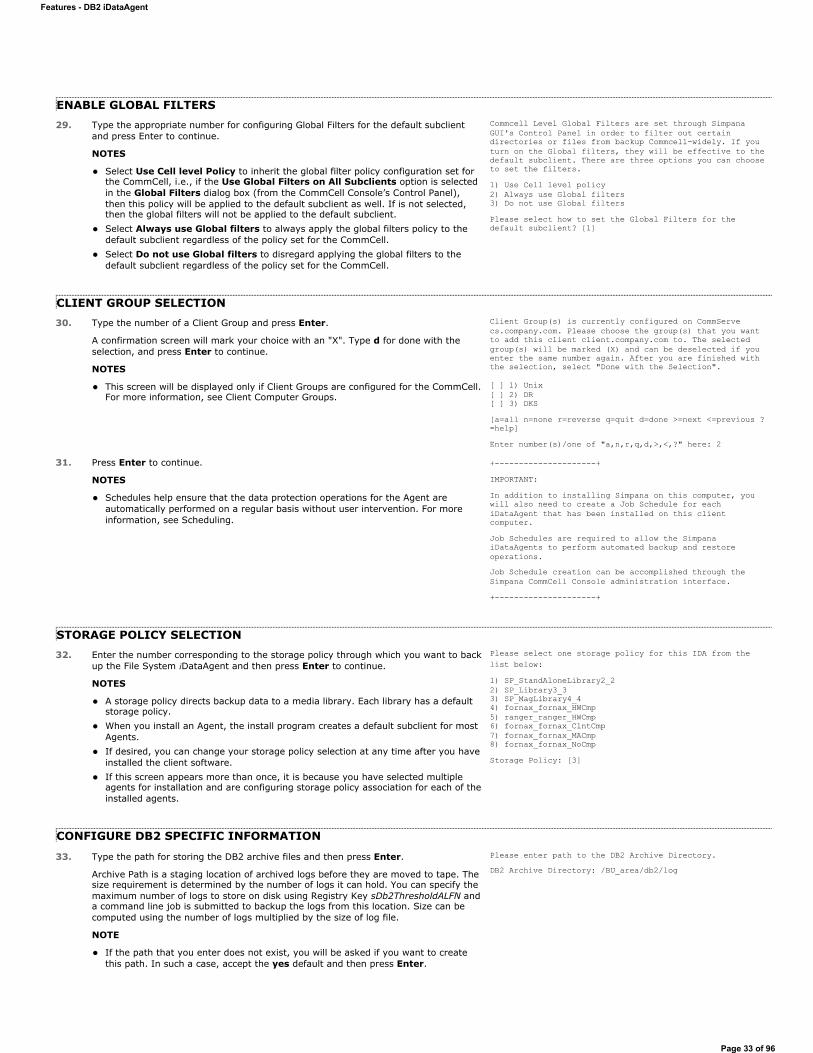
ENABLE GLOBAL FILTERS29. Type the appropriate number for configuring Global Filters for the default subclient
and press Enter to continue.
NOTES
Select Use Cell level Policy to inherit the global filter policy configuration set for the CommCell, i.e., if the Use Global Filters on All Subclients option is selected in the Global Filters dialog box (from the CommCell Console’s Control Panel), then this policy will be applied to the default subclient as well. If is not selected, then the global filters will not be applied to the default subclient. Select Always use Global filters to always apply the global filters policy to the default subclient regardless of the policy set for the CommCell. Select Do not use Global filters to disregard applying the global filters to the default subclient regardless of the policy set for the CommCell.
Commcell Level Global Filters are set through Simpana GUI's Control Panel in order to filter out certain directories or files from backup Commcell-widely. If you turn on the Global filters, they will be effective to the default subclient. There are three options you can choose to set the filters. 1) Use Cell level policy2) Always use Global filters3) Do not use Global filters Please select how to set the Global Filters for the default subclient? [1]
CLIENT GROUP SELECTION30. Type the number of a Client Group and press Enter.
A confirmation screen will mark your choice with an "X". Type d for done with the selection, and press Enter to continue.
NOTES
This screen will be displayed only if Client Groups are configured for the CommCell. For more information, see Client Computer Groups.
Client Group(s) is currently configured on CommServe cs.company.com. Please choose the group(s) that you want to add this client client.company.com to. The selected group(s) will be marked (X) and can be deselected if you enter the same number again. After you are finished with the selection, select "Done with the Selection".
[ ] 1) Unix[ ] 2) DR[ ] 3) DKS [a=all n=none r=reverse q=quit d=done >=next <=previous ?=help]Enter number(s)/one of "a,n,r,q,d,>,<,?" here: 2
31. Press Enter to continue.
NOTES
Schedules help ensure that the data protection operations for the Agent are automatically performed on a regular basis without user intervention. For more information, see Scheduling.
+---------------------+IMPORTANT:In addition to installing Simpana on this computer, you will also need to create a Job Schedule for each iDataAgent that has been installed on this client computer.Job Schedules are required to allow the Simpana iDataAgents to perform automated backup and restore operations.Job Schedule creation can be accomplished through the Simpana CommCell Console administration interface.+---------------------+
STORAGE POLICY SELECTION32. Enter the number corresponding to the storage policy through which you want to back
up the File System iDataAgent and then press Enter to continue.
NOTES
A storage policy directs backup data to a media library. Each library has a default storage policy. When you install an Agent, the install program creates a default subclient for most Agents. If desired, you can change your storage policy selection at any time after you have installed the client software. If this screen appears more than once, it is because you have selected multiple agents for installation and are configuring storage policy association for each of the installed agents.
Please select one storage policy for this IDA from the list below:1) SP_StandAloneLibrary2_22) SP_Library3_33) SP_MagLibrary4_44) fornax_fornax_HWCmp5) ranger_ranger_HWCmp6) fornax_fornax_ClntCmp7) fornax_fornax_MACmp8) fornax_fornax_NoCmpStorage Policy: [3]
CONFIGURE DB2 SPECIFIC INFORMATION
33. Type the path for storing the DB2 archive files and then press Enter.
Archive Path is a staging location of archived logs before they are moved to tape. The size requirement is determined by the number of logs it can hold. You can specify the maximum number of logs to store on disk using Registry Key sDb2ThresholdALFN and a command line job is submitted to backup the logs from this location. Size can be computed using the number of logs multiplied by the size of log file.
NOTE
If the path that you enter does not exist, you will be asked if you want to create this path. In such a case, accept the yes default and then press Enter.
Please enter path to the DB2 Archive Directory. DB2 Archive Directory: /BU_area/db2/log
Features - DB2 iDataAgent
Page 33 of 96
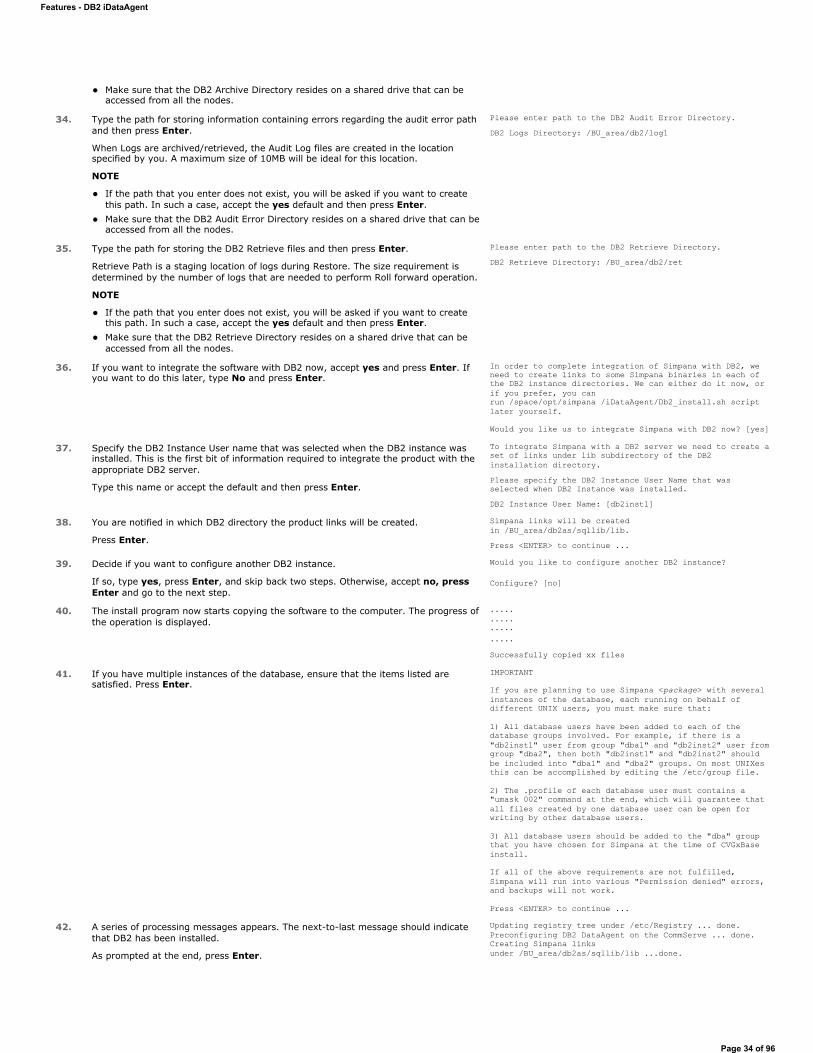
Make sure that the DB2 Archive Directory resides on a shared drive that can be accessed from all the nodes.
34. Type the path for storing information containing errors regarding the audit error path and then press Enter.
When Logs are archived/retrieved, the Audit Log files are created in the location specified by you. A maximum size of 10MB will be ideal for this location.
NOTE
If the path that you enter does not exist, you will be asked if you want to create this path. In such a case, accept the yes default and then press Enter. Make sure that the DB2 Audit Error Directory resides on a shared drive that can be accessed from all the nodes.
Please enter path to the DB2 Audit Error Directory. DB2 Logs Directory: /BU_area/db2/log1
35. Type the path for storing the DB2 Retrieve files and then press Enter.
Retrieve Path is a staging location of logs during Restore. The size requirement is determined by the number of logs that are needed to perform Roll forward operation.
NOTE
If the path that you enter does not exist, you will be asked if you want to create this path. In such a case, accept the yes default and then press Enter. Make sure that the DB2 Retrieve Directory resides on a shared drive that can be accessed from all the nodes.
Please enter path to the DB2 Retrieve Directory. DB2 Retrieve Directory: /BU_area/db2/ret
36. If you want to integrate the software with DB2 now, accept yes and press Enter. If you want to do this later, type No and press Enter.
In order to complete integration of Simpana with DB2, we need to create links to some Simpana binaries in each of the DB2 instance directories. We can either do it now, or if you prefer, you can run /space/opt/simpana /iDataAgent/Db2_install.sh script later yourself.
Would you like us to integrate Simpana with DB2 now? [yes]
37. Specify the DB2 Instance User name that was selected when the DB2 instance was installed. This is the first bit of information required to integrate the product with the appropriate DB2 server.
Type this name or accept the default and then press Enter.
To integrate Simpana with a DB2 server we need to create a set of links under lib subdirectory of the DB2 installation directory. Please specify the DB2 Instance User Name that was selected when DB2 Instance was installed.DB2 Instance User Name: [db2inst1]
38. You are notified in which DB2 directory the product links will be created.
Press Enter.
Simpana links will be created in /BU_area/db2as/sqllib/lib. Press <ENTER> to continue ...
39. Decide if you want to configure another DB2 instance.
If so, type yes, press Enter, and skip back two steps. Otherwise, accept no, press Enter and go to the next step.
Would you like to configure another DB2 instance?
Configure? [no]
40. The install program now starts copying the software to the computer. The progress of the operation is displayed.
.....
.....
.....
.....Successfully copied xx files
41. If you have multiple instances of the database, ensure that the items listed are satisfied. Press Enter.
IMPORTANT
If you are planning to use Simpana <package> with several instances of the database, each running on behalf of different UNIX users, you must make sure that:
1) All database users have been added to each of the database groups involved. For example, if there is a "db2inst1" user from group "dba1" and "db2inst2" user from group "dba2", then both "db2inst1" and "db2inst2" should be included into "dba1" and "dba2" groups. On most UNIXes this can be accomplished by editing the /etc/group file.
2) The .profile of each database user must contains a "umask 002" command at the end, which will guarantee that all files created by one database user can be open for writing by other database users.
3) All database users should be added to the "dba" group that you have chosen for Simpana at the time of CVGxBase install.
If all of the above requirements are not fulfilled, Simpana will run into various "Permission denied" errors, and backups will not work.
Press <ENTER> to continue ...
42. A series of processing messages appears. The next-to-last message should indicate that DB2 has been installed.
As prompted at the end, press Enter.
Updating registry tree under /etc/Registry ... done.Preconfiguring DB2 DataAgent on the CommServe ... done.Creating Simpana links under /BU_area/db2as/sqllib/lib ...done.
Features - DB2 iDataAgent
Page 34 of 96
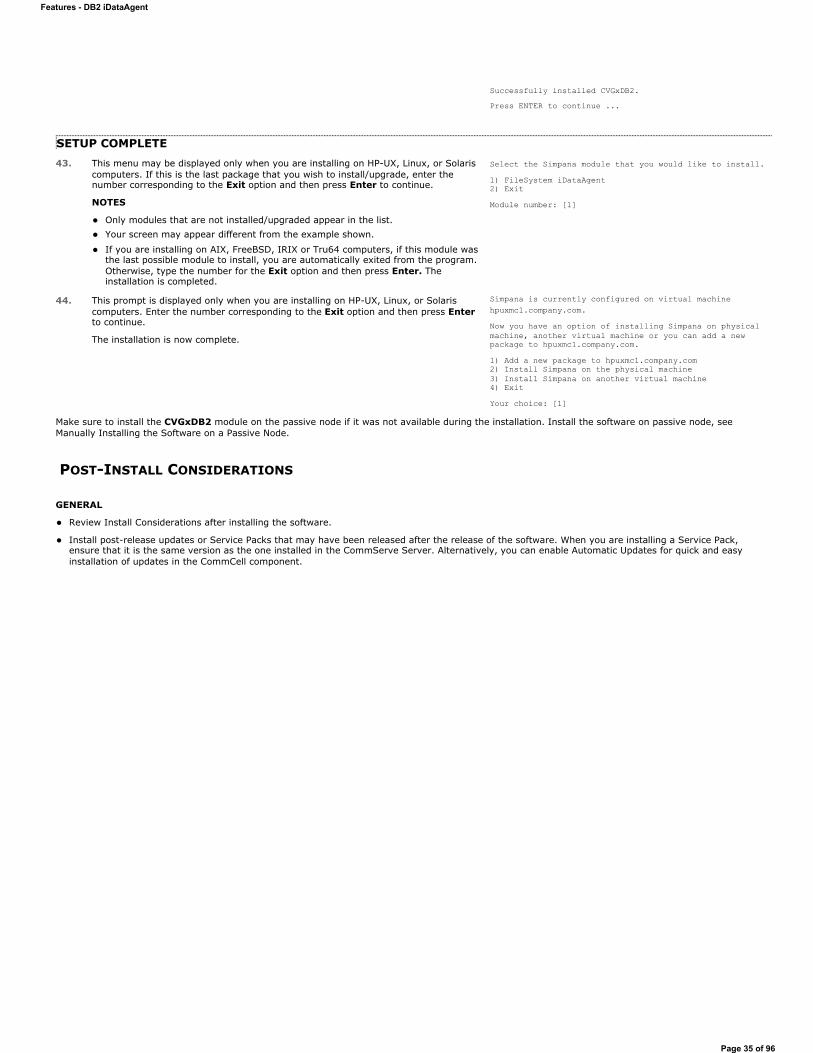
Successfully installed CVGxDB2.Press ENTER to continue ...
SETUP COMPLETE43. This menu may be displayed only when you are installing on HP-UX, Linux, or Solaris
computers. If this is the last package that you wish to install/upgrade, enter the number corresponding to the Exit option and then press Enter to continue.
NOTES
Only modules that are not installed/upgraded appear in the list. Your screen may appear different from the example shown.
If you are installing on AIX, FreeBSD, IRIX or Tru64 computers, if this module was the last possible module to install, you are automatically exited from the program. Otherwise, type the number for the Exit option and then press Enter. The installation is completed.
Select the Simpana module that you would like to install.1) FileSystem iDataAgent2) ExitModule number: [1]
44. This prompt is displayed only when you are installing on HP-UX, Linux, or Solaris computers. Enter the number corresponding to the Exit option and then press Enter to continue.
The installation is now complete.
Simpana is currently configured on virtual machine hpuxmc1.company.com.Now you have an option of installing Simpana on physical machine, another virtual machine or you can add a new package to hpuxmc1.company.com.1) Add a new package to hpuxmc1.company.com2) Install Simpana on the physical machine3) Install Simpana on another virtual machine4) ExitYour choice: [1]
Make sure to install the CVGxDB2 module on the passive node if it was not available during the installation. Install the software on passive node, see Manually Installing the Software on a Passive Node.
POST-INSTALL CONSIDERATIONS
GENERAL
Review Install Considerations after installing the software.
Install post-release updates or Service Packs that may have been released after the release of the software. When you are installing a Service Pack, ensure that it is the same version as the one installed in the CommServe Server. Alternatively, you can enable Automatic Updates for quick and easy installation of updates in the CommCell component.
Features - DB2 iDataAgent
Page 35 of 96
Backup - DB2Topics | How To | Related Topics
Overview
Supported Backup Types
DB2 Backup Jobs
Backup Considerations
Command Line Backups
Log on to the CommServe
Perform the Backup
Third Party Command Line Backups
Multi Stream Backups
Advanced Backup Options
OVERVIEW
Plan your backup jobs for this agent by reviewing the following information:
For an overview of backup jobs, see Backup Data.
For a list of supported data types for this agent, see Supported Data Types.
For information on subclients, see Subclients
For information on configuring subclients for this agent, see Subclients - DB2.
SUPPORTED BACKUP TYPES
This agent supports the following backup types:
Full Backups
Delta Backups
Incremental Backups
SnapProtect Backup
DB2 BACKUP JOBS
This agent has the following unique functionality.
DELTA BACKUPSFor the DB2 iDataAgent, Delta backup works as described in Incremental Backups. See Incremental Backups for information on DB2 Delta backups.
BACKUP ARGUMENTSSome database iDataAgents run backups using a system-generated script that is run behind the scenes from a command line. The CommCell Console serves as a front-end user interface for specifying various backup arguments and parameters that are passed to the backup script that is run. Depending on your agent, you can specify, for example, the application-specific Backup Level, whether the backups will be online or offline, as well as buffer and bundle sizes, among other settings. Although the backup arguments/parameters vary among iDataAgents, they all function in a similar manner. These arguments are set at the subclient level from the respective iDataAgent's Subclient Properties dialog box tab.
For step-by-step instructions, see Configure Backup Arguments.
ENABLE DATABASE CONFIGURATION PARAMETERS FOR DB2 BACKUPSEach DB2 database has its own configuration. To back up DB2 data successfully, you must enable the appropriate database configuration parameter(s). You must set these parameters based on the state of the database, backup type, and/or data type as follows:
Before you change any configuration parameter, ensure that no applications are currently using the affected
Features - DB2 iDataAgent
Page 36 of 96
Backups in General - Update the database configuration parameters when DB2 agent is installed on a cluster or multiple instances of Simpana are installed.
From the DB2 console, type the following command to set the LOGARCHOPT1 parameter:
db2 update db cfg for <databas e name> using LOGARCHOPT1"'CvClientName=<CvClientName>,CvInstanceName=<CvInstanceName>'"
Example:
db2 update db cfg for test_db using LOGARCHOPT1"'CvClientName=testhost,CvInstanceName=Instance001'"
Type the following command to set the VENDOROPT parameter:
db2 update db cfg for <database name> using VENDOROPT"'CvClientName=<CvClientName>,CvInstanceName=<CvInstanceName>'"
Example:
db2 update db cfg for test_db using VENDOROPT"'CvClientName=testhost,CvInstanceName=Instance001'"
Enable the LOGRETAIN database configuration parameter on the DB2 server.
From the DB2 Console, type the command to set the LOGRETAIN parameter.
db2 update database configuration for <database name> using LOGRETAIN on
Updating VENDOROPT and LOGARCHOPT1 is optional, if the DB2 instance is running on non cluster configuration and default simpana instance (Instance001).
CvClientName and CvInstanceName parameters are case sensitive.
CvClientName must match with the client name configured in cs.
Online Backups - To back up any type of DB2 data online, enable the LOGRETAIN database configuration parameter by entering the following command:
db2 update database configuration for <database name> using LOGRETAIN on
Delta/Incremental Backups - To run delta or incremental DB2 backups, enable the TRACKMOD database configuration parameter by entering the following command:
From the DB2 Console, type the following command to set the TRACKMOD parameter:
db2 update database configuration for <database name> using TRACKMOD on
Log Backups - To back up DB2 log files, enable the USEREXIT database configuration parameter by entering the following command:
db2 update database configuration for <database name> using USEREXIT on
To back up DB2 log files for DB2 version 8.2 or later using the SBT interface, enter the following commands to set the required parameters:
db2 update database configuration for <database name> using USEREXIT OFFdb2 update database configuration for <database name> using LOGARCHMETH1 VENDOR:<install path><shared library file>where:
<install path> identifies the base install directory
<shared library file> identifies the name of the shared library file libDB2Sbt.* (where * identifies the file extension, which will vary per the operating system)
for example:
db2 update database configuration for <database name> using Logretain recovery db2 update database configuration for <database name> using LOGARCHMETH1 “VENDOR:/opt/Simpana/Base/libDb2Sbt.so”
database. Also, be sure to consult your database administrator regarding business requirements for the database.
On a Cluster setup, you need to update the LOGARCHOPT1 and VENDOROPT database configuration parameters on a virtual machine name instead of physical client name.
You need to set the TRACKMOD database configuration parameter ON and run a full offline database backup to perform a successful delta/incremental backup.
Features - DB2 iDataAgent
Page 37 of 96
Whenever you change the TRACKMOD database configuration parameter, be sure to run a full offline database backup. Otherwise, the TRACKMOD parameter will not be updated.
With the SBT interface, log files are staged to an archive path, and an On Demand backup of the log files is performed when a certain threshold is reached. Alternatively, the user can submit a backup request for any number of log files from the CommCell Console.
The USEREXIT/SBT interface program takes the logs from the DB2 directory and transfers them first to the threshold directory that was defined during the DB2 iDataAgent install and then to tape. If you subsequently use the Delete option, the logs are deleted from the threshold directory; otherwise, the logs are kept in this directory. By default, the threshold directory can hold 1000 logs. If the threshold directory attempts to hold more than 1000 logs, a command line backup for the logs starts automatically, and the logs are transferred to tape.
You can control the threshold value by adding the sDb2ThresholdALFN <number> registry key to the Db2Agent registry, where <number> indicates the number of logs you want to hold in the threshold directory before the logs will automatically start backing up to tape. Otherwise, by default, the threshold directory can hold 1000 logs.
BACKUP CONSIDERATIONS
Before performing any backup procedures for this agent, review the following information:
If you perform a backup of the default subclient without changing its default properties, the backup would include all the objects in the database, including any new objects that may have been created.
If you have created subclients for databases, and if you have included the log files in these subclients, you can create a complete backup of the database by backing up these subclients. If you have created a group of online subset subclients for the database, you must back up all of these subclients to create a complete backup. If you have created separate subclients for log files, and if they are not included with the subclients defined for databases or subsets, then the subclients for log files must also be backed up to create a complete backup.
Multiple streams are supported for data protection and recovery operations with this agent; however, before utilizing multiple streams, you should understand how their use affects operations. For more information, see Streams.
When Oracle and DB2 iDataAgents are installed on the same client, make sure that both Oracle and DB2 users are part of the primary user groups.
COMMAND LINE BACKUPS
You can perform backups of one or more DB2 databases from the command line interface.
Command line backups enable you to perform backup operation on multiple clients simultaneously. In order to run the backups from command line, you need an input xml file which contains the parameters for configuring the backup options. This input xml file can be obtained from one of the following ways:
Download the input xml file template and save it on the computer from where the backup will be performed.
Generate the input xml file from the CommCell Console and save it on the computer from where the backup will be performed.
LOG ON TO THE COMMSERVETo run command line operations you must first login to the CommServe as follows:
From Command prompt, navigate to <Software_Installation_Directory>/Base and run the following command:
qlogin -cs <commserve name> -u <user name>
For example, to log on to CommServe 'server1' with username 'user1':
qlogin -cs server1 -u user1
PERFORM THE BACKUP
Execute the saved .xml script using the following qoperation execute command:
qoperation execute -af qoperation_db2_backup.xml -backupLevel <FULL| INCREMENTAL| DIFFERENTIAL> -subclientName <SubclientName> -clientName <DB2CleintName> -instanceName <DB2InstanceName> -backupsetName <DB2BackupSetName>
Example Using XML File:
qoperation execute -af qoperation_db2_backup.xml -backupLevel FULL -subclientName default -clientName dbserveaix2 -instanceName db2inst5 -backupsetName TESTDB
Example without using XML File:
qoperation backup -c client -a < iDataAgentType> -i <DB2InstanceName> -b <DB2BackupSetName> -s <SubclientName> -t <Q_FULL|Q_INC|Q_DIFF>
./qoperation backup -c dbserveaix2 -a Q_UNIX_DB2 -i db2inst5 -b TESTDB -s default -t Q_FULL
Features - DB2 iDataAgent
Page 38 of 96
Verify the status of the job using the following command:
qlist job –j JOBID
Once the job completes, logout from the CommServe using the qlogout command.
qlogout [-cs commserver] [-all] [-tf tokenfile] [-tk token] [-h]
THIRD PARTY COMMAND LINE BACKUPS
Use the following steps to backup the DB2 database:
At the Command Prompt, type the appropriate online/offline backup command for the specific platform.
Examples:
For a DB2 instance on a 32-bit AIX/Solaris or HP-UX or 32bit/64bit Linux or 31bit Linux on System Z:
db2 backup db <database name> load '<software install path>/Base/libDb2Sbt.so'
For a DB2 instance on 64-bit AIX/Solaris/HP PARISC or 64bit Linux on System Z:
db2 backup db <database name> load '<software install path>/Base64/libDb2Sbt.so'
For a DB2 instance on a 32bit/64bit Windows platform:
db2 backup db <database name> load '<software install path>\Base\Db2Sbt.dll'
For DB2 instance online backups:
db2 backup db <database name> online load '<software install path>\Base\Db2Sbt.dll'
For DB2 instance online backups with logs
db2 backup database <db_name> online load '<software install path>/Base/libDb2Sbt.so' include logs
For Incremental Backups:
db2 backup db <database name> incremental load '<software install path>/Base/libDb2Sbt.so'
For Delta Backups:
db2 backup db <database name> incremental delta load '<software install path>/Base/libDb2Sbt.so'
MULTI STREAM BACKUPS
DB2 third party command line backups running on multiple streams will generate separate job ids for each stream.
From the DB2 command prompt, type the following backup command.
Example:
On Unix client:
db2 backup database <database_name> online load '<software_install_path>/Base/libDb2Sbt.so' open 3 sessions
On Windows client:
db2 backup database <database_name> online load '<software_install_path>\Base\Db2Sbt.dll' open 10 sessions
where <database_name> is the name of the DB2 database and <software_install_path> is the install path for the agent software (e.g., level1/install).
Backup - DB2 - How ToTopics | How To | Related Topics
Start a Backup
Start a Delta Backup
Schedule Backups
Start a Backup in the Suspended State
Start a Backup on New Media
Features - DB2 iDataAgent
Page 39 of 96
Start a Backup that Marks Media Full on Completion
Start a Backup with a Set Job Priority
Start a Backup with Vault Tracking enabled
START A BACKUP
Before You Begin
Depending on your agent, you can perform the following types of backup operations: Full, Incremental, Differential or Synthetic Full.
Read Full Backups before performing a Full Backup.
Read Incremental Backups before performing a Incremental Backup.
Read Differential Backups before performing a Differential Backup.
Read Synthetic Full Backups before performing a Synthetic Full Backup.
Required Capability: See Capabilities and Permitted Actions
1. From the CommCell Browser, expand Client Computers by double-clicking Client Computers | iDA File System | defaultBackupSet. The default and other subclients (if available) are displayed on the right-hand windowpane.
2. To back up the default subclient, right-click the subclient, and click Backup.
3. From the Backup Options dialog box, select Run Immediately.
4. Select Full, Incremental, Differential or Synthetic Full backup.
In certain circumstances a non-full backup may automatically be converted to a full backup. For a listing of these circumstances, see When a Non-Full Backup is Automatically Converted to a Full Backup.
5. Click OK. You can track the progress of the backup job from the Job Controller window. If you are using a stand-alone drive, you are prompted to load a specific cartridge into the drive. If you are using a library, you will not receive this prompt. The system loads the tapes automatically. Your cartridges should be appropriately labeled. This will enable you to locate the correct cartridge for a restore job, if necessary.
6. When the backup has completed, the Job Controller displays Completed.
After running a backup, you may want to verify the backup data. You can do this by viewing the Backup History. For more information, see Backup Job History.
START A DELTA BACKUP
Backup jobs using the Run Immediately option allow you to secure data immediately without having to wait for the scheduled backup time. This capability can be useful if:
you have some particularly valuable data that you need to secure immediately.
your data is not routinely secured through a backup schedule and you want to back up your data.
Before You Begin
Be sure all of the subclients are backed up, or scheduled to be backed up as needed, in order to secure all of the data for the agent.
Required Capability: See Capabilities and Permitted Actions
You can also run backups of the following: For a user-defined backup set or instance, right-click the backup set you want to back up, click All Tasks, and click Backup All Subclients. For the Lotus Notes Document iDataAgent, to back up a partition, right-click the partition you want to back up, click All Tasks, and click Backup Default Backup Set.For the Lotus Notes Database iDataAgent, to back up a partition, right-click the partition you want to back up, click All Tasks, and click Backup All Subclients. For Agents that do not have backup set or instance levels, to back up all subclients, right-click the agent icon, click All Tasks, and click Backup All Subclients.
If you chose a level higher than subclient (i.e., backup set, etc.), you are prompted to confirm that you want to back up all the subclients below that level/node. Click Yes. Starting a data protection operation on a backup set, instance or agent level causes the system to start individual data protection operations for each subclient contained therein. If the subclients are associated with the same storage policy, then their operations will run sequentially unless that storage policy is configured to accommodate multiple data streams.
Features - DB2 iDataAgent
Page 40 of 96
1. From the CommCell Browser, select one of the following:
To backup a subclient, right-click the subclient to want to backup and click Backup.
To backup a user-defined backup set, right-click the backup set you want to backup, click All Tasks, and click Backup All Subclients.
To backup the default backup set, right-click the agent or instance node, click All Tasks, and click Backup Default Backup Set.
For the Microsoft SQL Server iDataAgent, to backup a database, right-click the database you want to backup, click All Tasks, and click Backup Database.
For the Microsoft SQL Server iDataAgent, to backup up an instance, right-click the instance you want to backup, click All Tasks, and click Backup SQL Server.
2. If you chose a level higher than subclient (i.e., backup set, etc.), you are prompted to confirm that you want to back up all the subclients below that level/node. Click Yes.
3. From the Backup Options dialog box, select Run Immediately.
4. Select Delta backup.In certain circumstances a non-full backup may automatically be converted to a full backup. For a listing of these circumstances, see When a Non-Full Backup is Automatically Converted to a Full Backup.
5. Click OK. You can track the progress of the backup job from the Job Controller window.
6. If you are using a stand-alone drive, you are prompted to load a specific cartridge into the drive. If you are using a library, you will not receive this prompt. The system loads the tapes automatically.
7. When the backup has completed, Job Controller displays Completed.
SCHEDULE BACKUPS
You can schedule backups to occur with the following procedure. You will be prompted to create a schedule for the data protection operation after selecting your data protection options.
Before You Begin
All Agents
Be sure all of the subclients are backed up, or scheduled to be backed up as needed, in order to secure all of the data for the agent. Note this does not apply to archive operations.
Required Capability: See Capabilities and Permitted Actions
1. From the CommCell Browser, select one of the following:
To back up a subclient, right-click the subclient and click Backup.
To back up a backup set or instance, right-click the backup set or instance, click All Tasks, and click Backup All Subclients.
To back up the default backup set, right-click the agent or instance node, click All Tasks, and click Backup Default Backup Set.
For the Lotus Notes Document iDataAgent, to back up a partition, right-click the partition you want to back up, click All Tasks, and click Backup Default Backup Set.For the Lotus Notes Database iDataAgent, to back up a partition, right-click the partition you want to back up, click All Tasks, and click Backup All Subclients.
For Agents that do not have backup set or instance levels, to back up all subclients, right-click the agent icon, click All Tasks, and click Backup All Subclients.
2. If you chose a level higher than subclient (i.e., backup set, etc.), you are prompted to confirm that you want to back up all the subclients below that level/node. Click Yes.
3. From the Backup Options dialog box, select the type of backup that you want to initiate. In certain circumstances a non-full backup may automatically be converted to a full backup. For a listing of these circumstances, see When a Non-Full Backup is Automatically Converted to a Full Backup.
4. Click Schedule. Click OK to continue.
5. From the Schedule Details (Schedule Details) dialog box, create a schedule for this operation. For step-by-step instructions, see Create a Job Schedule. Click OK to continue.
Your cartridges should be appropriately labeled. This will enable you to locate the correct cartridge for a restore job, if necessary.
Starting a backup on a backup set, instance or agent level causes the system to start individual backup jobs for each subclient contained therein. If the subclients are associated with the same storage policy, then their jobs will run sequentially unless that storage policy is configured to accommodate multiple data streams.
Features - DB2 iDataAgent
Page 41 of 96
6. Your backup operation will execute according to the specified schedule.
START A BACKUP IN THE SUSPENDED STATE
Use the following procedure to start a backup in the suspended state.
Before You Begin
Be sure all of the subclients are backed up, or scheduled to be backed up as needed, in order to secure all of the data for the agent. Note this does not apply to archive operations.
Required Capability: See Capabilities and Permitted Actions
1. From the CommCell Browser, select one of the following:
To backup a subclient, right-click the subclient to want to backup and click Backup.
To backup a user-defined backup set or instance, right-click the backup set you want to backup, click All Tasks, and click Backup All Subclients.
To backup the default backup set, right-click the agent or instance node, click All Tasks, and click Backup Default Backup Set.
For Lotus Notes iDataAgent, to backup a partition, right-click the partition you want to backup, click All Tasks, and click Backup Default Backup Set.
For Agents that do not have backup set or instance levels, to backup all subclients, right-click the agent icon, click All Tasks, and click Backup All Subclients.
2. If you chose a level higher than subclient (i.e., backup set, etc.), you are prompted to confirm that you want to back up all the subclients below that level/node. Click Yes.
3. From the Backup Options dialog box, select Run Immediately.
4. Select the type of backup that you want to initiate.In certain circumstances a non-full backup may automatically be converted to a full backup. For a listing of these circumstances, see When a Non-Full Backup is Automatically Converted to a Full Backup.
5. Click the Advanced button to open the Advanced Backup Options dialog box.
6. Click on the Advanced Backup Options (Startup) tab, and select Startup in suspended state and click OK.
7. From the Backup Options dialog box, click OK. You can track the progress of the backup job from the Job Controller window.
8. If you are using a stand-alone drive, you are prompted to load a specific cartridge into the drive. If you are using a library, you will not receive this prompt. The system loads the tapes automatically.
9. When the backup has completed, Job Controller displays Completed.
START A BACKUP ON NEW MEDIA
Use the following procedure to start a backup on new media.
Before You Begin
Be sure all of the subclients are backed up, or scheduled to be backed up as needed, in order to secure all of the data for the agent. Note this does not apply to archive operations.
Required Capability: See Capabilities and Permitted Actions
1. From the CommCell Browser, select one of the following:
To backup a subclient, right-click the subclient to want to backup and click Backup.
Starting a data protection operation on a backup set, instance or agent level causes the system to start individual data protection operations for each subclient contained therein. If the subclients are associated with the same storage policy, then their operations will run sequentially unless that storage policy is configured to accommodate multiple data streams.
Your cartridges should be appropriately labeled. This will enable you to locate the correct cartridge for a restore job, if necessary.
Starting a data protection operation on a backup set, instance or agent level causes the system to start individual data protection operations for each subclient contained therein. If the subclients are associated with the same storage policy, then their operations will run sequentially unless that storage policy is configured to accommodate multiple data streams.
Features - DB2 iDataAgent
Page 42 of 96
To backup a user-defined backup set or instance, right-click the backup set you want to backup, click All Tasks, and click Backup All Subclients.
To backup the default backup set, right-click the agent or instance node, click All Tasks, and click Backup Default Backup Set.
For Lotus Notes iDataAgent, to backup a partition, right-click the partition you want to backup, click All Tasks, and click Backup Default Backup Set.
For Agents that do not have backup set or instance levels, to backup all subclients, right-click the agent icon, click All Tasks, and click Backup All Subclients.
2. If you chose a level higher than subclient (i.e., backup set, etc.), you are prompted to confirm that you want to back up all the subclients below that level/node. Click Yes.
3. From the Backup Options dialog box, select Run Immediately.
4. Select the type of backup that you want to initiate.In certain circumstances a non-full backup may automatically be converted to a full backup. For a listing of these circumstances, see When a Non-Full Backup is Automatically Converted to a Full Backup.
5. Click the Advanced button to open the Advanced Backup Options dialog box.
6. Click on the Advanced Backup Options (Media) tab, and select Start new media and click OK.If you would like jobs with other Job IDs to use this new media, also select the Allow other schedule to use media set option.
7. From the Backup Options dialog box, click OK. You can track the progress of the backup job from the Job Controller window.
8. If you are using a stand-alone drive, you are prompted to load a specific cartridge into the drive. If you are using a library, you will not receive this prompt. The system loads the tapes automatically.
9. When the backup has completed, Job Controller displays Completed.
START A BACKUP THAT MARKS MEDIA FULL ON COMPLETION
Use the following procedure to start a backup that marks media full on completion.
Before You Begin
Be sure all of the subclients are backed up, or scheduled to be backed up as needed, in order to secure all of the data for the agent. Note this does not apply to archive operations.
Required Capability: See Capabilities and Permitted Actions
1. From the CommCell Browser, select one of the following:
To backup a subclient, right-click the subclient to want to backup and click Backup.
To backup a user-defined backup set or instance, right-click the backup set you want to backup, click All Tasks, and click Backup All Subclients.
To backup the default backup set, right-click the agent or instance node, click All Tasks, and click Backup Default Backup Set.
For Lotus Notes iDataAgent, to backup a partition, right-click the partition you want to backup, click All Tasks, and click Backup Default Backup Set.
For Agents that do not have backup set or instance levels, to backup all subclients, right-click the agent icon, click All Tasks, and click Backup All Subclients.
2. If you chose a level higher than subclient (i.e., backup set, etc.), you are prompted to confirm that you want to back up all the subclients below that level/node. Click Yes.
3. From the Backup Options dialog box, select Run Immediately.
4. Select the type of backup that you want to initiate.In certain circumstances a non-full backup may automatically be converted to a full backup. For a listing of these circumstances, see When a Non-Full Backup is Automatically Converted to a Full Backup.
5. Click the Advanced button to open the Advanced Backup Options dialog box.
6. Click on the Advanced Backup Options (Media) tab, and select Mark media full after successful operation and click OK.
7. From the Backup Options dialog box, click OK. You can track the progress of the backup job from the Job Controller window.
8. If you are using a stand-alone drive, you are prompted to load a specific cartridge into the drive. If you are using a library, you will not receive this
Your cartridges should be appropriately labeled. This will enable you to locate the correct cartridge for a restore job, if necessary.
Starting a data protection operation on a backup set, instance or agent level causes the system to start individual data protection operations for each subclient contained therein. If the subclients are associated with the same storage policy, then their operations will run sequentially unless that storage policy is configured to accommodate multiple data streams.
Features - DB2 iDataAgent
Page 43 of 96
prompt. The system loads the tapes automatically.
9. When the backup has completed, Job Controller displays Completed.
START A BACKUP WITH A SET JOB PRIORITY
This option allows you to manually set a job priority. This is useful if you have jobs that are very important and must complete, and/or jobs that can be moved to a lower priority. For more information, see Job Priorities and Priority Precedence.
Before You Begin
Be sure all of the subclients are backed up, or scheduled to be backed up as needed, in order to secure all of the data for the agent. Note this does not apply to archive operations.
Required Capability: See Capabilities and Permitted Actions
1. From the CommCell Browser, select one of the following:
To backup a subclient, right-click the subclient to want to backup and click Backup.
To backup a user-defined backup set or instance, right-click the backup set you want to backup, click All Tasks, and click Backup All Subclients.
To backup the default backup set, right-click the agent or instance node, click All Tasks, and click Backup Default Backup Set.
For Lotus Notes iDataAgent, to backup a partition, right-click the partition you want to backup, click All Tasks, and click Backup Default Backup Set.
For Agents that do not have backup set or instance levels, to backup all subclients, right-click the agent icon, click All Tasks, and click Backup All Subclients.
2. If you chose a level higher than subclient (i.e., backup set, etc.), you are prompted to confirm that you want to back up all the subclients below that level/node. Click Yes.
3. From the Backup Options dialog box, select Run Immediately.
4. Select the type of backup that you want to initiate.In certain circumstances a non-full backup may automatically be converted to a full backup. For a listing of these circumstances, see When a Non-Full Backup is Automatically Converted to a Full Backup.
5. Click the Advanced button to open the Advanced Backup Options dialog box.
6. Click on the Advanced Backup Options (Startup) tab, and select Change Priority and then enter a value. Click OK to continue.
7. From the Backup Options dialog box, click OK. You can track the progress of the backup job from the Job Controller window.
8. If you are using a stand-alone drive, you are prompted to load a specific cartridge into the drive. If you are using a library, you will not receive this prompt. The system loads the tapes automatically.
9. When the backup has completed, Job Controller displays Completed.
START A BACKUP WITH VAULT TRACKING ENABLED
Use the following procedure to start a backup with Vault Tracking enabled.
For additional information, see the following:
VaultTracker
VaultTracker Enterprise
Your cartridges should be appropriately labeled. This will enable you to locate the correct cartridge for a restore job, if necessary.
Starting a data protection operation on a backup set, instance or agent level causes the system to start individual data protection operations for each subclient contained therein. If the subclients are associated with the same storage policy, then their operations will run sequentially unless that storage policy is configured to accommodate multiple data streams.
Features - DB2 iDataAgent
Page 44 of 96

Before You Begin
Be sure all of the subclients are backed up, or scheduled to be backed up as needed, in order to secure all of the data for the agent.
Required Capability: See Capabilities and Permitted Actions
1. select one of the following:
To backup a subclient, right-click the subclient to want to backup and click Backup.
To backup a user-defined backup set or instance, right-click the backup set you want to backup, click All Tasks, and click Backup All Subclients.
To backup the default backup set, right-click the agent or instance node, click All Tasks, and click Backup Default Backup Set.
For Lotus Notes iDataAgent, to backup a partition, right-click the partition you want to backup, click All Tasks, and click Backup Default Backup Set.
For Agents that do not have backup set or instance levels, to backup all subclients, right-click the agent icon, click All Tasks, and click Backup All Subclients.
2. If you chose a level higher than subclient (i.e., backup set, etc.), you are prompted to confirm that you want to back up all the subclients below that level/node. Click Yes.
3. From the Backup Options dialog box, select Run Immediately.
4. Select the type of backup that you want to initiate.In certain circumstances a non-full backup may automatically be converted to a full backup. For a listing of these circumstances, see When a Non-Full Backup is Automatically Converted to a Full Backup.
5. Click the Advanced button to open the Advanced Backup Options dialog box.
6. Click on the Vault Tracking tab, and select the vault tracking options you want to use and click OK.
7. From the Backup Options dialog box, click OK. You can track the progress of the backup job from the Job Controller window.
8. If you are using a stand-alone drive, you are prompted to load a specific cartridge into the drive. If you are using a library, you will not receive this prompt. The system loads the tapes automatically.
9. When the backup has completed, Job Controller displays Completed.
Back To Top
Your cartridges should be appropriately labeled. This will enable you to locate the correct cartridge for a restore job, if necessary.
Features - DB2 iDataAgent
Page 45 of 96
Restore Data - DB2Topics | How To | Full System Restore | Related Topics
Overview
Restore Considerations for this Agent
Restore Order of DB2 Backup Images within a Cycle
DB2 Restore Options
General Option
Restore Arguments Option
Recover Database Option
DB2 Advanced Restore Options
Log Files Option
Redirect Option
Storage Paths Option
Roll-Forward Option
Troubleshooting DB2 Restores
Rerun Failed DB2 Restore Jobs
Restoring an Entire Database
Restoring the Database to a New Client (Out-of-Place)
Restore DB2 Databases Created in a User-defined Directory
Restore DB2 Databases with Specific Parameters Containing a Non-default Value
Restore Destinations
Command Line Restore
Log on to the CommServe
Perform the RestoreThird Party Command Line Restores
Restore from a Full Backup Image
Restore from an Incremental Backup Image
Restore from a Delta Image
Restore from Multi Stream Backups
Cross Database Restore on Same Instance
Cross Database Restore to Different Instance on Same Client
Cross Database Restore to Different Client
OVERVIEW
The following page describes the agent-specific restore options. Additional restore options are accessible from the Related Topics menu.
The DB2 iDataAgent supports the following types of restores:
Restoring and recovering entire DB2 system databases and DB2 user databases
Restoring and recovering portions of DB2 databases (i.e., selected table spaces)
Restoring history files
Restoring log files
Recovery involves two processes: restoring the physical files and then recovering the database. The user can either select backup images to be restored or have the system select the backup image. After the necessary files are restored, the database is recovered (and, in some cases, rolled forward) by applying the appropriate log files.
Additionally, the DB2 iDataAgent supports specific procedures for doing the following:
Administering table space containers (see DB2 Restore Options below for comprehensive information)
Features - DB2 iDataAgent
Page 46 of 96

Rerunning failed restore jobs containing multiple images based on the type of backup image (i.e., full, delta, or incremental) that failed during the previous restore
Restoring databases created within a user-defined directory
Restoring databases with specific parameters containing a non-default value
Depending on your restore options, restores can be performed in-place, out-of-place or cross-platform. (See Restore Destinations below for comprehensive information.) Also, DB2 restore jobs can be run from a third-party command line, and they cannot be suspended unless they are in a pending state.
For the DB2 iDataAgent, restore operations can be performed from the client and backup set levels in the CommCell Browser.
When there is a problem with DB2 database or the client system (operating system, hardware, hard drives, etc.), full system restores may be required. See Restore Data - DB2 iDataAgent - Full System Restore for more information.
RESTORE CONSIDERATIONS FOR THIS AGENT
If the database is upgraded, the next backup that is run detects the new version. The version is refreshed and displayed in the instance Properties dialog box and for the SQL Server iDataAgent, it is displayed during a browse operation. For more information, see Browse Databases.
Before performing any restore procedures for this agent, review the following information.
Restore Order of DB2 Backup Images within a Cycle
RESTORE ORDER OF DB2 BACKUP IMAGES WITHIN A CYCLEThe system attempts to restore the DB2 backup images within a backup cycle in a specific order, as follows:
Last backup image is always restored first.
Full backup image is always restored second.
Any other backup images are then restored individually in the order they were backed up.
Last backup image (which was restored first) is also restored last.
For example, assume that Backup Cycle A includes the following backup images (F represents a full backup image, D represents a delta backup image, and Irepresents an incremental backup image).
Using the rules in the previous bullet list, the backup images in Backup Cycle A would be restored in the following order.
Note that Delta Backup Image 5 (i.e., D5) is the last backup image in Backup Cycle A. Therefore, it is restored first and then last when the backup images in the cycle are restored. Note also that Full Backup Image 1 (i.e., F1) is restored second, and that the remaining backup images are restored in the appropriate order.
The information in this section is important if you try to restore a full backup image along with one or more associated incremental backup images and/or delta backup images but one of these backup images fails to restore. In such a case, you must follow the appropriate steps to implement a successful restore. For more information, see the appropriate how-to topic.
DB2 RESTORE OPTIONS
The following list discusses the DB2-specific restore options that are provided by the agent. The options that are also available to other agents are not discussed here.
The following options are provided from the Restore Options dialog box in the CommCell Browser.
GENERAL OPTION
The General tab allows you to select the data to restore and the destination(s) for the restore. It also provides an option to administer table space containers. You should use this option if your system has lost containers (because of a crash, for example) or if one or more current containers are full.
RESTORE ARGUMENTS OPTION
Features - DB2 iDataAgent
Page 47 of 96
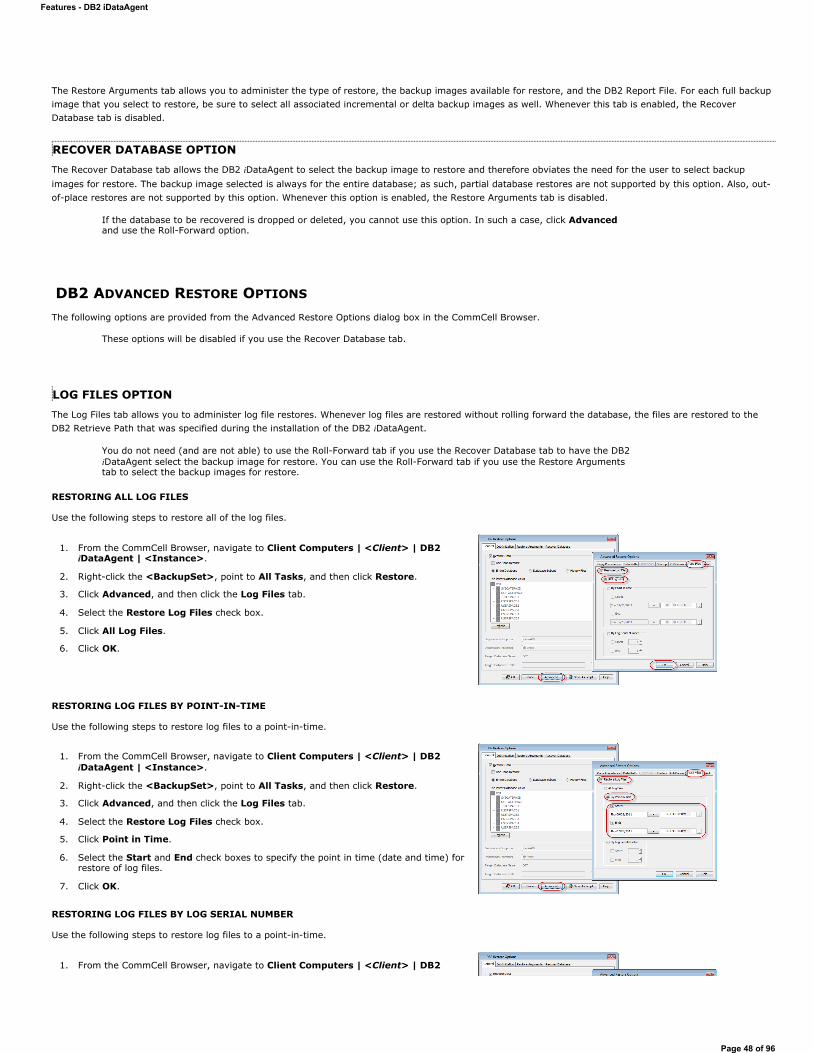
The Restore Arguments tab allows you to administer the type of restore, the backup images available for restore, and the DB2 Report File. For each full backup image that you select to restore, be sure to select all associated incremental or delta backup images as well. Whenever this tab is enabled, the Recover Database tab is disabled.
RECOVER DATABASE OPTIONThe Recover Database tab allows the DB2 iDataAgent to select the backup image to restore and therefore obviates the need for the user to select backup images for restore. The backup image selected is always for the entire database; as such, partial database restores are not supported by this option. Also, out-of-place restores are not supported by this option. Whenever this option is enabled, the Restore Arguments tab is disabled.
DB2 ADVANCED RESTORE OPTIONS
The following options are provided from the Advanced Restore Options dialog box in the CommCell Browser.
LOG FILES OPTIONThe Log Files tab allows you to administer log file restores. Whenever log files are restored without rolling forward the database, the files are restored to the DB2 Retrieve Path that was specified during the installation of the DB2 iDataAgent.
RESTORING ALL LOG FILES
Use the following steps to restore all of the log files.
RESTORING LOG FILES BY POINT-IN-TIME
Use the following steps to restore log files to a point-in-time.
RESTORING LOG FILES BY LOG SERIAL NUMBER
Use the following steps to restore log files to a point-in-time.
If the database to be recovered is dropped or deleted, you cannot use this option. In such a case, click Advancedand use the Roll-Forward option.
These options will be disabled if you use the Recover Database tab.
You do not need (and are not able) to use the Roll-Forward tab if you use the Recover Database tab to have the DB2 iDataAgent select the backup image for restore. You can use the Roll-Forward tab if you use the Restore Arguments tab to select the backup images for restore.
1. From the CommCell Browser, navigate to Client Computers | <Client> | DB2 iDataAgent | <Instance>.
2. Right-click the <BackupSet>, point to All Tasks, and then click Restore.
3. Click Advanced, and then click the Log Files tab.
4. Select the Restore Log Files check box.
5. Click All Log Files.
6. Click OK.
1. From the CommCell Browser, navigate to Client Computers | <Client> | DB2 iDataAgent | <Instance>.
2. Right-click the <BackupSet>, point to All Tasks, and then click Restore.
3. Click Advanced, and then click the Log Files tab.
4. Select the Restore Log Files check box.
5. Click Point in Time.
6. Select the Start and End check boxes to specify the point in time (date and time) for restore of log files.
7. Click OK.
1. From the CommCell Browser, navigate to Client Computers | <Client> | DB2
Features - DB2 iDataAgent
Page 48 of 96
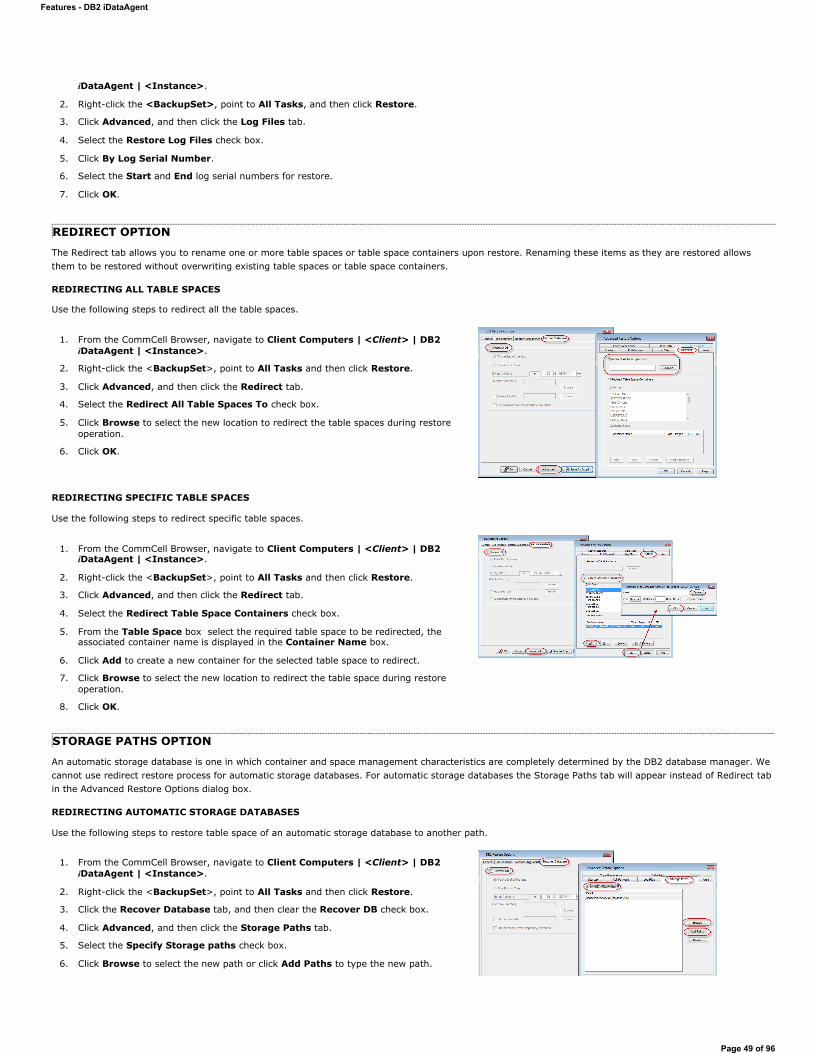
REDIRECT OPTION
The Redirect tab allows you to rename one or more table spaces or table space containers upon restore. Renaming these items as they are restored allows them to be restored without overwriting existing table spaces or table space containers.
REDIRECTING ALL TABLE SPACES
Use the following steps to redirect all the table spaces.
REDIRECTING SPECIFIC TABLE SPACES
Use the following steps to redirect specific table spaces.
STORAGE PATHS OPTION
An automatic storage database is one in which container and space management characteristics are completely determined by the DB2 database manager. We cannot use redirect restore process for automatic storage databases. For automatic storage databases the Storage Paths tab will appear instead of Redirect tab in the Advanced Restore Options dialog box.
REDIRECTING AUTOMATIC STORAGE DATABASES
Use the following steps to restore table space of an automatic storage database to another path.
iDataAgent | <Instance>.
2. Right-click the <BackupSet>, point to All Tasks, and then click Restore.
3. Click Advanced, and then click the Log Files tab.
4. Select the Restore Log Files check box.
5. Click By Log Serial Number.
6. Select the Start and End log serial numbers for restore.
7. Click OK.
1. From the CommCell Browser, navigate to Client Computers | <Client> | DB2 iDataAgent | <Instance>.
2. Right-click the <BackupSet>, point to All Tasks and then click Restore.
3. Click Advanced, and then click the Redirect tab.
4. Select the Redirect All Table Spaces To check box.
5. Click Browse to select the new location to redirect the table spaces during restore operation.
6. Click OK.
1. From the CommCell Browser, navigate to Client Computers | <Client> | DB2 iDataAgent | <Instance>.
2. Right-click the <BackupSet>, point to All Tasks and then click Restore.
3. Click Advanced, and then click the Redirect tab.
4. Select the Redirect Table Space Containers check box.
5. From the Table Space box select the required table space to be redirected, the associated container name is displayed in the Container Name box.
6. Click Add to create a new container for the selected table space to redirect.
7. Click Browse to select the new location to redirect the table space during restore operation.
8. Click OK.
1. From the CommCell Browser, navigate to Client Computers | <Client> | DB2 iDataAgent | <Instance>.
2. Right-click the <BackupSet>, point to All Tasks and then click Restore.
3. Click the Recover Database tab, and then clear the Recover DB check box.
4. Click Advanced, and then click the Storage Paths tab.
5. Select the Specify Storage paths check box.
6. Click Browse to select the new path or click Add Paths to type the new path.
Features - DB2 iDataAgent
Page 49 of 96
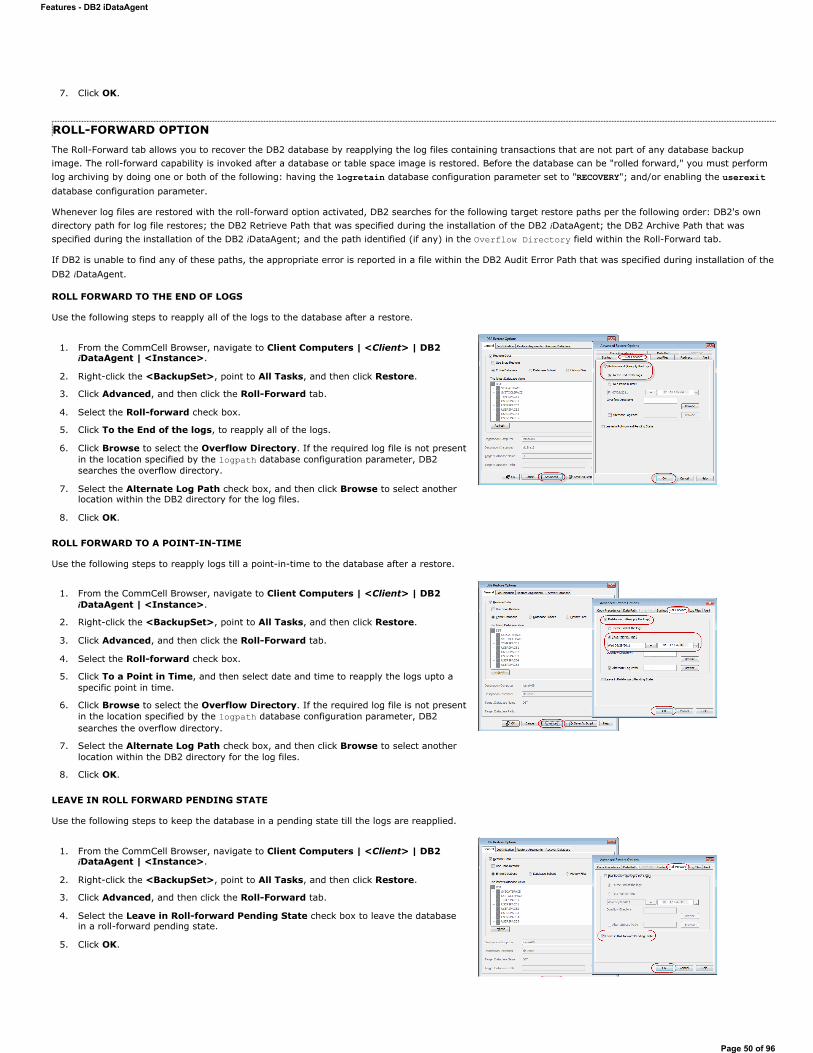
ROLL-FORWARD OPTIONThe Roll-Forward tab allows you to recover the DB2 database by reapplying the log files containing transactions that are not part of any database backup image. The roll-forward capability is invoked after a database or table space image is restored. Before the database can be "rolled forward," you must perform log archiving by doing one or both of the following: having the logretain database configuration parameter set to "RECOVERY"; and/or enabling the userexitdatabase configuration parameter.
Whenever log files are restored with the roll-forward option activated, DB2 searches for the following target restore paths per the following order: DB2's own directory path for log file restores; the DB2 Retrieve Path that was specified during the installation of the DB2 iDataAgent; the DB2 Archive Path that was specified during the installation of the DB2 iDataAgent; and the path identified (if any) in the Overflow Directory field within the Roll-Forward tab.
If DB2 is unable to find any of these paths, the appropriate error is reported in a file within the DB2 Audit Error Path that was specified during installation of the DB2 iDataAgent.
ROLL FORWARD TO THE END OF LOGS
Use the following steps to reapply all of the logs to the database after a restore.
ROLL FORWARD TO A POINT-IN-TIME
Use the following steps to reapply logs till a point-in-time to the database after a restore.
LEAVE IN ROLL FORWARD PENDING STATE
Use the following steps to keep the database in a pending state till the logs are reapplied.
7. Click OK.
1. From the CommCell Browser, navigate to Client Computers | <Client> | DB2 iDataAgent | <Instance>.
2. Right-click the <BackupSet>, point to All Tasks, and then click Restore.
3. Click Advanced, and then click the Roll-Forward tab.
4. Select the Roll-forward check box.
5. Click To the End of the logs, to reapply all of the logs.
6. Click Browse to select the Overflow Directory. If the required log file is not present in the location specified by the logpath database configuration parameter, DB2 searches the overflow directory.
7. Select the Alternate Log Path check box, and then click Browse to select another location within the DB2 directory for the log files.
8. Click OK.
1. From the CommCell Browser, navigate to Client Computers | <Client> | DB2 iDataAgent | <Instance>.
2. Right-click the <BackupSet>, point to All Tasks, and then click Restore.
3. Click Advanced, and then click the Roll-Forward tab.
4. Select the Roll-forward check box.
5. Click To a Point in Time, and then select date and time to reapply the logs upto a specific point in time.
6. Click Browse to select the Overflow Directory. If the required log file is not present in the location specified by the logpath database configuration parameter, DB2 searches the overflow directory.
7. Select the Alternate Log Path check box, and then click Browse to select another location within the DB2 directory for the log files.
8. Click OK.
1. From the CommCell Browser, navigate to Client Computers | <Client> | DB2 iDataAgent | <Instance>.
2. Right-click the <BackupSet>, point to All Tasks, and then click Restore.
3. Click Advanced, and then click the Roll-Forward tab.
4. Select the Leave in Roll-forward Pending State check box to leave the database in a roll-forward pending state.
5. Click OK.
Features - DB2 iDataAgent
Page 50 of 96
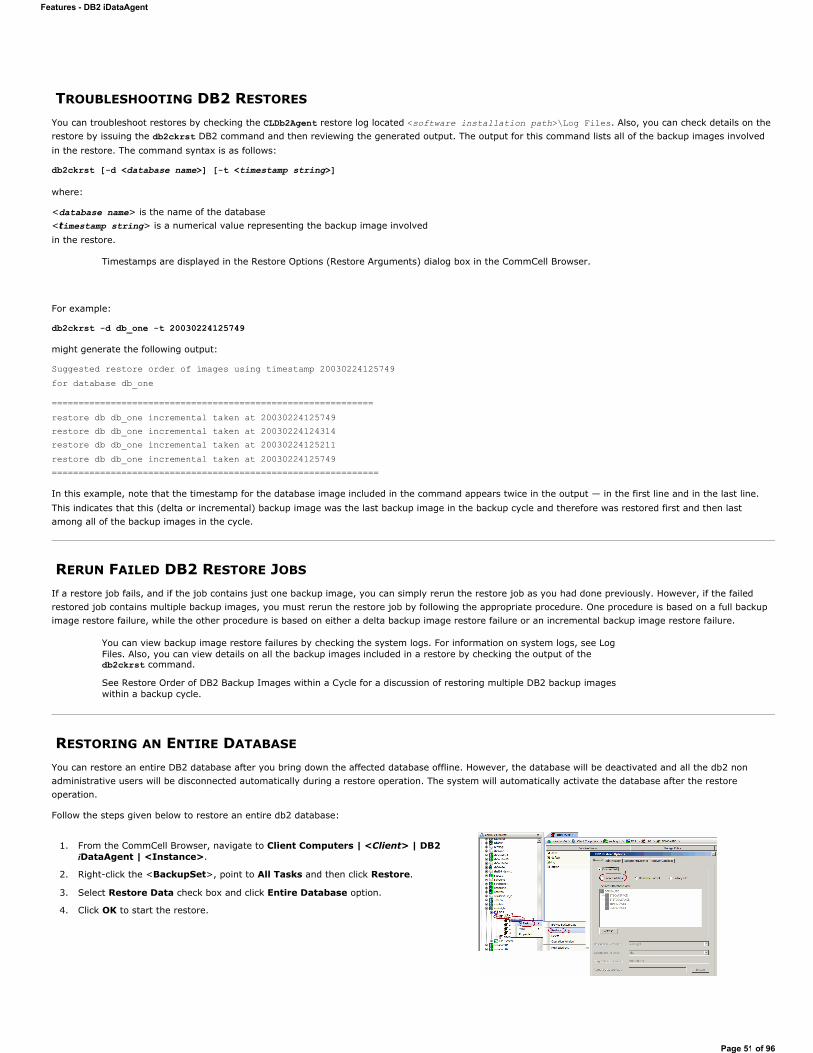
TROUBLESHOOTING DB2 RESTORES
You can troubleshoot restores by checking the CLDb2Agent restore log located <software installation path>\Log Files. Also, you can check details on the restore by issuing the db2ckrst DB2 command and then reviewing the generated output. The output for this command lists all of the backup images involved in the restore. The command syntax is as follows:
db2ckrst [-d <database name>] [-t <timestamp string>]
where:
<database name> is the name of the database<timestamp string> is a numerical value representing the backup image involvedin the restore.
For example:
db2ckrst -d db_one -t 20030224125749might generate the following output:
Suggested restore order of images using timestamp 20030224125749for database db_one
============================================================restore db db_one incremental taken at 20030224125749restore db db_one incremental taken at 20030224124314restore db db_one incremental taken at 20030224125211restore db db_one incremental taken at 20030224125749=============================================================
In this example, note that the timestamp for the database image included in the command appears twice in the output — in the first line and in the last line. This indicates that this (delta or incremental) backup image was the last backup image in the backup cycle and therefore was restored first and then last among all of the backup images in the cycle.
RERUN FAILED DB2 RESTORE JOBS
If a restore job fails, and if the job contains just one backup image, you can simply rerun the restore job as you had done previously. However, if the failed restored job contains multiple backup images, you must rerun the restore job by following the appropriate procedure. One procedure is based on a full backup image restore failure, while the other procedure is based on either a delta backup image restore failure or an incremental backup image restore failure.
RESTORING AN ENTIRE DATABASE
You can restore an entire DB2 database after you bring down the affected database offline. However, the database will be deactivated and all the db2 non administrative users will be disconnected automatically during a restore operation. The system will automatically activate the database after the restore operation.
Follow the steps given below to restore an entire db2 database:
Timestamps are displayed in the Restore Options (Restore Arguments) dialog box in the CommCell Browser.
You can view backup image restore failures by checking the system logs. For information on system logs, see Log Files. Also, you can view details on all the backup images included in a restore by checking the output of the db2ckrst command.
See Restore Order of DB2 Backup Images within a Cycle for a discussion of restoring multiple DB2 backup images within a backup cycle.
1. From the CommCell Browser, navigate to Client Computers | <Client> | DB2 iDataAgent | <Instance>.
2. Right-click the <BackupSet>, point to All Tasks and then click Restore.
3. Select Restore Data check box and click Entire Database option.
4. Click OK to start the restore.
Features - DB2 iDataAgent
Page 51 of 96
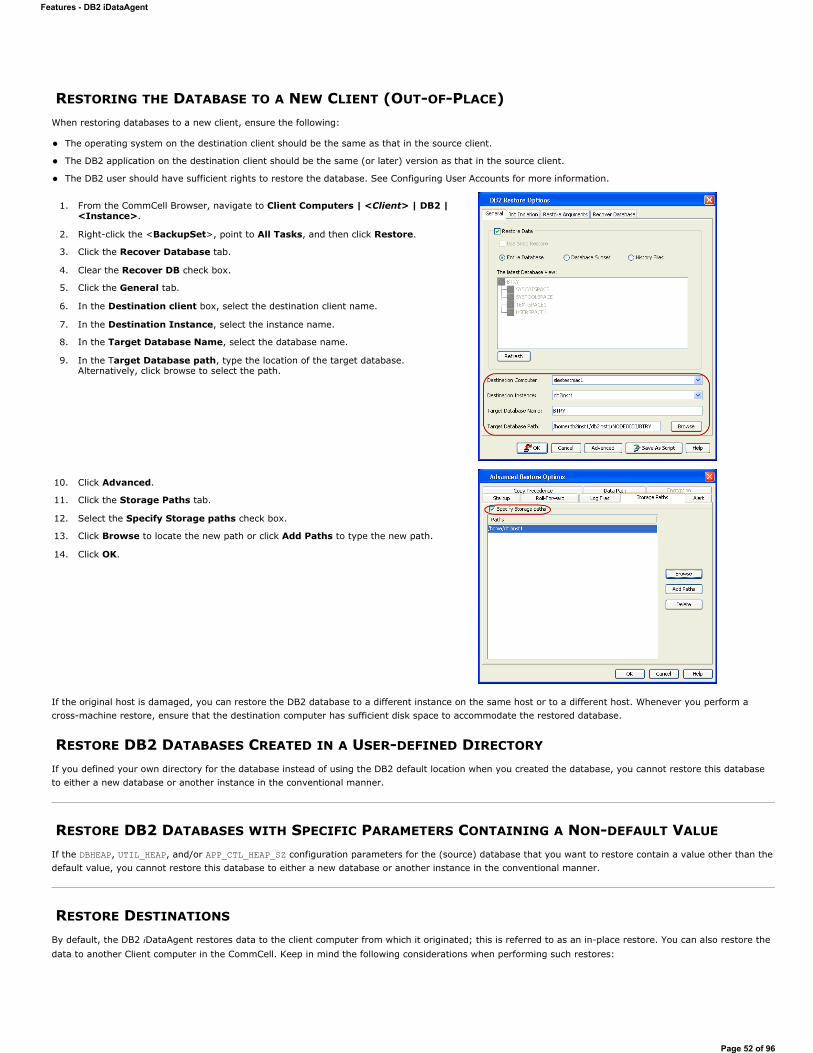
RESTORING THE DATABASE TO A NEW CLIENT (OUT-OF-PLACE)When restoring databases to a new client, ensure the following:
The operating system on the destination client should be the same as that in the source client.
The DB2 application on the destination client should be the same (or later) version as that in the source client.
The DB2 user should have sufficient rights to restore the database. See Configuring User Accounts for more information.
If the original host is damaged, you can restore the DB2 database to a different instance on the same host or to a different host. Whenever you perform a cross-machine restore, ensure that the destination computer has sufficient disk space to accommodate the restored database.
RESTORE DB2 DATABASES CREATED IN A USER-DEFINED DIRECTORY
If you defined your own directory for the database instead of using the DB2 default location when you created the database, you cannot restore this database to either a new database or another instance in the conventional manner.
RESTORE DB2 DATABASES WITH SPECIFIC PARAMETERS CONTAINING A NON-DEFAULT VALUE
If the DBHEAP, UTIL_HEAP, and/or APP_CTL_HEAP_SZ configuration parameters for the (source) database that you want to restore contain a value other than the default value, you cannot restore this database to either a new database or another instance in the conventional manner.
RESTORE DESTINATIONS
By default, the DB2 iDataAgent restores data to the client computer from which it originated; this is referred to as an in-place restore. You can also restore the data to another Client computer in the CommCell. Keep in mind the following considerations when performing such restores:
1. From the CommCell Browser, navigate to Client Computers | <Client> | DB2 | <Instance>.
2. Right-click the <BackupSet>, point to All Tasks, and then click Restore.
3. Click the Recover Database tab.
4. Clear the Recover DB check box.
5. Click the General tab.
6. In the Destination client box, select the destination client name.
7. In the Destination Instance, select the instance name.
8. In the Target Database Name, select the database name.
9. In the Target Database path, type the location of the target database. Alternatively, click browse to select the path.
10. Click Advanced.
11. Click the Storage Paths tab.
12. Select the Specify Storage paths check box.
13. Click Browse to locate the new path or click Add Paths to type the new path.
14. Click OK.
Features - DB2 iDataAgent
Page 52 of 96
The destination client must reside in the same CommCell as the client whose data was backed up.
Note that when you perform restores other than in-place restores, the restored data assumes the rights (i.e., permissions) of the parent directory.
The following section enumerates the types of restore destinations that are supported by the DB2 iDataAgent. See Restore/Recover/Retrieve Destinations -Support for a list of Agents supporting each restore destination type.
IN-PLACE RESTORESame path/destination
OUT-OF-PLACE RESTOREKeep in mind that out-of-place restore operations are also subject to the conditions described in Cross-Platform Restores.
Same path/destination
Different path/destination
CROSS-PLATFORM RESTORESSame Operating System - Different Version
COMMAND LINE RESTORE
You can perform restores of one of more databases from the command line interface.
Command line restores enable you to perform restore operations on multiple clients at the same time. It also allows you to reuse the command line scripts for additional restores.
When performing command line restores, note that backups taken from the CommCell Console can be restored using Command Line and vice versa. However, backups taken from a previous version of the CommCell Console can be restored only from the Command Line.
In order to run the restores from command line, you need an input xml file which contains the parameters for configuring the restore options. This input xml file can be obtained using one of the following ways:
Download the input xml file template and save it on the computer from where the restore will be performed.
Generate the input xml file from the CommCell Console and save it on the computer from where the restore will be performed.
LOG ON TO THE COMMSERVETo run command line operations you must first login to the CommServe as follows:
From Command prompt, navigate to <Software_Installation_Directory>/Base and run the following command:
qlogin -cs <commserve name> -u <user name>
For example, to log on to CommServe 'server1' with username 'user1':
qlogin -cs server1 -u user1
PERFORM THE RESTORE
1. Execute the saved xml script using qoperation execute command.
qoperation execute -af recover_template.xml -clientName <DB2CleintName> -instanceName <DB2InstanceName> -backupsetName <DB2BackupSetName>
Example
qoperation execute -af qoperation_db2_recover.xml -clientName dbserveaix2 -instanceName db2inst5 -backupsetName TESTDB
2. Verify the status of the job using the following command: qlist job –j JOBID
3. Once the job completes, logout from the CommServe using the qlogout command.
qlogout [-cs commserver] [-all] [-tf tokenfile] [-tk token] [-h]
THIRD PARTY COMMAND LINE RESTORES
Out-of-place restores are not supported by the Recover Database option.
Features - DB2 iDataAgent
Page 53 of 96
Use the following steps to restore a DB2 database. You must deactivate the database before performing a DB2 database restore.
1. At the Command Prompt, type the appropriate restore command for the specific platform.
For a DB2 instance on 32-bit AIX/Solaris, or 32-bit or 64-bit Linux, or 31-bit/64-bit Linux on System Z, run the following command:
db2 restore db <database name> incremental automatic load '<software install path>/Base/libDb2Sbt.so' taken at <backup image date> without prompting
For a DB2 instance on 64-bit AIX/Solaris or 64bit Linux on System Z, run the following command:
db2 restore db <database name> incremental automatic load '<software install path>/Base64/libDb2Sbt.so' taken at <backup image date> without prompting
For a DB2 instance on a 32bit/64bit Windows platform, run the following command:
db2 restore db <database name> incremental automatic load '<software install path>/Base/Db2Sbt.dll' taken at <backup image date> without prompting
where <software install path> is the install path for the agent software (e.g., level1/install); and <backup image date> is the date of the backup image in the following format: "YYYYMMDDHHMMSS" (e.g., 20070612120426).
2. Roll forward the DB2 database:
db2 rollforward db <database name> to end of logs and complete
RESTORE FROM A FULL BACKUP IMAGE
RESTORE FROM AN INCREMENTAL BACKUP IMAGE
RESTORE FROM A DELTA IMAGE
RESTORE FROM MULTI STREAM BACKUPS
When you perform third party command line restores from multiple stream backups, the restore operation will generate separate job ID for each stream.You can perform a third party command line restore from a multistream backup image using the following steps. Note that the number of streams specified for the restore should be same as the number of streams used by the backup image.
CROSS DATABASE RESTORE ON SAME INSTANCE
Use the following steps to perform a cross-database restore involving the same DB2 instance, assume, for example, that the name of the source database is pubs and that the name of the target database is emp.
1. At the Command Prompt, type the restore command. db2 restore db <database name> load '<software install path>/Base/libDb2Sbt.so' taken at <backup image date> without prompting
1. At the Command Prompt, type the restore command. db2 restore db <database name> incremental automatic load '<software install path>/Base/libDb2Sbt.so' taken at <backup image date> without prompting
1. At the Command Prompt, type the restore command. db2 restore db <database name> incremental automatic load '<software install path>/Base/libDb2Sbt.so' taken at <backup image date> without prompting
1.. At the Command Prompt, type the appropriate restore command for the specific platform.
On Unix client:
db2 restore db <db_name> load '<software install path>/Base(or Base64)/libDb2Sbt.so' open <n> sessions taken at <backup_image>
On Windows client:
db2 "restore db <db_name> load '<software install path>\Base\Db2Sbt.dll' open <n> sessions taken at <backup_image>"
2. Roll forward the DB2 database db2 rollforward db <database name> to end of logs and complete
1. At the Command Prompt, type the restore command. db2 restore db pubs load <source software install path>/Base/libDb2Sbt.so taken at 20080627113811 on <destination software install path> into emp
2. Set the CvSrcDbName option for the LOGARCHOPT1 parameter to the source database name.
db2 update db cfg for emp using LOGARCHOPT1 "'CvSrcDbName=pubs,CvClientName=<client name>,CvInstanceName=<CommServe instance name>"'
3. Roll forward the DB2 database db2 rollforward db emp to end of logs and stop
Features - DB2 iDataAgent
Page 54 of 96

CROSS DATABASE RESTORE TO DIFFERENT INSTANCE ON SAME CLIENT
Use the following steps to perform a cross-database restore involving different DB2 instances on the same client, assume, for example, that the name of the (source and destination) client is supernova, the name of the source DB2 instance is db2inst3, the name of the source database is pubs, the name of the destination DB2 instance is db2inst4, and the name of the destination database is emp01. Also, assume that the CommServe instance name (in a multi-instance environment) is Instance001.
CROSS DATABASE RESTORE TO DIFFERENT CLIENTFor a cross-database restore involving different DB2 instances on different clients, assume, for example, that the name of the source client is supernova, the name of the source DB2 instance is db2inst3, the name of the source database is pubs, the name of the destination client is neutronstar, the name of the destination instance is db2inst4, and the name of the destination database is emp. Also, assume that the CommServe instance name (in a multi-instance environment) is Instance001.
Back to Top
Restore Data - DB2 - How ToTopics | How To | Full System Restore | Related Topics
Rerun a Failed DB2 or DB2 DPF Restore Job
Restore a DB2 Database or DB2 DPF Database Partition Created in a User-defined Directory
Restore a DB2 Database or DB2 DPF Database Partition with Specific Parameters Containing a Non-default Value
RERUN A FAILED DB2 OR DB2 DPF RESTORE JOB
Before You Begin:
Review the general and agent-specific restore requirements accessed from Restore Backup Data prior to performing any restore operation.
Required Capability: See Capabilities and Permitted Actions
1. From the Restore Arguments tab of the Restore Options dialog box, enable the Incremental Restore (from one Full backup image) option.
2. Select only the full backup image that failed to restore from the Available Images field.
3. Click Advanced.
4. From the Roll-Forward tab of the Advanced Restore Options dialog box, select the Leave in Roll-Forward Pending State option.
1. Set the CvSrcDB2InstanceName option to the source database name in the VENDOROPT parameter (in this example, db2inst3).
db2 update db cfg for emp01 using VENDOROPT "'CvSrcDB2InstanceName=db2inst3,CvClientName=supernova,CvInstanceName=Instance001"'
2.. At the Command Prompt, type the restore command. db2 restore db pubs load <source software install path>/Base/libDb2Sbt.so taken at 20080627113811 on <destination software install path> into emp01
3. Set the CvSrcDbName option to the source database name and the CvSrcDB2InstanceName option to the source DB2 instance name in the LOGARCHOPT1parameter.
db2 update db cfg for emp01 using LOGARCHOPT1 "'CvSrcDbName=pubs,CvSrcDB2InstanceName=db2inst3,CvClientName=supernova, CvInstanceName=Instance001"'
4. Roll forward the DB2 database db2 rollforward db emp to end of logs and stop
1. Set the CvSrcClientName option to the source client name and the CvSrcDB2InstanceName option to the source database name in the VENDOROPTparameter (in this example, db2inst3).
db2 update db cfg for emp01 using VENDOROPT "'CvSrcClientName=supernova,CvSrcDB2InstanceName=db2inst3,CvClientName=neutronstar,CvInstanceName=Instance001"'
2. At the Command Prompt, type the restore command. db2 restore db pubs load <source software install path>/Base/libDb2Sbt.so taken at 20080627113831 on <destination software install path> into emp
3. Set the CvSrcDbName option to the source database name, the CvSrcClientNameoption to the source client name, and the CvSrcDB2InstanceName option to the source instance name in the LOGARCHOPT1 parameter.
db2 update db cfg for emp using LOGARCHOPT1"'CvSrcDbName=pubs,CvSrcClientName=supernova,CvSrcDB2InstanceName=db2inst3,CvClientName=neutronstar,CvInstanceName=Instance001"'
4. Roll forward the DB2 database db2 rollforward db emp to end of logs and stop
Features - DB2 iDataAgent
Page 55 of 96
5. Click OK to restore the full backup image.
6. From the Restore Arguments tab, disable the Incremental Restore (from one Full backup image) option.
7. Select the next (non-full) backup image in the backup cycle from the Available Images field.
8. Click OK to restore this backup image.
9. Repeat the previous two steps until all the other backup images in the cycle have been restored.
10. Click Advanced.
11. Apply the database roll-forward from the Roll-Forward tab.
12. Continue the restore.
1. From the Restore Arguments tab of the Restore Options dialog box, disable the Incremental Restore (from one Full backup image) option.
2. Select the backup image that failed to restore from the Available Images field.
3. Click OK to restore this backup image.
4. Select the next backup image in the backup cycle from the Available Images field.
5. Click OK to restore this backup image.
6. Repeat the previous two steps until all the other backup images in the cycle have been restored.
7. Continue the restore.
RESTORE A DB2 DATABASE OR DB2 DPF DATABASE PARTITION CREATED IN A USER-DEFINEDDIRECTORY
Before You Begin:
Review the general and agent-specific restore requirements accessed from Restore Backup Data prior to performing any restore operation.
Required Capability: See Capabilities and Permitted Actions
-defined directory location instead of at the DB2 default location:
1. Refer to Browse and Restore or Basic Restore as appropriate to restore the database.
2. Click Advanced.
3. Ensure that you redirect all the associated tablespaces by using the Redirect tab within the Advanced Restore Options dialog box.
4. Continue the restore.
RESTORE A DB2 DATABASE OR DB2 DPF DATABASE PARTITION WITH SPECIFIC PARAMETERSCONTAINING A NON-DEFAULT VALUE
Before You Begin:
Review the general and agent-specific restore requirements accessed from Restore Backup Data prior to performing any restore operation.
Required Capability: See Capabilities and Permitted Actions
DBHEAP, UTIL_HEAP, and/or APP_CTL_HEAP_SZ configuration parameters contain a value other than the default value:
1. Create a dummy database.
2. Set the DBHEAP, UTIL_HEAP, and/or APP_CTL_HEAP_SZ configuration parameters for this database to the (non-default) value of each of these parameters for the source database.
3. Restore the source database backup image to the dummy database. Refer to Browse and Restore or Basic Restore as appropriate.
Basic RestoreTopics | How To | Related Topics
Overview
Features - DB2 iDataAgent
Page 56 of 96
Time Range Options
OVERVIEW
There are two functions that help you retrieve backed up data from the backup media: Browse and Restore. Browse operations allow you to view the data that has been backed up for a client computer without actually restoring the data. Restore operations retrieve the data from the backup media and restore it to the desired location.
In the CommCell Browser, the Browse and various Restore commands appear in the right-click menus at the agent, instance and/or backup set levels, depending on agent.
Using the Restore commands, i.e., restoring without browsing, is most appropriate when you want to restore the latest backup job for an agent, instance or backup set and want to retain the current file structure.
In certain situations and for supported agents, Restore operations can run without utilizing the Browse feature. For example, if you know the path/name of the volume of the data that you want to restore, you can restore it without browsing. In these agents, this procedure is most appropriate when the number of paths for the data that you want to restore is small or when the data that you want to restore is at a single volume. If you want to restore data from many different paths or volumes, you should probably select the data from the Browse window.
TIME RANGE OPTIONSIn a Basic Restore, point-in-time data can be restored by specifying time range options in the Advanced Restore Options (Time Range) dialog box. See Time Range Options for Basic Restore for step-by-step instructions. When a time range is specified for a Basic Restore, the latest version of the backup job within the given time range will be restored.
Basic Restore - How ToTopics | How To | Related Topics
Basic Restore
Time Range Options for Basic Restore
BASIC RESTORE
Before You Begin:
Review the general and agent-specific restore requirements accessed from Restore Backup Data prior to performing any restore operation.
Required Capability: See Capabilities and Permitted Actions
1. From the CommCell Browser, right-click the agent, instance or backup set that contains the data you want to restore, click All Tasks and then click the available Restore command (command names vary by agent).
2. In the Restore dialog box, type the starting path of the data you want to restore.
3. From the Restore Options and Advanced Restore Options dialog boxes, select the restore options that you want to use. When you accept all the default settings, you will be restoring the selected data to its original location. See Restore Backup Data for complete information on the agent-specific restore options.
4. After completing your selections, you can either start an immediate restore or schedule the restore.
If you want to schedule the job, click the Job Initiation tab from the Restore Options dialog box, click Schedule, and enter your selections in the Schedule Details (Schedule Details) dialog box. Clicking OK from this dialog box saves your schedule. See Scheduled Data Recovery Operations for an overview of this feature.
If you want to run the job now, accept or click Run Immediately in the same tab and then click OK.
You can monitor the progress of the restore job in the Job Controller. While the job is running, you can right-click the job in the Job Controller and select Detailto view information on the job.
After the data has been restored, you will see a job completion message in the Job Controller and Event Viewer.
TIME RANGE OPTIONS FOR BASIC RESTORE
Features - DB2 iDataAgent
Page 57 of 96
Before You Begin:
Review the general and agent-specific restore requirements accessed from Restore Backup Data prior to performing any restore operation.
Required Capability: See Capabilities and Permitted Actions
1. From the CommCell Browser, right-click the agent, instance or backup set that contains the data you want to restore, click All Tasks and then click the available Restore command (command names vary by agent).
2. In the Restore dialog box, type the starting path of the data you want to restore.
3. From the Restore Options and Advanced Restore Options dialog boxes, select the Time Range tab.
4. In the Advanced Restore Options (Time Range) dialog box, clear the Show Deleted Items option, if required.
In the Specify Restore Time area select the Time Zone for the time range options. Select the Exclude Data Before option and select the start date and time from which you wish to restore data, and select the Browse Data Before option and select the end date and time until which you wish to restore data.
5. Click OK in the Advanced Restore Options dialog box.
6. Click OK in the Restore Options dialog box to execute the restore.
Back To Top
Browse and RestoreTopics | How To | Related Topics
OVERVIEW
There are two functions that help you retrieve backed up data from the backup media: browse and restore. In the CommCell Browser, the browse and variously-named restore commands appear, depending on agent, in the right-click menus at the agent, instance and/or backup set levels.
Browse operations allow you to view data that has been backed up by the agent on the client computer and select all or some of that data. Depending on the agent, there are several options available to customize your browse. See Browse Data for comprehensive information on Browse operations.
Restore operations allow you to retrieve data from backup media and restore it to the desired location. Restoring without browsing is most appropriate when you want to restore the latest backup job for an agent, instance or backup set and want to retain the current file structure. See Basic Restore for more information on restoring without using browse.
Browse and Restore
The Browse and Restore procedure is a sequential procedure that combines the two procedures. When you select a Browse command from the CommCell Browser, you can define and run one of many potential browse sequences. At the end of the browse, when you are looking at the resulting information presented in the Browse window, you can continue with a restore procedure simply by selecting data and clicking the Recover All Data button. As with the browse, depending on the agent, there are several options available to customize your restore.
Perform a browse and restore operation when you want to:
restore from an earlier backup
restore only select files/objects
restore deleted files/objects
when you don't want or don't need to retain the current file structure
utilize browse options
Browse and Restore - How ToTopics | How To | Related Topics
BROWSE AND RESTORE
Before You Begin:
Review the general and agent-specific restore requirements accessed from Restore Backup Data prior to performing any restore operation.
Features - DB2 iDataAgent
Page 58 of 96
Required Capability: See Capabilities and Permitted Actions
1. From the CommCell Browser, right-click the agent, instance, backup set, or Legal hold set (for Legal Hold data) that contains the data you want to restore, click All Tasks and then click the available Browse command (command names vary by agent).
2. Run a browse operation. See Browse Data for a list of customized browse operations and their step-by-step instructions. If you accept all defaults, you will be browsing the latest backups for the selected data.
3. From the Browse window, Select Objects From the Browse Window for Restore.
4. From the agent's Restore Options and Advanced Restore Options dialog boxes, select the restore options that you want to use. For agents with multiple tabs, do not click OK until you have used all of the desired tabs. When you accept all the default settings, you will be restoring the selected data to its original location. See Restore Backup Data for access to complete information on the agent-specific Restore Destination options and procedures available.
5. When restoring encrypted data, refer to Data Encryption for comprehensive feature information and procedures for using the Encryption tab of the Advanced Restore Options dialog box.
6. After completing your selections, you can either start an immediate restore or schedule the restore.
If you want to schedule the job, click the Job Initiation tab from the Restore Options dialog box, click Schedule, schedule the job, and then click OK.
If you want to run the job now, accept or click Run Immediately in the same tab and then click OK.
While the job is running, you can right-click the job in the Job Controller and select Detail to view information on the job. After the data has been restored, you will see a job completion message in the Job Controller and Event Viewer.
Back To Top
Features - DB2 iDataAgent
Page 59 of 96
Instances - DB2Topics | How To | Related Topics
Overview
Configurable Properties
Configuring User Accounts for Backups
OVERVIEW
You must create a DB2 instance from the CommCell Browser as soon as you install the DB2 iDataAgent. This allows you to perform a backup on the DB2 database.
See Instances for an overview of Instances. Given below is a list of what you need to provide before creating a DB2 instance.
Name of the instance
Windows User account that will be used for performing all system operations
Path to the DB2 home directory
Name of the storage policy that will be used by the backup set in the instance
Name of the storage policy for backups started by user commands
Name of the storage policy to be used for log files
Providing the latter two storage policies allows you to view and track the status of jobs in the Job Controller and Event Viewer.
Software compression for DB2 Command Line Backups can be enabled or disabled at the instance level. Software compression for data can be more granularly managed through the subclient level.
After creating the DB2 instance, you must Create Backup Sets for the instance.
CONFIGURABLE PROPERTIES
Once installed, the agent is configured and is therefore able to manage the data or volumes on the client computer. However, you can change certain aspects of the instance configuration to manage the data in the manner that best suits your needs.
You can view or change the instance configuration from the Instance Properties dialog box. The following information can be configured.
USE ENCRYPTION FOR THIRD-PARTY COMMAND LINE OPERATIONS
When accessing the Encryption tab from the instance level, you are selecting either Network and/or Media-side encryption for third-party Command Line operations. When accessing this same tab from the subclient level, the settings selected apply only to the selected subclient content for operations run from the CommCell Console. (See Data Encryption for an overview.) See the configuration section for your agent for more information on this feature.
VIEW AND CHANGE INSTANCE-LEVEL STORAGE POLICIES
From the Storage Device tab, you can view or change the storage policy used to back up data via the command line for the selected instance, select a storage policy for backing up logs on the selected instance, or view or select a default storage policy for the selected instance. By defining a storage policy for command line backups, you can view and track the status of those same jobs in the Job Controller. If you redefine (i.e., select a new) storage policy for command line backups at the instance level, the storage policy will apply only to any new command line backup jobs (i.e., those backup jobs that you subsequently start). (See Storage Policies for an overview.) See the configuration section for your agent for more information on this feature.
USER ACCOUNTSYou can change the Windows or Unix user accounts that are used by the system to access the application and in effect perform all data protection and recovery operations for the iDataAgent.
See the DB2 iDataAgents section in User Accounts and Passwords for more information.
USER SECURITY
Each DB2 iDataAgent consumes one license during installation. Note that each license can accommodate multiple instances and databases.
Features - DB2 iDataAgent
Page 60 of 96
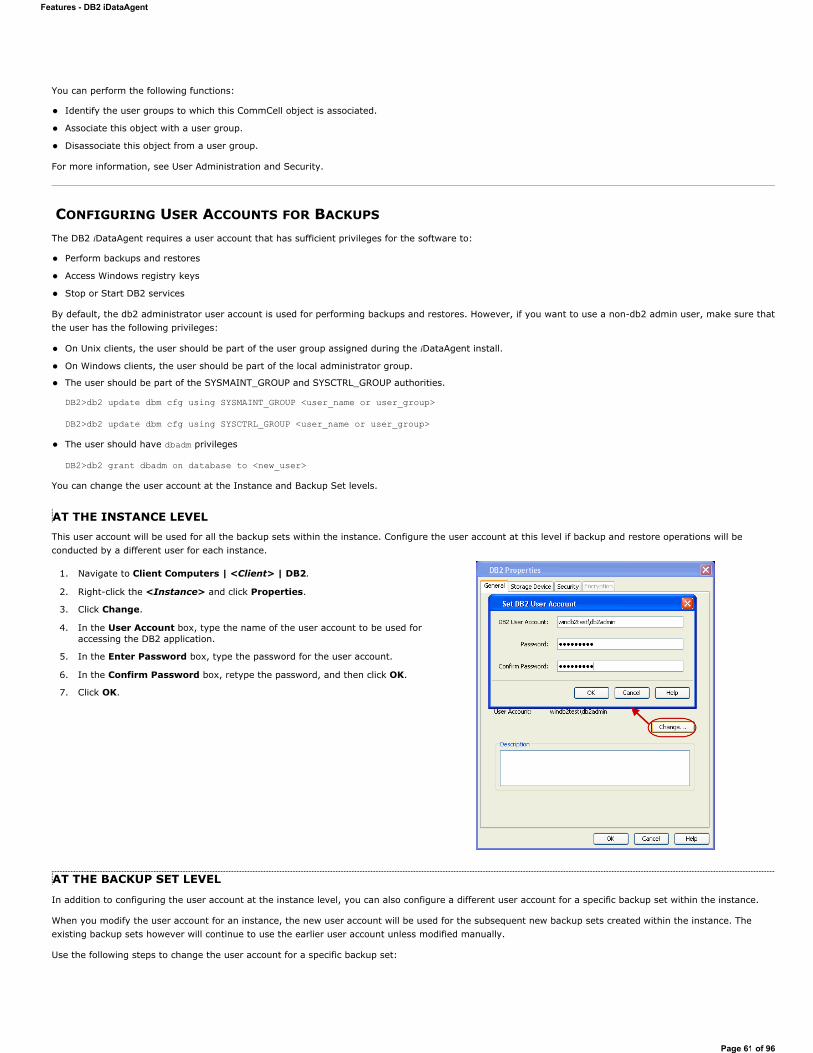
You can perform the following functions:
Identify the user groups to which this CommCell object is associated.
Associate this object with a user group.
Disassociate this object from a user group.
For more information, see User Administration and Security.
CONFIGURING USER ACCOUNTS FOR BACKUPS
The DB2 iDataAgent requires a user account that has sufficient privileges for the software to:
Perform backups and restores
Access Windows registry keys
Stop or Start DB2 services
By default, the db2 administrator user account is used for performing backups and restores. However, if you want to use a non-db2 admin user, make sure that the user has the following privileges:
On Unix clients, the user should be part of the user group assigned during the iDataAgent install.
On Windows clients, the user should be part of the local administrator group.
The user should be part of the SYSMAINT_GROUP and SYSCTRL_GROUP authorities.
DB2>db2 update dbm cfg using SYSMAINT_GROUP <user_name or user_group>
DB2>db2 update dbm cfg using SYSCTRL_GROUP <user_name or user_group>
The user should have dbadm privileges
DB2>db2 grant dbadm on database to <new_user>
You can change the user account at the Instance and Backup Set levels.
AT THE INSTANCE LEVELThis user account will be used for all the backup sets within the instance. Configure the user account at this level if backup and restore operations will be conducted by a different user for each instance.
AT THE BACKUP SET LEVEL
In addition to configuring the user account at the instance level, you can also configure a different user account for a specific backup set within the instance.
When you modify the user account for an instance, the new user account will be used for the subsequent new backup sets created within the instance. The existing backup sets however will continue to use the earlier user account unless modified manually.
Use the following steps to change the user account for a specific backup set:
1. Navigate to Client Computers | <Client> | DB2.
2. Right-click the <Instance> and click Properties.
3. Click Change.
4. In the User Account box, type the name of the user account to be used for accessing the DB2 application.
5. In the Enter Password box, type the password for the user account.
6. In the Confirm Password box, retype the password, and then click OK.
7. Click OK.
Features - DB2 iDataAgent
Page 61 of 96
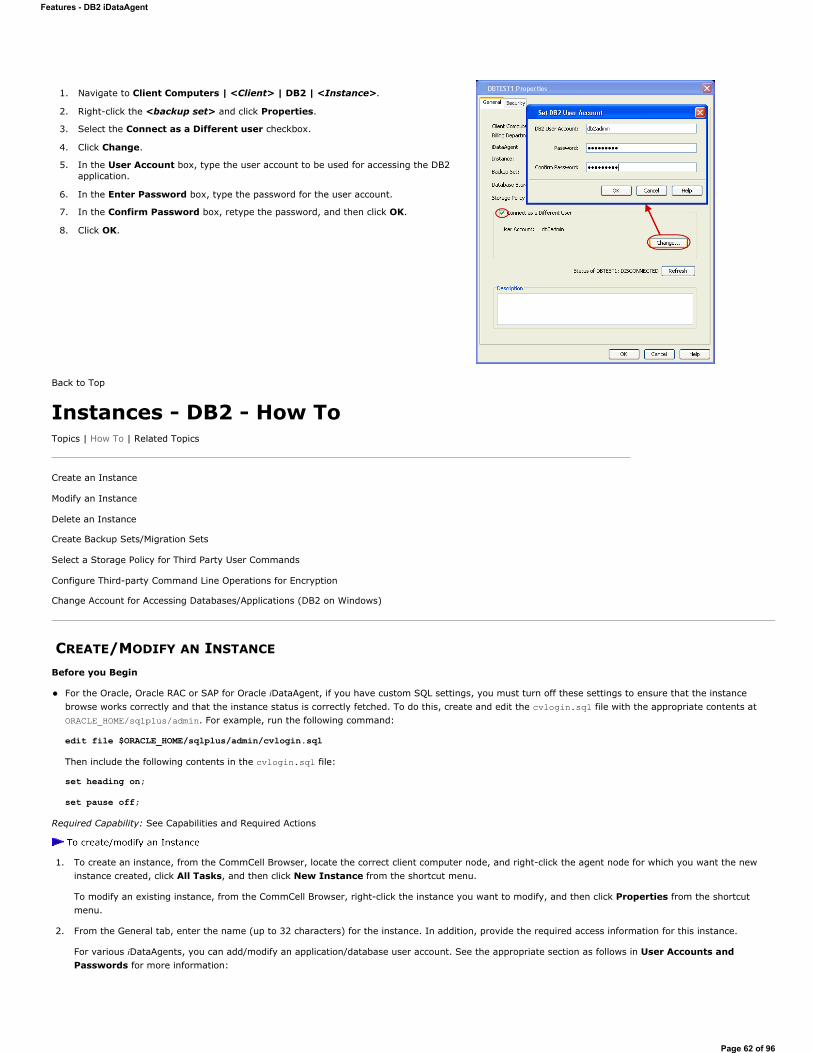
Back to Top
Instances - DB2 - How ToTopics | How To | Related Topics
Create an Instance
Modify an Instance
Delete an Instance
Create Backup Sets/Migration Sets
Select a Storage Policy for Third Party User Commands
Configure Third-party Command Line Operations for Encryption
Change Account for Accessing Databases/Applications (DB2 on Windows)
CREATE/MODIFY AN INSTANCE
Before you Begin
For the Oracle, Oracle RAC or SAP for Oracle iDataAgent, if you have custom SQL settings, you must turn off these settings to ensure that the instance browse works correctly and that the instance status is correctly fetched. To do this, create and edit the cvlogin.sql file with the appropriate contents at ORACLE_HOME/sqlplus/admin. For example, run the following command:
edit file $ORACLE_HOME/sqlplus/admin/cvlogin.sql Then include the following contents in the cvlogin.sql file:
set heading on; set pause off;
Required Capability: See Capabilities and Required Actions
1. To create an instance, from the CommCell Browser, locate the correct client computer node, and right-click the agent node for which you want the new instance created, click All Tasks, and then click New Instance from the shortcut menu.
To modify an existing instance, from the CommCell Browser, right-click the instance you want to modify, and then click Properties from the shortcut menu.
2. From the General tab, enter the name (up to 32 characters) for the instance. In addition, provide the required access information for this instance.
For various iDataAgents, you can add/modify an application/database user account. See the appropriate section as follows in User Accounts and Passwords for more information:
1. Navigate to Client Computers | <Client> | DB2 | <Instance>.
2. Right-click the <backup set> and click Properties.
3. Select the Connect as a Different user checkbox.
4. Click Change.
5. In the User Account box, type the user account to be used for accessing the DB2 application.
6. In the Enter Password box, type the password for the user account.
7. In the Confirm Password box, retype the password, and then click OK.
8. Click OK.
Features - DB2 iDataAgent
Page 62 of 96
DB2 iDataAgent
Documentum iDataAgent
Informix iDataAgent
Microsoft SQL Server iDataAgent
Oracle iDataAgents (Oracle, Oracle RAC, SAP for Oracle)
Sybase iDataAgent
MySQL iDataAgent
PostGreSQL iDataAgent
3. If your agent uses the Details tab, enter the required database connect string and other optional parameters.
For the Oracle, Oracle RAC and SAP for Oracle iDataAgents, see the Oracle iDataAgents section in User Accounts and Passwords for more information.
4. From the Storage Device tab, select storage policy copies to be used for, as applicable, data backups, command line data backups and log backups. Within these tabs you can click Data Paths to display the details of the data paths associated with the primary storage policy copy of the selected storage policy.
5. If your agent uses the Software Compression tab, and you want to enable software compression for the selected backups, click the tab and select the option appropriate to your environment.
6. If you want to enable data encryption, from the Encryption tab select encryption settings for third-party or RMAN command line backups.
7. Click OK to save the instance.
8. A message advises you to schedule backups for your new instance. It is recommended you elect to set a schedule now. You can also associate this instance with an All Agent Types schedule policy (which is automatically created by the system, or can be a user defined Data Protection schedule policy). If you have already associated a schedule policy at a previous level (Agent, Client, or Client Computer Group) the schedules defined in the Schedule Policy will be automatically applied to the new instance. See Schedule Policy for more information.
For agents that offer an OK option, click OK to acknowledge the message. This procedure is now complete.
For agents that offer Yes and No options to this message, click No if you don't want to create a backup schedule at this time, and this procedure is complete. If you click Yes, a dialog box prompts you to back up all subclients of this instance.
9. Click Yes. The Backup Options dialog box appears, which allows you to create the necessary schedules.
10. From the Backup Options dialog box, select the type of backup that you want to schedule.
11. If you want to access Advanced Backup Options, click Advanced.
12. After selecting the backup type and any advanced options, click OK. The Schedule Details dialog box appears.
13. From the Schedule Details tab of the Schedule Details dialog box, select the scheduling options that you want to apply, then click OK.
NOTES
A default subclient is created for the Oracle instance, which includes all the objects in the instance. When you are done with this procedure, open the Subclient Properties dialog box for the default subclient and verify that the Resync Catalog option available in the Backup Arguments tab is selected. This would help you to successfully perform a full system restore in the event of destroyed or damaged client.
After creating the instance for DB2, you can now create one or more Backup Sets for this instance.
MODIFY AN INSTANCE
Required Capability: See Capabilities and Required Actions
1. From the CommCell Browser, right-click the instance you want to modify, and then click Properties from the shortcut menu.
2. Click the General tab of the Instance properties box to change the required access information for this instance.
3. If your agent uses the Accounts tab, use this tab to specify the Windows account used by the system. For MySQL iDataAgent, use this tab to specify the MySQL Server user account.
4. If your agent uses the Restore View Names tab, use this tab to enter or modify a list of text patterns for the view through which the system displays a database's data documents when you browse.
5. If your agent has the Security tab, you can view CommCell resource associations to enable or disable user groups that can perform system operations on associated resources.
6. For an Oracle instance, click the Details tab to change the database connect string and other optional parameters.
7. For an Oracle RAC instance, go to the next step. Otherwise, go to Step 12.
Features - DB2 iDataAgent
Page 63 of 96
8. Click the Details tab, and type or select values for the fields at the bottom of the dialog box as appropriate. For the DB2 DPF instance, to associate a database partition with a different client, click the affected partition in the DB2 Partition Clients field, click Modify, and click from the list in the Edit Directory Share Name Pair dialog box the name of the new client for the partition. Then click OK.
9. Click the Oracle instance (Client/Instance/Status) that you want to modify. Then click Modify.
10. In the Update Instance dialog box, update the desired field values by typing or browsing as appropriate. Then click OK.
11. Repeat the previous two steps for each Oracle instance that you want to modify.
12. From the Storage Device tab(s), select storage policy copies to be used for, as applicable, data backups, command line data backups and log backups. Within these tabs you can click Data Paths to display the details of the data paths associated with the primary storage policy copy of the selected storage policy.
For the MySQL iDataAgent, select the storage policy for the log backups from the Log Backups tab.
13. If your agent uses the Software Compression tab, and you want to enable software compression for the selected backups, click the tab and select the appropriate option.
14. If you want to enable data encryption, from the Encryption tab select encryption settings for third-party or RMAN command line backups.
15. Click OK to save the configuration changes.
16. A message advises you to schedule backups for your new instance. It is recommended you elect to set a schedule now. If you click No, this procedure is now complete. If you click Yes, a dialog box prompts you to back up all subclients of this instance.
17. Click Yes. The Backup Options dialog box appears, which allows you to create the necessary schedules.
18. From the Backup Options dialog box, select the type of backup that you want to schedule.
19. If you want to access Advanced Backup Options, click Advanced.
20. After selecting the backup type and any advanced options, click OK. The Schedule Details dialog box appears.
21. From the Schedule Details tab of the Schedule Details dialog box, select the scheduling options that you want to apply, then click OK.
DELETE AN INSTANCE
Before You Begin
For most agents except Oracle and SQL Server, you cannot delete an instance if there is only one instance present for an agent. To delete the final instance for most agents except the ones identified, you must first remove the agent software from the client computer. For Oracle RAC, which does not involve agent software, you can delete the instance under the RAC pseudo-client.
When you delete a specific instance positioned in the level below the corresponding agent or pseudo-client in the CommCell Console, the following actions occur:
The corresponding backup data for that instance becomes immediately unavailable, thus making it inaccessible for restore purposes. In effect, the backup data is deleted.
All child levels contained within the level are deleted in the CommCell Browser.
All job schedules and job histories that pertain to any of the levels within the deleted instance are deleted.
If you delete an Oracle iDataAgent instance included within an Oracle RAC instance (node), the backup data is not deleted, and it is available for restore by another eligible client.
You cannot delete an instance if it is being backed up. Attempts to delete an instance under such conditions cause the deletion to fail. If a backup is in progress, either wait for the backup to complete or kill the backup job using the Job Manager. Once the backup is no longer in progress, you can delete the instance level.
Required Capability: See Capabilities and Required Actions
-client
1. From the CommCell Browser, right-click the instance that you want to delete, click All Tasks and then click Delete.
2. Click Yes to confirm the deletion. (Clicking No cancels the deletion and retains the node.)
3. Type the requested phrase in the Enter Confirmation Text dialog box and click OK. This should delete the instance.
iDataAgent instance included within an Oracle RAC instance (node)
1. Right-click the Oracle RAC instance, click Properties, and click Details.
2. Click the instance that you want to delete within Client/Instance/Status and click Delete.
3. Repeat the previous step for each Oracle iDataAgent instance (except the last one remaining) within the Oracle RAC instance that you want to delete.
4. Click OK. This should delete the Oracle iDataAgent instance(s).
Features - DB2 iDataAgent
Page 64 of 96
CREATE BACKUP SETS/ARCHIVE SETS
Required Capability: See Capabilities and Permitted Actions
1. From the CommCell Browser, locate the correct client computer node, right-click the iDataAgent, Agent or instance node (depending on your agent's functionality) for which you want the backup set/archive set created, select All Tasks and then click Create New Backup Set or Create New Archive Set.
2. For most agents, from the Create New Backup Set or Create New Archive Set dialog box, enter a New Backup Set Name or New Archive Set Name (up to 32 characters) of the backup set/archive set that you want to create. For the DB2 or DB2 DPF iDataAgent, from the same dialog box, click the desired database (backup set) name under Available DB Names and move this name under Selection.
NOTES
For DB2 or DB2 DPF, to prevent archive log backup failures, ensure that the name that you select is the actual name of the database and not the alias name for the database. If the database name and the corresponding alias name are different, both names are displayed under Available DB Names; if both names are the same, the name that is displayed is the database name. To find out about database names and their aliases, run the following command as a DB2 or DB2 DPF instance owner on the DB2 or DB2 DPF client: db2 list db directory.
3. Where applicable, if you want to designate this backup set/archive set as the default backup set/archive set, select Make this the Default backup set or Make this the Default Archive Set; otherwise, leave the check box cleared.
4. For most agents, verify that the storage policy copy associated with the default subclient is the storage policy that you want. If you want to select a different storage policy, click the storage policy box and select the one you want from the list. If the agent supports a system-state subclient, repeat this step for that subclient. For the DB2 or DB2 DPF iDataAgent, to establish a storage policy for all the log files, click the storage policy in the list provided.
5. Where applicable, if you want to create additional subclients within this backup set/archive set:
Click Add.
Follow Create a New Subclient procedure.
Repeat this step for each additional subclient that you want to define within this backup set/archive set.
When all subclients have been added, click OK.
A message will advise you to schedule backups for your new backup set. It is recommended that you elect to set a schedule now. You can also associate this backup set/archive set with an All Agent Types schedule policy (which is automatically created by the system, or can be a user-defined Data Protection schedule policy). If you have already associated a schedule policy at a previous level (Agent, Client, or Client Computer Group) the schedules defined in the Schedule Policy will be automatically applied to the new backup set/archive set. See Schedule Policy for more information.
If you want to associate this backup set/archive set with an All Agent Types schedule policy, click Associate with Generic Schedule Policy, and then select that schedule policy from the drop-down list box. Click OK.
If you have selected to define a schedule for this backup set/archive set:
Click Schedule.
If applicable, from the Backup Options dialog box, select the type of backup that you want to schedule.
If you want to set Advanced Backup/Archive Options, click Advanced.
After selecting the backup type and any advanced options, click OK. The Schedule Details dialog box appears.
From the Schedule Details tab, select the scheduling options that you want to apply, then click OK.
If you don't want to create a backup/archive schedule at this time, click Do Not Schedule, and then click OK.
The new backup set/archive set is displayed in the CommCell Browser.
SELECT A STORAGE POLICY FOR THIRD-PARTY USER COMMANDS
Required Capability: See Capabilities and Required Actions
When backing up data through third-party command line functions rather than the CommCell Console, the specific storage policy for the backups of the affected non-Oracle RAC agents is established and maintained through the Creating New Instance screen for the appropriate iDataAgent. For the Oracle RAC iDataAgent, the storage policy is established when you create the associated pseudo-client or when you modify the pseudo-client instance.
With the exceptions noted above, you can no longer access the corresponding backup data for restore purposes.
A content example for NetWare File System is SYS:\public, and an example for NDS content is OU=prospects.O=engineering.[Root].
Features - DB2 iDataAgent
Page 65 of 96
-party user commands for non-Oracle RAC agents:
1. From the CommCell Browser, right-click the supported server/instance icon, click All Tasks, and then click New Instance.
2. Within the Creating New Instance dialog box, click the Storage Device tab on server/instance properties.
3. From the Command Line Backup tab, select from the list of existing storage policies
4. Click OK to save your settings.
-party user commands for the Oracle RAC iDataAgent:
1. From the CommCell Browser, if you are creating a RAC pseudo-client, right-click Client Computers, click New Client, click RAC Client in the Add New Client dialog box, and then click OK. If you are modifying the pseudo-client instance, right-click the instance and then click Properties.
2. Click Storage Device.
3. From the Command Line Backup tab, select from the list of existing storage policies.
4. Use the other tabs as appropriate to configure the subclient and then click OK to save your settings.
CONFIGURE THIRD-PARTY COMMAND LINE OPERATIONS FOR ENCRYPTION
Encryption settings made at the instance level for third-party Command Line operations are not related in any way to settings made at the subclient level. Subclient encryption settings are only for data protection and recovery operations run from the CommCell Console.
See Data Encryption - Support for a list of supported products.
Before You Begin
Encryption must be enabled at the client level prior to configuring any instances residing on that client. See Configure the Client for Data Encryption.
Required Capability: Capabilities and Permitted Actions
-party command line operations:
1. From the CommCell Console, right-click the instance and click Properties.
2. From the respective Encryption tab, select an option based on the criteria described in the Encryption tab help.
3. Click OK to save your settings and close the properties dialog box.
CHANGE ACCOUNT FOR ACCESSING DATABASES/APPLICATIONS
Required Capability: See Capabilities and Permitted Actions
1. From the CommCell Browser, expand the tree if necessary to view the desired level icon.
From the agent level, right-click the agent icon, click All Tasks from the short-cut menu, click New Instance, and go to the next step.
From the instance level, right-click the instance icon, click Properties from the short-cut menu, and go to Step 3.
From the backup set level, right-click the backup set icon, click Properties from the short-cut menu, and go to Step 4.
2. Use the Creating New Instance dialog box to create and configure the instance. Thereafter, from the General tab, click the Change button associated with the User Account information. Then go to Step 5.
3. From the General tab of the Instance Properties dialog box, click the Change button associated with the User Account information. Then go to Step 5.
4. From the General tab of the Backup Set Properties dialog box, ensure that the Connect as a Different User option is selected. Then click the Change button associated with the User Account information.
5. Enter the required information in the Set DB2 User Account dialog box.
6. Click OK to save the settings.
1. From the CommCell Browser, expand the tree if necessary to view the desired level icon.
From the agent level, right-click the agent icon, click All Tasks from the short-cut menu, and click New Instance (Oracle SID).
For third-party Command Line data recovery operations to succeed when using pass-phrase security, you must export the pass-phrase to the destination client.
Features - DB2 iDataAgent
Page 66 of 96
From the instance level, right-click the instance icon and click Properties from the short-cut menu.
2. From the General tab, click the Change button associated with the User Account information.
3. Enter the required information in the Impersonate NT User dialog box.
4. Click OK to save the settings.
1. From the CommCell Browser, expand the tree if necessary to view the QR agent icon. Then right-click the icon and click Properties.
2. From the Authentication tab, click the Oracle sub-tab.
3. From the Oracle sub-tab, either click Add Instance or select an Oracle instance to edit and then click Edit Instance.
4. From the Add Oracle Instance to QR Agent dialog box, click Change.
5. Enter the required information in the Impersonate NT User dialog box.
6. Click OK to save the settings.
1. From the CommCell Browser, expand the tree if necessary to view the desired level icon. From the agent level, right-click the agent icon, click All Tasksfrom the short-cut menu, click New Instance, and go to the next step. From the instance level, right-click the instance icon, click Properties from the short-cut menu, and go to Step 3.
2. Use the New Instance dialog box to create and configure the instance.
3. From the General tab of the Instance Properties dialog box, do one of the following, as appropriate.
For Informix, type the name of the user account in the INFORMIX USER field.
For Oracle or SAP for Oracle, type the name of the user account in the ORACLE USER field.
4. Click OK to save the settings.
Back to Top
Features - DB2 iDataAgent
Page 67 of 96
Backup Sets - DB2 iDataAgentsTopics | How To | Related Topics
Overview
DB2 iDataAgent Configurable Properties
Database Storage Type
Changing the Storage Policy for All Log Files
User Accounts
OVERVIEW
Each DB2 backup set is actually an existing DB2 database. After installing the DB2 iDataAgent, you must create at least one DB2 backup set; however, you can create the backup set only if a DB2 database exists in the instance. If there is a DB2 database in that instance, you can create a corresponding backup set with the same name as the database. If not, you cannot create a DB2 backup set. Once you create a DB2 backup set, a default subclient is automatically created.
DB2 IDATAAGENT CONFIGURABLE PROPERTIES
Once installed, you must configure an instance and backup set for the agent.
You can view or change the backup set configuration from the BackupSet Properties dialog box. The following information can be configured.
DATABASE STORAGE TYPE
The Database Storage Type option in BackupSet properties will display the storage type of selected database. For example, if the storage type is Automatic (Automatic Storage), then the database is displayed as automatic.
CHANGING THE STORAGE POLICY FOR ALL LOG FILESDB2 iDataAgent uses this option to change the storage policy for all the log files in the backup set. See Associate a Subclient to a Storage Policy for step-by-step instructions.
USER ACCOUNTSYou can change the Windows user account used by the system to access the DB2 database and in effect perform all data protection and recovery operations for the affected iDataAgent. In effect, you are connecting as a different user.
See Configuring User Accounts for Backups for more information.
Backup Sets - DB2 iDataAgents - How ToTopics | How To | Related Topics
Change Default Backup Set/Archive Set Designation
Create Backup Sets/Archive Sets
Configure a Backup Set/Archive Set
Associate a Subclient to a Storage Policy
Change Account for Accessing Databases
Change Account for Executing Pre/Post Commands (Data Protection)
Rename a Backup Set/Archive Set
Delete a User-Defined Backup Set/Archive Set
Preserve the File Access Time
Features - DB2 iDataAgent
Page 68 of 96
CHANGE DEFAULT BACKUP SET/ARCHIVE SET DESIGNATION
Required Capability: See Capabilities and Permitted Actions
1. From the CommCell Browser, right-click the icon for any supported backup set or archive set that is not currently the default and then click Properties.
2. From the General tab of the Backup Set/Archive Set Properties dialog box, select the appropriate option to Make this the default backup set or Make this the default archive set.
3. Click OK to save your settings.
CREATE BACKUP SETS/ARCHIVE SETS
Required Capability: See Capabilities and Permitted Actions
1. From the CommCell Browser, locate the correct client computer node, right-click the iDataAgent, Agent or instance node (depending on your agent's functionality) for which you want the backup set/archive set created, select All Tasks and then click Create New Backup Set or Create New Archive Set.
2. For most agents, from the Create New Backup Set or Create New Archive Set dialog box, enter a New Backup Set Name or New Archive Set Name (up to 32 characters) of the backup set/archive set that you want to create. For the DB2 or DB2 DPF iDataAgent, from the same dialog box, click the desired database (backup set) name under Available DB Names and move this name under Selection.
NOTES
For DB2 or DB2 DPF, to prevent archive log backup failures, ensure that the name that you select is the actual name of the database and not the alias name for the database. If the database name and the corresponding alias name are different, both names are displayed under Available DB Names; if both names are the same, the name that is displayed is the database name. To find out about database names and their aliases, run the following command as a DB2 or DB2 DPF instance owner on the DB2 or DB2 DPF client: db2 list db directory.
3. Where applicable, if you want to designate this backup set/archive set as the default backup set/archive set, select Make this the Default backup set or Make this the Default Archive Set; otherwise, leave the check box cleared.
4. For most agents, verify that the storage policy copy associated with the default subclient is the storage policy that you want. If you want to select a different storage policy, click the storage policy box and select the one you want from the list. If the agent supports a system-state subclient, repeat this step for that subclient. For the DB2 or DB2 DPF iDataAgent, to establish a storage policy for all the log files, click the storage policy in the list provided.
5. Where applicable, if you want to create additional subclients within this backup set/archive set:
Click Add.
Follow Create a New Subclient procedure.
Repeat this step for each additional subclient that you want to define within this backup set/archive set.
When all subclients have been added, click OK.
A message will advise you to schedule backups for your new backup set. It is recommended that you elect to set a schedule now. You can also associate this backup set/archive set with an All Agent Types schedule policy (which is automatically created by the system, or can be a user-defined Data Protection schedule policy). If you have already associated a schedule policy at a previous level (Agent, Client, or Client Computer Group) the schedules defined in the Schedule Policy will be automatically applied to the new backup set/archive set. See Schedule Policy for more information.
If you want to associate this backup set/archive set with an All Agent Types schedule policy, click Associate with Generic Schedule Policy, and then select that schedule policy from the drop-down list box. Click OK.
If you have selected to define a schedule for this backup set/archive set:
Click Schedule.
If applicable, from the Backup Options dialog box, select the type of backup that you want to schedule.
If you want to set Advanced Backup/Archive Options, click Advanced.
After selecting the backup type and any advanced options, click OK. The Schedule Details dialog box appears.
From the Schedule Details tab, select the scheduling options that you want to apply, then click OK.
If you don't want to create a backup/archive schedule at this time, click Do Not Schedule, and then click OK.
The new backup set/archive set is displayed in the CommCell Browser.
A content example for NetWare File System is SYS:\public, and an example for NDS content is OU=prospects.O=engineering.[Root].
Features - DB2 iDataAgent
Page 69 of 96

CONFIGURE A BACKUP SET/ARCHIVE SET
Required Capability: See Capabilities and Permitted Actions
iDataAgent database:
1. From the CommCell Browser, right-click the backup set or archive set whose configuration you want to change, and then click Properties from the shortcut menu.
2. From the General tab, change one or more of the following fields as appropriate for your agent:
Backup Set Name - The field accepts 32 characters.
Archive Set Name - The field accepts 32 characters.
Storage Policy for All Log Files
User Account - For the DB2 or DB2 DPF iDataAgent, you can add/modify an application/database user account. See the DB2 iDataAgents section in User Accounts and Passwords for more information.
Make this the default Backup Set - When selected and committed, this option will make this the default backup set on this client computer.
Make this the default Archive Set - When selected and committed, this option will make this the default archive set on this client computer.
Use Change Journal (Recommended) or Use Classic File Scan which includes (Check archive bit during backups and/or Preserve File Access Time) settings which determine the way subclients within the backup set conduct incremental and differential backups (For an explanation of this field, see Setting the Archive Bit Attribute.)
Use Data Classification - Specifies that the Data Classification scan is used to determine whether files have been modified for all subclients within the backup set.
Select to have data on compressed volumes decompressed before being sent to the backup media. See Decompress Data before Backup for more information. (NetWare File System only.)
3. If your agent uses the Backup tab, click Edit Rules for the appropriate subclient type. You can elect to have the system automatically convert the type of backup under the listed conditions. Click OK to save your backup rules configuration changes. Without setting this option, if one of these conditions exists your backup will not take place. Subclient Backup Conversion Rules are defined for default subclients and for SQL Server file/file group subclients.
4. Click OK.
ASSOCIATE A SUBCLIENT TO A STORAGE POLICY
Required Capability: See Capabilities and Permitted Actions
1. From the CommCell Browser, right-click the subclient whose associated storage policy you want to change, then click Properties from the shortcut menu.
2. Click the Storage Device tab of the Subclient Properties dialog box.
3. From the Storage Policy list of the Data Storage Policy tab, select a data storage policy to associate with this subclient. If necessary, click the Create Storage Policy button to create a new storage policy to which the subclient can then be associated.
4. From the Changing a Storage Policy window select the next type of backup operation. Click OK.
5. If applicable for your agent, you can change the number of data streams from the Number of Data/Database Backup Streams field.
6. If applicable for your agent, click the Log Storage Policy tab and select a storage policy to associate with this transaction log subclient from the Transaction Log Storage Policy list. Also, you can set the Number of Transaction Log Backup Streams from this tab.
7. Click OK to save your changes and close the Subclient Properties Storage Device tab.
CHANGE ACCOUNT FOR ACCESSING DATABASES/APPLICATIONS
Required Capability: See Capabilities and Permitted Actions
1. From the CommCell Browser, expand the tree if necessary to view the desired level icon.
From the agent level, right-click the agent icon, click All Tasks from the short-cut menu, click New Instance, and go to the next step.
From the instance level, right-click the instance icon, click Properties from the short-cut menu, and go to Step 3.
Exchange Mailbox
If you disable the auto-discovery feature, newly created mailboxes will not be backed up unless they are manually discovered and assigned to a subclient.
Features - DB2 iDataAgent
Page 70 of 96
From the backup set level, right-click the backup set icon, click Properties from the short-cut menu, and go to Step 4.
2. Use the Creating New Instance dialog box to create and configure the instance. Thereafter, from the General tab, click the Change button associated with the User Account information. Then go to Step 5.
3. From the General tab of the Instance Properties dialog box, click the Change button associated with the User Account information. Then go to Step 5.
4. From the General tab of the Backup Set Properties dialog box, ensure that the Connect as a Different User option is selected. Then click the Change button associated with the User Account information.
5. Enter the required information in the Set DB2 User Account dialog box.
6. Click OK to save the settings.
1. From the CommCell Browser, expand the tree if necessary to view the desired level icon.
From the agent level, right-click the agent icon, click All Tasks from the short-cut menu, and click New Instance (Oracle SID).
From the instance level, right-click the instance icon and click Properties from the short-cut menu.
2. From the General tab, click the Change button associated with the User Account information.
3. Enter the required information in the Impersonate NT User dialog box.
4. Click OK to save the settings.
1. From the CommCell Browser, expand the tree if necessary to view the QR agent icon. Then right-click the icon and click Properties.
2. From the Authentication tab, click the Oracle sub-tab.
3. From the Oracle sub-tab, either click Add Instance or select an Oracle instance to edit and then click Edit Instance.
4. From the Add Oracle Instance to QR Agent dialog box, click Change.
5. Enter the required information in the Impersonate NT User dialog box.
6. Click OK to save the settings.
1. From the CommCell Browser, expand the tree if necessary to view the desired level icon. From the agent level, right-click the agent icon, click All Tasksfrom the short-cut menu, click New Instance, and go to the next step. From the instance level, right-click the instance icon, click Properties from the short-cut menu, and go to Step 3.
2. Use the New Instance dialog box to create and configure the instance.
3. From the General tab of the Instance Properties dialog box, do one of the following, as appropriate.
For Informix, type the name of the user account in the INFORMIX USER field.
For Oracle or SAP for Oracle, type the name of the user account in the ORACLE USER field.
4. Click OK to save the settings.
CHANGE ACCOUNT FOR EXECUTING PRE/POST COMMANDS (DATA PROTECTION)Required Capability: See Capabilities and Permitted Actions
1. From the CommCell Browser, expand the tree to view the appropriate level icon for the affected agent.
From the agent, instance/partition, or backup set/archive set level, right-click the appropriate icon, click All Tasks, and click New Subclient from the short-cut menu.
From the subclient level, right-click the subclient icon and click Properties from the short-cut menu.
2. From the Subclient Properties dialog box, create and/or configure the subclient as appropriate. Then click the Pre/Post Process tab.
3. From the Pre/Post Process tab, click Change.
4. From the User Account dialog box, select one of the account options. If you select Impersonate User, type the appropriate user name and password.
5. Click OK to save the settings.
RENAME A BACKUP SET/ARCHIVE SET
Features - DB2 iDataAgent
Page 71 of 96
Required Capability: See Capabilities and Permitted Actions
1. From the CommCell Browser, right-click the icon for the appropriate backup set or archive set and then click Properties.
2. From the General tab of the Backup Set/Archive Set Properties dialog box, type the desired name in the Backup Set or Archive Set field.
3. If you want to make this renamed backup set/archive set the default backup set/archive set, select the corresponding check box (where applicable).
4. Click OK to save your settings.
DELETE A USER-DEFINED BACKUP SET/ARCHIVE SET
Before You Begin
Each agent that utilizes backup sets/archive sets requires the default backup set/archive set in its configuration; therefore, you cannot delete a default backup set/archive set using this procedure. If you want to delete a default backup set/archive set, you must uninstall the agent software that contains it.
The system does not allow you to delete a backup set/archive set if one of its subclients is being backed up/archived. Any attempt to delete a backup set/archive set under such a condition causes the deletion to fail. If a data protection operation is in progress, do one of the following:
Wait for the data protection job to complete.
Kill the data Protection job using the Job Manager.
When you delete a backup set/archive set, several actions occur:
The backup set/archive set, its corresponding subclients, and any data that may have been backed up/archived from the backup set/archive set are logically deleted. Once the backup set/archive set is deleted, you can no longer access the corresponding data for restore/recovery purposes.
All job schedules and job histories that pertain to the subclients of the deleted backup set/archive set are deleted.
Required Capability: See Capabilities and Permitted Actions
-defined backup set or archive set:
1. From the CommCell Browser, right-click the user-defined backup set/archive set that you want to delete, select All Tasks and then click Delete.
2. A confirmation message is displayed, asking if you want to delete the backup set/archive set with all of its subclients. Click Yes to continue the deletion, or click No to cancel the deletion and retain the backup set.
3. If you clicked Yes in the previous step, then the Enter Confirmation Text dialog will appear, indicating that all the data in the backup set/archive set will be permanently removed. To confirm this action and continue with the deletion, type erase and reuse media in the entry space provided on this dialog. Click OK. The system will delete the selected backup set/archive node, the subclient nodes contained within it, and remove them from the CommCell Browser along with any associated data.
PRESERVE THE FILE ACCESS TIME
Required Capability: See Capabilities and Permitted Actions
1. From the CommCell Browser, right-click the desired file system backup set node, and then click Properties from the shortcut menu.
2. From the General tab, select the Preserve File Access Time option.
3. Click OK to save your change.
Features - DB2 iDataAgent
Page 72 of 96
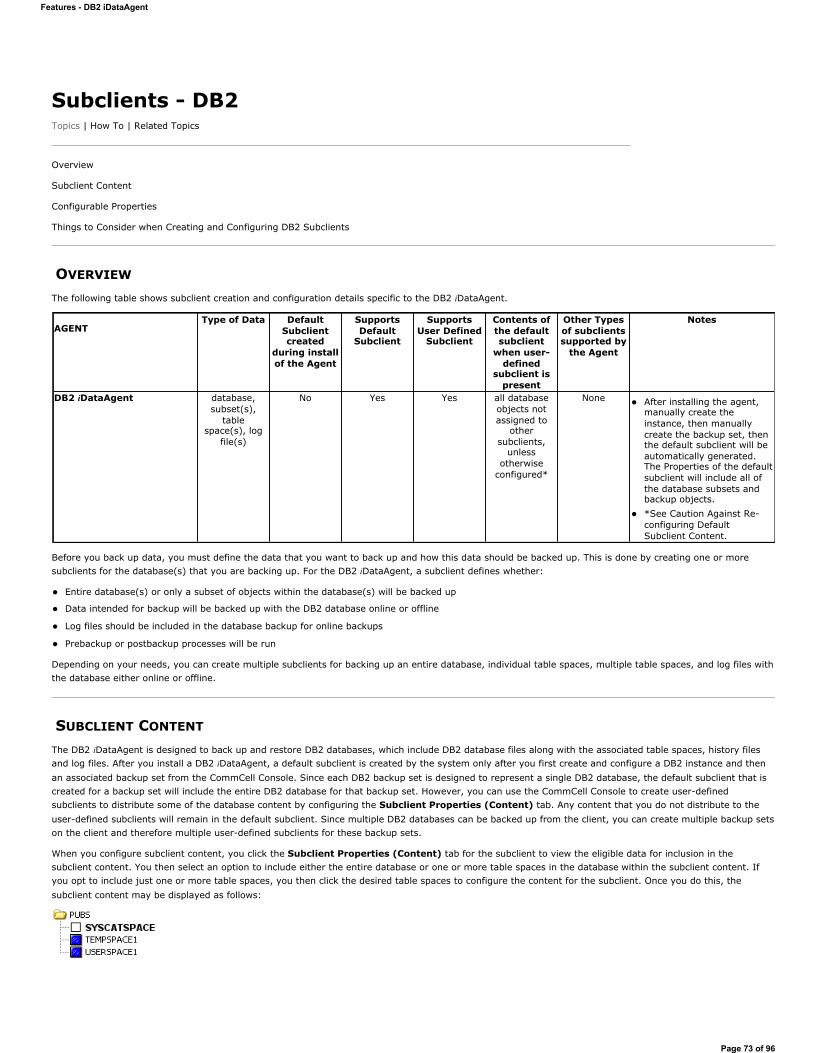
Subclients - DB2Topics | How To | Related Topics
Overview
Subclient Content
Configurable Properties
Things to Consider when Creating and Configuring DB2 Subclients
OVERVIEW
The following table shows subclient creation and configuration details specific to the DB2 iDataAgent.
Before you back up data, you must define the data that you want to back up and how this data should be backed up. This is done by creating one or more subclients for the database(s) that you are backing up. For the DB2 iDataAgent, a subclient defines whether:
Entire database(s) or only a subset of objects within the database(s) will be backed up
Data intended for backup will be backed up with the DB2 database online or offline
Log files should be included in the database backup for online backups
Prebackup or postbackup processes will be run
Depending on your needs, you can create multiple subclients for backing up an entire database, individual table spaces, multiple table spaces, and log files with the database either online or offline.
SUBCLIENT CONTENT
The DB2 iDataAgent is designed to back up and restore DB2 databases, which include DB2 database files along with the associated table spaces, history files and log files. After you install a DB2 iDataAgent, a default subclient is created by the system only after you first create and configure a DB2 instance and then an associated backup set from the CommCell Console. Since each DB2 backup set is designed to represent a single DB2 database, the default subclient that is created for a backup set will include the entire DB2 database for that backup set. However, you can use the CommCell Console to create user-defined subclients to distribute some of the database content by configuring the Subclient Properties (Content) tab. Any content that you do not distribute to the user-defined subclients will remain in the default subclient. Since multiple DB2 databases can be backed up from the client, you can create multiple backup sets on the client and therefore multiple user-defined subclients for these backup sets.
When you configure subclient content, you click the Subclient Properties (Content) tab for the subclient to view the eligible data for inclusion in the subclient content. You then select an option to include either the entire database or one or more table spaces in the database within the subclient content. If you opt to include just one or more table spaces, you then click the desired table spaces to configure the content for the subclient. Once you do this, the subclient content may be displayed as follows:
AGENTType of Data Default
Subclient created
during install of the Agent
Supports Default
Subclient
Supports User Defined
Subclient
Contents of the default subclient
when user-defined
subclient is present
Other Types of subclients supported by
the Agent
Notes
DB2 iDataAgent database, subset(s),
tablespace(s), log
file(s)
No Yes Yes all database objects not assigned to
other subclients,
unless otherwise
configured*
None After installing the agent, manually create the instance, then manually create the backup set, then the default subclient will be automatically generated. The Properties of the default subclient will include all of the database subsets and backup objects. *See Caution Against Re-configuring Default Subclient Content.
Features - DB2 iDataAgent
Page 73 of 96

In this example, PUBS is the name of the database (and the backup set), and two of the three table spaces in the database (TEMPSPACE1 and USERSPACE1) have been included in the subclient content.
To include log files in the subclient content, you should ensure that the appropriate option in the Subclient Properties (Backup Arguments) tab is selected (this is done by default). However, it is recommended that you configure separate user-defined subclients for log file content.
A useful way to distribute subclient content for this iDataAgent is to create separate user-defined sublients for frequently used table spaces and also for log files. For example, if the SYSCATSPACE and USERSPACE1 table spaces shown above undergo frequent changes, you can create a separate subclient for each table space. For example:
User-defined subclient: Syscat
Content:
SYSCATSPACE
User-defined subclient: User1
Content:
USERSPACE1
It is recommended that you create a separate user-defined subclient for the DB2 log files on the client. For example:
User-defined subclient: Logs
Content:
(all the DB2 log files)
Distributing the client data using subclients in this way can help improve backup performance by distributing the workload on the client into logical groupings.
FILTERINGData protection filtering is not applicable for this agent.
WILDCARDS AND REGULAR EXPRESSIONS
Wildcards and regular expressions are not supported for this agent when defining subclient content.
CONSIDERATIONS
For more information, see Things to Consider when Creating and Configuring DB2 Subclients.
CONFIGURABLE PROPERTIES
Once installed, the agent is configured and is therefore able to manage the data or volumes on the client computer. However, you can change certain aspects of the subclient configuration to manage the data in the manner that best suits your needs.
You can view or change the subclient configuration from the Subclient Properties dialog box. The following information can be configured.
ACTIVITY CONTROL
You can enable or disable all operations for this CommCell object and all objects below it. For more information, see Activity Control.
BACKUP ARGUMENTS
Some database iDataAgents run backups using a system-generated script that is run behind the scenes from a command line. The CommCell Console serves as a front-end user interface for specifying various backup arguments and parameters that are passed to the backup script that is run. Depending on your agent, you can specify, for example, the application-specific Backup Level, whether the backups will be online or offline, as well as buffer and bundle sizes, among other settings. Although the backup arguments/parameters vary among iDataAgents, they all function in a similar manner. These arguments are set at the subclient level from the respective iDataAgent's Subclient Properties dialog box tab.
For step-by-step instructions, see Configure Backup Arguments.
BACKUP STREAMS
You can set the number of backup streams. For more information, see Streams.
CONTENT/DATABASES
You can define the content of the subclient. Most agents include a configure button that displays a dialog where you can add or modify the data included as
Features - DB2 iDataAgent
Page 74 of 96
subclient content. For step-by-step instructions, see Configure Subclient Content.
DATA TRANSFER OPTIONSSeveral configurable options to efficiently use available resources for transferring data secured by data protection operations are provided in the subclient. This includes the following:
Enable or disable Data Compression either on the client or the MediaAgent.
Configure the transfer of data in the network using the options for Network Bandwidth Throttling and Network Agents.
DATA ENCRYPTIONYou can enable or disable the encryption of data for transmission over unsecure networks and for storage on media. For more information, see Data Encryption.
DATA PATHSYou can view the data paths associated with the primary storage policy copy of the selected storage policy or incremental storage policy. You can also modify the data paths for the subclient including their priority. For additional information, see Configuring Alternate Data Paths for Subclients.
PRE/POST PROCESSES
You can add, modify or view Pre/Post processes for the subclient. These are batch files or shell scripts that you can run before or after certain job phases. For more information, see Pre/Post Processes.
STORAGE POLICIES
You can associate the subclient to a storage policy. For more information, see Storage Policies.
SUBCLIENT NAMEYou can rename a user-defined subclient.
USER ACCOUNTSThe following pertains to DB2 on Windows:
You can define an account with permissions to execute Pre/Post commands for the agent's archive, backup, or volume creation jobs.
See DB2 iDataAgent: Other User Accounts in User Accounts and Passwords for more information.
THINGS TO CONSIDER WHEN CREATING AND CONFIGURING DB2 SUBCLIENTS
When creating and configuring subclients for DB2 agents, keep in mind the following considerations:
DB2 has a configuration requirement to indicate whether the database should be online or offline during backups in addition to specifying the subclient name, content and storage policy association.
Logs are used to recover database transactions that have been lost due to an operating system or disk failure. This recovery is done by applying the logs to an online backup. DB2 archives log files once they become full. Because of their importance in recovering data, it is suggested that you create separate subclients for backing up log files.
DB2 subclients include one or more table spaces. As databases are added to the table spaces, the subclients are updated automatically. This process is referred to as an Automatic Subclient Update.
Caution Against Re-configuring Default Subclient Content
We recommend that you do not re-configure the content of a default subclient because this would disable its capability to serve as "catch-all" entity for client data. As a result, the likelihood that some data will not get backed up or scanned for archiving would increase.
Back to Top
Subclients - DB2 - How ToTopics | How To | Related Topics
Associate a Subclient to a Storage Policy
Change Account for Executing Pre/Post Commands (Data Protection)
Features - DB2 iDataAgent
Page 75 of 96
Configure a Subclient for Pre/Post Processing of Data Protection Operations
Configure Backup Arguments
Configure Subclient Content
Configure the Subclient for Data Encryption
Create a New Subclient
Delete a User-Defined Subclient
Enable or Disable Operations
Enable or Disable Software Compression for a Subclient
Remove a Process from Pre/Post Processing of Data Protection Operations
Rename a Subclient
Set the Network Bandwidth and Network Agents for a Data Protection Operation
View Data Paths Associated with a Subclient
View Subclient Content
ASSOCIATE A SUBCLIENT TO A STORAGE POLICY
Required Capability: See Capabilities and Permitted Actions
1. From the CommCell Browser, right-click the subclient whose associated storage policy you want to change, then click Properties from the shortcut menu.
2. Click the Storage Device tab of the Subclient Properties dialog box.
3. From the Storage Policy list of the Data Storage Policy tab, select a data storage policy to associate with this subclient. If necessary, click the Create Storage Policy button to create a new storage policy to which the subclient can then be associated.
4. From the Changing a Storage Policy window select the next type of backup operation. Click OK.
5. If applicable for your agent, you can change the number of data streams from the Number of Data/Database Backup Streams field.
6. If applicable for your agent, click the Log Storage Policy tab and select a storage policy to associate with this transaction log subclient from the Transaction Log Storage Policy list. Also, you can set the Number of Transaction Log Backup Streams from this tab.
7. Click OK to save your changes and close the Subclient Properties Storage Device tab.
CHANGE ACCOUNT FOR EXECUTING PRE/POST COMMANDS (DATA PROTECTION)Required Capability: See Capabilities and Permitted Actions
1. From the CommCell Browser, expand the tree to view the appropriate level icon for the affected agent.
From the agent, instance/partition, or backup set/archive set level, right-click the appropriate icon, click All Tasks, and click New Subclient from the short-cut menu.
From the subclient level, right-click the subclient icon and click Properties from the short-cut menu.
2. From the Subclient Properties dialog box, create and/or configure the subclient as appropriate. Then click the Pre/Post Process tab.
3. From the Pre/Post Process tab, click Change.
4. From the User Account dialog box, select one of the account options. If you select Impersonate User, type the appropriate user name and password.
5. Click OK to save the settings.
CONFIGURE A SUBCLIENT FOR PRE/POST PROCESSING OF DATA PROTECTION/ARCHIVE OPERATIONS
Before You Begin
We recommend not configuring a pre/post process for a subclient that is currently running a data protection or archive operation.
Verify that there are no pre/post processes already assigned for the subclient.
Features - DB2 iDataAgent
Page 76 of 96
Review the Overview and Agent-Specific Guidelines for your agent before configuring pre/post processes for data protection/archive operations.
Pre-process commands for the iDataAgents will be executed only when the necessary resources (e.g., media, library, drive, etc.) are available.
Required Capability: Capabilities and Permitted Actions
1. From the CommCell Browser, right-click the subclient for which you want to configure a pre/post process, and then click Properties from the shortcut menu.
2. Click the Pre/Post Process tab of the Properties dialog box.
3. For an agent other than the Oracle RAC iDataAgent, click inside the space that corresponds to one of the following phases and type the full path of the process that you want executed during that phase. Alternatively, click Browse to locate the process (applicable only for paths that do not contain any spaces). For the Oracle RAC iDataAgent, click Browse for the corresponding process, click the name of the control node client in the Select Client for Browse dialog box, and click OK. Then browse for and click the process.
PreBackup
PreScan
PreArchive
PreCopy
PreSnap
PostBackup
PostScan
PostArchive
PostCopy
PostSnap
Click OK.
4. If you want to run a Post Process for all attempts to run that job phase, then select the corresponding checkbox.
5. For subclients on Windows platforms, if Run As displays Not Selected, or if you want to change the account that has permission to run these commands, click Change.
a. In the User Account dialog box, select Use Local System Account, or select Impersonate User and enter a user name and password. Click OK.
b. If you selected Local System Account, click OK to the message advising you that commands using this account have rights to access all data on the client computer.
6. Click OK to save your changes and close the Pre/Post Process tab of the Properties dialog box.
CONFIGURE BACKUP ARGUMENTS
Related Topics
Subclients - DB2
Subclients - DB2 DPF
Subclients - Informix
Subclients - Oracle
Subclients - Oracle RAC
Before You Begin
Do not change the backup arguments of a subclient that is being backed up.
For the DB2 and DB2 DPF iDataAgents, you will need to indicate whether the database should be online or offline during backups.
Review Performance Tuning - Oracle or Performance Tuning - Oracle RAC for details on setting configuration parameters to optimize backup and restore operations for your site.
Required Capability: See Capabilities and Permitted Actions
1. From the CommCell Browser, right-click the subclient whose backup arguments you want to configure, then click Properties from the shortcut menu.
2. Click the appropriate tab of the Subclient Properties dialog box for your iDataAgent:
DB2, DB2 DPF - (Backup Arguments)
Oracle, Oracle RAC - (Backup Arguments)
Features - DB2 iDataAgent
Page 77 of 96
Informix (Content)
3. Select the desired backup argument settings that you want configured for this subclient.
4. Click OK to save your changes.
CONFIGURE SUBCLIENT CONTENT
Before You Begin
Review Subclients.
Do not configure the content of a subclient while the parent node or any sibling subclient has a data protection or archive operation currently running on it.
Exchange Mailbox iDataAgents and Exchange Mailbox/Public Folder Archiver Agents: If you change the contents of the default backup set or archive set then the auto-discover feature will be disabled. If you disable the auto-discovery feature, newly created mailboxes will not be backed up/archived unless they are manually discovered and assigned to a subclient.
NAS NDMP iDataAgents: You must ensure there is no overlap in content between all subclients. Overlap in subclient content will result in loss of data. An existing subclient's contents are not automatically changed when another subclient is added with overlapping contents.
SharePoint Server iDataAgent: The Site Content Database, the Site Collection Database, the Site Database, and the Site Index for the virtual server must all be assigned to the same subclient.
Lotus Notes Document iDataAgent: Review Assigning Restore View Names to Newly-discovered Databases
QR Agent: Follow these guidelines when adding a volume to a QR Agent subclient:
The volume must correspond to a physical disk or RAID array.
A volume created by volume management software other than VxVM is not valid subclient content.
Subclients may have overlapping content; however, if two or more subclients overlap, they all must use the same snapshot engine. If the QR policies associated with the subclients are configured to use different snap engines, they must be reconfigured to use the same snap engine in this scenario.
Caution Against Re-configuring Default Subclient Content
We recommend that you do not re-configure the content of a default subclient because this would disable its capability to serve as "catch-all" entity for client data. As a result, the likelihood that some data will not get backed up or scanned for archiving would increase.
Required Capability: See Capabilities and Permitted Actions
1. From the CommCell Browser, right-click the subclient for which you want to configure content, click All Tasks (if applicable) and then click Properties.
2. Follow the procedure below that is applicable for your agent:
For File System, Active Directory, File Archiver, Exchange Public Folder iDataAgents, NDS, and SharePoint Server iDataAgents click the Subclient Properties (Content) tab and configure content for the subclient as described below for your agent:
For File System, Active Directory, File Archiver, NDS, and SharePoint Server iDataAgents: Type the full path of the data that you want to include as subclient content in the Enter New Content field, then click Add. Optionally, click Browse to enter the content. When browsing content while configuring SharePoint subclients, you can add content via multiple selections with the CTRL or SHIFT keys. For Windows, when specifying a UNC Path, click As User, and enter the user account information for the domain user with permissions for that path. For NetWare/DNS, see the Notessection below for content path examples. For Unix File Systems, you can enter the mount point of an NFS-mounted file system, see the Notessection below for examples.
For Exchange Public Folder iDataAgents: Click Browse, select folders to include as content, then click Add.
For the Unix File System iDataAgents, to facilitate the management of resource fork data in Apple double-encoded Macintosh files, click EnableApple Double Support.
For the Unix File System iDataAgents, to view the actual data path for any symbolic link in the subclient content, click Expand symbolic links of subclient content and then click Discover.
For NAS NDMP iDataAgents, configure the Backup Content Path field(s) as described below, then click Add:
Click the drop-down list arrow to display the root volumes on the file server. To change the root volume, click one in the list. If you want to refine the content path further, use the space to the right of (or below) the root volume list to enter additional path information. Note the following:
For NetApp, the root volume is the mount path of each volume.Example: for volume FS1 the root volume will be /vol/FS1.
For EMC Celerra, the root volume is the mount point created for a volume.Example: for volume FS1 with mount point /FS1 the root volume will be /FS1.
For Hitachi, no root volumes are shown in the drop down list. Type the full path of the root volume.Example: for volume FS1 with mount point /mnt/FS1 the root volume will be /mnt/FS1.
For BlueArc, the root volume is a combination of a descriptor of the path and the volume name.Example: for volume FS1 with a mount point of / the root volume will be /__VOLUME__/FS1.
Features - DB2 iDataAgent
Page 78 of 96
Optionally, for NetApp NAS NDMP, click Browse to enter the content.
For Exchange Mailbox and Exchange Mailbox/Public Folder Archiver Agents follow the procedure to Discover and Assign New Mailboxes or Assign Mailboxes to Another Subclient.
For Lotus Notes Database and Document iDataAgents follow the procedure to Discover and Assign New Databases or Assign Databases to a Subclient.
For DB2, DB2 DPF, Exchange Database, Novell GroupWise, SharePoint Server, SQL Server Database, Sybase, and MySQL iDataAgents, click the Subclient Properties (Content) tab and configure content for the subclient as described below for your agent:
For the DB2 iDataAgent, specify whether you want to include the entire database or a subset of this data as content for the subclient. For the DB2 DPF iDataAgent, specify whether you want to include all the affected database partitions or a subset of this data as content for the subclient.
For Exchange and GroupWise iDataAgents: Click Configure. From the Add/Modify Subclients dialog box click the subclient entry for the database element/Storage Group that you want to add to the new subclient and select the name of the destination subclient from the list that appears. Alternatively, you can select and assign a range of databases/storage groups using the Change all selected databases/storage groups to list. Note that you must have at least one database element/Storage Group assigned to this subclient in order to save the configuration.
A database/Storage Group that is not configured for a subclient does not appear in the list. This can be the case if the subclient containing the database/Storage Group was deleted. If this happens, click Discover to display all databases/Storage Groups.
For the SharePoint Server iDataAgent, follow the procedure to Discover and Assign New Data Types.
For the Sybase iDataAgent, follow the procedure to Manually Discover Databases.
For the MySQL iDataAgent, follow the procedure to Configure MySQL Databases.
For the Informix iDataAgent, click the Subclient Properties (Content) tab and define the contents of the subclient. Specifically, establish the backup mode for the data to be backed up, set the backup level, and decide whether to back up the emergency boot file and/or the ONCONFIG file.
For the Oracle, SAP for Oracle, or Oracle RAC iDataAgent, click the Subclient Properties (Content) tab and define the contents of the subclient. To configure this subclient for specialized types of backups, follow the appropriate procedure below:
Create Subclient for Backing Up Archived Redo Log Files
Create Subclient for Backing Up Offline Databases
Create Subclient for Backing Up Online Databases
Create Subclient for Performing Selective Online Full Backups
For SAN iDataAgents, click the Subclient Properties (Content) tab and configure content for the subclient as described below for your agent:
Image Level on Unix iDataAgent: Click Add. From the Add Content Path dialog box, select the volume(s) that you want to back up (use CTRL + click to select multiple volumes). Click OK. The selected volumes are added to the Contents of subclient list. These volumes are automatically configured to be CXBF devices. Alternatively, use Volume Explorer per specific scenarios to configure CXBF devices.
To configure an unmounted block device or raw device as content, first use Volume Explorer to configure the device as a CXBF device. Then select the configured CXBF device as subclient content. You can ignore the warning that is displayed.
For more information, see When to Use Volume Explorer. For a step-by-step procedure, see Configure a CXBF Device in Volume Explorer.
Image Level and Image Level ProxyHost on Windows iDataAgents: Click Add. Then in the Add Content dialog box, type the full path of the volume or mount point that you want to include as subclient content, then click Add. Optionally, click Browse to select the content. Click OK. The volume or mount point is added to the Contents of subclient list. Add additional content by repeating this step.
ProxyHost iDataAgent: Select a backup host from the Backup Host list. This is the computer to which the BCV is connected. Click Add. In the Content field of the Add/Edit Content for Subclient dialog box, type the primary host path of the content that you want to back up, or click Browseto find and select this data. In the Backup Host BCV Path field of the Add/Edit Content for Subclient dialog box, type the path through which the backup host accesses this data on the BCV, or click Browse to find and select this path. Click OK. The primary host data path and corresponding backup host BCV path are added as a single entry in the Contents of subclient list. To add additional entries, repeat these steps. Refer to Notesbelow for more information.
For Quick Recovery Agents, click the Subclient Properties (Content) tab and configure the following options:
Click Add Volume. From the Adding Volume dialog box, select volume(s) that you want to add to the subclient content (use CTRL + click to select multiple volumes). You can add/edit additional advanced options for the selected volume by select Advanced on the Adding Volume dialog box. Click OK.
Click Add App to select an application and associated volumes. Click OK.
Any instances you intend to protect and recover with the QR Agent must be configured in the QR Agent properties Authentication tab. They will not appear in the Add App dialog box if they are not configured. Only volumes containing datafiles and archive log files will be detected by Add App. Volumes containing control files and redo log files will not be detected.
For a clustered Exchange Server, if you are not using VSS to perform an online quiesce, sufficient permissions are required in order to be able to perform an offline quiesce; in such cases, ensure that the User Name specified has Exchange Administrator rights.
See also Configure Subclients for Overlapping Content.
3. Click OK to save your content configuration.
NOTES
Features - DB2 iDataAgent
Page 79 of 96
Content examples for NetWare are OU=prospects.O=engineering.[Root], (for NDS content), and SYS:\public (for File System content).
Content examples for adding an NFS-mounted file system to subclient content of a Unix File System iDataAgent:
/mountpointA to include the entire file system at mountpointA
/mountpointA/projects for only the projects directory within the file system at mountpointA.
Informix subclients include one or more dbspaces. As databases are added to the dbspaces, the subclients are updated automatically.
Exchange Mailbox iDataAgents and Exchange Mailbox/Public Folder Archiver Agents: Initially, all unconfigured mailboxes are assigned to the default subclient. You can create a new subclient and reassign mailboxes to this new subclient (within the same backup set/archive set). Once assigned, the mailboxes become part of the content of the new subclient.
SharePoint Server iDataAgent: Initially, all unconfigured data types are assigned to the default subclient. You can create a new subclient and reassign data types to this new subclient. Once assigned, they become part of the content of the new subclient.
ProxyHost iDataAgent: The primary host data path is backed up by the subclient and is the path through which the backup host accesses this data on the BCV. A primary host path and its corresponding backup host path are listed in the following format:
<primary_host_path> --> <backup_host_path>
For example, assume that you want to back up the D:\data directory from your primary host and D:\ is mirrored by a BCV, which is mapped to the backup host as F:\. Consequently, the path to this data on the backup host is F:\data. When you add this directory to a subclient, it is listed in the Contents of subclient pane as D:\data --> F:\data.
CONFIGURE THE SUBCLIENT FOR DATA ENCRYPTION
Encryption settings made at the subclient level are for data protection and recovery operations run from the CommCell Console and are not related in any way to settings made at the instance level which is for third-party Command Line operations only.
See Data Encryption - Support for a list of supported products.
Before You Begin
Encryption must be enabled at the client level prior to configuring any subclients residing on that client. See Configure the Client for Data Encryption.
If you are attempting to configure for third-party Command Line operations, do not use this procedure. See Configure Third-party Command Line Operations for Encryption.
Required Capability: Capabilities and Permitted Actions
1. From the CommCell Console, right-click the subclient and click Properties.
2. From the Subclient Properties (Encryption) tab, select an option based on the criteria described in the Encryption tab help.
3. Click OK to save your settings and close subclient properties.
CREATE A NEW SUBCLIENT
Before You Begin
Review Subclients.
Do not create a subclient while the parent node or any sibling subclient has a data protection or archive operation currently running on it.
In cases where a new subclient is created with the same name as a deleted subclient, the system will append a Unix time stamp to the deleted subclient's name in data protection job history reports and views to distinguish the two subclients. For example, subclientname_1104257351.
Informix iDataAgents: If you will be using the Informix ONBAR utility to create backup and restore scripts, you need not create subclients. Otherwise, if you will be using the CommCell Console to back up and restore Informix database objects (subsets/dbspaces), then you will need to create a subclient.
ProxyHost iDataAgents: If you are using a BCV, you must prepare a batch file or a shell script file on the backup host containing commands to synchronize and split the BCV. The Resource Pack includes information on configurations for these batch files or shell scripts, as well as examples that apply to specific applications and hardware (e.g., Exchange databases in an EMC Symmetrix environment). See Resource Pack for more information on the Resource Pack.
The ProxyHost iDataAgent also requires that you set permissions for the batch/shell script file on the backup host.
SQL Server Database iDataAgents: When running on Windows Server 2003 and VSS is enabled, the New Subclient command is not available.
The primary host path in the Content field is used for browse and restore purposes. However, it is the data in the Backup Host BCV Path which is actually backed up. If these two paths do not accurately correspond, the path that appears when data is browsed for restore does not accurately reflect the data that will be restored. In the example given above, assume that D:\data is entered in the Content field, while F:\data1 is accidentally entered in the Backup Host BCV Path. If you browse and select D:\data to be restored, it is actually D:\data1 that is restored. (Remember, F:\Data1 is the path on the backup host that corresponds to D:\data1 on the primary host.)
Features - DB2 iDataAgent
Page 80 of 96
PostgreSQL iDataAgents: Once you configure the PostgreSQL instance, the system automatically generates the default backup sets and default subclients. However, you can use the CommCell Console to create user-defined subclients for dump backup sets to distribute some of the database content. You cannot create user-defined subclients for FS backup sets.
Required Capability: See Capabilities and Permitted Actions
1. From the CommCell Browser, right-click the node (agent/backup set/archive set/instance) for which you want to create a new subclient, click All Tasks (if applicable), and then simply click New Subclient for most agents.
For the SQL Server iDataAgent, expand New Subclient and click either Database to include individual databases or File/File Group to include database elements.
2. Click the General tab or General (Quick Recovery Agent) tab of the Subclient Properties dialog box and type the name (up to 32 characters) of the subclient that you want to create.
For supported agents identified in Support Information - Snapshot Engines, you can select a QSnap option to snap data and then perform a data protection operation on the data.
For Image Level on Unix and Image Level ProxyHost on Unix, use the Incremental Support Using field to configure either a CXBF subclient or a checksum subclient and to enable incremental support for either subclient type.
For QR Agents, you must also select a QR Policy from the QR Policy list.
For the Windows iDataAgents that support VSS, you can optionally Enable VSS on a Subclient.
3. Select other options from the General tab as appropriate for the agent.
4. Click the Content or Databases tab of the Subclient Properties dialog box and Configure Subclient Content as appropriate for your agent.
5. For all agents (except QR), click the Storage Device (Data Storage Policy) tab of the Subclient Properties dialog box, then select a data storage policy to associate with this subclient from the storage policy list.
For the DB2 and DB2 DPF iDataAgents, you can also change the number of data backup streams. For the DB2 DPF iDataAgent, the default stream threshold should be equal to the total number of database partitions for the subclient.
For SQL Server iDataAgents, you can also click the Storage Device (Log Storage Policy) tab of the Subclient Properties dialog box, then select a log storage policy to associate with this subclient from the storage policy list and select the number of backup streams for transaction log backup jobs.
For 1-Touch for Unix, it is strongly recommended that the storage policy that you select for the subclient configured for 1-Touch use a MediaAgent on a different computer. If you do this, and if the system crashes, the media will not have to be exported to another MediaAgent in order to recover the system.
6. For Oracle and DB2 iDataAgents, click the Backup Arguments (Oracle) or Backup Arguments (DB2, DB2 DPF) tab of the Subclient Properties dialog box and Configure Backup Arguments as appropriate for your agent. Note that the backup arguments for Informix are located on the Content tab.
7. For Migration Archiver Agents, click the Archiving Rules or Rules tab of the Subclient Properties dialog box and configure archiving rules as appropriate for your agent. In order to perform rules-based migration archiving operations, the Disable All Rules checkbox must be cleared.
If the File Archiver for Windows supports Data Classification, several filter-like configuration fields are defined as archiving rules and are available from the Subclient Properties (Rules) tab. If you want to define content and archiving rules based on file attributes other than volumes, size, and modified time (i.e., if you want to customize your rules), click the Advanced tab and configure as appropriate. Also, stub management options can be configured from the Stub Rule tab. See Configure Archiving Rules - File Archiver Agents for step-by-step instructions.
8. For ProxyHost and Image Level ProxyHost iDataAgents, click the Pre/Post Process tab of the Subclient Properties dialog box. In the PreScan field, type the path to the batch file/shell script file that contains those commands that are to run before each backup of the subclient, or click Browse to locate and select this file. For ProxyHost and Image Level ProxyHost, the file must reside on the backup host or primary host.
9. Optionally (if supported for your agent) you can:
Add a Data Protection or Discovery Filter for a Subclient on the Filters tab.
Configure a Subclient for Pre/Post Processing of Data Protection/Archive Operations on the Pre/Post Process tab.
Enable Software Compression for a Subclient on the Software Compression tab of the Storage Device tab.
Configure the Subclient for Data Encryption on the Encryption tab.
Enable or Disable Operations for this subclient on the Activity Control tab.
Configure Mailbox Stores for Auto-Discovery on the Auto-discovery tab.
Configure the Subclient for 1-Touch on the 1-Touch Recovery tab.
View or change the user group security associations for this subclient from the Security tab.
Determine location from where archive logs will be backed up or deleted from the Log Destinations tab.
10. Click OK to save the subclient configuration. For QR Agents, this procedure is now complete. For all other agents, continue on to the next step.
11. The Backup Schedule dialog box advises you to schedule data protection operations for your new subclient. It is recommended you elect to set a schedule now. You can also associate this subclient with an All Agent Types schedule policy (which is automatically created by the system, or can be a user defined Data Protection schedule policy). If you have already associated a schedule policy at a previous level (Backup Set/Instance, Agent, Client, or Client
Features - DB2 iDataAgent
Page 81 of 96
Computer Group) the schedules defined in the Schedule Policy will be automatically applied to the new subclient. See Schedule Policy for more information.
If you want to associate this subclient with an All Agent Types schedule policy, click Associate with Generic Schedule Policy, and then select that schedule policy from the drop-down list box. Click OK.
If you want to associate this subclient with a specific schedule policy, click Associate to schedule policy, and then select the schedule policy from the drop-down list box. Click OK.
If you have selected to define a schedule for this subclient:
Click Schedule.
From the Backup/Archive Options dialog box, select the type of data protection operation that you want to schedule.
If you want to set Advanced Backup/Archive Options, click Advanced.
After selecting the data protection type and any advanced options, click OK. The Schedule Details dialog box appears.
From the Schedule Details tab, select the scheduling options that you want to apply, then click OK.
If you don't want to create a data protection schedule at this time, click Do Not Schedule, and then click OK.
This task is now complete.
DELETE A USER-DEFINED SUBCLIENT
Related Topics:
Command Line Interface - qdelete subclient
Subclients
Required Capability: See Capabilities and Permitted Actions
-defined subclient:
1. From the CommCell Browser, right-click the user-defined subclient that you want to delete, and then click Delete from the shortcut menu.
2. A confirmation message is displayed, asking if you want to delete the subclient.Click No to cancel the deletion and retain the subclient, or click Yes to continue the deletion. If you click Yes:
the subclient, and any data that may have been protected/archived by the subclient are logically deleted, and you can no longer access the corresponding data for recovery/retrieve purposes. However, the data remains valid for the length of time specified by the associated retention period. Some agents allow you to browse data from a deleted subclient provided that the Browse Data Before date and time precedes the time that the user-defined subclient was deleted.
for agents that support a default subclient, once the user-defined subclient is deleted its contents are automatically reallocated to the default subclient the next time a data protection/archive/discovery operation is run on the default subclient to ensure data protection coverage.
the system deletes the selected subclient node and removes it from the CommCell Browser.
the system deletes any data protection/archive and recovery/retrieve job schedules that are associated with the subclient.
ENABLE OR DISABLE OPERATIONS
Required Capability: See Capabilities and Permitted Actions
1. From the CommCell Browser, right-click the CommServe, client computer group, client computer, agent, or subclient, and then click Properties from the short-cut menu.
2. From the Activity Control tab of the associated Properties dialog box, select or clear option(s), as desired.
3. Click OK.
Level CapabilityCommCell Administrative Management with CommCell level association
Client Computer Group Administrative Management with Client Computer Group level associationClient Agent Management with Client level association
Agent Agent Management with Agent level association
Subclient Agent Management with Subclient level association
Disabled data management and/or data recovery operations are displayed with client and/or agent icon changes in the CommCell Browser. For a comprehensive list of all icons in the CommCell Console, see CommCell Console Icons.
Features - DB2 iDataAgent
Page 82 of 96
ENABLE OR DISABLE SOFTWARE COMPRESSION FOR A SUBCLIENT
Before you Begin
Do not enable/disable software compression for a subclient that is being backed up/archived.
Required Capability: Capabilities and Permitted Actions
1. From the CommCell Browser, right-click the subclient for which you wish to enable software compression and then click Properties.
2. Click the Storage Device tab and from the Data Storage Policy tab, select the storage policy from the Storage Policy list.
If applicable for the selected agent, click the Log Storage Policy tab and select a storage policy from the Transaction Log Storage Policy list.
3. Then click the Storage Device (Data Transfer Option) tab and choose the appropriate compression option for this subclient.
4. Click OK to save your changes.
This task is now complete.
REMOVE A PROCESS FROM PRE/POST PROCESSING OF DATA PROTECTION/ARCHIVE OPERATIONS
Before You Begin
We recommend not removing a pre/post process for a subclient that is currently running a data protection or archive operation.
Review the Overview and Agent-Specific Guidelines for your agent before removing pre/post processes for data protection/archive operations.
Required Capability: Capabilities and Permitted Actions
1. From the CommCell Browser, right-click the subclient for which you want to remove a pre/post process, and then click Properties from the shortcut menu.
2. Click the Pre/Post Process tab of the Subclient Properties dialog box.
3. Click the text inside the space that corresponds to one of the following phases for which you want a pre/post process removed, then press the Delete key:
PreScan
PreArchive
PreCopy
PreSnap
PostBackup
PostScan
PostArchive
PostCopy
PostSnap
4. Repeat Step 3 for any additional processes that you want to remove.
5. Click OK.
RENAME A SUBCLIENT
Before You Begin
You can rename a subclient at any time. However, we recommend that you don't rename a subclient while a data protection or archive operation is running on that subclient.
In cases where a subclient is renamed using the same name as a deleted subclient, the system will append a Unix time stamp to the deleted subclient's name in data protection job history reports and views to distinguish the two subclients. For example, subclientname_1104257351.
Required Capability: See Capabilities and Permitted Actions
1. From the CommCell Browser, right-click the subclient that you want to rename, and then click Properties from the shortcut menu.
2. From the Subclient Properties (General) tab, or the QR Agent Subclient Properties (General) tab, type the new name in the Subclient Name field, and then click OK.
Features - DB2 iDataAgent
Page 83 of 96
The CommCell Browser updates the subclient with its new name. The new name will also be reflected in any associated schedules and reports.
SET THE NETWORK BANDWIDTH AND NETWORK AGENTS FOR A DATA PROTECTION OPERATION
Before you Begin
Do not modify the network bandwidth and network agents for a subclient or instance that is being backed up.
Required Capability: Capabilities and Permitted Actions
1. From the CommCell Browser, right-click a subclient and then click Properties.
For the DB2, DB2 DPF, Informix, Oracle, Oracle RAC, SAP, or Sybase iDataAgent, right-click an instance and then click Properties.
2. Click the Storage Device Data Transfer Option tab.
For the QR Agent:
To control network bandwidth settings, use the Throttle Network Bandwidth section in the General tab of the Subclient Properties dialog box.
To control the number of network agents, you must create a nQRNetworkAgents registry key.
3. Enter a number of Network Agents that must be used to perform data protection operations on the subclient/instance.
4. Click the Throttle Network Bandwidth (MB/HR) option and then enter the throughput as needed. Note that throttling is done on a per Network Agent basis.
5. Click OK to save the changes.
This task is now complete.
VIEW DATA PATHS ASSOCIATED WITH A SUBCLIENT
Required Capability: See Capabilities and Permitted Actions
1. From the CommCell Browser, right-click the subclient whose data paths you want to view, then click Properties from the shortcut menu.
2. Click the Storage Device tab of the Subclient Properties dialog box.
3. From the Data [or Logs] Storage Policy tab, click Show Data Paths to view the data paths used by the subclient to access the storage media for data protection operations. Click Close to exit the Data Paths dialog box.
4. Click OK to exit the Subclient Properties Storage Device tab.
VIEW SUBCLIENT CONTENT
Required Capability: See Capabilities and Permitted Actions
1. From the CommCell Browser, right-click the subclient whose content you want to view, then click Properties.
2. From the Subclient Properties dialog box, click the Content tab (or Databases tab for Lotus Notes) to view the contents of the subclient.
3. Click OK to close the dialog box.
Back To Top
Features - DB2 iDataAgent
Page 84 of 96
Backup Job HistoryTopics | How To | Related Topics
Overview
Items That Were Backed Up
Items That Failed
Pruning Backup History Information
Supported Features
Content Indexing History Information
OVERVIEW
You can view the backup and restore history of iDataAgents, BackupSets/Instances, and subclients.
The Backup Job History Filter dialog box allows you view detailed, historical information about backup jobs. Once you have chosen your filter options, they are displayed in the Backup Job History window.
For information on Job Details displayed in the Job History, see Viewing Job Information.
From this window, you can right-click a backup job to:
Browse the data backed up by the backup set or instance from the Backup Job History window. This is provided as right-click option for each job. (This menu option, when selected, initiates the Browse Options dialog box preset with the values needed to browse the data.)
Browse the snapshots created during SnapProtect backup
View items that failed during the backup job
View details of the backup job
View files that were not indexed during a backup job that performed content indexing
View associated media
View events of the backup job
View a list of items that were backed up
View a list of items that were moved to media for a SnapProtect backup job
View the log files of the backup job.
View the RMAN log of an Oracle backup job.
View the BRTools log of a SAP for Oracle job. You can view the BRTools log for only those jobs that were initiated from the CommCell Console.
ITEMS THAT WERE BACKED UP
The View backup file list option allows you to view a list of the files that were backed up during a backup job, along with the data sizes of each backed up file. The View backed up messages option allows you to view a list of messages that were backed up by using, along with the alias name, display name, email address, sender name, and recipient of each message.
From these windows you can conduct searches based on a particular string, allowing to find particular files quickly and easily.
See View the Items That Were Protected During a Data Protection Operation for step-by-step instructions.
ITEMS THAT FAILED
The items that failed for a data protection operation include individual files that may fail the job even though a particular job completed successfully. You can determine the degree of success for these jobs using this window.
Filters can be used in conjunction with the "Items That Failed" list on the data protection Job History Report to eliminate backup or archive failures by excluding items which consistently fail that are not integral to the operation of the system or applications. Some items fail because they are locked by the operating system or application and cannot be opened at the time of the data protection operation. This often occurs with certain system-related files and database
It is not recommended that this option is used to view a very large list of items that were backed up (such as lists that total over 100,000 items). It is suggested that the Browse option is used to find a list of backed up items in such cases.
Features - DB2 iDataAgent
Page 85 of 96
application files.
Also, keep in mind that you will need to run a full backup after adding failed files to the filter in order to remove them.
See View the Items That Failed For a Data Protection Operation for step-by-step instructions.
PRUNING BACKUP HISTORY INFORMATION
You can prune backup history information based on the number of days established in the Days to keep the backup job histories option from the Media Management Configuration (Service Configuration) dialog box available in the Control Panel.
SUPPORTED FEATURESNAS iDataAgents do not support the ability to view items that failed.
The Image Level and Image Level ProxyHost iDataAgents do not support the ability to Browse the data of a selected backup job in Backup Job History.
CONTENT INDEXING HISTORY INFORMATION
Content Indexing history can also be viewed of iDataAgents, BackupSets/Instances, and subclients. The following information is displayed:
ITEMS THAT WERE SUCCESSFULLY CONTENT INDEXEDYou can view the list of items that were successfully content indexed during a Content Indexing operation for a particular job. for step-by-step instructions, see View the Items that Were Successfully Content Indexed.
CONTENT INDEXING FAILURES
Content Indexing failures allows you to look at the messages, files and documents that could not be indexed during a content indexing operation. Content Indexing looks at each file (of the supported data types) and indexes its contents allowing advanced searches of backed up/archived/migrated data.
Files that were not indexed, (perhaps because the file’s content could not be read) are added to the Content Indexing Failures list, and are viewable from the View Content Index (Failed Items) option in the Job History window. For step-by-step instruction, see View the Items that Failed to Content Index.
Back to Top
Backup Job History - How ToTopics | How To | Related Topics
View Backup Job History
View the Items That Were Protected During a Data Protection Operation
View the Items That Failed For a Data Protection Operation
View Job History Details
View the Media or Mount Paths of a Job History
View the Events of a Job History
View the Items that were Moved to Media during SnapProtect Backup
View the Log Files of a Job History
A listing of files and folders that failed is not available for the Quick Recovery Agent, or the Image Level and Image Level ProxyHost iDataAgents. These agents do not perform a file level backup/copy.
Certain application related files can never be backed up by the File System iDataAgent due to the nature of the data. For example, Microsoft SQL Server database files cannot be backed up by the File System iDataAgent. In this and other similar circumstances, consider entering files such as these as exclusions in the corresponding subclient filter.
If you have installed the SQL Server iDataAgent, do not use the stored procedure sp_delete_backuphistory, sp_delete_database_backuphistory and sp_delete_backup_and_restore_history provided by Microsoft clean up backup history. By default backup history is automatically pruned from the CommServe database and the Microsoft SQL Server, as necessary.
Features - DB2 iDataAgent
Page 86 of 96
View the Items that Were Not Indexed During Content Indexing
View the Items that Were Successfully Content Indexed
Resubmit a Backup Job
VIEW BACKUP JOB HISTORY
1. From the CommCell Browser, right-click the entity (client computer, iDataAgent, backup set or subclient) whose backup history you want to view, click View, and then click View Backup History.
2. From the Backup History filter window select the filter options, if any, that you want to apply, and then click OK. The system displays the Backup Job History window.
3. Click OK.
VIEW THE ITEMS THAT WERE PROTECTED DURING A DATA PROTECTION OPERATION
Required Capability: none required
1. From the CommCell Browser, right-click the entity whose history of data protection operations you want to view, click View, and then click the necessary options to view a job history.
2. From the Job History Filter dialog box, select the filter options, if any, that you want to apply, and then click OK.
3. From the Job History window, right-click the operation whose list of protected items you want to view, and then select View backup file list/View Backed Up Messages. The Backup file List window displays a list of the backed up files/messages that were included in the backup job. You can use the Search option to find items in the window.
4. Click File -> Exit.
5. Click Close from the Job History window.
VIEW THE ITEMS THAT FAILED FOR A DATA PROTECTION OPERATION
1. From the CommCell Browser, right-click the entity whose history of data protection operations you want to view, click View, and then click to view a job history.
2. From the Job History Filter dialog box, select the filter options, if any, that you want to apply, and then click OK.
3. From the Job History window, right-click the operation whose list of failed items you want to view, and then select View Failed Items. The Unsuccessful Backup Files window (for DataArchiver Agents, Items On Which Archive Failed) displays those items that failed. If no items failed, a message to that effect is displayed.
4. Click Close.
VIEW JOB HISTORY DETAILS
Required Capability: See Capabilities and Permitted Actions
1. From the CommCell Browser, right-click the entity (e.g., subclient, client computer, etc.) whose job history you want to view, click View, and then click job history.
2. From the Job History Filter dialog box, select the filter options that you want to apply and click OK.
This option is available for File System-like agents.
A listing of files and folders that failed is not available for the Quick Recovery Agent, nor the Image Level and Image Level ProxyHost iDataAgents. These agents do not perform a file level backup/copy.
Features - DB2 iDataAgent
Page 87 of 96

3. From the Data Management Job History window, right-click the job whose job details you want to view, and then click View Job Details.
4. The Job Details dialog box appears, displaying detailed job history in General, Details, Phase Details and Attempts tabs for the selected job.
5. Click OK.
VIEW THE MEDIA OR MOUNT PATHS OF A JOB HISTORY
1. From the CommCell Browser, right-click the entity (e.g., subclient, client computer, etc.) whose job history you want to view, click View, and then select the appropriate history.
2. From the Job History window select the filter options, if any, that you want to apply, and then click OK.
3. From the job history widow, right-click the backup whose media or mount paths you want to view, and then click View Media.
4. The Media Used By Job ID window displays a list of media or mount paths used by the operation.
5. Click OK.
VIEW THE EVENTS OF A JOB HISTORY
Required Capability: See Capabilities and Permitted Actions
1. From the CommCell Browser, right-click the entity (e.g., subclient, client computer, etc.) whose job history you want to view, click View, and then click Job History.
2. From the Job History Filter dialog box, select the filter options that you want to apply and click OK.
3. From the Data Management Job History window, right-click the job whose job details you want to view, and then click View Events.
4. The All Found Events window gets displayed. If no events where found for the back up, a message is displayed to that effect.
5. Click Close.
VIEW THE ITEMS THAT WERE MOVED TO MEDIA DURING SNAPPROTECT BACKUP
1. From the CommCell Browser, right-click the entity whose history of data protection operations you want to view, click View, and then click the necessary options to view a job history.
2. From the Job History Filter dialog box, select the filter options, if any, that you want to apply, and then click OK.
3. From the Job History window, right-click the operation whose list of items moved to media you want to view, and then select View Backup Copy file listing. The Backup file List window displays a list of the backed up files that were included in the backup copy job. You can use the Search option to find items in the window.
4. Click File -> Exit.
5. Click Close from the Job History window.
VIEW THE LOG FILES OF A JOB HISTORY
Required Capability: See Capabilities and Permitted Actions
If viewing the details of a job with a pending or failed status, the Reason for Job Delay field will contain an Error Code, which, if clicked, will launch the customer support website displaying troubleshooting article(s) related to the specific issue.
This option is available for the SnapProtect Backup.
To view the files moved to media for a backup copy job, right-click the SnapProtect backup job corresponding to the Backup Copy job and select View Backup Copy file listing. View backup items will not display anything for a Backup Copy job.
Features - DB2 iDataAgent
Page 88 of 96
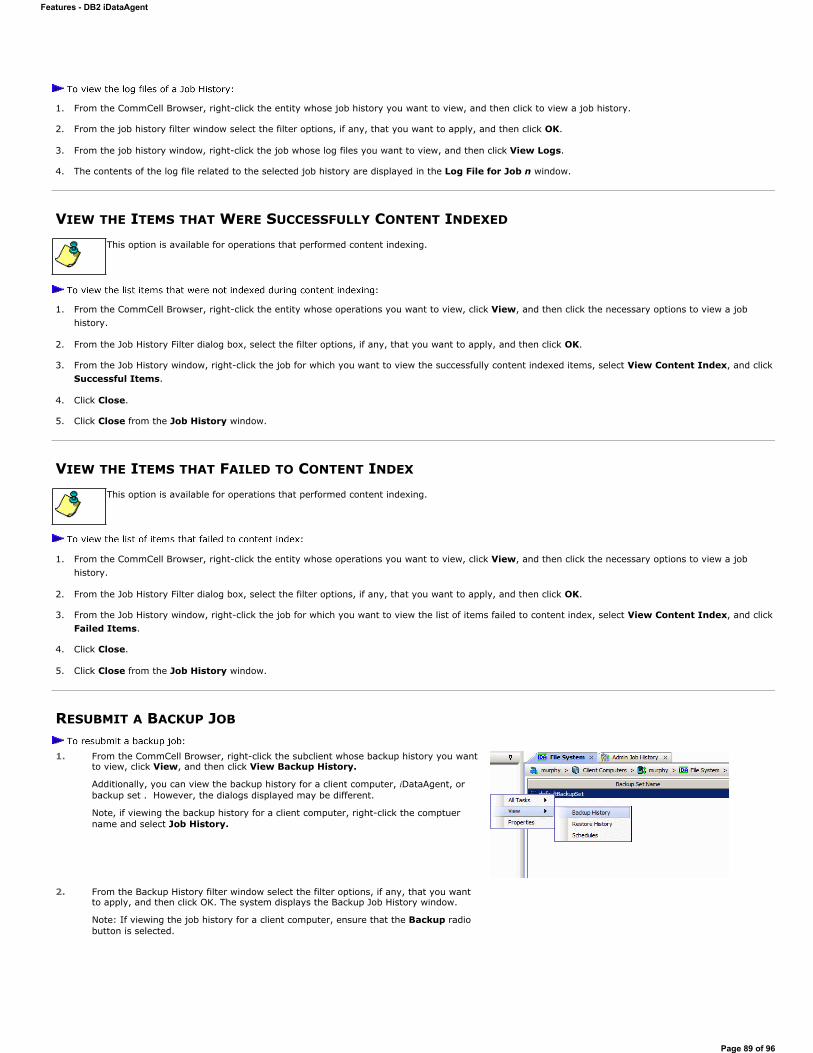
1. From the CommCell Browser, right-click the entity whose job history you want to view, and then click to view a job history.
2. From the job history filter window select the filter options, if any, that you want to apply, and then click OK.
3. From the job history window, right-click the job whose log files you want to view, and then click View Logs.
4. The contents of the log file related to the selected job history are displayed in the Log File for Job n window.
VIEW THE ITEMS THAT WERE SUCCESSFULLY CONTENT INDEXED
1. From the CommCell Browser, right-click the entity whose operations you want to view, click View, and then click the necessary options to view a job history.
2. From the Job History Filter dialog box, select the filter options, if any, that you want to apply, and then click OK.
3. From the Job History window, right-click the job for which you want to view the successfully content indexed items, select View Content Index, and click Successful Items.
4. Click Close.
5. Click Close from the Job History window.
VIEW THE ITEMS THAT FAILED TO CONTENT INDEX
1. From the CommCell Browser, right-click the entity whose operations you want to view, click View, and then click the necessary options to view a job history.
2. From the Job History Filter dialog box, select the filter options, if any, that you want to apply, and then click OK.
3. From the Job History window, right-click the job for which you want to view the list of items failed to content index, select View Content Index, and click Failed Items.
4. Click Close.
5. Click Close from the Job History window.
RESUBMIT A BACKUP JOB
This option is available for operations that performed content indexing.
This option is available for operations that performed content indexing.
1. From the CommCell Browser, right-click the subclient whose backup history you want to view, click View, and then click View Backup History.
Additionally, you can view the backup history for a client computer, iDataAgent, or backup set . However, the dialogs displayed may be different.
Note, if viewing the backup history for a client computer, right-click the comptuer name and select Job History.
2. From the Backup History filter window select the filter options, if any, that you want to apply, and then click OK. The system displays the Backup Job History window.
Note: If viewing the job history for a client computer, ensure that the Backup radio button is selected.
Features - DB2 iDataAgent
Page 89 of 96
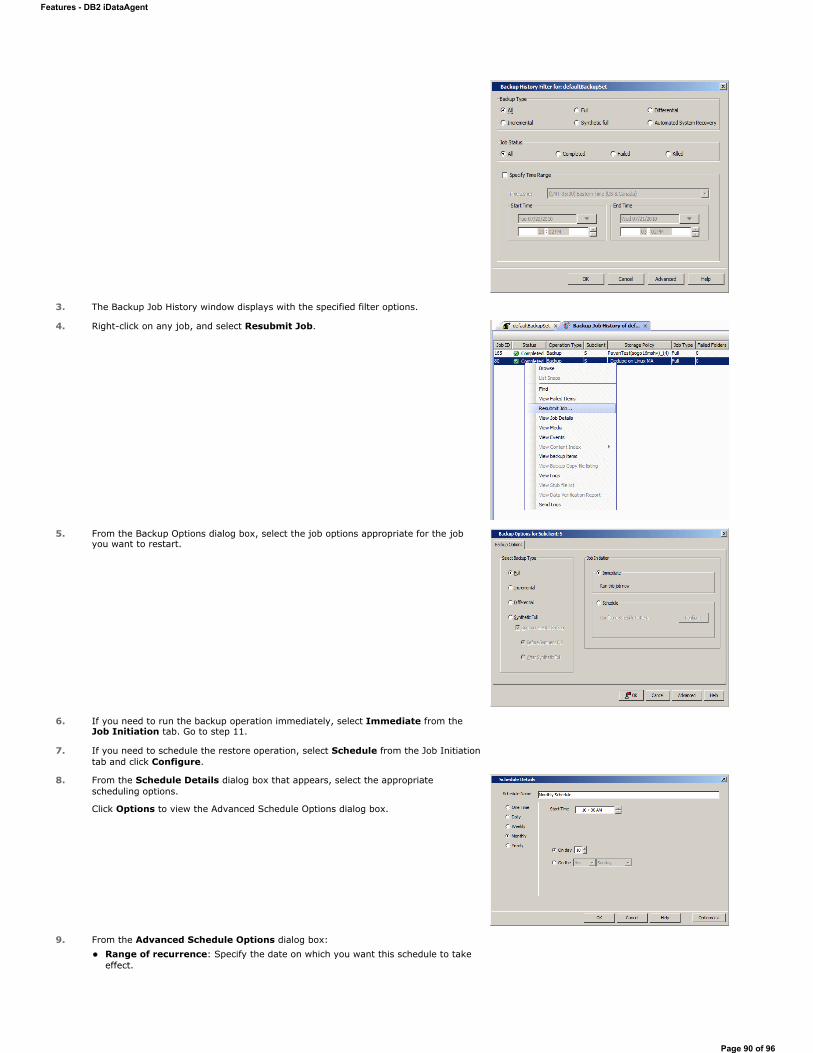
3. The Backup Job History window displays with the specified filter options.
4. Right-click on any job, and select Resubmit Job.
5. From the Backup Options dialog box, select the job options appropriate for the job you want to restart.
6. If you need to run the backup operation immediately, select Immediate from the Job Initiation tab. Go to step 11.
7. If you need to schedule the restore operation, select Schedule from the Job Initiation tab and click Configure.
8. From the Schedule Details dialog box that appears, select the appropriate scheduling options.
Click Options to view the Advanced Schedule Options dialog box.
9. From the Advanced Schedule Options dialog box: Range of recurrence: Specify the date on which you want this schedule to take effect.
Features - DB2 iDataAgent
Page 90 of 96
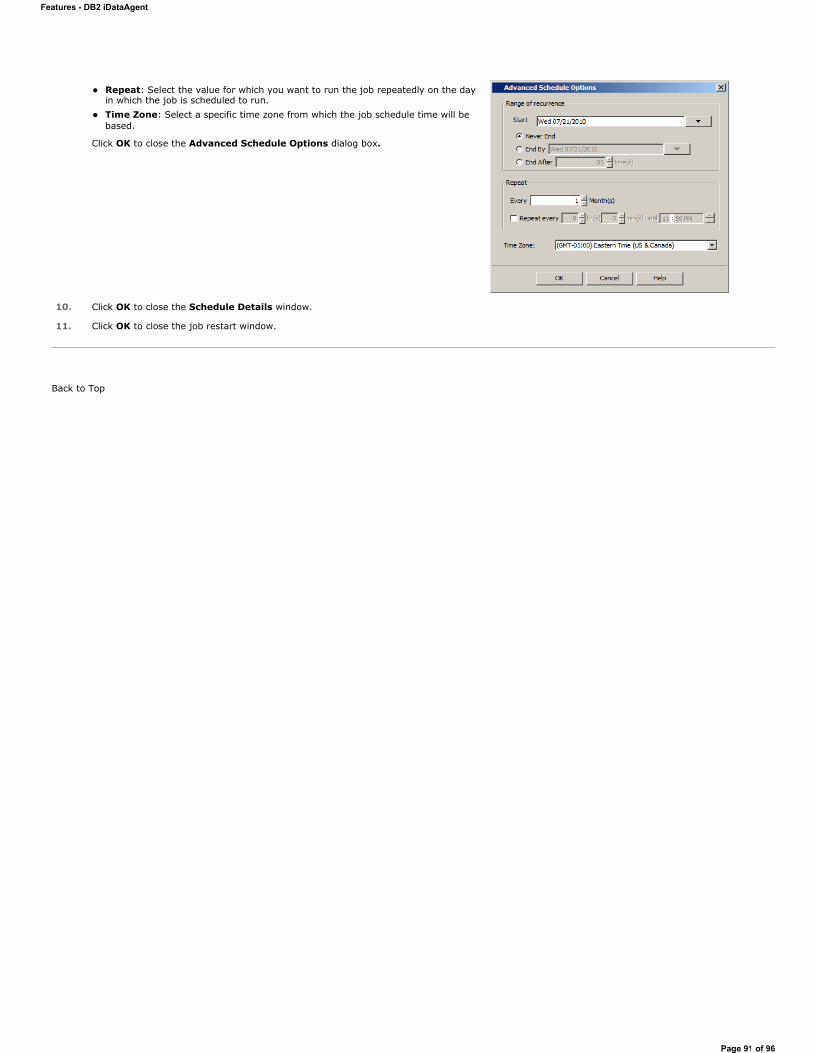
Back to Top
Repeat: Select the value for which you want to run the job repeatedly on the day in which the job is scheduled to run. Time Zone: Select a specific time zone from which the job schedule time will be based.
Click OK to close the Advanced Schedule Options dialog box.
10. Click OK to close the Schedule Details window.
11. Click OK to close the job restart window.
Features - DB2 iDataAgent
Page 91 of 96
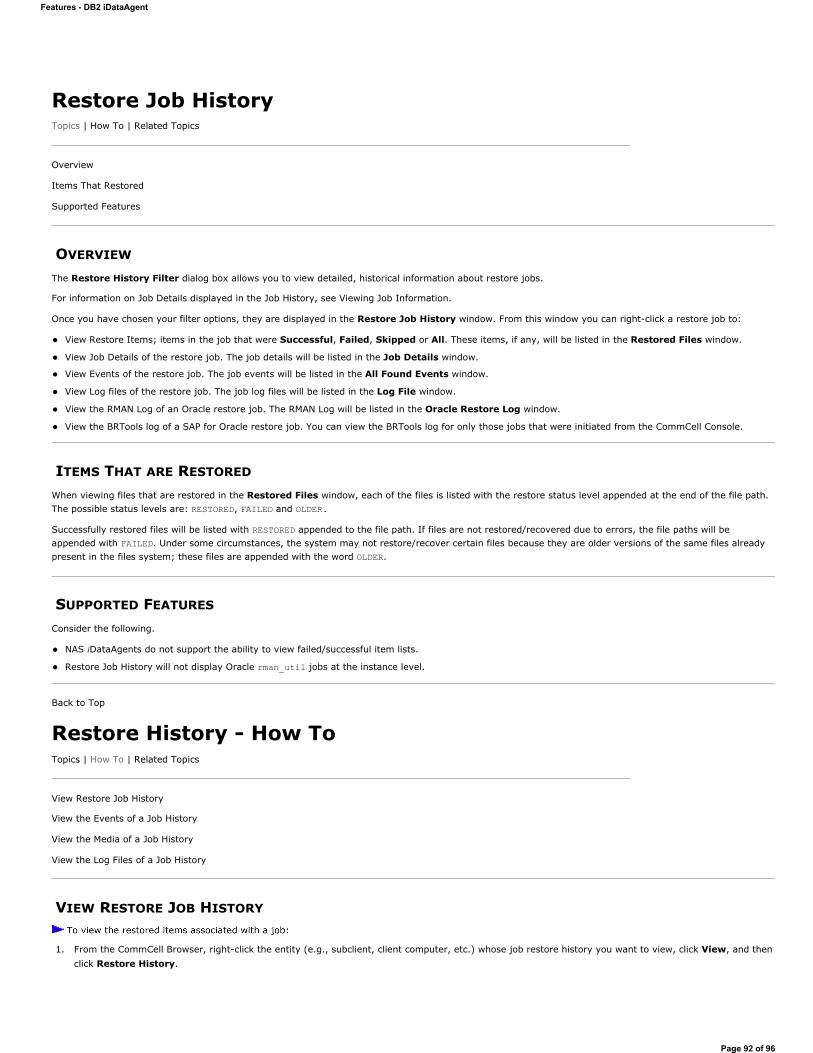
Restore Job HistoryTopics | How To | Related Topics
Overview
Items That Restored
Supported Features
OVERVIEW
The Restore History Filter dialog box allows you to view detailed, historical information about restore jobs.
For information on Job Details displayed in the Job History, see Viewing Job Information.
Once you have chosen your filter options, they are displayed in the Restore Job History window. From this window you can right-click a restore job to:
View Restore Items; items in the job that were Successful, Failed, Skipped or All. These items, if any, will be listed in the Restored Files window.
View Job Details of the restore job. The job details will be listed in the Job Details window.
View Events of the restore job. The job events will be listed in the All Found Events window.
View Log files of the restore job. The job log files will be listed in the Log File window.
View the RMAN Log of an Oracle restore job. The RMAN Log will be listed in the Oracle Restore Log window.
View the BRTools log of a SAP for Oracle restore job. You can view the BRTools log for only those jobs that were initiated from the CommCell Console.
ITEMS THAT ARE RESTORED
When viewing files that are restored in the Restored Files window, each of the files is listed with the restore status level appended at the end of the file path. The possible status levels are: RESTORED, FAILED and OLDER.
Successfully restored files will be listed with RESTORED appended to the file path. If files are not restored/recovered due to errors, the file paths will be appended with FAILED. Under some circumstances, the system may not restore/recover certain files because they are older versions of the same files already present in the files system; these files are appended with the word OLDER.
SUPPORTED FEATURES
Consider the following.
NAS iDataAgents do not support the ability to view failed/successful item lists.
Restore Job History will not display Oracle rman_util jobs at the instance level.
Back to Top
Restore History - How ToTopics | How To | Related Topics
View Restore Job History
View the Events of a Job History
View the Media of a Job History
View the Log Files of a Job History
VIEW RESTORE JOB HISTORY
1. From the CommCell Browser, right-click the entity (e.g., subclient, client computer, etc.) whose job restore history you want to view, click View, and then click Restore History.
Features - DB2 iDataAgent
Page 92 of 96
2. From the Job History filter window, select the filter options, if any, that you want to apply, and then click OK.
3. From the Job History window, right-click the job whose restored items you want to view; click View Restore Items, and select from the type of items to view: Successful, Failed, Skipped or All.
4. The Restored Files window will display the selected type of restored items for the job.
5. Click OK.
VIEW THE EVENTS OF A JOB HISTORY
Required Capability: See Capabilities and Permitted Actions
1. From the CommCell Browser, right-click the entity (e.g., subclient, client computer, etc.) whose job history you want to view, click View, and then click Job History.
2. From the Job History Filter dialog box, select the filter options that you want to apply and click OK.
3. From the Data Management Job History window, right-click the job whose job details you want to view, and then click View Events.
4. The All Found Events window gets displayed. If no events where found for the back up, a message is displayed to that effect.
5. Click Close.
VIEW THE MEDIA OR MOUNT PATHS OF A JOB HISTORY
1. From the CommCell Browser, right-click the entity (e.g., subclient, client computer, etc.) whose job history you want to view, click View, and then select the appropriate history.
2. From the Job History window select the filter options, if any, that you want to apply, and then click OK.
3. From the job history widow, right-click the backup whose media or mount paths you want to view, and then click View Media.
4. The Media Used By Job ID window displays a list of media or mount paths used by the operation.
5. Click OK.
VIEW THE LOG FILES OF A JOB HISTORY
Required Capability: See Capabilities and Permitted Actions
1. From the CommCell Browser, right-click the entity whose job history you want to view, and then click to view a job history.
2. From the job history filter window select the filter options, if any, that you want to apply, and then click OK.
3. From the job history window, right-click the job whose log files you want to view, and then click View Logs.
4. The contents of the log file related to the selected job history are displayed in the Log File for Job n window.
Back to Top
Features - DB2 iDataAgent
Page 93 of 96
Frequently Asked Questions - DB2What Database Parameters Do You Need to Configure to Manage DB2 Archive Logs?
How Do the Logs Get Archived and Managed in Simpana?
How is a Log Backup Scheduled?
Is it Possible to Backup the Logs Directly to the Media?
Can I Perform DB2 Database Backups as a User with No Operating System Password?
Why Do We See Log Restore Jobs during Online Database FULL backup?
When do I have to take a Full Offline Backup for Successful Data Protection Operations using Simpana?
How Can I List My DB2 Database Backups and Log Backups?
Can We Protect Data on Non-Global Zones if the File System iDataAgent is Installed Only on the Global Zone?
How Do We protect DB2 Data on a Non-Global Zone?
How are Command Line Backup Images Displayed in the CommCell Console?
What are the Folders/Files Created and Changes Done During Install of this Agent?
Do We Need to Create a Common User Group on a Unix Client Computer that has Multiple Database Applications Residing on it?
What do I do when my DB2 V10 Online GUI backup fails because the specified DB2 configuration parameter is discontinued?
Can We Use USER EXIT method instead of LOGARCHMETH1vendor method to Backup DB2 Log Files?
WHAT DATABASE PARAMETERS DO YOU NEED TO CONFIGURE TO MANAGE DB2 ARCHIVE LOGS?You need to configure the LOGARCHMETH1 and LOGARCHOPT1 parameters to manage DB2 Archive Logs using Simpana VENDOR Library interface.
db2 update db cfg for sample using LOGARCHMETH1 "VENDOR:/opt/Simpana/Base64/libDb2Sbt.so"db2 update db cfg for sample using LOGARCHOPT1 "'CvClientName=<db2client>,CvInstanceName=Instance001'"
HOW DO THE LOGS GET ARCHIVED AND MANAGED IN SIMPANA?
a. When an online log is full, DB2 requests Simpana VENDOR Library API to archive the logs.
b. By default, Simpana archives the logs in ARCHIVE_PATH specified during Simpana installation.
c. The logs will be moved to media when Logs backup is scheduled from CommCell console or when the number of Logs in Archive Path exceed the configured threshold.
d. ARCHIVE PATH can be configured using sDB2_ARCHIVE_PATH registry key.
HOW IS A LOG BACKUP SCHEDULED?A new subclient (Logs only) needs to be created for each DB2 database and schedule backup for every nn hours. The frequency depends upon the transactional activity on the database.
IS IT POSSIBLE TO BACKUP THE LOGS DIRECTLY TO THE MEDIA?
Simpana copies the archive logs to ARCHIVE Path to efficiently utilize the Media resources. The Logs are then backed up to media.
It is possible to backup the logs directly to the media without copying to archive log path. You need to set sDb2ThresholdALFN registry key to 1.
CAN I PERFORM DB2 DATABASE BACKUPS AS A USER WITH NO OPERATING SYSTEM PASSWORD?Yes. Update-46055(db2PasswordLessUser) provided with the service pack 11a allows you to successfully perform your DB2 database backups as a password less Operating System user. However, this Update is applicable only for Unix based DB2 backups.
WHY DO WE SEE LOG RESTORE JOBS DURING ONLINE DATABASE FULL BACKUP?DB2 includes all transaction logs that are required to make the full Backup image consistent into the same backup image. If transaction is spread across many logs and the logs are already archived to media, DB2 sends a request to restore them to storage manager. We could see all the restore jobs during Online FULL backup due to this reason.
Use db2pd to determine what transaction is holding up the log.
You should also review MAX_LOG and NUM_LOG_SPAN parametres and set correct value to prevent this from occurring
WHEN DO I HAVE TO TAKE A FULL OFFLINE BACKUP FOR SUCCESSFUL DATA PROTECTION OPERATIONS USING SIMPANA?When a database is in a roll forward recovery mode for the first time (i.e., when the LOGARCHMETH1 parameter value is set to either LOGRETAIN, USEREXIT,
Features - DB2 iDataAgent
Page 94 of 96
DISK, TSM, or VENDOR), perform a full offline backup for the database. In case of a HADR setup, perform the full offline backup on the primary database.
HOW CAN I LIST MY DB2 DATABASE BACKUPS AND LOG BACKUPS? Yes. The query for database backups is as follows:
qoperation execscript -sn QS_querydb2backup -si '<Clientname>' -si '<InstanceName>' -si '<DB2DatabaseName>' -si '<DATA>'QScript[QS_querydb2backup] CS[CSName] DB[CommServ] SP[QS_querydb2backup]Qscript Output:
jobId bkupLevel timeStamp streams----- --------- --------- -------152519 Full 20121218111407 1152333 Full 20121217180223 1152332 Full 20121217180009 1
The query for log backups is as follows:
qoperation execscript -sn QS_querydb2backup -si '<Clientname>' -si '<InstanceName>' -si '<DB2DatabaseName>' -si '<LOGS>'QScript[QS_querydb2backup] CS[CSName] DB[CommServ] SP[QS_querydb2backup]
Qscript Output:
jobId nodeNumber chainNumber firstLogNumber lastLogNumber firstLogTime lastLogTime----- ---------- ----------- -------------- ------------- ------------ -----------152988 NODE0000 C0000000 28 28 2012-12-19 18:32:48.000 2012-12-19 18:32:48.000152987 NODE0000 C0000000 27 27 2012-12-19 18:32:00.000 2012-12-19 18:32:00.000152973 NODE0000 C0000000 26 26 2012-12-19 17:38:17.000 2012-12-19 17:38:17.000152972 NODE0000 C0000000 25 25 2012-12-19 17:37:17.000 2012-12-19 17:37:17.000152969 NODE0000 C0000000 24 24 2012-12-19 17:33:07.000 2012-12-19 17:33:07.000152968 NODE0000 C0000000 23 23 2012-12-19 17:31:57.000 2012-12-19 17:31:57.000152796 NODE0000 C0000000 13 17 2012-12-19 02:40:03.000 2012-12-19 02:41:05.000152795 NODE0000 C0000000 0 12 2012-12-07 18:15:53.000 2012-12-19 02:38:44.000152650 NODE0000 C0000000 11 11 2012-12-18 21:22:11.000 2012-12-18 21:22:11.000152649 NODE0000 C0000000 10 10 2012-12-18 21:19:58.000 2012-12-18 21:19:58.000152638 NODE0000 C0000000 9 9 2012-12-18 20:40:06.000 2012-12-18 20:40:06.000152520 NODE0000 C0000000 8 8 2012-12-18 17:15:48.000 2012-12-18 17:15:48.000
You need to execute the parameters in same sequence as mentioned in the above commands.
CAN WE PROTECT DATA ON NON-GLOBAL ZONES IF THE FILE SYSTEM IDATAAGENT IS INSTALLED ONLY ON THE GLOBAL ZONE?Yes. We can protect file system data on non-global zones if the File System iDataAgent is installed only on the global zone. However, in order to enable consistent backups of application specific data on the non-global zones, you will need to install the corresponding application specific iDataAgent on the non-global zone.
HOW DO WE PROTECT DB2 DATA ON A NON-GLOBAL ZONE?
In order to enable consistent backups of DB2 data on a non-global zone, you need to install the DB2 iDataAgent on the non-global zone.
HOW ARE COMMAND LINE BACKUP IMAGES DISPLAYED IN THE COMMCELL CONSOLE?
When you run DB2 command line offline/online backup jobs, the backup image is always displayed as online in the CommCell Console.
WHAT ARE THE FOLDERS/FILES CREATED AND CHANGES DONE DURING INSTALL OF THIS AGENT?
WHAT DO I DO WHEN MY DB2 V10 ONLINE GUI BACKUP FAILS BECAUSE THE SPECIFIED DB2 CONFIGURATION PARAMETER IS DISCONTINUED?
PLATFORMS FOLDERS CREATED FILES CREATED OTHER CHANGES
Linux None None Symbolic links to Galaxy libraries under $DB2_HOME/sqllib/lib directory
Solaris None None Symbolic links to Galaxy libraries under $DB2_HOME/sqllib/lib directory
AIX None None Symbolic links to Galaxy libraries under $DB2_HOME/sqllib/lib directory
Features - DB2 iDataAgent
Page 95 of 96
If you upgraded DB2 V9 to V10 or are using DB2 V10 in R90 with Service Pack 8 or lower, you need to install Service Pack 9.
In DB2 V10 and higher, database configurations parameters (LOGRETAIN & USEREXIT) have been replaced with LOGARCHMETH1. You need to install SP9 in order to support DB2 V10 and higher.
CAN WE USE USER EXIT METHOD INSTEAD OF LOGARCHMETH1 VENDOR METHOD TO BACKUP DB2 LOG FILES?
Yes. You can use use USER EXIT method instead of LOGARCHMETH1 Vendor method to backup DB2 log files. However, this method is not commonly used and hence is deprecated.
Use the following steps to set the required parameters:
1. From the DB2 Console, type the command to set the USEREXIT parameter. db2 update database configuration for <database name> using USEREXIT on
2. Run Db2_install.sh from the following location:
<install path>/iDataAgent/Example:
/opt/Simpana/iDataAgent>./Db2_install.sh
Features - DB2 iDataAgent
Page 96 of 96