features - srm oracle agent - commvault · features - srm oracle agent table of contents overview...
TRANSCRIPT

Features - SRM Oracle Agent
TABLE OF CONTENTS
OVERVIEW
SYSTEM REQUIREMENTS - SRM ORACLE AGENT
INSTALLATION
Install the SRM Oracle Agent
CONFIGURATION
SRM Data Collection
SRM ORACLE AGENT SUMMARIES
SRM ORACLE REPORTS
MANAGEMENT
Admin Job History
Data Collection Job History
Features - SRM Oracle Agent
Page 1 of 39

Overview - SRM Oracle AgentTopics | Related Topics
Introduction
Supported Job Types for Data Collection
Discovery Job
Discovery and Analysis Job
Tree Level in SRM Oracle Agent
Configuration Considerations
License Requirement
INTRODUCTION
The SRM Oracle Agent gathers statistics on all levels of the Oracle Database.
Data collected by the SRM Oracle Agent is summarized by many types of reports that may be further customized with user-selected filters and charts in the Report Manager.
For the SRM Oracle Agent, the agent software is installed on a proxy client. For more information on installing the proxy client, see Deployment - SRM Oracle Agent. Once the installation is complete, the agent and the oracle database information must be configured from the client level in the CommCell Console. For step-by-step instructions see, Add Oracle Database.
SUPPORTED JOB TYPES FOR DATA COLLECTION
This agent supports two job types for data collection:
Discovery
Discovery and Analysis
DISCOVERY JOBThis job collects detailed statistics including information about databases, datafiles, tables, tablespaces, instances, users, ASM and RMAN; general information about indexes is also collected. Collections using the Discovery level job require minimal processing on the proxy server, and may be run either throughout the day or during off-peak hours. If you use the Discovery level job, you will not receive the same degree of detail on index related reports as the Analysis level template.
DISCOVERY AND ANALYSIS JOBThis job collects detailed statistics including information about databases, datafiles, tables, tablespaces, indexes, instances, users, ASM and RMAN. Collections using the Analysis level job for this agent require minimal processing on the proxy server, similar to the Discovery level job, and may be run either throughout the day or during off-peak hours.
See Reports - SRM Oracle Agent for more information about which reports require Analysis level data collection.
TREE LEVEL IN SRM ORACLE AGENT
When the SRM Oracle Agent is installed, the following levels are automatically created in the CommCell Browser.
Features - SRM Oracle Agent
Page 2 of 39
CONFIGURATION CONSIDERATIONS
Consider the following configuration requirements prior to using the SRM Oracle Agent:
For Oracle Databases running on Windows platforms, the SRM Oracle Agent can be installed directly on the computer running the Oracle Database or can function as a proxy Agent and be installed on a separate computer; in either event, the computer it is installed on must be running one of the operating systems listed in System Requirements - SRM Oracle Agent.
For Oracle Databases running on UNIX platforms, the SRM Oracle Agent functions as a proxy Agent and must be installed on a separate computer running one of the proxy Agent operating systems listed in System Requirements - SRM Oracle Agent.
Logical/physical device mapping for Oracle databases will only be accurate after you have run data collection jobs using both the SRM Agent for the Oracle Database and the SRM Windows File System Agent.
The logical/physical mapping of Oracle databases on UNIX raw volumes or with ASM (Automatic Storage Management) will be reported only by Windows and Red Hat Linux.
See Best Practices for Oracle to ensure that everything is set up properly before running Data Collection jobs for this agent.
See Oracle logical/physical device view not working to identify and avoid common configuration issues.
LICENSE REQUIREMENT
To perform a data collection operation using this Agent, you need a SRM Oracle Agent license, available in the SRM server. The license is consumed when this component is configured on the client computer. See License Administration for more details on license requirements.
Back to Top
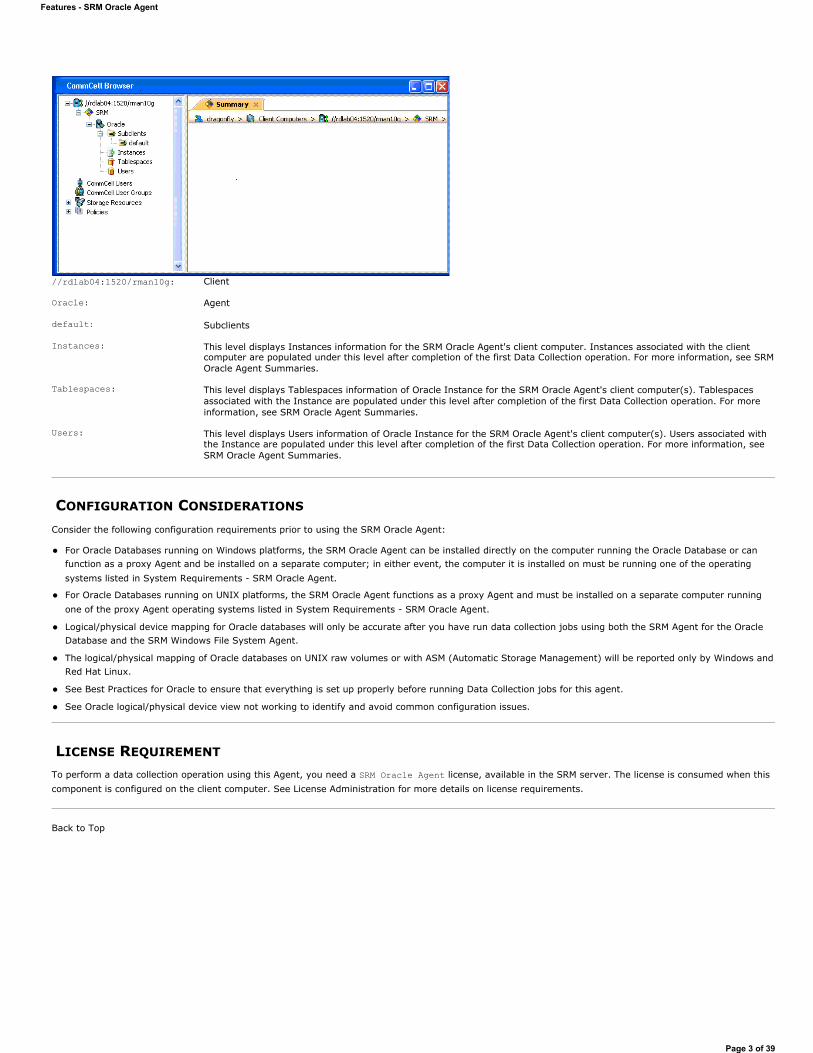
//rdlab04:1520/rman10g: Client
Oracle: Agent
default: Subclients
Instances: This level displays Instances information for the SRM Oracle Agent's client computer. Instances associated with the client computer are populated under this level after completion of the first Data Collection operation. For more information, see SRM Oracle Agent Summaries.
Tablespaces: This level displays Tablespaces information of Oracle Instance for the SRM Oracle Agent's client computer(s). Tablespaces associated with the Instance are populated under this level after completion of the first Data Collection operation. For more information, see SRM Oracle Agent Summaries.
Users: This level displays Users information of Oracle Instance for the SRM Oracle Agent's client computer(s). Users associated with the Instance are populated under this level after completion of the first Data Collection operation. For more information, see SRM Oracle Agent Summaries.
Features - SRM Oracle Agent
Page 3 of 39

System Requirements - SRM Oracle Agent
The SRM Oracle Agent can be installed on a computer that can access the Oracle database for which you wish to perform data collection. The following requirements are for the SRM Oracle Agent.
CLUSTER - SUPPORT
The software can be installed on a Cluster if clustering is supported by the above-mentioned operating systems.
For information on supported cluster types, see Clustering - Support.
System Requirements Supported Features
OPERATING SYSTEM
WINDOWS SERVER 2008Microsoft Windows Server 2008 x64 Editions*
*Core and R2 Editions not supported
WINDOWS SERVER 2003Microsoft Windows Server 2003 32-bit and x64 Editions with a minimum of Service Pack 1
HARD DRIVE
124 MB minimum of hard disk space for software/ 148 MB recommended
50 MB of additional hard disk space for log file growth
754 MB of temp space required for install or upgrade (where the temp folder resides)
MEMORY32 MB RAM minimum required beyond the requirements of the operating system and running applications
PROCESSORAll Windows-compatible processors supported
ORACLE VERSIONSData can be collected from the following Oracle databases installed on any operating system supported by the respective database(s):
Oracle 10g (10.1.x) Database 32-bit and 64-bit (Enterprise or Standard Edition)
Oracle 10g (10.1.x) RAC Database 32-bit and 64-bit (Enterprise or Standard Edition)
Oracle 10g R2 (10.2.x) Database 32-bit and 64-bit (Enterprise or Standard Edition)
Oracle 11g (11.1.0.6.0) Database 32-bit and 64-bit (Enterprise or Standard Edition)
PERIPHERALSDVD-ROM drive
Network Interface Card
MISCELLANEOUS
NETWORKTCP/IP Services configured on the computer.These requirements are in addition to the disk requirements set for the operating system.
.NET FRAMEWORK
.NET Framework 2.0 is automatically installed. Note that .NET Framework 2.0 can co-exist with other versions of this software.
Features - SRM Oracle Agent
Page 4 of 39

DISCLAIMER
Minor revisions and/or service packs that are released by application and operating system vendors are supported by our software but may not be individually listed in our System Requirements. We will provide information on any known caveat for the revisions and/or service packs. In some cases, these revisions and/or service packs affect the working of our software. Changes to the behavior of our software resulting from an application or operating system revision/service pack may be beyond our control. The older releases of our software may not support the platforms supported in the current release. However, we will make every effort to correct the behavior in the current or future releases when necessary. Please contact your Software Provider for any problem with a specific application or operating system.
Additional considerations regarding minimum requirements and End of Life policies from application and operating system vendors are also applicable
MICROSOFT VISUAL C++Microsoft Visual C++ 2008 Redistributable Package is automatically installed. Note that Visual C++ 2008 Redistributable Package can co-exist with other versions of this software.
Features - SRM Oracle Agent
Page 5 of 39

Install the SRM Oracle AgentTABLE OF CONTENTS
Install Requirements
Before You Begin
Install ProcedureGetting StartedCluster SelectionSelect Components for InstallationConfiguration of Other Installation OptionsClient Group SelectionSchedule Automatic UpdateVerify Summary of Install OptionsInstall Remaining Cluster NodesSetup Complete
Post-Install Considerations
INSTALL REQUIREMENTS
The following procedure describes the steps involved in installing the SRM Oracle Agent software on both clustered and non-clustered environment.
The SRM Oracle Agent is installed on the computer from which the Agent collects data for reporting purposes. (This computer is referred to as the Clientcomputer in this install procedure.)
SRM Agent for Oracle - For Oracle Database on Windows, the agent software can be installed either directly on the Oracle Database computer or can be installed as a proxy Agent on a separate computer running a supported Windows platform. For Oracle Database on UNIX, the agent software must be installed as a proxy Agent on a separate computer for supported Windows platforms.
Verify that the computer in which you wish to install the software satisfies the minimum requirements specified in System Requirements - SRM Oracle Agent.
Review the following Install Requirements before installing the software:
GENERALAgents should be installed only after the CommServe and SRM Server has been installed in the CommCell. Also, keep in mind that the CommServe and SRM Server must be installed and running (on the same computer), before you can install the Agent. Close all applications and disable any programs that run automatically, including anti-virus, screen savers and operating system utilities. Some of the programs, including many anti-virus programs, may be running as a service. Stop and disable such services before you begin. You can re-enable them after the installation. Ensure there is an available license on the CommServe for the Agent. Verify that you have the software installation disc that is appropriate to the destination computer’s operating system.
Make sure that you have the latest software installation disc before you start to install the software. If you are not sure, contact your software provider.
CLUSTERIn the clustered environment, the SRM Oracle Agent can be installed from the active node in the cluster group using the following procedure. The software can also be automatically installed on all available passive nodes when the software is installed in the cluster group, or you can choose to install any passive node(s) separately.
Check the following on the cluster computer in which you wish to install the software:
Cluster software is installed and running. Active and passive nodes are available. Disk array devices configured with access to the shared array. Public Network Interface Card is bound first, before the private Network Interface Card. (Does not apply to NetWare Cluster.)
BEFORE YOU BEGIN
Log on to the client as local Administrator or as a member of the Administrators group on that computer.
On a clustered computer, ensure that you are logged on to the active node as the Domain User with administrative privileges to all nodes on the cluster.
INSTALL PROCEDURE
GETTING STARTED
1. Place the Software Installation Disc for the Windows platform into the disc drive.
Features - SRM Oracle Agent
Page 6 of 39

After a few seconds, the installation program is launched.
If the installation program does not launch automatically:
Click the Start button on the Windows task bar, and then click Run. Browse to the installation disc drive, select Setup.exe, click Open, then click OK.
NOTES
If you are installing on Windows Server Core editions, mount to Software Installation Disc through command line, go to the AMD64 folder and run Setup.exe.
2. Choose the language you want to use during installation. Click the down arrow and select the desired language from the drop-down list, and click Next to continue.
3. Select the option to install software on this computer.
NOTES
The options that appear on this screen depend on the computer in which the software is being installed.
4. Read the license agreement, then select I accept the terms in the license agreement.
Click Next to continue.
CLUSTER SELECTIONIf you are installing in clustered environment, follow the steps below. For non-clustered environment, skip to Select Components for Installation.
5. Select Configure a Virtual Server.
Click Next to continue.
Features - SRM Oracle Agent
Page 7 of 39

6. Select the disk group in which the cluster group resides.
Click Next to continue.
SELECT COMPONENTS FOR INSTALLATION7. Select the component(s) to install.
NOTES
Your screen may look different from the example shown. Components that either have already been installed, or which cannot be installed, will be dimmed. Hover over the component for additional details. If you wish to install the agent software for restore only, select Install Agents for Restore Only checkbox. See Installing Restore Only Agents for more information. The Special Registry Keys In Use field will be highlighted when GalaxyInstallerFlags registry key is enabled. Move the mouse pointer over this field to see a list of registry keys that have been created in this computer.
Click Next to continue.
To install the SRM Oracle Agent, expand the SRM folder and then select SRM Oracle Agent.
CONFIGURATION OF OTHER INSTALLATION OPTIONS8. If this computer and the CommServe is separated by a firewall, select the Configure
firewall services option and then click Next to continue.
For firewall options and configuration instructions, see Firewall Configuration and continue with the installation.
If firewall configuration is not required, click Next to continue.
9. Enter the fully qualified domain name of the CommServe Host Name. This should be TCP/IP network name. e.g., computer.company.com.
NOTES
Features - SRM Oracle Agent
Page 8 of 39

The CommServe client name is the name of the computer. This field is automatically populated. Do not use space and the following characters when specifying a new name for the CommServe Host Name:
\|`~!@#$%^&*()+=<>/?,[]{}:;'"
If a computer has already been installed, this screen will not be displayed; instead the installer will use the same Server Name as previously specified. If you do not specify the CommServe Host Name, a window will be prompted to continue in decouple mode. Click Yes to continue to Decoupled Install. Click No to specify a CommServe Name and continue with the installation.
Click Next to continue.
10. Enter the username and password associated with an external domain user account or a CommCell user account to authorize the installation of this agent.
NOTES
This window will be displayed when the Require Authentication for AgentInstallation option is selected in the CommCell Properties. For more information, see Authentication for Agent Installs.
Click Next to continue.
11. Enter the following: The local (NetBIOS) name of the client computer. The TCP/IP IP host name of the NIC that the client computer must use to communicate with the CommServe Server.
NOTES
Do not use spaces when specifying a new name for the Client. The default network interface name of the client computer is displayed if the computer has only one network interface. If the computer has multiple network interfaces, enter the interface name that is preferred for communication with the CommServe Server. If a component has already been installed, this screen will not be displayed; instead, the install program will use the same name as previously specified.
Click Next to continue.
12. Select Add programs to the Windows Firewall Exclusion List, if you wish to add CommCell programs and services to the Windows Firewall Exclusion List.
NOTES:
If Windows Firewall is enabled on the computer, this option is selected by default and must be enabled to proceed with the installation.
If Windows Firewall is disabled on the computer, you can select this option to add the programs and services to enabled CommCell operations across the firewall, if the firewall is enabled at a later time.
You can either select this option during install or add the programs and services after installation. For adding the programs and services after installation, see Configure Windows Firewall to Allow CommCell Communication.
Click Next to continue.
13. Specify the location where you want to install the software.
NOTES
Do not install the software to a mapped network drive. Do not use the following characters when specifying the destination path: / : * ? " < > | #It is recommended that you use alphanumeric characters only. If you intend to install other components on this computer, the selected installation directory will be automatically used for that software as well.
Features - SRM Oracle Agent
Page 9 of 39
If a component is already installed in this computer, this screen may not be displayed. The software will be automatically installed in the same location that was previously specified.
Click Browse to change directories.
Click Next to continue.
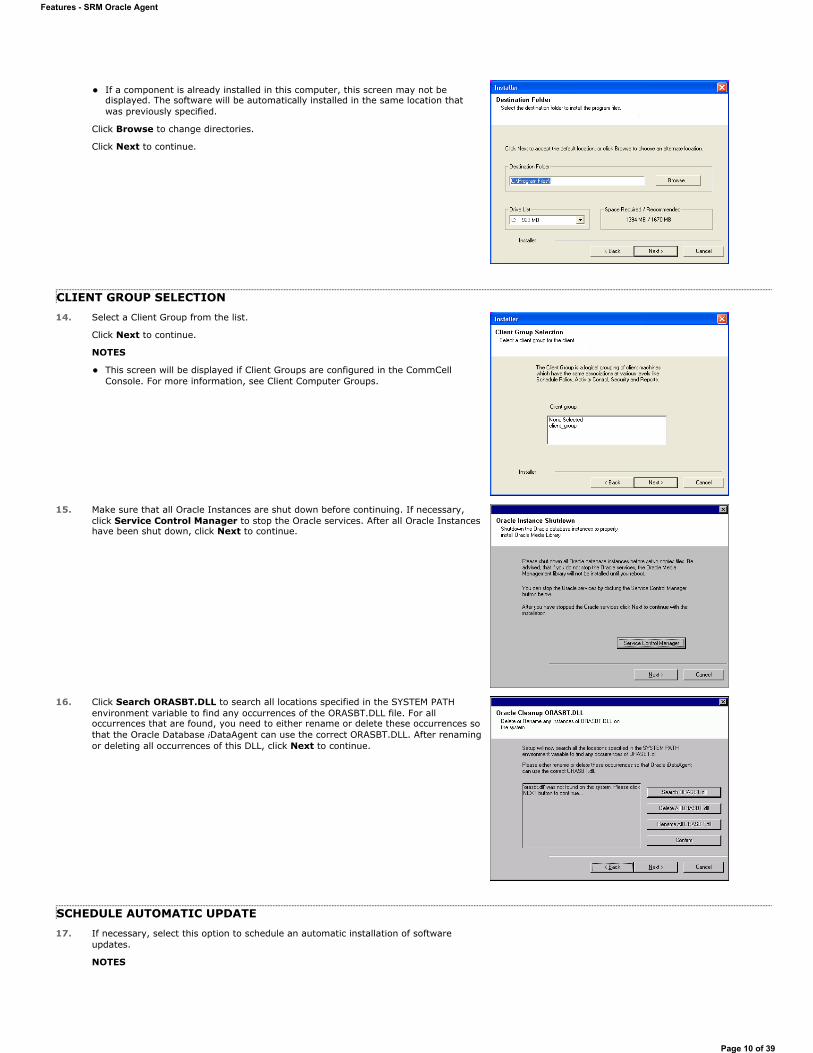
CLIENT GROUP SELECTION14. Select a Client Group from the list.
Click Next to continue.
NOTES
This screen will be displayed if Client Groups are configured in the CommCell Console. For more information, see Client Computer Groups.
15. Make sure that all Oracle Instances are shut down before continuing. If necessary, click Service Control Manager to stop the Oracle services. After all Oracle Instances have been shut down, click Next to continue.
16. Click Search ORASBT.DLL to search all locations specified in the SYSTEM PATH environment variable to find any occurrences of the ORASBT.DLL file. For all occurrences that are found, you need to either rename or delete these occurrences so that the Oracle Database iDataAgent can use the correct ORASBT.DLL. After renaming or deleting all occurrences of this DLL, click Next to continue.
SCHEDULE AUTOMATIC UPDATE17. If necessary, select this option to schedule an automatic installation of software
updates.
NOTES
Features - SRM Oracle Agent
Page 10 of 39

Schedule Install of Automatic Updates allows automatic installation of the necessary software updates on the computer on a single or weekly basis. If you do not select this option, you can schedule these updates later from the CommCell Console. To avoid conflict, do not schedule the automatic installation of software updates to occur at the same time as the automatic FTP downloading of software updates.
If a component has already been installed, this screen will not be displayed; instead, the installer will use the same option as previously specified.
Click Next to continue.
VERIFY SUMMARY OF INSTALL OPTIONS18. Verify the summary of selected options.
NOTES
The Summary on your screen should reflect the components you selected for install, and may look different from the example shown.
Click Next to continue or Back to change any of the options.
The install program now starts copying the software to the computer. This step may take several minutes to complete.
19. The System Reboot message may be displayed. If so, select one of the following: Reboot NowIf this option is displayed without the Skip Reboot option, the install program has found files required by the software that are in use and need to be replaced. If Reboot Now is displayed without the Skip Reboot option, reboot the computer at this point. The install program will automatically continue after the reboot. Exit SetupIf you want to exit the install program, click Exit Setup.
INSTALL REMAINING CLUSTER NODESIf you are installing in clustered environment, follow the steps below to install on remaining nodes of the cluster. For non-clustered environment, skip to Setup Complete.
20. To install/upgrade the software on the remaining nodes of the cluster, click Yes.
To complete the install for this node only, click No.
21. Select cluster nodes from the Preferred Nodes list and click the arrow button to move them to the Selected Nodes list.
NOTES
The list of Preferred Nodes displays all the nodes found in the cluster; from this list you should only select cluster nodes configured to host this cluster group server. Do not select nodes that already have multiple instances installed. For more information, see Multi Instancing.
When you have completed your selections, click Next to continue.
Features - SRM Oracle Agent
Page 11 of 39

22. Type the User Name and Password for the Domain Administrator account, so that the installer can perform the remote install/upgrade of the cluster nodes you selected in the previous step.
Click Next to continue.
23. The progress of the remote install for the cluster nodes is displayed; the install can be interrupted if necessary.
Click Stop to prevent installation to any nodes after the current ones complete.
Click Advanced Settings to specify any of the following:
Maximum number of nodes on which Setup can run simultaneously. Time allocated for Setup to begin executing on each node, after which the install attempt will fail. Time allocated for Setup to complete on each node, after which the install attempt will fail.
NOTES
If, during the remote install of a cluster node, setup fails to complete or is interrupted, you must perform a local install on that node. When you do, the install begins from where it left off, or from the beginning if necessary. For procedures, see Manually Installing the Software on a Passive Node.
24. Read the summary for remote installation to verify that all selected nodes were installed successfully.
NOTES
If any node installation fails, you must manually install the software on that node once the current installation is complete. (See Manually Installing the Software on a Passive Node for step-by-step instructions.) The message displayed on your screen will reflect the status of the selected nodes, and may look different from the example.
Click Next to continue.
Features - SRM Oracle Agent
Page 12 of 39
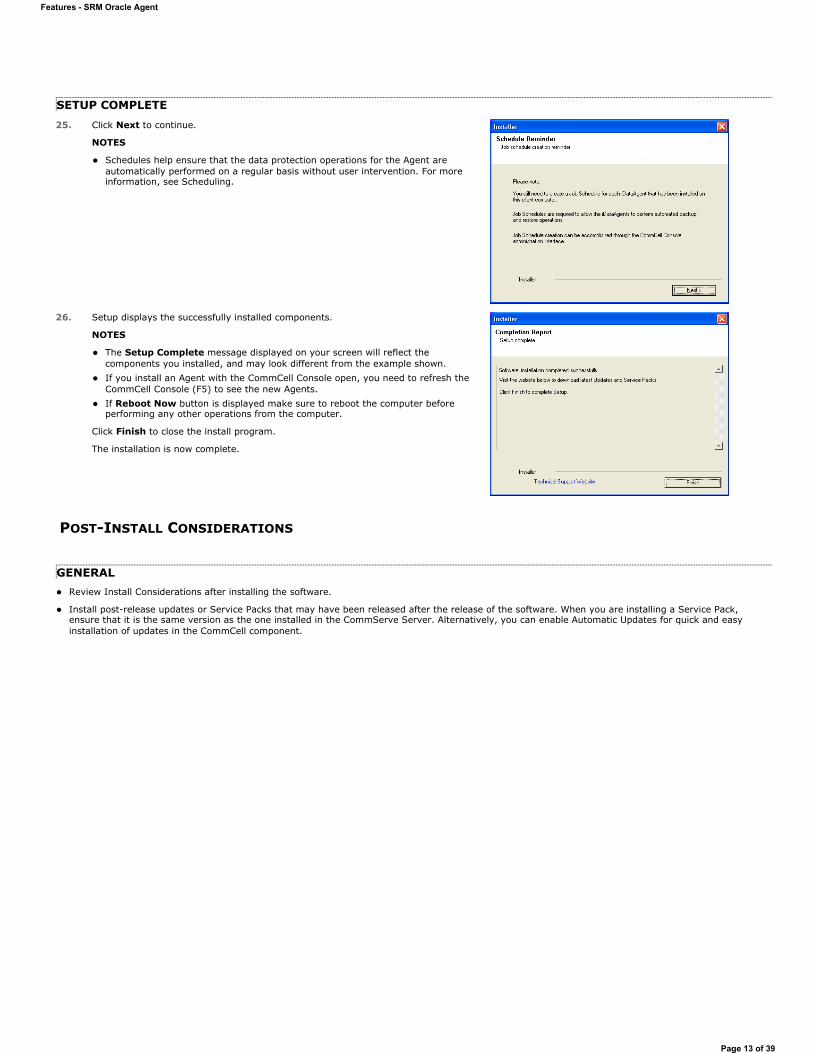
SETUP COMPLETE25. Click Next to continue.
NOTES
Schedules help ensure that the data protection operations for the Agent are automatically performed on a regular basis without user intervention. For more information, see Scheduling.
26. Setup displays the successfully installed components.
NOTES
The Setup Complete message displayed on your screen will reflect the components you installed, and may look different from the example shown. If you install an Agent with the CommCell Console open, you need to refresh the CommCell Console (F5) to see the new Agents. If Reboot Now button is displayed make sure to reboot the computer before performing any other operations from the computer.
Click Finish to close the install program.
The installation is now complete.
POST-INSTALL CONSIDERATIONS
GENERALReview Install Considerations after installing the software.
Install post-release updates or Service Packs that may have been released after the release of the software. When you are installing a Service Pack, ensure that it is the same version as the one installed in the CommServe Server. Alternatively, you can enable Automatic Updates for quick and easy installation of updates in the CommCell component.
Features - SRM Oracle Agent
Page 13 of 39

SRM Data CollectionTopics | How To | Troubleshoot | Related Topics
Overview
Scheduling Data Collection jobs
Considerations
Best Practices
Solaris
NAS
Enabling Reverse Lookup
SharePoint
Oracle
OVERVIEW
After installing the SRM Server, the SRM Agent software must be installed on your selected client computers before you can collect data from them. When data collection is performed, this information populates the SQL database on the SRM Server's repository with current statistics, for the purpose of generating summaries and reports.
When you configure data collection for a client, from the SRM node you have the options of choosing which Agent(s) to use (if more than one is available on the client), the type of data collection to be performed (determined by selecting either an Analysis or Discovery Job Type), a Schedule Policy, and a start date. You can exclude volumes and directories from the data collection process for Subclients filters. You can also balance the collection load across different subclients, each with a different schedule policy.
Data collection jobs run automatically according to the parameters you have selected, and will appear in the Job Controller as a scheduled job. The system can also be configured to generate advisories, a brief text message describing an actual or potential problem and the suggested corrective action.
Reports and SRM Summaries viewed through the console are generated from the data collected and stored on the SRM Server. Schedule your first reports to run after your first data collection jobs have completed. Note that data collection and Report Generation jobs are scheduled independently, at different times and intervals. Thus, you can, for example, collect data nightly, hourly, or on-demand, but generate reports only once per week if desired.
SCHEDULING DATA COLLECTION JOBS
Data Collection jobs can be scheduled to regularly collect data at specified intervals. Data Collection jobs can be scheduled from the SRM agent level in the CommCell Browser. In addition, Analysis Data Collection jobs can be scheduled for the individual subclients at the subclient level. When the Data Collection job is scheduled the job will be displayed in the Job Controller. After the successful completion of the Data Collection job, the client information is gathered at the SRM Server and the job status is shown as completed in the Job Controller. For more information on scheduling, see Scheduling. For step-by-step instructions on scheduling a Data Collection job see Run/Schedule Data Collection.
CONSIDERATIONSData Collection is not performed for mounted network drives, volumes, or directories. If you want to collect data for network file systems, install the appropriate SRM Agent on the local computer for those file systems.
SRM Exchange Agent based Analysis Data Collection job will report storage groups only if the storage groups are mounted.
For NAS Data Collection, all CIFS and NFS content will be included as content in the default subclient, unless some or all of it is specifically listed as content in a user-defined subclient.
For NAS Data Collection, if subclient SubB is child of subclient SubA meaning that SubB's paths are contained in paths of SubA, then when collecting SubA none of the contained paths of SubB will be collected. Instead they will be collected by Data Collection of SubB.
For NAS, data collection jobs are not supported for vfilers. If you enable data collection on a vfiler, then the data is not collected.
For UNIX file systems, all mount points (comprised of a logical volume or partition) will be included as content in the default subclient, unless they are specifically listed as content in a user-defined subclient.Consider this example:
You have created a subclient named sub1.
You have defined a directory named /mount_points as contents for sub1.
Within /mount_points there are three mount points, mnt1, mnt2, and mnt3.
Features - SRM Oracle Agent
Page 14 of 39

Data will not be collected on those three mount points as part of sub1; instead, they are part of the content of the default subclient.
To collect data on those mount points as part of sub1, you must specify each mount point, /mount_points/mnt1, /mount_points/mnt2, and /mount_points/mnt3, as content for sub1.
If you would like to configure the SRM Exchange Agent for cross-domain mailbox access for data collection purposes, this can be accomplished by creating the AdServerList key in the registry.
After adding, editing or removing a subclient, you must run an Analysis data collection job on all subclients associated with an agent for reports to reflect the changes.
For the SRM Agent for SharePoint only - ensure that all necessary SharePoint services are running and that the configuration and content databases are online; otherwise, installation may appear successful, but a subsequent Data Collection will fail.
For SRM Windows File System Agent, Summary pages may show different file count than the actual count as the Agent will skip junction points.
Using the integrated File System Agent, if DDR or Snap Protect is selected as the backup method, SRM Data Collection will be skipped.
For SRM Exchange Agents running with Exchange 2010, public folder object data is not collected when a Discovery and Analysis type data collection job is run.
BEST PRACTICES
SOLARISEnsure that the NFS client specifies the soft option when mounting NFS shares, or else data collection for NFS data will hang whenever the NFS server is down or not accessible. Also, increase the value for the retrans and timeo options; this will compensate for the soft option limiting the number of retries that the client can attempt to access the NFS server.
NASConfigure NAS filer (including NetApp vFiler, EMC Celerra CIFS Servers and Data Movers) with DNS server in a way that reverse DNS lookup (from NAS filer to SRM NAS proxy) is resolved. If that is not the case then CIFS connection or NFS mount from SRM NAS proxy to NAS filer will fail.
ENABLING REVERSE LOOKUP
Use the following steps to enable Reverse DNS lookup on a client computer:
1. Logon to the computer as an Administrator. Click Start, click Control Panel and then select Network and Internet. Click Network and Sharing Center. Under Tasks, Select Manage network connections. Right-click the Local Area Connection icon, and then click Properties. On the Local Area Connection Properties dialog box, select Internet Protocol Version4 (TCP/IPv4), and then click Properties. If you have a DHCP Server in your network environment, then select Obtain DNS server address automatically. Else, select Use the following DNS server addresses and follow the below steps:
In the Preferred DNS server box, type the IP Address of the DNS server. In the Alternate DNS server box, type the IP Address of the alternate DNS server.
2. Click Advanced. On the Advanced TCP/IP Settings dialog box, click the DNS tab. Click Append these DNS suffixes (in order).
Click Add, in the Domain suffix box, type the Domain suffix, and then click Add. Repeat this step to add all the DNS suffixes in order. Click OK, and then click OK. Click OK.
Features - SRM Oracle Agent
Page 15 of 39

In case the DNS is not configured or not supported, then the client computer will not be able to perform IP/Name resolution and will not be able to communicate with the remote computers by using the host names. You can overcome this temporarily by adding the IP addresses and the fully qualified domain names in the host file of the client computer. It is not recommended to add Hosts file entries as these create communications control points that may impact other server operations and are difficult to maintain and manage. These should be used only as temporary solutions until the larger network or DNS issues can be resolved. You can use the following steps to add entries to the host file of the client computer with Windows operating system:
1. Logon to the computer as an Administrator.
2. Click Start, and then click Run.
3. In the Open box, type drivers, and then click OK.
4. Double-click etc folder, open hosts file with Notepad, and then type the IP address, the fully qualified domain name and the host name of the remote computer. You can add additional entries on separate lines. Save the hosts file after adding the entries.
Example:
172.32.xxx.xxx dbwin1.idclab.loc dbwin1
172.14.xxx.xxx dbwin2.idclab.loc dbwin2
Similarly, to enable reverse lookup on a remote computer, repeat step 1 through step 3 for adding IP address of the client computer in the hosts file of the remote computer.
For more information, see: http://technet.microsoft.com/en-us/library/cc780585(WS.10).aspx
For a Unix computer, the entries should be added in the host file located under etc folder.
SHAREPOINT"Usage Analysis" must be enabled in SharePoint for SRM to collect data about hits, for those reports that include this information. Refer to Microsoft SharePoint documentation for information about enabling "Usage Analysis".
ORACLE
Consider the following configuration items before running data collection from the Oracle Agent:
Verify that Oracle databases are in OPEN status before running a data collection job.
Verify that the Oracle databases are running properly, and that there are no database-related memory issues.
Verify that the shared_pool_size parameter in the init<SID>.ora file is set to the maximum valid value so that SQL queries can run successfully for data collection.
Data collection by the appropriate file system SRM Agent must be scheduled to occur before data collection by the SRM Oracle Agent.
Back to Top
SRM Data Collection - How ToTopics | How To | Troubleshoot | Related Topics
Features - SRM Oracle Agent
Page 16 of 39

Run/Schedule a Data Collection Job for an SRM Instance, Agent or Subclient
Schedule Agentless SRM policies
RUN/SCHEDULE A DATA COLLECTION JOB FOR AN SRM INSTANCE, AGENT OR SUBCLIENT
Required Capability: See Capabilities and Permitted Actions
1. From the CommCell Browser, right-click the SRM instance, agent or subclient, and then click Data Collection from the short-cut menu.
2. From the Schedule Data Collection Job dialog box, select the agent for which you want to run the Data Collection job from the Agent list. (This option is not applicable at the SRM agent and subclient levels.)
3. Choose the Job Type. (This option is not applicable at the SRM subclient level.)
If you select Discovery, basic information on file system assets is collected and minimal processing on the server is required.
If you select Discovery and Analysis, detailed statistics is collected and these jobs require more processing throughput on the server.
If you select Discovery and Analysis, and if the agent has more than one subclient, click the name of the subclient you want from the Subclient list. (This option is not applicable at the SRM subclient level.)
4. Choose Schedule or Immediate from the Job Initiation area.
5. Configure any other options as appropriate.
6. Click OK.
If you have selected the Immediate option, you can track the progress of the job from the Job Controller window.
For more information on Scheduling, see Scheduling.
SCHEDULE AGENTLESS SRM POLICIES
Required Capability: See Capabilities and Permitted Actions
1. From the CommCell Browser, expand Policies and select Agentless SRM Policies.
2. In the main window right-click the Policy that needs to be scheduled and click Create Schedule.
3. In the Job Initiation dialog box, choose Immediate or Schedule.
4. Click Configure and select the required scheduling options.
5. Click OK.
For more information on Scheduling, see Scheduling.
If you have selected the Run Immediately option, you can track the progress of the job from the Job Controllerwindow.
Features - SRM Oracle Agent
Page 17 of 39

SRM Oracle Agent Summaries
Overview
Client Summaries
Agent Summaries
Subclient Summaries
Instance Summaries
Tablespace Summaries
User Summaries
OVERVIEW
SRM Oracle Agent Summaries provide a concise view of the status of Oracle Server entities in the CommCell Console. Summary information is provided as images in the form of bar graphs and pie charts to provide a succinct snapshot of the statistical information. While viewing summary, data rows in tables can be sorted by any one of the columns listed in that summary.
When you select an SRM Oracle Agent entity from the CommCell Console, its summary information appears in the main window. Each section can be expanded or collapsed as desired.
The following section describes the available summary types of SRM Oracle Agent at different levels in the CommCell Console:
CLIENT SUMMARIES
Summary information at the client level shows statistical data for the following:
Software Instances
The summary information for software instances displays details like Package, version and vendor name of all instances of the installed software.
Process Information
The summary information for processes displays details like Image Name, PID, Session ID, CPU Time, CPU Usage, Memory Usage, User Name, etc for each process that runs on the client.
Services
The summary information for services displays details like Name, State, Startup Type, and Log on information for each service that exists on the client.
AGENT SUMMARIES
Summary information at the Agent level include charts for Storage Usage per Oracle Database. Advisories with severity level, the time stamp, and a brief description are displayed.
1. From the CommCell Console, select the Client Computer with SRM Oracle Agent for which you want to view summaries.
2. Expand SRM and select Oracle.
Features - SRM Oracle Agent
Page 18 of 39
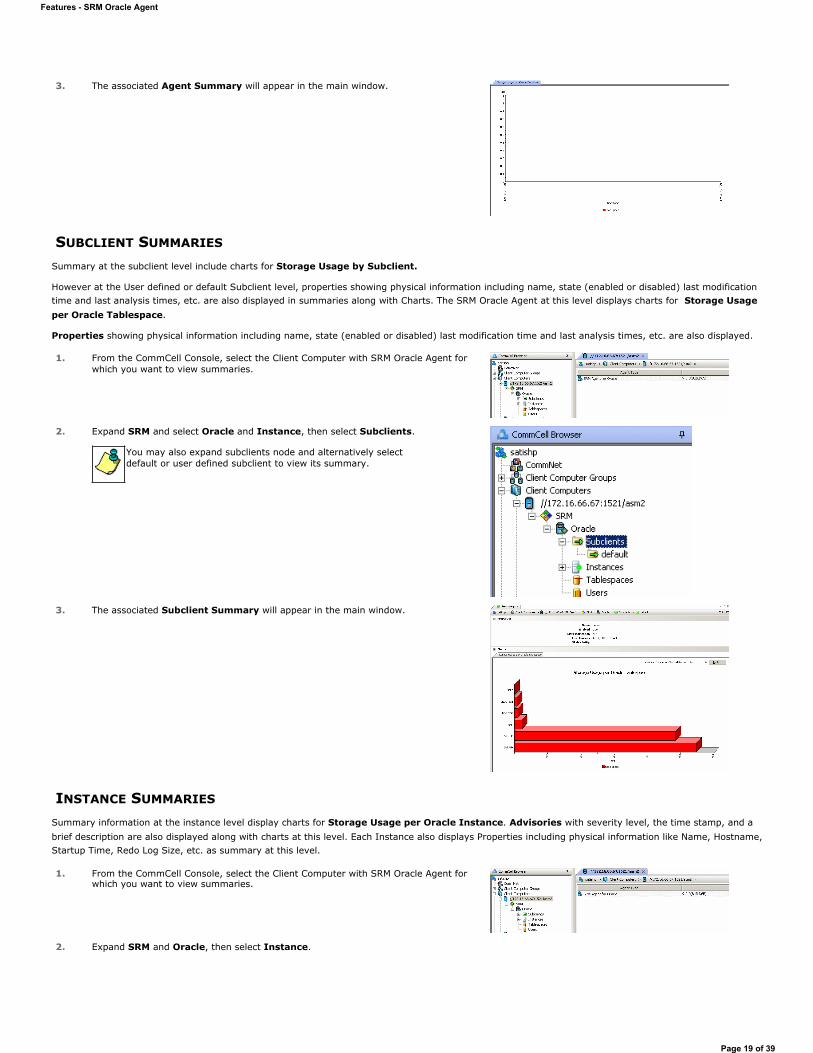
SUBCLIENT SUMMARIES
Summary at the subclient level include charts for Storage Usage by Subclient.
However at the User defined or default Subclient level, properties showing physical information including name, state (enabled or disabled) last modification time and last analysis times, etc. are also displayed in summaries along with Charts. The SRM Oracle Agent at this level displays charts for Storage Usage per Oracle Tablespace.
Properties showing physical information including name, state (enabled or disabled) last modification time and last analysis times, etc. are also displayed.
INSTANCE SUMMARIES
Summary information at the instance level display charts for Storage Usage per Oracle Instance. Advisories with severity level, the time stamp, and a brief description are also displayed along with charts at this level. Each Instance also displays Properties including physical information like Name, Hostname, Startup Time, Redo Log Size, etc. as summary at this level.
3. The associated Agent Summary will appear in the main window.
1. From the CommCell Console, select the Client Computer with SRM Oracle Agent for which you want to view summaries.
2. Expand SRM and select Oracle and Instance, then select Subclients.
You may also expand subclients node and alternatively select default or user defined subclient to view its summary.
3. The associated Subclient Summary will appear in the main window.
1. From the CommCell Console, select the Client Computer with SRM Oracle Agent for which you want to view summaries.
2. Expand SRM and Oracle, then select Instance.
Features - SRM Oracle Agent
Page 19 of 39
TABLESPACE SUMMARIES
Summary at the Database level include charts for Storage Usage per Oracle Tablespace. Advisories with severity level, the time stamp, and a brief description are also displayed along with charts at this level.
USER SUMMARIES
Summary at the Database level include charts for Storage Usage per Oracle User. Advisories with severity level, the time stamp, and a brief description are also displayed along with charts at this level.
3. The associated Instance Summary will appear in the main window.
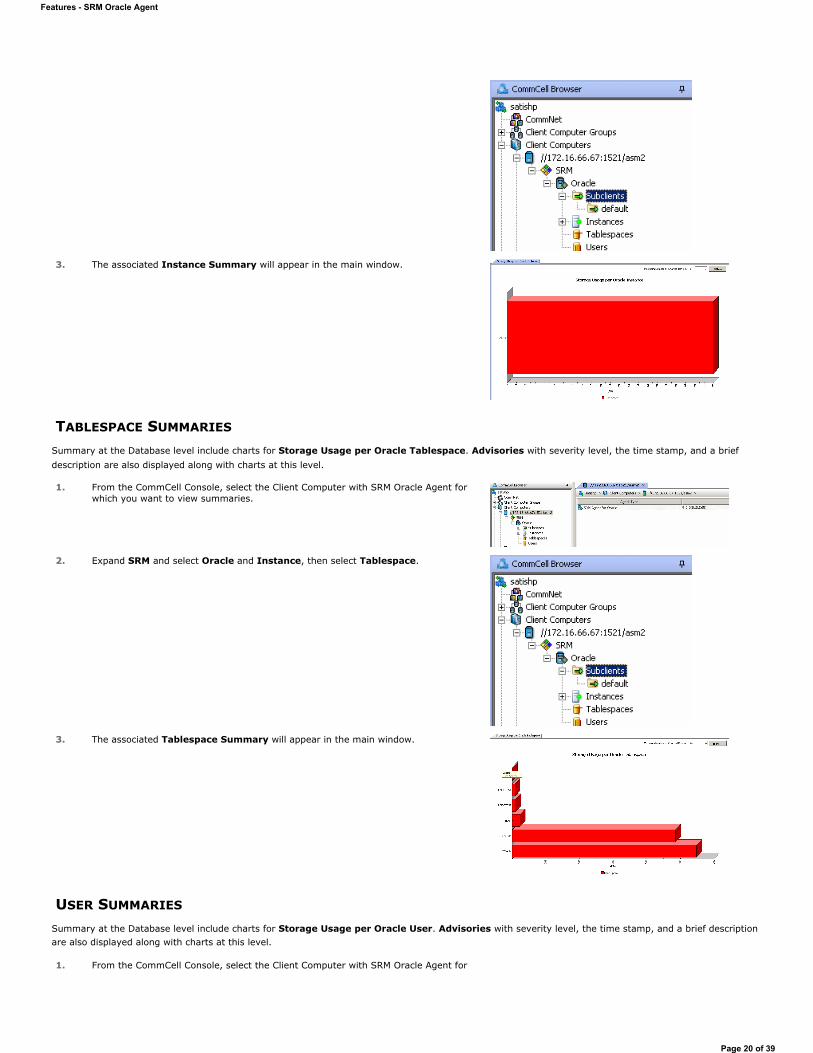
1. From the CommCell Console, select the Client Computer with SRM Oracle Agent for which you want to view summaries.
2. Expand SRM and select Oracle and Instance, then select Tablespace.
3. The associated Tablespace Summary will appear in the main window.
1. From the CommCell Console, select the Client Computer with SRM Oracle Agent for
Features - SRM Oracle Agent
Page 20 of 39

Back to Top
which you want to view summaries.
2. Expand SRM and select Oracle and Instance, then select User.
3. The associated User Summary will appear in the main window.
Features - SRM Oracle Agent
Page 21 of 39

SRM Oracle ReportsTopics | How To | Related Topics
SRM reports provide a sleek, versatile, and easy-to-use reporting framework that enables you to easily and effectively choose, view, and analyze vital data. Customized reporting is available through the selection of filter criteria (e.g., individual columns, specific clients, specific client computer groups, etc.) and filters as described in SRM Reports.
From the CommCell Console, the SRM Report Manager provides these types of reports:
Computer Inventory
Cost Analysis
Applications
Initial templates are provided for each type (e.g., Cost History by Application, Capacity by File System, etc.) where columns have been preselected. The only requirement before generating and displaying the report is to specify one or more client computers. For most reports, a data collection job must also have been run prior to generating the report.
Reports can be customized by adding or removing columns in the initial templates or specifying additional Filter Criteria.
This following table lists:
The category/columns that can be selected.
A description of the category.
For each type of data collection job, if data is collected for the column, it is marked with a . Running an Discovery and Analysis Job may be required to produce complete and accurate data. An Analysis Job also includes the data collected by a Discovery Job.
For step-by-step instructions on generating reports, see Display, Run, or Schedule a Report Manager Report for step-by-step instructions.
Category/Column Description SRM Oracle Agent
Discovery Job Discovery and Analysis Job
ASM Disk Details (Automatic Storage Management) In an ASM instance, it displays details for every disk discovered by the instance, including disks which are not part of any disk group. In a database instance, it displays details for disks in disk groups that are in use by the database instance. Use this report column to identify disks that are not part of a disk group, and to monitor read/write performance.
Bytes Read
Bytes Written
Created
Free Space
Header Status
Mode Status
Mount Status
Mounted
Name
Number
Read Errors
Redundancy Type
State
Total Space
Write Errors
ASM Disk Group Details (Automatic Storage Management) In an ASM instance, it displays information about every disk group discovered by the instance. In a database instance, it displays information about every ASM disk group mounted by the local ASM instance. Use it to obtain general properties of ASM disk groups.
Features - SRM Oracle Agent
Page 22 of 39

Allocation Unit Size
Block Size
Free Space
Name
Number
Redundancy Type
Sector Size
State
Total Space
ASM Template Details (Automatic Storage Management) Displays properties of every template that is present in every disk group mounted by the ASM instance. Use it to obtain general properties of ASM templates.
Name
Number
Redundancy Type
Stripe
System
Client Displays aspects of each client and their respective subclients on which the SRM Oracle Agent is installed.
Computer
Host Group
Sub Client
Client Properties Displays aspects of the client computer on which the SRM Oracle Agent is installed.
Hostname
Memory
Operating System
OS Vendor
OS Version
Processors
Service Pack
SP Version
Time Zone
Database Details Summarizes aspects of the content database in order to obtain database details, and to monitor space utilization.
Control File Creation Date
Control File Time
Control File Type
Creation Date
DBid
Flashback On
Force Logging
Guard Status
Host Name
Features - SRM Oracle Agent
Page 23 of 39
Log Mode
Open Mode
Platform Name
Protection Mode
Remote Archive
Reserved Space
Reserved Space Rank
Role
Switchover Status
Unique Name
Used Space
Utilization
Version
Database Usage History Displays overall database statistics. Useful for trending purposes.
As Of
Reserved Space
Used Space
Utilization
Datafile Details Summarizes aspects of each datafile in order to obtain database details and monitor space utilization.
Autoextensible
Available
Blocks
Bytes
Data File
File Id
Increment By
Max Bytes
Relative Fno
User Bytes
Index Details Displays aspects of the B-tree indexes used by Oracle to allow faster retrieval of records.
Average Data Blocks per Key
Average Leaf Blocks per Key
BLevel
Cluster Factor
Compression
Distinct Keys
Free Space
Generated
Index
Ind Level
Leaf Blocks
Number of Rows
Owner
Features - SRM Oracle Agent
Page 24 of 39

Partitioned
Reserved Space
Reserved Space Rank
Secondary
Temporary
Type
Uniqueness
Used Space
User Stats
Valid
Index Usage History Provides a historical view of the B-tree indexes used by Oracle. Useful for trending purposes.
As Of
Reserved Space
Used Space
Utilization
Instance Details Displays information on the Simpana instance created in the CommCell Browser tree that represents the database that needs to be backed up.
Active State
Actual Redo Blocks
Archiver
Database Status
Estimated Cluster Available Time
Estimated Mttr
Host Name
Log Switch Wait
Logfile Size Redo Blocks
Logs Bytes
Optimal Logfile Size
Parallel
Recovery Estimated IOs
Startup Time
Status
Target Mttr
Target Redo Blocks
Version
Instance Usage History Displays a log of the instance usage. Useful for trending purposes.
As Of
Log Archive Space
Oracle Entities Displays overall aspects per each computer selected (e.g., database, instance, etc.)
Database
Instance
Tablespace
RMAN Archived REDO Log Details Displays aspects of redo logs that Oracle has filled
Features - SRM Oracle Agent
Page 25 of 39

with redo entries, rendered inactive, and copied to one or more log archive destinations.
Block Size
Blocks
First Time
Next Time
REC ID
Sequence
Stamp
Stamp Thread
RMAN Backup Details Provides a detailed history of all backups, such as parallelization of backup data streams, and backup files retention policy.
Backup Type
File
File Size
File Type
Keep
Keep Options
Keep Until
Status
RMAN Corruption Details Displays information of each recorded block corruption symptoms at the file level.
Block Number
Blocks
File Number
Type
RMAN Database Corruption Details Details Displays information of each recorded block corruption symptoms at the database level.
Block Number
Blocks
File Number
Marked Corrupt
REC ID
Stamp
Type
RMAN Datafile Details Displays aspects of redo logs that Oracle has filled with redo entries, rendered inactive, and copied to one or more log archive destinations.
Blocks
Checkpoint Time
Completion Time
Control File Type
Creation Time
File Number
Increment Level
Marked Corrupt
REC ID
Features - SRM Oracle Agent
Page 26 of 39
Reset Log Time
RMAN Job Details Displays aspects of every task performed by the Recovery Manager (RMAN), such as the time it started and the operation involved.
Bytes Processed
End Time
Operation
REC ID
Row Type
Sid
Stamp
Start Time
Status
RMAN REDO Log Details Displays aspects of redo logs, which Oracle uses to record all changes made to the database.
Archived
Block Size
Blocks
First Time
Flash Recovery
Name
Next Time
REC ID
Stamp
Standby
Status
Thread
Table Details Displays information of tables in the Oracle database in order to to identify tables and monitor space utilization.
Average Space
Backed Up
Blocks
Chain Count
Clustered
Empty Blocks
Free Space
Index Used Space
Number of Rows
Owner
Partitioned
Reserved Space
Reserved Space Rank
Skip Corrupt
Table
Temporary
Used Space
Table Usage History Displays overall table usage statistics. Useful for
Features - SRM Oracle Agent
Page 27 of 39

trending purposes.
As Of
Index Used
Total Used
Used Space
Utilization
Tablespace Details Displays details of the tablespace in order to obtain properties of individual tablespaces and monitor increase in tablespace.
% Increase
Allocation Type
ASSM
Big File
Block Size
Contents
Extents Local
Free Space
Initial Extent
Max Extents
Min Extents
Minimum Extent Length
Next Extent
Reserved Space Rank
Reserved Space
Status
Table Compression
Used Space
Utilization
Tablespace Usage History Displays overall tablespace usage statistics. Useful for trending purposes.
As Of
Reserved Space
Used Space
Utilization
User Details Displays details of all users in the Oracle database such as user accounts per user name.
Account Status
Created
Expiry Date
Lock Date
Name
Profile
Reserved Space
Temporary Tablespace
Used Space
Utilization
Features - SRM Oracle Agent
Page 28 of 39

Back to Top
SRM Oracle Reports - How ToTopics | How To | Related Topics
Display, Run, or Schedule a Report Manager Report
File Categories for Reports
Time Categories for Reports
Top 'N' Category Counts for Reports
Configure IIS for Windows Server 2008
Save a Report Template
RUN, SCHEDULE, OR SAVE A SRM REPORT MANAGER REPORT
Before You Begin
Required Capability: Capabilities and Permitted Actions
1. In the CommCell Browser, expand Reports and then SRM Report Manager, click a report type.
2. Select one or more Client Computers or Client Computer Groups from the Client Selection tab. This is a required step.
3. Click the Column Selection tab, select a Category and then one or more Available category/columns and click on Add.
To remove a previously selected category, click on the selected filter from Selected column and click Remove.
Remove All will remove all previously selected categories for the reports.
4. Click the Report Options tab and configure these settings in the report:
From the General tab set Select Time Range and Include Trending options.
For all reports, the Maximum number of Bar Points Per Chart may be increased or decreased from the default value of 10 and Draw All Bar Points or Lines option may be selected. The default of 100 rows to output may be increased or decreased by specifying a number in Limit number of rows to output. The default of 5000 rows per page may be increased or decreased by specifying the desired number in Limit number of rows per page.
Click the Advanced Options tab and set the Data Size Unit for the Table and/or Chart (GB, MB, etc.). Also, the Output Locale may be changed from the default that is English. The ordering of the report may be changed by moving columns in Set Sorting Order of Rows to Return.
5. Optionally, click the Get SQL Query tab to generate the query for the filter criteria specified. This will display the SQL query that will be used to get the data and generate the report. The query that is displayed is Read-only and can be used in a third-party SQL application, such as SQL Server Management Studio.
6. Choose one of these options to generate the report:
Click Run to generate the report immediately and view the results in the CommCell Console.
Click Schedule to generate and schedule the report on a daily, weekly, monthly, yearly, or even one time basis. Specify the report language (see Languages - Support for the list of languages supported in Reports), format (HTML, EXCEL, PDF), and location. Optionally, notifications can be configured so the report can be emailed, sent to an SNMP trap, or RSS feed.
When scheduling, patterns can also be applied to the report so it runs on a specific time, repeated every so many days, or run for a particular number of times. Some reports allow enabling Forecasting by specifying default trending interval and number of data points on which the trending interval is based. For more information on trending, see Forecasting.
Click Save As... to save the report filter criteria, schedule information, notifications to a template so it can be used to generate a report at a later date. All report templates are saved under My Reports.
FILE TYPE CATEGORIES FOR REPORTS
These two options apply to history charts.
Features - SRM Oracle Agent
Page 29 of 39

Required Capability: Capabilities and Permitted Actions
1. In the CommCell Browser expand Reports and right-click SRM Report Manager and select File Type Categories.
2. In the Configure File Categories dialog box:
Select the agent for which you want to configure File Categories.
Select a File Category to add, delete, or edit associated extensions.
To add an extension, type the new extension, and click Add to save it.
To delete an extension, select it from the list, and click Delete.
To edit an extension, select it from the list, make the changes, then click Edit to save your changes.
Optionally, click Reset to return all categories to their default configuration (see Default File Categories).
3. Click OK to save your changes and close the Configure File Categories dialog box. You can also click Apply to save any changes to the current Agent configuration, and then repeat this procedure from step 2 to configure File Categories for other agents.
TIME CATEGORIES FOR REPORTS
Required Capability: Capabilities and Permitted Actions
1. In the CommCell Browser expand Reports and right-click SRM Report Manager and select Time Categories.
2. In the Configure Time Categories dialog box, select an Agent for which you want to modify Time Categories.
3. For each Interval:
Specify a Name for each custom Time Category.
Select the minimum number of days in the time range, or select None.
Select the maximum number of days in the time range, or select Unlimited.
4. Click OK to save your changes and close the Configure Time Categories dialog box, or click Apply to save your changes for the currently selected Agent, and repeat this procedure from Step 2 to configure Time Categories for other Agents.
TOP 'N' CATEGORY COUNTS FOR REPORTS
Required Capability: Capabilities and Permitted Actions
1. In the CommCell Browser expand Reports and right-click SRM Report Manager and select Top 'N' Categories.
2. In the Configure Top 'N' Category Counts dialog box, change the count for each Agent for which you want to modify the Category Count in reports.
3. Click OK to save your changes and close the Configure Top 'N' Category Counts dialog box.
CONFIGURE IIS FOR WINDOWS SERVER 2008Required Capability: Capabilities and Permitted Actions
1. Click Start, and then click Server Manager.
2. In Server Manager, right click Roles, and then click Add roles. The Add Roles Wizard window is displayed.
3. In the Add Roles Wizard, click Server Roles.
4. Select the Web Server (IIS) check box from Server Roles, and click Next to continue.
5. On the Role Services page, expand Common HTTP Features, and select the following check boxes:
Static Content
Default Document
When the Web Server (IIS) check box is selected, the File Server check box is automatically selected due to role dependency.
Features - SRM Oracle Agent
Page 30 of 39

Directory Browsing
HTTP Errors
HTTP Redirection
6. Expand Application Development, and select the ASP.NET, ASP, and CGI check boxes.
7. Expand Security, and select the Basic Authentication and Windows Authentication check boxes.
8. Expand Management Tools, expand IIS 6 Management Capability, and select the following check boxes:
IIS Metabase Compatibility
IIS 6 WMI Compatibility
IIS 6 Scripting Tools
IIS 6 Management Console
9. Click Next, and then click Install.
SAVE A REPORT TEMPLATE
Required Capability: Capabilities and Permitted Actions
1. In the CommCell Browser, expand Reports and then select SRM Report Manager and select a report type.
The specified Report Window will appear.
2. At the top of the window, click Save As...
3. In the Save Template dialog box, enter the name of the report and click OK to exit the screen. The report template name displays in the My Reports node of the CommCell Browser.
If you are prompted to add required role services, click OK.
Features - SRM Oracle Agent
Page 31 of 39
Admin Job HistoryTopics | How To | Related Topics
The Admin Job History Filter dialog box allows you to view detailed, historical information about the following administration job types:
All
Data Aging
Export Media
Auxiliary Copy
Inventory
Disaster Recovery Backup
Data Verification
Offline Content Indexing
Erase Media
Erase Backup/Archived Data
Drive Validation
Drive Cleaning
Stamp Media
Install Updates
Download Updates
Disk Library Maintenance
SRM Reports
Information Management
Once chosen, your filter options are then displayed in the Admin Job History window. From this window you can view more detailed information such as the:
Details of the administration job.
Events of the administration job.
Log files of the administration job.
For information on Job Details displayed in the Job History, see Viewing Job Information.
Back to Top
Admin Job History - How ToTopics | How To | Related Topics
View Admin Job History
View Job History Details
View the Events of a Job History
Viewing the Log Files of a Job History
Resubmit an Admin Job
VIEW ADMIN JOB HISTORY
Required Capability: See Capabilities and Permitted Actions
1. From the CommCell Browser, right-click the CommServe, click View, and then click Admin Job History.
2. From the Admin Job History Filter dialog box, select the filter options that you want to apply and click OK.
3. The Admin Job History dialog box displays with the specified filter options.
4. Click Close.
Features - SRM Oracle Agent
Page 32 of 39
VIEW JOB HISTORY DETAILS
Required Capability: See Capabilities and Permitted Actions
1. From the CommCell Browser, right-click the entity (e.g., subclient, client computer, etc.) whose job history you want to view, click View, and then click job history.
2. From the Job History Filter dialog box, select the filter options that you want to apply and click OK.
3. From the Data Management Job History window, right-click the job whose job details you want to view, and then click View Job Details.
4. The Job Details dialog box appears, displaying detailed job history in General, Details, Phase Details and Attempts tabs for the selected job.
5. Click OK.
VIEW THE EVENTS OF A JOB HISTORY
Required Capability: See Capabilities and Permitted Actions
1. From the CommCell Browser, right-click the entity (e.g., subclient, client computer, etc.) whose job history you want to view, click View, and then click Job History.
2. From the Job History Filter dialog box, select the filter options that you want to apply and click OK.
3. From the Data Management Job History window, right-click the job whose job details you want to view, and then click View Events.
4. The All Found Events window gets displayed. If no events where found for the back up, a message is displayed to that effect.
5. Click Close.
VIEW THE LOG FILES OF A JOB HISTORY
Required Capability: See Capabilities and Permitted Actions
1. From the CommCell Browser, right-click the entity whose job history you want to view, and then click to view a job history.
2. From the job history filter window select the filter options, if any, that you want to apply, and then click OK.
3. From the job history window, right-click the job whose log files you want to view, and then click View Logs.
4. The contents of the log file related to the selected job history are displayed in the Log File for Job n window.
RESUBMIT AN ADMIN JOB
Required Capability: See Capabilities and Permitted Actions
If viewing the details of a job with a pending or failed status, the Reason for Job Delay field will contain an Error Code, which, if clicked, will launch the customer support website displaying troubleshooting article(s) related to the specific issue.
1. From the CommCell Browser, right-click the CommServe, click View, and then click Admin Job History.
Features - SRM Oracle Agent
Page 33 of 39

2. From the Admin Job History Filter dialog box, select the filter options that you want to apply and click OK.
3. The Admin Job History window displays with the specified filter options.
4. Right-click on any job (e.g., Download Software), and select Resubmit.
5. Select the job options appropriate for the job you want to restart.
Features - SRM Oracle Agent
Page 34 of 39
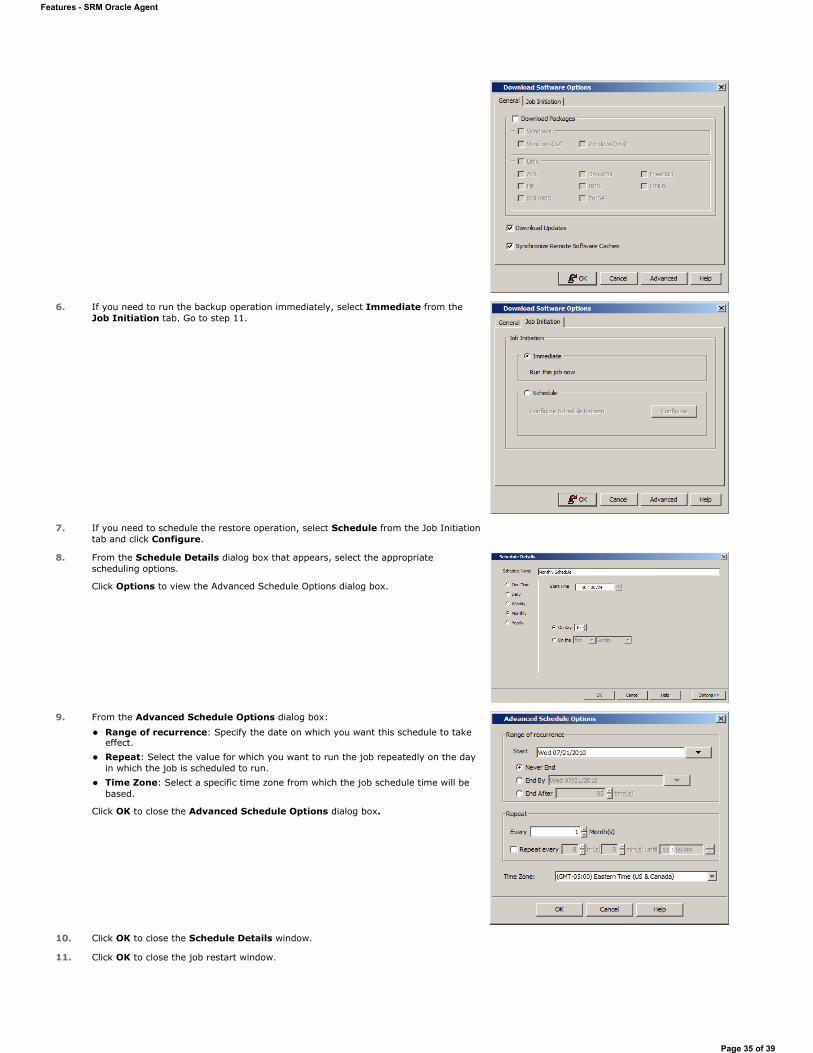
6. If you need to run the backup operation immediately, select Immediate from the Job Initiation tab. Go to step 11.
7. If you need to schedule the restore operation, select Schedule from the Job Initiation tab and click Configure.
8. From the Schedule Details dialog box that appears, select the appropriate scheduling options.
Click Options to view the Advanced Schedule Options dialog box.
9. From the Advanced Schedule Options dialog box:
Range of recurrence: Specify the date on which you want this schedule to take effect. Repeat: Select the value for which you want to run the job repeatedly on the day in which the job is scheduled to run. Time Zone: Select a specific time zone from which the job schedule time will be based.
Click OK to close the Advanced Schedule Options dialog box.
10. Click OK to close the Schedule Details window.
11. Click OK to close the job restart window.
Features - SRM Oracle Agent
Page 35 of 39

Back to Top
Features - SRM Oracle Agent
Page 36 of 39

SRM Data Collection Job HistoryTopics | How To | Related Topics
The Data Collection History Filter dialog box allows you view detailed, historical information about data collection jobs for the selected SRM entity. Data collection jobs run automatically according to the parameters you have selected, and appear in the Job Controller as a scheduled job. After the successful completion of the Data Collection job, the client information is gathered at the SRM Server and the job status is shown as completed in the Job Controller.
For information on Job Details displayed in the Job History, see Viewing Job Information.
Once chosen, your filter options are then displayed in the Data Collection Job History Window of the SRM entity. From this window you can view more detailed information such as:
Viewing the Events of a Job History
Viewing the Log Files of a Job History
SRM Data Collection Job History - How ToTopics | How To | Related Topics
View Job History Details
View the Events of a Job History
View the Log Files of a Job History
VIEW JOB HISTORY DETAILS
Required Capability: See Capabilities and Permitted Actions
1. From the CommCell Browser, right-click the entity (e.g., subclient, client computer, etc.) whose job history you want to view, click View, and then click job history.
2. From the Job History Filter dialog box, select the filter options that you want to apply and click OK.
3. From the Data Management Job History window, right-click the job whose job details you want to view, and then click View Job Details.
4. The Job Details dialog box appears, displaying detailed job history in General, Details, Phase Details and Attempts tabs for the selected job.
5. Click OK.
VIEW THE EVENTS OF A JOB HISTORY
Required Capability: See Capabilities and Permitted Actions
1. From the CommCell Browser, right-click the entity (e.g., subclient, client computer, etc.) whose job history you want to view, click View, and then click Job History.
2. From the Job History Filter dialog box, select the filter options that you want to apply and click OK.
3. From the Data Management Job History window, right-click the job whose job details you want to view, and then click View Events.
4. The All Found Events window gets displayed. If no events where found for the back up, a message is displayed to that effect.
5. Click Close.
VIEW THE LOG FILES OF A JOB HISTORY
If viewing the details of a job with a pending or failed status, the Reason for Job Delay field will contain an Error Code, which, if clicked, will launch the customer support website displaying troubleshooting article(s) related to the specific issue.
Features - SRM Oracle Agent
Page 37 of 39

Required Capability: See Capabilities and Permitted Actions
1. From the CommCell Browser, right-click the entity whose job history you want to view, and then click to view a job history.
2. From the job history filter window select the filter options, if any, that you want to apply, and then click OK.
3. From the job history window, right-click the job whose log files you want to view, and then click View Logs.
4. The contents of the log file related to the selected job history are displayed in the Log File for Job n window.
Back to Top
Features - SRM Oracle Agent
Page 38 of 39

Features - SRM Oracle Agent
Page 39 of 39