fibergrate products & services installation · pdf fileinstallation instructions have been...
TRANSCRIPT

The Dynarail® Modular Handrail System Installation Instructions have been designed to combine the best in fiberglass reinforced plastic (FRP) handrail with simplicity of installation. Fibergrate has made every attempt to provide clear and thorough instructions for installing this product. If you have any further questions, or need additional information, do not hesitate to contact Fibergrate at 800/527-4043.
By following these simple instructions, you should find installation of your handrail system quick and easy.
TOOLS REQUIRED
□ Drill □ Wrenches - □ Bits - ▫ 7/16” (2 each) ▫ 1/8” (for rivets) ▫ 9/16” (2 each) ▫ 3/16” (for kickplate screws) □ Hack Saw ▫ 9/16” & 11/16” (for connection bolts) □ 25’ Tape Measure□ Level □ Sealing Kit□ Bonding (Epoxy) Kit(s) (one for every 15 posts) □ Stir Sticks□ “C” Clamps □ Sandpaper (80 grit)
NOTE: Cuts and drilled holes must be sealed to maintain corrosion protection.
QUICK TIPS FOR INSTALLING HANDRAIL
1. Layout posts and post installation kits as required. Post installation drawings for various conditions are shown under Section I - Post Installation Methods. Install posts.
2. After installation of the posts, follow the instructions shown in Section II - Rail Installation for installation of toprails, midrails and kickplates. If installing rail extensions or returns, see Section III - Splices & Connections. Take care at the rail-to-post, rail splice and turns (see Section III - Splices & Connections for details) to correctly prepare the material surface and to correctly mix and apply the epoxy. Correct bond joints are important to enable the handrail to carry the required loads.
3. Attach endpost and rail endcaps at the required locations. (See Section III - Splices & Connections for details).
IMPORTANT
It is the installer’s responsibility to carefully follow fabrication and installation plans and instructions to ensure design performance characteristics of the Dynarail® handrail system. The installer could be liable for claims that result from improper installation.
High Performance Composite Solutions
Installation Instructions
High Strength-To-Weight Ratio
Long, Low Maintenance Life
Meets OSHA, BOCA & Other Building Code Requirements
Dynarail® Modular Handrail System
Nonconductive
Fire Retardant
Fibergrate Composite Structures Inc.4285 Kellway Circle, Suite 224, Addison, TX 75001
Phone: 800-527-4043 • Fax: 972-250-1530www.fibergrate.com • Email: [email protected]
©Fibergrate Inc. 2003 883300-07/03-5.0Made in the USA
Fibergrate Composite Structures Inc. believes the information contained here to be true and accurate. Fibergrate makes no warranty, expressed or implied based on this literature and assumes no responsibility for consequential or incidental damages in the use of these products and systems described, including any warranty of merchantability or fitness. Information contained here is for evaluation only.
Fibergrate Products & Services
Dynaform® Structural Shapes
Fibergrate offers a wide range of pultruded structural components for industrial use, including bars, rods, tubes, beams, channels, leg angles and plates.
Dynarail® Safety Ladder SystemEasily assembled on site, Dynarail safety ladder systems meet or exceed OSHA requirements. Though less costly than prefabricated ladder systems, these safety lad-ders provide a custom fit to the supporting structure.
Dynarail® HandrailEasily assembled from durable prefabricated components or engineered to your
specifications, Dynarail handrail meets or exceeds OSHA and strict building code requirements for safety and design.
RIGIDEX® Moltruded® GratingRIGIDEX Moltruded gratings are the first fiberglass gratings to combine the corrosion
resistance of molded grating with the longer span capacity of pultruded grating, all at the low cost of metal gratings.
Safe-T-Span® Pultruded Industrial and Pedestrian GratingsCombining corrosion resistance, long-life and low-maintenance designs, Safe-T-Span provides unidirectional strength for industrial and pedestrian pultruded grating applications.
Fibergrate® Molded Grating
Fibergrate molded gratings are designed to provide the ultimate in reliable performance, even in the most demanding conditions. Fibergrate offers the widest selection in the market with more than ten resins including Chemgrate CP-84 and more than twenty grating configurations available in many panel sizes and surfaces.
Stair SolutionsFibergrate offers a wide range of slip-resistant products to meet your stair safety needs. These durable products which include treads, tread covers and covered stair treads are a long-term, cost-efficient solution for your facility.
Engineering and Fabrication ServicesCombining engineering expertise with an understanding of fiberglass applications, Fibergrate provides turnkey design and fabrication of fiberglass structures, including platforms, catwalks, stairways and test racks.
Grating PedestalsUniquely designed adjustable single and quad head pedestals for square mesh molded
grating are manufactured to provide safe and economical support for elevated flooring.
Simplified Handrail Instructions
Corrosion Resistant

Section II - Rail InstallationSection I - Post Installation Methods Section III - Splices & Connections
DRAWING A - POST TO FRP OR STEEL CHANNEL
DRAWING B - POST TO STEEL PLATE ON STEEL BEAM
DRAWING C - POST TO FRP OR STEEL BEAM OR CHANNEL WITH FRP SPACERS
DRAWING D - POST TO STEEL ANGLE ON FRP OR STEEL BEAM
DRAWING E - REMOVABLE POST TO HLU ANGLE ON FRP OR STEEL BEAM
DRAWING F - SIDE-MOUNTED POST
DRAWING G - EMBEDDED POST
DRAWING H - TOP MOUNT STEEL STANCHION BASE
DRAWING I - TOP MOUNT FRP STANCHION BASE
CONCRETE ANCHOR BOLT LOADSDrawing F Drawing H Drawing I
OSHA (200 lb) 1886 lb 2584 lb 2688 lbUBC (50 lb/ft) 2829 lb 3876 lb 4032 lb
INSTALLING HORIZONTAL RAILS TO POSTS
1. Cut rails and kickplate to length.2. Use level to make posts vertical and tighten attachment bolts.3. Dry fit toprail into tops of posts and adjust to proper location.
Mark all post/rail intersections on sides of toprail.4. Slide toprail to the side enough to sand off glossy surfaces of
marked post/rail intersections using an 80 grit sandpaper.5. Apply properly mixed epoxy to sanded surfaces of toprail
and reinstall toprail into post tops.6. Drill a hole using a 1/8” bit through the center of the toprail/
post intersections. Install 2 rivets (one on each side) at all posts to secure the toprail while epoxy cures.
7. Dry fit midrail into square holes of posts and slide into position. Mark all rail/post intersections on all sides of midrail.
8. Slide rail to side and sand off glossy surfaces of marked post/rail intersections using an 80 grit sandpaper.
9. Apply epoxy to the sanded surfaces of midrail and return the rail to its proper location.
10. Drill a hole using a 1/8” bit through the center of the midrail/post intersections. Install 2 rivets (one on each side) at all posts to secure the midrail while epoxy cures.
11. Align bottom of kickplate 1/4” above walking surface. 12. Drill 3/16” hole through center of kickplate at posts.13. Install kickplate to posts using 1/4” self-tapping screws. Be
careful not to overtorque and strip the screws.
DRAWING J - HORIZONTAL RAIL INSTALLATION
INSTALLING INCLINED RAILS TO POSTS
1. Cut rails to length.2. Slide midrail through inclined posts.3. Mount post(s) to stairway stringer with toprail 32” high as
measured from the work line (see Drawing K).4. Use level to make posts vertical and tighten attachment bolts.5. Slide toprail down into tops of posts. Rails should make
contact with cutout in posts as shown in Drawing L.6. With rails in proper location, mark area in contact with posts.7. Slide rails to one side and sand contact areas with 80 grit
sandpaper to remove glossy surface on toprail and midrail.8. Apply epoxy to midrail and toprail.9. Replace toprail onto post tops and slide midrail through
posts to proper location.10. Tighten post attachment bolts.11. Drill hole using 1/8” drillbit through posts at toprail and
midrail.12. Install 2 rivets (supplied) to each rail/post intersection, apply
epoxy to tip of each rivet.13. Mark area of posts covered by gap cover plates and sand. 14. Apply epoxy to sanded area of posts and inside of gap cover
plates.15. C-clamp gap cover plates to posts until epoxy has cured.
DRAWING K - STAIRWAY WORK LINE (OSHA)
DRAWING L - INCLINED RAIL INSTALLATION
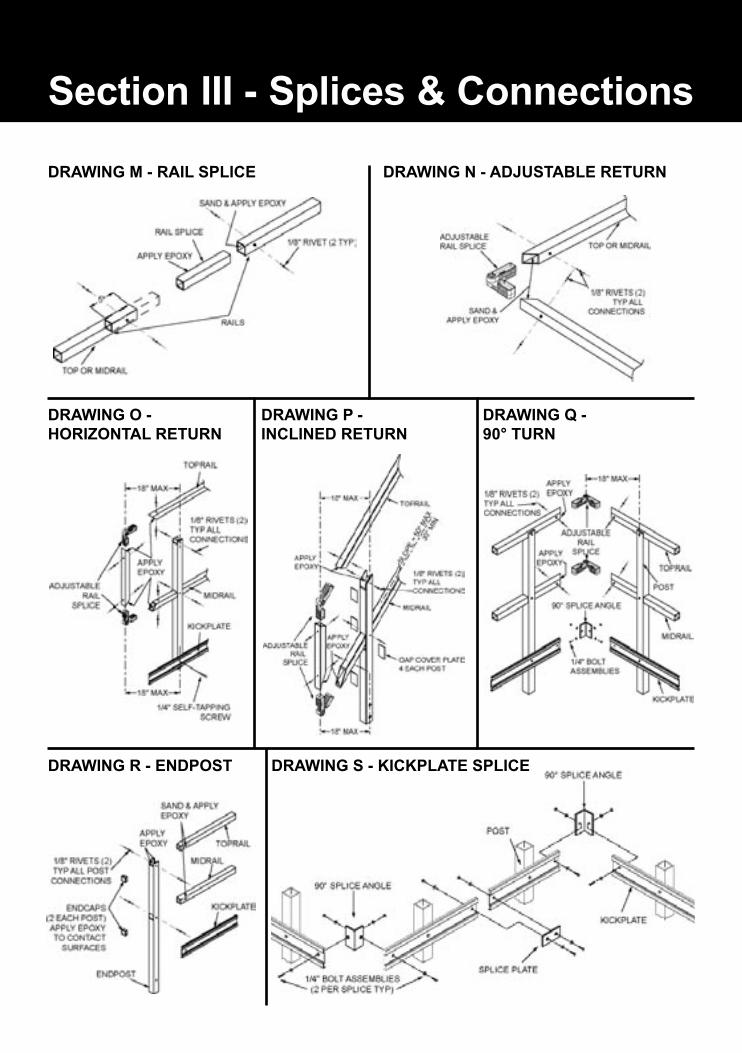
DRAWING M - RAIL SPLICE DRAWING N - ADJUSTABLE RETURN
DRAWING O - HORIZONTAL RETURN
DRAWING P - INCLINED RETURN
DRAWING Q - 90° TURN
DRAWING R - ENDPOST DRAWING S - KICKPLATE SPLICE
FOR INSTALLATION CONDITIONS NOT SHOWN - CONTACT FIBERGRATE
Check Codes for Specific Requirements

Section II - Rail InstallationSection I - Post Installation Methods Section III - Splices & Connections
DRAWING A - POST TO FRP OR STEEL CHANNEL
DRAWING B - POST TO STEEL PLATE ON STEEL BEAM
DRAWING C - POST TO FRP OR STEEL BEAM OR CHANNEL WITH FRP SPACERS
DRAWING D - POST TO STEEL ANGLE ON FRP OR STEEL BEAM
DRAWING E - REMOVABLE POST TO HLU ANGLE ON FRP OR STEEL BEAM
DRAWING F - SIDE-MOUNTED POST
DRAWING G - EMBEDDED POST
DRAWING H - TOP MOUNT STEEL STANCHION BASE
DRAWING I - TOP MOUNT FRP STANCHION BASE
CONCRETE ANCHOR BOLT LOADSDrawing F Drawing H Drawing I
OSHA (200 lb) 1886 lb 2584 lb 2688 lbUBC (50 lb/ft) 2829 lb 3876 lb 4032 lb
INSTALLING HORIZONTAL RAILS TO POSTS
1. Cut rails and kickplate to length.2. Use level to make posts vertical and tighten attachment bolts.3. Dry fit toprail into tops of posts and adjust to proper location.
Mark all post/rail intersections on sides of toprail.4. Slide toprail to the side enough to sand off glossy surfaces of
marked post/rail intersections using an 80 grit sandpaper.5. Apply properly mixed epoxy to sanded surfaces of toprail
and reinstall toprail into post tops.6. Drill a hole using a 1/8” bit through the center of the toprail/
post intersections. Install 2 rivets (one on each side) at all posts to secure the toprail while epoxy cures.
7. Dry fit midrail into square holes of posts and slide into position. Mark all rail/post intersections on all sides of midrail.
8. Slide rail to side and sand off glossy surfaces of marked post/rail intersections using an 80 grit sandpaper.
9. Apply epoxy to the sanded surfaces of midrail and return the rail to its proper location.
10. Drill a hole using a 1/8” bit through the center of the midrail/post intersections. Install 2 rivets (one on each side) at all posts to secure the midrail while epoxy cures.
11. Align bottom of kickplate 1/4” above walking surface. 12. Drill 3/16” hole through center of kickplate at posts.13. Install kickplate to posts using 1/4” self-tapping screws. Be
careful not to overtorque and strip the screws.
DRAWING J - HORIZONTAL RAIL INSTALLATION
INSTALLING INCLINED RAILS TO POSTS
1. Cut rails to length.2. Slide midrail through inclined posts.3. Mount post(s) to stairway stringer with toprail 32” high as
measured from the work line (see Drawing K).4. Use level to make posts vertical and tighten attachment bolts.5. Slide toprail down into tops of posts. Rails should make
contact with cutout in posts as shown in Drawing L.6. With rails in proper location, mark area in contact with posts.7. Slide rails to one side and sand contact areas with 80 grit
sandpaper to remove glossy surface on toprail and midrail.8. Apply epoxy to midrail and toprail.9. Replace toprail onto post tops and slide midrail through
posts to proper location.10. Tighten post attachment bolts.11. Drill hole using 1/8” drillbit through posts at toprail and
midrail.12. Install 2 rivets (supplied) to each rail/post intersection, apply
epoxy to tip of each rivet.13. Mark area of posts covered by gap cover plates and sand. 14. Apply epoxy to sanded area of posts and inside of gap cover
plates.15. C-clamp gap cover plates to posts until epoxy has cured.
DRAWING K - STAIRWAY WORK LINE (OSHA)
DRAWING L - INCLINED RAIL INSTALLATION
DRAWING M - RAIL SPLICE DRAWING N - ADJUSTABLE RETURN
DRAWING O - HORIZONTAL RETURN
DRAWING P - INCLINED RETURN
DRAWING Q - 90° TURN
DRAWING R - ENDPOST DRAWING S - KICKPLATE SPLICE
FOR INSTALLATION CONDITIONS NOT SHOWN - CONTACT FIBERGRATE
Check Codes for Specific Requirements

The Dynarail® Modular Handrail System Installation Instructions have been designed to combine the best in fiberglass reinforced plastic (FRP) handrail with simplicity of installation. Fibergrate has made every attempt to provide clear and thorough instructions for installing this product. If you have any further questions, or need additional information, do not hesitate to contact Fibergrate at 800/527-4043.
By following these simple instructions, you should find installation of your handrail system quick and easy.
TOOLS REQUIRED
□ Drill □ Wrenches - □ Bits - ▫ 7/16” (2 each) ▫ 1/8” (for rivets) ▫ 9/16” (2 each) ▫ 3/16” (for kickplate screws) □ Hack Saw ▫ 9/16” & 11/16” (for connection bolts) □ 25’ Tape Measure□ Level □ Sealing Kit□ Bonding (Epoxy) Kit(s) (one for every 15 posts) □ Stir Sticks□ “C” Clamps □ Sandpaper (80 grit)
NOTE: Cuts and drilled holes must be sealed to maintain corrosion protection.
QUICK TIPS FOR INSTALLING HANDRAIL
1. Layout posts and post installation kits as required. Post installation drawings for various conditions are shown under Section I - Post Installation Methods. Install posts.
2. After installation of the posts, follow the instructions shown in Section II - Rail Installation for installation of toprails, midrails and kickplates. If installing rail extensions or returns, see Section III - Splices & Connections. Take care at the rail-to-post, rail splice and turns (see Section III - Splices & Connections for details) to correctly prepare the material surface and to correctly mix and apply the epoxy. Correct bond joints are important to enable the handrail to carry the required loads.
3. Attach endpost and rail endcaps at the required locations. (See Section III - Splices & Connections for details).
IMPORTANT
It is the installer’s responsibility to carefully follow fabrication and installation plans and instructions to ensure design performance characteristics of the Dynarail® handrail system. The installer could be liable for claims that result from improper installation.
High Performance Composite Solutions
Installation Instructions
High Strength-To-Weight Ratio
Long, Low Maintenance Life
Meets OSHA, BOCA & Other Building Code Requirements
Dynarail® Modular Handrail System
Nonconductive
Fire Retardant
Fibergrate Composite Structures Inc.4285 Kellway Circle, Suite 224, Addison, TX 75001
Phone: 800-527-4043 • Fax: 972-250-1530www.fibergrate.com • Email: [email protected]
©Fibergrate Inc. 2003 883300-07/03-5.0Made in the USA
Fibergrate Composite Structures Inc. believes the information contained here to be true and accurate. Fibergrate makes no warranty, expressed or implied based on this literature and assumes no responsibility for consequential or incidental damages in the use of these products and systems described, including any warranty of merchantability or fitness. Information contained here is for evaluation only.
Fibergrate Products & Services
Dynaform® Structural Shapes
Fibergrate offers a wide range of pultruded structural components for industrial use, including bars, rods, tubes, beams, channels, leg angles and plates.
Dynarail® Safety Ladder SystemEasily assembled on site, Dynarail safety ladder systems meet or exceed OSHA requirements. Though less costly than prefabricated ladder systems, these safety lad-ders provide a custom fit to the supporting structure.
Dynarail® HandrailEasily assembled from durable prefabricated components or engineered to your
specifications, Dynarail handrail meets or exceeds OSHA and strict building code requirements for safety and design.
RIGIDEX® Moltruded® GratingRIGIDEX Moltruded gratings are the first fiberglass gratings to combine the corrosion
resistance of molded grating with the longer span capacity of pultruded grating, all at the low cost of metal gratings.
Safe-T-Span® Pultruded Industrial and Pedestrian GratingsCombining corrosion resistance, long-life and low-maintenance designs, Safe-T-Span provides unidirectional strength for industrial and pedestrian pultruded grating applications.
Fibergrate® Molded Grating
Fibergrate molded gratings are designed to provide the ultimate in reliable performance, even in the most demanding conditions. Fibergrate offers the widest selection in the market with more than ten resins including Chemgrate CP-84 and more than twenty grating configurations available in many panel sizes and surfaces.
Stair SolutionsFibergrate offers a wide range of slip-resistant products to meet your stair safety needs. These durable products which include treads, tread covers and covered stair treads are a long-term, cost-efficient solution for your facility.
Engineering and Fabrication ServicesCombining engineering expertise with an understanding of fiberglass applications, Fibergrate provides turnkey design and fabrication of fiberglass structures, including platforms, catwalks, stairways and test racks.
Grating PedestalsUniquely designed adjustable single and quad head pedestals for square mesh molded
grating are manufactured to provide safe and economical support for elevated flooring.
Simplified Handrail Instructions
Corrosion Resistant